


USER MANUAL
90cm ELECTRIC BUILT-IN OVENS
WVE915SC, WVE915SCA, WVEP916SC, WVEP917DSC

CONGRATULATIONS CONTENTS
Congratulations and thank you for choosing our product.
We are sure you will find your new cooker a pleasure to use and a great asset to your cooking. Before you use the appliance, we recommend you read through the whole user manual which provides a description of the product and its functions.
To avoid the risks that are always present when you use an appliance, it is important that the appliance is installed correctly and that you read the safety
instructions carefully to avoid misuse and hazards. We recommend that you keep this instruction booklet for future reference and pass it on to any future owners.
This appliance complies with the requirements of Australian Standard AS/NZS 60335.2.6.
Conditions of use
This appliance is intended to be used in household and similar applications such as:
•Staff kitchen areas in shops, offices and other working environments
•Farm houses
•By clients in hotels, motels and other residential type environments
•Bed and breakfast type environments
Please ensure you read the instruction manual fully before you call for service, or a full service fee could be applicable.
Record model and serial number here:
Model number:.......................................................................................
Serial number:........................................................................................
PNC:............................................................................................................
IMPORTANT INFORMATION THAT MAY IMPACT YOUR MANUFACTURER’S WARRANTY
Adherence to the directions for use in this manual is extremely important for health and safety. Failure to strictly adhere to the requirements in this manual may result in personal injury, property damage and affect your ability to make a claim under the Westinghouse manufacturer’s warranty provided with your product. Products must be used, installed and operated in accordance with this manual. You may not be able to claim on the Westinghouse manufacturer’s warranty in the event that your product fault is due to failure to adhere to this manual.
Important safety instructions...................................................... |
3 |
Description of your appliance: |
|
WVE915SC .................................................................................... |
5 |
WVE915SCA ................................................................................. |
5 |
WVEP916SC, WVEP917DSC ................................................ |
6 |
Installation of the appliance........................................................... |
7 |
Wiring requirements........................................................................ |
10 |
Before operating your appliance for the first time............ |
11 |
Installing your oven accessories................................................. |
12 |
Using your oven................................................................................. |
14 |
Operating WVE915SC ........................................................... |
17 |
Operating WVEP916SC.......................................................... |
19 |
Operating WVE915SCA and WVEP917DSC................ |
22 |
Cooking test........................................................................................ |
28 |
Cooking guide.................................................................................... |
28 |
Dealing with cooking problems................................................. |
32 |
Cleaning your oven.......................................................................... |
33 |
Cleaning your pyrolytic oven...................................................... |
35 |
Troubleshooting................................................................................ |
37 |
Notes...................................................................................................... |
38 |
Warranty............................................................................................... |
39 |
Please read this user manual carefully and store |
|
in a handy place for later reference. |
|
The symbols you will see in this booklet have |
|
the following meanings: |
|
 WARNING
This symbol indicates information concerning your personal safety.
 CAUTION
This symbol indicates information on how to avoid damaging the appliance.
 IMPORTANT
This symbol indicates tips and information about use of the appliance.
ENVIRONMENT
This symbol indicates tips and information about economical and ecological use of the appliance.
2 CONTENTS

IMPORTANT SAFETY INSTRUCTIONS
Please read this user manual carefully and store in a handy place for later reference. Pass the user manual on to possible new owners of the appliance.
Read the following carefully to avoid damage or injury.
NOTE: You must read these warnings carefully before installing or using the appliance. If you need assistance, contact your Customer Care Department. The manufacturer will not accept liability, should these instructions or any other safety instructions incorporated in this book be ignored.
 WARNING
General warnings
•This appliance must not be used as a space heater.
•In order to avoid fire, the appliance must be kept clean and vents kept unobstructed.
•Do not spray aerosols in the vicinity of this appliance whilst it is in operation.
•Do not use or store flammable materials in this appliance storage drawer or near this appliance.
•Do not line the bottom of the oven with foil or cookware.
•Always use gloves when handling hot items inside the oven.
•Always turn the grill off immediately after use as fat left behind may catch fire.
•Do not modify this appliance.
•To maintain safe operation, it is recommended that the product be inspected every 5 years by an authorised service person.
•The cooking process must be supervised. A short term cooking process must be supervised continuously.
•Always clean the grill/oven dish after every use. Excessive fat build up may cause a fire.
Installation, cleaning and servicing warnings
•An authorised person must install this appliance. (Certificate of Compliance to be retained).
•Before using the appliance, ensure that all packing materials are removed from the appliance.
•In order to avoid any potential hazard, the enclosed installation instructions must be followed.
•Ensure that all specified vents, openings and airspaces are not blocked.
•Where the appliance is built into a cabinet, the cabinet material must be capable of withstanding 85°C.
•Only authorised personnel should carry out servicing. (Certificate of Compliance to be retained).
•Always ensure the appliance is switched off before cleaning or replacing parts.
•Do not use steam cleaners, as this may cause moisture build up.
•Always clean the appliance immediately after any food spillage.
•This appliance must be earthed.
•Due to the weight (built in 70kg) and size of cookers, 2 persons are required to manually manoeuvre them. Remove loose items such as oven racks and trays to minimise weight.
•Do not use the handle to lift the cooker, instead open the oven door and lift the roof of the oven cavity.
•Take care when lifting to avoid any sharp edges not intended for lifting.
•This cooker must not be installed with a cut-off timer.
•Disconnection in the fixed wiring must occur in accordance with AS/NZS 3000 wiring rules.
IMPORTANT SAFETY INSTRUCTIONS |
3 |

IMPORTANT SAFETY INSTRUCTIONS (continued)
 WARNING
Oven
•During use the appliance becomes hot. Care should be taken to avoid touching the hot surfaces inside the oven.
•Switch the appliance off at the isolating switch before removing the oven light glass for globe replacement.
•To avoid an accident, ensure that oven shelves and fittings are always inserted into the appliance in accordance with the instructions.
•Do not use the door as a shelf.
 WARNING
Child safety
•This appliance is not intended for use by persons (including children) with reduced physical, sensory or mental capabilities, or lack of experience and knowledge, unless they have been given supervision or instruction concerning use of the appliance by a person responsible for their safety.
•Children should be supervised to ensure that they do not play with the appliance.
•During use this appliance becomes hot. Care should be taken to avoid touching hot surfaces, e.g. oven door, heating elements etc.
• |
Do not push down on the open oven door. |
• Accessible parts will also become hot when in |
|
|
|
• |
Do not cover the grill insert with foil, as fat left there |
use. To avoid burns and scalds children should be |
|
may catch fire. |
kept away. |
•Always keep the grill dish and baking tray clean as any residual fat may catch fire.
4 IMPORTANT SAFETY INSTRUCTIONS
DESCRIPTION OF YOUR APPLIANCE
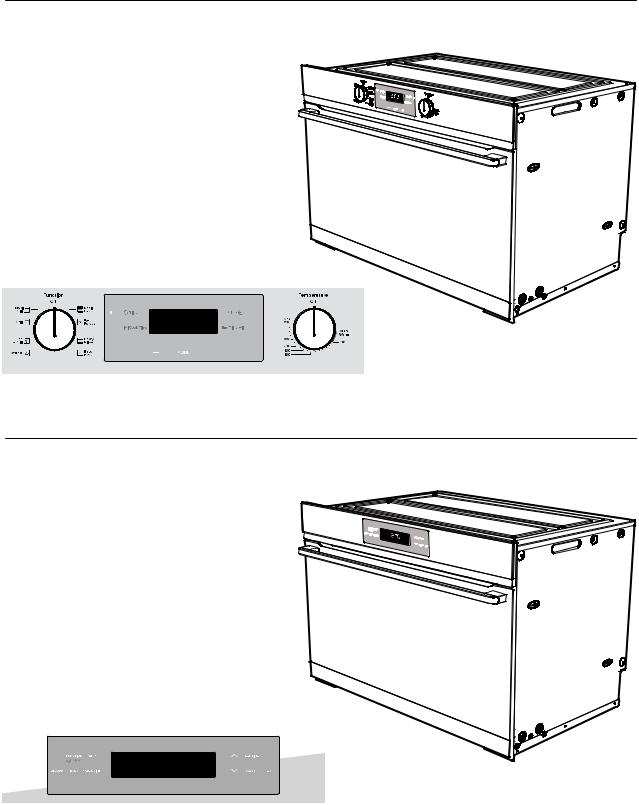
WVE915SC
Knob control electric oven
Control Panel
WVE915SCA
Programmable electric oven
Control Panel
DESCRIPTION OF YOUR APPLIANCE |
5 |

DESCRIPTION OF YOUR APPLIANCE (continued)
WVEP916SC
Pyro clean knob control electric oven
Control Panel
WVEP917DSC
Pyro clean programmable electric oven
Control Panel
6 DESCRIPTION OF YOUR APPLIANCE

INSTALLATION OF THE APPLIANCE
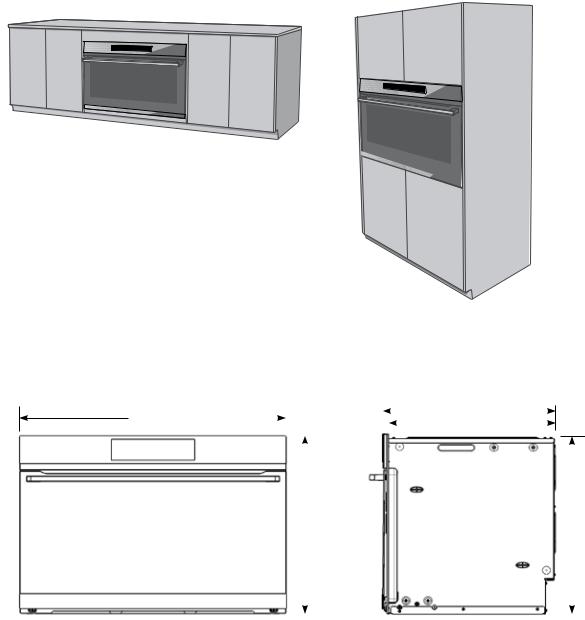
Cabinet requirement
Models are designed to be built into cabinetry either below a benchtop or into a vertical cabinet.
 WARNING
•The cooker must be installed and serviced only by an authorised person.
•A Certificate of Compliance MUST be supplied to be kept by the customer.
•The packing materials must be removed before you install the cooker.
•The surrounding kitchen cabinets must be able to withstand 85°C. Electrolux WILL NOT accept
responsibility for damage caused by installation into kitchen cabinets which cannot withstand 85°C.
•The vents, openings and air spaces MUST NOT be blocked.
•You MUST NOT lift or pull the cooker by the door handle.
•The cooker MUST be checked every five years.
•If the supply cord is damaged,it must be replaced by the manufacturer, its service agent or similarly qualified persons in order to avoid a hazard.
•The appliance must not be installed behind a decorative door in order to avoid overheating.
•Due to the weight (70kg) and size of the cooker, 2 persons are required to install it.
 IMPORTANT
To minimise the weight of the oven for easier installation, remove the oven door and oven internal accessory pack.
Locking tab up at normal position.
Press the locking tab down for removing the door.
Gently close the door until it comes to a stop. Then lift the door o the hinge.
Leveling oven
Place a level in the oven as below making sure the level sits on the front and rear forms.
INSTALLATION OF THE APPLIANCE |
7 |
INSTALLATION (continued)
Underbench installation |
Vertical cabinet installation |
Your underbench oven looks best when the control panel is directly under the benchtop. An upper infill panel may be added if the cooktop placed above the benchtop is too deep.
The oven can be built into a vertical cabinet in the same manner as an underbench. The required cavity dimensions are the same and the product is secured to the cabinet in the same way.
Oven dimensions
895mm |
|
|
|
|
|
|
|
|
|
572mm |
|
|
|
|
|
|
|
|
|
|
|
|
|||
|
|
|
|
|
|
|
|
|
|
552mm |
|
|
|
|
|
|
|
|
|
|
|
|
|
|
|
|
|
|
|
|
|
|
|
|
596mm |
|
|
|
|
||
|
|
586mm |
|
||||
|
|
|
|
|
|
|
|
|
|
|
|
|
|
|
|
|
|
|
|
|
|
|
|
8 INSTALLATION OF THE APPLIANCE

INSTALLATION (continued)
Cabinet construction for built in oven
For the best integration within a kitchen, install this appliance in a cupboard that gives a flush fit with the surrounding cupboard fronts. A recess of 20mm is ideal.
NOTE: Your appliance must be mounted on a horizontal surface for the full width and depth of the product.
NOTE: A ventilation slot 20mm wide is required at the rear of the base of the cabinet floor.
|
20mm |
|
|
580mm minimum |
|
|
|
20mm |
|
100mm |
(see NOTE) |
|
|
|
|
max. |
|
900mm |
Infill panel max. |
|
16mm thickness |
||
cupboard |
|
|
door |
|
|
600mm |
900mm |
slot |
|
|
20mm |
|
580mm |
876mm Mounting holes
 *20mm
*20mm  see note below
NOTE: If a powerpoint is fitted it must be accessible with the appliance installed.
*Refer to cooktop installation instructions for required clearance between cooktop and oven.
INSTALLATION OF THE APPLIANCE |
9 |
WIRING REQUIREMENTS
The cooker MUST be installed in compliance with:
•Wiring connections in AS/NZS 3000 Wiring Rules.
•Local regulations, municipal building codes and other statutory regulations.
For New Zealand Only:
The cooking range must be connected to the supply by a supply cord fitted with the
appropriately rated plug that is compatible with the socket-outlet fitted to the final sub-circuit in the fixed wiring that is intended to supply this cooking range.
Supply cord size required:
WVE915SC/WVE915SCA - 2.5mm2
WVEP916SC/WVEP917DSC - 4.0mm2
The Data plate gives information about rating and is located behind the bottom of the oven door.
•A functional switch MUST be provided near the appliance in an accessible position (AS/NZS 3000 - Clause 4.7.1).
•Wiring MUST be protected against mechanical failure (AS/NZS 3000 - Clause 3.9).
•Disconnection in the fixed wiring must occur in accordance with the AS/NZS 3000 wiring rules.
•The cooker MUST be properly earthed.
•This range must be connected with cable of 75°C rating minimum.
•This product has passed the insulation resistance test after manufacture. If the resistance reading is low at installation, it is probably caused by
moisture from the atmosphere being absorbed by the elements after the range has been produced.
(pass at 0.01 M AS/NZS 3000 Wiring Rules Clause 8.3.6.2).
Note: When connections are made to a multi-phase 230/240V supply, the bridge piece MUST be removed from between the active connections.
Connecting to services and commissioning
This appliance must be installed by an authorised person, according to all codes and regulations of:
•ELECTRICAL supply authorities.
•Building regulations.
•Local government and council authorities.
•AS/NZS 5601.1 (particular attention to clause 6.10.1, including figure 6.3 and subclause 6.10.1.11).
•AS/NZS 3000 (particular attention to clauses 4.7.1 and 3.9).
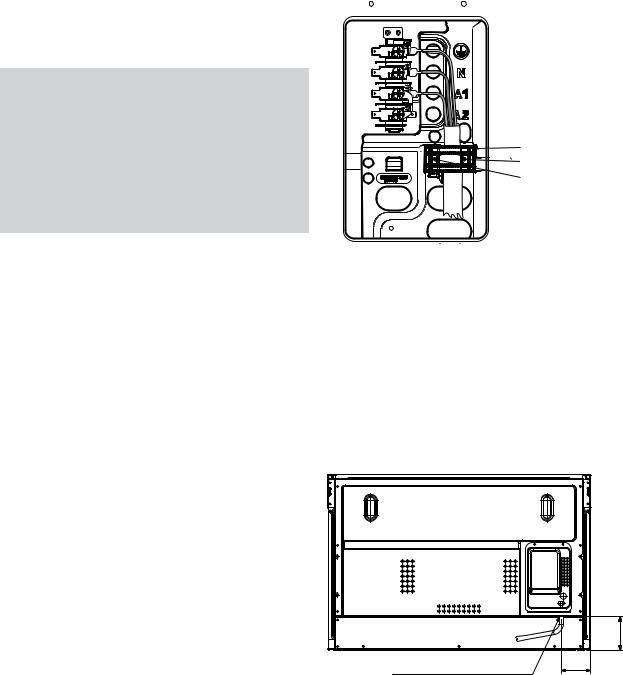
Plastic clips |
Plastic clip |
Securing points
Hard wiring detail
1.Remove terminal cover plate from rear panel of appliance.
2.Fit wires through hole in back panel below terminal cover.
3.Engage wires into plastic clip. Secure plastic clip with two long silver screws (supplied in separate bag).
4.Replace cover plate onto rear panel.
Electrical connection location - built-in models
|
113 |
Entry point of electrical cable |
99 |
|
10 WIRING REQUIREMENTS
BEFORE OPERATING YOUR APPLIANCE FOR THE FIRST TIME
Preparing your appliance for the first time
•Please remove all internal boxes and bags from the oven before operation.
•Please wipe out the oven interior prior to operation with warm soapy water and polish dry with a soft clean cloth. Do not close the oven door until the oven is completely dry.
•New appliances can have an odour during first operation. It is recommended to ‘run in’ your oven before you cook for the first time. Run the oven at 180°C for 2 hours and ensure that the room is well ventilated.
•DO NOT line the oven with foil, it will damage the enamel.
•Prior to installing accessories, remove all packaging and remove plastic film from external panels.
Setting the time
After electrically connecting the appliance, you must set the time of the day before you can operate your oven.
Touch control electronic clock model WVE915SC
WVEP916SC electronic controller
1.When power is supplied to the oven the  clock icon will be displayed. Along with the clock symbol the “12” will be flashing. This indicates that the ‘hour’ portion of the time is ready to be changed.
2. Toggle the temp selector or  , then touch when the correct hour is displayed.
3.The minutes will then flash and can be set in the same manner as above. 5 seconds after the last change, the clock display will stop flashing, confirming that the time has been set.
NOTE: The clock has a 24-hour display.
WVE915SCA, WVEP917DSC electronic controller
1.After the appliance has been electrically connected “12.00” will be displayed and the “clock” indicator will flash.
2. To set the time of day, press or  . 5 seconds after the last change, the “clock” indicator will disappear, confirming the time has been set.
NOTE: The clock has a 24-hour display.
When you connect the appliance to the mains, or reconnect after a power cut, the display contrast, the display brightness and the time of day all need to be set.
1.Press  or
or  to set the value.
2.Press  to confirm.
BEFORE OPERATING YOUR APPLIANCE |
11 |
INSTALLING YOUR OVEN ACCESSORIES
Slides (telescopic runners) (on selected models)
1.The selected models are supplied with a set of slides and instructions on how to assemble. Ensure the rack and slides are of the same hand, eg. left hand slide should be fitted on the left hand rack.
2.The instructions also show recommended slide positions on the rack.
Installing the slides (telescopic runners)
1.Obtain left hand side rack and left hand slide – see image to identify
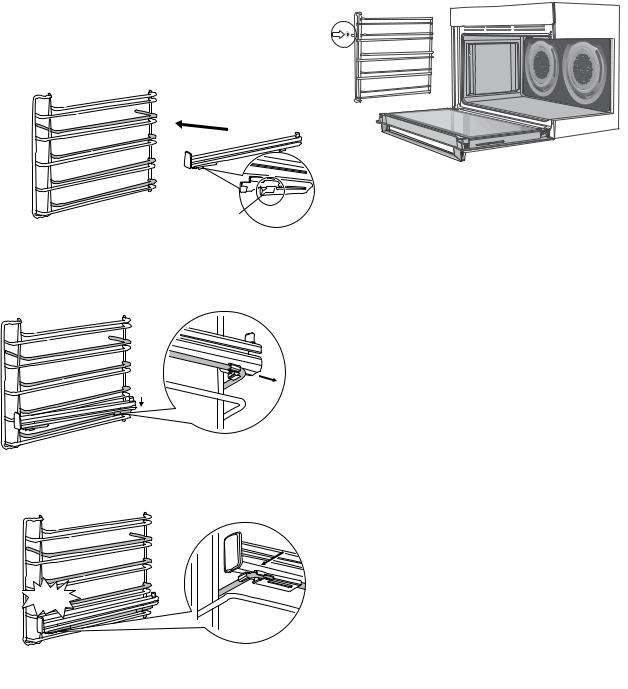
Installing the side racks
1.Insert the rear peg into the rear access hole provided, ensuring peg is fully inserted.
2.Then locate the front peg into the front access hole and push in firmly.
L = Left hand side R = Right hand side
2.The shaded wires indicate the wire the slide can be mounted on. Fit slide rear clips to the rear of wire at an angle as shown below.
1 |
2 |
3.Push slide front clip over wire until secured.
Fitting the shelves between the side rack wires
The shelves are designed so that they have maximum extension but cannot be accidentally pulled right out.
To fit a shelf to side racks:
1.Locate the rear edge of the shelf in between guide rails of the side rack – see diagram.
2.Ensure the same rail positions on both sides of the oven are being engaged. With the front edge raised, begin to slide the shelf into the oven.
3.Once the detents have passed the front edge of the side rack, the shelf can be pushed completely in. When fully inserted the shelf should not interfere with the closed oven door.
3
CLICK!
12 INSTALLING YOUR OVEN ACCESSORIES
 Loading...