


WD32HB1120-C
VGA PC Connection
USB Port Function
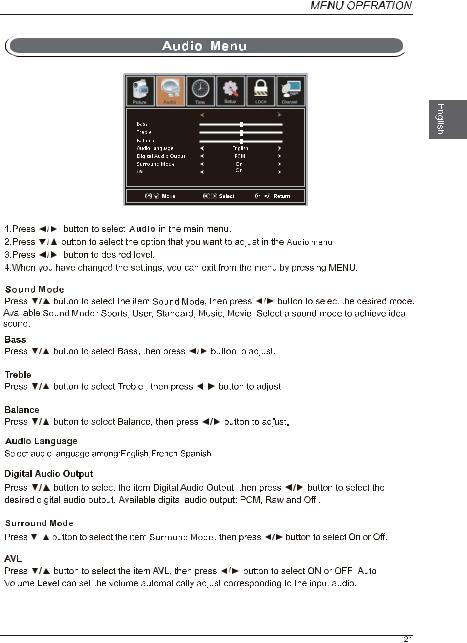
Audio
USB Menu
32
33
1


18

3

 Installing the Stand

 BB4x18
 BB4x18
Removing the Stand for Wall-Mounting
 1.Lay the TV face down on a flat,
cushioned surface to avoid damaging
or scratching.
 2.Untighten the 4 pcs screws holding the stand assembly and remove them.
 3.Attach the wall-mount bracket to the TV using the mounting holes on the back of the TV. Mount this TV according to the instructions included in the wall-mount bracket.
 Wall-Mounting Screws
Mount the VESA bracket using 4*M4*10 isometric threaded screws (not included).
WARNING:
with the installation instruction.
WARNING
Never place a television set in an unstable location. A television set may fall, causing serious personal injury or death. Many injuries, particularly to children, can be acoided by taking simple precautions such as:
-Using cabinets or stands recommended by the manufacturer of the television set. -Only using furniture that can safely support the television set.
-Ensuring the television set is not overhanging the edge of the supporting furniture.
-Not placing the television set on tall furniture(for example, cupboards or bookcases) without anchoring both the furniture and the television set to a suitable support.
-Not placing the television set on cloth or other materials that may be located between the television set and supporting furniture.
-Educating children about the dangers of climbing on furniture to reach the television set or its controls. If your existing television set is being retained and relocated, the same considerations as above should be applied.


|
|
|
|
|
|
|
|
|
|
|
|
|
|
|
|
|
|
|
|
Remote Control with Batteries |
|
||
|
|
|
|||
|
|
|
|||
|
TV Set |
|
|||
TV Stand |
Four Screws(BB4x18). |
User Manual |
|
Quick |
|
Warranty |
|
Connect |
|
||
|
|
Card |
||
|
|
|
||
|
|
Guide |
|
|
|
|
|
|
|
|
|
|
|
|
User Manual Quick Connect Guide Warranty Card
7

1. VOL -/+
Press to adjust the volume.
2.CH -/+
Press to select a Channel.
3.MENU / SOURCE
Display the main menu.
Press to select between different Sources of input Signal.
4.POWER
Press to turn the TV on or off.
5. IR (REMOTE SENSOR)
Receives signals from the remote control.
POWER INDICATOR
Blue when TV is powered on. Red when TV is powered off.
Headphone: Connect a stereo headphone for private listening.
Optical Output: Connect a digital sound system to this jack.


 and Audio


 and Audio


PC IN
HDMI 1 |
HDMI 2 |
VGA |
PC AUDIO |
8

9
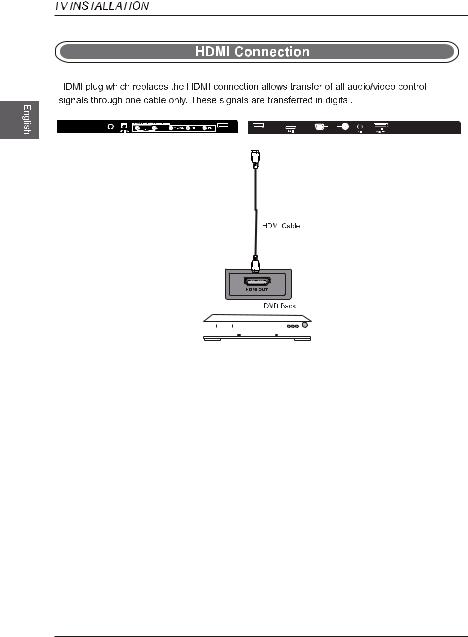
HDMI 1
HDMI 1
10

PC IN
HDMI 2 |
VGA |
PC AUDIO |
||||||
|
|
|
|
|
|
|
|
|
|
|
|
|
|
|
|
|
|
|
|
|
|
|
|
|
|
|
|
|
|
|
|
|
|
|
|
|
|
|
|
|
|
|
|
|
|
|
|
|
|
|
|
|
|
|
|
|
|
|
|
|
|
|
|
|
|
|
|
|
|
|
|
|
|
|
|
|
|
|
|
|
|
|
|
|
|
|
|
|
|
|
|
|
|
|
|
|
|
|
|
|
|
|
|
|
|
|
|
USB 
PC IN
HDMI 2 |
VGA |
PC AUDIO |
|
|
|
|
|
|
|
|
|
11
PC IN
|
|
HDMI 1 |
|
|
|
HDMI 2 |
VGA |
PC AUDIO |
|||||||||||
|
|
|
|
|
|
|
|
|
|
|
|
|
|
|
|
|
|
|
|
|
|
|
|
|
|
|
|
|
|
|
|
|
|
|
|
|
|
|
|
|
|
|
|
|
|
|
|
|
|
|
|
|
|
|
|
|
|
|
|
|
|
|
|
|
|
|
|
|
|
|
|
|
|
|
|
|
|
|
|
|
|
|
|
|
|
|
|
|
|
|
|
|
|
|
|
|
|
|
|
|
|
|
|
|
|
|
|
|
|
|
|
|
|
|
|
|
|
|
|
|
|
|
|
|
|
|
|
|
|
|
|
|
|
|
|
|
|
|
|
12

|
|
|
|
Turn the LED TV on or off. |
|
|
|
|
USB |
Access into the USB directly. |
|
|
|
|
|
||
|
|
||||
|
|
|
|
|
|
P.MODE
S.MODE
SLEEP
ASPECT
Press once to disable the audio and press again to enable the audio.
SOURCE 

 S
S


|
|
|
|
|
|
|
|
|
|
|
|
|
|
|
|
|
OK |
|
||||
|
|
|
|
|
|
|
|
|
|
|
|
|
|
|
|
|
|
|
|
|
||
|
|
|
|
|
|
|
|
|
|
|
|
|
|
|
|
|
|
|
|
|
|
|
|
|
|
|
|
|
|
|
|
|
|
|
|
|
|
|
|
|
Press to adjust between available audio channel. |
||||
|
|
|
|
|
|
|
|
|
|
|
|
|
|
|
|
|
|
|||||
|
|
|
|
|
|
|
|
|
|
|
|
|
|
|
|
|
|
Displays the main TV menu. |
|
|||
|
|
|
|
|
|
|
|
|
|
FREEZE |
|
Freeze the picture. |
|
|||||||||
|
|
|
|
|
|
|
|
|
|
|
INFO |
|
Displays |
|
|
. |
||||||
|
||||||||||||||||||||||
|
||||||||||||||||||||||
|
|
|
|
|
|
|
|
|
|
|
|
|
|
|
|
|
|
ok |
|
|||
|
|
|
|
|
|
|
|
|
|
|
|
|
|
|
|
|
|
|
||||
|
|
|
|
|
|
|
|
|
|
|
Allows you to navigate the on -screen menus and adjust the |
|
||||||||||
|
|
|
|
|
|
|
|
|
|
|
system settings to your preference. |
|
||||||||||
|
|
|
|
|
|
|
|
|
|
|
RETURN |
|
Return to previous menu. |
|
||||||||
|
|
|
|
|
|
|
|
|
|
|
CH.LIST Press to display TV program list. |
|
||||||||||
|
|
|
|
|
|
|
|
|
|
|
|
|||||||||||
|
|
|
|
|
|
|
|
|||||||||||||||
|
|
|
|
|
|
|
|
|
|
|
|
|
|
|
|
|
|
Exit the main TV menu. |
|
|||
|
|
|
|
|
|
|
|
|
|
|
|
|
|
|
|
|
|
|||||
|
|
|
|
|
|
|
|
|
|
|
|
|
|
|
|
|
|
Press to pause or resume the playback. |
|
|||
|
|
|
|
|
|
|
|
|
|
|
|
|
|
|
|
|
|
|
||||
|
|
|
|
|
|
|
|
|
|
|
|
|
|
|
|
|
|
Press to stop the playback and clear the existing |
|
|||
|
|
|
|
|
|
|
|
|
|
|
|
|
|
|
|
|
|
memory. |
|
|||
|
|
|
|
|
|
|
|
|
|
|
|
|
|
|
|
|
|
Press to skip between chapters. |
|
|||
|
|
|
|
|
|
|
|
|
|
REPEAT |
|
Press repeatedly to select the repeat mode. |
|
|||||||||
|
|
|
|
|
|
|
|
|
|
|
C.C |
|
Press to set the closed caption. |
|
||||||||
|
|
|
|
|
|
|
|
|
|
V CHIP |
|
Switch to V-CHIP input. |
|
|||||||||
|
|
|
|
|
|
|
|
|
|
AUTO |
|
Automatically adjust the Horizontal/Vertical |
|
|||||||||
|
|
|
|
|
|
|
|
|
|
|
|
|
|
|
|
|
|
position in PC (VGA) mode. |
|
|||
ADD/ERASE Add/Erase channel to favourite program list.
FAV Press to display the favourite program list.
13
14

 ,
,
OK 
Y
Menu: Skip DTV
OK
?6H6X
?6H6X '<
OK 
Antenna RF Warning
Notice:Westinghouse Electronics does not recommend using the RF Antenna input as your cable or satellite connection because it will provide poor video quality to your HDTV.Use a different connection for optimum conditions.If you do not have a cable box that provides an HD quality signal,we recommend that you call your cable provider for an upgrade.Otherwise,select Proceed.
Exit Setup |
Proceed |
Go Back
OK
?6H6X '<
;9(
OK 

YPbPr/AV
HDMI1
HDMI2
HDMI3
VGA
USB

Tint
Tint

ok
ok
NorM al


 Off,Weak,Medium,Strong.
ok
Color |
Red |
Hue |
|
ok |
Saturation |
|
Reset |
19
|
|
|
|
|
|
|
|
|
|
|
|
|
|
Time Zone |
Pacific |
||
|
|
Daylight Saving Time |
Off |
||
|
|
|
|
|
|
|
|
|
|
|
|
|
|
|
|
|
|
TiMe Zone
Press  /
/ botton to select Time Zone and press the
  /
/ button to enter time zone adjustment menu to select the local time zone.
Daylight Saving TiMe
Press  /
/ botton to select Daylight Saving Time and press the
 /
/ button to select On or Off.

Accesibility
Accesibility
Accesibility
Accesibility

Lock Menu
ok
 ok a sub menu will
8899
25


Channel Menu
Air
Signal Type
Signal Type |
Signal Type |
ok
 Skip DTV
ok
ok
27

 Loading...