


USER MANUAL
|
Function |
Oven/Grill |
|
|
|
|
|
|
Off |
Off |
Off |
Off |
Off |
Off |
Off |
Maxi |
|
Rapid |
|
|
|
|
|
Grill |
|
Heat |
|
|
|
|
|
Grill |
|
Fan |
|
|
|
|
|
|
Bake |
|
|
|
|
|
|
|
|
260 |
High |
High |
High |
High |
High |
Fan |
|
Bake/ |
Keep |
|
|
|
|
|
Warm |
|
|
|
|
||
Grill |
|
Pizza 220 |
100 |
|
|
|
|
Defrost |
Base |
200 |
Low |
Low |
Low |
Low |
Low |
|
Heat |
180 |
900mm COOKING APPLIANCES
WFE914SB, WFEP915SB, WFE946SB
WVE914SB, WVE916SB, WVEP916SB

CONGRATULATIONS CONTENTS
Congratulations and thank you for choosing our product.
We are sure you will find your new cooker a pleasure to use and a great asset to your cooking. Before you use the appliance, we recommend you read through the whole user manual which provides a description of the product and its functions.
To avoid the risks that are always present when you use an appliance, it is important that the appliance is installed correctly and that you read the safety instructions carefully to avoid misuse and hazards. We recommend that you keep this instruction booklet for future reference and pass it on to any future owners.
This appliance complies with the requirements of Australian Standard AS/NZS 60335.2.6. Gas appliances also comply with the requirements of AS4551.
Conditions of use
This appliance is intended to be used in household and similar applications such as:
•Staff kitchen areas in shops, offices and other working environments
•Farm houses
•By clients in hotels, motels and other residential type environments
•Bed and breakfast type environments
Please ensure you read the instruction manual fully before you call for service, or a full service fee could be applicable.
Record model and serial number here:
Model number:........................................................................................
Serial number:.........................................................................................
PNC:.............................................................................................................
Important safety instructions...................................................... |
3 |
Description of your appliance: |
|
WFE914SB.................................................................................... |
5 |
WFEP915SB.................................................................................. |
6 |
WFE946SB.................................................................................... |
7 |
WVEP916SB................................................................................. |
8 |
WVE916SB.................................................................................... |
8 |
WVE914SB.................................................................................... |
8 |
Before operating your appliance for the first time............ |
9 |
Installing your oven accessories................................................. |
10 |
Installing your cooktop accessories......................................... |
10 |
Getting to know your cooktop................................................... |
12 |
Using your ceramic cooktop........................................................ |
15 |
Using your oven................................................................................. |
18 |
Cooking test........................................................................................ |
24 |
Cooking guide.................................................................................... |
25 |
Dealing with cooking problems................................................. |
28 |
Cleaning your appliance................................................................ |
29 |
Cleaning oven accessories.......................................................... |
30 |
Cleaning your pyrolytic oven....................................................... |
31 |
Storage.................................................................................................. |
32 |
Troubleshooting................................................................................ |
33 |
Installation of the appliance........................................................ |
37 |
Wiring requirements....................................................................... |
42 |
Installing the gas cooker............................................................... |
43 |
LPG Conversion................................................................................ |
44 |
Testing the operation of the gas cooker............................... |
45 |
Warranty............................................................................................... |
47 |
Please read the user manual carefully and store in a handy place for later reference.
The symbols you will see in this booklet have these meanings:
 WARNING
This symbol indicates information concerning your personal safety.
 CAUTION
This symbol indicates information on how to avoid damaging the appliance.
 IMPORTANT
This symbol indicates tips and information about use of the appliance.
ENVIRONMENT
This symbol indicates tips and information about economical and ecological use of the appliance.
2 CONTENTS

IMPORTANT SAFETY INSTRUCTIONS
IMPORTANT INFORMATION THAT MAY IMPACT YOUR MANUFACTURER’S WARRANTY
Adherence to the directions for use in this manual is extremely important for health and safety. Failure to strictly adhere to the requirements in this manual may result in personal injury, property damage and affect your ability to make a claim under the Westinghouse manufacturer’s warranty provided with your product. Products must be used, installed and operated in accordance with this manual. You may not be able to claim on the Westinghouse manufacturer’s warranty in the event that your product fault is due to failure to adhere to this manual.
Please read the user manual carefully and store in a handy place for later reference. Pass the user manual on to possible new owners of the appliance.
Read the following carefully to avoid damage or injury.
NOTE: You must read these warnings carefully before installing or using the appliance. If you need assistance, contact your Customer Care Department. The manufacturer will not accept liability, should these instructions or any other safety instructions incorporated in this book be ignored.
 WARNING
General warnings
•This appliance must not be used as a space heater.
•In order to avoid fire, the appliance must be kept clean and vents kept unobstructed.
•Do not spray aerosols in the vicinity of this appliance whilst it is in operation.
•Do not use or store flammable materials in this appliance storage drawer or near this appliance.
•Do not line the bottom of the oven with foil or cookware.
•Always use gloves when handling hot items inside the oven.
•Always turn the grill off immediately after use as fat left behind may catch fire.
•Do not hang any objects from the hob as it may block the air vents.
•Do not modify this appliance.
•To maintain safe operation, it is recommended that the product be inspected every 5 years by an authorised service person.
•Do not install an aftermarket lid or cover over this appliance.
•The cooking process must be supervised. A short term cooking process must be supervised continuously.
Installation, cleaning and servicing
•An authorised person must install this appliance. (Certificate of Compliance to be retained).
•Before using the appliance, ensure that all packing materials are removed from the appliance.
•In order to avoid any potential hazard, the enclosed installation instructions must be followed.
•Ensure that all specified vents, openings and airspaces are not blocked.
•Where the appliance is built into a cabinet, the cabinet material must be capable of withstanding 85°C.
•Only authorised personnel should carry out servicing. (Certificate of Compliance to be retained).
•Always ensure the appliance is switched off before cleaning or replacing parts.
•Do not use steam cleaners, as this may cause moisture build up.
•Always clean the appliance immediately after any food spillage.
•This appliance must be earthed.
•Due to the weight (freestanding 95-100kg, built in 70kg) and size of cookers, 2 persons are required to manually manoeuvre them. Remove loose items such as trivets, oven racks and trays to minimise weight.
•Do not use the handle to lift the cooker, instead open the oven door and lift the roof of the oven cavity.
•Take care when lifting to avoid any sharp edges not intended for lifting.
•This cooker must not be installed with a cut-off timer.
IMPORTANT SAFETY INSTRUCTIONS |
3 |

IMPORTANT SAFETY INSTRUCTIONS
 WARNING
Oven
•During use the appliance becomes hot. Care should be taken to avoid touching the hot surfaces inside the oven.
•Switch the appliance off at the isolating switch before removing the oven light glass for globe replacement.
•To avoid an accident, ensure that oven shelves and fittings are always inserted into the appliance in accordance with the instructions.
•Do not use the door as a shelf.
•Do not push down on the open oven door.
•Do not cover the grill insert with foil, as fat left there may catch fire.
•Always keep the grill dish clean as any fat there may catch fire.
Gas cooktops
•Do not allow pots to boil dry, as damage to both pan and cooktop may result.
•Do not operate the cooktop for an extended period of time without a pot or pan on the burner.
•Do not allow large cookware to overhang the cooktop onto the adjacent benchtop. This will cause scorching to the benchtop surface.
•Do not allow cooking pots or pans to intrude into the area which is close to the controls.
•Ensure burner bodies and trivets are properly located.
•Unattended cooking with oil or fat on a hob can be dangerous and result in fire.
•In order to avoid a fire do not store items on the cooking surface.
Ceramic cooktops
•In order to avoid a fire do not store items on the cooking surface.
•Do not place heat resistant mats, wire mats or aluminium foil under pots and pans.
•Do not allow pots to boil dry, as damage to both pan and cooktop may result.
•Do not use the hotplate as extra bench space or as a cutting board.
•Do not allow large cookware to overhang the cooktop onto the adjacent benchtop. This will cause scorching to the benchtop surface.
•Do not use round bottom woks or similar utensils which could lead to overheating of the hotplates and possible damage to the cooking surface.
•Use the stored heat in the hotplate by turning the control to off before the final few minutes
of cooking.
•Do not slide pans across the surface of the ceramic glass as it could result in scratching of the surface.
•The ceramic cooktop is not intended to be operated by means of an external timer or separate remotecontrol system.
•Unattended cooking with oil or fat on a hob can be dangerous and result in fire.
 WARNING
Child safety
•This appliance is not intended for use by persons (including children) with reduced physical, sensory or mental capabilities, or lack of experience and knowledge, unless they have been given supervision or instruction concerning use of the appliance by a person responsible for their safety.
•Children should be supervised to ensure that they do not play with the appliance.
•During use this appliance becomes hot. Care should be taken to avoid touching hot surfaces, e.g. oven door, heating elements etc.
•Accessible parts will also become hot when in use. To avoid burns and scalds children should be kept away.
•Always turn pan handles to the side or rear to prevent accidental knocking and to keep out of reach of children.
4 IMPORTANT SAFETY INSTRUCTIONS

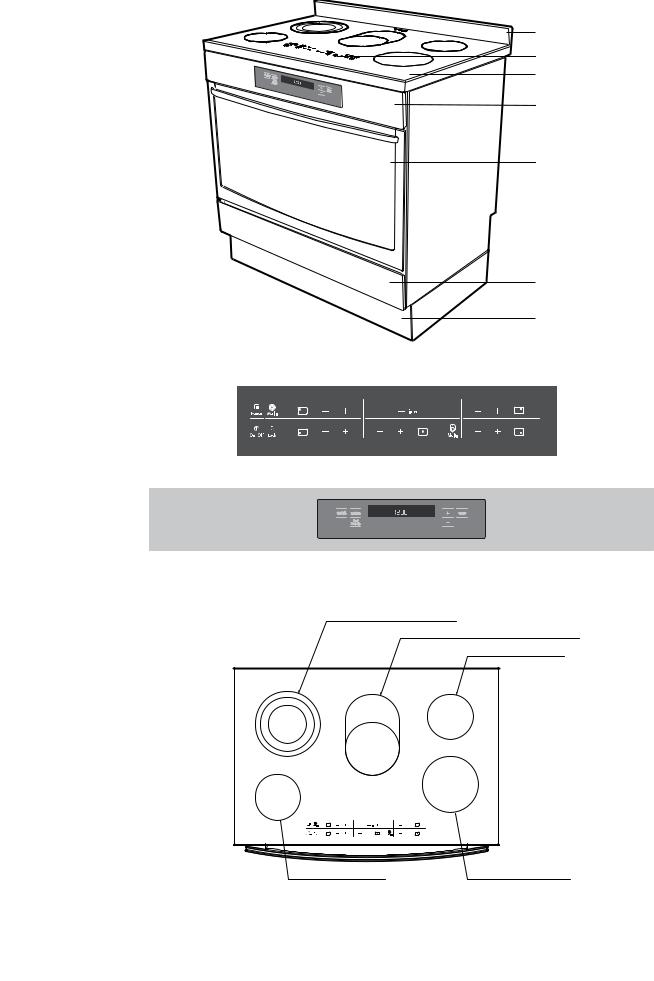
MODEL WFE914SB
Gas hob with flame safeguard, multi-function electric oven with touch control timer
Control Panel
Removable wok trivet
Stainless steel splashback
(optional to fit)


 Removable cast iron trivet


 Gas burner
Control panel
Oven door
Storage compartment
Stainless steel kick panel
|
Function |
|
Oven/Grill |
|
|
|
|
|
|
Off |
|
Off |
Off |
Off |
Off |
Off |
Off |
Maxi |
|
Rapid |
|
|
|
|
|
|
Grill |
|
Heat |
Timer |
Clock |
|
|
|
|
|
|
|
|
|
|
|
||
Grill |
|
Fan |
Cook Time |
End Time |
|
|
|
|
|
Bake |
|
|
|
|
|||
|
|
260 |
|
High |
High |
High |
High |
High |
Fan |
|
Bake/ |
Keep |
|
|
|
|
|
|
Warm |
|
|
|
|
|
||
Grill |
|
Pizza220 |
100 |
Mode |
|
|
|
|
Defrost |
Base |
200 |
180 |
Low |
Low |
Low |
Low |
Low |
|
Heat |
|
Oven function selector |
|
|
|
Clock/Timer |
|
Gas hob |
|
|
|||||
Oven/Grill temperature control |
|
display |
|
burner |
||
|
|
|
controls |
|||
|
|
|
||||
Medium heat burner
Gas Hob
Low heat burner |
High heat burner |
|
Intense heat wok burner |
WFE914SB 5

MODEL WFEP915SB
Gas hob with flame safeguard, programmable touch control pyro clean electric oven
Removable wok trivet
Stainless steel splashback (optional)
Removable cast iron trivet
Gas burner
Control panel
Oven door
Storage compartment
Stainless steel kick panel
Control Panel
Off |
Off |
Off |
Off |
Off |
High |
High |
High |
High |
High |
Low |
Low |
Low |
Low |
Low |
Programmable controller Gas hob burner controls
Medium heat burner
Gas Hob
Low heat burner |
|
|
|
High heat burner |
Intense heat wok burner
6 WFEP915SB
MODEL WFE946SB
Touch control electric ceramic hob, programmable touch control electric oven
Stainless steel splashback (optional)
Hob element controls
Ceramic glass hob
Oven control panel
Oven door
Storage compartment
Stainless steel kick panel
Ceramic hob touch controls
Control Panel - oven programmable controller
Ceramic Hob
Triple ring cooking zone
Multi-purpose double cooking zone Small cooking zone
Small cooking zone |
Medium cooking zone |
WFE946SB 7
MODEL WVEP916SB |
MODEL WVE916SB |
Pyro Clean programmable electric oven |
Programmable electric oven |
Control Panel - oven programmable controller |
|
WVEP916SB |
WVE916SB |
WVE914SB
Knob control electric oven
|
Function |
|
|
|
Oven/Grill |
|
|
Off |
|
|
|
|
Off |
Maxi |
Rapid |
|
|
|
|
|
Grill |
Heat |
Timer |
|
Clock |
|
|
|
|
|
|
|
||
Grill |
Fan |
Cook Time |
|
End Time |
Max |
|
Bake |
|
|
|
|
||
|
|
|
|
|
260 |
|
|
|
|
|
|
|
Keep |
Fan |
Bake/ |
|
|
|
|
Warm |
Grill |
Pizza |
|
Mode |
|
220 |
100 |
|
|
|
|
|
||
Defrost |
Base |
|
|
|
200 |
|
|
Heat |
|
|
|
180 |
160 |
8 WVEP916SB, WVE916SB, WVE914SB

BEFORE OPERATING YOUR APPLIANCE FOR THE FIRST TIME
 TIPS AND INFORMATION
Setting the time
If you have purchased a model fitted with an electronic or programmable timer, you must set the time of day before you can operate your appliance.
After electrically connecting the appliance, you must set the time of the day before you can operate your oven.
Touch control electronic clock model wfe914SB, WVE914SB
•After the appliance has been electrically connected “12.00” will be displayed and the “clock” indicator will flash.
•To set the time of day, press – or +. 5 seconds after the last change, the “clock” indicator will disappear, confirming the time has been set.
NOTE: The clock has a 24-hour display.
Preparing your appliance for the first time
•Please remove all internal boxes and bags from the oven before operation.
•Please wipe out the oven interior prior to operation with warm soapy water and polish dry with a soft clean cloth. Do not close the oven door until the oven is completely dry.
•New appliances can have an odour during first operation. It is recommended to ‘run in’ your oven before you cook for the first time. Run the oven at 180°C for 2 hours and ensure that the room is well ventilated.
•DO NOT line the oven with foil, it will damage the enamel.
Timer |
Clock |
Cook Time |
End Time |
|
Mode |
Model wfe914
Programmable Controller: models WFEP915SB, WFE946SB, WVEP916SB, WVE916SB
•After the appliance has been electrically connected, the set clock symbol  will flash on the clock display.
•To set the time of day, press – or +. 5 seconds after
the last change the timer arrow  will disappear, confirming the time has been set. Once the time has been entered, the clock advances minute by minute.
NOTE: The clock has a 24-hour display.
Model wfe916
BEFORE OPERATING YOUR APPLIANCE |
9 |
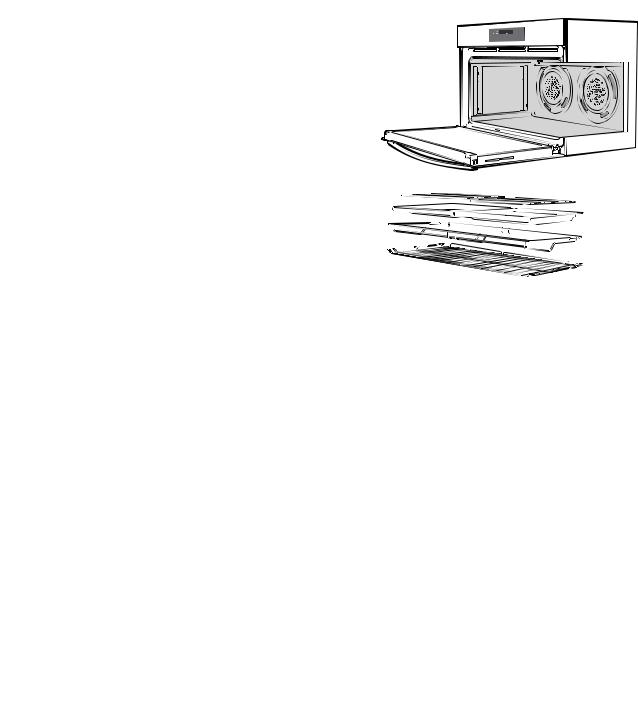
INSTALLING YOUR OVEN ACCESSORIES
Prior to installing accessories, remove all packaging and remove plastic film from external panels.
Side racks
The side racks that come with your oven are fitted in the following manner:
•Insert the rear peg into the rear access hole provided, ensuring peg is fully inserted.
•Then locate the front peg into the front access hole and push in firmly.
•Once the indents have passed the front edge of the side rack, the shelf can be pushed completely in.
•When fully inserted the shelf/tray should not interfere with the closed door.
Shelves and trays
The shelves are designed so that they have maximum travel but cannot be accidentally pulled right out. The trays are designed in the same way and fit straight into the side racks.
•Locate the rear edge of the shelf/tray in between 2 guide rails of the side rack – see diagram. Ensure the same rail positions on both sides of the oven are being engaged.
•With the front edge raised, begin to slide the shelf into the oven.
Installing burners
•The burner crown must be fitted correctly into the burner cup or damage will occur during operation.
•To do this, ensure that the 2 ribs on either side of the spark plug hole are positioned into the 2 slots on the burner cup.
•The burner cap and burner crown must be clean and located correctly for the burner to light.
NOTE: When the burner is correctly fitted it will sit level on the hob.
Burner cap
Burner crown
Flame safeguard sensor
Burner cup
Ignition spark plug
Injector
10 INSTALLING YOUR OVEN ACCESSORIES
INSTALLING YOUR COOKTOP ACCESSORIES
Installing trivets
•The rubber feet on the trivets locate into the contours of the hob
•Take care when placing the trivets as dropping them may damage the hob or trivet
•The wok trivet sits on top of the trivet above the wok burner
Trivets
Wok trivet
Burner cap
Wok burner
Burner crown
Using your gas hotplates
Note: Gas controls turn anti-clockwise from ‘Off’ and have limited movement.
INSTALLING BURNERS
AND TRIVETS
Lighting the burners
Electronic ignition
These hobs are fitted with mains powered electronic ignition. When the appliance has been connected and the power is on, depressing any knob will release sparks to all burners. To light a burner, depress the corresponding knob and while continuing to depress knob turn anticlockwise to ‘HI’ position. The knob may be released once the flame is established, and turned further anti-clockwise to reduce the flame height as desired.
Flame safeguard models WFE914SB & WFEP915SB
Models with flame safeguard have the same ignition procedure as electronic ignition, but require the knob to continue to be depressed after flame is established for approximately 5 seconds. If the flame goes out when the knob is released, simply depress the knob again, this time holding it down with slightly more force for the same length of time.
 WARNING
•Keep hands clear of burners when lighting.
•If burner does not light within 5 seconds, turn knob to ‘Off’ position, allow gas to disperse, then try lighting again.
•Burners MUST be operated between ‘HIGH’ and ‘LOW’ settings only.
ENVIRONMENT
To conserve gas, place the pan centrally over the burner and adjust the flame so that it does not go past the edge of the cookware.
NOTE: In the absence of electrical power, carry out the ignition directly to the burner with a hand held ignition source.
INSTALLING YOUR COOKTOP ACCESSORIES |
11 |

GETTING TO KNOW YOUR COOKTOP
Model WFEP915SB & WFE914SB
2
1 |
4 |
3 |
|
Ceramic hotplates Model wfe946SB
The cooktop is made from ceramic glass, a tough, durable material that withstands heating and cooling without breaking. It is strong enough to hold the heaviest utensils.
However, it must be remembered that as it is GLASS, it may break. Treat it accordingly!
Should you have any questions about the glass in your new appliance, please contact the service centre by dialling 13 13 49.
3
4
1
1.Low heat burner (5.1MJ/h)
Used for simmering with small cookware items.
2.Medium heat burner (9.0MJ/h)
Used for normal cooking and simmering with mid size cookware items.
3.High heat burner (12.1MJ/h)
Used for fast heating with large size cookware items.
4.Intense heat wok burner (14.4MJ/h)
Used for very fast heating with woks and other large size cookware items. Use wok trivet provided when cooking with a wok.
1 |
2 |
1.Single cooking zone small 1200W
2.Single cooking zone medium 1800W
3.Triple cooking zone 2300/1600/800W
4.Multi-purpose double cooking zone 2200/1400W
12 GETTING TO KNOW YOUR COOKTOP
 WARNING
If the ceramic glass is cracked, switch off the appliance to avoid the possibility of electric shock.
The heating elements are concealed under the smooth glass surface which has a pattern to show the location of the elements.
•Use pans with smooth, clean and dry bottoms to avoid scratching or burning residue into the glass.
•Ensure the pan bottom is the same size as the working element.
•We do not recommend ceramic glass pans because they do not conduct heat well.
•Stainless steel or enamelled saucepans are best.
•Do not use pans with copper or aluminium bottoms because they can leave traces which are difficult to remove from the glass.
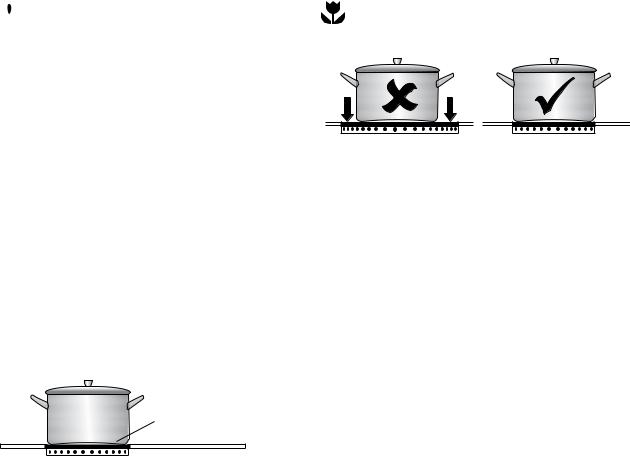
•If buying new utensils select enamelled steel pans with 2-3mm thick bottoms or stainless steel pans with sandwich bottoms 4-6mm thick. The pan bottom should be flat, or preferably, slightly concave at room temperature so that it lies flat on the glass surface when hot.
A flat or slightly concave pan is preferable for ceramic hotplates
ENVIRONMENT
The bottom of pans and cooking zones should be the same size
GETTING TO KNOW YOUR COOKTOP 13

GETTING TO KNOW YOUR CERAMIC COOKTOP
Ceramic cooktop controls
3 |
4 |
5 |
6 |
7 |
5 |
1 |
2 |
5 |
1.On/Off with power indicator
2.Lock with pilot light
3.Pause
4.Triple ring cooking zone
5.Zone indicator
6.Heat setting selection
7.Timer setting selection
8.Multipurpose cooking zone
The appliance is operated using Touch Control sensor fields. Functions are controlled by touching sensor fields and confirmed by displays and acoustic signals.
Touch the sensor fields from below, without covering other sensor fields.
ICONS |
SENSOR FIELD |
FUNCTION |
||||
|
|
|
|
|
On / Off |
To switch the appliance on |
|
|
|
|
|
and off |
|
|
|
|
|
|
|
|
+ |
Increase |
To increase heat settings |
||||
settings |
||||||
– |
Reduce settings |
To reduce heat settings |
||||
Timer |
Timer |
To select timer settings |
||||
|
|
|
|
|
Increase |
To increase Timer time |
|
|
|
|
|
settings |
|
|
|
|
|
|
|
|
|
|
|
|
|
Reduce settings |
To reduce Timer time |
|
|
|
|
|
Lock |
To lock/unlock the |
|
|
|
|
|
control panel |
|
|
|
|
|
|
|
|
|
|
|
|
|
Triple ring |
To switch outer rings on |
|
|
|
|
|
switch |
and off |
|
|
|
|
|
Multi-purpose |
Link zones on and off |
|
|
|
|
|
zone switch |
|
|
|
|
|
|
|
|
|
|
|
|
|
Pause |
Sets all operating zones to |
|
|
|
|
|
Keep Warm setting |
|
|
|
|
|
|
|
|
5 |
8 |
5 |
Displays
DISPLAY DESCRIPTION
Cooking zone is switched off
Keep warm setting is set
Heat setting is set
Automatic warm-up function is activated
Malfunction has occurred
Cooking zone is still hot
Lock/child safety device is activated
Switch off is active
 WARNING
Risk of burns from residual heat. After being switched off, the cooking zones need some time to cool down. Look at
the residual heat indicator  .
.
 TIPS AND INFORMATION
Residual heat can be used for melting and keeping food warm.
These touch controls apply to the hob only. The oven is operated independently.
14 GETTING TO KNOW YOUR CERAMIC COOKTOP

USING YOUR CERAMIC COOKTOP
Switching the ceramic cooktop on and off |
Locking/unlocking the control panel |
||||||
|
CONTROL PANEL |
DISPLAY |
The control panel, with the exception of the ‘On/Off’ |
||||
|
sensor field, can be locked at any time in order to |
||||||
Switch on |
Touch |
for 2 seconds |
/ |
prevent the settings being changed eg. By wiping over |
|||
the panel with a cloth. |
|
||||||
|
|
|
|
|
|||
Switch off |
Touch |
for 2 seconds |
/ none |
|
CONTROL |
|
|
|
|
|
|
|
DISPLAY |
||
|
|
|
|
|
PANEL |
||
|
|
|
|
|
|
||
TIPS AND INFORMATION |
|
Switch on |
Touch |
(for 5 seconds) |
|||
After switching on, within approx. 10 seconds a heat |
|
|
the previously set |
||||
setting or a function must be set, otherwise the appliance |
Switch off |
Touch |
|||||
heat settings |
|||||||
automatically switches itself off. |
|
|
|
||||
|
|
|
|
||||
Setting the heat setting
|
CONTROL PANEL |
DISPLAY |
To increase |
Touch |
to |
To decrease |
Touch |
to |
To switch off |
Touch until |
|
 TIPS AND INFORMATION
The keep warm setting  lies between
  and
and  . It is used to keep food warm.
Switching the outside ring on and off
By switching the outside rings on or off, the effective heating surface can be matched to the size of the cookware.
 TIPS AND INFORMATION
Before an outside ring can be switched on, the inside ring must be switched on.
TRIPLE |
CONTROL |
INDICATOR LIGHT |
|||
COOKING ZONE |
PANEL |
|
|||
|
|
|
|||
To switch on the |
Touch |
for |
Two indicator lights |
||
middle ring |
1-2 seconds |
are lit |
|||
To switch on the |
Touch |
for |
Three indicator |
||
outside ring |
1-2 seconds |
lights are lit |
|||
To switch off the |
Touch |
for |
The third indicator |
||
outside ring |
1-2 seconds |
light goes out |
|||
To switch off the |
Touch |
for |
The second |
||
indicator light goes |
|||||
middle ring |
1-2 seconds |
||||
out |
|
||||
|
|
|
|
||
MULTI-PURPOSE |
SENSOR |
|
INDICATOR |
||
ZONE |
FIELD |
|
|
LIGHT |
|
To switch on the |
Touch |
|
for |
is lit |
|
outside ring |
|
||||
1-2 seconds |
|
||||
|
|
||||
To switch off the |
Touch |
|
for |
goes out |
|
outside ring |
|
||||
1-2 seconds |
|
||||
|
|
||||
 TIPS AND INFORMATION
When you switch the appliance off, the locking function is automatically switched off.
Using the automatic warm-up function
All cooking zones are equipped with an automatic warm up function. When setting a heat setting using , when
starting from  , the cooking zone switches to full power for a certain amount of time and then automatically switches back to the heat setting set.
|
|
CONTROL |
POSSIBLE |
|
|
|
|
HEAT |
DISPLAY |
||
|
|
PANEL |
|||
|
|
SETTINGS |
|
||
|
|
|
|
||
Switch on |
|
|
|
(after |
|
(only when |
|
|
|
||
|
Touch |
to |
5 |
||
starting at |
) |
||||
|
|
||||
|
|
seconds) |
|||
|
|
|
|
||
Switch off |
|
Touch |
to / |
to |
|
|
|
|
|||
Not used |
|
Touch |
to |
to |
|
|
|
|
 TIPS AND INFORMATION
If during the automatic warm up a higher heat
setting is selected, e.g. from  to
to  , the automatic warm up is adjusted.
If there is still residual heat on the cooking zone (display  ), the automatic warm up is not performed.
USING YOUR CERAMIC COOKTOP |
15 |
 Loading...