

Page 1
Bedienungsanleitung
Instructions for use | Notice d´utilisation
Gebruiksaanwijzing
| Istruzioni per l’uso
Instrucciones de uso
| Návod k obsluze
Instrukcja obsługi
Modell 48850
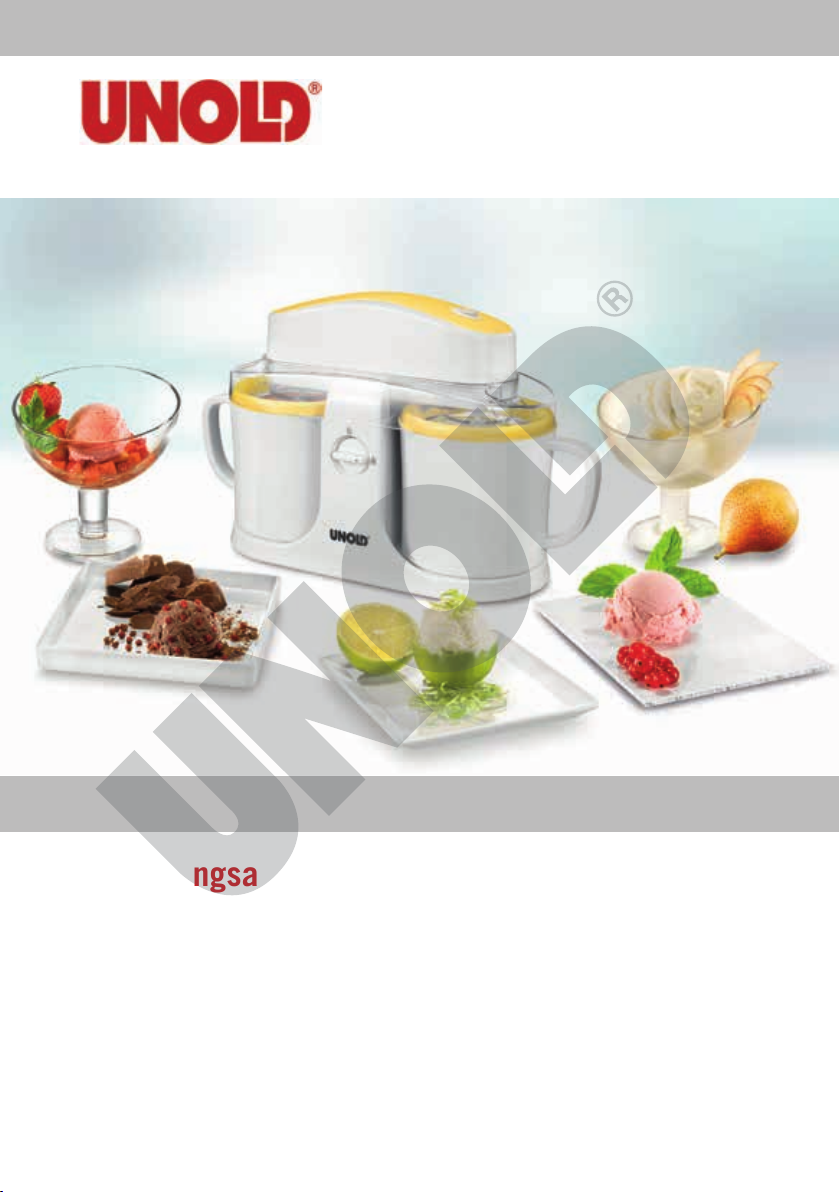
EISMASCHINE DUO
Copyright UNOLD AG | www.unold.de
Page 2

Impressum:
Copyright UNOLD AG | www.unold.de
Bedienungsanleitung Modell 48850
Stand: Dezember 2015 /nr
Copyright ©
Mannheimer Straße 4
68766 Hockenheim
Telefon +49 (0) 62 05/94 18-0
Telefax +49 (0) 62 05/94 18-12
E-Mail info@unold.de
Internet www.unold.de 48850_02
Page 3

SERVICE-HOTLINE
Copyright UNOLD AG | www.unold.de
Bei Fragen zu den Rezepten und zum Gebrauch des Gerätes können Sie sich direkt an unsere
Beraterin Frau Blum wenden:
Montag und Dienstag von 8 bis 12 Uhr und 13 bis 17 Uhr
Rufnummer: 0 18 05/94 18 99*
*derzeit 0,14 EUR/Minute aus dem Festnetz der Deutschen Telekom.
Bei Anrufen aus Mobilfunknetzen und aus dem Ausland (+49 18 05/94 18 99) können
abweichende Kosten anfallen. Ab 1.3.2010 Mobilfunkpreis maximal 0,42 EUR/Minute.
Kunden aus Österreich wählen bitte die Nummer (0) 1/8 10 20 39
Page 4

INHALTSVERZEICHNIS
Copyright UNOLD AG | www.unold.de
Bedienungsanleitung Modell 48850
Technische Daten ....................................8
Symbolerklärung ...................................... 8
Für Ihre Sicherheit ................................... 8
Vor dem ersten Benutzen ..........................11
Montieren ..............................................12
Vor der Eiszubereitung .............................13
Eis herstellen ..........................................13
Auseinanderbauen, Reinigen und Pflegen ..15
Fehler beheben .......................................17
Wichtige Tipps und Hinweise für
gutes Eis.................................................18
Rezept-Ideen für Kinder ...........................19
Rezept-Ideen für Erwachsene .................... 20
Service-Adressen .....................................21
Garantiebestimmungen ............................22
Entsorgung / Umweltschutz ......................22
Informationen für den Fachhandel ............. 22
Bestellformular ........................................ 111
Instructions for use Model 48850
Technical Specifications ........................... 23
Explanation of symbols ............................. 23
For your safety ......................................... 23
Before using the appliance the first time .... 26
Assembly ................................................ 26
Before preparing ice cream ....................... 27
Making ice cream ....................................28
Disassembly, cleaning and care .................30
Troubleshooting ....................................... 30
Important tips and instructions for
good ice cream ........................................ 32
Recipe ideas for children .......................... 33
Recipe ideas for grown-ups ....................... 34
Guarantee Conditions ............................... 35
Waste Disposal /
Environmental Protection .........................35
Service ...................................................21
Notice d´utilisation Modèle 48850
Spécification technique ........................... 36
Explication des symboles .......................... 36
Pour votre sécurité ................................... 36
Avant la première utilisation .....................39
Montage ................................................40
Avant la préparation de la glace ................41
Fabriquer de la glace ...............................41
Démontage, nettoyage et entretien ............43
Dépannage .............................................. 44
Conseils et remarques importants
pour réaliser une bonne glace ...................45
Idées de recettes pour enfants ..................46
Idées de recettes pour adultes ..................47
Conditions de Garantie ............................. 48
Traitement des déchets /
Protection de l’environnement ...................48
Service ...................................................21
Gebruiksaanwijzing Model 48850
Technische gegevens ............................... 49
Verklaring van de symbolen .......................49
Voor uw veiligheid ....................................49
Vóór het eerste gebruik .............................52
Monteren ............................................... 53
Vóór de ijsbereiding .................................54
IJs maken ............................................... 54
Demonteren, reinigen en onderhouden ....... 56
Storingen verhelpen ................................. 57
Belangrijke tips en instructies voor
goed ijs...................................................58
Receptideeën voor kinderen ...................... 58
Receptideeën voor volwassenen .................59
Garantievoorwaarden ................................ 60
Verwijderen van afval /
Milieubescherming ..................................60
Service ...................................................21
Page 5
INHALTSVERZEICHNIS
Copyright UNOLD AG | www.unold.de
Istruzioni per l’uso Modello 48850
Dati tecnici ............................................ 61
Significato dei simboli .............................61
Per la vostra sicurezza .............................. 61
Prima del primo utilizzo ...........................64
Montaggio .............................................. 65
Prima di preparare il gelato ....................... 66
Preparazione del gelato ............................66
Disassemblaggio, pulizia e manutenzione ... 68
Risoluzione dei problemi ..........................70
Suggerimenti e indicazioni importanti
per un buon gelato ................................... 71
Idee per ricette per bambini .....................72
Idee per ricette per adulti ......................... 73
Norme die garanzia .................................. 74
Smaltimento / Tutela dell’ambiente ...........74
Service ...................................................21
Manual de instrucciones Modelo 48850
Datos técnicos ........................................ 75
Explicación de símbolos ...........................75
Para su seguridad .................................... 75
Antes del primer uso ................................ 78
Montar ...................................................78
Antes de la preparación de helado ............. 79
Elaborar helado .......................................80
Desensamblaje, limpieza y cuidado ...........82
Eliminación de fallos ...............................82
Consejos e indicaciones importantes
para un buen helado ................................83
Ideas de recetas para niños ......................84
Ideas de recetas para adultos .................... 85
Condiciones de Garantia ........................... 86
Disposición/Protección del
medio ambiente ......................................86
Service ...................................................21
Návod k obsluze Modelu 48850
Technické údaje .....................................87
Vysvětlení symbolů ...................................87
Pro vaši bezpečnost .................................87
Před prvním použitím ............................... 90
Sestavení ............................................... 90
Před přípravou zmrzliny ............................ 91
Výroba ledu .............................................92
Rozebrání, čištění a péče .........................93
Odstraňování chyb ...................................94
Důležité tipy a informace pro
dobrou zmrzlinu ......................................95
Recepty pro děti ...................................... 96
Recepty pro dospělé ................................. 96
Záruční podmínky .................................... 98
Likvidace / Ochrana životného prostředí ....98
Service ...................................................21
Instrukcja obsługi Model 48850
Dane techniczne ...................................... 99
Objaśnienie symboli ................................. 99
Dla bezpieczeństwa użytkownika ...............99
Przed pierwszym użyciem .........................102
Montaż ...................................................103
Przed przygotowaniem lodów .....................104
Przygotowywanie lodów ............................104
Rozłożenie na części, czyszczenie i
pielęgnacja .............................................106
Usuwanie usterek ....................................107
Porady i wskazówki, jak zrobić dobre lody ... 108
Przepisy na lody dla dzieci ........................ 108
Przepisy na lody dla dorosłych ...................109
Warunki gwarancji....................................110
Utylizacja / ochrona środowiska ................. 110
Service ...................................................21
Page 6
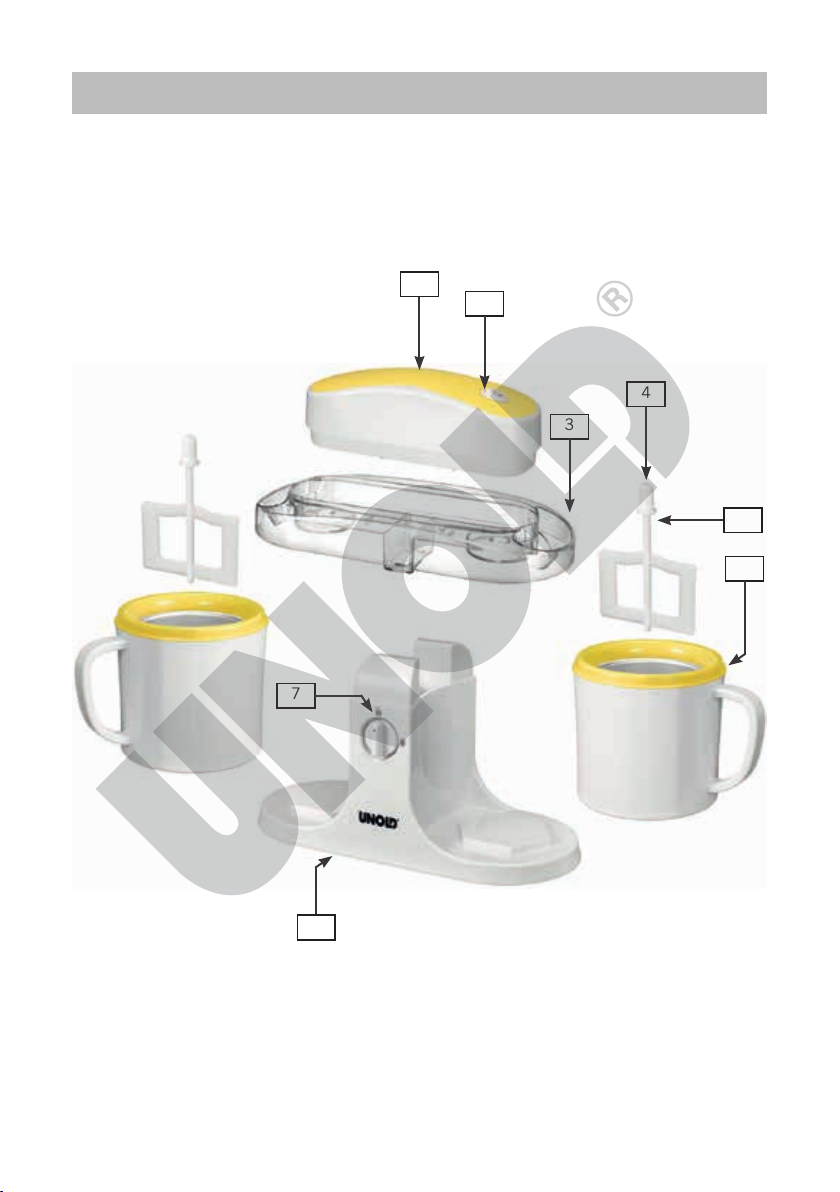
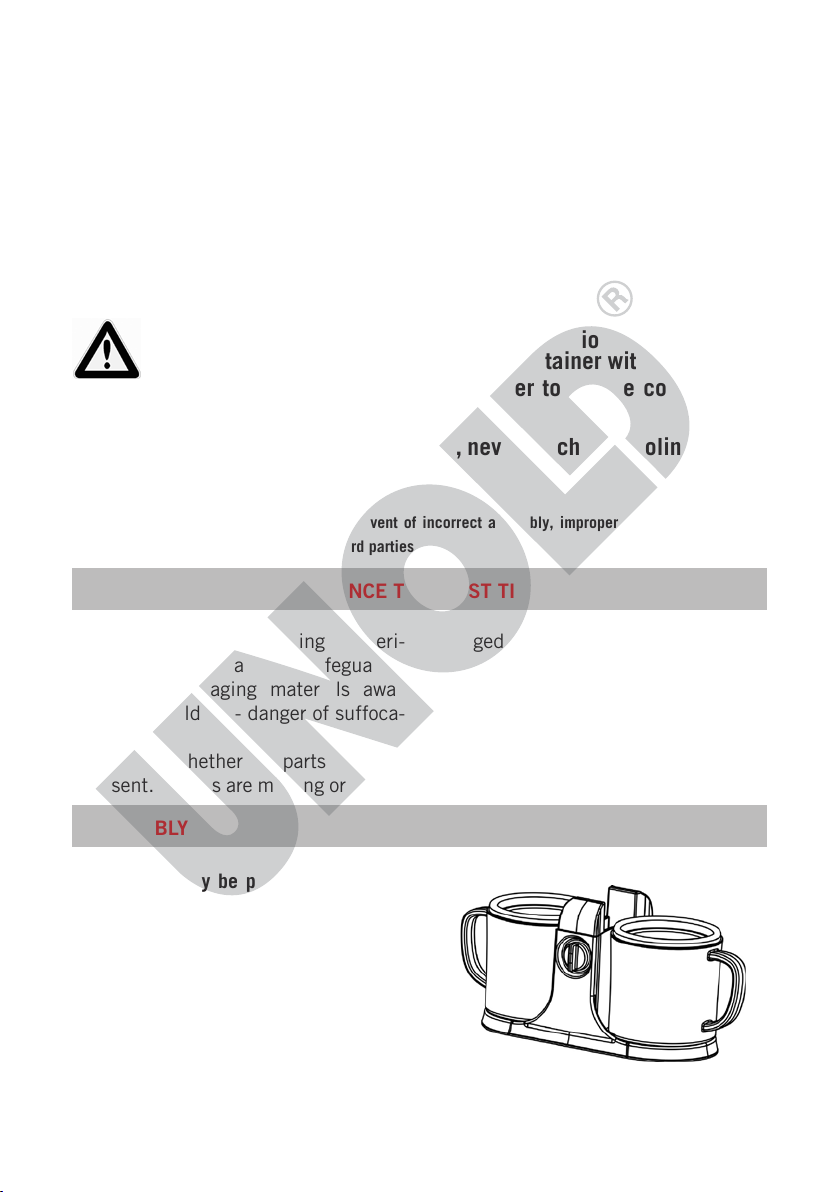
IHRE NEUE EISMASCHINE
Copyright UNOLD AG | www.unold.de
1
7
2
4
3
5
6
6
8
Page 7
IHRE NEUE EISMASCHINE
Copyright UNOLD AG | www.unold.de
D Ab Seite 8
1 Motor
2 EIN/AUS-Schalter
3 Deckel mit Einfüllöffnungen
4 Antriebswellen/Achse
5 Mischer
6 Entnehmbare Kühlbehälter
7 Entriegelungsschalter
8 Gerätebasis
GB Page 23
1 Motor
2 ON/OFF switch
3 Lid with fill openings
4 Drive shafts/axle
5 Mixer
6 Removable cooling containers
7 Unlock switch
8 Appliance base
F Page 36
1 Moteur
2 Interrupteur MARCHE / ARRÊT
3 Couvercle avec orifices de
remplissage
4 Arbres d'entraînement / Axe
5 Mélangeur
6 Réservoirs réfrigérants amovibles
7 Commutateur de déverrouillage
8 Socle de l‘appareil
NL Pagina 49
1 Motor
2 AAN/UIT-schakelaar
3 Deksel met vulopeningen
4 Aandrijfassen/as
5 Mixer
6 Uitneembare koelbakken
7 Ontgrendelingsschakelaar
8 Apparaatbasis
I Pagina 61
1 Motore
2 Interruttore ON/OFF
3 Coperchi con aperture di
riempimento
4 Alberi motore/asse
5 Mescolatori
6 Contenitori refrigeranti rimovibili
7 Interruttore di sblocco
8 Interruttore ON/OFF
E Página 75
1 Motor
2 Interruptor CON/DES
3 Tapa con aberturas de llenado
4 Ejes de accionamiento/ejes
5 Mezcladoras
6 Recipientes refrigeradores
extraíbles
7 Interruptor de desbloqueo
8 Base del aparato
CZ Strany 87
1 Motor
2 Spínač ZAP/VYP
3 Kryt s plnicími otvory
4 Hnací hřídele/osa
5 Míchadlo
6 Vyjímatelné chladicí nádoby
7 Tlačítko odblokování
8 Základna přístroje
PL Strony 99
1 Silnik
2 Przycisk WŁ./WYŁ.
3 Pokrywa z otworami do napełniania
4 Wały napędowe / oś
5 Mieszadła
6 Wyjmowane pojemniki chłodzące
7 Przycisk odblokowujący
8 Podstawa urządzenia
7
Page 8
BEDIENUNGSANLEITUNG MODELL 48850
Copyright UNOLD AG | www.unold.de
TECHNISCHE DATEN
Leistung: 12 W, 220–240 V~, 50 Hz
Fassungsvermögen: Ca. 500 ml pro Behälter
Max. Füllmenge: Max. 200 ml Zutaten pro Behälter
Größe: Ca. 35,1 x 15,3 x 22,3 cm (B/T/H)
Gewicht: Ca. 2,5 kg
Zuleitung: Ca. 120 cm
Zubereitungszeit: Ca. 15–25 Minuten
Schutzklasse:
Ausstattung: Eis-Maschine für 2 x 0,5 Liter Eis mit Kühlakku
Zubehör: Bedienungsanleitung mit Rezepten, 2 Kühlbehälter,
Änderungen und Irrtümer in Ausstattungsmerkmalen, Technik, Farben und Design
vorbehalten
SYMBOLERKLÄRUNG
Dieses Symbol kennzeichnet eventuelle Gefahren, die Verletzungen
nach sich ziehen können oder zu Schäden am Gerät führen.
II
(Vorkühlzeit ca. 8–12 Stunden), Eiszubereitung in ca.
15-25 Minuten (ohne Vorkühlzeit), EIN/AUS-Schalter,
zwei Einfüllschächte zum Zufügen der Zutaten, zwei
entnehmbare Kühlbehälter geeignet für ***-Gefrierfach
2 Mischer
FÜR IHRE SICHERHEIT
Bitte lesen Sie die folgenden Anweisungen und bewahren Sie diese auf.
Personen im Haushalt
Das Gerät kann von Kindern
1.
ab 8 Jahren und von Personen mit verringerten physischen, sensorischen oder
mentalen Fähigkeiten oder
Mangel an Erfahrung und/
oder W
issen benutzt werden, wenn sie beaufsichtigt werden oder bezüglich
des sicheren Gebrauchs des
8
Gerätes unterwiesen wurden
und die aus dem Gebrauch
des Geräts resultierenden
Gefahren verstanden haben.
Das Gerät ist kein Spielzeug.
Das Säubern und die War
tung des Geräts dürfen von
Kindern nur unter Aufsicht
durchgeführt werden.
2.
Kinder unter 3 Jahren soll-
ten dem Gerät fernbleiben
oder durchgehend beaufsichtigt werden.
-
Page 9
3. Kinder zwischen 3 und 8
Copyright UNOLD AG | www.unold.de
Jahren sollten das Gerät nur
dann ein- und ausschalten,
wenn es sich in seiner vorgesehenen normalen Bedienungsposition befindet,
sie beaufsichtigt werden
oder bezüglich des sicheren Gebrauchs unterwiesen
wurden und die aus dem
Gebrauch des Geräts resultierenden Gefahren verstanden haben. Kinder zwischen
3 und 8 Jahren sollten das
Gerät weder anschließen
noch bedienen, säubern
oder warten.
Kinder sollten beaufsichtigt
4.
werden, um sicherzustellen,
dass sie nicht mit dem Gerät
spielen.
Hinweise zur Gesundheit
5. Aufgetautes oder angetautes
Eis sofort verbrauchen und
nicht wieder einfrieren.
6. Verzehren Sie das Eis nur,
solange es noch frisch ist.
Eventuelle Reste sofort einfrieren und innerhalb einer
Woche verzehren.
Verwenden Sie nur frische
7.
Zutaten.
8. Achten Sie insbesondere bei
der Verwendung von Eiern
darauf, dass diese möglichst
frisch sind, um Keimbildung
zu vermeiden. Eisreste, die
Ei enthalten, nicht wieder
einfrieren.
9. Eiscreme, die aus rohem Ei
oder nur teilweise erhitztem
Ei hergestellt wurde, sollte
nicht von Kleinkindern,
Schwangeren, Senioren oder
chronisch bzw. akut erkrank
ten Menschen verzehrt werden.
Reinigen Sie das Gerät
10.
sofort, wenn Sie die Eiszubereitung beendet haben.
Andernfalls können sich
Keime bilden.
Tritt Kühlflüssigkeit aus
11.
einem der Kühlbehälter aus,
muss dieser Kühlbehälter
ersetzt werden.
Elektrische Sicherheit
12. Gerät nur an Wechselstrom
gemäß Typenschild anschließen.
Dieses Gerät darf nicht mit
13.
einer externen Zeitschaltuhr
oder einem Fernbedienungssystem betrieben werden.
Nach Gebrauch, vor der Rei-
14.
nigung oder bei eventuellen Störungen während des
Betriebs bitte immer den
Netzstecker ziehen.
Gerät nie in Wasser oder
15.
eine andere Flüssigkeit eintauchen, die Zuleitung vor
Feuchtigkeit schützen.
Die Zuleitung vor Gebrauch
16.
vollständig abwickeln.
17. Wickeln Sie die Zuleitung
nicht um das Gerät und vermeiden Sie Knicke in der
Zuleitung, um Schäden an
der Zuleitung zu vermeiden.
Das Gerät nur in Innenräu-
18.
men verwenden.
Ziehen Sie die Zuleitung
19.
nur am Netzstecker aus der
Steckdose, niemals an der
Zuleitung ziehen.
9
Page 10
20. Um Schäden an der Zulei-
Copyright UNOLD AG | www.unold.de
tung zu vermeiden, das Gerät
niemals an der Zuleitung tragen oder an der Zuleitung
ziehen.
Ziehen Sie den Stecker aus
21.
der Steckdose, bevor Sie das
Gerät zerlegen und reinigen,
Einzelteile abnehmen oder
anbringen oder wenn das
Gerät an eine andere Stelle
gestellt werden soll.
22. Prüfen Sie regelmäßig Stecker und Zuleitung auf Verschleiß oder Beschädigungen. Bei Beschädigung des
Anschlusskabels oder anderer Teile senden Sie das
Gerät zur Überprüfung und
Reparatur
an unseren Kun-
dendienst. Unsachgemäße
Reparaturen können zu
Gefahren für den Benutzer
führen und den Ausschluss
der Garantie bewirken.
Hinweise zum Aufstellen und si-
cheren Gebrauch des Gerätes
23.
Das Gerät sowie die Einsatz-
teile sind nicht spülmaschinengeeignet.
Stellen Sie das Gerät auf
24.
eine freie, ebene Fläche.
25. Das Gerät ist ausschließlich
für den Haushaltsgebrauch
oder ähnliche Verwendungszwecke bestimmt, z. B.
Teeküchen in Geschäf-
ten, Büros oder sonstigen
Arbeitsstätten,
landwirtschaftliche Betriebe,
zur Verwendung durch Gäste
in Hotels, Motels oder sons-
tigen Beherbergungsbetrieben,
in Privatpensionen oder
Ferienhäusern.
26. Gerät und Zuleitung aus
Sicherheitsgründen nie auf
oder in der Nähe von heißen
Oberflächen abstellen oder
betreiben.
27. Das Kabel darf nicht über
die Kante der Arbeitsfläche
herunterhängen.
28. Berühren Sie die Innenseite
des Kühlbehälters nicht mit
bloßen Händen oder ande
ren Körperteilen (insbesondere wenn diese nass sind),
um Verletzungen/Erfrierungen zu vermeiden.
29.
Die maximale Füllmenge
darf nicht überschritten werden. Der Kühlbehälter sollte
bis maximal 4 cm unterhalb
des oberen Randes gefüllt
sein, da sich das Eis
durch
den Gefriervorgang ausdehnt.
Das Gerät muss vollständig
30.
zusammengebaut und eingeschaltet sein, bevor Sie die
gewünschten Zutaten einfüllen. Geben Sie die erforderlichen Zutaten niemals vorher in den Kühlbehälter, da
die Zutaten am Behälterrand
festfrieren können. Hierdurch kann es zur Beeinträchtigung des gewünschten Ergebnisses kommen.
Bewegen Sie das Gerät nicht,
31.
solange es in Betrieb ist.
10
Page 11
32. Lassen Sie das Gerät nie
Copyright UNOLD AG | www.unold.de
unbeaufsichtigt, wenn es in
Betrieb ist.
33. Verwenden Sie das Gerät nie
ohne Kühlbehälter!
34. Während des Betriebs keine
Gegenstände in das laufende
Gerät halten und nicht mit
der Hand hineingreifen. Es
besteht Verletzungsgefahr!
35. Benutzen Sie das Gerät nur
nach ordnungsgemäßem Zusammenbau.
36. Betreiben Sie das Gerät nie
mit Zubehör anderer Geräte.
37. Benutzen Sie keine spit
-
zen oder scharfen Gegen-
Nicht in das laufende Gerät greifen – es besteht Verletzungsgefahr! Die Innenseite des Kühlbehälters nicht mit bloßen Händen
berühren!
Öffnen Sie auf keinen Fall den Motor des Gerätes. Es besteht die
Gefahr eines Stromschlages.
Achtung: Bitte berühren Sie den Kühlbehälter nie mit nassen
Körperteilen wie z. B. den Fingern, um Verletzungen/Erfrierungen zu vermeiden.
stände im Kühlbehälter, dieser könnte dadurch zerkratzt
werden. Verwenden Sie bei
Bedarf Kunststoff- oder
Holzschaber.
Schalten Sie das Gerät aus
38.
und ziehen Sie den Netzstecker, wenn die Eiszubereitung beendet ist, wenn Sie
das Gerät reinigen wollen
oder wenn Sie einen Fehler
am Gerät beheben müssen.
ACHTUNG: Bitte nur
39.
Lebensmittel in den Behälter einfüllen.
Der Hersteller übernimmt keine Haftung bei fehlerhafter Montage, bei unsachgemäßer oder fehlerhafter
Verwendung oder nach Durchführung von Reparaturen durch nicht autorisierte Dritte.
VOR DEM ERSTEN BENUTZEN
1. Entfernen Sie alle Verpackungsmaterialien und ggf. Transportsicherungen. Halten Sie Verpackungsmaterial von Kindern fern
– Erstickungsgefahr!
2. Prüfen Sie, ob alle Teile vorhanden sind. Wenn Teile fehlen oder
beschädigt sind, wenden Sie sich
bitte an Ihren Händler oder an
unseren Kundenservice.
3. Reinigen Sie alle Teile wie im
Kapitel „Reinigen und Pflegen“
beschrieben mit einem feuchten
Tuch.
11
Page 12
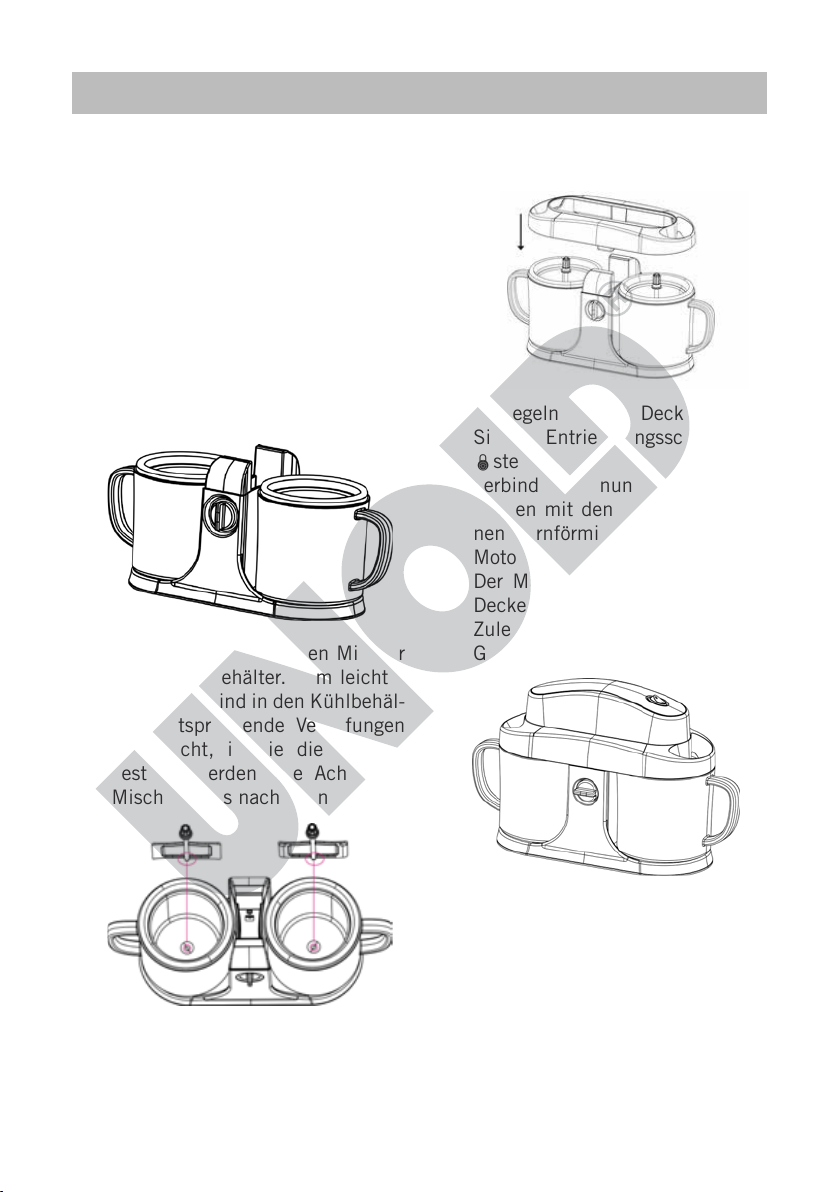
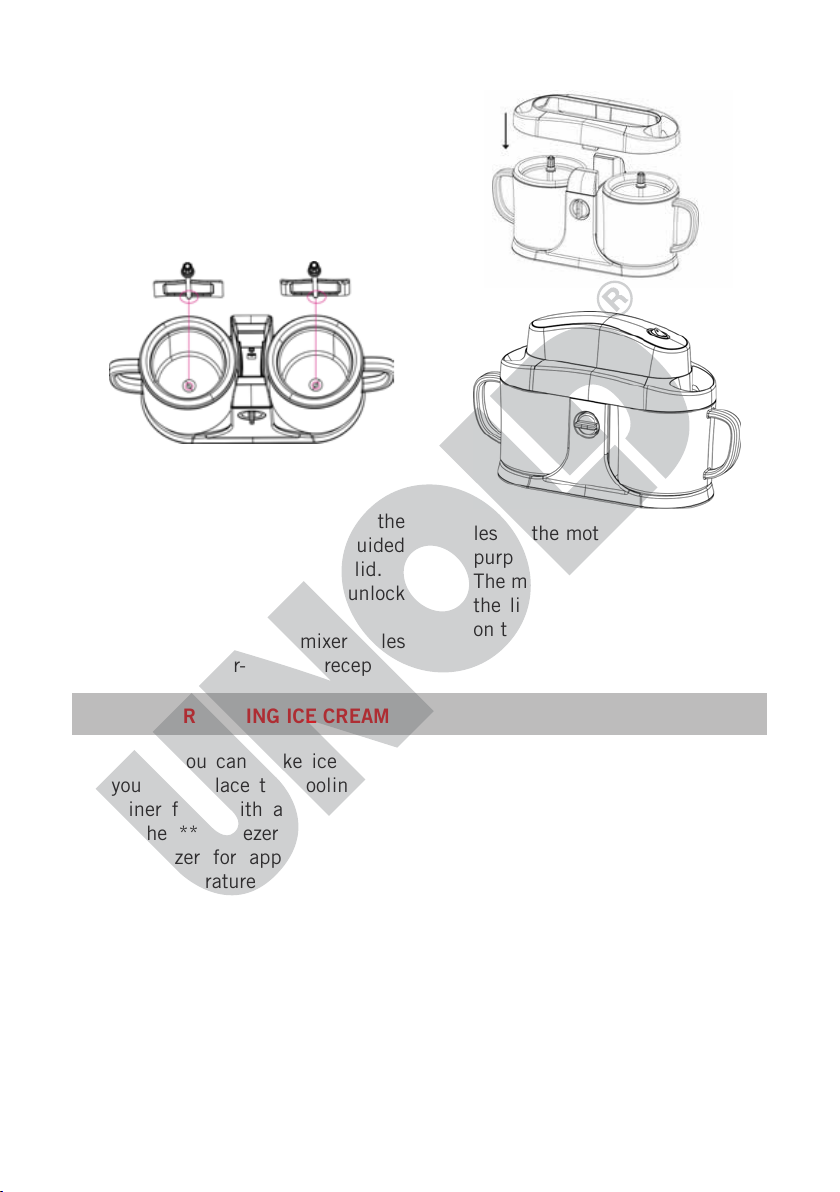
MONTIEREN
Copyright UNOLD AG | www.unold.de
Grundsätzlich lässt sich der Deckel nur
auf- oder abnehmen, wenn der Entriegelungsschalter auf gestellt ist.
1. Stellen Sie sicher, dass die Gerätebasis stabil auf einer ebenen
Fläche steht.
2. Platzieren Sie beide Kühlbehälter auf der Gerätebasis. Die Henkel der Behälter müssen dabei
jeweils nach außen weisen, da
das Gerät sonst nicht richtig montiert werden kann.
3. Stellen Sie jeweils einen Mischer
in die Kühlbehälter. Zum leichteren Einbau sind in den Kühlbehäl-
tern entsprechende Vertiefungen
angebracht, in die die Mischer
gesteckt werden. Die Achse der
Mischer muss nach oben zeigen.
muss jeweils durch die Öffnung
am Deckel geführt werden.
5. Verriegeln Sie den Deckel, indem
Sie den Entriegelungsschalter auf
stellen.
6. Verbinden Sie nun beide MischerAchsen mit den dafür vorgesehenen sternförmigen Aufnahmen am
Motor.
7. Der Motor muss nun so auf den
Deckel gesetzt werden, dass die
Zuleitung auf der Rückseite des
Geräts ist.
4. Befestigen Sie den Deckel auf
dem Gerät und achten Sie darauf, dass der Deckel einrastet.
Achtung: Die Achse der Mischer
12
Page 13
VOR DER EISZUBEREITUNG
Copyright UNOLD AG | www.unold.de
1. Bevor Sie Eis herstellen können,
müssen Sie die mit einer Kühlflüssigkeit gefüllten Kühlbehälter
für mindestens 8 Stunden in das
***-Tiefkühlfach bzw. die Gefriertruhe stellen. Die Temperatur
muss mindestens −18 °C betragen. Achten Sie bitte darauf, die
Behälter vorher innen zu reinigen
und sie anschließend vollständig
zu trocknen.
2. Stellen Sie die Kühlbehälter aufrecht in das Tiefkühlfach. Durch
die jeweiligen Henkel der Kühlbehälter können Sie die Kühlbehälter komfortabel aus dem Kühlfach
nehmen, ohne dass Sie direkt mit
den eiskalten Behältern in Berüh-
zwischen 8 und 22 Stunden.
Durch Schütteln der Behälter
können Sie feststellen, ob die
gesamte Kühlflüssigkeit gefroren
ist.
4. Tipp: Wenn Sie die Eismaschine
nicht verwenden, lagern Sie
die Kühlbehälter z. B. in einem
Kunststoffbeutel im Gefriergerät,
so ist der Behälter immer einsatzbereit.
5. Wenn Sie mehrere Sorten Eis
nacheinander herstellen möchten, empfehlen wir die Anschaffung von weiteren Kühlbehältern.
Diese können Sie direkt bei uns
beziehen, das Bestellformular finden Sie auf Seite 111.
rung kommen.
3. Je nach Temperatur des Gefrier-
gerätes dauert der Gefriervorgang
EIS HERSTELLEN
Die gewünschten Zutaten sollten einige Stunden vor der Zubereitung bereits im
Kühlschrank vorgekühlt werden! Falls Sie Alkohol für das Rezept verwenden, geben Sie diesen bitte erst zum Eis, wenn es bereits die gewünschte Konsistenz
hat. Die maximale Füllmenge pro Kühlbehälter beträgt 200 ml.
Grundsätzlich können Sie auch nur jeweils einen Kühlbehälter mit Eismasse füllen und so nur eine Eissorte herstellen. Es müssen aber immer beide Kühlbehälter im Gerät platziert werden, um Schäden am Gerät zu vermeiden!
Tipp: Wenn Sie ein Rezept mit Alkohol verwenden, dosieren Sie den Alkohol
sparsam und fügen Sie ihn erst zum Ende der Gefrierzeit zu, da Alkohol die Gefrierzeit verlängert.
1. Achtung: Das Gerät muss vollständig zusammengebaut und
eingeschaltet sein, bevor Sie
die gewünschten Zutaten einfüllen. Geben Sie nie die erforderli-
chen Zutaten vorher in den Kühl-
behälter! Die Zutaten können am
Behälterrand festfrieren und das
gewünschte Eis-Ergebnis wird
nicht erreicht, zudem kann der
Mischer blockieren und den Motor
überhitzen. Die Zutaten werden
13
Page 14
immer erst dann durch den Ein-
Copyright UNOLD AG | www.unold.de
füllschacht eingefüllt, wenn das
Gerät eingeschaltet ist.
2. Bereiten Sie die Eismasse nach
den Rezepten im Rezeptteil zu.
Wenn es sich um Eismassen handelt, die vorher gekocht werden
müssen, stellen Sie diese am
Vortag her, damit die Masse gut
abkühlen kann.
3. Wir raten dazu, die Eismasse vor
der Verwendung grundsätzlich im
Kühlschrank zu kühlen.
4. Nehmen Sie die Kühlbehälter aus
dem Gefrierfach. Montieren Sie
das Gerät wie im Kapitel „Montieren“ beschrieben.
5. Stecken Sie den Netzstecker in
eine Steckdose und schalten Sie
das Gerät am EIN/AUS-Schalter
ein.
6. Öffnen Sie dann sofort die Öff-
nung am gewünschten Einfüll-
schacht und füllen Sie Eismasse
durch den Schacht in das Gerät.
7. Da sich während des Gefrierens
das Volumen erhöht, füllen Sie
den Behälter bitte nicht bis zum
Rand, sondern lassen Sie ca. 4
cm Platz.
8. Die maximale Füllmenge pro Kühl-
behälter beträgt 200 ml.
9. Wenn die Eismasse zu fest wird,
ändert sich ggf. die Drehrichtung
des jeweiligen Mischers, um Schäden am Motor zu vermeiden.
10. Lassen Sie die Eismaschine so
lange laufen, bis das Eis die
gewünschte Konsistenz hat. Je
nach Zutaten dauert dies 15 bis
25 Minuten. Prüfen Sie bitte von
Zeit zu Zeit den Gefriervorgang.
Wir raten jedoch dazu, das Gerät
nicht zu oft ein- und auszuschalten, da dabei Eiscreme am Behälterrand festfrieren kann und ggf.
der Mischer nicht mehr richtig
arbeitet.
11. Schalten Sie das Gerät bitte
immer aus, wenn der Mischer
stillsteht, um ein Überhitzen des
Motors zu vermeiden. Lassen Sie
dann das Gerät etwas abkühlen
und schalten Sie das Gerät wieder ein.
12. Schalten Sie das Gerät am EIN/
AUS-Schalter aus.
13. Nehmen Sie den Motor und den
Deckel ab, indem Sie den Entriegelungsschalter auf drehen
und den Deckel mit dem Motor
nach oben abheben.
14. Ziehen Sie die Mischer aus den
Kühlbehältern.
15. Nehmen Sie die Kühlbehälter von
der Gerätebasis ab.
16. Das Eis entnehmen Sie am besten mit einem Plastik- oder Holzspatel, um die Behälter nicht zu
zerkratzen.
17. Speiseeis sollte eine weiche Konsistenz haben. Wenn Sie jedoch
härteres Eis bevorzugen, stellen
Sie den Behälter zusätzlich in das
Gefrierfach/den Gefrierschrank.
18. Bewahren Sie das Eis im Behälter
jedoch nicht länger als 30 Minuten im Gefrierfach auf. Wenn Sie
das Eis nicht sofort essen möchten, füllen Sie es bitte in eine
geschlossene Gefrierdose um und
stellen diese dann in das Gefrierfach. Das Eis kann dabei durch
das Zusammenziehen der Eiskristalle Wasserschlieren bilden, da
die optimale Eistemperatur bei
14
Page 15
ca. −10°C liegt, die Temperatur in
Copyright UNOLD AG | www.unold.de
den Gefriergeräten jedoch meistens tiefer ist.
19. Falls das Eis noch nicht die
gewünschte Konsistenz erreicht
hat und Sie die Zubereitung wieder aufnehmen möchten, müssen Sie zunächst den Deckel vom
Motor lösen. Bauen Sie dann wie
im Kapitel „Montieren“ beschrieben alle Teile wieder zusammen.
So ist sichergestellt, dass die
Achsen der Mischer korrekt eingesetzt sind.
20. Achtung: Schalten Sie das Gerät
die Eismasse am Kühlbehälterrand festfrieren. Sollte der Motor
während der Zubereitung überhitzen, schaltet der Motor ab. Stellen Sie in diesem Fall den EIN/
AUS-Schalter auf „AUS“, ziehen
Sie den Netzstecker und lassen
Sie das Gerät abkühlen. Möchten Sie dann weiter Eis zubereiten, müssen Sie ggf. neue Eiszutaten verwenden. In diesem Fall
sollte das Eis mit einem Kunststoffspatel aus dem Kühlbehälter
entnommen werden, nicht durch
die Auslassöffnung!
jedoch während der Eiszubereitung nicht aus. Hierbei würde
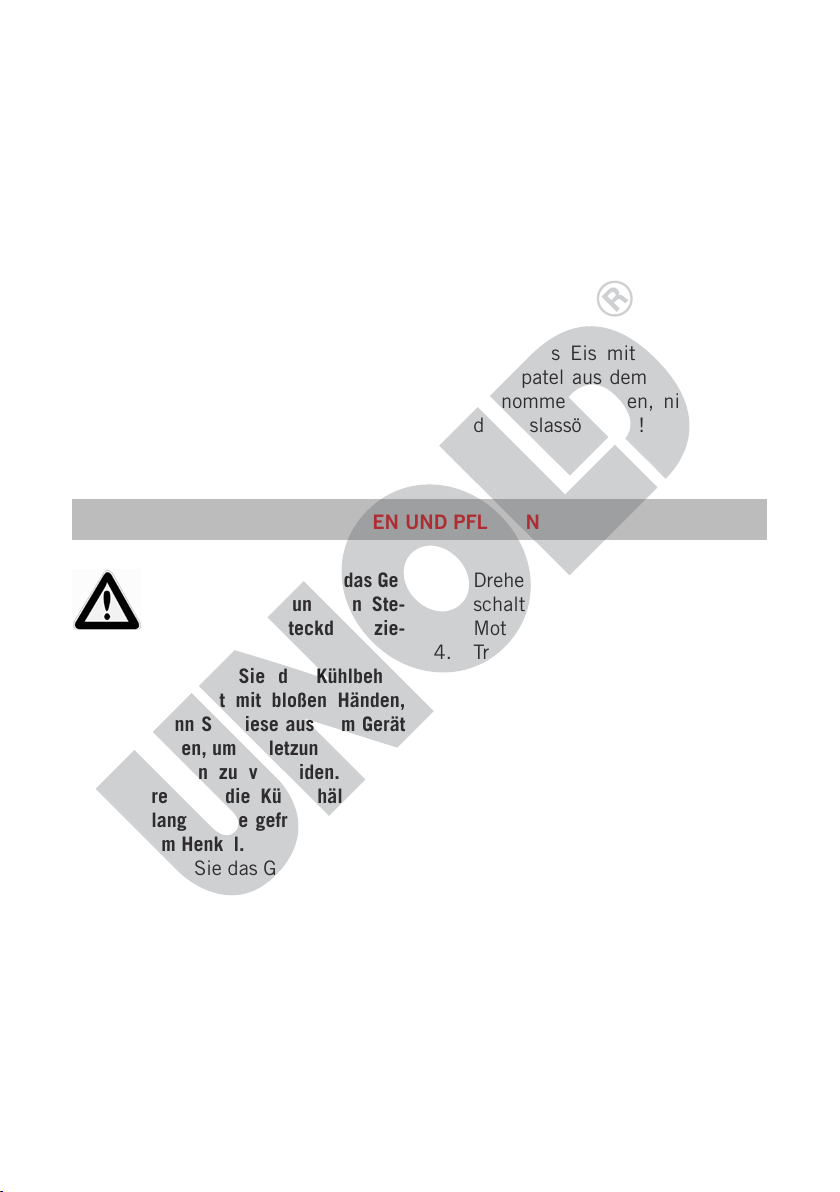
AUSEINANDERBAUEN, REINIGEN UND PFLEGEN
Vor dem Reinigen stets das Gerät ausschalten und den Ste-
cker aus der Steckdose zie-
hen.
Berühren Sie die Kühlbehälter nicht mit bloßen Händen,
wenn Sie diese aus dem Gerät
heben, um Verletzungen/Erfrierungen zu vermeiden. Berühren Sie die Kühlbehälter, solange diese gefroren sind, nur
am Henkel.
1. Reinigen Sie das Gerät, insbesondere den Motorblock, nicht unter
Wasser oder einer anderen Flüssigkeit. Verwenden Sie keine kratzenden oder scheuernden Reinigungsmittel.
2. Die entnehmbaren Teile können Sie mit warmem Wasser und
einem milden Spülmittel reinigen. Die Teile sind nicht spülmaschinengeeignet.
3. Drehen Sie den Entriegelungsschalter auf und heben Sie
Motor und Deckel vom Gerät ab.
4. Trennen Sie den Motor vom
Deckel. Hierfür müssen Sie die
beiden Verriegelungslaschen an
der Unterseite des Deckels nach
innen drücken, nur so lässt sich
der Motor abnehmen.
5. Ziehen Sie die Mischer-Achsen
aus den Motor.
6. Nehmen Sie die Mischer aus den
Kühlbehältern und heben Sie die
Kühlbehälter von der Gerätebasis
ab.
7. Wischen Sie den Motor mit einem
feuchten Tuch sauber und trocknen Sie ihn anschließend gut ab.
8. Reinigen Sie den Mischer mit
warmem Wasser und einem milden Spülmittel.
9. Lassen Sie den Kühlbehälter auf
Raumtemperatur aufwärmen,
15
Page 16

bevor Sie ihn reinigen, um Verlet-
Copyright UNOLD AG | www.unold.de
zungen bzw. Erfrierungen zu vermeiden.
10. Wischen Sie die innere Seite des
Kühlbehälters mit einem feuchten Tuch gut aus und trocken Sie
ihn anschließend gut ab.
11. Reinigen Sie Gehäuseteile gründlich mit warmem Wasser und
einem milden Spülmittel und trocken Sie diese anschließend gut
ab.
12. Vor dem nächsten Benutzen oder
dem Aufbewahren müssen alle
Teile vollständig trocken sein.
13. Bewahren Sie alle Teile an einem
trockenen, staubfreien und sauberen Ort auf. Tipp: Bewahren Sie
die Verpackung des Gerätes auf
und verstauen Sie den Eis-Maker
bei Nichtgebrauch in diesem Karton.
16
Page 17
FEHLER BEHEBEN
Copyright UNOLD AG | www.unold.de
Fehler Lösung
Geruchsbildung Tritt ggf. bei der ersten Benutzung des Gerätes auf.
Sofern der Geruch auch nach mehrmaliger Nutzung
weiterhin auftritt, nehmen Sie bitte Kontakt mit dem
Kundenservice auf.
Der Mischer dreht
sich nicht
Die Eismasse erreicht nicht die ge-
wünschte Konsistenz
Prüfen Sie, ob das Gerät an eine funktionierende
Steckdose gemäß Typenschild angeschlossen wurde
und eingeschaltet ist.
Falls die Eismasse zu fest geworden ist, hört der Mischer auf, sich zu drehen. Schalten Sie das Gerät aus.
Entfernen Sie Motor, Deckel und Mischer und lassen
Sie das Eis etwas antauen. Entnehmen Sie es z. B. mit
einem Kunststoffspatel.
Der Motor ist überhitzt und wurde durch den Überhitzungsschutz automatisch ausgeschaltet. Ziehen Sie
den Netzstecker und lassen Sie das Gerät abkühlen.
Entfernen Sie Motor, Deckel und Mischer und lassen
Sie das Eis etwas antauen. Entnehmen Sie es z. B. mit
einem Kunststoffspatel.
Wenn keine der genannten Ursachen zutrifft, nehmen
Sie bitte Kontakt mit unserem Kundenservice auf.
Prüfen Sie alle Rezeptzutaten, vermischen Sie diese
gut und achten Sie darauf, die Zutaten ausreichend
vorzukühlen.
Geben Sie Alkohol, den Sie ggf. verwenden, erst zu der
Eismasse, wenn diese schon die gewünschte Konsistenz erreicht hat. Wenn Sie den Alkohol zu früh zugeben, verhindert dieser das Festwerden der Masse.
17
Page 18

WICHTIGE TIPPS UND HINWEISE FÜR GUTES EIS
Copyright UNOLD AG | www.unold.de
Verwenden Sie nur vollreife Früchte. Obststücke und/oder ganze Beeren erst zum
Schluss zufügen. Wenn das Rezept die Zugabe von Eiern vorsieht, verwenden Sie
nur sehr frische Eier. Sie können Milch durch Sahne ersetzen oder Sahne durch
Milch ersetzen. Je mehr Sahne Sie verwenden, desto cremiger wird das Eis.
Sie können für alle Rezepte auch laktosefreie Milchprodukte verwenden. Die
benötigten Mengen entsprechen den aufgeführten Mengen. Selbstverständlich
können Sie auch z. B. Schlagcremes aus Soja oder Reis verwenden.
Zucker können Sie durch Honig, Sirup oder Süßstoff ersetzen. Bei Softeis ist
dies jedoch nicht möglich. Milch kann auch durch Sojamilch ersetzt werden. Die
Eiscreme schmeckt frisch zubereitet am besten. Möchten Sie die Eiscreme jedoch länger aufbewahren, geben Sie der Eismasse 30 g Eisbasis hinzu. Eisbasis
verhindert, dass sich die Wasserkristalle bei der Lagerung wieder zusammenziehen und das Eis splitterig wird. Sie erhalten Eisbasis bei
Hobbybäcker-Versand - Inge Pinzer
Am Mühlholz 6 – 89287 Bellenberg
Tel. 0 73 06/92 59 00 - Fax 0 73 06/92 59 05
Internet: www.hobbybaecker.de
Wenn Sie festeres Eis wünschen, stellen Sie die Eismasse für 15-30 Minuten in
das Gefrierfach, bevor Sie die Masse in die Eismaschine füllen. Gerade in der
heißen Jahreszeit sind die Temperaturen auch im Kühlschrank etwas höher, weil
z. B. die Kühlschranktür geöffnet wird und die Raumtemperatur höher ist. Eis
schmilzt nicht so schnell, wenn Sie der Eismasse vor dem Gefrieren ein Päckchen Fix-Gelatine (kaltlösliche Gelatine) zufügen. Die hier angegebenen Mengen sind Richtwerte, die je nach persönlichem Geschmack angepasst werden
können. Wir ermutigen Sie, auch einmal eigene Kreationen zu entwickeln. Im
Buchhandel und im Internet finden Sie darüber hinaus noch eine Fülle weiterer
Eis-Rezepte.
Die jeweilige Zubereitungszeit hängt von verschiedenen Faktoren wie z. B. der
Temperatur der Zutaten ab. Prüfen Sie regelmäßig die Konsistenz des Eises, um
den richtigen Entnahmezeitpunkt festzustellen.
Die hier vorgeschlagenen Rezepte sind für eine Füllung von beiden Kühlbehältern (jeweils zur Hälfte) vorgesehen.
18
Page 19
REZEPT-IDEEN FÜR KINDER
Copyright UNOLD AG | www.unold.de
Vanille-Eis
150 ml Milch, 150 g Sahne, 1/2 Vanilleschote, 1 Prise Salz, 1 Eigelb,
40 g Zucker, 25 g Kondensmilch.
Die Milch und 50 g Sahne in einen
Topf geben und erhitzen. Die Vanilleschote längs aufschlitzen, das Mark
mit einem Löffel herauskratzen und
zusammen mit der Schote und dem
Salz zur Sahnemilch geben. Das Ganze unter Rühren einmal aufkochen lassen, sofort von der Platte nehmen und
die Schote herausnehmen.
Das Eigelb mit dem Zucker cremig
schlagen, dann die heiße Sahnemilch
unter Rühren dazu laufen lassen. Die
Flüssigkeit zurück in den Topf gießen
und unter Rühren erhitzen, bis die
Masse leicht andickt. Die Kondensmilch einrühren, die Masse umfüllen
und etwa eine halbe Stunde abkühlen
lassen, dann für eine Stunde in den
Kühlschrank stellen.
Die restliche Sahne steif schlagen und
unter die gekühlte Puddingmasse zie-
hen. Die Mischung in die laufende Eismaschine geben und in 15 bis 30 Minuten gefrieren lassen.
Schokoladen-Eis
100 ml Milch, 1 Eigelb, 40 g Zucker,
1/2 P. Vanillinzucker, 50 g Vollmilchschokolade, 100 g Sahne, 1 TL Kakao
Die Milch in einem Topf erhitzen und
einmal aufwallen lassen. Inzwischen
das Eigelb mit dem Vanillinzucker zu
einer festen Schaummasse schlagen.
Dabei den Zucker nach und nach einrieseln lassen. Die heiße Milch unter
ständigem Rühren mit dem Schneebesen langsam in die Eischaummas-
se gießen. Die Eiermilch wieder in den
Milchtopf füllen und nochmals unter Rühren erhitzen, bis die Flüssigkeit leicht andickt. Das Ganze in eine
Rührschüssel umfüllen und etwa eine
halbe Stunde abkühlen lassen.
In der Zwischenzeit die Schokolade
mit drei Esslöffeln Sahne im Wasserbad unter Rühren schmelzen und sofort mit einem gehäuften Teelöffel Kakao unter die Eiermilch rühren, bis die
Schokolade ganz aufgelöst ist. Die Mischung eine halbe Stunde abkühlen
lassen, dann nochmals für etwa eine
Stunde in den Kühlschrank stellen.
Die restliche Sahne leicht anschlagen
und unter die Schokoladenmilch rühren. Das Ganze in die laufende Eismaschine geben und in etwa 30 Minuten
gefrieren lassen.
Joghurt-Eis
90 g Sahne, ca. 40 g Puderzucker, 175 g Joghurt in beliebiger Geschmacksrichtung (z. B. Frucht- oder
Nussjoghurt), 1 Ei
Die Sahne mit dem Puderzucker cremig schlagen. Den Joghurt mit dem Ei
verquirlen und die Sahne unterziehen.
Die Masse in die laufende Eismaschine geben und in etwa 25 Minuten gefrieren lassen.
Eis-Schokoküsse
4 Schokoküsse, 1-2 EL Puderzucker,
175 ml Milch
Die Schokoküsse vorsichtig zerlegen.
Dazu die Waffeln und den Schokoladenguss ablösen und beiseite stellen.
Den Zuckerschaum in eine Schüssel
geben. Den Zucker und die Milch zum
Zuckerschaum geben und alles zu ei-
19
Page 20
ner homogenen Creme verrühren. Die-
Copyright UNOLD AG | www.unold.de
se in die Eismaschine füllen und in
etwa 10 Minuten gefrieren. Nun den
Schokobruch zur Eismasse geben und
das Ganze in weiteren 10 bis 15 Minuten gefrieren lassen. Inzwischen die
Schokokuss-Waffeln auf einer Platte
auslegen. Nach Ablauf der Gefrierzeit
einen großen Eisportionierer (Größe
14) mit der Eismasse füllen und auf
REZEPT-IDEEN FÜR ERWACHSENE
jede Waffel eine Kugel setzen. Die EisSchokoküsse noch für einige Stunden
im Gefriergerät nachgefrieren lassen.
Tipp: Sie können die Eis-Schokoküsse
mit braunem oder weißem Schokoguss
überziehen und mit Schokoraspeln bestreuen.
Ananas-Kokos-Shake
1 Dose Ananasscheiben (ca. 125 g
Einwaage), 65 ml Kokosmilch, 2 Eiweiß, 25 g Puderzucker, 1 EL weißer
Rum, 1/2 Banane, 1/2 EL Zitronensaft, Belegkirschen, Holzspießchen,
125 ml Ananas-Saft, weitere 60 ml
Kokosmilch
3/4 der Ananasscheiben mit dem Ana-
nassirup aus der Dose und der Kokos-
milch (62 ml) pürieren. Die übrigen
Scheiben klein schneiden, dazugeben
und alles für eine halbe Stunde kühl
stellen. Die Eiweiße mit dem Puder-
zucker schlagen und unter das Fruchtpüree rühren. Das Ganze in der Eismaschine etwa 40 Minuten gefrieren
lassen. Nach 25 Minuten den Rum
hinzufügen. Die Hälfte der Banane in
Scheiben schneiden und mit Zitronensaft beträufeln. Die Scheiben und die
Kirschen auf Holzspießchen stecken.
Vier große Kugeln Eis in eine Rührschüssel geben. Den Rest in der Gefriertruhe aufbewahren. Den Ananassaft, die Kokosmilch und die restliche
Banane zu den Eiskugeln geben und
alles pürieren. Das Mixgetränk auf
Gläser verteilen und mit den Spießchen dekorieren.
Campari-Orangen-Sorbet
35 ml Campari, 200 ml Orangensaft,
75 g Puderzucker, 1 Eiweiß
Den Campari mit 180 ml Orangensaft
und 30 g Puderzucker in einen hohen
Rührbecher geben und so lange rühren, bis sich der Zucker aufgelöst hat.
Das Ganze für zwei Stunden in den
Kühlschrank stellen.
Nach Ablauf der Kühlzeit das Eiweiß
mit dem restlichen Puderzucker und
dem übrigen Orangensaft schaumig
schlagen. Diese Eiweißmasse mit der
Orangen-Campari-Mischung verrühren. Die Eismischung in die laufende
Eismaschine geben und in 30 bis 40
Minuten gefrieren lassen.
Tipp: Das Campari-Orangen-Sorbet ist
aufgrund seines Alkoholgehaltes recht
weich, sodass Sie es direkt aus dem
Gefriergerät portionieren können.
Sehr gut schmeckt dieses Sorbet,
wenn Sie es mit einem Spritzbeutel in
hohe Gläser geben und mit frisch gepresstem Orangensaft auffüllen.
20
Page 21

SERVICE-ADRESSEN
Copyright UNOLD AG | www.unold.de
DEUTSCHLAND
Kundendienst
Telefon +49 (0) 62 05/94 18-27
Mannheimer Straße 4
68766 Hockenheim
Sie möchten innerhalb der Garantiezeit ein Gerät zur Reparatur einsenden? Auf unserer
Internetseite www.unold.de/ruecksendung können Sie sich einen Rücksendeschein ausdrucken,
um damit das Paket kostenlos bei der Post abzugeben (nur für Einsendungen aus Deutschland
und Österreich).
ÖSTERREICH SCHWEIZ
Telefax +49 (0) 62 05/94 18-22
E-Mail service@unold.de
Internet www.unold.de
Reparaturabwicklung, Ersatzteile:
ESC Electronic Service Center GmbH
Molitorgasse 15
A-1110 Wien
Telefon +43 (0) 1/9 71 70 59
Telefax +43 (0) 1/9 71 70 59
E-Mail office@esc-service.at
MENAGROS SA
Route der Servion
CH - 1083 Mezières
Telefon +41 (0) 21 9 03 01-15
Telefax +41 (0) 21 9 03 01-11
E-Mail info@menagros.ch
Internet www.menagros.ch
POLEN TSCHECHIEN
„Quadra-net“ Sp. z o.o.
Skadowa 5
61-888 Poznan Skadowa 5
Internet www.quadra-net.pl
befree.cz s.r.o.
Škroupova 150
537 01 Chrudim
Telefon +42 0 46 46 01 881
E-Mail obchod@befree.cz
21
Page 22
GARANTIEBESTIMMUNGEN
Copyright UNOLD AG | www.unold.de
Wir gewähren auf unsere Geräte eine Garantie von 24 Monaten, bei gewerblichem Gebrauch 12 Monate, ab dem Kaufdatum für Schäden, die bei bestimmungsgemäßem Gebrauch nachweislich auf Werksfehler zurückzuführen sind. Innerhalb
der Garantiezeit beheben wir Material- und Herstellungsfehler nach unserem Ermessen durch Reparatur oder Umtausch.
Unsere Garantieleistungen gelten ausschließlich für in Deutschland und Österreich verkaufte Geräte. Bei anderen Ländern
wenden Sie sich bitte an den zuständigen Importeur. Geräte, für die eine Mängelbeseitigung beansprucht wird, senden Sie
bitte zusammen mit einer Kopie des maschinell erstellten Kauf belegs, aus dem das Kaufdatum ersichtlich sein muss, sowie
einer Fehlerbeschreibung gut verpackt und freigemacht an unseren Kundendienst. Im Garantiefall werden dem Kunden in
Deutschland und Österreich entstandene Versandkosten zurückerstattet. Von der Garantie ausgeschlossen sind Schäden
durch Verschleiß, unsachgemäße Handhabung und Nichteinhaltung der Wartungs- und Pflegeanweisungen. Der Garantieanspruch erlischt, wenn Reparaturen oder Eingriffe am Gerät von dritter Stelle vorgenommen werden. Eventuelle Ansprüche des
Endverbrauchers gegenüber dem Verkäufer oder Händler werden durch diese Garantie nicht eingeschränkt.
ENTSORGUNG / UMWELTSCHUTZ
Unsere Geräte werden auf hohem Qualitätsniveau für eine lange Nutzungsdauer her ge stellt. Regelmäßige
Wartung und fachge rechte Reparaturen durch unseren Kunden dienst können die Nutzungsdauer des Gerätes verlängern. Wenn ein Gerät defekt und nicht mehr zu reparieren ist, beachten Sie bitte: Dieses Produkt
darf nicht zusammen mit dem normalen Hausmüll entsorgt werden. Sie müssen dieses Produkt an einer
ausgewiesenen Sammelstelle zum Recycling von elektrischen oder elektronischen Geräten ab liefern. Durch
das separate Sammeln und Recyceln von Abfallprodukten helfen Sie mit, die natürlichen Ressourcen zu
schonen und stellen sicher, dass das Produkt in gesundheits- und umweltverträglicher Weise entsorgt wird.
INFORMATIONEN FÜR DEN FACHHANDEL
Hiermit erklärt die UNOLD AG, dass sich die Eismaschine 48850 in Übereinstimmung mit den
grundlegenden Anforderungen der europäischen Richtlinie für elektromagnetische Verträglichkeit
(2004/108/EG) und der Niederspannungsrichtlinie (2006/95/EC) bendet.
Die Übereinstimmung mit den Regularien bezieht sich auf den Tag der Erstellung dieser Erklärung.
Hockenheim, 7.10.2014
UNOLD AG, Mannheimer Straße 4, 68766 Hockenheim
Die Rezepte in dieser Bedienungsanleitung wurden von den Autoren und von der UNOLD AG
sorgfältig erwogen und geprüft, dennoch kann keine Garantie übernommen werden. Eine Haftung der
Autoren bzw. der UNOLD AG und ihrer Beauftragten für Personen-, Sach- und Vermögensschäden
ist ausgeschlossen.
Diese Anleitung kann im Internet unter www.unold.de als pdf-Datei heruntergeladen werden.
22
Page 23
INSTRUCTIONS FOR USE MODEL 48850
Copyright UNOLD AG | www.unold.de
TECHNICAL SPECIFICATIONS
Power: 18 W, 220–240 V~, 50 Hz
Capacity: Approx. 500 ml ice cream per container
Max. capacity: Max. 200 ml of ingredients per container
Size: Approx. 35.1 x 15.3 x 22.3 in (L/W/H)
Weight: Approx. 2.5 kg
Power cord: Approx. 120 cm
Preparation time: Approx. 15–25 minutes
Protection class: II
Features: Ice cream maker for 2 x 0.5 litres of ice cream with
Equipment features, technology, colours and design are subject to change without
notice.
EXPLANATION OF SYMBOLS
freezer pack (pre-cooling time approx. 8-12 hours), ice
cream preparation in approx. 15–25 minutes (without
pre-cooling time), ON/OFF switch, two filling shafts
for adding the ingredients, two removable cooling
containers suitable for *** freezer compartment
This symbol denotes a possible hazard which could cause injury or
damage to the appliance.
FOR YOUR SAFETY
Please read the following instructions and keep them on hand for
later reference.
Instructions for persons in the
household
The appliance can be used
1.
by children 8 years and older
and by persons with limited
physical, sensory or mental
abilities or with lack of experience or limited knowledge,
if they are supervised by a
person who is responsible for
their safety or if they
been instructed with regard
to safe use of the appli
ance and have understood
the dangers that can result
from use of the appliance.
The appliance is not a toy.
Children should only clean
and maintain the appliance
under supervision.
2.
Children under the age of 3
should stay away from the
have
-
23
Page 24

appliance or they must be
Copyright UNOLD AG | www.unold.de
under constant supervision.
3. Children between the ages
of 3 and 8 should only
switch the appliance on and
off when it is in its normal
intended operating position, if they are supervised
or have been instructed relative to safe use of the appliance and have understood
the hazards that can result
from using the appliance.
Children between 3 and 8
years of age should neither
connect or operate the appliance, nor should they clean
or maintain the appliance.
Children should be super-
4.
vised to ensure that they do
not play with the appliance.
Instructions concerning health
Consume thawed ice cream
5.
immediately, do not refreeze
it.
6. Only consume the ice cream
as long as it is still fresh.
Immediately freeze any
remaining ice cream and
consume it within one week.
7. Use only fresh ingredients.
8. When using eggs, particularly ensure that they are as
fresh as possible
to avoid the
formation of germs. Do not
re-freeze left-over ice cream
that contains eggs.
9. Ice cream that has been produced with raw egg or partially heated eggs should not
be eaten by small children,
pregnant women, the elderly
or by persons who are chro
-
nically ill or acutely ill.
Clean the appliance immedi-
10.
ately, when you have finished
preparing the ice cream. If
you do not germs can form.
If cooling fluid escapes from
11.
one of the cooling containers, the cooling container
must be replaced.
Electrical safety
Connect appliance only to
12.
an AC power supply with
voltage as specified on the
rating plate.
13. This appliance must not be
operated with an external
timer or a remote control
system.
14. After use, before cleaning or
if there are any faults during
operation, always unplug the
mains plug.
15. Never immerse the appliance
in water or other liquids, protect the power cord from
moisture.
Carefully and comple-
16.
tely unwind the power cord
before use.
Do not wrap the power cord
17.
around the appliance and
avoid kinking of the power
cord to prevent damage.
18. Only use the appliance
indoors.
19. To unplug the appliance,
only pull on the mains plug,
never pull directly on the
power cord.
20. To prevent damage to the
power cord never carry the
24
Page 25
appliance via the power cord
Copyright UNOLD AG | www.unold.de
or pull the power cord.
21. Unplug the appliance from
the electrical outlet before
you disassemble and clean
the appliance, remove or
attach component parts or
move the appliance to another location.
Check the plug and the power
22.
cord regularly for wear or
damage. In case of damage
to the power cord or other
parts, send the appliance
for inspection and repair to
our customer service department. Unauthorised repairs
can result in serious risks for
the user and void the war-
ranty.
Instructions for set-up and safe
use of the appliance
The appliance and the insert
23.
components are not dish-
washer safe.
24.
Place the appliance on a
free, level surface.
25. The appliance is intended
for household use only, or for
similar areas of use, such as,
kitchenettes in businesses,
offices or other workplaces,
agricultural enterprises,
for use by guests in hotels,
motels or other lodgings,
in private guest houses or
holiday homes.
26. For safety reasons, never
place or operate the appli
ance on or in the vicinity of
hot surfaces.
The cable must not hang
27.
down over the edge of the
work surface.
28. To avoid injury/freezing, do
not touch the inside of the
cooling container with bare
hands or other body parts
(particularly if hands or other
body parts are wet).
29. The maximum fill quantity
should not be exceeded. The
cooling container should not
be filled more than 4 cm
under the upper edge, since
ice cream expands during
the freezing process.
30. The appliance must be com
pletely assembled and switched on before you add the
desired ingredients. Never
put the required ingredients into the cooling container beforehand, because
the ingredients can firmly
freeze onto the edge
of the
container. This can prevent
the desired result from being
achieved.
31. Do not move the appliance
when it is in operation.
32. Never leave the appliance
unattended when it is in
operation.
33. Never use the appliance wit
-
hout cooling containers!
34.
Do not hold objects in the
running appliance during
operation, and do not reach
into the appliance with your
hand. Danger of injury!
35. Use the appliance only after
it has been properly assembled.
Never operate the appliance
36.
with accessories of other
appliances.
25
Page 26
37. Do not use any pointed or
Copyright UNOLD AG | www.unold.de
sharp objects in the cooling
container, pointed or sharp
objects could scratch the
cooling container. If necessary, use a plastic or wooden
scraper.
Switch off the appliance
38.
when you have concluded
preparing the ice cream, if
you want to clean the appliance, of if must rectify an
appliance fault.
39.
CAUTION: Only fill container
with food products.
and unplug the mains plug,
Never place hand in machine when in operation – risk of injury!
Do not touch the inside of the cooling container with bare hands.
Caution: To avoid injury/freezing, never touch the cooling con-
tainer with wet fingers or hands.
Caution: To avoid injury/freezing, never touch the cooling contai-
ner with wet fingers or hands.
The manufacturer will not be liable in the event of incorrect assembly, improper or incorrect use or if
repairs are carried out by unauthorized third parties.
BEFORE USING THE APPLIANCE THE FIRST TIME
1. Remove all packaging materi-
als and any transport safeguards.
Keep packaging materials away
from children - danger of suffoca-
tion!
2. Check whether all parts are present. If parts are missing or dama-
ASSEMBLY
The lid can only be put on or taken off
when the unlock switch is placed on
1. Ensure that the appliance base is
standing on a level surface.
2. Place both cooling containers
on the appliance base. In this
regard, the handles of the containers must point to the outside,
otherwise the appliance cannot
be assembled correctly.
26
ged, contact your dealer or our
customer service department.
3. Clean all parts with a damp
cloth, as described in the chapter
„Cleaning and care“.
Page 27
3. Place a mixer in each of the coo-
Copyright UNOLD AG | www.unold.de
ling containers. For easier installation, appropriate recesses are
attached in the cooling containers, into which the mixers are
inserted. The axles of the mixers
must point upward.
4. Fasten the lid on the appliance
and ensure that the lid locks in
place. Caution: The axles of the
mixers must each be guided
through the opening on the lid.
5. Lock the lid by placing the unlock
switch on .
6. Now connect both mixer axles
with the star-shaped receptac-
les on the motor intended for this
purpose.
7. The motor must now be placed on
the lid so that the power cord is
on the rear of the appliance.
BEFORE PREPARING ICE CREAM
1. Before you can make ice cream,
you must place the cooling container filled with a cooling fluid
in the *** freezer compartment
or freezer for approx. 8 hours.
The temperature must be at least
−18°C. Ensure that you clean the
inside of the containers and then
completely dry them beforehand.
2. Place the cooling containers
upright in the freezer compartment. With the handles you can
conveniently take the cooling containers out of the freezer compartment, without coming into direct
contact with the ice-cold container.
3. The freezing process takes between 8 and 22 hours depending
on the temperature of the freezing
device. By shaking the containers
you can determine whether the
entire cooling liquid is frozen.
4. Tip: When you are not using the
ice cream machine, store the
cooling containers, in a plastic
bag, for example, in the freezing
device, thus the containers are
always ready for use.
27
Page 28

5. If you want to make several types
Copyright UNOLD AG | www.unold.de
of ice cream in succession, we
recommend that you purchase
can order them directly from us,
an order form is provided on page
111.
additional cooling containers. You
MAKING ICE CREAM
The desired ingredients should have already been pre-cooled for several hours
prior to preparation! If you are using alcohol for the recipe, please only add it to
the ice cream when the ice cream has the desired consistency. The maximum fill
quantity per container is 200 ml.
Basically you can only fill a cooling container with ice cream mixture, and thus
you can only make one type of ice cream. However, both cooling containers must
always be placed in the appliance to prevent appliance damage!
Tip: If you are using a recipe with alcohol, only use a little alcohol and only add
it at the end of the freezing time, because the alcohol extends the freezing time.
1. Caution: The appliance must be
completely assembled and swit-
ched on before you add the desired
ingredients. Never put the required
ingredients into the cooling contai-
ner beforehand! The ingredients
can freeze onto the edge of the
container and the desired soft ice
cream result will not be achieved.
Only fill the ingredients through
the filling shaft, when the appliance is switched on.
2. Prepare the ice cream mixture
as specified in the recipes in the
recipe section. If the ice cream
mixture must be cooked beforehand, do this a day in advance so
that the mixture has time to cool
thoroughly.
3. We recommend that you always
thoroughly cool the ice cream
mixture in the refrigerator before
use.
4. Take the cooling containers out of
the freezer compartment. Assem-
ble the appliance as described in
the section „Assembly“.
5. Plug mains plug into an electrical outlet and switch on the appliance via the ON/OFF switch.
6. Then immediately open the opening on the desired filling shaft
and pour the ice-cream mixture
into the appliance through the
shaft.
7. Because the volume increases
during the freezing process, do
not fill the container all the way
up to the edge, but rather leave
approximately 4 cm space.
8. The maximum fill quantity per coo-
ling container is 200 ml.
9. When the ice cream mixture is too
solid, if necessary the direction
of rotation of the respective mixer
changes to prevent motor damage.
10. Let the ice cream maker run
until the ice cream has the desired consistency. Depending on
the ingredients this takes 15 to
28
Page 29

25 minutes. Check the freezing
Copyright UNOLD AG | www.unold.de
process from time to time. However we recommend that you not
switch the appliance on or off too
frequently, because through so
doing the ice cream can firmly
freeze onto the edge of the container and it is possible that the
mixer will no longer work correctly.
11. Always switch the appliance off
when the mixer is at a standstill
to prevent the motor from overheating. Then allow the appliance to
cool down slightly and switch the
appliance on again.
12. Switch off the appliance via the
ON/OFF switch.
13. Take off the motor and the lid by
turning the unlock switch to
and lifting the lid with the motor
upward and off.
14. Pull the mixers out of the cooling
containers.
15. Take the cooling containers off of
the appliance base.
16. It is best to remove the ice cream
with a plastic or wooden spatula,
so as not to scratch the containers.
17. Ice cream should have a soft consistency. However, if you prefer
harder ice cream, then additionally place the container in the
freezer compartment/freezer.
18. However do not keep the ice
cream in the container in the freezer compartment for longer than
30 minutes. If you do not want
to eat the ice cream immediately, then put it in a freezer box
and then place this freezer box in
the freezer compartment. In this
regard, due to the contraction of
ice crystals the ice cream can
form water streaks because the
optimal ice cream temperature
is approx. −10°C, but the temperature in the freezing devices is
usually lower.
19. If the ice cream has not reached
the desired consistency, and you
want to again commence preparation, you must first take the lid off
of the motor. Then re-assemble all
parts, as described in the section,
„Assembly“. This ensures that
the axles of the mixers are inserted correctly.
20. Caution: However do not switch off
the appliance while it is making
ice cream. This would cause the
ice cream mixture to freeze to the
edge of the cooling container. If
the motor should overheat when
ice cream is being prepared, the
motor switches off. In this case,
place the ON/OFF switch on
„OFF“, unplug the power plug
and allow the appliance to cool.
If you want to continue preparing
ice cream, it may be necessary to
use new ice cream ingredients.
In this case the ice cream should
be removed from the cooling container with a plastic spatula, not
through the discharge opening!
29
Page 30
DISASSEMBLY, CLEANING AND CARE
Copyright UNOLD AG | www.unold.de
Before cleaning, always turn
off the appliance and unplug it
from the electrical outlet.
To avoid injury/freezing, do not
touch the cooling containers
with bare hands when you lift
them out of the appliance. As
long as the cooling containers
are frozen, only touch them on
the handles.
1. Do not clean the appliance, particularly the motor block, under
water or a different liquid. Do not
use harsh or abrasive cleaning
agents.
2. The removable parts can be clea-
ned with warm water and a mild
washing-up liquid. The parts are
not dishwasher-safe.
3. Turn the unlock switch to and
lift the motor and the lid off of the
appliance.
4. Disconnect the motor from the
lid. To do this, you must press
both locking tabs on the underside of the lid inward; this is the
only way to take off the motor.
5. Pull the mixer axles out of the
motor.
6. Take the mixers out of the cooling containers and lift the cooling containers off of the appliance base.
7. Clean off the motor with a damp
cloth, and then dry the motor thoroughly.
8. Clean the mixer with warm water
and a mild washing-up liquid.
9. To prevent injury or freezing, allow
the cooling container to warm up
to room temperature, before you
clean it.
10. Wipe off the inside of the cooling
container with a damp cloth and
then dry it thoroughly.
11. Thoroughly clean all parts with
warm water and a mild washingup liquid, then dry all parts thoroughly.
12. All parts must be completely dry
before next use or storage.
13. Store all parts in a dry, dust-free
and clean location. Tip: Keep the
appliance packaging and store
the ice cream machine in this box
when the ice cream machine is
not in use.
TROUBLESHOOTING
Problem Solution
Odour May occur with the first use of the appliance.
30
If the odour should continue to occur after the appliance is used several times, contact the customer service department.
Page 31

Problem Solution
Copyright UNOLD AG | www.unold.de
The mixer does not
turn
The ice cream mixture does not reach
the desired consistency
Check whether the appliance is connected to a functioning electrical outlet as specified on the rating plate, and is switched on.
If the ice cream mixture has become too solid, the mixer stops turning. Switch off the appliance. Remove
the motor, lid and mixer and let the ice cream thaw
slightly. Remove it, e.g. with a plastic spatula.
The motor is overheated and has been switched off automatically by the overheating protection circuit. Unplug the power plug and allow the appliance to cool.
Remove the motor, lid and mixer and let the ice cream
thaw slightly. Remove it, e.g. with a plastic spatula.
If none of the causes cited apply, contact our customer service department.
Check all recipe ingredients, mix them thoroughly and
ensure that they are adequately pre-cooled.
If you are using alcohol, only add it to the ice cream
mixture when it has already reached the desired consistency. If you add the alcohol too soon, it prevents
the ice cream mixture from solidifying.
31
Page 32

IMPORTANT TIPS AND INSTRUCTIONS FOR GOOD ICE CREAM
Copyright UNOLD AG | www.unold.de
Use only fruit that is completely ripe. Only add pieces of fruit and/or entire berries at the end. If the recipe prescribes eggs, only use very fresh eggs. You can
replace milk with cream, or cream with milk. The more cream you use the creamier the ice cream will be.
You can also use lactose-free dairy products. The required quantities are the
same as the quantities specified for normal dairy products. Naturally you can
also use whipping creams made of soy or rice.
You can replace sugar with honey, syrup or sweetener. However this is not possible for soft ice cream. Milk can also be replaced with soy milk. The ice cream
tastes best right after it has been freshly prepared. However, if you want to store
ice cream longer add 30 grams stabiliser to the ice cream mixture. The stabiliser
prevents the ice crystals from contracting again in storage and it prevents the ice
cream from becoming grainy. You can get the stabiliser at
Hobbybäcker-Versand - Inge Pinzer
Am Mühlholz 6 – 89287 Bellenberg
Tel. 0 73 06/92 59 00 - Fax 0 73 06/92 59 05
Internet: www.hobbybaecker.de
If you want firmer ice cream, place the ice cream mixture in the freezer compartment for 15-30 minutes, before pouring the mixture into the ice cream maker. In the summer months, in particular, temperatures even in the refrigerator
can be slightly higher since, for example, the refrigerator door is opened and the
room temperature is higher. Ice cream does not melt so quickly if you add a package of cold-soluble gelatine) to the ice cream before freezing. The quantities
specified here are guide values that can be adapted based on personal taste. We
encourage you to also develop your own creations. You will find an abundance of
additional recipes in book stores and on the Internet.
The respective preparation time depends on various factors, such as the tempe-
rature of the ingredients. Regularly check the consistency of the ice cream to determine the right time to take the ice cream out of the appliance.
The suggested recipes are provided for a charge of two refrigerated containers
(each half).
32
Page 33

RECIPE IDEAS FOR CHILDREN
Copyright UNOLD AG | www.unold.de
Vanilla ice cream
150 ml milk, 150 g cream, 1/2 vanilla
pod, 1 pinch salt, 1 egg yolk, 40 g sugar, 25 g condensed milk.
Put the milk and 50 g cream in a pot
and heat. Slit the vanilla pod open
lengthwise, scrape out the seeds with
a spoon and together with the pod and
the salt, add to the cream/milk. Stirring constantly, bring the entire mixture to a boil, remove immediately
from the burner and take out the pod.
Whip the egg yolk together with the
sugar so that it is creamy, then under
constant stirring, add the hot cream/
milk. Pour the liquid back into the pot
and heat, stirring constantly, until the
ice cream mixture thickens slightly.
Stir in the condensed milk, put the ice
cream mixture in a different container
and let it cool, then put it in the refri-
gerator for one hour.
Whip the whipping cream until stiff
and fold it into the cooled pudding
mixture. Pour the mixture into the run-
ning ice cream machine and let it freeze in 15 to 30 minutes.
the sugar into the mixture slowly. Stirring the hot milk constantly with the
wire whisk, slowly pour it into the ice
cream foam mixture. Put the egg/milk
mixture back into the milk pan, and
again heat it up under constant stirring until the liquid thickens slightly.
Pour the entire mixture into a mixing
bowl and let it cool for half an hour.
In the meantime melt the chocolate
with three Tsp. in the water bath under
constant stirring and stir it into the egg
milk mixture with a heaping teaspoon
of cocoa until the chocolate is completely dissolved. Allow the mixture to
cool for half an hour, then again put it
in the refrigerator for approx. one hour.
Whip the remaining whipping cream
slightly and fold it into the chocolate/
milk mixture. Pour the entire mixture
into the running ice cream machine
and let it freeze approx. 30 minutes.
Chocolate ice cream
100 l milk, 1 egg yolks, 40 g sugar,
1/2 package vanilla sugar, 50 g milk
chocolate, 100 g cream , 1 tsp. cocoa
Heat the milk in a pan and let it boil
up once. In the meantime, beat the
egg yolk with the vanilla sugar into a
foam mixture. In this process drizzle
33
Page 34

RECIPE IDEAS FOR GROWN-UPS
Copyright UNOLD AG | www.unold.de
Pineapple-chocolate shake
1 can pineapple slices (approx. 125 g
net weight), 65 ml coconut milk, 2 egg
whites, 25 g powdered sugar, 1 Tsp.
white rum, 1/2 banana, 1/2 Tsp. lemon juice, glacé cherries, wooden skewers, 125 ml pineapple juice, an additional 60 ml coconut milk.
Puree 3/4 of the pineapple slices with
the pineapple syrup from the can and
the coconut milk (65 ml). Cut the remaining slices into small pieces, add,
and let everything cool for one half
hour.
Beat the egg whites and powdered sugar and fold it into the fruit puree. In
the ice cream machine let the entire
mixture freeze approx. 40 minutes. Af-
ter 25 minutes add the rum.
Cut half of the banana into slices and
drizzle with lemon juice. Put the slices
and cherries on wooden skewers.
Put 4 large scoops of ice cream in a
mixing bowl. Keep the rest in the free-
zer.
Add the pineapple juice, the coconut
milk, and the rest of the banana to the
scoops of ice cream and puree it all.
Distribute the mixed beverage in the
four glasses and decorate with the skewers.
Campari-orange sorbet
35 ml Campari, 200 ml orange juice,
75 g powdered sugar, 1 egg white
Pour the Campari with 380 ml orange
juice and 70 g powdered sugar into a
high mixing bowl and stir until the sugar is dissolved. Put the entire mixture
in the refrigerator for two hours.
After the cooling time has elapsed,
beat the egg white with the rest of the
powdered sugar and remaining orange juice until it is foamy. Stir the egg
white mixture together with the orange-Campari mixture.
Pour the ice cream mixture into the
running ice cream machine and let it
freeze in 30 to 40 minutes.
Tip: Due to its alcohol content, the
Campari-orange sorbet is quite soft,
so that you can portion it directly from
the freezing device.
This sorbet tastes very good when you
put it into tall glasses with an icing
bag, and top it off with fresh squeezed
orange juice.
34
Page 35

GUARANTEE CONDITIONS
Copyright UNOLD AG | www.unold.de
We grant a 24 months guarantee, and in case of commercial use a 12 months guarantee, starting from the date of purchase
for any damage demonstrably due to manufacturing defects and when the appliance has been used according to its intended
use. Within the warranty period we will remedy defective materials or workmanship through repair or replacement, at our
option. Our warranty terms apply only to appliances sold in Germany and Austria. For other countries, please contact the responsible importer. In the event of a claim for remedy of defects, please send the appliance to our after sales service, properly
packaged and postage paid, together with a copy of the automatically generated sales receipt, which must show the date of
purchase, and a description of the defect. If the defect is covered by the warranty, the customer will be reimbursed for the
shipping costs only in Germany and Austria. The warranty does not cover damage from normal wear, improper handling and
failure to comply with the maintenance and care instructions. The warranty is void if repairs or modifications are made to the
appliance by third parties. Any claims of the end consumer vis-à-vis the retailer are not limited by this warranty.
WASTE DISPOSAL / ENVIRONMENTAL PROTECTION
Our appliances are produced on a high quality level for a long lifetime. Regular maintenance and expert
repairs by our after-sales service can extend the useful life of the appliance. If an appliance is defective
and repair is not possible we ask you to follow the following instructions for disposal. Do not dispose this
appliance together with your standard household waste. Please bring this product to an approved collection
point for recycling of electric and electronic products. By separate collection and disposal of waste products
you help to protect natural resources and ensure, that the product is disposed in an adequate way to protect
health and environment.
The authors have thoroughly considered and tested the recipes included in these operating
instructions. Nevertheless, a guarantee cannot be accepted. The authors, respectively UNOLD AG
and their assignees shall not be liable for personal injuries, material damages and financial loss.
The instruction booklet is also available for download: www.unold.de
35
Page 36

NOTICE D´UTILISATION MODÈLE 48850
Copyright UNOLD AG | www.unold.de
SPÉCIFICATION TECHNIQUE
Puissance : 12 W, 220–240 V~, 50 Hz
Contenance : Env. 500 ml de glace par réservoir
Capacité max. : 200 ml max. d‘ingrédients par réservoir
Dimensions : Env. 35,1 x 15,3 x 22,3 cm (l/p/h)
Poids : Env. 2,5 kg
Cordon d’alimentation : Env. 120 cm
Temps de préparation : Env. 15 à 25 minutes
Classe de protection : II
Équipement : Machine à glace pour 2 x 0,5 litre, avec accu de
Accessoires : Mode d‘emploi avec recettes, 2 réservoirs réfrigé-
Modifications et erreurs des caractéristiques de l‘équipement, de la technique, des
couleurs et du design réservées.
refroidissement (durée de pré-réfrigération 8 à
12 heures env.), préparation de glace en 15 à 25
minutes env. (sans durée de pré-réfrigération),
interrupteur Marche / Arrêt, deux cheminées pour
l‘ajout des ingrédients, deux réservoirs réfrigérants
amovibles compatibles avec un tiroir de congélation
***.
rants, 2 mélangeurs
EXPLICATION DES SYMBOLES
Ce symbole vous indique des risques possibles qui puissent entraîner des lésions ou des
endommagements de l’appareil.
POUR VOTRE SÉCURITÉ
Veuillez lire les indications
suivantes et les conserver.
Personnes dans le foyer
1. L‘appareil peut être utilisé
par des enfants de plus de
8 ans et par des personnes dont les capacités physiques, sensorielles ou intellectuelles sont limitées ou
36
dont l‘expérience et/ou les
connaissances sont insuffisantes, si ceux-ci sont surveillés ou s‘ils ont été formés à une utilisation sûre
de l‘appareil et aux dangers
pouvant résulter de l‘usage
de l‘appareil. L‘appareil
n‘est
pas un jouet.
Le net-
Page 37

toyage et la maintenance de
Copyright UNOLD AG | www.unold.de
l‘appareil peuvent être exécutés par des clients, exclusivement sous surveillance.
Les enfants de moins de 3
2.
ans doivent se tenir loin de
l‘appareil ou être surveillés
en permanence.
3. Les enfants de 3 à 8 ans ne
doivent allumer et éteindre
l‘appareil que s‘il se trouve
dans sa position d‘utilisation
normale prévue, s‘ils sont
surveillés ou s‘ils ont été
informés concernant la sécu
rité d‘utilisation et qu‘ils ont
compris les risques potentiels en résultant. Les enfants
âgés de 3 à 8 ans ne doi-
vent ni brancher, ni utili-
ser, ni nettoyer ou entretenir
l‘appareil.
4.
Les enfants doivent être sur-
veillés afin de s’assurerqu’ils
ne jouent pas avec l’appareil.
Remarques concernant la santé
Consommer immédiatement
5.
la glace dégelée ou décongelée, et ne pas la recongeler.
Ne consommez la glace que
6.
si elle est encore fraîche.
Recongeler immédiatement
les restes éventuels et les
consommer dans un délai
d‘une semaine.
7. Utiliser uniquement des ingrédients frais.
Lors de l‘utilisation d‘œufs
8.
notamment, veiller à ce
qu‘ils soient aussi frais que
possibles afin d‘éviter la formation de germes. Ne pas
recongeler les restes de
glace qui contiennent des
œufs.
Les crèmes glacées élabo-
9.
rées à partir d‘œufs crus
ou seulement partiellement
cuits ne doivent pas être
consommées par des enfants
en bas âge, des femmes
enceintes, des personnes
âgées ou des personnes atteintes d‘affections aigües ou
chroniques.
Nettoyer l‘appareil immédi-
10.
atement après avoir terminé
-
la préparation de la glace.
Dans le cas contraire, des
germes peuvent se former.
Si du liquide frigorifique
11.
s‘écoule du réservoir réfrigérant, ce dernier doit être
remplacé.
Sécurité électrique
Raccorder exclusivement
12.
l’appareil au courant alternatif conformément à la plaque
signalétique.
Cet appareil ne doit pas être
13.
utilisé avec un minuteur
externe ou un système de
commande à distance.
14. Après utilisation, avant
le nettoyage ou en cas
d‘éventuels dysfonctionnements durant le fonctionnement, veuillez toujours
débrancher la prise.
Ne jamais immerger
15.
l‘appareil dans l‘eau ou un
autre fluide et protéger le
cordon d‘alimentation de
l‘humidité.
16. Dérouler intégralement le
cordon avant utilisation.
37
Page 38

17. N’enroulez jamais le câble
Copyright UNOLD AG | www.unold.de
autour de l’appareil et évitez
tout pli du cordon afin de ne
pas l’endommager.
18. Utiliser l‘appareil à l‘intérieur
uniquement.
19. Débrancher l‘appareil en
tirant sur la prise uniquement ; ne jamais tirer directement sur le câble.
Afin d‘éviter d‘endommager
20.
le cordon, ne jamais porter l‘appareil par son câble
d‘alimentation ou tirer sur le
câble.
Débrancher la prise avant
21.
de démonter et de nettoyer l‘appareil, de retirer ou
de monter des pièces déta-
chées, ou si l‘appareil doit
être installé à un autre endroit.
Vérifier régulièrement que
22.
la prise mâle et le cordon
d‘alimentation ne sont pas
usés ni abîmés. Si le câble
de raccordement ou d’autres
pièces sont abîmés, envoyer l’appareil pour contrôle
et réparation à notre service après-vente. Toute réparation irrégulière peut provoquer des dangers pour
l’utilisateur et entraîner
l’extinction de la garantie.
Remarques relatives à l‘installation
fonctionnement sécurisé de
et au
l‘appareil
23.
L‘appareil, ainsi que les
pièces détachées, ne sont
pas lavables en machine.
24. Poser l’appareil sur une surface plane et dégagée.
38
L‘appareil est exclusivement
25.
destiné à un usage ménager
ou à des fins similaires, par
ex.
une kitchenette dans des
boutiques, des bureaux ou
d‘autres lieux de travail,
des exploitations agricoles,
à l‘usage des clients dans
des hôtels, motels ou autres
lieux d‘hébergement,
dans des pensions privées ou
des résidences de vacances.
26. Pour des raisons de sécurité,
ne jamais placer ou utiliser
l‘appareil et le cordon sur
ou à proximité de surfaces
chaudes.
27. Le câble ne doit jamais
pendre par dessus le bord du
plan de travail.
28. Ne pas toucher la partie
intérieure du réservoir réfri
gérant à mains nues ou avec
d‘autres
(notamment
parties du corps
si celles-ci sont
mouillées) afin d‘éviter des
blessures / gelures.
29. La quantité de remplissage
maximale ne doit pas être
dépassée. Le réservoir réfrigérant doit être rempli
jusqu‘à 4 cm maximum sous
le bord supérieur car la glace
se dilate durant la congélation.
L‘appareil doit être totale-
30.
ment assemblé et être allumé
avant que vous n‘y placiez les ingrédients souhaités. Ne jamais introduire
les ingrédients nécessaires
à l‘avance dans le réservoir
Page 39

réfrigérant car ils pourraient
Copyright UNOLD AG | www.unold.de
geler sur le bord du réservoir.
Cela pourrait altérer la qualité du résultat obtenu.
Ne déplacez pas l‘appareil
31.
lorsqu‘il est en fonctionnement.
Ne laissez jamais l‘appareil
32.
sans surveillance lorsqu‘il
est en fonctionnement.
33. N‘utilisez jamais l‘appareil
sans réservoir réfrigérant !
34. Ne placez aucun objet dans
l‘appareil et n‘intervenez pas
avec les mains lorsqu‘il est
en fonctionnement. Risque
de blessures !
35. Utiliser l‘appareil unique
ment après un assemblage
correct.
Ne mettez jamais vos doigts ou un objet dans l’appareil en
fonctionnement - Risque de blessures !
Attention : ne jamais toucher le réservoir réfrigérant avec
des parties du corps humides, comme par ex. vos doigts, afin
d‘éviter des blessures / gelures.
N’ouvrez en aucun cas la coque de l’appareil. Risque
d‘électrocution.
36.
Ne jamais faire fonctionner
l‘appareil avec les accessoires d‘autres appareils.
Ne pas utiliser d‘objets poin-
37.
tus ou contondants dans le
réservoir réfrigérant, car cela
pourrait le rayer. En cas de
besoin, utilisez une
spatule
en plastique ou en bois.
38. Éteignez l‘appareil et
débranchez la prise lorsque
la préparation de la glace
est terminée, si vous voulez
nettoyer l‘appareil ou si vous
devez éliminer un dysfoncti
-
onnement sur l‘appareil.
39.
ATTENTION : ne remplir le
réservoir qu‘avec des aliments.
Le fabricant n’est nullement responsable en cas de montage non conforme, d‘utilisation irrégulière ou non
conforme ou suite à l’exécution de réparations par des tiers non autorisés.
AVANT LA PREMIÈRE UTILISATION
1. Retirer tous les matériaux
d‘emballage et, le cas échéant,
les sécurités de transport. Tenir
le matériel d‘emballage hors
de portée des enfants : risque
d‘asphyxie !
2. Vérifier si toutes les pièces sont
présentes. Si des pièces man-
quent ou sont endommagées,
veuillez vous adresser à votre distributeur ou à notre service aprèsvente.
3. Nettoyer toutes les pièces à
l’aide d’un chiffon humide,
comme décrit dans le chapitre
« Nettoyage et Entretien ».
39
Page 40

MONTAGE
Copyright UNOLD AG | www.unold.de
En principe, le couvercle ne peut être
positionné ou retiré que si l‘interrupteur
de déverrouillage est réglé sur
1. S‘assurer que le socle de l‘appareil
est stable sur une surface plane.
2. Placez les deux réservoirs réfrigérants sur le socle de l‘appareil.
Ce faisant, les anses des réservoirs doivent être tournées vers
l‘extérieur, sans quoi il sera
impossible de monter l‘appareil
correctement.
3. Placez un mélangeur dans cha-
cun des réservoirs réfrigérants.
Pour un montage plus facile, des
cavités correspondantes sont pla-
cées dans les réservoirs réfrigérants pour insérer les mélangeurs.
L‘axe des mélangeurs doit pointer
vers le haut.
doit être guidé à travers l‘orifice
dans le couvercle.
5. Verrouillez le couvercle en positionnant l‘interrupteur de déverrouillage sur .
6. Maintenant, reliez les deux axes
de mélangeurs aux logements en
forme d‘étoile prévus à cet effet
sur le moteur.
7. Le moteur doit maintenant être
positionné sur le couvercle de telle
sorte que le câble d‘alimentation
se trouve à l‘arrière de l‘appareil.
4. Fixez le couvercle sur l‘appareil
et veillez à ce qu‘il s‘enclenche.
Attention : l‘axe du mélangeur
40
Page 41

AVANT LA PRÉPARATION DE LA GLACE
Copyright UNOLD AG | www.unold.de
1. Avant de pouvoir fabriquer de la
glace, vous devez placer le réservoir réfrigérant rempli de liquide
frigorifique pendant au moins 8
heures dans le compartiment de
congélation *** ou le congélateur. La température doit être de
-18 °C au minimum. Veiller à nettoyer l‘intérieur du réservoir au
préalable et à le sécher ensuite
intégralement.
2. Positionnez le réservoir réfrigérant verticalement dans le tiroir
du congélateur. Grâce aux anses
sur le réservoir réfrigérant, vous
pouvez retirer aisément le réser-
voir réfrigérant du compartiment
de congélation sans devoir entrer
en contact direct avec le réservoir
gelé.
3. Selon la température du congé-
lateur, l‘opération de congélation
FABRIQUER DE LA GLACE
dure entre 8 et 22 heures. En
secouant le réservoir, vous pouvez
déterminer si l‘intégralité du fluide frigorifique est congelée.
4. Conseil : Lorsque vous n‘utilisez
pas la machine à glace, conservez
le réservoir réfrigérant, par exemple, dans un sachet en plastique
dans votre congélateur. Ainsi,
le réservoir est toujours prêt à
l‘emploi.
5. Si vous souhaitez fabriquer plusieurs variétés de glace les unes
après les autres, nous recommandons l‘achat d‘autres réservoirs réfrigérants. Vous pouvez les
acheter auprès de nous directement. Vous trouverez un formulaire de commande en page 111.
Les ingrédients souhaités doivent être pré-réfrigérés au réfrigérateur pendant
quelques heures avant la préparation ! Si vous utilisez de l‘alcool dans la recette, ne l‘ajoutez à la glace que lorsque celle-ci a déjà la consistance souhaitée. La
contenance maximale de chaque réservoir réfrigérant est de 200 ml.
En principe, vous ne pouvez remplir qu‘un seul réservoir réfrigérant de masse
de glace à la fois et donc fabriquer une seule variété de glace par opération. Cependant, les deux réservoirs réfrigérants doivent toujours être positionnés dans
l‘appareil afin d‘éviter toute détérioration de ce dernier !
Conseil : si vous préparez une recette contenant de l‘alcool, veuillez le doser avec
parcimonie et ne l‘ajouter qu‘à l‘issue de la durée de congélation, car l‘alcool
freine la congélation.
1. Attention : l‘appareil doit être totalement assemblé et être allumé
avant que vous n‘y placiez les
ingrédients souhaités. Ne placez
jamais les ingrédients nécessaires
au préalable dans le réservoir réfrigérant ! Les ingrédients peuvent
geler sur le bord du réservoir, ce
41
Page 42

qui empêche d‘atteindre la con-
Copyright UNOLD AG | www.unold.de
sistance de glace souhaitée. De
plus, cela pourrait entraîner un
blocage du mélangeur et une
surchauffe du moteur. Les ingrédients ne sont toujours introduits
par la cheminée que si l‘appareil
est allumé.
2. Préparez la masse de glace en respectant les recettes fournies dans
la section Recettes. S‘il s‘agit de
masses de glace qui doivent être
cuites au préalable, procédez à
cette opération la veille afin que
la masse puisse refroidir correctement.
3. Nous vous conseillons en principe
de laisser la masse de glace refroidir au réfrigérateur avant utili-
sation.
4. Retirez le réservoir réfrigérant du
compartiment de congélation.
Montez l‘appareil comme décrit
au chapitre « Montage ».
5. Branchez la fiche d‘alimentation
dans une prise de courant et
allumez l‘appareil à partir de
l‘interrupteur MARCHE / ARRÊT.
6. Ensuite, ouvrez immédiatement
l‘orifice sur la cheminée de remplissage souhaitée et remplissez
l‘appareil avec la masse de glace
par le biais de la cheminée.
7. Le volume étant amené à augmenter durant la congélation,
veuillez ne pas remplir le réservoir
jusqu‘au bord, mais conservez un
espace de 4 cm env.
8. La contenance maximale de chaque
réservoir réfrigérant est de 200 ml.
9. Si la masse de glace devient trop
ferme, le sens de rotation du mélangeur concerné peut éventuellement
changer afin d‘éviter une détérioration du moteur.
10. Laissez la machine à glace tourner
jusqu‘à ce que la glace ait la consistance souhaitée. Selon les ingrédients, cela dure 15 à 25 minutes. Veuillez contrôler de temps
en temps le processus de congélation. Nous conseillons toutefois de ne pas allumer et éteindre
trop souvent l‘appareil à cet effet,
car la crème glacée pourrait geler
sur le bord du réservoir et, le cas
échéant, le mélangeur pourrait ne
plus fonctionner correctement.
11. Veuillez toujours éteindre
l‘appareil lorsque le mélangeur
est immobile afin d‘éviter une
surchauffe du moteur. Ensuite,
laissez l‘appareil refroidir légèrement et rallumez l‘appareil.
12. Arrêtez l‘appareil avec le bouton
MARCHE/ARRÊT.
13. Retirez le moteur et le couvercle
en tournant le bouton de déverrouillage sur et en levant le
couvercle avec le moteur vers le
haut.
14. Retirez les mélangeurs des réservoirs réfrigérants.
15. Retirez le réservoir réfrigérant du
socle de l‘appareil.
16. Idéalement, éliminez la glace
avec une spatule en plastique ou
en bois afin de ne pas rayer le
réservoir.
17. La glace alimentaire doit avoir
une consistance molle. Cependant, si vous préférez une glace
plus dure, laissez le réservoir plus
longtemps dans le compartiment
de congélation / le congélateur.
42
Page 43

18. Toutefois, vous ne devez pas lais-
Copyright UNOLD AG | www.unold.de
ser la glace dans le réservoir plus
de 30 minutes dans le compartiment de congélation. Si vous ne
souhaitez pas manger immédiatement la glace, veuillez la transvaser dans une boîte de congélation
fermée et la placer au congélateur.
Dans ce cas, la glace peut former
des vagues du fait de la concentration des cristaux de glace. En
effet, la température optimale de
la glace se situe autour de -10 °C,
mais la température des congélateurs est souvent plus basse.
19. Si la glace n‘a pas encore atteint
la consistance souhaitée et que
vous voulez poursuivre la préparation, vous devez tout d‘abord reti-
rer le couvercle du moteur. Ensu-
ite, remontez toutes les pièces
DÉMONTAGE, NETTOYAGE ET ENTRETIEN
comme décrit au chapitre « Montage ». Cela permet de s‘assurer
que les axes des mélangeurs sont
correctement installés.
20. Attention : n‘éteignez pas l‘appareil
durant la préparation de glace.
La masse de glace gèlerait sur le
bord du réservoir réfrigérant. Si le
moteur surchauffe durant la préparation, le moteur s‘arrête. Dans ce
cas, placer l‘interrupteur Marche
/ Arrêt sur « Arrêt », débrancher
la prise et laisser l‘appareil refroidir. Si vous souhaitez continuer à
préparer de la glace, vous devez,
le cas échéant, utiliser de nouveaux ingrédients. Dans ce cas,
la glace doit être retirée du réservoir réfrigérant avec une spatule
en plastique et non être éliminée
via l‘orifice d‘évacuation !
Avant le nettoyage, éteindre
systématiquement l’appareil et
débrancher la prise.
Ne touchez pas les réservoirs réfrigérants à mains
nues lorsque vous les sortez de l‘appareil afin d‘éviter
des blessures / gelures. Ne
touchez les réservoirs réfrigérants qu‘au niveau des anses
tant qu‘ils sont gelés.
1. Ne pas nettoyer l‘appareil, et
notamment le bloc moteur, sous
l‘eau ou tout autre liquide. Ne pas
utiliser d‘instruments qui grattent
ou frottent pour le nettoyage.
2. Les pièces amovibles peuvent
être nettoyées à l‘eau chaude
avec un produit à vaisselle doux.
Les pièces ne sont pas lavables
en machine.
3. Tournez le bouton de déverrouillage sur et soulevez le moteur
et le couvercle de l‘appareil.
4. Séparez le moteur du couvercle.
Pour cela, vous devez pousser les
deux languettes de verrouillage
situées sur le dessous du couvercle vers l‘intérieur. Il s‘agit de la
seule manière de retirer le moteur.
5. Retirez les axes des mélangeur du
moteur.
6. Retirez les mélangeurs des réservoirs réfrigérants et soulevez les
réservoirs réfrigérants du socle de
l‘appareil.
43
Page 44

7. Essuyez le moteur avec un chiffon
Copyright UNOLD AG | www.unold.de
humide et séchez-le ensuite soigneusement.
8. Nettoyez les mélangeurs à l‘eau
chaude avec un produit à vaisselle doux.
9. Laissez le réservoir réfrigérant
réchauffer à température ambiante avant de le nettoyer afin
d‘éviter des blessures ou des
gelures.
10. Essuyez soigneusement l‘intérieur
du réservoir réfrigérant avec un
11. Nettoyez toute les pièces du boîtier soigneusement à l‘eau chaude
avec un produit à vaisselle doux et
séchez-les ensuite correctement.
12. Avant la prochaine utilisation ou
le rangement, toutes les pièces
doivent être totalement sèches.
13. Ranger toutes les pièces dans
un endroit sec, propre et exempt
de poussière. Conseil : conserver
l‘emballage de l‘appareil et ranger
la machine à glaces dans ce carton en cas d‘inutilisation.
chiffon humide et séchez-le ensuite correctement.
DÉPANNAGE
Dysfonctionnement Solution
Odeur Survient éventuellement lors de la première utilisati-
on de l‘appareil.
Dans la mesure où l‘odeur apparaît encore après plusieurs utilisations, veuillez contacter le service aprèsvente.
Le mixeur ne tourne
pas.
44
Vérifier si l‘appareil est branché sur une prise qui fonctionne, conformément à la plaque signalétique, et s‘il
est allumé.
Si la masse de glace est devenue trop solide, le mixeur arrête de tourner. Éteindre l’appareil. Retirer le moteur, le couvercle et le mixeur et laisser la glace dégeler un peu. La retirer, par exemple, avec une spatule
en plastique.
Le moteur surchauffe et il s‘est éteint automatiquement grâce à la protection contre la surchauffe. Débrancher la prise et laisser l‘appareil refroidir. Retirer
le moteur, le couvercle et le mixeur et laisser la glace
dégeler un peu. La retirer, par exemple, avec une spatule en plastique.
Si aucune des causes mentionnées ne correspond à
votre problème, veuillez contacter notre service aprèsvente.
Page 45

Dysfonctionnement Solution
Copyright UNOLD AG | www.unold.de
La masse de glace
n‘atteint pas la consistance souhaitée
Vérifier tous les ingrédients de la recette, les mélanger soigneusement et veiller à les pré-réfrigérer suffisamment.
N‘ajouter l‘alcool, si vous en utilisez, à la masse de
glace que lorsque celle-ci a déjà atteint la consistance souhaitée. Si vous ajoutez l‘alcool trop tôt, cela
empêche le durcissement de la glace.
CONSEILS ET REMARQUES IMPORTANTS POUR RÉALISER UNE BONNE GLACE
Utilisez uniquement des fruits parfaitement mûrs. Ajouter des morceaux de fruits
et/ou des baies entières à la fin uniquement. Si la recette prévoit l‘utilisation
d‘œufs, utiliser uniquement des œufs ultra-frais. Vous pouvez remplacer le lait par
de la crème ou la crème par le lait. Plus vous utiliserez de crème, plus votre glace sera onctueuse.
Pour toutes les recettes, vous pouvez également utiliser des produits laitiers sans
lactose. Les quantités nécessaires sont identiques aux quantités indiquées. Naturellement, vous pouvez également utiliser, par exemple, de la crème fouettée
à base de soja ou de riz.
Vous pouvez remplacer le sucre par du miel, du sirop ou de l‘édulcorant. Cependant, cela n‘est pas possible dans le cas de glace italienne. Le lait peut également être remplacé par du lait de soja. La crème glacée est encore meilleure
lorsqu‘elle est consommée fraîche. Cependant, si vous souhaitez conserver la
crème glacée plus longtemps, veuillez ajouter 30 g de base glacée à la masse de
glace. La base de glace empêche une nouvelle concentration des cristaux d‘eau
au moment du stockage et donc une consistance friable de la glace. Vous pouvez
obtenir de la base glacée auprès de
Hobbybäcker-Versand - Inge Pinzer
Am Mühlholz 6 – 89287 Bellenberg (Allemagne)
Tél. 0049 + (0) 73 06/92 59 00 - Fax 0049 + (0) 73 06/92 59 05
Site internet : www.hobbybaecker.de
Si vous souhaitez obtenir une glace plus ferme, veuillez placer la masse de glace
pendant 15 à 30 minutes dans le compartiment de congélation avant de verser
la masse dans la machine à glace. Durant la saison chaude, les températures
sont également plus élevées dans un réfrigérateur car, par ex., la porte du réfrigérateur est ouverte et que la température ambiante est plus élevée. La glace
fondra moins rapidement si vous ajoutez un paquet de gélatine à fixer (gélatine
soluble à froid) avant la congélation. Les quantités indiquées ici sont des valeurs
indicatives qui peuvent être ajustées en fonction des goûts de chacun. Nous
vous encourageons également à élaborer vos propres créations. Dans le manuel
45
Page 46

et sur Internet, vous trouverez en outre une multitude d‘autres recettes de gla-
Copyright UNOLD AG | www.unold.de
ces. La durée de préparation dépend de différents facteurs, comme par ex. la
température des ingrédients. Vérifiez régulièrement la consistance de la glace
afin de déterminer le bon moment pour la sortir. Les recettes proposées sont prévus pour une charge de deux conteneurs réfrigérés (chaque demi).
IDÉES DE RECETTES POUR ENFANTS
Glace à la vanille
150 ml de lait, 150 g de crème, 1/2
gousse de vanille, 1 pincée de sel, 1
jaune d‘œuf, 40 g de sucre, 25 g de
lait concentré.
Verser le lait et 50 g de crème dans
une casserole et faire chauffer. Fendre
la gousse de vanille dans la longueur,
gratter la pulpe avec une cuillère et
l‘intégrer avec la gousse et le sel dans
le lait additionné de crème. Porter le
tout à ébullition en mélangeant, retirer
immédiatement de la plaque et enle-
ver la gousse.
Fouetter les jaune d‘œuf avec le su-
cre pour obtenir une texture crémeuse, puis ajouter la préparation chaude
à base de lait et de crème tout en mé-
langeant. Verser à nouveau la préparation liquide dans la casserole et faire
chauffer tout en remuant jusqu‘à ce
que l‘appareil épaississe légèrement.
Incorporer le lait concentré, transvaser
la préparation et laisser refroidir environ une demie heure, puis réserver au
réfrigérateur pendant une heure.
Fouetter la crème restante et
l‘incorporer à l‘appareil à pudding refroidi. Verser le mélange dans la machine à glace en fonctionnement et laisser geler pendant 15 à 30 minutes.
Glace au chocolat
100 ml de lait, 1 jaune d‘œuf, 40 g
de sucre, 1/2 pincée de sucre vanil-
46
lé, 50 g de chocolat au lait, 100 g de
crème, 1 cc de cacao
Faire chauffer le lait dans une casserole et porter à ébullition. Entre-temps,
fouetter le jaune d‘œuf avec le sucre
vanillé pour obtenir une masse mousseuse et ferme. Ce faisant, verser progressivement le sucre en pluie. Verser
lentement le lait chaud dans la masse à base d‘œufs, tout en remuant
en permanence avec le fouet. Verser
à nouveau le lait mélangé aux œufs
dans la casserole et faire chauffer une
nouvelle fois la préparation en mélangeant, jusqu‘à ce qu‘elle épaississe
légèrement. Transvaser le tout dans
un saladier et laisser refroidir pendant
une demie heure environ.
Pendant ce temps, faire fondre le
chocolat au bain-marie avec trois
cuillérées à soupe de crème tout en
mélangeant, et incorporer immédiatement une cuillère à café bombée de
cacao jusqu‘à ce que le chocolat soit
intégralement fondu. Laisser le mélange refroidir une demie heure, puis
placer à nouveau au réfrigérateur pendant environ une heure.
Fouetter légèrement la crème restante
et l‘incorporer au lait chocolaté. Verser
le tout dans la machine à glace en fonctionnement et laisser geler pendant
environ 30 minutes.
Page 47

IDÉES DE RECETTES POUR ADULTES
Copyright UNOLD AG | www.unold.de
Shake ananas-coco
1 boîte d‘ananas en rondelles (poids net env. 125 g ), 65 ml de lait de
coco, 2 blancs d‘œuf, 25 g de sucre en
poudre, 1 cs de rhum blanc, 1/2 banane, 1/2 cs de jus de citron, cerises
de décoration, pics en bois, 125 ml de
jus d‘ananas, 60 ml de lait de coco
supplémentaires
Écraser les 3/4 des rondelles d‘ananas
en purée avec le sirop sortant de la
boîte avec le lait de coco (65 ml). Découper les rondelles restantes en petits morceaux, les ajouter à la préparation et laisser refroidir pendant une
demie heure.
Fouetter les blancs d‘œuf avec le su-
cre en poudre et incorporer à la pu-
rée de fruits. Laisser le tout congeler
dans la machine à glace pendant en-
viron 40 minutes. Ajouter le rhum au
bout de 25 minutes.
Découper la moitié de la banane en
rondelles et les arroser du jus de ci-
tron. Enfiler les rondelles de banane et
les cerises sur des pics en bois.
Placer quatre grosses boules de glace
dans un saladier. Conserver le reste au
congélateur.
Verser le jus d‘ananas, le lait de coco
et le reste de la banane dans le saladier contenant les boules de glace et
écraser le tout en purée.
Répartir la boisson dans quatre verres
et décorer avec les pics.
Sorbet Campari-orange
35 ml de Campari, 200 ml de jus
d‘orange, 75 g de sucre en poudre, 1
blanc d‘œuf
Verser le Campari avec 180 ml de jus
d‘orange et 30 g de sucre en poudre
dans un bol haut et mélanger jusqu‘à
dissolution complète du sucre. Placer
le tout pendant deux heures au réfrigérateur.
Une fois le temps de réfrigération écoulé, fouetter le blanc d‘œuf en mousse avec le reste de sucre en poudre et
le jus d‘orange restant. Incorporer cet
appareil au mélange orange-Campari.
Verser le mélange à base d‘œufs dans
la machine à glace en fonctionnement
et laisser geler pendant 30 à 40 minutes.
Conseil : du fait de sa teneur en alcool, le sorbet Campari-orange est
assez mou, de telle sorte qu‘il peut
être divisé en portions dès sa sortie du
congélateur.
Ce sorbet est excellent versé dans
des verres hauts à l‘aide d‘une poche
à douille et arrosé de jus d‘orange
fraîchement pressé.
47
Page 48

CONDITIONS DE GARANTIE
Copyright UNOLD AG | www.unold.de
En cas d’utilisation conforme et lors de dégâts manifestement dus à des défauts de fabrication, nos appareils sont garantis
24 mois, lors d’utilisation professionnelles 12 mois, à dater de l’achat. Notre garantie n’est valide que pour les appareils
vendus en Allemagne et en Autriche. Dans tout autre pays veuillez contacter l’importateur. Veuillez envoyer à notre adresse
les appareils, pour lesquels vous réclamez une suppression de défauts, avec le bon d’achat montrant la date d’achat, port
payé et proprement emballé. Les coûts de transport seront remboursés en cas de garantie en Allemagne et en Autriche. Les
défauts causés par usure, utilisation incorrecte ou non-respect des instructions de maintenance sont exclus. Notre obligation
de garantie cesse, si de réparations ou des interventions sont accomplies par des tiers. Cette garantie n’affecte pas les droits
du consommateur contre le commerçant.
TRAITEMENT DES DÉCHETS / PROTECTION DE L’ENVIRONNEMENT
Nos appareils sont produits selon un standard élevé de qualité pour une longue durée d’utilisation. Un
entretien régulier et des réparations compétentes par notre service après-vente prolongent cette durée
d’utilisation. Si néanmoins l’appareil est endommagé et ne peut plus être réparé, veuillez suivre les in-
structions suivantes. Ne jamais disposer ce produit avec les dégâts de ménage. Apportez ce produit à une
station de collection pour récupération de produits électriques et électroniques. Par la collection séparée
vous aidez à protéger les ressources naturelles et prenez soin, que le produit est démonté sans risque pour
la santé et l’environnement.
Les recettes figurant dans la présente notice ont été soigneusement étudiées et testées par leurs
auteurs et par UNOLD AG, mais elles ne sont pas garanties. Toute responsabilité des auteurs ainsi
que d’UNOLD AG et ses représentants est exclue pour tous dommages corporels, matériels et
pécuniaires.
48
Page 49

GEBRUIKSAANWIJZING MODEL 48850
Copyright UNOLD AG | www.unold.de
TECHNISCHE GEGEVENS
Vermogen: 12 W, 220–240 V~, 50 Hz
Capaciteit: Ca. 500 ml ijs per bak
Max. vulvolume: Max. 200 ml ingrediënten per bak
Grootte: Ca. 35,1 x 15,3 x 22,3 cm (b/d/h).
Gewicht: Ca. 2,5 kg
Snoer: Ca. 120 cm
Toebereidingstijd: Ca. 15-25 minuten
Beschermklasse: II
Uitvoering: IJsmachine voor 2 x 0,5 liter ijs met koelaccu (voorkoeltijd
Toebehoren: Bedieningshandleiding met recepten, 2 koelbakken, 2
Wijzigingen en vergissingen in de uitrustingskenmerken, techniek, kleuren en design
voorbehouden.
VERKLARING VAN DE SYMBOLEN
ca. 8-12 uur), ijsbereiding in ca. 15–25 minuten (zonder
voorkoeltijd), AAN/UIT-schakelaar, twee vulschachten
voor toevoeging van de ingrediënten, twee uitneembare
koelbakken geschikt voor ***-vriesvak
mixers
Dit symbool wijst op eventuele gevaren die letsel tot gevolg kunnen hebben of tot schade
aan het apparaat leiden.
VOOR UW VEILIGHEID
Lees a.u.b. de volgende instructies en sla deze op.
Personen in het huishouden
Het apparaat kan door kin-
1.
deren worden gebruikt die 8
jaar zijn of door personen die
over gebrekkige fysieke, sensorische of geestelijke vaardigheden of gebrek aan ervaring en/of kennis
mits zij onder toezicht staan
of instructies hebben gekre-
beschikken,
gen aangaande het veilige
gebruik van dit apparaat en
de uit het gebruik van het
apparaat resulterende gevaren begrepen hebben.
apparaat is geen speelgoed.
Schoonmaak en onderhoud
het apparaat mogen
van
uitsluitend onder toezicht
worden uitgevoerd.
2.
Kinderen onder 3 jaar moe-
ten uit de buurt van het
Het
49
Page 50

apparaat blijven of voortdu-
Copyright UNOLD AG | www.unold.de
rend onder toezicht staan.
Kinderen tussen 3 en 8 jaar
3.
moeten het apparaat uitsluitend in- en uitschakelen
als het zich op zijn beoogde
normale bedieningspositie
bevindt, als zij onder toezicht staan of instructies
hebben gekregen aangaande
het veilige gebruik en de uit
het gebruik van het apparaat
resulterende gevaren begrepen hebben. Kinderen tussen 3 en 8 jaar moeten het
apparaat noch aansluiten,
noch bedienen, schoonmaken of onderhouden.
Kinderen moeten onder toe-
4.
zicht staan om te waarborgen
dat zij niet met het apparaat
spelen.
Aanwijzingen m.b.t. de gezond-
heid
5.
Ontdooid of ontdooiend ijs
onmiddellijk gebruiken en
niet opnieuw invriezen.
6. Consumeer het ijs uitsluitend zolang het nog vers is.
Eventuele resten onmiddellijk invriezen en binnen een
week consumeren.
Gebruik uitsluitend verse
7.
ingrediënten.
8. Let er vooral bij het gebruik
van eieren op dat deze zo
vers mogelijk zijn om kiemvorming te voorkomen. IJsresten die ei bevatten, niet
opnieuw invriezen.
Ijs dat gemaakt is van rauw
9.
ei of slechts deels verhit ei,
dient niet geconsumeerd te
50
worden door kleine kinderen,
zwangeren, oudere mensen
of chronisch c.q. acuut zieke
mensen.
10. Reinig het apparaat onmid
dellijk, als u de ijsbereiding
beëindigd hebt. Anders kunnen kiemen worden gevormd.
11.
Als er koelvloeistof uit één
van de bakken komt, moet
deze koelbak vervangen worden.
Elektrische veiligheid
Het apparaat uitsluitend op
12.
wisselstroom conform typeplaatje aansluiten.
Dit apparaat mag niet wor-
13.
den gebruikt met een externe
tijdschakelklok of afstandsbesturing.
Na gebruik, vóór de reiniging
14.
of bij eventuele storingen tijdens het bedrijf a.u.b. altijd
de netstekker uittrekken.
Apparaat nooit in water of
15.
een andere vloeistof dompelen, het snoer tegen vocht
beschermen.
Het snoer vóór gebruik volle-
16.
dig afwikkelen.
Draai het snoer niet om het
17.
apparaat en voorkom knikken in het snoer om schade
aan het snoer te voorkomen.
Het apparaat uitsluitend bin-
18.
nen gebruiken.
Trek het snoer uitsluitend
19.
aan de netstekker uit het
stopcontact, nooit aan het
snoer trekken.
20. Om schade aan het snoer te
voorkomen het apparaat en
voorkom knikken in het snoer
Page 51

nooit aan het snoer dragen of
Copyright UNOLD AG | www.unold.de
aan het snoer trekken.
21. Trek de stekker uit het
stopcontact voordat u het
apparaat demonteert en reinigt, losse onderdelen wegneemt of aanbrengt of als
het apparaat op een andere
plaats moet worden gezet.
Controleer de stekker en
22.
het snoer regelmatig op slijtage of beschadigingen. Bij
beschadiging van de aansluitkabel of van andere onderdelen stuurt u het apparaat
voor controle en reparatie
naar onze klantenservice.
Onvakkundige reparaties
kunnen leiden tot gevaren
voor de gebruiker en kun-
nen tot gevolg hebben dat de
garantie vervalt.
Aanwijzingen
om het apparaat vei-
lig op te stellen en te gebruiken
23.
Het apparaat en de losse
onderdelen zijn niet geschikt
voor de afwasmachine.
24. Zet het apparaat op een vrij,
egaal vlak.
25. Het apparaat is uitsluitend
bestemd voor huishoudelijk gebruik of soortgelijke
gebruiksdoelen, bv.
theekeukens in bedrijven,
kantoren of overige werklo-
caties,
agrarische bedrijven,
voor gebruik door gasten
in hotels, motels of overige
logiesbedrijven,
in particuliere pensions of
vakantiehuizen.
26. Apparaat en snoer om veilig
heidsredenen nooit op of in
de buurt van hete oppervlakken neerzetten of gebruiken.
De kabel mag niet over
27.
de rand van het werkvlak
omlaaghangen.
28. Raak de binnenkant van de
koelbak niet met blote handen of andere lichaamsdelen
(met name als deze nat zijn)
aan om letsel/bevriezing te
voorkomen.
Het maximale vulvolume
29.
mag niet worden overschreden. De koelbak dient tot
maximaal 4 cm onder de
bovenrand gevuld te zijn,
omdat het ijs door het vriesproces uitzet.
Het apparaat moet volledig
30.
gemonteerd en ingeschakeld zijn, voordat u het vult
met de gewenste ingrediënten. Doe de benodigde ingrediënten nooit van tevoren in
de koelbak, omdat de ingrediënten aan de rand van de
bak kunnen vastvriezen.
Hierdoor kan het gewenste
resultaat worden geschaad.
Beweeg het apparaat niet
31.
zolang het in bedrijf is.
32. Laat het apparaat niet zolang
het in bedrijf is nooit zonder
toezicht als het in bedrijf is.
33. Gebruik het apparaat nooit
zonder koelbakken!
34. Tijdens het gebruik geen
voorwerpen in het lopende
apparaat houden en geen
greep naar binnen doen met
51
Page 52

de hand. Er bestaat kans op
Copyright UNOLD AG | www.unold.de
verwondingen!
35. Gebruik het apparaat uitsluitend als het op de voorgeschreven wijze is geassembleerd.
Gebruik het apparaat nooit
36.
met accessoires van andere
apparaten.
37. Gebruik geen spitse of
scherpe voorwerpen in de
nodig schrapers van kunst
stof of hout.
38.
Schakel het apparaat uit en
trek de netstekker uit als de
ijsbereiding beëindigd is, als
u het apparaat wilt reinigen
of als u een storing bij het
apparaat moet verhelpen.
39. ATTENTIE: Uitsluitend
levensmiddelen in de bak
doen a.u.b.
koelbak; deze kan daardoor
krassen oplopen. Gebruik zo
Grijp nooit in het draaiende apparaat – risico op letsel!
Attentie: Raak de koelbak a.u.b. niet met natte lichaamsdelen
zoals bv. de vingers aan om letsel/bevriezing te voorkomen.
Open de behuizing van het apparaat in geen geval. Er bestaat
gevaar voor een elektrische schok.
De fabrikant is niet aansprakelijk, indien het apparaat verkeerd gemonteerd, ondeskundig of foutief
gebruikt of door niet geautoriseerde derden gerepareerd werd.
VÓÓR HET EERSTE GEBRUIK
-
1. Verwijder alle verpakkingsmateri-
alen en evtl. transportbeveiligingen Houd verpakkingsmateriaal
uit de buurt van kinderen - gevaar
voor verstikking!
2. Controleer of alle onderdelen aanwezig zijn. Als er onderdelen ont-
52
breken of beschadigd zijn, neem
dan a.u.b. contact op met uw dealer of met onze klantenservice.
3. Reinig alle onderdelen met een
vochtige doek, zoals beschreven
staat in het hoofdstuk „Reinigen
en onderhouden“.
Page 53

MONTEREN
Copyright UNOLD AG | www.unold.de
In beginsel kan het deksel uitsluitend
worden op- of weggenomen, als de ontgrendelingsschakelaar op gezet is.
1. Zorg ervoor dat de apparaatbasis
stabiel op een egaal vlak staat.
2. Plaats beide koelbakken op de
apparaatbasis. De handvatten
van de bakken moeten hierbij telkens naar buiten staan, omdat
het apparaat anders niet juist kan
worden gemonteerd.
3. Zet telkens één mixer in de koel-
bakken. In de koelbakken zijn ter
vereenvoudiging van de inbouw
navenante uitdiepingen aangebracht, waar de mixers ingestoken
worden. De as van de mixers moet
naar boven zitten.
opening van het deksel worden
gevoerd.
5. Vergrendel het deksel door de
ontgrendelingsschakelaar op te
zetten.
6. Verbind nu beide assen van de
mixers met de daarvoor voorziene
stervormige opnemingen bij de
motor.
7. De motor moet nu zodanig op
het deksel worden gezet dat het
snoer aan de achterkant van het
apparaat zit.
4. Bevestig het deksel op het
apparaat en let erop dat het deksel vastklikt. Attentie: De as van
de mixers moet telkens door de
53
Page 54

VÓÓR DE IJSBEREIDING
Copyright UNOLD AG | www.unold.de
1. Voordat u ijs kunt produceren,
moet u de met een koelvloeistof
gevulde koelbakken minimaal 8
uur lang in het ***-diepvriesvak
c.q. de vrieskist zetten. De tem-
peratuur moet minimaal −18 °C
bedragen. Let er a.u.b. op dat de
bakken van tevoren worden gereinigd en vervolgens volledig worden gedroogd.
2. Zet de koelbakken rechtop in het
diepvriesvak. Door de desbetreffende handvaten van de koelbakken kunt u de koelbakken comfortabel uit het koelvak pakken
vriesproces 8 tot 22 uur. Door aan
de bakken te schudden kunt u
vaststellen of de gehele koelvloeistof bevroren is.
4. Tip: Als u de ijsmachine niet
gebruikt, slaat u de koelbakken
bv. in een kunststofzak in het
vriesapparaat op; op deze wijze is
de bak altijd gereed voor gebruik.
5. Als u meerdere soorten ijs achter elkaar wilt produceren, adviseren wij u om meer koelbakken aan
te schaffen. U kunt deze rechtstreeks bij ons kopen; u vindt het
bestelformulier op pagina 111.
zonder dat u rechtstreeks in con-
tact komt met de ijskoude bak-
ken.
3. Afhankelijk van de temperatuur
van het vriesapparaat duurt het
IJS MAKEN
De gewenste ingrediënten moeten enkele uren vóór de bereiding al in de koelkast
worden voorgekoeld. Als u alcohol voor het recept gebruikt, voegt u deze pas aan
het ijs toe als dit al de gewenste consistentie bezit. Het maximale vulvolume per
koelbak bedraagt 200 ml.
In beginsel kunt u ook slechts telkens één koelbak met ijsmassa vullen en zo
slechts één ijssoort produceren. Om schade aan het apparaat te voorkomen moeten echter altijd beide koelbakken in het apparaat worden geplaatst.
Tip: Als u een recept met alcohol gebruikt, doseert u de alcohol spaarzaam en
voegt u deze pas toe op het einde van de vriestijd, omdat alcohol de vriestijd
verlengt.
1. Attentie: Het apparaat moet volledig gemonteerd en ingeschakeld
zijn, voordat u het vult met de
gewenste ingrediënten. Doe de
benodigde ingrediënten nooit van
tevoren in de koelbak! De ingre-
54
diënten kunnen vastvriezen aan
de bakrand en het gewenste ijsresultaat wordt niet bereikt; bovendien kan de mixer blokkeren en
de motor oververhitten. De ingrediënten worden altijd pas via de
Page 55

vulschacht toegevoegd als het
Copyright UNOLD AG | www.unold.de
apparaat ingeschakeld is.
2. Bereid de ijsmassa volgens de
recepten in het receptgedeelte.
Als het om ijsmassa‘s gaat die van
tevoren gekookt moeten worden,
produceert u deze op de voorafgaande dag, zodat de massa goed
kan afkoelen.
3. Bovendien adviseren wij om de
ijsmassa vóór het gebruik te allen
tijde in de koelkast te koelen.
4. Neem de koelbak uit het diepvriesvak. Monteer het apparaat
voor zoals omschreven staat in het
hoofdstuk „Monteren“.
5. Steek de netstekker in een stopcontact en schakel het apparaat
met de AAN-/UIT-schakelaar in.
6. Open dan onmiddellijk de ope-
ning bij de gewenste vulschacht
en doe ijsmassa door de schacht
in het apparaat.
7. Omdat tijdens het bevriezen het
volume toeneemt, vult u de bak
a.u.b. niet tot de rand, maar laat
u ca. 4 cm ruimte over.
8. Het maximale vulvolume per koel-
bak bedraagt 200 ml.
9. Als de ijsmassa te vast wordt,
verandert evtl. de draairichting van
de desbetreffende mixer om schade
aan de motor te voorkomen.
10. Laat de ijsmachine net zolang
lopen tot het ijs de gewenste consistentie heeft. Afhankelijk van
de ingrediënten duurt dit 15 tot
25 minuten. Controleer van tijd
tot tijd het vriesproces a.u.b.
Wij adviseren bovendien om het
apparaat niet te vaak in- en uit te
schakelen, omdat hierbij ijs aan
de bakrand kan vastvriezen en
de mixer evtl. niet meer correct
werkt.
11. Schakel het apparaat a.u.b. altijd
uit als de mixer stilstaat om oververhitting van de motor te voorkomen. Laat het apparaat dan een
beetje afkoelen en schakel het
apparaat weer in.
12. Schakel het apparaat met de
AAN-/UIT-schakelaar uit.
13. Neem de motor en het deksel weg
door de ontgrendelingsschakelaar
naar te draaien en het deksel
met de motor naar boven toe weg
te tillen.
14. Trek de mixers uit de koelbakken.
15. Neem de koelbakken van de
apparaatbasis af.
16. Het ijs kunt u het beste met een
plastic of houten spatel wegpakken om de bakken niet te bekrassen.
17. Consumptie-ijs moet een zachte
consistentie hebben. Als u echter
harder ijs prefereert, zet u de bak
extra in het vriesvak/de diepvrieskast.
18. Sla het ijs in de bak echter niet
langer dan 30 minuten in het
vriesvak op. Als u het ijs niet
onmiddellijk wilt eten, doet u dit
in een gesloten vriesdoos en zet
u deze dan in het vriesvak. Het
ijs kan hierbij waterslierten vormen door de contractie van de ijskristallen, omdat de optimale ijs-
temperatuur ca. −10 °C bedraagt,
maar de temperatuur in de vriesapparaten meestal lager is.
19. Als het ijs nog niet de gewenste
consistentie bereikt heeft en u
weer wilt beginnen met de bereiding, moet u eerst het deksel van
55
Page 56

de motor losmaken. Assembleer
Copyright UNOLD AG | www.unold.de
daarna alle onderdelen weer zoals
beschreven staat in het hoofdstuk
„Monteren“. Op deze wijze is
gewaarborgd dat de assen van de
mixers correct geplaatst zijn.
20. Attentie: Schakel het apparaat
echter tijdens de ijsbereiding niet
uit. Hierbij zou de ijsmassa aan
de rand van de koelbak vastvriezen. Mocht de motor tijdens de
bereiding oververhit raken, wordt
DEMONTEREN, REINIGEN EN ONDERHOUDEN
de motor uitgeschakeld. Zet in dit
geval de AAN-/UIT-schakelaar op
„UIT“, trek de netstekker uit en
laat het apparaat afkoelen. Als u
daarna ijs wilt blijven bereiden,
moet u evtl. nieuwe ijsingrediënten gebruiken. In dit geval moet
het ijs met een kunststofspatel uit
de koelbak worden genomen, niet
door de aftapopening!
Vóór het reinigen altijd het
apparaat uitschakelen en de
stekker uit de stekkerdoos
trekken.
Raak de koelbakken niet met
blote handen aan, als u deze
uit het apparaat tilt, om letsel/
bevriezing te voorkomen. Raak
de koelbakken uitsluitend aan
het handvat aan zolang deze
bevroren zijn.
1. Reinig het apparaat, met name
het motorblok, niet onder water
of een andere vloeistof. Gebruik
geen krassende of schurende reinigingsmiddelen.
2. U kunt de wegneembare onderdelen met warm water en een zacht
afwasmiddel reinigen. De onderdelen zijn niet geschikt voor de
afwasmachine.
3. Draai de ontgrendelingsschakelaar naar en til de motor en
het deksel van het apparaat af.
4. Koppel de motor los van het deksel. Hiervoor moet u de twee vergrendelingsstrips aan de onder-
56
kant van het deksel naar binnen
drukken; de motor kan alleen op
deze wijze worden weggenomen.
5. Trek de mixerassen uit de motor.
6. Neem de mixers uit de koelbakken en til de koelbakken van de
apparaatbasis af.
7. Veeg de motor met een vochtige
doek schoon en droog hem vervolgens goed af.
8. Reinig de mixer met warm water
en een zacht afwasmiddel.
9. Laat de koelbak opwarmen tot
kamertemperatuur voordat u hem
reinigt om letsel c.q. bevriezing te
voorkomen.
10. Veeg de binnenkant van de koelbak met een vochtige doek goed
schoon en droog hem vervolgens
goed af.
11. Reinig de onderdelen van de
behuizing grondig met warm water
en een mild afwasmiddel en droog
deze vervolgens goed af.
12. Alle onderdelen moeten volledig
droog zijn voordat zij weer worden
gebruikt of opgeslagen.
Page 57

13. Sla alle onderdelen op een droge,
Copyright UNOLD AG | www.unold.de
stofvrije en schone plaats op.
in deze doos op als u hem niet
gebruikt.
Tip: Bewaar de verpakking van
het apparaat en sla de ijsmaker
STORINGEN VERHELPEN
Storing Oplossing
Geurvorming Treedt evtl. op bij het eerste gebruik van het apparaat.
Neem a.u.b. contact op met de klantenservice, voor
zover de geur ook na meermaals gebruik blijft optreden.
De mixer draait niet Controleer of het apparaat op een functionerend stop-
contact conform typeplaatje is aangesloten en ingeschakeld is.
Als de ijsmassa te vast is geworden, stopt de mixer
met draaien. Schakel het apparaat uit. Verwijder motor, deksel en mixer en laat het ijs een beetje ontdooien. Neem het bv. met een kunststofspatel eruit.
De motor is oververhit en is door de oververhittingsbeveiliging automatisch uitgeschakeld. Trek de netstekker uit en laat het apparaat afkoelen. Verwijder motor,
deksel en mixer en laat het ijs een beetje ontdooien.
Neem het bv. met een kunststofspatel eruit.
Als geen van de genoemde oorzaken van toepassing
is, neemt u a.u.b. contact op met onze klantenservice.
Dij ijsmassa bereikt
niet de gewenste
consistentie
Controleer alle ingrediënten van het recept, meng
deze goed door elkaar en let erop dat u de ingrediënten voldoende voorkoelt.
Doe de alcohol die u evtl. gebruikt, pas bij de ijsmassa als deze al de gewenste consistentie bereikt heeft.
Als u de alcohol te vroeg toevoegt, voorkomt deze dat
de massa vast wordt.
57
Page 58

BELANGRIJKE TIPS EN INSTRUCTIES VOOR GOED IJS
Copyright UNOLD AG | www.unold.de
Gebruik uitsluitend volledig rijp fruit. Stukjes fruit en/of hele bessen pas op het
eind toevoegen. Als volgens het recept eieren moeten worden toegevoegd, ge-
bruikt u uitsluitend zeer verse eieren. U kunt melk door slagroom vervangen of
slagroom door melk vervangen. Hoe meer slagroom u gebruikt, des te crème-achtiger wordt het ijs. U kunt voor alle recepten ook lactosevrije melkproducten gebruiken. De benodigde hoeveelheden komen overeen met de vermelde hoeveelheden. U kunt uiteraard ook bv. slagcrème van soja of rijst gebruiken.
U kunt suiker vervangen door honing, siroop of zoetstof. Dit is bij softice echter
niet mogelijk. Melk jan ook door sojamelk worden vervangen. Het ijs smaakt vers
bereid het beste. Als u het ijs echter vrij lang wilt opslaan, voegt u 30 g ijsbasis toe aan de ijsmassa. IJsbasis voorkomt dat de waterkristallen bij het opslaan
weer contraheren en het ijs splinterig wordt. U krijgt ijsbasis bij
Hobbybäcker-Versand - Inge Pinzer
Am Mühlholz 6 – 89287 Bellenberg
Tel. 0 73 06/92 59 00 - Fax 0 73 06/92 59 05
Internet: www.hobbybaecker.de
Als u vaster ijs wenst, zet u de ijsmassa 15-30 minuten lang in het vriesvak voordat u de massa in de ijsmachine doet. Juist in het warme seizoen zijn de temperaturen ook in de koelkast een beetje hoger, omdat bv. De deur van de koelkast
wordt geopend en de kamertemperatuur hoger is. IJs smelt niet zo snel als u vóór
het bevriezen een pakje fix-gelatine (koud oplosbare gelatine) aan de ijsmassa
toevoegt. De hier aangegeven hoeveelheden zijn richtwaarden die afhankelijk van
de persoonlijke smaak kunnen worden aangepast. Wij moedigen u aan om ook
eens eigen creaties te ontwikkelen. In de boekhandel en op het Internet vindt u
bovendien een overvloed van andere ijsrecepten.
De desbetreffende bereidingstijd hangt af van verschillende factoren zoals bv.
de temperatuur van de ingrediënten. Controleer regelmatig de consistentie van
het ijs om het juiste tijdstip voor wegneming vast te stellen. De voorgestelde recepten zijn bedoeld voor een bedrag van twee gekoelde containers (elk de helft).
RECEPTIDEEËN VOOR KINDEREN
Vanille-ijs
150 ml melk, 150 g slagroom, 1/2 vanillescheut, 1 snufje zout, 1 eierdooier, 40 g suiker, 25 g gecondenseerde
melk.
De melk en 50 g slagroom in een pan
doen en verhitten. De vanillescheut in
58
de lengte opensnijden, het merg met
een lepel eruit krabben en samen met
de scheut en het zout bij de slagroommelk doen. Dit alles al roerend een
keer laten opkoken, direct van de plaat
pakken een de scheut eruit halen.
Page 59

De eierdooier met de suiker crème-
Copyright UNOLD AG | www.unold.de
achtig kloppen, dan de hete slagroommelk al roerend erbij laten lopen. De
vloeistof teruggieten in de pan en al
roerend verhitten, tot de massa een
beetje dikker wordt. De gecondenseerde melk erdoorheen roeren, de massa
in een andere bak doen en ongeveer
een half uur laten afkoelen; dan een
uur lang in de koelkast zetten.
De resterende slagroom stijfkloppen
en bij de gekoelde puddingmassa
doen. Het mengsel in de lopende ijsmachine doen en in 15 tot 30 minuten
laten bevriezen.
Chocolade-ijs
100 ml melk, 1 eierdooier, 40 g suiker, 1/2 snufje vanillesuiker, 50 g
vollemelkchocolade, 100 g slagroom,
1 theelepel cacao
De melk in een pan verhitten en een
maal laten opwellen. Intussen de eier-
dooier met de vanillesuiker opkloppen
tot een vaste schuimmassa. Hierbij de
suiker geleidelijk laten indwarrelen.
De hete melk continu roerend met de
garde langzaam in de eischuimmassa gieten. De eierenmelk weer in de
melkpan doen en nogmaals al roerend
verhitten, tot de vloeistof een beetje
dikker wordt. Dit alles in een roerschotel doen en ongeveer een half uur laten afkoelen.
In de tussentijd de chocolade met
drie eetlepels slagroom au bain-marie
al roerend smelten en direct met een
niet-afgestreken theelepel cacao door
de eierenmelk roeren, tot de chocolade geheel opgelost is. Het mengsel
een half uur laten afkoelen; dan nogmaals ongeveer een uur lang in de koelkast zetten.
De resterende slagroom licht opkloppen en bij de chocolademelk doen. Alles in de lopende ijsmachine doen en
in ongeveer 30 minuten laten bevriezen.
RECEPTIDEEËN VOOR VOLWASSENEN
Ananas-kokos-shake
1 blik ananasschijven (ca. 125 g uitlekgewicht), 65 ml kokosmelk, 2 eiwit, 25 g poedersuiker, 2 eetlepels
witte rum, 1/2 banaan, 1/2 eetlepel
citroensap, suikerkersen, houten prikkertjes, 125 ml ananassap, nog eens
60 ml kokosmelk
3/4 van de ananasschijven met de ananassiroop uit het blik en de kokosmelk
(65 ml) pureren. De overige schijven
klein snijden, toevoegen en alles een
half uur koel zetten.
Het eiwit met de poedersuiker kloppen en onder de fruitpuree doen. Alles in de ijsmachine ongeveer 40 mi-
nuten laten bevriezen. Na 25 minuten
de rum toevoegen. De helft van de banaan in schijven snijden en bedruppelen met citroensap. De schijven en de
kersen op houten prikkertjes steken.
Vier grote bollen ijs in een roerschotel
doen. De rest in de vrieskist opslaan.
Het ananassap, de kokosmelk en de
rest van de banaan bij de ijsbollen
doen en alles pureren. Het mixdrankje
over de vier glazen verdelen en decoreren met de prikkertjes.
Campari-sinaasappelsorbet
35 ml Campari, 200 ml sinaasappelsap, 75 g poedersuiker, 1 eiwit
59
Page 60

De Campari met 180 ml sinaasap-
Copyright UNOLD AG | www.unold.de
pelsap en 30 g poedersuiker in een
hoge roerbeker doen en net zolang
roeren tot de suiker is opgelost. Alles
twee uur lang in de koelkast zetten.
Na het verstrijken van de koeltijd het
eiwit met de rest van de poedersuiker en het overige sinaasappelsap tot
schuim kloppen. Deze eiwitmassa
door het sinaasappel-Campari-meng-
Het ijsmengsel in de lopende ijsmachine doen en in 30 tot 40 minuten
laten bevriezen. Tip: Het Campari-sinaasappelsorbet is door zijn alcoholgehalte tamelijk zacht, zodat het direct
vanuit het vriesapparaat kan worden
geportioneerd. Dit sorbet smaakt zeer
goed als u het met een spuitzak in
hoge glazen doet en opvult met vers
geperst sinaasappelsap.
sel roeren.
GARANTIEVOORWAARDEN
Wij geven op onze apparaten een garantietermijn van 24 maanden (12 maanden bij commerciële gebruik), gerekend vanaf de
dag van aanschaf. Deze garantie geldt voor schade, die bij correct gebruik aantoonbaar is veroorzaakt door een fout in de productie. Binnen de garantietermijn verhelpen wij materiaal- en productiefouten door herstelling of vervanging naar onze keuze.
Onze garantie is slechts geldig voor in Duitsland en Oostenrijk verkopte apparaten. In andere landen a.u.b. de importeur
aanspreken. Apparaaten, waarvoor garantie in aanspraak wordt genomen, moeten ons samen met een kopie van de machineel
gegenereerde kassabon waaruit de koopdatum duidelijk wordt, alsmede een beschrijving van de fout goed verpakt aan onze
klantenservice worden toegezonden, porto betaald. Als er sprake van garantie is, worden de verzendingskosten in Duitsland
en Oostenrijk aan de klant vergoed. De garantie dekt geen schade veroorzaakt door slijtage, onbehoorlijk gebruik/foutieve handelingen en niet-naleving van de onderhouds- en reinigingsaanwijzingen. Het recht op garantie vervalt, wanneer reparaties
of manipulaties aan het apparaat door derden worden doorgevoerd. Eventuele rechten van de eindgebruiker t.o.v. de verkoper
of distributeur worden door deze garantie niet aangetast.
VERWIJDEREN VAN AFVAL / MILIEUBESCHERMING
Onze apparaten zijn geproduceerd met een hoge qualiteit voor een lange gebruik. Regelmatige onderhoud
en vakkundig reparaties door onze klantenservice verlengt de gebruiksduur. Wanneer het apparat defekt is
en kan niet meer gerepareerd worden, let op de volgende instructies. Dit product mag niet samen met het
normale huishoudelijke afval worden afgevoerd. U dient dit product bij een voor het recycleren van elektrische of elektronische apparaten aangewezen verzamelplaats in te leveren. Door het separaat inzamelen
en recycleren van afvalproducten helpt u mee bij het zuinig omgaan met de natuurlijke hulpbronnen en
zorgt u ervoor dat het product op een gezondheids- en milieuvriendelijke manier afgevoerd wordt.
De recepten in deze gebruiksaanwijzing zijn door de auteurs en door UNOLD AG zorgvuldig ontwikkeld
en getest. Een garantie kan er echter niet worden aanvaard. De auteurs en/of UNOLD AG en haar
gemachtigden kunnen in geen geval aansprakelijk worden gesteld voor letsel, materiële schade en
financiële schade.
60
Page 61

ISTRUZIONI PER L’USO MODELLO 48850
Copyright UNOLD AG | www.unold.de
DATI TECNICI
Potenza: 12 W, 220–240 V~, 50 Hz
Capacità: Circa 500 ml di gelato per contenitore
Quantità di
riempimento
max.: 200 ml di ingredienti per contenitore
Dimensioni: Circa 35,1 x 15,3 x 22,3 cm (L/P/H)
Peso: Circa 2,5 kg
Cavo di
alimentazione: Circa 120 cm
Classe di
isolamento: II
Tempo di
preparazione: Circa 15–25 minuti
Dotazioni: Gelatiera per 2 x 0,5 litri di gelato con accumulatore
Accessori: Istruzioni per l‘uso con ricettario, 2 contenitori refrigeranti, 2
Con riserva di modifiche ed errori relativi a caratteristiche delle dotazioni, tecnica, colore e design
di freddo (tempo di preraffreddamento circa 8-12 ore),
preparazione del gelato in circa 15–25 minuti (escluso tempo
di preraffreddamento), interruttore ON/OFF, due pozzetti di
riempimento per l‘aggiunta degli ingredienti, due contenitori
refrigeranti rimovibili adatti per vano freezer ***
mescolatori
SIGNIFICATO DEI SIMBOLI
Questo simbolo segnala possibili pericoli in grado di provocare lesioni a persone o danni
all‘apparecchio.
PER LA VOSTRA SICUREZZA
Si raccomanda di leggere e conservare le presenti istruzioni.
Persone in ambito domestico
L‘apparecchio può essere
1.
utilizzato da bambini a partire dagli 8 anni di età e
da persone che presentano
ridotte capacità fisiche, sen-
soriali o mentali o che difettano della necessaria esperienza e/o conoscenze solo se
adeguatamente sorvegliati o
addestrati sull‘uso in sicurezza dell‘apparecchio e se a
conoscenza dei rischi correlati all‘impiego dello stesso.
61
Page 62

L‘apparecchio non è un gio-
Copyright UNOLD AG | www.unold.de
cattolo. La pulizia e la manutenzione dell‘apparecchio
possono essere effettuate da
bambini soltanto sotto sorveglianza.
L‘apparecchio deve essere
2.
tenuto fuori dalla portata dei
bambini di età inferiore a 3
anni oppure questi devono
essere sorvegliati costantemente.
I bambini di età com-
3.
presa tra 3 e 8 anni dovrebbero accendere e spegnere l‘apparecchio soltanto
quando questo si trova nella
posizione di comando normalmente prevista, se sono
sorvegliati o se sono stati ist-
ruiti in relazione all‘uso sicuro
e hanno compreso i pericoli risultanti dall‘impiego
dell‘apparecchio. I bam-
bini di età compresa tra 3 e
8 anni non dovrebbero collegare, comandare, pulire o
sottoporre a manutenzione
l‘apparecchio.
I bambini vanno sorvegliati
4.
per assicurarsi che non giochino con l‘apparecchio.
Avvertenze sanitarie
Consumare immediatamente
5.
il gelato scongelato o sciolto
e non ricongelarlo.
6. Consumare il gelato soltanto
finché è fresco. Congelare
immediatamente eventuali
resti e consumarli nel giro di
una settimana.
7. Usare soltanto ingredienti
freschi.
62
8. In particolare se si usano
delle uova, per evitare la formazione di batteri, accertarsi
che siano freschissime. Non
ricongelare i resti di gelato
contenente uova.
Le creme gelato prodotte
9.
con uovo crudo o solo parzialmente riscaldato non dovrebbero essere consumate
da bambini piccoli, gestanti,
anziani o persone con patologie acute o croniche.
Pulire l‘apparecchio imme-
10.
diatamente al termine della
preparazione del gelato. Altrimenti possono formarsi
batteri.
Se da uno dei contenitori
11.
refrigeranti fuoriesce del
liquido, tale contenitore
deve essere sostituito.
Sicurezza elettrica
12. Collegare l‘apparecchio solo
a corrente alternata conforme alla targhetta.
13.
Questo apparecchio non
deve essere comandato tramite timer esterni o sistemi
di telecomando.
Dopo l‘uso, prima della puli-
14.
zia o in caso di eventuali
anomalie durante l‘esercizio
staccare sempre la spina
dalla presa elettrica.
Non immergere mai
15.
l‘apparecchio in acqua o altri
liquidi, proteggere il cavo di
alimentazione dall‘umidità.
16. Prima dell‘uso srotolare
completamente il cavo di alimentazione.
Page 63

17. Per evitare di danneggiare il
Copyright UNOLD AG | www.unold.de
cavo di alimentazione, non
piegarlo e non avvolgerlo
attorno all‘apparecchio.
18. Usare l‘apparecchio solo in
interni.
19. Staccare il cavo di alimentazione dalla presa elettrica
afferrandolo soltanto per la
spina, mai per il cavo.
Per prevenire danni al cavo
20.
di alimentazione, non trasportare mai l‘apparecchio
per il cavo di alimentazione
e non trazionare mai tale
cavo.
Prima di disassemblare
21.
e pulire l‘apparecchio, di
smontare o montare singoli
pezzi o di spostarlo staccare
la spina dalla presa elettrica.
22. Controllare regolarmente la
spina e il cavo di alimenta
-
zione per verificare che non
presentino tracce di usura
o danni. Qualora il cavo di
collegamento o altri compo-
nenti siano danneggiati inviare l‘apparecchio alla nostra
assistenza clienti per la verifica e la riparazione. Riparazioni inadeguate possono
causare pericoli per l’utente
e comportano l’esclusione
della garanzia.
Avvertenze per l‘installazione e
l‘uso in sicurezza dell‘apparecchio
23.
L‘apparecchio nonché i sin-
goli componenti non sono
adatti per il lavaggio in lavastoviglie.
24.
Appoggiare l’apparecchio su
una superficie piana sgombra.
L’apparecchio è progettato
25.
esclusivamente per l’uso
domestico o per impieghi
similari, ad es.
in aree cucina di negozi,
uffici o altri luoghi di lavoro,
aziende agricole,
per l‘uso da parte degli
ospiti di hotel, motel o altre
strutture ricettive,
in pensioni private o case di
vacanza.
26. Per ragioni di sicurezza non
riporre o far funzionare mai
l‘apparecchio e il cavo di ali
mentazione su o nei pressi di
superfici calde.
27.
Il cavo non deve pendere
oltre lo spigolo della superficie di lavoro.
Per prevenire ustioni e con-
28.
gelamenti non toccare mai il
lato interno del contenitore
refrigerante a mani nude o
con altre parti del corpo (in
particolare se bagnate).
Non superare la quantità
29.
di riempimento massima.
Il contenitore refrigerante
deve venir riempito al massimo fino a 4 cm dal bordo
superiore in quanto durante
il processo di congelamento
il gelato cresce di volume.
L‘apparecchio deve essere
30.
stato completamente assemblato e acceso prima di
versarvi gli ingredienti desi-
63
Page 64

derati. Non mettere mai gli
Copyright UNOLD AG | www.unold.de
ingredienti desiderati nel
contenitore refrigerante in
anticipo, in quanto possono gelare lungo il bordo.
Ciò potrebbe pregiudicare il
risultato desiderato.
Non spostare l‘apparecchio
31.
finché è in funzione.
32. Non lasciare mai incustodito
l‘apparecchio quando è in
funzione.
33. Non usare mai l‘apparecchio
senza contenitore refrigerante!
Durante l‘esercizio non
34.
inserire alcun oggetto
nell‘apparecchio in funzione
e non introdurre le mani nel
contenitore. Sussiste il peri-
colo di lesioni!
Non maneggiare all’interno dell’apparecchio in funzione – pericolo di ferimento!
Utilizzare l‘apparecchio sol-
35.
tanto previo corretto assemblaggio.
Non far funzionare mai
36.
l‘apparecchio con accessori
di altri apparecchi.
37. Non utilizzare oggetti appuntiti o taglienti nel contenitore refrigerante, in quanto
potrebbero graffiarlo. Se
necessario, usare raschini in
plastica o legno.
Quando la preparazione del
38.
gelato è terminata, se si
vuole pulire l‘apparecchio
o quando occorre eliminare un guasto, spegnere
l‘apparecchio e staccare la
spina dalla presa elettrica.
Attenzione: Versare nel con-
39.
tenitore soltanto alimenti.
Attenzione: Per evitare ferite/congelamenti non toccare mai i
contenitori refrigeranti con parti del corpo bagnate, ad es. le
dita.
Non aprire mai la scocca dell‘apparecchio. Pericolo di scossa
elettrica.
Il produttore declina qualunque responsabilità in caso di montaggio errato, utilizzi errati o non idonei o
qualora le riparazioni siano eseguite da terzi non autorizzati.
PRIMA DEL PRIMO UTILIZZO
1. Rimuovere tutti i materiali da
imballo e le eventuali protezioni da trasporto. Tenere il materiale da imballo fuori dalla portata
64
dei bambini – pericolo di soffocamento!
2. Controllare che tutte le parti siano
presenti. Se delle parti mancano
Page 65

o sono danneggiate, rivolgersi al
Copyright UNOLD AG | www.unold.de
rivenditore di fiducia o alla nostra
assistenza clienti.
MONTAGGIO
3. Pulire tutte le parti con un panno
umido, come descritto nel capitolo „Pulizia e manutenzione“.
In linea di principio il coperchio può
essere applicato/rimosso solo quando
l‘interruttore di sblocco è posizionato su
1. Assicurarsi che la base
dell‘apparecchio sia collocata in
maniera stabile su una superficie
piana.
2. Posizionare entrambi i contenitori refrigeranti sulla base
dell‘apparecchio. I manici dei
contenitori devono essere rivolti
verso l‘esterno, in quanto altrimenti non è possibile montare
l‘apparecchio in modo corretto.
3. A questo punto inserire un mescolatore nei contenitori refrigeranti.
Per facilitare il montaggio nei
contenitori refrigeranti sono pre-
senti apposite cavità, in cui vanno
inseriti i mescolatori. L‘asse dei
mescolatori deve essere rivolta
verso l‘alto.
4. Fissare il coperchio
all‘apparecchio e prestare attenzione che scatti in posizione. Attenzione: L‘asse dei mescolatori deve
essere fatto passare sempre attraverso l‘apertura del coperchio.
5. Bloccare il coperchio posizionando l‘interruttore di sblocco su
.
6. A questo punto collegare i due
assi dei mescolatori agli appositi
alloggiamenti a forma di stella del
motore.
65
Page 66

7. Il motore deve ora essere posizi-
Copyright UNOLD AG | www.unold.de
onato sul coperchio in modo che
PRIMA DI PREPARARE IL GELATO
il cavo di alimentazione venga a
trovarsi sul retro dell‘apparecchio.
1. Prima di poter preparare il gelato
i contenitori pieni di liquido refrigerante devono stare nel vano
freezer *** o nel congelatore per
almeno 8 ore. La temperatura
deve essere di almeno −18 °C.
Accertarsi di pulire l‘interno dei
contenitori e poi di asciugarli
completamente.
2. Quindi mettere i contenitori refrigeranti nel vano freezer in posizione verticale. I contenitori refrigeranti possono essere agevolmente
estratti dal vano freezer, senza
toccare direttamente i contenitori
gelidi, tramite i relativi manici.
3. Il processo di congelamento
a seconda della temperatura del
freezer. E‘ possibile verificare se
tutto il liquido refrigerante è congelato scuotendo il contenitore.
4. Consiglio: Quando la gelatiera non
è utilizzata, conservare i contenitori refrigeranti ad es. in un sacchetto di plastica nel congelatore,
in modo che siano sempre pronti
per essere usati.
5. Se si desidera preparare diversi
gusti di gelato uno dopo l‘altro,
consigliamo di acquistare altri
contenitori refrigeranti. Questi
possono essere acquistati direttamente da noi, l‘apposito modulo
d‘ordine si trova a pagina 111.
può durare tra le 8 e le 22 ore,
PREPARAZIONE DEL GELATO
Gli ingredienti desiderati dovrebbero venir preraffreddati in freezer per alcune
ore prima della preparazione! Se per la ricetta si usa dell‘alcol, aggiungerlo al
gelato soltanto quando questo ha già assunto la consistenza desiderata. La quantità di riempimento massima per ogni contenitore refrigerante è di 200 ml.
In linea di principio è possibile riempire anche un solo contenitore refrigerante
con il composto del gelato e preparare così un solo gusto di gelato. Per evitare danni all‘apparecchio bisogna però inserire nello stesso sempre entrambi i
contenitori refrigeranti!
Consiglio: Se per la ricetta si usa dell‘alcol, dosarlo con parsimonia e aggiungerlo
soltanto alla fine del congelamento, in quanto allunga i tempi di congelamento.
66
Page 67

1. Attenzione: L‘apparecchio deve
Copyright UNOLD AG | www.unold.de
essere stato completamente
assemblato e acceso prima di
versarvi gli ingredienti desiderati. Non mettere mai gli ingre-
dienti richiesti nel contenitore refrigerantein anticipo! Gli ingredienti
possono ghiacciarsi aderendo al
bordo del contenitore, impedendo
quindi di ottenere i risultati desiderati per il gelato, inoltre potrebbero bloccare il mescolatore e
surriscaldare il motore. Gli ingredienti devono venir versati tramite il pozzetto di riempimento
ad apparecchio acceso.
2. Preparare il composto del gelato
secondo le ricette del ricettario.
Se si tratta di composti che prima
devono essere cotti, cuocerli il
giorno precedente in modo che il
composto possa poi raffreddarsi
completamente.
3. Consigliamo di raffreddare il com-
posto del gelato in frigorifero
prima di utilizzarlo.
4. Estrarre i contenitori refrige-
ranti dal vano freezer. Montare
l‘apparecchio come illustrato nel
capitolo „Montaggio“.
5. Inserire la spina in una presa elettrica e accendere l’apparecchio
tramite l‘interruttore ON/OFF.
6. Quindi aprire subito l‘apertura del
pozzetto di riempimento desiderato e, attraverso il pozzetto, versare il composto nella gelatiera.
7. Non riempire il contenitore fino
al bordo bensì lasciare circa 4
cm di spazio, in quanto il volume
aumenta durante il congelamento.
8. La quantità di riempimento massima
per ogni contenitore refrigerante è
di 200 ml.
9. Se il composto del gelato diventa
troppo solido, per evitare danni al
motore, eventualmente invertire il
senso di rotazione del mescolatore.
10. Lasciare in funzione la gelatiera
finché il gelato non assume la
consistenza desiderata. A seconda
degli ingredienti utilizzati questo
richiede tra 15 e 25 minuti. Di
tanto in tanto controllare il processo di congelamento. Consigliamo tuttavia di non accendere
e spegnere l‘apparecchio troppo
spesso, in quanto la crema gelato
può aderire al bordo del contenitore ed eventualmente impedire il corretto funzionamento del
mescolatore.
11. Per prevenire surriscaldamenti
del motore, quando il mescolatore è fermo, spegnere sempre
l‘apparecchio. Far raffreddare
l‘apparecchio per qualche tempo
e poi riaccenderlo.
12. Spegnere l‘apparecchio tramite
l‘interruttore ON/OFF.
13. Rimuovere il motore e il coperchio
portando l‘interruttore di sblocco
su e sollevando verso l‘alto il
coperchio con il motore.
14. Estrarre i mescolatori dai contenitori refrigeranti.
15. Rimuovere i contenitori refrigeranti dalla base dell‘apparecchio.
16. Si consiglia di estrarre il gelato
con una spatola di plastica o di
legno in modo da non graffiare i
contenitori.
67
Page 68

17. Il gelato pronto per il consumo
Copyright UNOLD AG | www.unold.de
dovrebbe avere una consistenza
molle. Se invece lo si preferisce
più duro, mettere il contenitore
ancora un po‘ nel vano freezer/il
congelatore.
18. Tuttavia non lasciare il gelato
nel contenitore nel congelatore
per più di 30 minuti. Se non si
vuole mangiare subito il gelato,
travasarlo in un recipiente chiuso adatto per il freezer e quindi
metterlo nel vano freezer. Così
facendo, a causa del ritiro dei
cristalli di ghiaccio, nel gelato
possono però formarsi delle strie
di ghiaccio, in quanto la temperatura ideale per il gelato è di circa
−10°C, mentre nei freezer la tem-
peratura è solitamente più bassa.
19. Se il gelato non ha ancora assunto
la consistenza desiderata e si
desidera riprendere la prepara-
zione, per prima cosa staccare
il coperchio dal motore. Quindi
riassemblare tutte le parti come
illustrato nel capitolo „Montag-
gio“. In questo modo è assicurato
che gli assi dei mescolatori siano
inseriti in modo corretto.
20. Attenzione: Non spegnere
l‘apparecchio mentre sta preparando il gelato. In questo caso
il composto gelerebbe infatti sul
bordo del contenitore refrigerante. Qualora il motore si surriscaldi durante la preparazione si
disattiva in automatico. In questo
caso portare l‘interruttore ON/
OFF su „OFF“, staccare la spina
dalla presa di rete e far raffreddare l‘apparecchio. Se successivamente si desidera continuare a
preparare il gelato eventualmente
può essere necessario usare
nuovi ingredienti. In questo caso
il gelato deve essere estratto dal
contenitore refrigerante con una
spatola in plastica, non attraverso
l‘apertura di dispensazione!
DISASSEMBLAGGIO, PULIZIA E MANUTENZIONE
Prima di procedere alla pulizia
spegnere sempre l’apparecchio
e staccare la spina dalla presa
elettrica.
Per evitare ferite/congelamenti
non toccare i contenitori refrigeranti a mani nude quando li si
estraggono dall‘apparecchio.
Finché i contenitori refrigeranti sono gelati afferrarli soltanto
per i manici.
1. Non lavare mai l‘apparecchio, in
particolare il blocco motore, in
68
acqua o altri liquidi. Non usare
detergenti abrasivi o aggressivi.
2. Le parti asportabili possono essere
lavate con acqua tiepida e detersivo delicato. Le parti non sono
adatte al lavaggio in lavastoviglie.
3. Posizionare l‘interruttore di sblocco su e rimuovere il motore
e il coperchio sollevandoli
dall‘apparecchio.
4. Staccare il motore dal coperchio
premendo verso l‘interno le due
linguette di bloccaggio presenti
Page 69

sul lato inferiore del coperchio;
Copyright UNOLD AG | www.unold.de
solo in questo modo è possibile
rimuovere il motore.
5. Togliere dal motore gli assi dei
mescolatori.
6. Estrarre i mescolatori dai contenitori refrigeranti e quindi sfilare tali contenitori dalla base
dell‘apparecchio.
7. Pulire il motore strofinandolo con
un panno umido pulito e quindi
asciugarlo accuratamente.
8. Lavare il mescolatore con acqua
tiepida e un detersivo delicato.
9. Lasciar riscaldare il contenitore
refrigerante a temperatura ambiente prima di pulirlo, in modo da
evitare ferite e congelamenti.
10. Strofinare accuratamente l‘interno
del contenitore refrigerante con
un panno umido e quindi asciugarlo perfettamente.
11. Pulire accuratamente le parti del
corpo dell‘apparecchio con acqua
calda e un detersivo delicato e
quindi asciugarle accuratamente.
12. Tutte le parti devono essere perfettamente asciutte prima del
successivo utilizzo o della conservazione.
13. Conservare tutte le parti in un
luogo asciutto, pulito e non polveroso. Consiglio: Conservare
l‘imballo dell‘apparecchio e
quando la gelatiera non è utilizzata riporla in tale cartone.
69
Page 70

RISOLUZIONE DEI PROBLEMI
Copyright UNOLD AG | www.unold.de
Problema Soluzione
Cattivo odore Può eventualmente manifestarsi al primo utilizzo
dell‘apparecchio.
Se il problema persiste anche dopo diversi utilizzi,
contattare l‘assistenza clienti.
Il mescolatore non
gira
Il composto del ge-
lato non assume la
consistenza deside-
rata
Controllare che l‘apparecchio sia collegato a una presa
elettrica funzionante conforme alla targhetta di omologazione e che sia acceso.
Se il composto del gelato è diventato troppo solido il
mescolatore smette di girare. Spegnere l‘apparecchio.
Rimuovere motore, coperchio e mescolatore e far
scongelare un pochino il gelato. Estrarlo ad es. con
una spatola in plastica.
Il motore è surriscaldato ed è stato disattivato in automatico dall‘apposita protezione dai surriscaldamenti.
Staccare la spina dalla presa di rete e far raffreddare
l‘apparecchio. Rimuovere motore, coperchio e mescolatore e far scongelare un pochino il gelato. Estrarlo ad
es. con una spatola in plastica.
Se nessuna delle cause indicate è quella corretta,
contattare l‘assistenza clienti.
Verificare tutti gli ingredienti della ricetta, mescolarli
accuratamente e prestare attenzione a preraffreddarli
in modo adeguato.
Aggiungere al composto gelato l‘eventuale alcol usato
soltanto quando questo ha già assunto la consistenza
desiderata. Se l‘alcol è aggiunto troppo presto impedisce al composto di solidificarsi.
70
Page 71

SUGGERIMENTI E INDICAZIONI IMPORTANTI PER UN BUON GELATO
Copyright UNOLD AG | www.unold.de
Utilizzare soltanto frutta perfettamente matura. Aggiungere i pezzi di frutta / i
piccoli frutti interi solamente alla fine. Se la ricetta prevede l‘utilizzo di uova,
utilizzarne solamente di freschissime. E‘ possibile sostituire il latte con la panna o la panna con il latte. Il gelato sarà tanto più cremoso quanta più panna si
userà.
Per tutte le ricette si possono usare anche latticini senza lattosio. Le quantità
richieste sono identiche a quelle indicate. Ovviamente è possibile usare ad es.
anche panna di soia o di riso.
E‘ possibile sostituire lo zucchero con miele, sciroppo o dolcificante. Per contro
ciò non è possibile per il soft-ice cream (gelato soffice). Il latte può essere sostituito anche con latte di soia. La crema gelato è più buona se consumata fresca.
Per conservare la crema gelato più a lungo aggiungere al composto 30 g di base
gelato. La base gelato impedisce che i cristalli di ghiaccio si ritirino durante la
conservazione, facendo sì che il gelato si scheggi. La base gelato può essere acquistata da
Hobbybäcker-Versand - Inge Pinzer
Am Mühlholz 6 – 89287 Bellenberg
Tel. 0 73 06/92 59 00 - Fax 0 73 06/92 59 05
Internet: www.hobbybaecker.de
Se si desidera un gelato più solido mettere il composto nel congelatore per 1530 minuti prima di versarlo nella gelatiera. Soprattutto nelle stagioni calde le
temperature sono un po‘ più alte anche nel frigorifero ad es. in quanto la porta
è aperta e la temperatura ambientale è più elevata. Aggiungendo una bustina di
gelatina fissante (gelatina solubile a freddo) al composto prima del congelamento, il gelato non si scioglie così in fretta. Le quantità qui indicate sono valori indicativi, che possono essere adattati ai gusti personali. Vi incoraggiamo a mettere
a punto delle vostre creazioni personali. Nelle librerie e in Internet potete trovate
tantissime altre ricette di gelati.
Il relativo tempo di preparazione dipende da diversi fattori, ad es. dalla temperatura degli ingredienti. Verificare regolarmente la consistenza del gelato in modo
da identificare il momento di estrazione corretto.
Le ricette proposte sono disponibili per un costo di due contenitori refrigerati
(ogni mezzo).
71
Page 72

IDEE PER RICETTE PER BAMBINI
Copyright UNOLD AG | www.unold.de
Gelato alla vaniglia
150 ml di latte, 150 g di panna, 1/2
baccello di vaniglia, 1 presa di sale, 1
tuorlo, 40 g di zucchero, 25 g di latte
condensato.
Versare in un pentolino il latte e 50 g di
panna e scaldare. Intagliare il baccello
di vaniglia nel senso della lunghezza,
raschiare la polpa con un cucchiaio e
aggiungerla al latte e alla panna, assieme al baccello e al sale. Portare il
tutto ad ebollizione mescolando, quindi togliere immediatamente dal fornello e rimuovere il baccello.
Sbattere i tuorlo e lo zucchero fino a
ottenere un composto cremoso, quin-
di, sempre mescolando, versare il lat-
te e la panna caldi. Riversare il liquido
nella pentola e scaldare, mescolando,
finché il composto si addensa legger-
mente. Amalgamare il latte conden-
sato, travasare il composto e lasciar-
lo raffreddare per circa mezz‘ora, poi
metterlo in frigorifero per un‘ora.
Montare la panna restante finché risul-
ta ben ferma e incorporarla nel composto raffreddato. Versare il composto nella gelatiera in funzione e lasciar
congelare per 15 - 30 minuti.
il latte caldo nel composto spumoso
mescolando con la frusta lentamente e
in continuazione. Versare nuovamente
la crema di latte e uova nel pentolino
del latte e scaldare ancora mescolando finché il liquido si addensa leggermente. Versare il tutto in una ciotola e
lasciar raffreddare per circa mezz‘ora.
Nel frattempo sciogliere a bagnomaria
il cioccolato assieme a tre cucchiai di
panna, mescolando il tutto, e amalgamare immediatamente nella crema di
latte e uova un cucchiaino da té colmo
di cacao rimestando finché il cioccolato si è sciolto completamente. Lasciar
raffreddare il composto per mezz‘ora,
quindi metterlo ancora in frigorifero
per circa un‘ora.
Montare leggermente il resto della
panna e incorporarla nel latte e cioccolato. Versare il tutto nella gelatiera
in funzione e lasciar congelare per circa 30 minuti.
Gelato al cioccolato
100 ml di latte, 1 tuorlo, 40 g di zucchero, 1/2 conf. di zucchero vanigliato, 50 g di cioccolato al latte, 100 g di
panna, 1 cucchiaino di cacao
Scaldare il latte in una pentola e
portarlo ad ebollizione una volta. Nel
frattempo montare i tuorlo e lo zucchero vanigliato fino a ottenere un
composto denso e spumoso. Aggiungere a pioggia lo zucchero. Versare
72
Page 73

IDEE PER RICETTE PER ADULTI
Copyright UNOLD AG | www.unold.de
Shake di ananas e cocco
1 barattolo di ananas a fette (peso
sgocciolato 175 g circa), 65 ml di latte di cocco, 2 albumi, 25 g di zucchero a velo, 1 cucchiai di rum bianco,
1/2 banana, 1/2 cucchiaio di succo di
limone, ciliege candite, spiedini in legno, 125 ml di succo d‘ananas, altri
60 ml di latte di cocco
Ridurre a purea 3/4 delle fette
d‘ananas con lo sciroppo d‘ananas del
barattolo e il latte di cocco (65 ml).
Tagliare a pezzi piccoli il resto delle
fette, aggiungerle e lasciar riposare al
fresco il tutto per mezz‘ora.
Montare gli albumi con lo zucchero a
velo e incorporarli nella purea di frut-
ta. Lasciar congelare il tutto nella ge-
latiera per circa 40 minuti. Dopo 25
minuti aggiungere il rum.
Tagliare a fettine metà della banana e
spruzzarla con il succo di limone. In-
filare sugli spiedini le fettine e le ciliege.
Mettere in una ciotola quattro palline
di gelato grandi. Conservare il resto nel
congelatore.
Aggiungere alle palline di gelato il succo d‘ananas, il latte di cocco e il resto
della banana e ridurre tutto a purea.
Distribuire il frullato in quattro bicchieri e decorare con gli spiedini.
Sorbetto all‘arancia e Campari
35 ml di Campari, 200 ml di succo
d‘arancia, 75 g di zucchero a velo, 1
albume
Versare in una ciotola alta il Campari,
180 ml di succo d‘arancia e 30 g di
zucchero a velo e mescolare finché lo
zucchero si scioglie completamente.
Mettere il tutto in frigorifero per due
ore.
Al termine del raffreddamento montare
gli albume con il resto dello zucchero
a velo e il rimanente succo d‘arancia
fino a ottenere un composto spumoso.
Mescolare il composto di albumi con
la miscela di succo d‘arancia e Campari. Versare il composto nella gelatiera in funzione e lasciar congelare per
30 - bis 40 minuti.
Consiglio: Il sorbetto all‘arancia e Campari è molto soffice a causa dell‘alcol
contenuto e quindi può essere suddiviso in porzioni subito dopo averlo estratto dal congelatore.
Questo sorbetto è buonissimo servito
in bicchieri alti in cui sia stato messo con una sac à poche e successivamente riempiti con succo d‘arancia
spremuto fresco.
73
Page 74

NORME DIE GARANZIA
Copyright UNOLD AG | www.unold.de
I nostri prodotti sono garantiti per 24 mesi, 12 mesi in caso di uso professionale, dalla data di acquisto per i guasti manifestatisi durante un utilizzo conforme alle disposizioni e attribuibili in modo dimostrabile a difetti di fabbricazione. Nel periodo
di garanzia porremo rimedio ai difetti materiali e di produzione secondo la nostra valutazione, procedendo alla riparazione o
alla sostituzione dell’apparecchio.
Le nostre prestazioni di garanzia valgono esclusivamente per gli apparecchi venduti in Germania e Austria. In tutti gli altri
casi rivolgersi all‘importatore. Gli apparecchi per i quali si richiede la riparazione di guasti ci devono essere inviati con
spedizione affrancata e debitamente imballati, unitamente a una copia del documento di acquisto redatto a macchina dal
quale risulti la data di vendita, nonché la descrizione del guasto. In caso di garanzia al cliente verranno rimborsati i costi
di spedizione sostenuti in Germania e Austria. Sono esclusi dalla garanzia i guasti dovuti all’usura, all’uso inappropriato o
al mancato rispetto delle regole di manutenzione. Il diritto di garanzia decade qualora siano state effettuate riparazioni o
interventi da parte di terzi. Eventuali diritti del consumatore finale verso il venditore o negoziante non vengono limitati dalla
presente garanzia.
SMALTIMENTO / TUTELA DELL’AMBIENTE
I nostri apparecchi vengono prodotti rispettando un elevato standard qualitativo per una lunga durata
di utilizzo. Una corretta manutenzione e riparazioni adeguate a cura dal nostro servizio clienti possono
prolungare la durata di utilizzo del prodotto. Se un apparecchio è difettoso e non più riparabile, per il suo
smaltimento si presti attenzione ai punti che seguono. Questo prodotto non deve essere smaltito unitamente ai comuni rifiuti domestici. Consegnare il prodotto a un centro di raccolta per il riciclaggio dei rifiuti
elettrici o elettronici. Con la raccolta differenziata dei rifiuti e dei prodotti riciclabili è possibile contribuire
alla tutela delle risorse naturali e far smaltire il prodotto nel rispetto dell’ambiente e della salute.
Le ricette di queste istruzioni per l’uso sono state ideate e verificate dagli autori e da UNOLD AG.
Tuttavia non può essere emessa alcuna garanzia. È esclusa la responsabilità degli autori, di UNOLD
AG e dei rispettivi incaricati per danni provocati a persone, cose o materiali.
74
Page 75

MANUAL DE INSTRUCCIONES MODELO 48850
Copyright UNOLD AG | www.unold.de
DATOS TÉCNICOS
Potencia: 12 W, 220–240 V~, 50 Hz
Volumen: Aprox. 500 ml de helado por recipiente
Cantidad de llenado máx.: Máx. 200 ml de ingredientes por recipiente
Tamaño: Aprox. 35,1 x 15,3 x 22,3 cm (An/Pr/Al)
Peso: Aprox. 2,5 kg
Cable de alimentación: Aprox. 120 cm
Tiempo de preparación: Aprox. 15–25 minutos
Clase de protección: II
Equipamiento: Máquina de helados para 2 x 0,5 litros de
Accesorios: Instrucciones de manejo con recetas, 2 recipientes
Salvo modificaciones y errores a nivel de las características de equipamiento, la tecnología, los colores
y el diseño
helado con acumulador refrigerante (tiempo
de enfriamiento previo aprox. de 8 a 12 horas),
preparación de helado en aprox. 15 a 25 minutos
(sin tiempo de enfriamiento previo), interruptor
CON/DES, dos tubos de llenado para añadir
los ingredientes, dos recipientes refrigeradores
adecuados para congelador de ***
refrigeradores, 2 mezcladoras
EXPLICACIÓN DE SÍMBOLOS
Este símbolo se asocia con riesgos eventuales que pueden provocar lesiones o daños en
el aparato.
PARA SU SEGURIDAD
Lea y conserve las siguientes instrucciones.
Personas en el hogar
Este aparato puede ser
1.
manejado por niños a partir
de 8 años y por personas con
una capacidad física, mental
o sensorial reducida o carentes de experiencia y/o conocimientos siempre que estén
supervisados o hayan sido
correspondientemente instruidos en el manejo seguro
de dicho aparato y comprendan los peligros resultantes
del uso del mismo. Este aparato no es ningún juguete.
Los niños solo pueden llevar a cabo la limpieza y el
mantenimiento del mismo
75
Page 76

si están supervisados por un
Copyright UNOLD AG | www.unold.de
adulto.
2. Mantener vigilados o alejados del aparato a los niños
menores de 3 años.
Los niños de entre 3 y 8
3.
años solo deben conectar
y desconectar el aparato
si se encuentra en su posición de manejo normal previsto, si son supervisados o
si han sido instruidos en el
manejo seguro del aparato
y han comprendido los peligros resultantes del uso del
mismo.
Los niños
de entre 3
y 8 años no deberán conectar, manejar, limpiar ni realizar el mantenimiento del
aparato.
Los niños deben ser super-
4.
visados para asegurar que no
jueguen con el aparato.
Indicaciones para la salud
Consumir el helado descon-
5.
gelado de inmediato y no
volver a congelarlo.
Consuma el helado solo
6.
mientras esté fresco. Congelar de inmediato los posibles restos y consumirlos en
una semana.
Utilice solo ingredientes
7.
frescos.
8. Durante el uso de huevos
preste especial atención a
que estos sean lo más frescos posibles para evitar la
formación de gérmenes. No
volver a congelar restos de
helado que contenga huevo.
Los niños pequeños, las
9.
mujeres embarazadas, los
ancianos o las personas con
enfermedades crónicas o
agudas no deberían consumir el helado elaborado con
huevo crudo o huevo solo
parcialmente calentado.
Limpie el aparato inmedia-
10.
tamente después de haber
terminado la preparación
de helado. De lo contrario
podrían formarse gérmenes.
Si sale líquido refrigerante
11.
de uno de los recipientes refrigeradores, se debe sustituir
este recipiente.
Seguridad eléctrica
Conectar el aparato solo a
12.
la corriente alterna según la
placa de características.
13. Este aparato no debe utilizarse con un reloj programador externo ni con un sistema de mando a distancia.
Desenchufar siempre el apa-
14.
rato después de usarlo, antes
de limpiarlo o si se produce
algún fallo durante el funcionamiento.
No sumergir nunca el apa-
15.
rato en agua u otros líquidos;
proteja el cable de alimentación contra la humedad.
Desenrollar completamente
16.
el cable de alimentación
antes del uso.
17. No enrolle el cable alrededor del aparato y evite que
se doble para impedir daños
en el mismo.
Utilizar el aparato solo en
18.
espacios interiores.
19. Extraiga el cable de alimentación de la toma de cor-
76
Page 77

riente tirando solo de la
Copyright UNOLD AG | www.unold.de
clavija, no tire nunca directamente del cable.
Para evitar daños en el cable
20.
de alimentación, no transportar nunca el aparato por
el cable ni tirar del mismo.
Retire el enchufe de la toma
21.
de corriente antes de desmontar y limpiar el aparato
o si quiere quitar o colocar
piezas individuales o poner
el aparato en otro sitio.
Compruebe periódicamente
22.
si el enchufe y el cable de
alimentación están desgastados o deteriorados. En
caso de daños en el cable de
alimentación o en otras pie-
zas, envíe el aparato para su
verificación y reparación a
nuestro
servicio de atención
al cliente. Las reparaciones
inadecuadas pueden ocasio-
nar
peligros para el usuario y
provocan la exclusión de la
garantía.
Indicaciones para la colocación y
el uso seguro del aparato
El aparato y sus componen-
23.
tes no son aptos para el lavavajillas.
Coloque el aparato sobre una
24.
superficie plana despejada.
25. El aparato está diseñado
exclusivamente para un uso
doméstico o para fines similares, por ejemplo,
cocinas tipo office en
comercios, oficinas u otros
lugares de trabajo,
empresas agrícolas,
para el uso por parte de
clientes en hoteles, moteles
u otros establecimientos de
alojamiento colectivo,
en pensiones privadas o en
casas vacacionales.
26. Por motivos de seguridad,
nunca coloque ni ponga en
marcha el aparato sobre o
cerca de superficies calientes.
El cable no debe quedar
27.
colgando por el borde de la
superficie de trabajo.
28. No toque la parte interior del
recipiente refrigerador con
las manos desnudas u otras
partes del cuerpo (especialmente si están húmedas)
para evitar lesiones/congelaciones.
No sobrepasar la cantidad
29.
máxima de llenado. El recipiente refrigerador se debe
llenar hasta un máximo de
4 cm por debajo del borde
superior dado que el volumen del helado aumenta
durante el proceso de congelación.
El aparato debe estar com-
30.
pletamente ensamblado y
conectado antes de llenarlo con los ingredientes
deseados. No añada nunca
los ingredientes necesarios antes al recipiente refrigerador dado que podrían
congelarse en el borde del
recipiente y afectar negativamente al resultado.
No mueva el aparato mient-
31.
ras esté en funcionamiento.
No deje el aparato sin vigi-
32.
lancia mientras esté en funcionamiento.
77
Page 78

33. ¡No utilice nunca el aparato
Copyright UNOLD AG | www.unold.de
sin el recipiente refrigerador!
34. No introduzca objetos en
el aparato en marcha ni las
manos. ¡Peligro de lesiones!
35. El aparato solo debe utilizarse con el ensamblaje adecuado.
Nunca opere el aparato con
36.
accesorios de otros aparatos.
37. No utilice objetos puntiagudos ni afilados en el reci-
podrían arañarlo. En caso
necesario, utilice paletas de
plástico o de madera.
Desconecte el aparato y
38.
retire el enchufe de red si
ha terminado con la prepa
ración del helado, a la hora
de limpiar el aparato o si
debe eliminar un fallo en el
mismo.
39.
ATENCIÓN: verter solo ali-
mentos en el recipiente.
piente refrigerador; estos
No meta la mano en el equipo cuando esté funcionando. ¡Peligro
de lesiones!
Atención: No toque nunca el recipiente refrigerador con partes
desnudas del cuerpo como, p. ej., los dedos, para evitar lesiones
o congelaciones.
De ninguna manera abra la carcasa del aparato. Existe peligro
de una descarga eléctrica.
El fabricante no es responsable en caso de montaje erróneo, uso inapropiado o equivocado o después de
haber sido efectuadas reparaciones por terceros no autorizados.
-
ANTES DEL PRIMER USO
1. Retire todos los materiales de
embalaje y, dado el caso, los
seguros de transporte. Mantenga
el material de embalaje alejado
de los niños. ¡Peligro de asfixia!
2. Compruebe que todas las piezas
estén disponibles. En caso de
que falten piezas o estén deteri-
MONTAR
Principalmente, solo se puede abrir o retirar la tapa si el interruptor de desbloqueo está .
1. Asegúrese de que la base del aparato esté firmemente colocada
sobre una superficie plana.
78
oradas, diríjase a su proveedor o
a nuestro servicio de atención al
cliente.
3. Limpie todas las piezas con un
paño húmedo como se describe
en el capítulo “Limpieza y cuidado”.
Page 79

2. Posicione los dos recipientes ref-
Copyright UNOLD AG | www.unold.de
rigeradores sobre la base del aparato. Las asas de los recipientes
deben señalar hacia fuera dado
que, de lo contrario, no se podrá
montar correctamente el aparato.
3. Coloque correspondientemente
una mezcladora en los recipientes refrigeradores. Para facilitar
el montaje, hay cavidades adecuadas en los recipientes refrigeradores en las que se colocan las
mezcladoras. El eje de las mezcladoras debe señalar hacia arriba.
4. Fije la tapa sobre el aparato y
asegúrese de que encaje. Aten-
ción: el eje de las mezcladoras
se debe introducir a través de la
abertura en la tapa correspon-
dientemente.
5. Bloquee la tapa poniendo el interruptor de desbloqueo en .
6. Ahora, conecte los dos ejes de
la mezcladora con los alojamientos en forma de estrella del motor
previstos para ello.
7. Ahora, el motor se debe colocar sobre la tapa de modo que el
cable de alimentación quede en
la parte trasera del aparato.
ANTES DE LA PREPARACIÓN DE HELADO
1. Antes de poder preparar helado
debe colocar los recipientes refrigeradores llenos de un líquido
refrigerante durante mínimo 8
horas en el congelador o el arcón
congelador de ***. La temperatura debe ser como mínimo de
−18 °C. Asegúrese de limpiar previamente el interior de los recipientes secándolos bien después.
2. Coloque los recipientes refrigeradores verticalmente en el con-
gelador. Gracias a las asas de los
recipientes refrigeradores puede
retirar dichos recipientes cómodamente del congelador sin tener
que tocar los recipientes helados.
3. Dependiendo de la temperatura
del congelador, el proceso de
congelación tardará entre 8 y 22
horas. Agitando los recipientes
puede verificar si se ha congelado
todo el líquido refrigerante.
79
Page 80

4. Consejo: si no va a utilizar la
Copyright UNOLD AG | www.unold.de
máquina de helados, guarde los
recipientes refrigeradores, p. ej.,
en una bolsa de plástico dentro del congelador para tenerlos
siempre listos para su uso.
damos adquirir varios recipientes
refrigeradores. Puede pedir estos
recipientes en nuestra dirección
haciendo uso del formulario de
pedido que se encuentra en la
página 111.
5. Si desea preparar varios tipos de
helado sucesivamente recomen-
ELABORAR HELADO
¡Los ingredientes deseados deberían enfriarse previamente en la nevera durante
unas horas antes de la preparación! En caso de utilizar alcohol para la receta,
debe añadirlo al helado cuando ya tenga la consistencia deseada. La cantidad de
llenado máxima por cada recipiente refrigerador es de 200 ml.
También puede llenar solo un recipiente refrigerador con masa de helado y así
elaborar una única clase de helado. ¡Los recipientes refrigeradores se deben colocar siempre en el aparato para evitar daños en el mismo!
Consejo: Si desea utilizar una receta con alcohol, dosifique bien el alcohol y
añádalo solo al final del tiempo de congelación dado que el alcohol prolonga el
tiempo de congelación.
1. Atención: El aparato debe estar
completamente ensamblado y
conectado antes de llenarlo con
los ingredientes deseados. ¡No
añada nunca los ingredientes al
recipiente refrigerador antes de que
sean necesarios! Los ingredientes
se pueden congelar en el borde
del recipiente y no lograr el resultado deseado. También se puede
bloquear la mezcladora y sobrecalentar el motor. Los ingredientes
solo se deben verter por la abertura de llenado cuando el aparato
está conectado.
2. Prepare la masa de helado
según las recetas incluidas en el
apartado de recetas. Si se trata
de masas de helado que deben
cocerse previamente, hágalo el
día anterior para que la masa
pueda enfriarse bien.
80
3. Recomendamos enfriar la masa
de helado principalmente en la
nevera antes de su uso.
4. Extraiga los recipientes refrigeradores del congelador. Monte el
aparato como se describe en el
capítulo “Montar”.
5. Introduzca el enchufe de red en
una toma de corriente y conecte
el aparato a través del interruptor
CON/DES.
6. Después, abra inmediatamente
la abertura en el tubo de llenado
deseado y vierta masa de helado a
través del tubo en el aparato.
7. Dado que el volumen aumenta
durante la congelación, no llene
los recipientes hasta el borde y
deje un espacio de 4 cm.
8. La cantidad de llenado máxima por
cada recipiente refrigerador es de
200 ml.
Page 81

9. Si la masa de helado se pone dema-
Copyright UNOLD AG | www.unold.de
siado consistente, modifique, en su
caso, la dirección de giro de la
mezcladora correspondiente para
evitar daños en el motor.
10. Deje en marcha la máquina de
helado hasta que este tenga la
consistencia deseada. Según los
ingredientes se tarda entre 15 y
25 minutos. Compruebe de vez
en cuando el proceso de congelación. Sin embargo, recomendamos no conectar y desconectar el
aparato demasiadas veces dado
que el helado podría congelarse
en el borde del recipiente y, en su
caso, provocar que la mezcladora
no funcione correctamente.
11. Desconecte el aparato siempre y
cuando la mezcladora esté parada
para evitar un sobrecalentamiento
del motor. Después, deje enfriar
el aparato y vuelva a conectarlo.
12. Desconecte el aparato en el inter-
ruptor CON/DES.
13. Retire el motor y la tapa girando
el interruptor de desbloqueo a
y levantando la tapa con el motor
hacia arriba.
14. Extraiga las mezcladoras de los
recipientes refrigeradores.
15. Retire los recipientes refrigeradores de la base del aparato.
16. La mejor forma de retirar el helado
es con una espátula de plástico o
de madera para no arañar los recipientes.
17. El helado debe tener una consistencia blanda. Sin embargo, si
prefiere helado más duro, coloque
el recipiente adicionalmente en el
congelador.
18. No guarde el helado en el recipiente durante más de 30 minutos en el congelador. Si no desea
consumir el helado de inmediato,
páselo a un recipiente hermético
para congelación y colóquelo en
el congelador. A causa de la cristalización de las partículas de
agua se pueden formar líneas.
Esto se debe a que la temperatura
óptima para la conservación de
helados es de aproximadamente
−10 °C, pero la temperatura de
los congeladores es, por lo general, más baja.
19. Si el helado aún no ha obtenido
la consistencia deseada y desea
retomar la preparación, debe primero quitar la tapa del motor.
Después, vuelva a ensamblar
todas las piezas como se describe
en el capítulo „Montar“. De este
modo se garantiza que los ejes de
las mezcladoras estén correctamente colocados.
20. Atención: no desconecte el aparato mientras está preparando
el helado. La masa de helado se
congelaría en el borde del recipiente refrigerador. Si el motor
se sobrecalienta durante la preparación, se desconectará. En
ese caso, ponga el interruptor EIN/AUS en „AUS“, retire el
enchufe y deje enfriar el aparato.
Si después desea preparar más
helados, puede ser necesario utilizar nuevos ingredientes. ¡En ese
caso, debe retirar el helado con
una espátula de plástico del recipiente refrigerador y no a través
de la abertura de salida!
81
Page 82

DESENSAMBLAJE, LIMPIEZA Y CUIDADO
Copyright UNOLD AG | www.unold.de
Antes de la limpieza se debe
desconectar siempre el aparato y retirar el enchufe de la
toma de corriente.
No toque los recipientes refrigeradores con las manos desnudas al retirarlos del aparato
para evitar lesiones o congelaciones. Toque los recipientes
refrigeradores solo por el asa
mientras estén congelados.
1. No limpie ni sumerja el aparato
en agua u otros líquidos, especialmente el bloque del motor. No
utilice detergentes abrasivos ni
que puedan rayar la superficie de
limpieza.
2. Puede limpiar las piezas desmontables en agua caliente con un
detergente suave. Las piezas no
son aptas para el lavavajillas.
3. Gire el interruptor de desbloqueo
a y retire el motor y la tapa del
aparato.
4. Separe el motor de la tapa. Para
ello, debe empujar hacia dentro
las dos lengüetas de bloqueo de
la parte inferior de la tapa. Solo
así podrá retirar el motor.
5. Extraiga los ejes de las mezcladoras del motor.
6. Retire las mezcladoras de los recipientes refrigeradores y quite los
recipientes de la base del aparato.
7. Limpie el motor con un paño
húmedo y séquelo bien después.
8. Limpie el mezclador en agua caliente con un detergente suave.
9. Deje que el recipiente refrigerador alcance la temperatura ambiente antes de limpiarlo para evitar
lesiones o congelaciones.
10. Limpie la parte interior del recipiente refrigerador con un paño
húmedo y séquelo bien después.
11. Limpie todas las piezas de la carcasa a fondo en agua caliente con
un detergente suave y séquelas
bien después.
12. Todas las piezas deben estar completamente secas antes de volver
a utilizarlas o a guardarlas.
13. Guarde todas las piezas en un
lugar seco, sin polvo y limpio.
Consejo: conserve el embalaje del
aparato y guarde la máquina de
helados en esta caja mientras no
la utilice.
ELIMINACIÓN DE FALLOS
Fallos Solución
Mal olor Puede presentarse durante el primer uso del aparato.
82
Si el olor persiste incluso tras varios usos, póngase en
contacto con el servicio de atención al cliente.
Page 83

Fallos Solución
Copyright UNOLD AG | www.unold.de
El mezclador no gira Compruebe si el aparato está conectado a una toma de
corriente funcional según la placa de características y
si está encendido.
Si la masa de helado ha quedado demasiado consistente, el mezclador dejará de girar. Desconecte el aparato. Retire el motor, la tapa y el mezclador y deje
que se descongele un poco el helado. Extráigalo, por
ejemplo, con una espátula de plástico.
El motor está sobrecalentado y se ha apagado automáticamente gracias a la protección contra sobrecalentamiento. Desenchufe el aparato y déjelo enfriar.
Retire el motor, la tapa y el mezclador y deje que se
descongele un poco el helado. Extráigalo, por ejemplo,
con una espátula de plástico.
Si no procede ninguna de las causas detalladas, póngase en contacto con nuestro servicio de atención al
cliente.
La masa de helado
no alcanza la consistencia deseada
Revise todos los ingredientes de la receta, mézclelos y
asegúrese de enfriarlos previamente lo suficiente.
En caso de utilizar alcohol, agréguelo a la masa de
helado solo cuando tenga ya la consistencia deseada.
Si añade alcohol antes del tiempo, este evitará que la
masa se solidifique.
CONSEJOS E INDICACIONES IMPORTANTES PARA UN BUEN HELADO
Utilice solo frutas maduras. Añada los trozos de fruta y/o las bayas enteras solo
al final. Si la receta exige que se utilicen huevos, cerciórese que estos sean muy
frescos. Puede sustituir leche por nata o nata por leche. Cuanta más nata uti-
lice, más cremoso quedará el helado. En todas las recetas podrá utilizar también productos lácteos sin lactosa. Las cantidades requeridas corresponden a las
cantidades indicadas. Naturalmente, también podrá utilizar nata líquida de soja
o arroz, por ejemplo. Puede sustituir el azúcar por miel, almíbar o edulcorante.
Esto no es posible si se prepara helado blando. También puede sustituir la leche
por leche de soja. El helado sabe mejor recién preparado. Sin embargo, si desea
guardar el helado por algún tiempo, agregue 30 g de base para helado a la masa
de helado. La base para helado impide que los cristales de agua vuelvan a contraerse durante el almacenamiento convirtiendo el helado en crujiente. Puede
adquirir la base de helado en
83
Page 84

Hobbybäcker-Versand - Inge Pinzer
Copyright UNOLD AG | www.unold.de
Am Mühlholz 6 – 89287 Bellenberg
Tel. (+49) 0 73 06/92 59 00 - Fax (+49) 0 73 06/92 59 05
Internet: www.hobbybaecker.de
Si desea un helado más sólido, ponga la masa de helado entre 15 y 30 minutos
en el congelador antes de verter la masa en la máquina de helados. Durante las
estaciones cálidas, la temperatura de la nevera también es más alta porque, por
ejemplo, la puerta de la misma se suele abrir con más frecuencia y la temperatura ambiental es también más elevada. El helado no se derretirá tan rápido si
se agrega a la masa de helado un sobre de gelatina fix (gelatina de disolución en
frío) antes de congelarlo. Las cantidades que aquí se indican son orientativas y
pueden adaptarse a gusto del consumidor. Le animamos a crear sus propias recetas. En las librerías y en Internet encontrará otras muchas recetas de helado.
El tiempo de preparación correspondiente depende de distintos factores, por
ejemplo, de la temperatura de los ingredientes. Compruebe periódicamente la
consistencia del helado para determinar el momento justo para su extracción.
Las recetas sugeridas se proporcionan por un cargo de dos contenedores refrigerados (cada medio).
IDEAS DE RECETAS PARA NIÑOS
Helado de vainilla
150 ml de leche, 150 g de nata,
1/2 vaina de vainilla, 1 pizca de sal,
1 yema, 40 g de azúcar, 25 g de leche
condensada.
Verter la leche y 50 g de nata en una
cacerola y calentar. Cortar la rama de
vainilla longitudinalmente, raspar el
extracto con una cuchara y añadir junto con la vaina y la sal a la mezcla de
nata y leche. Remover y llevar brevemente a ebullición. Retirar inmediatamente de la placa de cocina y quitar
la vaina.
Batir la yema con el azúcar hasta obtener una crema. Después, añadir la
mezcla de leche y nata caliente sin
dejar de remover. Verter el líquido de
nuevo en la cacerola y calentarlo removiendo hasta que la masa se espese ligeramente. Añadir la leche con-
84
densada, trasvasar la masa y dejar
enfriar durante aproximadamente media hora. Después, ponerla en la nevera durante una hora.
Montar el resto de la nata y añadirla
a la masa de natillas enfriada. Verter
la mezcla en la máquina de helado en
marcha y dejar congelar entre 15 y 30
minutos.
Helado de chocolate
100 ml de leche, 1 yema, 40 g de
azúcar, 1/2 sobrecito de vainilla azucar da, 50 g de chocolate con leche,
100 g de nata, 1 cucharadita de cacao
Calentar la leche en una cacerola y llevar brevemente a ebullición. Mientras
tanto, batir las yemas con la vainilla azucarada hasta obtener una masa
espumosa sólida. Al mismo tiempo,
añadir poco a poco el azúcar. Verter la
Page 85

leche caliente en la masa espumosa
Copyright UNOLD AG | www.unold.de
de huevo sin dejar de remover lentamente con la batidora. Verter de nuevo la mezcla de leche y huevo al cazo
y calentar otra vez sin dejar de remover hasta que el líquido se espese ligeramente. Pasar todo a un recipiente
amasador y dejar enfriar durante aproximadamente media hora.
Mientras tanto, derretir el chocolate
con tres cucharadas de nata al baño
maría sin dejar de remover y añadir directamente una cucharadita colmada
IDEAS DE RECETAS PARA ADULTOS
de cacao a la mezcla de leche y huevos hasta que el chocolate se haya disuelto completamente. Dejar enfriar la
mezcla durante media hora y después
ponerla de nuevo en la nevera durante
aproximadamente una hora.
Montar ligeramente el resto de nata
y añadirla a la leche de chocolate
sin dejar de remover. Agregar todo a
la máquina de helado en marcha y
dejar congelar durante 30 minutos
aproximadamente.
Batido de piña y coco
1 lata de rodajas de piña (aprox. 125 g
de peso neto), 65 ml de leche de coco,
2 claras, 25 g de azúcar glass, 1 cu-
charada de ron blanco, 1/2 plátano,
1/2 cucharada de zumo de limón,
guindas al marrasquino, palillos,
125 ml de zumo de piña, 60 ml más
de leche de coco
Mezclar 3/4 de las rodajas de piña con
el zumo de piña de la lata y la leche de
coco (65 ml) hasta obtener un puré.
Cortar en trozos pequeños las rodajas
restantes, añadirlas y dejar enfriar durante media hora.
Batir las claras con el azúcar glass y
añadir al puré de frutas. Dejar congelar todo durante 40 minutos aproximadamente en la máquina de helado.
Después de 25 minutos, añadir el ron.
Cortar en rodajas la mitad del plátano
y rociar con el zumo de limón. Pinchar
las rodajas y las guindas en los palillos. Añadir bolas grandes de helado a
un recipiente amasador. Guardar el resto en el congelador.
Agregar el zumo de piña, la leche de
coco y el resto del plátano a las bolas de helado y mezclar todo hasta obtener un puré. Distribuir el batido en
cuatro vasos y decorar con los pinchos.
Sorbete de naranja y Campari
35 ml de Campari, 200 ml de zumo de
naranja, 75 g de azúcar glass, 1 clara
Añadir el Campari con 180 ml de zumo
de naranja y 30 g de azúcar glass en
un vaso mezclador alto y batir hasta
que se haya disuelto el azúcar. Poner
todo en la nevera durante dos horas.
Después del tiempo de enfriamiento,
batir la clara con el resto de azúcar
glass y el zumo de naranja restante hasta obtener una espuma. Mezclar esta
masa de claras con la mezcla de naranja y Campari. Agregar la mezcla de
helado a la máquina de helado y dejar
congelar entre 30 y 40 minutos. Consejo: El sorbete de naranja y Campari
es bastante blando por su contenido
de alcohol, de modo que puede dividirlo en porciones directamente desde
85
Page 86

el congelador. Este sorbete sabe muy
Copyright UNOLD AG | www.unold.de
bien si lo añade con una manga pa-
stelera a vasos altos rellenándolos con
zumo de naranja recién exprimido.
CONDICIONES DE GARANTIA
La garantía para nuestros equipos es de 24 meses, y de 12 meses en el caso de uso comercial, a partir de la fecha de
compra, cubriendo los daños que con un uso acorde a lo prescrito pueden atribuirse fehacientemente a defectos de fabricación. Dentro del período de garantía, solucionamos errores de material y de fabricación a consideración nuestra mediante
reparación o cambio. Nuestros servicios de garantía son válidos únicamente para los aparatos que han sido vendidos en
Alemania y Austria. Para todos los demás casos diríjase por favor al importador correspondiente. Aquellos aparatos que se
presentan para eliminar errores, por favor enviarlos junto a una copia del comprobante de compra extendido a máquina, del
cual debe desprenderse la fecha de compra, así como una breve descripción de las deficiencias, apropiadamente embalado
y con los sellos correspondientes a nuestro servicio al cliente. En caso de garantía, los gastos de envío serán restituidos al
cliente solamente en Alemania y Austria. Aquellos daños causados por desgaste están excluidos de la garantía, así como
manipulación incorrecta, e incumplimiento de las condiciones de mantenimiento y cuidado. El derecho a garantía expira si las
reparaciones o mantenimiento son realizadas por terceros. Todo reclamo del consumidor final ante el vendedor, comerciante
no se ve afectado por esta garantía.
DISPOSICIÓN/PROTECCIÓN DEL MEDIO AMBIENTE
Nuestros aparatos se fabrican con un alto nivel de calidad por un largo período de uso. El mantenimiento
regular y las reparaciones de tipo técnico a través de nuestro servicio al cliente pueden prolongar la duración del aparato. Cuando un aparato está defectuoso y ya no puede repararse, por favor considere en la disposición final los siguientes puntos: Este producto no puede ser eliminado junto a la basura domiciliaria.
Usted debe entregar este producto a un lugar oficial para el reciclaje de aparatos eléctricos o electrónicos.
Mediante la clasificación por separado y el reciclaje de productos residuales, Usted contribuye a proteger
los recursos naturales y asegura que el producto sea eliminado de forma salubre y acorde con el medio
ambiente.
Las recetas del presente manual de instrucciones han sido cuidadosamente seleccionadas y probadas
tanto por sus autores como por UNOLD AG quienes, no obstante, no asumen garantía alguna. Queda
explícitamente excluida cualquier responsabilidad de los autores y UNOLD AG o sus delegados por
daños personales, materiales o financieros.
86
Page 87

NÁVOD K OBSLUZE MODELU 48850
Copyright UNOLD AG | www.unold.de
TECHNICKÉ ÚDAJE
Výkon: 12 W, 220–240 V~, 50 Hz
Objem: Cca 500 ml zmrzliny na nádobu
Max. množství
náplně: Max. 200 ml přísad na nádobu
Velikost: Cca 35,1 x 15,3 x 22,3 cm (Š/H/V)
Hmotnost: Cca 2,5 kg
Přívod: Cca 120 cm
Doba přípravy: Cca 15–25 minut
Stupeň
ochrany: II
Vybavení: Zmrzlinový přístroj na 2 x 0,5 litru zmrzliny s chladicím
Příslušenství: Návod k použití s recepty, 2 chladicí nádoby, 2 míchadla
Je vyhrazeno právo na omyly a změny vybavení, techniky, barev a designu
VYSVĚTLENÍ SYMBOLŮ
akumulátorem (doba předchlazení cca 8-12 hodin), příprava
zmrzliny cca 15-25 minut (bez předchlazení), spínač ZAP/VYP,
dva plnicí otvory pro přidávání přísad, dvě vyjímatelné chladicí
nádoby vhodné pro mrazicí přihrádku s označením ***
Tento symbol označuje eventuální nebezpečí, která mohou mít za následek zranění nebo
poškození přístroje.
PRO VAŠI BEZPEČNOST
Následující pokyny si přečtěte a
uložte.
Osoby v domácnosti
1. Přístroj může být používán
dětmi od 8 let a osobami se
sníženými fyzickými, smys-
lovými nebo duševními schopnostmi nebo s nedostatkem
zkušeností a/nebo nedostatkem znalostí, pokud jsou
pod dohledem nebo pokud
byly poučeny o
bezpečném
používání přístroje a
porozuměly rizikům vyplýva
jícím z přístroje. Přístroj není
hračka. Čištění a
údržbu
přístroje smí provádět děti
pouze pod dohledem.
2. Děti do 3 let by se neměly k
přístroji přibližovat nebo být
pod trvalým dohledem.
3. Děti mezi 3 a 8 roky by měly
zapínat a vypínat přístroj
pouze tehdy, když se nachází
87
-
Page 88

ve své určené normální
Copyright UNOLD AG | www.unold.de
pozici ovládání a když jsou
pod dohledem nebo pokud
byly poučeny o bezpečném
používání přístroje a
porozuměly rizikům vyplývajícím z přístroje. Děti mezi 3
a 8 roky
by neměly přístroj
ani připojovat ani ovládat,
čistit nebo provádět údržbu.
4. Je potřeba dohlížet na děti,
aby bylo zajištěno, že si s
přístrojem nehrají.
Zdravotní pokyny
5. Roztátou nebo změklou
zmrzlinu ihned spotřebujte
a nenechávejte ji znovu mrazit.
Konzumujte zmrzlinu pouze
6.
dokud je čerstvá. Případné
zbytky ihned zmrazte a zkon-
zumujte během jednoho
týdne.
Používejte pouze čerstvé
7.
přísady.
8. Zvláště při použití vajec
dbejte na to, aby byla co
nejčerstvější, aby se zabránilo tvoření zárodků. Zbytky
zmrzliny, která obsahuje
vejce, znovu nezmrazujte.
Zmrzliny, které byly
9.
připraveny ze syrových nebo
jen částečně tepelně upravených vajec by neměly být
požívány malými dětmi,
těhotnými
ženami, seniory
nebo chronicky popř. akutně
nemocnými lidmi.
10. Okamžitě přístroj vyčistěte,
když jste ukončili přípravu
zmrzliny. Jinak se mohou
tvořit zárodky.
88
11. Pokud z některé chladicí
nádoby uniká chladicí kapa
lina, musí být tato chladicí
nádoba vyměněna.
Elektrická bezpečnost
12.
Přístroj připojujte pouze na
střídavý proud podle typového štítku.
13.
Tento přístroj nesmí být
používán s externími
časovými spínacími hodi-
nami nebo se systémem pro
dálkové ovládání.
Po použití, před čištěním
14.
nebo při případných
poruchách během provozu
vždy vytáhněte zástrčku ze
zásuvky.
15. Přístroj nikdy neponořujte
do vody nebo jiné tekutiny,
přívod chraňte před vlhkostí.
16. Před použitím přívod
kompletně odviňte.
17. Nenavíjejte přívodní vedení
kolem přístroje a nepřipusťte
lámání přívodu, abyste zab
ránili jeho poškození.
18.
Používejte přístroj pouze ve
vnitřních prostorech.
19. Přívod vytahujte ze zásuvky
pouze za zástrčku, nikdy
přímo za kabel.
20. Aby se předešlo poškození
přívodu, nikdy přístroj za
přívod nenoste ani netahejte.
21. Vytáhněte zástrčku ze
zásuvky dříve, než budete
přístroj rozebírat nebo čistit,
sundávat nebo nasazovat
jednotlivé díly, nebo když se
má přístroj dát na jiné místo.
22. Pravidelně kontrolujte
zástrčku a přívodní kabel,
-
-
Page 89

zda nejsou opotřebeny nebo
Copyright UNOLD AG | www.unold.de
poškozeny. Při poškození
přívodního kabelu nebo jiných dílů pošlete přístroj na
kontrolu a opravu do našeho
servisu. Neodborné opravy
mohou vést k
nebezpečí pro
uživatele a způsobují ztrátu
záruky.
Pokyny k postavení a bezpečnému
použití přístroje
23. Přístroj ani nástavné díly
nejsou vhodné pro mytí v
myčkách.
24. Postavte přístroj na volnou,
rovnou plochu.
25. Přístroj je určen výhradně
pro domácí použití nebo
podobné účely, např.
pro kuchyňky v obchodech,
kancelářích nebo podobných
pracovištích,
zemědělské provozy,
pro použití hosty v hotelu,
motelu nebo jiných
ubytovacích zařízeních,
v soukromých penziónech
nebo rekreačních objektech.
26. Přístroj a přívod z
bezpečnostních důvodů
nikdy neodkládejte na horké
plochy nebo do jejich blíz
kosti.
Kabel nesmí viset dolů přes
27.
hranu pracovní plochy.
28. Nikdy se nedotýkejte vnitřní
strany chladicí nádoby
holýma rukama nebo jin-
ými částmi těla (zvláště když
jsou mokré), abyste se vyva-
rovali zranění/omrzlin.
Nesmí být překročeno
29.
maximální množství náplně.
Chladicí nádoba by měla
být naplněna maximálně 4
cm pod horní okraj, protože
zmrzlina zmrazováním
zvětšuje svůj objem.
30. Přístroj musí být kompletně
sestaven a zapnut, než jej
začnete plnit požadovanými
přísadami. Nikdy nedávejte
požadované přísady do chladicí nádoby předem, protože
by mohly přimrznout
k jejímu
okraji. Nebylo by tak možné
dosáhnout žádoucího výs-
ledku.
Nepohybujte přístrojem,
31.
dokud je v provozu.
32. Nikdy přístroj nenechávejte
bez dozoru, když je v provozu.
Nikdy přístroj nepoužívejte
33.
bez chladicí nádoby!
34. Během provozu nedávejte
žádné předměty do běžícího
přístroje a nesahejte do něj
rukou. Je nebezpečí zranění!
35. Používejte přístroj pouze po
správném sestavení.
36. Nikdy nepoužívejte přístroj
s příslušenstvím jiných
přístrojů.
-
37. V chladicí nádobě
nepoužívejte žádné špičaté
nebo ostré předměty, protože
by se tím mohla poškrábat.
V případě potřeby použijte
plastovou nebo dřevěnou
škrabku.
38. Vypněte přístroj a vytáhněte
síťovou zástrčku, když jste
ukončili přípravu zmrzliny,
když chcete přístroj čistit
89
Page 90

nebo když musíte na přístroji
Copyright UNOLD AG | www.unold.de
odstranit závadu.
39. POZOR: Do nádoby dávejte
jen potraviny.
Nesahat do běžícího přístroje – hrozí nebezpečí poranění!
Pozor: Nikdy se nedotýkejte chladicí nádoby mokrými částmi
těla, např. prsty, abyste se vyvarovali zranění/omrzlin.
V žádném případě těleso přístroje neotevírejte. Je nebezpečí
úderu elektrickým proudem.
Výrobce nepřebírá žádné ručení při chybné montáži, neodborném nebo chybném použití nebo po provedení
opravy neautorizovanými třetími osobami.
PŘED PRVNÍM POUŽITÍM
1. Odstraňte všechny části balení
a případné transportní pojistky.
Materiál balení udržujte mimo
dosah dětí – nebezpečí udušení!
2. Zkontrolujte, zda jsou všechny
části dodány. Pokud by některé
části chyběly nebo byly poškozené,
SESTAVENÍ
Zásadně je možné kryt nasadit nebo sun-
dat pouze tehdy, když je tlačítko odblo-
kování nastaveno na .
1. Zajistěte, aby základna přístroje
stabilně stála na rovné ploše.
2. Obě chladicí nádoby umístěte
na základnu přístroje. Držadla
nádob přitom musí vždy ukazovat směrem ven, protože jinak
nemůže být přístroj správně ses-
taven.
3. Postavte vždy jedno míchadlo
do nádob. Pro snadnější nasazení jsou na chladicích nádobách
umístěna příslušná prohloubení,
do kterých se míchadla zastrčí.
Osa míchadel musí ukazovat
směrem nahoru.
90
obraťte se na Vašeho prodejce
nebo náš zákaznický servis.
3. Všechny části vyčistěte vlhkou
utěrkou, jak je popsáno v kapitole
„Čištění a péče“.
Page 91

4. Upevněte kryt na přístroj a dbejte
Copyright UNOLD AG | www.unold.de
na to, aby kryt zaskočil. Pozor:
Osa míchadel musí být vždy
prostrčena otvorem v krytu.
5. Zablokujte kryt tím, že tlačítko
odblokování nastavíte na .
6. Nyní propojte osy obou míchadel
s k tomu určenými hvězdicovými
úchyty na motoru.
7. Motor musí být nyní na kryt nasa-
zen tak, aby přívod byl na zadní
straně přístroje.
PŘED PŘÍPRAVOU ZMRZLINY
1. Než budete moci připravit zmrzlinu, musíte chladicí nádoby
naplněné chladicí kapalinou dát
na minimálně 8 hodin do mrazicí
přihrádky s označením *** popř.
do mrazáku. Teplota musí činit
minimálně −18 °C. Dbejte na to,
abyste nádoby předem zvnitřku
vyčistili a potom je zcela osušili.
2. Nyní chladicí nádoby postavte
ve vzpřímené poloze do mrazicí
přihrádky. Za držadla můžete
chladicí nádoby pohodlně vyjmout
z mrazicí přihrádky, aniž byste
se museli přímo dotýkat ledově
chladných nádob.
3. Podle teploty mrazáku trvá pro-
ces mražení mezi 8 až 22 hodinami. Zatřesením nádob můžete
zjistit, zda veškerá chladicí kapalina zmrzla.
4. Tip: Když zmrzlinový přístroj
nepoužíváte, uložte chladicí
nádoby např. do plastového sáčku
do mrazáku, aby byla nádoba
stále připravena k použití.
5. Pokud chcete postupně
připravit více druhů zmrzliny,
doporučujeme pořízení dalších
chladicích nádob. Ty můžete
zakoupit přímo u nás, objednací
formulář naleznete na straně 111.
91
Page 92

VÝROBA LEDU
Copyright UNOLD AG | www.unold.de
Požadované přísady by měly být již několik hodin před přípravou předchlazeny
v ledničce! Pokud v receptu používáte alkohol, přidejte jej teprve ke zmrzlině,
která již má požadovanou konzistenci. Maximální množství náplně na jednu chladicí nádobu činí 200 ml.
V zásadě můžete také jen jednu chladicí nádobu naplnit zmrzlinovou hmotou a
vyrobit tak jen jeden druh zmrzliny. Vždy však musí být v přístroji umístěny obě
chladicí nádoby, aby se předešlo jeho poškození!
Tip: Pokud v receptu používáte alkohol, dávkujte jej úsporně a přidávejte až ke
konci doby zmrazování, protože alkohol tuto dobu prodlužuje.
1. Pozor: Přístroj musí být kompletně
sestaven a zapnut, než jej začnete
plnit požadovanými přísadami.
Nikdy nedávejte požadované
přísady do chladicí nádoby předem!
Přísady mohou přimrznout k
okraji nádoby a nebude dosažen
žádoucí výsledek zmrzliny, navíc
se může míchadlo zablokovat a
motor přehřát. Přísady dávejte do
plnicího otvoru vždy teprve tehdy,
když je přístroj zapnutý.
2. Připravte si zmrzlinovou hmotu
podle receptů v části recepty.
Pokud jde o zmrzlinovou hmotu,
která se musí předem povařit,
připravte ji o den dříve, aby mohla
dobře vychladnout.
3. Radíme nechat zmrzlinovou
hmotu před použitím vždy vychladit v ledničce.
4. Vyndejte chladicí nádoby z mra-
zicí přihrádky. Sestavte přístroj
tak, jak je popsáno v kapitole
„Sestavení“.
5. Zastrčte zástrčku do zásuvky a
zapněte přístroj spínačem ZAP/
VYP.
6. Potom otevřete příslušný plnicí
otvor a naplňte skrz něj přístroj
zmrzlinovou hmotou.
92
7. Protože se během zmrazování
zvětšuje objem, neplňte chladicí
nádobu až po okraj, ale nechte
cca 4 cm místo.
8. Maximální množství náplně na
jednu chladicí nádobu činí 200 ml.
9. Když je zmrzlinová hmota příliš
pevná, případně se změní směr
otáčení daného míchadla, aby se
předešlo poškození motoru.
10. Nechte zmrzlinový přístroj v
chodu tak dlouho, dokud zmrz-
lina nezíská požadovanou konzistenci. Podle přísad to trvá
15 až 25 minut. Občas zkontrolujte průběh zmrazování. Radíme
však, abyste přístroj nezapínali
a nevypínali příliš často, protože
přitom zmrzlina může přimrznout
k okraji nádoby a míchadlo pak již
případně nepracuje správně.
11. Vždy přístroj vypněte, když
se míchadlo zastavilo, abyste
předešli přehřátí motoru. Nechte
pak přístroj trochu vychladnout a
opět jej zapněte.
12. Vypněte přístroj spínačem ZAP/
VYP.
13. Sundejte motor a kryt tím, že
tlačítko odblokování otočíte na
Page 93

a kryt s motorem zvednete nah-
Copyright UNOLD AG | www.unold.de
oru.
14. Vytáhněte míchadla z chladicích
nádob.
15. Sundejte chladicí nádoby ze
základny přístroje.
16. Zmrzlinu vyjměte nejlépe plastovou nebo dřevěnou stěrkou, aby-
ste nádoby nepoškrábali.
17. Zmrzlina by měla mít měkkou
konzistenci. Pokud však dáváte
přednost tvrdší zmrzlině, postavte potom nádobu do mrazicí
přihrádky/mrazáku.
18. Nádobu se zmrzlinou však v mra-
zicí přihrádce nenechávejte déle
než 30 minut. Když zmrzlinu
nechcete jíst okamžitě, naplňte
ji do uzavřené mrazicí dózy a tu
postavte do mrazicí přihrádky.
Zmrzlina přitom spojováním ledových krystalů může tvořit ledovou
krustu, protože optimální teplota
pro zmrzlinu je −10°C, teplota
v mrazicích přístrojích však
většinou bývá nižší.
19. Pokud zmrzlina ještě nedosáhla
požadované konzistence a chcete
opět zahájit přípravu, musíte
nejprve uvolnit kryt od motoru.
Potom všechny díly sestavte tak,
jak je popsáno v kapitole „Ses-
tavení“. Tak je zajištěno, že osy
míchadel budou vloženy správně.
20. Pozor: Během přípravy zmrzliny
však přístroj nevypínejte. Zmrzlinová hmota by přitom přimrzla k
okraji chladicí nádoby. Pokud by
se motor během přípravy přehřál,
vypne se. V takovém případě nastavte spínač ZAP/VYP na „AUS“,
vytáhněte síťovou zástrčku a
nechte jej vychladnout. Když pak
chcete dále připravovat zmrzlinu, musíte případně použít
nové přísady. V takovém případě
by zmrzlina měla být z chla-
dicí nádoby vybrána plastovou
stěrkou, nikoli skrz výstupní otvor!
ROZEBRÁNÍ, ČIŠTĚNÍ A PÉČE
Před čištěním přístroj vždy
vypněte a vyndejte zástrčku ze
zásuvky.
Nikdy se nedotýkejte chladicích nádob holýma rukama,
když je zvedáte z přístroje,
abyste se vyvarovali zranění/
omrzlin. Nedotýkejte se chla-
dicích nádob, dokud jsou ještě
ledově chladné, pouze za
držadlo.
1. Přístroj, zvláště pak blok motoru,
nečistěte pod vodou nebo jinou
kapalinou. Nepoužívejte žádné
abrazivní čisticí prostředky, nebo
prostředky, které mohou způsobit
poškrábání.
2. Vyjímatelné části můžete očistit
teplou vodou s jemným sapo-
nátem. Části nejsou vhodné pro
čištění v myčce.
3. Tlačítko odblokování otočte na
a motor a kryt zvedněte z přístroje.
4. Oddělte motor od krytu. K tomu
musíte oba aretační výstupky na
spodní straně krytu stisknout
dovnitř, pouze tak lze motor sun-
dat.
93
Page 94

5. Vytáhněte osy míchadel z motoru.
Copyright UNOLD AG | www.unold.de
6. Vyjměte míchadla z chladicích
nádob a zvedněte chladicí nádoby
ze základny přístroje.
7. Otřete motor vlhkou utěrkou
dočista a potom jej dobře osušte.
8. Vyčistěte míchadlo teplou vodou a
jemným saponátem.
9. Nechte chladicí nádobu ohřát na
pokojovou teplotu, než ji budete
čistit, abyste předešli zraněním
11. Části tělesa důkladně očistěte
teplou vodou a jemným saponá-
tem a potom je dobře osušte.
12. Před příštím použitím nebo před
uložením musí být všechny díly
zcela suché.
13. Uložte všechny části na suchém,
bezprašném a čistém místě.
Tip: Uložte si obal přístroje a při
delším nepoužívání zmrzlinový
přístroj vložte do tohoto kartonu.
popř. omrzlinám.
10. Otřete vnitřní stranu chladicí
nádoby vlhkou utěrkou a potom ji
dobře osušte.
ODSTRAŇOVÁNÍ CHYB
Chyba Řešení
Vznik zápachu Případně se vyskytne při prvním použití přístroje.
Pokud se zápach vyskytuje i po několika použitích, obraťte
se na náš servis.
Míchadlo se
neotáčí
Zkontrolujte, zda přístroj je zapojen do funkční zásuvky po-
dle typového štítku a je zapnutý.
Pokud zmrzlinová hmota příliš ztuhne, přestane se
míchadlo otáčet. Vypněte přístroj. Demontujte motor, kryt
a míchadlo a nechte zmrzlinu trochu změknout. Případně
ji vyjměte plastovou stěrkou.
Motor je přehřátý a byl automaticky vypnut tepelnou
ochranou. Vytáhněte zástrčku ze zásuvky a nechte přístroj
vychladnout. Demontujte motor, kryt a míchadlo a nechte
zmrzlinu trochu změknout. Případně ji vyjměte plastovou
stěrkou.
Pokud žádná z uvedených příčin neodpovídá, obraťte se na
náš servis.
Zmrzlinová hmota nedosahuje
požadované konzistence
Zkontrolujte všechny přísady receptu, dobře je promíchejte
a dbejte na to, abyste je dostatečně předchladili.
Pokud případně používáte alkohol, přidejte jej teprve ke
zmrzlinové hmotě, která již dosáhla požadované konzistence. Když přidáte alkohol příliš brzy, zabrání to ztuhnutí
hmoty.
94
Page 95

DŮLEŽITÉ TIPY A INFORMACE PRO DOBROU ZMRZLINU
Copyright UNOLD AG | www.unold.de
Používejte pouze zcela zralé ovoce. Kousky ovoce a/nebo celé bobuloviny přidejte
až ke konci. Pokud recept počítá s přidáním vajec, použijte pouze velmi čerstvá
vejce. Mléko můžete nahradit smetanou nebo smetanu mlékem. Čím více smetany použijete, tím bude zmrzlina krémovější.
Pro všechny recepty můžete použít mléčné produkty bez obsahu laktózy.
Potřebná množství odpovídají uvedeným množstvím. Samozřejmě můžete také
použít šlehaný krém ze sóji nebo rýže.
Cukr můžete nahradit medem, sirupem nebo sladidlem. U točené zmrzliny to
však není možné. Mléko může být nahrazeno sójovým mlékem. Zmrzlina nejlépe
chutná čerstvě připravená. Pokud však chcete zmrzlinu uložit na delší dobu,
přidejte ke zmrzlině 30 g zmrzlinového základu. Zmrzlinový základ zabrání tomu
aby se vodní krystaly při skladování opět spojily a zmrzlina byla drobivá. Zmrzli-
nový základ (Eisbasis) nakoupíte u
Hobbybäcker-Versand - Inge Pinzer
Am Mühlholz 6 – 89287 Bellenberg
Tel. 0 73 06/92 59 00 - Fax 0 73 06/92 59 05
Internet: www.hobbybaecker.de
Pokud si přejete pevnější zmrzlinu, postavte zmrzlinovou hmotu na 15-30 minut do mrazicí přihrádky, než hmotou naplníte zmrzlinový přístroj. Právě v letním období jsou teploty i v ledničce o něco vyšší, protože se např. lednička otevírá a teplota místnosti je vysoká. Zmrzlina se nerozteče tak rychle, když před
zmražením přidáte do zmrzlinové hmoty balíček želatiny Fix (za studena rozpustná želatina). Zde uvedená množství jsou jen orientační, je možné je upravit podle
osobní chuti. Nebojte se někdy vyzkoušet i své vlastní kreace. V prodejnách knih
a na internetu navíc naleznete spoustu dalších receptů na zmrzlinu.
Daná doba přípravy závisí na různých faktorech, jako např. na teplotě přísad.
Pravidelně kontrolujte konzistenci zmrzliny, abyste zjistili správný okamžik pro
její odebrání. Navrhované recepty jsou poskytovány za poplatek dvou chladicích
nádobách (každá polovina).
95
Page 96

RECEPTY PRO DĚTI
Copyright UNOLD AG | www.unold.de
Vanilková zmrzlina
150 ml mléka, 150 g smetany, 1/2
vanilkového lusku, 1 špetka soli, 1
žloutek, 40 g cukru, 25 g kondenzovaného mléka.
Mléko a 50 g smetany dejte do hrnce
a ohřejte. Vanilkový lusk podélně
rozřízněte, jádro lžičkou vyškrábejte a
společně s luskem a solí přidejte do
smetanového mléka. To vše za stálého
míchání ještě jednou uveďte do varu,
okamžitě sundejte z varné desky a lusk
vyjměte. Žloutek s cukrem ušlehejte do
krémova, potom vmíchejte horké sme-
tanové mléko. Tekutinu nalijte zpět do
hrnce a za stálého míchání ohřívejte,
až hmota mírně zhoustne. Vmíchejte
kondenzované mléko, hmotu přelijte a
nechte asi půl hodiny chladnout, než
ji dáte na hodinu do ledničky. Zbylou
smetanu ušlehejte do tuha a vmíche-
jte do vychlazené pudingové hmoty.
Vložte směs do běžícího zmrzlinového přístroje a nechte 15 až 30 minut
mrazit.
Mléko ohřejte v hrnci a nechte jej jednou vzkypět. Mezitím žloutky s va-
nilkovým cukrem ušlehejte do pevné
pěnové hmoty. Cukr přitom přidávejte
postupně. Horké mléko za stálého
míchání šlehací metlou pomalu nalijte
do zmrzlinové pěnové hmoty. Mléko
se žloutky nalijte zpět do hrnce a za
stálého míchání jej znovu ohřívejte,
až tekutina mírně zhoustne. To vše
dejte do míchací nádoby a nechte
přibližně půl hodiny chladnout. Mezitím rozpusťte za stálého míchání ve
vodní lázni čokoládu se třemi lžícemi
smetany a ihned s vrchovatou čajovou
lžičkou kakaa vmíchejte do mléka se
žloutky, až se čokoláda zcela rozpustí. Nechte směs asi půl hodiny chladnout, než ji znovu dáte přibližně na
hodinu do ledničky. Zbylou smetanu mírně našlehejte a vmíchejte do
čokoládového mléka. To vše vložte
do běžícího zmrzlinového přístroje a
nechte přibližně 30 minut mrazit.
Čokoládová zmrzlina
100 ml mléka, 1 žloutek, 40 g cukru,
1/2 sáček vanilkového cukru, 50 g
mléčné čokolády, 100 g smetany, 1
čajová lžička kakaa
RECEPTY PRO DOSPĚLÉ
Ananasovo kokosový koktejl
1 konzerva ananasových plátků (náplň
cca 125 g), 65 ml kokosového mléka,
2 bílky, 25 g práškového cukru, 1lžíce
bílého rumu, 1/2 banán, 1/2 lžíce citrónové šťávy, koktejlové třešně, malé
dřevěné špízy, 125 ml ananasové
96
šťávy, dalších 60 ml kokosového mléka
Rozmixujte 3/4 ananasových plátků s
ananasovou šťávou z konzervy a koko-
sovým mlékem (65 ml). Zbylé plátky
rozkrájejte na malé kousky, přidejte je
a vše dejte na půl hodiny do chladna.
Page 97

Ušlehejte bílky s práškovým cukrem
Copyright UNOLD AG | www.unold.de
a vmíchejte je do ovocného pyré. To
vše vložte do zmrzlinového přístroje a
nechte přibližně 40 minut mrazit. Po
25 minutách přidejte rum. Polovinu
banánu nakrájejte na plátky a pokape-
jte citrónovou šťávou. Plátky a třešně
napíchejte na malé dřevěné špízy.
Do míchací nádoby dejte čtyři velké
kopečky zmrzliny. Zbytek uložte do
mrazáku. Ananasovou šťávu, kokosové mléko a zbytek banánu přidejte ke
kopečkům zmrzliny a vše rozmixujte.
Míchaný nápoj rozdělte do čtyř sklenic
a ozdobte špízy.
Sorbet s campari a pomerančem
35 ml campari, 200 ml pomerančové
šťávy, 75 g práškového cukru, 1 bílek
Campari se 180 ml pomerančové šťávy
a 30 g práškového cukru dejte do vyso-
kého poháru a míchejte tak dlouho, až
se cukr rozpustí. To vše dejte na dvě
hodiny do ledničky. Po uplynutí doby
chlazení bílek se zbylým práškovým
cukrem a zbytkem pomerančové
šťávy ušlehejte do pěny. Tuto bílkovou hmotu rozmíchejte se směsí
pomerančové šťávy a campari. Vložte
zmrzlinovou směs do běžícího zmrzlinového přístroje a nechte 30 až 40
minut mrazit. Tip: Sorbet s campari
a pomerančem je kvůli obsahu alkoholu dost měkký, takže jej lze porcovat přímo z mrazicího přístroje. Velice dobře tento sorbet chutná, když jej
sáčkem na zdobení dáte do vysokých
sklenic a doplníte čerstvě vymačkanou
pomerančovou šťávou.
97
Page 98

ZÁRUČNÍ PODMÍNKY
Copyright UNOLD AG | www.unold.de
Na naše přístroje poskytujeme záruku v trvání 24 měsíců (u průmyslového využití 12 měsíců) od data koupě výrobku, záruka
se vztahuje na poškození, která prokazatelne vznikla při správném použití v důsledku výrobních vad. Po dobu záruky budeme
odstraňovat materiální i výrobní vady opravou nebo výměnou podle našeho uvážení. Poskytnutí záruky výhradně platí pro
zařízení prodány v Německu i Rakousku. V jiných zemích se obrat’te prosím na kompetentní dovozce. Přístroje, na které
bylo uplatňováno odstranění vad, zašlete prosím smechanicky vyhotovenou kopií nákupního dokladu, ze kterého musí být
bezpodmínečně patrný datum nákupu i s popisem vad, přístroj musí být bezpečně zabalen a nafrankován na náš záruční
servis. V připadě opravněné záruky jsou kupujícím vraceny poštovní poplatky v Německu i Rakousku. Tato záruka se nevztahuje
na poškození způsobená opotřebením, nesprávným zacházením a nedodržováním návodů kúdržbě a obsluze. Záruční doba
zaniká, když opravy nebo manipulace s přístrojem byly provedeny třetí osobou. Eventuální nároky zákazníka vůči prodejci/
obchodníku nejsou touhle zárukou omezeny.
LIKVIDACE / OCHRANA ŽIVOTNÉHO PROSTŘEDÍ
Naše vyrobené přístroje mají vysoce kvalitní standard pro zajišt’ění jejich dlouhé životnosti. Pravidel-
né údržby i opravy odborně provedeny naším prodejním servisem mohou mít vliv na prodloužení provozní
životnosti přístroje. Když je přístroj vadný a už ho nelze opravit, neopomeňte prosím: Toto zařízení nepatří do
běžného domovního odpadku, ale musí být předáno do autorizované sběrny pro recyklování elektrických nebo
elektronických zařízení. Separátní sběr a recyklování odpadních produktů umožňuje šetření přírodních zdrojů
a zajišt’uje, aby byly odpady likvidovány způsobem, který je pro zdraví a kologii přijatelný.
Recepty v tomto návodu k použití byly pečlivě zváženy a odzkoušeny autory z firmy UNOLD AG, přesto
není možno za tyto převzít záruku. Poskytnutí záruky na poškození zdraví, věcné a majetkové škody
prostřednictvím autorů popř. firmou UNOLD AG a jí pověřenými osobami je vyloučeno.
98
Page 99

INSTRUKCJA OBSŁUGI MODEL 48850
Copyright UNOLD AG | www.unold.de
DANE TECHNICZNE
Moc: 12 W, 220–240 V~, 50 Hz
Pojemność: Ok. 500 ml lodów / pojemnik
Maks. ilość
napełnienia: 200 ml składników / pojemnik
Rozmiary: Ok. 35,1 x 15,3 x 22,3 cm (szer./głęb./wys.)
Ciężar: Ok. 2,5 kg
Przewód zasilający: Ok. 120 cm
Czas przygotowania: Ok. 15 – 25 min
Stopień ochrony: II
Wyposażenie: Maszyna do lodów do produkcji 2 x 0,5 l lodów, z
Akcesoria: Instrukcja obsługi z przepisami, 2 pojemniki chłodzące,
Zmiany i błędy w opisie wyposażenia, technice, kolorach i konstrukcji są
zastrzeżone
OBJAŚNIENIE SYMBOLI
wkładem chłodzącym (czas chłodzenia wstępnego ok.
8 - 12 godzin), czas przygotowywania lodów ok. 15 -
25 minut (bez chłodzenia wstępnego), przycisk WŁ./
WYŁ., dwa otwory do napełniania, dwa wyjmowane
pojemniki chłodzące przystosowane do temperatury w
zamrażalniku ***
2 mieszadła
Symbol ten oznacza ewentualne niebezpieczeństwa, które mogą prowadzić do obrażeń
lub uszkodzenia urządzenia.
DLA BEZPIECZEŃSTWA UŻYTKOWNIKA
Prosimy przeczytać poniższe instrukcje i zachować je do użytku
w przyszłości.
Wskazówki dotyczące osób
podarstwie domowym
Urządzenie może być
1.
używane przez dzieci w wieku
powyżej 8 lat lub osoby o
ograniczonej sprawności
fizycznej, sensorycz-
nej czy umysłowej lub nie
posiadające doświadczenia
w gos-
i/lub wiedzy,
jeśli są one
nadzorowane lub zostały
przeszkolone w zakresie
bezpiecznego użytkowania
urządzenia i zrozumiały
niebezpieczeństwa
wynikające z użytkowania
urządzenia. Urządzenie nie
jest zabawką. Dzieci mogą
czyścić i konserwować
urządzenie tylko pod nadzo
-
rem.
99
Page 100

2. Nie dopuszczać do
Copyright UNOLD AG | www.unold.de
urządzenia dzieci w wieku
poniżej 3 lat lub nadzorować
je przez cały czas.
3. Dzieci w wieku od 3 do 8
lat mogą włączać i wyłączać
urządzenie tylko wtedy, gdy
znajduje się ono w swojej
normalnej pozycji obsługi,
gdy dzieci są nadzorowane lub zostały poinstruo-
wane na temat bezpieczn-
ego użytkowania i zrozumiały
niebezpieczeństwa
wynikające z
użytkowania
urządzenia. Dzieci w wieku
od 3 do 8 lat nie powinny
urządzenia podłączać,
obsługiwać, czyścić ani
konserwować.
4. Nie dopuścić, aby dzieci
bawiły się urządzeniem.
Wskazówki dotyczące zdrowia
5. Rozmrożone lody należy
natychmiast spożyć i
nie należy ich ponownie
zamrażać.
6. Lody należy spożywać tylko
świeże. Ewentualne resztki
należy natychmiast zamrozić
i spożyć w ciągu tygodnia.
7. Używać tylko świeżych
składników.
8. Przede wszystkim jaja
powinny być bardzo świeże,
aby uniknąć namnażania się
szkodliwych mikroorganiz
-
mów. Resztek lodów, które
zawierają jaja, nie
należy
ponownie zamrażać.
9. Lody przyrządzone z dodatkiem surowych jaj lub
częściowo surowych jaj
100
nie
powinny być spożywane
przez małe dzieci, kobiety
w ciąży, starsze osoby lub
chore osoby.
10. Urządzenie należy
czyścić natychmiast po
przyrządzeniu lodów. W
innym przypadku może dojść
do namnażania się bakterii.
11. Jeżeli z pojemnika
chłodzącego wycieka
płyn chłodzący, należy go
wymienić na nowy.
Bezpieczeństwo elektryczne
12. Podłączać urządzenie
wyłącznie do prądu zmienn
-
ego o napięciu podanym na
tabliczce znamionowej.
13.
Urządzenie nie może
pracować z zewnętrznym
programatorem czasowym
lub systemem zdalnego sterowania.
Po użyciu, przed czyszcze-
14.
niem lub w razie ewentual-
nych zakłóceń podczas pracy
należy zawsze wyciągnąć
wtyczkę z gniazdka.
Nie zanurzać urządzenia do
15.
wody ani do innej cieczy,
chronić kabel przed wilgocią.
16. Przed użyciem kabel
całkowicie rozwinąć.
17. Nie owijać kabla wokół
urządzenia i nie zaginać go,
aby uniknąć jego uszkodze
-
nia.
18.
Używać urządzenie tylko
w pomieszczeniach
wewnętrznych.
19. Podczas wyciągania wtyczki
z gniazdka ciągnąć tylko za
 Loading...