


Toshiba RAS-3M23GACV-E, RAS-M10GDV-E, RAS-M14GACV-E, RAS-M18GACV-E, RAS-4M27GACV-E Owner Manual
...OWNER’S MANUAL MANUEL DU PROPRIETAIRE BETRIEBSANLEITUNG
MANUALE DEL PROPRIETARIO
MANUAL DEL PROPIETARIO
MANUAL DO USUÁRIO
ПдзгЯет ЧсЮузб
AIR CONDITIONER (MULTI-SPLIT TYPE) CLIMATISEUR (TYPE MULTI-SPLIT) KLIMAGERÄT (MULTI-SPLIT SYSTEM)
CONDIZIONATORE D'ARIA (TIPO MULTIAMBIENTI) AIRE ACONDICIONADO (TIPO MULTI-SPLIT)
CONDICIONADOR DE AR (TIPO COM MÚLTIPLA DIVISÃO)
КЛЙМБФЙУФЙКП (TÕÐÏÓ MULTI-SPLIT)
<Concealed Duct Type>
<Type à conduits dissimulés> / <Luftkanal verborgen montiert> <Tipo a condotto nascosto> / <Modelo con conductos ocultos> <Tipo com Conduto Embutido> / <Фэрпт ухгкекблхммЭнпх бгщгпэ>
Indoor Unit |
Outdoor Unit |
Unité intérieure/Raumeinheit |
Unité extérieure/Außeneinheit |
Unità interna/Unidad interior |
Unità esterna/Unidad exterior |
Unidade Interna/ЕущфесйкЮ МпнЬдб |
Unidade Externa/ЕощфесйкЮ МпнЬдб |
Cooling Only Model
Modèle à froid seul/Geräte nur zur Kühlung
Modello solo per raffreddamento/Modelo de refrigeración únicamente
Modelo Apenas para Refrigeração/МпнфЭлп Шэозт брпклейуфйкЬ
RAS-M10GDCV-E RAS-M13GDCV-E RAS-M16GDCV-E
RAS-M14GACV-E RAS-M18GACV-E RAS-3M23GACV-E RAS-4M27GACV-E
Heat Pump Model
Modèle à thermopompe/Geräte mit Heizung
Modello con pompa di riscaldamento/Modelo con bomba de calor Modelo da Bomba de Calor/МпнфЭлп ме БнфлЯб Иесмьфзфбт
RAS-M10GDV-E RAS-M13GDV-E RAS-M16GDV-E
RAS-M14GAV-E RAS-M18GAV-E RAS-3M26GAV-E RAS-4M27GAV-E
Thank you very much for purchasing TOSHIBA Air Conditioner.
Please read this owner's manual carefully before using your Air Conditioner.
• Be sure to keep the “Owner’s manual” and “Installation manual” from constructor (or dealer).
Request to constructor or dealer
Please clearly explain the contents of the Owner’s manual and hand over it.
Nous vous remercions pour avoir choisi un climatiseur TOSHIBA.
Veuillez lire attentivement ce Manuel du propriétaire avant d’utiliser votre climatiseur.
•Assurez-vous que le constructeur (ou le revendeur) vous remette le ”Manuel du propriétaire” et le ”Manuel d’installation”.
Demande au constructeur ou au revendeur
Veuillez expliquer clairement le contenu du Manuel du propriétaire et le remettre.
Wir danken Ihnen, dass Sie sich für ein TOSHIBA Klimagerät entschieden haben. Bitte lesen Sie, bevor Sie Ihr Klimagerät benutzen, diese Betriebsanleitung sorgfältig.
• Lasse Sie sich die “Betriebsanleitung” und das “Installations-Handbuch” unbedingt vom Installateur oder vom Lieferanten aushändigen. Eine Bitte an den Installateur oder Lieferanten:
Bitte erklären Sie dem Käufer den Inhalt der Betriebsanleitung und händigen sie ihm aus.
Grazie di aver acquistato un condizionatore d'aria TOSHIBA.
Prima di usare il condizionatore d'aria, leggere con attenzione questo manuale del proprietario.
• Si raccomanda di tenere a portata di mano il "Manuale del proprietario" e il "Manuale di installazione" ricevuti dal produttore (o dal rivenditore). Richiesta al produttore o al rivenditore
Spiegare chiaramente il contenuto del Manuale del proprietario e consegnarne una copia all'utente.
\Muchas gracias por haber adquirido el aparato de aire acondicionado TOSHIBA.
Lea atentamente este Manual del propietario antes de utilizar el aparato de aire acondicionado.
• Asegúrese de guardar el “Manual del propietario” y el “Manual de instalación” que le proporcione el fabricante (o distribuidor). Solicitud al fabricante o distribuidor
Explique con claridad el contenido del Manual del propietario y entréguelo al cliente.
Muito obrigado por adquirir um Condicionador de Ar TOSHIBA.
Por favor, leia este Manual de Instalação atentamente, antes da instalação do Condicionador de Ar.
• Certifique-se de manter o “Manual do Usuário” e o “Manual de instalação” do fabricante (ou representante). Peça ao fabricante ou representante
Por favor, não deixe de esclarecer o conteúdo manualdo Usuário e passe-o adiante.
Убт ехчбсйуфпэме рплэ рпх рспфймЮубфе гйб фзн бгпсЬ убт Энб Клймбфйуфйкь TOSHIBA. Рбсбкблпэме дйбвЬуфе рспуечфйкЬ фйт пдзгЯет чсЮузт рсйн брь фз чсЮуз фпх Клймбфйуфйкпэ.
• ВевбйщиеЯфе ьфй п кбфбукехбуфЮт (Ю п рщлзфЮт) убт рбсЭдщуе кбй фйт «ПдзгЯет ЧсЮузт» кбй фп «ЕгчейсЯдйп ЕгкбфЬуфбузт». РбсЬклзуз гйб фпн кбфбукехбуфЮ Ю фпн рщлзфЮ Рбсбкблю еозгЮуфе ме убцЮнейб фб ресйечьменб фщн Пдзгйюн ЧсЮузт кбй рбсбдюуфе фп.

ADOPTION OF NEW REFRIGERANT
This Air Conditioner is a new type one which adopts a new refrigerant HFC (R410A) instead of the conventional refrigerant R22 in order to prevent destruction of the ozone layer.
UTILISATION DU NOUVEAU REFRIGERANT
Ce climatiseur est d’un type inédit qui utilise le nouveau réfrigérant HFC (R410A) au lieu du réfrigérant traditionnel R22, afin d’éviter la destruction de la couche d’ozone.
VERWENDUNG EINES NEUEN KÜHLMITTELS
Dies ist ein neuartiges Klimagerät. Anstatt des herkömmlichen Kühlmittels R22 verwendet es das neue ozonschichtschonende HFC Kühlmittel R410A.
ADOZIONE DI UN NUOVO REFRIGERANTE
Questo condizionatore d'aria è di un tipo nuovo che adotta un nuovo refrigerate HFC (R410A) al posto del refrigerante convenzionale R22, per prevenire la distruzione dello strato di ozono dell'atmosfera terrestre.
ADOPCIÓN DE NUEVO REFRIGERANT
Este aparato de aire acondicionado es un modelo reciente que incorpora el nuevo refrigerante HFC (R410A) en lugar del refrigerante convencional R22 para evitar daños en la capa de ozono.
ADOÇÃO DO NOVO REFRIGERANTE
Este Condicionador de Ar é um tipo novo que adota o novo refrigerante HFC (R410A) ao invés do refrigerante convencional R22, de forma a prevenir a destruição do camada de ozônio.
ХЙПИЕФЗУЗ НЕПХ ШХКФЙКПХ
Фп рбсьн Клймбфйуфйкь еЯнбй Энбт нЭпт фэрпт рпх хйпиефеЯ Энб еоЯупх нЭп шхкфйкь HFC (R410A) уфз иЭуз фпх ухмвбфйкпэ шхкфйкпэ R22 рспкеймЭнпх нб впзиЮуей уфзн рспуфбуЯб фпх ьжпнфпт.

CONTENTS |
|
|
|||
ACCESSORIES ........................................................................................................ |
1 |
DRY OPERATION ................................................................................................... |
10 |
ENGLISH |
|
PRECAUTIONS FOR SAFETY ................................................................................ |
1 |
HIGH POWER OPERATION ................................................................................... |
11 |
||
PARTS NAME .......................................................................................................... |
3 |
TIMER OPERATION ............................................................................................... |
11 |
||
TEMPORARY OPERATION / VOLTAGE SETTING .................................................. |
4 |
MEMORY/PRESET OPERATION ........................................................................... |
13 |
||
PARTS NAME OF REMOTE CONTROLLER .......................................................... |
5 |
AUTO RESTART FUNCTION ................................................................................. |
14 |
||
NAMES AND FUNCTIONS OF INDICATIONS ON REMOTE CONTROLLER ....... |
6 |
HOW THE AIR CONDITIONER WORKS ................................................................ |
15 |
||
PREPARATION AND CHECK BEFORE USE ......................................................... |
7 |
MAINTENANCE ..................................................................................................... |
16 |
||
HANDLING THE REMOTE CONTROLLER ............................................................. |
8 |
AIR CONDITIONER OPERATIONS AND PERFORMANCE ................................. |
18 |
||
AUTOMATIC OPERATION |
9 |
INSTALLATION |
19 |
||
|
|||||
AUTOMATIC OPERATION (AUTO CHANGEOVER) ............................................... |
9 |
TROUBLES AND CAUSES .................................................................................... |
19 |
|
|
COOLING/HEATING/FAN ONLY OPERATION ...................................................... |
10 |
TROUBLES AND CAUSES (Concerning Remote Controller) ............................ |
21 |
|
|
|
|
|
|||
SOMMAIRE |
|
|
|||
ACCESSOIRES ...................................................................................................... |
22 |
DESHUMIDIFICATION ........................................................................................... |
31 |
FRANCAIS |
|
MESURES DE SECURITE ..................................................................................... |
22 |
FONCTIONNEMENT A HAUTE PUISSANCE ....................................................... |
32 |
||
NOM DES PIECES ................................................................................................. |
24 |
FONCTIONNEMENT PAR MINUTERIE ................................................................. |
32 |
||
FONCTIONNEMENT TEMPORAIRE / REGLAGE DE LA TENSION .................... |
25 |
MEMORISATION / PROGRAMMATION ................................................................ |
34 |
||
NOM DES PIECES DE LA TELECOMMANDE ...................................................... |
26 |
FONCTION DE REDEMARRAGE AUTOMATIQUE ............................................... |
35 |
||
NOM ET FONCTIONS DES INDICATIONS DE LA TELECOMMANDE ................ |
27 |
COMMENT FONCTIONNE LE CLIMATISEUR ...................................................... |
36 |
||
PREPARATION ET VERIFICATION AVANT UTILISATION ................................... |
28 |
ENTRETIEN ............................................................................................................ |
37 |
||
MANIPULATION DE LA TELECOMMANDE .......................................................... |
29 |
FONCTIONNEMENT ET PERFORMANCES DU CLIMATISEUR ......................... |
39 |
||
FONCTIONNEMENT AUTOMATIQUE ................................................................... |
30 |
INSTALLATION ...................................................................................................... |
40 |
||
FONCTIONNEMENT AUTOMATIQUE (CHANGEMENT AUTOMATIQUE) ........... |
30 |
PROBLEMES ET CAUSES .................................................................................... |
40 |
|
|
REFROIDISSEMENT / CHAUFFAGE / VENTILATION SEULE ............................. |
31 |
PROBLEMES ET CAUSES (Concernant la télécommande) .............................. |
42 |
|
|
|
|
|
|
||
|
INHALT |
|
|
||
ZUBEHÖR .............................................................................................................. |
43 |
BETRIEBSART ENTFEUCHTEN ........................................................................... |
52 |
DEUTSCH |
|
SICHERHEITSVORKEHRUNGEN ......................................................................... |
43 |
HÖCHLEISTUNGSBETRIEB ................................................................................. |
53 |
||
TEILEBEZEICHNUNGEN ...................................................................................... |
45 |
ZEITVORGABEN .................................................................................................... |
53 |
||
MANUELLER BETRIEB/ SPANNUNGSEINSTELLUNG ....................................... |
46 |
BETRIEBSART SPEICHER/VOREINSTELLUNG ................................................. |
55 |
||
TEILEBEZEICHNUNG DER FERNBEDIENUNG .................................................. |
47 |
BETRIEBSART AUTOMATISCHER NEUSTART .................................................. |
56 |
||
BEZEICHNUNGEN UND FUNKTIONEN AUF DER FERNBEDIENUNGS-ANZEIGE ........ |
48 |
ARBEITSWEISE DES KLIMAGERÄTS ................................................................. |
57 |
||
VORBEREITUNGEN UND TESTS VOR DER INBETRIEBNAHME ....................... |
49 |
WARTUNG ............................................................................................................. |
58 |
||
HANDHABUNG DER FERNBEDIENUNG ............................................................. |
50 |
FUNKTIONEN UND LEISTUNG DES KLIMAGERÄTS ......................................... |
60 |
||
AUTOMATISCHER BETRIEB |
51 |
INSTALLATION |
61 |
||
|
|||||
AUTOMATISCHER BETRIEB (AUTOMATISCHER WECHSEL) ........................... |
51 |
STÖRUNGEN UND IHRE URSACHEN ................................................................. |
61 |
|
|
BETRIEBSART HEIZEN / KÜHLEN / NUR VENTILATOR .................................... |
52 |
STÖRUNGEN UND IHRE URSACHEN (Fernbedienung) .................................... |
63 |
|
|
|
|
|
|
||
|
INDICE |
|
|
||
ACCESSORI ........................................................................................................... |
64 |
FUNZIONAMENTO DI DEUMIDIFICAZIONE ........................................................ |
73 |
ITALIANO |
|
PRECAUZIONI PER LA SICUREZZA .................................................................... |
64 |
FUNZIONAMENTO AD ALTA POTENZA .............................................................. |
74 |
||
NOME DELLE PARTI ............................................................................................. |
66 |
FUNZIONAMENTO CON TIMER ............................................................................ |
74 |
||
OPERAZIONI TEMPORANEE / IMPOSTAZIONE DELLA TENSIONE .................. |
67 |
MEMORIA / FUNZIONAMENTO PREIMPOSTATO ............................................... |
76 |
||
NOME DELLE PARTI DEL TELECOMANDO ........................................................ |
68 |
FUNZIONE DI RIAVVIO AUTOMATICO ................................................................. |
77 |
||
NOME E FUNZIONE DELLE INDICAZIONI VISUALIZZATE SUL TELECOMANDO ......... |
69 |
COME FUNZIONA IL CONDIZIONATORE D'ARIA ............................................... |
78 |
||
PREPARAZIONE E CONTROLLO PRIMA DELL'USO ......................................... |
70 |
MANUTENZIONE ................................................................................................... |
79 |
||
USO DEL TELECOMANDO ................................................................................... |
71 |
OPERAZIONI E PRESTAZIONI DEL CONDIZIONATORE D'ARIA ....................... |
81 |
||
FUNZIONAMENTO AUTOMATICO |
72 |
INSTALLAZIONE |
82 |
||
|
|||||
FUNZIONAMENTO AUTOMATICO (COMMUTAZIONE AUTOMATICA) .............. |
72 |
PROBLEMI E CAUSE ............................................................................................ |
82 |
|
|
RAFFREDDAMENTO / RISCALDAMENTO / FUNZIONAMENTO CON SOLA VENTOLA ..... |
73 |
PROBLEMI E CAUSE (Riguardanti il telecomando) ........................................... |
84 |
|
|
|
|
|
|||
CONTENIDO |
|
|
|||
ACCESORIOS ........................................................................................................ |
85 |
FUNCIONAMIENTO CON AIRE SECO ................................................................. |
94 |
ESPAÑOL |
|
PRECAUCIONES DE SEGURIDAD ....................................................................... |
85 |
FUNCIONAMIENTO CON POTENCIA ELEVADA ................................................. |
95 |
||
NOMBRE DE LOS COMPONENTES .................................................................... |
87 |
FUNCIONAMIENTO DEL TEMPORIZADOR ......................................................... |
95 |
||
FUNCIONAMIENTO TEMPORAL/AJUSTE DEL VOLTAJE ................................... |
88 |
MEMORIA/FUNCIONAMIENTO PRESELECCIONADO ....................................... |
97 |
||
DESCRIPCIÓN DE LOS BOTONES DEL CONTROL REMOTO ........................... |
89 |
FUNCIÓN DE REINICIO AUTOMÁTICO ............................................................... |
98 |
||
NOMBREY FUNCIONES DE LOS INDICADORES DEL CONTROL REMOTO ... |
90 |
CÓMO FUNCIONA EL APARATO DE AIRE ACONDICIONADO ......................... |
99 |
||
PREPARACIÓNY PRUEBA ANTES DEL USO ..................................................... |
91 |
MANTENIMIENTO ................................................................................................ |
100 |
||
USO DEL CONTROL REMOTO ............................................................................. |
92 |
FUNCIONES Y RENDIMIENTO DEL APARATO DE AIRE ACONDICIONADO .. |
102 |
||
FUNCIONAMIENTO AUTOMÁTICO |
93 |
INSTALACIÓN |
103 |
||
|
|||||
FUNCIONAMIENTO AUTOMÁTICO (CAMBIO AUTOMÁTICO) ........................... |
93 |
PROBLEMASY CAUSAS .................................................................................... |
103 |
|
|
FUNCIONAMIENTO DE REFRIGERACIÓN/CALEFACCIÓN/SÓLO VENTILADOR . 94 |
PROBLEMASY CAUSAS (Relacionadas con el control remoto) .................... |
105 |
|
||
|
|
|
|
||
|
ÍNDICE |
|
PORTUGUÊS |
||
ACESSÓRIOS ...................................................................................................... |
106 |
OPERAÇÃO DE SECAGEM ................................................................................ |
115 |
||
PRECAUÇÕES PARA A SEGURANÇA .............................................................. |
106 |
OPERAÇÃO DE ALTA POTÊNCIA ...................................................................... |
116 |
||
NOME DAS PARTES ............................................................................................ |
108 |
OPERAÇÃO DO REGULADOR .......................................................................... |
116 |
||
OPERAÇÃO TEMPORÁRIA/AJUSTE DE VOLTAGEM ....................................... |
109 |
OPERAÇÃO MEMÓRIA / PRÉ-AJUSTE ............................................................. |
118 |
||
NOMES DAS PARTES DO CONTROLE REMOTO ............................................. |
110 |
FUNÇÃO DE REINÍCIO AUTOMÁTICO .............................................................. |
119 |
||
NOME E FUNÇÕES DAS INDICAÇÕES NO CONTROLE REMOTO ................. |
111 |
COMO O CONDICIONAR DE AR FUNCIONA .................................................... |
120 |
||
PREPARAÇÃO E VERIFICAÇÃO ANTES DO USO ........................................... |
112 |
MANUTENÇÃO .................................................................................................... |
121 |
||
MANUSEIO DO CONTROLE REMOTO .............................................................. |
113 |
OPERAÇÕES DO CONDICIONADOR DE AR E DESEMPENHO ...................... |
123 |
||
OPERAÇÃO AUTOMÁTICA ................................................................................ |
114 |
ESPAço DA INSTALAçãO ................................................................................... |
124 |
||
OPERAÇÃO AUTOMÁTICA (CONVERSÃO AUTOMÁTICA) ............................. |
114 |
PROBLEMAS E CAUSAS .................................................................................... |
124 |
||
OPERAÇÃO DE REFRIGERAÇÃO / AQUECIMENTO / APENAS VENTILADOR .. |
115 |
PROBLEMAS E CAUSAS (Relativos ao Controle Remoto) ............................. |
126 |
|
|
|
|
|
|
|
|
РЕСЙЕЧПМЕНБ |
|
|
|||
РБСЕЛКПМЕНБ .................................................................................................. |
127 |
ОЗСЗ ЛЕЙФПХСГЙБ .............................................................................................. |
136 |
ЕЛЛЗНЙКБ |
|
РСПЦХЛБОЕЙУ БУЦБЛЕЙБУ .............................................................................. |
127 |
ЛЕЙФПХСГЙБ ХШЗЛЗУ ЙУЧХПУ ........................................................................... |
137 |
||
ПНПМБ ФМЗМБФЩН .......................................................................................... |
129 |
ЛЕЙФПХСГЙБ ЧСПНПДЙБКПРФЗ ........................................................................ |
137 |
||
РСПУЩСЙНЗ ЛЕЙФПХСГЙБ / СХИМЙУЗ ФБУЗУ .................................................. |
130 |
ЛЕЙФПХСГЙБ МНЗМЗУ / РСПКБИПСЙУМПХ .................................................... |
139 |
||
ПНПМБУЙБ ФМЗМБФЩН ФПХ ФЗЛЕЧЕЙСЙУФЗСЙПХ ......................................... |
131 |
ЛЕЙФПХСГЙБ БХФПМБФЗУ ЕРБНЕККЙНЗУЗУ ................................................. |
140 |
||
ПНПМБ КБЙ ЛЕЙФПХСГЙЕУ ФЩН ЕНДЕЙОЕЩН ФПХ ФЗЛЕЧЕЙСЙУФЗСЙПХ ...... |
132 |
РЩУ ЛЕЙФПХСГЕЙ ФП КЛЙМБФЙУФЙКП ................................................................ |
141 |
||
РСПЕФПЙМБУЙБ КБЙ ЕЛЕГЧПУ РСЙН БРП ФЗ ЧСЗУЗ .................................... |
133 |
УХНФЗСЗУЗ ........................................................................................................ |
142 |
||
ЧЕЙСЙУМПУ ФПХ ФЗЛЕЧЕЙСЙУФЗСЙПХ ............................................................... |
134 |
ЛЕЙФПХСГЙЕУ КЛЙМБФЙУФЙКПХ КБЙ БРПДПУЗ ............................................... |
144 |
||
БХФПМБФЗ ЛЕЙФПХСГЙБ |
135 |
ЕГКБФБУФБУЗ |
145 |
||
|
|||||
БХФПМБФЗ ЛЕЙФПХСГЙБ (БХФПМБФЗ МЕФБВПЛЗ) ...................................... |
135 |
РСПВЛЗМБФБ КБЙ БЙФЙЕУ ................................................................................. |
145 |
|
|
ШХОЗ / ИЕСМБНУЗ / ЛЕЙФПХСГЙБ МПНП БНЕМЙУФЗСБ ............................... |
136 |
РСПВЛЗМБФБ КБЙ БЙФЙБ (УчефйкЬ ме фп ФзлечейсйуфЮсйп) ............................ |
147 |
|
|
|
|
|
|
|
|
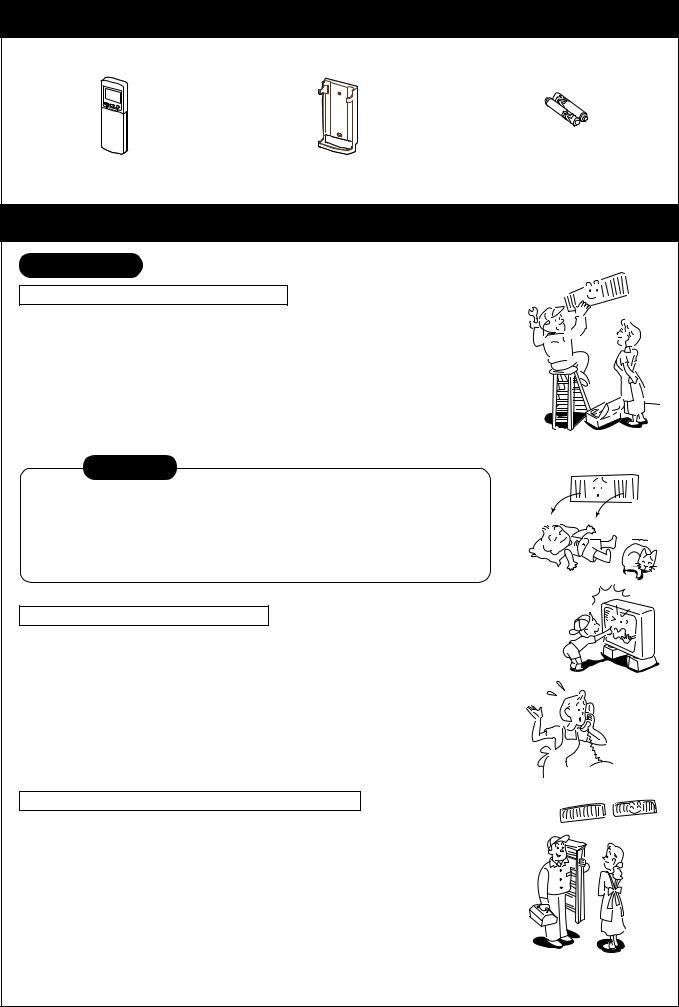
ACCESSORIES
Remote controller |
|
Remote controller holder |
|
Battery (two pcs.) |
PRECAUTIONS FOR SAFETY
WARNING 
WARNINGS ABOUT INSTALLATION
• Make sure to ask the qualified person in electric work to install the air conditioner.
If the air conditioner is imperfectly installed by yourself, it may cause water leak, electric shock, fire, and so on.
• Ground the air conditioner without fail.
Don’t connect the ground wire to gas pipe, water pipe, lightning rod or ground wire of telephone. If the air conditioner is imperfectly grounded, it may cause electric shock.
CAUTION
TO DISCONNECT THE APPLIANCE FROM THE MAINS SUPPLY
This appliance must be connected to the mains by means of a switch with a contact separation of at least 3 mm.
The installation fuse (25A D type  ) must be used for the power supply line of this conditioner.
WARNINGS ABOUT OPERATION
• Avoid cooling the room too strong or exposing the human body to cool breeze for a long time, because it is bad for the health.
•When you are aware of something abnormal with the air conditioner (smells something scorching, poor cooling, etc.), immediately turn off the main switch,
the circuit breaker, from the mains to stop the air conditioner, and make contact with the dealer.
If the air conditioner is continuously operated with something abnormal, it may cause machine failure, electric shock, fire, and so on.
WARNINGS ABOUT MOVEMENT AND REPAIR
•Don’t move or repair any unit by yourself.
Since there is high voltage inside the unit, you may get electric shock when
removing the cover and main unit.
• Whenever the air conditioner needs repair, make sure to ask the dealer to do it. If it is repaired imperfectly, it may cause electric shock or fire.
•When moving the air conditioner for re-installing at another place, ask the dealer to do it. If it is imperfectly installed, it may cause electric shock or fire.
1

CAUTION
CAUTIONS ABOUT INSTALLATION
•Certainly lay the drain hose for perfect draining.
Bad drainage may cause flooding in the house and getting furniture wet.
•Make sure to connect the air conditioner to an exclusive AC outlet of the rated voltage, otherwise, the unit may break down or cause a fire.
•Don’t install the unit in a place where inflammable gas may leak.
If inflammable gas accumulates around the unit, it may cause a fire.
CAUTIONS ABOUT OPERATION
•Carefully read this manual before starting the air conditioner. There are many important things for daily operation in them.
•Don’t use this air conditioner for special purpose such as preserving food, precision instruments, art objects, breeding animals, growing potted plants, etc.
•Avoid exposing potted plants and animals to wind of the air conditioner,
because it badly affects the health and growing of them.
•When the air conditioner is operated together with a combustion appliance in the same place, be careful of ventilation to let fresh air enter into the room.
Poor ventilation causes oxygen shortage.
•When the air conditioner is used in a closed room, be careful of sufficient ventilation of the room. Poor ventilation causes oxygen shortage.
•Don’t touch any switches with wet finger, otherwise you may get an electric shock.
•Don’t place any combustion appliance in a place where it is directly exposed to wind of the air conditioner, otherwise it may cause imperfect combustion.
•When the air conditioner won’t be used for a considerably long time, turn off the main switch or the circuit breaker, for safety. Disconnect from the power supply prevents the unit from lightning and power supply surge.
•Check the concrete blocks, etc. of the base of the outdoor unit occasionally.
If the base is left damaged or deteriorated, the unit may topple over and inflict an injury on a person as the worst case.
•When cleaning the unit, make sure to turn off the main switch or the circuit breaker, beforehand for preventing you from getting injured by the electric fan running inside. For details of cleaning method, refer to “Maintenance” on page 16.
•Don’t put anything on the outdoor unit nor step onto it. If you do so, it may not only topple over the unit but also injure yourself.
•To make the air conditioner demonstrate its original performance, operate it within the range of the operating temperature specified in the instructions.
Otherwise it may cause a malfunction, or water leak from the unit.
ENGLISH
2

PARTS NAME
Supply chamber |
Connecting duct |
|
|
|
|
Indoor unit |
NOTE : |
XXX |
|
|
Parts marked with |
indicate |
||
|
|
the locally prepared parts. |
|
|
Supply air grille |
|
AirAfilterfilter |
||
|
Return grille |
|
|
|
|
|
TEMPORARY |
AUTO RESTART |
|
|
|
COOL AUTO |
OFF ON |
|
Receiving section |
|
VOLTAGE1 |
|
|
|
220V/230V 240V |
|
||
|
VOLTAGE2 |
REMOCON |
|
|
|
|
|
||
|
|
220V |
230V A B |
|
Transmitting section |
|
|
|
|
Outdoor unit |
Remote controller |
|
|
|
|
|
|
||
Air inlet (Side and rear) |
|
|
|
|
|
|
Pipes and electric wires |
||
Air outlet |
|
|
|
|
|
3 |
|
|
|

TEMPORARY OPERATION / VOLTAGE SETTING
TEMPORARY switch (COOL, AUTO)
When you can’t use the remote controller temporarily due to missing, etc., temporary operation can be performed on the switch panel.
•Setting the TEMPORARY switch to “AUTO” starts the automatic operation, to “COOL” starts the cooling operation (LOW), respectively.
•Setting the TEMPORARY switch to “AUTO” or “COOL”, the operation can’t be performed from the remote controller.
To stop the temporary operation, set the switch to “AUTO RESTART OFF”.
Voltage setting
The most suitable voltage can be set up by combining the VOLTAGE SELECT 1 with 2 when adjusting the voltage on the spot.
(Do not touch the switches at the installation time because an installation dealer will adjust them.)
TEMPORARY |
AUTO RESTART |
COOL AUTO |
OFF ON |
VOLTAGE1
220V/230V |
|
|
|
|
|
240V |
VOLTAGE2 |
|
REMOCON |
|||||||||||
|
|
|
|
|
|
|
|
|
|
|
|
|
|
220V |
|
|
|
|
230V |
A |
|
|
|
|
|
B |
|
|
|
|
|
|
|
|
|
|
|
|
|
|
|
|
|
|
|
|
|
|
|
|
|
|
|
|
|
|
|
|
|
|
|
|
|
|
|
|
|
|
|
|
|
|
|
|
|
|
|
|
|
|
|
|
|
Supply voltage |
Voltage select 1/Voltage select 2 |
|
VOLTAGE1 |
|
|
|
|
|
|
|
|
|
|||||||||||
220V |
220V/230V |
|
|
|
|
|
|
|
|
|
|
|
|
240V |
|||||||
|
|
|
|
|
|
|
|
|
|
|
|
|
|
|
|
|
|
|
|
|
|
VOLTAGE2 |
|
|
|
|
|
|
|
|
|
||||||||||||
|
|
|
|
|
|
|
|
|
|
||||||||||||
|
220V |
|
|
|
|
|
|
|
|
230V |
|||||||||||
|
|
|
|
|
|
|
|
|
|||||||||||||
|
|
|
|
|
|
|
|
|
|
|
|
|
|
|
|
|
|
|
|
|
|
|
VOLTAGE1 |
|
|
|
|
|
|
|
|
|
|||||||||||
|
|
|
|
|
|
|
|
||||||||||||||
230V |
220V/230V |
|
|
|
|
|
|
|
|
|
|
|
240V |
||||||||
|
|
|
|
|
|
|
|
|
|
|
|
|
|
|
|
|
|
|
|
|
|
VOLTAGE2 |
|
|
|
|
|
|
|
|
|
||||||||||||
|
|
|
|
|
|
|
|
|
|
||||||||||||
|
220V |
|
|
|
|
|
|
|
|
230V |
|||||||||||
|
|
|
|
|
|
|
|
|
|||||||||||||
|
|
|
|
|
|
|
|
|
|
|
|
|
|
|
|
|
|
|
|
|
|
|
VOLTAGE1 |
|
|
|
|
|
|
|
|
|
|||||||||||
|
|
|
|
|
|
|
|
|
|
|
|
|
|
||||||||
|
220V/230V |
|
|
|
|
|
|
|
|
|
|
|
|
240V |
|||||||
|
|
|
|
|
|
|
|
|
|
|
|
|
|
||||||||
240V |
VOLTAGE2 (Both are available.) |
||||||||||||||||||||
|
|
|
|
|
|
|
|
|
|
|
|
|
|
||||||||
|
220V |
|
|
|
|
|
|
|
|
|
|
230V |
|||||||||
|
220V |
|
|
|
|
|
|
|
|
|
|
|
230V |
||||||||
|
|
|
|
|
|
|
|
|
|
|
|
||||||||||
4

PARTS NAME OF REMOTE CONTROLLER
1 START/STOP button
Push the button to start operation. (A receiving beep is heard.)
Push the button again to stop operation. (A receiving beep is heard.)
If no receiving sound is heard from the indoor unit, push the button twice.
2 Mode select button (MODE)
Push this button to select a mode.
Each time you push the button, a mode is selected in a sequence that goes from
A : Auto changeover control,  : Cool,
 : Dry,
  : Heat (for Heat pump model only),
 : Fan only (For Cooling only model), and back to A. (A receiving beep is heard.)
3 Temperature button 


 .. The set temperature is increased up to 30°C.
 .. The set temperature is decreased to 17°C. (A receiving beep is heard.)
4 Fan speed button (FAN)
Push this button to select fan speed. When you select AUTO, the fan speed is automatically adjusted according to the room temperature.
You can also manually select the desired fan speed among five settings.
(LOW  , LOW+
  , MED
, MED 
 , MED+
 , HIGH

 ) (A receiving beep is heard.)
5 Off timer button (OFF)
Push this button to set the OFF timer.
6 On timer button (ON)
Push this button to set the ON timer.
7 Reserve button (SET)
Push this button to reserve time settings. (A receiving beep is heard.)
8 Cancel button (CLR)
Push this button to cancel ON timer and OFF timer. (A receiving beep is heard.)
9 High power button (Hi-POWER)
Push this button to start the high power operation.
CAUTION
•When pushing the “SWING”, “FIX” and “FILTER” buttons.
Indoor unit does not operate and the receiving beep sound also not appear :
10 Memory button (MEMO)
Push this button to stand by memorizing the settings.
Push the button again for more than 4 seconds to memorize the setting indicated on the remote controller and P mark is indicated.
(Refer to “MEMORY/PRESET OPERATION”)
11 ECO timer button (ECO)
Push this button to start the ECO timer (OFF timer) operation.
You can select the OFF timer time among four settings (1, 3, 5 or 9 hours).
12 PRESET button
Push this button to operate the air conditioner according to settings memorized by the MEMO button.
13 TIMER button
Use this button to change the clock, ON timer, and OFF timer times.
To forward the time, push the “TIMER  ” button.
To set back the time, push the “TIMER  ” button.
14 Automatic operation button (AUTO)
Push this button to operate the air conditioner automatically. (A receiving beep is heard.) (Refer to “AUTOMATIC OPERATION”)
AUTOA |
B PMAM |
|
|
: |
|
|
P |
ON |
|
˚C AM |
OFF |
HiPOWER |
: |
|
PM |
|
|
CHK AUTO |
|
|
3 |
|
PRESET |
|
|
12
1 |
START/STOP |
2 |
||
|
||||
|
|
|
|
|
4 |
FAN |
MODE |
AUTO |
14 |
11 |
SWING |
ECO |
Hi-POWER |
9 |
|
FIX |
TIMER |
MEMO |
10 |
6 |
|
|||
|
8 |
|||
ON OFF |
|
SET CLR |
||
|
|
|
||
|
FILTER |
|
|
7 |
5 |
|
RESET CLOCK CHECK |
||
|
|
|
13 |
|
5

NAMES AND FUNCTIONS OF INDICATIONS ON REMOTE CONTROLLER
Display
All indications, except for clock time indication, are indicated by pushing the START/STOP button.
1 Transmission mark |
6 High power display |
This transmission mark  indicates when the remote controller transmits signals to the indoor unit.
Indicates when the High power operation starts.
Push the Hi-POWER button to start and push it again to stop the operation.
2 Mode display
Indicates the current operation mode.
(AUTO : Automatic control, A : Auto changeover control,  : Cool,
 : Dry,
  : Heat,
  : Fan only)
3 Temperature display
Indicates the temperature setting (17°C to 30°C).
When you set the operating mode to  : Fan only, no temperature setting is indicated.
4 FAN speed display
Indicates the selected fan speed. AUTO or one of five fan speed levels (LOW , LOW+
  , MED
, MED 
 , MED+
 , HIGH

 ) can be indicated.
Indicates AUTO when the operating mode is either AUTO or : Dry.
5 TIMER and clock time display
The time set for timer operation or clock time is indicated.
The present time is always indicated except for TIMER operation.
7 P (MEMORY) display
Flashes for 3 seconds when the MEMO button is pushed during operation.
P mark is indicated when the button is not pushed for more than 3 seconds while the mark is flashing.
Push another button to turn off the mark.
8 ECO TIMER display
Indicates when the ECO TIMER is in operation.
Each time you push the ECO button, the display changes in the sequence of 1, 3, 5, or 9h.
9 A, B change indication remote controller
Push the “CHK” point and “MODE” button at once, for changing remote controller setting from “A” to “B”. (Priority is given to “A” setting.)
The switch panel of indoor unit is also changed to “B” setting.
3 |
1 |
2 9 |
7 |
• |
In the illustration, all indications are indicated for |
|
explanation. |
During operation, only the relevant indications will be indicated on the remote controller.
AUTOA |
B PMAM |
|
AUTO |
|
|
: |
|
|
|
|
P |
ON |
|
|
|
˚C PMAM |
OFF |
|
OFF |
HiPOWER |
: |
PM |
: |
|
CHK AUTO |
|
|
|
|
|
|
AUTO |
|
|
|
|
|
|
8 6 |
4 |
5 |
6

PREPARATION AND CHECK BEFORE USE
Loading the remote controller batteries.
1 Remove the cover, and insert the batteries.
2 Push the RESET button.
The clock display flashes.
Adjust the clock.
Place back the cover.
Batteries
•Slide off the cover while pushing the sides.
•Battery replacement
Be careful not to reverse the (+) position and the
(–) position.
•To replace the batteries, use two new batteries (AAA type).
•In normal use, the batteries will last about one year.
•Replace the batteries if there is no receiving beep from the indoor unit or when the air conditioner cannot be operated using the remote controller.
•To avoid malfunctions by battery leakage, remove the batteries when not using the remote controller for more than one month.
Setting the clock
FAN |
MODE |
AUTO |
SWING |
ECO |
Hi-POWER |
FIX |
TIMER |
MEMO |
|
||
ON OFF |
|
SET CLR |
FILTER |
|
|
RESET CLOCK CHECK
Before you start operating the air conditioner, set the clock of the remote controller using the procedures given in this section.
The clock panel on the remote controller will indicate the time regardless of whether the air conditioner is in use or not.
Initial setting
When batteries are inserted in the remote controller, the clock panel will indicate AM 0:00 and will flash.
1 TIMER  button
Push the TIMER button to set the current time.
Each push of the TIMER button changes the time in one minute steps.
Pushing the TIMER button continually changes the time in ten minute steps.
2 SET SET button. |
1 |
Push the SET SET button. |
|
The current time is indicated and the clock starts.
Clock adjusting
1 CLOCK button
Push the CLOCK button.
The CLOCK display flashes.
2 TIMER  button.
Push the TIMER button to set the current time.
FAN MODE AUTO
SWING ECO Hi-POWER
FIX |
TIMER |
MEMO |
|
ON OFF |
SET CLR |
FILTER |
|
|
RESET CLOCK CHECK |
Push CLOCK
Each push of the TIMER button changes the time by one minute.
Pushing the TIMER button continually changes the time by ten minutes.
3 SET SET button. |
2 |
|
Push the SET SET button. |
3 |
|
The current time is indicated and the clock starts.
|
AM |
: |
|
|
PRESET |
START/STOP |
||
FAN |
MODE |
AUTO |
SWING |
ECO |
Hi-POWER |
FIX |
TIMER |
MEMO |
|
||
ON OFF |
SET CLR |
|
FILTER |
|
|
RESET CLOCK CHECK
|
PM |
: |
|
|
AUTO |
|
|
|
|
|
PRESET |
|
START/STOP |
||
FAN |
MODE |
|
AUTO |
SWING ECO |
|
Hi-POWER |
|
FIX |
TIMER |
|
MEMO |
|
|
||
ON |
OFF |
SET CLR |
|
|
FILTER |
|
|
RESET CLOCK CHECK
2
2
1
7
HANDLING THE REMOTE CONTROLLER
CAUTION
•The air conditioner will not operate if curtains, doors or other materials are blocking the signals sent from the remote controller to the indoor unit.
•Prevent any liquid from falling into the remote controller. Do not spill juice, water or any kinds of liquids.
•If the infrared signal receiver on the switch panel is exposed to direct sunlight, the air conditioner may not function properly.
Use curtains to prevent reaching the receiver from direct sunlight.
•If the air conditioner is installed in a room which has fluorescent lights with electronic starters or inverter system, signals may not be properly received and the air conditioner can’t start or stop while the lights go on. If you are planning to use such fluorescent lights in the same room where the air conditioner operates, consult your local dealer.
•If other electrical appliances react to the remote controller of the air conditioner, either remove these appliances or consult your local dealer.
Location of the remote controller
•Keep the remote controller where its signals can reach the receiver on the switch panel.
(maximum distance is 7 m)
•When you select the timer operation, the remote controller automatically transmits a signal to the indoor unit at the specified time.
If you keep the remote controller in a position that hinders proper signal transmission, a time lag of up to 15 minutes may occur.
TEMPORARY |
AUTO RESTART |
OFF ON |
|
COOL AUTO |
|
220V/230V |
|
|
|
Receiving |
VOLTAGE1 |
|
240V |
|
|
220V |
|
REMOCON |
section of |
|
VOLTAGE2 |
230V |
A |
B |
|
|
|
|
|
|
|
|
|
|
main unit |
Approx. 7m |
|
|
Transmitting section |
|
|
|
of remote controller |
||
|
|
|
||
Remote controller holder
Installing the remote controller holder
•Before you install the remote controller holder on a wall or pillar, check whether the remote controller signals can be received by the indoor unit.
Mounting and removing the remote controller
•To mount the remote controller, hold it parallel to the remote controller holder and push it in fully. To remove the remote controller, slide the remote controller upwards and take it out from the holder.
|
RARY |
TEMPO |
|
COOL |
AUTO |
|
RT |
|
AUTO |
RESTA |
|
OFF ON |
||
|
E1 |
|
||
VOLTAG |
|
||
220V/230V |
|
||
E2 |
|
||
VOLTAG |
|
|
230V |
220V |
|
|
|
240V REMOCON
B
A
Receiving section of main unit
When the receiving section receives the signal, a receiving sound is issued from the indoor unit.
pip, pip |
: Operation |
Long pip |
: Stop |
pip |
: Change |
8
AUTOMATIC OPERATION
When you set the air conditioner in AUTO mode, it will automatically select either cooling, heating, or fan only operation depending on the outdoor temperature. (Refer to page 15.)
In addition, fan speed is automatically controlled.
Start
1 START/STOP button
Push this button to start the air conditioner.
2 AUTO button (AUTO)
Push AUTO button.
• The OPERATION lamp (green) on the switch panel of the indoor unit
lights. The operating mode is selected in accordance with the room tempera- |
1 |
|
|
||
ture and operation starts after approximately 3 minutes. |
2 |
|
• If the AUTO mode is uncomfortable, you can select the desired condi- |
||
|
||
tions manually. |
|
|
Temperature and fan speed can be changed. |
|
|
When it is changed, MODE is also changed from AUTO to A. |
|
|
At the same time, fan speed indication is indicated. |
|
|
Stop |
|
|
START/STOP button |
|
|
Push this button again to stop the air conditioner. |
|
|
˚C AM |
: |
|
|
PRESET |
START/STOP |
||
FAN |
MODE |
AUTO |
SWING |
ECO |
Hi-POWER |
FIX |
TIMER |
MEMO |
|
||
ON OFF |
SET CLR |
|
FILTER |
|
|
RESET CLOCK CHECK
AUTOMATIC OPERATION (AUTO CHANGEOVER)
When you set the air conditioner in A mode or switch over from AUTO operation because of some settings change, it will automatically select either cooling, heating, or fan only operation depending on the outdoor temperature. (Refer to page 15.)
Start
1 START/STOP button
Push this button to start the air conditioner.
2 Mode select button (MODE)
Select A. |
3 |
|
3 Temperature button |
||
1 |
||
Set the desired temperature. |
||
• The OPERATION lamp (green) on the switch panel of the indoor unit lights. |
2 |
|
The operation mode is selected in accordance with the room tempera- |
||
ture and operation starts after approximately 3 minutes. |
|
•When you select the A mode, it is unnecessary to set the fan speed. The FAN speed display will show AUTO and the fan speed will be automatically controlled.
•If the A mode is uncomfortable, you can select the desired conditions manually.
Stop
START/STOP
Push this button again to stop the air conditioner.
˚C AM 

 :
:


AUTO
PRESET

 START/STOP
FAN |
MODE |
AUTO |
SWING |
ECO |
Hi-POWER |
FIX |
TIMER |
MEMO |
|
||
ON OFF |
|
SET CLR |
FILTER |
|
|
RESET CLOCK CHECK
9
COOLING/HEATING/FAN ONLY OPERATION
Start
1 START/STOP button
Push this button to start the air conditioner.
2 Mode select button (MODE)
Select Cool  , Heat
  , or Fan only
  . (For cooling only model)
3 Temperature button 


Set the desired temperature. Cooling 21°C or higher. Heating 28°C or lower.
When the air conditioner is in FAN ONLY operation, the temperature display is not indicated.
4 Fan speed button (FAN)
Select one of “AUTO”, LOW  , LOW+
  , MED
, MED 
 , MED+
 , HIGH

 .
.
•The OPERATION lamp (green) on the switch panel of the indoor unit goes on. And operation starts after approximately 3 minutes.
(If you select FAN ONLY mode, the unit will start immediately.)
•The  : Fan only mode does not control temperature. Therefore, perform only steps 1, 2 and 4 to select this mode.
Stop
START/STOP button
Push this button again to stop the air conditioner.
3
1
4
2
˚C AM 

 :
:


AUTO
PRESET

 START/STOP
FAN MODE AUTO
SWING ECO Hi-POWER
FIX |
TIMER |
MEMO |
|
ON OFF |
SET CLR |
FILTER |
|
|
RESET CLOCK CHECK |
DRY OPERATION
Start
1 START/STOP button
Push this button to start the air conditioner.
2 Mode select button (MODE)
Select DRY
3 Temperature button 


Set the desired temperature.
•The fan speed display indicates AUTO.
•The OPERATION lamp (green) on the switch panel of the indoor unit lights, and operation starts after approximately 3 minutes.
Stop
START/STOP button
Push this button again to stop the air conditioner.
3
1
2
˚C AM 

 :
:


AUTO
PRESET

 START/STOP
FAN MODE AUTO
SWING ECO Hi-POWER
FIX |
TIMER |
MEMO |
|
ON OFF |
SET CLR |
FILTER |
|
|
RESET CLOCK CHECK |
10
HiGH POWER OPERATION
High power (Hi POWER)
•The High power (High power operation) mode automatically controls room temperature, operation mode so that the room is quickly cooled in summer and warmed in winter. (Refer to page 15.)
Setting High power mode |
|
|
|
1 |
Hi-POWER button |
˚C AM |
: |
HiPOWER |
|
||
|
Push the Hi-POWER button. |
AUTO |
|
|
|
|
|
|
The “Hi POWER” mark on the remote controller is indicated. |
|
PRESET |
|
|
|
|
Canceling High power mode |
|
START/STOP |
|||
|
|
|
|
||
1 Hi-POWER button |
1 |
FAN |
MODE |
AUTO |
|
|
|
|
|||
Push the Hi-POWER button once again. The “Hi POWER” mark on |
SWING |
ECO |
Hi-POWER |
||
|
|||||
the remote controller goes out. |
|
FIX |
TIMER |
MEMO |
|
|
|
|
|
||
|
|
ON OFF |
|
SET CLR |
|
CAUTION
FILTER
RESET CLOCK CHECK
The High POWER mode cannot be activated in the DRY and FAN ONLY operation and when the ON TIMER operation is reserved.
TIMER OPERATION
ON timer and OFF timer Setting TIMER
1 ON/OFF TIMER button
Push the ON or OFF TIMER buttons as required.
•The previous timer setting is displayed and flashes along with ON/ OFF TIMER display.
2 TIMER  button
Push the TIMER button.
Set the timer to the desired time.
Each push of the TIMER button changes the time in ten minutes steps. Pushing the TIMER button continually changes the time in one hour steps.
3 SET SET button
Push the SET SET button to set the timer.
The timer time is indicated and the timer starts.
4 CLR  button
Push the CLR  button to cancel the timer setting.
1
2
3
4
AM  :
:


 ON
ON
OFF
˚C AM 
 :
:


HiPOWER
AUTO
PRESET
 START/STOP
FAN MODE AUTO
SWING ECO Hi-POWER
FIX |
TIMER |
MEMO |
|
ON OFF |
SET CLR |
FILTER |
|
|
RESET CLOCK CHECK |
CAUTION
•When you select the timer operation, the remote controller automatically transmits the timer signal to the indoor unit at the specified time. Therefore, keep the remote controller in a location where it can transmit the signal to the switch panel properly.
•If you do not push the SET SET button within 30 seconds after setting the time, the setting will be cancelled.
Once you select the timer operation mode, the settings are saved in the remote controller. Thereafter, the air conditioner will start operating under the same conditions when you simply push the ON/OFF button of the remote controller.
If the clock display is flashing, you cannot set the timer. Follow the instructions in the section “SETTING THE CLOCK” on page 8 to set the clock, and then set the timer.
11
 Loading...