


Toshiba RAS-16SAVP-E, RAS-13SAVP-E, RAS-B10SKCVP-E, RAS-10SAVP-E, RAS-B10SKVP-E Owners Manual
...RASseries_OwnersManual.book Page 1 Tuesday, January 9, 2007 4:48 PM
OWNER’S MANUAL
MODE D’EMPLOI BEDIENUNGSANLEITUNG MANUALE DI ISTRUZIONI MANUAL DEL PROPIETARIO
MANUAL DO UTILIZADOR
GEBRUIKSAANWIJZING
ИНСТРУКЦИЯ ДЛЯ ПОЛЬЗОВАТЕЛЯ
AIR CONDITIONER (SPLIT TYPE)
|
For general public use |
|
CLIMATISEUR (TYPE SEPARE) |
Pour utilisation grand public |
|
KLIMAGERÄT (GETEILTE AUSFÜHRUNG) |
Für allgemeine Verwendung |
|
CONDIZIONATORE D’ARIA (TIPO SPLIT) |
Per l’uso in generale |
|
ACONDICIONADOR DE AIRE (TIPO SEPARADO) |
Para el uso público general |
|
( |
) μ |
|
AR CONDICIONADO (TIPO SPLIT) |
Para utilização geral |
|
AIRCONDITIONER (TWEEDELIG TYPE) |
Voor algemeen publiek gebruik |
|
КОНДИЦИОНЕР (РАЗДЕЛИТЕЛЬНЫЙ ТИП) |
Для общего бытового использования |
|
Indoor Unit |
Outdoor Unit |
|
Unité intérieure |
Unité extérieure |
|
Innenraumgerät |
Außengerät |
|
Unità interna |
Unità esterna |
|
Unidad interior |
Unidad exterior |
|
!" μ#$ |
%!" μ#$ |
|
Unidade interior |
Unidade exterior |
|
Binnenapparaat |
Buitenapparaat |
|
Внутренний блок |
Наружный блок |
|
|
RAS-B10SKVP-E |
RAS-10SAVP-E |
|
RAS-B13SKVP-E |
RAS-13SAVP-E |
|
RAS-B16SKVP-E |
RAS-16SAVP-E |
|
|
RAS-M14GAV-E |
|
|
RAS-M18GAV-E |
RAS-M10SKCVP-E |
RAS-M14GACV-E |
|
RAS-M13SKCVP-E |
RAS-M18GACV-E |
|
RAS-M16SKCVP-E |
|
|
Thank you for purchasing this TOSHIBA Air Conditioner. Please read this owner’s manual carefully before using your Air Conditioner.
Avant tout, merci d’avoir porté votre choix sur un climatiseur TOSHIBA. Veuillez lire attentivement ce mode d’emploi avant de mettre en service le climatiseur.
Wir danken Ihnen für den Kauf dieses TOSHIBA-Klimageräts. Lesen Sie die Bedienungsanleitung sorgfältig durch, bevor Sie das Gerät in Betrieb nehmen.
Grazie per aver acquistato questo Condizionatore d’Aria TOSHIBA. Prima di usare il Condizionatore d’Aria, si consiglia di leggere con attenzione il presente manuale.
Gracias por adquirir este acondicionador de aire TOSHIBA. Lea este manual del propietario detenidamente antes de utilizar su acondicionador de aire.
& "#'μ " #$ &"#' "#& * μ " " #' " + S , . *-" /$" 0 # "$ " + #-+ + 0 μ#0# " " * μ " " μ#$ +.
Obrigado por ter adquirido este ar condicionado da TOSHIBA. Leia atentamente este manual do utilizador antes de utilizar o ar condicionado.
Hartelijk dank voor uw aankoop van deze TOSHIBA airconditioner. Leest u vooral deze gebruiksaanwijzing aandachtig door alvorens het apparaat in gebruik te nemen.
Благодарим Вас за покупку этого кондиционера фирмы TOSHIBA. Перед использованием Вашего кондиционера прочитайте, пожалуйста, внимательно эту инструкцию для пользователя.
ENGLISH
DEUTSCH FRANÇAIS
ITALIANO
РУССКИЙ ЯЗЫК NEDERLANDS PORTUGUÊS ESPAÑOL
RASseries_OwnersManual.book Page i Tuesday, January 9, 2007 4:48 PM
CONTENTS/SOMMAIRE
ENGLISH
ACCESSORIES |
1 |
|
|
About indoor unit and outdoor unit combinations |
|||
SAFETY PRECAUTIONS............................................................... |
1 |
||
........................................................................NAMES OF PARTS |
3 |
• The RAS-B10SKVP-E, RAS-B13SKVP-E and RAS-B16SKVP-E |
|
NAMES AND FUNCTIONS OF INDICATORS AND CONTROLS |
|
||
|
indoor units can be connected to a single outdoor unit or a multi |
||
ON INDOOR UNIT |
3 |
||
outdoor unit. |
|||
REMOTE CONTROLLER AND ITS FUNCTIONS |
4 |
||
For single unit connection |
|||
NAMES AND FUNCTIONS OF INDICATORS ON REMOTE |
|
||
|
Use the following combinations. |
||
CONTROLLER |
5 |
||
RAS-B10SKVP-E/RAS-10SAVP-E |
|||
PREPARATION AND CHECK BEFORE USE |
5 |
||
RAS-B13SKVP-E/RAS-13SAVP-E |
|||
USING THE REMOTE CONTROLLER |
7 |
||
RAS-B16SKVP-E/RAS-16SAVP-E |
|||
AUTOMATIC OPERATION |
8 |
||
For multi unit connection |
|||
AUTOMATIC OPERATION (AUTO CHANGEOVER) |
8 |
||
Refer to the specifications included with the multi outdoor unit. |
|||
COOLING/HEATING OPERATION |
9 |
||
|
|||
DRY OPERATION .......................................................................... |
9 |
• The RAS-M10SKCVP-E, RAS-M13SKCVP-E and |
|
FAN ONLY OPERATION (cooling-only models only) |
9 |
||
RAS-M16SKCVP-E indoor units can be connected to a multi |
|||
PURE OPERATION |
10 |
||
outdoor unit. Refer to the specifications included with the multi |
|||
Hi POWER OPERATION |
11 |
||
outdoor unit. |
|||
1, 3, 5, 9H OFF TIMER |
11 |
||
|
|||
TIMER OPERATION .................................................................... |
12 |
|
|
......................................MEMORY/MY COMFORT OPERATION |
14 |
About indoor unit model names |
|
ADJUSTING AIR FLOW DIRECTION .......................................... |
15 |
|
|
|
|||
AUTO RESTART OPERATION.................................................... |
16 |
Heat pump models |
|
HOW THE AIR CONDITIONER WORKS ..................................... |
17 |
(RAS-B10SKVP-E, RAS-B13SKVP-E and RAS-B16SKVP-E) |
|
TEMPORARY OPERATION |
18 |
||
These indoor units can perform both cooling and heating operation. |
|||
CLEANING OPERATION |
18 |
||
Cooling-only models |
|||
USUAL MAINTENANCE .............................................................. |
19 |
||
SPECIAL MAINTENANCE ........................................................... |
21 |
(RAS-M10SKCVP-E, RAS-M13SKCVP-E and |
|
AIR CONDITIONER OPERATION AND PERFORMANCE.......... |
23 |
RAS-M16SKCVP-E) |
|
TROUBLESHOOTING ................................................................. |
24 |
These indoor units are cooling-only models, and cannot perform |
|
SPECIFICATIONS........................................................................ |
27 |
heating operation. |
|
TROUBLESHOOTING (Remote Controller) ................................. |
28 |
|
FRANÇAIS
..............................................................................ACCESSOIRES |
1 |
Sur les combinaisons d’unités intérieure et |
|
MESURES DE SECURITE |
1 |
||
extérieure |
|||
NOM DES PIECES......................................................................... |
3 |
||
NOM ET FONCTION DES TEMOINS ET COMMANDES DE |
|
• Les unités intérieures RAS-B10SKVP-E, RAS-B13SKVP-E et |
|
L’UNITE INTERIEURE |
3 |
||
RAS-B16SKVP-E peuvent être raccordées à une seule unité |
|||
TELECOMMANDE ET SES FONCTIONS |
4 |
||
extérieure ou à une unité extérieure multiple. |
|||
NOM ET FONCTION DES INDICATEURS DE LA |
|
||
|
Pour un raccordement à une seule unité |
||
TELECOMMANDE |
5 |
||
Utilisez les combinaisons suivantes. |
|||
PREPARATION ET VERIFICATION AVANT UTILISATION |
5 |
||
RAS-B10SKVP-E/RAS-10SAVP-E |
|||
UTILISATION DE LA TELECOMMANDE |
7 |
||
RAS-B13SKVP-E/RAS-13SAVP-E |
|||
FONCTIONNEMENT AUTOMATIQUE |
8 |
||
RAS-B16SKVP-E/RAS-16SAVP-E |
|||
FONCTIONNEMENT AUTOMATIQUE (PERMUTATION |
|
||
|
Pour un raccordement à une unité multiple |
||
AUTOMATIQUE) |
8 |
||
Reportez-vous aux caractéristiques techniques fournies avec |
|||
REFROIDISSEMENT/CHAUFFAGE |
9 |
||
l’unité extérieure multiple. |
|||
DESHUMIDIFICATION |
9 |
||
|
|||
VENTILATEUR SEULEMENT (modèles refroidissement |
|
• Les unités intérieures RAS-M10SKCVP-E, RAS-M13SKCVP-E et |
|
seulement) ................................................................................... |
9 |
RAS-M16SKCVP-E peuvent être raccordées à une unité extérieure |
|
MODE PURE ................................................................................ |
10 |
multiple. Reportez-vous aux caractéristiques techniques fournies |
|
MODE Hi POWER |
11 |
||
avec l’unité extérieure multiple. |
|||
MINUTERIE D’ARRET (OFF) 1, 3, 5, 9H |
11 |
||
|
|||
MODE MINUTERIE ...................................................................... |
12 |
|
|
......................................................MODE MEMOIRE/CONFORT |
14 |
Sur les noms des modèles d’unité intérieure |
|
REGLAGE DU SENS DU FLUX D’AIR ........................................ |
15 |
|
|
|
|||
FONCTION DE REDEMARRAGE AUTOMATIQUE .................... |
16 |
Modèles pompe à chaleur |
|
COMMENT LE CLIMATISEUR FONCTIONNE............................ |
17 |
(RAS-B10SKVP-E, RAS-B13SKVP-E et RAS-B16SKVP-E) |
|
FONCTIONNEMENT TEMPORAIRE ........................................... |
18 |
Ces unités intérieures peuvent effectuer des opérations de |
|
OPERATION DE NETTOYAGE ................................................... |
18 |
refroidissement et de chauffage. |
|
ENTRETIEN REGULIER .............................................................. |
19 |
Modèles refroidissement seulement |
|
ENTRETIEN SPECIAL |
21 |
||
(RAS-M10SKCVP-E, RAS-M13SKCVP-E et RAS-M16SKCVP-E) |
|||
FONCTIONNEMENT ET PERFORMANCES DU |
|
||
|
Ces unités intérieures sont des modèles refroidissement seulement |
||
CLIMATISEUR |
23 |
||
et elles ne peuvent pas effectuer des opérations de chauffage. |
|||
DEPISTAGE DES PANNES |
24 |
||
|
|||
CARACTERISTIQUES TECHNIQUES ........................................ |
27 |
|
|
DEPISTAGE DES PANNES (Télécommande)............................. |
28 |
|
i

RASseries_OwnersManual.book Page ii Tuesday, January 9, 2007 4:48 PM
INHALT/INDICE
DEUTSCH
ZUBEHÖR |
1 |
|
|
Kombinationen von Innenraumund |
|||
SICHERHEITSVORKEHRUNGEN................................................. |
1 |
||
BEZEICHNUNG DER TEILE .......................................................... |
3 |
Außengeräten |
|
BEZEICHNUNG UND FUNKTION DER ANZEIGEN UND |
|
|
|
|
• Die Klimageräte RAS-B10SKVP-E, RAS-B13SKVP-E und |
||
REGLER AM INNENRAUMGERÄT............................................. |
3 |
||
DIE FERNBEDIENUNG UND IHRE FUNKTIONEN....................... |
4 |
RAS-B16SKVP-E können an ein Einfachaußengerät oder an ein |
|
BEZEICHNUNG UND FUNKTION DER ANZEIGEN AUF DER |
|
Multisystem-Außengerät angeschlossen werden. |
|
FERNBEDIENUNG ...................................................................... |
5 |
Zum Anschließen an Einfachgeräte |
|
VORBEREITUNGEN UND ÜBERPRÜFUNG VOR DEM |
|
Verwenden Sie die folgenden Kombinationen. |
|
BETRIEB...................................................................................... |
5 |
RAS-B10SKVP-E/RAS-10SAVP-E |
|
HANDHABUNG DER FERNBEDIENUNG ..................................... |
7 |
RAS-B13SKVP-E/RAS-13SAVP-E |
|
AUTOMATIKBETRIEB ................................................................... |
8 |
RAS-B16SKVP-E/RAS-16SAVP-E |
|
AUTOMATIKBETRIEB (AUTOMATISCHER |
8 |
Zum Anschließen an Multisystemgeräte |
|
BETRIEBSARTWECHSEL) ......................................................... |
Lesen Sie die Spezifikationen, die dem |
||
KÜHL-/HEIZBETRIEB |
9 |
||
Multisystem-Außengerät beiliegen. |
|||
ENTFEUCHTUNGSBETRIEB |
9 |
||
• Die Innenraumgeräte RAS-M10SKCVP-E, RAS-M13SKCVP-E und |
|||
NUR-VENTILATOR-BETRIEB (bei Modellen, die nur für den |
|
||
Kühlbetrieb ausgerüstet sind) ...................................................... |
9 |
RAS-M16SKCVP-E können an ein Multisystem-Außengerät |
|
PURE-BETRIEB ........................................................................... |
10 |
angeschlossen werden. Lesen Sie dazu die Spezifikationen, die |
|
HOCHLEISTUNGSBETRIEB ....................................................... |
11 |
dem Multisystem-Außengerät beiliegen. |
|
ABSCHALTUNG NACH 1-, 3-, 5- ODER 9-STUNDEN |
|
|
|
(OFF-TIMER) ............................................................................. |
11 |
|
|
...........................................................................TIMERBETRIEB |
12 |
Modellbezeichnungen für Innenraumgeräte |
|
SPEICHERUND KOMFORTBETRIEB ....................................... |
14 |
|
|
|
|||
REGULIERUNG DER LUFTSTROMRICHTUNG......................... |
15 |
Modelle mit Wärmepumpe |
|
AUTOMATISCHER NEUSTART .................................................. |
16 |
(RAS-B10SKVP-E, RAS-B13SKVP-E und RAS-B16SKVP-E) |
|
WIE DAS KLIMAGERÄT FUNKTIONIERT................................... |
17 |
Diese Innenraumgeräte können sowohl für den Kühlbetrieb als |
|
BETRIEB OHNE FERNBEDIENUNG |
18 |
||
auch für den Heizbetrieb verwendet werden. |
|||
REINIGUNGSBETRIEB |
18 |
||
Modelle nur für den Kühlbetrieb |
|||
REGELMÄSSIGE WARTUNG ..................................................... |
19 |
||
SPEZIALWARTUNG .................................................................... |
21 |
(RAS-M10SKCVP-E, RAS-M13SKCVP-E und |
|
BETRIEB UND LEISTUNG DES KLIMAGERÄTS ....................... |
23 |
RAS-M16SKCVP-E) |
|
BEI STÖRUNGEN ........................................................................ |
24 |
Diese Innenraumgeräte sind nur für den Kühlbetrieb ausgelegt und |
|
TECHNISCHE DATEN ................................................................. |
27 |
zum Heizen nicht geeignet. |
|
BEI STÖRUNGEN DER FERNBEDIENUNG ............................... |
28 |
|
ITALIANO
..................................................................................ACCESSORI |
1 |
Riguardo alle combinazioni di unità interne ed |
|
PRECAUZIONI PER LA SICUREZZA |
1 |
||
esterne |
|||
NOME DEI COMPONENTI ............................................................ |
3 |
||
NOMI E FUNZIONI DEGLI INDICATORI, DELLE SPIE E DEI |
|
• Le unità interne RAS-B10SKVP-E, RAS-B13SKVP-E e |
|
COMANDI SULL’UNITÀ INTERNA |
3 |
||
RAS-B16SKVP-E possono essere collegate a una singola unità |
|||
FUNZIONAMENTO DEL TELECOMANDO ................................... |
4 |
||
NOMI E FUNZIONI DEGLI INDICATORI E DELLE SPIE SUL |
|
esterna o a una multiunità esterna. |
|
TELECOMANDO ......................................................................... |
5 |
Per il collegamento a una singola unità |
|
OPERAZIONI PRELIMINARI E CONTROLLO PRIMA |
|
Usare le combinazioni seguenti. |
|
DELL’USO.................................................................................... |
5 |
RAS-B10SKVP-E/RAS-10SAVP-E |
|
USO DEL TELECOMANDO ........................................................... |
7 |
RAS-B13SKVP-E/RAS-13SAVP-E |
|
FUNZIONAMENTO AUTOMATICO ............................................... |
8 |
RAS-B16SKVP-E/RAS-16SAVP-E |
|
FUNZIONAMENTO AUTOMATICO (COMMUTAZIONE |
|
Per il collegamento a una multiunità |
|
AUTOMATICA) ............................................................................ |
8 |
Riferirsi alle specifiche in dotazione alla multiunità esterna. |
|
RAFFREDDAMENTO/RISCALDAMENTO..................................... |
9 |
• Le unità interne RAS-M10SKCVP-E, RAS-M13SKCVP-E e |
|
DEUMIDIFICAZIONE |
9 |
||
RAS-M16SKCVP-E possono essere collegate a una multiunità |
|||
FUNZIONAMENTO DELLA VENTOLA SOLTANTO (modelli di |
|
||
solo raffreddamento soltanto) ...................................................... |
9 |
esterna. Riferirsi alle specifiche in dotazione alla multiunità esterna. |
|
FUNZIONAMENTO PURE ........................................................... |
10 |
|
|
FUNZIONAMENTO AD ALTA POTENZA (Hi POWER) ............... |
11 |
|
|
TIMER DI SPEGNIMENTO (OFF) DOPO 1, 3, 5 O 9 ORE ......... |
11 |
Riguardo ai nomi dei modelli delle unità interne |
|
FUNZIONAMENTO CON TIMER |
12 |
|
|
Modelli a pompa di calore |
|||
FUNZIONAMENTO IN MODALITÀ MEMORIA/MY COMFORT... |
14 |
||
REGOLAZIONE DELLA DIREZIONE DEL GETTO D’ARIA ........ |
15 |
(RAS-B10SKVP-E, RAS-B13SKVP-E e RAS-B16SKVP-E) |
|
RIACCENSIONE AUTOMATICA (AUTO RESTART)................... |
16 |
Queste unità interne possono eseguire entrambe le operazioni di |
|
FUNZIONAMENTO DEL CONDIZIONATORE D’ARIA ................ |
17 |
raffreddamento e di riscaldamento. |
|
FUNZIONAMENTO TEMPORANEO............................................ |
18 |
Modelli di solo raffreddamento |
|
OPERAZIONE DI PULIZIA |
18 |
||
(RAS-M10SKCVP-E, RAS-M13SKCVP-E e RAS-M16SKCVP-E) |
|||
MANUTENZIONE ORDINARIA |
19 |
||
Queste unità interne sono modelli di solo raffreddamento e non |
|||
MANUTENZIONE STRAORDINARIA |
21 |
||
possono eseguire l’operazione di riscaldamento. |
|||
FUNZIONAMENTO E PRESTAZIONI DEL CONDIZIONATORE |
|
||
|
|
||
D’ARIA ....................................................................................... |
23 |
|
|
INDIVIDUAZIONE E RIPARAZIONE DEI GUASTI ...................... |
24 |
|
|
SPECIFICHE TECNICHE............................................................. |
27 |
|
|
INDIVIDUAZIONE E RIPARAZIONE DEI GUASTI |
|
|
|
(Telecomando) ........................................................................... |
28 |
|
ii
ENGLISH
DEUTSCH FRANÇAIS
ITALIANO
РУССКИЙ ЯЗЫК NEDERLANDS PORTUGUÊS ESPAÑOL

RASseries_OwnersManual.book Page iii Tuesday, January 9, 2007 4:48 PM
ÍNDICE/ |
|
|
|
|
||
|
|
|
|
|
|
|
|
ESPAÑOL |
|
|
|
|
|
|
ACCESORIOS |
|
1 |
|
|
|
|
|
Acerca de las combinaciones de unidades interi- |
|
|||
|
PRECAUCIONES SOBRE SEGURIDAD ....................................... |
1 |
|
|||
|
NOMBRES DE LOS COMPONENTES .......................................... |
3 |
ores y unidad exterior |
|
||
|
NOMBRES Y FUNCIONES DE LOS INDICADORES Y |
|
|
|
||
|
|
• Las unidades interiores RAS-B10SKVP-E, RAS-B13SKVP-E y |
||||
|
CONTROLES DE LA UNIDAD INTERIOR .................................. |
3 |
||||
|
MANDO A DISTANCIA Y SUS FUNCIONES................................. |
4 |
RAS-B16SKVP-E pueden conectarse a una sola unidad exterior o |
|||
|
NOMBRES Y FUNCIONES DE LOS INDICADORES DEL |
|
unidad exterior múltiple. |
|||
|
MANDO A DISTANCIA ................................................................ |
|
5 |
Para conexión de una sola unidad |
||
|
PREPARACIÓN Y COMPROBACIÓN ANTES DE USAR ............. |
5 |
Utilice las combinaciones siguientes. |
|||
|
UTILIZACIÓN DEL MANDO A DISTANCIA ................................... |
7 |
RAS-B10SKVP-E/RAS-10SAVP-E |
|||
|
OPERACIÓN AUTOMÁTICA ......................................................... |
|
8 |
RAS-B13SKVP-E/RAS-13SAVP-E |
||
|
OPERACIÓN AUTOMÁTICA (CAMBIO AUTOMÁTICO) ............... |
8 |
RAS-B16SKVP-E/RAS-16SAVP-E |
|||
|
OPERACIÓN DE ENFRIAMIENTO/CALEFACCIÓN ..................... |
9 |
Para conexión de múltiples unidades |
|||
|
OPERACIÓN DE DESHUMIDIFICACIÓN...................................... |
9 |
Consulte las especificaciones incluidas con la unidad exterior |
|||
|
OPERACIÓN CON VENTILADOR SOLAMENTE (modelos con |
|
múltiple. |
|||
|
sólo enfriamiento solamente) ....................................................... |
|
9 |
• Las unidades interiores RAS-M10SKCVP-E, RAS-M13SKCVP-E y |
||
|
OPERACIÓN PURE |
|
10 |
|||
|
|
RAS-M16SKCVP-E pueden conectarse a una unidad exterior |
||||
|
OPERACIÓN Hi POWER (ALTA POTENCIA) |
11 |
||||
|
múltiple. Consulte las especificaciones incluidas con la unidad |
|||||
|
TEMPORIZADOR DE APAGADO (OFF) EN 1, 3, 5, 9H |
11 |
||||
|
exterior múltiple. |
|||||
|
OPERACIÓN CON TEMPORIZADOR |
12 |
||||
|
|
|
||||
|
OPERACIÓN MEMORIA/MI CONFORT ...................................... |
14 |
|
|
||
|
AJUSTE DE LA DIRECCIÓN DEL FLUJO DE AIRE |
15 |
|
|
||
|
Acerca de los nombres de modelos de unidades |
|
||||
|
OPERACIÓN DE REINICIO AUTOMÁTICO |
16 |
|
|||
|
interiores |
|
||||
|
MODO DE FUNCIONAMIENTO DEL ACONDICIONADOR DE |
|
|
|||
|
...........................................................................................AIRE |
|
17 |
Modelos con bomba de calor |
||
|
OPERACIÓN TEMPORAL |
|
18 |
|||
|
|
(RAS-B10SKVP-E, RAS-B13SKVP-E y RAS-B16SKVP-E) |
||||
|
OPERACIÓN DE LIMPIEZA |
|
18 |
|||
|
|
Estas unidades interiores pueden realizar tanto operación de |
||||
|
MANTENIMIENTO NORMAL |
|
19 |
|||
|
|
enfriamiento como de calefacción. |
||||
|
MANTENIMIENTO ESPECIAL |
|
21 |
|||
|
|
|
|
|||
|
OPERACIÓN Y RENDIMIENTO DEL ACONDICIONDOR DE |
|
Modelos con sólo enfriamiento |
|||
|
AIRE........................................................................................... |
|
23 |
(RAS-M10SKCVP-E, RAS-M13SKCVP-E y RAS-M16SKCVP-E) |
||
|
SOLUCIÓN DE PROBLEMAS ..................................................... |
|
24 |
Estas unidades interiores son modelos con sólo enfriamiento, y no |
||
|
ESPECIFICACIONES .................................................................. |
|
27 |
pueden realizar operación de calefacción. |
||
|
SOLUCIÓN DE PROBLEMAS (Mando a distancia) ..................... |
28 |
|
|
||
|
|
|
|
|
|
|
|
A |
|
|
|
|
|
|
|
|
1 |
|
|
|
|
* #:#-+ & & μ#'+ !" 5 |
|
||||
|
|
1 |
|
|||
|
%!" 5 μ#$! |
|
||||
............................................................ |
|
3 |
|
|||
|
|
• =- >? ;? > ; -@ ;A :-B @ μ C> @ |
||||
|
3 |
|||||
RAS-B10SKVP-E, RAS-B13SKVP-E B- RAS-B16SKVP-E ; |
||||||
|
4 |
|||||
#A :-B< μ C> μ= @ ;" > ;$@ < ; #A :-B< μ C> D E |
||||||
|
|
|||||
|
;? > ; A . |
|||||
|
|
5 |
||||
|
μ#$ μ-+ ' + |
|||||
|
5 |
|||||
:$;-μ D-<; ?@ B ?F ?@ ;? >? ;μ "@. |
||||||
|
|
7 |
||||
|
RAS-B10SKVP-E/RAS-10SAVP-E |
|||||
|
|
8 |
||||
|
RAS-B13SKVP-E/RAS-13SAVP-E |
|||||
( ) |
8 |
|||||
RAS-B16SKVP-E/RAS-16SAVP-E |
||||||
/ |
9 |
|||||
μ#$ 0#**5 & 7 ! |
||||||
|
|
9 |
||||
|
: # ;-@ D: >-L: M @ D ? ;? > " ? $ #A :-B< |
|||||
|
(μ μ μ !"#$ |
|
||||
|
|
μ C> D E ;? > ; A . |
||||
|
μ ) |
|
9 |
|||
|
|
|
|
|||
................................ |
10 |
• =- >? ;? > ; -@ ;A :-B @ μ C> @ |
||||
|
|
11 |
||||
|
RAS-M10SKCVP-E, RAS-M13SKCVP-E B- RAS-M16SKCVP-E |
|||||
% |
& 1, 3, 5, 9 ' |
11 |
||||
; #A :-B< μ C> D E ;? > ; A . : # ;-@ |
||||||
|
|
12 |
||||
|
D: >-L: M @ D ? ;? > " ? $ #A :-B< μ C> D E |
|||||
/ |
14 |
|||||
;? > ; A . |
||||||
|
15 |
|||||
|
|
|||||
.......................... |
16 |
|
|
|||
........................................ |
17 |
* #:#-+ " # μ " μ# "7*! |
|
|||
.......................................................... |
|
18 |
!" + μ#$+ |
|
||
|
|
18 |
|
|||
|
|
|
||||
............................................................. |
|
19 |
# "7* "*-+ 87 μ + |
|||
|
|
21 |
||||
|
(RAS-B10SKVP-E, RAS-B13SKVP-E B- RAS-B16SKVP-E) |
|||||
|
23 |
|||||
? @ - ;A :-B @ μ C> @ μD : " D: Lμ D-" |
||||||
* * |
|
24 |
||||
|
-?:L= @ !"#$@ B- F :μ ;$@. |
|||||
|
|
27 |
||||
|
|
|
||||
* * ($+-:-; <:-) .............................. |
28 |
# "7* μ # 9'% |
||||
|
|
|
|
(RAS-M10SKCVP-E, RAS-M13SKCVP-E B- RAS-M16SKCVP-E) |
||
? @ - ;A :-B @ μ C> @ D " μ μ !"#$@ B- > =- >? D: Lμ D-" -?:L= F :μ ;$@.
iii
RASseries_OwnersManual_TOC.fm Page iv Tuesday, January 9, 2007 8:56 PM
ÍNDICE/INHOUD
PORTUGUÊS
ACESSÓRIOS |
1 |
|
|
Combinações da unidade interior e exterior |
|||
PRECAUÇÕES DE SEGURANÇA................................................. |
1 |
||
.....................................................................NOMES DAS PEÇAS |
3 |
• As unidades interiores RAS-B10SKVP-E, RAS-B13SKVP-E e |
|
NOMES E FUNÇÕES DOS INDICADORES E CONTROLOS DA |
|
||
|
RAS-B16SKVP-E podem ligar-se a uma unidade exterior única ou |
||
UNIDADE INTERIOR |
3 |
||
a uma unidade exterior múltipla. |
|||
TELECOMANDO E FUNÇÕES |
4 |
||
Para fazer a ligação a uma unidade única |
|||
NOMES E FUNÇÕES DOS INDICADORES DO |
|
||
|
Utilize as combinações indicadas abaixo. |
||
TELECOMANDO |
5 |
||
RAS-B10SKVP-E/RAS-10SAVP-E |
|||
PREPARAÇÃO E VERIFICAÇÃO ANTES DA UTILIZAÇÃO |
5 |
||
RAS-B13SKVP-E/RAS-13SAVP-E |
|||
UTILIZAÇÃO DO TELECOMANDO |
7 |
||
RAS-B16SKVP-E/RAS-16SAVP-E |
|||
OPERAÇÃO AUTOMÁTICA |
8 |
||
Para fazer a ligação a uma unidade múltipla |
|||
OPERAÇÃO AUTOMÁTICA (COMUTAÇÃO AUTOMÁTICA) |
8 |
||
Consulte as especificações fornecidas com o sistema de |
|||
OPERAÇÃO DO AQUECIMENTO/REFRIGERAÇÃO |
9 |
||
unidades exteriores múltiplas. |
|||
OPERAÇÃO A SECO |
9 |
||
|
|||
OPERAÇÃO SÓ VENTOINHA (Apenas nos modelos só de |
|
• As unidades interiores RAS-M10SKCVP-E, RAS-M13SKCVP-E e |
|
refrigeração) |
9 |
||
RAS-M16SKCVP-E podem ligar-se a um sistema de unidades |
|||
OPERAÇÃO PURE |
10 |
||
exteriores múltiplas. Consulte as especificações fornecidas com o |
|||
OPERAÇÃO DE ALTA POTÊNCIA |
11 |
||
sistema de unidades exteriores múltiplas. |
|||
TEMPORIZADOR DE DESACTIVAÇÃO 1, 3, 5, 9H (OFF) |
11 |
||
|
|||
OPERAÇÃO DO TEMPORIZADOR ............................................. |
12 |
|
|
...........................OPERAÇÃO PRÉ-CONFIGURADA/MEMÓRIA |
14 |
Nomes dos modelos de unidade interior |
|
AJUSTE DA DIRECÇÃO DO FLUXO DE AR .............................. |
15 |
|
|
|
|||
FUNÇÃO DE REPOSIÇÃO EM MARCHA AUTOMÁTICA........... |
16 |
Modelos com bomba de calor |
|
COMO FUNCIONA O AR CONDICIONADO |
17 |
||
(RAS-B10SKVP-E, RAS-B13SKVP-E e RAS-B16SKVP-E) |
|||
OPERAÇÃO TEMPORÁRIA ........................................................ |
18 |
Estas unidades interiores podem executar operações de |
|
OPERAÇÃO DE LIMPEZA |
18 |
||
refrigeração e de aquecimento. |
|||
MANUTENÇÃO |
19 |
||
Modelos só de refrigeração |
|||
MANUTENÇÃO ESPECIAL ......................................................... |
21 |
||
OPERAÇÃO E DESEMPENHO DO AR CONDICIONADO.......... |
23 |
(RAS-M10SKCVP-E, RAS-M13SKCVP-E e RAS-M16SKCVP-E) |
|
RESOLUÇÃO DE PROBLEMAS.................................................. |
24 |
Estas unidades interiores são modelos só de refrigeração e não |
|
ESPECIFICAÇÕES ...................................................................... |
27 |
podem executar operações de aquecimento. |
|
RESOLUÇÃO DE PROBLEMAS (TELECOMANDO) .................. |
28 |
|
NEDERLANDS
ACCESSOIRES |
1 |
|
|
Betreffende mogelijke combinaties van |
|||
VEILIGHEIDSVOORSCHRIFTEN .................................................. |
1 |
||
NAMEN VAN DE ONDERDELEN .................................................. |
3 |
binnenapparaat en buitenapparaat |
|
NAMEN EN FUNCTIES VAN AANDUIDINGEN EN KNOPPEN |
|
|
|
|
• De RAS-B10SKVP-E, RAS-B13SKVP-E en RAS-B16SKVP-E |
||
OP HET BINNENAPPARAAT ...................................................... |
3 |
||
DE AFSTANDSBEDIENING EN HAAR FUNCTIES....................... |
4 |
binnenapparaten kunnen worden aangesloten op een enkel |
|
NAMEN EN FUNCTIES VAN AANDUIDINGEN OP DE |
|
buitenapparaat of een meervoudig buitenapparaat. |
|
AFSTANDSBEDIENING .............................................................. |
5 |
Voor aansluiten op een enkel apparaat |
|
VOORBEREIDINGEN EN CONTROLEPUNTEN VOOR |
|
Gebruik een van de volgende combinaties. |
|
GEBRUIK ..................................................................................... |
5 |
RAS-B10SKVP-E/RAS-10SAVP-E |
|
GEBRUIK VAN DE AFSTANDSBEDIENING ................................. |
7 |
RAS-B13SKVP-E/RAS-13SAVP-E |
|
AUTOMATISCHE WERKING ......................................................... |
8 |
RAS-B16SKVP-E/RAS-16SAVP-E |
|
AUTOMATISCHE WERKING (AUTOMATISCH |
|
Voor aansluiten op een meervoudig buitenapparaat |
|
OMSCHAKELEN) ........................................................................ |
8 |
Zie de technische gegevens die zijn inbegrepen bij het |
|
KOELING/VERWARMINGSFUNCTIES ......................................... |
9 |
meervoudig buitenapparaat. |
|
DROGINGSWERKING ................................................................... |
9 |
• De RAS-M10SKCVP-E, RAS-M13SKCVP-E en |
|
ALLEEN VENTILATORWERKING (alleen voor koeling geschikte |
|
||
|
RAS-M16SKCVP-E binnenapparaten kunnen worden aangesloten |
||
modellen) |
9 |
||
op een meervoudig buitenapparaat. Zie de technische gegevens |
|||
ZUIVERINGSWERKING |
10 |
||
die zijn inbegrepen bij het meervoudig buitenapparaat. |
|||
WERKING MET HOOG VERMOGEN |
11 |
||
|
|||
OFF UITSCHAKELTIMER VOOR 1, 3, 5 OF 9 UUR ................... |
11 |
|
|
SCHAKELKLOK-WERKING |
12 |
|
|
Betreffende de modelnummers van de |
|||
GEHEUGEN/MIJN COMFORT FUNCTIE |
14 |
||
binnenapparaten |
|||
AFSTELLEN VAN DE LUCHTSTROOMRICHTING..................... |
15 |
||
..................AUTOMATISCH HERSTARTEN VAN DE WERKING |
16 |
Warmtepomp-modellen |
|
HOE DE AIRCONDITIONER WERKT |
17 |
||
(RAS-B10SKVP-E, RAS-B13SKVP-E en RAS-B16SKVP-E) |
|||
TIJDELIJKE WERKING |
18 |
||
Deze binnenapparaten zijn zowel geschikt voor koeling als voor |
|||
REINIGINGSWERKING |
18 |
||
verwarmingsdoeleinden. |
|||
PERIODIEK ONDERHOUD |
19 |
||
|
|||
SPECIAAL ONDERHOUD ........................................................... |
21 |
Alleen-koelende modellen |
|
BEDIENING EN WERKING VAN DE AIRCONDITIONER ........... |
23 |
(RAS-M10SKCVP-E, RAS-M13SKCVP-E en RAS-M16SKCVP-E) |
|
VERHELPEN VAN STORINGEN ................................................. |
24 |
Deze binnenapparaten zijn alleen geschikt voor koeling, dus niet |
|
TECHNISCHE GEGEVENS ......................................................... |
27 |
voor verwarmingsdoeleinden. |
|
VERHELPEN VAN STORINGEN (afstandsbediening) ................ |
28 |
|
iv
ENGLISH
DEUTSCH FRANÇAIS
ITALIANO
РУССКИЙ ЯЗЫК NEDERLANDS PORTUGUÊS ESPAÑOL
RASseries_OwnersManual_TOC.fm Page v Tuesday, January 9, 2007 8:50 PM
СОДЕРЖАНИЕ
РУССКИЙ ЯЗЫК
ПРИНАДЛЕЖНОСТИ |
1 |
|
|
О комбинации внутреннего блока и наружного |
|||
МЕРЫ ПРЕДОСТОРОЖНОСТИ.................................................. |
1 |
||
НАЗВАНИЯ ЧАСТЕЙ .................................................................... |
3 |
блока |
|
НАЗВАНИЯ И ФУНКЦИИ ИНДИКАТОРОВ И ОРГАНОВ |
|
|
|
|
• Внутренние блоки RAS-B10SKVP-E, RAS-B13SKVP-E и |
||
УПРАВЛЕНИЯ НА ВНУТРЕННЕМ БЛОКЕ ............................... |
3 |
||
ПУЛЬТ ДУ И ЕГО ФУНКЦИИ ....................................................... |
4 |
RAS-B16SKVP-E могут быть подсоединены к одиночному |
|
НАЗВАНИЯ И ФУНКЦИИ ИНДИКАТОРОВ НА ПУЛЬТЕ ДУ...... |
5 |
наружному блоку или к многоэлементному наружному блоку. |
|
ПОДГОТОВКА И ПРОВЕРКА ПЕРЕД ИСПОЛЬЗОВАНИЕМ..... |
5 |
Для подсоединения к одиночному блоку |
|
ИСПОЛЬЗОВАНИЕ ПУЛЬТА ДУ.................................................. |
7 |
Используйте следующие комбинации. |
|
АВТОМАТИЧЕСКОЕ ФУНКЦИОНИРОВАНИЕ........................... |
8 |
RAS-B10SKVP-E/RAS-10SAVP-E |
|
АВТОМАТИЧЕСКОЕ ФУНКЦИОНИРОВАНИЕ |
|
RAS-B13SKVP-E/RAS-13SAVP-E |
|
(АВТОМАТИЧЕСКОЕ ИЗМЕНЕНИЕ) ........................................ |
8 |
RAS-B16SKVP-E/RAS-16SAVP-E |
|
ОПЕРАЦИЯ ОХЛАЖДЕНИЯ/ОБОГРЕВА.................................... |
9 |
Для подсоединения к многоэлементному блоку |
|
ОПЕРАЦИЯ ОСУШЕНИЯ............................................................. |
9 |
Обращайтесь к техническим характеристикам |
|
ТОЛЬКО ОПЕРАЦИЯ ВЕНТИЛЯТОРА (только модели |
|
прилагаемым с многоэлементным наружным блоком. |
|
охлаждения) ............................................................................... |
9 |
• Внутренние блоки RAS-M10SKCVP-E, RAS-M13SKCVP-E и |
|
ОПЕРАЦИЯ PURE |
10 |
||
RAS-M16SKCVP-E могут быть подсоединены к |
|||
ОПЕРАЦИЯ Hi POWER |
11 |
||
многоэлементному наружному блоку. Обращайтесь к |
|||
ТАЙМЕР 1, 3, 5, 9H OFF |
11 |
||
техническим характеристикам, прилагаемым с |
|||
ОПЕРАЦИЯ ТАЙМЕРА |
12 |
||
многоэлементным наружным блоком. |
|||
ОПЕРАЦИЯ MEMORY/MY COMFORT |
14 |
||
|
|||
РЕГУЛИРОВКА НАПРАВЛЕНИЯ ВОЗДУШНОГО ПОТОКА .... |
15 |
|
|
ОПЕРАЦИЯ АВТОМАТИЧЕСКОГО ПОВТОРНОГО |
|
|
|
|
О названиях моделей внутренних блоков |
||
ЗАПУСКА |
16 |
||
|
|||
.............................................КАК РАБОТАЕТ КОНДИЦИОНЕР |
17 |
Модели тепловой накачки |
|
ВРЕМЕННАЯ ЭКСПЛУАТАЦИЯ |
18 |
||
(RAS-B10SKVP-E, RAS-B13SKVP-E и RAS-B16SKVP-E) |
|||
ОПЕРАЦИЯ ОЧИСТКИ |
18 |
||
Эти внутренние блоки могут выполнять обе операции |
|||
ОБЫЧНЫЙ УХОД |
19 |
||
охлаждения и обогрева. |
|||
СПЕЦИАЛЬНЫЙ УХОД |
21 |
||
Модели только охлаждения |
|||
ФУНКЦИОНИРОВАНИЕ И РАБОТА КОНДИЦИОНЕРА.......... |
23 |
||
ВЫЯВЛЕНИЕ И УСТРАНЕНИЕ НЕИСПРАВНОСТЕЙ ............. |
24 |
(RAS-M10SKCVP-E, RAS-M13SKCVP-E и RAS-M16SKCVP-E) |
|
ТЕХНИЧЕСКИЕ ХАРАКТЕРИСТИКИ........................................ |
27 |
Эти внутренние блоки являются моделями только охлаждения |
|
ВЫЯВЛЕНИЕ И УСТРАНЕНИЕ НЕИСПРАВНОСТЕЙ (пульт |
|
и не могут выполнять операцию обогрева. |
|
ДУ) ............................................................................................. |
28 |
|
v
RASseries_OwnersManual.book Page 1 Tuesday, January 9, 2007 4:48 PM
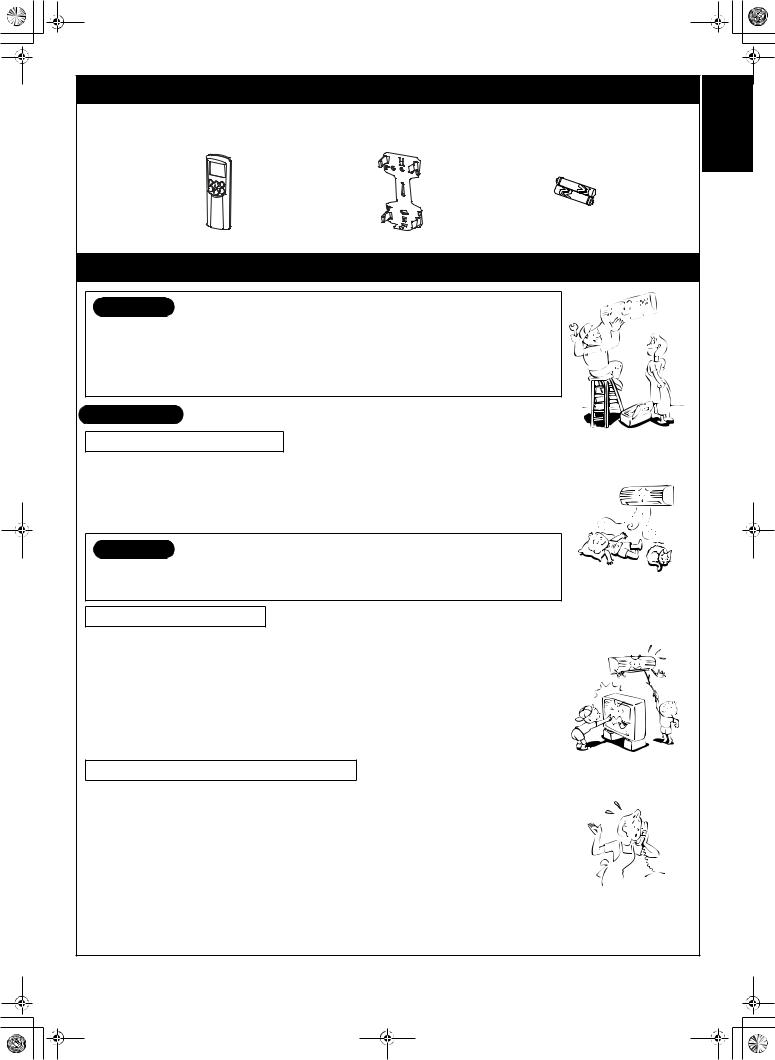
ACCESSORIES
Remote controller |
|
Remote controller holder |
|
Batteries (two) |
||||||
|
|
|
|
|
|
|
|
|
|
|
|
|
|
|
|
|
|
|
|
|
|
|
|
|
|
|
|
|
|
|
|
|
|
|
|
|
|
|
|
|
|
|
|
|
|
|
|
|
|
|
|
|
|
|
|
|
|
|
|
|
|
|
|
|
|
SAFETY PRECAUTIONS
DANGER
• DO NOT ATTEMPT TO INSTALL THIS UNIT BY YOURSELF. THIS UNIT REQUIRES A QUALIFIED INSTALLER.
• DO NOT ATTEMPT TO REPAIR THE UNIT BY YOURSELF. THIS UNIT SHOULD BE PROFESSIONALLY REPAIRED.
• OPENING OR REMOVING THE COVER WILL EXPOSE YOU TO DANGEROUS VOLTAGES.
• TURNING OFF THE POWER SUPPLY WILL NOT PREVENT POTENTIAL ELECTRIC SHOCK.
WARNING 
INSTALLATION WARNINGS
•Be sure to ask a dealer or a store specialized in electric work to install the air conditioner.
•If the air conditioner is improperly installed by yourself, it can cause some problems such as water
leaks, electric shock, fire, and so on.
• Be sure to always ground the air conditioner.
• Do not connect the ground wire to gas pipes, water pipes, lightning rods or ground wires of telephones. If the air conditioner is improperly grounded, it can cause an electric shock.
CAUTION
TO DISCONNECT THE APPLIANCE FROM THE MAIN POWER SUPPLY
A switch or circuit breaker that can disconnect all poles must be included in the fixed wiring. Be sure to use an approved circuit breaker or switch.
OPERATION WARNINGS
• Avoid cooling the room too strongly or exposing yourself to cool wind for a long time because it can be detrimental to your health.
• Never insert fingers or sticks into the air outlet and air inlet to avoid getting injured and damaging the machine because there are fans running at a high speed inside both the air inlet and air outlet.
• When you notice something unusual with the air conditioner (such as a burning smell or weak cooling power), immediately turn off the main switch and the circuit breaker from the main power supply to stop the air conditioner, and contact the dealer.
• If the air conditioner is operated continuously when something is wrong, it can cause machine failure, electric shock, fire, and so on.
• Do not spill water or other liquid on the indoor unit. If the unit is wet, it can cause an electric shock.
MOVEMENT AND REPAIR WARNINGS
•Do not attempt to move or repair the unit by yourself.
•Do not disassemble the unit. As there is high voltage inside the unit, you may receive an electric
shock.
• Always ask the dealer to move the air conditioner for re-installing it in another place. If it is improperly installed, it can cause electric shock or fire.
• Whenever the air conditioner needs repairs, request repairs from the dealer.
If the air conditioner is repaired improperly it can cause an electric shock or fire.
1
ENGLISH
EN

RASseries_OwnersManual.book Page 2 Tuesday, January 9, 2007 4:48 PM
CAUTION
.
INSTALLATION CAUTIONS
•Securely lay the drain hose for the best draining results.
•Incorrect drainage can cause flooding in the house and furniture to get wet.
•Be sure to connect the air conditioner to a dedicated power supply having the rated voltage. Otherwise, the unit can break down or cause a fire.
•Do not install the unit in a place where inflammable gas can leak. A fire can result if inflammable gas accumulates around the unit.
•The indoor unit shall be installed so that the top of the indoor unit is at least 2 m in height. Also, avoid putting anything on the top of the indoor unit.
OPERATION CAUTIONS
•Carefully read this manual before starting the air conditioner. The manual includes a lot of important information for daily operation.
•Do not use this air conditioner for other purposes such as preserving food, precision instruments, art objects, breeding animals, or growing potted plants.
•Do not install this air conditioner in a special-purpose room such as a ship or any kind of vehicle. Doing so could harm machine performance.
•Avoid exposing potted plants and animals to wind from the air conditioner because it harms their health and growth.
•When the air conditioner is operated in close proximity to a combustion device, pay careful attention to ventilation and let fresh air into the room.
Poor ventilation can cause an oxygen shortage.
•When the air conditioner is used in a closed room, pay careful attention to the ventilation of the room. Poor ventilation can cause an oxygen shortage.
•Do not touch the operation buttons with wet hands. Doing so could cause an electric shock.
•Do not place any combustion device in a place where it is directly exposed to wind from the air conditioner. Doing so could cause incomplete combustion.
•When the air conditioner is not to be used for an extended period of time, turn off the main switch or the circuit breaker for added safety. Disconnecting from the power supply protects the unit from lightning and power surges.
•Do not put a container with water such as a vase on the unit because water can enter into the unit and cause an electric shock due to deterioration in the electric insulation.
•Check the concrete blocks underneath the outdoor unit occasionally. If the base is left damaged or deteriorated, the unit can topple over and could possibly cause an injury.
•Do not wash the unit with water. This could cause an electric shock.
•Do not use alcohol, benzene, thinner, glass cleaner, polishing powder or other solvent for cleaning the unit because they can deteriorate and damage the air conditioner.
•Before cleaning the unit, be sure to turn off the main switch or circuit breaker to prevent injuries from the electric fan running inside.
•For details of the cleaning method, refer to “USUAL MAINTENANCE” and “SPECIAL MAINTENANCE” on pages 19 to 22.
•Do not put anything on or step on the indoor unit and outdoor unit. If you do so, it can topple over and cause an injury.
•To allow the air conditioner to operate at maximum performance, operate within the operating temperature range specified in the instructions. Failure to do so can cause a malfunction, break down, or water to leak from the unit.
•It is recommended that maintenance be performed by a specialist when the unit has been operated for a long time.
EN |
2 |
|
|
RASseries_OwnersManual.book Page 3 Tuesday, January 9, 2007 4:48 PM
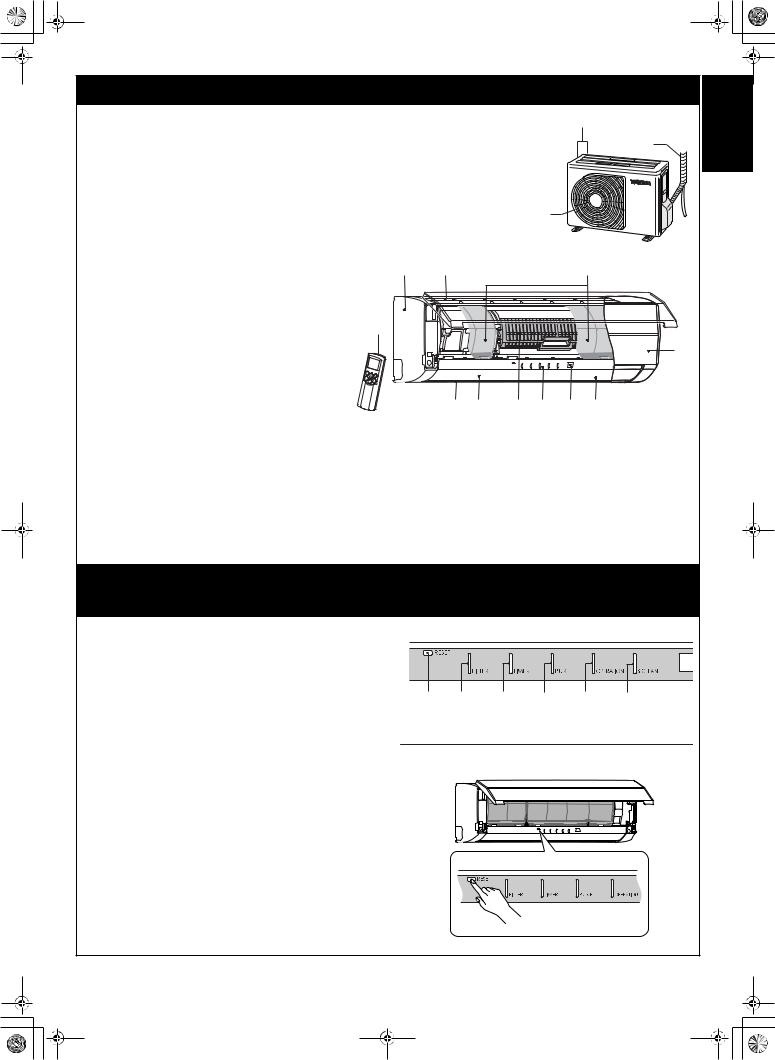
NAMES OF PARTS
Outdoor unit |
b |
a Refrigerant connecting pipe and electric wires
b Air inlet (Side and rear) a c Air outlet
Indoor unit |
|
|
c |
d Room temperature sensor |
|
|
|
e Front panel |
|
|
|
f Air inlet grille |
|
|
|
g Air filter |
e |
f |
g |
h Air outlet |
|
|
|
i Horizontal air flow louver |
|
|
|
Located at the back of the vertical air flow louver. |
|
|
|
j Vertical air flow louver |
m |
|
|
k Display panel |
|
|
|
|
|
|
|
l Infrared signal receiver |
|
|
d |
m Remote controller |
|
|
|
|
|
|
|
n Plasma pure filter |
|
|
|
i h n k l j
NAMES AND FUNCTIONS OF INDICATORS AND CONTROLS ON INDOOR UNIT
Display panel
The operating states are shown below. |
|
|
|
|
|
|
a RESET button |
|
|
|
|
|
|
b FILTER indicator (Orange) |
|
|
|
|
|
|
c TIMER indicator (Yellow) |
a |
b |
c |
d |
e |
f |
|
d PURE indicator (Blue)
e OPERATION indicator (Green)
The operation indicators flash rapidly (5 times per second) when a safety protection feature is activated.
fS.CLEAN indicator (Green)
When the unit shuts down after having operated for 10 or more minutes in the cooling or dry mode, the cleaning operation is started automatically, and the S.CLEAN indicator turns on.
RESET button
The RESET button has the following two functions.
• Reset function
Use when the FILTER indicator (orange) is on. ( see page 20.)
• Temporary operation function
Use when you misplace or lose the remote controller, or when its batteries are used up. ( see page 18.)
ENGLISH
3 |
EN |

RASseries_OwnersManual.book Page 4 Tuesday, January 9, 2007 4:48 PM
REMOTE CONTROLLER AND ITS FUNCTIONS
aInfrared signal transmitter
Transmits signals to the indoor unit.
b  button
Press the button to start operation. (A receiving beep is heard.) Press the button again to stop operation. (A receiving beep is heard.)
If no receiving sound is heard from the indoor unit, press the button again.
cMode select button (MODE)
Press this button to select a mode. Each time you press the button, the modes cycle in order from A: Auto
changeover control,  : COOL,
  : DRY,
  : HEAT (heat pump models only),
  : FAN ONLY (cooling-only models only) and back to A.
(A receiving beep is heard.)
dTemperature button (TEMP)
 .. The temperature setting is raised to 30°C.
 ... The temperature setting is lowered to 17°C.
(A receiving beep is heard.)
eFan speed button (FAN)
Press this button to select the fan speed. When you select AUTO, the fan speed is automatically adjusted according to the room temperature. You can also manually select the desired fan speed from five available settings.
(LOW , LOW+ |
, MED |
, MED+ |
, |
HIGH  ) (A receiving beep is heard.)
fAuto louver button (SWING)
Press this button to swing the louver. (A receiving beep is heard.)
Press the button again to stop the louver from swinging. (A
receiving beep is heard.) ( see page 15.) g Set louver button (FIX)
Press this button to adjust the air flow direction. (A receiving beep is heard.) ( see page 15.)
hON timer button (ON)
Use this button to change the clock and ON timer times. To move up the time, press  of the ON ON button.
To move down the time, press  of the ON ON button.
iOFF timer button (OFF)
Use this button to change the OFF timer times.
To move up the time, press  of the OFF OFF button.
To move down the time, press  of the OFF OFF button.
jReserve button (SET)
Press this button to store the time settings. (A receiving
beep is heard.)
k Cancel button (CLR)
Press this button to cancel the ON timer and OFF timer. (A receiving beep is heard.)
lHigh power button (Hi POWER)
Press this button to start high power operation. ( see
page 17.)
mMemory button (MEMO)
Press this button to ready for storing the settings.
Hold down the button for 3 seconds or more to store the
setting indicated on the remote controller and until the
 mark is displayed. ( see page 14.)
nAutomatic operation button (AUTO)
Press this button to operate the air conditioner automatically.
(A receiving beep is heard.) ( see page 17.) o SLEEP MODE button
Press this button to start sleep mode. ( see page 17.)
pMY COMFORT button
Press this button to operate the air conditioner according to the settings stored using the MEMO button. ( see
page 14.)
qPURE button (PURE)
Press this button to start the electrical air purifying operation.
Press the button again to stop operation.
rOff timer button (OFF)
Press this button to start the OFF timer operation. You can select the OFF timer time from among four settings (1, 3, 5 or 9 hours).
|
a |
|
q |
n |
|
d |
|
|
c |
p |
|
b |
o |
|
l |
||
m |
||
|
||
g |
e |
|
f |
r |
|
k |
j |
|
h |
i |
EN |
4 |
RASseries_OwnersManual.book Page 5 Tuesday, January 9, 2007 4:48 PM
NAMES AND FUNCTIONS OF INDICATORS ON REMOTE CONTROLLER
Display
All indicators, except for the clock time indicator, are displayed by pressing the  button. a Transmission mark
This transmission mark ( ) indicates when the remote controller transmits signals to the indoor unit. |
|
||||
b Mode indicator |
|
c |
ad b hj |
|
|
Indicates the current operation mode. |
|
|
|||
|
|
|
|
||
• |
Heat pump models |
|
|
|
|
|
(AUTO: Automatic control, A: Auto changeover control, |
: COOL, |
: DRY, |
|
|
|
: HEAT) |
|
|
|
|
• |
Cooling-only models |
|
|
|
|
|
(AUTO: Automatic control, A: Auto changeover control, |
: COOL, |
: DRY, |
|
|
|
: FAN ONLY) |
|
|
|
|
c Temperature indicator |
|
|
|
|
|
Indicates the temperature setting (17°C to 30°C). |
|
|
|
|
|
d PURE indicator |
|
|
|
|
|
Shows that the electrical air purifying operation is in progress. |
i g |
e |
f |
||
|
|
|
|||
e FAN speed indicator
Indicates the selected fan speed. AUTO or one of five fan speed levels (LOW , |
• In the illustration, all indicators are shown |
|||||
for purposes of explanation. During |
||||||
LOW+ |
, MED |
, MED+ |
, HIGH |
) can be shown. |
||
operation, only the relevant indicators are |
||||||
Indicates AUTO when the operating mode is either AUTO or |
: DRY. |
|||||
shown on the remote controller. |
||||||
|
|
|
|
|
||
f TIMER and clock time indicator
The time setting for timer operation or the clock time is indicated. The current time is always indicated except during TIMER operation.
g Hi POWER indicator
Indicates when Hi POWER operation starts.
Press the Hi POWER button to start and press it again to stop operation.
h  (MEMORY) indicator
Flashes for 3 seconds when the MEMO button is pressed during operation.
The  mark is shown when holding down the button for 3 seconds or more while the mark is flashing.
Press another button to turn off the mark.
iSLEEP MODE indicator
Indicates when the SLEEP MODE is activated.
Press the SLEEP MODE button to start and press it again to stop operation.
jA. B change indicator remote controller
•When the remote controller switching function is set, “B” appears in the remote
controller display. (When the remote controller setting is “A”, there is no indication at this position.)
Remote controller switching function
•If two indoor units are installed in the same room or adjoining rooms, both units may start and stop at the same time when the remote controller is operated. This can be prevented by setting the switching function so that each indoor unit is operated only by the corresponding remote controller.
•To use the remote controller switching function, contact the air conditioner dealer or the installation company.
PREPARATION AND CHECK BEFORE USE
Loading the remote controller batteries
a Remove the cover, and insert the batteries.
bPress the RESET button.
The clock time indicator flashes. Press the RESET button using an object with a narrow tip.
c Reattach the cover.
b |
ENGLISH
5 |
EN |
RASseries_OwnersManual.book Page 6 Tuesday, January 9, 2007 4:48 PM
Batteries
•To replace the batteries, use two new batteries (AAA type).
•The batteries will last about one year under normal usage.
•Replace the batteries if there is no receiving beep from the indoor unit or when the air conditioner cannot be operated using the remote controller.
•To avoid malfunctions due to battery leakage, remove the batteries when not using the remote controller for over one month.
•Slide off the cover while pressing the sides.
•Battery replacement
Be careful not to reverse the (+) position and the (–) position.
Setting the clock
Before you start operating the air conditioner, set the clock of the remote controller using the procedures given in this section. The clock panel on the remote controller will indicate the time regardless of whether the air conditioner is in use or not.
Initial setting
When batteries are inserted in the remote controller, the clock panel displays AM 0:00 and flashes.
a ON ON button
Press the ON ON button to set the current time.
Each press of the ON button changes the time in one minute increments. Holding down the ON button changes the time in ten minute increments.
b SET SET button
Press the SET SET button.
The current time is displayed and the clock starts.
Adjusting the clock
aCLOCK button
Press the CLOCK button.
The clock time indicator flashes.
b ON ON button
Press the ON ON button to set the current time.
Each press of the ON button changes the time in one minute increments.
Holding down the ON button changes the time in ten
minute increments. |
Push CLOCK |
c SET SET button |
|
Press the SET SET |
button. |
The current time is displayed and the clock starts.
b |
a |
b |
c |
|
a |
||
|
EN |
6 |
RASseries_OwnersManual.book Page 7 Tuesday, January 9, 2007 4:48 PM
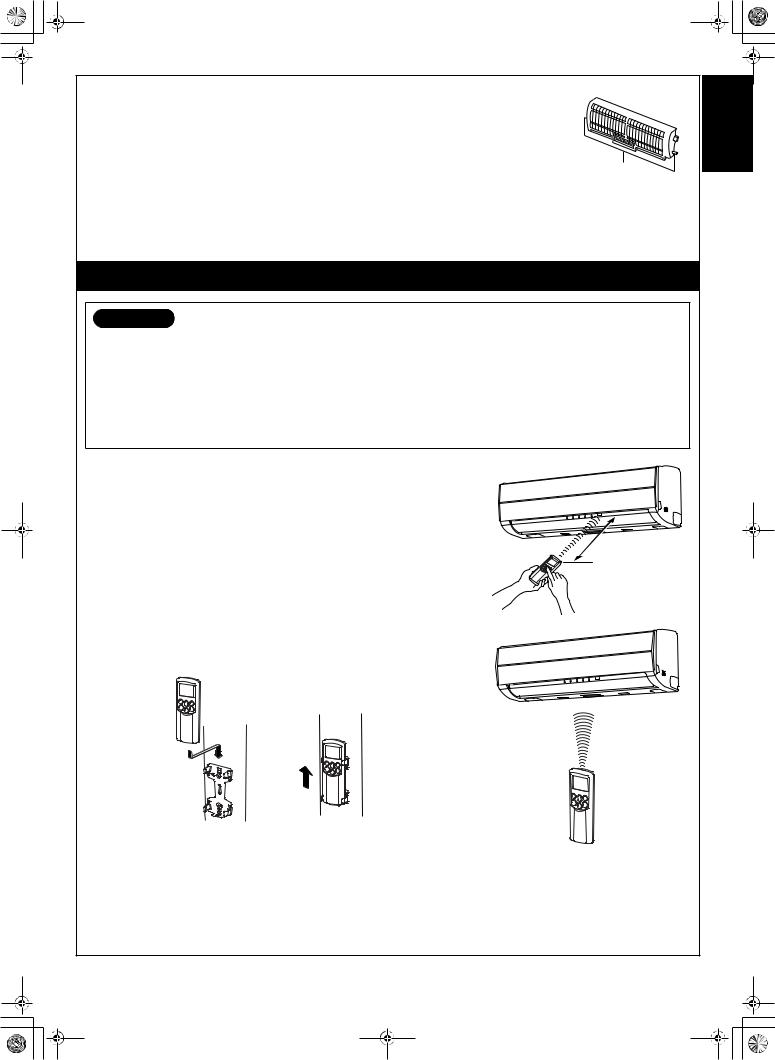
Check that the air filter and the plasma pure filter are correctly installed
•Press the plasma pure filter until the projections on both sides are fully inserted into the holders (tabs). If the installation is not correct, the FILTER indicator (orange) may come on.
Projections
USING THE REMOTE CONTROLLER
CAUTION
•The air conditioner will not operate if curtains, doors or other objects block the signals from the remote controller to the indoor unit.
•Be careful that liquids do not spill onto the remote controller.
•Do not expose the remote controller to direct sunlight or heat.
If the infrared signal receiver on the indoor unit is exposed to direct sunlight, the air conditioner may not function properly. Use curtains to prevent sunlight from reaching the receiver.
•Signals may not be properly received, if the room using the air conditioner has fluorescent lighting with electronic starters. If you plan to use fluorescent lamps, consult with your local dealer.
•If other electrical appliances are activated by the remote controller, move these appliances or consult with your local dealer.
Location of the remote controller
•Keep the remote controller where its signals can reach the receiver of the indoor unit (a distance of up to 7 m is allowed).
•When you select timer operation, the remote controller automatically transmits a signal to the indoor unit at the specified time.
If you keep the remote controller in a location where proper signal transmission is
blocked, a time lag of up to 15 minutes may occur.
7 m
Remote controller holder
Installing the remote controller holder
•Before you actually install the remote controller holder on a wall or pillar, check whether the remote controller signals can be received by the indoor unit.
Mounting and removing the remote controller
•To mount the remote controller, hold it parallel to the remote controller holder and push it in fully. To remove the remote controller, slide the remote controller upwards and out from the holder.
ENGLISH
|
|
|
|
|
|
|
|
|
|
|
|
|
|
|
|
|
|
|
|
|
|
|
|
|
|
|
|
|
|
|
|
|
|
|
|
|
|
|
|
|
|
|
|
|
|
|
|
|
|
|
|
|
|
|
|
|
|
|
|
|
|
|
|
|
|
|
|
|
|
|
|
|
|
|
|
|
|
|
|
|
|
|
|
|
|
|
|
|
|
|
|
|
|
|
|
|
|
|
|
|
|
|
|
|
|
|
|
|
|
|
|
|
|
|
|
|
|
|
|
|
|
|
|
|
|
|
|
|
|
|
|
7 |
|
EN |
||||||||
|
||||||||||

01_OwnersManual_EN.fm Page 8 Tuesday, January 9, 2007 8:51 PM
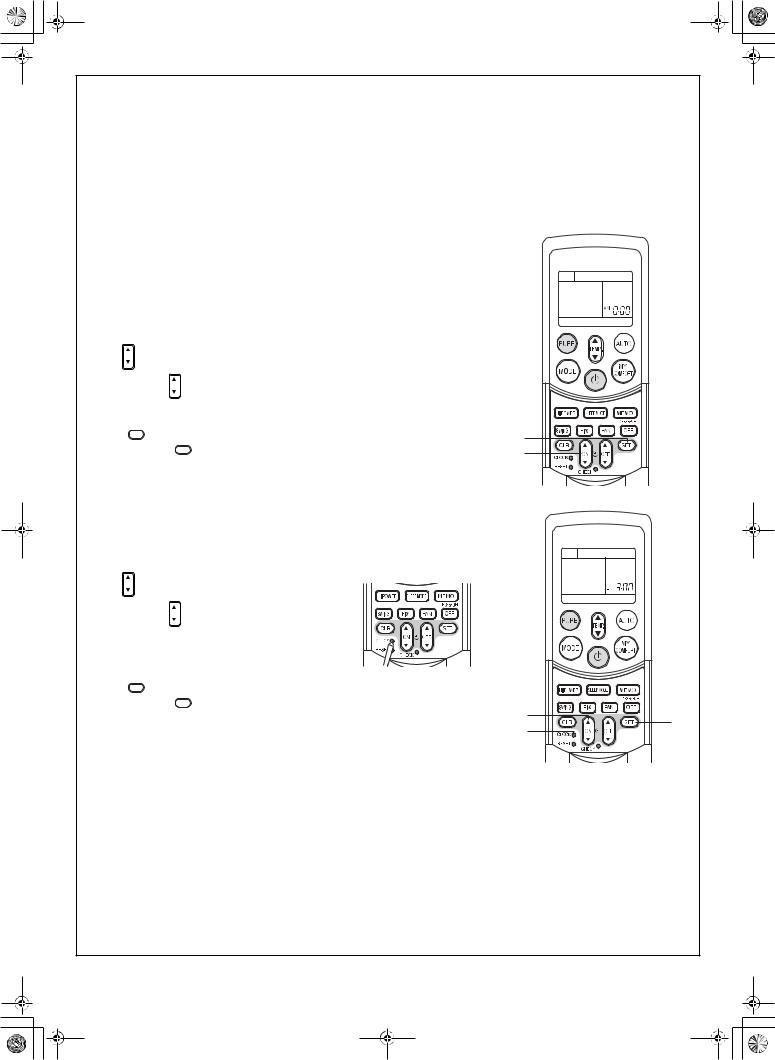
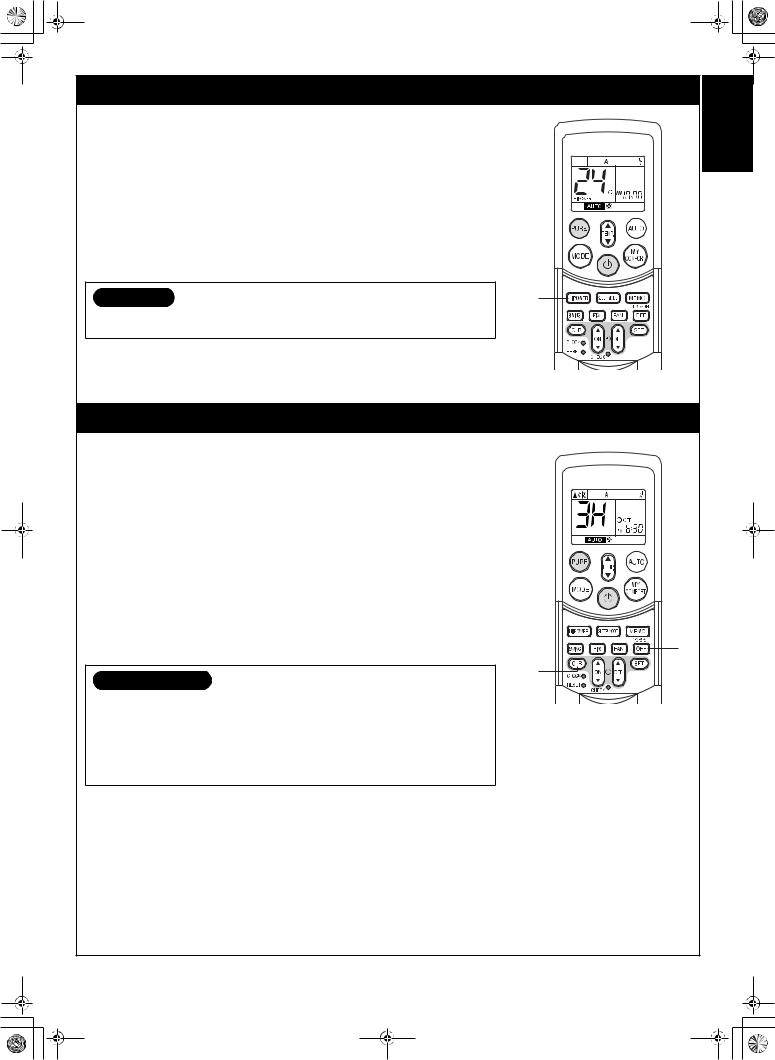
AUTOMATIC OPERATION
When you set the air conditioner to AUTO mode, it automatically selects cooling, heating (heat pump models only), or fan only operation depending on the room temperature. ( see page 17.)
The fan speed and louver are also automatically controlled.
Start
a  button
Press this button to start the air conditioner.
bAUTO button (AUTO)
Press AUTO button.
cTemperature button (TEMP)
Set the desired temperature.
•The OPERATION indicator (green) on the display panel of the indoor unit lights. The operating mode is selected according to the room temperature and operation starts after approximately 3 minutes.
•If the AUTO mode is uncomfortable, you can select the desired conditions manually. The fan speed and louver position can be changed, and MODE is also changed from AUTO to A when the fan speed or louver position is changed.
The fan speed indicator is also shown.
Stop
button
Press this button again to stop the air conditioner.
b |
c |
a |
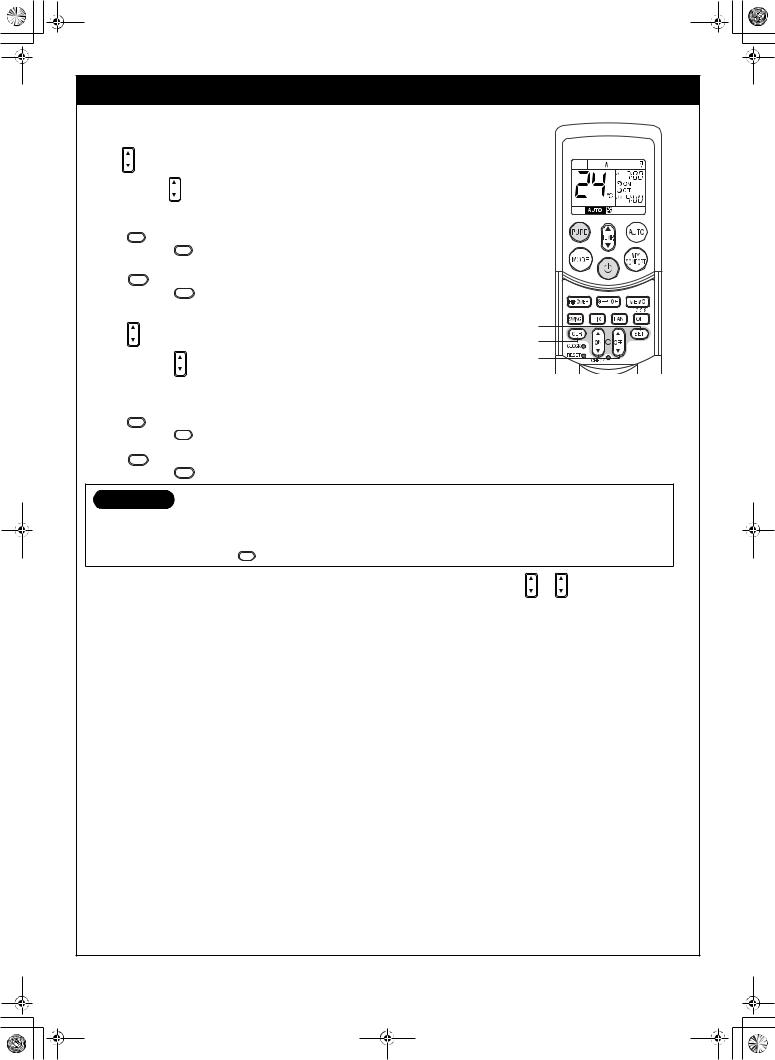
AUTOMATIC OPERATION (AUTO CHANGEOVER)
When you set the air conditioner to A mode or switch over from AUTO operation because of a change in settings, the air conditioner automatically selects cooling, heating (heat pump models only), or fan only operation depending on the room temperature. ( see page 17.)
Start
a  button
Press this button to start the air conditioner.
bMode select button (MODE)
Select A.
c Temperature button (TEMP)
Set the desired temperature. d Fan speed button (FAN)
Select one of “AUTO” LOW , LOW+ |
, MED |
, MED+ |
, |
|
HIGH |
. |
|
|
|
•The OPERATION indicator (green) on the display panel of the indoor unit lights. The operating mode is selected according to the room temperature and operation starts after approximately 3 minutes.
•The temperature, fan speed and louver position can be changed. You can select the desired conditions manually.
Stop
button
Press this button again to stop the air conditioner.
c |
b |
a |
d |
EN |
8 |

RASseries_OwnersManual.book Page 9 Tuesday, January 9, 2007 4:48 PM
COOLING/HEATING OPERATION |
|
ENGLISH |
|||||
a |
button |
|
|
|
|
|
|
Start |
|
|
|
|
|
|
|
|
Press this button to start the air conditioner. |
|
|
|
|
||
b Mode select button (MODE) |
|
|
|
|
|
||
|
Select COOL |
or HEAT |
(heat pump models only). |
|
|
|
|
c Temperature button (TEMP ) |
|
|
|
|
|
||
|
Set the desired temperature. |
|
|
|
|
c |
|
d Fan speed button (FAN) |
|
|
|
|
b |
||
|
Select one of “AUTO” LOW |
, LOW+ |
, MED |
, MED+ |
, |
a |
|
|
HIGH |
. |
|
|
|
|
|
|
|
|
|
|
|
|
d |
• The OPERATION indicator (green) on the display panel of the indoor unit turns on. |
|
||||||
Operation starts after approximately 3 minutes. |
|
|
|
||||
Stop |
|
|
|
|
|
|
|
button
Press this button again to stop the air conditioner.
• Heating operations cannot be performed by a cooling-only model.
DRY OPERATION
Start |
|
|
|
|
|
|
|
|
a |
button |
|
|
|
|
|
|
|
|
Press this button to start the air conditioner. |
|
|
|
|
|||
b Mode select button (MODE) |
|
|
|
|
|
|||
|
Select DRY . |
|
|
|
|
|
|
|
c Temperature button (TEMP ) |
|
|
|
|
|
|||
|
Set the desired temperature. |
|
|
|
|
c |
||
|
|
|
|
|
|
|
|
|
• |
The fan speed setting is fixed to AUTO and the AUTO is displayed. |
|
b |
|||||
|
a |
|||||||
• |
The OPERATION indicator (green) on the display panel of the indoor unit turns on, and |
|
||||||
|
operation starts after approximately 3 minutes. |
|
|
|
||||
Stop |
|
|
|
|
|
|
|
|
|
button |
|
|
|
|
|
|
|
Press this button again to stop the air conditioner. |
|
|
|
|||||
FAN ONLY OPERATION (cooling-only models only) |
|
|
||||||
Start |
|
|
|
|
|
|
|
|
a |
button |
|
|
|
|
|
|
|
|
Press this button to start the air conditioner. |
|
|
|
|
|||
b Mode select button (MODE) |
|
|
|
|
|
|||
|
Select FAN ONLY . |
|
|
|
|
|
||
c Fan speed button (FAN) |
|
|
|
|
|
|||
|
Select one of “AUTO” LOW |
, LOW+ |
, MED |
, MED+ |
, |
|
||
|
HIGH |
. |
|
|
|
|
|
|
|
|
|
|
|
|
|
|
b |
• |
The OPERATION indicator (green) on the display panel of the indoor unit turns on. |
a |
||||||
|
Operation will start immediately. |
|
|
|
|
|
||
• |
The |
: FAN ONLY mode does not control the temperature. |
|
|
c |
|||
Stop |
|
|
|
|
|
|
|
|
|
button |
|
|
|
|
|
|
|
Press this button again to stop the air conditioner.
9 |
EN |
RASseries_OwnersManual.book Page 10 Tuesday, January 9, 2007 4:48 PM
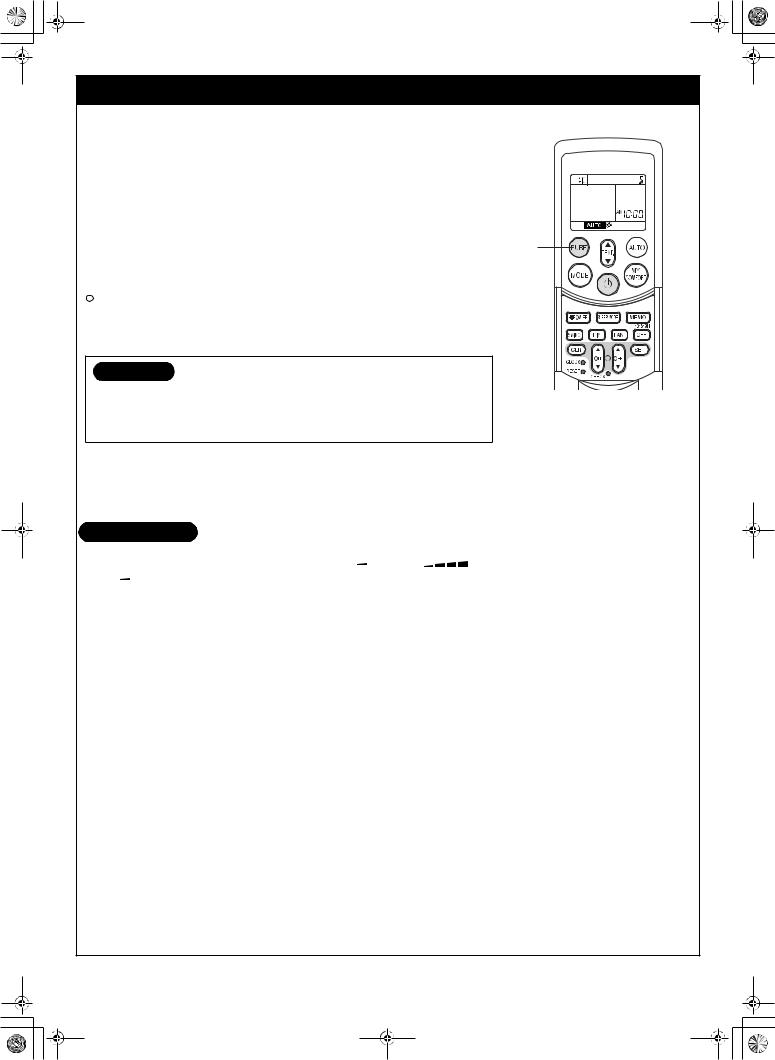
PURE OPERATION
Press this button to start the electrical air purifying operation.
During air conditioner operation
aPURE button
PURE operation starts by pressing this button.
•The PURE indicator (blue) on the display panel of the indoor unit turns on.
•Plasma pure filter is activated.
To stop only PURE operation
PURE button
PURE operation stops by pressing this button.
•The PURE indicator (blue) on the display panel of the indoor unit turns off.
•Plasma pure filter is deactivated.
To stop air conditioner operation at the same time  button
Air conditioner operation and PURE operation stop by pressing this button.
•The OPERATION indicator (green) and PURE indicator (blue) on the display panel of the indoor unit turn off.
CAUTION
•When the  button is pressed the next time, operation starts with the combined air conditioner and PURE operation.
•During the combined air conditioner and PURE operation, air conditioner operation only cannot be stopped.
a |
When the air conditioner is stopped
aPURE button
PURE operation starts by pressing this button.
• The PURE indicator (blue) on the display panel of the indoor unit turns on.
INFORMATION
• During PURE operation, a small amount of ozone is produced, and you might notice the smell.
• When the air flow is automatic, it changes between LOW |
and MED+ |
. |
|
LOW |
operation is performed when the indoor air becomes clean. During operation, the position of the vertical air flow louvers may |
||
change if the room temperature is low. |
|
|
|
•Opening the air inlet grille during PURE operation sometimes turns on the FILTER indicator (orange).
In this case, stop PURE operation (stop the air conditioner if it is also operating), and then close the air inlet grille.
•The FILTER indicator (orange) turns on after PURE operation is performed for about 1000 hours. When the indicator turns on, clean the plasma pure filter. ( see page 21.)
EN |
10 |
RASseries_OwnersManual.book Page 11 Tuesday, January 9, 2007 4:48 PM
Hi POWER OPERATION |
ENGLISH |
|
High power (Hi POWER) |
||
|
||
• The Hi POWER (high power operation) mode automatically controls room temperature, |
|
|
air flow and the operation mode so that the room is quickly cooled in summer and |
|
|
warmed in winter. ( see page 17.) |
|
|
Setting Hi POWER mode |
|
|
a Hi POWER button |
|
|
Press the Hi POWER button. The Hi POWER mark on the remote controller is |
|
|
shown. |
|
|
Canceling Hi POWER mode |
|
|
a Hi POWER button |
|
|
Press the Hi POWER button once again. |
|
|
The Hi POWER mark on the remote controller turns off. |
|
|
CAUTION |
a |
|
The Hi POWER mode cannot be activated during DRY operation and FAN ONLY |
|
|
operation (cooling-only models only). |
|
1, 3, 5, 9H OFF TIMER
The air conditioner stops after operating for the set time (1, 3, 5 or 9 hours).
a OFF button |
|
||
|
Press the OFF button (during operation). |
|
|
|
• |
There is a short beep and the timer indicator comes on. The time at which the air |
|
|
|
conditioner will stop is indicated on the remote controller display (1H: about 1 |
|
|
|
hour after the current time). |
|
|
• |
Press the button again while 1H is displayed (about 3 seconds) to change to the |
|
|
|
3H indicator, press again to change to the 5H indicator, and press again to |
|
|
|
change to the 9H indicator. |
|
|
• |
After selecting the time you want, do not press this button again. (When the 1H, |
|
|
|
3H, etc. indicator goes off the timer is set.) |
|
b CLR button |
|
||
|
Press the CLR button to cancel the timer. |
|
|
|
• |
The timer is canceled but the air conditioner continues to operate. |
|
|
• |
The 1, 3, 5 or 9H OFF timer operation is also canceled if the OFF button is |
a |
|
|
pressed after making a setting. |
|
|
|
|
|
. |
|
|
|
|
INFORMATION |
b |
|
|
|
||
• |
Cleaning operation starts when the time of the 1, 3, 5 or 9H OFF timer is reached. |
|
|
|
(Cleaning operation is not performed during heating operation or the PURE |
|
|
|
operation.) |
|
|
• |
When using in combination with the ON timer, first set the 1, 3, 5 or 9H OFF timer |
|
|
|
and then set the ON timer. |
|
|
• |
If the OFF button is pressed while the ON (OFF) timer has been set, the ON (OFF) |
|
|
|
timer is canceled and only the 1, 3, 5 or 9H OFF timer is set. |
|
|
11 |
EN |
RASseries_OwnersManual.book Page 12 Tuesday, January 9, 2007 4:48 PM
TIMER OPERATION |
|
|
ON timer and OFF timer |
|
|
Setting the ON Timer |
|
|
a ON ON button |
|
|
Press the ON ON button. Set the timer to the desired time. |
|
|
Each time the ON button is pressed, the time changes in ten minute increments. |
|
|
Holding down the ON button changes the time in one hour increments. |
|
|
b SET SET button |
|
|
Press the SET SET |
button to set the timer. |
|
The timer time is displayed, and the timer starts. |
|
|
c CLR CLR button |
|
|
Press the CLR CLR |
button to cancel the timer setting. |
|
Setting OFF Timer |
|
|
a OFF OFF button |
|
b |
|
c |
|
|
|
|
Press the OFF OFF |
button. |
a |
|
||
Set the timer to the desired time.
Each time the OFF button is pressed, the time changes in ten minute increments.
Holding down the OFF button changes the time in one hour increments.
b SET |
|
SET |
|
button |
|
|
||
Press the SET |
|
|
button to set the timer. |
|||||
SET |
||||||||
The timer time is displayed, and the timer starts. |
||||||||
c CLR |
|
CLR |
|
button |
|
|
||
Press |
|
|
CLR |
|
|
|
button to cancel the timer setting. |
|
the |
CLR |
|||||||
. |
|
|
|
|
|
|
|
|
CAUTION
•When you select timer operation, the remote controller automatically transmits the timer signal to the indoor unit at the specified time. Therefore, keep the remote controller in a location where it can transmit the signal to the indoor unit properly.
• If you do not press the SET SET button within 30 seconds after setting the time, the setting will be cancelled.
Once you select timer operation mode, the settings are saved in the remote controller.
Thereafter, the air conditioner will start operating under the same conditions as you pressed the ON or OFF button on the remote controller.
You cannot set the timer when the clock display is flashing.
Follow the instructions in the section “Setting the clock” on page 6 to set the clock, and then set the timer.
EN |
12 |
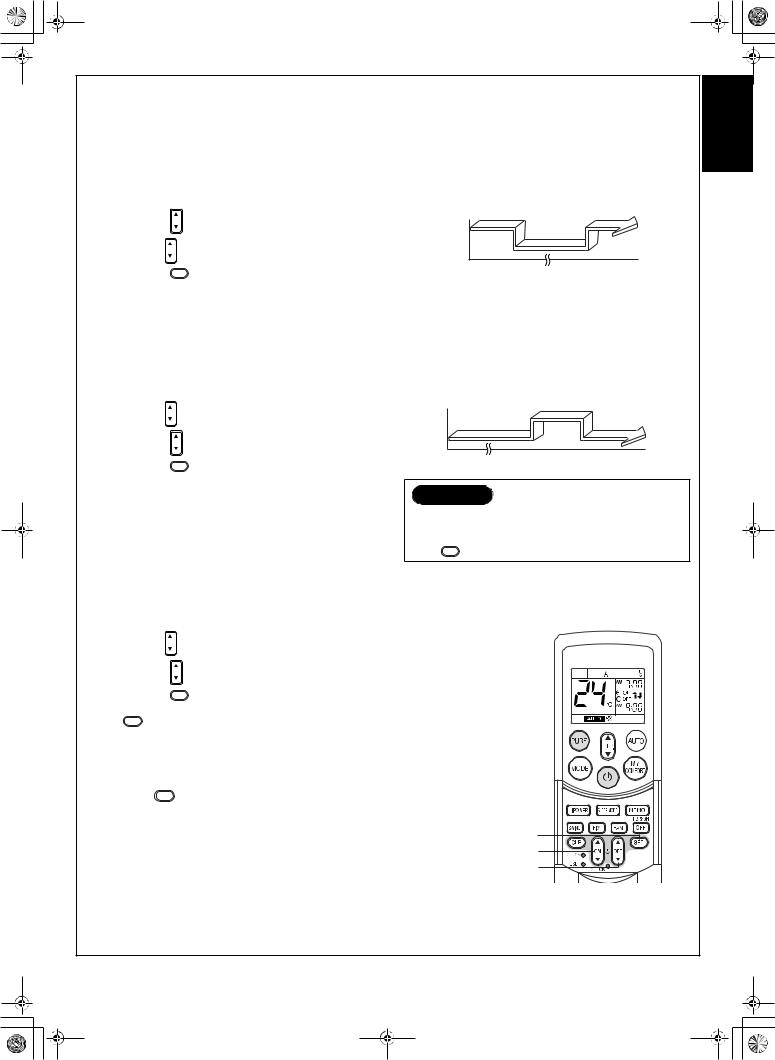
RASseries_OwnersManual.book Page 13 Tuesday, January 9, 2007 4:48 PM
Combined timer (Setting the ON and OFF timers simultaneously) OFF timer —> ON timer
(Operation —> Stop —> Operation)
This feature is useful when you want to stop the air conditioner after you go to sleep, and start it again in the morning when you wake up or you return home.
Example:
To stop the air conditioner and start it again next morning
Setting combined TIMER
Operation |
Operation again |
(1) |
Press the OFF |
OFF |
|
button to set the OFF timer. |
|
|
|
|
Stop |
(2) |
Press the ON |
ON |
button to set the ON timer. |
|
(3) |
Press the SET |
SET |
button. |
|
ON timer —> OFF timer
(Stop —> Operation —> Stop)
You can use this setting to start the air conditioner when you wake up and stop it when you leave the house. Example:
To start the air conditioner the next morning and stop it
Setting combined TIMER
(1)Press the ON ON button to set the ON timer.
(2)Press the OFF OFF button to set the OFF timer.
(3) Press the SET SET button.
•The ON or OFF timer function that is closer to the current time is activated first.
•If the same time is set for both ON and OFF timers, no timer operation is performed. Also, the air conditioner may stop operating.
|
Operation |
Stop |
Stop |
CAUTION
Approximately 3 seconds later, the remote controller will transmit the signal to the indoor unit and a receiving beep will sound from the indoor unit after you press the
SET SET button.
Daily combined timer (setting the ON and OFF timers simultaneously and activating every day)
This feature is useful when you want to use the combined timers at the same time every day.
Setting combined TIMER
(1)Press the ON ON button to set the ON timer.
(2)Press the OFF OFF button to set the OFF timer.
(3)Press the SET SET button.
(4)After step (3), an arrow mark ( or
or  ) flashes for about 3 seconds. Press the
SET SET button during this flashing.
• Both arrows (  ,
,  ) are shown while the daily timer is activated.
Cancelling timer operation
Press the CLR CLR button.
Clock display
During TIMER operation (ON-OFF, OFF-ON, OFF timer), the clock time indicator is not shown so the setting time can be displayed. To view the current time, press the SET button briefly and the current time will be displayed for about 3 seconds.
c |
a |
b |
ENGLISH
13 |
EN |
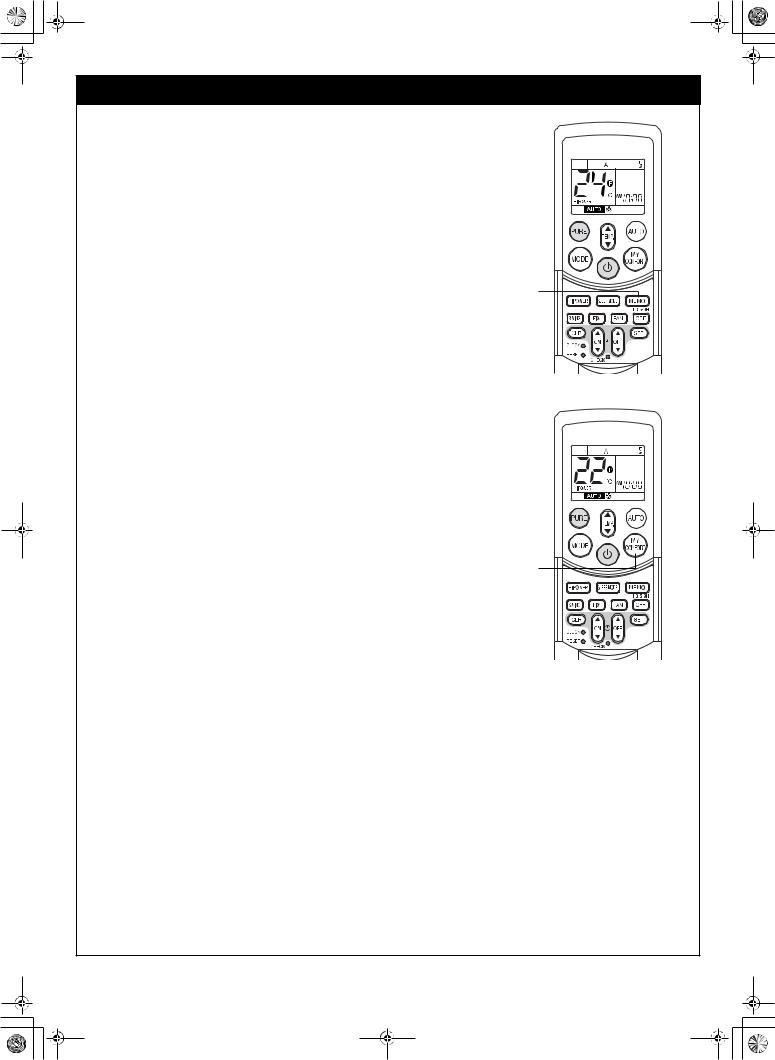
RASseries_OwnersManual.book Page 14 Tuesday, January 9, 2007 4:48 PM
MEMORY/MY COMFORT OPERATION
Use the MEMO button to store a frequently used operation setting for convenience. Start the air conditioner in the operation mode that you want the remote controller to store.
Press the button as shown below while the air conditioner is operating.
aMEMO button
Press this button briefly to ready for storing the setting.
All the icons currently shown flash, except for the clock time indicator and mode indicator.
bMEMO button
Hold down the MEMO button for 3 seconds or more while the indicator flashes. The  mark is shown and the setting is stored.
•If you do not press the MEMO button within 3 seconds or if you press another button, the MEMORY setting is cancelled.
•Operation modes which can be stored with the MEMO button are MODE, Temperature, FAN, TIMER and Hi POWER.
To operate the air conditioner with the setting stored using the MEMO button.
aMY COMFORT button
Press the MY COMFORT button. The setting stored with the MEMO button will be shown and the air conditioner operates based on the setting.
(A): When the MY COMFORT button is pressed while operation is stopped
•The OPERATION indicator (green) on the display panel of the indoor unit turns on, and operation starts after approximately 3 minutes.
(B): When the MY COMFORT button is pressed during operation
•The operation mode changes to the setting stored with the MEMO button.
•Initial setting:
MODE : AUTO
Temperature : 22
a |
b |
a |
EN |
14 |
 Loading...