


Waiting on Front
Contents
Sunbeam's Safety Precautions |
2 |
About espresso coffee |
3 |
Features of your Café Series® |
|
Espresso Machine |
4 |
Using the control panel |
10 |
Reference guide to using your espresso |
|
machine |
13 |
Programming your espresso machine |
20 |
Preparing your espresso machine |
|
before use |
22 |
Guide to the perfect espresso |
23 |
Guide to milk texturing |
25 |
Using the hot water dispenser |
26 |
Espresso recipes |
27 |
Care and cleaning |
29 |
Cleaning the group head |
30 |
Descaling |
32 |
Advanced programming options |
34 |
Important instructions – retain for future use.
Sunbeam’s Safety Precautions
|
SAFETY PRECAUTIONS FOR YOUR |
therefore avoid any direct contact with the |
SUNBEAM ESPRESSO MACHINE |
steam wand or hot water tap. |
|
• Always place the unit on a flat, level surface. |
• Always disconnect the plug from the power |
|
• Do not operate without water in reservoir. |
outlet prior to cleaning the espresso machine |
|
Fill reservoir with only clean and cold water. |
or if there is any problem during the coffee |
|
Observe the maximum filling volume is 3 litres. |
making process. |
|
• Do not remove the filter handle during the |
• Do not allow the power cord to come into |
|
espresso pour or water flow as the unit is |
contact with the hot parts of the espresso |
|
under pressure. Removing the filter handle |
machine, including the cup warming plate, hot |
|
during either of these operations can lead to a |
water tap and steam wand. |
|
scalding or injury. |
• Do not place hands directly under the steam, |
|
• The steam wand and hot water tap become |
hot water or coffee pour as this can lead to a |
|
very hot during texturing milk and water flow. |
scalding or injury. |
|
This may cause burns in case of contact, |
|
|
|
|
|
|
Sunbeam are very safety conscious when |
• Do not use an appliance for any purpose other |
|
designing and manufacturing consumer products, |
than its intended use. |
|
but it is essential that the product user also |
• Do not place an appliance on or near a hot gas |
|
exercise care when using an electrical appliance. |
flame, electric element or on a heated oven. |
|
Listed below are precautions which are essential |
Do not place on top of any other appliance. |
|
for the safe use of an electrical appliance: |
• Do not let the power cord of an appliance hang |
• Read carefully and save all the instructions |
over the edge of a table or bench top or touch |
|
provided with an appliance. |
any hot surface. |
|
• Always turn the power off at the power outlet |
• For safety reasons and to avoid maintenance |
|
before you insert or remove a plug. Remove by |
by unskilled persons, some appliances are |
|
grasping the plug - do not pull on the cord. |
‘sealed’ using tamperproof screws. Such |
|
• Turn the power off and remove the plug |
appliances should always be returned to the |
|
when the appliance is not in use and before |
nearest Sunbeam Appointed Service Centre for |
|
|
cleaning. |
adjustment or repair if required. |
• Do not use your appliance with an extension |
• Do not operate any electrical appliance with a |
|
cord unless this cord has been checked and |
damaged cord or after the appliance has been |
|
tested by a qualified technician or service |
dropped or damaged in any manner. If damage |
|
|
person. |
is suspected, return the appliance to the |
• Always use your appliance from a power |
nearest Sunbeam Appointed Service Centre for |
|
outlet of the voltage (A.C. only) marked on the |
examination, repair or adjustment. |
|
|
appliance. |
• For additional protection, Sunbeam |
• Close supervision is necessary when your |
recommend the use of a residual current |
|
appliance is being used near children or infirm |
device (RCD) with a tripping current not |
|
|
persons. |
exceeding 30mA in the electrical circuit |
• Never leave an appliance unattended while in |
supplying power to your appliances. |
|
|
use. |
• Do not immerse the appliance in water or any |
• Young children should be supervised to ensure |
other liquid unless recommended. |
|
that they do not play with the appliance. |
|
|
If you have any concerns regarding the performance and use of your appliance, please visit www.sunbeam.com.au or contact the Sunbeam Consumer Service Line.
Ensure the above safety precautions are understood.
About espresso coffee
Congratulations on the purchase of your Sunbeam Café Series® Espresso Machine.
The Sunbeam Café Series® delivers quality, style and superior performance capturing the essence of the commercial kitchen. Inspired by heavy-duty equipment found in restaurants, cafés and bars, the Sunbeam
Café Series® is built to last. It brings together a range of appliances designed to expertly create authentic café food and beverages at home.
Uncompromising blends of stainless steel, brass and die-cast alloy characterise the range. This combined with advanced technology and functional design, guarantee the performance, that each product will surpass expectations.
The Sunbeam Café Series® Espresso Machine features a twin pump, twin thermoblock, TPTT™ system to ensure a stable water temperature while also allowing simultaneous production of espresso and steam to texture milk.
The dedicated twin thermoblock heating system takes away the waiting time for water temperatures to change between pouring espresso and producing steam. The twin pumps enables the coffee maker to deliver instant steam for texturing milk and at the same time produce a serve of espresso just like a commercial machine.
Another feature of the espresso machine is the progressive pre-infusion. The pre-infusion gradually releases water pressure pre-soaking the coffee grinds before full water pressure is applied. This in turn delivers greater body and sweetness to the espresso.
The Café Series® Espresso Machine is designed with quality die-cast metal components and includes many features that make producing delicious espresso at home even easier. We hope you enjoy your new espresso machine and should you need any further assistance please don’t hesitate to contact the Sunbeam Coffee Hotline on Free Call 1800 025 059.
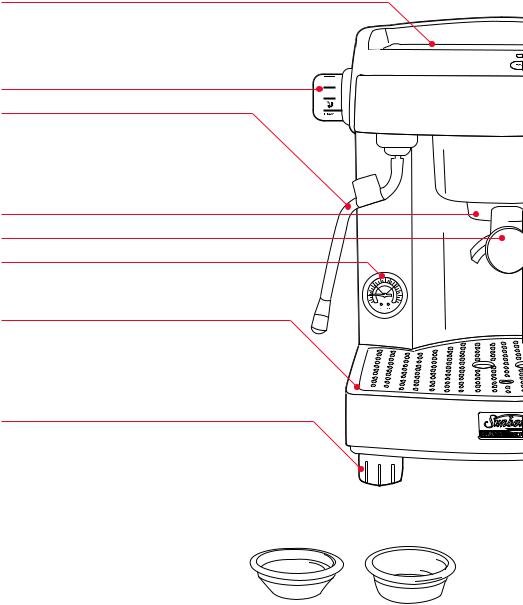
Features of your Café Series® Espresso Machine
Warming plate
The large warming plate effectively prewarms cups helping to retain the essential characteristics true of espresso - sweet, rich tasting and aroma.
Variable steam control dial
Steam wand
A dedicated thermoblock and pump provide an instant supply of powerful dry steam for achieving silky, dense and rich milk. The commercial 360° ball joint allows the steam wand to be moved into the ideal position.
Commercial size group head
Commercial size group handle
Espresso gauge
The gauge measures the resistance to the espresso pour.
Removable drip tray and grill
The large capacity die-cast metal drip tray is lined with plastic, preventing staining from espresso oils, lightweight for easy removal and designed with no dirt traps for simple wipe down cleaning.
Height adjustable rubber feet
The height adjustable feet ensure the espresso machine is level on the benchtop. Additionally integrated into the two back feet are rollers, these allow the user to effortlessly move
the machine – great when trying to clean underneath.
Single filter basket |
Double filter basket |

|
Tamp |
Single filter basket |
Double filter basket |
Dual-floor |
Dual-floor |
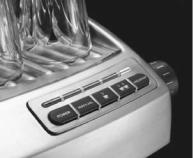
Programmable control panel
An easy to use control panel provides the choice of manual operation or utilising the programmed espresso pour lengths.
Hot water control dial
Hot water wand
Dispenses a controlled flow of hot water. For ease of use the wand has a commercial 360° ball joint.
3 litre water reservoir
Removable 3 litre water reservoir is fitted with an anti-calc filter and hand grips for easy filling.
Low water warning indicator
Accessories
All the essential accessories to make an authentic café-quality espresso – 600ml stainless steel milk texturing jug, barista coffee tamp and spoon for measuring out coffee.
Measuring spoon
Single pour spout
600ml jug
Cleaning Disc
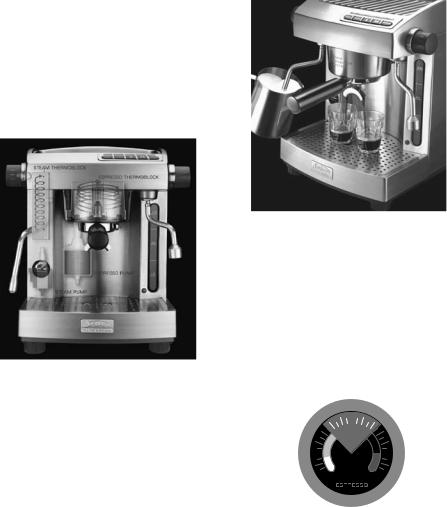
Features of your Café Series® Espresso Machine
Twin Pump and Twin Thermoblock – TPTT™ System
Italian designed and manufactured, the machine is fitted with a 15 BAR pump for the espresso function, delivering the pressure required for a complete extraction of oils, coffee solids and aroma. An additional 4 BAR pump is dedicated to the steam function, producing instant steam pressure for texturing milk.
Independent thermoblock heating systems lined with stainless steel, heat the water ensuring the precise temperature is achieved for each function eliminating waiting time and reducing temperature fluctuations.
TPTT™ System – Simultaneous Use
True to commercial use, the unique TPTT™ System features twin pumps and twin thermoblocks, this allows the coffee maker to texture milk and pour an espresso simultaneously.
Espresso Gauge
The espresso gauge is an indicator of the quality of the espresso pour and should be used as a guide.
It measures the pressure or resistance created by water being pumped through the tamped coffee grinds in the group handle.
Whilst the needle is within the target area on the gauge it indicates that a quality serve of espresso has been made. This is indicated by a
Optimum
Pour
Under |
Over |
|
Extracted |
||
Extracted |
||
Pour |
||
Pour |
||
|
Features of your Café Series® Espresso Machine continued
slow and steady pour of liquid espresso with a consistency similar to that of dripping honey. The crema should be dark golden in colour.
Should the needle fail to reach the target area this is an indication that the serve of espresso is ‘under-extracted’. This occurs when water passes too quickly through the tamped coffee grinds and is an indication that either the grind needs to be made finer or the filter basket has been under-dosed. The pour is quick and light in colour and the resulting crema is thin with a creamy light brown colour.
When the needle goes beyond the target area it is an indication that the serve of espresso is ‘over-extracted’. This occurs when the water passes very slowly through the tamped coffee grinds and is an indication that either the grind is too fine or the filter basket has been over-dosed. In this situation the hot water is in contact with the coffee grinds
for too long thus creating a burnt and bitter tasting espresso. This is characterised by the espresso only slowly dripping during the entire pour and the crema is very dark.
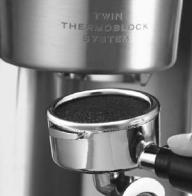
Commercial Size Group Head & Group Handle
The group head, group handle and filters are designed to commercial specifications using brass and stainless steel components. These elements help contribute to the preparation of an espresso serve, as it allows the coffee maker to pack the necessary amount of coffee grinds, which then expand firmly and evenly onto the shower screen.
Features of your Café Series® Espresso Machine continued
Filter Baskets
Supplied with the espresso machine are two different sets of filter baskets – Standard Filter Baskets (one and two cup) and DualFloor Filter Baskets (one and two cup).
The Standard Filter Baskets (one and two cup) are the same specification as used with commercial espresso machines and are less tolerant to the quality of the coffee bean. They have a single floor to the filter and if held up to the light you can see many small holes.
Note: For the optimum results Sunbeam recommends that you use these filters with this espresso machine.
To achieve the optimum espresso pour with these filters it is best to grind the coffee as you need it. Therefore we recommend a
conical burr grinder such as the Café Series® Grinder (Code EM0480) to ensure you have complete control of the particle size and are assured a consistent grind.
Note: If you don’t have a grinder and have your coffee beans ground for you, then you must request that the coffee is ground very fine, the same fineness that would be used on a commercial espresso machine.
The Dual-Floor Filter Baskets (one and two cup) are designed to be used with preground coffee that is typically available at supermarkets and delicatessens. They have two floors, looking into the filter basket you can see many small holes and when held up to the light and looking at the under-side of the filter you will see a single hole.
These pre-ground coffee types are often vacuum packaged into a brick shape and their packaging states that they are a ‘universal grind’ that can be used throughout a variety of coffee makers. The particle size of ‘Universal grind’ is too coarse for making quality espresso, therefore the Dual-Floor Filter Baskets are designed to compensate for this by slowing the flow of liquid espresso creating a subtle aeration to ensure a golden crema. Dual-floor filters or similar designs are used in most domestic espresso machines.
Control Panel
An easy to use control panel provides the choice of manual operation or utilising the programmed espresso pour lengths. The programmed espresso pour is set to 30mls per cup while the Program function allows users to personalise and save their own espresso volumes.
Features of your Café Series® Espresso Machine continued
Pre-Infusion
Pre-infusion is programmed into the ‘MANUAL’,  single espresso and
 double espresso operations. It is a gradual increase of water pressure pre-soaking the coffee cake before full water pressure is applied. This in turn delivers greater body and sweetness to the espresso.
Anti-Calc Filter
An Anti-Calc water filter reduces impurities that taint the flavour and odour of the water, improving the taste and aroma of the espresso brewed. Additionally, scale build up is slowed reducing the frequency of cleaning required.
The Anti-Calc water filter fitted inside the 3 litre water reservoir has a 12 month life for domestic use and a 3 month life for commercial use.
Note: Contact Sunbeam on 1800 025 059 for replacement filters (Part code: EM69101).
Note: The espresso machine can operate normally without the filter and is easily removed by gently pulling it out.
Single & Double Pour Spouts
Supplied with the espresso machine are two pouring spouts – Standard two pour spout and a single pour spout.
Your espresso machine group handle will come fitted with the standard two pour spout for making two coffees simultaneously and for most coffee makers this is ideal.
However for those regularly making single cups you may like to remove the two pour spout and fit the group handle with the single pour spout. The pour from the single spout is more defined, evenly transferring the qualities of the espresso into one cup preventing loss of any characteristics during the espresso pour.
The two pour spout is securely fixed to the group handle using Loctite™, so removing the two pour spout may be difficult and you will need to use force.
To remove the two pour spout use a piece of wooden dowel with a 5mm diameter (or a rigid utensil of the same diameter). Rest it over the top of the pour spouts and then using the dowel as leverage turn it anticlockwise to loosen the pour spout.
Alternatively, protect the pour spout with a cloth and two pieces of thin wood on either side. Gently secure the pour spout in a vice. Slowly loosen the pour spout from the group handle.
Once loosened use your hand to completely remove. Then simply screw on the single pour spout until it is firmly tightened.
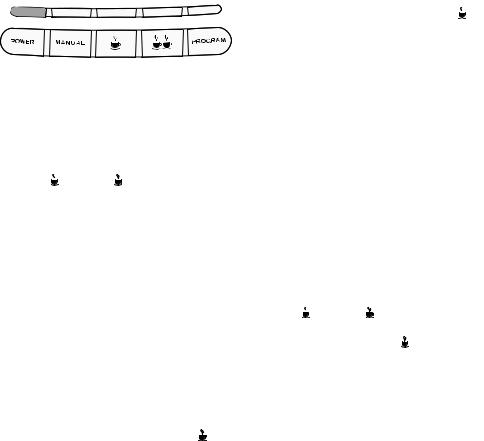
Using the control panel
Power
Press the ‘POWER’ button once to turn the espresso machine on. The light above the ‘POWER’ button will illuminate green and start flashing; this is to indicate that your espresso machine is on and is heating up.
Note: Before turning on the espresso machine ensure that the steam and hot water control dials are in the OFF position.
When the green light above the ‘POWER’ button stops flashing and turns to a constant red light, this indicates that the espresso machine is heated and ready to use. The lights above the ‘MANUAL’,
 single and
 double espresso buttons will also show a constant green light.
To turn the espresso machine off, simply press
the ‘POWER’ button, the red power light and all other lights on the control panel will turn off.
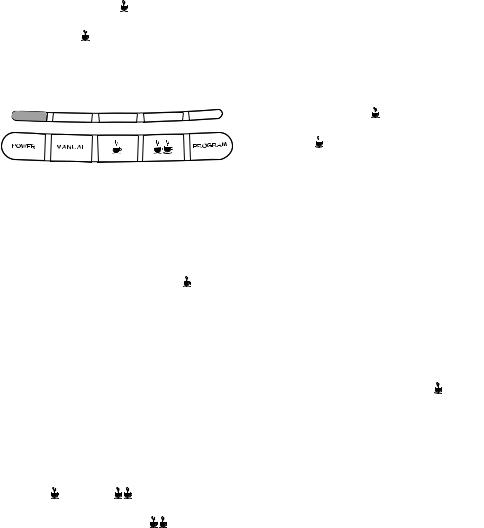
Manual
The ‘MANUAL’ button allows the coffee maker to have complete control over the length of the espresso pour.
Once the espresso machine is switched on and heated, so the light above the ‘POWER’ button is red and the lights above the ‘MANUAL’, single and
 double espresso buttons show a constant green light, the coffee maker is able to use the manual operation. The coffee maker simply needs to press to the ‘MANUAL’ button once to start the pour and again to stop.
Important: Once the manual operation is activated, before the espresso pour starts the pre-infusion feature will release three short bursts of gradual water pressure onto the coffee cake. After this the full water pressure is applied and the espresso will pour freely.
Note: When the coffee maker has activated the manual operation the lights above the
 single and
 double espresso buttons will go off. The lights above the ‘POWER’ and ‘MANUAL’ buttons will remain on.
 Single Espresso
The  single espresso function removes the guesswork and is programmed to pour 30mls
of liquid espresso.
Tip: We recommend using the single cup filter when using the programmed single espresso operation.
Once the espresso machine is switched on and heated, so the light above the ‘POWER’ button is red and the lights above the ‘MANUAL’,
 single and
 double espresso buttons show a constant green light, the coffee maker is able to use the
 single espresso operation. The coffee maker simply needs to press the
 single espresso button once to start and the pour of liquid espresso will stop automatically.
Important: Once the  single espresso operation is activated, before the espresso pour starts the pre-infusion feature will release three short bursts of gradually increasing water pressure onto the coffee cake. After this the full water pressure is applied and the espresso will pour freely.
10
Using the control panel continued
Note: When the coffee maker has activated the  single espresso operation the lights above the ‘MANUAL’ and
 double espresso buttons will go off. The lights above the ‘POWER’ and
 single espresso buttons will remain on.
Note: The coffee maker does not need to press the  single espresso button again to end the pour as the espresso machine will stop
automatically.
Once the pour of liquid espresso stops the espresso machine is ready to make another espresso.
Note: When using the single espresso operation you can stop the pour of espresso at any time by pressing the ‘MANUAL’, single, or
 double espresso operation buttons.

 Double Espresso
The 
 double espresso function removes the guesswork and is programmed to pour 60mls of liquid espresso.
Tip: We recommend using the double cup filter when using the programmed
 double espresso operation.
Once the espresso machine is switched on and heated, so the light above the ‘POWER’ button is red and the lights above the
‘MANUAL’, single and |
double espresso |
|
buttons show a constant green light, the |
||
coffee maker is able to use the |
double |
|
espresso operation. The coffee maker simply needs to press the
 double espresso button once to start and the pour of liquid espresso will stop automatically.
Important: Once the 
 double espresso operation is activated, before the espresso pour starts the pre-infusion feature will release three short bursts of gradually increasing water pressure onto the coffee cake. After this the full water pressure is applied and the espresso will pour freely.
Note: When the coffee maker has activated the 
 double espresso operation the lights above the ‘MANUAL’ and
 single espresso buttons will go off. The lights above the ‘POWER’ and

 double espresso buttons will remain on.
Note: The coffee maker does not need to press the 
 double espresso button again to end
the pour as the espresso machine will stop automatically.
Once the pour of liquid espresso stops the espresso machine is ready to make another espresso.
Note: When using the
 double espresso operation you can stop the pour of espresso at any time by pressing the ‘MANUAL’, single, or
 double espresso operation buttons.
Program
The program function allows the coffee maker to personalise and save their own espresso pour settings.
Note: Refer to the section ‘Programming your espresso machine’ for simple to follow instructions.
11
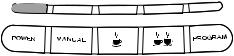
HeadingUsing the control panel continued
Once the espresso machine is switched on and heated, so the light above the ‘POWER’ button is red and the lights above the ‘MANUAL’, single and
 double espresso buttons show a constant green light, the coffee maker is able to use the program function. To activate the program function, the coffee maker simply needs to press ‘PROGRAM’ button.
Note: When the coffee maker has activated the program function the light above the ‘PROGRAM’ button will show a constant red light and the light above the ‘MANUAL’ button will go off. Additionally the lights
above the ‘POWER’,  single and
 double espresso buttons will remain on.
Note: For more detailed information on programming refer to page 20 ‘Programming your espresso machine.’
12
 Loading...