


5841
Bake your first loaf of bread on us while
you read this book! First review the safety
guidelines, then turn to page 7 for the
easy
1,2,3 instructions!
Congratu

!
Fresh, warm homemade bread is just a
few, easy steps away with your new Oster
®
Deluxe Bread and
Dough Maker.
We've done everything we can to make bread-baking a breeze:
We've streamlined the instructions; designed a simple, easy-toread control panel; and developed a host of great recipes.
Along the way, feel free to ask questions. You can call us toll free at
1-800-526-2832.
1
lations

Table
of
Contents
Before You Start ......................................................... 5-6
Safety Guidelines
Symphony of Ingredients........................................... 7
Basic Ingredients ............................................................................... 8
The Process, Simplified ..................................................................... 10
Getting to Know Your Bread Maker .......................... 13
Getting to Know the Operation Panel ............................................. 14
Step by Step Directions..................................................................... 15
Breadmaking Cycle Times................................................................. 16
Recipes and Tips
Special Tips........................................................................................ 18
White Breads .................................................................................... 19-30
Whole Wheat Breads........................................................................ 31-36
French Breads ................................................................................... 37-38
Sweet Breads .................................................................................... 39-48
Doughs Only ..................................................................................... 49-58
Cake/Quick Breads ............................................................................ 59-64
Jam/Jellies......................................................................................... 65-66
The Finishing Touch: Spreads and Glazes......................................... 67-68
Special Concerns
Troubleshooting Tips ........................................................................ 69-70
Commonly Asked Questions ............................................................. 71
How to Test Yeast............................................................................. 71
Cleaning and Care Guidelines .......................................................... 72
Baking at High Altitudes .................................................................. 73
Index of Recipes......................................................... 74

After Use
1.Use oven mitts or a pot holder when taking out
the bread pan after baking.
2.Make sure to disconnect the power by
unplugging the unit. Allow the Bread Maker
to cool down before storing.
3.Read instructions before cleaning. Do not
immerse the unit in water. This will cause
electric shock and/or damage to the unit.
Before Use
1.Read and keep all instructions.
2.Make sure to remove all foreign matter
from the baking pan.
3.Plug the Bread Maker into a properly
wired outlet.
Where to Use
1.Use only on a stable, heat-resistant surface.
2.Do not use the Bread Maker where it will be
exposed to direct sunlight or other heat sources,
such as a stove or oven.
3.Place the unit at least two inches away from walls.
If you do not, walls may become discolored.
While in Use
Keep the Bread Maker out of the reach of
children – it's hot!
1.The temperature is very hot during operation.
Be careful to keep your hands and face away
from the unit.
2.Do not open the lid or remove the bread pan
during operation.
3.Do not place anything on the Bread Maker lid.
Do not cover vents.
4.If any buttons are accidentally touched during
operation, baking may stop.
Using Your Bread Maker Safely
We’ve designed the Oster®Deluxe Bread and
DoughMaker to be easy to use. But, like any
kitchen appliance, it requires proper use
and handling.
5
Before You Start

Important Safeguards
When using electrical appliances, basic safety precautions should always be followed including the following:
1.
2.
3.
4.
5.
6.
7.
Read all instructions, product labels, and warnings before using the Bread Maker.
Do not touch hot surfaces. Always use oven mitts when handling hot materials, and allow metal parts to cool before
cleaning. Allow the Bread Maker to cool thoroughly before putting in or taking off parts.
When unit is not in use and before cleaning, unplug the Bread Maker from wall outlet.
To protect against risk of electrical shock, do not immerse the appliance or plugs in water or other liquids.
Close supervision is always necessary when this or any appliance is used by or near children, or incapacitated persons.
Do not allow anything to rest on the power cord. Do not plug in cord where people may walk or trip on it.
Do not operate this or any appliance with a frayed or damaged cord or plug or after the appliance malfunctions or is
dropped or has been damaged in any manner. Return appliance to the nearest authorized service facility for examination,
repair or electrical or mechanical adjustment.
8.
Do not let the cord dangle over the edge of a table or counter or touch hot surfaces. Do not place on an unsteady or
cloth-covered surface.
9.
Avoid contact with moving parts.
10.
Do not use attachments not recommended by the manufacturer; they may cause fire, electric shock or injury.
11. Do not use outdoors or for commercial purposes.
12. Do not place the appliance near a hot gas or electric burner, or in a heated oven.
13. To unplug, press and hold the “STOP” button, grip plug and pull from wall outlet. Never pull on the cord.
14.
Use of extension cords: A short power supply cord has been provided to reduce the risk of injury resulting from
becoming entangled in or tripping over a longer cord. Extension cords are available from hardware stores and may be
used with care. The cord should be arranged so that it will not drape over the counter or table top where it can be pulled
by children or tripped over accidentally. If the appliance’is of the grounded type the extension cord should be a
grounding-
type
3-wire
cord.
15. Electrical power: If electric circuit is overloaded with other appliances, your Bread Maker may not operate properly. The
Bread Maker should be operated on a separate electrical circuit from other operating appliances.
16. Do not let cord hang over edge of table or counter, or touch hot surfaces.
17. Do not use appliance for other than intended use.
This unit is intended for household use only.
Read and Save These Instructions
6

Like the instruments in an orchestra, the
ingredients in basic bread are very simple:
flour, sugar, salt, a liquid (such as water or milk),
possibly a fat (such as butter or oil), and yeast.
And, like each musical instrument, each
ingredient performs a specific job, and each
lends a special flavor to the final masterpiece.
That's why it’s important to use the right
ingredients in exactly the right proportions
to ensure you get the most delicious results!
7
A Symphony of
Ingredients

Yeast
Yeast is actually a microscopic plant. Simply stated, without yeast, your bread
will not rise. When moistened by a liquid, fed by sugar, and carefully warmed,
yeast produces gases which power the dough to rise. If the temperature is too
cold, the yeast will not be activated; if it's too warm, it will die. The Oster
®
Deluxe Bread and Dough Maker takes care of this worry for you by maintaining
just the right temperature in the baking chamber at all times. You can use
either “active dry yeast”, “ quick acting”, “rapid rise yeast” or one of the new
“Bread machine yeasts” in your Oster®Deluxe Bread and Dough Maker.
Important: The amount of yeast for Extra Large Loaf recipes may be the same
or even less than what is called for in Large recipes. For best results, use yeast
amounts as indicated in each recipe.
Sugars
Sugars sweeten the bread, brown the crust, and lend tenderness to the texture.
These jobs can be performed by white or brown sugar, molasses, maple or corn
syrups, honey, fruits or other sweeteners.
Flour
In order for the bread to rise, the flour has to have a high protein content.
You should always use a “bread flour” (for white bread recipes) in your bread
maker to get the best results. Do not use all-purpose, cake flour or self-rising
flour. Unlike white bread flour, whole wheat flour contains bran and wheat
germ which inhibit rising. Wheat breads therefore tend to be heavier in
texture and smaller in size. A lighter larger loaf can be achieved by combining
whole wheat flour with white bread flour for wheat bread recipes.
Liquids
When liquids are mixed with the proteins in flour, gluten is formed. Gluten is
necessary for rising. Many recipes use dry milk, but other liquids, such as fruit
juice, beer, and water work too. It's a delicate balance: A recipe with too much
liquid may cause the bread to fall during baking while a recipe with too little
liquid will not rise.
Salt
Salt inhibits rising, so be very careful measuring. Ordinary table salt will do.
Fats
Many breads use fats to enhance the flavor and retain moisture. Typically,
we use margarine in these recipes, but butter may also be used.
8
Basic Ingredients

Important Measuring Tips
Because each ingredient plays such a specific role, it is especially
important to measure the ingredients exactly to get the best results.
For dry ingredients, use a standard measuring spoon or measuring
cup — not a tableware spoon or coffee cup — and level off.
For flour, simply spoon the flour into a measuring cup and
level off with a flat kitchen utensil.
For liquids, fill a standard measuring spoon or measuring cup
to the level indicated. Check your cup measurement by placing
the measuring cup on a flat surface.
For solid fats, fill a standard measuring spoon or measuring cup
to the level indicated and level off with a kitchen utensil.
Last Things Last!
You'll see this tip in several places in this book, but it bears repeating: Always put the liquids
in first, the dry ingredients in next, and the yeast last. Before adding the yeast, dig a shallow
hole in the dry ingredients and place the yeast in the hole so that there's absolutely no contact
between the liquids and the yeast. You don’t want the yeast to be activated too soon in the
process. This is especially important when you're using the Delay Bake option.
9

Mixing, Kneading, Rising, Baking...
here’s a glimpse of how the Oster
®
Deluxe Bread and Dough Maker
automatically does all the steps
for you.
The Process Simplified
10

Mixing and Kneading
In standard bread baking, the baker mixes the ingredients
first by stirring, then by kneading the dough by hand.
The Oster
®
Deluxe Bread and Dough Maker mixes and
kneads the dough automatically for you.
Rising
When making bread by hand, the dough is placed in a warm
place to rise after mixing so that the yeast can ferment and
produce gas. After mixing the dough, the Oster
®
Deluxe Bread
and Dough Maker maintains the optimum temperature for
rising during this part of the process.
If you are using the Dough Only cycle, the Oster
®
Deluxe Bread
and Dough Maker will stop at the end of the first rising.
You will hear a series of 3 beeps to let you know it’s done.
The dough can now be removed and shaped - for bagels, pizza
or other creations - and placed in your own oven for baking.
Punch Down
Once the dough has risen, the baker will typically “punch
down” the dough. This process helps to break apart large,
unwanted pockets of air and gas that have developed through
rising, giving the bread a more even and appetizing texture.
This Oster
®
Deluxe Bread and Dough Maker handles this
process automatically for you by turning on the kneading
blade for just the right amount of time.
1
2
3
11

Second Rise
After it is punched down, the bread bounces back — it rises a
second time. Some breads require shorter or longer rising
times. For example, wheat breads require a longer rising time
because the flour contains bran and wheat germ which inhibit
rising. The Oster
®
Deluxe Bread and Dough Maker regulates
the temperature and timing of this second rise automatically
for you based on your selection.
Bake
The Oster®Deluxe Bread and Dough Maker automatically
regulates baking time and temperature for perfect results
every time!
Cool
In standard baking, the baker removes the bread from
the pan immediately to keep the crust from turning soggy.
We recommend that you do the same with the Oster
®
Deluxe
Bread and Dough Maker, too. The baking chamber will remain
at a constant warm temperature for 60 minutes if you're not
home to take it out immediately. This will also keep the bread
from getting soggy.
4
5
6
12

13
Getting to Know
Your Deluxe Bread
and
Dough Maker
The best way to get there is to use this map.
Soon you’ll know the electronic bread-baking
territory the way you know your own kitchen.
In the meantime, here are some easy-to-follow
directions to get you started.
14
Stop
Start
Timer Set
Basic Breads
1 • Regular
2 • Large
3 • Large Dark
Whole Wheat
4 • Regular
5 • Large
6 • Large Rapid
Specialty
7 • French
8 • Sweet
9 • Dough
10 • Cake/Quick Bread
11 • Jam
Select
®
Questions? You can call us toll free at 1-800-526-2832.
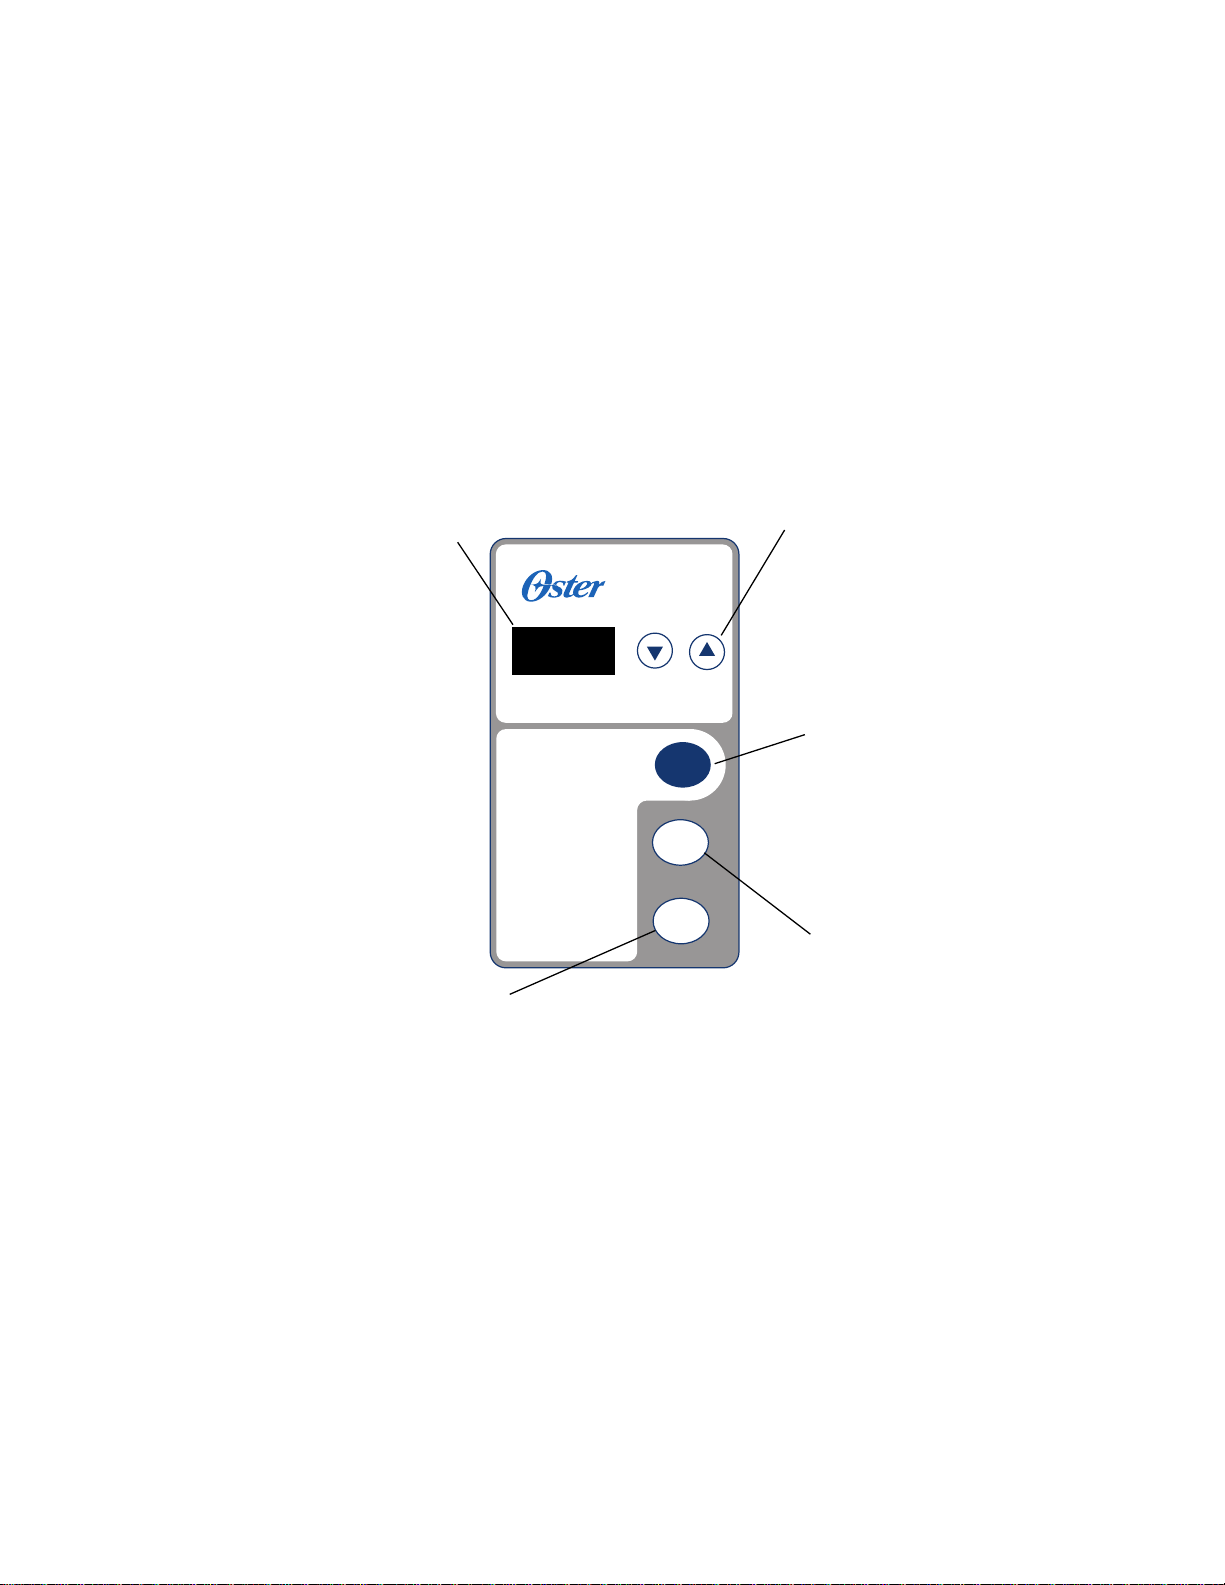
The Control Panel
DISPLAY WINDOW –
Indicates the One
Digit Number for
the selected Bread
Setting. Shows the
minute-by-minute
countdown for
the baking cycle.
TIMER SET –
Allows you to set the
timer for Delay Bake
Function. Has “Up” and
“Down” arrows to set
time. The arrows move
up and down in
10-minute increments.
SELECT –
Press to select desired
bread setting and it
will automatically set
the time needed
to complete the
baking cycle.
START –
Tells the bread
maker to begin
operation.
STOP –
Tells the bread maker
to stop everything.
Press and hold until
you hear the beep
to stop operation
or cancel incorrect
Timer setting.

15
1. OPEN THE LID AND REMOVE THE
BAKING PAN by pulling straight
up on the handle. It is important to
remove the Baking Pan from the
unit before putting the ingredients
into the pan to avoid accidentally
spilling ingredients into the inner
case.
2. ATTACH THE KNEADING BLADE
onto the shaft inside the Baking Pan by
lining up the flat side of the blade with
the flat side on the shaft. Make sure the
Kneading Blade is placed securely on the
shaft.
3. MEASURE ALL INGREDIENTS carefully
and accurately. Inaccurate measurement,
even if only slightly off, can make a
difference in results. Add ingredients
into the bread pan in the order they are
listed. Yeast is always
added last and
must not come in contact
with any liquid.
(Before adding yeast, remember to dig a
small hole in the
flour so that the yeast
doesn’t prematurely
come into contact
with the liquids. This is especially
important when you are using the Delay
Bake Timer.)
4. WIPE WATER AND OTHER SPILLS
from the outside of the pan; then insert
the pan firmly into the bottom of the
machine, applying pressure to each corner
of the pan to make sure it is snapped
tightly into the retaining brackets.
5. CLOSE THE LID AND PLUG IN THE
BREAD MAKER.
You will hear a
beep and the LED display window
will be blank.
6. CHOOSE YOUR BREAD TYPE. Select
the appropriate setting for your recipe
(#1 thru 11) by pressing the “SELECT”
button on the control panel. Each time
“SELECT” is pressed the number in the
display window will advance to the next
setting.
7. PRESS THE “START” BUTTON once
you have selected your bread type.
The baking time in hours and minutes
will appear in the display. It will count
down the remaining bake time in
one minute increments until the bread is
done. This bread maker has a convenient
Viewing Window so that you may watch
the progress of the bread as it is mixed,
kneaded, and baked. DO NOT OPEN THE
LID DURING THE BAKING CYCLES.
8. WHEN THE BREAD IS DONE. When
the baking time is completed, a signal
tone will sound three times and the
display window will read END. Remove
the pan using potholders, and take the
bread out of the pan by turning the pan
upside down and shaking it. If you have
difficulty removing the bread from the
pan, slide a flat rubber or plastic spatula
along the sides of the pan to loosen the
loaf. If the kneading paddle remains in
the bottom of the loaf, use the end
of a plastic utensil to remove it. Once
removed from the Bread Pan, it’s best
to let your bread cool 15 minutes
before slicing. Enjoy!
9. KEEP WARM CYCLE automatically
begins when the bake time is done.
The display will show END for up to
60 minutes after baking is complete
and will keep bread warm during that
time. At the end of the 60 minutes, the
heater will turn off.
Note: You may remove the Baking Pan at
any time during the “Keep Warm” cycle.
To turn off the “Keep Warm” feature,
simply press the “STOP” button and hold
it for 3 seconds. “END” will disappear
and the display window will be blank.
Please Note: Bread is best when removed
from bread pan no more than 1 hour
after keep warm feature ends.
The “Keep Warm” feature is not
provided for the dough setting
or the Jam/Jelly Setting.
10. USING THE TIMER FOR DELAYED
COMPLETION
To delay the
completion of your bread, use
the TIMER. This feature allows you
to delay the bake time for up to
12 hours. For example, it lets you set
the TIMER at 8 p.m. one evening so
that you can wake to fresh bread by
8 a.m. the following morning. To set
the TIMER, follow these instructions:
NOTE: It is not recommended that
you use the “Delayed Completion”
function and TIMER with recipes that
call for fresh ingredients that might
spoil such as eggs, milk, sour cream, or
cheese. 1. To set the TIMER, determine
when you would like your bread to be
finished. For example, if it is 8 p.m.
when you place all your ingredients in
the Baking Pan and you would like to
the aroma of fresh-baked bread at
8 a.m., you will want a total of 12 hours
before your bread is complete. Once
you have chosen the appropriate
setting for your recipe, (for example,
if you are doing Sweet Bread, you will
push “SELECT” until #8 is showing)
you simply set the TIMER to bring it
up to your total hours (in this case,
12 hours). 2. Press the “Up” arrow on
the control panel and 3:25 (the time
setting for #8 setting) will automatically
come up in the display window.
Continue to press the “Up” arrow
until the display reads 12:00. You do
not need to mathematically calculate
the difference between the setting
time (3:25) and the total hours you
want (12:00). The machine will
automatically adjust to include the
setting time. Simply set the TIMER for
your total hours. If you pass the 12:00,
simply press the “Down” arrow to go
back. 3. Once you have selected the
time, press START. The colon in the
display will flash to indicate the TIMER
has been set and the countdown will
begin. The TIMER will
count down in
one-minute increments.
When the
display reads “END”, your bread is
complete and the beeper will sound.
4. If you make a mistake while setting
the TIMER, press and hold the STOP
button for 3 seconds. This will clear
the display and you can set the TIMER
again.
Step-by-Step Directions
On How to Use You Bread Maker

16
Breadmaking
Cycle Times
Basic Basic Basic Wheat Wheat Wheat
Regular Large Large Regular Large Large, Med.
PHASE Med. Crust Med. Crust Dark Crust Med. Crust Med. Crust Rapid
Rest 30 min 30 min 15 min
Knead 1 6 min 6 min 6 min 6 min 6 min 6 min
Knead 2 27 min 31 min 31 min 18 min 25 min 25 min
Rise 1 23 min 23 min 29 min 76 min 79 min 39 min
Punch 1 10 sec 15 sec 15 sec
Punch 2
Punch 3
Rest 30 min 30 min 15 min
Shape 1 5 sec 5 sec 5 sec 3 sec 3 sec 3 sec
Shape 2 10 sec 10 sec 10 sec
Shape 3 5 sec 5 sec 5 sec
Rise 2 64 min 54 min 54 min 55 min 45 min 45 min
Bake 45 min 50 min 70 min 45 min 55 min 56 min
Keep Warm 60 min 60 min 60 min 60 min 60 min 60 min
Total Cycle Time 2:45 hr 2:50 hr 3:10 hr 4:20 hr 4:30 hr 3:20 hr
French Sweet Cake/Quick Jam/
PHASE Med. Crust Med. Crust Dough Bread Jellies
Rest
Knead 1 6 min 6 min 6 min 12 min 45 min
Knead 2 22 min 31 min 24 min 8 min 15 min
Rise 1 34 min 40 min 60 min
Punch 1 5 sec 5 sec
Punch 2 10 sec 10 sec
Punch 3 5 sec 5 sec
Rest 29 min 29 min
Shape 1 5 sec 5 sec
Shape 2 10 sec 10 sec
Shape 3 5 sec 5 sec
Rise 2 54 min 49 min
Bake 65 min 50 min 90 min
Keep Warm 60 min 60 min 60 min
Total Cycle Time 3:30 hr 3:25 hr 1:30 hr 1:50 hr 1:00 hr
Tips for the

Last Things Last
You'll see this tip in several places in this book, but it bears repeating:
Always put the liquids in first, the dry ingredients in next, and the yeast
last (fruits and nuts are added later, after the machine has completed the
first knead). Dig a shallow hole in the dry ingredients and place the yeast
in the hole so that there's absolutely no contact between the liquids and
the yeast. This is especially important when you're using the Delay Bake
option. You don’t want the yeast to be activated too soon in the process!
Placement Counts!
Place dried fruits, vegetables, and dried spices away from the liquid
ingredients in the bread pan. If they soak up water, they can undermine
the bread’s chemistry.
Freshness First
Avoid using perishable ingredients — milk, yogurt, eggs, or cheese — with
the Delay Bake function.
Just Wait Fifteen
For best results, wait fifteen minutes before slicing; the bread needs time
to cool.
Deep Freeze
To freeze fresh bread, let it cool completely and double-bag in plastic.
18

Traditional White Bread
Extra Large Loaf (2 pounds)
1 1/3 cups water
4 teaspoons margarine or butter, softened
4 cups Gold Medal
®
Better for Bread™flour
2 tablespoons sugar
4 teaspoons dry milk
2 teaspoons salt
2 teaspoons regular active dry yeast
OR
2 teaspoons bread machine yeast or
quick-acting active dry yeast
Large Loaf (1 1/2 pounds)
1 cup plus 2 tablespoons water
1 tablespoon margarine or butter, softened
3 cups Gold Medal
®
Better for Bread™ flour
2 tablespoons sugar
1 tablespoon dry milk
1 3/4 teaspoons salt
1 3/4 teaspoons regular active dry yeast
OR
2 1/2 teaspoons bread machine yeast or
quick-acting active dry yeast
Small Loaf (1 pound)**
3/4 cup plus 2 tablespoons water
2 teaspoons margarine or butter, softened
2 cups Gold Medal
®
Better for Bread™ flour
1 tablespoon sugar
2 teaspoons dry milk
1 teaspoon salt
1 1/4 teaspoons regular active dry yeast
OR
1 1/4 teaspoons bread machine yeast or
quick-acting active dry yeast
DIRECTIONS:
1.Remove bread pan; attach kneading blade.
2.Place all ingredients in bread pan in the order listed.
3.Insert bread pan, close lid and plug in.
4.Select bread type: Press SELECT until the desired bread setting number is displayed. Press START.
(For white breads, the bread setting selections are numbers 1-3. Select “1” for 1 pound loaf recipes.
Select either “2” or “3” for 1 1/2 and 2 pound loaf recipes. Select “2” for a desired medium crust color
and “3” for a desired dark crust color.)
5.If Delay Bake option is desired, press ▲ and ▼ to set timer.
6.Press START. Bread will be done baking in the number of hours indicated.
7. A fruit and nut beep is indicated at 32 minutes into the cycle.
White Bread Recipes

Potato Bread
Extra Large Loaf (2 pounds)
1 1/2 cups water
2 tablespoons margarine or butter, softened
4 cups Gold Medal
®
Better for Bread™ flour
1/2 cup mashed potato mix (dry)
4 teaspoons sugar
2 teaspoons salt
1 3/4 teaspoons regular active dry yeast
OR
1 3/4 teaspoons bread machine yeast or
quick-acting active dry yeast
Large Loaf (1 1/2 pounds)
1 1/4 cups water
2 tablespoons margarine or butter, softened
3 1/4 cups Gold Medal
®
Better for Bread™ flour
1/2 cup mashed potato mix (dry)
1 tablespoon sugar
1 1/2 teaspoons salt
1 3/4 teaspoons regular active dry yeast
OR
1 3/4 teaspoons bread machine yeast or
quick-acting active dry yeast
Small Loaf (1 pound)
3/4 cup water
1 tablespoon margarine or butter, softened
2 cups Gold Medal
®
Better for Bread™ flour
1/3 cup mashed potato mix (dry)
2 teaspoons sugar
1 teaspoon salt
1 3/4 teaspoons regular active dry yeast
OR
1 3/4 teaspoons bread machine yeast or
quick-acting active dry yeast
DIRECTIONS:
1.Remove bread pan; attach kneading blade.
2.Place all ingredients in bread pan in the order listed.
3.Insert bread pan, close lid and plug in.
4.Select bread type: Press SELECT until the desired bread setting number is displayed. Press START.
(For white breads, the bread setting selections are numbers 1-3. Select “1” for 1 pound loaf recipes.
Select either “2” or “3” for 1 1/2 and 2 pound loaf recipes. Select “2” for a desired medium crust color
and “3” for a desired dark crust color.)
5.If Delay Bake option is desired, press ▲ and ▼ to set timer.
6.Press START. Bread will be done baking in the number of hours indicated.
7. A fruit and nut beep is indicated at 32 minutes into the cycle.
20

DIRECTIONS:
1.Remove bread pan; attach kneading blade.
2.Place all ingredients in bread pan in the order listed.
3.Insert bread pan, close lid and plug in.
4.Select bread type: Press SELECT until the desired bread setting number is displayed. Press START.
(For white breads, the bread setting selections are numbers 1-3. Select “1” for 1 pound loaf recipes.
Select either “2” or “3” for 1 1/2 and 2 pound loaf recipes. Select “2” for a desired medium crust color
and “3” for a desired dark crust color.)
5.If Delay Bake option is desired, press ▲ and ▼ to set timer.
6.Press START. Bread will be done baking in the number of hours indicated.
7. A fruit and nut beep is indicated at 32 minutes into the cycle.
Garlic-Herb Bread
Extra Large Loaf (2 pounds)
1 1/2 cups water
4 teaspoons margarine or butter, softened
2 cloves garlic, crushed
4 cups Gold Medal
®
Better for Bread™ flour
2 tablespoons sugar
2 teaspoons salt
1/2 teaspoon dried rosemary leaves
1/4 teaspoon dried thyme leaves
1/4 teaspoon dried basil leaves
1 3/4 teaspoons regular active dry yeast
OR
1 3/4 teaspoons bread machine yeast or
quick-acting active dry yeast
Large Loaf (1 1/2 pounds)
1 1/4 cups water
1 tablespoon margarine or butter, softened
2 cloves garlic, crushed
3 1/4 cups Gold Medal
®
Better for Bread™ flour
2 tablespoons sugar
1 1/2 teaspoons salt
1/2 teaspoon dried rosemary leaves
1/4 teaspoon dried thyme leaves
1/4 teaspoon dried basil leaves
1 3/4 teaspoons regular active dry yeast
OR
1 1/2 teaspoons bread machine yeast or
quick-acting active dry yeast
Small Loaf (1 pound)
3/4 cup water
2 teaspoons margarine or butter, softened
1 clove garlic, crushed
2 cups Gold Medal
®
Better for Bread™ flour
1 tablespoon sugar
1 teaspoon salt
1/4 teaspoon dried rosemary leaves
1/8 teaspoon dried thyme leaves
1/8 teaspoon dried basil leaves
1 3/4 teaspoons regular active dry yeast
OR
1 3/4 teaspoons bread machine yeast or
quick-acting active dry yeast

DIRECTIONS:
1.Remove bread pan; attach kneading blade.
2.Place all ingredients in bread pan in the order listed.
3.Insert bread pan, close lid and plug in.
4.Select bread type: Press SELECT until the desired bread setting number is displayed. Press START.
(For white breads, the bread setting selections are numbers 1-3. Select “1” for 1 pound loaf recipes.
Select either “2” or “3” for 1 1/2 and 2 pound loaf recipes. Select “2” for a desired medium crust color
and “3” for a desired dark crust color.)
5.If Delay Bake option is desired, press ▲ and ▼ to set timer.
6.Press START. Bread will be done baking in the number of hours indicated.
7. A fruit and nut beep is indicated at 32 minutes into the cycle.
22
Caraway-Rye Bread
Extra Large Loaf (2 pounds)
1 1/2 cups plus 2 tablespoons water
4 teaspoons margarine or butter, softened
3 cups Gold Medal
®
Better for Bread™ flour
1 cup rye flour
2 tablespoons dry milk
2 tablespoons sugar
1 1/2 teaspoons salt
1/2 teaspoon caraway seed
2 1/4 teaspoons regular active dry yeast
OR
2 1/4 teaspoons bread machine yeast or
quick-acting active dry yeast
Large Loaf (1 1/2 pounds)
1 1/4 cups water
1 tablespoon margarine or butter, softened
2 1/2 cups Gold Medal
®
Better for Bread™ flour
3/4 cup rye flour
2 tablespoons dry milk
2 tablespoons sugar
1 1/2 teaspoons salt
1/2 teaspoon caraway seed
2 3/4 teaspoons regular active dry yeast
OR
2 1/2 teaspoons bread machine yeast or
quick-acting active dry yeast
Small Loaf (1 pound)
3/4 cup water
2 teaspoons margarine or butter, softened
1 1/2 cups Gold Medal
®
Better for Bread™ flour
1/2 cup rye flour
1 tablespoon dry milk
1 tablespoon sugar
1 teaspoon salt
1/8 teaspoon caraway seed
1 3/4 teaspoons regular active dry yeast
OR
1 1/2 teaspoons bread machine yeast or
quick-acting active dry yeast
DIRECTIONS:
1. Remove bread pan; attach kneading blade.
2. Place all ingredients in bread pan in the order listed.
3. Insert bread pan, close lid and plug in.
4. Select bread type: Press “➣” until WHITE is blinking.
Press SELECT.
5. Select crust color: Press “➣” until desired color
is blinking. Press SELECT.
6. If rapid cycle is desired, press SELECT when RAPID
is blinking. Or press “➣” if rapid cycle is not desired.
7. Select loaf size: Press “➣” until LARGE or SMALL is
blinking. (NOTE: Use LARGE setting for 2 lb and
1 1/2 lb loaf size. For 2 lb. loaf, also add bread pan
extension.) Press SELECT.
8. If delay bake option is desired, press HOUR and MIN
to set timer.
9. Press START. Bread will be done baking in the
number of hours indicated.

Onion Bread
Do not use the delay bake option for this recipe.
Extra Large Loaf (2 pounds)
1 1/3 cups plus 2 tablespoons water
2/3 cup chopped onion
4 teaspoons margarine or butter, softened
4 cups Gold Medal®Better for Bread™ flour
2 tablespoons sugar
4 teaspoons dry milk
2 teaspoons salt
2 teaspoons regular active dry yeast
OR
2 teaspoons bread machine yeast or
quick-acting active dry yeast
Large Loaf (1 1/2 pounds)
1 cup plus 2 tablespoons water
1/2 cup chopped onion
1 tablespoon margarine or butter, softened
3 1/4 cups Gold Medal®Better for Bread™ flour
2 tablespoons sugar
1 tablespoon dry milk
1 1/2 teaspoons salt
2 3/4 teaspoons regular active dry yeast
OR
2 1/2 teaspoons bread machine yeast or
quick-acting active dry yeast
Small Loaf (1 pound)
2/3 cup water
1/3 cup chopped onion
2 teaspoons margarine or butter softened
2 cups Gold Medal
®
Better for Bread™ flour
1 tablespoon sugar
2 teaspoons dry milk
1 teaspoon salt
1 3/4 teaspoons regular active dry yeast
OR
1 1/2 teaspoons bread machine yeast or
quick-acting active dry yeast
DIRECTIONS:
1. Remove bread pan; attach kneading blade.
2. Place all ingredients in bread pan in the order listed.
3. Insert bread pan, close lid and plug in.
4. Select bread type: Press SELECT until the desired bread setting number is displayed. Press START.
(For white breads, the bread setting selections are numbers 1-3. Select “1” for 1 pound loaf recipes.
Select either “2” or “3” for 1 1/2 and 2 pound loaf recipes. Select “2” for a desired medium crust color
and “3” for a desired dark crust color.)
5. Press START. Bread will be done baking in the number of hours indicated.
6. A fruit and nut beep is indicated at 32 minutes into the cycle.
 Loading...