


C o n g r a t u l a t i o n s !
Enjoy rotisserie cooking at home in just a few, easy steps with your new Sunbeam Carousel Rotisserie.
We’ve done everything we can to make rotisserie cooking a breeze. Our instruction book is designed to give you helpful information, tips and a host of great recipes.
Your Sunbeam Carousel Rotisserie will:
! Seal in natural juices while unwanted fats drip away.
 chicken to be moist and flavorful inside, crispy and golden brown outside.
 brown and cook a wide variety of foods to perfection.
 a smokeless cooking environment with see through door.
 up easily with dishwasher safe components.

Table of Contents
Introduction . . . . . . . . . . . . . . . . . . . . . . . . . . . . . . . . . . . . . . . . |
1 |
Using Your Rotisserie Safely . . . . . . . . . . . . . . . . . . . . . |
3 |
Important Safeguards...................... |
4 |
Know your Sunbeam Carousel Rotisserie. |
6 |
Assembly Instructions ...
Step-by-Step Directions....
Cleaning and Caring  Your Rotisserie...
Cooking Times. . . . . . . . ................................... |
8 |
W a r r a n t y . . . ..................................... |
11 |

I M P O R T A N T S A F E G U A R D S |
|
|
|
shock, |
||||||||||||||||||||
When using |
electrical |
appliances, |
to |
reduce the risk |
of fire, electric |
|||||||||||||||||||
and/or |
injury |
to persons basic safety precautions |
should |
always |
to |
be |
fol- |
|||||||||||||||||
lowed, |
including |
the |
following: |
|
|
|
|
|
|
|
|
|
|
|
|
|
||||||||
Read all |
instructions |
carefully. |
the |
handles or knobs. Always use oven |
||||||||||||||||||||
2. |
Do |
not |
touch |
hot surfaces, use |
||||||||||||||||||||
|
mitts when handling |
hot |
|
|
|
|
|
Allow metal parts to cool before |
||||||||||||||||
|
cleaning. Allow the Rotisserie to cool thoroughly before putting in or |
|||||||||||||||||||||||
3. |
removing |
parts. |
in |
use |
and before |
cleaning, |
unplug |
the |
Rotisserie |
from |
||||||||||||||
When |
unit |
is |
not |
|||||||||||||||||||||
4. |
wall |
outlet. |
|
|
|
|
|
shock, |
do |
not place |
cord, |
plug |
or |
appliance in |
||||||||||
To |
protect |
against electric |
||||||||||||||||||||||
5. |
water |
or |
other |
liquids. |
|
|
|
|
|
|
|
|
|
|
|
|
|
|
|
|||||
Close |
supervision |
is always necessary when this or any appliance is |
||||||||||||||||||||||
6 . |
used by |
or |
near |
children. |
|
|
|
|
|
|
|
|
|
|
|
|
|
|
||||||
Do |
not |
allow anything to rest on the power cord. Do not plug in cord |
||||||||||||||||||||||
7. |
where |
people |
may walk |
or trip on |
it. |
|
|
|
|
|
|
|
|
|
||||||||||
Do |
not |
operate this or any appliance with a damaged cord or plug or |
||||||||||||||||||||||
|
after the appliance malfunctions or has been damaged in any manner. |
|||||||||||||||||||||||
|
Return |
appliance |
to |
an |
authorized |
service |
facility |
for |
examination, |
repair |
||||||||||||||
|
or |
adjustment. |
|
|
|
|
|
|
|
|
|
|
|
|
|
|
|
|
|
|
||||
8. Avoid contact with moving parts. |
|
|
|
|
|
|
|
|
|
|
|
|||||||||||||
9. |
Do |
not |
|
use |
attachments |
that |
are |
not recommended by the manufacturer; |
||||||||||||||||
IO. |
they may |
cause |
fire, |
electric |
shock |
|
or |
injury. |
|
|
|
|
|
|
|
|||||||||
Do |
not |
use |
outdoors or |
for |
commercial purposes. |
|
|
|
|
|
||||||||||||||
|
Do not let the cord hang over the edge of a table or counter or touch hot |
|||||||||||||||||||||||
|
surfaces. |
Do |
not |
|
|
the |
appliance |
on |
an |
unsteady or |
cloth-covered |
|||||||||||||
|
surface. |
|
|
|
|
|
|
|
|
|
|
|
|
|
|
|
|
|
|
|
|
|
||
12. Do not place the appliance near a hot gas or electric burner or in a |
||||||||||||||||||||||||
13. |
heated |
|
oven. |
|
plug and pull from wall outlet. |
|
|
|
|
|
|
|||||||||||||
To |
unplug, grip |
appliance |
containing |
|||||||||||||||||||||
14. |
Extreme |
caution |
must be |
used |
when |
moving |
an |
|||||||||||||||||
15. |
hot |
oil |
or |
other |
hot |
liquids. |
|
than |
intended |
use. |
|
|
|
|
|
|||||||||
Do |
not |
use |
appliance for |
other |
|
|
|
|
|
|||||||||||||||
16. Use |
|
|
|
|
|
|
|
|
removing drip pan or disposing of hot |
|
||||||||||||||
|
grease. |
|
|
|
|
|
|
|
|
|
|
|
|
|
|
|
|
|
|
|
|
|
||
Page 5

Use of extension cords: |
|
|
|
|
a) A short power supply cord (or detachable power-supply cord) is to be |
||||
provided to reduce the risk resulting from becoming entangled in or |
||||
tripping over a longer cord. |
|
|
|
|
b) Longer detachable power-supply cords or extensions cords are |
||||
available and may |
be used if care is |
exercised |
in |
their use. |
c) If a longer detachable power-supply cord or extension cord is used, |
||||
1) The marked electrical rating of the |
cord set |
or |
extension cord |
|
should be at least as great as the electrical rating of the appliance, |
||||
and |
|
|
|
|
2) The cord should be arranged so that it will not drape over the |
||||
countertop or |
where it can be pulled on by children or |
|||
tripped over |
unintentionally. |
|
|
|
d) If the appliance is of the grounded type, the extension cord |
||||
should be a grounding-type 3-wire cord. |
|
|
||
Electrical power: If electric circuit is overloaded with other appliances, your |
||
Rotisserie |
may not operate |
properly. The Rotisserie should be operated on |
a separate |
electrical circuit |
from other appliances. |
This appliance has a polarized alternating current plug (one blade is wider than the other). To reduce the risk of electric shock, as a safety feature, this plug will fit in a polarized outlet only one way. If the plug does not insert fully in the outlet, reverse the plug. If it still fails to fit, contact a qualified electrician to replace the obsolete outlet. DO NOT ATTEMPT TO DEFEAT THIS SAFETY FEATURE.
S A V E T H E S E I N S T R U C T I O N S N O U S E R M A I N T E N A N C E
R E T U R N T O S E R V I C E S T A T I O N H O U S E H O L D U S E O N L Y
Page 6
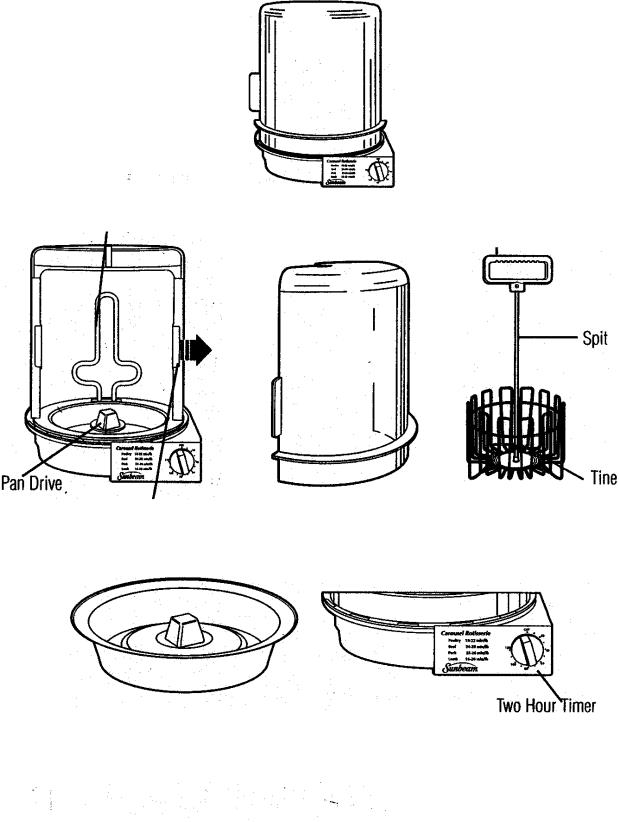
K N O W Y O U R ROTlSSERlE
HeatingElement |
Handle |
|
I |
Removable deflector Shield |
“Door |
Cooking Basket |
Non Stick Drip Pan
6

ASSEMBLY INSTRUCTIONS
Remove the following parts from foam insert:
Spit with handle .
Tine
Cooking basket
Aluminum drip pan
Black pan drive
2.Place the pan drive on top of the drive shaft in the base of the rotisserie. Make sure the flat side of the drive shaft meets with the flat side of the pan drive.
3.Remove the drip pan from the plastic bag, then place drip pan on top of the pan drive.
4.The assembly of the spit, tine and cooking basket will vary depending on what type of food will be prepared. Follow the step-by-step directions on page 7 of the Carousel Rotisserie  assemble the cooking basket.
STEP-BY-STEP DIRECTIONS
1.Place unit on a clean, dry surface with at least six inches of clearance on all sides.
2.Peel off the static label from the door.
3.To open the door, slide it counterclockwise.
4.Cooking basket should be removed from the unit before loading with food.
5.Vegetables or cut-up pieces of meat must be placed inside the basket around the spit.
6.Chicken, roasts or other large cuts of meat should be skewered through the spit as follows:
!Lift tine to the top of the spit.
!By holding the tine with one hand, skewer the spit through the meat.
!Screw the spit into the cooking basket until spit stops turning. DO NOT SCREW THE SPIT TOO TIGHTLY.
!Once the spit is secured, lower the tine and press them into the meat CAUTION: THE SPIT AND TINE HAVE SHARP ENDS.
Note: Chicken or other poultry should be placed with the neck end up, legs down.
7.Position drip pan inside the Rotisserie.
8.Lower basket onto center of the drip pan.
9.Plug cord into 120 volt outlet.
Set the timer for correct cooking time.
11Cooking times vary by the size and type of food and recipes. The maximum capacity for the rotisserie is 8 pounds. (See recipes section for cooking times).
12The unit needs to cool for at least one half hour before using it again. Allow. your Rotisserie to cool before cleaning and storing.
7

CLEANING THE ROTISSERIE
Before using your Oster Carousel Rotisserie for the first time:
Wash the cooking basket, spit, drip pan, reflector shield and door in hot, soapy water. Rinse and dry.
NOTE: The following items are dishwasher safe: door (top rack only), drip pan, cooking basket, and reflector shield. To remove the door from the rotisserie, turn the door
counter-clockwise until |
it has |
been rotated |
to the back of the |
unit. Then, lift it straight |
up from the unit. When replacing the door |
onto the rotisserie |
be sure to locate the |
||
door so that it will be |
on the |
back side of the unit when it is |
installed. Locate the pin on |
|
the door into the hole that is on the top of the rotisserie. Once the pin and hole are engaged, the door can be rotated clockwise to the front of the unit.
The reflector shield can be removed by grasping the handle on either side and pulling in either direction until it is pulled clear of the unit.
CAUTION: REFLECTOR SHIELD HAS A SHARP EDGE.
Always make sure rotisserie is unplugged and cool, before attempting to clean.
To clean, wipe with a damp,  cloth. Do not use any abrasive materials. Do not immerse in water! Wash individual parts as instructed above.
CARING  ROTISSERIE
1. Keep your Rotisserie clean.
2.Do not use metal utensils.
3.Make sure that the unit is completely cool and dry before storing.
COOKING TIMES
The cooking times provided in this chart are only a |
guideline to the |
approximate |
|||||||
cooking times, based on test averages. Cooking times |
vary because of dif- |
||||||||
ferences in meat, shape, size, |
and amount of fat and |
bone. |
|
|
|
||||
When cooking with the Oster |
Rotisserie, |
use a |
meat |
thermometer. |
Insert |
the |
|||
point of the thermometer stem |
at |
least |
2 |
inches |
into |
the thickest part of the |
|||
not near the bone or gristle. The meat thermometer must not |
touch |
the |
|||||||
heating element while the basket is rotating. See the |
chart below |
for |
the |
tem- |
|||||
peratures required for the meat |
to |
be |
cooked. |
|
|
|
|
|
|
Page 9

|
SUNBEAM CAROUSEL ROTISSERIE COOKlNG CHART |
. |
||||||
|
FOOD |
Weight |
Temperature |
Approximate |
|
|||
|
|
|
|
|
Meat Thermometer |
Cooking Time* |
|
|
|
|
|
|
|
|
|
|
|
|
POULTRY |
2 to 3 Ibs. |
185°F |
30 min. |
60 min. |
|
||
Chicken, whole |
|
|||||||
Chicken, whole |
3 l/2 to 5 Ibs. |
185°F |
60 min. - 110 min. |
|
||||
Cornish hens |
1 or 2 hens |
185°F |
60 min. |
|
|
|||
Duck |
3 to 5 Ibs. |
185°F |
110 min. - 2 hr. 10 min |
|
||||
Turkey breast |
4 to 6 Ibs. |
185°F |
70 min. - 100 min. |
|
||||
Turkey breast |
6 to 8 Ibs. |
185°F |
100 min. - 3 hrs. |
|
||||
PORK |
4 to 5 Ibs. |
|
100 min. - 2 hrs. I0 min. |
|||||
Crown roast of pork |
|
|||||||
Loin roast |
2 l/5 to 5 l/2 Ibs. |
|
60 min. - 70 min. |
|
||||
Pork tenderloin |
3/4 to 1 l/2 Ibs. |
|
20 min.- 40 min. |
|
||||
Rolled pork roast |
3 to 6 Ibs. |
|
80 min. -2 hrs. 35 min. |
|
||||
Spareribs |
2 l/2 to 4 l/2 Ibs. |
|
60 min. - 120 min. |
|
||||
HAM |
2 to 7 Ibs. |
|
45 min. - 60 min. |
|
||||
Ham, canned |
|
|
||||||
|
Ham Shank |
3 to 6 Ibs. |
|
50 min. |
|
|
||
|
LAMB |
4 to 6 Ibs. |
|
80 min. - 120 min. |
|
|||
Leg of lamb |
|
|
||||||
|
Rolled lamb roast |
3 to 6 Ibs. |
|
60 min. - 120 min. |
|
|||
VEAL |
3 to 6 Ibs. |
170°F |
70 min. - 120 min.. |
|
||||
|
Leg of veal |
|
||||||
Rolled veal roast |
3 to 6 Ibs. |
1 7 0 ° F |
75 min. - 120 min.. |
|
||||
BEEF |
2 to 6 Ibs. |
150°F160°F |
55 min. - 2 hrs. 50 min.. |
|
||||
Beef tenderloin roast |
|
|||||||
Rolled rib roast |
4 to 6 Ibs. |
150°F -160°F |
100 min. - 2 hrs. 50 min.. |
|||||
Rolled sirloin tip |
4 to 8 Ibs. |
|
100 min. - 3 hrs. 45 min. |
|
||||
or rump roast |
|
|
||||||
Standing rib roast |
4 to 8 Ibs. |
|
100 min. - 3 hrs. 45 min. |
|
||||
OTHER |
|
|
|
7 min. - 10 min. |
|
|||
Hot dogs |
|
|
|
|
||||
Pre-cooked bratwurst |
|
15 min. - 17 min. |
|
|||||
New potatoes |
|
|
|
60min.-80min. |
|
|||
Baked potatoes |
|
|
|
60 min. |
80 min. |
|
||
Corn on the cob |
|
|
|
60 min. |
80 min. |
|
||
Vegetables |
|
|
|
20 min. |
30 min. |
|
||

N O T E
When preparing poultry and other meats int he Carousel Rotisserie, be sure to use a meat thermometer to verify that the food is properly cooked. ,
If the food takes longer than it shuts off automatically after
to cook, the timer will have to be reset as 2 hours.
Please refer to the Carousel Rotisserie Cookbook for detailed directions before using the Carousel Rotisserie.
C a r v i n g P o u l t r y
Arrange the chicken or other poultry on a carving board with the legs to the right. Starting at the side facing the carver, cut the leg off body by grasping the leg with your left hand pulling gently while cutting through the meat and the joint at the thigh.
Place the leg on the carving board and cut through the joint to sever the thigh bone from the drumstick. Slice the meat from the leg and thigh, carving parallel to the bone.
Insert the meat fork into the breast meat to secure the body. Sever the wing from the body by carving through the joint.
Start carving the breast just above the joint where the wing was removed. Cut thin slices of white meat, carving upward and cutting parallel to the breast bone.
Carving a Whole Ham, Pork Roast or Roast leg of lamb
Place a whole ham, pork roast or leg of lamb on the carving board with the shank end to the right of the carver. For a ham, turn the scored fat side up. For the leg of lamb, place the roast so that the meaty section faces away from the carver.
Insert a meat fork into the heavy part of the meat and cut several lengthwise slices from the less meaty side.
Turn the ham, pork roast or leg of lamb so that it rests upright on the cut surface. Cut a wedge from the shank end by starting at the base of the bulge and slicing down to the leg bone. Then, make another cut at an angle to this, close to the shank end. Lift out the wedge.
Starting at the shank end, cut thin uniform slices down to the leg bone.
Carving  Rib Roast
Arrange the roast on a platter or a cutting board with the largest end of the roast down, and the rib side to your left. The small end of the roast is nearest the carver. Insert a carving fork between the two top 
Slice across the roast from the fat edge of the rib bone. Free the slice from the bone using the tip of the knife.
10
L I M I T E D W A R R A N T Y
What is Covered and For How long
Congratqtations on your recent purchase’of a quality Sunbeam product. We are confident that our product will perform well and therefore warrant to you, as the original retail purchaser, for a period of 2 years from the date of original purchase, that your new product will be free of mechanical and electrical defects in material and workmanship.
What Sunbeam Will Do & How to Get Service
If your product is covered during the warranty period, we will repair or replace you new product (at our option), which will be your exclusive remedy under this warranty. Simply send your product postage prepaid, with proof of purchase and a short description of the problem directly to our factory service center at the following address:
SUNBEAM HOUSEHOLD PRODUCTS |
SUNBEAM CANADA |
Service Station |
Please call to: |
117Central |
1-800-663-8623 o email us at |
Industrial Row |
consumeraffairs@consumer.sunbeam.com |
Purvis, MS 39475 |
|
What is Not Covered
Our warranty for your product will not cover normal wear of parts, damage resulting from negligent use or misuse of the product, use on improper voltage or current, use contrary to operation instructions, glass breakage (if applicable), disassembly, repair, or alteration by any person other than an authorized service station. Any implied warranty of merchantability of fitness for a particular purpose on your product is limited to the duration of this written warranty. We shall not be liable for any incidental or consequential damages for breach of any express or implied warranty on your product.
How Your State’s or Province’s Law May Apply
Some states/provinces do not allow limitations on how long an implied warranty lasts or the exclusion or limitation of incidental or consequential damages, so the above limitation may not apply to you. This warranty gives you specific legal rights, and you may also have other rights which vary from state to state or province to province.
1996 Sunbeam Corporation or its affiliated companies, all rights reserved. Sunbeam is a regist. tered trademark of Sunbeam Corporation or its affiliated companies.
Distributed by: Sunbeam Household Products, Schaumburg, Illinois 60173 Sunbeam Corporation Canada Ltd., Mississauga, Ontario L5R
Model 4780
P.N. 67185
11
R E C I P E S
GARLIC LOVERS' CHICKEN
4 servings
1 whole Tyson Holly Farms Fresh Young Chicken (broiler-fryer) (3 to 3 l/2 Ibs.) 3 heads garlic, peeled (about 35 garlic cloves)
1 cup chicken broth
Rinse chicken in cold running water. Drain, pat dry inside and out with paper towel.
Combine garlic and broth in small saucepan. Bring to a boiling; cook 5 minutes. With slotted spoon, remove garlic and place inside whole chicken. Reserve broth for basting.
Spray inside of rotisserie basket with nonstick vegetable coating spray; place chicken on the spit and screw spit into the basket. Center chicken on spit with wings downward, legs upward. Place basket with chicken inside the rotisserie.
Close the rotisserie door. Plug in, be certain unit rotates freely. Cook until juices run clear and internal thermometer inserted in the breast reads 185°F (approximately 60 to, 65 minutes). Brush with reserved broth every IO minutes; discard any remaining broth.
Open rotisserie door. Grasp end of spit and basket with pat holders and place on a heatproof work surface. Remove chicken to a warm platter to serve. Refrigerate leftovers.
HERB-RUBBED SAVORY CHICKEN
4 servings
1 whole Tyson Holly Farms Fresh Young Chicken (broiler-fryer) (3 to 3 l/2 Ibs.) l/4 cup vegetable oil
 teaspoon dried basil l/2 teaspoon dried oregano l/2 teaspoon dried sage
 teaspoon dried thyme leaves
Page 14
Rinse chicken in cold running water. Drain, pat dry inside and out with paper towel.
Combine oil and seasonings. Rub skin evenly with this mixture.
Spray inside of rotisserie basket with nonstick vegetable coating spray; place chicken on
the spit and screw spit into the basket. Center chicken on spit with wings downward, legs upward. Place basket with chicken inside the rotisserie.
Close the rotisserie door. Plug in, be certain unit rotates freefy. Cook until juices run clear and thermometer inserted in breast registers 185°F (approximately 60 to 65 minutes) .
Open rotisserie door. Grasp end of spit and basket with pot holders and place on a heatproof work surface. Remove chicken to a warm platter to serve. Refrigerate leftovers.
CITRUS-BASTED CHICKEN
4 servings
1 whole Tyson Holly Farms Fresh Young Chicken (broiler-fryer) (3 to 3 l/2 Ibs.) 1 orange, halved, cut into slices
1 lemon, halved, cut into slices 3/4 cup orange juice, divided
3 tablespoons lemon juice, divided
1 tablespoon lime juice
2 tablespoons honey
1 teaspoon cornstarch
Rinse chicken in cold running water. Drain, pat dry inside and out with paper towel. Place orange and lemon slices inside chicken,
Spray inside of rotisserie basket with nonstick vegetable coating spray; place chicken on the spit and screw spit into the basket. Center chicken on spit with wings downward, legs upward. Place basket with chicken inside the rotisserie.
Combine  cup orange juice, 1 tablespoon lemon juice, and lime juice. Brush , one-third of mixture over chicken. Reserve remaining mixture.
Page 15
Close rotisserie door. Plug in be certain unit rotates freely. Cook until juices run clear and thermometer inserted in breast registers 185°F (approximately 60 to 65 minutes). Brush with remaining mixture during last 15 minutes of cooking.
Meanwhile, combine remaining  cup orange juice, 2 tabtespoons lemon juice, honey and cornstarch in small saucepans. Cook over medium heat until boiling. Cook 2 minutes, stirring constantly until thickened and clear. Serve as sauce with chicken.
Open rotisserie door. Grasp end of spit and basket with’ pot hofders and place on a heatproof work surface. Remove chicken to warm platter to serve. Refrigerate leftovers.
CHILI BUTTER CHICKEN
4 servings
1 whole Tyson Holly Farms Fresh Young Chicken (broiler-fryer) (3 to 3 l/2 Ibs.) 2 tablespoons butter or margarine, softened
l/2 teaspoon chili powder
Rinse chicken in cold running water. Drain, pat dry inside and out with paper towel.
Blend butter and chili powder. Gently loosen skin from chicken at breasts. Rub chili butter evenly under skin of chicken.
Spray inside of rotisserie basket with nonstick vegetable coating spray; place chicken on the spit and screw spit into the basket., Center chicken on spit with wings downward, legs upward. Place basket with chicken inside the rotisserie.
Close rotisserie door. Plug in, be certain unit rotates freely. Cook until juices run clear and thermometer inserted in breast registers 185°F (approximately 60 to 65 minutes).
Open rotisserie door. Grasp end of spit and basket with pot holders and place on a heatproof work surface. Remove chicken to a warm platter to serve. Refrigerate leftovers.
Page 16
BROTH-BASTED CHICKEN
4 servings
1 whole Tyson Holly Farms Fresh Young Chicken (broiler-fryer) (3 to 3 l/2 Ibs.) 2 whole carrots, peeled, cut in 2-inch lengths
2 ribs celery, cut in two-inch lengths
1 small onion, peeled, cut in chunks
1 cup double-strength chicken-broth
Rinse chicken in cold running water. Drain, pat dry inside and out with paper towel.
Combine carrots, celery, onion and broth in small saucepan. Cook over medium heat until boiling; cook 5 minutes or until vegetables are tender. With slotted spoon, remove vegetables and place inside whole chicken. Reserve broth for basting.
Spray inside of rotisserie basket with nonstick vegetable cooking spray; place on spit and fit unit on hub of drip tray. Center chicken on spit with wings downward, legs upward.
Close rotisserie door. Plug in; be certain unit rotates freely. Cook until juices run clear and thermometer inserted in breast registers 185°F (approximately 60 to 65 minutes). Brush with reserved broth every 10 minutes; discard any remaining broth.
Open rotisserie door. Grasp end of spit and basket with pot holders and place on a heatproof work surface. Remove chicken to a warm platter to serve. Refrigerate leftovers.
APRICOT GLAZED CORNISH HENS
2 servings
2
Tyson Rock Cornish game hens (3 l/2 to 4 Ibs. for two) l/2 cup apricot preserves
2 tablespoons vinegar
1 tablespoon soy sauce
If frozen, place hens in refrigerator 24 hours to defrost or use microwave.
..
Page17
 Loading...