


2
Horizontal
Rotisserie
USER MANUAL
Model
4785

CONGRATULATIONS!
Enjoy rotisserie cooking at home in just a few, easy steps with your new SUNBEAM® Horizontal Rotisserie.
We've done everything we can to make rotisserie cooking a breeze. Our instruction manual is designed to give you helpful information on operating your new SUNBEAM® Horizontal Rotisserie.
Your SUNBEAM® Horizontal Rotisserie:
Seals in natural juices while unwanted fats drip away.
Cooks chicken to be moist and flavorful inside, crispy and golden brown outside.
Fits two chickens.
Evenly browns and cooks a wide variety of foods to perfection.
Provides an enclosed cooking environment with see-through door.
Cleans up easily with dishwasher-safe components.
3

TABLE OF CONTENTS
Congratulations . . . . . . . . . . . . . . . . . . . |
Inside Cover |
Table of Contents . . . . . . . . . . . . . . . . . |
. . . . . . . . . 3 |
Important Safeguards . . . . . . . . . . . . . . . |
. . . . . . . . 4 |
Use of Extension Cords . . . . . . . . . . . . . . |
. . . . . . . . 5 |
Using Your Rotisserie Safely . . . . . . . . . . |
. . . . . . . . 6 |
Features of Your Rotisserie . . . . . . . . . . . |
. . . . . . . . 7 |
Step-by-Step Instructions . . . . . . . . . . . . . |
. . . . . . . . 8 |
Using Basket Accessory . . . . . . . . . . . . . . |
. . . . . . . .12 |
Cleaning and Caring for Your Rotisserie . |
. . . . . . . .14 |
Cooking Times . . . . . . . . . . . . . . . . . . . . . |
. . . . . . . .15 |
Rotisserie Cooking Chart . . . . . . . . . . . . . |
. . . . . . . .16 |
Carving Tips . . . . . . . . . . . . . . . . . . . . . . . |
. . . . . . . .17 |
Warranty Information . . . . . . . . . . . . . . . |
. . . . . . . .19 |
Product Information . . . . . . . . . . . . . . . . |
. . . . . . . .20 |
4

IMPORTANT SAFEGUARDS
When using electrical appliances, to reduce the risk of fire, electric shock, and/or injury to persons, basic safety precautions should always be followed, including the following:
READ ALL INSTRUCTIONS CAREFULLY.
Do not touch hot surfaces, use the handles or knobs. Always use oven
mitts when handling hot materials. Allow metal parts to cool before cleaning. Allow the Rotisserie to cool thoroughly before inserting and removing parts.
When the unit is not in use, keep the Rotisserie unplugged.
To protect against electric shock, do not place cord, plug or appliance in water or other liquids.
Close supervision is always necessary when this or any appliance is used by or near children or incapacitated persons.
Do not allow anything to rest on the power cord. Do not plug in cord where people may walk or trip on it.
Do not operate this or any appliance with a damaged cord or plug or after the appliance malfunctions or has been damaged in any manner. Return appliance to an authorized service facility for examination, repair or adjustment.
Avoid contact with moving parts.
Do not use attachments that are not recommended by the manufacturer; they may cause fire, electric shock or injury.
Do not use outdoors or for commercial purposes.
Do not let the cord hang over the edge of a table or counter or touch hot surfaces. Do not place the appliance on an unsteady
or cloth-covered surface.
Do not place the appliance near a hot gas or electric burner or in a heated oven.
To unplug, grip plug and pull from wall outlet.
Extreme caution must be used when moving an appliance containing hot oil or other hot liquids.
Do not use appliance for other than intended use.
Use extreme caution when removing drip pan or disposing of hot grease.
Do not operate without food inside.
5

Use of extension cords:
A.A short power supply cord is provided to reduce the risk resulting from becoming entangled in or tripping over a longer cord.
B.Longer extensions cords may be used if care is exercised in their use.
C.If a longer detachable power-supply cord or extension cord is used:
1.The marked electrical rating of the cord set or extension cord should be at least as great as the electrical rating of the appliance, and
2.The cord should be arranged so that it will not drape over the countertop or tabletop where it can be pulled on by children or tripped over unintentionally.
D.If the appliance is of the grounded type, the extension cord should be a grounding-type 3-wire cord.
Electrical Power: If electric circuit is overloaded with other appliances, your Rotisserie may not operate properly. The Rotisserie should be operated on a separate electrical circuit from other appliances.
Read the following instructions before using this unit for the first time.
THIS UNIT IS FOR HOUSEHOLD USE ONLY
To reduce the risk of electrical shock, this appliance has a polarized plug (one blade is wider than the other). This plug fits a polarized outlet only one way; if the plug does not fit fully into the outlet, reverse the plug.
If it still does not fit, contact a qualified electrician. Do not attempt to defeat this safety feature.
NO USER SERVICEABLE PARTS
IF UNIT MALFUNCTIONS RETURN TO SERVICE STATION
SAVE THESE INSTRUCTIONS
6

USING YOUR ROTISSERIE SAFELY
BEFORE USE
Read all instructions carefully.
Make sure to remove all foreign matter from the drip tray.
Peel off static label from the door, if present.
Plug the Rotisserie into a properly wired outlet.
WHERE TO USE
Use only on a stable, heat resistant surface.
Do not use the Rotisserie where it will be exposed to direct sunlight or other heat sources, such as a stove or oven.
Keep the Rotisserie out of the reach of children or incapacitated persons — it is hot!
Place the unit at least eight inches away from walls.
Do not use under a cabinet or in an enclosed area.
WHILE IN USE
The Rotisserie is very hot during operation. Be careful to keep your hands and face away from the unit.
Do not operate the Rotisserie without reflector shield in place.
Do not open the door or remove the cooking basket during operation.
Do not cover the vents on the top of the Horizontal Rotisserie.
AFTER USE
Use oven mitts or a pot holder when removing the basket and the drip pan after cooking.
Make sure to disconnect the power by unplugging the unit. Allow the Rotisserie to cool down before storing.
Read instructions before cleaning. DO NOT IMMERSE THE UNIT IN WATER. THIS WILL CAUSE ELECTRIC SHOCK AND/OR DAMAGE TO THE UNIT.
7
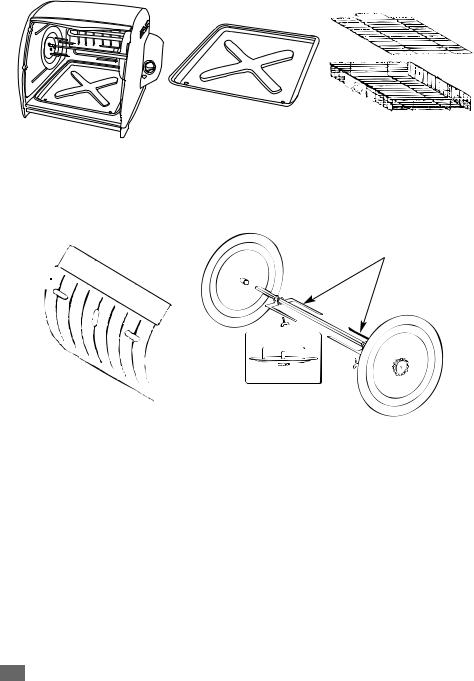
Features of Your Rotisserie
A B C
ADJUSTABLE FORKS
D E
DESCRIPTION OF PARTS
A.Rotisserie Unit
B.Drip Tray
C.Food Basket and Cover
D.Heat Reflector
E.Spit Assembly
8

STEP-BY-STEP INSTRUCTIONS
1.Be sure unit is unplugged before starting. Clean all parts and accessories with warm, soapy water. Rinse well and dry thoroughly.
2.Rotisserie should be placed at least 8 inches from walls and should not be positioned under cabinets.
3.Slide the drip tray into machine at the base of unit.
4.Position the heat reflector by sliding along the inside top towards the back and placing it behind the heating element. Reflector should fit neatly into grooves at the back of heating element leading into the drip tray.
5.DO NOT EXCEED MAXIMUM LOAD WEIGHT OF 12 POUNDS.
Trim any excess fat or loose hangings from meat or poultry before positioning in Rotisserie.
6.Tie the wings and legs of poultry together with plain string or butcher’s twine to prevent loose pieces from rubbing the inside of the door, heat shield or heating element as the spit rotates inside the Rotisserie.
9

7.Start with the end of a leg and loop a suitable length of the string (about 12 inches) or twine and tie-off. Bring the string to the next leg, pull tightly and wrap once or twice around the end and tie-off. Next, wrap approximately 36 inches (3 feet) of string or twine around the body of the bird making sure to secure the wings and legs close to the body by wrapping crossways so there is a big “X” of string or twine pulled tightly across the breast. Bring free end of string to the leg again and tie-off with a secure or double knot. Cut off the excess string or twine so it does not hang loose. The bird should now be a securely bound bundle with no loose parts hanging from its body.
8.Open screws on adjustable fork then slide onto spit rod with pointed ends facing open end of spit rod.
9.If cooking one chicken or turkey, insert spit rod through center
of poultry, starting at the breast area. If cooking two small chickens or three cornish hens, insert spit rod through side of poultry, starting between the wing and thigh area.
10.Push food onto spit rod and into fork as close to the fixed wheel as possible.
11.Place second fork onto spit rod and slide into meat, adjust both forks making sure that meat or poultry is balanced on the spit. Make sure that forks are tightly fixed on spit by securing screws tightly by hand.
12.Once your meat or poultry is securely fixed on spit rod, attach other wheel to end of spit rod.
10

13.To place spit rod into machine, place right hand under meat, use your left hand to firmly hold detachable wheel, place loaded spit into unit by matching fixed wheel with gear to rotisserie gear located on the right side of the unit.
14.If BBQ sauce is desired, it can be applied to the meat or poultry by gently brushing on with a basting brush after cooking process.
15.Close the glass door. Make sure that the unit is at least 8 inches from the walls and is not placed under cabinets.
16.Plug unit into outlet and turn unit on by setting timer to the desired cooking time.
17.Allow the food to rotate one or more times to ensure that nothing hits the heating element, heat reflector or door. If necessary, turn timer off and adjust food.
18.If the right side of the spit “jumps” on the gear and does not rotate properly, the poultry or meat must be set closer to the fixed wheel and balanced on the spit. Turn unit off, unplug the cord and reposition food so that it will be weighted evenly on the rotating spit.
Plug cord into outlet and set timer to desired setting.
19.A bell will sound at the end of the cooking cycle indicating that the machine is off and your food is ready. Unplug the electric cord.
11
20.At the end of the cooking cycle allow the Rotisserie to cool down for a few minutes before removing the hot food. Be sure to wear protective gloves or oven mitt while handling hot food or a hot machine. Always assume that both the Rotisserie and food are hot after cooking.
21.Once the unit is cooled down and while wearing protective gloves, remove drip tray. BE CAREFUL : Contents of drip tray are very hot.
22.With your right hand (in glove or oven mitt) place a dish or platter below cooked meat, lift platter under meat until you gently lift the spit rod up and out of grooves and drive gear.
23.Use your left hand (in glove or oven mitt) to stabilize the left removable wheel as you remove it from the unit.
12
24.Place platter carefully on the counter.
25.Carefully remove detachable wheel located on the left side.
26.Loosen screw on adjustable fork and slide fork out of meat or poultry and off spit rod. BE CAREFUL : Food may be very hot and screws may be slippery due to meat’s juices.
27.While holding the fixed wheel, use a fork or gloved hand to gently push meat or poultry off spit rod onto platter.
28.Disassemble the remaining removable fork from the spit rod. Wash with warm, soapy water. Rinse all parts and accessories and dry thoroughly after every use. We suggest that the Heat Reflector
be removed and cleaned only as needed. It is not necessary to clean after every use.
*Be very careful when handling spit rod and adjustable forks. The ends are very sharp and can cause serious injury if not handled carefully.
*As with any other high-temperature appliance, some discoloration will occur after usage and does not indicate any problem with the unit.
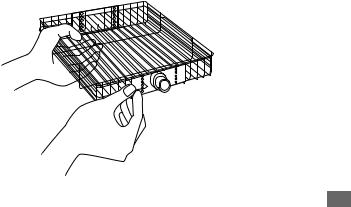
USING BASKET ACCESSORY
1.Make sure unit is unplugged before starting and is positioned at least 8 inches from walls and is not beneath cabinets.
2.Be sure that the basket has been washed and dried before using. Use warm, soapy water to wash and clean basket. The basket should be cleaned after each use.
3.Place drip tray into position at the bottom of unit.
4.Release the basket lid by pulling the fastening pins out of the positioning holes located at both sides of the basket.
13
 Loading...