

HRGB CY
RO
BG GR
DE
AT
CH
7
RO
HR
BG
GB CY
DE AT CH
GR CY
SUŠILO ZA KOSU
Upute za korištenje
ɋȿɒɈȺɊ
Ɋɴɤɨɜɨɞɫɬɜɨɡɚɟɤɫɩɥɨɚɬɚɰɢɹ
HAARTROCKNER
Bedienungsanleitung
HAIR DRYER SHTR 2200 E3
HAIR DRYER
Operating instructions
USCßTOR DE PßR
Instrucķiuni de utilizare
ȈȉǼīȃȍȉdzȇǹȈȂǹȁȁǿȍȃ
ȅįȘȖȓĮȤȡȒıȘȢ
HOYER Handel GmbH
T asköprüstraße 3
22761 Hamburg
Deutschland
Status of information · Stanje informacija · Data reviziei
Ⱦɚɬɚɧɚɢɧɮɨɪɦɚɰɢɹɬɚ · ǾȝİȡȠȝȘȞȓĮȑțįȠıȘȢʌȜȘȡȠijȠȡȚȫȞā6WDQGGHU,QIRUPDWLRQHQ
ID: SHTR 2200 E3_16_V1.6
IAN 278227 IAN 278227
__NAS278227_Haartrockner_B7.book Seite 1 Donnerstag, 29. September 2016 7:03 19
English..................................................................................... 2
Hrvatski ................................................................................ 12
Românà................................................................................. 22
ǯȨșȑȎȞȟȘȖ ........................................................................... 32
ƧnjnjLjǎNJNjƽ ............................................................................... 42
Deutsch ................................................................................. 54
ID: SHTR 2200 E3_16_V1.6
2
3
4
5
8
6
9
1011
7
13
B
A
1
__NAS278227_Haartrockner_B7.book Seite 2 Mittwoch, 28. Septem ber 2016 2:39 14
Overview / Pregled / Privire de ansamblu /
ƧǑNJǔNjǝǑLjǔLj
/ Übersicht
12
ǽȞȓȑșȓȒ
/
13
12
__NAS278227_Haartrockner_B7.book Seite 2 Mittwoch, 28. Septem ber 2016 10:34 10
Contents
1. Overview ........................................................................................ 2
2. Intended purpose ............................. .... ...................... ... .................. 3
3. Safety information ........................................................................... 4
4. Items supplied ................................................................................. 6
5. Operation ........................................................................................ 6
6. Cleaning .......................................................................................... 8
7. Storage ........................................................................................... 9
8. Disposal .......................................................................................... 9
9. Trouble-shooting .............................................................................. 9
10.Technical specifications .................................................................... 9
11.Warranty of the HOYER Handel GmbH ........................................... 10
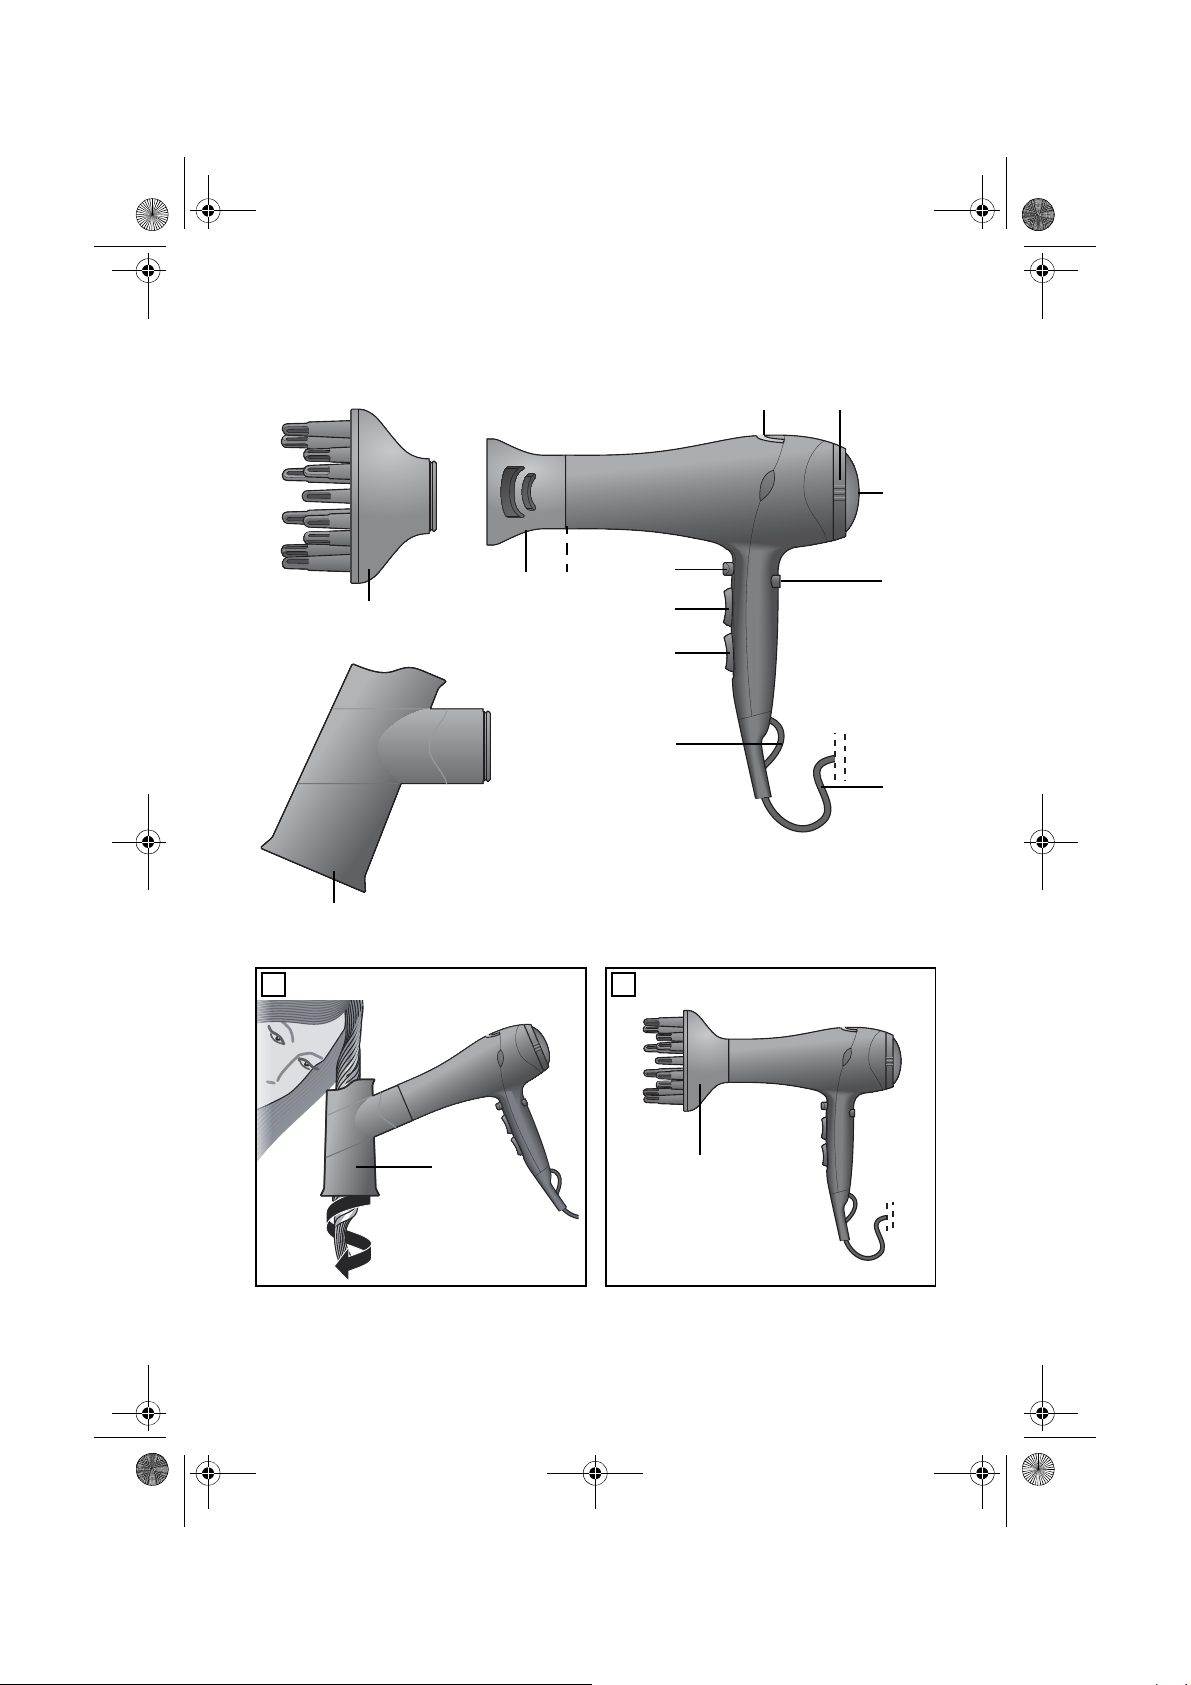
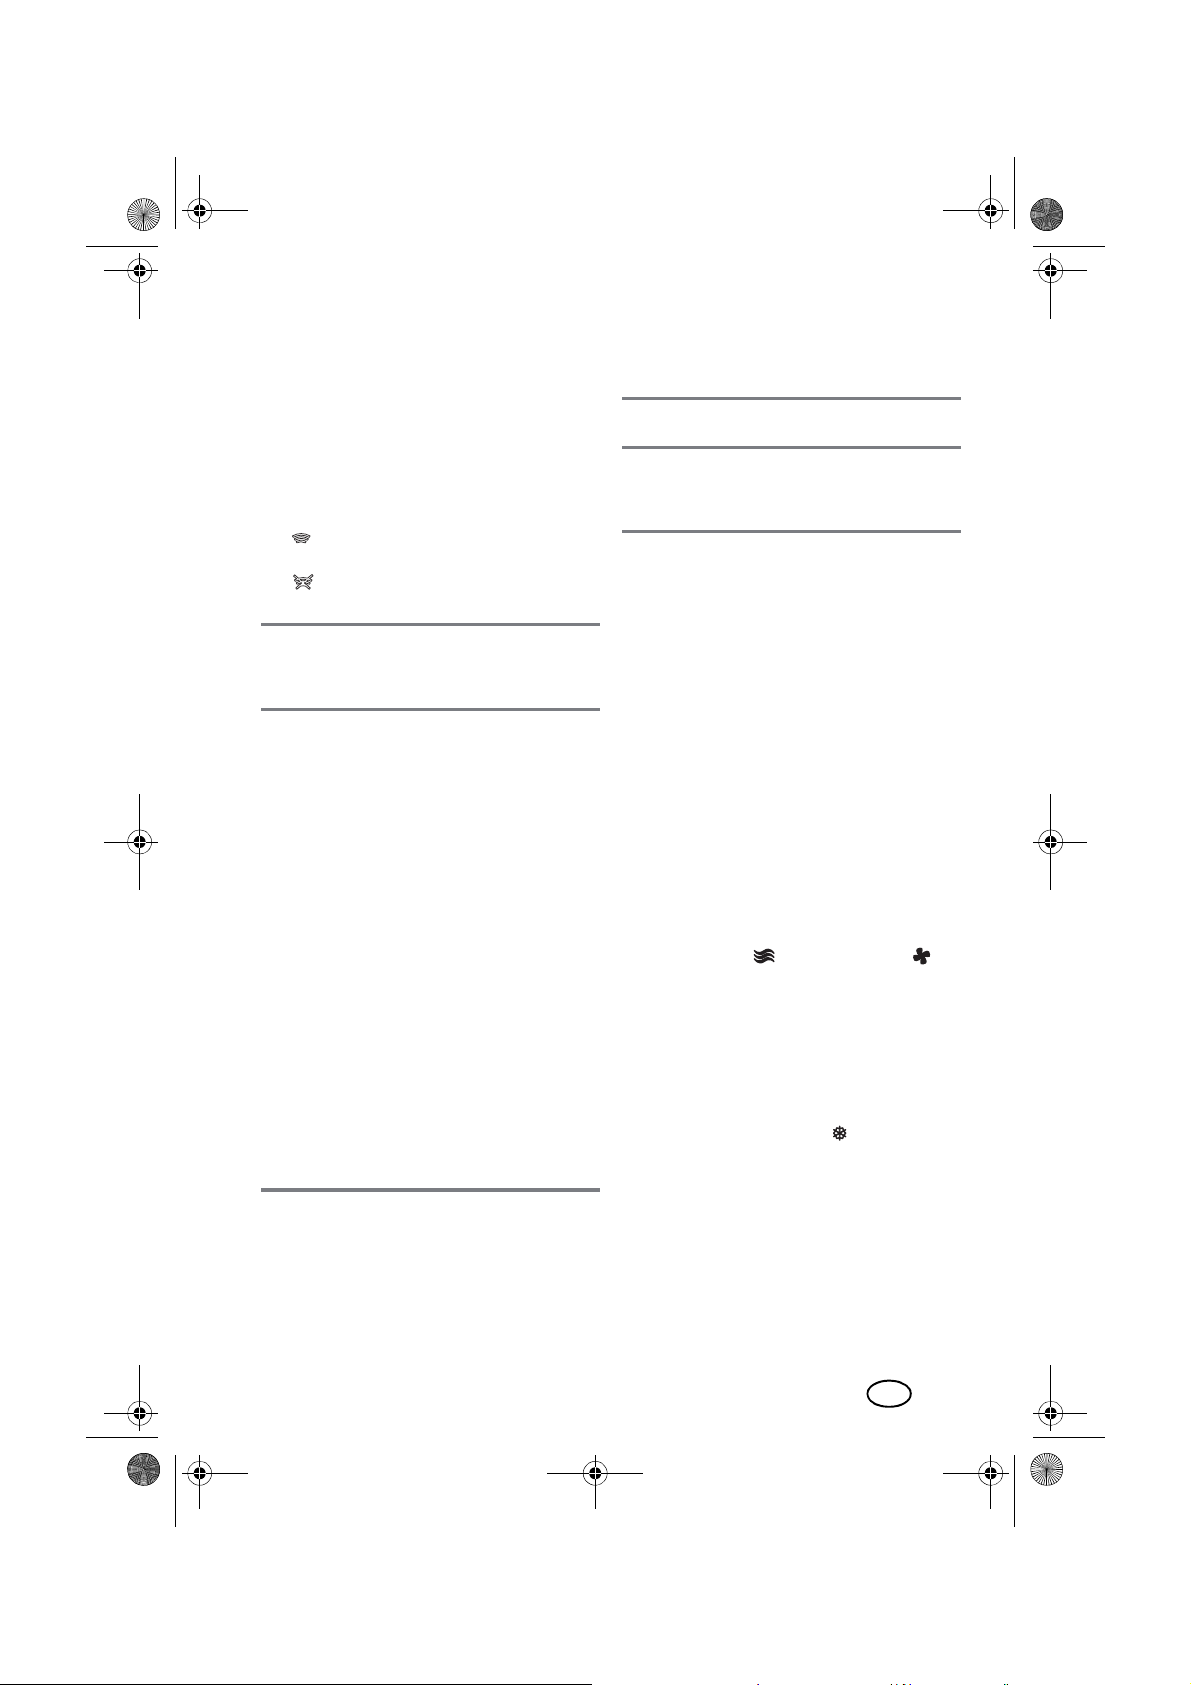
1. Overview
1 LED, lights up when the ion function is active.
2 Protective grid
3 Air inlet (with detachable protective grid)
4 Slide switch for ion function
5 Cable with mains plug
6 Hook loop
7 On/off switch and switch for speed settings:
0 (off) / (slow) / (fast)
8 Switch for hot air settings:
(low) / (medium) / (high)
9 Button for cooling function
10Air outlet (with protective disc)
11Styling attachment (rotatable and detachable)
12Diffuser (rotatable and detachable)
13Curling attachment (rotatable and detachable)
The styling at t ach me n t |11, the diffuser|12
and the curling attachment|13 are not supplied with any model (see “Items supplied”
on page 6). All 3 attachments are described
in these operating instructions.
2
GB
__NAS278227_Haartrockner_B7.book Seite 3 Mittwoch, 28. Septem ber 2016 10:34 10
Thank you for your trust!
Congra tulations on yo ur new
ion function
For a safe handling of the product and in or der to get to know the entire scope of features:
• Thoroughly read these operating instructions prior to initial
commissioning.
• Above all, observe the safety instructions!
• The device should only be used
as described in these operating
instructions.
• Keep these operating instructions for reference.
• If you pass the device on to
someone else, please inc l ud e
these operating instruc ti on s.
We hope you enjoy your new hair dryer
with ion function!
.
hair dryer with
2. Intended purpose
The hair dryer is intended exclusively for the
purpose of drying and styling real, own human head hair.
The device is designed for private home use
and must not be used fo r com merc ial purp oses.
The devic e mus t onl y be us ed indo ors .
Foreseeable misuse
WARNING! Risk of injury!
~ Do not use the hair dryer for drying any
other body parts, animals or objects.
Do not use the device for artificial hair
or with extensions.
Symbols on your appliance
Do not use this devic e in the vicinity
of bathtubs, showers, washbasins
or other vessels containing water.
__ Please observe the information in
these instructions. Read these instructions before you use the device.
GB
3
__NAS278227_Haartrockner_B7.book Seite 4 Mittwoch, 28. Septem ber 2016 10:34 10
3. Safety information
Warnings
If necessary, the following warnings will be used in these opera ting instructions:
DANGER! High risk: failure to observe this warning may result in injury to life and
limb.
WARNING! Moderate risk: failure to observe this warning may result in injury or serious
material damage.
CAUTION: low risk: failure to observe this warning may r es ult in m inor in ju ry or material
damage.
NOTE: circumstances and specifics that must be observed when handling the device.
Instructions for safe operation
~
This device can be used by children from the age of 8 and people
with restricted physical, sensory or intellectual abilities or people
without adequate experience and/or understanding, if they are supervised or instructed on how to use this device safely and if they
are aware of the resulting risks. Children must not play with the device. Cleaning and user maintenance must not be performed by
children unless they are older than 8 years and supervised.
~ Children under the age of 8 must be kept away from the device
and the power cable.
~ If you use the hair dryer in a bathroom, always pull out the mains
plug afterwards because of the safety risk s when it is cl ose to water. The proximity of water represents a hazard even when the
device is switched off.
~
If the mains cor d is damaged it must be replaced by the manufacturer
or its service agent or a similarly qualified person, to av oid danger.
~
Installation of a residual current device (FI/RCD) with a rated residual operating current of no more than 30 mA is recommended to
provide additional protection. Ask your electrician for advice. The
installation should only be carried out by a qualified electrician.
DANGER for children
~ Packing materials ar e not children's
toys. Children should not be allowed to
play with the plastic bags: there is a risk
of suffocation.
4
GB
DANGER to and from pets
and livestock
~ Electrical devices can represent a haz-
ard to pets and livestock. In addition,
animals can also cause damage to the
device. For this reason you should keep
animals away from electrical devices at
all times.
__NAS278227_Haartrockner_B7.book Seite 5 Mittwoch, 28. Septem ber 2016 10:34 10
DANGER! Risk of electric
shock due to moisture
~ Do not use this device in the vi-
cinity of bathtubs, showers,
washbasins or other vessels
containing water.
~ Never place the devic e anywhere that it
could fall into water while plugged in.
~ Protect the device from moisture, water
drops and water spray.
~ The device, the cable and the mains
plug must not be immersed in water or
any other liquids.
~ If liqui d gets into the dev ice, remove th e
mains plug immediately. Have the device checked before reusing.
~ If the device has fallen into water, pull
out the mains plug immediately, and
only then remove the device fr om the
water . Do not use the device again, and
have it checked by a specialist.
~ Never touch the device with wet hands.
DANGER! Risk of electric
shock
~ Do not use the device if the device or
the power cable has any visible damage, or if the device has previously
been dropped.
Lay the power cable such that no one can
~
step on it, get caught on it, or trip over it.
~ Only connect th e ma i ns p lug to a pr o p er-
ly installed and easily acc essible wall
socket whose voltage corresponds to the
specifications on the rating plate. The
wall socket must continue to be easily accessible after the device is plugged in.
~ Ensure that the power cable cannot be
damaged by sharp edges or hot points.
Do not wrap the power cable around
the device (risk of cable damage!).
~ Ensure that the power cable cannot be
trapped or crushed.
~ To pull the mains plug out of the wall
socket, always pull on the mains plug,
and never on the power cable.
~ Disconnect the mains plug from the wall
socket…
… after every use,
… if there is a fault,
… when you are not using the device,
… before you clean the de vice, and
… during thunderstorms.
~ To avoid any risk, do not make modifi-
cations to the product. You also must not
replace the power cable yourself. Repairs must be carried out by a specialist
workshop or the Service Centre.
~ Never attempt to remove dust or foreign
bodies from inside the device using a
pointed object (e.g. with a tail comb).
DANGER! Fire hazard
~ Never leave the device unattended
while it is plugged in.
~ Never cover the device or place it on
soft objects (e.g. towels).
~ Ensur e that the air inlet and outlet are al-
ways kept free. Keep the air inlet away
from long hair or objects that could get
sucked in.
~ This appliance is protected against over-
heating. In the event of overheating,
e.g. because the air inlet or outlet is
covered, the device switches off automatically. In this case, set the on/off
switch to 0 (off), pull the mains plug out
of the wall socket and allow the device
to cool down adequately . Ensure that no
hair or foreign bodies are blocking the
air inlet before switching the device
back on.
~ Never switch on the devic e at the same
time as there is another device with a
high power consumption attached to the
same multi-socket power strip.
~ Do not use an extension cable.
GB
5
__NAS278227_Haartrockner_B7.book Seite 6 Mittwoch, 28. Septem ber 2016 10:34 10
DANGER! Risk of injury
through burning
~ Do not direct the flow of hot air into
eyes, onto hands, or onto any other
heat-sensitive body parts.
~ Do not touch the hot surfaces of the de-
vice.
~ Allow the device to cool down com-
pletely before you clean it or put it
away.
~ Allow all attachments to cool down be-
fore removing it from the device.
WARNING! Risk of material damage
~ Only use the original accessories.
~ Never place the device on hot surfaces
(e.g. hob plates) or near heat sources or
open fire.
~ Do not use any astringent or abrasive
cleaning agents.
~ Do not expose the device to tempera-
tures below -10 °C or above +40 °C.
4. Items supplied
1 hair dryer
1 styling attachment|11
1 diffuser|12
1 curling attachment|13
1 set of operating instructions
Attachment per model:
-grey hair dryer
Diffuser|12, styling attachment|11
-blue hair dryer
curling attachment|13, styling attachment|11
-purple hair dryer
Diffuser|12, styling attachment|11
5. Operation
NOTE:
• before using for the first ti me, switch the
device on for a few minutes and allow it
to run at the highest speed and temperature settings. As a result of the manufacturing process, you may notice a slight
odour. This is normal and only occurs
during first use. Ensure that the room is
well ventilated.
Switching on/off and adjusting
speed
1. Connect the mains plug|5 with an easi-
ly accessible wall socket.
2. Using the on/off switch|7 and the
switch for the speed settings, you can
switch the device on and select the desired speed for the air flow:
0 =off
= slow; gentle air flow
= fast; strong air flow
3. After drying, switch the on/off switch|7
to 0 (off) and pull out the mains plug|5.
Selecting the temperature
Use the switch for the hot air settings|8 to select the desired temperature for the air flow:
=low temperature
= mediu m temperature
=high temperature
Cooling function
In order to improve the durability of your
hair style, you can cool the hair after it has
been styled with hot air using the button|9| .
Keep the button|9 held down during drying in order to get a cool air flow, irrespective of the starting temperature.
When you no longer require the cool air
flow, release the button|9 .
6
GB
__NAS278227_Haartrockner_B7.book Seite 7 Mittwoch, 28. Septem ber 2016 10:34 10
Ionisation function
Y ou can use the ion switch|4 to additionally
activate the ionisation function, whatever
setting you are using. This then continuously
applies ions to the hair.
This reduces the static loading of the hair
and improves its stylability.
The hair becomes soft, smooth, glossy, and
easier to style.
• Ion function on, LED|1 lights up
• Ion function off, LED|1 off
NOTE:
• We recommend the use without attachments for the optimum activity of the ions.
Styling attachment
The styling attachment|11 mak es it possible
to direct the air flow onto specific sections of
hair.
1. Place the styling attachment|11 onto
the front of the hair dryer, so that it
locks into position.
2. The styling attachment|11 can be rotat-
ed into any position desired.
3. Do not remove the styling attachment|11
from the hair dryer until it has cooled
down.
Curling attachment
With the curling attachment|13 you can
easily create curls and waves. Since your
hair is exposed to significantly less heat, it is
not damaged as much as with a curling iron.
NOTE:
• the result is influenced by the following
factors:
-your hair type;
- the humidity of the hair;
-your hair length;
- the thickness of the strand of hair you
dry in one step;
- the pretreatment of the hair.
1. Wash your hair with regular shampoo.
NOTE:
• do not use any conditioner. It would reduce the formation of curls.
2. Towel-dry your hair.
3. Brush the hair and ensure that all kn ots
are untangled.
4. Place the styling attachment|11 onto
the front of the hair dryer, so that it
locks into position.
5. Only dry the hair at the hairline.
6. Take off the styling attachment|11.
7. Place the curling attachment|13 onto
the front of the hair dryer, so that it
locks into position.
8. Separate your hair into individual strands
and treat each str and on e by one .
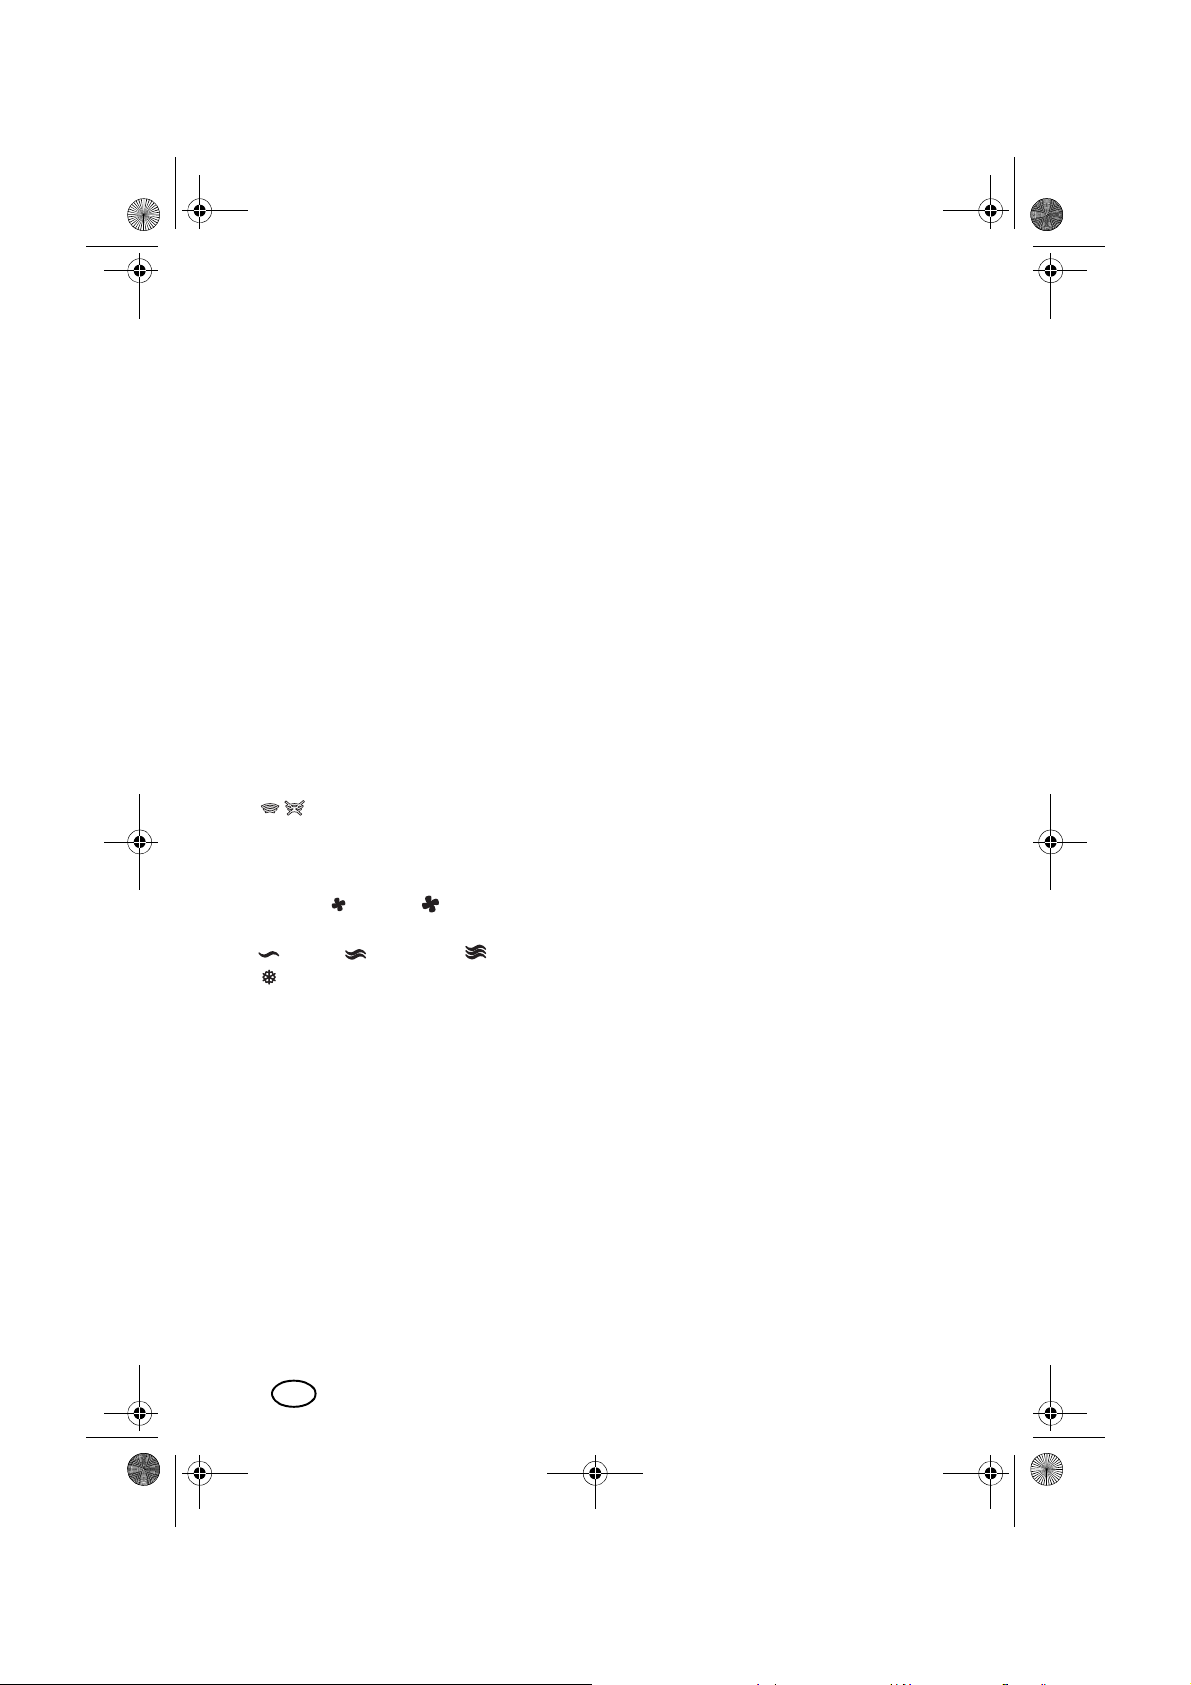
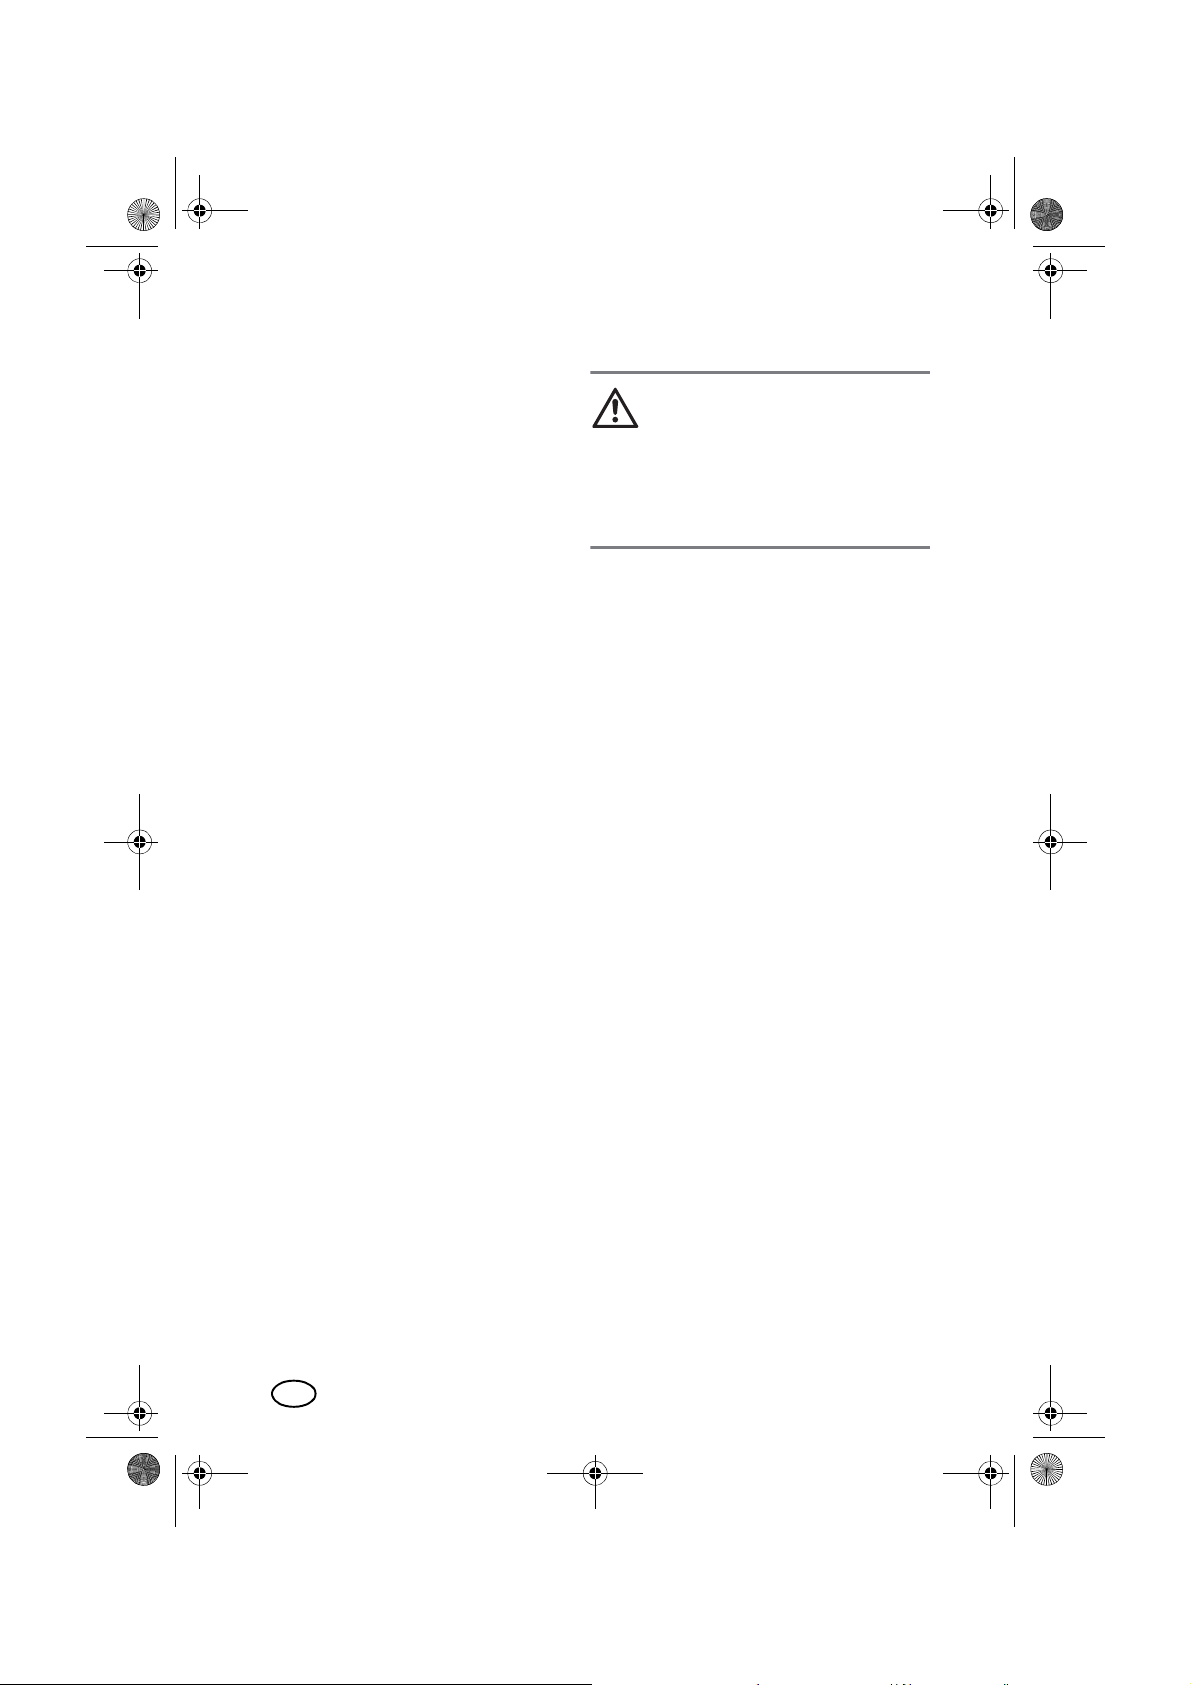
9. Figure A: slightly curl in a strand and
put it into the curling attachment|13
from above.
10. Select the highest temperature setting
and the highest speed setting on the
hair dryer . The strand of hair is
turned in the air flow of the curling attachment.
11. Slowly move the hair dryer up and
down. The strand must be run through
the curling attachment from the hair
ends almost all the way to the hairline
until it is dry.
12. In order to stabilise the shape by
means of cool air press and hold the
button|9 during the last phase of
drying.
13. Proceed accordingly with the remaining strands of hair.
14. Turn off the hair dryer and let the hair
cool off.
15. Then untwist the individual curled
strands.
16. Now you can continue styling your hair
as you would like. For example, you
can loosen the hair with your fingers or
brush it.
GB
7

__NAS278227_Haartrockner_B7.book Seite 8 Mittwoch, 28. Septem ber 2016 10:34 10
17. If you like, you can us e ha irsp ra y to set
the style.
18. Do not remove th e curling a ttachme nt|13
from the hair d ryer until it has co oled
down.
Diffuser
Use the diffuser attachment|12 to create
curls and gentle waves in the lengths and
tips, as well as for body and volume at the
roots of the hair.
1. Figure B: Place the diffuser|12 onto
the hair dryer.
2. Switch on the hair dryer.
3. Use:
- For long hair: draw diffuser|12
through to the tips, and style the ha ir
into gentle waves in the direction of
the roots.
- For short hair: use the diffuser|12 to
work on the hair around the roots,
generating body and volume.
4. Do not remove the diffuser|12 fr om the
hair dryer until it has cooled down.
6. Cleaning
DANGER!
~ Pull the mains plug|5 out of the wall
socket before you clean the hair dryer.
WARNING! Risk of material damage!
~ Do not use any astringent or abrasive
cleaning agents.
Clean the device regularly. Particularly ensure that the air inlet and outlet are free of
dust, hair and fluff.
• Wipe down the casing, the protective
2
over the air inlet|3, and the styl-
grid|
11
ing attachment|
• Remove the styling attachment|
the diffuser|
the hair dryer with the air outlet|
pointing downwards. Clean the protective discs using a brush.
Cleaning the protective grid
1. Rotate the protective grid|2 a little bit
anti-clockwise and then remove it.
2. Hold the hair dryer with the air inlet
pointing downwards. Clean the inside
and the outside protective grid using a
brush.
3. Replace the protective g r id|
using a damp cloth.
11
12
from the hair dryer . Hold
10
2
.
or
8
GB
Cleaning the attachments
1. Do not remove an attachment
11,|12,|13
(
it has cooled down.
2. Wipe the attachment (
with a damp cloth.
3. Allow the attachment (11,|12,|13) to
dry completely before you use it again.
) from the hair dryer until
11,|12,|13
)
__NAS278227_Haartrockner_B7.book Seite 9 Mittwoch, 28. Septem ber 2016 10:34 10
7. Storage
WARNING! Risk of material damage!
~ Do not wrap the cable around the de-
vice (risk of cable damage!).
• You can use the hook loop|
and practically hang up the device for
storage purposes.
6
to safely
8. Disposal
This product is subject to the
provisions of European Directive 2012/19/EC. The symbol showing a wheelie bin
crossed through indicates
that the product requires separate refuse collection in the European Union. This applies to the product and all
accessories marked with this symbol. Products identified with this symbol may not be
discarded with normal household waste, but
must be taken to a collection point for recycling electric and electronic appliances. Recycling helps to reduce the consumption of
raw materials and protect the environment.
Packaging
When disposing of the packaging, make
sure you comply with th e e nvir onm ental r egulations applicable in your country.
9. Trouble-shooting
If your device fails to function as required,
please try this checklist first. Perhaps there is
only a minor problem, and you ca n solve it
yourself.
DANGER! Risk of electric
shock!
~ Do not attempt to r epair the device your-
self under any circumstances.
Fault Possible causes / Action
No
function
• Has the device been connected to the power supply?
• Has the overheating protection switched off the device?
7
Set the on/off switch|
(off), pull the mains plug |5
out of the wall socket and
allow the device to cool
down adequately. Ensure
that no hair or foreign bodies are blocking the air inle t
before switching the device
back on.
to
0
10. Technical
specifications
Model: SHTR 2200 E3
Mains voltage: 230-240 V ~ 50 Hz
Protection class: II
Power rating: 2000 - 2200 W
Subject to technical modification.
GB
9
__NAS278227_Haartrockner_B7.book Seite 10 Mittwoch, 28. September 2016 10:34 10
11. Warranty of the
HOYER Handel GmbH
Dear Customer,
your device is provided with a 3 year warranty starting with the purchase date. In the
event of product defects, you ar e entitled to
statutory rights against the vendor. These
statutory rights are not restricted by our warranty presented in the following.
Warranty conditions
The warranty period starts with th e purchase
date. Please keep the original purchase receipt in a safe place. This document is required to verify the purchase.
If within three years from the purchase date
of this product a material or factory defect
occurs, the product will be repaired or replaced by us – at our discretion – free of
charge to you. This warranty implies that
within the period of three years the defective
device and the purchase receipt are presented, including a brief written description of
the defect and the time it occurred.
If the defect is covered by our warranty, the
repaired or a new product will be returned
to you. No new warranty period starts with
a repair or replacement of the product.
Warranty perio d and statutor y
claims for defects
The warranty period is not extended when
the warran ty has been claimed. T his also ap plies to replaced and repaired parts. Any
damages and defects already existing at the
time of purchase must be reported immediately upon unpacking. Repairs arising after
the expiration of the warranty period are
subject to a charge.
Warranty coverage
The device was produced carefully according
to strict quality guidelines and tested diligently prior to delivery.
The warrant y ap plie s to mate rial or facto ry
defects.
Excluded from the warranty are
wear parts subject to normal wear
and damages to fragile parts, e.g.
switches, batteries, lamps or other
parts manufactured from glass.
This warranty expire s if the produ ct is damaged, not used as intended or not serviced.
For the proper operation of the product, all instructions listed in the operating instructions
must be observed carefully. Any form of use
and handling that is advised against in the
operating instructions or warned against
must always be av oide d.
The product is only intended for private and
not for commercial use. In the case of incorrect and improper treatment, use of force and
interventions not performed by our authorised Service Centre, the warranty shall cease.
Handling in case of a warranty
claim
In order to ensure prompt processing of your
matter, please observe the following notes:
• Please keep the article number
IAN: 278227
ceipt as a purchase verification for all
inquiries.
• The article number can be found on the
rating plate, an engraving, the title
page of your instructions (in the bottom
left), or as a label on the rear or underside of the device.
• If faulty operation or other defects occur ,
first contact the Service Centre listed in
the following by
• Then, you are able to send a product reported as defective free of charge to the
service address specified to you, including the purchase receipt and the information on the defect and when it
occurred.
Please visit www .lidl-service.com to
download this and many other
manuals, product videos and software.
and the purchase re-
telephone
or
email
.
10
GB
GB
IE
CY
__NAS278227_Haartrockner_B7.book Seite 11 Mittwoch, 28. September 2016 10:34 10
Service Centre
Service Great Britain
Tel.: 0871 5000 720 (£ 0.10/Min.)
E-Mail: hoyer@lidl.co.uk
Service Ireland
Tel.: 1890 930 034
(0,08 EUR/Min., (peak))
(0,06 EUR/Min., (off peak))
E-Mail: hoyer@lidl.ie
Service Cyprus
Tel.: 8009 4409
E-Mail: hoyer@lidl.com.cy
IAN: 278227
Supplier
Please note that the following address is
service address
. First contact the afore-
mentioned Service Centre.
no
HOYER Hand el GmbH
Tasköprüstraße 3
22761 Hamburg
Germany
GB
11
__NAS278227_Haartrockner_B7.book Seite 12 Mittwoch, 28. September 2016 10:34 10
Sadržaj
1. Pregled .......................................................................................... 12
2. Predviîena uporaba ............................. ...................... ... .... ............ 13
3. Sigurnosne upute ........................................................................... 14
4. Opseg isporuke ............................................................................. 16
5. Rukovanje ..................................................................................... 16
6. éišäenje ......................................................................................... 18
7. éuvanje ......................................................................................... 19
8. Uklanjanje otpada ......................................................................... 19
9. Rješenje problema ......................................................................... 19
10.Tehniêki podaci .............................................................................. 19
11.Jamstvo tvrtke HOYER Handel GmbH ............................................ 20
1. Pregled
1
LED, svijetli kada je aktivirana funkcija iona.
2
Zaštitnom rešetkom
3
Otvor usisa zraka (s odvojivom zaštitnom rešetkom)
4
5
6
7
8
9
10
11
12
13
Pomiêna sklopka za funkciju iona
Kabel s mrežnim utikaêem
Ušica za vješanje
Sklopka za ukljuêivanje/iskljuêivanje te sklopka za odabir razine brzine:
0
(iskljuêeno) / (sporo) / (brzo)
Sklopka za odabir razine vruäeg zraka:
(niska) / (umjerena) / (visoka)
Tipka funkcije rashlaîivanja
Otvor ispuha zraka (sa zaštitnim lamelama)
Mlaznica za oblikovanje kose (može se okretati i skidati)
Difuzor (može se okretati i skidati)
Nastavak za kovrêe (okretljiv i odvojiv)
Dijelovi pribora kao što su mlaznica za obli-
11
kovanje kose|
oblikovanje kovrêa|
seg isporuke kod svih modela (pogledajte
“Opseg isporuke” na stran i ci 1 6). U ovim
uputama opisane su sve 3 varijante.
, difuzor|12 i nastavak za
13
nisu ukljuêeni u op-
12 HR
__NAS278227_Haartrockner_B7.book Seite 13 Mittwoch, 28. September 2016 10:34 10
Zahvaljujemo vam na
povjerenju!
éestitamo na k u pnji n ovog
funkcijom iona
Kako biste omoguäili sigurno korištenje proizvoda te se upoznali sa svim njegovim radnim znaêajkama:
• Prije prvog korištenja pažljivo
proêitajte ove upute za korištenje.
• Prije svega se pridržavajte sigurnosnih napomena!
•Ureîaj se smije koristiti samo
kako je opisano u ovim uputama
za korištenje.
•Saêuvajte ove upute za korište-
nje.
•Ako ureîaj namjeravate dati u
treäe ruke, priložite i ove upute
za korištenje.
Želimo vam mnogo radosti s novim sušilom
za kosu s funkcijom iona!
.
sušila za kosu s
2. Predviîena uporaba
Sušilo za kosu namijenjeno je iskljuêivo sušenju i oblikovanju prave, vlastite, ljudske
kose.
Ureîaj je namijenjen uporabi u domaäinstvu i ne smije se k oristiti u komercijalne svrhe.
Ureîaj se smije koristiti samo u unutr ašnj im
prostorijama.
Moguäa pogrešna uporaba
UPOZ ORE NJ E na oz lj ede!
~ Sušilom nemojte sušiti druge dijelove ti-
jela, životinje ili predmete. Ureîaj nemojte koristiti za umjetnu k osu. Nemojt e
koristiti ureîaj za umjetnu kosu ili ekstenzije za kosu.
Simboli na ureîaju
Ureîaj nemojte koristiti u blizini kade, tuša, umivaonika ili drugih posuda s vodom.
__ Prouêite informacije u ovim uputa-
ma. Proêitajte upute, prije korištenja ureîaja.
13HR
__NAS278227_Haartrockner_B7.book Seite 14 Mittwoch, 28. September 2016 10:34 10
3. Sigurnosne upute
Napomene upozorenja
Po potrebi äe se u ovim Uputama za korištenje primijeniti sljedeäe oznake upozorenja:
OPASNOST!
i život.
UPOZORENJE!
materijalnu štetu.
OPREZ:
nu štetu.
NAPOMENA:
vati.
Niski rizik: Nepoštivanje upozorenja može uzrokovati lakše ozljede ili materijal-
Visoki rizik: Nepoštivanje upozorenja može biti opasno po zdravlje
Srednji rizik: Nepoštivanje upozor enja može uzroko vati ozljede ili veliku
Stanja i posebnosti kojih se prilikom korištenja ureîaja potrebno pridrža-
Upute za siguran rad
~
Ureîaj smiju koristiti djeca od 8 god ina i starija te osobe s ograni-
êenim psihiêkim, senzornim ili mentalnim sposobnostima ili osobe
bez iskustva i/ili znanja samo ako ih nadzire osoba zadužena za
njihovu sigurnost ili ako su od takve osobe dobili upute za korištenje ureîaja te su razumjeli moguäe opasnosti. Djeca se ne smiju
igrati ureîajem. Djeca ne smiju obavljati êišäenje i održavanje ako
su mlaîa od 8 godina te nisu pod nadzorom.
~
Djecu mlaîu od 8 godina treba držati podalje od ureîaja i prikljuênog kabela.
~
Ako se sušilo za kosu koristi u kupatilu, nakon uporabe iskopêajte
utikaê. Blizina vode opasna je za ur e îaj i kada je on iskljuêen.
~
Ako se mrežni prikljuêni kabel ovog ureîaja ošteti, tr eba ga zamijeniti proizvoîaê, Korisniêka služba ili kvalificirana osoba kako bi
se izbjegle opasnosti.
~
Kao dodatna zaštita preporuêuje se instalacija zaštitne naprave
(FI/RCD) sa strujom pokr etanja mjerenja od najviše 30 mA u strujnom krugu. Pitajte elektroinstalatera za savjet. Pobrinite se da
ugradnju provede iskljuêivo struêni elektri êar.
OPASNOST za djecu
~ Ambalaža nije djeêja igraêka. Djeca se
ne smiju igrati plastiênim vreäicama. Postoji opasnost od gušenja.
14 HR
OPASNOST za i od strane
kuänih i domaäih životinja
~ Elektroniêki ureîaji mogu predstavljati
opasnost za kuäne i domaäe životinje.
Nadalje, životinje takoîer mogu uzrokovati št etu na ureîaju. Stoga držite životinje u naêelu dalje od elektroniêkih
ureîaja.

__NAS278227_Haartrockner_B7.book Seite 15 Mittwoch, 28. September 2016 10:34 10
OP ASNOS T od udara struje
uslijed dodira s vlagom
~ Ureîaj nemojte koristiti u blizini
kade, tuša, umivaonika ili drugih posuda s vodom.
~ Ureîaj nemojte nikada ostavljati tako
da u prikljuêenom stanju može upasti u
vodu.
~ Zaštitite ureîaj od vlage i vode koja ka-
plje ili se raspršuje.
~ Ureîaj, kabel i mrežni utika ê nemojte
uroniti u vodu ili druge tekuäine.
~ Ako tekuäine prodru u ureîaj, odmah
izvucite mrežni utikaê iz utiênice. Pr ije
ponovnog korištenja zatražite provjeru
ureîaja.
~ U sluêaju da ureîaj ipak padne u vodu,
izvucite mrežni utikaê iz struje i tek nakon toga izvadite ureîaj iz v ode. U tom
sluêaju nemojte više koristiti ur eîaj, veä
ga dajte na provjeru servisnoj službi.
~ Ureîajem nemojte rukovati mokrim ru-
kama.
OP ASNOS T od udara struje
~ Ureîaj nemojte uklju êivati ako na ure-
îaju ili prikljuênom kabelu uoêite vidlji-
va ošteäenja ili Vam je prije toga ur eîaj
pao na pod.
~ Prikljuêni kabel i produžni kabel položi-
te tako da ih nitko ne može nagaziti, o
njih se objesiti ni zapeti za njih.
~ Mrežni utikaê prikljuêite samo u pravil-
no instaliranu i lako pristupa
ênu utiênicu
êiji napon odgovara podacima s tipske
oznake. Utiênica i nakon prikljuêenja
kabela mora biti lako dostupna.
~ Pazite da se prikljuêni kabel ne ošteti
oštrim rubovima ili vruäim m jestima. Prikljuêni kabel nemojte zamotavati o ko
ureîaja (opasnost od prijeloma kabela!).
~ Pripazite da prikljuêni kabel nije uklije-
šten ili pritisnut.
~ Prilikom izvlaêenja mrežnog utikaêa iz
utiênice, uvijek povucite za mrežni utikaê, nikada za prikljuêni kabel.
~ Izvucite mrežni utikaê iz utiênice...
… nakon svakog korištenja,
… ako nastane smetnja,
…ako ne koristite ureîaj,
…prije êišäenja ureîaja i
… kod nevremena.
~ Kako bi se izbjegle opasnosti, nemojte
ništa mijenjati na artiklu. Ni prikljuêni
kabel ne smijete sami mijenjati. Popravke smiju vršiti samo struêne ra dionice,
odnosno servisni centar.
Nemojte pokušavati uklanjati prašinu ili
~
strana tijela iz un utr ašnjo sti ur eîaja šilja-
stim predmetima (npr . êešljem s drškom).
OPASNOST od požara
~ Nemojte ostaviti prikljuêeni ureîaj da
radi bez nadzora.
~ Ureîaj nemojte nikada prekrivati ili
ostavljati na mekanim predmetima (npr.
ruênicima).
~ Pobrinite se da su otvori us isa i ispuha
zraka uvijek slobodni. Ne dopustite da
otvor usisa zraka prekrivaju duge dlake
ili predmeti koji se mogu usisati.
~ Ureîaj je opremljen zaštitom od pregri-
javanja. Kod pregr ij a vanj a, n p r. uslijed
prekrivanja otvora usisa i ispuha zraka,
ureîaj se automatski iskljuêuje. U tom
sluêaju namjestite sklopku za ukljuêiva-
0
nje/iskljuêivanje na
(iskljuêeno), izvucite mrežni utikaê iz utiênic e i priêekajte
da se ureîaj dovoljno rashladi. Pobrinite se da prije ponovnog ukljuêivanja
dlake ni strana tijela ne blokiraju otvor
usisa zraka.
Ne ukljuêujte ur eîaj istovremeno s nekim
~
drugim ureîajem više razine snage, k o ji
je prikljuêen na istu višekratnu utiênicu.
~ Ne primjenjujte produžni kabel.
15HR
__NAS278227_Haartrockner_B7.book Seite 16 Mittwoch, 28. September 2016 10:34 10
OP ASNOST od ozljeda uslijed
opeklina
~ Vruäu struju zraka ne usmjeravajte pre-
ma oêima, rukama ili drugim dijelovima
tijela koji su osjetljivi na toplinu.
~ Nemojte dodirivati vruäe površine ure-
îaja.
~ Priêekajte da se ureîaj sasvim rashladi
prije nego ga po ênete êistiti ili spremati.
~ Pustite dijelove pribora da se osuše pri-
je nego ih odvojite od ureîaja.
UPOZORENJE na materijalnu
štetu
~ Koristite samo originalni pribor.
~ Ureîaj nikada nemojte polagati na vru-
äe površine (npr. grijaäe ploêe štednja-
ka) ili u blizinu izvora topline ili
otvorene vatre.
~ Ne koristite agresivna sredstva za êišäe-
nje ni sredstva za ribanje.
~ Ureîaj ne izlažite temperaturi ispod
-10 °C ili preko +40 °C.
4. Opseg isporuke
1 sušilo za kosu
1 mlaznica za oblikovanje kose|
1 difuzor|
1 nastavak za kovrêe|
1 upute za korištenje
Pribor kod pojedinih varijanti:
12
13
- sivo sušilo za kosu
difuzor|
kose|
- plavo sušilo za kosu
nastavak za kov rêe|
oblikovanje kose|
-ljubiêasto sušilo za kosu
difuzor|
kose|
12
, mlaznica za oblikovanje
11
11
12
, mlaznica za oblikovanje
11
11
13
, mlaznica za
5. Rukovanje
NAPOMENA:
• Prije prvog korištenja ukljuêite ureîaj i
ostavite da radi nekoliko minu ta na najvišoj razini brzine pri najvišoj temperaturi. Pritom se može pojaviti slabi dim
zbog naêina izrade. To nije problem i
pojavljuje se samo kod prvog korištenja. Pobrinite se za dobro prozraêiva-
nje prostorije.
Ukljuêivanje/iskljuêivanje i regulacija brzine
1. Mrežni utikaê|5 utaknite u lako do-
stupnu utiênicu.
2. Sklopkama za ukljuêivanje/iskljuêiv a nj e|7
te odabir razine brzine ukljuêite ureîaj i
odaberite željenu brzinu struje zraka:
0
= iskljuêeno
= sporo; slaba struja zraka
= brzo; jaka struja zraka
3. Nakon sušenja namjestite sklopku za
7
ukljuêivanje/iskljuêivanje|
kljuêeno) i iskopêajte mrežni utikaê|
Odaberite temperaturu
Sklopkom za odabir razine vruäeg zraka|8
odaberite željenu temperaturu struje zraka:
=niska temperatura
=srednja temperatura
= visoka temperatura
Funkcija rashlaîivanja
Za pospješivanje trajnosti frizure, dio kose
oblikovan vruäim zrakom možete rashladiti
9
koristeäi tipku|
Tijekom sušenja držite pritisnutu tipku|
kako biste neovisno o vanjskoj temperaturi
postigli hladnu struju zraka.
Kada više ne trebate hladnu struju zraka, otpustite tipku|
.
9
.
na 0 (is-
9
5
|
.
16 HR
__NAS278227_Haartrockner_B7.book Seite 17 Mittwoch, 28. September 2016 10:34 10
Funkcija ioniziranja
Sklopkom za ione|4 možete kod svakog na-
êina rada dodatno ukljuêiti funkciju ionizira-
nja. Ta funkcija omoguäava neprekidno
donošenje iona na kosu.
Time se smanjuje statiêki naboj kose te se
time pospješuje oblikovanje frizure.
Kosa je mekša, nježnija, sjaji se i lakše se
oblikuje u frizuru.
1
• Funkcija iona ukljuêena, LED|
svijetli
• Funkcija iona iskljuêena, LED|1
iskljuêen
NAPOMENA:
•Za optimalan uêinak iona preporuêamo
uporabu bez nastavka.
Mlaznica za oblikovanje kose
Mlaznica za oblikovanje kose|11 omogu-
äava usmjeravanje struje zraka ciljano na
odreîeni dio kose.
1. Nataknite mlaznica za oblikovanje ko-
11
na prednju stranu sušila za kosu
se|
tako da se dobro uglavi.
2. Mlaznica za oblikovanje kose|11
može se okretati i namještati u željeni
položaj.
3. Najprije skinite mlaznica za oblikovanje
11
kose|
rashladi.
sa sušila za kosu nakon što se
Nastavak za kovrêe
Nastavak za kovrêe|13 omoguäuje vam brzo
oblikovanje kovrêi i valova. Buduäi da na
kosu djeluje znatno man je topline n ego k od
uvijaêa za kosu, kosa se m a nje ošteäuje.
NAPOMENA:
• Rezultat ovisi o sljedeäim êimbenicima:
-vašem tipu kose;
-vlažnosti kose;
- duljini kose;
- debljini pramenova kose koje sušite
pri postupku;
- prethodnom tretmanu kose.
1. Operite kosu uobiêajenim šamponom.
NAPOMENA:
• Nemojte koristiti regenerator. On otežava oblikovanje kovrêa.
2. Protrljajte kosu ruênikom kako biste je
djelomiêno osušili.
3. Proêetkajte kosu i pripazite na to da
kosa ne ostane zapetljana.
4. Umetnite mlaznicu za oblikovanje ko-
se|
11
uêvrsti.
5. Osušite kosu samo pri korijenu.
6. Odvojite mlaznicu za oblikovanje|
kose.
7. Umetnite nastavak za oblikovanje kovr-
13
êa|
uêvrsti.
8. Zatim podijeli te kosu u pramenove i
obraîujte pramen po pramen.
9.
Slika A:
te ga odozgo u nastavak za ko vrêe|
10. Namjestite sušilo za kosu na najvišu
temperaturu i najveäu brzinu .
Pramen äe se uvijati u strujanju zraka.
11. Lagano pomiêite sušilo za kosu gore-
dolje. Pramen za kosu bi trebalo provesti kroz nastavak za kosu od vrha pa
skoro do korijena sve dok se ne osuši.
12. Ka ko biste uêvrstili oblik ovanje uz po-
moä hladne struje zr aka, u z adnjoj fa zi
sušenja držite tipku|
13. Ponovite postupak s ostalim pramenovi-
ma kose.
14. Iskljuêite sušilo za kosu i pustite kosu
da se ohladi.
15. Zatim odvijte pojedine pramenove ko-
vrêa.
16. Nakon toga kosu možete dalje oblikova-
ti prema želji. Primjerice, prstima opustite kosu ili pro îite kroz kosu êetko m.
na prednji dio sušila dok se ne
11
na prednji dio sušila dok se ne
Lagano uvijte pram en i um etni-
13
9
pritisnutom.
.
17HR
__NAS278227_Haartrockner_B7.book Seite 18 Mittwoch, 28. September 2016 10:34 10
17. Ako želite, kovrêe možete fiksirati spre-
jem za kosu.
13
18. Odvojite nastavak za kovrêe|
šila za kosu tek kad se ohladi.
od su-
Difuzor
Nastavak difuzora|12 upotrijebite za oblikovanje uvojaka i blagih valova duž dlake i
pri vrhovima ka o i za oblik ovanje špi castog
vrha kose na êelu.
Slika B:
1.
lo za kosu.
2. Ukljuêite sušilo za kosu.
3. Primjena:
-Kod duge kose: Difuzor|
- Kod kratke kose: Difuzorom|
4. Najprije skinite difuzor|
kosu nakon što se rashladi.
Nataknite difuzor|12 na suši-
12
dovedite
do vrhova dlaka i oblikujte kosu u
smjeru nastavka u blage valove.
12
obradite kratku kosu u podruêju nastavka tako da nastane željeni oblik
frizure.
12
sa sušila za
6. éišäenje
OPASNOST!
~ Prije êišäenja sušila za kosu izvucite
5
mrežni utikaê|
UPOZORENJE na materijalnu št etu!
~ Ne koristite agresivna sredstva za êišäe-
nje ni sredstva za ribanje.
Redovito êistite ureîaj. Pobrinite se da su
otvori usisa i ispu ha zr ak a u vi jek s l obod ni i
da ih ne blokiraju prašina, dlake i vlakna.
• Po potrebi prebrišite kuäište, zaštitnu re-
2
iznad otvora usisa zraka|3 te
šetku|
mlaznicu za oblikovanje kose|
no navlaženom krpom.
• Skinite mlaznicu za oblikovanje kose|11
sklopke ili dif uzo r|
Sušilo za kosu držite tak o d a je otvor ispuha zraka|
éetkicom oêistite zaštitne lamele.
éišäenje zaštitne rešetke
1. Okrenite zaštitnu rešetku|2 lagano u
smjeru suprotnom od smjera kazaljke
na satu i potom je skinite.
2. Sušilo za kosu držite tako da je otvor
usisa zraka usmjeren prema dolje. Oêi-
stite unutrašnjost i zaštitnu rešetku pomoäu êetkice.
3. Ponovno stavite zaštitnu rešetku|
iz utiênice.
12
sa sušila za kosu.
10
usmjeren prema dolje.
11
laga-
2
.
18 HR
éišäenje dijelova pribora
1. Odvojite dio pribora (11,|12 ili|13)
od sušila za kosu tek kad se ohladi.
2. Pobrišite dio pribora (
vlažnom maramicom.
3. Pustite dio pribora (11,|12 ili|13) da
se u potpunosti osuši prije ponovne
uporabe.
11,|12
ili|13)
 Loading...