

Page 1
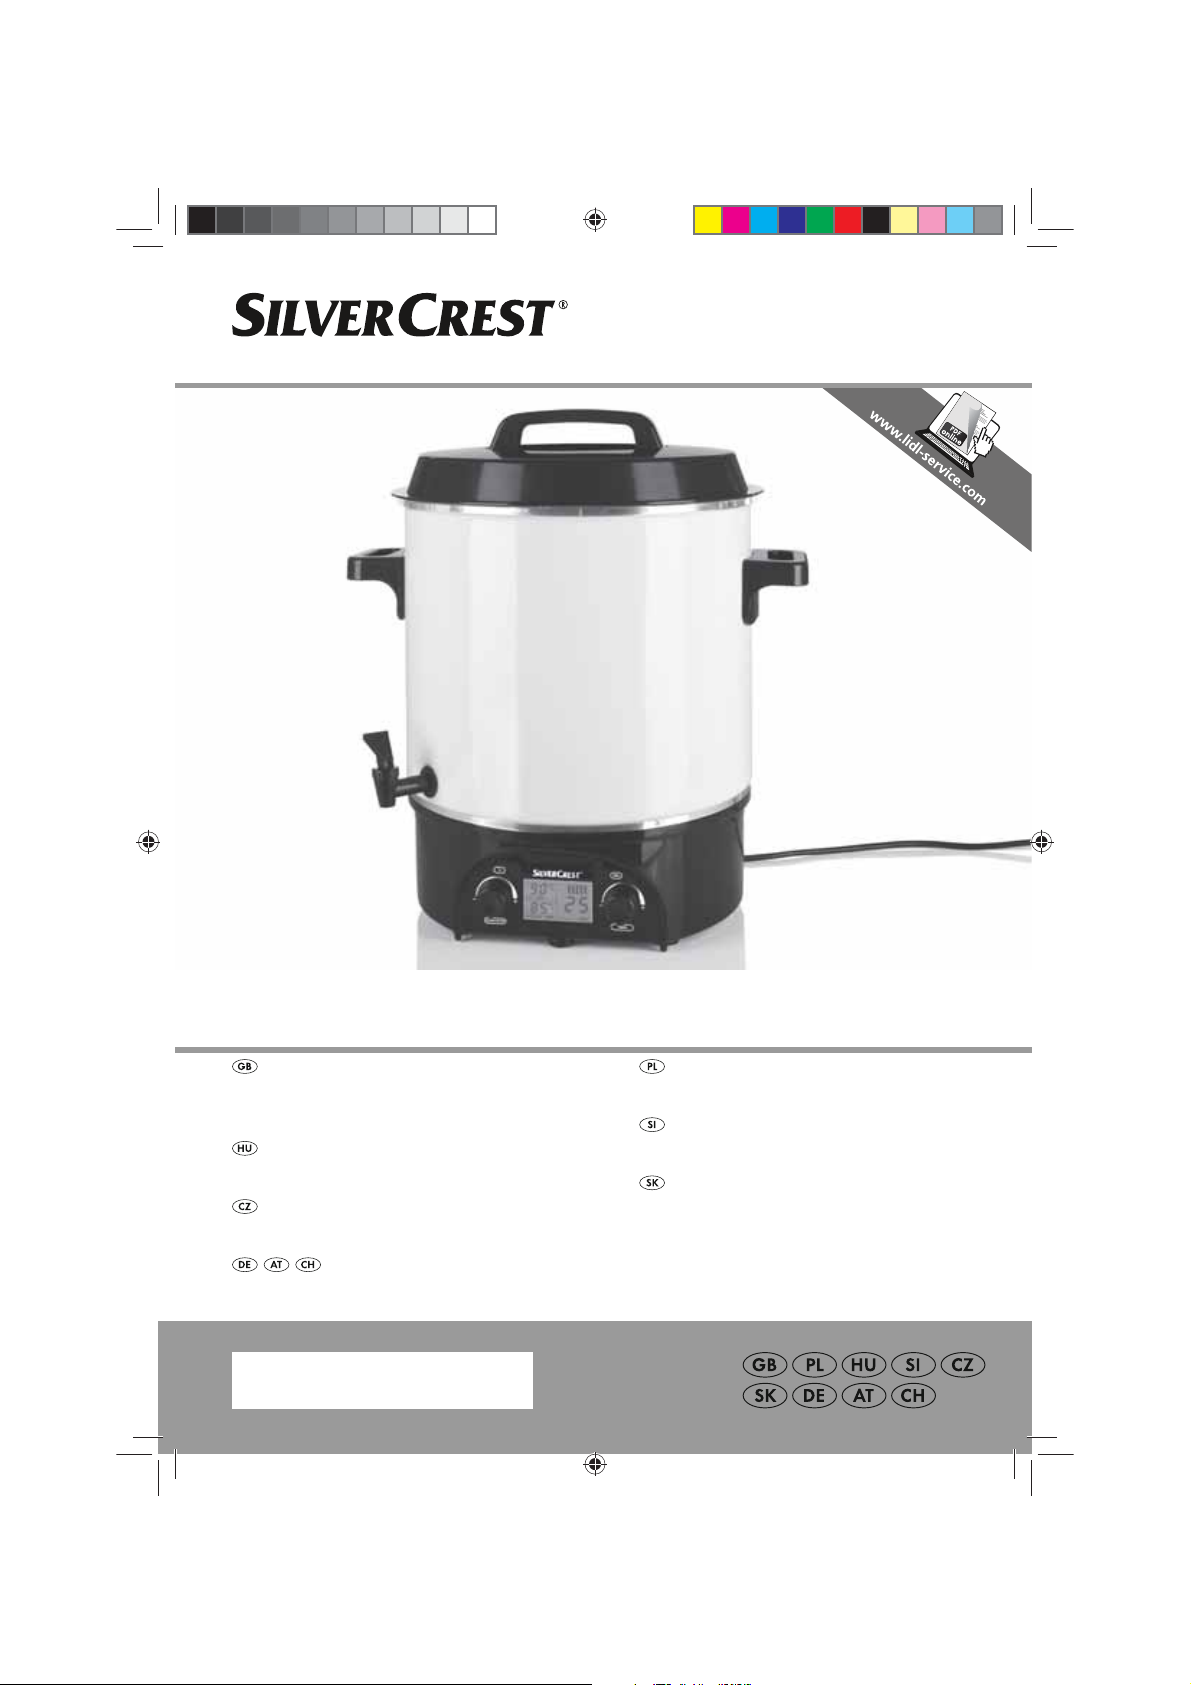
ELECTRIC FRUIT PRESERVER & JAM MAKER SEAD 1800 B1
ELECTRIC FRUIT PRESERVER &
JAM MAKER
Operating instructions
BEFŐZŐ
Kezelési útmutató
ZAVAŘOVACÍ HRNEC
Návod k obsluze
AUTOMAT DO PASTERYZACJI
Instrukcja obsługi
AVTOMAT ZA VKUHAVANJE
Navodilo za uporabo
AUTOMAT NA ZAVÁRANIE
Návod na obsluhu
EINKOCHAUTOMAT
Bedienungsanleitung
IAN 89015IAN 89015
RP89015_Einkochautomat_Cover_LB4.indd 2 10.01.13 16:08
Page 2
Inhalt Seite 1 Freitag, 22. März 2013 3:21 15
English . . . . . . . . . . . . . . . . . . . . . . . . . . . . . . . . . . . . . . . . . . 2
Be sure to note the fold-out page.
Polski . . . . . . . . . . . . . . . . . . . . . . . . . . . . . . . . . . . . . . . . . 16
Proszę zwrócić uwagę na informacje umieszczone na wewnętrznej stronie okładki
Magyar . . . . . . . . . . . . . . . . . . . . . . . . . . . . . . . . . . . . . . . . 32
Kérjük, figyeljen a kinyitható oldalra
Slovensko . . . . . . . . . . . . . . . . . . . . . . . . . . . . . . . . . . . . . . 47
Prosimo, upoštevajte tekst na zavihani strani.
Česky . . . . . . . . . . . . . . . . . . . . . . . . . . . . . . . . . . . . . . . . . 60
Povšimněte si vyklápěcí strany
Slovensky . . . . . . . . . . . . . . . . . . . . . . . . . . . . . . . . . . . . . . 74
Prosím, všimnite si vyklápaciu stranu.
Deutsch . . . . . . . . . . . . . . . . . . . . . . . . . . . . . . . . . . . . . . . . 89
Bitte beachten Sie die Ausklappseite
SEAD 1800 B1_13_V1.8_GB_PL_HU_SI_CZ_SK_DE
Page 3
RP89015 Einkochautomat LB4 Seite 1 Dienstag, 12. März 2013 4:19 16
1
2
3
4
11 10 8
9
5
6
7
12
Page 4
RP89015 Einkochautomat LB4 Seite 2 Dienstag, 12. März 2013 4:19 16
Contents
1. Device description . . . . . . . . . . . . . . . . . . . . . . . . . . . . . . . . . . . . . . . . . . . . . . . . . . . . . . . 2
2. Names of parts (see fold-out page). . . . . . . . . . . . . . . . . . . . . . . . . . . . . . . . . . . . . . . . . . . 3
3. Technical data. . . . . . . . . . . . . . . . . . . . . . . . . . . . . . . . . . . . . . . . . . . . . . . . . . . . . . . . . . 3
4. Safety information . . . . . . . . . . . . . . . . . . . . . . . . . . . . . . . . . . . . . . . . . . . . . . . . . . . . . . 3
5. Unpacking and setting up . . . . . . . . . . . . . . . . . . . . . . . . . . . . . . . . . . . . . . . . . . . . . . . . . 6
6. Operating the appliance . . . . . . . . . . . . . . . . . . . . . . . . . . . . . . . . . . . . . . . . . . . . . . . . . . 6
7. Recipes. . . . . . . . . . . . . . . . . . . . . . . . . . . . . . . . . . . . . . . . . . . . . . . . . . . . . . . . . . . . . . . 9
8. Operating times and temperatures . . . . . . . . . . . . . . . . . . . . . . . . . . . . . . . . . . . . . . . . . . 12
9. Cleaning and storing . . . . . . . . . . . . . . . . . . . . . . . . . . . . . . . . . . . . . . . . . . . . . . . . . . . . 12
10. Disposal . . . . . . . . . . . . . . . . . . . . . . . . . . . . . . . . . . . . . . . . . . . . . . . . . . . . . . . . . . . . . 13
11. HOYER Handel GmbH Warranty. . . . . . . . . . . . . . . . . . . . . . . . . . . . . . . . . . . . . . . . . . . . 14
Congratulations on the purchase of
your new product.
You have selected a high-quality product.
The operating instructions are a constituent
part of this product. They contain important
information about safety, use and disposal.
1. Device description
1.1 Intended purpose
With the Electric Preserver & Jam Maker
from SilverCrest SEAD 1800 B1 you can:
• can and preserve jam, fruit and
vegetables
• keep drinks warm and draw them off
• keep sausages warm
• keep soup warm
This appliance should only be used in dry
rooms. It must not be used out in the open or
in humid rooms.
This appliance is only designed for use in
the home and in similar situations such as:
Familiarize yourself with all the operating
and safety instructions before using the
product. Use the product only as described
and for the stated spheres of application.
If you pass the product on to a third party,
always pass on all the documentation as
well.
• kitchenettes for staff in shops, offices and
other workplaces;
•farmhouses;
• use by guests in hotels, motels and other
similar residential environments;
• guesthouses.
1.2 Scope of supply
• 1 Electric Preserver & Jam Maker,
comprising:
–1 container
–1 lid
–1 rack
• 1 copy of the operating instructions
2
Page 5
RP89015 Einkochautomat LB4 Seite 3 Dienstag, 12. März 2013 4:19 16
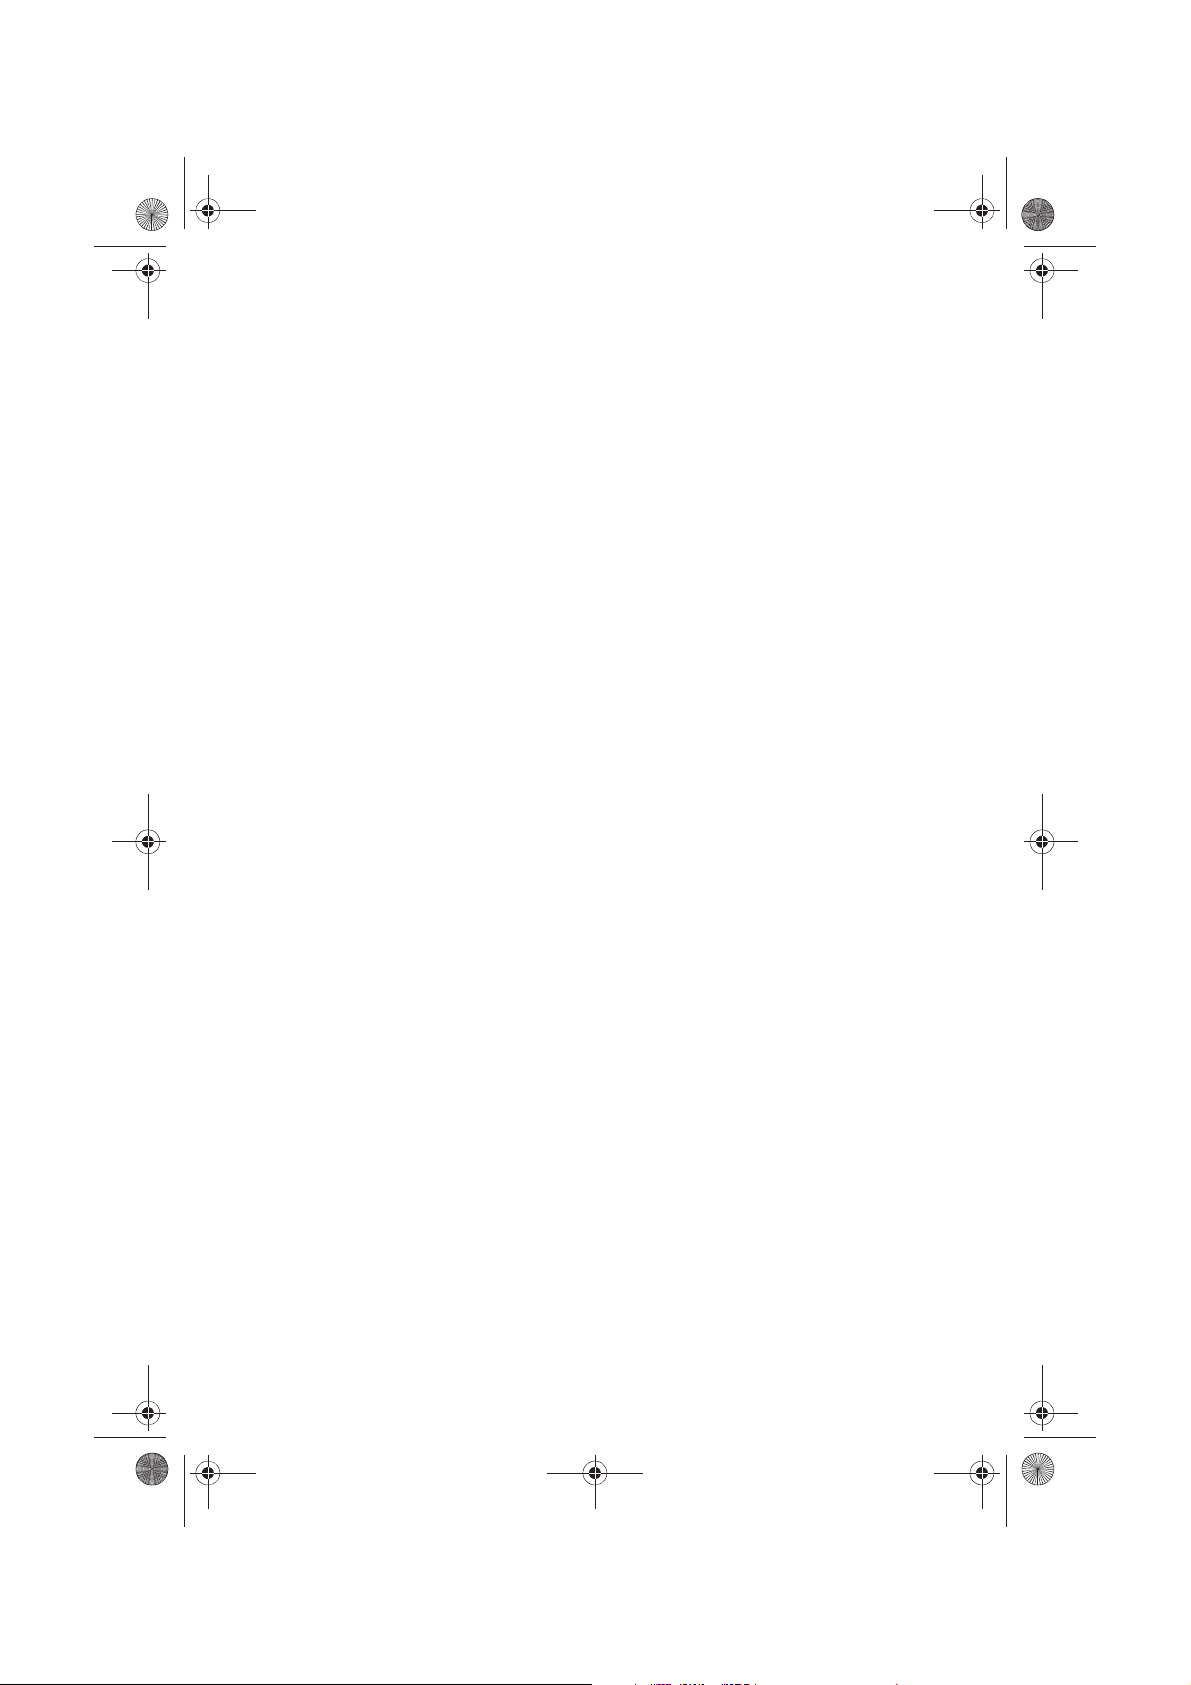
2. Names of parts (see fold-out page)
1 Lid
2 Handles
3 Container
4 Tap lever
5 Tap
6 Start/stop button with rotary knob for
temperature
3. Technical data
Power supply: 220 - 240 V~/50 Hz
Output: 1,800 watts
Capacity: approx. 27 litres
Protection class: I
4. Safety information
4.1 Explanation of terms
The following keywords are used in these
user instructions:
Warning!
High risk: ignoring this warning
could result in a risk to life and
limb.
Caution!
Medium risk: ignoring this warning may
result in damage.
Note:
Low risk: points to be noted when handling
the appliance.
7 Timer with rotary knob for minutes
8 Cable store (underneath appliance)
9 Display of minutes
10 Display of temperature selected
11 Display of current temperature
12 Rack
4.2 Special information about
this appliance
Warning!
please observe the following information.
• This appliance can be used by children aged from
8 years and above and persons with reduced
physical, sensory or mental capabilities or lack of
experience and knowledge if they have been
given supervision or instruction concerning use of
the appliance in a safe way and understand the
hazards involved. Children shall not play with the
appliance.
• Cleaning and user maintenance shall not be
made by children unless they are older than 8 and
supervised.
• Keep the appliance and its cord out of reach of
children less than 8 years.
To avoid injury or damage,
SEAD 1800 B1 3
Page 6
RP89015 Einkochautomat LB4 Seite 4 Dienstag, 12. März 2013 4:19 16
• Keep the appliance and its mains cable out of
reach of children.
• This appliance is not intended for use by persons
(including children) with reduced physical,
sensory or mental capabilities or lack of
experience and/or lack of knowledge, unless
either supervised by a person responsible for their
safety or given instructions on the use of the
appliance by such a person. Children should be
supervised to ensure they do not play with the
appliance.
• The appliance must not be operated with an
external timer or separate remote control system
such as a remote control socket.
• Be aware that the surfaces of the appliance can
become hot in operation:
–When the appliance is running, only hold it by
the handles
2
;
–Allow the appliance to cool down before
moving it to a different location.
• Always remove the power supply plug from the
mains socket before starting to clean the
appliance.
• Allow the appliance to cool down before cleaning
it.
• Never immerse the container
3
in water.
• Never use abrasive, corrosive or scratching
cleaning materials. They could damage the
appliance.
4.3 General information
• Please read these user instructions
carefully before use. They are a
constituent part of the appliance and
must be kept to hand at all times.
• Use the appliance only for the purpose
described (see “1.1 Intended purpose”
on page 2).
• To prevent damage, check that the
mains voltage required (see type plate
on the appliance) is compatible with
your mains voltage.
• Please note that any claim under the
warranty or for liability will be invalid if
accessories are used that are not
recommended in these user instructions,
or if original spare parts are not used for
repairs. This also applies to repairs
undertaken by unqualified persons. You
will find the service address in “Service
Centre” on page 15.
• If the appliance should develop a fault
during the warranty period, it may only
be repaired by our Service Centre.
Otherwise all claims under warranty are
null and void. You will find the service
address in “Service Centre” on
page 15.
4.4 Protection against electric shock
Warning! The following safety
information is intended to protect
you against electric shock.
• Only connect the appliance to a mains
socket with an earthing contact as this
provides protection against electric
shock.
• The appliance must not under any
circumstances be used if it is damaged.
Have the device repaired in such cases
by a qualified specialist. The contact
data can be found in “Service Centre”
on page 15.
• If the mains cable for this appliance is
damaged, it must be replaced by the
manufacturer or a person with similar
qualifications in order to avoid a
hazard.
• No water or other liquids should be
allowed to get inside the appliance,
apart from in the container 3 provided
for this purpose. For this reason:
– never use it outdoors
4
Page 7
RP89015 Einkochautomat LB4 Seite 5 Dienstag, 12. März 2013 4:19 16
– never immerse the container 3 in water
– never place containers filled with
liquid, such as drinking glasses, vases
etc. on the appliance
– never use in very humid environments
– never use in the immediate vicinity of a
kitchen sink, bath, shower or a
swimming pool, as water may splash
into the appliance.
If liquid should enter the appliance,
unplug the mains plug immediately and
have the appliance repaired by a
qualified technician. The contact data
can be found in “Service Centre” on
page 15.
• Never touch the appliance, the mains
cable or the mains plug with wet hands.
• Always unplug it by pulling out the plug,
never pull on the cable itself.
• Ensure that the mains cable is not kinked,
twisted or crushed.
• Keep the mains cable away from hot
surfaces, such as the top of a stove.
• If you are not going to use the appliance
for a while, remove the plug from the
wall socket. Only then is the appliance
completely free of current.
• Avoid using extension cables. These
may only be used under very specific
conditions:
– the extension cable must be able to
handle the amount of current drawn
by the appliance,
– the extension cable must not be
"suspended". Keep children away
from it and ensure that it does not
present a trip hazard,
– under no circumstances use a
damaged extension cable,
– do not connect any other appliances
to the mains socket, since it could
cause an overload (do not use
multiple sockets of any kind).
4.5 Preventing the risk of fire
Warning! As the appliance
operates at high temperatures,
follow the safety instructions below
to prevent a fire starting.
• To prevent overheating, never cover the
appliance.
• Never leave the appliance running
unsupervised. Damage is almost always
indicated by intensive odours. In this
case, disconnect the power supply
immediately and have the appliance
examined. Contact details can be found
in “Service Centre” on page 15.
4.6 Preventing injury
Warning! To prevent injury,
please observe the following
information.
• Make sure that the power cord never
becomes a trip hazard, that no-one can
get tangled in it or tread on it.
4.7 For the safety of your child
Warning! Children are often
unaware of danger and are injured
as a result. Please note therefore:
• Only allow children to use this appliance
under the supervision of an adult.
• Ensure the appliance is always kept out
of the reach of children.
• Ensure that children cannot pull the
appliance down onto themselves with
the mains cable.
• Ensure that the packing foil does not
become a deadly trap for a child.
Packing foils are not toys.
SEAD 1800 B1 5
Page 8
RP89015 Einkochautomat LB4 Seite 6 Dienstag, 12. März 2013 4:19 16
4.8 Material damage
Warning! Follow the instructions below to
prevent material damage.
• Never operate the appliance without
water or liquid.
• Make sure there is never too much liquid in
the appliance. The level of liquid must
always be below "MAX". If there is too
much liquid, the appliance might overflow.
5. Unpacking and setting up
Note: As the appliance is supplied with a
thin film of grease, there might be a small
amount of smoke and odour the first time it is
used. This is not harmful and will stop after a
short time. Please ensure adequate
ventilation during this process.
1. Remove the individual parts from the
packaging.
2. Check that the individual parts are
complete (see “1.2 Scope of supply” on
page 2) and are undamaged.
3. Clean the appliance thoroughly before
using it for the first time (see
“9. Cleaning and storing” on page 12).
• Only place the appliance on a level, dry,
non-slip surface so that the appliance can
neither fall over nor slide off.
• Do not place the appliance immediately
underneath a suspended cupboard, as
steam escapes upwards and might
damage the furniture.
• Do not place the appliance on a hot
cooking ring.
• The appliance and accessories may not
be put in a microwave oven.
4. Unwind the mains cable 8 from the
cable store over its entire length.
5. Place the appliance on a level, dry, nonslip surface so that the appliance can
neither fall over nor slide off.
6. Insert the power supply plug in a
suitable earthed mains socket (see
“3. Technical data” on page 3).
7. Add around 5 l water to the container 3.
8. Allow the water to boil for around 20
min (see “6. Operating the appliance”
on page 6).
9. Pour the water away.
The appliance is now ready to use.
6. Operating the appliance
6.1 Adjusting settings, switching on and
off
Note: As soon as you turn the rotary
knobs 7 or 6, the background illumination
for the displays will switch on automatically.
The light for the displays switches off again
automatically after 5 minutes.
6
Warning! Only connect the
appliance to an earthed mains
socket, as protection against
electric shock depends on this.
1. Insert the power supply plug in a
suitable earthed mains socket (see
“3. Technical data” on page 3).
Page 9
RP89015 Einkochautomat LB4 Seite 7 Dienstag, 12. März 2013 4:19 16
2. Turn the rotary knob for the
temperature 6 to the temperature you
require.
– The temperature is increased in
increments of 1 °C;
– A signal sounds every 5 °C;
– The temperature selected is shown on
the display for temperature
selection 10.
3. Select the operating time you require
using the knob for minutes 7.
– The time is increased in increments of
1 min;
– A signal sounds every 5 minutes;
– The time selected is shown on the
display for minutes 9.
4. Press the start/stop button 6.
– The appliance will begin to heat up,
and a progress bar is shown on the
display;
– The current temperature is shown on
the display 11.
As soon as the temperature selected is
reached:
– Signals will sound;
– An hourglass symbol will be shown;
– The time period selected will start to
run.
As soon as the time period selected comes
to an end, signals will sound, and the
appliance switches itself off.
5. If you wish to switch the appliance off
before the time period selected ends,
press the start/stop button 6.
6.2 Canning / preserving
Canning / preserving (bottling) means
heating up certain foods with a vacuum
seal, so making them keep for much longer.
Canning / preserving makes use of special
jars, either with a screw-top or with a lid and
rubber ring.
Only fresh food that is fully ripe should be
preserved. Overripe fruit or vegetables that
have gone limp are not suitable.
It is also possible to can mushrooms, meat
and even cake.
This should be done straight after harvesting
to preserve as many nutrients as possible in
the food.
The food to be preserved must be cleaned
properly ready for use. Any dirt, insects or
rotten parts need to be removed. Even the
smallest blemishes may cause preserved
food to spoil.
Fruit will keep for longer and be more tastier
when preserved with sugar.
Hard vegetables such as carrots, cabbage
or kohlrabi need to be precooked in salted
water. They should not however be cooked
until they are soft. Pour the water used for
cooking away afterwards as it is not suitable
for use when preserving.
To make sure preserved food keeps for as
long as possible, cleanliness and hygiene
are the top priority. You should preferably
give all utensils, crockery and everything
that comes into contact with your food a
thorough clean, followed by boiling in hot
water for 5 min.
Make sure your hands are clean at all times.
1. Wash fruit and vegetables thoroughly.
Note: Fruit and vegetables should be
washed before they are cut up to to
preserve water-soluble vitamins.
SEAD 1800 B1 7
Page 10
RP89015 Einkochautomat LB4 Seite 8 Dienstag, 12. März 2013 4:19 16
2. Cut up fruit and vegetables to the
required size.
3. Fill the preserving jars with food.
Note: Make sure that you layer the
food properly in the jar. That will look
better and make best use of the space
inside.
4. If wished, add sugar or seasonings /
spices.
5. Fill the jars up with water up until just
below the rim.
6. Seal the jars.
Note: Make absolutely sure that they
are properly sealed.
7. Pl ac e t he rac k 12 in the container 3.
8. Place the jars you have prepared in the
container 3.
Note: The jars can be arranged in the
container 3 in two layers.
9. Add water to the container 3 so that the
jars on top are standing about 3/4 in
water.
10.Place the lid 1 on the container 3.
11.Set the temperature and operating time
(see “6.1 Adjusting settings, switching
on and off” on page 6 and
“8. Operating times and temperatures”
on page 12).
12.Start the preserving process by pressing
the start/stop button 6 (see
“6.1 Adjusting settings, switching on
and off” on page 6).
13.As soon as the operating time selected
ends, place a heat-resistant vessel under
the tap 5.
14.Press the lever 4 to let the water out of
the container 3.
15.Allow the jars to cool down before
taking them out of the container 3 .
Note: Preserving jars that are still warm
are sensitive to draughts. Where
possible, you should therefore leave
them in the container 3 until they have
cooled right down. Should you need the
appliance beforehand, you can take the
warm jars out, place them on a towel
and cover them up with another towel
until they have cooled right down.
16.Label the jars with the contents and the
date you preserved them.
17. Store your preserves in a dry, dark, cool
place, and they will then keep for up to
a year.
6.3 Keeping liquids and soups warm
This appliance is also ideal for keeping
mulled wine, cocoa, soups and hot pots
warm.
Warning! Make sure there is never too
much liquid in the appliance. The level of
liquid must always be below "MAX". If there
is too much liquid, the appliance might
overflow.
1. Add the liquid to the container 3.
2. Place the lid 1 on the container 3.
3. Turn the rotary knob for the
temperature 6 to the temperature you
require.
– The temperature is increased in
increments of 1 °C;
– A signal sounds every 5 °C;
– The temperature selected is shown on
the display for temperature
selection 10.
4. Do not select the time but press the
rotary "TIMER" knob 7.
– The display will show a horizontal "8".
5. Press the start/stop button 6.
– The appliance will begin to heat up;
8
Page 11
RP89015 Einkochautomat LB4 Seite 9 Dienstag, 12. März 2013 4:19 16
– As soon as the temperature selected is
reached, signals will sound;
– The appliance will remain hot until you
press the start/stop button 6 again.
6. Stir the liquid regularly to distribute the
heat evenly and make sure it does not
get stuck to the bottom .
7. Clear liquids not containing any solid
particles can be drawn off using the
tap 5. To do so, press down the lever 4.
Note: If you do not want to keep the
tap lever 4 held down to draw of large
volumes of liquid, you can move the tap
lever 4 up vertically.
8. Soup or liquids containing solid particles
would block the tap. They should be
removed with a ladle.
9. Clean the appliance carefully after use
(see “9. Cleaning and storing” on
page 12).
7. Recipes
6.4 Thermal cut-out
The appliance is protected against
overheating. As soon as there is too little
liquid in the container 3, and the
temperature then starts to become too high,
the appliance will warn you with an alarm
and the symbol for an insufficient filling
level:
1. Press the start/stop button 6 to switch
the appliance off.
The alarm will stop.
2. Top up with liquid.
3. Press the start/stop button 6 to switch
the appliance back on again.
If you take no action in the 5 minutes after
the warning, the appliance switches off
automatically.
In this case, disconnect the appliance from
the power supply and allow it to cool down.
You can then start the appliance up again
as normal.
7.1 Liver sausage
Ingredients:
• 250 g liver (pork, beef, chicken, turkey)
• 300 g streaky bacon
• 400 g belly of pork
• 300 g neck of pork
•4 onions
• 2 leeks
• 50 g lard
• 1 bunch parsley
•1 bunch chives
• 1 tablespoon majoram, dried
• 1 tablespoon thyme, fresh or dried
• 1 tablespoon chervil, fresh or dried
SEAD 1800 B1 9
• 1 tablespoon salt
• 1 teaspoon white pepper
• 1 teaspoon nutmeg
• 1 teaspoon ground cloves
• 1 teaspoon cardamom
• 1 teaspoon ginger, ground or freshly
grated
Preparation:
1. Cook the neck and belly of pork in
lightly salted water.
2. Remove the meat from the broth and
allow to cool down.
3. Put the broth to one side.
Page 12
RP89015 Einkochautomat LB4 Seite 10 Dienstag, 12. März 2013 4:19 16
4. Cover the liver with hot water (do not
boil).
5. Pass the meat, liver and bacon through a
mincer.
6. Chop the onions and leek very fine.
7. Fry the chopped onions and leek in lard
until soft, but do not brown.
8. Put the minced meat, onions and leek in
a bowl along with the seasonings and
herbs.
9. Add 1 litre of the broth you kept to one
side.
10.Knead the ingredients together produce
a smooth mixture.
11.Place the kneaded mixture in screw-top
jars.
12.Cook at 100 °C for around 160 min.
Note: The liver sausage will keep for
approx. 1 year.
7.2 Strawberry and kiwi jam
Ingredients:
• 1.5 kg fresh strawberries
• 500 g ripe kiwi fruit
•1 kg no-boil preserving sugar
Method:
1. Wash strawberries carefully.
2. Allow them to drain.
3. Top and tail strawberries, removing
stalks, leaves and any spoilt parts.
4. Peel kiwis and cut into small pieces.
5. Put fruit in a bowl.
6. Add the preserving sugar.
7. Process the mixture with a blender.
8. Add to jars and seal carefully.
9. Cook at 80 °C for around 25 min.
Note: For this type of gentle cooking you
have to use preserving sugar that sets
without being boiled. A cheaper alternative
is conventional preserving sugar 2:1. But the
fruit jam may come out more liquid.
7.3 Courgette ketchup
Ingredients:
•3 kg courgettes
•1 kg onions
• Around 3 tablespoons of salt
• 500 g sugar
• 1 litre mild herb vinegar
• 2 tablespoons ground red pepper
• 3 tablespoons curry powder
• 3 tablespoons strong mustard
• 1-2 tablespoons cayenne pepper
• 2 tubes of tomato purée
Method:
1. Grate courgettes finely.
2. Dice onions finely.
3. Put the courgettes, onions and salt in a
bowl.
4. Leave to stand in a cool, dry place for
around 24 hrs.
5. Drain the water from the bowl, possibly
pressing the mixture together to force
more out.
6. Put all ingredients in a saucepan and
heat carefully (make sure it does not
burn).
7. Simmer for around 30 min. Stir
constantly as the mixture burns easily.
8. Purée with a blender.
9. Place in screw-top jars.
10.Cook at 100 °C for around 1 hr.
10
Page 13
RP89015 Einkochautomat LB4 Seite 11 Dienstag, 12. März 2013 4:19 16
7.4 Sour cherries
Ingredients:
• Sour cherries
•Sugar
•Water
Preparation:
1. Sort your sour cherries carefully as only
ones that are unspoilt should be
preserved.
2. Remove the stalks from the cherries.
3. Soak in cold water for around 30 min to
remove any maggots or insects.
4. Remove the stones.
5. Once you have done this, layer the
cherries in the jars.
6. Make up a mixture of sugar and water,
using 300 g sugar to 1 litre water.
7. Add this mixture to the jars until the
cherries are completely covered.
8. Cook at 80 °C for around 30 min.
7.5 Tea punch
Note: The quantities given will make
around 3 litres of punch. If you want to
make more, simply increase the quantities of
the ingredients.
Ingredients:
• 1.5 l black tea
• 1 bottle red wine (0.75 l)
• 6 untreated oranges
•3 untreated lemons
• 6 cinnamon sticks
• Around 750 g sugar
• Rum according to taste
Preparation:
Note: You can make the tea punch directly
in the appliance. As the drink contains solid
particles, it should however be taken out
with a ladle as the tap might otherwise get
blocked.
You can also make the drink in a saucepan
and then strain into the appliance. As the
punch then no longer contains solid
particles, it can be drawn off via the tap.
1. Make up some black tea.
2. Squeeze 4 oranges and 2 lemons.
3. Cut up 2 oranges and 1 lemon into thin
slices.
4. Add the black tea, wine, juice, slices of
fruit and cinnamon sticks to the pot.
5. Only bring the mixture briefly to the boil.
6. Slowly stir in the sugar while tasting
constantly to make sure the punch does
not become too sweet.
7. Finally add a good shot of rum (quantity
according to taste).
8. Allow to steep on a gentle heat for
another 30 min or so.
Note: When making in the appliance, set
the temperature to 100 °C when boiling.
When steeping and keeping warm, reduce
this to approx. 80 °C. The tea punch is only
supposed to be hot and not boil, or the
alcohol will otherwise be lost.
SEAD 1800 B1 11
Page 14
RP89015 Einkochautomat LB4 Seite 12 Dienstag, 12. März 2013 4:19 16
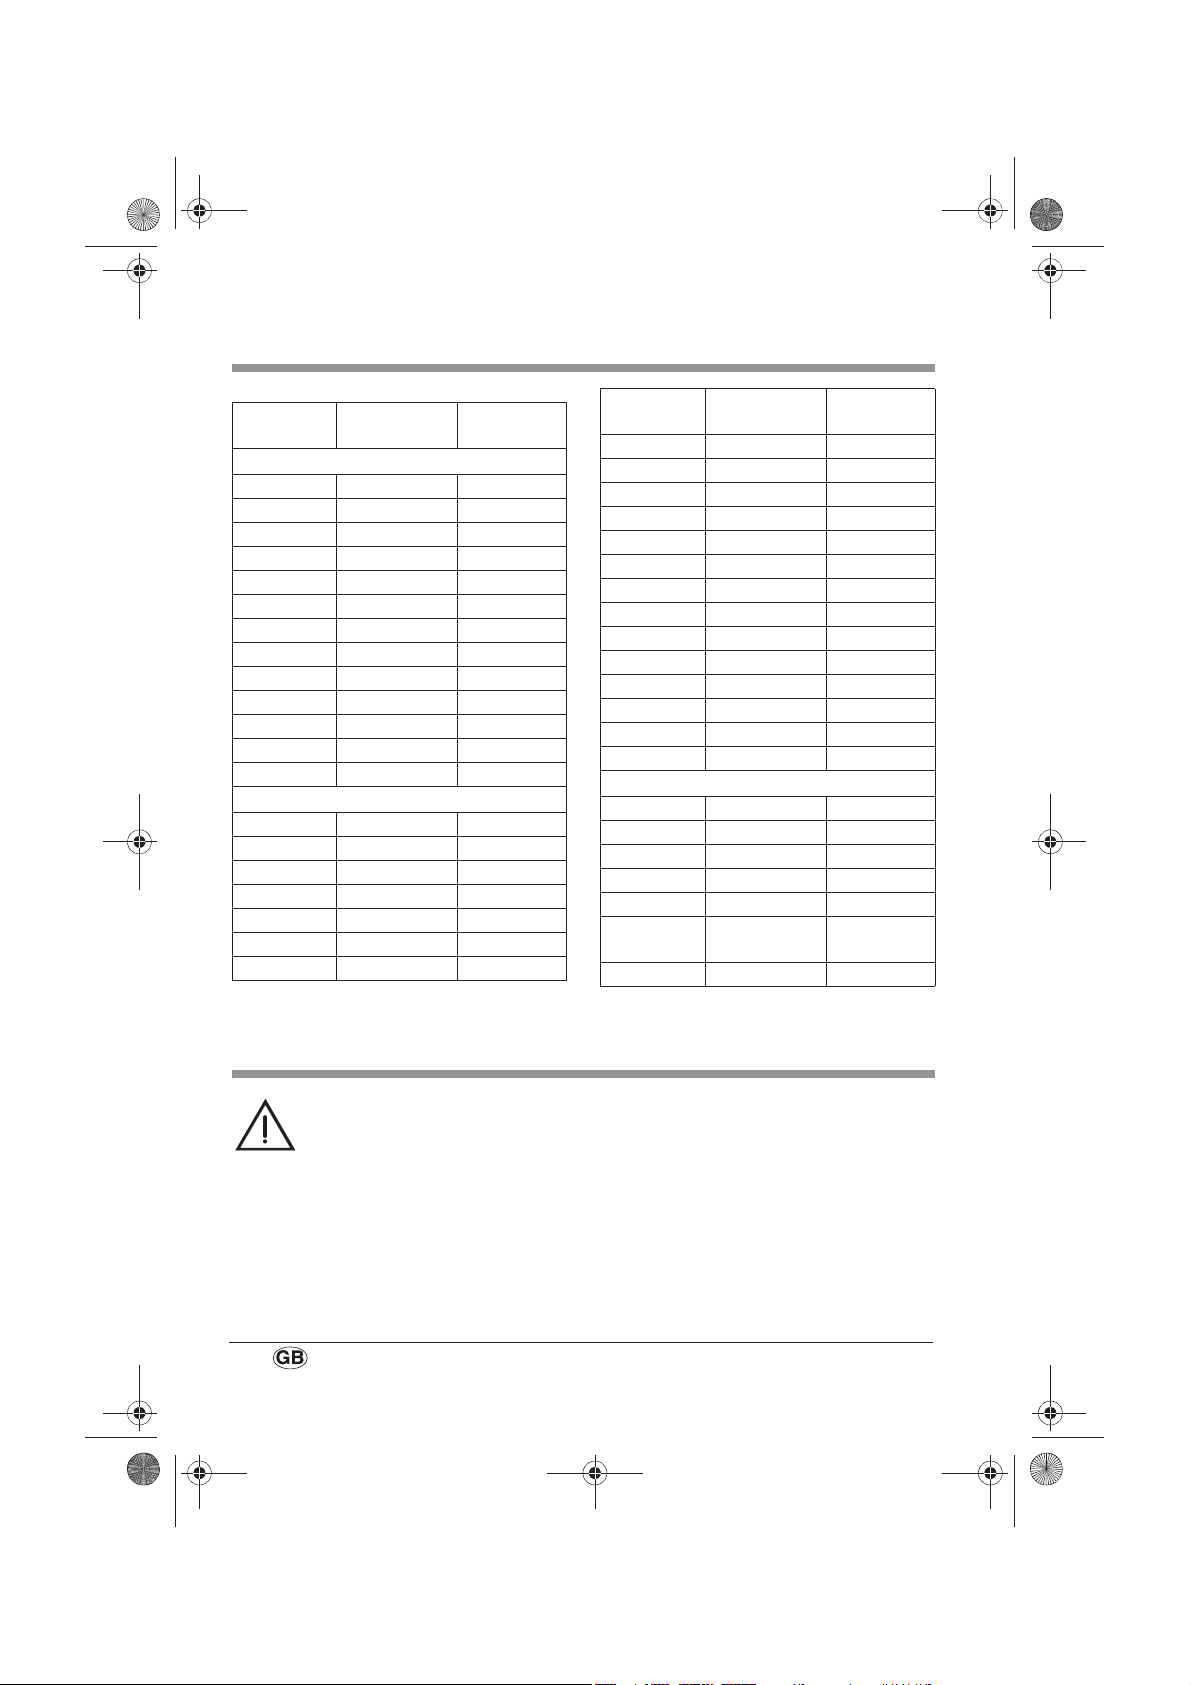
8. Operating times and temperatures
Food Temperature
in °C
Veg etable
Cauliflower 100 (MAX) 90
Beans 100 (MAX) 120
Peas 85 120
Gherkins 100 (MAX) 30
Kohlrabi 100 (MAX) 95
Pumpkin 90 30
Carrots 100 (MAX) 90
Mushrooms 100 (MAX) 110
Sprouts 100 (MAX) 110
Red cabbage 100 (MAX) 110
Celery 100 (MAX) 110
Asparagus 100 (MAX) 120
Tomatoes 90 30
Fruit
Apples, hard 85 40
Apples, soft 85 30
Apple purée 90 30
Apricots 85 30
Pears, hard 90 80
Pears, soft 90 30
Blackberries 80 25
Time in
minutes
Food Temperature
in °C
Strawberries 80 25
Bilberries 85 25
Raspberries 80 30
Currants 90 25
Cherries 80 30
Mirabelles 85 30
Peaches 85 30
Plums 90 30
Cranberries 90 25
Quinces 95 30
Greengages 85 30
Rhubarb 95 30
Gooseberries 80 30
Plums 90 30
Time in
minutes
Meat (must always be pre-cooked)
Roast 100 (MAX) 85
Meat broth 100 (MAX) 60
Poultry 100 (MAX) 75
Goulash 100 (MAX) 75
Game 100 (MAX) 75
Sausage,
cooked
Sausage, raw 100 (MAX) 110
100 (MAX) 75
12
9. Cleaning and storing
Warning! To prevent the risk of
an electric shock, injury or
damage:
– Disconnect the power supply
from the mains socket before any
cleaning step.
– Allow the appliance to cool
down before cleaning it.
– Never immerse the container 3
in water.
Caution! Under no circumstances use
scouring agents or corrosive or abrasive
cleaning materials, as these could damage
the appliance.
1. Clean the appliance with a damp cloth.
A little detergent may also be used.
2. Wipe off with clean water.
3. Do not use the appliance again until it is
completely dry.
Page 15
RP89015 Einkochautomat LB4 Seite 13 Dienstag, 12. März 2013 4:19 16
9.1 Cleaning rack and lid
1. Clean the rack 12 and lid 1 by hand in
the sink.
2. Rinse off with clean water.
9.2 Cleaning tap
The tap lever 4 can be unscrewed to make it
easier to clean. The tap itself 5 cannot be
unscrewed as there might otherwise be
problems with leakage.
1. Unscrew the tap lever 4 from the tap 5.
2. Clean the tap lever 4 by hand in the
sink.
3. Rinse off with clean water.
4. Add a mild detergent solution to the
container 3 and allow it to run through
the tap 5.
Note: Pipe cleaners can help with any
stubborn dirt remaining in the tap 5.
5. Rinse off with clean water.
6. Screw the tap lever 4 back onto the
tap 5.
9.3 Storing the appliance
1. Wind the mains cable back up on the
underside of the appliance.
2. Insert the power supply plug back in the
middle of the appliance base.
3. Put the appliance away.
9.4 Descaling appliance
Depending on the hardness of your water,
limescale may build up in the appliance.
You should remove this regularly to save
energy, increase the service life of the
appliance and for hygiene reasons.
1. Wipe over surfaces with limescale using
a cloth soaked in a little vinegar.
2. If the appliance has severe limescale,
pour a commercially available descaler
into the container 3 and leave to stand
overnight.
Caution! The appliance may under no
circumstances be switched on whilst
being descaled. This could lead to
damage.
3. Rinse thoroughly afterwards.
4. Do not use the appliance again until it is
completely dry.
10. Disposal
10.1 Appliance
The symbol with the crossedout rubbish bin on wheels
means that within the European
Union, the product must be
disposed of to a sorted rubbish
collection. This applies to the
product and all accessories which are
SEAD 1800 B1 13
marked with this symbol. Marked products
must not be disposed of via the regular
domestic waste but must be handed in to a
recycling centre for electrical or electronic
devices. Recycling helps to reduce the use of
raw materials and to relieve the
environment. It is therefore imperative that
you follow the disposal regulations
applicable in your country.
Page 16
RP89015 Einkochautomat LB4 Seite 14 Dienstag, 12. März 2013 4:19 16
10.2 Packaging
If you wish to discard the packaging, please
observe the applicable environmental
regulations in your country.
11. HOYER Handel GmbH Warranty
Dear Customer,
You have a warranty on this product which
is valid for 3 years from the date of
purchase. In the event of this product being
defective, you have statutory rights against
the seller of the product. These statutory
rights are not limited by our warranty as set
out below.
Warranty conditions
The warranty period begins with the date of
purchase. Please keep the original till receipt
in a safe place. This is required as your
proof of purchase.
If a defect in materials or workmanship
occurs within three years of the date your
product was purchased, we will repair or
replace the product at our discretion at no
charge to you. This service under warranty
assumes that the defective product and the
proof of purchase (till receipt) are submitted
within the three-year period and that a brief
description in writing is provided of what the
defect is and when it occurred.
If the defect is covered by our warranty, the
repaired product or a new one will be sent
back to you. There is no new warranty
period following repair or replacement of
the product.
Warranty period and statutory claims
relating to defects
The warranty period is not extended when a
service is provided under warranty. This also
applies to replaced and repaired parts. Any
damage or defects present at purchase must
be reported immediately the product is
unpacked. Repairs incurred once the
warranty period has expired are
chargeable.
Scope of warranty
The product has been carefully
manufactured in accordance with strict
quality guidelines and was thoroughly
checked before being delivered.
The warranty applies to defective materials
or workmanship. This warranty does not
extend to product parts exposed to normal
wear and tear (and which can therefore be
considered wear parts) or to damage to
fragile parts such as switches, batteries or
parts made of glass.
This warranty is void if the product is
damaged or if it is not used or maintained
properly. All the information in the operating
instructions should be observed precisely to
ensure that the product is used properly.
It is essential to avoid intended uses and
actions which are discouraged or warned
against in the operating instructions.
The product is intended for only private use
and not for commercial purposes.
14
Page 17
RP89015 Einkochautomat LB4 Seite 15 Dienstag, 12. März 2013 4:19 16
The warranty is void in the event of misuse,
incorrect treatment, use of force or
interference by anyone other than our
authorized service centre.
Warranty process
Please follow the instructions below to
ensure that your claim is processed quickly.
• In case of any enquiry, please keep the
article number (for this product:
IAN 89015) and the till receipt as proof
of purchase.
• The article number can be found on the
rating plate, as an engraving, on the
cover sheet of your instructions (bottom
left) or as a label on the back or
underside of your appliance.
• If malfunctions or any other defects
should occur, in the first instance contact
the Service Centre mentioned below by
telephone or e-mail.
• Once a product has been recorded as
defective, you can then send it Freepost
to the service address you are given,
enclosing the proof of purchase (till
receipt) and quoting what the defect is
and when it occurred.
You can download these
instructions and many other
manuals, product videos and
software from
www.lidl-service.com.
Service Centre
Service Great Britain
Tel.: 0871 5000 720 (£ 0.10/Min.)
E-Mail: hoyer@lidl.co.uk
Service Ireland
IR
Tel.: 1890 930 034
(0,08 EUR/Min., (peak))
(0,06 EUR/Min., (off peak))
E-Mail: hoyer@lidl.ie
Service Cyprus
CY
Tel.: 8009 4409
E-Mail: hoyer@lidl.com.cy
Service Malta
MT
Tel.: 80062230
E-Mail: hoyer@lidl.com.mt
IAN: 89015
Supplier
Please note that the address below is not a
service address. In the first instance,
contact the service centre mentioned above.
HOYER Handel GmbH
Kühnehöfe 5
D-22761 Hamburg
Germany
SEAD 1800 B1 15
Page 18
RP89015 Einkochautomat LB4 Seite 16 Dienstag, 12. März 2013 4:19 16
Spis treści
1. Opis urządzenia . . . . . . . . . . . . . . . . . . . . . . . . . . . . . . . . . . . . . . . . . . . . . . . . . . . . . . . 16
2. Nazwy części (patrz strona rozkładana) . . . . . . . . . . . . . . . . . . . . . . . . . . . . . . . . . . . . . . 17
3. Dane techniczne . . . . . . . . . . . . . . . . . . . . . . . . . . . . . . . . . . . . . . . . . . . . . . . . . . . . . . . 17
4. Wskazówki bezpieczeństwa. . . . . . . . . . . . . . . . . . . . . . . . . . . . . . . . . . . . . . . . . . . . . . . 17
5. Rozpakowywanie i ustawianie. . . . . . . . . . . . . . . . . . . . . . . . . . . . . . . . . . . . . . . . . . . . . 21
6. Obsługa urządzenia . . . . . . . . . . . . . . . . . . . . . . . . . . . . . . . . . . . . . . . . . . . . . . . . . . . . 21
7. Przepisy . . . . . . . . . . . . . . . . . . . . . . . . . . . . . . . . . . . . . . . . . . . . . . . . . . . . . . . . . . . . . 24
8. Czasy wekowania i temperatury. . . . . . . . . . . . . . . . . . . . . . . . . . . . . . . . . . . . . . . . . . . . 27
9. Czyszczenie i przechowywanie. . . . . . . . . . . . . . . . . . . . . . . . . . . . . . . . . . . . . . . . . . . . . 28
10. Utylizacja . . . . . . . . . . . . . . . . . . . . . . . . . . . . . . . . . . . . . . . . . . . . . . . . . . . . . . . . . . . . 29
11. Gwarancja firmy HOYER Handel GmbH. . . . . . . . . . . . . . . . . . . . . . . . . . . . . . . . . . . . . . . 29
Gratulujemy zakupu nowego
urządzenia.
Jest to wysokiej jakości produkt. Instrukcja
obsługi jest integralną częścią tego
produktu. Zawiera ona ważne wskazówki
dotyczące bezpieczeństwa, użytkowania i
utylizacji.
1. Opis urządzenia
1.1 Przeznaczenie
Przy użyciu automatu do pasteryzacji
SilverCrest SEAD 1800 B1 można:
•wekować
• utrzymywać temperaturę napojów i
nalewać napoje
• utrzymywać temperaturę kiełbasek
•utrzymywać temperaturę zup
Urządzenie można użytkować tylko w
suchych pomieszczeniach. Użytkowanie
urządzenia na dworze lub w wilgotnych
pomieszczeniach jest niedozwolone.
Przed rozpoczęciem użytkowania produktu
należy się zapoznać z wszystkimi
instrukcjami dotyczącymi obsługi oraz
bezpieczeństwa. Produktu należy używać
tylko w opisany sposób i do opisanych
celów.
Przekazując produkt innym osobom, należy
razem z nimi przekazać całą jego
dokumentację.
To urządzenie jest przeznaczone wyłącznie
do użytkowania w gospodarstwie
domowym i podobnych miejscach, takich
jak:
• kuchenki dla pracowników w sklepach,
biurach i innych miejscach pracy;
• gospodarstwach rolnych;
• hotelach, motelach i innych obiektach
podobnych do obiektów mieszkalnych
na potrzeby klientów;
•pensjonatach.
16
Page 19
RP89015 Einkochautomat LB4 Seite 17 Dienstag, 12. März 2013 4:19 16
1.2 Zawartość opakowania
• 1 automat do pasteryzacji,
złożony z następujących elementów:
–1 pojemnik
–1 pokrywka
–1 kratka
• 1 instrukcja obsługi
2. Nazwy części (patrz strona rozkładana)
1 pokrywka
2 uchwyty
3 pojemnik
4 dźwigienka kurka
5 kurek
6 przycisk Start/Stop z selektorem
temperatury
3. Dane techniczne
Zasilanie: 220 - 240 V~/50 Hz
Moc: 1.800 W
Pojemność ok. 27 litrów
Klasa ochronności: I
4. Wskazówki bezpieczeństwa
4.1 Wyjaśnienie haseł
Instrukcja obsługi zawiera następujące
hasła ostrzegawcze:
Ostrzeżenie!
Wysokie ryzyko: Nieprzestrzeganie
tego ostrzeżenia grozi utratą
zdrowia lub życia.
7 zegar z selektorem minut
8 nawijacz kabla (pod urządzeniem)
9 wskaźnik minut
10 wskaźnik ustawionej temperatury
11 wskaźnik aktualnej temperatury
12 kratka
Uwaga!
Średnie ryzyko: Nieprzestrzeganie tego
ostrzeżenia może spowodować szkody
materialne.
Wskazówka:
Niskie ryzyko: Kwestie, które należy
uwzględnić przy eksploatacji urządzenia.
SEAD 1800 B1 17
Page 20
RP89015 Einkochautomat LB4 Seite 18 Dienstag, 12. März 2013 4:19 16
4.2 Specjalne wskazówki
dotyczące tego urządzenia
Ostrzeżenie!
zranień lub uszkodzeń, należy
przestrzegać następujących
wskazówek.
• Dzieci powyżej 8 roku życia i osoby o
ograniczonej sprawności fizycznej,
sensorycznej i umysłowej oraz osoby
nieposiadające dostatecznej wiedzy albo
wystarczającego doświadczenia mogą
używać tego urządzenia tylko pod opieką
lub pod warunkiem, że zostały
poinstruowane o bezpiecznym sposobie
używania urządzenia i zrozumiały
zagrożenia związane z używaniem
urządzenia. Dzieciom nie wolno bawić się
urządzeniem.
• Dzieciom nie wolno czyścić urządzenia ani
wykonywać przewidzianych do
wykonywania przez użytkownika czynności
pielęgnacyjnych, chyba że są w wieku
powyżej 8 lat i znajdują się pod opieką.
• Dzieci w wieku poniżej 8 lat nie mogą mieć
kontaktu z urządzeniem i przewodem
sieciowym.
• Niniejsze urządzenie nie jest przeznaczone
dla osób (w tym dzieci) o ograniczonych
zdolnościach fizycznych, sensorycznych lub
umysłowych, odznaczających się brakiem
doświadczenia lub wiedzy, chyba że
pozostają pod nadzorem osoby
odpowiedzialnej za ich bezpieczeństwo lub
otrzymają od niej wskazówki dotyczące
używania. Dzieci powinny pozostawać pod
nadzorem, aby nie używały urządzenia do
zabawy.
• Urządzenia nie wolno podłączać do
zewnętrznego programatora czasowego
Aby uniknąć
lub osobnego systemu zdalnego
sterowania, np. gniazdka elektrycznego
sterowanego bezprzewodowo.
• Należy pamiętać, że powierzchnie
pracującego urządzenia mogą się silnie
nagrzewać:
–Pracujące urządzenie chwytać wyłącznie
2
za uchwyty
;
–Przed ustawieniem urządzenia w innymi
miejscu zaczekać, aż urządzenie
ostygnie.
• Przed przystąpieniem do czyszczenia
zawsze odłączać wtyczkę od gniazdka
elektrycznego.
• Przed przystąpieniem do czyszczenia
zaczekać, aż urządzenie wystygnie.
• Nigdy nie zanurzać pojemnika
3
w wodzie.
• Nigdy nie używać szorujących, żrących lub
rysujących środków czyszczących. Można
w ten sposób uszkodzić urządzenie.
4.3 Wskazówki ogólne
• Przed użyciem przeczytajcie Państwo
starannie instrukcję obsługi. Jest ona
częścią składową urządzenia i musi być
zawsze dostępna.
• Stosować urządzenie tylko zgodnie z
opisanym przeznaczeniem (patrz
"1.1 Przeznaczenie" na stronie 16).
• Sprawdzić zgodność wymaganego
napięcia sieciowego (patrz tabliczka
identyfikacyjna na urządzeniu) z
napięciem Waszego gniazda sieciowego.
• Pamiętajcie Państwo o tym, że w
wypadku stosowania innych akcesoriów
niż zalecanych w tej instrukcji obsługi
lub jeśli przy naprawach nie będą
stosowane wyłącznie części oryginalne,
zniesiona zostaje jakolwiek
odpowiedzialność i wygasają wszelkie
roszczenia gwarancyjne. Posiada to
18
Page 21
RP89015 Einkochautomat LB4 Seite 19 Dienstag, 12. März 2013 4:19 16
również ważność odnośnie napraw
wykonywanych przez personel
niewykwalifikowany. Dane kontaktowe
znajdziesz w "Centrum serwisowe" na
stronie30.
• Przy wystąpieniu ewntualnych zakłóceń
funkcjonowania urządzenia w okresie
gwarancji może być ono naprawione
tylko przez nasze centrum serwisowe/
Service-Center. W przeciwnym
wypadku wygasają wszelkie roszczenia
gwarancyjne.
4.4 Ochrona przed porażeniem prądem
elektrycznym
Ostrzeżenie! Następujące
wskazówki bezpieczeństwa
powinny chronić Państwa przed
porażeniem prądem elektrycznym.
• Urządzenie przyłączać tylko do
gniazda sieciowego z zestykiem
ochronnym, ponieważ od tego
uzależniona jest ochrona przed
porażeniem prądem elektrycznym.
• W razie uszkodzenia urządzenia nie
należy w żadnym wypadku go używać.
Należy oddać urządzenie do naprawy
wykwalifikowanemu personelowi. Dane
kontaktowe znajdziesz w "Centrum
serwisowe" na stronie30.
• W razie uszkodzenia przewodu
sieciowego urządzenia musi on zostać
wymieniony przez producenta lub
podobnie wykwalifikowaną osobę, aby
uniknąć zagrożeń.
• Do wnętrza urządzenia, poza specjalnie
przewidzianymi pojemnikami 3, nie
może się nigdy dostać woda albo inne
ciecze. Dlatego:
– nigdy nie używać urządzenia na
dworze
– nigdy nie zanurzać pojemnika 3 w
wodzie
– nigdy nie stawiać na urządzeniu
pojemników napełnionych cieczą jak
szklanki, wazony etc.
– nigdy nie stosować w otoczeniu
wilgotnym
– nigdy nie stawiać w bezpośredniej
bliskości zlewozmywaków, wanny
kąpielowej, prysznicu lub basenu
kąpielowego, ponieważ pryskająca
woda mogłaby przedostać się do
urządzenia.
W przypadku, gdy do urządzenia
przedostanie się ciecz, natychmiast
wyjąć wtyczkę z sieci i przekazać
urządzenie do naprawy
wykwalifikowanemu personelowi. Dane
kontaktowe znajdziesz w "Centrum
serwisowe" na stronie30.
• Nigdy nie dotykać wilgotnymi rękoma
urządzenia, kabla sieciowego lub
wtyczki sieciowej.
• Kabel sieciowy odłączać zawsze
poprzez wyciągnięcie wtyczki. Nigdy
nie pociągać bezpośrednio za kabel
sieciowy.
• Przestrzegać, aby kabel sieciowy nigdy
nie był zgięty i przyciśnięty.
• Kabel sieciowy musi znajdować się
zawsze z daleka od powierzchni
gorących (np. kuchennych płyt
grzewczych).
• Jeśli urządzenie nie będzie użytkowane
przez dłuższy okres, należy wyciągnąć
wtyczkę z gniazda sieciowego. Tylko w
takim wypadku urządzenie jest
całkowicie wyłączone z prądu.
•Unikajcie Państwo korzystania z
przedłużaczy. Dozwolone jest to tylko w
określonych przypadkach:
– przedłużacz musi odpowiadać
natężeniu prądu urządzenia.
– przedłużacz nie może być ułożony
„wisząco“: nie może stawać się
SEAD 1800 B1 19
Page 22
RP89015 Einkochautomat LB4 Seite 20 Dienstag, 12. März 2013 4:19 16
pułapką lub znajdować się w zasięgu
dostępu dzieci.
– przedłużacz nie może być nigdy
uszkodzony.
– do gniazda sieciowego, do którego
przyłączone jest urządzenie nie
wolno przyłączać innych dalszych
urządzeń, ponieważ mogłoby dojść
do przeciążenia sieci prądu (zakaz
używania przedłużacza
wielogniazdkowego!).
4.5 Ochrona przeciwpożarowa
Ostrzeżenie! Ze względu na to,
że urządzenie wytwarza wysokie
temperatury, należy przestrzegać
podanych niżej zasad
bezpieczeństwa w celu
wykluczenia niebezpieczeństwa
pożaru.
• Nie należy nigdy przykrywać
urządzenia, aby uniknąć przegrzania.
• Nigdy nie pozostawiać włączonego
urządzenia bez nadzoru. Na
uszkodzenia wskazuje prawie zawsze
intensywny zapach. W takiej sytuacji
należy natychmiast odłączyć wtyczkę
od gniazdka sieciowego i zlecić
sprawdzenie urządzenia. Dane
kontaktowe są podane w "Centrum
serwisowe" na stronie30.
4.6 Ochrona przed zranieniami
Ostrzeżenie! Aby uniknąć
zranienia, należy przestrzegać
podanych niżej wskazówek.
• Uważać, by kabel sieciowy przebiegał
w sposób uniemożliwiający potknięcie
się, zaplątanie się w nim lub deptanie
po nim.
4.7 Bezpieczeństwo Waszego dziecka
Ostrzeżenie! Dzieci często nie
potrafią właściwie ocenić
niebezpieczeństwa, dlatego też
narażone są na niebezpieczństwo
zranienia. W związku z tym
należy przestrzegać:
• Produkt może być użytkowany tylko pod
nadzorem osób dorosłych, aby
zapewnić, by dzieci się nim nie bawiły.
• Przestrzegać skrupulatnie, aby
urządzenie znajdowało się zawsze
poza zasięgiem dostępu dzieci, aby nie
mogły one pociągać za kabel sieciowy i
ściągnąć urządzenie do zabawy.
• Pamiętać o tym, że opakowanie foliowe
może stać się śmiertelną pułapką dla
dzieci. Opakowania foliowe nie są
zabawkami dla dzieci.
4.8 Szkody materialne
Uwaga! Aby uniknąć szkód materialnych,
należy przestrzegać podanych niżej
wskazówek.
• Nigdy nie używać automatu do
pasteryzacji bez wody albo płynu.
• Uważać, by w urządzeniu nigdy nie
znajdowało się za dużo płynu. Poziom
płynu musi zawsze leżeć poniżej
znacznika „MAX”. Przy za wysokim
poziomie płynu mógłby się on przelać
przez krawędź pojemnika.
• Nie stawiać urządzenia bezpośrednio
pod wiszącą szafką kuchenną,
ponieważ para ulatnia się do góry i
może uszkodzić taki mebel.
• Nigdy nie stawiać urządzenia na
gorącej płycie palnikowej.
• Ani urządzenia, ani jego akcesoriów nie
wolno wstawiać do kuchenki
mikrofalowej.
20
Page 23
RP89015 Einkochautomat LB4 Seite 21 Dienstag, 12. März 2013 4:19 16
5. Rozpakowywanie i ustawianie
Wskazówka: Nowe urządzenie jest
lekko naoliwione, w związku z czym po
pierwszym włączeniu może powstać
niewielka ilość dymu i może być
wyczuwalny lekki zapach. Są to
nieszkodliwe zjawiska, które ustają po
krótkim czasie. Należy w tym czasie
dostateczne wietrzyć pomieszczenie.
1. Wyjąć części z opakowania.
2. Sprawdzić, czy wszystkie części są
kompletne (patrz "1.2 Zawartość
opakowania" na stronie 17) i nie mają
uszkodzeń.
3. Przed pierwszym użyciem dokładnie
wyczyścić urządzenie (patrz
"9. Czyszczenie i przechowywanie" na
stronie 28).
6. Obsługa urządzenia
6.1 Dokonywanie ustawień, włączanie,
wyłączanie
Wskazówka: Obrócenie selektora 7
albo 6 powoduje automatyczne włączenie
podświetlenia wskaźników. Po 5 minutach
podświetlenie wskaźników wyłącza się
automatycznie.
Ostrzeżenie! Urządzenie
należy podłączać wyłącznie do
elektrycznego gniazdka ściennego
z zestykiem ochronnym, ponieważ
tylko takie gniazdko zapewnia
ochronę przed porażeniem
prądem elektrycznym.
1. Podłączyć wtyczkę sieciową do
odpowiedniego gniazdka ściennego z
4. Odwinąć cały przewód sieciowy z
nawijacza 8.
5. Urządzenie należy stawiać na równej,
suchej i przeciwpoślizgowej
powierzchni tak, by nie mogło się
przewrócić lub zsunąć.
6. Podłączyć wtyczkę sieciową do
odpowiedniego gniazdka ściennego z
zestykiem ochronnym (patrz "3. Dane
techniczne" na stronie 17).
7. Wlać mniej więcej 5 l wody do
pojemnika 3.
8. Gotować wodę przez około 20 minut
(patrz "6. Obsługa urządzenia" na
stronie 21).
9. Wylać wodę.
Urządzenie jest teraz gotowe do pracy.
zestykiem ochronnym (patrz "3. Dane
techniczne" na stronie 17).
2. Ustawić selektorem temperatury 6
żądaną temperaturę.
–Temperatura zwiększa się w
jednostkach równych 1°C;
– Co 5°C słychać sygnał dźwiękowy;
– Ustawiona temperatura jest
wyświetlana we wskaźniku ustawionej
temperatury 10.
3. Ustawić selektorem minut 7 żądany
czas wekowania.
– Czas zwiększa się w jednostkach
równych 1 min;
–Co 5min słychać sygnał dźwiękowy;
– Ustawiony czas jest wyświetlany na
wskaźniku minut 9.
SEAD 1800 B1 21
Page 24
RP89015 Einkochautomat LB4 Seite 22 Dienstag, 12. März 2013 4:19 16
4. Nacisnąć przycisk Start/Stop 6.
– Urządzenie zaczyna grzać, we
wskaźniku pojawia się ruchomy
pasek;
– we wskaźniku 11 pokazana jest
aktualna temperatura.
Po osiągnięciu ustawionej temperatury:
– słychać sygnały dźwiękowe;
– wyświetlana jest klepsydra;
– Zaczyna upływać ustawiony czas.
Po upływie ustawionego czasu słychać
sygnały dźwiękowe i urządzenie zostaje
wyłączone.
5. Aby wyłączyć urządzenie przed
upływem ustawionego czasu, należy
nacisnąć przycisk Start/Stop 6.
6.2 Wekowanie
Pod pojęciem wekowania (konserwowania)
rozumie się podgrzewanie artykułów
spożywczych bez dostępu powietrza, co
umożliwia ich długie przechowywanie.
Do wekowania potrzebne są specjalne
słoiki z zakrętkami albo z pokrywką i
pierścieniem gumowym.
Do wekowania nadają się tylko świeże,
dojrzałe artykuły spożywcze. Przejrzałe
owoce i przywiędłe warzywa nie nadają się
do tego celu.
Wekować można też grzyby, mięso, a
nawet ciasto.
Artykuły należy wekować jak najszybciej po
zbiorze, aby zachowały jak najwięcej
wartościowych substancji odżywczych.
Wekowane artykuły muszą być czyste.
Należy usunąć zanieczyszczenia, szkodniki
albo zepsute części. Nawet najmniejsze
nadpsute części mogą spowodować
zepsucie zawekowanych artykułów.
Owoce trzymają się dłużej i są bardziej
aromatyczne, jeżeli zostały zawekowane z
cukrem.
Twarde warzywa, np. marchew, kapusta
czy kalarepa, należy przed wekowaniem
podgotować w słonej wodzie. Nie wolno
ich jednak ugotować do miękkości. Wodę z
gotowania należy wylać, nie nadaje się ona
do wekowania.
Aby zapewnić długą przechowywalność
zawekowanych artykułów, należy
zachować absolutną czystość i higienę.
Najlepiej jest dokładnie umyć wszystkie
używane urządzenia, naczynia i wszystkie
części stykające się z artykułami
spożywczymi i wygotować przez 5 min w
gorącej wodzie.
Zawsze pamiętać o czystości rąk.
1. Dokładnie umyć owoce i warzywa.
Wskazówka: Owoce i warzywa
powinny być myte przed
rozdrobnieniem, zapewni to
zachowanie większości rozpuszczalnych
w wodzie witamin.
2. Rozdrobnić owoce i warzywa do
preferowanej wielkości.
3. Umieścić artykuły spożywcze w wekach.
Wskazówka: Artykuły spożywcze
należy dokładnie rozmieścić w weku.
Zapewnia to lepszy wygląd i optymalne
wykorzystanie pojemności weków.
4. Dodać przyprawy albo cukier, zgodnie
z własnymi preferencjami.
5. Napełnić weki wodą do poziomu tuż
pod krawędzią.
6. Zamknąć weki.
Wskazówka: Uważać, by szczelnie i
dokładnie zamknąć weki.
7. Wło żyć kra tkę 12 do pojemnika 3.
8. Wstawić przygotowane weki do
pojemnika 3.
Wskazówka: Weki można wstawiać
do pojemnika 3 w dwóch warstwach,
jedne na drugich.
22
Page 25
RP89015 Einkochautomat LB4 Seite 23 Dienstag, 12. März 2013 4:19 16
9. Wlać do pojemnika 3 tyle wody, by
górne weki stały do mniej więcej 3/4
wysokości w wodzie.
10.Założyć pokrywę 1 na pojemnik 3.
11.Ustawić temperaturę i czas wekowania
(patrz "6.1 Dokonywanie ustawień,
włączanie, wyłączanie" na stronie 21 i
"8. Czasy wekowania i temperatury" na
stronie 27).
12.Zacząć wekowanie przez naciśnięcie
przycisku Start/Stop 6 (patrz
"6.1 Dokonywanie ustawień, włączanie,
wyłączanie" na stronie 21).
13.Po upływie czasu wekowania wstawić
żaroodporne naczynie pod kurek 5.
14.Nacisnąć dźwigienkę kurka 4, aby
spuścić wodę z pojemnika 3.
15.Przed wyjęciem weków z pojemnika 3
zaczekać, aż weki wystygną.
Wskazówka: Ciepłe weki są
wrażliwe na przeciąg. Należy je więc w
miarę możliwości pozostawić w
pojemniku 3 do całkowitego
wystygnięcia. Jeżeli urządzenie jest
jeszcze potrzebne, można też wyjąć
ciepłe weki, postawić na ręczniku i
przykryć drugim ręcznikiem, aby
całkowicie wystygły.
16.Opisać weki informacją o zawartości i
dacie zawekowania.
17. Zawekowane artykuły przechowywać w
suchym, ciemnym i chłodnym miejscu, w
ten sposób można je przechowywać do
roku.
6.3 Utrzymywanie temperatury płynów
i zup
Automat do pasteryzacji nadaje się
doskonale do utrzymywania grzanego
wina, kakao, zup i dań jednogarnkowych w
żądanej temperaturze.
Uwaga! Uważać, aby w urządzeniu nigdy
nie znajdowało się za dużo płynu. Poziom
płynu musi zawsze leżeć poniżej znacznika
„MAX”. Przy za wysokim poziomie płynu
mógłby się on przelać przez krawędź
pojemnika.
1. Wlać płyn do pojemnika 3.
2. Założyć pokrywę 1 na pojemnik 3.
3. Ustawić selektorem temperatury 6
żądaną temperaturę.
–Temperatura zwiększa się w
jednostkach równych 1°C;
– Co 5°C słychać sygnał dźwiękowy;
– Ustawiona temperatura jest
wyświetlana we wskaźniku ustawionej
temperatury 10.
4. Nie ustawiać czasu, zamiast tego
nacisnąć selektor „TIMER” 7.
– We wskaźniku pojawia się leżąca
„8”.
5. Nacisnąć przycisk Start/Stop 6.
– Urządzenie zaczyna grzać;
– Po osiągnięciu ustawionej temperatury
słychać sygnały dźwiękowe;
– Urządzenie grzeje do momentu
ponownego naciśnięcia przycisku
Start/Stop 6.
6. Regularnie mieszać płyn, aby zapewnić
równy rozkład ciepła i uniemożliwić
osadzanie się na dnie stałych
składników.
7. Czyste płyny bez stałych składników
można nalewać przez kurek 5. W tym
celu nacisnąć dźwigienkę kurka 4 na
dół.
Wskazówka: Aby nie musieć ciągle
naciskać dźwigienki kurka 4 przy
większych ilościach cieczy, można
ustawić dźwigienkę kurka 4 pionowo do
góry.
SEAD 1800 B1 23
Page 26
RP89015 Einkochautomat LB4 Seite 24 Dienstag, 12. März 2013 4:19 16
8. Zupy i płyny zawierające stałe składniki
spowodowałyby zatkanie kurka. Należy
je czerpać chochlą.
9. Po użyciu starannie wyczyścić urządzenie
(patrz "9. Czyszczenie i przechowywanie"
na stronie 28).
6.4 Zabezpieczenie przed przegrzaniem
Urządzenie wyposażone jest w
zabezpieczenie przed przegrzaniem. Jeżeli
w pojemniku 3 jest za mało płynu, wskutek
czego temperatura nadmiernie wzrasta,
urządzenie ostrzega przy użyciu sygnałów
dźwiękowych i symbolu, że jest w nim za
mało płynu:
7. Przepisy
7. 1 Pa s zt e to wa
Składniki:
• 250 g wątróbki (wieprzowej, wołowej,
kurzej, indyczej)
• 300 g tłustej słoniny
• 400 g boczku wieprzowego
• 300 g karkówki wieprzowej
•4 cebule
•2 pory
• 50 g smalcu wieprzowego
• 1 pęczek pietruszki
•1 pęczek szczypiorku
• 1 łyżka stołowa majeranku suszonego
• 1 łyżka stołowa tymianku świeżego albo
suszonego
• 1 łyżka stołowa trybuli świeżej albo
suszonej
• 1 łyżka stołowa soli
• 1 łyżeczka do herbaty białego pieprzu
• 1 łyżeczka do herbaty gałki
muszkatołowej
1. Wyłączyć urządzenie przez naciśnięcie
przycisku Start/Stop 6 .
Sygnały dźwiękowe zostają wyłączone.
2. Dolać płynu.
3. Włączyć urządzenie ponownie przez
naciśnięcie przycisku Start/Stop 6 .
Jeżeli użytkownik nie zareaguje na
ostrzeżenie w ciągu 5 minut, urządzenie
wyłączy się automatycznie.
W takiej sytuacji należy odłączyć wtyczkę
od gniazdka sieciowego i zaczekać, aż
urządzenie wystygnie.
Następnie można ponownie włączyć
urządzenie.
• 1 łyżeczka do herbaty goździków
mielonych
• 1 łyżeczka do herbaty kardamonu
• 1 łyżeczka do herbaty imbiru mielonego
lub tartego
Przygotowanie:
1. Ugotować karkówkę wieprzową i
boczek w lekko osolonej wodzie.
2. Wyjąć mięso z rosołu i zaczekać, aż
wystygnie.
3. Rosół zachować.
4. Zalać wątróbkę gorącą wodą (nie
gotować).
5. Mięso, słoninę i wątróbkę przepuścić
przez maszynkę do mięsa.
6. Cebulę, szczypiorek i por bardzo
drobno posiekać.
7. Posiekaną cebulę, szczypiorek i por
zeszklić w smalcu wieprzowym.
24
Page 27
RP89015 Einkochautomat LB4 Seite 25 Dienstag, 12. März 2013 4:19 16
8. Przepuszczone przez maszynką mięso,
cebulę, szczypiorek i por oraz
przyprawy i zioła umieścić w misce.
9. Zalać 1 litrem zachowanego rosołu.
10.Ugniatać składniki do uzyskania
jednorodnej konsystencji.
11.Ugniecioną masę włożyć do
zakręcanych słoików.
12.Wekować w temperaturze
100°C przez ok. 160 min.
Wskazówka: przechowywalność
potrawy wynosi ok. 1 roku.
7.2 Dżem z truskawek i owoców kiwi
Składniki:
• 1,5 kg świeżych truskawek
• 500 g dojrzałych owoców kiwi
•1 kg cukru żelującego bez
gotowania
Przygotowanie:
1. Dokładnie umyć truskawki.
2. Dobrze obsuszyć truskawki.
3. Oczyścić truskawki: usunąć łodyżki, listki
i nadpsute miejsca.
4. Obrać i drobno pokroić kiwi.
5. Umieścić owoce w misce.
6. Dodać cukier żelujący.
7. Zmiksować wszystko ręcznym mikserem.
8. Napełnić słoiki i dokładnie je zamknąć.
9. Wekować w temperaturze 80°C przez
25 min.
Wskazówka: Korzystając z tej
nieniszczącej naturalnych składników
odżywczych metody wekowania należy
używać cukru żelującego, który żeluje bez
gotowania. Tańsza alternatywa jest
normalnego cukru żelującego 2:1. Owoców
jest, ale trochę gładsza.
7.3 Keczup z cukinią
Składniki:
•3 kg cukinii
•1 kg cebuli
• ok. 3 łyżek stołowych soli
• 500 g cukru
• 1 litr łagodnego octu ziołowego
• 2 łyżeczki do herbaty sproszkowanej
papryki
•3 łyżki stołowe curry
• 3 łyżki stołowe ostrej musztardy
• 1-2 łyżeczki do herbaty pieprzu
cayenne
• 2 tuby koncentratu pomidorowego
Przygotowanie:
1. Drobno zetrzeć cukinię.
2. Cebulę pokroić w drobną kostkę.
3. Umieścić cukinię, cebulę i sól w misce.
4. Pozostawić do naciągnięcia na ok. 24
godziny w chłodnym i suchym miejscu.
5. Odlać wodę z miski, w razie potrzeby
lekko wycisnąć masę.
6. Włożyć wszystkie składniki do garnka i
ostrożnie podgrzać (niebezpieczeństwo
przypalenia).
7. Gotować na wolnym ogniu ok. 30 min.
Podczas gotowania ciągle mieszać,
ponieważ masa łatwo się przypala.
8. Zmiksować masę.
9. Wlać masę do zakręcanych słoików.
10.Wekować w temperaturze
100°C przez ok. 1 godziny.
SEAD 1800 B1 25
Page 28
RP89015 Einkochautomat LB4 Seite 26 Dienstag, 12. März 2013 4:19 16
7. 4 W iś nie
Składniki:
•Wiśnie
•Cukier
•Woda
Przygotowanie:
1. Starannie przebrać wiśnie. Do słoika
mogą się dostać tylko dobre owoce.
2. Usunąć ogonki.
3. Umieścić na ok. 30 min w zimnej
wodzie, aby wypędzić ewentualne
gąsienice albo owady.
4. Wypestkować wiśnie.
5. Wypestkowane wiśnie ułożyć w
słoikach.
6. Wykonać roztwór cukru z 300 g cukru
na 1 litr wody.
7. Wlać tyle roztworu cukru do słoików, by
wiśnie były całkowicie przykryte.
8. Wekować w temperaturze 80°C przez
ok. 30 min.
7.5 Poncz herbaciany
Wskazówka: Podane ilości dają ok. 3 l
napoju. Aby uzyskać większą ilość, należy
proporcjonalnie zwiększyć ilość składników.
Składniki:
• 1,5 l czarnej herbaty
• 1 butelka czerwonego wina (0,75 l)
•6 naturalnych pomarańczy o skórce
nadającej się do spożycia
• 3 naturalne cytryny o skórce nadającej
się do spożycia
• 6 lasek cynamonu
• ok. 750 g cukru
• Rum do smaku
Przygotowanie:
Wskazówka: Poncz herbaciany można
przygotować bezpośrednio w automacie
do pasteryzacji. Ze względu na to, że w
napoju będą się znajdować stałe składniki,
napój należy czerpać chochlą do zupy, w
gdyż przeciwnym razie może dojść do
zatkania kurka.
Napój można też ugotować w oddzielnym
garnku, a następnie przecedzić i wlać do
automatu do pasteryzacji. W napoju nie
będzie wtedy stałych składników i będzie
można nalewać go z kurka.
1. Zaparzyć czarną herbatę.
2. Wycisnąć 4 pomarańcze i 2 cytryny.
3. 2 pomarańcze i 1 cytrynę pokroić na
cienkie plasterki.
4. Umieścić w garnku czarną herbatę,
wino, sok, plasterki owoców i laski
cynamonu.
5. Lekko zagotować składniki.
6. Powoli wmieszać cukier, ciągle
sprawdzając, czy poncz nie jest za
słodki.
7. Na koniec dodać sporą ilość rumu (ilość
zależna od preferencji).
8. Gotować jeszcze przez ok. 30 min na
małym ogniu.
Wskazówka: Jeżeli poncz jest
przygotowywany w automacie do
pasteryzacji, wybrać do gotowania
temperaturę 100 °C. W czasie naciągania
i utrzymywania temperatury zmniejszyć
temperaturę do ok. 80 °C. Poncz powinien
być tylko gorący, ale nie powinien się
gotować, w przeciwnym razie alkohol
wyparuje.
26
Page 29
RP89015 Einkochautomat LB4 Seite 27 Dienstag, 12. März 2013 4:19 16
8. Czasy wekowania i temperatury
Artykuł Tempera-
tura w °C
Czas w
minutach
Warzywa
Kalafior 100 (MAX) 90
Fasola 100 (MAX) 120
Groch 85 120
Ogórki
konserwowe
Kalarepa 100 (MAX) 95
Dynia 90 30
Marchewka 100 (MAX) 90
Grzyby 100 (MAX) 110
Brukselka 100 (MAX) 110
Czerwona
kapusta
Seler 100 (MAX) 110
Szparagi 100 (MAX) 120
Pomidory 90 30
100 (MAX) 30
100 (MAX) 110
Owoce
Jabłka,
twarde
Jabłka,
miękkie
Przecier
jabłkowy
Morele 85 30
Gruszki,
twarde
Gruszki,
miękkie
Jeżyny 80 25
Truskawki 80 25
Czarne
jagody
Maliny 80 30
Porzeczki 90 25
Czereśnie 80 30
Mirabelki 85 30
85 40
85 30
90 30
90 80
90 30
85 25
Artykuł Tempera-
tura w °C
Brzoskwinie 85 30
Śliwki 90 30
Czerwone
borówki
Pigwy 95 30
Renklody 85 30
Rabarbar 95 30
Agrest 80 30
Śliwki
niebieskie
90 25
90 30
Czas w
minutach
Mięso (zasadniczo wymaga
podgotowania)
Pieczeń 100 (MAX) 85
Rosół mięsny 100 (MAX) 60
Drób 100 (MAX) 75
Gulasz 100 (MAX) 75
Dziczyzna 100 (MAX) 75
Kiełbasa,
gotowana
Kiełbasa,
surowa
100 (MAX) 75
100 (MAX) 110
SEAD 1800 B1 27
Page 30
RP89015 Einkochautomat LB4 Seite 28 Dienstag, 12. März 2013 4:19 16
9. Czyszczenie i przechowywanie
Ostrzeżenie! Aby uniknąć
porażenia prądem, zranienia lub
uszkodzenia urządzenia:
– Przed każdym czyszczeniem
wyjąć wtyczkę sieciową z
gniazdka sieciowego.
– Przed przystąpieniem do
czyszczenia zaczekać, aż
urządzenie wystygnie.
– Nigdy nie zanurzać
pojemnika 3 w wodzie.
Uwaga! Nie stosować środków do
szorowania ani żrących lub rysujących
środków czyszczących. Można w ten
sposób uszkodzić urządzenie.
1. Czyścić urządzenie wilgotną szmatką.
Można też użyć niewielkiej ilości płynu
do mycia naczyń.
2. Następnie przetrzeć powierzchnię
czystą wodą.
3. Urządzenia używać dopiero po jego
całkowitym wyschnięciu.
9.1 Czyszczenie kratki i pokrywy
1. Kratkę 12 i pokrywę 1 myć ręcznie w
zlewozmywaku.
2. Płukać w czystej wodzie.
9.2 Czyszczenie kurka
Aby ułatwić sobie czyszczenie, można
odkręcić dźwigienkę kurka 4. Kurka 5 nie
można wykręcić, w przeciwnym razie mogą
wystąpić problemy ze szczelnością.
1. Odkręcić dźwigienkę kurka 4 od
kurka 5.
2. Umyć dźwigienkę kurka 4 ręcznie w
zlewozmywaku.
3. Wypłukać w czystej wodzie.
4. Wlać do pojemnika 3 łagodny roztwór
płynu do mycia naczyń i przepuścić go
przez kurek 5.
Wskazówka: Jeżeli w kurku 5
występują trudne do usunięcia
zanieczyszczenia, można sobie pomóc
środkiem do czyszczenia fajek.
5. Wypłukać w czystej wodzie.
6. Ponownie wkręcić dźwigienkę 4 od
kurka 5.
9.3 Przechowywanie urządzenia
1. Nawinąć kabel sieciowy na dolną część
podstawy urządzenia.
2. Włożyć wtyczkę do odpowiedniej
wnęki pośrodku dna urządzenia.
3. Schować urządzenie.
9.4 Usuwanie kamienia
W zależności od stopnia twardości wody w
urządzeniu mogą powstawać osady
kamienia. Należy je regularnie usuwać, aby
zapewnić oszczędność energii i
długotrwałą sprawność urządzenia, a także
ze względów higienicznych.
1. Pokryte kamieniem miejsca wycierać
ściereczką zwilżoną w niewielkiej ilości
octu.
2. Jeżeli urządzenie jest pokryte grubszym
osadem kamienia, wlać dostępny w
handlu preparat do usuwania kamienia
do pojemnika 3 i pozostawić go na noc.
Uwaga! Podczas usuwania kamienia
nie wolno włączyć urządzenia! Może to
spowodować uszkodzenie.
3. Po usunięciu kamienia urządzenie
należy dokładnie wypłukać.
28
Page 31

RP89015 Einkochautomat LB4 Seite 29 Dienstag, 12. März 2013 4:19 16
4. Urządzenia używać dopiero po jego
całkowitym wyschnięciu.
10. Utylizacja
10.1 Urządzenie
Symbol przekreślonego kubła
na śmieci na kółkach oznacza,
że produkt w Unii Europejskiej
musi być zbierany oddzielnie.
Dotyczy to produktu i
wszystkich oznakowanych tym
symbolem części wyposażenia.
Oznakowane produkty nie mogą być
odprowadzane do odpadów
z gospodarstw domowych, lecz muszą być
oddane na składowiska, zbierające
11. Gwarancja firmy HOYER Handel GmbH
Szanowna Klientko, szanowny Kliencie,
dla tego urządzenia obowiązuje gwarancja
ważna przez 3 lata od daty zakupu. W
przypadku wad produktu Klient ma
ustawowe prawa wobec sprzedawcy.
Podane niżej warunki gwarancji nie
ograniczają zakresu tych praw
ustawowych.
Warunki gwarancji
Okres gwarancji zaczyna upływać w dniu
zakupu. Należy zachować oryginalny
paragon kasowy. Dokument ten jest
potrzebny jako dowód zakupu.
Jeżeli w ciągu trzech lat od daty zakupu
tego produktu wystąpi wada materiałowa
lub wada wykonania, produkt zostanie
przez nas – zgodnie z naszą decyzją –
nieodpłatnie naprawiony lub wymieniony.
Warunkiem skorzystania ze świadczenia
produkty elektryczne oraz elektroniczne do
recyklingu. Recykling pomaga zredukować
zużycie surowców i odciąża środowisko. W
związku z tym ściśle przestrzegaj
obowiązujących w kraju użytkowania
przepisów dotyczących usuwania.
10.2 Opakowanie
Przy usuwaniu opakowania należy
stosować się do odpowiednich krajowych
przepisów.
gwarancyjnego jest przedstawienie w ciągu
trzyletniego okresu gwarancji
uszkodzonego urządzenia i dowodu
zakupu (paragonu kasowego) wraz z
krótkim pisemnym opisem wady oraz czasu
jej wystąpienia.
Jeżeli defekt jest objęty naszą gwarancją,
Klient otrzyma z powrotem naprawiony
albo nowy produkt. Fakt naprawy lub
wymiany produktu nie powoduje
wznowienia upływu okresu gwarancji.
Okres gwarancji i prawa ustawowe
związane z wadliwymi produktami
Wykonanie świadczenia gwarancyjnego
nie przedłuża okresu gwarancji. Dotyczy to
również wymienionych i naprawionych
części. Ewentualne wady i braki, które
występowały już w chwili sprzedaży, Klient
SEAD 1800 B1 29
Page 32

RP89015 Einkochautomat LB4 Seite 30 Dienstag, 12. März 2013 4:19 16
ma obowiązek zgłosić natychmiast po
rozpakowaniu produktu. Naprawy
wykonywane po upływie okresu gwarancji
są odpłatne.
Zakres gwarancji
Urządzenie zostało wyprodukowane
zgodnie z surowymi normami jakościowymi
i starannie sprawdzone przed dostawą.
Gwarancja obejmuje wady materiałowe i
wady wykonania. Gwarancja nie obejmuje
części produktu, które ulegają normalnemu
zużyciu i mogą być uznane za części
zużywające się. a także uszkodzeń czułych
części, np. przełączników, akumulatorów i
elementów wykonanych ze szkła.
Gwarancja wygasa w przypadku
uszkodzenia produktu, jego niezgodnego z
przeznaczeniem użytkowania lub
nieprawidłowej pielęgnacji. Warunkiem
zgodnego z przeznaczeniem użytkowania
produktu jest dokładne przestrzeganie
wszystkich wskazówek zawartych w
instrukcji obsługi.
Należy wykluczyć takie sposoby używania
produktu i czynności, których zakazuje lub
przed którymi przestrzega instrukcja obsługi.
Produkt jest przeznaczony tylko do użytku
prywatnego, nie do użytku gospodarczego.
Niezgodne z przeznaczeniem i
nieprawidłowe obchodzenie się z produktem,
używanie siły i ingerencje ze strony osób
innych niż nasze autoryzowane centrum
serwisowe powodują utratę gwarancji.
urządzenia: IAN 89015) oraz paragon
kasowy jako dowód zakupu.
• Numer artykułu jest podany na tabliczce
znamionowej, na wygrawerowanym
polu, na stronie tytułowej instrukcji
obsługi (z lewej strony u dołu) albo na
naklejce znajdującej się na tylnej lub
dolnej części produktu.
• W razie wadliwego działania albo innych
wad należy się wstępnie skontaktować z
podanym niżej centrum serwisowym,
telefonicznie lub e-mailem.
• Produkt uznany za wadliwy można
następnie bezpłatnie wysłać na
otrzymany adres serwisu z dołączonym
dowodem zakupu (paragonem
kasowym) i informacją, na czym polega
i kiedy wystąpiła wada.
Na stronie www.lidlservice.com można pobrać tę
instrukcję obsługi i wiele innych
podręczników użytkownika i
filmów wideo oraz
oprogramowanie.
Centrum serwisowe
Serwis Polska
Tel.: 22 397 4996
E-Mail: hoyer@lidl.pl
IAN: 89015
Opracowywanie reklamacji objętych
gwarancją
Aby zapewnić szybkie opracowanie
reklamacji, należy się zastosować do
następujących wskazówek:
• Przy każdym kontakcie należy
przygotować numer artykułu (dla tego
30
Page 33

RP89015 Einkochautomat LB4 Seite 31 Dienstag, 12. März 2013 4:19 16
Dostawca
Proszę pamiętać, że podany niżej adres nie
jest adresem serwisu. Należy się
wcześniej skontaktować z podanym wyżej
centrum serwisowym.
HOYER Handel GmbH
Kühnehöfe 5
D-22761 Hamburg
Deutschland
SEAD 1800 B1 31
Page 34

RP89015 Einkochautomat LB4 Seite 32 Dienstag, 12. März 2013 4:19 16
Tartalom
1. A készülék leírása . . . . . . . . . . . . . . . . . . . . . . . . . . . . . . . . . . . . . . . . . . . . . . . . . . . . . . 32
2. Az alkatrészek megnevezése (lásd a kihajtható oldalon) . . . . . . . . . . . . . . . . . . . . . . . . . . 33
3. Műszaki adatok . . . . . . . . . . . . . . . . . . . . . . . . . . . . . . . . . . . . . . . . . . . . . . . . . . . . . . . 33
4. Biztonsági előírások . . . . . . . . . . . . . . . . . . . . . . . . . . . . . . . . . . . . . . . . . . . . . . . . . . . . 33
5. Kicsomagolás és felállítás . . . . . . . . . . . . . . . . . . . . . . . . . . . . . . . . . . . . . . . . . . . . . . . . 36
6. A készülék kezelése. . . . . . . . . . . . . . . . . . . . . . . . . . . . . . . . . . . . . . . . . . . . . . . . . . . . . 37
7. Receptek . . . . . . . . . . . . . . . . . . . . . . . . . . . . . . . . . . . . . . . . . . . . . . . . . . . . . . . . . . . . 40
8. Befőzési idők és hőmérsékletek . . . . . . . . . . . . . . . . . . . . . . . . . . . . . . . . . . . . . . . . . . . . 42
9. Tisztítás és tárolás. . . . . . . . . . . . . . . . . . . . . . . . . . . . . . . . . . . . . . . . . . . . . . . . . . . . . . 43
10. Ártalmatlanítás. . . . . . . . . . . . . . . . . . . . . . . . . . . . . . . . . . . . . . . . . . . . . . . . . . . . . . . . 44
11. Jótállási . . . . . . . . . . . . . . . . . . . . . . . . . . . . . . . . . . . . . . . . . . . . . . . . . . . . . . . . . . . . . 44
Gratulálunk az új készülék
megvásárlásához.
Ön egy kiváló minőségű termék mellett
döntött. A Kezelési utasítás a termék
szállítási terjedelméhez tartozik. Az utasítás
fontos biztonsági, kezelési és
hulladékkezelési utasításokat tartalmaz.
1. A készülék leírása
1.1 Rendeltetési cél
Ez a SilverCrest SEAD 1800 B1 befőző
alkalmas
•befőzésre
• italok melegen tartására
• virsli melegen tartására
• levesek melegen tartására
A készülék csak száraz helyiségben
használható. Alkalmazása szabadban vagy
nedves helyiségekben nem megengedett.
Ez a készülék csak magánháztartásokban
vagy olyan helyeken alkalmazható mint pl:
• vállalati alkalmazottak által használt
bolti, irodai és egyéb konyhafülkékben;
Használat előtt ismerkedjen meg a termékre
vonatkozó valamennyi kezelési és
biztonsági utasítással. A terméket csak a
leírás szerint, a megfelelő alkalmazási
területen használja.
A termékkel együtt az összes, a termékre
vonatkozó dokumentumot adja tovább.
• parasztházakban;
• hotelokban, motelokban és egyéb
lakókörnyezetekben, ahol vendégek
használhatják;
•panziókban.
1.2 Szállítási terjedelem
• 1 db befőző,
amely a következő egységekből áll:
– 1 db tartály
– 1 db fedő
–1 db rács
• 1 db kezelési útmutató
32
Page 35

RP89015 Einkochautomat LB4 Seite 33 Dienstag, 12. März 2013 4:19 16
2. Az alkatrészek megnevezése (lásd a kihajtható oldalon)
1 Fedő
2 Fogantyúk
3 Tartály
4 Csapolókar
5 Csap
6 Start/Stop gomb hőmérséklet-beállító
forgatógombbal
3. Műszaki adatok
Áramellátás: 220 - 240 V~/50 Hz
Teljesítmény: 1800 Watt
Befogadóképesség kb. 27 liter
Érintésvédelmi osztály: I
4. Biztonsági előírások
4.1 Fogalommagyarázat
A következő jelfogalmak szerepelnek a
kezelési útmutatóban:
Figyelmeztetés!
Magas fokú kockázat. A
figyelmeztetések be nem tartása
életveszélyes lehet.
Vigyázat!
Közepes kockázat. A figyelmeztetések be
nem tartása anyagi károkat okozhat.
Figyelem:
Kis fokú kockázat. A készülék használatakor
figyelembe veendő tények.
7 Időzítő forgatógomb a percek
beállításához
8 Vezetékcsévélő (a készülék alatt)
9 A percek kijelzése
10 A beállított hőmérséklet kijelzése
11 Az aktuális hőmérséklet kijelzése
12 Rács
4.2 A készülékre vonatkozó
külön utasítások
Figyelmeztetés!
megelőzése érdekében vegye
figyelembe a következő utasításokat.
• Ezt a készüléket 8. életévüket betöltött,
valamint csökkentett fizikai, érzéki vagy
mentális képességekkel rendelkező, ill.
tapasztalatlan, alacsonyabb tudásszintű
személyek használhatják, ha a felhasználók
felügyelete, ill. a biztonságos használatra
vonatkozó tájékoztatásuk biztosított, és a
használatból eredő veszélyeknek
tudatában vannak. Ne hagyja, hogy
gyerekek játszanak a készülékkel.
• Gyerekek a készülék tisztítását vagy
karbantartását csak akkor végezhetik, ha 8.
A sérülések
SEAD 1800 B1 33
Page 36

RP89015 Einkochautomat LB4 Seite 34 Dienstag, 12. März 2013 4:19 16
életévüket betöltötték és felügyelet alatt
állnak.
• 8 évesnél kisebb gyerekek kezébe a
készülék és a csatlakozóvezeték nem való.
• Ez a készülék nem arra szolgál, hogy
korlátozott fizikai, érzékszervi vagy szellemi
képességekkel vagy hiányzó
tapasztalatokkal és/vagy hiányzó
ismeretekkel rendelkező személyek
(gyermekeket is ideértve) használják,
kivéve, ha a biztonságukért felelős személy
felügyelete alatt vannak vagy tőle
utasításokat kaptak arra, hogy miként kell a
készüléket használni. A gyermekeket
célszerű felügyelet alatt tartani, hogy ne
játszhassanak a készülékkel.
• A készüléket tilos külső időkapcsoló órával
vagy külön távkapcsoló rendszerrel, mint
például rádiós csatlakozó aljzattal
működtetni.
• Vegye figyelembe, hogy a készülék felülete
üzem közben felforrósodhat:
–A készüléket kizárólag a füleknél (
2
fogja meg;
–Áthelyezés előtt hagyja a készüléket
kihűlni.
• Minden egyes tisztítás előtt húzza ki a
hálózati csatlakozódugót a hálózati
csatlakozóaljzatból.
• Tisztítás előtt hagyja lehűlni a készüléket.
• Soha ne merítse vízbe a tartályt (
3
).
• Semmiképpen se használjon súroló, maró
vagy karcoló tisztítószert. Ellenkező esetben
a készülék megsérülhet.
4.3 Általános tudnivalók
• Kérjük, használat előtt figyelmesen
olvassa el a kezelési útmutatót. Az
útmutató a készülék tartozéka, és mindig
rendelkezésre kell állnia.
• A készüléket kizárólag a megadott
rendeltetési célra használja (lásd
„1.1 Rendeltetési cél“ a 32. oldalon).
• Ellenőrizze, hogy a hálózati feszültség
megegyezik-e a szükséges hálózati
feszültséggel (lásd a készüléken lévő
típustáblán), mivel az eltérő hálózati
feszültség károsíthatja a készüléket.
• Kérjük, vegye figyelembe, hogy az
ebben a kezelési útmutatóban nem
szereplő tartozékok használata vagy az
eredetitől eltérő pótalkatrészekkel
történő javítás a garancia és
szavatosság megszűnését eredményezi.
Ez olyan javításokra is vonatkozik,
amelyeket nem képzett szakember
végez. A kapcsolatfelvételi adatok itt
találhatók: 44. oldalon a „11. Jótállási”.
• A garanciális időszak alatt bekövetkező
működési rendellenességek esetén
kizárólag szervizközpontunkhoz
forduljon javítás céljából. Máskülönben
megszűnik a garancia.
4.4 Áramütés elleni védelem
)
Figyelmeztetés! A következő
biztonsági tudnivalók célja, hogy
megvédjék Önt az áramütéstől.
• A készüléket kizárólag védőérintkezős
hálózati dugaszoló aljzatba
csatlakoztassa, mivel ettől függ az
áramütés elleni védelem.
• Semmiképp sem szabad a készüléket
használni, ha a készülék megsérült. Ilyen
esetben a készüléket képzett
szakemberekkel javíttassa meg. A
kapcsolatfelvételi adatok itt találhatók:
44. oldalon a „11. Jótállási”.
•Ha a készülék hálózati
csatlakozókábele megsérül, akkor a
veszélyek megelőzése érdekében azt a
gyártóval vagy hasonló képzettségű
személlyel kell kicseréltetni.
34
Page 37

RP89015 Einkochautomat LB4 Seite 35 Dienstag, 12. März 2013 4:19 16
• A készülékbe az erre a célra szolgáló
tartály (3) kivételével ne kerüljön víz
vagy egyéb folyadék. Ezért:
– a készüléket soha ne használja a
szabadban
–a tartályt (3) soha ne merítse vízbe
– soha ne tegyen folyadékkal telt
edényeket a készülékre, mint például
poharat, vázát stb.
– soha ne használja túl nedves
környezetben
– soha ne használja mosogató,
fürdőkád, zuhany vagy úszómedence
közvetlen közelében, mert a
kifröccsenő víz a készülékbe kerülhet.
Ha mégis víz kerülne a készülékbe,
azonnal húzza ki a hálózati csatlakozó
dugót, és a készüléket vigye el
szakszervizbe javíttatni. A
kapcsolatfelvételi adatok itt találhatók:
44. oldalon a „11. Jótállási”.
•Soha ne nyúljon vizes kézzel a
készülékhez, a hálózati kábelhez vagy a
hálózati csatlakozó dugóhoz.
• A hálózati kábelt mindig a
csatlakozónál fogva húzza ki. Soha ne
húzza ki a kábeltől fogva.
• Figyeljen, hogy a hálózati kábelt soha
ne hajlítsa, vagy ne törje meg.
• A hálózati kábelt tartsa távol forró
felületektől (pl. a tűzhelytől).
• Ha a készüléket hosszabb ideig nem
használja, húzza ki a csatlakozó dugót
a csatlakozó aljzatból. A készülék csak
ebben az esetben van teljesen
áramtalanítva.
• Kerülje a hosszabbítók használatát.
Ezek használata csak bizonyos feltételek
mellett megengedett:
– A hosszabbító kábel megegyezik a
készülék áramerősségével.
– A kábelt ne hagyja rögzítetlen
állapotban: olyan helyre tegye, hogy
ne lehessen belebotlani, és ahol
gyerekek nem férhetnek hozzá.
– A hosszabbító ne rongálódjon meg.
– Ne csatlakoztasson egyéb készüléket
a hálózati csatlakozó dugóhoz, mivel
az megterhelheti a villamoshálózatot
(többszörös csatlakozó aljzat
használata tilos!).
4.5 Tűzveszély elleni védelem
Figyelmeztetés! Mivel a
készülék magas hőmérsékleten
működik, a tűzveszély elkerülése
érdekében vegye figyelembe a
következő biztonsági utasításokat.
• A túlmelegedés megelőzése érdekében
a készüléket soha nem szabad letakarni.
• Soha ne hagyja felügyelet nélkül
bekapcsolva a készüléket. A károsodást
csaknem minden esetben erős
szagképződés jelzi. Ebben az esetben
húzza ki azonnal a hálózati
csatlakozódugót, és ellenőriztesse a
készüléket. A kapcsolatfelvételi adatok
itt találhatók: 44. oldalon a
„11. Jó tá ll ás i” .
4.6 Sérülések elleni védelem
Figyelmeztetés! A sérülések
megelőzése érdekében vegye
figyelembe a következő
utasításokat.
• Figyeljen arra, hogy a hálózati kábelbe
ne lehessen belebotlani, beleakadni
vagy arra rálépni.
SEAD 1800 B1 35
Page 38

RP89015 Einkochautomat LB4 Seite 36 Dienstag, 12. März 2013 4:19 16
4.7 Gyermekei biztonsága érdekében
Figyelmeztetés! A gyerekek
gyakran nem tudják helyesen
felmérni a vészhelyzeteket, ezért
gyakran megsérülnek. Ezért
figyeljen a következőkre:
• A készüléket csak felnőtt felügyelete
mellett szabad használni.
• Vigyázzon, hogy a készüléket mindig
gyermekektől elzárva tartsa. Vigyázzon,
hogy a gyerekek soha ne tudják a
készüléket lehúzni vagy felborítani a
kábelnél fogva.
• Vigyázzon, hogy a csomagolófóliák ne
okozzanak halálos balesetet a gyerekek
számára. A csomagolófólia nem
játékszer.
5. Kicsomagolás és felállítás
4.8 Anyagi károk
Vigyázat! Az anyagi károk elkerülése
érdekében tartsa be a következő
előírásokat.
• Soha ne használja a befőzőt víz vagy
folyadék nélkül.
• Ügyeljen arra, hogy a készülékben soha
ne legyen túl sok folyadék. A
folyadékszint mindig a "MAX" jelölés
alatt legyen. Ha túl sok a folyadék, az a
tartályból kifuthat.A készüléket kizárólag
sík, száraz és nem csúszó felületen
helyezze el, hogy a készülék ne
eshessen vagy csúszhasson le.
• Ne állítsa a készüléket faliszekrény alá,
mert a fölfelé áramló gőz károkat
okozhat.
• Ne tegye a készüléket forró
tűzhelylapra.
• Se a készüléket, se annak tartozékait ne
tegye mikrohullámú sütőbe.
Figyelem: Mivel a készüléket enyhén
kenőzsíros állapotban szállítják, első
használatkor lehetséges, hogy enyhe füst
vagy rossz szag keletkezik. Ez nem
ártalmas, és kis idő múlva megszűnik.
Kérjük, addig is gondoskodjon a kellő
szellőztetésről.
1. Vegye ki a tartozékokat a
csomagolásból.
2. Ellenőrizze, hogy az összes tartozék
meglegyen (lásd „1.2 Szállítási
terjedelem“ a 32. oldalon) és épségben
legyen.
3. Az első használat előtt alaposan tisztítsa
meg a készüléket (lásd „9. Tisztítás és
tárolás“ a 43. oldalon).
36
4. Teljesen csévélje le a hálózati csatlakozóvezetéket a vezetékcsévélőről (8).
5. A készüléket sík, száraz és
csúszásmentes felületen állítsa fel, hogy
a készülék ne borulhasson fel és ne
csúszhasson le.
6. Dugja be a hálózati csatlakozódugót
egy megfelelő védőérintkezős hálózati
dugaszoló aljzatba (lásd „3. Műszaki
adatok“ a 33. oldalon).
7. Töltsön kb. 5 l vizet a tartályba (3).
8. Forralja a vizet kb. 20 percig (lásd „6. A
készülék kezelése“ a 37. oldalon).
9. Öntse ki a vizet.
A készülék most üzemkész.
Page 39

RP89015 Einkochautomat LB4 Seite 37 Dienstag, 12. März 2013 4:19 16
6. A készülék kezelése
6.1 Beállítás, bekapcsolás, kikapcsolás
Figyelem: Mihelyt a forgatógombokat (7
vagy 6) elfordítja, automatikusan bekapcsol
a kijelzők háttérvilágítása. A kijelzők
világítása 5 perc elteltével automatikusan
kikapcsol.
Figyelmeztetés! A készüléket
kizárólag védőérintkezős hálózati
dugaszoló aljzatba csatlakoztassa,
mivel ettől függ az áramütés elleni
védelem.
1. Dugja be a hálózati csatlakozódugót
egy megfelelő védőérintkezős hálózati
dugaszoló aljzatba (lásd „3. Műszaki
adatok“ a 33. oldalon).
2. A hőmérsékletet szabályozó
forgókapcsolóval (6) állítsa be a kívánt
hőmérsékletet.
–A hőmérséklet 1°C-os lépésekben
emelkedik;
– 5 °C-onként elhangzik egy
figyelmeztető hang;
– A beállított hőmérséklet megjelenik a
beállított hőmérséklet kijelzőjén (10).
3. A percszabályozó forgókapcsolóval (7)
állítsa be a kívánt hőmérsékletet.
– A hőmérséklet 1 perces lépésekben
emelkedik;
– 5 percenként elhangzik egy
figyelmeztető hang;
– A beállított idő megjelenik a
perckijelzőn (9).
4. Nyomja meg a Start/Stop
nyomógombot (6).
– A készülék fűteni kezd, és a kijelzőn
megjelenik egy mozgó csík;
–A kijelző (11) az aktuális
hőmérsékletet mutatja.
Mihelyt a folyadék elérte a beállított
hőmérsékletet:
– Figyelmeztető hangjelzés hallatszik;
– A kijelzőn megjelenik egy homokóra.
– A beállított idő mérése elkezdődik.
Mihelyt lejár a beállított idő, hangjelzések
hallatszanak, és a készülék kikapcsol.
5. Ha a készüléket a beállított idő letelte
előtt kívánja kikapcsolni, nyomja meg a
Start/Stop gombot (6).
6.2 Befőzés
A befőzés (becsinálás, dunsztolás, elrakás)
alatt az élelmiszerek légmentes felhevítését
és ez által történő tartósítását értjük.
Befőzéshez külön erre a célra alkalmas
csavaros vagy gumigyűrűs fedéllel zárható
üvegek szükségesek.
Befőzésre csak friss, teljesen érett
élelmiszerek alkalmasak. Túlérett gyümölcs
vagy fonnyadt zöldség erre nem alkalmas.
Gombát, húst, sőt süteményt is be lehet
főzni.
A befőzést a leszedés után minél hamarabb
végezze el, hogy az élelmiszerben lehetőleg
sok értékes anyag maradjon meg.
A befőzendő élelmiszereket gondosan
válogassa meg. Távolítsa el a
szennyeződéseket, a férges és a hibás
részeket. A befőttet a legkisebb rohadás is
tönkre teheti.
A gyümölcsök tartósabbak és
aromadúsabbak, ha azokat cukorral főzi
be.
A keményebb zöldségfajtákat, pl.
sárgarépát, káposztát vagy karalábét, főzze
elő sós vízben. Ezeket ne puhítsa meg
teljesen. A sós lét öntse ki, ez befőzésre nem
alkalmas.
SEAD 1800 B1 37
Page 40

RP89015 Einkochautomat LB4 Seite 38 Dienstag, 12. März 2013 4:19 16
A befőtt tartósságának elengedhetetlen
feltétele a tisztaság és a higiénia. Azt
javasoljuk, hogy minden munkaeszközt,
edényt és olyan tárgyat, amely az
élelmiszerekkel érintkezésbe lép, gondosan
tisztítson meg és legalább 5 percig forró
vízben főzzön ki.
Ügyeljen arra, hogy az Ön keze mindig
tiszta legyen.
1. A gyümölcsöket és a zöldségeket
alaposan mossa meg.
Figyelem: A gyümölcsöket és a
zöldségeket feldarabolás előtt tisztítsa
meg, így maximális mértékben
megmaradnak a vízben oldódó
vitaminok.
2. Aprítsa a gyümölcsöket és a zöldségeket
a kívánt méretre.
3. Töltse az élelmiszereket a
befőttesüvegekbe..
Figyelem: Ügyeljen az élelmiszerek
megfelelő rétegelésére a
befőttesüvegben. Ez jobban néz ki, és a
befőttesüvegek kihasználása is
optimális.
4. Tegyen a befőttbe ízlés szerint fűszereket
vagy cukrot.
5. Annyi vizet töltsön az üvegekbe, hogy a
vízszint majdnem az üvegek pereméig
érjen.
6. Zárja le az üvegeket.
Figyelem: Gondosan ügyeljen arra,
hogy az üvegek tökéletesen le legyenek
zárva.
7. He ly ezz e a rác so t ( 12) a tartályba (3).
8. Helyezze az előkészített befőttesüvegeket
a tartályba (3).
Figyelem: A befőttesüvegeket a
tartályban (3) két rétegben helyezheti
el.
9. Töltse fel a tartályt (3) annyi vízzel,
hogy a felső üvegsor kb. 3/4-ig vízben
legyen.
10.Helyezze rá a fedőt (1) a tartályra (3).
11.Állítsa be a hőmérsékletet és a befőzési
időt (lásd 37. oldalon a „6.1 Beállítás,
bekapcsolás, kikapcsolás” és
42. oldalon a „8. Befőzési idők és
hőmérsékletek”).
12.Nyomja meg a Start/Stop gombot (6),
ezzel beindítja a befőzési folyamatot
(lásd „6.1 Beállítás, bekapcsolás,
kikapcsolás“ a 37. oldalon).
13.Mihelyt lejár a befőzési idő, helyezzen
egy hőálló edényt a csap (5) alá.
14.A víznek a tartályból (3) való
kiengedéséhez nyomja meg a
csapolókart (4).
15.Hagyja kihűlni a befőttesüvegeket,
mielőtt azokat kiveszi a tartályból (3).
Figyelem: A még meleg
befőttesüvegek érzékenyek a huzatra.
Ezért lehetőleg hagyja az üvegeket a
tartályban (3), míg teljesen ki nem
hűlnek. Ha közben szüksége van a
készülékre, a meleg üvegeket kiveheti,
de helyezze őket egy konyharuhára,
egy másik konyharuhával pedig fedje
be őket, és várja meg, hogy teljesen
kihűljenek.
16.Írja rá az üvegekre, hogy mit
tartalmaznak, és a befőzés dátumát.
17. A befőttet száraz, sötét, hűvös helyen
tárolja, így az akár egy évig is
eltartható.
6.3 Folyadékok és levesek melegen
tartása
Az a befőző kiválóan alkalmas pl. forralt
bor, kakaó, levesek és főzelékek melegen
tartására.
Vigyázat! Ügyeljen arra, hogy a
készülékben soha ne legyen túl sok
folyadék. A folyadékszint mindig a "MAX"
jelölés alatt legyen. Ha túl sok a folyadék,
az a tartályból kifuthat.
38
Page 41

RP89015 Einkochautomat LB4 Seite 39 Dienstag, 12. März 2013 4:19 16
1. Töltse a folyadékot a tartályba (3).
2. Helyezze rá a fedőt (1) a tartályra (3).
3. A hőmérsékletet szabályozó
forgókapcsolóval (6) állítsa be a kívánt
hőmérsékletet.
–A hőmérséklet 1°C-os lépésekben
emelkedik;
– 5 °C-onként elhangzik egy
figyelmeztető hang;
– A beállított hőmérséklet megjelenik a
beállított hőmérséklet kijelzőjén (10).
4. Ne állítsa be az időt, hanem nyomja
meg a "TIMER" (7) forgatógombot.
– A kijelzőn megjelenik a "8" jelzés.
5. Nyomja meg a Start/Stop
nyomógombot (6).
–A készülék melegíteni kezd.
– A beállított hőmérsékletet elérését
hangjelzés jelzi:
– A készülék addig tartja a meleget,
amíg Ön meg nem nyomja a Start/
Stop gombot (6) .
6. Rendszeresen kevergesse a folyadékot,
hogy a hőeloszlás egyenletes legyen, és
semmi ne ragadjon le a tartály aljára.
7. Ha a folyadék tiszta, és nincsenek
benne szilárd élelmiszerdarabok, akkor
azt a csapon (5) keresztül ki lehet
folyatni. Ehhez nyomja le a
csapolókart (4).
Figyelem: Ha a csapolókart (4) nagy
folyadékmennyiség esetén nem akarja
állandóan nyomva tartani, tolja fel a
csapolókart (4) függőleges helyzetbe.
8. A szilárd élelmiszerek a csapot
eldugítanák. Ezeket merőkanállal
merítse ki.
9. Használat után alaposan tisztítsa meg a
készüléket (lásd „9. Tisztítás és tárolás“
a 43. oldalon).
6.4 Túlmelegedés elleni védelem
A készülék túlmelegedés elleni védelemmel
rendelkezik. Ha a tartályban (3) nincs elég
folyadék és ezáltal túlságosan megnőne a
hőmérséklet, figyelmeztető hangjelzések és
egy szimbólum hívják fel a figyelmet a túl
alacsony töltési szintre.
1. Kapcsolja ki a készüléket a Start/Stop
gomb (6) megnyomásával.
A figyelmeztető hangjelzések
elhallgatnak.
2. Töltsön a készülékbe folyadékot.
3. Indítsa be a készüléket a Start/Stop
gomb (6) megnyomásával.
Ha Ön a figyelmeztetés után 5 percen belül
nem intézkedik, a készülék automatikusan
kikapcsol.
Ebben az esetben húzza ki a hálózati
csatlakozódugót, hagyja a készüléket
kihűlni.
Ezután a készüléket ismét üzembe veheti.
SEAD 1800 B1 39
Page 42

RP89015 Einkochautomat LB4 Seite 40 Dienstag, 12. März 2013 4:19 16
7. Receptek
7.1 Májpástétom dunsztolva
Hozzávalók:
• 25 dkg máj (sertés, marha, tyúk, pulyka)
• 30 dkg kövér szalonna
• 40 dkg dagadó
• 30 dkg tarja
• 4 fej vöröshagyma
•2 szál zöldhagyma
• 5 dkg sertészsír
•1 csomó petrezselyem
•1 csomó metélőhagyma
• 1 evőkanál szárított majoránna
• 1 evőkanál friss vagy szárított kakukkfű
• 1 evőkanál friss vagy szárított turbolya
• 1 evőkanál só
• 1 teáskanál fehér bors
• 1 teáskanál szerecsendió
• 1 teáskanál őrölt szegfűszeg
• 1 teáskanál kardamóm
• 1 teáskanál őrölt vagy reszelt gyömbér
Elkészítés:
1. A tarját és a dagadót enyhén sós vízben
főzze meg.
2. A húst vegye ki a léből és hagyja kihűlni.
3. A húslét tegye félre.
4. A májat forrázza le (ne főzze).
5. A húst, a szalonnát és a májat darálja le.
6. A vöröshagymát és a zöldhagymát
vágja apróra.
7. A felaprított vöröshagymát és
zöldhagymát sertészsíron pirítsa
üvegesre.
8. A ledarált húst, a zöld- és a
vöröshagymát, valamint a fűszereket és
a fűszerzöldséget tegye egy tálba.
9. Töltsön hozzá 1 liter húslét.
10.Ezt a keveréket addig dagassza, amíg
egynemű masszát nem kap.
11.Az átdagasztott masszát töltse csavaros
üvegekbe.
12.100 °C-on kb. 160 percig dunsztolja.
Figyelem: A szavatossági idő kb. 1 év.
7.2 Földieper-kivi krém
Hozzávalók:
• 1,5 kg friss földieper
• 50 dkg érett kivi
• 1 kg zselésítő cukor főzés nélkül
Elkészítés:
1. Alaposan mossa meg a földiepret.
2. Csöpögtesse le a földiepret.
3. Tisztítsa meg a földiepret . Távolítsa el a
szárakat, a leveleket és a rossz részeket.
4. A kivit hámozza meg és vágja apróra.
5. Rakja a gyümölcsöket egy tálba.
6. Adja hozzá a zselésítő cukrot.
7. Pürésítse mindezt egy krumplinyomóval.
8. A pürét töltse üvegekbe, az üvegeket
gondosan zárja le.
9. 80 °C-on kb. 25 percig főzze be.
Figyelem: Ehhez az elkészítési módhoz
olyan zselésítő cukrot használjon, amely
forralás nélkül is besűrűsödik. Egy olcsóbb
alternatíva a hagyományos zselésítő cukor
2:1. Hagyományos zselésítő cukor esetén
előfordulhat, hogy a gyümölcskrém hg
marad.
7.3 Cukkinis kecsöp
Hozzávalók:
•3 kg cukkini
•1 kg vöröshagyma
• kb. 3 evőkanál só
• 50 dkg cukor
• 1 liter gyenge fűszeres ecet
• 2 evőkanál fűszerpaprika
40
Page 43

RP89015 Einkochautomat LB4 Seite 41 Dienstag, 12. März 2013 4:19 16
• 3 evőkanál curry
• 3 evőkanál csípős mustár
• 1-2 evőkanál cayenne-bors
• 2 tubus sűrített paradicsom
Elkészítés:
1. Reszelje le a cukkinit finom reszelőn.
2. Vágja a hagymát apróra.
3. A cukkinit, a hagymát és a sót tegye egy
tálba.
4. Tegye a tálat 24 órára egy száraz,
hűvös helyre, hogy a zöldség levet
eresszen.
5. Öntse ki a levet, esetleg nyomja ki a
masszát.
6. Az összes adalékot tegye egy lábosba
és óvatosan melegítse meg (lekozmálási
veszély).
7. Kb. 30 percig kis lángon forralja.
Közben állandóan keverje, mert a
massza könnyen lekozmál.
8. Pürésítse a masszát.
9. Töltse a masszát csavaros üvegekbe.
10.100 °C-on kb. óráig dunsztolja.
7.4 Meggy
Hozzávalók:
• meggy
•cukor
•víz
Elkészítés:
1. A meggyet gondosan válogassa meg.
Csak a jók kerüljenek az üvegekbe.
2. Szártalanítsa a meggyet.
3. Kb. 30 percre áztassa be hideg vízbe,
így kijönnek az esetleg benne lévő
kukacok vagy férgek.
4. Magozza ki a meggyet.
5. A kimagozott meggyet rétegezve töltse
az üvegekbe.
6. Készítsen cukoroldatot 1 liter vízre
30 dkg cukrot számítva.
7. Az üvegekbe annyi cukoroldatot tegyen,
hogy az a meggyet teljesen elfedje.
8. 80 °C-on kb. 30 percig főzze be.
7. 5 T ea pu n c s
Figyelem: Az itt megadott mennyiség kb.
3 l ital elkészítéséhez elegendő. Nagyobb
mennyiség esetén ennek megfelelően több
alapanyagot használjon.
Hozzávalók:
• 1,5 l fekete tea
• 1 üveg vörösbor (0,75 l)
• 6 kezeletlen narancs
•3 kezeletlen citrom
• 6 rúd fahéj
• kb. 75 dkg cukor
• rum ízlés szerint
Elkészítés:
Figyelem: A teapuncsot közvetlenül a
befőzőben készítheti el. Mivel azonban az
italban szilárd élelmiszerdarabkák vannak,
az italt merőkanállal merje ki, mert ellenkező
esetben a csap eldugulhat.
Az italt azonban külön lábosban is
elkészítheti, azután átszűrve a befőzőbe
teheti. Mivel így már nincsenek szilárd
darabkák az italban, a puncsot a csapon
keresztül is folyathatja.
1. Főzzön egy fekete teát.
2. Préseljen ki 2 citromot.
3. Vágjon 2 narancsot és 1 citromot vékony
szeletekre.
4. A teát, a bort, a citromlevet, a
gyümölcsszeleteket és a fahéjrudakat
tegye egy lábosba.
5. Az adalékokat addig melegítse, amíg a
folyadék forrni nem kezd.
6. Lassan keverje bele a cukrot állandó
kóstolgatás mellett, hogy el ne édesítse
a teapuncsot.
7. Végül (ízlés szerint) öntsön hozzá egy jó
adag rumot.
SEAD 1800 B1 41
Page 44

RP89015 Einkochautomat LB4 Seite 42 Dienstag, 12. März 2013 4:19 16
8. Kis hőfokon még kb. 30 percig hagyja
főni.
8. Befőzési idők és hőmérsékletek
Élelmiszer Hőmérséklet
°C-ban
Zöldség
Karfiol 100 (MAX) 90
Bab 100 (MAX) 120
Borsó 85 120
Csemege
uborka
Karalábé 100 (MAX) 95
Tök 90 30
Sárgarépa 100 (MAX) 90
Gomba 100 (MAX) 110
Kelbimbó 100 (MAX) 110
Vörös
káposzta
Zeller 100 (MAX) 110
Spárga 100 (MAX) 120
Paradicsom 90 30
100 (MAX) 30
100 (MAX) 110
Gyümölcs
Alma, kemény 85 40
Alma, puha 85 30
Almapüré 90 30
Sárgabarack 85 30
Körte, kemény 90 80
Körte, puha 90 30
Szeder 80 25
Földieper 80 25
Áfonya 85 25
Málna 80 30
Ribizli 90 25
Idő
percben
Figyelem: Ha a befőzőben készíti, a
felforraláshoz 100 °C-ot állítson be. A
további elkészítéshez és a melegen
tartáshoz csökkentse a hőmérsékletet kb.
80 °C-ra. A teapuncs legyen meleg, de ne
forrjon, mert akkor az alkohol kipárolog.
Élelmiszer Hőmérséklet
°C-ban
Cseresznye,
meggy
Mirabella 85 30
Őszibarack 85 30
Vörös szilva 90 30
Vörös áfonya 90 25
Birsalma 95 30
Ringló 85 30
Rebarbara 95 30
Egres 80 30
Kék szilva 90 30
80 30
Idő
percben
Hús (csak előfőzött állapotban)
Sültek 100 (MAX) 85
Húslé 100 (MAX) 60
Szárnyas 100 (MAX) 75
Pörkölt 100 (MAX) 75
Vadas 100 (MAX) 75
Főtt kolbász-
termékek
Nyers kolbásztermékek
100 (MAX) 75
100 (MAX) 110
42
Page 45

RP89015 Einkochautomat LB4 Seite 43 Dienstag, 12. März 2013 4:19 16
9. Tisztítás és tárolás
Figyelmeztetés! Az áramütés,
sérülés vagy károsodás
veszélyének elkerülése érdekében:
– Minden egyes tisztítás előtt
húzza ki a hálózati
csatlakozódugót a hálózati
csatlakozóaljzatból.
– Tisztítás előtt hagyja lehűlni a
készüléket.
– Soha ne merítse vízbe a
tartályt (3).
Vigyázat! Semmiképpen se használjon
súroló, maró vagy karcoló tisztítószert. Ezek
miatt a készülék megsérülhet.
1. Tisztítsa meg a készüléket nedves
ruhával. Használhat némi
mosogatószert is.
2. Ezután öblítse le tiszta vízzel.
3. A készüléket csak azután használja újra,
miután az teljesen megszáradt.
9.1 A rács és a fedő tisztítása
1. A rácsot (12) és a fedőt (1) kézzel
mosogassa el.
2. Öblítse el tiszta vízzel.
9.2 A csap tisztítása
A csapolókar (4) a tisztítás
megkönnyebbítésére lecsavarozható. A
csapot (5) nem lehet leszerelni, mert ez
tömítési problémákat okozhat.
1. Csavarja le a csapolókart (4) a
csapról (5).
2. A csapolókart (4) kézzel mosogassa el.
3. Öblítse el tiszta vízzel.
4. Töltsön a tartályba (3) gyenge
öblítőoldatot és engedje le a csapon (5)
keresztül.
Figyelem: Makacs szennyeződések
esetén a csapot (5) pipatisztítóval
tisztíthatja.
5. Öblítse át tiszta vízzel.
6. Csavarja vissza a csapolókart (4) a
csapra (5).
9.3 A készülék tárolása
1. A készülék alsó részére tekerje fel a
hálózati csatlakozózsinórt.
2. Dugja a hálózati csatlakozódugót a
készülék aljának közepén kialakított
mélyedésbe.
3. Tegye el a készüléket.
9.4 Lerakódások eltávolítása
A víz keménységi fokának függvényében a
készüléken lerakódások keletkezhetnek.
Ezeket az energiamegtakarítás, a készülék
élettartamának meghosszabbítása valamint
a higiénia betartása érdekében
rendszeresen távolítsa el.
1. Törülje le a lerakódásokkal borított
felületeket ecetes vízbe mártott ruhával.
2. Ha a készülék nagyon vízköves, töltsön
a tartályba (3) a kereskedelemben
beszerezhető vízkőoldót és hagyja
benne egy éjszakára.
Vigyázat! Vízkőoldás közben a
készülék ne legyen bekapcsolva, mert ez
a készülékben kárt tehet.
3. Ezután a készüléket alaposan öblítse ki.
4. A készüléket csak azután használja újra,
miután az teljesen megszáradt.
SEAD 1800 B1 43
Page 46

RP89015 Einkochautomat LB4 Seite 44 Dienstag, 12. März 2013 4:19 16
10. Ártalmatlanítás
10.1 A készülék
Az áthúzott szemeteskuka
szimbólum azt jelenti, hogy az
elhasználódott terméket az
Európai Unióban szelektív
hulladékgyűjtő-helyre kell vinni.
Ez a termékre és valamennyi
ilyen jellel ellátott tartozékára vonatkozik. A
jelzett termékeket nem szabad a normál
háztartási hulladékok közé dobni, hanem
valamely elektromos és elektronikus
készülék újrahasznosító gyűjtőhelyen kell
leadni. Az újrahasznosítás elősegíti a
nyersanyag-felhasználás csökkentését és a
környezet tehermentesítését. Ezért kérjük,
feltétlenül vegye figyelembe az Ön
országában érvényes ártalmatlanítási
előírásokat.
10.2 Csomagolás
A csomagolóanyag ártalmatlanítása során
vegye figyelembe a helyi környezetvédelmi
előírásokat.
11. Jótállási
JÓTÁLLÁSI TÁJÉKOZTATÓ
A termék megnevezése: Befőző
A termék típusa: SEAD 1800 B1 A termék azonosításra alkalmas részeinek
A gyártó cégneve, címe és email címe:
HOYER Handel GmbH
Kühnehöfe 5
D-22761 Hamburg
Az importáló és forgalmazó cégneve és címe: Lidl Magyarország Kereskedelmi Bt.,
H-1037 Budapest, Rádl árok 6.
1. A jótállási idő a Magyar Köztársaság
területén, Lidl Magyarország
Kereskedelmi Bt. üzletében történt
vásárlás napjától számított 3 év.
2. A jótállási igény a jótállási jeggyel
érvényesíthető. A jótállási jegy
szabálytalan kiállítása, vagy
átadásának elmaradása nem érinti a
Gyártási szám: 89015
meghatározása: Alsó rész
A szerviz neve, címe és telefonszáma:
Szerviz Magyarosrzag
Teknihall Elektronik GmbH
Breitefeld 15
D-64839 Münster
Tel.: 0640 102785
E-Mail: hoyer@lidl.hu
jótállási kötelezettség-vállalás
érvényességét. Kérjük, hogy a vásárlás
tényének és időpontjának bizonyítására
őrizze meg a pénztári fizetésnél kapott
jótállási jegyet (nyugtát).
44
Page 47

RP89015 Einkochautomat LB4 Seite 45 Dienstag, 12. März 2013 4:19 16
3. A vásárlástól számított három napon
belül érvényesített csereigény esetén a
forgalmazó köteles a terméket kicserélni,
feltéve ha a hiba a rendeltetésszerű
használatot akadályozza.
A jótállási jogokat a termék
tulajdonosaként a fogyasztó
érvényesítheti az áruházakban, valamint
a jótállási tájékoztatóban feltüntetett
szervizekben.
A fogyasztó jótállási kifogásáról a
forgalmazó (szerviz) jegyzőkönyvet
köteles felvenni, amelyben rögzíteni kell
a fogyasztó nevét, címét, a fogyasztási
cikk (termék) megnevezését, vételárát, a
vásárlás időpontját, a hiba
bejelentésének időpontját, a hiba
leírását, a fogyasztó által érvényesíteni
kívánt igényt, a kifogás rendezésének
módját.
Amennyiben a kifogás rendezésének
módja a fogyasztó igényétől eltér, ennek
indokolását a jegyzőkönyvben meg kell
adni. A jegyzőkönyv másolatát a
fogyasztónak át kell adni. Ha a
kötelezett a fogyasztó igényének
teljesíthetőségéről annak bejelentésekor
nem tud nyilatkozni, álláspontjáról
legkésőbb három munkanapon belül
köteles értesíteni a fogyasztót.
A jótállás ideje alatt a fogyasztó kérheti
a termék kijavítását, kicserélését, vagy
ha a termék nem javítható vagy
cserélhető, árleszállítást kérhet, vagy
elállhat a szerződéstől és visszakérheti a
vételárat. Ha a forgalmazó, vagy
szerviz a termék kijavítását megfelelő
határidőre nem vállalja, vagy nem végzi
el, a fogyasztó a hibát a forgalmazó
költségére kijavíthatja, vagy mással
kijavíttathatja. A kijavítás során a
termékbe csak új alkatrész kerülhet
beépítésre.
4. A fogyasztó a hiba felfedezésé után a
lehető legrövidebb időn belül köteles a
hibát bejelenteni és a terméket a jótállási
jogok érvényesítése céljából átadni. A
hiba felfedezésétől számított két
hónapon belül bejelentett jótállási igényt
időben közöltnek kell tekinteni. A közlés
elmaradásából eredő kárért a fogyasztó
felelős. A jótállási igény
érvényesíthetőségének határideje a
termék, vagy fődarabjának kicserélése,
kijavítása esetén a kicserélt, vagy
kijavított termékre, illetve alkatrészre újra
kezdődik.
5. A rögzített bekötésű, illetve a 10 kg-nál
súlyosabb, vagy tömegközlekedési
eszközön nem szállítható terméket az
üzemeltetés helyén kell megjavítani.
Abban az esetben, ha a javítás a
helyszínen nem végezhető el, a termék
ki- és visszaszereléséről, valamint
szállításáról a forgalmazónak kell
gondoskodnia.
6. A jótállás nem áll fenn, ha a hiba a nem
rendeltetésszerű használatból,
átalakításból, helytelen tárolásból, vagy
a használati utasítástól eltérő kezelésből,
vagy bármely a vásárlást követő
behatásból fakad, vagy elemi kár
okozta, és azt a forgalmazó, vagy a
szerviz bizonyítja. A jótállás nem
vonatkozik a mozgó kopó alkatrészek
(világítótestek, gumiabroncsok stb.)
rendeltetésszerű elhasználódására. A
szerviz és a forgalmazó a kijavítás során
nem felel a terméken a fogyasztó vagy
harmadik személyek által tárolt
adatokért vagy beállításokért.
A jótállás a fogyasztó törvényből eredő
szavatossági jogait és azok
érvényesíthetőségét nem érinti.
Ezt a dokumentumot, egyéb
kézikönyveinket, termékvideóinkat és szoftvereinket a
www.lidl-service.com
címről töltheti le.
SEAD 1800 B1 45
Page 48

RP89015 Einkochautomat LB4 Seite 46 Dienstag, 12. März 2013 4:19 16
- - - - - - - - - - - - - - - - - - -- - - - - - - - - - - -- - - - - - - - - - - - - - - - - - - - - - - - - - - - - - - - - - - - - - - - - - - -
12. Garanciakártya 89015
A jótállási igény bejelentésének
és javításra átvételi időpontja:
A hiba oka:
A fogyasztó részére történő
visszaadás időpontja:
A hiba javításának módja:
A szerviz bélyegzője, kelt és
aláírása:
A javításra tekintettel a jótállás
új határideje:
46
Page 49

RP89015 Einkochautomat LB4 Seite 47 Dienstag, 12. März 2013 4:19 16
Kazalo
1. Opis aparata. . . . . . . . . . . . . . . . . . . . . . . . . . . . . . . . . . . . . . . . . . . . . . . . . . . . . . . . . . 47
2. Poimenovanje delov (glejte pregibno stran) . . . . . . . . . . . . . . . . . . . . . . . . . . . . . . . . . . . 48
3. Tehnični podatki . . . . . . . . . . . . . . . . . . . . . . . . . . . . . . . . . . . . . . . . . . . . . . . . . . . . . . . 48
4. Varnostna navodila . . . . . . . . . . . . . . . . . . . . . . . . . . . . . . . . . . . . . . . . . . . . . . . . . . . . . 48
5. Razpakiranje in namestitev . . . . . . . . . . . . . . . . . . . . . . . . . . . . . . . . . . . . . . . . . . . . . . . 51
6. Upravljanje aparata . . . . . . . . . . . . . . . . . . . . . . . . . . . . . . . . . . . . . . . . . . . . . . . . . . . . 51
7. Recepti. . . . . . . . . . . . . . . . . . . . . . . . . . . . . . . . . . . . . . . . . . . . . . . . . . . . . . . . . . . . . . 54
8. Časi in temperature za vkuhavanje . . . . . . . . . . . . . . . . . . . . . . . . . . . . . . . . . . . . . . . . . . 56
9. Čiščenje in shranjevanje. . . . . . . . . . . . . . . . . . . . . . . . . . . . . . . . . . . . . . . . . . . . . . . . . . 57
10. Odlaganje odpadkov . . . . . . . . . . . . . . . . . . . . . . . . . . . . . . . . . . . . . . . . . . . . . . . . . . . . 58
11. Garancija . . . . . . . . . . . . . . . . . . . . . . . . . . . . . . . . . . . . . . . . . . . . . . . . . . . . . . . . . . . . 59
Prisrčne čestitke ob nakupu vaše
nove naprave.
S tem ste se odločili za kakovosten izdelek.
Navodila za uporabo so sestavni del tega
izdelka. Vsebujejo pomembna navodila za
varnost, uporabo in odstranjevanje.
1. Opis aparata
1.1 Namen uporabe
Ta aparat za vkuhavanje SilverCrest SEAD
1800 B1 omogoča:
• vkuhavanje,
• ogrevanje in točenje pijač,
•ogrevanje klobasic,
•ogrevanje juh.
Ta aparat lahko uporabljate samo v suhih
prostorih. Uporaba na prostem ali v vlažnih
prostorih ni dovoljena.
Ta aparat lahko uporabljate samo v
gospodinjstvu ali na podobnih mestih, kot
so:
Pred prvo uporabo izdelka se dobro
seznanite z vsemi navodili za uporabo in
varnostnimi opozorili. Izdelek uporabljajte
samo v skladu z opisi in samo za navedena
področja uporabe.
Če izdelek prevzame tretja oseba, le-tej
izročite tudi vso dokumentacijo.
• kuhinjske niše za zaposlene v trgovinah,
pisarnah in drugih poslovnih objektih;
•kmečki turizmi;
• hoteli, moteli in drugi stanovanjski
objekti za uporabo za stranke;
•penzioni.
1.2 Obseg dobave
• 1 aparat za vkuhavanje,
ki vsebuje:
–1 posodo,
–1 pokrov,
–1 mrežico.
• 1 navodila za uporabo
SEAD 1800 B1 47
Page 50

RP89015 Einkochautomat LB4 Seite 48 Dienstag, 12. März 2013 4:19 16
2. Poimenovanje delov (glejte pregibno stran)
1 Pokrov
2 Ročaja
3 Posoda
4 Točilna ročica
5 Točilna pipa
6 Tipka za vklop/izklop z vrtljivim
gumbom za temperaturo
7 Časovnik z vrtljivim gumbom za minute
8 Sistem za navijanje kabla (pod
9 Prikaz minut
10 Prikaz nastavljene temperature
11 Prikaz trenutne temperature
12 Mrežica
3. Tehnični podatki
Napajalna napetost: 220 – 240 V~/50 Hz
Moč: 1800 W
Prostornina pribl. 27 l
Razred zaščite: I
4. Varnostna navodila
4.1 Razlaga pojmov
V teh navodilih za uporabo boste našli
naslednje signalne pojme:
Opozorilo!
Veliko tveganje: Neupoštevanje
opozorila lahko povzroči nevarnost
telesnih poškodb ali življenjsko
nevarnost.
Previdno!
Srednje tveganje: Neupoštevanje opozorila
lahko povzroči materialno škodo.
Napotek:
Majhno tveganje: Stanja, ki jih je treba
upoštevati pri rokovanju s strojem.
4.2 Posebni napotki za ta aparat
• To napravo lahko uporabljajo otroci od 8.
• Otroci lahko čistijo napravo in izvajajo
aparatom)
Opozorilo!
Da bi preprečili
poškodbe in materialno škodo,
upoštevajte naslednje napotke.
leta starosti dalje in osebe z zmanjšanimi
fizičnimi, čustvenimi ali duševnimi
sposobnostmi oz. s pomanjkanjem izkušenj
in/ali znanja, če so pod nadzorom oz. so
ustrezno poučeni z načinom uporabe
naprave in so razumeli, kakšne so možne
nevarnosti pri uporabi naprave. Otroci se
ne smejo igrati z napravo.
vzdrževalna dela samo, če so starejši od 8
let in so pod nadzorom.
48
Page 51

RP89015 Einkochautomat LB4 Seite 49 Dienstag, 12. März 2013 4:19 16
• Otrokom, ki so mlajši od 8 let, preprečite
dostop do naprave in napajalnega kabla.
• Te naprave naj ne uporabljajo osebe
(vključno z otroci), ki je zaradi zmanjšanih
fizičnih, čustvenih ali duševnih sposobnosti
oz. zaradi svoje neizkušenosti in/ali
pomanjkanja znanja niso sposobne varno
uporabljati brez nadzora ali ustreznega
navodila osebe, ki je odgovorna za njihovo
varnost. Zagotovite ustrezen nadzor in
preprečite, da bi se otroci igrali z napravo.
• Aparata ni dovoljeno uporabljati z zunanjo
stikalno uro ali ločenim sistemom
daljinskega vodenja, kot je npr. daljinsko
vodena vtičnica.
• Bodite pozorni na to, da lahko površine
aparata med delovanjem postanejo vroče:
–Ko aparat deluje, se ga dotikajte samo na
ročajih
2
.
–Preden aparat postavite na drugo mesto,
počakajte, da se ohladi.
• Pred vsakim čiščenjem izvlecite omrežni vtič
iz omrežne vtičnice.
• Počakajte, da se aparat pred čiščenjem
ohladi.
•Posode
3
nikoli ne potapljajte v vodo.
• V nobenem primeru ne uporabljajte
abrazivnih, jedkih ali grobih čistil. Sicer se
lahko aparat poškoduje.
4.3 Splošna opozorila
• Pred uporabo naprave skrbno preberite
navodila za uporabo. Navodila so
sestavni del stroja in morajo biti vedno
na voljo.
• Stroj lahko uporabljate samo v namen, ki
je opisan v navodilih (glejte poglavje
»1.1 Namen uporabe« na strani 47).
• Preverite, če se zahtevana omrežna
napetost (glejte tipsko ploščico na stroju)
ujema z vašo omrežno napetostjo.
• Upoštevajte dejstvo, da vsaka zahteva
glede garancije in jamstva ugasne, če
boste uporabljali dele pribora, ki jih
navodila ne priporočajo ali če pri
popravilu niso bili uporabljeni originalni
nadomestni deli. To velja tudi za
popravila, ki jih opravijo nekvalificirane
osebe. Kontaktni podatki so na voljo v
»Servisni center« na strani59.
• Pri morebitnih motnjah delovanja
v garancijskem roku lahko stroj popravi
samo naš servisni center. V nasprotnem
primeru vsi garancijski zahtevki
ugasnejo.
4.4 Zaščita proti električnemu udaru
Opozorilo! Spodaj navedena
varnostna opozorila vas bodo
zaščitila proti električnemu udaru.
• Stroj lahko priključite samo na vtičnico z
zaščitnim kontaktom. Od tega je namreč
odvisna zaščita proti električnemu
udaru.
• Če je naprava poškodovana, je v
nobenem primeru ne uporabljajte.
Popraviti jo mora strokovno
usposobljena oseba. Kontaktni podatki
so na voljo v »Servisni center« na
strani59.
• V primeru poškodbe napajalnega kabla
na napravi mora kabel zamenjati
predstavnik proizvajalca ali druga
strokovno usposobljena oseba, da
preprečite morebitne nevarnosti.
• V notranjost aparata, razen v za to
predvideno posodo 3, nikakor ne sme
prodreti voda ali druge tekočine. Zato:
– aparata nikoli ne uporabljajte na
prostem
– posode 3 nikoli ne potapljajte v vodo
– nikoli ne postavljajte na stroj polnih
posod z vodo, vaz in podobnega
SEAD 1800 B1 49
Page 52

RP89015 Einkochautomat LB4 Seite 50 Dienstag, 12. März 2013 4:19 16
– nkoli ne uporabljajte stroja v zelo
vlažnem okolju
– nkoli ne uporabljajte stroja v bližini
pomivalnega korita, kopalne kadi,
prhe ali plavalnega bazena. Vodni
curki lahko pridejo v stroj.
Če bi v stroj vseeno prišla tekočina, takoj
izvlecite omrežni vtikač iz vtičnice, stroj
pa naj popravi kvalificirana strokovna
oseba. Kontaktni podatki so na voljo v
»Servisni center« na strani59.
• Nikoli se z vlažnimi rokami ne dotikajte
stroja, omrežnega kabla ali omrežnega
vtikača.
• Omrežni kabel vedno izvlecite tako, da
iztaknete vtikač. Nikoli ne vlecite za
kabel.
• Pazite, da omrežni kabel ne bo
prepognjen ali zmečkan.
• Zavarujte omrežni kabel pred vročimi
površinami (na primer štedilnik).
• Če stroja dalj časa ne boste uporabljali,
iztaknite vtikač iz vtičnice. Samo v tem
primeru bo stroj ločen od električne
napetosti.
• Izogibajte se uporabi kabelskih
podaljškov. Uporaba je dovoljena le
pod naslednjimi pogoji:
– Kabelski podaljšek mora ustrezati
jakosti toka stroja.
– Kabelski podaljšek ne sme biti speljan
»leteče«: onemogočeno mora biti
spotikanje obenj, speljite pa ga tako,
da ne bo dostopen otrokom.
– Kabelski podaljšek ne sme biti
poškodovan.
– Na omrežno vtičnico ne smejo biti
priključeni nobeni drugi stroji, ker
lahko pride do preobremenjenosti
omrežja (prepovedana uporaba
večkratnih vtičnic!)
4.5 Zaščita pred nevarnostjo požara
Opozorilo! Ker naprava deluje
pri visokih temperaturah,
upoštevajte naslednja varnostna
opozorila, da preprečite požar.
• Naprave nikoli ne pokrivajte, da ne
pride do pregrevanja.
• Naprave nikoli ne pustite delovati brez
nadzora. Poškodbe se skoraj vedno
pojavijo hkrati z nastankom neprijetnega
vonja. V tem primeru takoj izvlecite
omrežni vtič iz vtičnice in zagotovite
preverjanje naprave. Kontaktni podatki
so na voljo v »Servisni center« na
strani59.
4.6 Zaščita pred telesnimi poškodbami
Opozorilo! Upoštevajte
naslednje napotke, da ne pride do
poškodb.
• Pazite, da napajalni kabel ni napeljan
tako, da bi se lahko ob njega kdo
spotaknil, se vanj zapletel ali ga
pohodil.
4.7 Varnost vašega otroka
Opozorilo! Otroci pogosto ne
morejo pravilno oceniti nevarnosti,
kar lahko povzroči telesne
poškodbe. Zato bodite pozorni na
naslednje:
• Ta izdelek se lahko uporablja samo pod
nadzorom odraslih oseb, kar bo
preprečili, da bo se otroci igrali z njim.
• Skrbno pazite, da bo stroj vedno izven
dosega otrok in da ga ne bodo mogli za
kabel potegniti dol in se igrati z njim.
• Pazite, da embalažna folija ne bo
smrtna past za otroke. Embalažne folije
niso igrača.
50
Page 53

RP89015 Einkochautomat LB4 Seite 51 Dienstag, 12. März 2013 4:19 16
4.8 Materialna škoda
Pozor! Da bi preprečili materialno škodo,
upoštevajte naslednje predpise.
• Aparata za vkuhavanje nikoli ne
uporabljajte brez vode ali tekočine.
• Bodite pozorni, da v aparatu nikoli ni
preveč tekočine. Nivo tekočine mora biti
vedno pod oznako »MAX«. Če je
tekočine preveč, lahko steče čez rob.
5. Razpakiranje in namestitev
Napotek: Ker je aparat ob dobavi
namaščen, se lahko pri prvi uporabi
pojavita blag dim in vonj. Pojav ni škodljiv
in hitro izgine. V tem času zagotovite
zadostno prezračevanje.
1. Iz embalaže vzemite posamezne dele.
2. Preverite, ali so posamezni deli popolni
(glejte poglavje »1.2 Obseg dobave«
na strani 47) in ali imajo kakšne
poškodbe.
3. Pred prvo uporabo napravo temeljito
očistite (glejte poglavje »9. Čiščenje in
shranjevanje« na strani 57).
4. Napajalni kabel v celoti odvijte s
sistema za navijanje 8.
• Napravo postavite samo na ravno, suho
in nedrsljivo površino, da se ne more
prevrniti ali zdrsniti na tla.
• Naprave ne postavite neposredno pod
viseče omare, saj para izstopa v smeri
navzgor in lahko poškoduje pohištvo.
• Naprave ne postavite na vročo ploščo
štedilnika.
• Naprave in pribora ne smete uporabljati
v mikrovalovni pečici.
5. Napravo postavite na ravno, suho in
nedrsečo površino, da se ne more
prevrniti in zdrsniti.
6. Omrežni vtič priključite v ustrezno
omrežno vtičnico z varnostnim
kontaktom (glejte poglavje »3. Tehnični
podatki« na strani 48).
7. V p oso do 3 nalijte približno 5 l vode.
8. Voda naj se približno 20 min kuha
(glejte poglavje »6. Upravljanje
aparata« na strani 51).
9. Nato jo odlijte.
Aparat je zdaj pripravljen na delovanje.
6. Upravljanje aparata
6.1 Spreminjanje nastavitev, vklop,
izklop
Napotek: takoj ko zavrtite enega od
vrtljivih gumbov 7 ali 6, se samodejno
vklopi osvetlitev ozadja za prikaze. Osvetlitev za prikaze se po 5 min samodejno
izklopi.
SEAD 1800 B1 51
1. Omrežni vtič priključite v ustrezno
Opozorilo! Aparat priključite
izključno v omrežno vtičnico z
varnostnim kontaktom, kajti od
tega je odvisna zaščita pred
električnim udarom.
omrežno vtičnico z varnostnim
kontaktom (glejte poglavje »3. Tehnični
podatki« na strani 48).
Page 54

RP89015 Einkochautomat LB4 Seite 52 Dienstag, 12. März 2013 4:19 16
2. Na vrtljivem gumbu za temperaturo 6
nastavite želeno temperaturo.
– Temperaturo nastavljate v korakih po
1°C.
– Vsakih 5 °C zaslišite zvočni signal.
– Nastavljena temperatura je prikazana
na prikazu za nastavljeno
temperaturo 10.
3. Na vrtljivem gumbu za minute 7
nastavite želen čas vkuhavanja.
– Čas nastavljate v korakih po 1 min.
– Vsakih 5 min zaslišite zvočni signal.
– Nastavljen čas je prikazan na prikazu
za minute 9.
4. Pritisnite tipko za vklop/izklop 6.
– Aparat se začne segrevati in na
prikazu se pojavi utripajoča črtica.
–Na zaslonu 11 se prikaže trenutna
temperatura.
Ko je nastavljena temperatura
dosežena:
– zaslišite zvočni signal;
– prikaže se simbol peščene ure;
– nastavljen čas se začne odštevati.
Ko nastavljeni čas poteče, zaslišite zvočni
signal in aparat se izklopi.
5. Če želite napravo izklopiti pred iztekom
nastavljenega časa, pritisnite tipko za
vklop/izklop 6.
6.2 Vkuhavanje
Vkuhavanje (vlaganje) pomeni segrevanje
živil v zračno nepropustni posodi, da se tako
podaljša njihov rok uporabe.
Za vkuhavanje se uporabljajo posebni
kozarci z navojnim pokrovom ali s pokrovom
in gumijastim obročem.
Za vkuhavanje so primerna samo sveža in
popolnoma zrela živila. Prezrelo sadje ali
uvela zelenjava ni primerna.
Vkuhavati je mogoče tudi gobe, meso in
celo kolače.
Vkuhavanje je treba izvesti kar se da hitro
po obiranju, da se tako v živilih ohrani čim
več hranljivih snovi.
Živila je treba pred vkuhavanjem dobro
prebrati in očistiti. Treba je odstraniti
umazanijo, mrčes in slaba mesta. Že
najmanjše gnilo mesto lahko uniči vkuhana
živila.
Če sadje vkuhate s sladkorjem, je dlje časa
obstojno in bolj aromatičnega okusa.
Trdo zelenjavo, kot je korenje, zelje ali
koleraba, je treba predhodno skuhati v slani
vodi. Pri tem pa je ne smete razkuhati do
mehkega. Nato to vodo odlijte, saj ni
primerna za vkuhavanje.
Da bodo vložena živila dolgo časa užitna,
je treba paziti na čistočo in higieno.
Aparate, posodo in vse, kar bo v stiku z
živili, temeljito očistite in 5 min prekuhavajte
v vreli vodi.
Tudi roke naj bodo vedno čiste.
1. Sadje in zelenjavo temeljito operite.
Napotek: Sadje in zelenjavo operite
pred sekljanjem, tako da ohranite čim
več v vodi topnih vitaminov.
2. Sadje in zelenjavo nasekljajte na želeno
velikost.
3. Živila vstavite v kozarce za vlaganje.
Napotek: Bodite pozorni, da so živila
v kozarcih za vlaganje dobro
razporejena. Tako bodo kozarci lepši na
pogled, poleg tega jih boste optimalno
izkoristili.
4. Po želji dodajte začimbe ali sladkor.
5. Kozarce napolnite z vodo, ki naj sega tik
pod rob.
6. Zaprite kozarce.
Napotek: zagotovite, da so kozarci
res dobro zaprti.
52
Page 55

RP89015 Einkochautomat LB4 Seite 53 Dienstag, 12. März 2013 4:19 16
7. V posodo 3 položite mrežico 12.
8. Nato v posodo 3 vstavite še
pripravljene kozarce za vlaganje.
Napotek: kozarce za vlaganje lahko v
posodo 3 postavite v dveh plasteh, ene
kozarce na drugih.
9. V posodo 3 natočite toliko vode, da
bodo zgornji kozarci za vlaganje
približno do 3/4 v vodi.
10.Posodo 3 zaprite s pokrovom 1.
11.Nastavite temperaturo in čas
vkuhavanja (glejte »6.1 Spreminjanje
nastavitev, vklop, izklop« na strani 51 in
»8. Časi in temperature za vkuhavanje«
na strani 56).
12.Za začetek vkuhavanja pritisnite tipko za
vklop/izklop 6 (glejte poglavje
»6.1 Spreminjanje nastavitev, vklop,
izklop« na strani 51).
13.Ko nastavljen čas vkuhavanja poteče,
pod točilno pipo 5 postavite posodo,
odporno na vročino.
14.Pritisnite točilno ročico 4 in iz posode 3
izpustite vodo.
15.Preden kozarce za vlaganje vzamete iz
posode 3, naj se ohladijo.
Napotek: še vroči kozarci za vlaganje
so občutljivi na prepih. Zato jih čim bolj
dolgo pustite v posodi 3, dokler se
popolnoma ne ohladijo. Če boste
aparat za tem želeli ponovno uporabiti,
lahko tople kozarce vzamete iz posode,
jih postavite na krpo in prekrijete z
drugo krpo, dokler se popolnoma ne
ohladijo.
16.Kozarce označite z datumom
vkuhavanja in pripišite vsebovano živilo.
17. Vkuhana živila hranite v suhem, temnem
in hladnem prostoru, tako bodo
uporabna vse do enega leta.
6.3 Ogrevanje juh in tekočin
Ta aparat za vkuhavanje je še posebej
primeren za ogrevanje kuhanega vina,
kakava, juh in enolončnic.
Previdno! Bodite pozorni, da ni v aparatu
nikoli preveč tekočine. Nivo tekočine mora biti
vedno pod oznako »MAX«. Če je tekočine
preveč, lahko steče čez rob.
1. Tekočino nalijte v posodo 3.
2. Posodo 3 zaprite s pokrovom 1.
3. Na vrtljivem gumbu za temperaturo 6
nastavite želeno temperaturo.
– Temperaturo nastavljate v korakih po
1°C.
– Vsakih 5 °C zaslišite zvočni signal.
– Nastavljena temperatura je prikazana
na prikazu za nastavljeno
temperaturo 10.
4. Ne nastavite časa, ampak pritisnite
vrtljivi gumb »TIMER« (časovnik) 7.
– Na prikazu se pojavi ležeča »8«.
5. Pritisnite tipko za vklop/izklop 6.
– Aparat se začne segrevati.
– Ko je nastavljena temperatura
dosežena, zaslišite zvočni signal.
– Aparat ogreva tako dolgo, dokler
ponovno ne pritisnete tipke za vklop/
izklop 6.
6. Tekočino redno premešajte, da se
toplota enakomerno porazdeli in se
tekočina ne oprime dna.
7. Čiste tekočine brez delcev lahko iztočite
skozi točilno pipo 5. Za to pritisnite
točilno ročico 4 navzdol.
Napotek: če želite iztočiti večje
količine tekočine, vam točilne ročice 4 ni
treba nenehno držati, ampak jo lahko
navpično poklopite navzgor.
SEAD 1800 B1 53
Page 56

RP89015 Einkochautomat LB4 Seite 54 Dienstag, 12. März 2013 4:19 16
8. Juhe in tekočine s trdimi delci bi zamašile
točilno pipo, zato takšno vsebino
odvzemite z zajemalko.
9. Po uporabi aparat skrbno očistite (glejte
poglavje »9. Čiščenje in shranjevanje«
na strani 57).
6.4 Zaščita pred pregrevanjem
Aparat ima zaščito pred pregrevanjem. Ko je v
posodi 3 premalo tekočine in temperatura
zato preveč naraste, zaslišite zvočni signal, na
prikazovalniku pa se prikaže simbol
prenizkega nivoja napolnjenosti:
7. Recepti
7.1 Jetrna klobasa
Sestavine:
• 250 g jeter (svinjskih, govejih, kokošjih,
puranjih)
• 300 g mastne slanine
• 400 g potrebušine
• 300 g svinjskega vratu
•4 čebule
•2 pora
• 50 g svinjske masti
• 1 šop peteršilja
• 1 šop drobnjaka
• 1 žlica majarona, posušenega
• 1 žlica timijana, svežega ali posušenega
• 1 žlica krebuljice, sveže ali posušene
•1 žlica soli
• 1 žlička belega popra
• 1 žlička muškatnega oreščka
• 1 žlička klinčkov, mletih
• 1 žlička kardamoma
• 1 žlička ingverja, mletega ali ribanega
1. Aparat izklopite, tako da pritisnite tipko
za vklop/izklop 6.
Zvočni signal utihne.
2. Dolijte tekočino.
3. Aparat ponovno vklopite, tako da
pritisnete tipko za vklop/izklop 6.
Če po opozorilu v roku 5 minut ne izvedete
nobenih ukrepov, se aparat samodejno
izklopi.
V tem primeru izvlecite omrežni vtič in
počakajte, da se aparat ohladi.
Nato lahko aparat ponovno uporabite.
Priprava:
1. Svinjski vrat in potrebušino skuhajte v
rahlo slani vodi.
2. Meso vzemite iz vode in pustite, da se
ohladi.
3. Vodo shranite.
4. Jetra poparite z vročo vodo (ne
kuhajte).
5. Meso, slanino in jetra zmeljite.
6. Čebulo in por na drobno nasekljajte.
7. Nasekljano čebulo in por popražite v
svinjski masti, da posteklenita.
8. Zmleto meso, čebulo in por ter začimbe
in zelišča dajte v skledo.
9. Vse skupaj zalijte z 1 l shranjene vode
od kuhanega mesa.
10.Vse sestavine dobro pregnetite, tako da
nastane homogeno testo.
11.To testo nato porazdelite v kozarce z
zamaški na navoj.
12.Vkuhavajte pribl. 160 min pri 100 °C.
Napotek: rok uporabe živila je pribl. 1 leto.
54
Page 57

RP89015 Einkochautomat LB4 Seite 55 Dienstag, 12. März 2013 4:19 16
7.2 Sadni namaz iz jagod in kivijev
Sestavine:
• 1,5 kg svežih jagod
• 500 g zrelih kivijev
• 1 kg želirnega sladkorja brez
kuhanja
Priprava:
1. Jagode temeljito operite.
2. Pustite, da se dobro posušijo.
3. Nato jih očistite: peclje, liste in slaba
mesta odstranite.
4. Kivije olupite in na drobno narežite.
5. Sadje položite v skledo.
6. Dodajte želirni sladkor.
7. S paličnim mešalnikom vse spasirajte.
8. Napolnite v kozarce in dobro zaprite.
9. Vkuhavajte 25 min pri 80 °C.
Napotek: pri tem načinu priprave morate
uporabiti želirni sladkor, ki veže tudi brez
kuhanja. Cenejša alternativa za običajen
želirni sladkor 2:1. Če uporabite običajen
želirni sladkor, sadni namaz morda ne bo
trden.
7.3 Gosta zelenjavna omaka iz bučk
Sestavine:
•3 kg bučk
•1 kg čebule
•pribl. 3 žlice soli
• 500 g sladkorja
• 1 l blagega zeliščnega kisa
• 2 žlici paprike v prahu
•3 žlice curryja
•3 žlice pekoče gorčice
• 1–2 žlici kajenskega popra
• 2 tubi paradižnikove mezge
Priprava:
1. Bučke nastrgajte.
2. Čebulo nasekljajte na kocke.
3. Bučke, čebulo in sol dajte v skledo.
4. Pustite stati pribl. 24 ur na hladnem in
suhem mestu.
5. Iz sklede odlijte vso vodo, po potrebi
maso nekoliko iztisnite.
6. Vse sestavine dajte v lonec in previdno
segrevajte (lahko se prismodi).
7. Pustite rahlo vreti pribl. 30 min. Ob tem
nenehno mešajte, saj se masa lahko
prismodi.
8. Nato maso spasirajte.
9. Maso napolnite v kozarce z zamaški na
navoj.
10.Vkuhavajte pribl. 1 h pri 100 °C.
7.4 Vložene v išnje
Sestavine:
•Višnje
• Sladkor
•Voda
Priprava:
1. Višnje temeljito preberite, v kozarce
boste namreč vložili samo dobre.
2. Nato z njih odstranite peclje.
3. Za pribl. 30 min jih potopite v hladno
vodo, da odstranite morebitne žerke in
mrčes.
4. Nato iz višenj odstranite koščice.
5. Višnje naložite v kozarce.
6. Iz 300 g sladkorja in 1 l vode pripravite
sladkorno raztopino.
7. V kozarce napolnite toliko raztopine, da
z njo v celoti prekrijete višnje.
8. Vkuhavajte pribl. 30 min pri 80 °C.
SEAD 1800 B1 55
Page 58

RP89015 Einkochautomat LB4 Seite 56 Dienstag, 12. März 2013 4:19 16
7.5 Čajni punč
Napotek: iz navedenih količin boste
pripravili pribl. 3 l pijače. Za več pijače
preprosto povečajte količine sestavin.
Sestavine:
• 1,5 l črnega čaja
• 1 steklenica rdečega vina (0,75 l)
• 6 neškropljenih pomaranč
• 3 neškropljene limone
•6 palčk cimeta
• pribl. 750 g sladkorja
• rum po okusu
Priprava:
Napotek: čajni punč lahko pripravite kar
v aparatu za vkuhavanje. Ker bodo v pijači
tudi trdni delci, jo iz aparata nato zajemajte
z zajemalko, sicer lahko zamašite točilno
pipo.
Pijačo lahko pripravite tudi v ločenem loncu
in jo nato precedite v aparat za vkuhavanje.
Nato v pijači ne bo več trdnih delcev in čajni
punč boste lahko natakali skozi točilno pipo.
8. Časi in temperature za vkuhavanje
1. Skuhajte črni čaj.
2. Iztisnite 4 pomaranče in 2 limoni.
3. 2 pomaranči in 1 limono narežite na
tanke rezine.
4. Črni čaj, vino in sok zlijte v lonec ter
dodajte sadne rezine in cimetove
palčke.
5. Sestavine naj nato rahlo zavrejo.
6. Počasi vmešajte sladkor, pri tem pa
redno pokušajte, da čajni punč ne bo
presladek.
7. Na koncu dodajte kanček ruma (po
okusu).
8. Na zmerni vročini kuhajte še pribl. 30
min.
Napotek: pri pripravi v aparatu za
vkuhavanje za kuhanje nastavite
temperaturo 100 °C, za kuhanje pri zmerni
vročini in za ohranjanje toplote pa pribl.
80 °C. Čajni punč naj bo vroč, vendar ne
sme vreti, sicer se izloči alkohol.
Živila Tempera-
tura v °C
Čas v
minutah
Zelenjava
Cvetača 100 (maks.) 90
Fižol 100 (maks.) 120
Grah 85 120
Kisle kumarice
Koleraba 100 (maks.) 95
Buča 90 30
Korenček 100 (maks.) 90
Gobe 100 (maks.) 110
Brstični ohrovt 100 (maks.) 110
Rdeče zelje 100 (maks.) 110
100 (maks.) 30
56
Živila Tempera-
tura v °C
Zelena 100 (maks.) 110
Šparglji 100 (maks.) 120
Paradižnik 90 30
Čas v
minutah
Sadje
Jabolka, trda 85 40
Jabolka,
mehka
Jabolčna
čežana
Marelice 85 30
Hruške, trde 90 80
Hruške,
mehke
85 30
90 30
90 30
Page 59

RP89015 Einkochautomat LB4 Seite 57 Dienstag, 12. März 2013 4:19 16
Živila Tempera-
tura v °C
Robide 80 25
Jagode 80 25
Borovnice 85 25
Maline 80 30
Ribez 90 25
Češnje 80 30
Mirabele 85 30
Breskve 85 30
Slive 90 30
Brusnice 90 25
Kutine 95 30
Ringlo 85 30
Rabarbara 95 30
Kosmulje 80 30
Češplje 90 30
Čas v
minutah
9. Čiščenje in shranjevanje
Opozorilo! Da bi preprečili
nevarnost električnega udara,
telesnih poškodb ali poškodb
aparata:
– Pred vsakim čiščenjem izvlecite
omrežni vtič iz omrežne vtičnice.
– Počakajte, da se aparat pred
čiščenjem ohladi.
– Posode 3 nikoli ne potapljajte v
vodo.
Previdno! Nikoli ne uporabljajte
abrazivnih, jedkih ali grobih čistil. Na tak
način se aparat lahko poškoduje.
1. Aparat očistite z vlažno krpo. Uporabite
lahko tudi nekaj sredstva za pomivanje.
2. Nazadnje pobrišite z vlažno krpo brez
čistila.
3. Aparat lahko uporabite šele, ko je
povsem suh.
Živila Tempera-
tura v °C
Čas v
minutah
Meso (mora biti načeloma že
kuhano)
Pečenka 100 (maks.) 85
Mesna juha 100 (maks.) 60
Perutnina 100 (maks.) 75
Golaž 100 (maks.) 75
Divjačina 100 (maks.) 75
Klobasa, kuh-
ana
Klobasa,
surova
100 (maks.) 75
100 (maks.) 110
9.1 Čiščenje mrežice in pokrova
1. Mre žico 12 in pokrov 1 ročno očistite v
pomivalnem koritu.
2. Zatem splaknite s čisto vodo.
9.2 Čiščenje točilne pipe
Za boljše čiščenje lahko točilno ročico 4
odvijete. Točilne pipe 5 ni mogoče odviti,
sicer bi lahko prišlo do težav s tesnjenjem.
1. Točilno ročico 4 odvijte s točilne pipe 5.
2. Točilno ročico 4 ročno očistite v
pomivalnem koritu.
3. Zatem splaknite s čisto vodo.
4. Posodo 3 napolnite z blago mešanico
vode in čistila in tekočino spustite skozi
točilno pipo 5.
SEAD 1800 B1 57
Page 60

RP89015 Einkochautomat LB4 Seite 58 Dienstag, 12. März 2013 4:19 16
Napotek: Pri trdovratni umazaniji v
točilni pipi 5 si lahko pomagate z
ustrezno čistilno palico.
5. Zatem splaknite s čisto vodo.
6. Točilno ročico 4 ponovno privijte na
točilno pipo 5.
9.3 Shranjevanje naprave
1. Napajalni kabel navijte na spodnjo
stran aparata.
2. Omrežni vtič pritrdite na sredini dna
aparata v ustrezno držalo.
3. Shranite aparat.
10. Odlaganje odpadkov
9.4 Odstranjevanje vodnega kamna iz
aparata
Glede na trdoto vode se lahko v aparatu
naredijo obloge iz apnenca. Te morate
redno odstranjevati, da prihranite energijo in
podaljšate življenjsko dobo aparata, pa tudi
zaradi higienskih razlogov.
1. Mesta z apnencem obrišite s krpo, ki ste
jo namočili v nekaj kisa.
2. Če je aparat močno prekrit z apnencem,
posodo 3 napolnite z običajnim
sredstvom za odstranjevanje vodnega
kamna in pustite stati čez noč.
Pozor! Ko iz aparata odstranjujete
apnenec, ta nikoli ne sme biti vklopljen.
Sicer lahko poškodujete aparat.
3. Ko končate, aparat temeljito sperite.
4. Aparat lahko uporabite šele, ko je
povsem suh.
10.1 Naprava
Simbol, prečrtan smetnjak na
kolesih pomeni, da je treba
proizvod v Evropski Uniji
odstraniti v ločene odpadke. To
velja za sam produkt in za vse
s tem simbolom označene dele
pribora. Označeni produkti ne spadajo v
normalne gospodinjske smeti, temveč jih je
treba oddati na zbirnem mestu za reciklažo
električnih in elektronskih naprav. Reciklaža
pripomore, da se potrošnja surovin zmanjša
in okolje razbremeni. Pri tem obvezno
upoštevajte predpise za odstranjevanje v
svoji državi.
58
10.2 Embalaža
Glede odlaganja pakirnega materiala,
morate spoštovati ustrezne predpise v vaši
deželi.
Page 61

Bedienung SI Seite 59 Freitag, 22. März 2013 3:19 15
11. Garancija
Dobavitelj
Upoštevajte, da naslednji naslov ni naslov
servisnega centra. Najprej se obrnite
na zgoraj naveden servisni center.
HOYER Handel GmbH
Kühnehöfe 5
D-22761 Hamburg
Deutschland
Servisni Center
Servis Slovenija
Tel.: 080080917
E-Mail: hoyer@lidl.si
Garancijski list
1. S tem garancijskim listom jamčimo
Hoyer Handel GmbH, da bo izdelek v
garancijskem roku ob normalni in
pravilni uporabi brezhibno deloval in se
zavezujemo, da bomo ob izpolnjenih
spodaj navedenih pogojih odpravili
morebitne pomanjkljivosti in okvare
zaradi napak v materialu ali izdelavi oz.
po svoji presoji izdelek zamenjali ali
vrnili kupnino.
2. Garancija je veljavna na ozemlju
Republike Slovenije.
3. Garancijski rok za proizvod je
36 mesecev od dneva nabave.
4. Kupec je dolžan okvaro javiti
pooblaščenemu servisu oz. se informirati
o nadaljnjih postopkih na zgoraj
navedeni telefonski številki. Svetujemo
vam, da pred tem natančno preberete
navodila o sestavi in uporabi izdelka.
5. Kupec je dolžan pooblaščenemu servisu
predložiti garancijski list in račun, kot
potrdilo in dokazilo o nakupu.
6. V primeru, da proizvod popravlja
nepooblaščeni servis ali oseba, kupec
ne more uveljavljati zahtevkov iz te
garancije.
7. Vzroki za okvaro oz. nedelovanje
izdelka morajo biti lastnosti stvari same,
in ne vzroki, ki so zunaj proizvajalčeve
oz. prodajalčeve sfere. Kupec ne more
uveljavljati zahtevkov iz te garancije, če
se ni držal priloženih navodil za sestavo
in uporabo izdelka ali, če je izdelek
kakorkoli spremenjen ali nepravilno
vzdrževan.
8. Jamčimo servisiranje in rezervne dele za
minimalno dobo, ki je zahtevana s strani
zakonodaje.
9. Obrabni deli oz. potrošni material so
izvzeti iz garancije.
10.Vsi potrebni podatki za uveljavljanje
garancije se nahajajo na dveh ločenih
dokumentih (garancijski list, račun).
11.Ta garancija proizvajalca ne izključuje
pravic potrošnika, ki izhajajo iz
odgovornosti prodajalca za napake na
blagu.
Prodajalec:
Lidl d.o.o.k.d.,
Pod lipami 1,
SI-1218 Komenda
S spletne strani
www.lidl-service.com
lahko prenesete ta priročnik ter
mnoge druge priročnike, videe
izdelkov in programsko
opremo.
SEAD 1800 B1 59
Page 62

RP89015 Einkochautomat LB4 Seite 60 Dienstag, 12. März 2013 4:19 16
Obsah
1. Popis přístroje . . . . . . . . . . . . . . . . . . . . . . . . . . . . . . . . . . . . . . . . . . . . . . . . . . . . . . . . 60
2. Označení dílů (viz odklopná stránka) . . . . . . . . . . . . . . . . . . . . . . . . . . . . . . . . . . . . . . . . 61
3. Technické údaje. . . . . . . . . . . . . . . . . . . . . . . . . . . . . . . . . . . . . . . . . . . . . . . . . . . . . . . . 61
4. Bezpečnostní pokyny . . . . . . . . . . . . . . . . . . . . . . . . . . . . . . . . . . . . . . . . . . . . . . . . . . . . 61
5. Vybalení a instalace . . . . . . . . . . . . . . . . . . . . . . . . . . . . . . . . . . . . . . . . . . . . . . . . . . . . 64
6. Obsluha přístroje . . . . . . . . . . . . . . . . . . . . . . . . . . . . . . . . . . . . . . . . . . . . . . . . . . . . . . 64
7. Recepty . . . . . . . . . . . . . . . . . . . . . . . . . . . . . . . . . . . . . . . . . . . . . . . . . . . . . . . . . . . . . 67
8. Doby zavařování a teploty . . . . . . . . . . . . . . . . . . . . . . . . . . . . . . . . . . . . . . . . . . . . . . . . 69
9. Čištění a uskladnění . . . . . . . . . . . . . . . . . . . . . . . . . . . . . . . . . . . . . . . . . . . . . . . . . . . . 70
10. Likvidace . . . . . . . . . . . . . . . . . . . . . . . . . . . . . . . . . . . . . . . . . . . . . . . . . . . . . . . . . . . . 71
11. Záruka společnosti HOYER Handel GmbH . . . . . . . . . . . . . . . . . . . . . . . . . . . . . . . . . . . . . 71
Gratulujeme k zakoupení Vašeho
nového přístroje.
Zakoupením jste se rozhodli pro kvalitní
výrobek. Součástí tohoto výrobku je návod k
obsluze. Obsahuje důležitá upozornění
týkající se bezpečnosti, použití a likvidace.
1. Popis přístroje
1.1 Účel použití
Tento zavařovací hrnec SilverCrest SEAD
1800 B1 je vhodný pro:
• zavařování
• udržování teploty nápojů a jejich
čepování
• udržování teploty párků
• udržování teploty polévek
Tento přístroj se smí používat pouze
v suchých prostorách. Použití vně budov
nebo ve vlhkých prostorách není povoleno.
Tento přístroj je určen pouze k použití v
domácnostech a podobných místech jako:
• kuchyňkách zaměstnanců obchodů,
kanceláří a jiných pracovišť;
Před použitím výrobku si pozorně pročtěte
všechny pokyny k obsluze a bezpečnostní
pokyny. Výrobek používejte pouze podle
pokynů a pro uvedenou oblast použití.
Při předání výrobku třetím osobám přiložte
k výrobku také všechny podklady.
•selských domech;
• zákazníky v hotelech, motelech a jiných
podobných prostředích;
• penzionech.
1.2 Obsah dodávky
• 1 zavařovací hrnec,
součásti:
– 1 nádoba
–1 víko
–1 mřížka
•1 návod k obsluze
60
CZ
Page 63

RP89015 Einkochautomat LB4 Seite 61 Dienstag, 12. März 2013 4:19 16
2. Označení dílů (viz odklopná stránka)
1 Víko
2 Úchytky
3 Nádoba
4 Čepovací páčka
5 Vypouštěcí kohoutek
6 Tlačítko start/stop s otočných spínačem
teploty
3. Technické údaje
Napájení: 220 - 240 V~/50 Hz
Výkon: 1.800 W
Objem cca 27 litrů
Třída ochrany: I
4. Bezpečnostní pokyny
4.1 Vysvětlení pojmů
V tomto návodu k obsluze najdete
následující signální pojmy:
Výstraha!
Vysoké riziko. Nerespektování
výstrahy může způsobit škody na
životě a zdraví.
Pozor!
Střední riziko. Nerespektování varování
může způsobit hmotnou škodu.
Pokyn:
Nízké riziko. Okolnosti, kterých byste měli
dbát při zacházení s přístrojem.
7 Časovač s otočným spínačem pro
nastavení minut
8 Navíjení kabelu (pod přístrojem)
9 Zobrazení minut
10 Zobrazení nastavené teploty
11 Zobrazení aktuální teploty
12 Mřížka
4.2 Zvláštní pokyny k tomuto
přístroji
Výstraha!
pokyny, aby se zabránilo poranění nebo
poškození.
• Tento přístroj mohou používat děti starší 8 let a
osoby se sníženými fyzickými, senzorickými nebo
mentálními schopnostmi nebo osoby s
nedostatkem zkušeností a/nebo vědomostí tehdy,
pokud jsou pod dozorem nebo jsou poučeny o
bezpečném používání přístroje a porozuměly
riziku možného nebezpečí. Děti si s přístrojem
nesmí hrát.
• Čištění a uživatelskou údržbu nesmí provádět děti,
výjimku tvoří děti starší 8 let pod dozorem dospělé
osoby.
• Děti mladší 8 let se nesmí zdržovat v blízkosti
přístroje a síťového přívodu.
Dodržujte následující
SEAD 1800 B1 61
CZ
Page 64

RP89015 Einkochautomat LB4 Seite 62 Dienstag, 12. März 2013 4:19 16
• Přístroj není určen k tomu, aby jej používaly osoby
(včetně dětí)
s omezenými fyzickými,
smyslovými nebo duševními schopnostmi, osoby s
nedostatečnými zkušenostmi a/nebo znalostmi,
vyjma případů, kdy jsou pod dozorem osoby
pověřené starostí o jejich bezpečnost nebo byly-li
touto osobou poučeny, jak se přístroj používá. Na
děti je třeba dohlédnout, aby bylo zajištěno, že si
s přístrojem nebudou hrát.
• Přístroj nesmí být používán s připojením k externím
spínacím hodinám nebo k samostatnému systému
dálkového řízení, například k zásuvce s rádiovým
ovládáním.
• Nezapomeňte, že povrchy přístroje mohou za
provozu dosahovat vysokých teplot:
–Proto uchopujte přístroj při provozu výhradně za
úchyty
2
;
–Než přístroj umístíte na jiné místo, nechte ho
předtím vychladnout.
• Před každým čištěním vytáhněte síťovou vidlici ze
síťové zásuvky.
• Před čištěním nechte přístroj vychladnout.
•Nádobu
3
nikdy neponořujte do vody.
• V žádném případě nepoužívejte abrazivní,
leptavé nebo drsné čisticí prostředky. Mohly by
přístrojpoškodit.
4.3 Všeobecné informace
• Před použitím si tento návod k obsluze
prosím pečlivě přečtěte. Je součástí
přístroje a musí být stále k dispozici.
• Přístroj používejte jen pro popsaný účel
použití (glejte poglavje »1.1 Účel
použití« na strani 60).
• Zkontrolujte, zda potřebné síťové napětí
(viz typový štítek na přístroji) souhlasí s
Vaším síťovým napětím.
• Dbejte toho, že jakýkoli nárok na plnění
ze záruky a odpovědnost zaniká, pokud
se používají díly příslušenství, které
nejsou doporučeny v tomto návodu k
obsluze, nebo nebyly při opravách
použity výhradně originální náhradní
díly. Totéž platí pro opravy, které byly
provedeny nekvalifikovanými osobami.
Kontaktní údaje jsou uvedeny v »Servisní
středisko« na strani72.
• Při případných poruchách funkce v
záruční době smí být oprava provedena
pouze naším servisním střediskem. V
opačném případě veškeré nároky ze
záruky zanikají.
4.4 Ochrana před zasažením
elektrickým proudem
Výstraha! Následující
bezpečnostní pokyny Vás mají
chránit před zasažením elektrickým
proudem.
• Přístroj připojujte výhradně k síťové
zásuvce s ochranným kontaktem, tím je
zaručena ochrana před zasažením
elektrickým proudem.
• Pokud je přístroj poškozen, nesmí se
používat. V tom případě nechejte přístroj
opravit kvalifikovanou osobou. Kontaktní
údaje jsou uvedeny v »Servisní
středisko« na strani72.
• Je-li poškozen přívodní kabel přístroje, je
nutno jej nechat vyměnit u výrobce nebo
podobně kvalifikovanou osobou –
poškozený kabel je nebezpečný!
• Do vnitřku přístroje, kromě do určené
nádoby 3, se nesmí dostat voda nebo
jiné kapaliny. Proto:
– přístroj nikdy nepoužívejte venku
–nádobu 3 nikdy neponořujte do vody
– nikdy na přístroj nestavte nádoby
naplněné tekutinou jako jsou sklenice
s nápoji, vázy a pod.,
– nikdy přístroj nepoužívejte ve velmi
vlhkém prostředí
– nikdy přístroj nepoužívejte v
bezprostřední blízkosti dřezu, vany,
62
CZ
Page 65

RP89015 Einkochautomat LB4 Seite 63 Dienstag, 12. März 2013 4:19 16
sprchy nebo bazénu, protože stříkající
voda by se mohla dostat do přístroje.
Pokud by se přesto do přístroje dostala
tekutina, vytáhněte ihned síťovou
zástrčku a nechte přístroj opravit
kvalifikovanou osobou. Kontaktní údaje
jsou uvedeny v »Servisní středisko« na
strani72.
• Nikdy se nepokoušejte prostrkávat prsty
nebo předměty přes ochrannou mříž do
vnitřního prostoru přístroje.
• Nikdy na přístroj, síťový kabel nebo
zástrčku nesahejte mokrýma rukama.
• Síťový kabel vždy vytahujte za zástrčku.
Nikdy netahejte za kabel samotný.
• Dbejte na to, aby nedošlo k zalomení
ani k přimáčknutí přívodního kabelu.
• Dbejte na to, aby přívodní kabel nebyl
poškozen o ostré hrany.
• Dbejte na to, aby se přívodní kabel
nedostal do blízkosti horkých ploch
(např. plotýnky).
• Pokud přístroj delší dobu nepoužíváte,
vytáhněte síťovou zástrčku ze síťové
zásuvky. Jen pak není přístroj pod
proudem.
• Měli byste se vyhýbat používání
prodlužovacích kabelů. To je dovoleno
pouze za zcela určitých předpokladů:
– prodlužovací kabel musí být vhodný
pro intenzitu proudu přístroje;
– prodlužovací kabel nesmí být uložen
"ve vzduchu": nesmí být nástrahou,
o kterou se dá zakopnout a nesmí na
něj dosáhnout děti;
– prodlužovací kabel nesmí být v
žádném případě poškozený;
– na síťovou zásuvku nesmějí být kromě
tohoto spotřebiče připojeny žádné
další přístroje, neboť jinak může dojít k
přetížení elektrické sítě (zákaz
vícenásobných zásuvek!).
4.5 Ochrana před nebezpečím požáru
Výstraha! Přístroj pracuje s
vysokými teplotami, proto dodržujte
následující bezpečnostní pokyny,
aby nemohlo dojít k požáru.
• Aby se vyloučilo přehřátí, nesmí být
přístroj nikdy zakrýván.
• Přístroj nikdy nenechávejte běžet bez
dohledu. Závady se skoro vždy projevují
intenzivním zápachem.Vtakovém
případě ihned vytáhněte síťovou
zástrčku a nechte přístroj
zkontrolovat.Kontaktní údaje viz
»Servisní středisko« na strani72.
4.6 Ochrana před úrazem
Výstraha! Dodržujte následující
pokyny, aby se zabránilo zranění.
• Dbejte na to, aby byl síťový kabel veden
tak, aby o něj nemohl nikdo zakopnout,
zaplést se do něj nebo na něj šlápnout.
4.7 Pro bezpečnost Vašeho dítěte
Výstraha! Děti často neumějí
správně odhadnout potenciální
nebezpečí a mohou si následkem
toho způsobit úraz. Řiďte se proto
těmito pokyny:
• Výrobek se smí používat pouze za
dohledu dospělých, aby bylo zajištěno,
že si s přístrojem nebudou hrát děti.
• Dbejte důsledně na to, aby byl přístroj
vždy umístěn mimo dosah dětí.
• Dávejte pozor, aby obalová fólie
nezavinila smrt dítěte. Obalové fólie
nejsou určeny ke hraní.
SEAD 1800 B1 63
CZ
Page 66

RP89015 Einkochautomat LB4 Seite 64 Dienstag, 12. März 2013 4:19 16
4.8 Věcné škody
Pozor! Aby se zabránilo vzniku věcných
škod, řiďte se následujícími ustanoveními:
• Zavařovací hrnec nikdy nepoužívejte
bez vody nebo kapaliny.
• Dbejte na to, aby se v přístroji nikdy
nenacházelo příliš hodně kapaliny.
Hladina kapaliny se musí neustále
nacházet pod značkou „MAX” . V
případě nadměrného množství kapaliny
by mohlo dojít k přetečení.
5. Vybalení a instalace
Pokyn: Přístroj je dodáván lehce natřený
tukem, proto může při prvním použití dojít k
mírné tvorbě kouře a zápachu. Je to
neškodné a po krátké době přestane. Dbejte
proto v této době na dostatečné větrání.
1. Vyjměte zobalu jednotlivé díly.
2. Zkontrolujte, zda jsou obsaženy všechny
části (glejte poglavje »1.2 Obsah
dodávky« na strani 60) a zda nejsou
poškozené.
3. Před prvním použitím přístroj důkladně
umyjte (glejte poglavje »9. Čištění a
uskladnění« na strani 70).
• Přístroj instalujte výhradně na rovné,
suché a neklouzavé ploše, aby nemohlo
dojít k převrácení nebo sklouznutí
přístroje.
• Přístroj nikdy neumišťujte pod zavěšené
skříňky, protože pára vystupuje nahoru a
mohlo by dojít k poškození nábytku.
• Přístroj neumisťujte na horkou plotýnku.
• Přístroj a příslušenství se nesmí používat
v mikrovlnné troubě.
4. Síťový přívod zcela odmotejte od
navíjení 8 kabelu.
5. Přístroj instalujte na rovné, suché a
neklouzavé ploše, aby nemohlo dojít k
převrácení nebo sklouznutí přístroje.
6. Zasuňte síťovou vidlici do vhodné síťové
zásuvky sochranným kontaktem (glejte
poglavje »3. Technické údaje« na
strani 61).
7. Naplňte nádobu 3 cca 5 litry vody.
8. Nechte vodu cca 20 min vařit (glejte
poglavje »6. Obsluha přístroje« na
strani 64).
9. Vodu vylijte.
Nyní je přístroj připraven kprovozu.
6. Obsluha přístroje
6.1 Provedení nastavení, zapnutí,
vypnutí
Pokyn: Jakmile otočíte otočným
spínačem 7 nebo 6, automaticky se zapne
osvícení pozadí indikací. Po 5 minutách se
osvícení indikací automaticky opět vypne.
64
CZ
Výstraha! Přístroj připojujte
výhradně k síťové zásuvce s
ochranným kontaktem, tím je
zaručena ochrana před zasažením
elektrickým proudem.
1. Zasuňte síťovou vidlici do vhodné síťové
zásuvky sochranným kontaktem (glejte
poglavje »3. Technické údaje« na
strani 61).
Page 67

RP89015 Einkochautomat LB4 Seite 65 Dienstag, 12. März 2013 4:19 16
2. Pomocí otočného spínače teploty 6
nastavte požadovanou teplotu.
– Teplota se zvyšuje po krocích po
1°C;
– Každých 5 °C zazní signální tón;
– Nastavená teplota se zobrazuje v
indikaci nastavené teploty 10.
3. Na otočném spínači minut 7 nastavte
požadovanou teplotu zavařování.
– Čas se zvyšuje po krocích po 1 min;
– Každých 5 minut zazní signální tón;
– Nastavený čas se zobrazuje v indikaci
minut 9.
4. Stiskněte tlačítko start/stop 6.
– Přístroj se začne zahřívat a zobrazí se
probíhající pruh;
–Na displeji 11 se zobrazí aktuální
teplota.
Jakmile je dosaženo nastavené teploty:
–Zazní signální tóny;
– Zobrazí se přesýpací hodiny;
– Začne ubíhat nastavená doba.
Jakmile uběhne nastavená doba, zazní
signální tóny a přístroj se vypne.
5. Pokud chcete přístroj vypnout před
uplynutím nastavené doby, stiskněte
tlačítko start/stop 6.
6.2 Zavařování
Pod pojmem zavařovat (nakládat, odpařit,
zavařit) se rozumí, že dojde k zahřátí
potravin bez přístupu vzduchu a tím se
stávají trvanlivé.
Při zavařování se používají speciální
sklenice se šroubovým uzávěrem nebo s
víčkem a gumovým kroužkem.
Pro zavařování jsou vhodné pouze čerstvé a
zcela zralé potraviny. Není vhodné přezrálé
ovoce nebo povadlá zelenina.
Můžete zavařovat také houby, maso a
dokonce koláče.
Zavařování by mělo proběhnout pokud
možno ihned po sklizni, aby v potravinách
zůstalo pokud možno mnoho hodnotných
látek.
Zavařované potraviny musí být přebrané.
Nečistoty, hmyz nebo špatná místa musí být
odstraněna. Již malá nahnilá místa mohou
zavařeniny zkazit.
Ovoce je déle trvanlivé a má lepší aroma,
pokud ho zavaříte s cukrem.
Tvrdé druhy zeleniny, jako mrkev, zelí nebo
kedlubny musí být předvařeny ve slané
vodě. Nesmí být ale rozvařené. Tuto vodu,
ve které se zelenina vařila, vylijte, není
vhodná pro zavařování.
Aby byly zavařeniny dlouho trvanlivé, je
čistota na prvním místě. Nejlépe je, pokud
všechny pracovní přístroje, nádobí a vše, co
přichází do styku s potravinami, důkladně
vyčistíte a sterilizujete 5 minut v horké vodě.
Dbejte na to, aby byly Vaše ruce neustále
čisté.
1. Ovoce a zeleninu důkladně omyjte.
Pokyn: Ovoce a zeleninu omyjte
před rozkrájením, aby zůstala
zachována většina vitamínů rozpustných
ve vodě.
2. Ovoce a zeleninu rozkrájejte na
požadovanou velikost.
3. Potraviny naplňte do zavařovacích
sklenic.
Pokyn: Dbejte na to, aby byly
potraviny ve sklenicích dobře
rozvrstveny. Vypadá to lépe a sklenice
jsou optimálně využité.
4. Podle přání přidejte koření nebo cukr.
5. Sklenice naplňte vodou skoro po okraj.
6. Sklenice uzavřete.
Pokyn: Dbejte na to, aby byly sklenice
skutečně dobře uzavřeny.
7. Vl ož te m ří žku 12 do nádrže 3.
SEAD 1800 B1 65
CZ
Page 68

RP89015 Einkochautomat LB4 Seite 66 Dienstag, 12. März 2013 4:19 16
8. Připravené zavařovací sklenice vložte do
nádoby 3.
Pokyn: Zavařovací sklenice můžete v
nádobě 3 umístit ve dvou vrstvách.
9. Do nádoby 3 naplňte tolik vody, aby
horní sklenice stály cca ze 3/4 ve vodě.
10.Na nádobu 3 nasaďte víko 1.
11.Nastavte teplotu a dobu zavařování (viz
»6.1 Provedení nastavení, zapnutí,
vypnutí« na strani 64 a »8. Doby
zavařování a teploty« na strani 69).
12.Spusťte proces zavařování: Stiskněte
tlačítko start/stop 6 (glejte poglavje
»6.1 Provedení nastavení, zapnutí,
vypnutí« na strani 64).
13.Jakmile uběhla doba zavařování,
postavte pod vypouštěcí kohout 5
tepelně odolnou nádobu.
14.Stiskněte čepovací páčku 4 a vypusťte
vodu z nádrže 3 .
15. Než zavařovací sklenice vyjmete z
nádrže 3 , nechte je vychladnout.
Pokyn: Ještě horké zavařovací sklenice
citlivě reagují na průvan. Proto je nechte
pokud možno v nádobě 3 tak dlouho,
až zcela vychladnou. Pokud přístroj
opětovně potřebujete již před
ochlazením sklenic, pak postavte teplé
sklenice na ručník a přikryjte je jiným
ručníkem do té doby, než zcela
vychladnou.
16.Na sklenicích označte obsah a datum
zavaření.
17. Zavařeniny skladujte v suchu, temnu a
chladu, jsou pak trvanlivé až jeden rok.
6.3 Udržování teploty tekutin a polévek
Tento zavařovací hrnec se výborně hodí na
udržování teploty svařeného vína, kakaa,
polévek a hustých polévek.
Pozor! Dbejte na to, aby se v přístroji nikdy
nenacházelo příliš mnoho kapaliny. Hladina
kapaliny se musí neustále nacházet pod
značkou „MAX” . V případě nadměrného
množství kapaliny by mohlo dojít k
přetečení.
1. Tekutinu naplňte do nádoby 3.
2. Na nádobu 3 nasaďte víko 1.
3. Pomocí otočného spínače teploty 6
nastavte požadovanou teplotu.
– Teplota se zvyšuje po krocích po
1°C;
– Každých 5 °C zazní signální tón;
– Nastavená teplota se zobrazuje v
indikaci nastavené teploty 10.
4. Nenastavujte žádný čas, ale stiskněte
otočný spínač„TIMER” 7.
– Na indikaci se zobrazí ležící číslice
„8”.
5. Stiskněte tlačítko start/stop 6.
– Přístroj se začne zahřívat;
– Jakmile je dosaženo nastavené
teploty, zazní signální tóny;
– Přístroj se ohřívá tak dlouho, než je
opětovně stisknuto tlačítko start/stop 6.
6. Tekutiny pravidelně míchejte, aby došlo
k rovnoměrnému rozdělení tepla a
nedocházelo k usazování na dnu .
7. Tekutiny bez pevných látek můžete
odebírat pomocí vypouštěcího
kohoutku 5. Stiskněte čepovací páčku 4
dolů.
Pokyn: Abyste při velkém množství
tekutiny nemuseli stále držet stisknutou
čepovací páčku 4, můžete čepovací
páčku 4 sklopit svisle nahoru.
8. Polévky nebo tekutiny s pevnými
součástmi by vypouštěcí kohoutek
ucpaly. Tyto odebírejte pomocí
naběračky.
9. Po použití přístroj důkladně vyčistěte
(glejte poglavje »9. Čištění a
uskladnění« na strani 70).
66
CZ
Page 69

RP89015 Einkochautomat LB4 Seite 67 Dienstag, 12. März 2013 4:19 16
6.4 Ochrana proti přehřátí
Přístroj je vybaven pojistkou proti přehřátí.
Jakmile je v nádobě 3 příliš málo tekutiny a
díky tomu se příliš zvýší teplota, varuje
přístroj signálním tónem a prostřednictvím
symbolu pro příliš nízkou hladinu:
1. Vypněte přístroj stisknutím tlačítka start/
stop 6.
Signální tóny se vypnou.
7. Recepty
7.1 Játrová paštika
Přísady:
• 250 g jater (vepřová, hovězí, kuřecí,
krůtí)
• 300 g tučného špeku
• 400 g vepřový bok
• 300 g vepřová krkovička
•4 cibule
•2 ks pórek
• 50 g vepřového sádla
•1 svazek petržele
•1 svazek pažitky
• 1 lžíce sušené majoránky
• 1 lžíce tymiánu, čerstvý nebo sušený
• 1 lžíce kerblíku, čerstvý nebo sušený
•1 lžíce soli
• 1 lžička bílého pepře
•1 lžička muškátu
• 1 lžička mletého hřebíčku
• 1 lžička kardamonu
• 1 lžička zázvoru, mletý nebo třený
Příprava:
1. Krkovičku a bok uvařte v mírně osolené
vodě.
2. Maso vyjměte z vývaru a nechte
vychladnout.
2. Doplňte tekutinu.
3. Přístroj opětovně zapněte stisknutím
tlačítka start/stop 6.
Pokud po varování během 5 minut
neproběhne žádní opatření, přístroj se
automaticky vypne.
V tom případě vytáhněte síťovou vidlici a
nechte přístroj zchladit.
Poté můžete přístroj opět uvést do provozu.
3. Vývar uchovejte.
4. Játra spařte horkou vodou (nevařte).
5. Maso, špek a játra zpracujte strojkem na
maso.
6. Cibuli a pórek nadrobno nakrájejte.
7. Nakrájenou cibuli a pórek osmažte na
sádle, až zesklovatí.
8. Maso zpracované strojkem na maso,
cibuli, pórek, koření a bylinky dejte do
mísy.
9. Doplňte 1 litr vývaru.
10.Promíchejte, až vznikne homogenní
těsto.
11. Toto těsto naplňte do sklenic se
šroubovým uzávěrem.
12.Při teplotě 100 °C zavařte cca 160 min.
Pokyn: Trvanlivost je cca 1 rok.
7.2 Ovocná pomazánka jahody-kiwi
Přísady:
• 1,5 kg čerstvých jahod
• 500 g zralého kiwi
• 1 kg želírovacího cukru bez vaření
Příprava:
1. Jahody důkladně omyjte.
2. Jahody nechte dobře okapat.
SEAD 1800 B1 67
CZ
Page 70

RP89015 Einkochautomat LB4 Seite 68 Dienstag, 12. März 2013 4:19 16
3. Jahody očistěte: Odstraňte stopky, listy a
špatná místa.
4. Kiwi oloupejte a nakrájejte na malé
kousky.
5. Dejte ovoce do mísy.
6. Přidejte želírovací cukr.
7. Rozmixujte pomocí ručního mixéru.
8. Naplňte do sklenic a dobře uzavřete.
9. Při teplotě 80 °C zavařte 25 min.
Pokyn: Při tomto způsobu šetrné přípravy
musíte použít želírovací cukr, který želíruje i
bez vaření. Levnější alternativou je
konvenční želírovacího cukr 2:1. Tak,
ovocná pomazánka je ale trochu hladší.
7.3 Kečup z cukety
Přísady:
• 3 kg cuket
•1 kg cibule
• cca 3 lžíce soli
• 500 g cukru
• 1 litr jemného bylinkového octa
• 2 lžíce mleté papriky
•3 lžíce kari
•3 lžíce ostré hořčice
• 1-2 lžíce čili
• 2 tuby rajčatového protlaku
Příprava:
1. Cukety nastrouhejte na jemno.
2. Cibuli nadrobno nakrájejte.
3. Cuketu, cibuli a sůl dejte do mísy.
4. Na chladném a suchém místě nechte
stát cca 24 hodin.
5. Z mísy slijte vodu, příp. hmotu
vymačkejte.
6. Všechny přísady dejte do hrnce a
opatrně ohřejte (pozor, může se
připalovat).
7. Nechte cca 30 min mírně vařit. Přitom
neustále míchejte, hmota se snadno
připaluje.
8. Hmotu rozmixujte.
9. Hmotu naplňte do sklenic se šroubovým
uzávěrem.
10.Při teplotě 100 °C zavařte po dobu cca
1 hodiny.
7. 4 Vi šn ě
Přísady:
•Višně
•Cukr
•Voda
Příprava:
1. Višně důkladně proberte. Použijte jen
dobré plody.
2. Višně zbavte stopek.
3. Na cca 30 minut vložte do studené
vody, aby byly vypuzeny příp. larvy
nebo hmyz.
4. Višně odpeckujte.
5. Vypeckované višně navrstvěte do
sklenic.
6. Ze 300 g cukru na 1 litr vody připravte
cukrový roztok.
7. Do sklenic naplňte tolik cukrového
roztoku, až jsou višně zcela zakryté.
8. Při teplotě 80 °C zavařte 30 minut.
7.5 Čajový punč
Pokyn: Z uvedeného množství vyrobíte
cca 3 litry nápoje. Pro přípravu většího
množství přísady vynásobte.
Přísady:
•1,5 l černého čaje
• 1 láhev červeného vína (0,75 l)
• 6 neošetřených pomerančů
• 3 neošetřené citróny
•6 ks skořice celé
• cca 750 g cukru
• rum podle chuti
68
CZ
Page 71

RP89015 Einkochautomat LB4 Seite 69 Dienstag, 12. März 2013 4:19 16
Příprava:
Pokyn: Punč můžete připravovat přímo v
zavařovacím hrnci. Protože se ale v nápoji
nachází pevné látky, použijte při servírování
naběračku, jinak by mohlo dojít k ucpání
vypouštcího kohoutku.
Nápoj můžete připravit v jiném hrnci a poté
přes síto přelít do zavařovacího hrnce. Nyní
se v nápoji již nenachází pevné látky a
proto může být punč podáván pomocí
vypoutěcího kohoutku.
1. Uvařte černý čaj.
2. Vytlačte šťávu ze 4 pomerančů a 2
citrónů.
3. 2 pomeranče a 1 citrón nakrájejte na
tenké plátky.
8. Doby zavařování a teploty
Potravina Teplota ve °CDoba v
minutách
Zelenina
Květák 100 (MAX) 90
Fazole 100 (MAX) 120
Hrách 85 120
Kyselé okurky 100 (MAX) 30
Kedluben 100 (MAX) 95
Dýně 90 30
Mrkev 100 (MAX) 90
Houby 100 (MAX) 110
Růžičková
kapusta
Červené zelí 100 (MAX) 110
Celer 100 (MAX) 110
Chřest 100 (MAX) 120
Rajčata 90 30
Ovoce
Jablka, tvrdá 85 40
Jablka, měkká 85 30
Jablková dřeň 90 30
100 (MAX) 110
4. Do hrnce dejte černý čaj, víno, šťávu,
plátky ovoce a tyčinky skořice.
5. Přísady mírně povařte.
6. Pomalu vmíchejte cukr a přitom
ochutnávejte, aby punč nebyl příliš
sladký.
7. Nakonec přidejte rum (množství podle
chuti).
8. Na slabém plameni nechte táhnout
dalších cca 30 minut.
Pokyn: při přípravě v zavařovacím hrnci
zvolte při vaření 100 °C. Při tažení a
udržování teploty snižte teplotu na cca
80 °C. Čajový punč by měl být teplý, ale
neměl by vařit, jinak se vypaří alkohol.
Potravina Teplota ve °CDoba v
minutách
Meruňky 85 30
Hrušky, tvrdé 90 80
Hrušky,
měkké
Ostružiny 80 25
Jahody 80 25
Borůvky 85 25
Maliny 80 30
Rybíz 90 25
Třešně 80 30
Mirabelky 85 30
Broskve 85 30
Švestky 90 30
Brusinky 90 25
Kdoule 95 30
Slivoň
renklóda
Rebarbora 95 30
Angrešt 80 30
Švestky 90 30
90 30
85 30
SEAD 1800 B1 69
CZ
Page 72

RP89015 Einkochautomat LB4 Seite 70 Dienstag, 12. März 2013 4:19 16
Potravina Teplota ve °CDoba v
minutách
Maso (musí se vždy předvařit)
Pečeně 100 (MAX) 85
Masový vývar 100 (MAX) 60
Drůbež 100 (MAX) 75
Guláš 100 (MAX) 75
Zvěřina 100 (MAX) 75
Salám,
vařený
Salám, syrový 100 (MAX) 110
100 (MAX) 75
9. Čištění a uskladnění
Výstraha! K vyloučení
nebezpečí zasažení elektrickým
proudem, poranění nebo
poškození:
– Před každým čištěním vytáhněte
síťovou vidlici ze síťové zásuvky.
– Před čištěním nechte přístroj
vychladnout.
– Nádobu nikdy neponořujte 3 do
vody.
Pozor! V žádném případě nepoužívejte
abrazivní, leptavé nebo drátkovací čisticí
prostředky. Mohly by přístrojpoškodit.
1. Přístroj čistěte vlhkým hadříkem. Můžete
použít také malé množství prostředku na
mytí nádobí.
2. Nakonec vše otřete hadříkem
navlhčeným čistou vodou.
3. Přístroj znovu použijte až tehdy, když
bude zcela suchý.
9.1 Čištění víka a mřížky
1. Mřížku 12 a víko 1 čistěte ručně v
dřezu.
2. Nakonec opláchněte čistou vodou.
9.2 Čištění vypouštěcího kohoutku
Pro lepší čištění můžete čepovací páčku 4
odšroubovat. Vypouštěcí kohoutek 5 nelze
odšroubovat, jinak by mohly vzniknout
netěsnosti.
1. Čepovací páčku 4 odšroubujte od
vypouštěcího kohoutkem 5.
2. Čepovací páčku 4 čistěte ručně v dřezu.
3. Nakonec opláchněte čistou vodou.
4. Nádobu naplňte oplachovacím
louhem 3 a nechte ho protéct
vypouštěcím 5 kohoutkem.
Pokyn: V případě nečistot usazených
ve vypouštěcím kohoutku 5 použijte
čistič dýmek.
5. Nakonec opláchněte čistou vodou.
6. Čepovací páčku 4 opět našroubujte na
vypouštěcí kohoutek 5.
9.3 Skladování přístroje
1. Namotejte síťový přívod na spodní
straně přístroje.
2. Síťovou vidlici zastrčte ve středu dna
přístroje do odpovídajícího uchycení.
3. Přístroj ukliďte.
70
CZ
Page 73

RP89015 Einkochautomat LB4 Seite 71 Dienstag, 12. März 2013 4:19 16
9.4 Odvápnění přístroje
V závislosti na tvrdosti vody se mohou v
přístroji tvořit vápenité usazeniny. Tyto by
měly být pravidelně odstraňovány. Šetříte
tak energii, prodlouží se životnost přístroje a
také z hygienických důvodů.
1. Zanesená místa otřete hadříkem
namočeným v octu.
10. Likvidace
10.1 Přístroj
Symbol přeškrtnuté popelnice
na kolečkách znamená, že je
přístroj v Evropské unii nutno
odevzdat ve sběrně zvláštního
odpadu. To platí pro výrobek a
pro všechny díly příslušenství
označené tímto symbolem. Takto označené
výrobky se nesmějí odhazovat do
domovního odpadu, ale je třeba je
odevzdat k recyklaci ve sběrně elektrických
2. Pokud jsou u přístroje 3 vápenité
usazeniny silnější, naplňte nádobu
obvyklým prostředkem na odvápnění a
nechte ji přes noc stát.
Pozor! Během odvápňování se přístroj
nikdy nesmí zapínat. Mohlo by dojít k
poškození.
3. Poté důkladně propláchněte.
4. Přístroj znovu použijte až tehdy, když
bude zcela suchý.
a elektronických přístrojů. Recyklace
pomáhá snižovat spotřebu surovin a
zatížení životního prostřední. Dbejte proto
vždy předpisů o likvidaci elektrospotřebičů
ve své zemi.
10.2 Obal
Při likvidaci obalu respektujte příslušné
předpisy o ochraně životního prostředí své
země.
11. Záruka společnosti HOYER Handel GmbH
Vážená zákaznice, vážený zákazníku,
na tento výrobek obdržíte záruku 3 roky od
data nákupu. V případě závad na tomto
výrobku Vám při jednání s prodejcem přísluší
zákonem stanovená práva. Tato zákonem
stanovená práva nejsou omezena naší níže
uvedenou zárukou.
Záruční podmínky
Záruční lhůta začíná dnem zakoupení.
Originální pokladní lístek dobře uschovejte.
Tento doklad je potřebný jako důkaz o
zakoupení.
SEAD 1800 B1 71
Pokud se během tří let od data nákupu
tohoto výrobku vaskytne chyba materiálu
nebo výrobní závada, výrobek Vám
bezplatně, dle našeho uvážení, opravíme
nebo nahradíme. Podmínkou pro poskytnutí
této záruky je předložení defektního
přístroje a dokladu o zaplacení (pokladního
lístku) v rámci tříleté lhůty a krátký písemný
popis závady a okamžiku výskytu závady.
Pokud se záruka vztahuje na tuto závadu,
obdržíte zpět opravený nebo nový výrobek.
Okamžikem opravy nebo výměny nezačíná
nová záruční lhůta.
CZ
Page 74

RP89015 Einkochautomat LB4 Seite 72 Dienstag, 12. März 2013 4:19 16
Záruční lhůta a zákonné nároky na
odstranění vady
Záruční lhůta se poskytnutím záruky
neprodlužuje. To platí také pro vyměněné a
opravené díly. Případné škody a závady,
které se vyskytly již při zakoupení, musí být
nahlášeny ihned po rozbalení. Náklady na
opravy provedené po uplynutí záruční lhůty
budou zpoplatněny.
Rozsah záruky
Přístroj byl vyroben precizně za dodržení
přísných směrnic pro kvalitu a před expedicí
byl důkladně zkontrolován.
Poskytnutí záruky se vztahuje na chyby
materiálu nebo výrobní závady. Tato záruka
se nevztahuje na díly výrobku, které jsou
vystaveny normálnímu opotřebení a proto je
můžeme zařadit do skupiny dílů
podléhajícím rychlému opotřebení, nebo na
poškození křehkých dílů, jako např. spínačů,
baterií nebo skleněných dílů.
Tato záruka zaniká v případě poškozených,
neodborně používaných nebo neodborně
opravovaných výrobků. Pro odborné použití
výrobku se musí přesně dodržovat všechny
pokyny uvedené v návodu k obsluze.
Bezpodmínečně se vyvarujte účelu použití a
činnostem, od kterých se v návodu k obsluze
odrazuje nebo před kterými se varuje.
Přístroj je určen výhradně pro soukromé
použití, nikoli pro živnostenské účely.
V případě zneužití a neodborné
manipulace, použití násilí a zákroků, které
nebyly provedeny naším autorizovaným
servisním centrem záruka zaniká.
• Při všech dotazech mějte připraveno
číslo zboží (pro tento přístroj: IAN
89015) a pokladní lístek jako důkaz o
zakoupení.
• Číslo zboží je uvedeno na typovém
štítku, gravuře, na titulním listu vašeho
návodu (vlevo dole) nebo jako nálepka
na zadní nebo spodní straně.
• V případě výskytu závad funkce nebo
jiných závad, kontaktujte nejprve
telefonicky nebo prostřednictvím e-mailu
níže uvedené servisní středisko.
• Registrovaný defektní výrobek pak
můžete s přiloženým dokladem o
nákupu (pokladním lístkem) a uvedením
příčiny a doby výskytu závady, zaslat na
naše náklady na adresu servisu, která
Vám byla sdělena.
Na stránkách
www.lidl-service.com
můžete stáhnout tuto a mnoho
dalších příruček,
videdokumentací o výrobcích a
software.
Servisní středisko
CZ
Servis Česko
Tel.: 0800143873
E-Mail: hoyer@lidl.cz
IAN: 89015
Postup při uplatnění záruky
Aby se zajistilo rychlé zpracování Vaší
žádosti, postupujte podle těchto pokynů:
72
CZ
Page 75

RP89015 Einkochautomat LB4 Seite 73 Dienstag, 12. März 2013 4:19 16
Dodavatel
Níže uvedená adresa není adresou
servisu. Kontaktujte nejprve výše uvedené
servisní středisko.
HOYER Handel GmbH
Kühnehöfe 5
22761 Hamburg
Deutschland
SEAD 1800 B1 73
CZ
Page 76

RP89015 Einkochautomat LB4 Seite 74 Dienstag, 12. März 2013 4:19 16
Obsah
1. Popis prístroja . . . . . . . . . . . . . . . . . . . . . . . . . . . . . . . . . . . . . . . . . . . . . . . . . . . . . . . . 74
2. Označenie častí (pozri odklopnú stranu). . . . . . . . . . . . . . . . . . . . . . . . . . . . . . . . . . . . . . 75
3. Technické údaje. . . . . . . . . . . . . . . . . . . . . . . . . . . . . . . . . . . . . . . . . . . . . . . . . . . . . . . . 75
4. Bezpečnostné pokyny . . . . . . . . . . . . . . . . . . . . . . . . . . . . . . . . . . . . . . . . . . . . . . . . . . . 75
5. Vybalenie a inštalácia . . . . . . . . . . . . . . . . . . . . . . . . . . . . . . . . . . . . . . . . . . . . . . . . . . . 78
6. Obsluha prístroja . . . . . . . . . . . . . . . . . . . . . . . . . . . . . . . . . . . . . . . . . . . . . . . . . . . . . . 79
7. Recepty . . . . . . . . . . . . . . . . . . . . . . . . . . . . . . . . . . . . . . . . . . . . . . . . . . . . . . . . . . . . . 82
8. Časy zavárania a teploty . . . . . . . . . . . . . . . . . . . . . . . . . . . . . . . . . . . . . . . . . . . . . . . . . 84
9. Čistenie a skladovanie. . . . . . . . . . . . . . . . . . . . . . . . . . . . . . . . . . . . . . . . . . . . . . . . . . . 85
10. Likvidácia. . . . . . . . . . . . . . . . . . . . . . . . . . . . . . . . . . . . . . . . . . . . . . . . . . . . . . . . . . . . 86
11. Záruka spoločnosti HOYER Handel GmbH . . . . . . . . . . . . . . . . . . . . . . . . . . . . . . . . . . . . . 86
Blahoželáme vám ku kúpe vášho
nového prístroja.
Rozhodli ste sa pre kvalitný výrobok. Návod
na použitie je súčasťou tohto výrobku.
Obsahuje dôležité pokyny a upozornenia
týkajúce sa bezpečnosti, používania
alikvidácie.
1. Popis prístroja
1.1 Účel použitia
S týmto automatom na zaváranie SilverCrest
SEAD 1800 B1 môžete:
• zavárať
• čapovať nápoje a udržiavať ich v teple
• udržiavať v teple párky
• udržiavať v teple polievky
Prístroj používajte len v suchých priestoroch.
Používanie prístroja vexteriéri alebo vo
vlhkých priestoroch je zakázané.
Tento prístroj je určený len na použitie v
domácnosti a podobných priestoroch, ako
sú:
Prv než začnete výrobok používať,
oboznámte sa so všetkými pokynmi a
upozorneniami týkajúcimi sa obsluhy a
bezpečnosti. Výrobok používajte len na
opísané účely auvedené oblasti použitia.
Ak výrobok postúpite tretej osobe,
odovzdajte jej spolu sním aj všetky
podklady.
• kuchynky pre zamestnancov v
obchodoch, kanceláriách a iných
pracoviskách;
•hostince;
• priestory v hoteloch, moteloch a iných
priestoroch podobných obytným
zariadeniam, kde je určený na použitie
pre zákazníkov;
•penzióny.
74
Page 77

RP89015 Einkochautomat LB4 Seite 75 Dienstag, 12. März 2013 4:19 16
1.2 Obsah dodávky
•1 automat na zaváranie,
pozostávajúci z:
–1 nádoby
–1 veka
–1 mriežky
• 1 návod na obsluhu
2. Označenie častí (pozri odklopnú stranu)
1 veko
2 rukoväti
3 nádoba
4 výčapná páka
5 výčapný kohútik
6 tlačidlo štart/stop s otočným tlačidlom
na nastavenie teploty
3. Technické údaje
Napájanie: 220 - 240 V~/50 Hz
Výkon: 1 800 W
Objem cca 27 litrov
Druh krytia: I
4. Bezpečnostné pokyny
4.1 Vysvetlenie pojmov
V návode na obsluhu nájdete tie signálne
pojmy:
Výstraha!
Vysoké riziko: Neuposlúchnutie
výstrahy môže mať za následok
škody na zdraví a ohrozenie
života.
7 časovač s otočným tlačidlom na
nastavenie minút
8 navíjač kábla (pod prístrojom)
9 zobrazenie minút
10 zobrazenie nastavenej teploty
11 zobrazenie aktuálnej teploty
12 mriežka
Pozor!
Stredné riziko: Neuposlúchnutie tejto
výstrahy môže mať za následok vecné
škody.
Upozornenie:
Nízke riziko: Skutočnosti, ktoré je pri
zachádzaní s prístrojom potrebné brať do
úvahy.
SEAD 1800 B1 75
Page 78

RP89015 Einkochautomat LB4 Seite 76 Dienstag, 12. März 2013 4:19 16
4.2 Špeciálne pokyny k tomuto
prístroju
Výstraha!
zraneniam alebo škodám,
dodržiavajte nasledujúce pokyny.
• Tento prístroj môžu používať deti od 8 rokov
a osoby so zníženými fyzickými,
senzorickými alebo psychickými
schopnosťami alebo nedostatkom
skúseností a/alebo vedomostí len vtedy, ak
sú pod dozorom alebo ak boli poučené o
bezpečnom používaní prístroja a
porozumeli, aké nebezpečenstvá z jeho
používania vyplývajú. Nenechajte deti, aby
sa hrali sprístrojom.
• Čistenie a používateľskú údržbu nesmú
vykonávať deti, s výnimkou prípadu, že ide
o deti staršie ako 8 rokov a že sú pod
dozorom.
• Zabezpečte, aby sa deti mladšie ako 8
rokov zdržiavali v bezpečnej vzdialenosti
od prístroja a sieťového prívodu.
• Tento prístroj nie je určený na to, aby bol
používaný osobami (vrátane detí) s
obmedzenými fyzickými, senzorickými či
duševnými schopnosťami alebo s
nedostatočnými skúsenosťami a/alebo
nedostatočnými znalosťami, s výnimkou
prípadu, že sú pod dozorom osoby
zodpovednej za bezpečnosť alebo dostali
od nej pokyny, ako treba prístroj používať.
Na deti treba dávať pozor, aby sa s týmto
prístrojom nehrali.
• Prístroj sa nesmie používať spripojením
kexterným spínacím hodinám alebo k
samostatnému systému diaľkového
zariadenia, napríklad k zásuvke s rádiovým
ovládaním.
Aby sa predišlo
• Dávajte pozor na to, že povrchyprístroja,
ktorý je v prevádzke, môžu byť horúce:
–Prístroj počas prevádzky chytajte
výhradne za rukoväti
2
;
–Skôr ako prístroj postavíte na iné miesto,
nechajte ho najskôr vychladnúť.
• Pred každým čistením vytiahnite konektor zo
zástrčky.
• Pred čistením nechajte prístroj vychladnúť.
• Nádobu
3
nikdy neponárajte do vody.
• Vžiadnom prípade nepoužívajte
abrazívne, leptajúce čistiace prostriedky
aprostriedky, ktoré by mohli prístroj
poškriabať. Prístroj by sa mohol poškodiť.
4.3 Všeobecné informácie
• Pred použitím si, prosím, starostlivo
prečítajte tento návod na obsluhu. Je
súčasťou prístroja aþmusí byť
kedykoľvek kþdispozícii.
• Prístroj používajte len pre popísaný účel
použitia (pozri »1.1 Účel použitia« na
strane 74).
• Zkontrolujte, zda potřebné síťové napětí
(viz typový štítek na přístroji) souhlasí
sþVaším síťovým napětím.
• Uvedomte si, že akýkoľvek nárok na
plnenie zo záruky a zodpovednosť
zaniká, ak sa používajú časti
príslušenstva, ktoré nie sú odporúčané v
tomto návode na obsluhu alebo pri
opravách neboli použité výhradne
originálne náhradné dielce. To isté platí
pre opravy, ktoré boli uskutočnené
osobami bez príslušnej kvalifikácie.
Kontaktné údaje nájdete v »Servisné
stredisko« na strane88.
• Pri prípadných poruchách funkcie v
záručnej dobe smie byť oprava
vykonaná výlučne naším servisným
strediskom. V opačnom prípade
76
Page 79

RP89015 Einkochautomat LB4 Seite 77 Dienstag, 12. März 2013 4:19 16
zanikajú akékoľvek nároky na záručné
plnenie.
4.4 Ochrana pred úrazom elektrickým
prúdom
Výstraha! Nasledujúce
bezpečnostné pokyny vás majú
chrániť pred úrazom elektrickým
prúdom.
• Prístroj pripájajte výlučne do sieťovej
zásuvky s ochranným kontaktom, keďže
od toho závisí ochrana pred úrazom
elektrickým prúdom.
• Ak je prístroj poškodený, nesmie sa
prístroj vþžiadnom prípade používať.
Vþtomto prípade nechajte prístroj
opraviť kvalifikovanou osobou.
Kontaktné údaje nájdete v »Servisné
stredisko« na strane88.
• Ak bude sieťový prívod tohto prístroja
poškodený, musí byť nahradený
výrobcom alebo rovnako kvalifikovanou
osobou, aby sa predišlo ohrozeniu.
• Dovnútra prístroja, s výnimkou na to
určenej nádoby 3, nesmie v žiadnom
prípade preniknúť voda ani iné kvapaliny. Preto:
– prístroj nikdy nepoužívajte v exteriéri
– nádobu 3 nikdy neponárajte do vody
– nikdy na prístroj neklaďte nádoby
naplnené tekutinou, ako sú poháre s
nápojmi, vázy atď.
– prístroj nikdy nepoužívajte vo veľmi
vlhkom prostredí
– prístroj nikdy nepoužívajte v
bezprostrednej blízkosti drezu, vane,
sprchy alebo bazénu, pretože
striekajúca voda by sa mohla dostať
do prístroja.
Pokiaľ by sa aj napriek tomu do prístroja
dostala tekutina, vytiahnite ihneď
sieťovú zástrčku a prístroj dajte opraviť
personálu s príslušnou kvalifikáciou.
Kontaktné údaje nájdete v »Servisné
stredisko« na strane88.
• Prístroj, sieťový kábel ani sieťovú
zástrčku nikdy nechytajte vlhkými
rukami.
• Sieťový kábel vyťahujte vždy za
zástrčku. Nikdy neťahajte za samotný
kábel.
• Dbajte na to, aby nedošlo k zalomeniu
ani k pomliaždeniu prívodného kábla.
• Dbajte na to, aby sa prívodný kábel
nedostal do blízkosti horúcich plôch
(napr. varná doska).
• Pokiaľ prístroj dlhšiu dobu nepoužívate,
vytiahnite sieťovú zástrčku zo zásuvky.
Len tak je prístroj úplne bez prúdu.
• Mali by ste sa vyvarovať používania
predlžovacích káblov. Je to dovolené len
za celkom určitých predpokladov:
– predlžovací kábel musí byť vhodný
pre intenzitu elektrického prúdu
prístroja;
– predlžovací kábel nesmie byť
položený "vo vzduchu“: nesmie byť
nástrahou pre zakopnutie, aniþnesmie
byť vþdosahu detí;
– predlžovací kábel nesmie byť
vþžiadnom prípade poškodený;
– do sieťovej zásuvky nesmú byť
pripojené žiadne iné prístroje, iba
tento prístroj, keďže vþopačnom
prípade môže dôjsť kþpreťaženiu
elektrickej siete (zákaz viacnásobných
zásuviek!).
4.5 Ochrana pred nebezpečenstvom
požiaru
Výstraha! Pretože prístroj pracuje
s vysokými teplotami, dodržiavajte
nasledujúce bezpečnostné pokyny,
aby nemohol vzniknúť žiadny
požiar.
SEAD 1800 B1 77
Page 80

RP89015 Einkochautomat LB4 Seite 78 Dienstag, 12. März 2013 4:19 16
• Aby ste sa vyhli prehriatiu, prístroj
nesmie byť nikdy zakrytý.
• Prístroj nikdy nenechávajte zapnutý bez
dozoru. Škody sa prejavujú skoro vždy
intenzívnym zápachom. V takomto
prípade okamžite vytiahnite sieťovú
zástrčku a nechajte prístroj skontrolovať.
Kontaktné údaje nájdete v »Servisné
stredisko« na strane88.
4.6 Ochrana pred poraneniami
Výstraha! Ak sa chcete vyhnúť
poraneniam,dodržiavajte
nasledujúce pokyny.
• Dbajte na to, aby sieťový
prívodnemohol nikdy spôsobiť potknutie
alebo aby sa do neho niekto nemohol
zachytiť alebo naň stúpiť.
4.7 Pre bezpečnosť vášho dieťaťa
Výstraha! Deti často nevedia
správne odhadnúť možné
nebezpečenstvo a môžu si
následkom toho spôsobiť úraz.
Riaďte sa preto týmito pokynmi:
• Výrobok sa smie používať jedine pod
dohľadom dospelých, aby sa zaistilo, že
sa s prístrojom nebudú hrať deti.
• Dbajte starostlivo na to, aby sa prístroj
nenachádzal v dosahu detí, ktoré by ho
mohli stiahnuť za prívodný kábel alebo
sa s ním hrať.
• Dbajte na to, aby obalová fólia
nezavinila smrť dieťaťa. Obalové fólie
nie sú určené na hranie.
4.8 Vecné škody
Pozor! Ak sa chcete vyhnúť vecným
škodám, dodržiavajte nasledujúce
ustanovenia.
• Automat na zaváranie nikdy
neprevádzkujte bez vody alebo tekutiny.
• Dbajte na to, aby sa v prístroji nikdy
nenachádzalo príliš veľa tekutiny.
Hladina tekutiny musí byť vždy pod
značkou „MAX“. Ak je tekutiny príliš
veľa, mohla by pretiecť.
• Prístroj pokladajte výhradne na rovnú,
suchú plochu, ktorá nie je klzká, aby sa
prístroj nemohol prevrhnúť, ani skĺznuť
na zem.
• Prístroj nestavajte priamo pod závesnú
skrinku, pretože para vychádza smerom
nahor a mohla by nábytok poškodiť.
• Prístroj nepokladajte na horúci varič.
• Prístroj a príslušenstvo sa nesmú dávať
do mikrovlnnej rúry.
• Pre vytváranie pary používajte výhradne
číru pitnú vodu.
5. Vybalenie a inštalácia
Upozornenie: Keďže sa prístroj dodáva
ľahko namastený, môže pri prvom použití
vznikať mierny dym a zápach. Nie je to
škodlivé a po krátkom čase to prestane.
Počas prvej prevádzky zabezpečte
dostatočné vetranie.
1. Jednotlivé diely vyberte z obalu.
78
2. Skontrolujte, či sú jednotlivé diely úplné
(pozri »1.2 Obsah dodávky« na
strane 75) a či nemajú žiadne
poškodenia.
3. Pred prvým použitím prístroj dôkladne
umyte (pozri »9. Čistenie a skladovanie«
na strane 85).
Page 81

RP89015 Einkochautomat LB4 Seite 79 Dienstag, 12. März 2013 4:19 16
4. Úplne odmotajte sieťový prívod z
navíjača kábla 8.
5. Prístroj položte na rovnú, suchú plochu,
ktorá nie je klzká, aby sa nemohol
prevrhnúť, ani skĺznuť na zem.
6. Zasuňte sieťovú zástrčku do vhodnej
sieťovej zásuvky s ochranným kontaktom
6. Obsluha prístroja
6.1 Vykonanie nastavení, zapnutie,
vypnutie
Upozornenie: Hneď ako otočíte otočné
tlačidlá 7 alebo 6, automaticky sa zapne
osvetlenie pozadia displeja. Po 5 minútach
sa osvetlenie displeja opäť automaticky
vypne.
Výstraha! Prístroj pripájajte
výlučne do sieťovej zásuvky s
ochranným kontaktom, keďže od
toho závisí ochrana pred zásahom
elektrickým prúdom.
1. Zasuňte sieťovú zástrčku do vhodnej
sieťovej zásuvky s ochranným kontaktom
(pozri »3. Technické údaje« na
strane 75).
2. Na otočnom tlačidle pre teplotu 6
nastavte požadovanú teplotu.
– Teplota sa zvyšuje po 1 °C;
– Po každých 5 °C zaznie signálny tón;
– Nastavená teplota sa zobrazí na
displeji pre nastavenú teplotu 10.
3. Na otočnom tlačidle pre minúty 7
nastavte požadovaný čas zavárania.
– Čas sa zvyšuje po 1 minúte;
– Po každých 5 minútach zaznie
signálny tón;
(pozri »3. Technické údaje« na
strane 75).
7. Naplňte približne 5 l vody do nádoby
3.
8. Nechajte vodu variť asi 20 minút (pozri
»6. Obsluha prístroja« na strane 79).
9. Vodu vylejte.
Prístroj je teraz pripravený na používanie.
– Nastavený čas sa zobrazí na displeji
pre minúty 9.
4. Stlačte tlačidlo štart/stop 6.
– Prístroj sa začne zahrievať a na
zobrazení sa objaví priebežný
prúžok;
– na displeji 11 sa zobrazuje aktuálna
teplota.
Hneď ako sa dosiahne nastavená
teplota:
– zaznejú signálne tóny;
– zobrazí sa symbol presýpacích hodín;
– začne plynúť nastavený čas.
Keď uplynie nastavený čas, zaznejú
signálne tóny a prístroj sa vypne.
5. Ak chcete prístroj vypnúť pred uplynutím
nastaveného času, stlačte tlačidlo štart/
stop 6.
6.2 Zaváranie
Pod zaváraním (tepelným konzervovaním)
sa rozumie, že sa potraviny pod
vzduchovým uzáverom ohrievajú, čím
získavajú dlhšiu trvanlivosť.
Na zaváranie sú potrebné špeciálne poháre
so skrutkovacím uzáverom alebo s vekom a
gumovým krúžkom.
SEAD 1800 B1 79
Page 82

RP89015 Einkochautomat LB4 Seite 80 Dienstag, 12. März 2013 4:19 16
Na zaváranie sú vhodné iba čerstvé a zrelé
potraviny. Prezreté ovocie alebo zvädnutá
zelenina nie sú vhodné.
Zavárať sa môžu aj hríby, mäso a dokonca
koláče.
Zaváranie by sa malo uskutočniť čo najskôr
po zbere úrody, aby sa v potravinách
zachovalo čo najväčšie množstvo výživných
látok.
Potraviny určené na zaváranie sa musia
očistiť od lístia, stopiek, nečistôt a pod.
Nečistoty, hmyz alebo chybné miesta sa
musia odstrániť. Aj tie najmenšie hnilé
miesta môžu zaváraninu pokaziť.
Ovocie vydrží dlhšie a má aromatickejšiu
chuť, keď sa zavarí s cukrom.
Tvrdé druhy zeleniny, napr. mrkva, kel alebo
kaleráb, sa musia najprv predvariť v slanej
vode. Nesmú sa pritom ale uvariť domäkka.
Vriacu vodu následne vylejte, nie je vhodná
na zaváranie.
Aby zaváranina dlhšie vydržala, sú čistota a
hygiena najvyššou prioritou. Najlepšie je,
keď sa všetky pracovné nástroje, riady a
všetko, čo príde do kontaktu s potravinami,
dôkladne vyčistí a nechá vyvariť 5 minút v
horúcej vode.
Neustále dbajte na to, aby ste mali čisté
ruky.
1. Dôkladne umyte ovocie a zeleninu.
Upozornenie: Ovocie a zelenina by
sa mali pred pokrájaním na menšie
kúsky umyť, aby sa zachovalo čo
najviac vitamínov rozpustných vo vode.
2. Pokrájajte ovocie a zeleninu na
požadovanú veľkosť.
3. Naložte potraviny do zaváracích
pohárov.
Upozornenie: Dbajte na to, aby ste
potraviny v zaváracom pohári dobre
navrstvili. Vyzerá to lepšie a poháre sa
tak optimálne využijú.
4. Podľa želania doplňte korenie alebo
cukor.
5. Naplňte poháre vodou tesne pod okraj.
6. Uzavrite poháre.
Upozornenie: Dbajte dôsledne na to,
aby boli poháre skutočne dobre
uzavreté.
7. Po lož te m ri ež ku 12 do nádoby 3.
8. Uložte pripravené zaváracie poháre do
nádoby 3.
Upozornenie: Zaváracie poháre sa
môžu do nádoby 3 poukladať jeden na
druhý v dvoch vrstvách.
9. Vlejte do nádoby 3 toľko vody, aby
vrchné zaváracie poháre stáli približne
do 3/4 vo vode.
10.Veko nasaďte 1 na nádobu 3.
11.Nastavte teplotu a čas zavárania (pozri
»6.1 Vykonanie nastavení, zapnutie,
vypnutie« na strane 79 a »8. Časy
zavárania a teploty« na strane 84).
12.Proces zavárania spustíte tak, že stlačíte
tlačidlo štart/stop 6 (pozri
»6.1 Vykonanie nastavení, zapnutie,
vypnutie« na strane 79).
13.Keď čas zavárania uplynie, položte pod
výčapný kohútik teplovzdornú
nádobu 5.
14.Stlačte výčapnú páku 4, aby ste z
nádoby 3 vypustili vodu.
15.Nechajte zaváracie poháre vychladnúť,
skôr ako ich vyberiete z nádoby 3.
Upozornenie:
Ak sú zaváracie
poháre ešte teplé, citlivo reagujú na
prievan. Z toho dôvodu ich podľa
možnosti nechajte v nádobe 3, kým
úplne nevychladnú. Ak by ste prístroj
znova potrebovali už skôr, môžete tiež
80
Page 83

RP89015 Einkochautomat LB4 Seite 81 Dienstag, 12. März 2013 4:19 16
teplé poháre vybrať, položiť ich na
uterák a zakryť ich ďalším uterákom,
kým úplne nevychladnú.
16.Označte poháre štítkami s názvom
obsahu a dátumom zavárania.
17. Zaváraninu skladujte v suchu, tme a
chlade. Pri takomto skladovaní má
trvanlivosť až jeden rok.
6.3 Udržiavanie tekutín a polievok v
teple
Tento automat na zaváranie sa výborne
hodí na udržiavanie vareného vína, kakaa,
polievok a hustých polievok v teple.
Pozor! Dbajte na to, aby sa v prístroji nikdy
nenachádzalo príliš veľa tekutiny. Hladina
tekutiny musí byť vždy pod značkou „MAX“.
Ak je tekutiny príliš veľa, mohla by pretiecť.
1. Naplňte tekutinu do nádoby 3.
2. Veko nasaďte 1 na nádobu 3.
3. Na otočnom tlačidle pre teplotu 6
nastavte požadovanú teplotu.
– Teplota sa zvyšuje po 1 °C;
– Po každých 5 °C zaznie signálny tón;
– Nastavená teplota sa zobrazí na
displeji pre nastavenú teplotu 10.
4. Nenastavujte čas, ale stlačte otočné
tlačidlo časovača „TIMER“ 7.
– Na displeji sa zobrazí ležatá „8“.
5. Stlačte tlačidlo štart/stop 6.
– Prístroj sa začne ohrievať;
– Hneď ako sa dosiahne nastavená
teplota, zaznejú signálne tóny;
– Prístroj sa zohrieva tak dlho, kým opäť
nestlačíte tlačidlo štart/stop 6.
6. Pravidelne tekutinu zamiešajte, aby sa
teplo rovnomerne rozložilo a nič sa
neusadilo na dne.
7. Číre tekutiny bez tuhých častí sa môžu
nalievať pomocou výčapného
kohútika 5. Stlačte preto výčapnú
páku 4 nadol.
Upozornenie: V prípade veľkých
objemov tekutín môžete výčapnú páku 4
vyklopiť kolmo nahor, aby ste výčapnú
páku 4 nemuseli dlho držať.
8. Polievky alebo tekutiny s tuhými časťami
by výčapný kohútik upchali. Naberajte
ich naberačkou.
9. Prístroj po použití dôkladne vyčistite
(pozri »9. Čistenie a skladovanie« na
strane 85).
6.4 Ochrana proti prehriatiu
Prístroj má ochranu proti prehriatiu. Keď sa v
nádobe 3 nachádza príliš málo vody a príliš
sa tým zvýši teplota, spustí prístroj výstrahu
pomocou signálnych tónov a symbolu pre
príliš nízku hladinu:
1. Prístroj vypnete tak, že stlačíte tlačidlo
štart/stop 6.
Signálne tóny doznejú.
2. Doplňte tekutinu.
3. Prístroj znova zapnete tak, že stlačíte
tlačidlo štart/stop 6.
Ak sa v priebehu 5minút od výstrahy
neurobia žiadne opatrenia, prístroj sa
automaticky vypne.
V tom prípade vytiahnite sieťovú zástrčku a
nechajte prístroj vychladnúť.
Potom môžete prístroj opäť normálne uviesť
do prevádzky.
SEAD 1800 B1 81
Page 84

RP89015 Einkochautomat LB4 Seite 82 Dienstag, 12. März 2013 4:19 16
7. Recepty
7. 1 Ja te rn ic a
Prísady:
• 250 g pečene (bravčovej, hovädzej,
kuracej, morčacej)
• 300 g tučnej slaniny
• 400 g bravčového bôčika
• 300 g bravčovej krkovičky
•4 cibule
•2 ks póru
• 50 g bravčovej masti
•1 zväzok petržlenu
•1 zväzok pažítky
• 1 PL sušeného majoránu
• 1 PL čerstvého alebo sušeného tymiánu
• 1 PL čerstvej alebo sušenej trebuľky
•1 PL soli
• 1 ČL bieleho korenia
• 1 ČL muškátového orieška
• 1 ČL mletých klinčekov
•1 ČL kardamonu
• 1 ČL mletého alebo strúhaného zázvoru
Príprava:
1. Varte bravčovú krkovičku a bôčik v
mierne osolenej vode.
2. Mäso vyberte z vývaru a nechajte
vychladnúť.
3. Vývar uschovajte.
4. Pečeň prelejte horúcou vodou (nevarte).
5. Mäso, slaninu a pečeň zomeľte v
mlynčeku na mäso.
6. Cibuľu a pór nakrájajte najemno.
7. Nakrájanú cibuľu a pór opražte na
bravčovej masti, kým nezosklovatejú.
8. Premleté mäso, cibuľu a pór vložte spolu
s korením a bylinkami do misy.
9. Vlejte 1 liter uschovaného vývaru.
10.Prísady premieste, kým nevznikne
homogénna masa.
11.Uložte premiesenú hmotu do pohárov so
skrutkovacím vekom.
12.Zavárajte pri 100 °C cca 160 minút.
Upozornenie: Trvanlivosť je cca 1 rok.
7.2 Jahodovo-kivová ovocná pomazánka
Prísady:
• 1,5 kg čerstvých jahôd
• 500 g zrelého kivi
•1 kg želírovacieho cukru bez varenia
Príprava:
1. Jahody dôkladne umyte.
2. Nechajte jahody dobre odkvapkať.
3. Očistite jahody: Odstráňte stopky, listy a
hnilé miesta.
4. Ošúpte kivi a nakrájajte na malé kúsky.
5. Vložte ovocie do jednej misy.
6. Pridajte želírovací cukor.
7. Tyčovým mixérom na prípravu pyré
všetko rozmixujte.
8. Naplňte do pohárov a dôkladne ich
uzavrite.
9. Zavárajte pri 80 °C 25 minút.
Upozornenie: Pre tento druh šetrnej
prípravy musíte použiť želírovací cukor,
ktorý tuhne aj bez varenia. Lacnejšou
alternatívou je bežný želírovací cukor 2:1. V
opačnom prípade sa pri bežných
želírovacích cukroch môže stať, že ovocná
nátierka nestuhne.
82
Page 85

RP89015 Einkochautomat LB4 Seite 83 Dienstag, 12. März 2013 4:19 16
7.3 Cuketový kečup
Prísady:
• 3 kg cukety
•1 kg cibule
• cca 3 PL soli
• 500 g cukru
• 1 liter jemného bylinného octu
• 2 PL paprikového prášku
• 3 PL kari korenia
• 3 PL štipľavej horčice
• 1-2 PL kajenského korenia
• 2 tuby paradajkového pretlaku
Príprava:
1. Cuketu jemne nastrúhajte.
2. Cibuľu pokrájajte na malé kocky.
3. Vložte cuketu, cibuľu a soľ do jednej
misy.
4. Nechajte zatiahnuť na suchom a
chladnom mieste približne 24 hodín.
5. Vylejte vodu z misy, prípadne hmotu
trochu potlačte.
6. Všetky prísady vložte do jedného hrnca
a opatrne zohrejte (nebezpečenstvo
pripálenia).
7. Nechajte variť cca 30 minút. Pritom
hmotu neustále miešajte, pretože sa
ľahko pripaľuje.
8. Hmotu rozmixujte na pyré.
9. Naplňte hmotou poháre so skrutkovacím
vekom.
10.Zavárajte pri 100 °C cca 1 hodinu.
7. 4 Vi šn e
Prísady:
•višne
•cukor
•voda
Príprava:
1. Višne dôkladne preberte. Do pohára
pôjdu len tie dobré.
2. Višne odstopkujte.
3. Vložte do studenej vody na cca 30
minút, aby ste vypudili prípadné červíky
a hmyz.
4. Višne vykôstkujte.
5. Vykôstkované višne navrstvite do
pohárov.
6. Vytvorte cukrový roztok z 300 g cukru
na 1 liter vody.
7. Nalejte do pohárov toľko cukrového
roztoku, aby boli višne úplne zakryté.
8. Zavárajte pri 80 °C cca 30 minút.
7.5 Čajový punč
Upozornenie: Z uvedeného množstva
vyrobíte približne 3 litre nápoja. Pre väčší
objem jednoducho zvýšte množstvo prísad.
Prísady:
• 1,5 l čierneho čaju
• 1 fľaša červeného vína (0,75 l)
• 6 neošetrených pomarančov
•3 neošetrené citróny
• 6 kusov celej škorice
• cca 750 g cukru
• rum podľa chuti
Príprava:
Upozornenie: Čajový punč môžete
pripraviť priamo v automate na zaváranie.
Keďže v nápoji sa nachádzajú tuhé časti,
mali by ste nápoj vyberať polievkovou
naberačkou, inak by ste upchali výčapný
kohútik.
Nápoj však môžete variť aj v inom hrnci a
následne ho cez sito preliať do automatu na
zaváranie. Takto sa z nápoja odstránia tuhé
časti a môžete čajový punč nalievať cez
výčapný kohútik.
SEAD 1800 B1 83
Page 86

RP89015 Einkochautomat LB4 Seite 84 Dienstag, 12. März 2013 4:19 16
1. Uvarte čierny čaj.
2. Vytlačte 4 pomaranče a 2 citróny.
3. 2 pomaranče a 1 citrón nakrájajte na
tenké plátky.
4. Čierny čaj, víno, ovocnú šťavu, plátky
ovocia a celú škoricu vložte do hrnca.
5. Prísady len zľahka uvarte.
6. Pomaly vmiešajte cukor a pritom nápoj
neustále ochutnávajte, aby čajový punč
nebol príliš sladký.
8. Časy zavárania a teploty
Druh
potraviny
Zelenina
Karfiol 100 (MAX) 90
Bôby 100 (MAX) 120
Hrach 85 120
Uhorky v
korenenom
náleve
Kaleráb 100 (MAX) 95
Tekvica 90 30
Mrkva 100 (MAX) 90
Hríby 100 (MAX) 110
Ružičkový kel 100 (MAX) 110
Červená
kapusta
Zeler 100 (MAX) 110
Špargľa 100 (MAX) 120
Rajčiny 90 30
Ovocie
Jablká, tvrdé 85 40
Jablká, mäkké 85 30
Jablkové pyré 90 30
Marhule 85 30
Hrušky, tvrdé 90 80
Teplota v °C Čas v
minútach
100 (MAX) 30
100 (MAX) 110
7. Na záver pridajte výdatnú dávku rumu
(množstvo podľa chuti).
8. Nechajte zatiahnuť ešte asi 30 minút na
miernej teplote.
Upozornenie: Pri príprave v automate na
zaváranie vyberte pri varení 100 °C. Na
zatiahnutie a udržiavanie v teple znížte
teplotu na približne 80 °C. Čajový punč by
nemal vrieť, ale zostať horúci, pretože inak
stráca alkohol.
Druh
potraviny
Hrušky, mäkké
Černice 80 25
Jahody 80 25
Čučoriedky 85 25
Maliny 80 30
Ríbezle 90 25
Čerešne 80 30
Mirabelky 85 30
Broskyne 85 30
Slivky 90 30
Brusnice 90 25
Duly 95 30
Ringloty 85 30
Rebarbora 95 30
Egreš 80 30
Slivky 90 30
Teplota v °C Čas v
minútach
90 30
Mäso (musí byť v zásade
predvarené)
Pečienka 100 (MAX) 85
Mäsový vývar 100 (MAX) 60
Hydina 100 (MAX) 75
Guláš 100 (MAX) 75
Divina 100 (MAX) 75
84
Page 87

RP89015 Einkochautomat LB4 Seite 85 Dienstag, 12. März 2013 4:19 16
Druh
potraviny
Klobása,
varená
Klobása,
surová
Teplota v °C Čas v
minútach
100 (MAX) 75
100 (MAX) 110
9. Čistenie a skladovanie
Výstraha! Ak chcete vylúčiť
nebezpečenstvo úrazu elektrickým
prúdom, poranenie alebo
poškodenie:
– Pred každým čistením vytiahnite
sieťovú zástrčku zo sieťovej
zásuvky.
– Pred čistením nechajte prístroj
vychladnúť.
–Nádobu3 nikdy neponárajte do
vody.
Pozor! Vžiadnom prípade nepoužívajte
abrazívne, leptajúce čistiace prostriedky
aprostriedky, ktoré by mohli prístroj
poškriabať. Prístroj by sa mohol poškodiť.
1. Prístroj vyčistite vlhkou handričkou.
Môžete použiť aj malé množstvo
umývacieho prostriedku.
2. Nakoniec prístroj utrite handričkou
navlhčenou včistej vode.
3. Prístroj znovu použite až po tom, keď je
úplne suchý.
9.1 Čistenie mriežky a veka
1. Mr iežku 12 a veko 1 vyčistite rukou v
dreze.
2. Nakoniec ho opláchnite čistou vodou.
9.2 Čistenie výčapného kohútika
Na lepšie čistenie môžete odskrutkovať
výčapnú páku 4. Výčapný kohútik 5 sa
nedá odskrutkovať, pretože by sa mohli
vyskytnúť problémy s tesnením.
1. Odskrutkujte výčapnú páku 4 z
výčapného kohútika 5.
2. Výčapnú páku 4 vyčistite rukou v dreze.
3. Nakoniec ju opláchnite čistou vodou.
4. Vlejte jemný umývací prostriedok do
nádoby 3 a nechajte ho pretiecť
výčapným kohútikom 5.
Upozornenie: Pri odolných
znečisteniach vo výčapnom kohútiku 5 si
pri čistení môžete pomôcť čističom na
fajky.
5. Nakoniec ho opláchnite čistou vodou.
6. Naskrutkujte výčapnú páku 4 znova na
výčapný kohútik 5.
9.3 Skladovanie prístroja
1. Sieťový kábel naviňte na spodnej časti
prístroja.
2. Zasuňte sieťovú vidlicu do príslušného
upevnenia v strede spodnej časti
prístroja.
3. Prístroj odložte.
SEAD 1800 B1 85
Page 88

RP89015 Einkochautomat LB4 Seite 86 Dienstag, 12. März 2013 4:19 16
9.4 Odvápnenie prístroja
V závislosti od tvrdosti vody sa v prístroji
môžu tvoriť vápenaté usadeniny. Tieto by sa
mali pravidelne odstraňovať, aby sa ušetrila
energia, zvýšila životnosť prístroja, ako aj z
hygienických dôvodov.
1. Miesta s vápenatými usadeninami utrite
handričkou, ktorú ste predtým namočili v
troche octu.
10. Likvidácia
10.1 Prístroj
Symbol prečiarknutej smetnej
nádoby na kolieskach
znamená, že prístroj je v
Európskej únii nutné odovzdať
v zberni zvláštneho odpadu. To
platí pre výrobok a pre všetky
diely príslušenstva označené týmto
symbolom. Takto označené výrobky sa
nesmú odhadzovať do domového odpadu,
ale je potrebné ich odovzdať na
2. Keď by mal prístroj silnejšie vápenaté
usadeniny, do nádoby 3 naplňte bežne
dostupný odvápňovač a nechajte ho cez
noc stáť.
Upozornenie! Počas odvápňovania
sa prístroj v žiadnom prípade nesmie
zapnúť. Mohlo by to viesť k škodám.
3. Následne dôkladne vymyte.
4. Prístroj znova použite, až keď bude
úplne suchý.
recyklovanie v zberni elektrických a
elektronických prístrojov. Recyklácia
pomáha znižovať spotrebu surovín a
zaťaženie životného prostredia. Preto
bezpodmienečne dodržiavajte predpisy na
likvidáciu vo Vašej krajine.
10.2 Obal
Pri likvidácii obalu rešpektujte príslušné
predpisy o ochrane životného prostredia v
príslušnej krajine.
11. Záruka spoločnosti HOYER Handel GmbH
Vážená zákazníčka, vážený zákazník,
na tento prístroj platí záruka počas doby 3
rokov od dátumu kúpy. V prípade chyby
tohto výrobku vám prislúchajú zákonné
práva voči predajcovi výrobku. Tieto
zákonné práva nie sú obmedzené našou
nižšie uvedenou zárukou.
Záručné podmienky
Záručná doba začína plynúť od dátumu
kúpy. Odložte si originálny pokladničný
blok. Je potrebný ako doklad okúpe.
86
Ak sa v priebehu troch rokov od dátumu
kúpy tohto výrobku vyskytne chyba
materiálu alebo výrobná chyba, výrobok
vám – podľa nášho rozhodnutia – zdarma
opravíme alebo vymeníme. Predpokladom
tohto záručného plnenia je v priebehu
trojročnej lehoty predložiť chybný výrobok a
doklad o kúpe (pokladničný blok) a
písomne v krátkosti opísať, v čom spočíva
chyba a kedy sa vyskytla.
Page 89

RP89015 Einkochautomat LB4 Seite 87 Dienstag, 12. März 2013 4:19 16
Keď sa na chybu naša záruka vzťahuje,
dostanete naspäť opravený alebo nový
výrobok. Opravou alebo výmenou výrobku
nezačína plynúť nová záručná doba.
Záručná doba a zákonné nároky
vyplývajúce z chyby výrobku
Záručná doba sa poskytnutím plnenia
nepredlžuje. Platí to aj pre vymenené a
opravené dielce. Prípadne už pri kúpe
existujúce poškodenia a chyby je potrebné
nahlásiť hneď po vybalení výrobku. Opravy,
ktoré sa uskutočnia po uplynutí záručnej
doby, budú spoplatnené.
Záručná doba
Prístroj bol vyrobený s použitím prísnych
smerníc pre kvalitu a pred expedíciou bol
svedomito skontrolovaný.
Poskytnutie záruky platí na chyby materiálu
a výrobné chyby. Táto záruka sa nevzťahuje
na časti výrobku, ktoré podliehajú
normálnemu opotrebovaniu, a teda sa môžu
pokladať za opotrebovateľné súčiastky
alebo na poškodenia rozbitných častí, napr.
vypínačov, akumulátorov alebo častí
vyrobených zo skla.
Táto záruka zaniká, keď je výrobok
poškodený, nesprávne sa používa alebo
udržiava. Aby ste výrobok používali
správne, presne dodržiavajte všetky pokyny
uvedené vnávode na použitie.
Bezpodmienečne sa vyvarujte používania,
ktoré nie je vsúlade surčeným používaním
alebo konania, od ktorého odrádzajú alebo
pred ktorým varujú upozornenia uvedené
vnávode na použitie.
Prístroj je určený na len súkromné, nie na
komerčné použitie.
Pri nenáležitom anesprávnom
zaobchádzaní, násilnom používaní a
zásahoch, ktoré neuskutočnilo naše servisné
stredisko, záruka zaniká.
Postup vprípade nároku na záručné plnenie
Aby bola vaša žiadosť čo najskôr
spracovaná, postupujte podľa nasledovných
pokynov:
• Pri akejkoľvek požiadavke majte
pripravené číslo výrobku (pre tento
prístroj: IAN 89015) apokladničný
blok ako doklad o kúpe.
• Číslo výrobku nájdete na typovom štítku,
vygravírované, na titulnom liste vášho
návodu (vľavo dolu) alebo ako nálepku
na zadnej alebo dolnej strane.
• Ak by sa vyskytli chyby funkcií alebo iné
nedostatky, kontaktujte najprv
telefonicky alebo prostredníctvom
elektronickej pošty nižšie uvedené
servisné stredisko.
• Výrobok, na ktorom ste zistili chybu,
potom môžete s priloženým dokladom o
kúpe (pokladničný blok) auvedením,
včom spočíva chyba akedy sa vyskytla,
zaslať bez poštového poplatku na
adresu servisu, ktorá vám bola
oznámená.
Tento návod a mnoho ďalších
príručiek, videí o výrobkoch a
softvér si môžete stiahnuť na
www.lidl-service.com.
SEAD 1800 B1 87
Page 90

RP89015 Einkochautomat LB4 Seite 88 Dienstag, 12. März 2013 4:19 16
Servisné stredisko
Servis Slovensko
Tel.: 0850 232001
E-Mail: hoyer@lidl.sk
IAN: 89015
Dodávateľ
Všimnite si prosím, že nasledujúca adresa
nie je adresa servisu. Kontaktujte
najprv vyššie uvedené servisné stredisko.
HOYER Handel GmbH
Kühnehöfe 5
D-22761 Hamburg
Deutschland
88
Page 91

RP89015 Einkochautomat LB4 Seite 89 Dienstag, 12. März 2013 4:19 16
Inhalt
1. Gerätebeschreibung . . . . . . . . . . . . . . . . . . . . . . . . . . . . . . . . . . . . . . . . . . . . . . . . . . . . 89
2. Benennung der Teile (siehe Ausklappseite) . . . . . . . . . . . . . . . . . . . . . . . . . . . . . . . . . . . . 90
3. Technische Daten. . . . . . . . . . . . . . . . . . . . . . . . . . . . . . . . . . . . . . . . . . . . . . . . . . . . . . . 90
4. Sicherheitshinweise. . . . . . . . . . . . . . . . . . . . . . . . . . . . . . . . . . . . . . . . . . . . . . . . . . . . . 90
5. Auspacken und aufstellen. . . . . . . . . . . . . . . . . . . . . . . . . . . . . . . . . . . . . . . . . . . . . . . . . 93
6. Bedienen des Gerätes . . . . . . . . . . . . . . . . . . . . . . . . . . . . . . . . . . . . . . . . . . . . . . . . . . . 94
7. Rezepte . . . . . . . . . . . . . . . . . . . . . . . . . . . . . . . . . . . . . . . . . . . . . . . . . . . . . . . . . . . . . 97
8. Einkochzeiten und Temperaturen. . . . . . . . . . . . . . . . . . . . . . . . . . . . . . . . . . . . . . . . . . . . 99
9. Reinigen und lagern . . . . . . . . . . . . . . . . . . . . . . . . . . . . . . . . . . . . . . . . . . . . . . . . . . . 100
10. Entsorgung . . . . . . . . . . . . . . . . . . . . . . . . . . . . . . . . . . . . . . . . . . . . . . . . . . . . . . . . . . 101
11. Garantie der HOYER Handel GmbH . . . . . . . . . . . . . . . . . . . . . . . . . . . . . . . . . . . . . . . . 102
Herzlichen Glückwunsch zum Kauf
Ihres neuen Gerätes.
Sie haben sich damit für ein hochwertiges
Gerät entschieden. Die Bedienungsanleitung ist Bestandteil dieses Geräts. Sie enthält
wichtige Hinweise für Sicherheit, Gebrauch
und Entsorgung.
1. Gerätebeschreibung
1.1 Verwendungszweck
Mit diesem Einkochautomat SilverCrest
SEAD 1800 B1 können Sie:
•Einkochen
• Getränke warm halten und zapfen
• Würstchen warmhalten
•Suppen warmhalten
Dieses Gerät darf nur in trockenen Räumen
verwendet werden. Eine Verwendung im
Freien oder in Feuchträumen ist nicht gestattet.
Dieses Gerät ist nur zur Verwendung im
Haushalt und ähnlichen Orten gedacht, wie:
• Küchenzeilen für Angestellte in Läden,
Büros und anderen Arbeitsumgebungen;
Machen Sie sich vor der Benutzung des
Geräts mit allen Bedien- und Sicherheitshinweisen vertraut. Benutzen Sie das Gerät nur
wie beschrieben und für die angegebenen
Einsatzbereiche.
Händigen Sie alle Unterlagen bei Weitergabe des Geräts an Dritte mit aus.
• Bauernhäusern;
• durch Kunden in Hotels, Motels und
anderen Wohnbezirk ähnlichen Umgebungen;
• Pensionen.
1.2 Lieferumfang
• 1 Einkochautomat,
bestehend aus:
–1 Behälter
–1 Deckel
–1 Gitter
• 1 Bedienungsanleitung
SEAD 1800 B1 89
Page 92

RP89015 Einkochautomat LB4 Seite 90 Dienstag, 12. März 2013 4:19 16
2. Benennung der Teile (siehe Ausklappseite)
1 Deckel
2 Griffe
3 Behälter
4 Zapfhebel
5 Zapfhahn
6 Start/Stopp-Taste mit Drehknopf für
Temperatur
3. Technische Daten
Spannungsversorgung: 220 - 240 V~/50 Hz
Leistung: 1.800 Watt
Fassungsvermögen ca. 27 Liter
Schutzklasse: I
4. Sicherheitshinweise
4.1 Begriffserklärung
Folgende Signalbegriffe finden Sie in dieser
Bedienungsanleitung:
Warnung!
Hohes Risiko: Missachtung der
Warnung kann Schaden für Leib
und Leben verursachen.
Vorsicht!
Mittleres Risiko: Missachtung der Warnung
kann einen Sachschaden verursachen.
Hinweis:
Geringes Risiko: Sachverhalte, die im Umgang mit dem Gerät beachtet werden sollten.
7 Timer mit Drehknopf für Minuten
8 Kabelaufwicklung (unter dem Gerät)
9 Anzeige der Minuten
10 Anzeige der eingestellten Temperatur
11 Anzeige der aktuellen Temperatur
12 Gitter
4.2 Besondere Hinweise für
dieses Gerät
Warnung!
Hinweise, um Verletzungen oder
Schäden zu vermeiden.
• Dieses Gerät kann von Kindern ab 8 Jahren
und von Personen mit reduzierten physischen, sensorischen oder mentalen Fähigkeiten oder Mangel an Erfahrung und/oder
Wissen benutzt werden, wenn sie beaufsichtigt oder bezüglich des sicheren Gebrauches des Gerätes unterwiesen wurden und
die daraus resultierenden Gefahren verstanden haben. Kinder dürfen nicht mit dem
Gerät spielen.
• Reinigung und Benutzer-Wartung dürfen
nicht durch Kinder durchgeführt werden, es
Beachten Sie folgende
90
Page 93

RP89015 Einkochautomat LB4 Seite 91 Dienstag, 12. März 2013 4:19 16
sei denn, sie sind älter als 8 Jahre und
beaufsichtigt.
• Kinder jünger als 8 Jahre sind vom Gerät
und der Netzanschlussleitung fernzuhalten.
• Halten Sie das Gerät und seine Netzanschlussleitung außerhalb der Reichweite von
Kindern.
• Dieses Gerät ist nicht dafür bestimmt, durch
Personen (einschließlich Kinder) mit eingeschränkten physischen, sensorischen oder
geistigen Fähigkeiten oder mit mangelnder
Erfahrung und/oder mangelndem Wissen
benutzt zu werden, es sei denn, sie werden
durch eine für ihre Sicherheit zuständige
Person beaufsichtigt oder erhielten von ihr
Anweisungen, wie das Gerät zu benutzen
ist. Kinder sollten beaufsichtigt werden, um
sicherzustellen, dass sie nicht mit dem Gerät
spielen.
• Das Gerät darf nicht mit einer externen Zeitschaltuhr oder einem separaten Fernwirksystem, wie zum Beispiel einer Funksteckdose,
betrieben werden.
• Achten Sie darauf, dass die Oberflächen
des Gerätes im Betrieb heiß werden
können:
–Fassen Sie das Gerät im Betrieb aus-
schließlich an den Griffen
2
an;
–Bevor Sie das Gerät an einen anderen Ort
stellen, lassen Sie es zuvor abkühlen.
• Ziehen Sie vor jeder Reinigung den Netzstecker aus der Netzsteckdose.
• Lassen Sie das Gerät vor der Reinigung
abkühlen.
• Tauchen Sie den Behälter
3
nie in Wasser.
• Verwenden Sie keinesfalls scheuernde,
ätzende oder kratzende Reinigungsmittel.
Dadurch könnte das Gerät beschädigt
werden.
4.3 Allgemeine Hinweise
• Lesen Sie vor dem Gebrauch bitte sorgfältig diese Bedienungsanleitung. Sie ist
Bestandteil des Gerätes und muss jederzeit verfügbar sein.
• Verwenden Sie das Gerät nur für den
beschriebenen Verwendungszweck
(siehe „1.1 Verwendungszweck“ auf
Seite 89).
• Überprüfen Sie, ob die erforderliche
Netzspannung (siehe Typenschild am
Gerät) mit Ihrer Netzspannung übereinstimmt.
• Bitte beachten Sie, dass jeglicher
Anspruch auf Garantie und Haftung
erlischt, wenn Zubehörteile verwendet
werden, die nicht in dieser Bedienungsanleitung empfohlen werden oder wenn
bei Reparaturen nicht ausschließlich
Originalersatzteile verwendet werden.
Dies gilt auch für Reparaturen, die durch
nichtqualifizierte Personen durchgeführt
werden. Die Kontaktdaten finden Sie in
„Service-Center” auf Seite 103.
• Bei eventuellen Funktionsstörungen
innerhalb der Garantiezeit darf die
Instandsetzung des Gerätes nur durch
unser Service-Center erfolgen. Ansonsten erlischt jeglicher Garantieanspruch.
4.4 Schutz vor elektrischem Schlag
Warnung! Die folgenden Sicherheitshinweise sollen Sie vor einem
elektrischen Schlag schützen.
• Schließen Sie das Gerät ausschließlich
an einer Netzsteckdose mit Schutzkontakt an, da davon der Schutz vor
elektrischem Schlag abhängt.
• Wenn das Gerät beschädigt ist, darf das
Gerät keinesfalls benutzt werden. Lassen
Sie das Gerät in diesem Falle von qualifiziertem Fachpersonal reparieren. Die
SEAD 1800 B1 91
Page 94

RP89015 Einkochautomat LB4 Seite 92 Dienstag, 12. März 2013 4:19 16
Kontaktdaten finden Sie in „Service-Center” auf Seite 103.
• Wenn die Netzanschlussleitung dieses
Gerätes beschädigt wird, muss sie durch
den Hersteller oder eine ähnlich qualifizierte Person ersetzt werden, um
Gefährdungen zu vermeiden.
• In das Innere des Gerätes, außer in den
dafür vorgesehenen Behälter 3, dürfen
keinesfalls Wasser oder andere Flüssigkeiten gelangen. Daher:
– niemals im Freien einsetzen
– niemals den Behälter 3 in Wasser
eintauchen
– niemals mit Flüssigkeit gefüllte
Gefäße, wie Trinkgläser, Vasen etc.
auf das Gerät stellen
– niemals in sehr feuchter Umgebung
einsetzen
– niemals in unmittelbarer Nähe eines
Spülbeckens, einer Badewanne, einer
Dusche oder eines Schwimmbeckens
benutzen, da Spritzwasser in das
Gerät gelangen könnte.
Falls doch einmal Flüssigkeit in das
Gerät gelangt, ziehen Sie sofort den
Netzstecker und lassen das Gerät von
qualifiziertem Fachpersonal reparieren.
Die Kontaktdaten finden Sie in „ServiceCenter” auf Seite 103.
• Fassen Sie das Gerät, die Netzanschlussleitung oder den Netzstecker
niemals mit feuchten Händen an.
• Ziehen Sie die Netzanschlussleitung
stets am Netzstecker heraus. Ziehen Sie
niemals an der Netzanschlussleitung
selber.
• Achten Sie darauf, dass die Netzanschlussleitung nie geknickt oder
gequetscht wird.
• Halten Sie die Netzanschlussleitung von
heißen Flächen (z.B. Herdplatte) fern.
• Wenn Sie das Gerät längere Zeit nicht
benutzen, ziehen Sie den Netzstecker
aus der Netzsteckdose. Nur dann ist das
Gerät völlig stromfrei.
• Die Benutzung von Verlängerungskabeln
sollten Sie vermeiden. Sie ist nur unter
ganz bestimmten Voraussetzungen
gestattet:
– Das Verlängerungskabel muss für die
Stromstärke des Gerätes geeignet
sein.
– Das Verlängerungskabel darf nicht
„fliegend“ verlegt sein: es darf nicht
zur Stolperfalle werden oder von
Kindern erreichbar sein.
– Das Verlängerungskabel darf keines-
falls beschädigt sein.
– Es dürfen keine weiteren Geräte als
dieses Gerät an der Netzsteckdose
angeschlossen werden, da es sonst zu
einer Überlastung des Stromnetzes
kommen kann (Verbot von Mehrfachsteckdosen!).
4.5 Schutz vor Verletzungen
Warnung! Beachten Sie folgende
Hinweise, um Verletzungen zu vermeiden.
• Achten Sie darauf, dass die Netzanschlussleitung nie zur Stolperfalle wird
oder sich jemand darin verfangen oder
darauftreten kann.
4.6 Schutz vor Brandgefahr
Warnung! Da das Gerät mit
hohen Temperaturen arbeitet,
beachten Sie die folgenden Sicherheitshinweise, damit kein Brand entstehen kann.
• Um eine Überhitzung zu vermeiden, darf
das Gerät niemals abgedeckt werden.
92
Page 95

RP89015 Einkochautomat LB4 Seite 93 Dienstag, 12. März 2013 4:19 16
• Lassen Sie das Gerät nie unbeaufsichtigt
laufen. Schäden kündigen sich fast
immer durch intensive Geruchsbildung
an. Ziehen Sie in diesem Falle sofort den
Netzstecker und lassen Sie das Gerät
überprüfen. Die Kontaktdaten finden Sie
in „Service-Center” auf Seite 103.
4.7 Zur Sicherheit Ihres Kindes
Warnung! Kinder können Gefahren oft nicht richtig einschätzen und
sich dadurch Verletzungen
zuziehen. Beachten Sie daher:
• Dieses Gerät darf nur unter Aufsicht von
Erwachsenen verwendet werden, um
sicherzustellen, dass sie nicht mit dem
Gerät spielen.
• Achten Sie sorgfältig darauf, dass sich
das Gerät immer außerhalb der Reichweite von Kindern befindet, damit diese
es nicht an der Netzanschlussleitung herunterziehen können oder damit spielen.
• Achten Sie darauf, dass die Verpackungsfolie nicht zur tödlichen Falle
für Kinder wird. Verpackungsfolien sind
kein Spielzeug.
4.8 Sachschäden
Achtung! Um Sachschäden zu vermeiden,
beachten Sie folgende Bestimmungen.
• Betreiben Sie den Einkochautomaten nie
ohne Wasser oder Flüssigkeit.
• Achten Sie darauf, dass sich nie zu viel
Flüssigkeit im Gerät befindet. Der Flüssigkeitsstand muss stets unter „MAX”
liegen. Bei zuviel Flüssigkeit könnte diese
überlaufen.
• Stellen Sie das Gerät ausschließlich auf
einer ebenen, trockenen und rutschfesten
Fläche auf, damit das Gerät weder
umfallen noch herunterrutschen kann.
• Stellen Sie das Gerät nicht direkt unter
einem Hängeschrank auf, da Dampf
nach oben austritt und das Möbel
beschädigen könnte.
• Stellen Sie das Gerät nicht auf eine
heiße Herdplatte.
• Das Gerät und das Zubehör dürfen nicht
in ein Mikrowellengerät gestellt werden.
5. Auspacken und aufstellen
Hinweis: Da das Gerät leicht eingefettet
geliefert wird, kann es bei der ersten
Benutzung zu leichter Rauch- und
Geruchsbildung kommen. Dies ist unschädlich und hört nach kurzer Zeit auf. Bitte achten Sie währenddessen auf ausreichende
Lüftung.
1. Nehmen Sie die Einzelteile aus der
Verpackung.
2. Überprüfen Sie, dass die Einzelteile vollständig sind (siehe „1.2 Lieferumfang“
auf Seite 89) und keine Beschädigungen aufweisen.
SEAD 1800 B1 93
3. Reinigen Sie vor der ersten Benutzung
das Gerät gründlich (siehe „9. Reinigen
und lagern“ auf Seite 100).
4. Wickeln Sie die Netzanschlussleitung
vollständig von der Kabelaufwicklung 8
ab.
5. Stellen Sie das Gerät auf einer ebenen,
trockenen und rutschfesten Fläche auf,
damit das Gerät weder umfallen noch
herunterrutschen kann.
6. Stecken Sie den Netzstecker in eine
geeignete Netzsteckdose mit Schutzkon-
Page 96

RP89015 Einkochautomat LB4 Seite 94 Dienstag, 12. März 2013 4:19 16
takt (siehe „3. Technische Daten“ auf
Seite 90).
7. Füllen Sie etwa 5 l Wasser in den
Behälter 3.
6. Bedienen des Gerätes
6.1 Einstellungen vornehmen,
einschalten, ausschalten
Hinweis: Sobald Sie an den Drehknöpfen
7 oder 6 drehen, schaltet sich die Hinter-
grundbeleuchtung für die Anzeigen automatisch ein. Nach 5 Minuten schaltet sich die
Beleuchtung für die Anzeigen automatisch
wieder aus.
Warnung! Schließen Sie das
Gerät ausschließlich an einer Netzsteckdose mit Schutzkontakt an, da
davon der Schutz vor elektrischem
Schlag abhängt.
1. Stecken Sie den Netzstecker in eine
geeignete Netzsteckdose mit Schutzkontakt (siehe „3. Technische Daten“ auf
Seite 90).
2. Stellen Sie am Drehknopf für Temperatur 6
die gewünschte Temperatur ein.
– Die Temperatur wird in Schritten von
1 °C erhöht;
– Alle 5 °C ertönt ein Signalton;
– Die eingestellte Temperatur wird in der
Anzeige der eingestellten
Temperatur 10 angezeigt.
3. Stellen Sie am Drehknopf für Minuten 7
die gewünschte Einkochzeit ein.
– Die Zeit wird in Schritten von 1 min
erhöht;
– Alle 5 min ertönt ein Signalton;
8. Lassen Sie das Wasser etwa 20 min
kochen (siehe „6. Bedienen des Gerätes“ auf Seite 94).
9. Gießen Sie das Wasser weg.
Das Gerät ist nun betriebsbereit.
– Die eingestellte Zeit wird in der
Anzeige der Minuten 9 angezeigt.
4. Drücken Sie die Start/Stopp-Taste 6.
– Das Gerät beginnt zu heizen und in
der Anzeige erscheint ein laufender
Balken;
–in der Anzeige 11 wird die aktuelle
Temperatur angezeigt.
Sobald die eingestellte Temperatur
erreicht ist:
– Erklingen Signaltöne;
– Es wird ein Stundenglas angezeigt;
– Die eingestellte Zeit beginnt abzulaufen.
Sobald die eingestellte Zeit abgelaufen ist,
ertönen Signaltöne und das Gerät schaltet
sich aus.
5. Um das Gerät vor Ablauf der eingestellten Zeit auszuschalten, drücken Sie die
Start/Stopp-Taste 6.
6.2 Einkochen
Unter Einkochen (Einmachen, Eindünsten,
Einwecken) versteht man, dass Lebensmittel
unter Luftabschluss erhitzt und dadurch haltbar gemacht werden.
Zum Einkochen werden spezielle Gläser mit
Schraubverschluss oder mit Deckel und
Gummiring benötigt.
Zum Einkochen eignen sich nur frische vollreife Lebensmittel. Überreifes Obst oder welkes Gemüse ist nicht geeignet.
94
Page 97

RP89015 Einkochautomat LB4 Seite 95 Dienstag, 12. März 2013 4:19 16
Auch Pilze, Fleisch und sogar Kuchen können eingekocht werden.
Das Einkochen sollte so schnell wie möglich
nach der Ernte erfolgen, damit möglichst
viele wertvolle Stoffe in den Lebensmitteln
erhalten bleiben.
Die einzukochenden Lebensmittel müssen
sauber verlesen werden. Schmutz, Ungeziefer oder schlechte Stellen müssen entfernt
werden. Schon kleinste Faulstellen können
das Eingekochte verderben lassen.
Obst wird länger haltbar und schmeckt aromatischer, wenn es mit Zucker eingekocht
wird.
Harte Gemüsesorten, wie z.B. Möhren, Kohl
oder Kohlrabi müssen in Salzwasser vorgekocht werden. Dabei dürfen sie aber nicht
weich gekocht werden. Schütten Sie dieses
Kochwasser weg, es ist zum Einkochen
ungeeignet.
Damit das Eingekochte lange hält, ist
Sauberkeit und Hygiene oberstes Gebot.
Am besten werden alle Arbeitsgeräte,
Geschirr und alles, was mit den Lebensmitteln in Berührung kommt, gründlich gesäubert und 5 min in heißem Wasser
abgekocht.
Achten Sie auch stets auf saubere Hände.
1. Waschen Sie Obst und Gemüse gründlich ab.
Hinweis: Obst und Gemüse sollten
vor dem Zerkleinern gewaschen
werden, damit die wasserlöslichen
Vitamine weitestgehend erhalten
bleiben.
2. Zerkleinern Sie Obst und Gemüse auf
die gewünschte Größe.
3. Füllen Sie die Lebensmittel in die Einkochgläser.
Hinweis: Achten Sie darauf, die
Lebensmittel gut im Einkochglas zu
schichten. Das sieht besser aus und die
Gläser werden optimal ausgenutzt.
4. Fügen Sie nach Wunsch Gewürze oder
Zucker hinzu.
5. Füllen Sie die Gläser mit Wasser bis kurz
unter den Rand auf.
6. Verschließen Sie die Gläser.
Hinweis: Achten Sie sorgfältig darauf,
dass die Gläser wirklich gut verschlossen
sind.
7. Legen Sie das Gitter 12 in den
Behälter 3.
8. Stellen Sie die vorbereiteten Einkochgläser in den Behälter 3.
Hinweis: Die Einkochgläser können in
zwei Schichten übereinander in den
Behälter 3 gestellt werden.
9. Füllen Sie so viel Wasser in den
Behälter 3, dass die oberen Einkochgläser zu etwa 3/4 im Wasser stehen.
10.Setzen Sie den Deckel 1 auf den
Behälter 3.
11. Stellen Sie Temperatur und Einkochzeit
ein (siehe „6.1 Einstellungen vornehmen, einschalten, ausschalten” auf
Seite 94 und „8. Einkochzeiten und Temperaturen” auf Seite 99).
12.Starten Sie den Einkochvorgang, indem
Sie die Start/Stopp-Taste 6 drücken
(siehe „6.1 Einstellungen vornehmen,
einschalten, ausschalten“ auf Seite 94).
13.Sobald die Einkochzeit abgelaufen ist,
stellen Sie ein hitzebeständiges Gefäß
unter den Zapfhahn 5.
14.Drücken Sie den Zapfhebel 4, um das
Wasser aus dem Behälter 3 abzulassen.
SEAD 1800 B1 95
Page 98

RP89015 Einkochautomat LB4 Seite 96 Dienstag, 12. März 2013 4:19 16
15.Lassen Sie die Einkochgläser abkühlen,
bevor Sie sie aus dem Behälter 3
entnehmen.
Hinweis: Noch warme Einkochgläser
reagieren empfindlich auf Zugluft.
Lassen Sie sie daher möglichst im
Behälter 3 stehen, bis sie ganz
abgekühlt sind. Sollten Sie das Gerät
vorher wieder benötigen, können Sie die
warmen Gläser auch entnehmen, auf ein
Handtuch stellen und mit einem anderen
Handtuch abdecken, bis sie vollständig
abgekühlt sind.
16.Beschriften Sie die Gläser mit Inhalt und
Einkochdatum.
17. Lagern Sie das Eingekochte trocken,
dunkel und kühl, dann ist es bis zu einem
Jahr haltbar.
6.3 Flüssigkeiten und Suppen warm
halten
Dieser Einkochautomat eignet sich hervorragend, um Glühwein, Kakao, Suppen und
Eintöpfe warm zu halten.
Achtung! Achten Sie darauf, dass sich nie zu
viel Flüssigkeit im Gerät befindet. Der Flüssigkeitsstand muss stets unter „MAX” liegen. Bei
zuviel Flüssigkeit könnte diese überlaufen.
1. Füllen Sie die Flüssigkeit in den
Behälter 3.
2. Setzen Sie den Deckel 1 auf den
Behälter 3.
3. Stellen Sie am Drehknopf für Temperatur 6
die gewünschte Temperatur ein.
– Die Temperatur wird in Schritten von
1 °C erhöht;
– Alle 5 °C ertönt ein Signalton;
– Die eingestellte Temperatur wird in der
Anzeige der eingestellten
Temperatur 10 angezeigt.
4. Stellen Sie keine Zeit ein, sondern
drücken Sie den Drehknopf „TIMER” 7.
– In der Anzeige erscheint eine liegende
„8”.
5. Drücken Sie die Start/Stopp-Taste 6.
– Das Gerät beginnt zu heizen;
– Sobald die eingestellte Temperatur
erreicht ist, erklingen Signaltöne;
– Das Gerät heizt so lange, bis Sie
erneut die Start/Stopp-Taste 6
drücken.
6. Rühren Sie die Flüssigkeit regelmäßig
um, damit sich die Wärme gleichmäßig
verteilt und sich nichts am Boden
festsetzt.
7. Reine Flüssigkeiten ohne feste Bestandteile können über den Zapfhahn 5 entnommen werden. Drücken Sie herzu den
Zapfhebel 4 herunter.
Hinweis: Um bei großen
Flüssigkeitsmengen den Zapfhebel 4
nicht dauernd festhalten zu müssen,
können Sie den Zapfhebel 4 senkrecht
nach oben klappen.
8. Suppen oder Flüssigkeiten mit festen
Bestandteilen würden den Zapfhahn verstopfen. Entnehmen Sie diese mit einer
Schöpfkelle.
9. Reinigen Sie das Gerät nach Gebrauch
sorgfältig (siehe „9. Reinigen und lagern“
auf Seite 100).
6.4 Überhitzungsschutz
Das Gerät besitzt einen Überhitzungsschutz.
Sobald sich zu wenig Flüssigkeit im
Behälter 3 befindet und dadurch die Temperatur zu hoch wird, warnt das Gerät mit Signaltönen und einem Symbol für zu geringen
Füllstand:
96
Page 99

RP89015 Einkochautomat LB4 Seite 97 Dienstag, 12. März 2013 4:19 16
1. Schalten Sie das Gerät aus, indem Sie
die Start/Stopp-Taste 6 drücken.
Die Signaltöne verstummen.
2. Füllen Sie Flüssigkeit nach.
3. Starten Sie das Gerät erneut, indem Sie
die Start/Stopp-Taste 6 drücken.
7. Rezepte
7. 1 Le be r wu r st
Zutaten:
• 250 g Leber (Schwein, Rind, Huhn, Pute)
• 300 g fetten Speck
• 400 g Schweinebauch
• 300 g Schweinenacken
•4 Zwiebeln
•2 Stangen Lauch
• 50 g Schweineschmalz
• 1 Bund Petersilie
• 1 Bund Schnittlauch
•1 EL Majoran, getrocknet
• 1 EL Thymian frisch oder getrocknet
• 1 EL Kerbel frisch oder getrocknet
•1 EL Salz
• 1 TL weißen Pfeffer
•1 TL Muskat
• 1 TL Nelken, gemahlen
•1 TL Kardamom
• 1 TL Ingwer, gemahlen oder gerieben
Zubereitung:
1. Schweinenacken und Schweinebauch in
leicht gesalzenem Wasser kochen.
2. Fleisch aus der Brühe nehmen und
abkühlen lassen.
3. Die Brühe aufbewahren.
4. Leber mit heißem Wasser überbrühen
(nicht kochen).
Wenn nach der Warnung innerhalb von
5 Minuten keine Maßnahme erfolgt, schaltet das Gerät automatisch ab.
Ziehen Sie in diesem Falle den Netzstecker
und lassen Sie das Gerät abkühlen.
Danach können Sie das Gerät wieder normal in Betrieb nehmen.
5. Fleisch, Speck und Leber durch den
Fleischwolf drehen.
6. Zwiebeln und Lauch sehr fein hacken.
7. Gehackte Zwiebeln und Lauch im
Schweineschmalz anrösten, bis sie
glasig sind.
8. Durchgedrehtes Fleisch, Zwiebeln und
Lauch sowie die Gewürze und Kräuter in
eine Schüssel geben.
9. Mit 1 Liter der aufbewahrten Brühe auffüllen.
10.Zutaten durchkneten, bis ein homogener
Teig entsteht.
11. Den durchgekneteten Teig in Schraubgläser geben.
12.Bei 100 °C ca. 160 min einkochen.
Hinweis: Die Haltbarkeit beträgt ca.
1Jahr.
7.2 Erdbeer-Kiwi Fruchtaufstrich
Zutaten:
• 1,5 kg frische Erdbeeren
• 500 g reife Kiwi
• 1 kg Gelierzucker ohne Kochen
Zubereitung:
1. Erdbeeren gründlich waschen.
2. Erdbeeren gut abtropfen lassen.
SEAD 1800 B1 97
Page 100

RP89015 Einkochautomat LB4 Seite 98 Dienstag, 12. März 2013 4:19 16
3. Erdbeeren säubern: Stiele, Blätter und
schlechte Stellen entfernen.
4. Kiwis schälen und klein schneiden.
5. Früchte in eine Schüssel geben.
6. Den Gelierzucker dazu geben.
7. Mit dem Pürierstab alles pürieren.
8. In Gläser füllen und diese sorgfältig verschließen.
9. Bei 80 °C 25 min lang einkochen.
Hinweis: Für diese Art der schonenden
Zubereitung müssen Sie Gelierzucker verwenden, der auch ohne Kochen abbindet.
Eine günstigere Alternative ist konventioneller Gelierzucker 2:1. Damit wird der
Fruchtaufstrich allerdings etwas flüssiger.
7.3 Zucchini Ketchup
Zutaten:
• 3 kg Zucchini
•1 kg Zwiebeln
•ca. 3 EL Salz
• 500 g Zucker
• 1 Liter milder Kräuteressig
•2 EL Paprikapulver
•3 EL Curry
• 3 EL scharfer Senf
• 1-2 EL Cayennepfeffer
• 2 Tuben Tomatenmark
Zubereitung:
1. Zucchini fein raspeln.
2. Zwiebeln fein würfeln.
3. Zucchini, Zwiebeln und Salz in eine
Schüssel geben.
4. An einem kühlen und trockenen Ort ca.
24 h ziehen lassen.
5. Das Wasser aus der Schüssel abgießen,
evtl. die Masse etwas ausdrücken.
6. Alle Zutaten in einen Topf geben und
vorsichtig erhitzen (Anbrenngefahr).
7. Ca. 30 min köcheln lassen. Dabei ständig
umrühren, da die Masse leicht anbrennt.
8. Die Masse pürieren.
9. Masse in Schraubgläser füllen.
10.Bei 100 °C ca. 1 h einkochen.
7.4 Sauerkirschen
Zutaten:
• Sauerkirschen
•Zucker
•Wasser
Zubereitung:
1. Sauerkirschen sorgfältig sortieren. Nur
die guten kommen ins Glas.
2. Sauerkirschen entstielen.
3. Ca. 30 min in kaltes Wasser einlegen,
damit eventuell vorhandene Maden
oder Insekten ausgetrieben werden.
4. Sauerkirschen entsteinen.
5. Entsteinte Sauerkirschen in die Gläser
schichten.
6. Zuckerlösung herstellen mit 300 g
Zucker auf 1 Liter Wasser.
7. Soviel Zuckerlösung in die Gläser füllen,
bis die Kirschen vollständig bedeckt sind.
8. Bei 80 °C ca. 30 min lang einkochen.
7. 5 Te ep un sch
Hinweis: Die angegebenen Mengen ergeben ca. 3 L Getränk. Für größere Mengen
die Zutaten einfach erhöhen.
Zutaten:
•1,5 l schwarzen Tee
• 1 Flasche Rotwein (0,75 l)
• 6 unbehandelte Orangen
• 3 unbehandelte Zitronen
•6 Stangen Zimt
• ca. 750 g Zucker
•Rum nach Geschmack
98
 Loading...