

Page 1
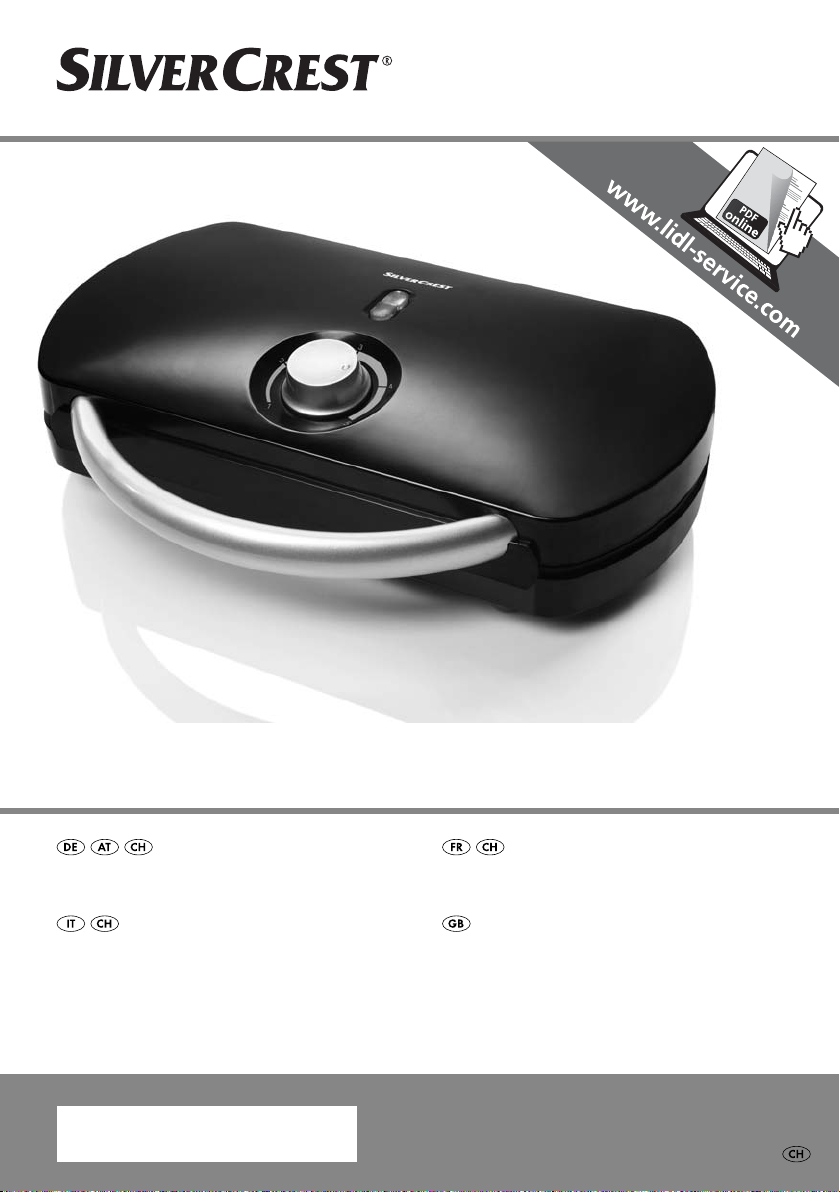
DOPPEL-WAFFELEISEN SDW 1200 B2
DOPPEL-WAFFELEISEN
Bedienungsanleitung
PIASTRA DOPPIA PER WAFFEL
Istruzioni per l’uso
IAN 90247
GAUFRIER DOUBLE
Mode d’emploi
WAFFLE MAKER
Operating instructions
Page 2
Klappen Sie vor dem Lesen die Seite mit den Abbildungen aus und machen Sie sich anschließend mit allen
Funktionen des Gerätes vertraut.
Avant de lire le mode d‘emploi, ouvrez la page contenant les illustrations et familiarisez-vous ensuite avec
toutes les fonctions de l‘appareil.
Prima di leggere aprire la pagina con le immagini e prendere confi denza con le diverse funzioni
dell’apparecchio.
Before reading, unfold the page containing the illustrations and familiarise yourself with all functions of
the device.
DE / AT / CH Bedienungsanleitung Seite 1
FR / CH Mode d’emploi Page 11
IT / CH Istruzioni per l’uso Pagina 21
GB Operating instructions Page 31
Page 3
Page 4

INHALTSVERZEICHNIS SEITE
1. Bestimmungsgemäßer Gebrauch 2
2. Lieferumfang 2
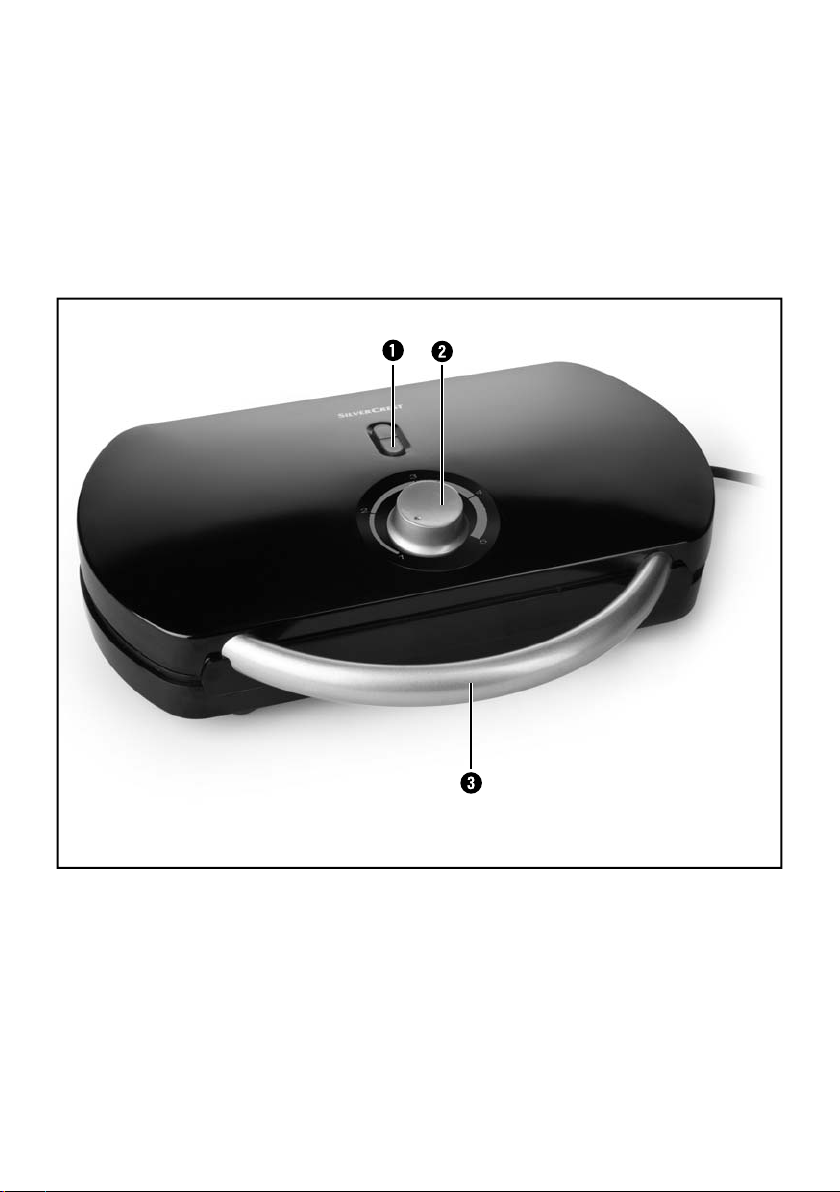
3. Gerätebeschreibung 2
4. Technische Daten 2
5. Sicherheitshinweise 3
6. Vor der ersten Inbetriebnahme 5
7. Waffeln backen 5
8. Reinigen und Pflegen 6
9. Aufbewahren 7
10. Entsorgen 7
11. Garantie und Service 7
12. Importeur 8
13. Rezepte 8
1. Basisteig . . . . . . . . . . . . . . . . . . . . . . . . . . . . . . . . . . . . . . . . . . . . . . . . . . . . . . . . . . . . . . . .8
2. Mandelwaffeln . . . . . . . . . . . . . . . . . . . . . . . . . . . . . . . . . . . . . . . . . . . . . . . . . . . . . . . . . . .9
3. Schokowaffeln . . . . . . . . . . . . . . . . . . . . . . . . . . . . . . . . . . . . . . . . . . . . . . . . . . . . . . . . . . . .9
4. Mandarinenwaffeln . . . . . . . . . . . . . . . . . . . . . . . . . . . . . . . . . . . . . . . . . . . . . . . . . . . . . .10
5. Tomatenwaffeln . . . . . . . . . . . . . . . . . . . . . . . . . . . . . . . . . . . . . . . . . . . . . . . . . . . . . . . . . .10
- 1 -
Page 5

DOPPEL-WAFFELEISEN
3. Gerätebeschreibung
Herzlichen Glückwunsch zum Kauf Ihres neuen
Gerätes.
Sie haben sich damit für ein hochwertiges Produkt
entschieden. Die Bedienungsanleitung ist Bestandteil dieses Produkts. Sie enthält wichtige Hinweise
für Sicherheit, Gebrauch und Entsorgung. Machen
Sie sich vor der Benutzung des Produkts mit allen
Bedien- und Sicherheitshinweisen vertraut. Benutzen
Sie das Produkt nur wie beschrieben und für die angegebenen Einsatzbereiche. Händigen Sie alle
Unterlagen bei Weitergabe des Produkts an Dritte
mit aus.
1. Bestimmungsgemäßer
Gebrauch
Dieses Gerät dient ausschließlich dem Backen von
Waffeln. Dieses Gerät ist ausschließlich für die Benutzung in privaten Haushalten bestimmt. Es ist nicht
vorgesehen für die Zubereitung anderer Lebensmittel. Benutzen Sie es nicht gewerblich.
2. Lieferumfang
1 Betriebslampe (Rot / Grün)
2 Bräunungsregler
3 Handgriff
4. Technische Daten
Spannung: 220 - 240 V ~/ 50 Hz
Leistungsaufnahme: 1200 W
• Doppel-Waffeleisen
• Bedienungsanleitung
- 2 -
Page 6

5. Sicherheitshinweise
Gefahr! Elektrischer Schlag!
• Stellen Sie sicher, dass das Gerät niemals mit Wasser in Berührung kommt, solange der Netzstecker in der Steckdose
ist, insbesondere wenn Sie es in einer Küche in Nähe der
Spüle verwenden.
• Achten Sie darauf, dass im Betrieb das Netzkabel niemals
nass oder feucht wird. Führen Sie es so, dass es nicht eingeklemmt oder anderweitig beschädigt werden kann.
• Ziehen Sie nach Gebrauch immer den Netzstecker aus der
Steckdose.
• Lassen Sie beschädigte Netzstecker oder Netzkabel sofort
von autorisiertem Fachpersonal oder dem Kundenservice
austauschen, um Gefährdungen zu vermeiden.
Achtung! Verletzungsgefahr!
• Die Geräteteile können beim Betrieb heiß werden, fassen
Sie daher nur den Handgriff an. Auch der Bräunungsregler
kann nach einer gewissen Betriebsdauer heiß werden –
tragen Sie deshalb besser Topf-Handschuhe.
• Dieses Gerät kann von Kindern ab 8 Jahren sowie von
Personen mit reduzierten physischen, sensorischen oder
mentalen Fähigkeiten oder Mangel an Erfahrung
und/oder Wissen benutzt werden, wenn sie beaufsichtigt
oder bezüglich des sicheren Gebrauchs des Gerätes
unterwiesen wurden und die daraus resultierenden Gefahren verstanden haben.
- 3 -
Page 7

• Kinder dürfen nicht mit dem Gerät spielen.
• Reinigung und Benutzer-Wartung dürfen nicht durch Kin-
der durchgeführt werden, es sei denn, sie sind älter als 8
Jahre und beaufsichtigt. Kinder jünger als 8 Jahre sind
vom Gerät und der Anschlussleitung fernzuhalten.
• Beim Öffnen des Deckels können sehr heiße Dampfschwa-
den entweichen. Tragen Sie beim Öffnen daher besser
Topf-Handschuhe.
Achtung! Brandgefahr!
• Teigwaren können brennen! Stellen Sie das Gerät deshalb
niemals unter brennbaren Gegenständen ab, insbesondere
nicht unter brennbaren Gardinen.
• Benutzen Sie keine externe Zeitschaltuhr oder ein separates
Fernwirksystem, um das Gerät zu betreiben.
• Lassen Sie das Gerät nie unbeaufsichtigt arbeiten.
- 4 -
Page 8

6. Vor der ersten
Inbetriebnahme
Bevor Sie das Gerät in Betrieb nehmen, überzeugen Sie sich davon, dass das Gerät, Netzstecker
und Netzkabel in einwandfreiem Zustand sind und
alle Verpackungsmaterialien vom Gerät entfernt
sind.
Reinigen Sie zunächst das Gerät, wie unter
“8. Reinigen und Pflegen” beschrieben.
Fetten Sie die Backflächen leicht mit zum Backen
geeigneter Butter, Margarine oder Öl ein. So lösen
sich eventuelle fertigungsbedingte Rückstände an
den Backflächen besser.
Heizen Sie das Gerät bei geschlossenem Deckel
einmal kurz auf maximale Temperatur auf:
Hinweis:
Beim ersten Gebrauch kann durch fertigungsbedingte Rückstände ein leichter Geruch entstehen
(auch geringe Rauchentwicklung möglich). Dieser
ist normal und verliert sich nach kurzer Zeit. Sorgen
Sie bitte für eine ausreichende Belüftung. Öffnen
Sie z.B. ein Fenster.
1. Hierzu stecken Sie den Netzstecker in die Netz-
steckdose und drehen den Bräunungsregler 2
auf Stufe 5.
2. Die rote Betriebslampe 1 leuchtet, solange der
Netzstecker in der Steckdose ist. Die grüne
Betriebslampe 1 leuchtet, sobald das Gerät
aufgeheizt ist.
• Ziehen Sie wieder den Netzstecker und lassen
Sie das Gerät aufgeklappt auskühlen.
Reinigen Sie das Gerät erneut, wie unter
“8. Reinigen und Pflegen” beschrieben. Danach ist
das Waffeleisen betriebsbereit.
7. Waffeln backen
Wenn Sie einen für Waffeleisen vorgesehenen Teig
vorbereitet haben:
1. Heizen Sie das Gerät bei geschlossenem Deckel
auf. Hierzu stecken Sie den Netzstecker in die
Steckdose und drehen den Bräunungsregler 2
auf die Stufe 3. Je weiter Sie den Bräunungsregler 2 nach rechts drehen, desto dunkler werden
die Waffeln gebacken.
2. Sobald die grüne Betriebslampe 1 leuchtet, ist
das Gerät aufgeheizt.
• Fetten Sie, bevor Sie die erste Waffel backen, die
heißen Backflächen leicht mit zum Backen geeigneter Butter, Margarine oder Öl ein.
• Verteilen Sie den Teig gleichmäßig auf den unte-
ren Backflächen. Um die richtige Teigmenge zu
bestimmen, füllen Sie so viel Teig ein, bis der
Rand der Backflächen leicht berührt wird. Falls
nötig vergrößern Sie die Teigmenge bei der nächsten Waffel. Achten Sie darauf, dass der Teig
nicht über den Rand der Backflächen läuft.
Schließen Sie den Deckel.
• Nach frühestens 2 Minuten können Sie den
Deckel öffnen, um das Backergebnis zu kontrollieren. Ein frühzeitigeres Öffnen würde nur die
Waffel aufreißen.
• Nach ca. 3 Minuten ist die Waffel fertig
gebacken.
Hinweis:
Da der ideale Bräunungsgrad stark vom persönlichen Geschmack und der Art des Teiges abhängig
ist, kann die Backzeit variieren: Backen Sie daher
die Waffeln so lange, bis der gewünschte Bräunungsgrad erreicht ist. Den Bräunungsgrad können Sie entweder durch Verstellen des Bräunungsreglers 2
oder durch die Backzeit bestimmen. So lassen sich
goldgelbe bis knusperbraune Waffeln backen.
- 5 -
Page 9

• Achten Sie beim Herausnehmen der Waffeln darauf, dass nicht versehentlich die Beschichtung der
Backflächen beschädigt wird. Andernfalls lassen
sich dort die Waffeln nicht mehr so gut lösen.
Hinweis:
Die Backflächen müssen nicht vor jeder neuen
Waffel nochmals eingefettet werden. Fetten Sie die
Backflächen nur vor jedem neuen Gebrauch des
Waffeleisens ein.
• Nach der letzten Waffel ziehen Sie den Netzstecker aus der Steckdose und lassen das Gerät
aufgeklappt abkühlen.
8. Reinigen und Pflegen
Gefahr eines elektrischen
Schlages!
Öffnen Sie niemals das Gehäuse des Gerätes. Es
befinden sich keinerlei Bedienelemente darin. Bei
geöffnetem Gehäuse kann Lebensgefahr durch
elektrischen Schlag bestehen.
Bevor Sie das Gerät reinigen, ziehen Sie erst den
Netzstecker aus der Netzsteckdose und lassen Sie
das Gerät abkühlen. Es besteht die Gefahr von
Verbrennungen.
Achtung!
Auf keinen Fall dürfen die Geräteteile in Wasser
oder andere Flüssigkeiten getaucht werden! Hier kann
Lebensgefahr durch elektrischen Schlag entstehen,
wenn bei erneutem Betrieb Flüssigkeitsreste auf
spannungsführende Teile gelangen.
• Reinigen Sie die Backflächen nach Gebrauch
zunächst mit einem trockenen Papier-Küchentuch,
um die Fettrückstände aufzusaugen.
• Reinigen Sie danach alle Flächen und das Netzkabel mit einem leicht angefeuchteten Spültuch.
Trocknen Sie das Gerät gut ab, bevor Sie es
erneut verwenden.
Achtung!
• Verwenden Sie keine chemischen oder aggressi-
ven Reinigungs- oder Lösemittel. Diese können
nicht nur zu Schäden am Gerät führen, sondern
auch zu Rückständen in den nächsten Waffeln.
• Nehmen Sie auf keinen Fall harte Gegenstände
für die Reinigung zu Hilfe. Hierdurch kann die Beschichtung der Waffelflächen beschädigt werden.
Bei fettigen Verschmutzungen:
Geben Sie ein mildes Spülmittel auf das angefeuchtete Spültuch. Reiben Sie damit die fettigen Verschmutzungen ab. Lösen sich diese immer noch
nicht, benutzen Sie eine weiche Spülbürste.
Entfernen Sie die Spülmittelreste gründlich mit einem
mit klarem Wasser befeuchteten Spültuch. Entfernen
Sie die Spülmittelreste gründlich mit klarem Wasser
aus dem Tuch und wiederholen Sie die Reinigung
so oft, bis alle Spülmittelreste auf den Waffelflächen
beseitigt sind.
Ansonsten kann es zu Rückständen in den nächsten
Waffeln kommen!
Bei festgebackenen Rückständen:
Legen Sie ein nasses Spültuch auf die festgebackenen Rückstände, um diese aufzuweichen. Danach
können Sie die aufgeweichten Rückstände mit dem
nassen Tuch entfernen.
- 6 -
Page 10

9. Aufbewahren
11. Garantie und Service
Lassen Sie das Gerät erst vollständig auskühlen,
bevor Sie es wegstellen. Wickeln Sie das Netzkabel
um den Halter unter dem Geräteboden und fixieren
Sie es mit dem Kabel-Clip.
Lagern Sie das Gerät an einem trockenen Ort.
10. Entsorgen
Werfen Sie das Gerät keinesfalls in den
normalen Hausmüll. Dieses Produkt
unterliegt der europäischen Richtlinie
2012/19/EU.
Sie erhalten auf dieses Gerät 3 Jahre Garantie ab
Kaufdatum. Das Gerät wurde sorgfältig produziert
und vor Anlieferung gewissenhaft geprüft.
Bitte bewahren Sie den Kassenbon als Nachweis
für den Kauf auf. Bitte setzen Sie sich im Garantiefall mit Ihrer Servicestelle telefonisch in Verbindung.
Nur so kann eine kostenlose Einsendung Ihrer Ware
gewährleistet werden.
Die Garantieleistung gilt nur für Material- oder
Fabrikationsfehler, nicht aber für Transportschäden,
Verschleißteile oder für Beschädigungen an zerbrechlichen Teilen, z. B. Schalter oder Akkus. Das
Produkt ist lediglich für den privaten und nicht für
den gewerblichen Gebrauch bestimmt.
Bei missbräuchlicher und unsachgemäßer Behandlung, Gewaltanwendung und bei Eingriffen, die
nicht von unserer autorisierten Service-Niederlassung vorgenommen wurden, erlischt die Garantie.
Ihre gesetzlichen Rechte werden durch diese
Garantie nicht eingeschränkt.
Die Garantiezeit wird durch die Gewährleistung
nicht verlängert. Dies gilt auch für ersetzte und reparierte Teile. Eventuell schon beim Kauf vorhandene
Schäden und Mängel müssen sofort nach dem
Auspacken gemeldet werden, spätestens aber zwei
Tage nach Kaufdatum. Nach Ablauf der Garantiezeit anfallende Reparaturen sind kostenpflichtig.
Entsorgen Sie das Gerät über einen zugelassenen
Entsorgungsbetrieb oder über Ihre kommunale
Entsorgungseinrichtung.
Beachten Sie die aktuell geltenden Vorschriften.
Setzen Sie sich im Zweifelsfall mit Ihrer Entsorgungseinrichtung in Verbindung.
Führen Sie alle Verpackungsmaterialien
einer umweltgerechten Entsorgung zu.
- 7 -
Page 11

Service Deutschland
Tel.: 0800 5435 111
E-Mail: kompernass@lidl.de
IAN 90247
13. Rezepte
1. Basisteig
Service Österreich
Tel.: 0820 201 222 (0,15 EUR/Min.)
E-Mail: kompernass@lidl.at
IAN 90247
Service Schweiz
Tel.: 0842 665566 (0,08 CHF/Min.,
Mobilfunk max. 0,40 CHF/Min.)
E-Mail: kompernass@lidl.ch
IAN 90247
Erreichbarkeit Hotline:
Montag bis Freitag von 8:00 Uhr - 20:00 Uhr (MEZ)
12. Importeur
KOMPERNASS HANDELS GMBH
BURGSTRASSE 21
44867 BOCHUM
GERMANY
www.kompernass.com
Für ca. 20 Stück
250 g Margarine oder Butter (weich)
200 g Zucker
2 Päckchen Vanillezucker
5 Eier
500 g Mehl
5 g Backpulver
400 ml Milch
Die Backflächen einfetten, zuklappen und
aufheizen.
Die Eier verquirlen und mit dem Zucker und der
Margarine/Butter zu einem glatten Teig verrühren.
Vanillezucker hinzufügen. Mehl und Backpulver dazugeben und verrühren.
Zuletzt die Milch nach und nach unterrühren, bis
der Teig eine glatte und weiche Konsistenz hat.
Jeweils etwa 2 EL Teig in die Mitte der unteren
Backflächen geben und das Waffeleisen schließen.
Jede Waffel etwa 3 Min. goldbraun backen. Die
anschließend fertigen Waffeln auf ein Kuchengitter
legen.
- 8 -
Page 12

2. Mandelwaffeln
3. Schokowaffeln
Für ca. 8 Stück
200 g weiche Butter
200 g gemahlene Mandeln
300 g Mehl
100 g Schmand
1/4 l Milch
1 TL Salz
1 TL Currypulver
Die Backflächen einfetten, zuklappen und
aufheizen.
Die Butter mit den Mandeln, dem Mehl, dem
Schmand, der Milch, dem Salz und dem Currypulver verquirlen. Den Teig abschmecken und nach
Belieben noch etwas nachwürzen.
Jeweils etwa 2 EL Teig in die Mitte der unteren
Backflächen geben und das Waffeleisen schließen.
Jede Waffel etwa 3 Min. goldbraun backen. Die
anschließend fertigen Waffeln auf ein Kuchengitter
legen.
Für ca. 8 Stück
200 g weiche Butter
200 g Zucker
4 Eier
150 g Crème fraîche
80 g Schokotröpfchen
200 g Mehl
Die Backflächen einfetten, zuklappen und
aufheizen.
Die Butter mit dem Zucker, den Eiern und der Crème
fraîche schaumig schlagen. Die Schokotröpfchen
und das Mehl unterrühren.
Jeweils etwa 2 EL Teig in die Mitte der unteren
Backflächen geben und das Waffeleisen schließen.
Jede Waffel etwa 3 Min. goldbraun backen. Die
anschließend fertigen Waffeln auf ein Kuchengitter
legen.
- 9 -
Page 13

4. Mandarinenwaffeln
5. Tomatenwaffeln
Für ca. 8 Stück
1 Dose Mandarinen-Orangen
(175 g Abtropfgewicht)
200 g weiche Butter
200 g Zucker
2 Eier
150 g Vanillejoghurt
200 g Mehl
50 g Speisestärke
Die Mandarinen-Orangen abtropfen lassen. Die
Backflächen einfetten, zuklappen und aufheizen.
Die Butter mit dem Zucker und den Eiern schaumig
schlagen. Die Mandarinen untermischen, sie dürfen
dabei ruhig zerfallen. Dann den Joghurt, das Mehl
und die Speisestärke unterrühren.
Jeweils etwa 2 EL Teig in die Mitte der unteren
Backflächen geben und das Waffeleisen schließen.
Jede Waffel etwa 3 Min. goldbraun backen. Die
anschließend fertigen Waffeln auf ein Kuchengitter
legen.
Für ca. 8 Stück
5 Eier
100 g weiche Butter
1 TL Salz
8 El Buttermilch
150 g Mehl
100 g getrocknete, in Öl eingelegte Tomaten
3 Stängel Basilikum
Die Backflächen einfetten, zuklappen und
aufheizen.
Zuerst die Eier trennen. Dann die Eiweiße steif
schlagen. Die Eigelbe mit der Butter und dem Salz
schaumig rühren. Dann die Buttermilch und das
Mehl unterrühren.
Die Tomaten abtropfen lassen und klein schneiden.
Das Basilikum waschen und trockenschütteln. Die
Blättchen abzupfen und klein schneiden. Die Tomaten und das Basilikum unter den Teig rühren, dann
den Eischnee unterheben. Den Teig zwischendurch
umrühren, damit sich die Tomatenstücke gleichmäßig verteilen.
Jeweils etwa 2 EL Teig in die Mitte der unteren
Backflächen geben und das Waffeleisen schließen.
Jede Waffel etwa 4 Min. goldbraun backen. Die
anschließend fertigen Waffeln auf ein Kuchengitter
legen.
- 10 -
Page 14

SOMMAIRE PAGE
1. Finalité de l'appareil 12
2. Accessoires fournis 12
3. Description de l'appareil 12
4. Caractéristiques techniques 12
5. Consignes de sécurité 13
6. Avant la première mise en service 15
7. Faire des gaufres 15
8. Nettoyage et entretien 16
9. Rangement 17
10. Mise au rebut 17
11. Garantie & service après-vente 17
12. Importateur 18
13. Délicieuses recettes de gaufres 18
1. Pâte de base . . . . . . . . . . . . . . . . . . . . . . . . . . . . . . . . . . . . . . . . . . . . . . . . . . . . . . . . . . . .18
2. Gaufres aux amandes . . . . . . . . . . . . . . . . . . . . . . . . . . . . . . . . . . . . . . . . . . . . . . . . . . . .19
3. Gaufres au chocolat . . . . . . . . . . . . . . . . . . . . . . . . . . . . . . . . . . . . . . . . . . . . . . . . . . . . .19
4. Gaufres aux mandarines . . . . . . . . . . . . . . . . . . . . . . . . . . . . . . . . . . . . . . . . . . . . . . . . . .20
5. Gaufres aux tomates . . . . . . . . . . . . . . . . . . . . . . . . . . . . . . . . . . . . . . . . . . . . . . . . . . . . .20
- 11 -
Page 15

GAUFRIER DOUBLE
3. Description de l'appareil
Toutes nos félicitations pour l'achat de votre nouvel
appareil.
Vous avez choisi un produit de grande qualité. Le
mode d'emploi fait partie de ce produit. Il contient
des remarques importantes concernant la sécurité,
l'utilisation et la mise au rebut. Veuillez vous familiariser avec l'ensemble des consignes d'opération et
de sécurité avant l'usage du produit. N'utilisez le
produit que conformément aux consignes et pour
les domaines d'utilisation prévus. En cas de transfert
du produit à un tiers, remettez-lui également tous les
documents.
1. Finalité de l'appareil
Cet appareil sert exclusivement à la confection de
gaufres. Cet appareil est exclusivement réservé à
l'utilisation dans le cadre domestique. Il n'est pas
prévu pour la préparation d'autres aliments. Evitez
de l'utiliser à des fins professionnelles.
2. Accessoires fournis
1 Témoin de service (rouge/vert)
2 Bouton de réglage
3 Poignée
4. Caractéristiques techniques
Tension: 220 - 240 V ~/ 50 Hz
Puissance consommée: 1200 W
• Gaufrier Double
• Mode d'emploi
- 12 -
Page 16

5. Consignes de sécurité
Danger ! Risque d'électrocution !
• Assurez-vous que l'appareil ne peut jamais entrer en contact avec de l'eau tant que la fiche secteur est branchée
dans la prise, en particulier lorsque vous l'utilisez dans une
cuisine à proximité de l'évier.
• Assurez-vous que le cordon d'alimentation ne soit jamais
mouillé ou même humide lorsque l'appareil est utilisé. Disposez le cordon de manière à éviter qu'il ne soit endommagé
ou coincé.
• Après utilisation, retirez toujours la fiche secteur de la prise.
• Faites immédiatement remplacer la fiche secteur ou le cordon
d'alimentation endommagé par un technicien spécialisé
ou par le service clientèle afin d'éviter tout danger.
Attention ! Risque de blessure !
• En cours d'opération, les pièces de l'appareil peuvent devenir chaudes. Pour cette raison, saisissez uniquement la
poignée. Le régulateur de dorage peut lui aussi s'échauffer
après une certaine durée d'opération – voilà pourquoi il
est fortement recommandé d'utiliser des maniques.
• Cet appareil peut être utilisé par des enfants d'au moins 8
ans et par des personnes disposant de capacités physiques,
sensorielles ou mentales réduites ou de peu d'expérience
et/ou de connaissances, à condition qu'ils soient sous surveillance ou initiés à l'utilisation sécurisée de l'appareil.
- 13 -
Page 17

• Ne pas laisser les enfants jouer avec l'appareil.
• Le nettoyage et la maintenance réalisée par l'utilisateur ne
doivent pas être effectués par des enfants à moins qu'ils
soient âgés de plus de 8 ans et supervisés. Les enfants
âgés de moins de 8 ans doivent être tenus hors de portée
du cordon d'alimentation.
• Lors de l'ouverture du couvercle, des vapeurs très chaudes
peuvent s'échapper. Voilà pourquoi, il est conseillé de porter
des gants de protection ou des maniques lors de l'ouverture.
Attention ! Risque d'incendie !
• Les denrées à base de pâte peuvent brûler ! Ne placez
donc jamais l'appareil sous des objets combustibles, en
particulier sous des rideaux pouvant prendre feu.
• Ne pas utiliser de minuterie externe ou de dispositif de commande à distance séparé pour faire fonctionner l'appareil.
• Ne laissez jamais fonctionner l'appareil sans surveillance.
- 14 -
Page 18

6. Avant la première
mise en service
Avant de mettre en service l'appareil, veuillez vous
assurer que l'appareil, la fiche secteur et le cordon
d'alimentation sont dans un parfait état de fonctionnement et tous les matériaux d'emballage sont retirés
de l'appareil.
Nettoyez tout d'abord l'appareil comme décrit au
point “8. Nettoyage et entretien”.
Graissez ensuite légèrement les surfaces de cuisson
avec du beurre, de la margarine ou de l'huile adaptés à la cuisson. Les éventuels résidus de fabrication
peuvent ainsi plus facilement se retirer des surfaces
de cuisson.
Faites chauffer l'appareil une fois à la température
maximum en laissant le couvercle fermé:
Remarque :
Lors de la première utilisation, la présence de résidus de fabrication peut générer une légère odeur
(un léger développement de fumée est également
possible). Ce phénomène est normal et s'estompe
rapidement. Veuillez assurer une aération suffisante en
ouvrant par ex. une fenêtre.
1. Enfichez la fiche secteur dans la prise secteur puis
tournez le bouton de réglage 2 vers le niveau 5.
2. Le témoin de service 1 rouge s'allume, tant que
la fiche secteur est branchée dans la prise. Le
témoin de service 1 vert s’allume dès que
l’appareil a atteint la température requise.
• Retirez de nouveau la fiche secteur et laissez
refroidir l'appareil avec le couvercle ouvert.
Nettoyez de nouveau l'appareil comme décrit au
point “8. Nettoyage et entretien”. Le gaufrier est
ensuite prêt à l'emploi.
7. Faire des gaufres
Si vous avez préparé une pâte à utiliser avec le
gaufrier :
1. Faites chauffer l'appareil avec le couvercle fermé. Pour ce faire, insérez la fiche secteur dans la
prise secteur et tournez le bouton de réglage 2
vers le niveau 3. Plus vous tournez le bouton de
réglage 2 vers la droite, plus les gaufres seront
foncées.
2. Le témoin de service 1 vert s’allume pour indiquer
que l’appareil a atteint la température requise.
• Avant de cuire la première gaufre, graissez les
surfaces de cuisson chaudes avec du beurre, de
la margarine ou de l'huile adaptée à la cuisson.
• Répartissez la pâte uniformément sur la surface
de cuisson inférieure. Pour déterminer la bonne
quantité de pâte, versez suffisamment de pâte
pour atteindre presque le bord des surfaces de
cuisson. Si nécessaire augmentez la quantité de
pâte pour la gaufre suivante. Veillez à ce que la
pâte ne déborde pas hors de la surface de cuisson.
Fermez le couvercle.
• Au bout de 2 minutes au plus tôt, ouvrez le cou-
vercle pour contrôler le résultat de cuisson. Une
ouverture trop précoce pourrait déchirer la gaufre.
• Après env. 3 minutes, la gaufre est prête.
Remarque :
Comme le degré de dorage idéal dépend dans une
large mesure du goût personnel et du type de pâte,
le temps de cuisson peut varier : voilà pourquoi, vous
devriez cuire les gaufres jusqu’à ce que le degré de
dorage souhaité soit atteint. Vous pouvez définir le
degré de dorage soit en réglant le bouton de réglage 2 ou par le temps de cuisson.Vous pouvez ainsi
confectionner des gaufres dorées ou d’une belle couleur brun croustillant.
- 15 -
Page 19

• Lorsque vous retirez les gaufres, veillez à ce que
le revêtement des surfaces de cuisson ne soit pas
endommagé. Sinon, les gaufres colleront ensuite
à cet endroit.
Remarque :
Il n'y a pas besoin de graisser à nouveau les surfaces de cuisson avant chaque gaufre. Il suffit de
graisser les surfaces de cuisson avant chaque nouvel usage du gaufrier.
• Après la dernière gaufre, débranchez la fiche
secteur de la prise et laissez refroidir l'appareil
avec le couvercle ouvert.
8. Nettoyage et entretien
• Nettoyez les surfaces de cuisson après utilisation
tout d'abord avec un essuie-tout sec afin d'absorber
les résidus de graisse.
• Nettoyez ensuite toutes les surfaces et le cordon
d'alimentation avec un chiffon de nettoyage légèrement humidifié. N'oubliez pas de bien sécher
l'appareil avant de le réutiliser.
Attention !
• N'utilisez pas de produits de nettoyage chimi-
ques ou de solvants aggressifs. Ces derniers
peuvent non seulement endommager l'appareil
mais également contribuer au dépôt de résidus
dans les gaufres suivantes.
• Ne vous aidez en aucun cas d'objets durs pour
le nettoyage. Le revêtement de la surface de cuisson peut être ainsi endommagé.
Risque de choc électrique !
N'ouvrez jamais le corps de l'appareil. La machine
ne contient aucun élément de commande dans ces
pièces. Danger de mort par électrocution lorsque le
corps de l'appareil est ouvert.
Avant de nettoyer l'appareil, retirez tout d'abord la
fiche secteur de la prise et laissez l'appareil refroidir.
Attention !
Les pièces de l'appareil ne doivent sous aucun prétexte être plongées dans l'eau ou un autre liquide !
Danger de mort par électrocution si des restes d'humidité entrent en contact avec des pièces sous tension.
En cas de saletés grasses :
Mettez un détergent doux sur le chiffon humidifié.
Frottez les saletés grasses. Si elles ne se désincrustent
toujours pas, utilisez une brosse de nettoyage douce.
Supprimez soigneusement les résidus de détergent
avec un chiffon humidifié d'eau claire. Retirez soigneusement les résidus de détergent du chiffon avec
de l'eau claire jusqu'à ce que tous les résidus de détergent aient été retirés des surfaces des gaufres.
Sinon, vous risquez d'avoir des résidus dans les prochaines gaufres !
En cas de résidus incrustés :
posez un chiffon mouillé sur les résidus incrustés
afin de les ramollir. Vous pouvez ensuite retirer les
résidus ramollis à l'aide du chiffon humidifié.
- 16 -
Page 20

9. Rangement
Attendez que l'appareil ait complètement refroidi
avant de le ranger. Enroulez le câble secteur autour
du support sous le fond de l'appareil et fixez-le
avec le clip du cordon.
Rangez l'appareil dans un endroit sec.
10. Mise au rebut
L’appareil ne doit jamais être jeté dans
la poubelle domestique normale. Ce produit est soumis à la directive européenne
2012/19/EU.
Eliminez l’appareil par l’intermédiaire d’une entreprise de traitement des déchets autorisée ou via le
service de recyclage de votre commune.
Veuillez respecter les règlements actuellement en
vigueur. En cas de doutes, contactez votre organisation de recyclage.
Procédez à une élimination des matériaux
d’emballage respectueuse de l’environnement.
11. Garantie &
service après-vente
Cet appareil bénéficie de 3 ans de garantie à compter de la date d'achat. L'appareil a été fabriqué
avec soin et consciencieusement contrôlé avant sa
distribution.
Veuillez conserver le ticket de caisse en guise de
preuve d'achat. Si la garantie devait s'appliquer,
contactez par téléphone votre interlocuteur du service
après-vente. Cette condition doit être respectée pour
assurer l'expédition gratuite de votre marchandise.
La prestation de garantie s'applique uniquement
pour les erreurs de matériaux et de fabrication, pas
pour les dommages de transport, les pièces d'usure
ou les dommages subis par les pièces fragiles, comme
par ex. les interrupteurs ou les batteries. Le produit est
exclusivement destiné à un usage privé et non commercial.
La garantie est annulée en cas de manipulation incorrecte et inappropriée, d'utilisation brutale et en cas
d'intervention qui n'aurait pas été réalisée par notre
centre de service après-vente agréé. Cette garantie ne
constitue pas une restriction de vos droits légaux.
La durée de la garantie n'est pas prolongée par la
garantie du fabricant. Ceci vaut également pour les
pièces remplacées et réparées. Tous dommages et
défauts présents dès l'achat doivent être notifiés dès
que le produit est déballé, et au plus tard deux jours
après la date d'achat. Toutes réparations survenant
après la période sous garantie ne seront pas prises
en charge.
Indépendamment de la garantie commerciale souscrite, le vendeur reste tenu des défauts de conformité
du bien et des vices rédhibitoires dans les conditions
prévues aux articles L211-4 et suivants du Code de
la consommation et aux articles 1641 et suivants du
Code Civil.
- 17 -
Page 21

Service France
Tel.: 0800 919270
E-Mail: kompernass@lidl.fr
IAN 90247
Service Suisse
Tel.: 0842 665566 (0,08 CHF/Min.,
mobile max. 0,40 CHF/Min.)
E-Mail: kompernass@lidl.ch
IAN 90247
Heures de service de notre hotline :
du lundi au vendredi de 8 h à 20 h (HEC)
12. Importateur
KOMPERNASS HANDELS GMBH
BURGSTRASSE 21
44867 BOCHUM
GERMANY
www.kompernass.com
13. Délicieuses recettes
de gaufres
1. Pâte de base
Pour env. 20 gaufres
250 g de margarine ou de beurre (ramolli)
200 g de sucre
2 sachets de sucre vanillé
5 œufs
500 g de farine
5 g de levure chimique
400 ml de laitit
Graisser les surfaces de cuisson, replier et faire
chauffer.
Battre les œufs et les mélanger avec le sucre et la
margarine/beurre pour en faire une pâte lisse.
Ajouter le sucre vanillé. Ajouter la farine et la levure
chimique et bien mélanger.
Enfin, ajouter progressivement le lait jusqu'à ce que
la pâte ait une consistance lisse et douce.
Poser respectivement 2 cuillères à soupe au milieu de
la surface de cuisson inférieure et fermer le gaufrier.
Faire cuire chaque gaufre pendant env. 3 minutes.
Poser ensuite les gaufres terminées sur une grille repose- gâteau.
- 18 -
Page 22

2. Gaufres aux amandes
3. Gaufres au chocolat
Pour env. 8 gaufres
200 g de beurre mou
200 g d'amandes en poudre
300 g de farine
100 g de crème
1/4 l de lait
1 CC de sel
1 CC de poudre de curry
Graisser, fermer et faire chauffer le gaufrier.
Battre au fouet le beurre avec les amandes, la
farine, la crème, le lait, le sel et la poudre de curry.
Assaisonnez la pâte et si nécessaire rajoutez de
l'assaisonnement.
Poser respectivement 2 cuillères à soupe au milieu de
la surface de cuisson inférieure et fermer le gaufrier.
Faire cuire chaque gaufre pendant env. 3 minutes.
Poser les gaufres prêtes sur une grille.
Pour env. 8 gaufres
200 g de beurre mou
200 g de sucre
4 oeufs
150 g de crème fraîche
80 g de graines de chocolat
200 g de farine
Graisser, fermer et faire chauffer le gaufrier.
Fouetter le beurre avec le sucre, les oeufs et la
crème fraîche pour obtenir un mélange mousseux.
Ajouter les graines chocolatées et la farine.
Poser respectivement 2 cuillères à soupe au milieu
de la surface de cuisson inférieure et fermer le
gaufrier. Faire cuire chaque gaufre pendant env.
3 minutes. Poser les gaufres prêtes sur une grille.
- 19 -
Page 23

4. Gaufres aux mandarines
5. Gaufres aux tomates
Pour env. 8 gaufres
1 boîte de mandarines
(175 g égouttées)
200 g de beurre mou
200 g de sucre
2 oeufs
150 g de yaourt à la vanille
200 g de farine
50 g de fécule
Egouttez les mandarines. Graisser, fermer et faire
chauffer le gaufrier.
Mélanger le beurre et le sucre et les oeufs pour
obtenir un mélange mousseux. Mélanger les mandarines (qui peuvent être un peu écrasées). Ajouter
le yaourt, la farine et la fécule.
Poser respectivement 2 cuillères à soupe au milieu
de la surface de cuisson inférieure et fermer le
gaufrier. Faire cuire chaque gaufre pendant env.
3 minutes. Poser les gaufres prêtes sur une grille.
Pour env. 8 gaufres
5 oeufs
100 g de beurre mou
1 CC de sel
8 CS de petit lait
150 g de farine
100 g de tomates séchées, marinées dans l'huile
3 tiges de basilic
Graisser, fermer et faire chauffer le gaufrier.
Séparer le blanc du jaune des oeufs. Monter les
blancs en neige. Mélanger les jaunes d'oeufs avec
du beurre et du sel pour obtenir un mélange mousseux. Ajouter le petit lait et la farine.
Egouttez les tomates et les couper en morceaux.
Laver le basilic et le sécher. Retirer les feuilles et
couper en petits morceaux. Mélanger les tomates
et le basilic à la pâte, ajouter ensuite aux blancs en
neige. Remuer de temps en temps la pâte afin que
les morceaux de tomates soient uniformément
répartis.
Poser respectivement 2 cuillères à soupe au milieu
de la surface de cuisson inférieure et fermer le
gaufrier. Faire cuire chaque gaufre pendant env. 4 minutes. Poser les gaufres prêtes sur une grille pour
qu'elles refroidissent.
- 20 -
Page 24

INDICE PAGINA
1. Destinazione d'uso 22
2. Volume della fornitura 22
3. Descrizione dell'apparecchio 22
4. Dati tecnici 22
5. Indicazioni di sicurezza 23
6. Prima della prima messa in funzione 25
7. Cottura dei waffel 25
8. Pulizia e manutenzione 26
9. Conservazione 27
10. Smaltimento 27
11. Garanzia & assistenza 27
12. Importatore 28
13. Golose ricette per waffel 28
1. Impasto di base . . . . . . . . . . . . . . . . . . . . . . . . . . . . . . . . . . . . . . . . . . . . . . . . . . . . . . . . .28
2. Waffel alle mandorle . . . . . . . . . . . . . . . . . . . . . . . . . . . . . . . . . . . . . . . . . . . . . . . . . . . .29
3. Waffel al cioccolato . . . . . . . . . . . . . . . . . . . . . . . . . . . . . . . . . . . . . . . . . . . . . . . . . . . . .29
4. Waffel al mandarino . . . . . . . . . . . . . . . . . . . . . . . . . . . . . . . . . . . . . . . . . . . . . . . . . . . . .30
5. Waffel al pomodoro . . . . . . . . . . . . . . . . . . . . . . . . . . . . . . . . . . . . . . . . . . . . . . . . . . . . . .30
- 21 -
Page 25

PIASTRA DOPPIA
PER WAFFEL
Congratulazioni per l'acquisto del nuovo apparecchio.
Lei ha scelto un prodotto di alta qualità. Il manuale
di istruzioni è parte integrante del presente prodotto.
Esso contiene importanti indicazioni per la sicurezza,
l'uso e lo smaltimento. Prima di utilizzare il prodotto,
si familiarizzi con tutte le indicazioni relative ai comandi e alla sicurezza.Utilizzi il prodotto solo come
descritto e per i campi di impiego indicati. In caso
di cessione del prodotto a terzi, consegni anche tutta
la documentazione relativa.
1. Destinazione d'uso
Questo apparecchio serve esclusivamente per cuocere waffel ed è destinato esclusivamente all'uso in
ambienti domestici privati. Non è previsto per la
preparazione di altre pietanze. Non utilizzare a fini
commerciali.
3. Descrizione dell'apparecchio
1 Spia di funzionamento (rosso / verde)
2 Regolatore di doratura
3 Maniglia
4. Dati tecnici
Tensione : 220 - 240 V ~/ 50 Hz
Potenza assorbita : 1200 W
2. Volume della fornitura
• Piastra doppia per Waffel
• Istruzioni per l'uso
- 22 -
Page 26

5. Indicazioni di sicurezza
Pericolo! Rischio di folgorazione!
• Impedire che l'apparecchio venga a contatto con l'acqua
fintantoché la spina di rete è collegata alla presa di rete,
in particolare se lo si utilizza in cucina nelle vicinanze di
un lavandino.
• Impedire che il cavo di rete durante l'uso dell'apparecchio
si bagni o si inumidisca. Disporlo in modo tale che non
possa venire schiacciato o danneggiato in altro modo.
• Dopo l'uso disinserire sempre la spina dalla presa.
• Fare sostituire immediatamente la spina o il cavo di rete
danneggiato da personale qualificato autorizzato o dal
Servizio Assistenza Clienti, per evitare possibili danni.
Attenzione! Pericolo di lesioni!
• Le parti dell'apparecchio possono surriscaldarsi durante il
funzionamento, pertanto non toccare altro che la maniglia.
Anche il regolatore del grado di doratura, dopo un certo
periodo d'impiego, può surriscaldarsi; utilizzare pertanto
preferibilmente guanti o presine da cucina.
• Questo apparecchio può essere utilizzato dai bambini di
almeno 8 anni di età e da persone con capacità fisiche,
sensoriali o mentali ridotte o insufficiente esperienza o
conoscenza solo se sorvegliati o istruiti sull'uso sicuro
dell'apparecchio e qualora ne abbiano compreso i pericoli associati.
- 23 -
Page 27

• I bambini non devono giocare con l'apparecchio.
• La pulizia e la manutenzione a cura dell'utente non devono
essere eseguiti dai bambini, a meno che non abbiano almeno 8 anni di età e non siano sorvegliati. Tenere lontano
dall'apparecchio i bambini di età inferiore agli 8 anni.
• All'apertura del coperchio potrebbero fuoriuscire getti di
vapore bollente. Nell'eseguire tale operazione, quindi, è
consigliabile utilizzare guanti o presine da cucina.
Attenzione! Pericolo d'incendio!
• I prodotti tipo paste possono bruciare! Non collocare mai
l'apparecchio sotto oggetti combustibili, in particolare tendine.
• Non utilizzare timer esterni o un sistema di telecomando
separato per azionare l'apparecchio.
• Non lasciare mai l'apparecchio incustodito durante il
funzionamento.
- 24 -
Page 28

6. Prima della prima messa
in funzione
Prima di mettere in funzione l'apparecchio è necessario accertarsi che: l'apparecchio, la spina e il
cavo siano in perfette condizioni e tutto il materiale
d'imballaggio sia stato rimosso dall'apparecchio.
Ripulire prima l'apparecchio come descritto al
punto “8. Pulizia e manutenzione”.
Ungere leggermente le superfici di cottura con
burro, margarina o olio adatti. Così si possono rimuovere meglio dalle piastre di cottura eventuali
resti legati alla lavorazione.
Riscaldare brevemente l'apparecchio con il
coperchio chiuso alla massima temperatura:
Avvertenza:
Durante il primo impiego, a causa dei residui di lavorazione, può manifestarsi una leggera formazione di odori (eventualmente anche di fumo). Si tratta
di un evento normale che cessa dopo poco tempo.
neu Provvedere a una sufficiente aerazione, aprendo ad esempio una finestra.
1. A tale scopo infilare la spina nella presa e girare
poi il regolatore di doratura 2 portandolo in posizione 5.
2. La spia di funzionamento 1 rossa si accende
non appena la spina viene inserita nella presa di
corrente. La lampada verde che segnala il funzionamento 1 si illumina non appena l’apparecchio
si è riscaldato.
• Staccare nuovamente la spina dalla presa di
corrente e fare raffreddare l'apparecchio aperto.
Ripulire nuovamente l'apparecchio come descritto al punto “8. Pulizia e manutenzione”. Al termine, la piastra per waffel è pronta per l'uso.
7. Cottura dei waffel
Se avete preparato un impasto previsto per piastre
per waffel:
1. Riscaldare l'apparecchio con il coperchio chiuso.
A tal fine inserire la spina nella presa e ruotare il
regolatore di doratura 2 portandolo in posizione 3. Tanto più si gira verso destra il regolatore
di doratura 2, tanto maggiore sarà la doratura.
2. Quando la lampada verde che segnala il funzionamento 1 si accende, ciò significa che l’apparecchio si è riscaldato.
• Prima di preparare il primo waffel, ingrassare
leggermente le piastre bollenti con burro, olio o
margarina adatto/a alla cottura al forno.
• Distribuire l’impasto uniformemente sulle superfici di
cottura inferiori. Per determinare qual è la giusta
quantità d’impasto, immetterne fino a che esso tocca leggermente il bordo delle superfici di cottura.
Se necessario, per la preparazione del waffel successivo aumentare la quantità d’impasto. Badare
che esso non trabocchi uscendo fuori dal bordo
delle superfici di cottura. Chiudere il coperchio.
• Solo dopo 2 minuti potete aprire il coperchio per
controllare se i waffel sono pronti. Aprendo il coperchio troppo presto, i waffel si rovinerebbero.
• Dopo circa 3 minuti il waffel è pronto.
Avviso:
poiché il grado di doratura ideale dipende molto
dai gusti personali e dal tipo di impasto, il tempo di
cottura può variare: cuocere pertanto il waffel fino
a ottenere il grado di doratura desiderato. Il grado
di doratura può essere determinato con lo spostamento del regolatore di doratura 2 o con il tempo
di cottura. In tal modo si ottengono waffel dorati o
croccanti.
- 25 -
Page 29

• Nello staccare i waffel, fare attenzione a non
danneggiare inavvertitamente il rivestimento delle
superfici di cottura, poiché in tal modo i waffel
non si staccherebbero più facilmente.
Avvertenza:
Le piastre di cottura non devono venire nuovamente
ingrassate prima di ogni nuovo waffel. Ingrassare le
piastre di cottura solo prima di ogni nuovo uso della
cialdiera.
• Dopo aver cotto l'ultimo waffel, staccare la
spina dalla presa di corrente e fare raffreddare
l'apparecchio aperto.
8. Pulizia e manutenzione
Pericolo di scossa elettrica!
Non aprire mai l'alloggiamento dell'apparecchio. In
esso non sono presenti elementi di comando. L'apertura dell'alloggiamento comporta il rischio di morte
per scossa elettrica. Prima di ripulire l'apparecchio,
estrarre prima di tutto la spina dalla presa di corrente e far raffreddare l'apparecchio.
Attenzione!
Gli elementi dell'apparecchio non devono assolutamente essere immersi in acqua o altri liquidi! Se
l'umidità penetra su parti in tensione, può sussistere
il rischio di morte a causa di scossa elettrica.
Attenzione!
• Non utilizzare detergenti o solventi chimici o
aggressivi. Tali sostanze, oltre a causare danni
all'apparecchio, potrebbero anche lasciare residui che verrebbero assorbiti dai waffel nella
cottura successiva.
• Non utilizzare assolutamente oggetti duri per la
pulizia, poiché si potrebbe danneggiare il rivestimento delle superfici della piastra.
In caso di sporco grasso:
Versare un detergente delicato su un panno per pulizia inumidito. Rimuovere in tal modo lo sporco grasso.
Se non si riuscisse ancora a rimuoverlo, utilizzare
una spazzola morbida.
Rimuovere accuratamente i resti di detergente con
un panno per la pulizia inumidito in acqua corrente.
Eliminare accuratamente i resti di detergente dal
panno con acqua corrente e ripetere la pulizia fino
ad assicurarsi di aver rimosso tutti i resti di detergente
dalle superfici di cottura dei waffel.
In caso contrario, i residui potrebbero finire nei waffel
cotti successivamente!
In caso di resti bruciati e appiccicati:
applicare un panno umido sulle incrostazioni per
ammorbidirle. In seguito è possibile rimuovere i resti
ammorbiditi con il panno inumidito.
• Dopo l'uso, ripulire le superfici di cottura prima
con un panno di carta da cucina asciutto, per
assorbire i resti di unto.
• Ripulire quindi tutte le superfici e il cavo di rete
con una spugnetta leggermente inumidita. Asciugare bene l'apparecchio in ogni caso prima di
riutilizzarlo.
- 26 -
Page 30

9. Conservazione
11. Garanzia & assistenza
Prima di riporre l'apparecchio, è necessario farlo
raffreddare completamente. Avvolgere il cavo intorno al supporto sotto il fondo dell'apparecchio e
fissarlo con l'apposita clip.
Riporre l'apparecchio in un luogo asciutto.
10. Smaltimento
Non gettare per alcun motivo l’apparecchio insieme ai normali rifiuti
domestici. Questo prodotto sottostà
alla direttiva europea 2012/19/EU.
Smaltire l’apparecchio presso un’azienda autorizzata o presso l’ente comunale di smaltimento.
Rispettare le norme attualmente in vigore. In caso di
dubbi, contattare l’azienda di smaltimento
competente.
Questo apparecchio è garantito per 3 anni a partire
dalla data di acquisto. L'apparecchio è stato prodotto con cura e debitamente collaudato prima della
consegna.
Conservare lo scontrino come prova d'acquisto. In
caso di interventi in garanzia, contattare telefonicamente il proprio centro di assistenza. Solo in questo
modo è possibile garantire una spedizione gratuita
della merce.
La garanzia vale solo per i difetti di materiale o
fabbricazione, non per i danni da trasporto, parti
soggette a usura o danni a parti fragili come ad es.
interruttori o accumulatori. Il prodotto è destinato
esclusivamente all'uso domestico e non a quello
commerciale.
La garanzia decade in caso di impiego improprio o
manomissione, uso della forza e interventi non eseguiti dalla nostra filiale di assistenza autorizzata.
Questa garanzia non costituisce alcun limite ai diritti
legali del consumatore.
Il periodo di garanzia non viene prolungato in caso
di un intervento in garanzia. Ciò vale anche per le
componenti sostituite e riparate. I danni e difetti
presenti già all'acquisto devono essere comunicati
immediatamente dopo il disimballaggio, e non oltre
due giorni dalla data di acquisto. Le riparazioni effettuate dopo la scadenza del periodo di garanzia
sono a pagamento.
Assistenza Italia
Tel.: 02 36003201
E-Mail: kompernass@lidl.it
IAN 90247
Smaltire tutti i materiali d’imballo in conformità alle norme per il rispetto dell’ambiente.
Assistenza Svizzera
Tel.: 0842 665566 (0,08 CHF/Min.,
telefonia mobile max. 0,40 CHF/Min.)
E-Mail: kompernass@lidl.ch
IAN 90247
Raggiungibilità della hotline:
dal lunedì al venerdì, dalle 8.00 alle 20.00 (CET)
- 27 -
Page 31

12. Importatore
KOMPERNASS HANDELS GMBH
BURGSTRASSE 21
44867 BOCHUM
GERMANY
www.kompernass.com
13. Golose ricette per waffel
1. Impasto di base
Per ca. 20 pezzi
250 g di margarina o burro (morbido)
200 g di zucchero
2 pacchetti di zucchero vanigliato
5 uova
500 g di farina
5 g polvere lievitante
400 ml di latte
Ungere le piastre di cottura, chiudere e fare riscaldare.
Sbattere le uova con lo zucchero e la margarina/
burro formando un impasto uniforme. Aggiungere
lo zucchero vanigliato. Aggiungere la farina e la
polvere lievitante e mescolare.
Infine aggiungere il latte e mescolare fino a quando
l'impasto non assume una consistenza liscia e morbida.
Versare due cucchiai di cucina di impasto nel centro della superficie di cottura inferiore e chiudere la
piastra per waffel. Dorare ogni waffel per circa 3
minuti. Collocare infine i waffel pronti su una griglia
da cucina.
- 28 -
Page 32

2. Waffel alle mandorle
3. Waffel al cioccolato
Per ca. 8 pezzi
200 g di burro ammorbidito
200 g di mandorle macinate
300 g di farina
100 g di panna da cucina
1/4 l di latte
1 cucchiaino di sale
1 cucchiaino di curry
Ungere la piastra per waffel, chiudere e fare
riscaldare.
Mescolare il burro con le mandorle, la farina, la
panna da cucina, il latte e il curry. Assaggiare l'impasto e se lo si desidera aggiungere altre spezie.
Versare due cucchiai da cucina di impasto nel centro della superficie di cottura inferiore e chiudere la
piastra per waffel. Dorare ogni waffel per circa 3
minuti. Posare i waffel cotti su una griglia da cucina.
Per ca. 8 pezzi
200 g di burro ammorbidito
200 g di zucchero
4 uova
150 g di panna liquida
80 g di gocce di cioccolato
200 g di farina
Ungere la piastra per waffel, chiudere e fare
riscaldare.
Montare il burro con lo zucchero, le uova e la
panna liquida. Aggiungere le gocce di cioccolato
e la farina.
Versare due cucchiai da cucina di impasto nel centro della superficie di cottura inferiore e chiudere la
piastra per waffel. Dorare ogni waffel per circa 3
minuti. Posare i waffel cotti su una griglia da cucina.
- 29 -
Page 33

4. Waffel al mandarino
5. Waffel al pomodoro
Per ca. 8 pezzi
175 g di mandarini freschi (sbucciatio in scatola)
200 g di burro ammorbidito
200 g di zucchero
2 uova
150 g yogurt alla vaniglia
200 g di farina
50 g di amido per dolci
Sbucciare i mandarini o, se si usano mandarini in
scatola, farli sgocciolare. Ungere la piastra per
waffel, chiudere e fare riscaldare.
Montare il burro con lo zucchero e le uova. Incorporare i mandarini, senza preoccuparsi che rimangano
interi. Aggiungere quindi lo yogurt, la farina e l'amido
per dolci.
Versare due cucchiai da cucina di impasto nel
centro della superficie di cottura inferiore e chiudere la piastra per waffel. Dorare ogni waffel per
circa 3 minuti. Posare i waffel cotti su una griglia
da cucina.
Per ca. 8 pezzi
5 uova
100 g di burro ammorbidito
1 cucchiaino di sale
8 cucchiai di latticello
150 g di farina
100 g di pomodori secchi sott'olio
3 rametti di basilico
Ungere la piastra per waffel, chiudere e fare
riscaldare.
Separare i tuorli dagli albumi e montare a neve
ferma questi ultimi. Montare a neve i tuorli con
burro e sale.
Incorporare quindi il latticello e la farina. Fare sgocciolare i pomodori e tagliuzzarli minutamente. Lavare e asciugare il basilico scrollandolo. Staccare le
foglioline e tagliuzzarle. Incorporare pomodori e
basilico all'impasto, aggiungendo quindi gli albumi
montati a neve. Continuare a mescolare la pasta
per distribuire uniformemente i pezzi di pomodoro.
Versare due cucchiai da cucina di impasto nel centro della superficie di cottura inferiore e chiudere la
piastra per waffel. Dorare ogni waffel per circa 4
minuti. Fare raffreddare i waffel pronti su una griglia
da cucina.
- 30 -
Page 34

CONTENT PAGE
1. Intended Use 32
2. Items supplied 32
3. Appliance description 32
4. Technical data 32
5. Safety Instructions 33
6. Before the first usage 35
7. Baking waffles 35
8. Cleaning and care 36
9. Storage 37
10. Disposal 37
11. Warranty & Service 37
12. Importer 37
13. Recipes 38
1. Basic Batter . . . . . . . . . . . . . . . . . . . . . . . . . . . . . . . . . . . . . . . . . . . . . . . . . . . . . . . . . . . . .38
2. Almond Waffles . . . . . . . . . . . . . . . . . . . . . . . . . . . . . . . . . . . . . . . . . . . . . . . . . . . . . . . . .38
3. Chocolate Waffles . . . . . . . . . . . . . . . . . . . . . . . . . . . . . . . . . . . . . . . . . . . . . . . . . . . . . . .39
4. Mandarine waffels . . . . . . . . . . . . . . . . . . . . . . . . . . . . . . . . . . . . . . . . . . . . . . . . . . . . . . .39
5. Tomato Waffles . . . . . . . . . . . . . . . . . . . . . . . . . . . . . . . . . . . . . . . . . . . . . . . . . . . . . . . . . .40
- 31 -
Page 35

WAFFLE MAKER
3. Appliance description
Congratulations on the purchase of your new appliance.
You have clearly decided in favour of a quality product. These operating instructions are a part of this
product. They contain important information in regard to safety, use and disposal. Before using the
product, familiarise yourself with all of these operating
and safety instructions. Use the product only as described and only for the specified areas of application.
In addition, pass these documents on, together with
the product, to any future owner.
1. Intended Use
This appliance is intended exclusively for the baking
of waffles. This appliance is intended exclusively for
use in domestic households. It is not intended for the
preparation of other foodstuffs. Do not use it for
commercial purposes.
2. Items supplied
• Waffle Maker
• Operating manual
1 Operating light (red / green)
2 Browning regulator
3 Grip
4. Technical data
Voltage: 220 - 240 V ~ / 50 Hz
Power consumption: 1200 W
- 32 -
Page 36

5. Safety Instructions
Danger! Electric shock!
• Ensure that the appliance never comes into contact with water
when the plug is inserted into a power socket, especially if
it is being used in the kitchen and close to the sink.
• Ensure that the power cable never becomes wet or damp
when the appliance is in use. Route the cable so that it
cannot be trapped or damaged in any way.
• Always disconnect the plug from the mains power socket
after use.
• Arrange for defective power plugs and/or cables to be
replaced at once by qualified technicians or our Customer
Service Department.
Attention! Risk of injury!
• Parts of the appliance will become hot during operation; you
should hold the appliance only by the grip. The browning
regulator can also become hot after a certain amount of
operation – it is therefore best to wear oven mitts.
• This appliance may be used by children of the age of 8
years or more and by persons with reduced physical,
sensory or mental capabilities or lack of experience and/
or knowledge if they are being supervised or have been
instructed with regard to the safe use of the appliance and
have understood the potential risks.
- 33 -
Page 37

• Children must not play with the appliance.
• Cleaning and user maintenance should not be performed
by children, unless they are older than 8 years of age and
are supervised. Children younger than 8 years of age are
to be kept away from the appliance and the power cable.
• Very hot steam clouds can escape when opening the lid.
It is thus best to wear oven mitts when opening the appliance.
Attention! Risk of fire!
• Bakery products can burn! Therefore, never place the
appliance under flammable objects, especially flammable
curtains.
• Do not use an external timing switch or a separate remote
control system to operate the appliance.
• Never let the appliance be in use without supervision.
- 34 -
Page 38

6. Before the first usage
7. Baking waffles
Before taking the appliance into use check to ensure
that the appliance, the power plug and the power
cable are all in a serviceable condition and that all
packaging materials have been removed.
First clean the appliance as described chapter
“8. Cleaning and care”.
Lightly grease the baking surfaces with butter,
margarine or oil that is suitable for baking. In this
way any production-related residues on the baking
surfaces are better dissolved.
Heat the appliance briefly to the maximum
temperature with the lid closed:
Note:
On this first use, the development of a light odour
may occur, caused by production residues (a slight
smoke development is also possible). This is normal
and dissipates after a short time. Provide for sufficient ventilation. For example, open a window.
1. To do this, insert the plug into the wall socket and
set the browning regulator 2 to level 5.
2. The red operating light 1 glows as long as the
power plug is in the socket. The green operating
light 1 glows as soon as the appliance is sufficiently warmed up.
• Remove the power plug and, with the lid open,
allow the appliance to cool down.
Clean the appliance again as described under
“8. Cleaning and care”. The waffle maker is now
ready for use.
When you have prepared a pastry that is intended
for baking in the waffle machine:
1. Heat the appliance with the lid closed. To do this,
insert the plug into the wall socket and turn the
browning regulator 2 to level 3. The further you
turn the browning regulator 2 to the right, the
darker the waffles will be baked.
2. As soon as the green operating light 1 glows
the appliance is sufficiently warmed up.
• Before you bake the first waffle, lightly grease the
hot baking surfaces with butter, margarine or oil
that is suitable for baking.
• Spread the pastry evenly over the lower baking
surface. To determine the correct amount of pastry,
fill it until the pastry lightly touches the edge of
the baking area. If necessary, increase the
amount of pastry used in the next waffle. Make
certain that the pastry does not run over the edge
of the baking surface. Now close the lid.
• After 2 minutes at the earliest you can open the
lid to check the baking result. Opening the lid
earlier will only tear the waffle.
• After about 3 minutes the waffle is baked.
Note:
As the ideal level of browning is very dependent on
personal taste and the type of pastry, the baking
time can vary: Therefore, bake the waffles until your
personally desired level of browning is achieved.
The level of browning can be determined either by
adjusting the browning regulator 2 or by the length
of baking time. In this way you can bake crispy golden waffles.
- 35 -
Page 39

• When removing the waffles ensure that you do
not damage the coating of the baking surfaces. If
you do, it will be harder to separate the waffles
from the surfaces.
Note:
The baking surfaces need not be greased again
before each fresh waffle. Lightly grease the baking
surfaces only before each new use of the waffle iron.
• After baking the last waffle, remove the power
plug from the wall socket and allow the appliance
to cool with the lid up.
• First of all, clean the baking surfaces with a dry
paper towel to soak up the grease residue.
• Then clean all surfaces and the power cable with
a lightly moistened dish cloth. Always dry the
appliance well before using it again.
Attention!
• Do not use chemical or aggressive cleaning
agents or solvents. These could not only cause
damage to the appliance, they can also leave
traces that could be baked into the next waffles.
• Under no circumstances should you use hard
objects for cleaning. These could damage the
coatings of the baking surfaces.
8. Cleaning and care
Risk of electric shock!
Never open the casing of the appliance. There are
no user-serviceable elements inside. When the casing is open, there is the risk of receiving a fatal
electrical shock. Before cleaning the appliance,
remove the power plug from the wall socket and
allow the device to cool down completely.
Attention!
Under no circumstances may the components of the
appliance be submerged in water or other liquids!
There would be the risk of a fatal electric shock
upon the next use of the appliance should moisture
be present in the voltage conducting elements.
For greasy soiling:
Apply some mild detergent onto a damp cloth. Use
it to rub the greasy soiling away. If this still does not
dissolve it, use a soft washing-up brush.
Remove the detergent residues thoroughly with a
wash cloth moistened with clean water. Completely
remove the detergent residues from the cloth with
clean water and then repeat the cleaning process
until all detergent residues are removed from the
waffel surfaces.
If you do not, there may be residues in the next waffles!
In the case of stubborn residues:
Place a piece of damp cloth on the stubborn residues, so as to soften them. After that, you can then
remove the softened residues with a wet cloth.
- 36 -
Page 40

9. Storage
11. Warranty & Service
Allow the appliance to cool off completely before
putting it into storage. Wind the mains cable around
the holder under the bottom of the appliance and
fix it with the cable clip.
Store the appliance in a dry location.
10. Disposal
Do not dispose of the appliance in your
normal domestic waste. This product is
subject to the European guideline
2012/19/EU.
Dispose of the appliance through an approved disposal centre or at your community waste facility.
Observe the currently applicable regulations.
In case of doubt, please contact your waste disposal
centre.
Dispose of all packaging materials in an
environmentally responsible manner.
The warranty for this appliance is for 3 years from
the date of purchase. The appliance has been
manufactured with care and meticulously examined
before delivery.
Please retain your receipt as proof of purchase. In the
event of a warranty claim, please make contact by
telephone with our Service Department. Only in this
way can a post-free despatch for your goods be assured.
The warranty covers only claims for material and
maufacturing defects, but not for transport damage,
for wearing parts or for damage to fragile components, e.g. buttons or batteries. This product is for private use only and is not intended for commercial use.
The warranty is void in the case of abusive and improper handling, use of force and internal tampering
not carried out by our authorized service branch.
Your statutory rights are not restricted in any way by
this warranty.
The warranty period will not be extended by repairs
made under warranty. This applies also to replaced
and repaired parts. Any damage and defects extant
on purchase must be reported immediately after unpacking the appliance, at the latest, two days after
the purchase date. Repairs made after the expiration of the warranty period are subject to payment.
Service Great Britain
Tel.: 0871 5000 720 (£ 0.10/Min.)
E-Mail: kompernass@lidl.co.uk
IAN 90247
Hotline availability:
Monday to Friday 08:00 - 20:00 (CET)
12. Importer
KOMPERNASS HANDELS GMBH
BURGSTRASSE 21
44867 BOCHUM
GERMANY
www.kompernass.com
- 37 -
Page 41

13. Recipes
1. Basic Batter
For approx. 20 waffles
250 g margarine or butter (soft)
200 g sugar
2 packets of vanilla sugar
5 eggs
500 g flour
5 g baking powder
400 ml milk
Grease the baking surfaces, close the appliance
and allow it to heat up.
Scramble the eggs and stir in the sugar and the
margarine or butter to form a smooth dough. Add
the vanilla sugar. Now add the flour and baking
powder, and stir in.
Lastly, add the milk bit by bit and stir in until the
dough has a smooth, soft consistency.
Place about 2 tablespoons of batter into the middle
of the lower baking surface, then close the waffle
iron. Let each waffle bake for about 3 minutes until
golden brown. Lay the cooked waffles on a cake
grill.
2. Almond Waffles
For approx. 8 waffles
200 g soft butter
200 g ground almonds
300 g flour
100 g sour cream
1/4 l milk
1 tsp. salt
1 tsp. curry powder
Grease the baking surfaces, close the appliance
and allow it to heat up.
Stir the butter together with the almonds, flour, sour
cream, milk, salt and curry powder. Taste the batter
and add seasonings as desired.
Place about 2 tablespoons of batter into the middle
of each lower baking surface, then close the waffle
iron. Let each waffle bake for about 3 minutes until
golden brown. Lay the ready waffles on a cake grill.
- 38 -
Page 42

3. Chocolate Waffles
4. Mandarine waffels
For approx. 8 waffles
200 g soft butter
200 g sugar
4 eggs
150 g crème fraîche
80 g chocolate drops
200 g flour
Grease the baking surfaces, close the appliance
and allow it to heat up.
Beat the butter with the sugar, eggs and crème
fraîche until creamy. Stir in the chocolate chips
and the flour.
Place about 2 tablespoons of batter into the middle
of each lower baking surface, then close the waffle
iron. Let each waffle bake for about 3 minutes until
golden brown. Lay the ready waffles on a cake grill.
For approx. 8 waffles
1 tin of mandarine pieces
(175 g drained weight)
200 g soft butter
200 g sugar
2 eggs
150 g vanilla yoghurt
200 g flour
50 g edible starch
Drain the tangerines. Grease the baking surfaces,
close the appliance and allow it to heat up.
Beat the butter with the sugar and eggs until creamy.
Mix in the tangerines, it is alright if they disintegrate.
Then blend in the yoghurt, flour and the edible starch.
Place about 2 tablespoons of pastry mixture into the
middle of each lower baking surface, then close the
waffle iron. Let each waffle bake for about 3 minutes
until golden brown. Lay the ready waffles on a cake
grill.
- 39 -
Page 43

5. Tomato Waffles
For approx. 8 waffles
5 eggs
100 g soft butter
1 tsp. salt
8 tbsp. butter milk
150 g flour
100 g tomatos, dried and marinaded in oil
3 stalks of basil
Grease the baking surfaces, close the appliance
and allow it to heat up.
First separate the eggs. Beat the whites until stiff.
Beat the yolks with the butter and salt until creamy.
Then blend in the butter milk and the flour.
Drain the tomatos and cut them into small pieces.
Wash the basil and shake it dry. Pluck off the leaves
and cut into small pieces. Stir the tomatoes and basil into the mixture, then mix in the egg white. Stir
the batter occasionally so that the tomato pieces
are distributed evenly.
Place about 2 tablespoons of pastry mixture into the
middle of each lower baking surface, then close the
waffle iron. Let each waffle bake for about 4 minutes until golden brown. Lay the ready waffles on a
cake grill.
- 40 -
Page 44

KOMPERNASS HANDELS GMBH
BURGSTRASSE 21
44867 BOCHUM
DEUTSCHLAND / GERMANY
www.kompernass.com
Stand der Informationen · Version des informations
Versione delle informazioni · Last Information Update:
07 / 2013 · Ident.-No.: SDW1200B2-032013-2
IAN 90247
 Loading...