

Page 1
SDV-702
User Manual
English
1
Page 2

Page 3

1 Introduction
Thank you for choosing this SilverCrest SDV-702 portable 7“ DVD
player. In order to be able to use this product to its fullest extent, we
recommend reading these instructions before using this product for
the first time, even if you are familiar with electronic devices.
Pay particular attention to the chapter Important Safety Instructions
on page 7. Keep this manual for future reference. If you sell or pass
the equipment on, hand over this user manual also.
2 Copyright
Without our permission, contents of this user manual may not be
reproduced, copied (or otherwise duplicated in any way), installed
in a search engine, or translated into other languages.
3 Declaration
The SilverCrest SDV-702 DVD player and the supplied accessories
comply with the basic requirements and relevant regulations of
EMC directive 2004/108/EC, as well as the low-voltage directive
2006/95/EC. The equipment fulfills the demands of Standard EN
50332 (parts 1 and 2) concerning a max. sound pressure level of
100 dB(A) and an output voltage of max. 150 mV at the headphone
jack.
The descriptions and characteristics in this user manual serve only
as general references and are not guaranteed. In order to offer a
product of the highest quality, we reserve the right to make design
improvements or changes without prior notice. For all product
descriptions and user manuals (in case of possible deviations
in other languages), the German version serves as the valid
reference.
3
Page 4

4 Manufacturer Information
JNC Datum Tech GmbH
Benzstraße 33
71083 Herrenberg
Germany
For more information visit:
www.mysilvercrest.de
4
Page 5

5 Contents
1 Introduction ............................................................................3
2 Copyright ................................................................................3
3 Declaration .............................................................................3
4 Manufacturer Information .....................................................4
5 Contents .................................................................................5
6 Important Safety Instructions ...............................................7
7 Package Contents ...............................................................10
8 Parts......................................................................................12
8.1 DVD player .......................................................................... 12
8.2 Monitor .................................................................................13
8.3 Remote control .................................................................... 14
9 Power Supply .......................................................................15
9.1 Mains power ........................................................................ 15
9.2 Car adapter ..........................................................................15
9.3 Battery operation ................................................................. 15
10 Installation ............................................................................17
10.1 Set up the player .................................................................. 17
10.2 Connect to power supply ..................................................... 17
10.3 Insert battery (remote control) .............................................17
10.4 Insert disc ............................................................................18
10.5 Turn DVD player on ............................................................. 18
10.6 Remove disc and turn off DVD player .................................18
11 Connections .........................................................................19
11.1 Headphones .......................................................................19
11.2 Use external AV device for playback ................................... 19
11.3 Display signal of AV device .................................................. 20
11.4 Connect digital amplifier ......................................................20
12 Mounting ..............................................................................21
13 Basic Operation ...................................................................22
13.1 Use remote control ..............................................................22
13.2 Turn unit on and off .............................................................. 22
13.3 Select mode .........................................................................23
13.4 Image settings .....................................................................23
13.5 Volume control .....................................................................24
13.6 Mute .....................................................................................24
13.7 Turn display off .................................................................... 24
5
Page 6

14 Disc Functions .....................................................................24
14.1 Navigation ............................................................................24
14.2 Disc playback ....................................................................... 25
14.3 Stop playback ...................................................................... 26
14.4 Pause ................................................................................... 26
14.5 Forward / Rewind ................................................................. 26
14.6 Search mode .......................................................................26
14.7 Slow motion ......................................................................... 27
14.8 Step .....................................................................................27
14.9 Zoom .................................................................................... 27
14.10 Change angle ......................................................................28
14.11 Numeric buttons ...................................................................28
14.12 Go to function ......................................................................29
14.13 Repeat .................................................................................30
14.14 Repeat section ..................................................................... 30
14.15 Program playback ................................................................ 31
14.16 Display information ..............................................................32
14.17 Display subtitle .....................................................................33
14.18 Select audio language .........................................................33
14.19 Access menu .......................................................................34
14.20 Rotate image .......................................................................34
14.21 Slideshow effects ................................................................. 34
15 Setup Menu .........................................................................35
15.1 Access setup menu .............................................................35
15.2 System setup ....................................................................... 36
15.3 Language setup ................................................................... 39
15.4 Audio setup ..........................................................................40
15.5 Video setup ..........................................................................40
15.6 Digital setup ......................................................................... 41
16 USB Device ..........................................................................42
16.1 Connect USB device ............................................................ 42
16.2 File playback ........................................................................42
16.3 Disconnect data storage device .......................................... 42
17 Care & Maintenance ............................................................43
18 Troubleshooting ..................................................................43
19 Technical Specifications .....................................................45
20 Disposal................................................................................47
6
Page 7

6 Important Safety Instructions
Please read and observe the safety instructions.
General
The packaging materials are not toys. Do not let children play
•
with the plastic packaging materials that come with this product.
Danger of suffocation.
Do not allow children to operate electrical devices
•
unsupervised.
CAUTION! LASER RADIATION HAZARD!
•
This DVD player is a class 1 laser product. This equipment
works with a bundled laser beam. When the product is
disassembled, or if it has a defective safety mechanism, the
laser beam can cause eye damage.
Power supply
Connect the power adapter only to a 100-240V~50/60Hz
•
wall outlet. Ensure the wall outlet is in close proximity to the
equipment and is accessible at all times.
Route the cables in such a way that nobody can trip over them.
•
Ensure that you do not route cables over edges; do not kink the
•
cable.
Disconnect from mains power supply during lightning.
•
When disconnecting, do not pull the cable, always hold the
•
plug.
Operating conditions
Avoid moisture and dripping or splashing water.
•
To avoid electric shock, do not submerge the product in water or
•
other liquids.
Do not place objects filled with water on or near the unit.
•
Do not use in environments with high humidity; do not use in
•
bathrooms.
7
Page 8

If you move the equipment from a cold place to a warm place,
•
humidity can condense on the lens. In this case leave the
equipment switched off for several hours to adapt to the current
temperature.
Do not place heavy articles on top of the equipment. Do not
•
touch the display.
Do not press on the surface of the display. Avoid contact with
•
sharp or pointed objects.
Do not expose the equipment to excessive heat. Do not place it
•
in close proximity to heat sources, such as radiators or ovens.
Ensure that there is sufficient ventilation. If you set up the
•
equipment on a shelf, keep a minimum distance of 10 cm
between the product and other objects and the shelf walls.
Do not set up the unit in close proximity to devices which
•
are sensitive to disturbances by magnetic sources (e.g. tape
decks).
Do not place open sources of fire, e.g. a burning candle, on top
•
or beside the equipment.
Do not expose the equipment to direct sunlight.
•
Operation
Do not move the DVD player during playback; this can damage
•
the inserted disc.
Remove the disc only after it has completely stopped.
•
Remove the disc before moving the equipment. Switch the
•
equipment off and disconnect from mains power supply.
Please note that even when the equipment is switched off the
•
power and car adapters use a small quantity of electricity.
Operation in vehicles
We urgently advise against operating this equipment while
•
driving in a vehicle. Ignoring this warning can lead to accidents
causing personal injury and/or death.
CAUTION! In some countries operating a DVD player while
•
driving is prohibited or restricted.
Switch on the engine before connecting the product to the
•
car adapter. The airbag, the area around the airbag, and the
8
Page 9

active headrests must not be covered, blocked, obstructed, or
weighted down by the headrest mounting plate. Also read the
vehicle documentation and get advice from specialists.
Please note that an excessive use of the product can lead to
•
the exhaustion of the car battery.
Please note that temperatures inside vehicles can reach
•
extreme levels in summer and winter. Do not store the DVD
player in your vehicle and do not store it in places with
temperatures below 0°C or higher than 40°C.
When routing the cables inside the vehicle ensure that they do
•
not obstruct the driver’s ability to operate the vehicle.
Connect the 12V car adapter to a well accessible 12V cigarette
•
lighter jack or 12V power supply jack.
During installation, ensure that the cables are not jammed or
•
squeezed.
When attaching the product to the headrest ensure that is does
•
not obstruct the driver.
Batteries
CAUTION! There is a danger of explosion from the
•
inappropriate handling of batteries. Replace batteries with the
same type only.
A swallowed battery can be lethal. Keep batteries and remote
•
control out of reach of children. Immediately ask for medical
assistance if a battery is swallowed.
The supplied battery may not be charged or re-activated by
•
other means, disassembled, thrown into fire, or short-circuited.
Remove exhausted batteries from the remote control and the
•
DVD player. Remove batteries from the remote control and the
DVD player if you will not use it for an extended period of time.
Do not expose batteries to extreme temperatures. Do not place
•
the remote control and the DVD player on heaters. Leaked
battery acid can cause damages.
Avoid contact with leaked battery acid. Rinse affected areas
•
immediately after contact with the acid and wash with plenty of
clean water. Visit a physician.
9
Page 10
Headphones
CAUTION! Avoid listening with headphones at a
•
consistently high volume. Danger of permanent hearing
damage!
Ensure that children do not turn the volume too high.
•
The unit may only be used with the supplied headphones.
•
In case of malfunctions
In case of damages to the cable, power adapter, car adapter, or
•
the unit itself, immediately disconnect from mains power supply.
Do not use the equipment if there are visible damages to the
•
casing, power adapter, or mains cable. Repairs to casing,
power adapter, and mains cable are to be performed by
qualified technical personnel only.
Do not insert objects into the equipment. Danger of electric
•
shock.
Immediately disconnect from mains power supply if liquids
•
or foreign objects have entered the device. Have the unit
examined by qualified technical personnel before operating it
again.
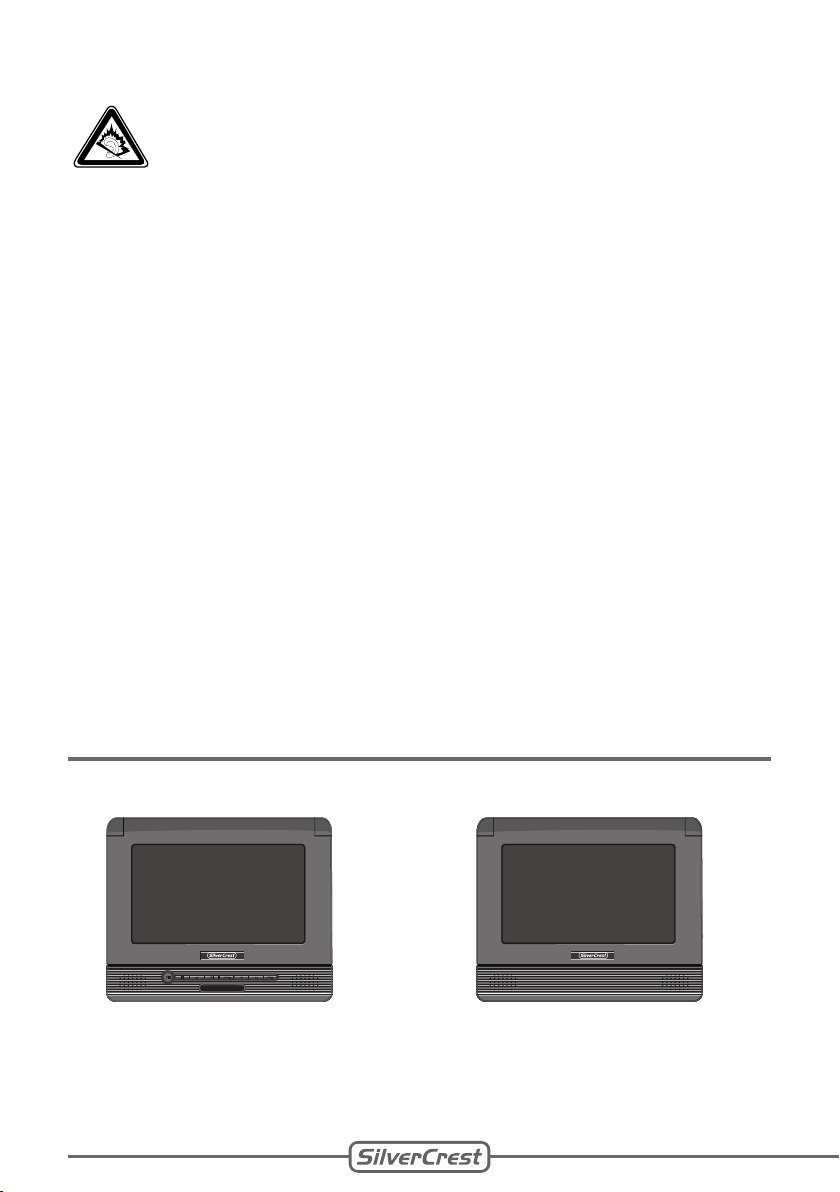
7 Package Contents
1. DVD player (1x) 2. Monitor (1x)
10
Page 11
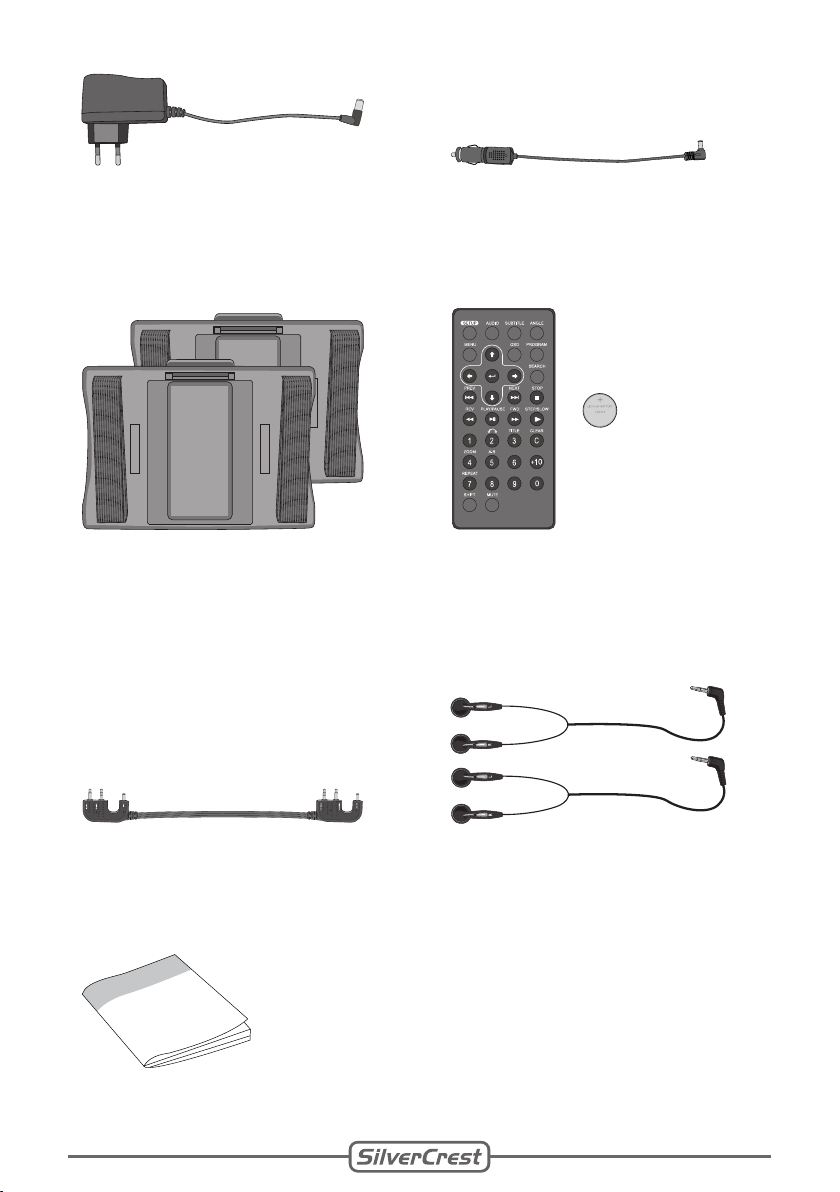
3. 12V power adapter
(input 220V) (1x)
4. 12V car adapter (1x)
5. Head rest holder (2x)
7. Connecting cable (1x)
9. User manual (1x)
6. Remote control with
battery (1x)
8. Earphones (2x)
11
Page 12
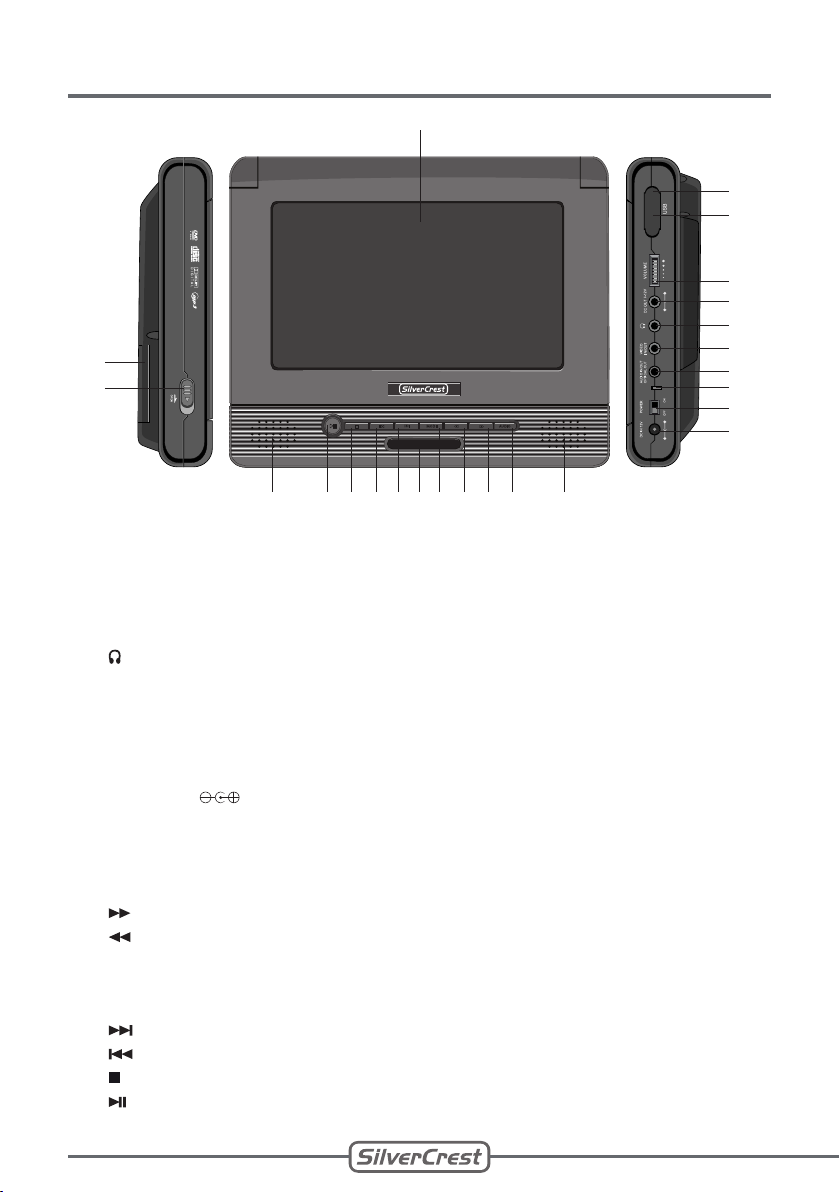
8 Parts
8.1 DVD player
24
23
22 121314151618192021 17
1 LCD display
2 Rubber cover
3 USB USB port
4 VOLUME Volume control
5 DC OUT 7-12 V Power output
6 Earphones jack
7 VIDEO IN/ OUT Jack for video signals
8 AUDIO IN/OUT
OPTICAL OUT
9 Power indicator (lights up orange during operation)
10 POWER ON OFF ON/OFF switch DVD player
11 DC IN 12V Input 12V power adapter (220V input) and 12V car adapter for
12 Right speaker
13 AUDIO DVD: audio language; other media: select stereo / mono L /
14 Search forward
15 Search backward
16 MODE Mode; image settings; press and hold for 2 seconds: turn off
17 Infrared sensor
18 Next title, next chapter
19 Previous title, previous chapter
20 Stop playback
21 Play/pause
Jack for audio signals
Output for optical audio signals
DVD player
mono R
display
1
2
3
4
5
6
7
8
9
10
11
12
Page 13
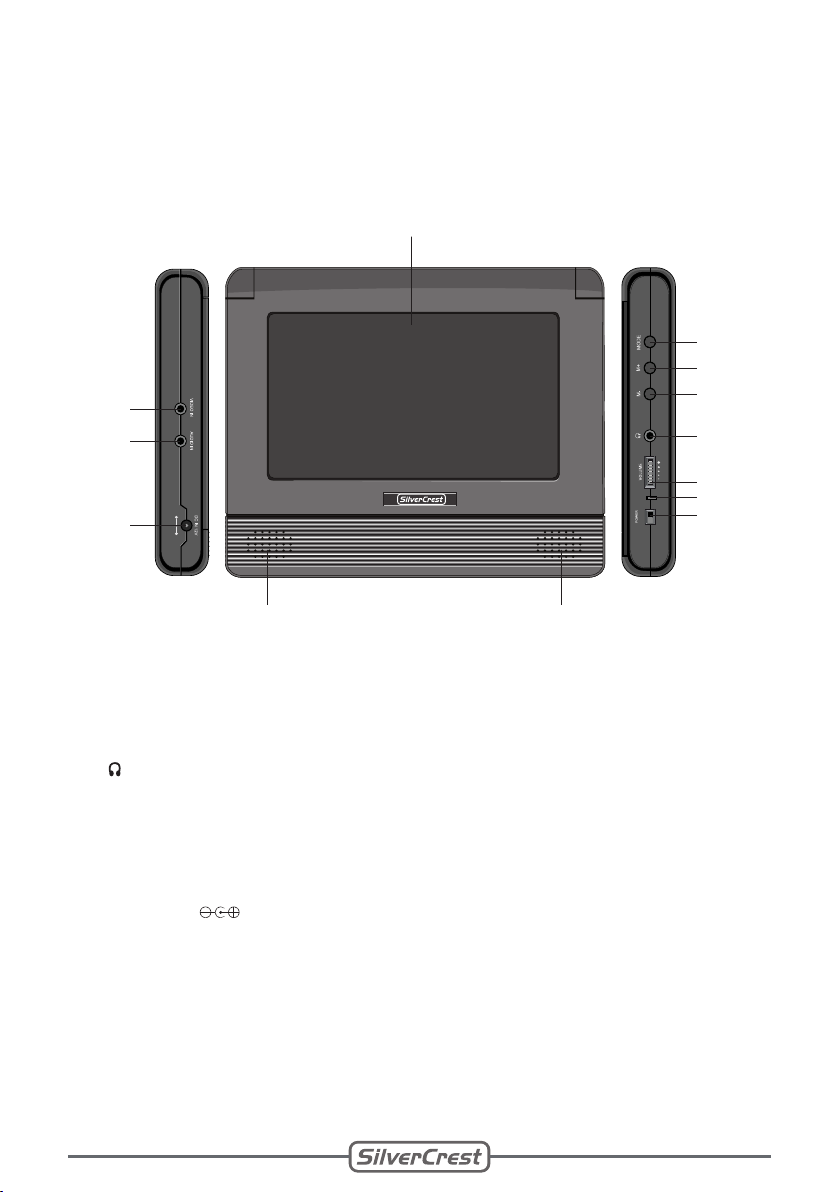
22 Left speaker
OFF ON
23 OPEN Open disc compartment
24 Battery compartment DVD player
8.2 Monitor
25
37
36
35
26
27
28
29
30
31
32
3334
25 LCD display
26 MODE Access image settings
27 M+ Change settings
28 M- Change settings
29 Earphones jack
30 VOLUME Volume control
31 Power indicator (lights up orange during operation)
32 POWER ON OFF ON/OFF switch monitor
33 Right speaker
34 Left speaker
35 DC IN 12V Power connection
36 AUDIO IN Input jack for audio signals
37 VIDEO IN Input jack for video signals
13
Page 14
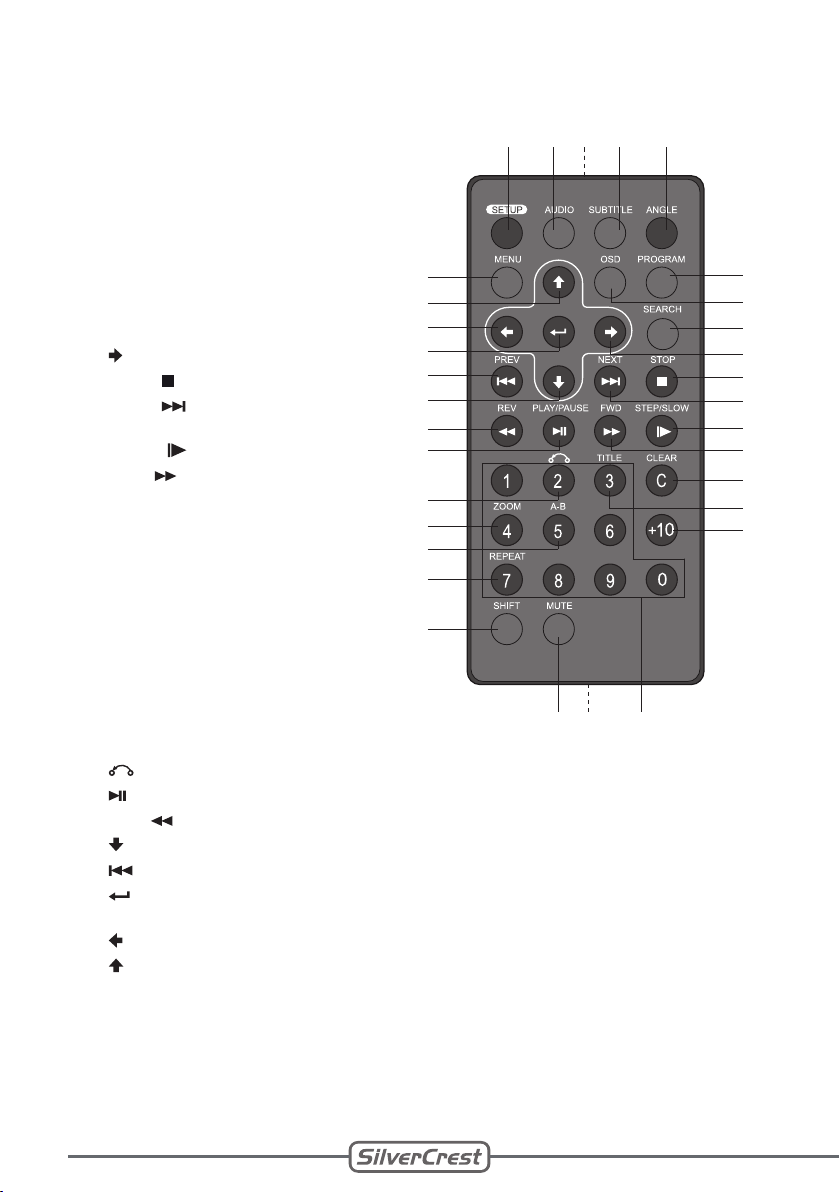
8.3 Remote control
38 SETUP Setup menu
39 AUDIO Audio language
40 Infrared transmitter
41 SUBTITLE Subtitles
42 ANGLE Camera angle
43 PROGRAM Program
44 OSD On-screen-display
information
45 SEARCH Search function
46 Navigate right
47 STOP Stop playback
48 NEXT Next title
49 STEP/
SLOW
50 FWD Search forward
51 CLEAR Clear input
52 TITLE Display DVD title
53 +10 Multi-digit number
54 Numeric buttons
55 Battery compartment
56 MUTE Mute sound
57 SHIFT Toggle function /
58 REPEAT Repeat
59 A-B Repeat section
60 ZOOM Zoom function
61 Return
62 Play/pause
63 REV Search backward
64 Navigate down
65 Previous title
66 Confirm/start
67 Navigate left
68 Navigate up
69 MENU Display menu
Step / slow motion
numeric buttons
playback
69
68
67
66
65
64
63
62
61
60
59
58
57
38 39 41 42
40
56
55 54
43
44
45
46
47
48
49
50
51
52
53
14
Page 15
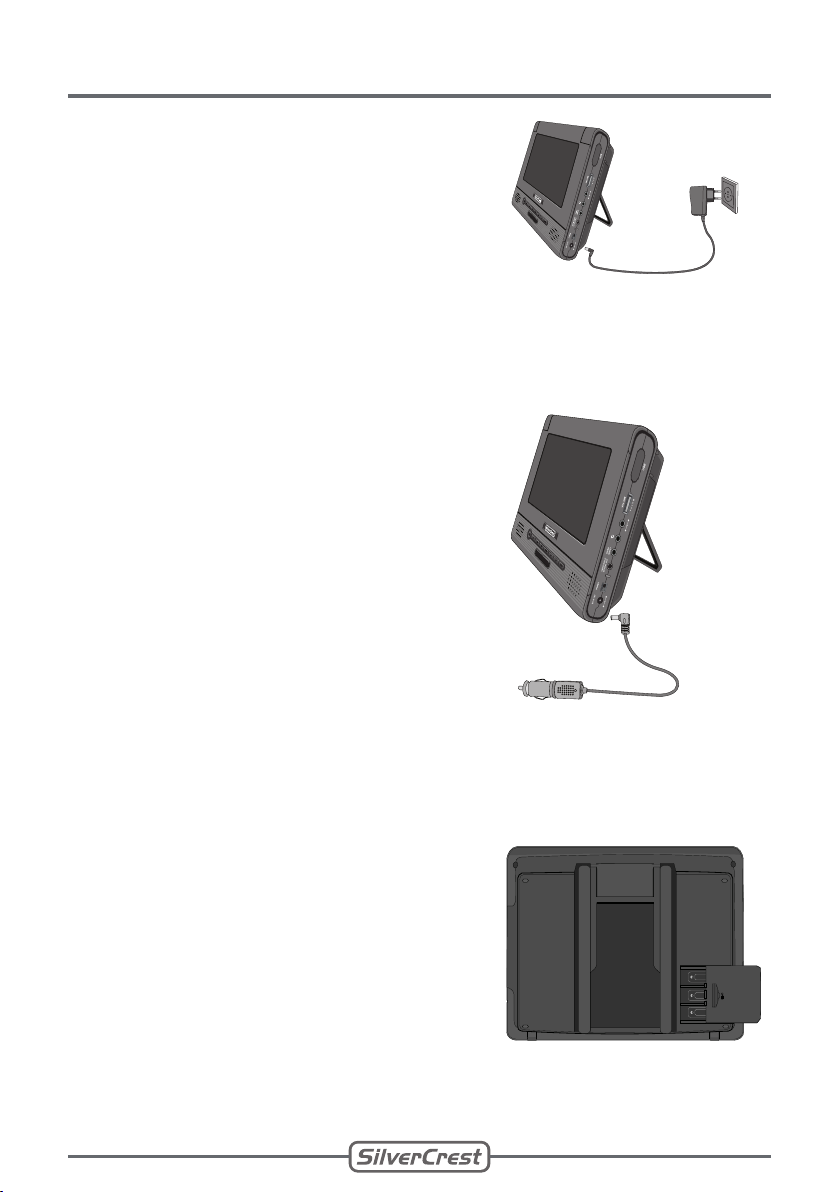
9 Power Supply
DC OUT 7-12V
OFF ON
DC OUT 7-12V
OFF ON
9.1 Mains power
Mains power operation: The power
•
adapter of the DVD player is
designed for 100-240V~50/60Hz.
Connect the plug of the power
•
adapter to DC IN (11) on the DVD
player.
Connect the power adapter to a
•
well accessible wall outlet.
9.2 Car adapter
Vehicle operation: The car adapter
•
allows you to operate the DVD
player in a vehicle. The car adapter
is designed for a 12V vehicle
system.
Connect the car adapter to
•
DC IN (11) on the DVD player.
Connect the car adapter to a well
•
accessible 12V cigarette lighter
jack or 12V vehicle power supply
output jack. The car adapter LED
lights up red during operation.
9.3 Battery operation
The DVD player can be operated
•
with 6 Mignon type AA batteries.
We recommend using rechargeable
batteries with amperage of
2300 mAh in order to ensure a
long operating time. With these
batteries, an operating time of up to
2 hours is possible.
15
Page 16

Insert batteries:
Slide the cover of the battery compartment (24) to the side.
•
Insert the batteries in accordance with the polarity markings in
•
the battery compartment (24) and close the cover again.
Notes:
The monitor has no battery compartment.
•
The DVD player can be operated with batteries independently
•
of the monitor.
The operating time depends on the use of the DVD player.
•
Use rechargeable batteries with amperage of 2300 mAh.
•
Remove the batteries from the DVD player if not in use.
•
Rechargeable batteries cannot be charged while inserted in the
•
DVD player.
Observe the disposal instructions for batteries on page 47.
•
Also observe the safety instructions for handling batteries on
•
page 9.
16
Page 17

10 Installation
DC OUT 7-12V
OFF ON
RELEASE
+
RELEASE
10.1 Set up the player
Place your DVD player on a
•
sturdy, even surface.
Fold out the support on the rear
•
of the unit and adjust for the best
viewing angle.
Note:
For vehicle operation read the chapter Mounting on page 21.
•
10.2 Connect to power supply
For power supply, use the power adapter, car adapter, or batteries
(→ Power Supply, page 15).
10.3 Insert battery (remote control)
Open the battery compartment
•
(55) at the bottom of the remote
control. Press and hold the
locking mechanism on the side
and pull out the battery holder at
the same time.
Insert the supplied battery, making
•
sure to match the +symbol on the
battery with the same symbol in
the battery compartment.
Push the battery support holder back into the battery
•
compartment (55).
Notes:
The average life span of the battery is 1 year.
•
Replace an exhausted battery with a battery of the same type
•
only (button cell CR2025 3 V).
During extended periods of non-use, remove the battery from
•
the battery compartment.
Also, observe the safety instructions for handling batteries on
•
page 9.
17
Page 18

10.4 Insert disc
Press OPEN (23) in the direction
•
of the arrow to open the disc
compartment.
Insert the desired disc with the
•
label up. 8 cm and 12 cm discs
can be inserted.
Press the disc down in the center,
•
until clicking into position.
Close the compartment by
•
pressing the cover down until it
locks into place.
10.5 Turn DVD player on
Slide the ON/OFF switch (10) to ON position. The power indicator
(9) lights up orange. The inserted disc is loaded. READ is shown
on the display. The disc starts automatically. Depending on the
type of disc, the following actions will take place:
DVD Usually an initial scene will play and afterwards the
main DVD menu is displayed.
Video CD A folder and a track overview are displayed. The
following video files can be played: MPEG1 (DAT),
MPEG2 (DAT, VOB, MPG), MPEG4 (AVI, MP4).
Audio CD The music is played and, if available, a track
overview is displayed.
MP3/WMA CDA folder and a track overview are displayed.
Foto CD A folder and a file overview are displayed. Only
JPEG files are displayed.
10.6 Remove disc and turn off DVD player
Press STOP (47) twice to stop disc playback.
•
Press OPEN (23) in the direction of the arrow to open the disc
•
compartment and remove the disc.
18
Page 19

Close the compartment by pressing the cover down until it locks
•
in place.
Slide the ON/OFF switch (10) to OFF position. The power
•
indicator (9) turns off.
Note:
If you open the cover during playback by accident, the rotating
•
disc will stop.
Do not remove the disc while it is still rotating.
•
11 Connections
11.1 Headphones
Press VOLUME (4) to set the DVD player to the lowest volume.
•
Connect the headphones connector to the jack (6) on the unit.
•
Press VOLUME (30) to set the monitor to the lowest volume.
•
Connect the headphones connector to the jack (29) on the
•
monitor.
Note:
Use headphones with an angled plug if the connecting cable is
•
connected to the equipment at the same time.
11.2 Use external AV device for playback
Connect, for example, a TV set
•
via an A/V cable (not supplied).
Connect the video and audio
•
connectors to the VIDEO IN/OUT
(7) and AUDIO IN/OUT OPTICAL
OUT (8) jacks on the DVD player.
Connect the RCA connector to the
•
corresponding colour-coded jacks
on your TV set.
Select an AV channel for playback on your TV set. Read
•
specifics in the user manual of your TV set.
19
Page 20

11.3 Display signal of AV device
With an A/V cable (not supplied) you can connect A/V
•
equipment, such as an external DVD player.
Connect the video and audio connectors to the VIDEO IN/OUT
•
(7) and AUDIO IN/OUT OPTICAL OUT (8) jacks on the DVD
player.
Connect the RCA connector to the corresponding colour-coded
•
jacks on your TV set.
Press MODE (16) on the DVD player and, using
•
(15) or (14), select AV IN mode on the unit.
Now you will receive the signal of the external DVD player.
•
11.4 Connect digital amplifier
With an optical digital cable (not
•
supplied) you can connect the DVD
player to a digital amplifier.
Connect the digital cable to
•
AUDIO IN/OUT OPTICAL OUT
(8) on the DVD player and to
the optical digital input of your
amplifier.
20
Note:
Depending on the connected amplifier, select SPDIF/RAW or
•
SPDIF/PCM in the setup menu under Audio Setup (page 40).
Page 21

12 Mounting
DC OUT 7-12V
OFF ON
Mount the DVD player with the headrest
•
holder to a headrest in your vehicle.
CAUTION! Do not impair the proper
•
functioning of airbags and headrests.
Place the mounting plate with the foam
•
material side against the headrest and
place the straps over and under the
head rest.
Ensure that the fastener points are able
•
to lock the DVD player and monitor
properly in place.
Tighten the straps firmly and close the
•
Velcro fasteners.
Insert the DVD player from above
•
into the mounting plate. Push the unit
downward until it locks into place.
Turn DVD player and monitor off.
•
Connect DVD player and monitor
•
with the supplied connecting cable.
Connect DC OUT in such way to
•
DC OUT 7-12V (5) on the right of
the DVD player so that the jacks
VIDEO OUT and AUDIO OUT fit
into the corresponding sockets on
the equipment.
21
Page 22

Connect DC IN to the socket DC IN 12V (35) on the left of the
•
monitor so that the jacks VIDEO IN and AUDIO IN fit into the
corresponding sockets on the monitor.
Connect the car adapter to a well accessible 12V cigarette
•
lighter jack or 12V vehicle power supply output jack. The car
adapter LED lights up red during operation.
Note:
Observe the safety precautions for in-car operation on page 8.
•
Ensure that the cables do not disturb the driver’s ability to
•
operate the vehicle.
13 Basic Operation
13.1 Use remote control
The key functions depend on the inserted disc (e.g. DVD, Audio
•
CD, MP3/WMA CD, Picture CD). Not all functions are supported
by each disc. This is not a malfunction of the device.
The following functions are operated with the remote control, if
•
not indicated differently.
The numeric buttons (54) have dual functions. Press
•
SHIFT (57) to toggle between numeric buttons and the function
keys. After pressing SHIFT (57) the display briefly shows
SELECT FUNC (function keys) or SELECT NUM (numeric
buttons).
Note:
Ensure that no objects obstruct the line between the infrared
•
transmitter (40) of the remote control and the infrared
sensor (17) on the unit. Other infrared devices can affect the
functioning of the remote control.
13.2 Turn unit on and off
Slide the ON/OFF switch (10) on the DVD player to ON
•
position. The power indicator (9) lights up orange.
22
Page 23

To turn the unit off, slide the ON/OFF switch (10) to OFF
•
position.
To turn the monitor on or off, slide the ON/OFF switch (32) to
•
the corresponding position. The power indicator (31) lights up
orange.
13.3 Select mode
Press MODE (16) on the DVD player to select a mode. You
•
can select between the DVD player (AV OUT) and an external
device (AV IN).
13.4 Image settings
You can adjust the image settings on the DVD player and on
•
the monitor.
Press MODE (16) on the DVD player in order to display the
•
options bar. Repeatedly press MODE (16) to access the image
quality options.
Adjust the values with (15) or (14) on the unit.
•
Repeatedly press MODE (26) on the monitor to access the
•
image quality options. Adjust the values with M- (28) or M+ (27)
on the monitor.
Note:
The window closes automatically if no setting is made within 5
•
seconds.
Set the brightness level.
Select a value for saturation.
16:9
4:3
The display is rotated clockwise by 180 degrees.
Select this aspect ratio if the unit is connected to
a screen with a 16:9 format.
Select this aspect ratio if the unit is connected to
a screen with a 4:3 format.
23
Page 24

13.5 Volume control
Set the desired volume on the DVD player with VOLUME (4)
•
and with VOLUME (30) on the monitor.
13.6 Mute
Press MUTE (56) to mute the sound. MUTE is displayed.
•
Press MUTE (56) again to resume playback with sound.
•
13.7 Turn display off
Press and hold MODE (16) on the DVD player for 2 seconds to
•
turn the display off.
Press any button to turn the display on again.
•
Note:
You can turn off the display only with MODE (16) on the DVD
•
player.
If the DVD player and the monitor are connected, the display of
•
the monitor is not turned off, if you press and hold MODE (16)
on the DVD player for 2 seconds.
You cannot turn off the monitor display with MODE (26) on the
•
monitor.
14 Disc Functions
14.1 Navigation
The display shows the following icons:
folder
audio files
image files
video files
24
Page 25

ABBA - SO LONG .MP3
0 2 . BES T O F AB B
0 1 . GRE ATES T H I
0 3 . IN C O N C E RT
0 4 . ABB A LI VE
0 5 . TH E A L BU M
01 - SO LONG
02 - S.O .S.
03 - MAM MA M
04 - HON EY H
05 - He IS YO
06 - RIN G RIN
07 - PEO PLE
08 - FER NAND
09 - ANOT HER
10 - NIN A PRE
•
Use
(67) / (46), (68) / (64) for navigation in folders, files,
and menus.
You can only select one folder / file at a time.
•
Press (66) to open a folder. All files in the folder are
•
displayed.
Press (66) to play or view a file or to confirm your input.
•
Note:
If a file name is longer than can be displayed in the window,
•
only a part of the file name is shown.
14.2 Disc playback
This unit can play the following disc formats:
Audio: Audio CD, MP3, WMA
•
Video: DVD Video, MPEG1 (DAT), MPEG2 (DAT, VOB, MPG),
•
MPEG4 (AVI, MP4)
Others: JPEG
•
DVD/Audio
disc
Video files/
MP3/WMA/
JPEG disc
The unit starts playback automatically.
•
If playback does not start, press
•
PLAY/PAUSE (62) to play the inserted disc.
After inserting the
•
disc, a folder and a file
overview are displayed.
Press (66) to play or
•
view a file.
25
Page 26

14.3 Stop playback
DVD/Audio/
MP3/WMA/
JPEG disc
Video files
disc
14.4 Pause
DVD/Audio/
MP3/WMA/
JPEG/
Video files
disc
Press STOP (47) once to stop playback. The
•
DVD player stores the current position. The
display briefly shows PRE STOP.
Press PLAY/PAUSE (62) to continue
•
playback.
Press STOP (47) twice to terminate disc
•
playback. The display briefly shows STOP.
Press PLAY/PAUSE (62) to start playback
•
from the beginning of the CD.
Press STOP (47) once to stop playback.
•
Press PLAY/PAUSE (62) to start playback
•
from the beginning of the CD.
Press PLAY/PAUSE (62) to pause disc
•
playback temporarily. The display shows
PAUSE.
Press PLAY/PAUSE (62) again to resume
•
playback.
14.5 Forward / Rewind
DVD/Audio/
MP3/WMA/
JPEG/
Video files
disc
14.6 Search mode
DVD/Audio/
MP3/WMA/
Video files
disc
JPEG disc Function not available.•
26
Press NEXT (48) to skip to the next
•
chapter/title/file.
Press PREV (65) to skip to the previous
•
chapter/title/file.
Press REV (63) or FWD (50) to start the
•
fast search backward or forward (2x, 4x, 8x,
and 20x speed).
Press PLAY/PAUSE (62) to resume normal
•
playback.
Page 27

14.7 Slow motion
DVD/Video
files disc
Audio/MP3/
WMA/JPEG
disc
14.8 Step
DVD/Video
files disc
Audio/MP3/
WMA/JPEG
disc
Press STEP/SLOW (49) to reduce the
•
playback speed. There are 6 speed settings
available: 1/2, 1/3, 1/4, 1/5, 1/6, 1/7.
Press PLAY/PAUSE (62) to continue
•
normal playback.
Function not available.•
First press PLAY/PAUSE (62).
•
Press STEP/SLOW (49) to display a frozen
•
image.
Press STEP/SLOW (49) to step one frame
•
ahead.
Press PLAY/PAUSE (62) to return to
•
normal playback.
Press ZOOM (60) to enlarge or reduce frozen
•
images.
Function not available.•
14.9 Zoom
DVD/Video
file/JPEG disc
Press ZOOM (60) to enlarge or reduce an
•
image (Zoom 2, Zoom 3, Zoom 4, Zoom 1/2,
Zoom 1/3, Zoom 1/4).
Repeatedly press ZOOM (60) to enlarge or
•
reduce the image.
The value is briefly displayed.
•
To turn the zoom function off, press ZOOM
•
(60) until ZOOM:OFF is displayed.
Use
•
in the screen window.
(67) / (46), (68) / (64) to navigate
27
Page 28

Audio/MP3/
WMA disc
14.10 Change angle
Function not available.•
DVD disc Repeatedly press ANGLE (42) to select a
Audio/MP3/
WMA/ Video
files/JPEG
disc
14.11 Numeric buttons
DVD/Audio/
MP3/WMA/
JPEG/ Video
files disc
•
viewing angle.
Note: This function is not supported by all
•
DVDs.
Function not available.•
First press SHIFT (57) to activate
•
SELECT NUM mode.
With the numeric buttons (54), you can
•
directly select the number of the chapter / title
or the file. Playback starts.
Press +10 (53) to select a multi-digit number.
•
The display shows SELECT 10+.
Press a numeric button (0-9) to select a
•
number between 10 and 19.
Press +10 (53) to change the first number.
•
The display shows SELECT 20+,
SELECT 30+, etc.
28
Page 29

14.12 Go to function
TT
TIME
CH
CH
TT
01
03
10
39
00 : 30 : 26
TRK
REP
TRKTIME
TT
CH
00 : 00 : 29
OFF
01
07
Search for a title, chapter, or certain location.
•
Press SEARCH (45) during playback.
•
Navigate with
•
Press SEARCH (45) to close the window.
•
(68) / (64).
DVD disc A window with input
•
fields is displayed for
title (TT), chapter (CH),
and time (TIME). TT is
the default setting.
Press (66) and enter the desired title with
•
the numeric buttons (54). Press (66) to
confirm and start playback. The title is played
in the preview window.
You can enter a chapter and a certain time
•
(hours, minutes, seconds) in the same way.
Audio/MP3/
WMA/ Video
files disc
A window with input
•
fields for track (TRK)
and track duration
(TRKTIME) is
displayed.
TRK is the default setting. Press (66) and
•
enter the desired track with the numeric
buttons (54). Press (66) to confirm and start
playback.
You can enter a certain time (hours, minutes,
•
seconds) in the same way.
JPEG disc Function not available.•
29
Page 30

14.13 Repeat
Press REPEAT (58).
•
To turn the function off, press REPEAT (58), until REP CANCEL
•
is displayed.
DVD disc You can repeat chapters and titles. The
Audio disc You can repeat tracks or the entire CD. The
MP3/WMA/
Video files/
JPEG disc
14.14 Repeat section
DVD/Audio/
MP3/WMA/
Video files
disc
JPEG disc Function not available.•
•
display will successively display REP
CHAPTER, REP 1, and REP CANCEL.
•
display will successively display REP 1, REP
ALL, and REP CANCEL.
You can repeat tracks, folders, or the entire
•
CD. The display will successively display REP
1, REP DIR, REP ALL, and REP CANCEL.
Press A-B (59) during playback to specify the
•
beginning of a section. The display shows
REPEAT A.
Press A-B (59) again to mark the end of the
•
section. The display shows REPEAT A-B. The
DVD player automatically skips to the marked
beginning of the section and continuously
repeats the marked section.
Press A-B (59) again to resume normal
•
playback. The display shows A-B CANCEL.
30
Page 31

14.15 Program playback
PROG
T C T C T C T C
1 -- : -- 5 -- : -- 9 -- : -- 13 -- : --
2 -- : -- 6 -- : -- 10 -- : -- 14 -- : --
3 -- : -- 7 -- : -- 11 -- : -- 15 -- : --
4 -- : -- 8 -- : -- 12 -- : -- 16 -- : --
PLAY
CLEAR
DVD disc With an inserted DVD,
•
you can program up
to 16 chapters in any
desired order.
Press PROGRAM (43). The programming
•
window opens.
Navigate with
•
Enter the desired title and chapter numbers
•
(67) / (46), (68) / (64).
with the numeric buttons (54).
Press CLEAR (51) to clear your input.
•
Select CLEAR and press (66) to confirm the
•
deletion of all inputs.
Press PLAY/PAUSE (62) to start playback
•
of the programmed titles and chapters.
The display briefly shows PRG PLAY.•
Delete program
Delete your programming by again pressing
•
PROGRAM (43). Select CLEAR and press
(66) to confirm.
During playback, you can delete the
•
programming by pressing STOP (47) twice.
Audio/MP3/
WMA/ Video
files/JPEG
With an inserted DVD, you can program up to
•
16 files in any desired order.
Proceed as with the programming of a DVD.
•
disc
31
Page 32

14.16 Display information
1 3
CH
2 3 9
00 :0 2:09
TT
D 3 2 1 4
EN G
1 1ENG
OF F
CD
TRK
00 : 00 : 29
1
7
X
CDrom
PIC
1 33
X
During playback press OSD (44) once to display disc
•
information.
Press OSD (44) again to fade the display out.
•
DVD disc Press OSD (44) once
•
to display title, chapter,
and elapsed playing
time.
Press OSD (44)
•
twice to display audio
language, subtitle, and
angle.
Audio/MP3/
WMA/ Video
files Disc
The current track
•
number, total number
of tracks, black
loudspeaker (sound
on), gray loudspeaker
(sound muted), and
elapsed playing time
are displayed.
JPEG disc The current image
•
number and the total
number of images are
displayed.
32
Page 33

14.17 Display subtitle
DVD disc Press SUBTITLE (41) to change the subtitle
Audio/MP3/
WMA/ Video
files/JPEG
disc
14.18 Select audio language
DVD disc Press AUDIO (39) to select the audio
Audio/MP3/
WMA/ Video
files/JPEG
disc
•
language. All supported languages on the
DVD are displayed successively.
Press SUBTITLE (41) until OFF is displayed
•
to deactivate the subtitle language function.
Note: This function is only available if the
•
DVD was recorded with multiple subtitle
languages.
Function not available.•
•
language for the DVD.
Note: This function is only available if the
•
DVD was recorded with multiple audio
languages.
Function not available.•
33
Page 34

14.19 Access menu
DVD disc Press (61) oder MENU (69) during
Video files/
JPEG disc
Audio/MP3/
WMA disc
14.20 Rotate image
JPEG disc
DVD/Audio/
MP3/WMA/
Video files
disc
•
playback to open the DVD menu.
Press PLAY/PAUSE (62) to resume DVD
•
playback.
Press (61) during playback to display the
•
title and folder overview.
The slideshow is terminated.
•
Function not available.•
Press
•
rotate it in 90° increments.
Press
•
mirror the image horizontally/vertically.
Note: This function only changes the image
•
display. The image is not saved.
Function not available.•
(67) / (46) during image display to
(68) / (64) during image display to
14.21 Slideshow effects
JPEG disc Press PROGRAM (43) during playback to
DVD/Audio/
MP3/WMA/
Video files
disc
34
•
change the image transitions. You can select
between 15 effects.
The selected effect will not be stored. Select
•
the effect again with each new slideshow.
Press STOP (47) to deactivate this function.
•
Function not available.•
Page 35

15 Setup Menu
15.1 Access setup menu
Press SETUP (38) to access the main menu of the DVD player.
In the setup menu you can adjust the following settings:
System setup
Language setup
Audio setup
Video setup
Digital setup
Use
•
menu.
Press (66) to confirm a selection or input.
•
Press SETUP (38) again, or select EXIT SETUP and confirm
•
with (66) to close the setup window.
Notes:
Some settings are disabled during disc playback. Stop disc
•
playback to enable the corresponding settings.
(67) / (46), (68) / (64) to navigate in the setup
35
Page 36

15.2 System setup
TV SYSTEM
SCREEN SAVER
TV TYPE
PASSWORD
RATING
EXIT SETUP
SYSTEM SETUP
DEFAULT
Press SETUP (38) and select
•
SYSTEM SETUP.
TV SYSTEM This setting concerns the TV output
signal and depends on the connected
equipment. In Europe mainly PAL is used.
NTSC All DVDs are played in NTSC
format. To play NTSC DVDs a
connected TV set must be set-up
accordingly.
PAL All DVDs are played in PAL
format.
AUTO The TV system is adjusted
automatically, depending on the
connected TV set.
SCREEN SAVER Activate/deactivate screen saver.
The screen saver is activated:
60 seconds after pressing STOP (47).
•
60 seconds after turning the unit on if no
•
disc is inserted.
During DVD playback the screen saver is
not activated.
36
Page 37

TV TYPE 4:3
PS
4:3 LB Select this option if the equipment
16:9 The picture is displayed in full
PASSWORD The preset password is 0000. Press
(66) and enter a new password with
the numeric buttons (54) to change the
password. Confirm with (66).
Select this option, if the
equipment is connected to a
screen in 4:3 format.
Pan & Scan (PS) is a process
to display videos on an output
device without black bars.
Parts of the image, which do not
fit on the display, are omitted on
the left and right.
is connected to a screen in
4:3 format. Letter box (LB) is a
process to display 16:9 videos on
a 4:3 TV set. The missing image
parts under and above the image
are replaced by black bars.
16:9 size. Select this option if
the equipment is connected to a
screen in 16:9 format.
Note: If you forget your password, you
can deactivate the parental setting with
0000.
37
Page 38

RATING
Specify that certain DVDs can not be played, starting from a
certain rating. There are eight different rating options.
Select a rating option:
In order to set one of the options, select RATING in the setup
•
menu.
Press
•
Press (66) to confirm.
•
Select PASSWORD in the setup menu.
•
Enter your password and press (66) to disable the RATING
•
settings.
This sets the parental function. The DVD player will only play
•
discs that correspond to the specified rating settings.
Note: A corresponding rating must be stored on the DVD for
the parental function to work. If this is missing on the DVD, the
parental function cannot work.
Disable parental setting:
Select PASSWORD in the setup menu.
•
Press (66) and enter your password with the numeric
•
buttons (54).
Press (66) to confirm.
•
Now select the rating option ADULT in RATING.
•
The parental setting is disabled. All DVDs can be played.
•
1: KID SAFE Children’s films can be watched. All movies
2: G General audiences
3: PG Parental guidance is suggested.
4: PG 13 Parents strongly cautioned; for young people
5: PGR Parental guidance recommended; adult
(68) / (64) to select a rating option.
with a rating are disabled.
starting from the age of 13, adult supervision
is recommended.
supervision is recommended.
38
Page 39

6: R Restricted; not permitted for young people
OSD LANGUAGE
AUDIO LANG
SUB LANG
MENU LANG
EXIT SETUP
LANGUAGE SETUP
under 17 unless in the company of adults.
7: NC 17 No children; not permitted for young people
under 17.
8: ADULT Only for adults.
DEFAULT Reset to factory settings.
EXIT SETUP Exit the setup menu.
15.3 Language setup
Press SETUP (38) and select
•
your LANGUAGE SETUP.
OSD
LANGUAGE
Select the language for the DVD menu
(default: English).
AUDIO LANG Select the language for the DVD audio
(default: English). Available only if the inserted
DVD is recorded with multiple languages.
If the selected language is not available, the
DVD starts with another language.
SUB LANG Select the DVD subtitle language (default:
English). Available only if the inserted DVD is
recorded with multiple subtitle languages.
Select OFF to start without subtitles.
MENU LANG Select the DVD menu language (default:
English). Available only if the inserted DVD is
recorded with multiple menu languages.
EXIT SETUP Exit the setup menu.
Note: During playback you can set audio and subtitles languages
(if available) with AUDIO (39) and SUBTITLE (41).
39
Page 40

15.4 Audio setup
AUDIO OUT
EXIT SETUP
AUDIO SETUP
BRIGHTNESS
CONTRAST
HUE
SATURATION
EXIT SETUP
VIDEO SETUP
Press SETUP (38) and select
•
AUDIO SETUP.
AUDIO OUT SPDIF/
OFF
Select this setting if no external
equipment is connected. No digital
signal is outputted.
SPDIF/
RAW
Select this setting to output a digital
signal if an audio decoder or amplifier
with audio decoder is connected to the
DVD player. Also read and observe
the user manual of the connected
equipment.
SPDIF/
PCM
Select this setting to output a digital
signal if a digital 2-channel amplifier
is connected to the DVD player. Also
read and observe the user manual of
the connected equipment.
EXIT SETUP Exit the setup menu.
15.5 Video setup
Press SETUP (38) and select
•
VIDEO SETUP.
40
BRIGHTNESS Set the brightness level.
CONTRAST Set the contrast level.
HUE Set the hue level.
SATURATION Select a value for saturation.
EXIT SETUP Exit the setup menu.
Page 41

15.6 Digital setup
OP MODE
DYNAMIC RANGE
EXIT SETUP
DIGITAL SETUP
Press SETUP (38) and select
•
DIGITAL SETUP.
OP MODE LINE OUT Select this setting to limit the output
signal. This setting is best suited
for night operation, since the output
volume is limited.
RF
REMOD
This setting offers an optimal
playback with less volume. The loud
playback passages are absorbed
and the quiet passages are played
slightly louder. This setting is best
suited during the day. The function is
only possible with digital sound.
DYNAMIC
RANGE
If you selected the option LINE OUT, you can set
the limit of the output signal.
If the playback is too loud or too quiet, you can
absorb peak sections with this function and play
quiet sections louder.
Press
(68) / (64) to select a value (OFF,
1/8, 2/8, 3/8, 4/8, 5/8, 6/8, 7/8, FULL) and press
(66) to confirm.
In the OFF setting the sound is reproduced
in original dynamics. In the FULL setting, the
output signal is limited, i.e. the loud passages are
reduced in volume, while the volumes of the quiet
parts are raised.
EXIT SETUP Exit the setup menu.
41
Page 42

16 USB Device
16.1 Connect USB device
The unit can play files, e.g. MP3’s,
•
from a USB data storage device.
The unit supports USB 1.1.
•
Open the rubber cover (2) on the
•
equipment.
Connect a USB device via the
•
USB port (3).
Turn the unit on. The display
•
shows READ.
Notes:
If after turning the equipment on, a disc is inserted and a USB
•
device is connected, only the CD is played.
If during USB playback a disc is inserted, the USB playback is
•
stopped and disc playback starts.
16.2 File playback
After connecting the USB device, a folder and file overview,
•
such as with an MP3 CD, are displayed.
The playback functions in USB mode are the same as in disc
•
mode.
16.3 Disconnect data storage device
Slide the ON/OFF switch (10) to OFF position and disconnect
•
the USB device.
42
Page 43

17 Care & Maintenance
DVD player
Disconnect from mains power supply before cleaning.
•
Only use a dry, soft cloth for cleaning the device.
•
Do not use corrosive or abrasive cleaning agents. These may
•
damage the surface of the device.
Disc
If a disc has finger marks or dust on it, wipe off carefully from
•
the center to the edge with a soft cloth.
Do not use anti-static cleaners or other cleaning agents to clean
•
a disc.
18 Troubleshooting
If a problem arises, check the following list before taking the
product for servicing. If you cannot solve a problem using the
following information, try contacting the Hotline. Under no
circumstances should you try to repair the equipment yourself.
This will void your warranty.
Problem Cause/Solution
DVD player
cannot be
switched on.
DVD player
does not start
playback.
Ensure that the mains plug is properly
•
connected to the DVD player and the wall
outlet.
Check your power supply.
•
Check the batteries.
•
Check whether the ON/OFF switch (10) is
•
in ON position.
Insert the disc with the label facing up.
•
Clean the disc.
•
The regional code of the DVD player does
•
not correspond with the inserted DVD.
43
Page 44

No Sound. No
picture.
No picture on
connected TV
set.
Distorted / cut
image.
The remote
control does not
work.
The parental settings prevent the playback
•
of the inserted disc. Disable the parental
function.
Condensation in the unit: Turn the DVD
•
player on and wait until the moisture has
evaporated.
Check the power supply.
•
Check the volume setting.
•
Ensure that MUTE (56) is not activated.
•
Ensure that the A/V cable between the
•
DVD player and external equipment is
properly connected and that the A/V cable
is not damaged.
Ensure that the display is not switched off.
•
Press any button to turn the display on.
•
Check whether the DVD player and the TV
•
set are properly connected.
Check the TV settings.
•
Press SETUP (38) to access the setup
•
menu.
Check the display format in the setup
•
menu under SYSTEM SETUP. Select
TV TYPE.
Always direct the remote control towards
•
the infrared sensor (17) on the front of the
DVD player.
Ensure that the signal of the remote control
•
is not blocked by any objects.
Check whether the battery is correctly
•
inserted.
Replace the exhausted battery.
•
44
Page 45

19 Technical Specifications
General
Dimensions DVD player 210 x 175 x 40mm (L x W x H)
Dimensions monitor 210 x 175 x 31mm (L x W x H)
Weight DVD player 710g
Weight monitor 410g
LCD screen diagonal 7” (17.8cm)
Resolution 480 x 234 pixels
Laser Class 1
Operating temperature 0° C to +40°C
Operating humidity 20% to 80%
Storage temperature -10° C to +60°C
DVD Player
Input DC IN 12V
Power consumption ≤ 15W
Max. power output < 5W
Max. headphones output 135mV
Regional code free
Monitor
Input DC IN 12V
Power consumption ≤ 4W
Max. headphones output 135mV
Power adapter
Manufacturer / Type Ktec / KSAD1200150W1UK
Input AC 100-240V~50/60Hz, 0,4A
Output DC 12V 1.5A
Car adapter (cigarette lighter)
Manufacturer Jcable
Input DC 12V 1.5A
Output DC 12V 1.5A
45
Page 46

Remote control
Type Infrared
Battery 1 x button cell (CR2025 3V)
DVD playback NTSC, PAL
Compatible media
Video DVD, DVD±R/RW
Audio 8/12cm CD, CD-R, CD-RW
Compatible formats MPEG1 (DAT), MPEG2 (DAT,
VOB, MPG), MPEG4 (AVI, MP4),
JPEG, MP3, WMA
Connectors DVD player
Voltage output monitor DC OUT 12V 500mV
Video I/O jack (3.5mm)
Audio I/O jack (3.5mm), stereo
Optical output jack (3.5mm)
Earphones output jack (3.5mm), stereo
USB USB port
Connectors monitor
Video input jack (3.5mm)
Audio input jack (3.5mm), stereo
Earphones output jack (3.5mm), stereo
Headphones
Manufacturer / Type DongZang / DY-EP137-B002S
Impedance 32Ω
Bandwidth 20Hz to 20000Hz
Nominal input 3mW
Jack 3.5mm
Wide band characteristic
voltage of supplied headphones 75mV
46
Page 47

20 Disposal
Battery
Please remember that as the end user you are obligated to
dispose of exhausted batteries via the dealer or a public disposal
site.
The same applies for rechargeable batteries.
Device
Please remember that your consumer electronics equipment is
subject to the European directive 2002/96/EC to reduce electronic
scrap.
Therefore, it is prohibited to dispose of your equipment in
•
the household garbage.
Information regarding the disposal of old devices is
•
available at your local municipality, at the garbage
disposal administration, and at the shop where you
acquired this product.
You can return this device free of charge at local
•
collecting points.
Proper disposal of old equipment prevents environmental
•
damages and does not endanger your health.
47
 Loading...