

Page 1
STEAM BRUSH SDRB 1000 B1
STEAM BRUSH
Operating instructions
GŐZÖLOS KEFE
Használati utasítás
NAPAROVACIA KEFA
Návod na obsluhu
IAN 102541
SZCZOTKA PAROWA
Instrukcja obsługi
PARNÍ KARTÁČ
Návod k obsluze
DAMPFBÜRSTE
Bedienungsanleitung
Page 2
Before reading, unfold the page containing the illustrations and familiarise yourself with all functions of
the device.
Przed przeczytaniem proszę rozłożyć stronę z ilustracjami, a następnie proszę zapoznać się z wszystkimi
funkcjami urządzenia.
Olvasás előtt kattintson az ábrát tartalmazó oldalra és végezetül ismerje meg a készülék mindegyik
funkcióját.
Před čtením si otevřete stranu s obrázky a potom se seznamte se všemi funkcemi přístroje.
Pred čítaním si odklopte stranu s obrázkami a potom sa oboznámte so všetkými funkciami prístroja.
Klappen Sie vor dem Lesen die Seite mit den Abbildungen aus und machen Sie sich anschließend mit allen
Funktionen des Gerätes vertraut.
GB Operating instructions Page 1
PL Instrukcja obsługi Strona 11
HU Használati utasítás Oldal 21
CZ Návod k obsluze Strana 31
SK Návod na obsluhu Strana 41
DE / AT / CH Bedienungsanleitung Seite 51
Page 3
ABA
B
Page 4

CONTENT PAGE
Introduction 2
Intended Use 2
Items supplied 2
Description of the appliance 2
Technical data 2
Safety instructions 3
Before the First Usage 5
Operation 5
Filling with water . . . . . . . . . . . . . . . . . . . . . . . . . . . . . . . . . . . . . . . . . . . . . . . . . . . . . . . . . . . .5
Attaching/detaching the brush attachment . . . . . . . . . . . . . . . . . . . . . . . . . . . . . . . . . . . . . . .6
Steam brush function . . . . . . . . . . . . . . . . . . . . . . . . . . . . . . . . . . . . . . . . . . . . . . . . . . . . . . . . .6
Clothing care . . . . . . . . . . . . . . . . . . . . . . . . . . . . . . . . . . . . . . . . . . . . . . . . . . . . . . . . . . . . . . .7
Curtain and soft furnishing care . . . . . . . . . . . . . . . . . . . . . . . . . . . . . . . . . . . . . . . . . . . . . . . .7
Fluff brush . . . . . . . . . . . . . . . . . . . . . . . . . . . . . . . . . . . . . . . . . . . . . . . . . . . . . . . . . . . . . . . . .7
Ironing function . . . . . . . . . . . . . . . . . . . . . . . . . . . . . . . . . . . . . . . . . . . . . . . . . . . . . . . . . . . . .8
After using the steam brush . . . . . . . . . . . . . . . . . . . . . . . . . . . . . . . . . . . . . . . . . . . . . . . . . . . .8
Cleaning and care 9
Scale removal . . . . . . . . . . . . . . . . . . . . . . . . . . . . . . . . . . . . . . . . . . . . . . . . . . . . . . . . . . . . . .9
Storage 9
Troubleshooting 9
Disposal 9
Warranty & Service 10
Importer 10
- 1 -
Page 5

STEAM BRUSH
Introduction
Congratulations on the purchase of your new
appliance.
You have clearly decided in favour of a quality
product. These operating instructions are a part of
this product. They contain important information in
regard to safety, use and disposal. Before using the
product, familiarise yourself with all of these operating
and safety instructions. Use the product only as
described and only for the specified areas of
application. In addition, pass these documents on,
together with the product, to any future owner.
Description of the appliance
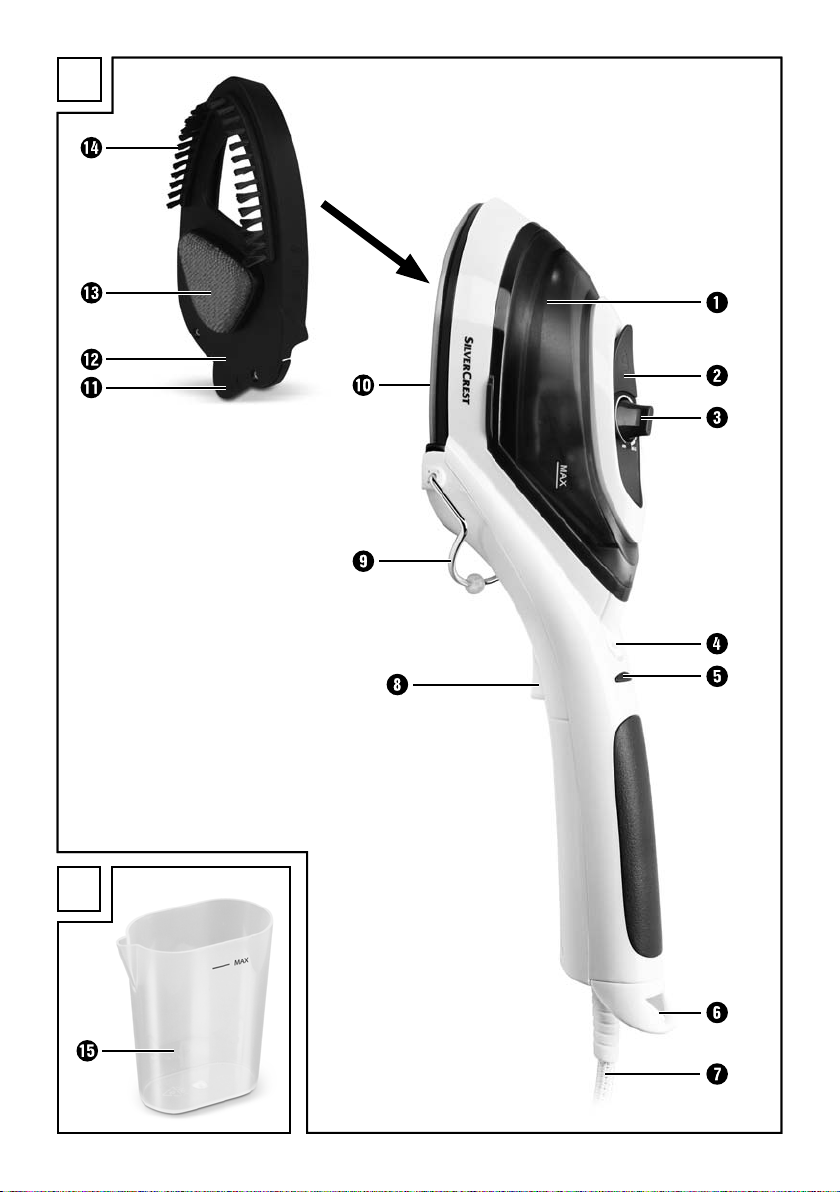
Figure A:
1 Watertank
2 Water fill opening
3 Temperature regulator
4 Unlocking device for the water tank
5 Heating-up control lamp
6 Suspension eye
7 Power cable with power plug
8 Steam blast button
9 Stand
0 Sole of the iron
q Unlocking device for brush attachment
w Brush attachment
e Fluff brush
r Clothes brush
Intended Use
This Steam Brush is intended exclusively for the
smoothing and removal of crinkles, fluff and hairs
on home textiles. It may only be used indoors and
in a domestic household. All other use is deemed
improper use.
Items supplied
Steam Brush
Brush attachment
Measuring beaker
Operating instructions
Figure B:
t Measuring beaker
Technical data
Rated voltage: 220 - 240 V ~ / 50 Hz
Output: 1000 W
- 2 -
Page 6
Safety instructions
Risk of Burns!
• When the appliance is hot, grasp it only by the handle.
• Children should be supervised to ensure that they do not play with the appliance.
• Never hold your hand over the steam spray or on hot metal parts.
• You should not open the filler opening of the water reservoir while the steam
brush is in use. First of all, remove the plug from the mains power socket and
allow the appliance to cool down completely.
• Never use the steam brush on clothes while they are being worn!
• Never direct jets of steam at other people or animals.
• Under no circumstance should you use the appliance if it shows visible signs
of damage, has fallen or leaks water. Arrange for it to be repaired by qualified
specialists.
• The steam brush and its connecting cable must, when the appliance is heating
up or cooling down, be kept out of reach of children who are younger than 8
years old.
Attention! Hot surfaces!
Risk of fire! Risk of Injury!
• Never leave unattended a steam brush that is hot, switched on or connected to
the mains power supply.
• Put the appliance into storage only when it has cooled down.
• This appliance must be used and placed on a stable surface.
• Place the appliance on level and heat resistant surfaces only with the stand
folded out. The appliance must be stood securely when it is put down.
• When applying steam, use only the temperatures detailed in the garment care
instructions, or those suitable for the material. Otherwise, you could damage
the textiles. Should care instructions not be given or known, start with the lowest
temperature setting.
• Never permit children to use the steam brush.
- 3 -
Page 7

Danger of electrical shocks!
• The rating of the local power supply must tally completely with the details given on the rating plate of the appliance.
• To avoid potential risks, arrange for a defective appliance to be checked and
possibly repaired by qualified technicians, or contact our Customer Service
Department.
• Arrange for defective power plugs and/or cables to be replaced at once by
qualified technicians or our Customer Service Department.
• To disconnect from the power source, pull only on the plug itself, not on the cable.
• Never bend (kink) or crush the power cable. Arrange it in such a way that it cannot
come into contact with hot surfaces and so that no-one can step on it or trip over it.
• After every usage, before cleaning the appliance and when refilling with
water, remove the plug from the mains power socket.
• Never touch the power cable or the power plug with wet hands.
• Under no circumstances may the appliance be submersed in fluids or fluids be
allowed to permeate the housing. Do not expose the appliance to humidity
and do not use it outdoors. Should liquids enter the housing, unplug the appliance
from the mains power socket immediately and arrange for it to be repaired by
a qualified technician.
• NEVER use the appliance adjacent to water contained in a bath, shower, wash
basin or other vessels. The proximity of moisture presents a danger, even when
the appliance is switched off.
• You may not open the appliance housing. Permit only authorised technicians to
repair a defective appliance.
• Under NO circumstance should you use the appliance if it shows visible signs
of damage, has fallen or leaks water. Arrange for it to be repaired by qualified
specialists.
• Discontinue use of the appliance if the anti-kink protection on the power cable
is damaged!
• This appliance may only be used by children aged 8 years or more and by
individuals with reduced physical, sensory or mental capabilities or lack of
experience and/or knowledge if they are supervised, or have been instructed
in the safe use of the appliance and have understood the potential risks. Children
may not play with the appliance. Cleaning and user maintenance by children
should not be carried out without supervision of them.
- 4 -
Page 8
Attention!
• Should the care instructions in the clothing item
forbid ironing (Symbol ), you may not use the
steam brush on it. Should you do so, the clothing
item could be permanently damaged.
• The watertank 1 is to be filled exclusively with
mains water (or a mix of distilled and mains water). You will otherwise damage the appliance.
• You may not clean the appliance with solvents,
alcohol or abrasive cleaning agents. These could
cause damage to it.
Before the First Usage
• Remove the steam brush from the packaging.
• Remove all possible adhesive tags and protective
foils from the steam iron.
• Remove the protective cap from the brush attachment w.
Attention!
Plastic bags can be dangerous. To avoid fatalities
through suffocation, keep plastic bags out of the
reach of children.
Note:
As every steam brush is tested for functionality after
manufacture, it is possible that there may be droplets
of water in the watertank 1.
• Heat the steam brush up at the highest setting
for a few minutes. By doing this you will clear
production residues from the sole of the iron 0.
• Activate the steam shot button 8 a few times, so
that steam exits from the sole of the iron 0 .
• Then iron a redundant piece of material, this will
remove any impurites that may possibly be on
the sole of the iron 0.
Note:
On the first heating up of the appliance a small volume
of smoke and smell may be generated, caused by
production residues. This is completely normal and
is not dangerous. Provide for sufficient ventilation,
for example, open a window.
Operation
Notes
• Should the care instructions in the clothing item
forbid ironing (Symbol ), you may not use
the steam brush on it. If you do so, the clothing
item could be permanently damaged.
• Do NOT use the appliance on leather, velvet, impregnated furniture or steam sensitive materials.
If you do, the material/furniture could become
damaged.
Filling with water
• Fill the watertank 1 with water (see chapter
"Filling with water").
• Insert the power plug 7 into a correctly installed and earthed mains power socket.
• Hold the steam brush horizontally.
• Place the temperature regulator 3 at the position "MAX".+
Attention!
Fill the watertank 1 exclusively with tap water or distilled water mixed with tap water. Never fill watertank 1
with chemical substances, cleaning agents (with the exception of decalcification agents) or other liquids.
Do not use chemically distilled water. This would
irreparably damage the appliance.
- 5 -
Page 9
Should the mains water at your locality be rated as
hard, it is recommended that you mix mains water
with some distilled water. Otherwise, the jets for the
steam blast function could calcify (become blocked)
prematurely.
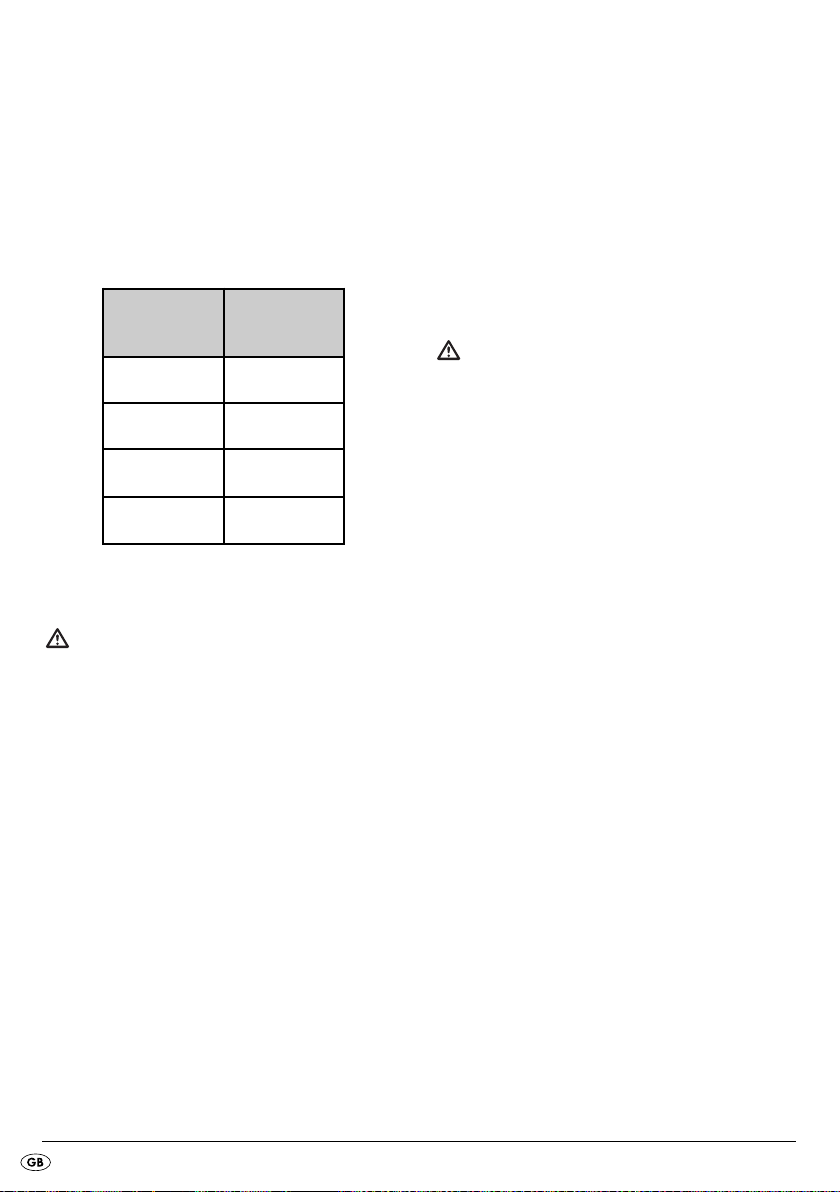
To extend the optimal steam blast function, mix mains
water with distilled water according to the table.
Ratios - distilled
Water hardness
very soft / soft 0
medium 1: 1
water to mains
water
• Close the water fill opening 2 to the water tank 1.
Ensure that the lug on the water fill opening 2
sits in the indentation on the lid. Only in this way
is the watertank 1 properly closed.
• Replace the watertank 1 back onto the appliance.
The watertank 1 must audibly engage with the
unlocking device for the watertank 4.
Attaching/detaching the brush
attachment
Attention!
NEVER attempt to attach or detach the brush attachment w when the appliance is heated up.
Risk of Burns!
hard 2: 1
very hard 3: 1
The water hardness level can be queried at your
local water works.
Attention!
Before refilling with water, ALWAYS remove the power plug 7 from the mains power socket! There is
a risk of electric shock!
• Lift the watertank 1 up vertically, in that you slide
the runlocking device 4 for the watertank 1 to the
rear until the watertank 1 allows itself to be lifted
off. Grasp the watertank 1 with your thumb and index finger on the hatched markings to lift it vertically
upwards. The temperature regulator 3 remains on
the appliance and is not lifted off.
• Open the water fill opening 2 to the watertank 1.
• Using the measuring beaker t, fill the watertank 1 with mains water to the "Max" marking,
but no further.
• To use the steam and brush function, place the
brush attachment w onto the steam brush.
• To do this, slide the brush attachment w all the
way along the guide to the end. The unlocking
device of the brush attachment q must engage
audibly.
• To be able to use the ironing function, remove
the brush attachment w from the steam brush.
• To do this, press the unlocking device q downwards and, at the same time, pull the brush attachment w away to the front.
Steam brush function
• Place the brush attachment w onto the applian-
ce. This must engage audibly with the unlocking
device on the brush attachment q.
• Insert the power plug 7 into a correctly installed
and earthed mains power socket.
• To generate steam, set the temperature regulator 3
to at least ••• or higher. The heating-up control
lamp 5 glows. As soon as the set temperature has
been reached, the heating-up control lamp 5
goes out.
- 6 -
Page 10
Note:
For the steam blast function, set the temperature
regulator 3 to at least •••. At lower settings the
temperature is not sufficient to generate a steam blast.
• By pressing the steam blast button 8 you can
now produce jets of steam.
Note:
To release the first steam blast after heating the appliance up, it can happen that you may need to press
the steam blast button 8 several times in succession.
Note:
You can repeatedly press the steam blast button 8
until the heating-up control lamp 5 glows or water
drips from the sole of the iron 0.
Then, wait until the heating-up control lamp 5 extinguishes before activating a further blast of steam.
• If the heating-up control lamp 5 lights up during
operation, do not press the steam blast button 8.
Wait a few seconds until the heating-up control
lamp 5 goes out before pressing the steam
blast button 8 again.
The appliance is now ready for use.
Attention!
The steam brush can be used with all clothing items.
Caution is to be exercised with heat-sensitive materials
such as synthetics, polyamides or artificial silk. With
these materials you should first check at a concealed
part (inside seam) that the hot steam will not cause
any damage to the garment. Do not touch these materials directly with the hot sole of the iron 0. Use
only the steam blast.
Clothing care
• Suspend the crumpled garment from a coat hanger.
• With one hand pull the garment flat, then steam it
from top to bottom. The combination of steam and
clothes brush r will gently remove all creases.
• Use light pressure with the clothes brush r and
guide the appliance from top to bottom over the
garment. You can thereby press the steam blast
button 8 in short intervals.
Note:
Should you press the steam blast button 8 whilst
the heating-up control lamp 5 is glowing the result
will be condensed water instead of steam, and water
will drip from the sole of the iron 0.
• Leave the garment on the clothes hanger to cool
down before putting it on.
Curtain and soft furnishing care
• Creases and wrinkles can be removed from
draperies by hanging them over a pole.
• Then simply follow the directions given under
“Clothing care”.
• Always carry out a test first at a concealed part.
• If you are using the appliance horizontally, every
now and then hold it upright so as to have the
maximum steam performance.
Fluff brush
• Threads, fluff and hairs can be easily removed
with the red fluff brush e by slowly brushing
over the garment with it from left to right.
• You can clean the fluff brush e by brushing with
it in the opposite direction (from right to left)
over, for example, a remnant of material.
- 7 -
Page 11
Ironing function
• Dismantle the brush attachment w from the
appliance (see “Attaching/detaching the brush
attachment”).
• Connect the appliance to a correctly installed
and earthed mains power socket.
• Adjust the temperature regulator 3 as per the
international point symbols (Care Label) or the
type of material. The heating-up control lamp 5
glows. As soon as the set temperature has been reached, the heating-up control lamp 5 goes out .
• You can repeatedly press the steam blast button 8
until the heating-up control lamp 5 glows or
water drips from the sole of the iron 0. Then, wait
until the heating-up control lamp 5 extinguishes
before activating a further blast of steam.
Note:
Should you press the steam blast button 8 whilst
the heating-up control lamp 5 is glowing the result
will be condensed water instead of steam, and water
will drip from the sole of the iron 0.
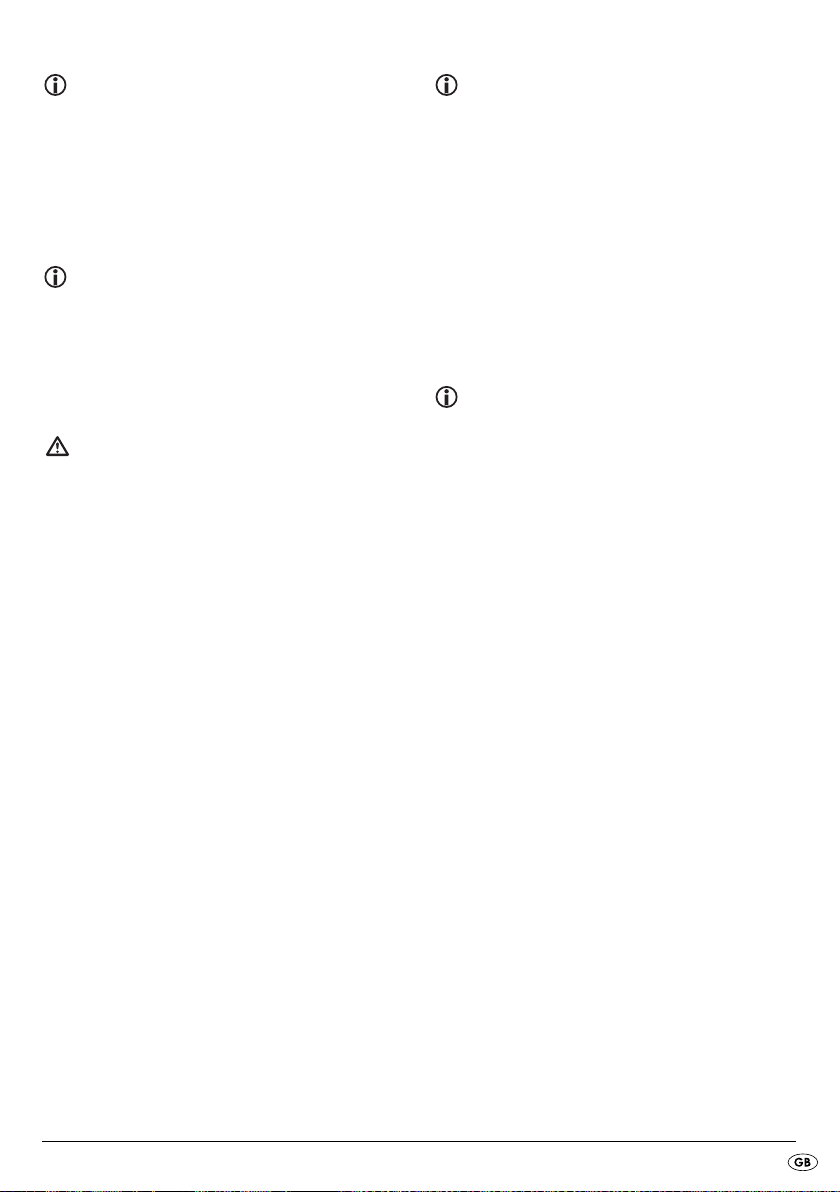
Washing label Type of
material
Chemical fibres,
e.g. viscose,
polyester
Temperature
regulator 3
•
(low
temperature)
••
Silk, Wool
(medium
temperature)
•••
Cotton, Linen
Note:
If doubt exists, start with a low temperature and
gradually increase it to a higher one. With sensitive
materials we recommend carrying out an ironing
test at a concealed part (inside seam).
• For heavily creased laundry, you can use the steam
function by pressing the steam blast button 8. To
generate the steam, the temperature regula-tor 3
must be set to at least ••• or higher.
• Should the heating-up control lamp 5 glow during
the process, release the steam blast button 8
and wait for a few moments until the heating-up
control lamp 5 extinguishes.
(high
temperature)
Should the water tank 1 become empty while the
appliance is in use, remove the plug 7 from the
power socket before refilling it.
• If you want to put the appliance down during
use, fold out the stands 9 to the front and place
the appliance on them. When you are ready to
reuse the appliance, simply fold the stands 9
back to the rear.
After using the steam brush
• Place the temperature regulator 3 at the
position "MIN".
• After use, ALWAYS remove the plug 7 from the
power socket.
• Pour away any water remaining in the water
tank 1 to do this, open, the water fill opening 2
of the water tank 1, turn the appliance upside
down and lightly swivel it.
- 8 -
Page 12
Cleaning and care
Troubleshooting
Risk of personal injury!
ALWAYS remove the plug 7 before cleaning the
appliance.
There is a risk of electric shock! Allow the appliance
to cool down. Risk of Burns!
Caution!
Never use aggressive cleansers. These can damage
the surfaces.
• Clean the housing with a soft, dry cloth only.
• Clean the metal components with a lightly watermoistened cloth and a mild, non-aggressive cleaning
agent.
Scale removal
Should the steam output diminish over a period of
time, decalcify the steam brush.
• For decalcification use a standard commercial
descaling agent based on citric acid. Proceed
as detailed in the product instructions.
Storage
Attention!
Remove the plug 7 from the power socket and allow
the appliance to cool down before putting it into
storage.
Risk of fire!
Store the appliance at a dry location. You can also
hang the appliance up by the suspension eye 6.
The steam brush ejects no or very little steam:
The supply of water in the steam brush is exhausted.
Fill the water tank 1 with water (see "Filling with
water").
The steam brush does not heat itself up:
The appliance is not connected to mains power.
Insert the plug 7 into a wall power socket and
set the desired temperature with the temperature
regulator 3.
The steam brush is defective. Arrange for the appliance to be repaired by a qualified specialist.
The power socket is defective. Try another wall
socket.
Disposal
Do not dispose of the appliance in your
normal domestic waste. This product is
subject to the European guideline
2012/19/EU.
Dispose of the appliance through an approved disposal centre or at your community waste facility.
Observe the currently applicable regulations.
In case of doubt, please contact your waste disposal
centre.
Dispose of all packaging materials in an
environmentally responsible manner.
- 9 -
Page 13
Warranty & Service
Importer
The warranty for this appliance is for 3 years from
the date of purchase. The appliance has been manufactured with care and meticulously examined
before delivery.
Please retain your receipt as proof of purchase. In the
event of a warranty claim, please make contact by
telephone with our Service Department. Only in this
way can a post-free despatch for your goods be assured.
The warranty covers only claims for material and
manufacturing defects, but not for transport damage,
for wearing parts or for damage to fragile components, e.g. buttons or batteries. This product is for
private use only and is not intended for commercial
use. The warranty is void in the case of abusive and
improper handling, use of force and internal tampering not carried out by our authorized service branch.
Your statutory rights are not restricted in any way by
this warranty.
The warranty period will not be extended by repairs
made under warranty. This applies also to replaced
and repaired parts. Any damage and defects extant
on purchase must be reported immediately after unpacking the appliance, at the latest, two days after
the purchase date. Repairs made after the expiration
of the warranty period are subject to payment.
KOMPERNASS HANDELS GMBH
BURGSTRASSE 21
44867 BOCHUM
GERMANY
www.kompernass.com
Service Great Britain
Tel.: 0871 5000 720 (£ 0.10/Min.)
E-Mail: kompernass@lidl.co.uk
IAN 102541
Hotline availability:
Monday to Friday 08:00 - 20:00 (CET)
- 10 -
Page 14

SPIS TREŚCI STRONA
Wprowadzenie 12
Zastosowanie zgodnie z przeznaczeniem 12
Zakres dostawy 12
Opis urządzania 12
Dane techniczne 12
Wskazówki bezpieczeństwa 13
Przed pierwszym użyciem 15
Obsługa 15
Napełnić wodę . . . . . . . . . . . . . . . . . . . . . . . . . . . . . . . . . . . . . . . . . . . . . . . . . . . . . . . . . . . .15
Zakładanie/zdejmowanie końcówki szczotkującej . . . . . . . . . . . . . . . . . . . . . . . . . . . . . . . .16
Funkcja szczotki z parą . . . . . . . . . . . . . . . . . . . . . . . . . . . . . . . . . . . . . . . . . . . . . . . . . . . . .16
Prasowanie ubrań . . . . . . . . . . . . . . . . . . . . . . . . . . . . . . . . . . . . . . . . . . . . . . . . . . . . . . . . . .17
Prasowanie firan i tapicerki . . . . . . . . . . . . . . . . . . . . . . . . . . . . . . . . . . . . . . . . . . . . . . . . . .17
Szczotka do czyszczenia tkanin . . . . . . . . . . . . . . . . . . . . . . . . . . . . . . . . . . . . . . . . . . . . . . .17
Funkcja prasowania . . . . . . . . . . . . . . . . . . . . . . . . . . . . . . . . . . . . . . . . . . . . . . . . . . . . . . . .18
Po użyciu szczotki na parę . . . . . . . . . . . . . . . . . . . . . . . . . . . . . . . . . . . . . . . . . . . . . . . . . . .18
Czyszczenie i konserwacja 19
Odkamienianie . . . . . . . . . . . . . . . . . . . . . . . . . . . . . . . . . . . . . . . . . . . . . . . . . . . . . . . . . . . .19
Przechowywanie 19
Usuwanie zakłóceń działania 19
Utylizacja 19
Gwarancja i serwis 20
Importer 20
- 11 -
Page 15

SZCZOTKA PAROWA
Wprowadzenie
Gratulujemy Ci zakupu naszego urządzenia.
Jest to produkt wysokiej jakości. Instrukcja obsługi
stanowi część tego produktu. Zawiera ona ważne
wskazówki dotyczące bezpieczeństwa, użytkowania i utylizacji urządzenia. Przed przystąpieniem do
użytkowania produktu zapoznaj się z wszystkimi
wskazówkami obsługi i bezpieczeństwa. Używaj
produkt zgodnie z opisem i w podanych obszarach
użytkowania. W razie przekazania produktu następnej osobie, nie zapomnij dołączyć również
instrukcji obsługi.
Opis urządzania
Ilustracja A:
1 Zbiornik na wodę
2 Otwór do nalewania
3 Regulator temperatury
4 Odryglowanie zbiornika na wodę
5 Lampka kontrolna nagrzewania
6 Ucho do zawieszania
7 Kabel zasilający z wtyczką sieciową
8 Przycisk uderzenia pary
9 Stojak
0 Stopa do prasowania
q Odryglowanie końcówki szczotkującej
w Końcówka szczotkująca
e Szczotka do czyszczenia tkanin
r Szczotka do ubrań
Zastosowanie zgodnie
z przeznaczeniem
Szczotka na parę jest przeznaczona wyłącznie do
prasowania i usuwania fałd, kłaczków i włosów
z materiałów w domu. Można go używać wyłącznie w pomieszczeniach zamkniętych w prywatnych
gospodarstwach domowych. Jakiegokolwiek inne
zastosowania uważane są za niezgodne z przezna-czeniem.
Zakres dostawy
Szczotka parowa
Nasadka ze szczotką
Miarka
Instrukcja obsługi
Ilustracja B:
t Miarka
Dane techniczne
Napięcie nominalne: 220 - 240 V ~ / 50 Hz
Moc: 1000 W
- 12 -
Page 16
Wskazówki bezpieczeństwa
Niebezpieczeństwo poparzenia!
• Gdy żelazko jest gorące, chwytać go tylko za uchwyt.
• Nie można pozwolić dzieciom na zabawę urządzeniem.
• Nigdy nie wkładać rąk w obłok pary ani nie dotykać nimi gorących części
metalowych.
• Podczas używania nie wolno otwierać otworu do napełniania zbiornika wody.
Najpierw wyjmij wtyczkę sieciową z gniazdka i zaczekaj, aż urządzenie ostygnie.
• Nigdy nie prasuj założonych ubrań!
• Nigdy nie kieruj strumienia pary na inne osoby lub zwierzęta.
• Nigdy nie używaj urządzenia z widocznymi uszkodzeniami, gdy urządzenie
upadnie z wysokości ani gdy ze środka wylewa się woda. Najpierw oddaj je
wykwalifikowanemu personelowi do naprawy.
• Żelazko, w tym również jego przewód zasilający, w czasie włączenia lub
stygnięcia nie może się znajdować w zasięgu dzieci w wieku poniżej 8 lat.
Uwaga! Gorąca powierzchnia!
Niebezpieczeństwo pożaru! Niebezpieczeństwo odniesienia obrażeń!
• Nigdy nie zostawiaj gorącego, podłączonego do zasilania lub włączonego
żelazka bez nadzoru.
• Urządzenie chowaj tylko po całkowitym wystygnięciu.
• Prasuj szczotka parowa i odstawiaj je na stabilnym podłożu.
• Urządzenie odkładaj zawsze z rozłożonym stojakiem na płaskim i ognioodpornym podłożu. Urządzenie musi pewnie stać na podłożu.
• Prasuj zawsze przy ustawieniu temperatury zgodnie ze wskazówkami podanymi na ubraniu i odpowiednio do prasowanego materiału. W przypadku nieprzestrzegania tych wskazówek można uszkodzić prasowany materiał.
W przypadku braku wyraźnych instrukcji dotyczących temperatury prasowania,
zacznij od najniższego ustawienia, a następnie stopniowo zwiększaj temperaturę.
• Nie pozwalaj na używanie żelazka dzieciom.
Niebezpieczeństwo porażenia prądem elektrycznym!
• Napięcie źródła zasilania musi być zgodne z informacją o dopuszczalnym
zasilaniu podaną na tabliczce znamionowej.
• By uniknąć zagrożeń, uszkodzone urządzenie oddaj niezwłocznie do autoryzowanego warsztatu naprawczego lub zwróć się do serwisu klienta.
- 13 -
Page 17

• Wymianę uszkodzonej wtyczki lub kabla sieciowego należy niezwłocznie
zlecić wykwalifikowanemu personelowi lub serwisowi.
• Ciągnij zawsze za wtyczkę, nigdy za kabel.
• Nie załamywać ani nie zgniatać kabla sieciowego. Układać go w taki sposób,
aby nie stykał się z gorącymi powierzchniami, i aby nikt nie mógł na niego
wejść albo się na nim potknąć.
• Przed przystąpieniem do czyszczenia urządzenia, nalaniem wody oraz po
każdym użyciu wyjmuj wtyczkę z gniazdka zasilania.
• Nigdy nie chwytaj ani nie dotykaj kabla lub wtyczki sieciowej wilgotnymi rękami.
• Urządzenia nie wolno zanurzać w cieczach ani dopuszczać do dostawania
się jakichkolwiek płynów do obudowy. Nie wolno również dopuścić do sytuacji, w której ciecz dostałaby się do obudowy silnika. Nie należy użytkować
urządzenia w warunkach podwyższonej wilgotności ani na wolnym powietrzu. Jeśli zdarzyło by się, że jakaś ciecz dostała się do wnętrza obudowy silnika, należy natychmiast wyciągnąć wtyczkę z gniazdka sieciowego i oddać
wyrób do naprawy w ręce wykwalifikowanego fachowca.
• Nigdy nie używaj szczotki parowej w pobliżu wody, znajdującej się na przykład
w wannie, brodziku prysznica, umywalce lub w innych naczyniach. Bliskość wody
stanowi poważne zagrożenie nawet przy wyłączonym urządzeniu.
• Nie wolno samemu otwierać obudowy urządzenia. Uszkodzone urządzenie
oddawaj wyłącznie do autoryzowanych punktów naprawczych.
• Nigdy nie używaj urządzenia z widocznymi uszkodzeniami, gdy urządzenie
upadnie z wysokości ani gdy ze środka wylewa się woda. Najpierw oddaj je
wykwalifikowanemu personelowi do naprawy.
• Nie używaj urządzenia, w którym doszło do uszkodzenia zabezpieczenia
przed zginaniem kabla sieciowego!
• Urządzenie może być użytkowane przez dzieci powyżej 8 roku życia, a także
przez osoby o ograniczonej sprawności fizycznej, ruchowej bądź umysłowej lub
nieposiadające doświadczenia i / lub wiedzy, gdy będą one przebywały pod
opieką lub zostaną im przekazane wskazówki dotyczące właściwego używania
urządzenia i zrozumieją one, jakie zagrożenia wiążą się z użytkowaniem urządzenia. Nie dawaj urządzenia dzieciom do zabawy. Czyszczeniem i konserwacją
nie mogą zajmować się dzieci bez nadzoru osoby dorosłej.
- 14 -
Page 18

Uwaga!
• W przypadku gdy wskazówki na matce danego
materiału zabraniają prasowania (symbol ),
nie należy prasować. ponieważ groziłoby to
uszkodzeniem materiału.
• Do zbiornika wlewaj wyłącznie wodę 1 wodociągową (lub wodę destylowaną zmieszaną z
wodą wodociągową). Inaczej nastąpi uszkodzenie urządzenia.
• Nie można czyścić urządzenia rozpuszczalnikami,
alkoholem lub środkami do szorowania. Inaczej
można je uszkodzić.
Przed pierwszym użyciem
• Wyjmij szczotkę na parę z opakowania.
• odklej wszystkie naklejki i elementy foliowe ze
szczotki na parę.
• Zdejmij osłonę z końcówki szczotki w.
• Zaczekaj kilka minut, aż szczotka parowa nagrzeje się do najwyższego stopnia. W ten sposób
ze stopy 0 odkleją się pozostałości środka
wykorzystywanego do produkcji.
• Naciśnij kilka razy przycisk uderzenia pary 8,
aż ze stopy 0 zacznie wydobywać się para.
• Następnie przeprasuj niepotrzebny skrawek materiału, by usunąć ze stopy ewentualnie zanieczyszczenia 0.
Wskazówka:
Pierwszemu nagrzewaniu urządzenia może towarzyszyć zapach spalenizny i dym wywołany wypalaniem
się pozostałości środków zastosowanych podczas
produkcji. Jest to zjawisko całkowicie normalne i nie
stanowi zagrożenia. Pamiętaj o zapewnieniu odpowiedniej wentylacji w pomieszczeniu, np. poprzez
otwarcie okna.
Obsługa
Uwaga!
Plastikowe torebki mogą stanowić zagrożenie. Aby nie
spowodować zagrożenia uduszenia, torby plastikowe
przechowuj w miejscach niedostępnych dla niemowląt
i dzieci.
Wskazówka:
Ponieważ każda szczotka parowa jest kontrolowana
na końcu procesu produkcji pod kątem poprawnego
działania, może się zdarzyć, że w zbiorniku wody 1
znajdują się krople wody.
• Dolej wody do zbiornika 1 (patrz „Napełnianie
wodą”).
• Podłącz wtyczkę sieciową 7 do prawidłowo
zainstalowanego i uziemionego gniazdka.
• Trzymaj szczotkę na parę poziomo.
• Ustaw regulator temperatury 3 w położenie
„MAX“.
Przygotowania
• W przypadku gdy wskazówki na matce danego
materiału zabraniają prasowania (symbol ),
nie należy prasować. ponieważ groziłoby to
uszkodzeniem materiału.
• Nie prasuj skóry, aksamitu, mebli impregnowanych ani żadnych materiałów nieodpornych na
parę. W przeciwnym razie można uszkodzić
materiały/elementy mebli.
Napełnić wodę
Uwaga!
Do zbiornika na wodę 1 wlewaj wyłącznie wodę
z kranu lub wodę destylowaną zmieszaną z wodą z
kranu. Nigdy nie wlewaj do zbiornika na wodę 1
żadnych chemicznych substancji, środków czyszczących – z wyjątkiem środków do usuwania osadów z kamienia – ani żadnych innych płynów.
Nie używaj wody poddanej chemicznemu procesowi
usunięcia wapnia. Prowadzi to do uszkodzenia
urządzenia, którego nie będzie można naprawić.
- 15 -
Page 19
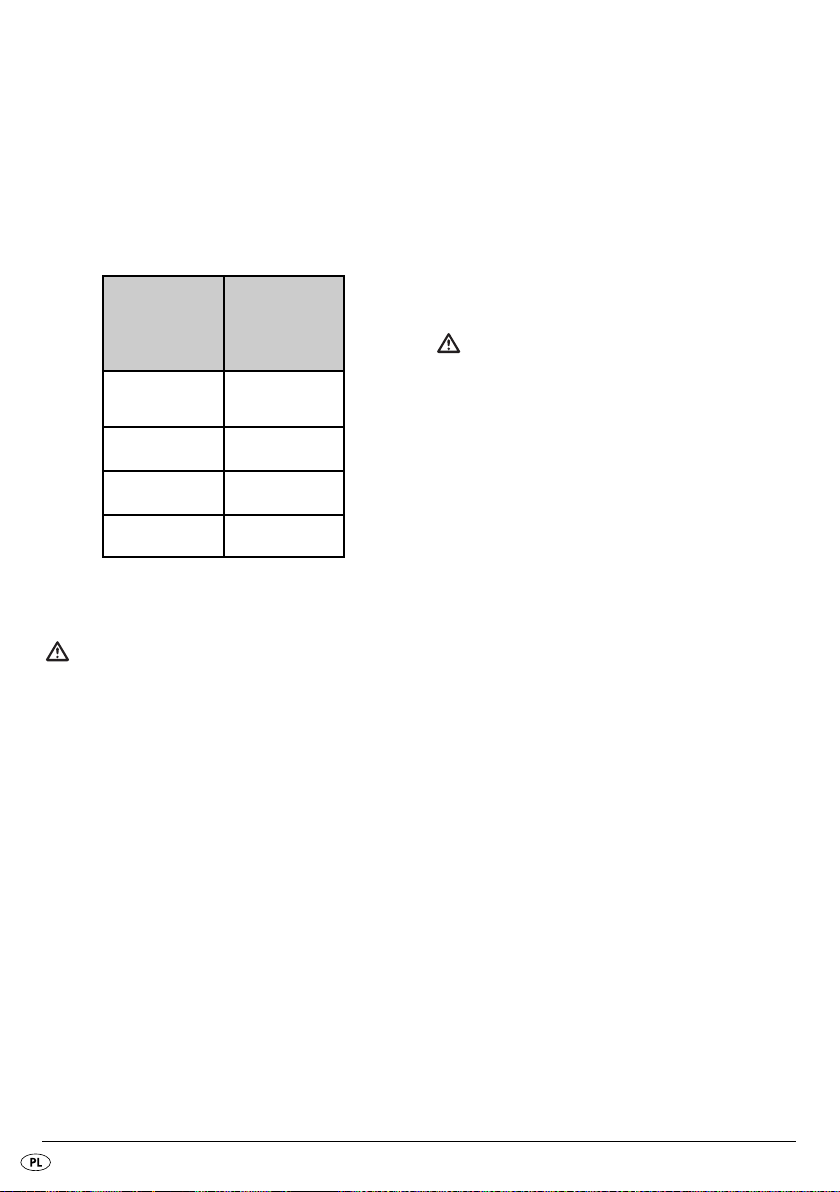
Jeśli woda w kranie jest za twarda, zaleca się mieszanie jej z wodą destylowaną. W przeciwnym razie
mogłoby dojść do zatkania osadem z kamienia
dysz funkcji uderzenia pary.
W celu przedłużenia prawidłowego działania funkcji
uderzenia pary zmieszaj wodę z kranu z wodą
destylowaną w proporcjach podanych w tabeli.
Stosunek ilości
Twardość wody
bardzo miękka /
miękka
średni: 1: 1
na twardo 2: 1
bardzo twarda 3: 1
Informacje dotyczące twardości wody można
uzyskać od miejscowych wodociągów miejskich.
wody destylo-
wanej do wody
kranowej
0
Uwaga!
Przed nalaniem wody do zbiornika zawsze najpierw
odłącz wtyczkę 7 z gniazdka! Istnieje zagrożenie
porażenia prądem elektrycznym!
• Zdejmij zbiornik 1 pionowo do góry, przesuwa-
jąc w tył odryglowanie 4 zbiornika 1, aż
zbiornik 1 będzie można podnieść. Zbiornik 1
chwyć kciukiem i palcem wskazującym za chropowate zaznaczenia, by podnieść go pionowo.
Regulator temperatury 3 pozostaje w urządzeniu
i nie wyjmuje się go ze zbiornikiem.
• Otwórz otwór 2 w zbiorniku 1.
• Nalej wodę z miarki t maksymalnie do poziomu
zbiornika oznaczonego napisem „Max” 1.
• Zamknij otwór 2 w zbiorniku 1. Zwróć uwagę na
to, by otwór 2 sięgał do wycięcia w pokrywce.
Tylko w tym położeniu zbiornik 1 jest prawidłowo
zamknięty.
• Załóż ponownie zbiornik 1 na urządzenie.
Zbiornik 1 musi się zatrzasnąć wyraźnie
w odryglowaniu 4.
Zakładanie/zdejmowanie
końcówki szczotkującej
Uwaga!
Nigdy nie zdejmuj końcówki szczotkującej w ani
nie zakładaj jej na urządzenie, gdy urządzenie
jest rozgrzane. Niebezpieczeństwo poparzenia!
• W celu skorzystania z funkcji pary i szczotki, załóż na szczotkę końcówkę szczotkującą w.
• W tym celu przesuń końcówkę szczotkującą w
po prowadnicy aż do oporu. Odryglowanie
końcówki szczotkującej q musi wyraźnie się
zatrzasnąć.
• By skorzystać z funkcji prasowania, zdejmij
ze szczotki końcówkę szczotkującą w.
• W tym celu naciśnij odryglowanie q i jedno-
cześnie wyciągnij końcówkę szczotkującą w
do przodu.
Funkcja szczotki z parą
• Załóż końcówkę szczotkującą w na urządzenie.
Musi ona wyraźnie się zatrzasnąć w ryglowaniu
końcówki szczotkującej q.
• Podłącz wtyczkę sieciową 7 do prawidłowo
zainstalowanego i uziemionego gniazdka.
• W celu wytworzenia pary, ustaw pokrętło regulacji temperatury 3 przynajmniej na ••• lub
wyżej.. Zapala się lampka kontrolna nagrzewania 5. Po osiągnięciu ustawionej temperatury
lampka kontrolna nagrzewania 5 gaśnie.
- 16 -
Page 20
Wskazówka:
W celu uruchomienia funkcji uderzenia parą ustaw
pokrętło regulacji temperatury 3 przynajmniej na
•••. Na niższym stopniu temperatura jest za niska
do wytworzenia uderzenia pary.
• Do prasowania z uderzeniem pary służy
przycisk 8.
Wskazówka:
W celu wypuszczenia pierwszego uderzenia pary
po nagrzaniu może zajść konieczność naciśnięcia
kilka razy po kolei przycisku uderzenia pary 8.
Teraz urządzenie jest gotowe do pracy.
Uwaga!
Szczotkę na parę można używać do wszystkich
rodzajów ubrań. Przy prasowaniu materiałów
wrażli-wych na wysokie temperatury, takie jak materiały sztuczne, poliamid lub jedwab sztuczny,
zachowaj szczególną ostrożność. Przy takich materiałach najpierw wypróbuj na niewidocznym skrawku materiału (na zszyciu), czy gorąca para nie
uszkodzi materiału. Do tych materiałów nie przystawiaj bezpośrednio gorącej stopy 0. Zastosuj tylko
uderzenie pary.
Prasowanie ubrań
• Pomięte ubranie zawieś na wieszak.
• Jedną ręką rozprostuj fragment ubrania i
przeprasuj go parą. Para i szczotka r
usuwają wszystkie fałdy.
• Lekko dociśnij szczotkę r i przesuwaj urządzenie
od góry do dołu po fragmencie obrania.
Możesz przy tym naciskać przycisk uderzenia
pary 8 w krótkich odstępach.
Wskazówka:
Naciskaj przycisk uderzenia pary 8 dotąd, aż
zapali się lampka kontrolna nagrzewania 5 lub
ze stopy żelazka 0 zacznie kapać woda. Przed
rozpoczęciem korzystania z uderzenia pary, odczekaj, aż lampka kontrolna nagrzania 5 zgaśnie.
• Jeżeli kontrolka grzania 5 świeci się podczas
pracy, nie naciskaj jeszcze raz przycisku wyrzutu
pary 8. Odczekaj chwilę, aż kontrolka wyrzutu
pary 5 zgaśnie i dopiero wtedy ponownie naciśnij przycisk wyrzutu pary 8.
Uwaga!
W przypadku naciśnięcia przycisku uderzania
pary 8 przy zapalonej lampce kontrolnej nagrzewania 5 zamiast pary powstaje skroplona para
wodna i woda kapie ze stopy do prasowania 0.
• Przed założenie wyprasowanego ubrania,
od-czekaj aż ostygnie zawieszone na wieszaku.
Prasowanie firan i tapicerki
• Fałdy i zgniecenia można rozprasować z materiałów tekstylnych, przewieszając je na
drążku.
• Przestrzegaj instrukcji w punkcie „Prasowanie
ubrań”.
• Najpierw zawsze wypróbuj na niewidocznym
skrawku materiału, czy prasowanie nie uszkodzi
materiału.
• Przy użytkowaniu urządzenia ustawionego
w poziomie, przekręcaj je od czasu do czasu
pionowo, by uzyskać maksymalną moc pary.
Szczotka do czyszczenia tkanin
• Nitki, kłaczki i włosy można łatwo usuwać
szczotką do czyszczenia tkanin e, przesuwając
ją powoli z lewej do prawej po ubraniu.
• Szczotkę do czyszczenia tkanin e możesz
wyczyścić, szczotkując materiał w przeciwnym
kierunku (od prawej do lewej), np. po niepotrzebnym skrawku materiału.
- 17 -
Page 21

Funkcja prasowania
• Zdejmij z urządzenia końcówkę szczotkującą w
(patrz „Zakładanie/zdejmowanie końcówki
szczotkującej”).
• Urządzenie należy podłączać wyłącznie do
prawidłowo zainstalowanego gniazdka ze
stykiem uziemiającym.
• Ustaw regulator temperatury 3 zgodnie z międ-
zynarodową symboliką (na etykiecie) lub zgodnie
z rodzajem materiału. Zapala się lampka kontrolna
nagrzewania 5. Po osiągnięciu ustawionej temperatury lampka kontrolna nagrzewania 5 gaśnie.
Etykieta Rodzaj tkaniny Regulator
temperatury 3
Materiały
sztuczne np.
wiskoza,
poliester
•
(niska
temperatura)
••
Jedwab, wełna
(średnia
temperatura)
•••
Bawełna, len
Wskazówka:
W razie wątpliwości rozpocznij od najniższej temperatury i zwiększaj stopniowo temperaturę. Przy
wrażliwych materiałach zalecamy wypróbowanie
na niewidocznym skrawku materiału (na zszyciu),
czy nie dojdzie do uszkodzenia materiału.
(wysoka
temperatura)
• Naciskaj przycisk uderzenia pary 8 dotąd, aż
zapali się lampka kontrolna nagrzewania 5 lub
ze stopy żelazka 0 zacznie kapać woda. Przed
rozpoczęciem korzystania z uderzenia pary, odczekaj, aż lampka kontrolna nagrzania 5 zgaśnie.
Uwaga!
W przypadku naciśnięcia przycisku uderzania pary 8
przy zapalonej lampce kontrolnej nagrzewania 5
zamiast pary powstaje skroplona para wodna i
woda kapie ze stopy do prasowania 0.
Gdy podczas prasowania zabraknie wody w
zbiorniku 1, przed dolaniem wyciągnij wtyczkę 7
z gniazdka.
• By urządzenie odłożyć na chwilę podczas pracy,
rozłóż stojak 9 do przodu i połóż na nim
urządzenie. By ponownie skorzystać z urządzenia, złóż ponownie stojak 9 do tyłu.
Po użyciu szczotki na parę
• Ustaw regulator temperatury 3 w położenie
„MIN”.
• Po skończeniu użytkowania urządzenia wyjmuj
wtyczkę z gniazdka 7.
• Pozostałą wodę wylej ze zbiornika 1, otwierając 2 otwór zbiornika 1, obracając urządzenie i
lekko je przechylając.
• Do silnie pogniecionych rzeczy możesz użyć
funkcji pary, naciskając w tym celu przycisk uderzenia pary 8. W celu wytworzenia pary, pokrętło
regulacji temperatury 3 musi się znajdować przy-
najmniej w położeniu ••• lub wyżej.
• Gdy podczas prasowania zapali się lampka
kontrolna nagrzewania 5, puść przycisk uderzenia pary 8 i odczekaj chwilę, aż lampka
kontrolna nagrzewania 5 zgaśnie.
- 18 -
Page 22

Czyszczenie i konserwacja
Usuwanie zakłóceń działania
Zagrożenie odniesieniem obrażeń!
Przed rozpoczęciem czyszczenia należy wyjąć
wtyczkę z gniazdka 7.
Istnieje zagrożenie porażenia prądem elektrycznym!
Należy poczekać do ostygnięcia urządzenia.
Niebezpieczeństwo poparzenia!
Ostrożnie!
Nie używaj do czyszczenia żrących środków
czyszczących. Mogłyby one uszkodzić plastikową
powierzchnię.
• Obudowę czyść wyłącznie miękką, suchą szmatką.
• Elementy metalowe czyść szmatką zwilżoną lekko
wodą z dodatkiem łagodnego, nie szorującego
środka czyszczącego.
Odkamienianie
Gdy z czasem moc pary zacznie słabnąć, wyczyść
urządzenie z osadów z kamienia.
• Użyj do tego dostępnego w sprzedaży środka
do usuwania osadów z kamienia na bazie kwasu
cytrynowego. Postępuj zgodnie z instrukcją podaną przez producenta środka.
Przechowywanie
Uwaga!
Przed schowaniem urządzenia, wyciągnij wtyczkę 7
i odczekaj, aż urządzenie ostygnie.
Niebezpieczeństwo pożaru!
Przechowuj urządzenie w suchym miejscu. Urządzenie możesz zawiesić za ucho do zawieszania 6.
Z szczotki nie wydobywa się para wodna
lub wydobywa się w niewielkiej ilości:
Kończy się zapas wody w zbiorniku. Dolej wody
do zbiornika 1 (patrz „Napełnianie wodą”).
Szczotka na parę nie nagrzewa się:
Urządzenie nie jest podłączone. Podłącz wtyczkę 7
do gniazdka zasilania i ustaw pokrętło regulacji
temperatury 3 w żądanym położeniu.
Szczotka jest uszkodzona. Przekaż szczotkę
wykwalifikowanemu serwisowi do kontroli.
Gniazdko zasilania jest uszkodzone. Spróbować
podłączyć do innego gniazdka.
Utylizacja
Urządzenia nie należy wyrzucać wraz
z normalnymi odpadami domowymi.
Niniejszy produkt podlega działaniom,
przewidziamyn w przepisach dyrektywy europejskiej 2012/19/EU.
Urządzenie należy usuwać w akredytowanych zakładach utylizacji odpadów lub komunalnych zakładach utylizacji odpadów.
Należy przestrzegać aktualnie obowiązujących
przepisów. W razie pytań i wątpliwości odnośnie
zasad utylizacji należy skontaktować się z najbliższym zakładem utylizacji odpadów.
Materiał opakowaniowy należy przekazywać do utylizacji zgodnie z przepisami o
ochronie środowiska.
- 19 -
Page 23

Gwarancja i serwis
Importer
Urządzenie objęte jest 3-letnią gwarancją, licząc
od daty zakupu. Urządzeniezostało starannie wyprodukowane i poddane skrupulatnej kontroli przed
wysyłką.
Paragon należy zachować jako dowód dokonania
zakupu. W przypadku roszczeń gwarancyjnych należy skontaktować się telefonicznie z serwisem. Tylko w ten sposób można zagwarantować bezpłatną
wysyłkę zakupionego produktu.
Gwarancja obejmuje wyłącznie wady materiałowe i
fabryczne, natomiast nie obejmuje szkód powstałych
podczas transportu, części ulegających zużyciu ani
uszkodzeń części łatwo łamliwych/podatnych na uszkodzenia mechaniczne, np. wyłączników, akumulatorów. Produkt przeznaczony jest wyłącznie do użytku
domowego, a nie do zastosowań profesjonalnych.
Gwarancja traci ważność w przypadku niewłaściwego używania urządzenia, używania niezgodnego z przeznaczeniem, użycia siły lub ingerencji w
urządzenie dokonywanej poza naszymi autoryzowanymi punktami serwisowymi. Niniejsza gwarancja nie ogranicza ustawowych praw nabywcy urządzenia.
Okres gwarancji nie ulega wydłużeniu o czas trwania usługi gwarancyjnej. Dotyczy to również wymienionych i naprawionych części. Szkody i wady zauważone już w chwili zakupu należy zgłosić od razu
po rozpakowaniu, nie później niż po upływie
dwóch dni od daty zakupu. Po upływie okresu
gwarancyjnego wszystkie naprawy będą wykonywane płatnie.
KOMPERNASS HANDELS GMBH
BURGSTRASSE 21
44867 BOCHUM
GERMANY
www.kompernass.com
Serwis Polska
Tel.: 22 397 4996
E-Mail: kompernass@lidl.pl
IAN 102541
Czas pracy infolinii:
od poniedziałku do piątku, w godzinach
08:00 - 20:00 czasu środkowoeuropejskiego
- 20 -
Page 24

TARTALOMJEGYZÉK OLDALSZÁM
Bevezető 22
Rendeltetésszerű használat 22
Tartozékok 22
A készülék leírása 22
Műszaki adatok 22
Biztonsági utasítás 23
Az első használat előtt 25
Működtetés 25
A víz betöltése . . . . . . . . . . . . . . . . . . . . . . . . . . . . . . . . . . . . . . . . . . . . . . . . . . . . . . . . . . . . .25
A kefetartozék feltevése / levétele . . . . . . . . . . . . . . . . . . . . . . . . . . . . . . . . . . . . . . . . . . . . .26
Gőzölős kefefunkció . . . . . . . . . . . . . . . . . . . . . . . . . . . . . . . . . . . . . . . . . . . . . . . . . . . . . . . .26
Ruhaápolás . . . . . . . . . . . . . . . . . . . . . . . . . . . . . . . . . . . . . . . . . . . . . . . . . . . . . . . . . . . . . . .27
Függöny- és kárpitápolás . . . . . . . . . . . . . . . . . . . . . . . . . . . . . . . . . . . . . . . . . . . . . . . . . . . .27
Boholytalanító kefe . . . . . . . . . . . . . . . . . . . . . . . . . . . . . . . . . . . . . . . . . . . . . . . . . . . . . . . . .27
Vasalási funkció . . . . . . . . . . . . . . . . . . . . . . . . . . . . . . . . . . . . . . . . . . . . . . . . . . . . . . . . . . . .28
A gőzölős kefe használata után . . . . . . . . . . . . . . . . . . . . . . . . . . . . . . . . . . . . . . . . . . . . . . .28
Tiszítás és ápolás 29
Vízkőoldás . . . . . . . . . . . . . . . . . . . . . . . . . . . . . . . . . . . . . . . . . . . . . . . . . . . . . . . . . . . . . . . .29
Tárolás 29
Hibaelhárítás 29
Ártalmatlanítás 29
Garancia és szerviz 30
Gyártja 30
- 21 -
Page 25

GŐZÖLŐS KEFE
Bevezető
Gratulálunk új készüléke megvásárlásához.
Vásárlásával kiváló minőségű termék mellett döntött. A használati útmutató a termék része. Fontos
tudnivalókat tartalmaz a biztonságra, használatra
és ártalmatlanításra vonatkozólag. A termék használata előtt ismerkedjen meg a használati és biztonsági utasításokkal. Csak a leírtak szerint és a megadott célokra használja a terméket. A készülék
harmadik személynek történő továbbadásakor adja
a termékhez valamennyi leírást is.
Rendeltetésszerű használat
A gőzölős kefe kizárólag otthoni textíliákon lévő
gyűrődések, bolyhok és szőr/hajszálak eltávolítására szolgál. Csak belső zárt térben és a magánháztartásban használható. Minden ettől eltérő használat nem rendeltetésszerű használatnak minősül.
Tartozékok
A készülék leírása
„A“ ábra:
1 víztartály
2 betöltőnyílás
3 hőmérséklet-szabályzó
4 víztartály kireteszelő gombja
5 felmelegedést jelző lámpa
6 akasztó
7 hálózati kábel hálózati dugasszal
8 gőzlöket gomb
9 állvány
0 vasalótalp
q a kefetartozék kireteszelő gombja
w kefetartozék
e boholytalanító kefe
r ruhakefe
„B“ ábra:
t mérőpohár
Műszaki adatok
Névleges feszültség: 220 - 240 V~ / 50 Hz
Teljesítmény: 1000 W
gőzölős kefe
kefetartozék
mérőpohár
használati útmutató
- 22 -
Page 26

Biztonsági utasítás
Megégetheti magát!
• Ha a készülék forró, csak a fogantyújánál fogja meg.
• Vigyázni kell a gyermekekre, hogy ne játsszanak a készülékkel.
• Soha ne tartsa a kezét a gőzsugárba vagy a forró fémrészekhez.
• Használat közben nem szabad kinyitni a víztartály betöltőnyílását. Hagyja, hogy
a készülék lehűljön, csak utána húzza ki a csatlakozót a csatlakozó aljzatból.
• Soha ne vasaljon magán felvett ruhadarabot!
• Ne irányítsa a gőzsugarat emberre vagy állatra.
• Ne használja a készüléket, ha látható sérülés van rajta, leesett vagy kifolyik
belőle a víz. Képzett szakemberrel javíttassa meg.
• A gőzölős kefe és a vezetéke bekapcsolás és lehűlés közben 8 évesnél kisebb
gyermekek közelében ne legyen.
Figyelem! A felületek forrók!
Tűzveszély! Sérülésveszély!
• A forró, áramra kapcsolt vagy bekapcsolt gőzölős kefét soha ne hagyja
felügyelet nélkül.
• Csak lehűlt állapotban tegye vissza a készüléket tárolási helyére!
• A gőzölős kefe stabil felületen kell használni és letenni.
• A készüléket csak a kihajtott állvánnyal tegye le sík és hőálló felületre.
A készülék stabilan álljon, ha leteszi.
• Csak a tisztítási útmutatóban megadott és az anyagnak megfelelő hőmérsékletbeállítással vasalja a ruhát. Máskülönben kárt tehet a textíliában. Ha nem ismeri
a tisztítási útmutatót, a legalacsonyabb hőmérséklet-beállítással kezdjen vasalni.
• Soha ne engedélyezze a gyermekeknek a gőzölős kefe használatát.
- 23 -
Page 27

Áramütés veszélye!
• Az áramforrás feszültségének meg kell egyeznie a készülék típusjelzésén lévő
adatokkal.
• A hibás készüléket azonnal javíttassa meg szakképzett szerelővel vagy forduljon
az ügyfélszolgálathoz, hogy kizárja a veszélyt.
• A veszélyek elkerülése érdekében a sérült hálózati csatlakozót vagy vezetéket
azonnal cseréltesse ki engedélyeztetett szakemberrel vagy az ügyfélszolgálattal.
• Mindig a dugónál, és ne a kábelnél fogva húzza ki a gőzölős kefét.
• Ne törje meg és ne nyomja össze a hálózati kábelt, és olyan módon vezesse
azt, hogy ne érintkezzen forró felületekkel és ne lehessen rálépni vagy megbotlani benne.
• Tisztítás és a víz betöltése előtt illetve használat után mindig húzza ki a csatlakozót!
• Soha ne érintse meg nedves kézzel a kábelt vagy a dugós csatlakozót.
• A készüléket semmi esetre sem szabad folyadékba meríteni és hagyni, hogy
folyadék kerüljön a készülékházba. Nem szabad a készüléket nedvességnek
kitenni és a szabadban használni. Ha mégis folyadék kerülne a készülékházba,
azonnal húzza ki a készülék hálózati dugóját a csatlakozó aljzatból és javíttassa képzett szakemberrel.
• Ne használja a gőzölős kefét víz közelében, fürdőkádban, zuhanyzóban,
mosdókagylóban vagy egyéb edényekben lévő víz közelében. A víz közelsége még kikapcsolt készüléknél is veszélyt jelent.
• A készülékházat tilos felnyitni. Csak minősített szakemberrel javíttassa a készüléket.
• Ne használja a készüléket, ha látható sérülés van rajta, leesett vagy kifolyik
belőle a víz. Képzett szakemberrel javíttassa meg.
• Ne használja tovább a készüléket, ha meg van sérülve a vezetéken lévő törésvédő!
• A készüléket 8 éves kor feletti gyermekek és csökkent fizikai, érzékszervi vagy
mentális képességű vagy tapasztalattal illetve tudással nem rendelkező személyek felügyelet mellett használhatják, vagy ha felvilágosították őket a készülék
biztonságos használatáról és az ebből eredő veszélyekről. A gyerekeknek
nem szabad a készülékkel játszani. Tisztítást és a felhasználó által végzendő
karbantartást felügyelet nélküli gyermekek nem végezhetnek.
- 24 -
Page 28

Figyelem!
• Amennyiben a ruhadarabon lévő címke megtiltja
a vasalást ( jel), nem szabad gőzölős kefével
kezelni. Ellenkező esetben kár keletkezhet a ruhadarabban.
• Kizárólag csapvizet (vagy csapvízzel kevert
desztilált vizet) szabad tölteni a tartályba 1.
Ellenkező esetben kárt tehet a készülékben.
• A gőzölős kefét nem szabad oldószerekkel,
alkohollal vagy súrolószerekkel tisztítani.
Ellenkező esetben kárt tehet a készülékben.
Az első használat előtt
• Vegye ki a csomagból a gőzölős kefét.
• Vegyen le a gőzölős keféről minden öntapadót
és fóliadarabot.
• Vegye le a védőkupakot a kefetartozékról w.
Figyelem!
A műanyagzacskó veszélyt jelenthet. A fulladásveszély elkerülése végett a műanyagzacskókat kisbabáktól és gyermekektől elzárva tárolja.
Tudnivaló:
Mivel gyártás után valamennyi gőzölő kefét ellenőrzünk, hogy működik-e, előfordulhat, hogy vízcseppek
vannak a víztartályban 1.
• Töltsön vizet a víztartályba 1 (Lásd „Csapvíz
betöltése“).
• Dugja be a csatlakozót 7 egy előírásszerűen
beszerelt és földelt dugaszoló aljzatba.
• Tartsa vízszintesen a gőzölős kefét.
• Állítsa a hőmérséklet-szabályozót 3 „MAX"
helyzetbe.
• Melegítse fel a gőzölő kefét néhány percig a
legmagasabb fokozatra. Így leoldódnak a vasalótalpról
• Nyomja meg párszor a gőzlöket gombot 8,
hogy gőz jöjjön ki a vasaló talpán 0.
• Vasaljon ki egy használaton kívüli ruhadarabot,
hogy eltávolítsa a vasalótalpról 0 az lehetséges
szennyeződéseket.
0 a gyártásból visszamaradt anyagok.
Tudnivaló:
A készülék első felmelegítésekor a gyártásból viszamaradt anyagok enyhe füstöt és szagot eredményezhetnek. Ez teljesen normális és veszélytelen.
Gondoskodjon elegendő szellőzésről, nyisson ki
például egy ablakot.
Működtetés
Tudnivaló:
• Amennyiben a ruhadarabon lévő címke megtiltja a
vasalást ( jel), nem szabad gőzölős kefével kezelni. Egyébként kár keletkezhet a ruhadarabban.
• Ne használja bőrhöz, bársonyhoz, impregnált
bútorokhoz vagy gőzre érzékeny anyagokhoz.
Ellenkező esetben kárt tehet a textíliákban/
bútordarabokban.
A víz betöltése
Figyelem!
Csak csapvizet vagy desztilált vízzel kevert csapvizet töltsön a víztartályba 1. Ne töltsön a víztartályba 1 vegyszert, tisztítószert – kivéve vízkőoldót –
vagy más folyadékot. Ne használjon vegyileg vízkőmentesített vizet. Ez a készülékben helyrehozhatatlan
kárt okoz. Amennyiben lakóhelyén magas a vízkeménység, a csapvízhez ajánlott desztillált vizet keverni.
- 25 -
Page 29

Máskülönben a gőzlöketfunkció fúvókái idő előtt
elmeszesedhetnek.
Az optimális gőzlöketfunkció élettartamának meghosszabbításához keverjen a csapvízhez a táblázatnak megfelelő mennyiségű desztillált vizet.
A desztillált víz
Vízkeménység
nagyon
puha/puha
közepes: 1 : 1
aránya a csap-
vízhez képest
0
• Zárja le a víztartály 1 betöltőnyílását 2. Ügyeljen
arra, hogy a betöltőnyílás 2 füle a fedélen lévő
mélyedésbe nyúljon bele. A víztartály 1 csak
ilyenkor van rendesen lezárva.
• Ismét helyezze vissza a víztartályt 1 a készülékre.
A víztartálynak 1 jól hallhatóan be kell pattannia
a víztartály kireteszelésébe 4.
A kefetartozék feltevése / levétele
Figyelem!
Soha ne vegye le a kefetartozékot w és dugja a
készülékre úgy, hogy a készülék még meleg.
Megégetheti magát!
kemény 2: 1
nagy
keménységű
A víz keménységi fokát a helyi vízügyi hivatalnál
is meg lehet érdeklődni.
3: 1
Figyelem!
Mielőtt feltöltené, mindig húzza ki a csatlakozót 7
a dugaszoló aljzatból!Ez esetben áramütés veszélye
állhat fenn!
• Vegye le a víztartályt 1: tolja hátra a víztartály 1
kireteszelő gombját 4, amíg le lehet emelni a
víztartályt 1. Fogja át a víztartályt 1 a hüvelyk- és
mutatóujjával a barázdált jelölésnél, hogy függőlegesen felfele le tudja emelni. A hőfokszabályzó 3 a készüléken marad és nem emeljük le.
• Nyissa ki a víztartály 1 betöltőnyílását 2.
• A mérőpohárral t legfeljebb a MAX jelzésig
töltsön csapvizet a víztartályba 1.
• A gőzölési és kefefunkció használatához tegye
a kefetartozékot w a gőzölőkefére.
• Tolja a kefetartozékot w a vezetés mentén
ütközésig a készülékre. A kefetartozék kireteszelőjének q hallhatóan be kell pattannia.
• A kefefunkció használatához vegye le a gőzölős
keféről a kefetartozékot w.
• Nyomja meg lefele a kireteszelőt q és húzza le
előrefele a kefetartozékot w.
Gőzölős kefefunkció
• Dugja a kefetartozékot w a készülékre. Jól hall-
hatóan be kell pattannia a kefetartozék reteszelésébe q .
• Dugja be a csatlakozót 7 egy előírásszerűen
beszerelt és földelt dugaszoló aljzatba.
• Ha gőzölni szeretne, a hőmérsékletszabályozót 3
legalább ••• vagy magasabb fokozatra állítsa. Ha a felmelegedést jelző lámpa 5 kialszik,
az azt jelenti, hogy a készülék elérte a beállított
hőfokot.
- 26 -
Page 30

Tudnivaló:
A gőzlöket funkcióhoz a hőmérsékletszabályozót 3
legalább ••• fokozatra állítsa. A legalacsonyabb fokozaton nem elég a hőmérséklet a gőzlökethez.
• A gőzlöket gomb 8 megnyomásával csak egy
gőzlöketet ér el.
Tudnivaló:
Csak annyiszor nyomja meg egymás után a gőzlöket
gombot 8, amíg világítani nem kezd a felmelegedést jelző lámpa 5, vagy víz csöpög a vasaló
talpából 0. Várja meg, amíg kialszik a felmelegedést
jelző lámpa 5, mielőtt még egyszer megnyomja a
gőzlöketet.
Tudnivaló:
Előfordulhat, hogy többször egymás után meg kell
nyomni a gőzlöket gombot 8, ha felmelegítés után
először gőzlöketet szeretne kiváltani.
A készülék ezzel üzemkész.
Figyelem!
A gőzölős kefét bármilyen ruhadarabhoz lehet
használni. Vigyázzunk az olyan hőérzékeny anyagoknál, mint a szintetikus anyagok, poliamid és
műselyem. Ezeknél az anyagoknál előtte egy kevésbé
látható helyen (szegély belső részén) győződjünk
meg arról, hogy a forró gőz nem tesz kárt az anyagban. Ezekhez az anyagokhoz ne érjen hozzá
közvetlenül a forró vasalótalppal 0. Csak a gőzlö-
ketet használja.
Ruhaápolás
• Akassza az összegyűrődött ruhadarabot egy
vállfára.
• Egyik kezével simítsa ki a ruhadarabot r, és gőzölje meg fentről lefele. A gőz és ruhakefe kombinációja valamennyi gyűrődést óvatosan elsimít.
• Gyakoroljon enyhe nyomást a ruhakefével és
mozgassa a készüléket fentről lefele a ruharadab
r felett. Közben kis időközönként megnyomhatja a gőzlöket gombot 8.
• Ha üzemelés közben világítani kezd a melegedést
jelző lámpa 5, ne nyomja meg még egyszer a
gőzlöket gombot 8. Várjon egy kicsit, míg újra
kialszik a melegedést jelző lámpa 5, mielőtt
újra megnyomná a gőzlöket gombot 8.
Tudnivaló:
Ha megnyomja a gőzlöket gombot 8, míg a felmelegedést jelző lámpa 5 még ég, gőz helyett
lecsapódó víz keletkezik és kicsepeg a vasalótalpon 0 át.
• Hagyja lehűlni a ruhadarabokat egy vállfán,
mielőtt felvenné őket.
Függöny- és kárpitápolás
• A gyűrődést és ráncokat úgy távolíthatjuk el a
legegyszerűbben a lakástextíliákból, ha rúdra
akasztjuk őket.
• Egyszerűen csak kövesse a “Ruhaápolás” pontban
leírtakat.
• Először mindig végezzen próbát egy nem látható
részen.
• Ha vízszintesen szeretné használni a készüléket,
közben tartsa párszor függőlegesen is, hogy
maximális gőzteljesítményt érjen el.
Boholytalanító kefe
• A piros boholytalanító kefével e egyszerűen
lehet eltávolítani a szálakat, bolyhot és hajat/
szőrt, ha balról jobbra a ruhadarab felett kefélünk vele.
• A boholytalanító kefét e úgy lehet kitisztítani,
ha az ellenkező irányban kefél vele (jobbról
balra) pl. maradék anyagon.
- 27 -
Page 31

Vasalási funkció
• Vegye le a készülékről a kefetartozékot w (lásd
“A kefetartozék felhelyezése/levétele").
• A készüléket csak előírásszerűen beszerelt és
földelt konnektorba csatlakoztassa.
• A nemzetközi pontjelek (textil-KRESZ) vagy a szövet fajtája alapján állítsa be a hőmérséklet-szabályzót 3.A felmelegedést jelző lámpa 5 világít.
Ha a felmelegedést jelző lámpa 5 kialszik, az azt
jelenti, hogy a készülék elérte a beállított hőfokot.
Ruha címkéje Szövet fajtája Hőmérséklet-
szabályzó 3
vegyi szálak
pl. viszkóz,
poliészter
•
(alacsony
hőmérséklet)
••
selyem, gyapjú
(közepes
hőmérséklet)
•••
pamut, len
Tudnivaló:
Ha bizonytalan, inkább alacsonyabb hőmérsékleten
kezdje, majd növelje a hőfokot. Érzékeny anyagoknál
azt javasoljuk, hogy nem látható helyen (belső szegélyen) végezzen próbavasalást.
• Az erősen gyűrött ruhákat a gőzölő funkcióval a
gőzlöket gomb megnyomásával 8 tudja hasz-
nálni. A gőzlöket funkcióhoz a hőmérsékletszabályozót 3 legalább ••• fokozatra állítsa.
• Ha a felmelegítést jelző lámpa 5 világít üzemelés
közben, oldja ki a gőzlöket gombot 8 és várjon
pár pillanatot, amíg a felemelegedést jelző lámpa 5
megint kialszik.
(magas
hőmérséklet)
• Csak annyiszor nyomja meg egymás után a gőzlöket gombot 8, amíg világítani nem kezd a felmelegedést jelző lámpa 5, vagy víz csöpög a
vasaló talpából 0. Várja meg, amíg kialszik a
felmelegedést jelző lámpa 5, mielőtt még egys-
zer megnyomja a gőzlöketet.
Tudnivaló:
Ha megnyomja a gőzlöket gombot 8, míg a felmelegedést jelző lámpa 5 még ég, gőz helyett lecsapódó
víz keletkezik és kicsepeg a vasalótalpon 0 át.
Ha munka közben üres kifogyna a víz a tartályból 1,
húzza ki a csatlakozót 7, mielőtt utántöltené.
• Ha üzemelés közben rövid időre le szeretné tenni a
készüléket, hajtsa ki előrefele az állványt 9 és
arra helyezze a készüléket. Ha ismét használni
szeretné a készüléket, hajtsa össze hátrafele az
állványt 9.
A gőzölős kefe használata után
• Állítsa a hőmérséklet-szabályozót 3 „MIN"
helyzetbe.
• Használat után mindig húzza ki a csatlakozót 7
a dugaszoló aljzatból!
• Öntse ki a megmaradt vizet a tartályból 1:
nyissa ki a víztartály betöltőnyílását 2, fordítsa
el a készüléket és enyhén rázza meg.
- 28 -
Page 32

Tiszítás és ápolás
Hibaelhárítás
Sérülésveszély!
Tisztítás előtt húzza ki a hálózati csatlakozót 7.
Ez esetben áramütés veszélye állhat fenn! Hagyja
lehűlni a készüléket! Megégetheti magát!
Vigyázat!
Ne használjon erős tisztítószereket. Ezek megsérthetik
a műanyag felületet.
• A burkolatot csak puha és száraz kendővel
törölje le.
• A fémalkatrészeket puha, vízzel benedvesített
kendővel és enyhe, nem karcoló hatású tisztítószerrel tisztítsa.
Vízkőoldás
Ha egy idő után alábbhagyna a gőzölés, vízkőoldóval kezelje a gőzölős kefét.
• Vízkőoldáshoz citromsavalapú hagyományos
vízkőoldót használjon. Kövesse a vízkőoldó
gyártójának utasításait.
Tárolás
A gőzölős vasaló nem lök ki gőzt, vagy csak
nagyon keveset:
kiürült a víztartályból a víz. Töltsön vizet a
víztartályba 1 (Lásd „Csapvíz betöltése“).
A gőzölős kefe nem melegszik fel:
A készülék nincsen csatlakoztatva. Dugja be
a csatlakozót 7 a konnektorba és állítsa
be a hőmérséklet-szabyálozót 3 a kívánt hő-
mérsékletre.
A gőzölős kefe elromlott. Javíttassa a készüléket
képzett szakemberrel.
A dugaszoló aljzat hibás. Próbáljon ki másik d
ugaszoló aljzatot.
Ártalmatlanítás
Semmi esetre se dobja a készüléket a
háztartási hulladékba. Jelen termékre
a 2012/19/EU számú európai utasítás
rendelkezési vonatkoznak.
Figyelem!
Húzza ki a csatlakozót 7 és hagyja lehűlni a készüléket, mielőtt eltenné a helyére.
Tűzveszély!
A készüléket száraz helyen tárolja. A készüléket
az akasztónál 6 fogva is felakaszthatja.
A készüléket engedélyeztetett hulladékgyűjtő
helyen vagy a helyi hulladékeltávolító üzemnél
tudja kidobni.
Vegye figyelembe az érvényben lévő idevonatkozó előírásokat. Ha kérdése merülne fel,
vegye fel a kapcsolatot a hulladékfeldolgozó vállalattal.
A csomagolóanyagot juttassa környezetvédő ártalmatlanítóhelyre.
- 29 -
Page 33

Garancia és szerviz
Gyártja
A készülékre 3 év garanciát adunk a vásárlás dátumától számítva. A készüléket gondosan gyártottuk,
és szállítás előtt lelkiismeretesen ellenőriztük.
Kérjük, a vásárlás igazolására őrizze meg a pénztári blokkot. Kérjük, garanciaigény esetén vegye fel
a kapcsolatot telefonon az Ön közelében lévő szervizzel. Csak ebben az esetben garantálhatjuk, hogy
ingyen tudja beküldeni az árut.
A garancia csak anyag- és gyártási hibára vonatkozik, nem pedig szállítási kárra, kopásra vagy törékeny részek (pl. kapcsoló vagy elem) sérülésére. A termék kizárólag magánhasználatra, nem üzleti
használatra készült.
A garancia érvényét veszti visszaélésszerű vagy
szakavatatlan kezelés, erőszak alkalmazása vagy
olyan beavatkozások esetén, amelyeket nem engedélyeztetett szervizelő üzleteink hajtottak végre. Az
ön törvényes jogait ez a garancia nem korlátozza.
A garanciaidő nem hosszabbodik a jótállással. Ez
a kicserélt vagy javított alkatrészekre is érvényes.
Az esetlegesen már a megvételkor meglévő károkat
és hiányosságokat azonnal kicsomagolás után, legkésőbb két nappal a vétel dátumától számítva jelezni kell. A garanciális idő lejárta után esedékes javítások térítéskötelesek.
KOMPERNASS HANDELS GMBH
BURGSTRASSE 21
44867 BOCHUM
GERMANY
www.kompernass.com
Szerviz Magyarország
Tel.: 0640 102785
E-Mail: kompernass@lidl.hu
IAN 102541
Az ügyfélszolgálati forródrót elérhetősége:
hétfőtől péntekig 8.00 és 20.00 óra között
(közép-európai idő szerint)
- 30 -
Page 34

OBSAH STRANA
Úvod 32
Účel použití 32
Rozsah dodávky 32
Popis přístroje 32
Technické údaje 32
Bezpečnostní pokyny 33
Před prvním použitím 35
Obsluha 35
Plnění vody . . . . . . . . . . . . . . . . . . . . . . . . . . . . . . . . . . . . . . . . . . . . . . . . . . . . . . . . . . . . . . .35
Nasadit/sejmout kartáčový nástavec . . . . . . . . . . . . . . . . . . . . . . . . . . . . . . . . . . . . . . . . . . .36
Funkce napařovacího kartáče . . . . . . . . . . . . . . . . . . . . . . . . . . . . . . . . . . . . . . . . . . . . . . . .36
Péče o oděvy . . . . . . . . . . . . . . . . . . . . . . . . . . . . . . . . . . . . . . . . . . . . . . . . . . . . . . . . . . . . .37
Ošetřování záclon a čalounění . . . . . . . . . . . . . . . . . . . . . . . . . . . . . . . . . . . . . . . . . . . . . . .37
Kartáč na chlupy . . . . . . . . . . . . . . . . . . . . . . . . . . . . . . . . . . . . . . . . . . . . . . . . . . . . . . . . . . .37
Žehlící funkce . . . . . . . . . . . . . . . . . . . . . . . . . . . . . . . . . . . . . . . . . . . . . . . . . . . . . . . . . . . . .38
Po použití napařovacího kartáče . . . . . . . . . . . . . . . . . . . . . . . . . . . . . . . . . . . . . . . . . . . . . .38
Čištění a údržba 39
Odstraňování vodního kamene . . . . . . . . . . . . . . . . . . . . . . . . . . . . . . . . . . . . . . . . . . . . . . .39
Úschova 39
Odstranění chybných funkcí 39
Likvidace 39
Záruka & servis 40
Dovozce 40
- 31 -
Page 35

PARNÍ KARTÁČ
Úvod
Gratulujeme Vám k zakoupení nového přístroje.
Vaším nákupem jste si vybrali kvalitní výrobek. Návod
k obsluze je součástí tohoto výrobku. Obsahuje
důležité pokyny a upozornění ohledně bezpečnosti,
použití a likvidace. Před použitím výrobku si dobře
přečtěte provozní a bezpečnostní pokyny. Výrobek
používejte pouze předepsaným způsobem a v
uvedených oblastech použití. Při předávání výrobku
třetím osobám předávejte i tyto podklady.
Účel použití
Popis přístroje
Obrázek A:
1 vodní nádržka
2 plnicí otvor
3 regulátor teploty
4 odjisťovač vodní nádrže
5 kontrolní světlo vyhřívání
6 úchyt na zavěšení
7 přívodní kabel se zástrčkou
8 tlačítko výstupu páry
9 Stojan
0 žehlicí plocha
q odjištění kartáčového nástavce
w kartáčový nástavec
e kartáč na chlupy
r kartáč na šaty
Napařovací kartáč je určen výlučně k vyhlazení
a odstranění smačkání, chlupů a vlasů na domácích
textiliích. Smí se používat pouze v uzavřených prostorách a v privátních domácnostech. Každé jiné
použití je považováno za neshodující se s ustanovením.
Rozsah dodávky
Parní kartáč
Kartáčový nástavec
Měrná nádobka
Návod k obsluze
Obrázek B:
t odměrka
Technické údaje
Jmenovité napětí: 220 - 240 V~ / 50 Hz
Výkon: 1000 W
- 32 -
Page 36

Bezpečnostní pokyny
Nebezpečí popálení!
• Pokud je přístroj horký, dotýkejte se jej pouze na rukojeti.
• Dohlížejte na děti, aby si s přístrojem nehrály.
• Ruce nikdy nedávejte do směru proudu páry ani nepokládejte na horké
kovové díly.
• Během používání nesmíte otevírat plnicí otvor vodní nádržky. Nechte přístroj
nejdříve vychladnout a vytáhněte síťovou zástrčku ze sítě.
• Nikdy nežehlete oděvy přímo na těle!
• Nikdy nesměřujte výstupem páry na jiné osoby nebo zvířata.
• V případě, že je přístroj poškozený, upadl na zem, nebo vytéká z něj voda,
jej nikdy nepoužívejte. Nechte jej nejdříve opravit kvalifikovaným odborným
personálem.
• Napařovací kartáč a jeho připojovací kabel musí být při zapnutí nebo
ochlazování mimo dosah dětí,mladších než 8 let.
Pozor! Horký povrch!
Nebezpečí požáru! Nebezpečí poranění!
• Nikdy nenechávejte horký, do sítě zapojený nebo zapnutý napařovací kartáč
bez dozoru.
• Přístroj uschovejte pouze ve vychladlém stavu.
• Přístroj se musí používat a odstavit na pevném povrchu.
• Položte přístroj pouze s vyklopeným stojanem na rovnou a žáruvzdornou
podložku. Při odstavení musí stát přístroj stabilně.
• Žehlete pouze nastavenými teplotami, uvedenými na pokynech o ošetřování
a vhodnými pro materiál. V opačném případě byste mohli textilie poškodit.
Pokud neznáte pokyny pro ošetřování, začněte s nastavením nejnižší teploty.
• Nikdy nedovolte dětem, aby používaly napařovací kartáč.
- 33 -
Page 37

Nebezpečí úrazu elektrickým proudem!
• Napětí proudového zdroje musí souhlasit s údaji na typovém štítku přístroje.
• Porouchaný přístroj nechte ihned opravit v autorizované servisní provozovně
nebo se obraťte na servis zákazníkům, aby se tak zabránilo ohrožení.
• Poškozené zástrčky nebo síťový kabel nechte ihned vyměnit autorizovanými
odborníky nebo zákaznickým servisem - vyhnete se tím nebezpečí.
• Tahejte vždy jen za zástrčku, nikdy ne za kabel.
• Síťový kabel neohýbejte ani nemačkejte a pokládejte jej tak, aby nepřišel
do kontaktu s horkými povrchy a nikdo na něj nemohl stoupnout nebo o něj
zakopnout.
• Před čištěním, před nalitím vody do přístroje a po každém použití vytáhněte
zástrčku ze sítě.
• Nikdy se kabelu ani zásuvky nedotýkejte mokrýma rukama.
• Přístroj se nesmí ponořit do vody a do krytu přístroje nesmí také vniknout žádné
tekutiny. Přístroj nevystavujte vlhkosti a nepoužívejte venku. Pokud se přesto
někdy dostane kapalina do tělesa přístroje, vytáhněte ihned zástrčku přístroje
ze zásuvky a nechte jej opravit kvalifikovaným personálem.
• Nepoužívejte v žádném případě přístroj nikdy v blízkosti vody, např. ve vanách,
sprchách, umyvadlech a jiných nádobách. Blízkost vody představuje nebezpečí,
i když je přístroj vypnutý.
• Kryt přístroje nesmíte nikdy otevřít. Závadný přístroj nechte opravit pouze
kvalifikovaným odborníkem.
• V případě, že je přístroj poškozený, upadl na zem, nebo vytéká z něj voda,
jej nikdy nepoužívejte. Nechte jej nejdříve opravit kvalifikovaným odborným
personálem.
• Přístroj dále nepoužívejte v případě poškození ochrany napájecího kabelu!
• Tento přístroj smí používat děti ve věku 8 let a starší stejně jako osoby s omezenými fyzickými, smyslovými nebo duševními schopnostmi nebo nedostatkem
zkušeností a/nebo znalostí, pouze pod dohledem nebo pokud byly poučeni o
bezpečném používání přístroje a pokud pochopily nebezpečí, vyplývajících z
použití přístroje. Děti si nesmějí hrát s přístrojem. Čištění a provozní údržbu
nesmí provádět děti bez dozoru.
- 34 -
Page 38

Pozor!
• Nedovolují-li pokyny k ošetřování žehlení oděvu
(symbol ), nesmíte oděv žehlit ani napařovacím
kartáčem. V opačném případě byste mohli oděv
poškodit.
• Do vodní nádrže 1 můžete nalít pouze vodu z
vodo-vodu (nebo destilovanou vodu smíchanou s
vodou z vodovodu). V opačném případě poškodíte přístroj.
• Přístroj se nesmí čistit ředidly, alkoholem nebo
abrazivami. Jinak může dojít k jeho poškození.
Před prvním použitím
• Vyjměte napařovací kartáč z balení.
• Odstraňte všechny nálepky a části fólie z
napařovacího kartáče.
• Odstraňte ochranný uzávěr z nástavce kartáče w.
Pozor!
Plastikové sáčky mohou představovat nebezpečí.
Abyste se vyhnuli nebezpečí udušení, uchovávejte
igelitové sáčky mimo dosah batolat a malých dětí.
Upozornění:
Protože se po výrobě každý parní kartáč zkouší na
funkčnost, se může stát, že se ve vodní nádrži 1
nachází kapičky vody.
• Parní kartáč vyhřívejte několik minut na nejvyšší
stupeň. Tím se od spodní části žehličky 0 uvolní
zbytky podmíněné výrobou.
• Stiskněte několikrát tlačítko dání páry 8, takže
ze žehlicí plochy 0 vystupuje pára.
• Ožehlete nejdříve nepotřebný kus látky, aby se tak
odstranily případné nečistoty ze žehlící plochy 0.
Upozornění:
Při prvém vyhřátí přístroje může dojít z důvodu
z výroby pozůstalých zbytků k lehkému úniku kouře
nebo zápachu. To je zcela normální a není to
nebezpečné. Zajistěte dostatečné větrání - otevřete
například okno.
Obsluha
Upozornûní:
• Nedovolují-li pokyny k ošetřování žehlení oděvu
(symbol ), nesmíte oděv žehlit ani napařovacím
kartáčem. V opačném případě byste mohli oděv
poškodit.
• Nežehlete kůži, samet, impregnovaný nábytek
nebo textilie, citlivé na páru. V opačném případě
by mohlo dojít k poškození textilií/nábytku.
Plnění vody
• Nalijte do vodní nádrže 1 vodu (viz kapitolu
„Nalití vody“).
• Zastrčte zástrčku 7 do síťové zásuvky, která je
instalovaná dle předpisů a je uzemněná.
• Držte napařovací kartáč ve vodorovné poloze.
• Nastavte regulátor teploty 3 do pozice „MAX“.
Pozor!
Do nádržky na vodu 1 nalévejte výhradně vodu z
vodovodu nebo destilovanou vodu smíšenou s vodou
z vodovodu. Do nádržky na vodu 1 nikdy nenalévejte chemické substance, čisticí prostředky – s vyjímkou
odvápňovacích prostředků – nebo jiné kapaliny.
Nepoužívejte chemicky odvápněnou vodu.
To může způsobit na přístroji nevratné škody.
- 35 -
Page 39

Pokud je voda ve vodovodu v místě vašeho bydliště
příliš tvrdá, doporučujeme ji smíchat s destilovanou
vodou. V opačném případě by trysky funkce na-pařování mohly předčasně zvápenatět.
Chcete-li prodloužit optimální funkci napařování,
smíchejte vodu z vodovodu s destilovanou vodou
v souladu s údaji v tabulce.
Podíl destilova-
Tvrdost vody
velmi
měkká/měkká
né vody vůči
vodě
z vodovodu
0
• Zavřete otvor pro nalití vody 2 na vodní nádrži 1.
Dbejte na to, aby nos na otvoru naplnění 2
zapadal do záseku na víčku. Pouze tak je vodní
nádrž 1 správně zavřená.
• Nasaďte vodní nádrž 1 opět na přístroj. Vodní
nádrž 1 musí slyšitelně zapadnout do odjističe
vodní nádrže hörbar 4.
Nasadit/sejmout kartáčový nástavec
Pozor!
Nikdy nenasazujte kartáčový nástavec w a nikdy
jej nezastrkujte do přístroje, když je tento vyhřátý.
Nebezpečí popálení!
středně tvrdá: 1: 1
tvrdá 2: 1
velmi tvrdá 3: 1
Na tvrdost vody se můžete dotázat u místně příslušné vodárenské společnosti.
Pozor!
Před nalitím vody do nádrže vytáhněte vždy zástrčku 7
ze sítě!Hrozí nebezpečí úderu elektrickým proudem!
• Sejměte vodní nádrž 1 svisle nahoru tak, že posunete odjisťovač 4 vodní nádrže 1 dozadu, do-
kud se vodní nádrž 1 nedá nadzvednout. Pro
zvednutí svisle nahoru uchyťte vodní nádrž 1
palcem a ukazovákem na šrafovaném označení.
Regulátor teploty 3 zůstane na přístroji a se
nenadzvedne spolu přístrojem.
• Otevřte otvor pro nalití vody 2 na vodní nádrži 1.
• Odměrkou nalijte t vodu z vodovodu do vodní
nádrže až po nejvyšší označení „Max“ 1.
• K využití funkce napařování a kartáčování, nasaďte
laskavě kartáčový nástavec w na napařovací
kartáč.
• Nasuňte k tomu kartáčový nástavec w podél
vedení až na doraz na přístroj. Odjisťovač kartáčového nástavce q musí slyšitelně zapadnout.
• K použití žehlící funkce odstraňte laskavě kartáčový nástavec w od napařovacího kartáče.
• Stlačte k tomu odjištění q dolů a vytáhněte
současně kartáčový nástavec w dopředu.
Funkce napařovacího kartáče
• Zastrčte kartáčový nástavec w do přístroje.
Tento musí slyšitelně zapadnout do odjištění
kartáčového nástavce an der q.
• Zastrčte zástrčku 7 do síťové zásuvky, která
je instalovaná dle předpisů a je uzemněná.
• Pro vytvoření páry nastavte teplotní regulátor 3
minimálně na ••• nebo výš. Svítí kontrolní světlo vyhřívání 5. Dosáhne-li se nastavená teplota,
zhasne kontrolní světlo vyhřívání 5.
- 36 -
Page 40

Upozornění:
Pro funkci k vydání páry nastavte teplotní regulátor 3
minimálně na •••. Na nižších stupních nestačí teplota k vytvoření páry.
• Stlačením tlačítka výstupu páry 8 můžete nyní
napařovat.
Upozornění:
Aby bylo možné spustit po vyhřátí první parní náraz,
může se stát, že budete muset několikrát za sebou
stisknout tlačítko pro spuštění parního nárazu 8.
Přístroj je připravený k provozu.
Pozor!
Napařovací kartáč se může používat u všech oděvů. Napařovacím kartáčem se musí však oaptrně
zacházet při látkách, citlivých na ohřev, jako jsou
syntetické látky, polyamidy nebo umělé hedvábí.
U těchto textíliích by jste se měli nejdříve předem
ujistit na neviditelném místě (vrub látky), zda-li horká
pára tuto látku ne-poškodí. Nedotýkejte se těchto
materiálů přímo horkou žehlicí plochou 0. Používejte pouze páru.
Péče o oděvy
• Zavěste smačkaný oděv na ramínko.
• Narovnávejte oděv jednou rukou a napařujte jej
zhora dolů. Kombinací páry a kartáčem na šaty r
se jemně odstraní všechny záhyby.
• Přitlačte kartáč na šaty r lehce na oděv a pohybujte přístrojem po oděvu zhora na dol. Přitom
můžete stisknout v krátkých intervalech tlačítko
dání páry 8.
Upozornění:
Stlačte tlačítko pro dávkování páry 8 pouze tolikrát za sebou, dokud se nerozsvítí kontrolní světlo
vyhřívání 5, anebo nekape voda ze žehlicí plochy 0.
Počkejte, dokud kontrolní světlo vyhřívání 5 zhasne, než stisknete další dávkování páry.
• Pokud se během provozu rozsvítí kontrolka
vyhřívání 5, nestiskněte ještě jednou tlačítko
rázu páry 8. Než znovu stisknete tlačítko rázu
páry 8, vyčkejte chvíli, dokud kontrolka vyhřívání 5 opět nezhasne.
Upozornění:
Stlačíte-li tlačítko pro dání páry 8 během svícení
kontrolního světla vyhřívání 5, vznikne kondenzační
voda a místo páry kape ze žehlící plochy voda 0.
• Předtím, než si oděv opět obléknete, nechte jej
na ramínku vychladnout.
Ošetřování záclon a čalounění
• Záhyby a smačkání je možné ze zácloviny
odstranit tak, že se převěsí přes tyč.
• Následujte jednoduše pokynům pod bodem
“Péče o oděvy”.
• Proveďte nejdříve test na neviditelném místě.
• Použijete-li přístroj vodorovně, podržte jej občas
kolmo, aby se tak vytvořil maximální napařovací
výkon.
Kartáč na chlupy
• Nítě, chlupy a vlasy se mohou jednoduše odstranit
červeným kartáčem na chlupy e tak, že jím
kartá-čujete po oděvu pomalu z leva do prava.
• Kartáč na chlupy e můžete očistit tak, že
kartáčujete do protisměru (z prava do leva),
např. na zbytku látky.
- 37 -
Page 41

Žehlící funkce
• Sejměte kartáčový nástavec z w přístroje
(viz “Nasadit/sejmout kartáčový nástavec”).
• Zapojte přístroj do zástrčky, která je instalovaná
dle předpisů a je uzemněná.
• Nastavte regulátor teploty 3 dle mezinárodních
symbolových bodů (etiketa na oděvu) nebo podle
druhu tkáně. Svítí kontrolní světlo vyhřívání 5.
Dosáhne-li se nastavená teplota, zhasne kontrolní
světlo vyhřívání 5.
Etiketa o praní Tkáně Regulátor
teploty 3
chemická
vlákna, např.
viskóza,
polyester
•
(nízká teplota)
••
hedvábí, vlna
bavlna, lněné
plátno
Upozornění:
V případě nejistoty začněte nižší teplotou, kterou
pomalu zvyšujete. Při citlivých látkách doporučujeme,
provést zkoušku žehlení na neviditelném místě (vrubní
strana).
(střední teplota)
•••
(vysoká teplota)
• Stlačte tlačítko pro dávkování páry 8 pouze tolikrát za sebou, dokud se nerozsvítí kontrolní
světlo vyhřívání 5, anebo nekape voda ze žeh-
licí plochy 0. Počkejte, dokud kontrolní světlo
vyhřívání 5 zhasne, než stisknete další dávkování páry.
Upozornění:
Stlačíte-li tlačítko pro dání páry 8 během svícení
kontrolního světla vyhřívání 5, vznikne kondenzační
voda a místo páry kape ze žehlící plochy voda 0.
Je-li během práce vodní nádrž prázdná 1, vytáhněte zástrčku ze sítě 7, než opět nalijete do vodní
nádrže vodu.
• Chcete-li přístroj během provozu krátce odstavit,
vyklopte stojan 9 dopředu a postavte na něj
přístroj. Chcete-li přístroj opět používat, sklopte
stojan 9 opět dozadu.
Po použití napařovacího kartáče
• Nastavte regulátor teploty 3 do pozice „MIN“.
• Po použití vždy vytáhněte zástrčku 7 ze sítě.
• Vylijte zbylou vodu z vodní nádrže 1 tak, že
otevřete otvor pro nalití 2 vody vodní nádrže 1,
přístroj otočíte a lehce ním kývete.
• U silně zmačkaného prádla můžete použít parní
funkci stisknutím tlačítka pro dání páry 8.Pro
vytvoření páry musí být teplotní regulátor 3
nastaven minimálně ••• nebo výš.
• Svítí-li kontrolní světlo vyhřívání 5 během provozu,
pusťte tlačítko pro dání páry 8 a počkejte malý
okamžik, dokud kontrolní světlo vyhřívání 5 opět
zhasne.
- 38 -
Page 42

Čištění a údržba
Odstranění chybných funkcí
Nebezpečí poranění!
Před čištěním vytáhněte zástrčku ze zásuvky 7.
Hrozí nebezpečí úderu elektrickým proudem! Přístroj nechte vychladnout. Nebezpečí popálení!
Pozor!
Nepoužívejte agresivní čistící prostředky. Tato by
mohla poškodit povrchy.
• Kryt přístroje čistěte pouze měkkým a suchým
hadříkem.
• Kovové části vyčistěte lehce vlhkým hadříkem
a jemný, ne abrazivním čistícím prostředkem.
Odstraňování vodního kamene
Zníží-li se po určité době výkon napařování, je třeba
napařovací kartáč odvápnit.
• K odstranění vodního kamene můžete použít běžný
odvápňovací prostředek na základě kyseliny
citronové. Postupujte podle návodu odvápňovacího prostředku.
Úschova
Pozor!
Předtím, než přístroj opět uložíte na místo, vytáhněte
zástrčku ze sítě 7 a nechte přístroj vychladnout.
Nebezpečí požáru!
Uchovávejte přístroj na suchém místě. Přístroj můžete Sie zavěsit na úchytce na zavěšení 6.
Napařovací kartáč nevydává žádnou páru,
nebo vypařuje pouze malé množství páry:
Zásoba vody v napařovacím kartáči je vyčerpaná.
Nalijte do vodní nádrže 1 vodu (viz bod „Nalití
vody“).
Napařovací kartáč se nevyhřeje:
Přístroj není zapojený do zásuvky. Zastrčte síťovou
zástrčku 7 do zásuvky a otočným regulátorem
teploty 3 nastavte požadovanou teplotu.
Napařovací kartáč je závadný.
Zásuvka je vadná. Vyzkoušejte jinou zásuvku.
Likvidace
V žádném případě nevyhazujte přístroj
do běžného domovního odpadu. Tento
výrobek musí plnit ustanovení evropské směrnice 2012/19/EU.
Zlikvidujte přístroj prostřednictvím firmy na likvidaci
s příslušným povolením nebo zařízení na likvidaci
komunálního odpadu.
Dodržujte aktuální platné předpisy. V případě
pochybností kontaktujte příslušnou firmu, která
se zabývá likvidací odpadu.
Veškeré obalové materiály nechte zlikvidovat v souladu s ekologickými předpisy.
- 39 -
Page 43

Záruka & servis
Dovozce
Na tento přístroj platí 3 letá záruka od data zakoupení. Přístroj byl vyroben s nejvyšší pečlivostí a před
odesláním prošel výstupní kontrolou. Uschovejte si,
prosím, pokladní
lístek jako doklad o nákupu. V případě uplatňování
záruky kontaktujte telefonicky Vaší servisní službu.
Pouze tak může být zajištěno bezplatné zaslání Vašeho zboží.
Záruka se vztahuje pouze na chyby materiálu nebo
výrobní závady, ale ne na škody,vzniklé při přepravě, ne na součásti, podléhající rychlému opotřebení
nebo na poškození křehkých dílů, jako jsou např.
spínače nebo akumulátory. Výrobek je určen pouze
pro privátní použití, ne průmyslové.
Při nesprávném a neodborném využívání, při použití
násilí a při zásazích, které nebyly provedeny našimi
autorizovanými servisními provozovnami, záruční
nároky zanikají. Vaše práva vyplývající ze zákona
touto zárukou nejsou omezena.
Záruční doba se zárukou neprodlouží. Toto platí
také pro náhradní díly a opravené součásti. Případné škody a vady, existující už při koupi, se musí hlásit ihned po vybalení, nejpozději však do dvou dnů
od data nákupu. Po uplynutí záruční doby se provedené opravy musí zaplatit.
KOMPERNASS HANDELS GMBH
BURGSTRASSE 21
44867 BOCHUM
GERMANY
www.kompernass.com
Servis Česko
Tel.: 800143873
E-Mail: kompernass@lidl.cz
IAN 102541
Dostupnost horké linky:
pondělí až pátek 8:00 hod. – 20:00 hod. (SEČ)
- 40 -
Page 44

OBSAH STRANA
Úvod 42
Používanie v súlade s účelom použitia 42
Obsah dodávky 42
Opis prístroja 42
Technické údaje 42
Bezpečnostné pokyny 43
Pred prvým použitím 45
Ovládanie 45
Naplnenie vodou . . . . . . . . . . . . . . . . . . . . . . . . . . . . . . . . . . . . . . . . . . . . . . . . . . . . . . . . . .45
Nasadenie a sňatie nástavca s kefou . . . . . . . . . . . . . . . . . . . . . . . . . . . . . . . . . . . . . . . . . .46
Kefovanie s naparovaním . . . . . . . . . . . . . . . . . . . . . . . . . . . . . . . . . . . . . . . . . . . . . . . . . . . .46
Ošetrovanie šatstva . . . . . . . . . . . . . . . . . . . . . . . . . . . . . . . . . . . . . . . . . . . . . . . . . . . . . . . . .47
Ošetrovanie záclon a čalúnenia . . . . . . . . . . . . . . . . . . . . . . . . . . . . . . . . . . . . . . . . . . . . . .47
Kefa na vlákna . . . . . . . . . . . . . . . . . . . . . . . . . . . . . . . . . . . . . . . . . . . . . . . . . . . . . . . . . . . .47
Žehlenie . . . . . . . . . . . . . . . . . . . . . . . . . . . . . . . . . . . . . . . . . . . . . . . . . . . . . . . . . . . . . . . . . .48
Po použití naparovacej kefy . . . . . . . . . . . . . . . . . . . . . . . . . . . . . . . . . . . . . . . . . . . . . . . . . .48
Čistenie a údržba 49
Odvápňovanie . . . . . . . . . . . . . . . . . . . . . . . . . . . . . . . . . . . . . . . . . . . . . . . . . . . . . . . . . . . .49
Uskladnenie 49
Odstránenie funkčných závad 49
Likvidácia 49
Záruka a servis 50
Dovozca 50
- 41 -
Page 45

NAPAROVACIA KEFA
Úvod
Srdečne vám gratulujeme ku kúpe tohto nového
prístroja.
Rozhodli ste sa tým pre vysokokvalitný výrobok.
Návod na používanie je súčasťou tohto výrobku.
Obsahuje dôležité pokyny týkajúce sa bezpečnosti,
používania a likvidácie zariadenia. Pred používaním
tohto výrobku sa oboznámte so všetkými pokynmi na
ovládanie a bezpečnostnými pokynmi. Výrobok
používajte iba tak, ako je tu opísané a iba v tých
oblastiach použitia, ktoré sú tu uvedené. Pri odovzdávaní výrobku tretej osobe s ním odovzdajte aj
všetky podklady.
Používanie v súlade
s účelom použitia
Opis prístroja
Obrázok A:
1 Nádržka na vodu
2 Plniaci otvor
3 Regulátor teploty
4 Poistka nádoby na vodu
5 Kontrolné svetlo zohrievania
6 Závesné očko
7 Sieťová šnúra so zástrčkou
8 Tlačidlo prúdu pary
9 Stojan
0 Žehliaca plocha
q Poistka nástavca s kefou
w Nástavec s kefou
e Kefa na vlákna
r Kefa na šatstvo
Obrázok B:
t Odmerka
Naparovacia kefa je určená výlučne na vyrovnávanie a odstraňovanie záhybov po pokrčení, vlákien
a vlasov z domácich textílií. Môžete ju používať iba
v uzavretých priestoroch a v súkromných domácnostiach. Všetky ostatné spôsoby použitia sa považujú
za nezodpovedajúce danému určeniu.
Obsah dodávky
Naparovacia kefa
Nástavec s kefou
Odmerná nádobka
Návod na používanie
Technické údaje
Menovité napätie: 220 - 240 V~/ 50 Hz
Výkon: 1000 W
- 42 -
Page 46

Bezpečnostné pokyny
Nebezpečenstvo popálenia!
• Keď je naparovacia kefa horúca, chytajte ju len za držadlo.
• Na deti treba dohliadať, aby sa zabezpečilo, že sa nebudú hrať s prístrojom.
• Nikdy nevkladajte ruku do prúdu pary ani na horúce kovové súčasti.
• Plniaci otvor vodnej nádržky sa nesmie otvárať počas používania. Nechajte
naparovaciu kefu najskôr vychladnúť a vytiahnite sieťovú zástrčku zo sieťovej
zásuvky.
• Nikdy nežehlite časti odevu priamo na tele!
• Nikdy nemierte prúdom pary na iných ľudí ani na zvieratá.
• V žiadnom prípade prístroj nepoužívajte, keď sú na ňom viditeľné poškodenia,
keď spadol alebo z neho vytiekla voda. Najprv ju dajte opraviť kvalifikovanému
odbornému personálu.
• Naparovacia kefa a jej prívodný kábel musia byť pri zapnutí alebo chladnutí
mimo dosahu detí mladších ako 8 rokov.
Pozor! Horúce povrchy!
Hrozí nebezpečenstvo požiaru! Riziko poranenia!
• Nikdy nenechajte horúcu, do elektrickej siete pripojenú alebo zapnutú naparovaciu kefu bez dozoru.
• Naparovaciu kefu odkladajte iba keď je v celkom vychladnutom stave.
• Naparovaciu kefu sa musí používať a odkladať na stabilný podklad.
• Prístroj odkladajte vždy s vyklopeným stojanom len na rovný a voči teplu odolný
podklad. Keď je prístroj odstavený, musí stáť stabilne.
• Žehlite iba pri nastaveniach teploty uvedených v upozorneniach pre ošetrovanie
a určených pre daný materiál. V opačnom prípade môžete textílie poškodiť.
Pokiaľ žiadne upozornenia pre ošetrovanie nepoznáte, začnite s najnižším
nastavením teploty.
• Nikdy nedovoľte deťom používať naparovaciu kefu.
- 43 -
Page 47

Nebezpečenstvo úrazu elektrickým prúdom!
• Napätie sieťového zdroja musí súhlasiť s údajmi na typovom štítku prístroja.
• Pokazený prístroj nechajte ihneď opraviť v kvalifikovanej opravovni alebo sa
obráťte na zákaznícky servis, aby ste sa vyhli možným nebezpečenstvám.
• Poškodenú sieťovú šnúru alebo zástrčku nechajte ihneď vymeniť oprávnenému
odborníkovi alebo v zákazníckom servise, aby ste sa vyhli ohrozeniu zdravia.
• Ťahajte vždy za zástrčku, nikdy nie za kábel samotný.
• Sieťovú šnúru nezalomte a nepricviknite, a umiestnite ju tak, aby neprišla do kontaktu s horúcimi povrchmi a aby na ňu nemohol nikto stúpiť alebo sa o ňu potknúť.
• Pred čistením, pri plnení vodou a po každom použití vytiahnite sieťovú zástrčku.
• Nikdy sa nedotýkajte kábla ani sieťovej zástrčky vlhkými rukami.
• V žiadnom prípade nesmiete prístroj ponárať do kvapaliny a nesmiete ani
dovoliť, aby sa nejaká kvapalina dostala do vnútra prístroja. Prístroj nesmiete
vystaviť vlhkosti ani používať ho na voľnom priestranstve. Ak by do prístroja
predsa vnikla tekutina, vytiahnite okamžite sieťovú zástrčku zo sieťovej zásuvky
a dajte prístroj opraviť kvalifikovanému odbornému personálu.
• Naparovaciu kefu v žiadnom prípade nepoužívajte v blízkosti vody, ktorá sa
nachádza vo vaniach, v sprchách, umývadlách alebo iných nádobách.
Blízkosť vody predstavuje nebezpečenstvo, aj keď je prístroj vypnutý.
• Teleso prístroja nesmiete otvárať. Pokazený prístroj dajte opraviť len kvalifikovanému odborníkovi.
• V žiadnom prípade prístroj nepoužívajte, keď sú na ňom viditeľné poškodenia,
keď spadol alebo z neho vytiekla voda. Najprv ho dajte opraviť kvalifikovanému
odbornému personálu.
• Nikdy nepoužívajte prístroj ďalej, ak je poškodená ochrana pred zalomením!
• Tento prístroj môžu používať deti staršie ako 8 rokov a osoby so zníženými
fyzickými, senzorickými alebo mentálnymi schopnosťami alebo s nedostatkom
skúseností alebo znalostí, len ak sú pod dohľadom alebo boli poučené o
bezpečnom používaní prístroja a z toho vyplývajúcich rizikách, a tieto poučenia
pochopili. Deti sa nesmú hrať s prístrojom. Čistenie a údržbu nesmú robiť deti
bez dohľadu.
- 44 -
Page 48

Pozor!
• Ak údaje na štítkoch na oblečení zakazujú žehlenie (symbol ), nesmiete šaty ošetriť naparovacou kefou. V opačnom prípade by ste mohli
šaty poškodiť.
• Do nádržky na vodu 1 smiete dať výlučne vodu
z vodovodu (alebo destilovanú vodu zmiešanú
s vodou z vodovodu). V opačnom prípade by
ste mohli naparovaciu kefu poškodiť.
• Naparovacia kefa sa nesmie čistiť pomocou rozpúšťadiel, alkoholu alebo abrazívnych čistiacich
prostriedkov. V opačnom prípade by ste ju mohli
poškodiť.
• Zohrievajte parnú kefu niekoľko minút na najvyššom stupni. Tým sa uvoľnia zvyšky z výroby zo
žehliacej plochy 0.
• Niekoľkokrát stlačte tlačidlo prúdu pary 8, aby
para vyšla zo žehliacej plochy 0.
• Potom vyžehlite kus nepotrebnej látky, čím odstránite prípadné nečistoty zo žehliacej plochy 0.
Upozornenie:
Pri prvom zohrievaní prístroja môže dôjsť k miernemu
vzniku zápachu a dymu, čo je spôsobené zvyškami z
výroby. Je to úplne normálne a nie je to nebezpečné.
Zabezpečte dostatočné vetranie, napr. otvorte okno.
Pred prvým použitím
• Vyberte naparovaciu kefu z obalu.
• Odstráňte všetky nálepky a časti fólií z naparovacej kefy.
• Odstráňte ochranný kryt z nástavca s kefou w.
Pozor!
Plastové vrecká môžu byť nebezpečné. Aby ste sa
vyhli riziku zadusenia, uchovávajte plastové vrecká
mimo dosahu bábätiek a malých detí.
Upozornenie:
Pretože sa po výrobe skúša funkčnosť každej parnej
kefy, môže sa stať, že sa vo vodnej nádrži 1 nachádzajú kvapôčky vody.
• Naplňte nádobu na vodu 1 vodou (pozri kapi-
tolu „Naplnenie vodou“).
• Zasuňte sieťovú zástrčku 7 do elektrickej zásuv-
ky, ktorá je nainštalovaná podľa predpisov a
uzemnená.
• Držte naparovaciu kefu vodorovne.
• Nastavte regulátor teploty 3 do polohy „MAX“.
Ovládanie
Prípravu
• Ak údaje na štítkoch na oblečení zakazujú
žehlenie (symbol ), nesmiete šaty ošetriť
naparovacou kefou. V opačnom prípade by ste
mohli šaty poškodiť.
• Neošetrujte kožu, zamat, impregnovaný nábytok
ani látky citlivé na paru. Mohli by ste tým poškodiť
textíliu alebo kus nábytku.
Naplnenie vodou
Pozor!
Do nádržky na vodu 1 dávajte len vodovodnú
vodu alebo destilovanú vodu zmiešanú s vodou z
vodovodu. Do nádržky na vodu 1 nikdy nedávajte
chemické látky, čistiace prostriedky (okrem odvápňovačov), ani iné tekutiny. Nepoužívajte žiadnu chemicky odvápnenú vodu. To vedie k nenapraviteľnému poškodeniu prístroja.
- 45 -
Page 49

Ak je u vás vodovodná voda príliš tvrdá, odporúčame
ju zmiešať s destilovanou vodou. Inak by sa mohli
naparovacie trysky predčasne zaniesť.
Na predĺženie optimálnej funkcie naparovania zmiešajte vodovodnú vodu s destilovanou podľa tabuľky.
Tvrdosť vody
veľmi
mäkká/mäkká
stredná: 1: 1
tvrdá 2: 1
veľmi tvrdá 3: 1
Tvrdosť vody môžete zistiť v miestnej vodárni.
Pomer destilova-
nej vody k
vodovodnej
0
Pozor!
Pred napĺňaním vždy vytiahnite sieťovú zástrčku 7
zo zásuvky! Hrozí nebezpečenstvo úrazu elektrikkým prúdom!
• Vyberte nádobu na vodu 1 zvislo nahor tak, že
posuniete aretáciu 4 nádoby na vodu 1 dozadu, aby sa dala nádoba na vodu 1 zdvihnúť.
Chyťte nádobu na vodu 1 palcom a ukazovákom na vyšrafovaných značkách, aby ste ju
mohli zdvihnúť zvislo nahor. Regulátor teploty 3
zostane v prístroji a nezdvihne sa.
• Otvorte plniaci otvor 2 na nádobe na vodu 1.
• Odmerkou t naplňte vodu z vodovodu do nádoby na vodu 1 nanajvýš po značku „Max“.
• Zatvorte plniaci otvor 2 na nádobe na vodu 1.
Dajte pozor na to, aby výčnelok na plniacom
otvore 2 zapadol do zárezu v kryte. Len tak
sa dá nádoba na vodu 1 správne zatvoriť.
• Znova nasaďte nádobu na vodu 1 na prístroj.
Nádoba na vodu 1 musí počuteľne zaklapnúť
na poistku (aretáciu) nádoby na vodu 4.
Nasadenie a sňatie nástavca s kefou
Pozor!
Nikdy nesnímajte nástavec s kefou w a nikdy ho
nenasadzujte na prístroj, keď je prístroj zohriaty.
Nebezpečenstvo popálenia!
• Ak chcete využiť funkciu naparovania a kefovania,
nasaďte na naparovaciu kefu nástavec s kefou w.
• Za tým účelom zasuňte nástavec s kefou w na
prístroj pozdĺž vedenia až na doraz. Poistka
(aretácia) nástavca s kefou q musí počuteľne
zaklapnúť.
• Ak chcete využiť funkciu žehlenia, dajte nástavec
s kefou w dolu z naparovacej kefy.
• Za tým účelom stlačte poistku q nadol a zároveň
vytiahnite nástavec s kefou w vpred.
Kefovanie s naparovaním
• Nasuňte nástavec s kefou w na prístroj. Nástavec
pritom musí počuteľne zaklapnúť na poistku
nástavca s kefou q.
• Zasuňte sieťovú zástrčku 7 do elektrickej zásuvky,
ktorá je nainštalovaná podľa predpisov a uzemnená.
• Ak chcete vytvoriť paru, dajte regulátor teploty 3
aspoň na stupeň ••• alebo vyšší.
Kontrolné svetlo zohrievania 5 sa rozsvieti.
Len čo sa dosiahne nastavená teplota, zhasne
kontrolné svetlo zohrievania 5.
- 46 -
Page 50

Upozornenie:
Ak chcete použiť funkciu prúdu pary, musíte dať regulátor teploty 3 aspoň na stupeň •••. Na najnižšom stupni nie je teplota dostatočná na to, aby sa
vytvoril prúd pary.
• Keď stlačíte tlačidlo prúdu pary 8, môžete
vytvoriť prúd pary.
Upozornenie:
Môže sa stať, že pri pokuse o prvý výstup pary po
zohratí budete musieť niekoľkokrát po sebe stlačiť tlačidlo prúdu pary 8.
Prístroj je teraz pripravený na prácu.
Pozor!
Naparovaciu kefu možno použiť na všetky druhy
ošatenia. Opatrne treba postupovať pri látkach,
ktoré sú citlivé na teplo, ako sú syntetické materiály,
polyamid alebo umelý hodváb. Ak ide o takéto materiály, mali by ste si najprv overiť na mieste, ktoré
nie je vidieť (napr. vnútorná strana lemu), či horúca
para nepoškodí tento materiál. Týchto materiálov sa
nedotýkajte priamo horúcou žehliacou plochou 0.
Použite len prúd pary.
Ošetrovanie šatstva
• Zaveste pokrčený kus bielizne na ramienko na šaty.
• Jednou rukou potiahnite bielizeň, aby bola rovná
a naparte ju zhora nadol. Kombinácia pary
a kefy na šatstvo r jemne odstráni všetky záhyby.
• Vyviňte mierny tlak kefou na šatstvo r a pohy-
bujte prístrojom zhora nadol po bielizni. Pritom môžete tlačidlo prúdu pary 8 stláčať v krátkych
intervaloch.
Upozornenie:
Tlačidlo prúdu pary 8 stláčajte len dovtedy, kým svieti
kontrolné svetlo zohrievania 5 alebo kým kvapká
voda zo žehliacej plochy 0.
Predtým než znova použijete prúd pary, vyčkajte, kým
zhasne kontrolné svetlo zohrievania 5.
• Ak sa počas prevádzky rozsvieti kontrolka vyhrievania 5, nestlačte ešte raz tlačidlo rázu pary 8.
Než stlačíte znovu tlačidlo rázu pary 8, vyčkajte
chvíľu, než kontrolka vyhrievania 5 opäť zhasne.
Upozornenie:
Ak by ste stlačili tlačidlo prúdu pary 8 vtedy, keď
svieti kontrolné svetlo zohrievania 5, namiesto
pary by vznikla kondenzovaná voda a táto voda
by kvapkala zo žehliacej plochy 0.
• Skôr než si kusy šatstva oblečiete, nechajte ich
vychladnúť na vešiaku.
Ošetrovanie záclon a čalúnenia
• Sklady a záhyby môžete odstrániť zo súkna tak,
že ho prevesíte cez tyč.
• Riaďte sa pritom jednoducho pokynmi uvedenými
v bode „Ošetrovanie šatstva”.
• Vždy urobte najprv skúšku na nejakom mieste,
ktoré nie je vidieť.
• Ak prístroj používate vodorovne, podržte ho
z času na čas zvislo, aby sa zachoval maximálny
výkon naparovania.
Kefa na vlákna
• Nitky, vlákna a vlasy môžete jednoducho odstrániť
červenou kefou na vlákna e tak, že ňou budete
pomaly prechádzať po šatách zľava doprava.
• Kefu na vlákna e môžete vyčistiť takým spôsobom,
že ňou budete kefovať v opačnom smere (sprava doľava), napr. po zvyškoch látky.
- 47 -
Page 51

Žehlenie
• Dajte nástavec s kefou w dolu z prístroja (pozri
„Nasadenie a sňatie nástavca s kefou“).
• Prístroj pripojte iba do takej zásuvky, ktorá je
nainštalovaná a uzemnená podľa predpisov.
• Nastavte regulátor teploty 3 podľa medziná-
rodných symbolov s bodkami (štítky na odevoch)
alebo podľa druhu látky. Kontrolné svetlo zohrievania 5 sa rozsvieti. Len čo sa dosiahne nastavená
teplota, zhasne kontrolné svetlo zohrievania 5.
• Tlačidlo prúdu pary 8 stláčajte len dovtedy, kým
svieti kontrolné svetlo zohrievania 5 alebo kým
kvapká voda zo žehliacej plochy 0. Predtým než
znova použijete prúd pary, vyčkajte, kým zhasne
kontrolné svetlo zohrievania 5.
Upozornenie:
Ak by ste stlačili tlačidlo prúdu pary 8 vtedy, keď
svieti kontrolné svetlo zohrievania 5, namiesto
pary by vznikla kondenzovaná voda a táto voda
by kvapkala zo žehliacej plochy 0.
Štítok na
šatstve
Druh látky Regulátor
teploty 3
Chemické vlák-
na, napr. viskó-
za, polyester
(nízka teplota)
•
••
Hodváb, vlna
(stredná
teplota)
•••
Bavlna, ľan
Upozornenie:
V prípade pochybností začnite pri nižšej teplote
a potom ju pomaly zvyšujte. V prípade citlivých
látok odporúčame najprv urobiť skúšku žehlenia
na nejakom mieste, ktoré nie je vidieť (napr. vnútorná
hrana lemu).
• Ak je bielizeň veľmi zhúžvaná, môžete použiť
funkciu naparovania a stlačiť tlačidlo prúdu pary
8. Na výrobu pary musí byť regulátor teploty 3
nastavený aspoň na stupeň ••• alebo vyšší.
• Ak sa počas prevádzky rozsvieti kontrolné svetlo
zohrievania 5, pusťte tlačidlo prúdu pary 8
a vyčkajte chvíľu, kým kontrolné svetlo zohrievania 5 znova nezhasne.
(vysoká teplota)
Ak sa počas práce minie voda v nádobe na vodu 1,
vytiahnite sieťovú zástrčku 7 predtým než vodu
doplníte.
• Ak chcete prístroj počas prevádzky nakrátko
odložiť, vyklopte stojan 9 dopredu a postavte
prístroj naň. Ak chcete prístroj znova používať,
sklopte stojan 9 znova dozadu.
Po použití naparovacej kefy
• Nastavte regulátor teploty 3 do polohy „MIN“.
• Po použití vždy vytiahnite sieťovú zástrčku 7 zo
zásuvky.
• Vylejte zvyšnú vodu z nádoby na vodu 1 tak,
že otvoríte plniaci otvor 2 nádoby na vodu 1,
prístroj otočíte a zľahka ním pokývete.
- 48 -
Page 52

Čistenie a údržba
Odstránenie funkčných závad
Riziko poranenia!
Pred čistením vytiahnite sieťovú zástrčku 7.
Hrozí nebezpečenstvo úrazu elektrickým prúdom!
Nechajte prístroj vychladnúť. Nebezpečenstvo
popálenia!
Pozor!
Nepoužívajte žiadne agresívne čistiace prostriedky.
Mohli by poškodiť povrchové časti prístroja.
• Teleso čistite len mäkkou, suchou utierkou.
• Na čistenie kovových súčastí použite látku mierne
navlhčenú vodou a mierny, neabrazívny čistiaci
prostriedok.
Odvápňovanie
Ak po určitom čase dôjde k poklesu naparovacieho
výkonu, odvápnite naparovaciu kefu.
• Na odvápnenie použite bežne dostupné odvápňovacie prostriedky z kyseliny citrónovej.
Postupujte podľa návodu k odvápňovaču.
Uskladnenie
Pozor!
Pred odložením prístroja vytiahnite sieťovú zástrčku 7
a nechajte prístroj vychladnúť.
Hrozí nebezpečenstvo požiaru!
Prístroj uskladnite na suchom mieste. Prístroj môžete
aj zavesiť za závesné očko 6.
Naparovacia kefa nevypúšťa žiadnu alebo
len málo pary:
Minula sa zásoba vody v naparovacej kefe. Naplňte
vodou nádobu na vodu 1 (pozri časť „Napĺňanie
vodou“).
Naparovacia kefa sa nezohreje:
Prístroj nie je pripojený do elektrickej siete. Zasuňte
sieťovú zástrčku 7 do zásuvky a nastavte regulátor
teploty 3 na požadovanú teplotu.
Naparovacia kefa je pokazená. Dajte prístroj opraviť
kvalifikovanému odborníkovi.
Sieťová zásuvka je pokazená. Vyskúšajte inú sieťovú
zásuvku.
Likvidácia
Prístroj v žiadnom prípade nevyhadzujte do normálneho domového odpadu.
Tento výrobok podlieha európskej
smernici 2012/19/EU.
Zlikvidujte prístroj v príslušnom zariadení (firme)
na likvidáciu odpadu.
Dodržte aktuálne platné predpisy. V prípade
pochybností sa obráťte na zariadenia na likvidáciu
odpadu.
Všetok baliaci materiál zlikvidujte
ekologickým spôsobom.
- 49 -
Page 53

Záruka a servis
Na tento prístroj máte 3 ročnú záruku od dátumu
nákupu. Prístroj bol starostlivo vyrobený a pred expedíciou dôkladne vyskúšaný.
Uschovajte si, prosím, účtenku ako dôkaz o nákupe.
V prípade uplatňovania záruky sa spojte s opravovňou telefonicky. Len tak sa dá zabezpečiť bezplatné
zaslanie tovaru.
Záruka platí len na chyby materiálu a výroby, nie
na poškodenia spôsobené prepravou, opotrebením
ani na poškodenia krehkých častí, ako sú spínače
alebo akumulátory. Výrobok je určený výlučne na
súkromné používanie a nie na komerčné účely.
Záruka prestáva platiť pri zaobchádzaní nezodpovedajúcom účelu, pri neprimeranom zaobchádzaní,
pri používaní násilia a pri zásahoch, ktoré neurobil
nami autorizovaný servis. Práva vyplývajúce zo zákona nie sú touto zárukou obmedzené.
Záručná doba sa nepredlžuje o dobu trvania záručných opráv. To platí aj na vymenené alebo opravené
diely. Prípadné poškodenia a nedostatky zistené už
pri nákupe musíte ohlásiť ihneď po vybalení, najneskoršie však do dvoch dní od dátumu zakúpenia. V prípade opráv spadajúcich do obdobia po uplynutí záručnej doby ste povinní uhradiť vzniknuté náklady.
Servis Slovensko
Tel.: 0850 232001
E-Mail: kompernass@lidl.sk
IAN 102541
Dostupnosť hotline:
pondelok až piatok od 8:00 hod. - 20:00 hod.
(SEČ)
Dovozca
KOMPERNASS HANDELS GMBH
BURGSTRASSE 21
44867 BOCHUM
GERMANY
www.kompernass.com
- 50 -
Page 54

INHALTSVERZEICHNIS SEITE
Einleitung 52
Bestimmungsgemäßer Gebrauch 52
Lieferumfang 52
Gerätebeschreibung 52
Technische Daten 52
Sicherheitshinweise 53
Vor dem ersten Gebrauch 55
Bedienen 55
Wasser einfüllen . . . . . . . . . . . . . . . . . . . . . . . . . . . . . . . . . . . . . . . . . . . . . . . . . . . . . . . . . . .55
Bürstenaufsatz aufsetzen/abnehmen . . . . . . . . . . . . . . . . . . . . . . . . . . . . . . . . . . . . . . . . . . .56
Dampfbürstenfunktion . . . . . . . . . . . . . . . . . . . . . . . . . . . . . . . . . . . . . . . . . . . . . . . . . . . . . . .56
Kleiderpflege . . . . . . . . . . . . . . . . . . . . . . . . . . . . . . . . . . . . . . . . . . . . . . . . . . . . . . . . . . . . . .57
Gardinen- und Polsterpflege . . . . . . . . . . . . . . . . . . . . . . . . . . . . . . . . . . . . . . . . . . . . . . . . . .57
Fusselbürste . . . . . . . . . . . . . . . . . . . . . . . . . . . . . . . . . . . . . . . . . . . . . . . . . . . . . . . . . . . . . . .57
Bügelfunktion . . . . . . . . . . . . . . . . . . . . . . . . . . . . . . . . . . . . . . . . . . . . . . . . . . . . . . . . . . . . . .58
Nach dem Gebrauch der Dampfbürste . . . . . . . . . . . . . . . . . . . . . . . . . . . . . . . . . . . . . . . . .58
Reinigen und Pflegen 59
Entkalken . . . . . . . . . . . . . . . . . . . . . . . . . . . . . . . . . . . . . . . . . . . . . . . . . . . . . . . . . . . . . . . . .59
Aufbewahren 59
Fehlfunktionen beseitigen 59
Entsorgen 59
Garantie und Service 60
Importeur 60
- 51 -
Page 55

DAMPFBÜRSTE
Einleitung
Herzlichen Glückwunsch zum Kauf Ihres neuen
Gerätes.
Sie haben sich damit für ein hochwertiges Produkt
entschieden. Die Bedienungsanleitung ist Bestandteil dieses Produkts. Sie enthält wichtige Hinweise
für Sicherheit, Gebrauch und Entsorgung. Machen
Sie sich vor der Benutzung des Produkts mit allen
Bedien- und Sicherheitshinweisen vertraut. Benutzen
Sie das Produkt nur wie beschrieben und für die angegebenen Einsatzbereiche. Händigen Sie alle
Unterlagen bei Weitergabe des Produkts an Dritte
mit aus.
Bestimmungsgemäßer
Gebrauch
Gerätebeschreibung
Abbildung A:
1 Wassertank
2 Einfüllöffnung
3 Temperaturregler
4 Entriegelung für den Wassertank
5 Aufheizkontrollleuchte
6 Aufhängeöse
7 Netzkabel mit Netzstecker
8 Dampfstoßtaste
9 Ständer
0 Bügelsohle
q Entriegelung für den Bürstenaufsatz
w Bürstenaufsatz
e Fusselbürste
r Kleiderbürste
Abbildung B:
t Messbecher
Die Dampfbürste ist ausschließlich zum Glätten und
Entfernen von Knitterfalten, Fusseln und Haaren auf
Heimtextilien bestimmt. Sie dürfen sie nur innerhalb
geschlossener Räume und in privaten Haushalten
verwenden. Alle anderen Verwendungen gelten als
nicht bestimmungsgemäß.
Lieferumfang
Dampfbürste
Bürstenaufsatz
Messbecher
Bedienungsanleitung
Technische Daten
Nennspannung: 220 - 240 V ~ / 50 Hz
Leistung: 1000 W
- 52 -
Page 56

Sicherheitshinweise
Verbrennungsgefahr!
• Fassen Sie das Gerät nur am Griff an, wenn es heiß ist.
• Kinder sollten beaufsichtigt werden, um sicherzustellen, dass sie nicht mit dem
Gerät spielen.
• Halten Sie niemals Ihre Hände in den Dampfstoß oder an heiße Metallteile.
• Sie dürfen die Einfüllöffnung für den Wassertank während des Gebrauchs
nicht öffnen. Lassen Sie das Gerät zunächst abkühlen und ziehen Sie den
Netzstecker aus der Netzsteckdose.
• Bügeln Sie nie Kleidungsstücke direkt am Körper!
• Richten Sie den Dampfstrahl nie gegen andere Personen oder Tiere.
• Benutzen Sie das Gerät auf keinen Fall, wenn es sichtbare Beschädigungen
aufweist, heruntergefallen ist, oder Wasser ausläuft. Lassen Sie es erst von qualifiziertem Fachpersonal reparieren.
•Die Dampfbürste und dessen Anschlussleitung muss während des Einschaltens oder
Abkühlens außer Reichweite von Kindern sein, die jünger als 8 Jahre alt sind.
Achtung! Heiße Oberfläche!
Brandgefahr! Verletzungsgefahr!
•Lassen Sie die heiße, am Stromnetz angeschlossene oder eingeschaltete
Dampfbürste niemals unbeaufsichtigt.
• Verstauen Sie das Gerät nur im abgekühlten Zustand.
• Das Gerät muss auf einer stabilen Oberfläche benutzt und abgestellt werden.
• Legen Sie das Gerät nur mit ausgeklapptem Ständer auf einen ebenen und hitzeunempfindlichen Untergrund. Das Gerät muss stabil stehen, wenn es abgestellt wird.
• Bügeln Sie nur mit den auf den Pflegehinweisen angegebenen und für das Material geeigneten Temperatureinstellungen. Sie können die Textilien andernfalls
beschädigen. Falls Sie keine Pflegehinweise kennen, beginnen Sie mit der niedrigsten Temperatureinstellung.
• Lassen Sie niemals Kinder die Dampfbürste benutzen.
- 53 -
Page 57

Gefahr durch elektrischen Schlag!
• Die Spannung der Stromquelle muss mit den Angaben auf dem Typenschild
des Gerätes übereinstimmen.
• Lassen Sie ein defektes Gerät umgehend von einer qualifizierten Fachwerkstatt
instandsetzen, oder wenden Sie sich an den Kundenservice, um Gefährdungen
zu vermeiden.
• Lassen Sie beschädigte Netzstecker oder Netzkabel sofort von autorisiertem Fachpersonal oder dem Kundenservice austauschen, um Gefährdungen zu vermeiden.
• Ziehen Sie immer nur am Netzstecker, niemals am Kabel.
• Knicken oder quetschen Sie das Netzkabel nicht und verlegen Sie es so, dass
es nicht in Kontakt mit heißen Oberflächen kommt und niemand darauf treten
oder darüber stolpern kann.
• Ziehen Sie vor dem Reinigen, beim Auffüllen mit Wasser und nach jedem
Gebrauch den Netzstecker.
• Fassen Sie das Kabel oder den Netzstecker niemals mit feuchten Händen an.
• Sie dürfen das Gerät keinesfalls in eine Flüssigkeit tauchen und keine Flüssigkeiten in das Gerätegehäuse gelangen lassen. Sie dürfen das Gerät keiner
Feuchtigkeit aussetzen und nicht im Freien benutzen. Falls doch einmal Flüssigkeit in das Gerätegehäuse gelangt, ziehen Sie sofort den Netzstecker des
Geräts aus der Netzsteckdose und lassen Sie es von qualifiziertem Fachpersonal
reparieren.
• Benutzen Sie das Gerät keinesfalls in der Nähe von Wasser, das in Badewannen,
Duschen, Waschbecken oder anderen Gefäßen enthalten ist. Die Nähe von
Wasser stellt eine Gefahr dar, auch wenn das Gerät ausgeschaltet ist.
• Sie dürfen das Gerätegehäuse nicht öffnen. Lassen Sie das defekte Gerät nur
von qualifiziertem Fachpersonal reparieren.
• Benutzen Sie das Gerät auf keinen Fall, wenn es sichtbare Beschädigungen
aufweist, heruntergefallen ist, oder Wasser ausläuft. Lassen Sie es erst von
qualifiziertem Fachpersonal reparieren.
• Benutzen Sie das Gerät nicht weiter, wenn der Knickschutz am Netzkabel
beschädigt ist!
• Dieses Gerät kann von Kindern ab 8 Jahren und älter und von Personen mit
reduzierten physischen, sensorischen oder mentalen Fähigkeiten oder Mangel
an Erfahrung und/oder Wissen benutzt werden, wenn sie beaufsichtigt oder
bezüglich des sicheren Gebrauchs des Gerätes unterwiesen wurden und die
daraus resultierenden Gefahren verstanden haben. Kinder dürfen nicht mit
dem Gerät spielen. Reinigung und Benutzer-Wartung dürfen nicht durch Kinder
ohne Beaufsichtigung durchgeführt werden.
- 54 -
Page 58

Achtung!
• Falls die Pflegehinweise in der Kleidung das
Bügeln untersagen (Symbol ), dürfen Sie das
Kleidungsstück nicht mit der Dampfbürste behandeln. Sie könnten das Kleidungsstück andernfalls
beschädigen.
• Sie dürfen ausschließlich Leitungswasser (oder
destilliertes Wasser mit Leitungswasser gemischt)
in den Wassertank 1 einfüllen. Andernfalls beschädigen Sie das Gerät.
• Sie dürfen das Gerät nicht mit Lösungsmitteln,
Alkohol oder scheuernden Reinigungsmitteln säubern. Andernfalls könnten Sie es beschädigen.
Vor dem ersten Gebrauch
• Entnehmen Sie die Dampfbürste aus der
Verpackung.
• Entfernen Sie alle evtl. Aufkleber und Folienteile
von der Dampfbürste.
• Entfernen Sie die Schutzkappe vom Bürstenaufsatz w.
Achtung!
Plastiktüten können eine Gefahr darstellen. Um
Erstickungsgefahr zu vermeiden, bewahren Sie die
Plastiktüten außerhalb der Reichweite von Babys
und Kleinkindern auf.
Hinweis:
Da jede Dampfbürste nach der Herstellung auf
Funktionalität geprüft wird, kann es passieren, dass
sich Wassertropfen im Wassertank 1 befinden.
• Füllen Sie Wasser in den Wassertank 1 (siehe
Kapitel „Wasser einfüllen“).
• Stecken Sie den Netzstecker 7 in eine vorschrifts-
mäßig installierte und geerdete Netzsteckdose.
• Halten Sie die Dampfbürste waagerecht.
• Stellen Sie den Temperaturregler 3 auf die
Position „MAX“.
• Heizen Sie die Dampfbürste einige Minuten auf
der höchsten Stufe auf. Dadurch lösen sich fertigungsbedingte Rückstände von der Bügelsohle 0.
• Betätigen Sie die Dampfstoßtaste 8 einige
Male, so dass Dampf aus der Bügelsohle 0
austritt.
• Bügeln Sie dann ein nicht mehr benötigtes Stück
Stoff, um eventuelle Unreinheiten von der
Bügelsohle 0 zu beseitigen.
Hinweis:
Beim erstmaligen Aufheizen des Gerätes kann es
durch fertigungsbedingte Rückstände zu leichter
Rauch- und Geruchsentwicklung kommen. Das ist
normal und völlig ungefährlich. Sorgen Sie für ausreichende Belüftung, öffnen Sie zum Beispiel ein
Fenster.
Bedienen
Hinweise
• Falls die Pflegehinweise in der Kleidung das
Bügeln untersagen (Symbol ), dürfen Sie das
Kleidungsstück nicht mit der Dampfbürste behandeln. Sie könnten das Kleidungsstück andernfalls
beschädigen.
• Behandeln Sie kein Leder, Samt, imprägnierte
Möbel oder dampfempfindliche Stoffe. Sie
könnten die Textilie/das Möbelstück anderenfalls beschädigen.
Wasser einfüllen
Achtung!
Füllen Sie ausschließlich Leitungswasser oder
destilliertes Wasser mit Leitungswasser gemischt in
den Wassertank 1. Befüllen Sie den Wassertank 1
niemals mit chemischen Substanzen, Reinigungsmitteln – mit Ausnahme von Entkalkungsmittel – oder
andere Flüssigkeiten. Verwenden Sie kein chemisch entkalktes Wasser. Dies kann zu irreparablen Schäden
am Gerät führen.
- 55 -
Page 59

Sollte das Leitungswasser Ihres Wohnortes zu hart
sein, empfiehlt es sich, das Leitungswasser mit destilliertem Wasser zu mischen. Ansonsten können die
Düsen für die Dampfstoß-Funktion vorzeitig verkalken.
Zur Verlängerung der optimalen DampfstoßFunktion mischen Sie das Leitungswasser mit
destilliertem Wasser entsprechend der Tabelle.
Anteil destillier-
Wasserhärte
sehr
weich/weich
tes Wasser zu
Leitungswasser
0
• Verschließen Sie die Einfüllöffnung 2 am Wassertank 1. Achten Sie darauf, dass die Nase an der
Einfüllöffnung 2 in die Kerbe am Deckel greift.
Nur so ist der Wassertank 1 richtig verschlossen.
• Setzen Sie den Wassertank 1 wieder auf das
Gerät. Der Wassertank 1 muss hörbar an der
Entriegelung für den Wassertank 4 einrasten.
Bürstenaufsatz aufsetzen/abnehmen
Achtung!
Nehmen Sie niemals den Bürstenaufsatz w ab und
stecken Sie ihn niemals an das Gerät, wenn das
Gerät aufgeheizt ist. Verbrennungsgefahr!
mittel 1 : 1
hart 2 : 1
sehr hart 3 : 1
Die Wasserhärte können Sie beim örtlichem
Wasserwerk erfragen.
Achtung!
Ziehen Sie vor dem Befüllen immer den Netzstecker 7
aus der Netzsteckdose! Es besteht die Gefahr
eines elektrischen Schlages!
• Nehmen Sie den Wassertank 1 senkrecht nach
oben ab, indem Sie die Entriegelung 4 für den
Wassertank 1 nach hinten schieben, bis sich der
Wassertank 1 abheben lässt. Umfassen Sie den
Wassertank 1 mit Daumen und Zeigefinger an
den schraffierten Markierungen, um ihn senkrecht
nach oben abzuheben. Der Temperaturregler 3
verbleibt am Gerät und wird nicht mit abgehoben.
• Öffnen Sie die Einfüllöffnung 2 am Wassertank 1.
• Füllen Sie mit dem Messbecher t Leitungswasser
bis höchstens zur „Max“-Markierung in den
Wassertank 1.
• Um die Dampf- und Bürstenfunktion zu nutzen,
setzen Sie bitte den Bürstenaufsatz w auf die
Dampfbürste.
• Schieben Sie hierzu den Bürstenaufsatz w entlang der Führung bis zum Anschlag auf das
Gerät. Die Entriegelung des Bürstenaufsatzes q
muss hörbar einrasten.
• Um die Bügelfunktion zu nutzen, entfernen Sie
bitte den Bürstenaufsatz w von der Dampfbürste.
• Drücken Sie hierzu die Entriegelung q nach unten
und ziehen den Bürstenaufsatz w gleichzeitig
nach vorne ab.
Dampfbürstenfunktion
• Stecken Sie den Bürstenaufsatz w auf das
Gerät. Dieser muss hörbar an der Entriegelung
für den Bürstenaufsatz q einrasten.
• Stecken Sie den Netzstecker 7 in eine vor-
schriftsmäßig installierte und geerdete Netzsteckdose.
• Um Dampf zu erzeugen, stellen Sie den Temperaturregler 3 mindestens auf ••• oder höher.
Die Aufheizkontrollleuchte 5 leuchtet. Sobald
die eingestellte Temperatur erreicht ist, erlischt
die Aufheizkontrollleuchte 5.
- 56 -
Page 60

Hinweis:
Stellen Sie für die Dampfstoßfunktion den Temperaturregler 3 mindestens auf ••• . Auf niedrigeren
Stufen ist die Temperatur nicht ausreichend, um
einen Dampfstoß zu erzeugen.
• Durch Drücken der Dampfstoßtaste 8, können
Sie nun einen Dampfstoß erzeugen.
Hinweis:
Um den ersten Dampfstoß nach dem Aufheizen
auszulösen, kann es sein, dass Sie mehrere Male
hintereinander die Dampfstoßtaste 8 drücken
müssen.
Das Gerät ist betriebsbereit.
Achtung!
Die Dampfbürste kann bei allen Kleidungsstücken
angewendet werden. Vorsicht ist geboten bei
hitzeempfindlichen Stoffen wie synthetischen Materialien, Polyamid oder Kunstseide. Bei diesen Materialien sollten Sie vorher an einer nicht sichtbaren
Stelle (Sauminnenseite) sicher stellen, dass der
heiße Dampf das Material nicht beschädigt.
Berühren Sie diese Materialien nicht direkt mit der
heißen Bügelsohle 0. Wenden Sie nur den Dampf-
stoß an.
Kleiderpflege
• Hängen Sie das verknitterte Wäschestück auf
einen Kleiderbügel.
• Ziehen Sie mit einer Hand das Wäschestück
flach, bedampfen Sie es von oben nach unten.
Die Kombination von Dampf und Kleiderbürste r
entfernt sanft alle Falten.
• Üben Sie leichten Druck mit der Kleiderbürste r
aus und bewegen Sie das Gerät von oben nach
unten über das Wäschestück. Sie können dabei
die Dampfstoßtaste 8 in kurzen Abständen
drücken.
Hinweis:
Drücken Sie die Dampfstoßtaste 8 nur so oft hintereinander, bis die Aufheizkontrollleuchte 5 aufleuchtet, oder Wasser aus der Bügelsohle 0 tropft.
Warten Sie, bis die Aufheizkontrollleuchte 5 er-
lischt, bevor Sie einen weiteren Dampfstoß tätigen.
• Leuchtet die Aufheizkontrollleuchte 5 während
des Betriebes auf, drücken Sie nicht noch einmal
die Dampfstoßtaste 8. Warten Sie einige Augenblicke, bis die Aufheizkontrollleuchte 5 wieder
erlischt, bevor Sie die Dampfstoßtaste 8 erneut
drücken.
Hinweis:
Wenn Sie die Dampfstoßtaste 8 drücken, während
die Aufheizkontrollleuchte 5 leuchtet, entsteht
Kondenswasser anstatt Dampf und Wasser tropft
aus der Bügelsohle 0.
• Lassen Sie Kleidungsstücke auf einem Kleiderbügel abkühlen, bevor Sie sie tragen.
Gardinen- und Polsterpflege
• Falten und Knitter können aus Tuchwaren entfernt
werden, indem man sie über eine Stange hängt.
• Folgen Sie einfach den Anweisungen unter dem
Punkt “Kleiderpflege”.
• Führen Sie immer erst einen Test an einer nicht
sichtbaren Stelle durch.
• Wenn Sie das Gerät waagerecht benutzen,
halten Sie es ab und zu senkrecht, um eine
maximale Dampfleistung zu erhalten.
Fusselbürste
• Fäden, Fussel und Haare können mit der roten
Fusselbürste e einfach entfernt werden, indem
Sie langsam von links nach rechts über die Kleidung bürsten.
• Sie können die Fusselbürste e reinigen, wenn
Sie in die entgegengesetzte Richtung bürsten
(von rechts nach links), z.B. über Stoffreste.
- 57 -
Page 61

Bügelfunktion
• Entfernen Sie den Bürstenaufsatz w vom Gerät
(siehe “Bürstenaufsatz aufsetzen/abnehmen”).
• Schließen Sie das Gerät an eine vorschriftsmäßig installierte und geerdete Netzsteckdose an.
• Stellen Sie den Temperaturregler 3 nach den
internationalen Punktsymbolen (Wäscheetikett)
oder nach Gewebeart ein. Die Aufheizkontrollleuchte 5 leuchtet. Sobald die eingestellte Temperatur erreicht ist, erlischt die Aufheizkontrollleuchte 5.
Wäsche-
etikett
Gewebe
art
Chemiefaser
z.B. Viskose,
Polyester
Temperatur-
regler 3
•
(niedrige
Temperatur)
••
Seide, Wolle
Baumwolle,
Leinen
Hinweis:
Im Zweifelsfall beginnen Sie mit einer niedrigen
Temperatur und steigern diese dann zu einer hohen
Temperatur. Bei empfindlichen Stoffen empfehlen
wir, an einer nicht sichtbaren Stelle (Sauminnenseite) eine Bügelprobe durchzuführen.
• Sie können bei stark verknitterter Wäsche die
Dampffunktion durch Drücken der Dampfstoßtaste 8 benutzen. Um den Dampf zu erzeugen,
muss der Temperaturregler 3 mindestens auf
••• oder höher stehen.
• Leuchtet die Aufheizkontrollleuchte 5 während
des Betriebes auf, drücken Sie nicht noch einmal
die Dampfstoßtaste 8 und warten Sie einige
Augenblicke, bis die Aufheizkontrollleuchte 5
wieder erlischt.
(mittlere
Temperatur)
•••
(hohe
Temperatur)
• Drücken Sie die Dampfstoßtaste 8 nur so oft
hintereinander, bis die Aufheizkontrollleuchte 5
aufleuchtet, oder Wasser aus der Bügelsohle 0
tropft. Warten Sie, bis die Aufheizkontrollleuchte 5
erlischt, bevor Sie einen weiteren Dampfstoß
tätigen.
Hinweis:
Wenn Sie die Dampfstoßtaste 8 drücken, während
die Aufheizkontrollleuchte 5 leuchtet, entsteht Kondenswasser anstatt Dampf und Wasser tropft aus
der Bügelsohle 0.
Sollte während des Arbeitens das Wasser im Wassertank 1 leer sein, ziehen Sie den Netzstecker 7,
bevor Sie wieder Wasser einfüllen.
• Wenn Sie das Gerät während des Betriebes kurz
ablegen wollen, klappen Sie den Ständer 9
nach vorne und stellen Sie das Gerät darauf ab.
Wenn Sie das Gerät wieder benutzen wollen,
klappen Sie den Ständer 9 wieder nach hinten.
Nach dem Gebrauch der Dampfbürste
• Stellen Sie den Temperaturregler 3 auf die
Position „MIN“.
• Ziehen Sie nach dem Gebrauch immer den
Netzstecker 7 aus der Netzsteckdose.
• Gießen Sie verbliebenes Wasser aus dem Wassertank 1, indem Sie die Einfüllöffnung 2 des
Wassertankes 1 öffnen, das Gerät umdrehen
und leicht schwenken.
- 58 -
Page 62

Reinigen und Pflegen
Fehlfunktionen beseitigen
Verletzungsgefahr!
Ziehen Sie vor der Reinigung den Netzstecker 7.
Es besteht die Gefahr eines elektrischen Schlages!
Lassen Sie das Gerät abkühlen. Verbrennungsgefahr!
Vorsicht!
Benutzen Sie keine aggressiven Reinigungsmittel.
Diese können die Oberflächen beschädigen.
• Reinigen Sie das Gehäuse nur mit einem
weichen, trockenem Tuch.
• Reinigen Sie die Metallteile mit einem leicht mit
Wasser befeuchtetem Tuch und einem milden,
nicht scheuerndem Reinigungsmittel.
Entkalken
Sollte die Dampfleistung nach einiger Zeit nachlassen, entkalken Sie die Dampfbürste.
• Benutzen Sie zum Entkalken ein handelsübliches
Entkalkungsmittel auf Zitronensäurebasis. Gehen
Sie nach der Anleitung des Entkalkers vor.
Aufbewahren
Die Dampfbürste stößt keinen oder sehr
wenig Dampf aus:
Der Vorrat an Wasser in der Dampfbürste ist
erschöpft. Füllen Sie den Wassertank 1 mit
Wasser (siehe „Wasser einfüllen“).
Die Dampfbürste erhitzt sich nicht:
Das Gerät ist nicht angeschlossen. Stecken Sie den
Netzstecker 7 in die Netzsteckdose und stellen mit
dem Temperaturregler 3 die gewünschte Temperatur ein.
Die Dampfbürste ist defekt. Lassen Sie das Gerät
von qualifiziertem Fachpersonal reparieren.
Die Netzsteckdose ist defekt. Probieren Sie eine andere Netzsteckdose aus.
Entsorgen
Werfen Sie das Gerät keinesfalls in den
normalen Hausmüll. Dieses Produkt
unterliegt der europäischen Richtlinie
2012/19/EU.
Achtung!
Ziehen Sie den Netzstecker 7 und lassen Sie das
Gerät abkühlen, bevor Sie es verstauen.
Brandgefahr!
Bewahren Sie das Gerät an einem trockenem Ort
auf. Sie können das Gerät an der Aufhängeöse 6
aufhängen.
Entsorgen Sie das Gerät über einen zugelassenen
Entsorgungsbetrieb oder über Ihre kommunale
Entsorgungseinrichtung.
Beachten Sie die aktuell geltenden Vorschriften.
Setzen Sie sich im Zweifelsfall mit Ihrer Entsorgungseinrichtung in Verbindung.
Führen Sie alle Verpackungsmaterialien
einer umweltgerechten Entsorgung zu.
- 59 -
Page 63

Garantie und Service
Sie erhalten auf dieses Gerät 3 Jahre Garantie ab
Kaufdatum. Das Gerät wurde sorgfältig produziert
und vor Anlieferung gewissenhaft geprüft.
Bitte bewahren Sie den Kassenbon als Nachweis
für den Kauf auf. Bitte setzen Sie sich im Garantiefall mit Ihrer Servicestelle telefonisch in Verbindung.
Nur so kann eine kostenlose Einsendung Ihrer Ware
gewährleistet werden.
Die Garantieleistung gilt nur für Material- oder
Fabrikationsfehler, nicht aber für Transportschäden,
Verschleißteile oder für Beschädigungen an zerbrechlichen Teilen, z. B. Schalter oder Akkus. Das
Produkt ist lediglich für den privaten und nicht für
den gewerblichen Gebrauch bestimmt.
Bei missbräuchlicher und unsachgemäßer Behandlung, Gewaltanwendung und bei Eingriffen, die
nicht von unserer autorisierten Service-Niederlassung vorgenommen wurden, erlischt die Garantie.
Ihre gesetzlichen Rechte werden durch diese
Garantie nicht eingeschränkt.
Die Garantiezeit wird durch die Gewährleistung
nicht verlängert. Dies gilt auch für ersetzte und reparierte Teile. Eventuell schon beim Kauf vorhandene
Schäden und Mängel müssen sofort nach dem
Auspacken gemeldet werden, spätestens aber zwei
Tage nach Kaufdatum. Nach Ablauf der Garantiezeit anfallende Reparaturen sind kostenpflichtig.
Service Deutschland
Tel.: 0800 5435 111
(Kostenfrei aus dem dt. Festnetz/Mobilfunknetz)
E-Mail: kompernass@lidl.de
IAN 102541
Service Österreich
Tel.: 0820 201 222 (0,15 EUR/Min.)
E-Mail: kompernass@lidl.at
IAN 102541
Service Schweiz
Tel.: 0842 665566 (0,08 CHF/Min.,
Mobilfunk max. 0,40 CHF/Min.)
E-Mail: kompernass@lidl.ch
IAN 102541
Erreichbarkeit Hotline:
Montag bis Freitag von 8:00 Uhr - 20:00 Uhr (MEZ)
Importeur
KOMPERNASS HANDELS GMBH
BURGSTRASSE 21
44867 BOCHUM
GERMANY
www.kompernass.com
- 60 -
Page 64

KOMPERNASS HANDELS GMBH
BURGSTRASSE 21
44867 BOCHUM
DEUTSCHLAND / GERMANY
www.kompernass.com
Last Information Update · Stan informacji · Információk állása
Stav informací · Stav informácií · Stand der Informationen:
08 / 2014 · Ident.-No.: SDRB1000B1-072014-1
IAN 102541
4
 Loading...