


KC-930EU-W
Table of contents
 Loading...
日本語
R
* Plasmacluster is a trademark of Sharp
Corporation.
KC-930EU
ČISTIČKA VZDUCHU
s funkcí zvlhčování
NÁVOD K OBSLUZE
ČISTIČKA VZDUCHU
s funkciou zvlhčovania
NÁVOD NA POUŽITIE
LÉGTISZTÍTÓ
párásító funkcióval
HASZNÁLATI ÚTMUTATÓ
ОЧИСНИК ПОВІТРЯ
з Функцією Зволожування
ПОСІБНИК З ЕКСПЛУАТАЦІЇ
Free standing type
Freistehendes Modell
Type mobile
Vrijstaand type
Тип установки: отдельностоящий
Volně stojící
Voľne stojaca
Különálló típus
Вільностоячий тип
床置き・卓上兼用型
AIR PURIFIER
with Humidifying Function
OPERATION MANUAL
LUFTREINIGER
mit Befeuchtungsfunktion
BEDIENUNGSANLEITUNG
Puricateur d’air avec
fonction d’humidication
MANUEL D’UTILISATION
LUCHTREINIGER
met luchtbevochtiger
GEBRUIKSAANWIJZING
NEDERLANDS
РУССКИЙ
Воздухоочиститель с
функцией увлажнения
РУКОВОДСТВО ПО
ЭКСПЛУАТАЦИИ
FRANÇAIS
SLOVENSKY
УКРАЇНСЬКА
日本語
加湿空気清浄機
取扱説明書
Printed in China
TINS-A385KKRZ 09J-
CN 1
MAGYAR ČESKY
DEUTSCH
ENGLISH
OSAKA, JAPAN
SHARP CORPORATION
Free standing type
Freistehendes Modell
Type mobile
Vrijstaand type
Тип установки: отдельностоящий
Volně stojící
Voľne stojaca
Különálló típus
Вільностоячий тип
床置き・卓上兼用型
Please read before operating your new Air Purifi er
Some odour ingredients absorbed by the fi lter may become separated and
may be discharged through the air outlet and result in additional odour. De-
pending on the usage environment, especially when the product is used in
a condition signifi cantly more severe than household use, this odour may
become strong in a shorter period than expected.
In this case we recommend purchasing the optional replacement fi lter.
NOTE
• The air purifi er is designed to remove air-suspended dust and odour, but not harmful gases (for
example, carbon monoxide contained in cigarette smoke.) If the odour sources still exist, it cannot
completely remove the odour(for example, odours from construction materials and pet odours).
• It is suggested to open the window a bit when you are smoking in order to facilitate ventilation.
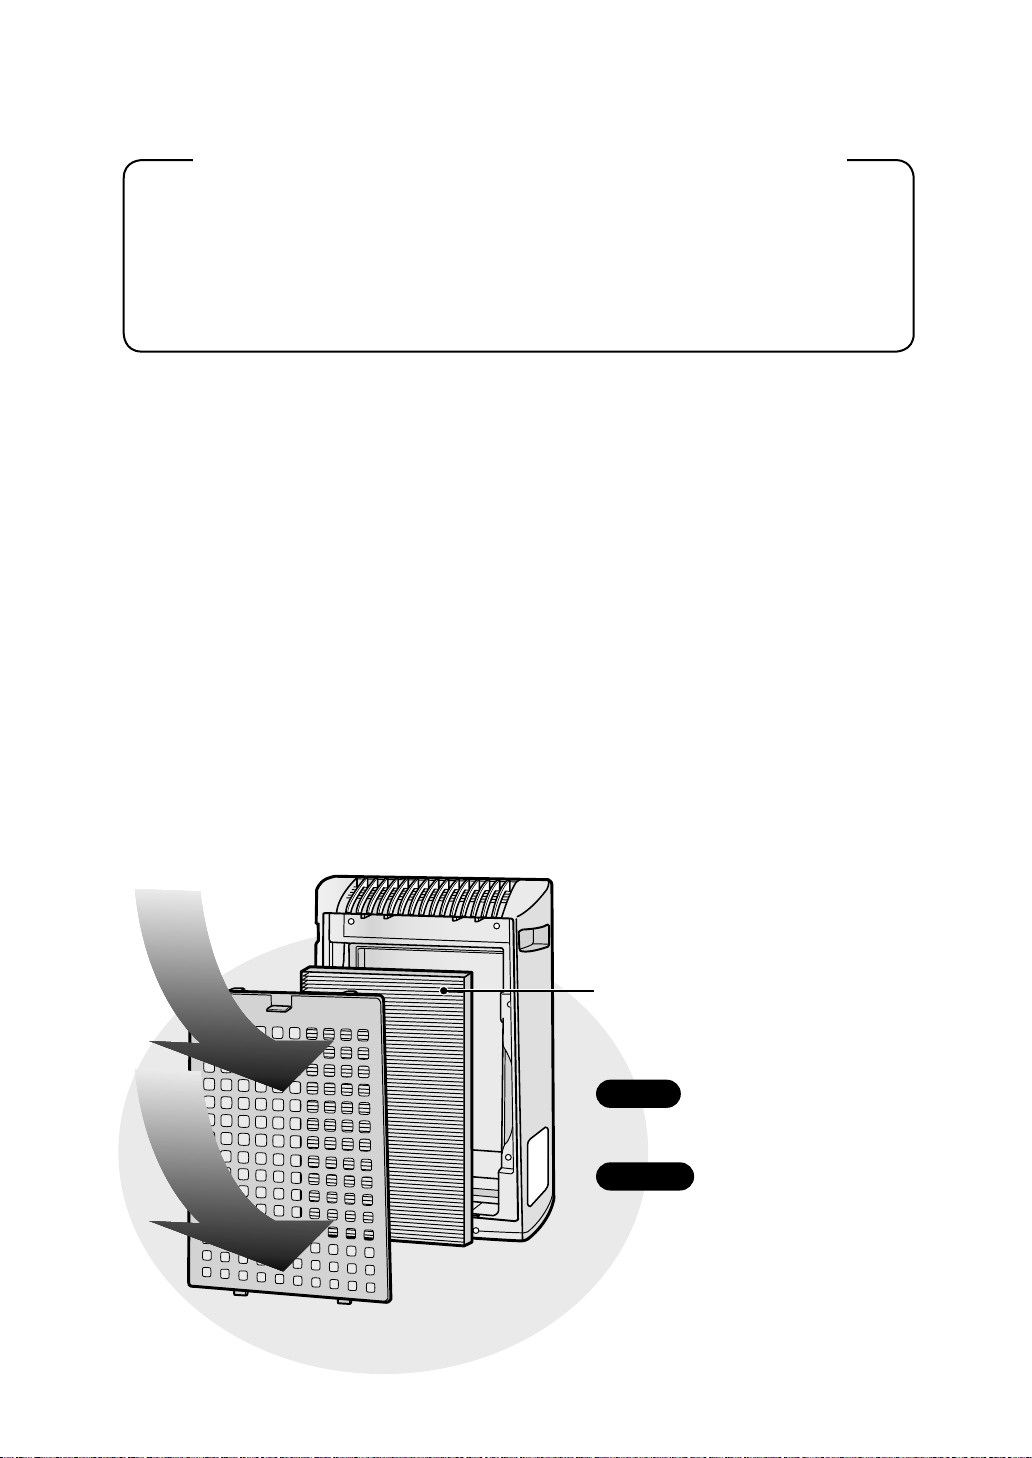
pollen, dust, particles of
cigarette smoke, pet dander
Dust Collection / Deodorizing Filter
Elements removed by filter
cigarette smoke odour,
household odour (toilet /
raw garbage / pet, etc.)
Odour
Dust

ENGLISH
E-1
ENGLISH
Thank you for purchasing the SHARP Air Puri-
fi er. Please read this manual carefully for the
correct usage information. Before using this
product, be sure to read the section: “Important
Safety Instructions.”
After reading this manual, retain it in a conven-
ient location for future reference.
IMPORTANT SAFETY INSTRUCTIONS
.....
E-2
• WARNING ....................................................
E-2
• CAUTIONS CONCERNING OPERATION ...
E-3
• INSTALLATION GUIDELINES ......................
E-3
• FILTER GUIDELINES ..................................
E-3
PART NAMES
...............................................
E-4
• MAIN UNIT DISPLAY ...................................
E-4
• ILLUSTRATIVE DIAGRAM ..........................
E-4
• INCLUDED ...................................................
E-5
• BACK ............................................................
E-5
PREPARATION
............................................
E-6
• FILTER INSTALLATION ...............................
E-6
• REFILLING THE WATER TANK ...................
E-7
OPERATION
.................................................
E-8
• MAIN UNIT OPERATION .............................
E-8
CARE AND MAINTENANCE
.....................
E-9
• FILTER INDICATOR LIGHT .........................
E-9
• BACK PANEL AND SENSORS ....................
E-9
• WATER TANK .............................................
E-10
• UNIT ...........................................................
E-10
• HUMIDIFYING TRAY .................................
E-11
• HUMIDIFYING FILTER ...............................
E-12
• FILTER REPLACEMENT GUIDELINES .....
E-13
TROUBLESHOOTING
..............................
E-14
SPECIFICATIONS
......................................
E-15
CONTENTS
FEATURES
Plasmacluster technology uses plas-
ma discharge to produce and release
the same positive and negative ions
as those found in nature ("Plasma-
cluster ions").
This is a unique air cleaning technol-
ogy of the SHARP CORPORATION
for breaking down and inactivating
such potential allergens as the feacal
matter or corpses of aerial mites*
1
,
viruses *
2
and mold and bacteria *
3
suspended in the air, and has been
substantiated by third-party organiza-
tions both in Japan and overseas.
When there is a high density of Plas-
macluster ions in the air, the smell of
cigarette smoke trapped in curtains
or sofas is removed in about 80 min-
utes*
4
, and when clothing is hung in
a place exposed to the direct air ex-
pelled from the unit generating Plas-
macluster ions, the smell of sweat is
reduced to a virtually imperceptible
level in one night (about 6 hours).
"Plasmacluster" technology
*1 Graduate School of Advanced Sci-
ences of Matter, Hiroshima University,
Japan
Measurement of action on the poten-
tial allergens of aerial mites in (13m²)
*2 Retroscreen Virology, Ltd., London, UK
Measurement of ratio of viruses elimi-
nated from the air in a 1m³ box
*3 Ishikawa Health Service Association,
Japan
Measurement of aerial mold and bac-
teria with an air sampler (13m²)
*4 Japan Spinners Inspecting Foundation,
Japan
Evaluation of deodorizing effect on
odor-imbued fragments of cloth

When using electrical appliances, basic safety precautions should be followed, including the
following:
E-2
IMPORTANT SAFETY INSTRUCTIONS
WARNING
- To reduce the risk of electrical shock, fi re or injury to persons:
• Read all instructions before using the unit.
• Use only a 220-240 volt outlet.
• Do not use the unit if the power cord or plug is damaged or the connection to the wall outlet
is loosened.
• Periodically remove dust from the power plug.
• Do not insert fi ngers or foreign objects into the intake or air outlet.
• When removing the power plug, always hold the plug and never pull the cord.
Electrical shock and/or fi re from short circuit may occur as a result.
• Do not remove the plug when your hands are wet.
• Do not use this unit near gas appliances or fi replaces.
• Remove the power plug from the wall outlet before cleaning the unit and when not using the
unit.
Electrical shock from bad insulation and/or fi re from short circuit may occur as a result.
• When refi lling the Water Tank, cleaning the unit, or when the unit is not in use, be sure to
unplug the unit. Electrical shock and/or fi re from a short circuit may result.
• If the power cord is damaged, it must be replaced by the manufacturer, its service agent,
Sharp Authorised Service Centre or similarly qualifi ed person in order to avoid a hazard.
• Do not operate when using aerosol insecticides or in rooms where there is oily residue, incense,
sparks from lit cigarettes, chemical fumes in the air or in very high humidity conditions, such as a
bathroom.
• Be cautious when cleaning the unit. Corrosive cleansers may damage the exterior.
• Only Sharp Authorised Service Centre should service this air purifi er. Contact the nearest Service
Centre for any problems, adjustments, or repairs.
• When carrying the unit, remove the Water Tank and Humidifying Tray fi rst and hold the unit by han-
dles on both sides.
• Do not drink the water in the Humidifying Tray or Water Tank.
• Change the water in the Water Tank daily with fresh tap water and regularly clean the Water Tank
and Humidifying Tray. (See E-11 and E-12). When unit is not in use, dispose of the water in the
Water Tank and Humidifying Tray. Leaving water in the Water Tank and/or Humidifying Tray may
result in mold, bacteria, and bad odours.
In rare cases, this bacteria may cause harmful physical effects.
• This appliance is not intended for use by persons (including children) with reduced physical, sen-
sory or mental capabilities, or lack of experience and knowledge, unless they have been given su-
pervision or instruction concerning use of the appliance by a person responsible for their safety.
Children should be supervised to ensure they do not play with the appliance.
NOTE
- Radio or TV Interference
If this air purifi er should cause interference to radio or television reception, try to correct the interfer-
ence by one or more of the following measures:
• Reorient or relocate the receiving antenna.
• Increase the separation between the unit and radio/TV receiver.
• Connect the equipment into an outlet on a circuit different from that to which the receiver is con-
nected.
• Consult the dealer or an experienced radio/TV technician for help.

ENGLISH
E-3
CAUTIONS CONCERNING OPERATION
• Do not block the intake and/or air outlet.
• Do not use the unit near or on hot objects, such as stoves or heaters or where it may come into
contact with steam.
• Always operate the unit in an upright position.
• Always hold the handle on both sides of the unit when moving it.
Holding the back panel when carrying may cause it to detach, thus dropping the unit and resulting
in bodily injury.
• Do not operate the unit without the fi lters, Water Tank, and Humidifying Tray properly in-
stalled.
• Do not wash and reuse the fi lter .
Not only does it not improve fi lter performance, it may cause electrical shock or malfunction.
• Clean the exterior with a soft cloth only.
Do not use volatile fl uids and/or detergents.
The unit surface may be damaged or cracked.
In addition, the sensors may malfunction as a result.
INSTALLATION GUIDELINES
• During the operation of the product, please place the unit at least 2 m away from equipment
utilizing electrical waves such as televisions, radios or wave clocks.
• Avoid use in locations where furniture, fabrics or other items may come in contact with and
restrict the air intake and/or air outlet.
• Avoid use in locations where the unit is exposed to condensation or rapid temperature
changes. (Use under appropriate conditions between 0 and 35˚C in the room.)
(If it is unavoidable please allow unit to stand for 1 hour before switching on.)
• Place on a stable surface with suffi cient air circulation.
When placing the unit on a heavily carpeted area, it may cause the unit to vibrate slightly.
• Avoid use in locations where grease or oily smoke is generated (such as in a kitchen, etc.).
The unit surface may crack or the sensor may malfunction as a result.
• Place the unit about 30 cm~60 cm(1~2 ft) away from the wall in order to ensure proper air-
fl ow.
The wall directly behind the air outlet may become dirty over time. When using the unit for an ex-
tended period of time in the same location, periodically clean the wall and protect the wall with a
vinyl sheet, etc. to prevent the wall from becoming dirty.
FILTER GUIDELINES
• Follow the instructions in this manual for correct care and maintenance of the fi lters.
Use only fi lters designed for this product.

E-4
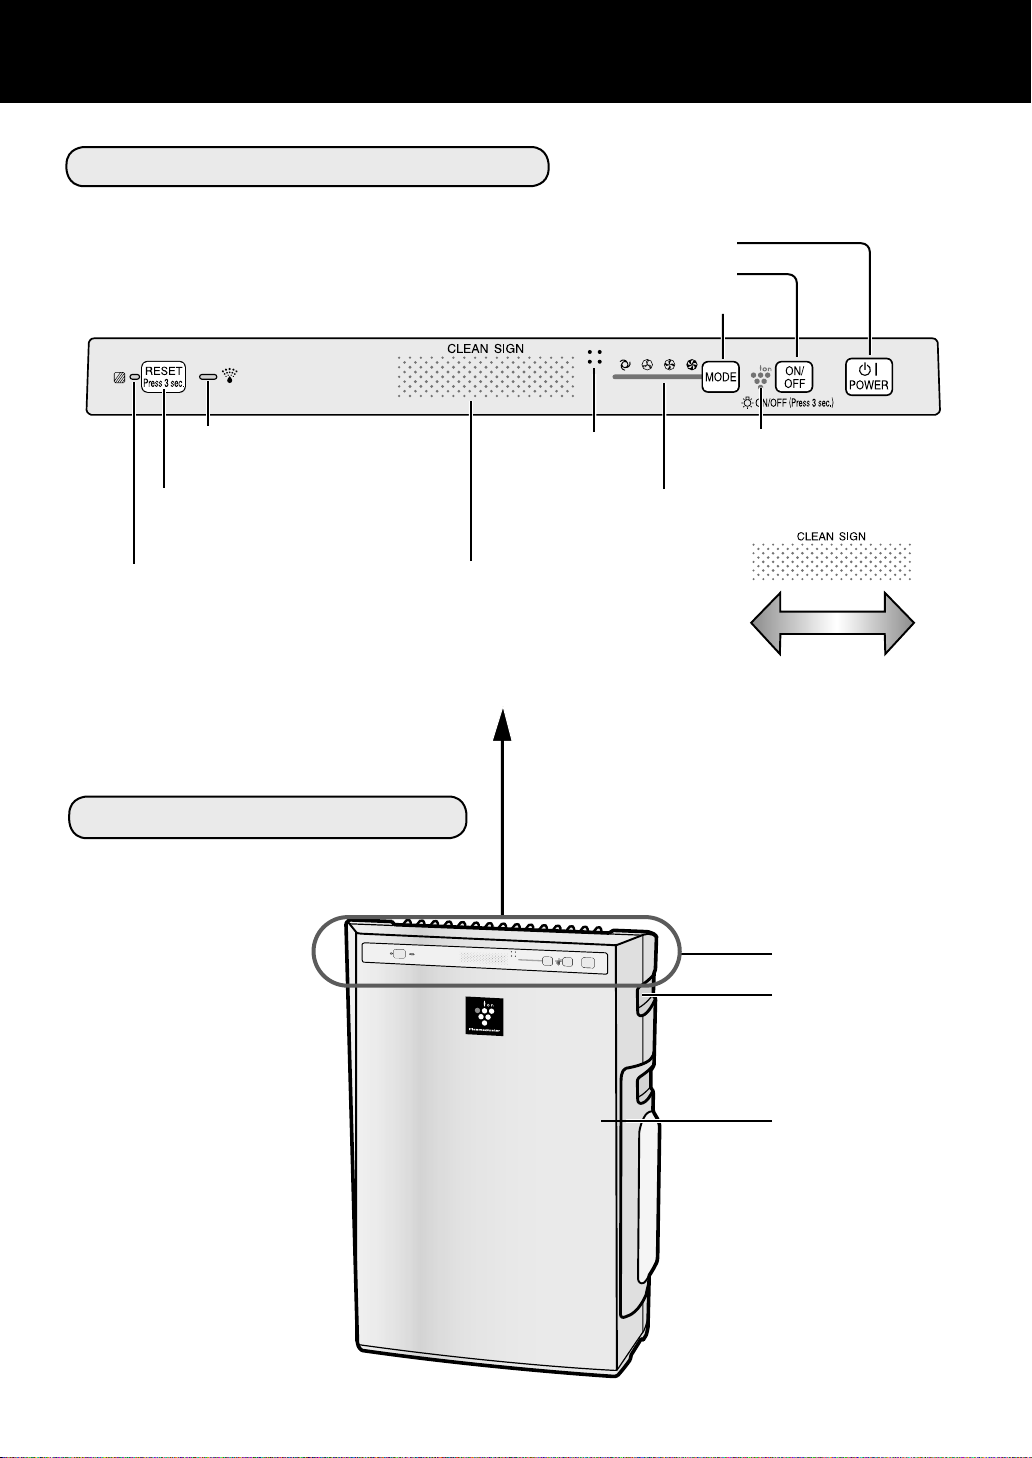
MAIN UNIT DISPLAY
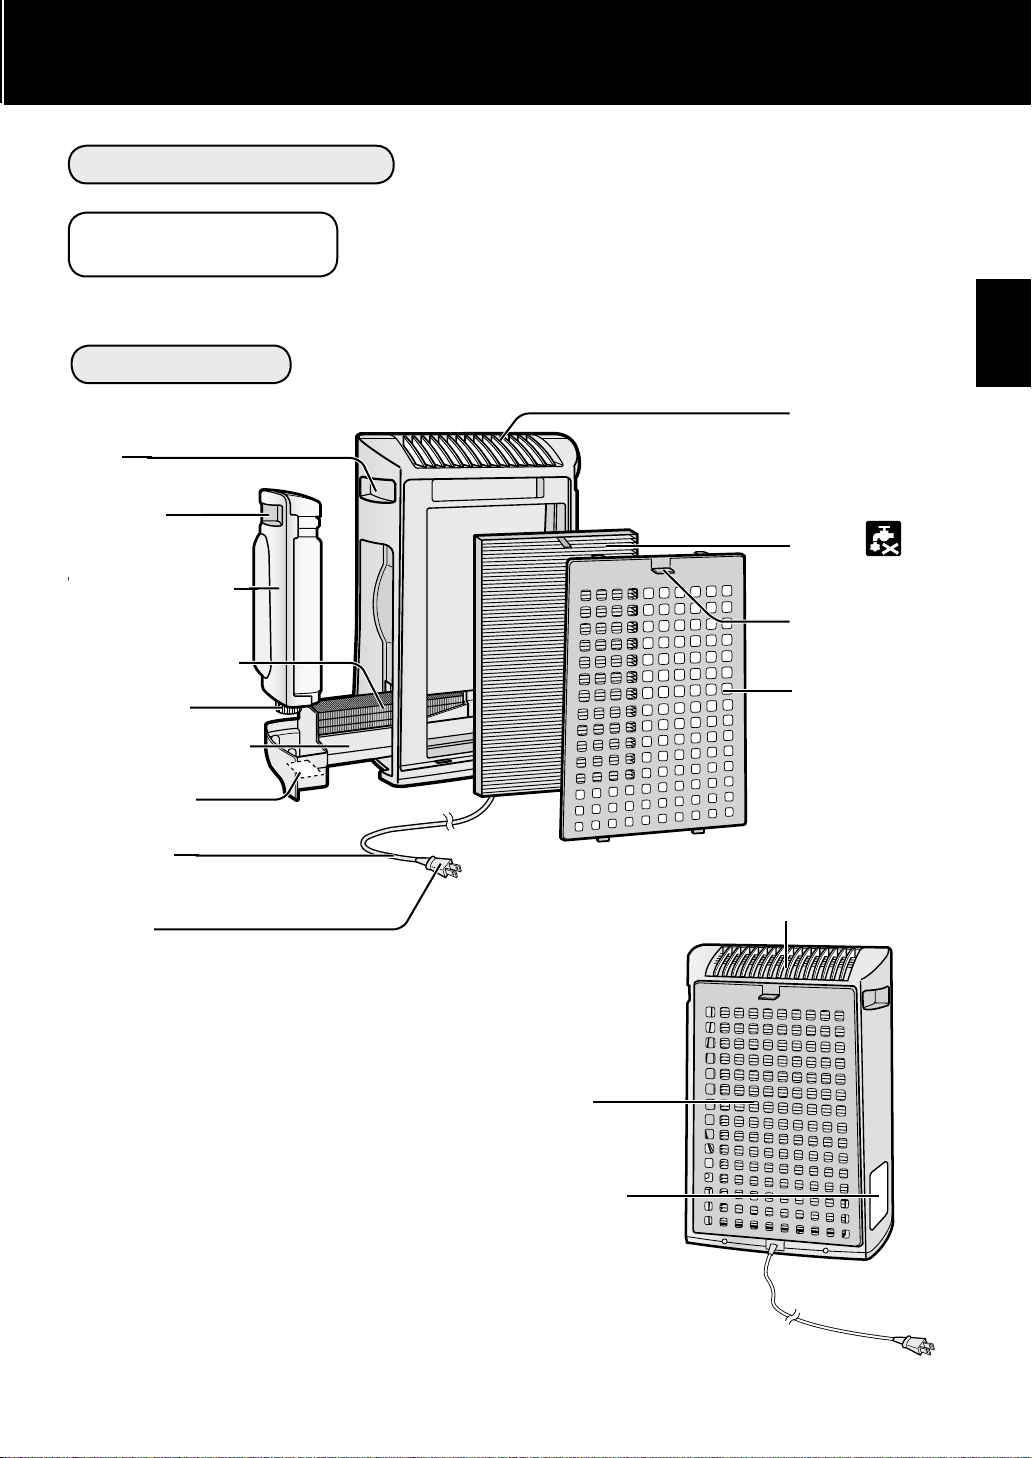
ILLUSTRATIVE DIAGRAM
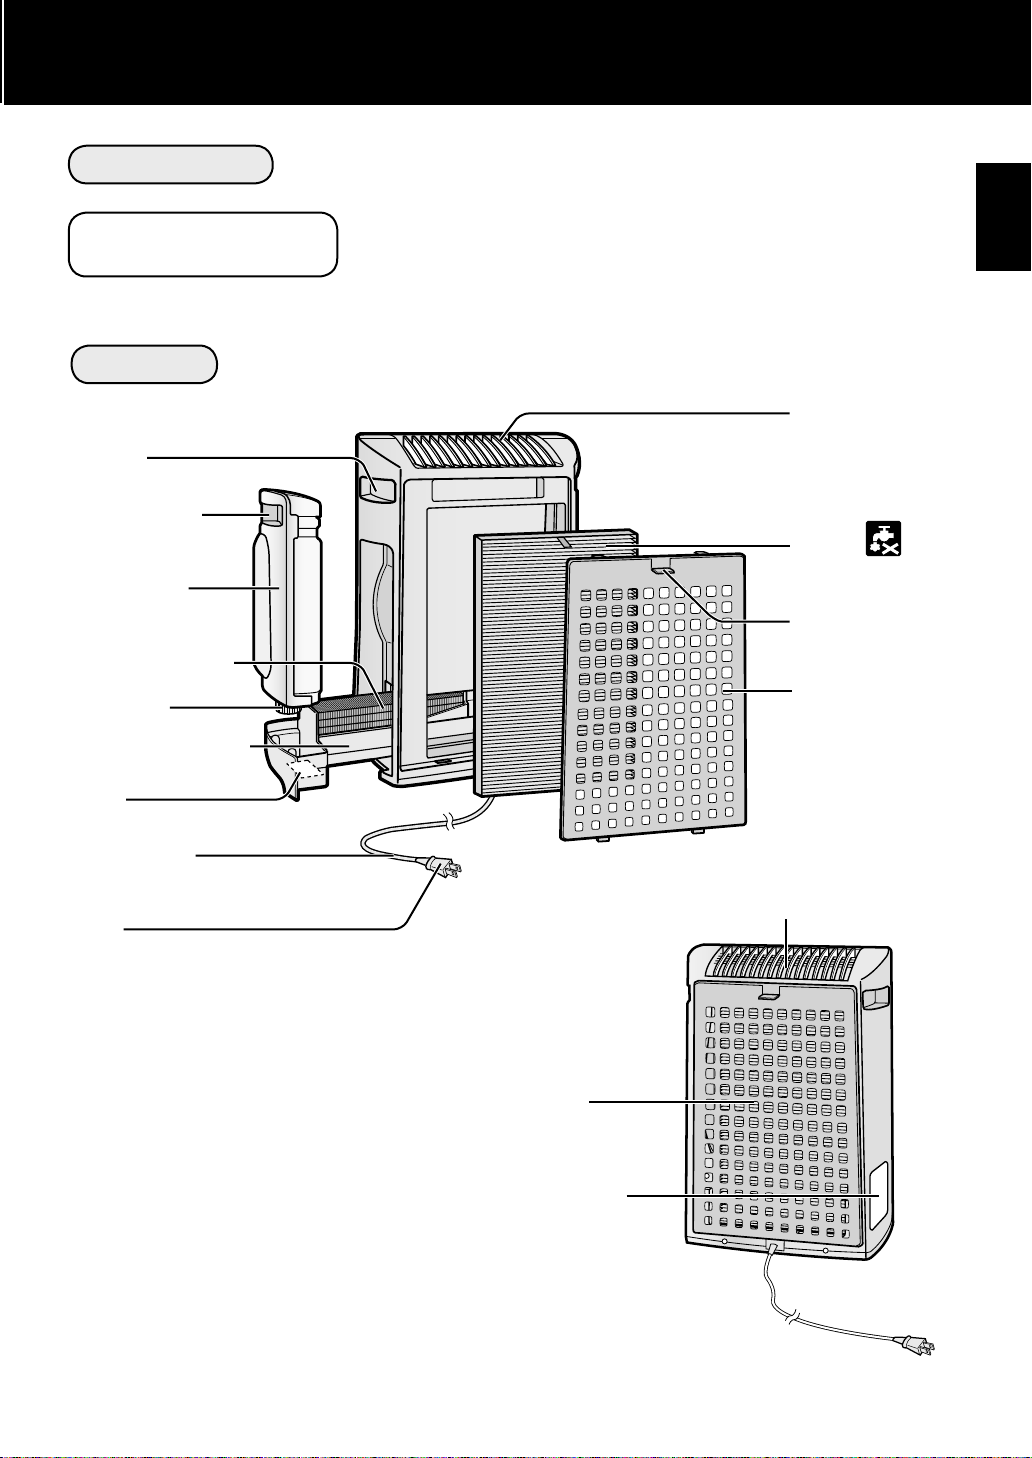
PART NAMES
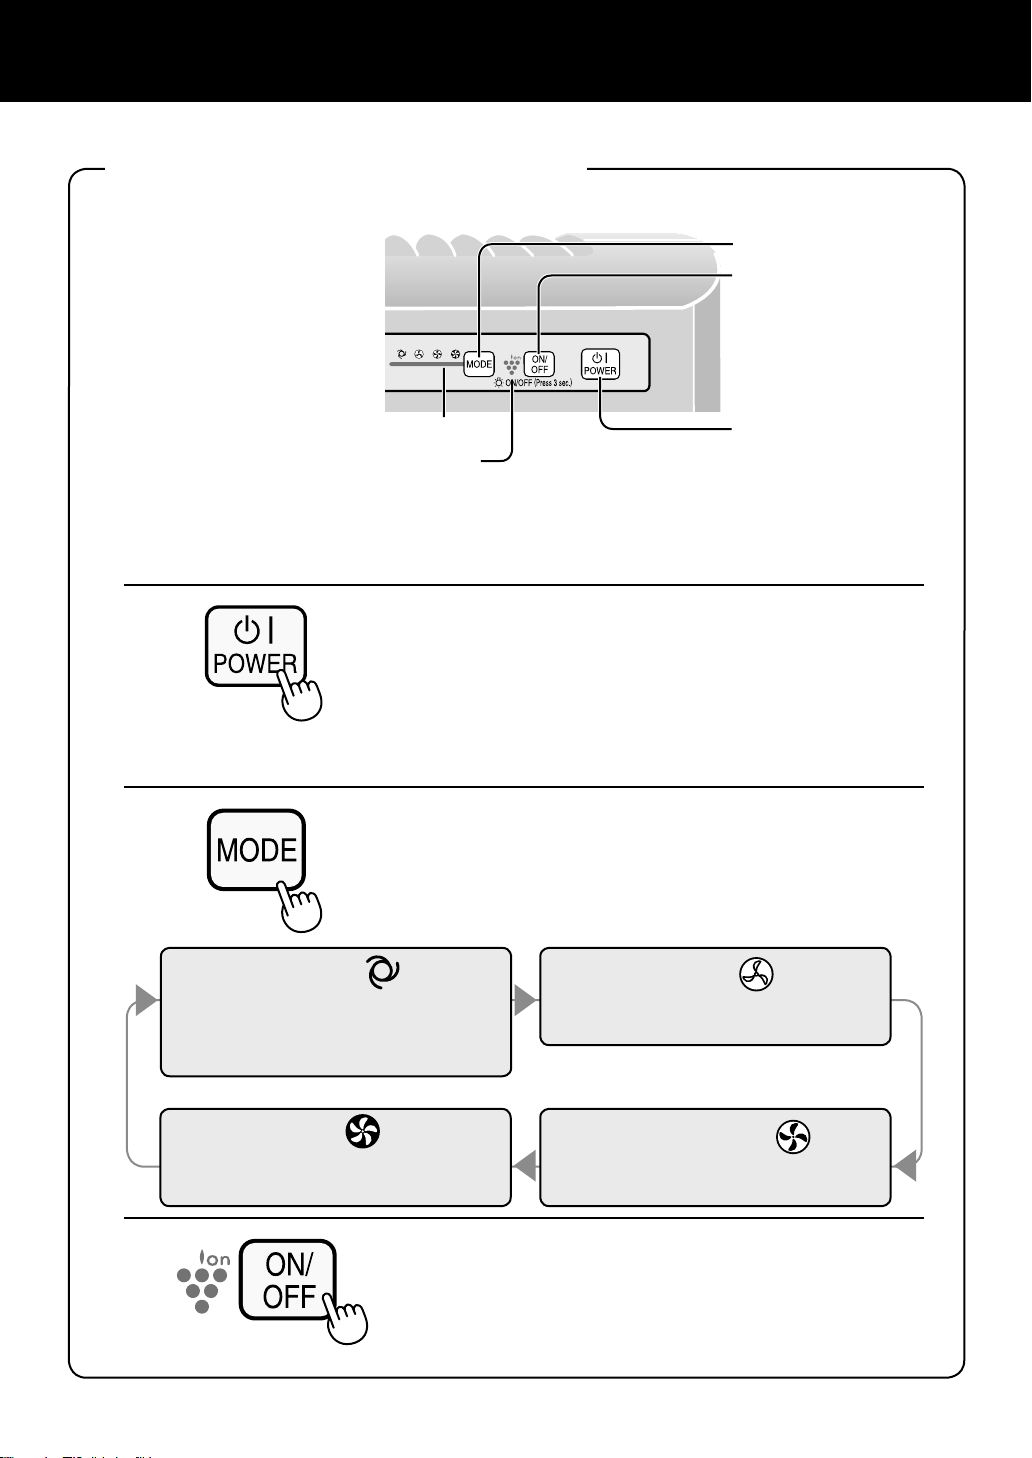
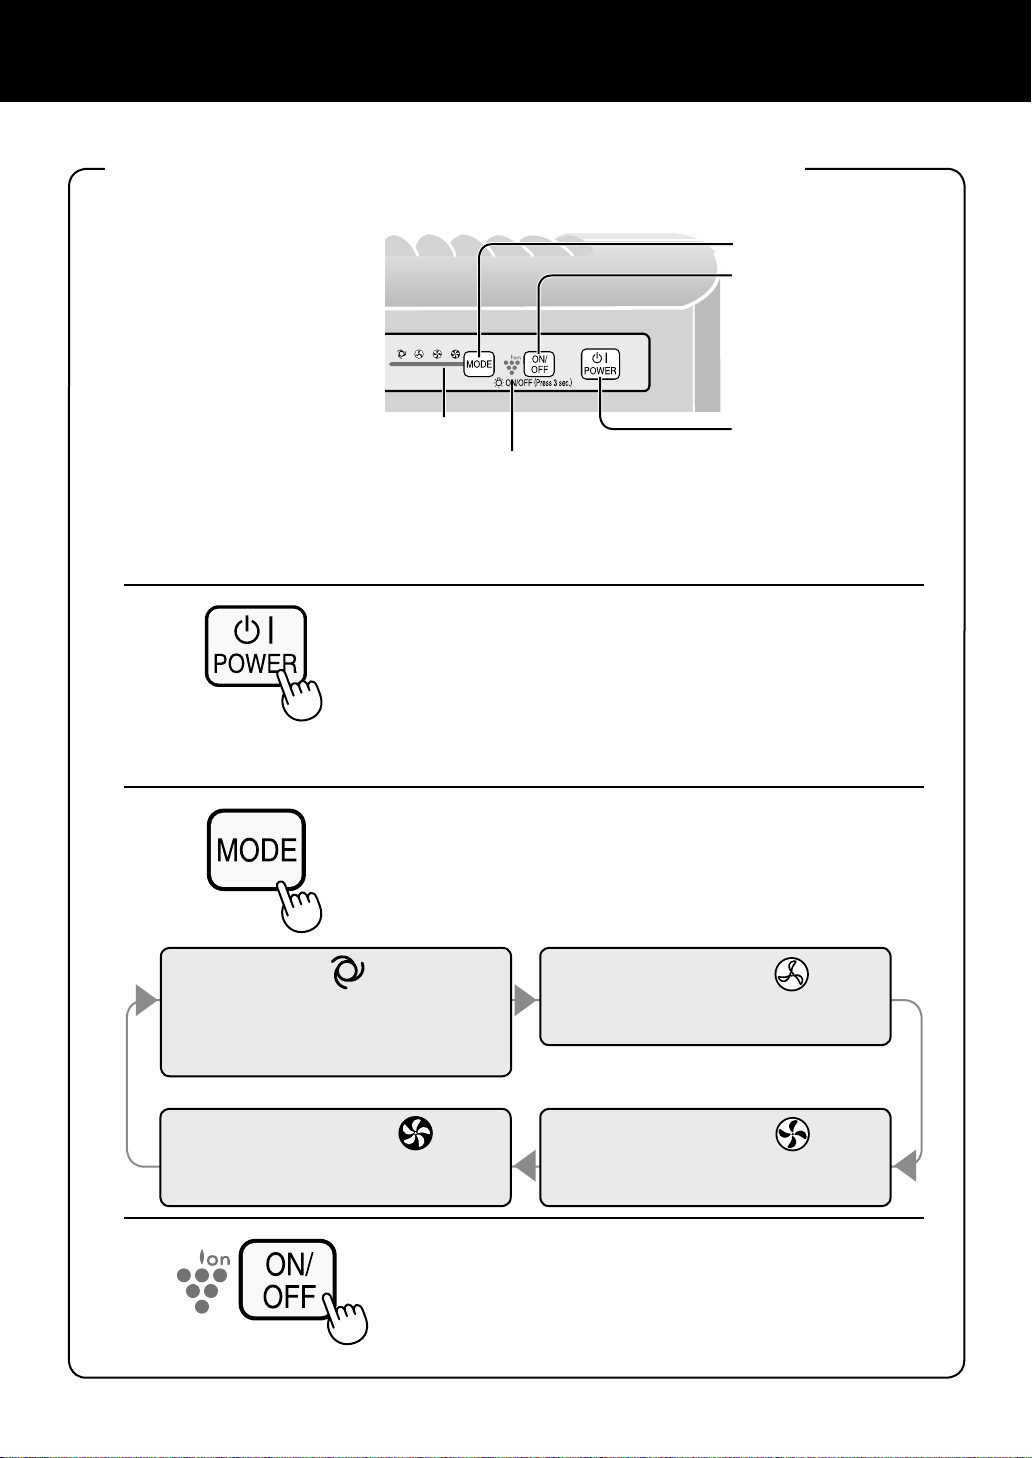
POWER ON/OFF Button
Plasmacluster Ion ON/OFF Button
MODE Button
Fan Speed
Indicator Lights
Filter Indicator Light
Filter Reset Button
Humidify Mode
Indicator Light
Odour
Sensor
CLEAN SIGN
The odour sensor continuosly monitors
the air and changes colour depending
on air punity.
Green Orange Red
Clean Very Impure
Plasmacluster
Ion ON/OFF
Indicator Light
Handle
Main Unit
Main Unit Display
ENGLISH
Handle
Tank Handle
Tank Cap
Power Cord
Plug
Float
Humidifying Tray
Humidifying Filter
Water Tank
(For humidifying)
Air Outlet
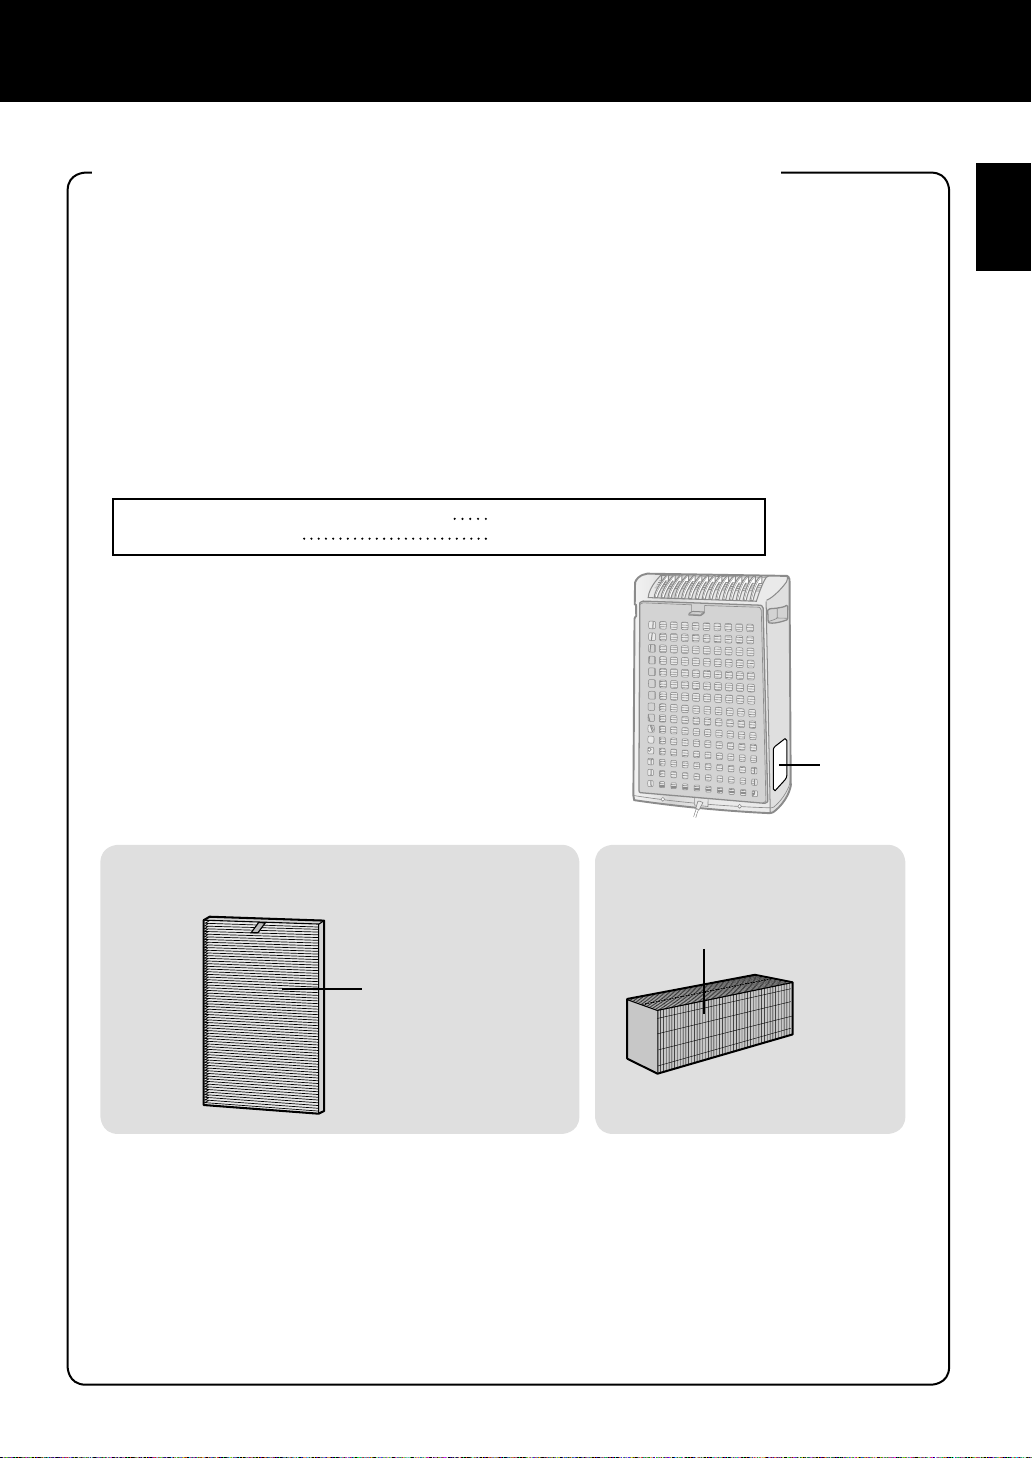
Filter
Tab
Back Panel
(Pre-Filter)
E-5
INCLUDED
• Operation manual
BACK
(Shape of plug depends on country.)
(Dust Collection /
Deodorizing Filter)
Air Inlet
Date Label
Air outlet

PREPARATION
E-6
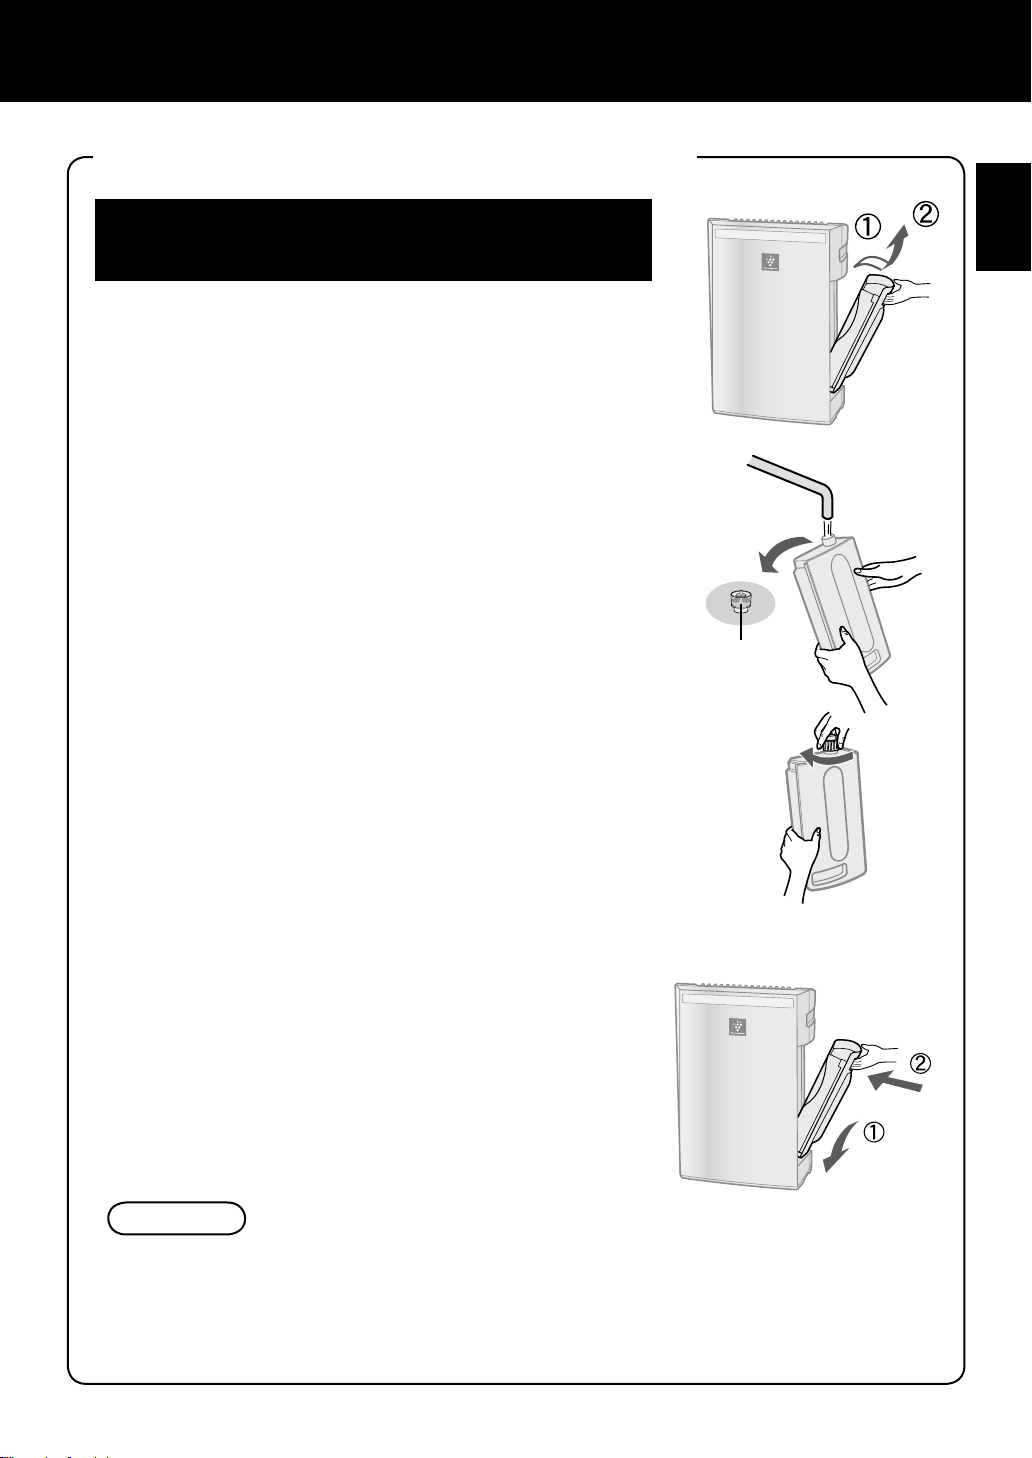
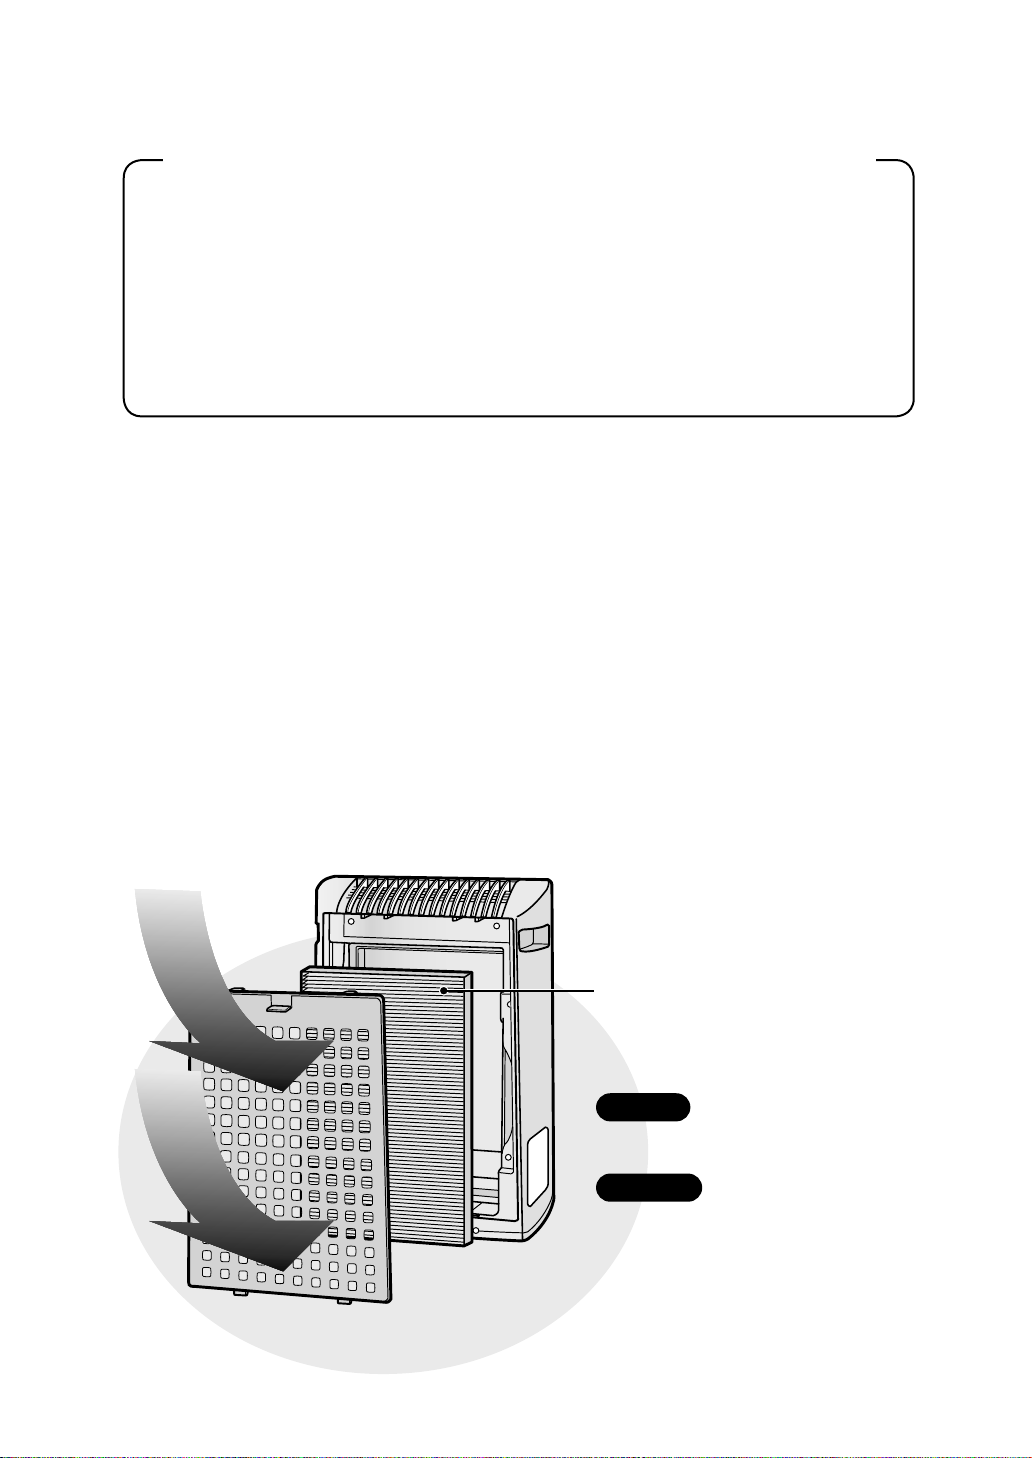
Be sure to remove the power plug from the wall outlet.
To maintain the quality of the fi lter, it is installed in the main unit and packed in
plastic bag. Be sure to remove the fi lter from the plastic bag before using the
unit.
Remove the fi lter
Remove the Back Panel.
Pull the tab at the top of the Back Panel.
Intall the fi lter
FILTER INSTALLATION
Remove the Filter from the
plastic bag.
Do not install the fi lter backwards or the unit
will not operate properly.
Place the Filter within the main unit.
1
2
2
1
1
Ta b
Replace the Back Panel to the main
unit.
2
Fill in the usage start date on the
Date Label.
3
Use the date as a guide for the fi lter replace-
ment schedule.
Date Label
ENGLISH
E-7
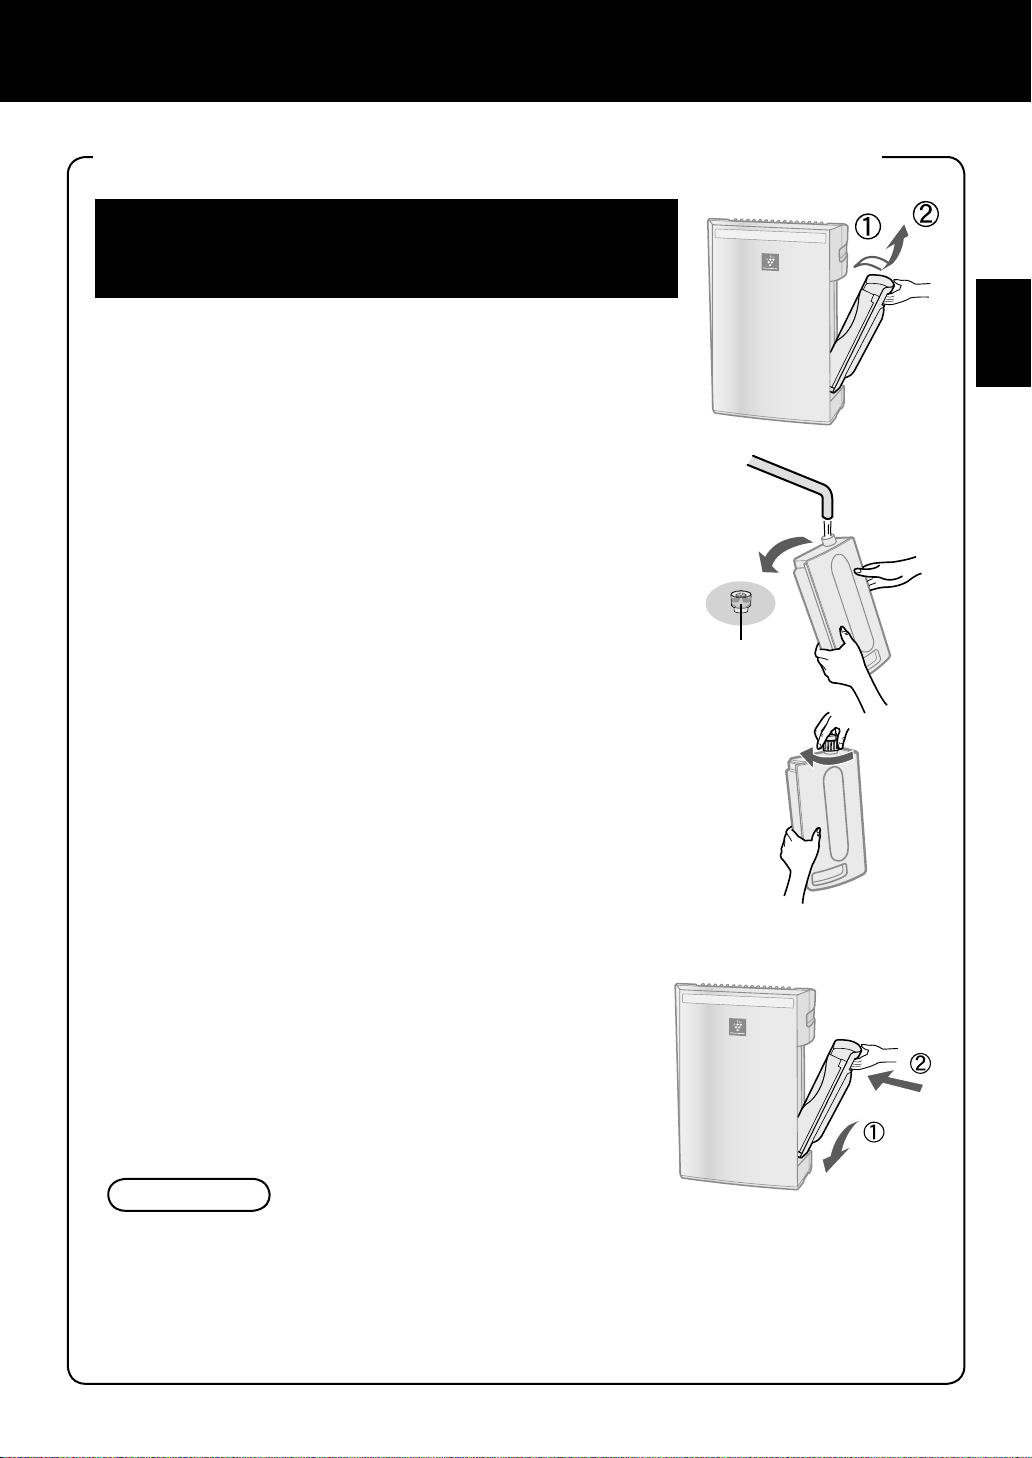
REFILLING THE WATER TANK
CAUTION
Tank Cap
• Do not expose the unit to water. Short circuit and/or electrical shock may occur as a result.
• Do not use hot water (40 ºC), chemical agents, aromatic substances, dirty water, or other
damaging substances, deformation and/or malfunction may occur.
• Use only fresh tap water. Use of other water sources may promote the growth of mold, fun-
gus and/or bacteria.
The unit can be used in the Clean Air Mode without
putting water in the Water Tank. When using in the Hu-
midify Mode, the Water Tank should be fi lled with water.
1
Remove the Water Tank by unlatching the
top.
2
Remove the Water Tank Cap and carefully fi ll
the Water Tank with tap water.
3
After fi lling, securely tighten the Tank Cap.
• Check to see that there is no water leaking.
• Be sure to wipe off any excess water on the outside of
the Water Tank.
• When carrying the Water Tank, hold it with both hands
so that the Water Tank opening is facing up.
4
Replace the Water Tank in the unit.
Change the water in the Water Tank every day with
fresh tap water.
The top latch will “click” in place when the Water Tank is
properly installed.
Fan Speed Indicator Lights
Plasmacluster Ion Indicator Light
POWER ON/OFF
Button
MODE Button
Plasmacluster Ion
ON/OFF Button
LOW operation
The unit will operate quietly using
minimal air intake.
MEDIUM operation
The unit will operate at a fan speed
of MEDIUM.
MAX operation
The unit will operate at a fan speed
of MAX.
AUTO operation
The fan speed is automatically switched
(between HIGH and LOW) depending on the
amount of impurities in the air. The sensors
detect impurities for effi cient air purfi cation.
OPERATION
MAIN UNIT OPERATION
E-8
Power ON/OFF Button
• Press to start operation (short beep) and stop operation
(long beep)
• Plasmacluster Indicator Light and Fan Speed Indicator
Light turn on/off.
• Unless the power cord has been unplugged, the opera-
tions starts in the previous mode it was operated in.
MODE Button
Plasmacluster Ion ON/OFF Button
• Press the MODE Button to select the desired fan speed.
Indicator Lights will show the fan speed currently select-
ed.
• The operation mode can be switched as below.
Press the Plasmacluster Ion ON/OFF Button to turn
Plasmacluster Ion Mode ON and OFF.
When Plasmacluster Ion is ON, the Plasmacluster Ion
Indicator Light will turn on. (blue)
Please select either Humidify mode or Clean air mode operation when operation when using.
Humidify mode : Fill Water Tank. (See E-7)
Clean Air mode : Drain Water Tank and Humidifying Tray.
ENGLISH
E-9
CARE AND MAINTENANCE
FILTER INDICATOR LIGHT
The Filter Indicator Light will illuminate as a reminder to perform maintenance of the
Back Panel, Sensors, and Humidifying Filter. The Indicator Light will turn on after ap-
proximately 720 hours of use.
To maintain optimum performance of this air purifi er, please clean the unit including
the sensor and fi lters periodically.
When cleaning the unit, be sure to fi rst unplug the power cord, and never handle the
plug with wet hands. Electrical shock and/or bodily injury may occur as a result.
Care Cycle
After 720 hours of use
(
30days × 24hours = 720)
Care Cycle
Whenever dust accumulates
on the unit or every 2 months
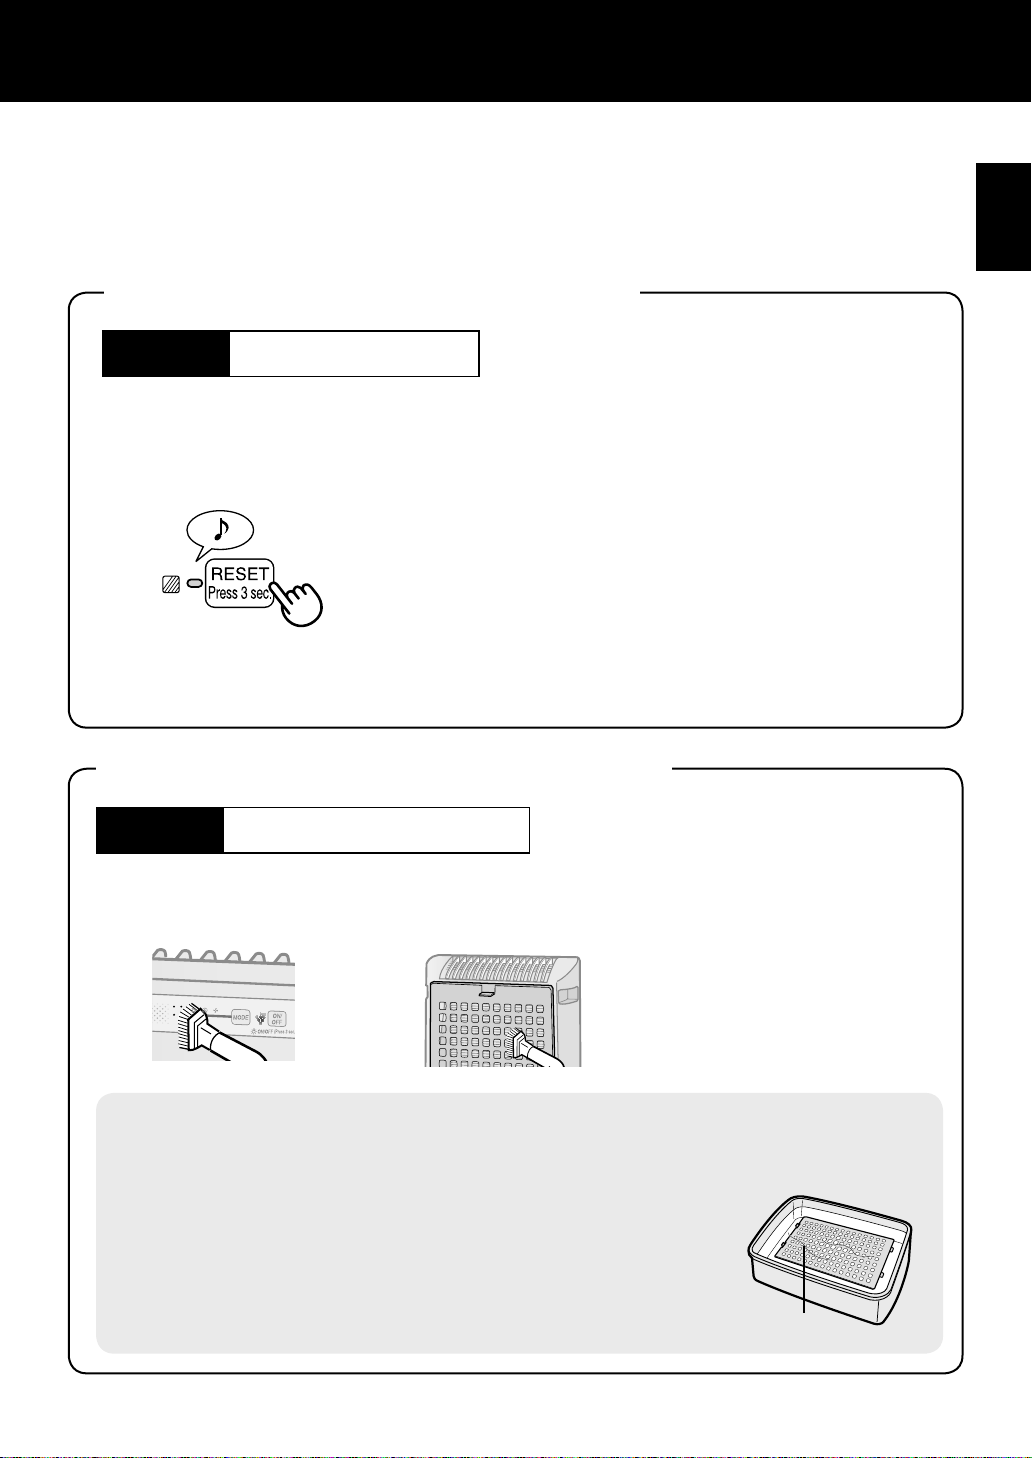
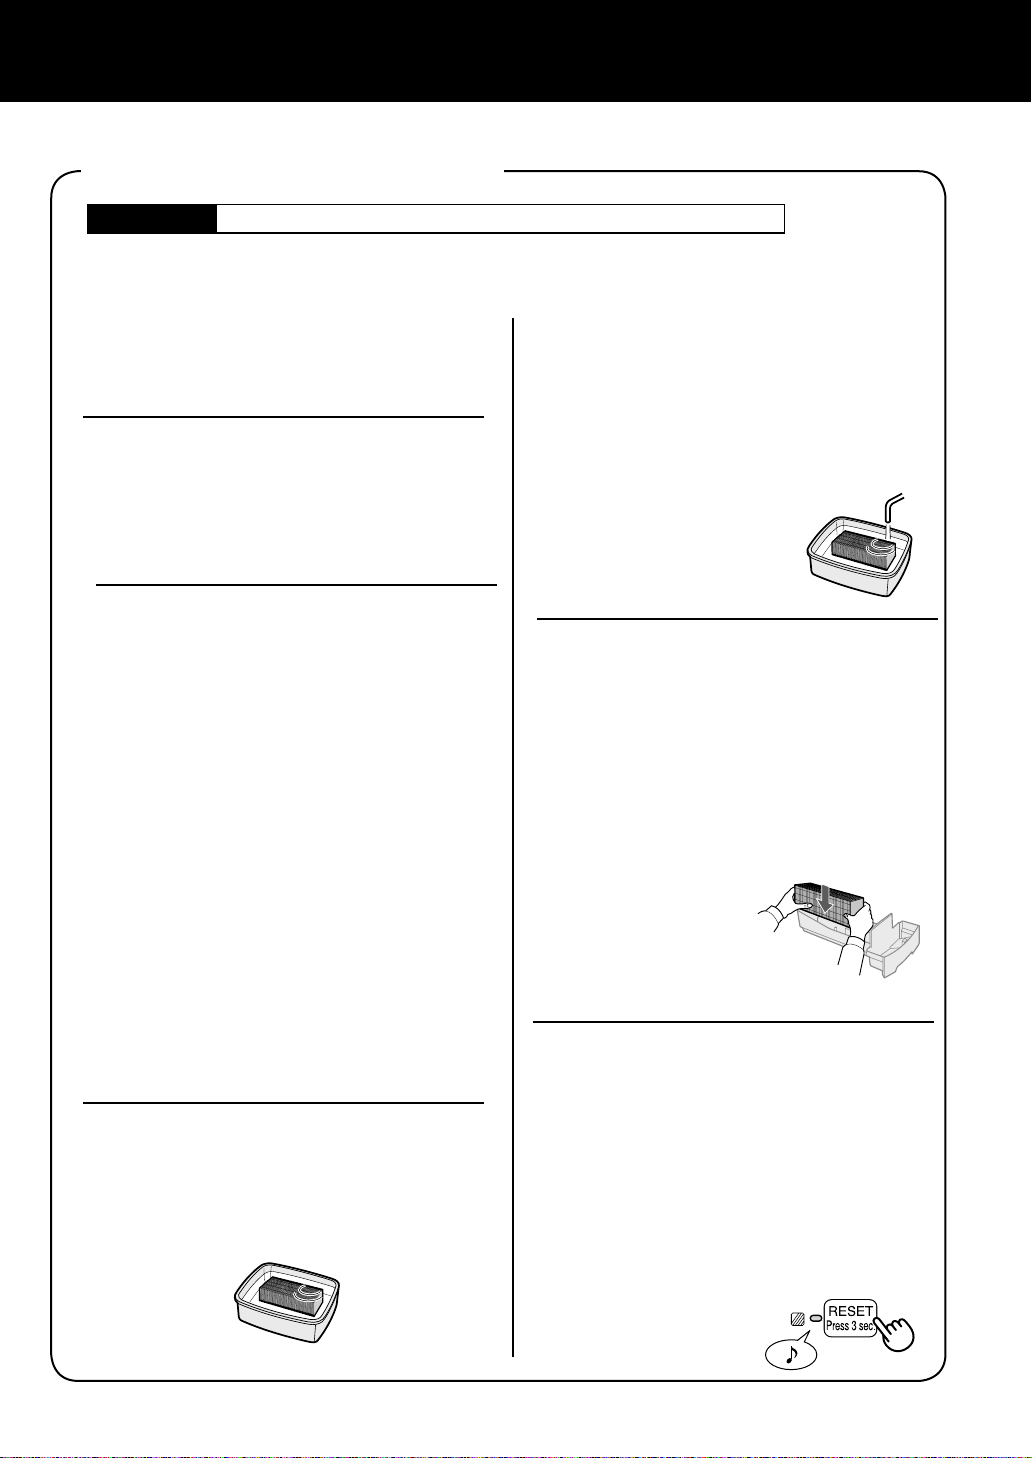
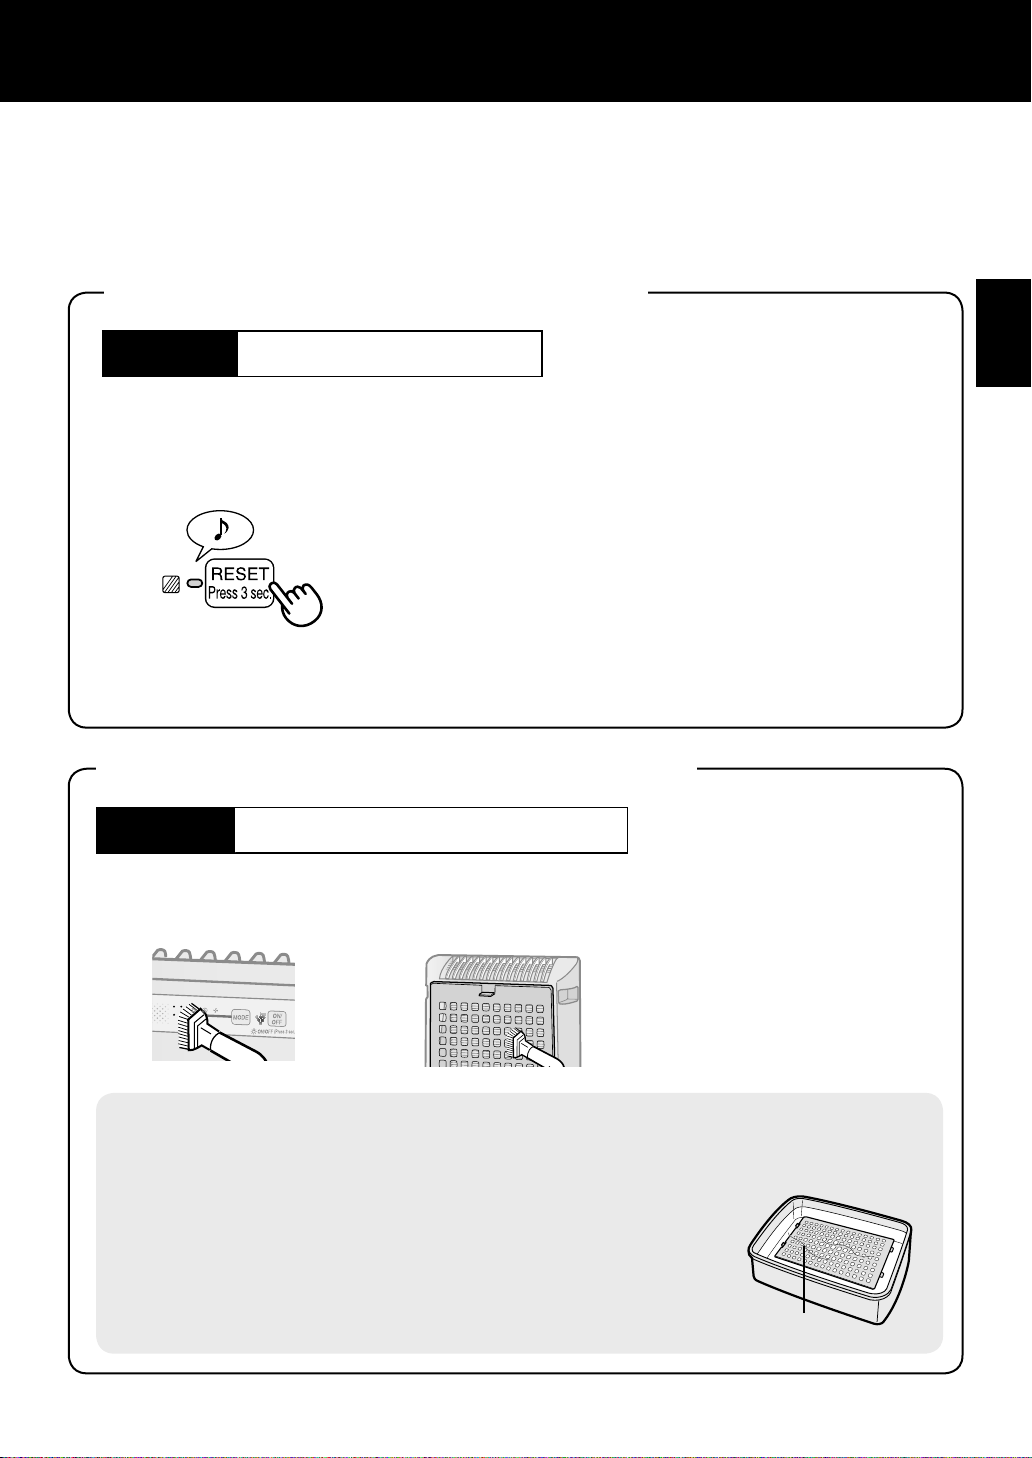
After performing maintenance, reset the Filter
Indicator.
1
Plug the unit in, turn power ON.
Press the RESET button for 3 seconds.
• The Filter Indicator Light will go off.
• Even if the Filter Indicator Light is already off, the RESET
button should be pressed to reset the maintenance timer.
2
Gently remove dust from the sensor opening and the back panel, using a vacuum
cleaner attachment or similar tool.
Back Panel
BACK PANEL and SENSORS
<When the back panel has stubborn dirt>
1
In case of heavy dirt, soak the back panel in water with a small amount of kitchen
detergent.
(Approx. 10min.)
(Avoid scrubbing the back panel hard when washing.)
2
Rinse the back panel repeatedly with clean water to remove
the solution residue.
3
Drip dry fi lter to remove excess water.
E-10
CARE AND MAINTENANCE
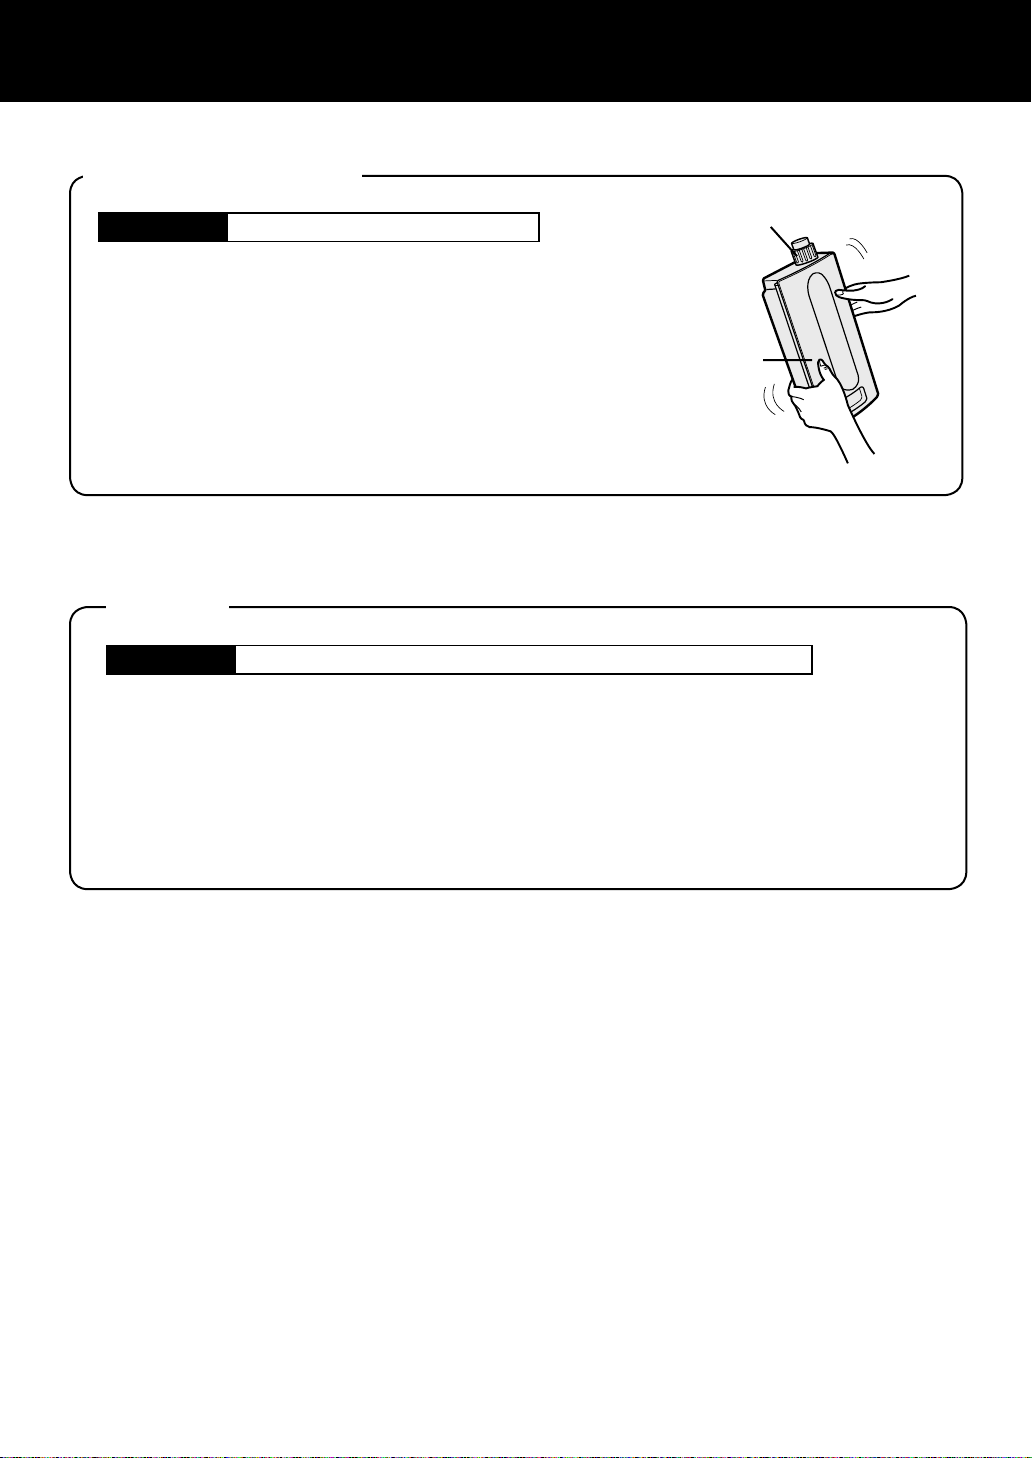
WATER TANK
Rinse the inside of the tank by leaving a small amount of luke-
warm water inside, closing the tank cap firmly, and shaking
the tank. Mild household detergents may be used to clean the
inside of the tank, but detergent should be diluted and the tank
should be thoroughly rinsed to remove all detergent residue.
(Note the Water Tank is not dishwasher safe.)
Tank Cap
Water Tank
Care Cycle
Every day when Humidifying
UNIT
Care Cycle
Whenever dust accumulates on the unit or every 2 months
To prevent dirt or stains on the unit, clean regularly. If stains are allowed to remain, they may
become diffi cult to remove.
Wipe with a dry, soft cloth
For stubborn stains or dirt, use a soft cloth dampened with warm water.
Do not use volatile fl uids
Benzene, paint thinner, polishing powder, may damage the surface.
Do not use detergents
Detergent ingredients may damage the unit.
ENGLISH
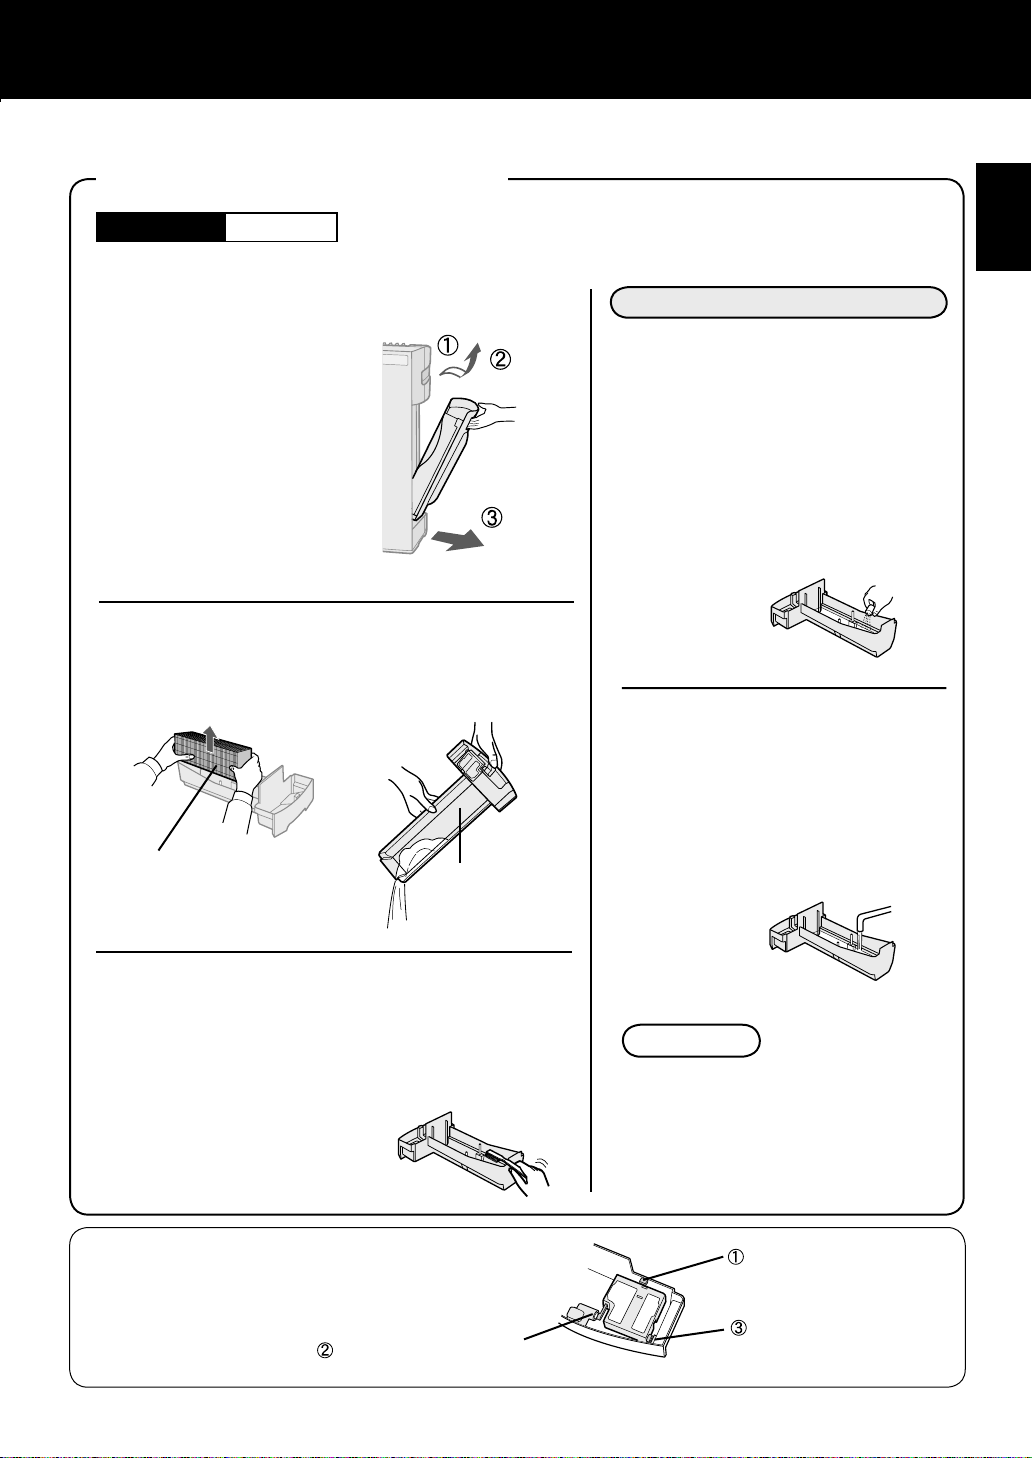
2
Remove the Humidifying Filter from the
Humidifying Tray. Drain accumulated wa-
ter by tilting the Humidifying Tray slowly.
1
Remove the Water Tank and Humidifying
Tray.
E-11
Frequency of maintenance cycle will depend on the hardness
of the water. Avoid spilling water when removing or cleaning
the tray.
3
Rinse the inside of the Humidifying
Tray with lukewarm water to remove
impurities.
• Do not remove the Styrofoam fl oat.
• Clean diffi cult-to-reach parts with a cotton-
tipped swab or tooth brush.
CAUTION
If the Styrofoam fl oat comes off,
replace by inserting the tabs of
the Float into the holes in the
Humidifying Tray as shown in the
diagram.
When Water Deposits are Diffi cult to Remove
• Use only mild kitchen detergents to
clean the Humidifying Tray. Use of
non-designated chemicals or deter-
gents can cause deformation, tar-
nishing, cracking (water leakage).
Insert the fl oat below
this tab.
Insert the tab on
the other side of the
fl oat into the hole.
Insert the tab of the
fl oat into the hole.
1
Fill Humidifying Tray half-
way with lukewarm water,
add a small amount of mild
kitchen detergent, and leave
to soak for about 30 min-
utes.
Dilute detergent according to
instructions on the container.
Clean diffi cult-to-reach parts
with a cotton swab or tooth
brush.
2
Rinse the Humidifying
Tray with lukewarm wa-
ter.
• Rinse until all detergent residue
is removed.
• Inadequate rinsing may cause
the detergent odour or changes
in the shape/colour of the main
unit.
HUMIDIFYING TRAY
Care Cycle
1 month
Unlatch the Water
Tank first, then re-
move the tray. Use
both hands when
pulling out the Hu-
midifying Tray to
avoid spilling water.
Humidifying Filter
Humidifying Tray
E-12
Frequency of maintenance cycle will depend on the hardness or the impuri
ties of the water that
you use; the harder the water the more often descaling will be necessary.
Pay attention not to spill water when cleaning the fi lter.
1
Remove the Water Tank and
Humidifying Tray.
(See E-11)
2
Remove the Humidifying Filter
from the Humidifying Tray.
Avoid spilling water from the Humidifying
Tray.
3
Preparing the descaling solu-
tion.
Citric acid, available at some drugstores,
or 100 % bottled lemon juice are used for
descaling. Choose either one to use, and
prepare the descaling solution.
<For using citric acid>
Dissolve 3 teaspoons of citric acid and 2
1/2 cups of lukewarm water in a suitable
container, and stir well.
<For using lemon juice>
100 % bottled lemon juice can be used
for descaling. Use only 100 % bottled
lemon juice with no pulp (strain juice if
necessary). Combine 1/4 cup lemon juice
and 3 cups of lukewarm water in a con-
tainer large enough to hold the Humidify-
ing Filter and stir well.
4
When using lemon juice, it is recommend-
ed to pre-soak longer than citric acid.
5
Rinse the Humidifying Filter re-
peatedly with lukewarm water
to remove all the solution resi-
due.
Inadequate rinsing may cause odour and
affect the performance and/or appear-
ance of the unit.
* Do not scrub the Hu-
midifying Filter, rinse
gently under lukewarm
water only.
6
Attach the Humidifying Filter
to the Humidifying Tray, and
replace the Humidifying Tray in
the unit.
•The Humidifying Filter dose not
need to be oriented in any particular
position(forward/backward, up/down)
7
Plug in the unit, turn power
ON, and press the Filter Reset
Button on the display for more
than 3 seconds to reset.
HUMIDIFYING FILTER
Care Cycle
Once a month or when the Filter Indicator Light is on.
P
re-soak the Humidifying Filter
in the solution for 30 minutes
before cleaning.
CARE AND MAINTENANCE
You may notice reddish-brown or
white deposits forming on the surface
of the Humidifying Filter. These impu-
rities (calcium, etc.) are due to the im-
purities contained in tap water; this is
not a defect. Replace the Humidifying
Filter when it is covered completely in
white deposits.
•When not using
the unit for a long
periods of time,
dry the Humidify-
ing Filter com-
pletely before
replacing.
When cleaning the unit, be sure to fi rst unplug the power cord, and never handle the plug with
wet hands. Electrical shock and/or bodily injury may occur as a result.
ENGLISH
Date Label
Filter life vary depending on the room environment, usage, and location
of the unit.
If dust or odour persist, replace the fi lter.
(Refer to “Please read before operating your new Air Purifi er”)
Guide for fi lter replacement timing
• The following fi lter life and replacement period is based on the condition of smoking 5
cigarettes per day and the dust collection/deodorization power is reduced by half compared
with that of new fi lter.
We recommend to replace the fi lter more frequently if the product is used in a condition sig-
nifi cantly severer than normal household use.
E-13
FILTER REPLACEMENT GUIDELINES
Dust Collection /
Deodorizing Filter
Humidifying Filter
•Dust Collection / Deodorizing Filter About 2 years after opening
•Humidifying Filter About 1 years after opening
REPLACING THE FILTER
1
See page E-6 and E-11,12 for
directions on how to install the
fi lter when replacing.
2
Fill in the usage start date of the
fi lter on the Date La
bel.
Replacement Filters
Model : FZ-Y30SFE
•Dust Collection / Deodorizing Filter : 1 unit
Model : FZ-Y30MFE
•Humidifying fi lter : 1 unit
Please consult your dealer for purchase of replacement fi lter.
Disposal of Filter
Please dispose of the replaced fi lter according to the local disposal laws and regulations.
Dust Collection / Deodorizing Filter materials :
•Filter : Polypropylene
•Frame : Polyester
•Deodorizer : Activated charcoal
Humidifying Filter materials :
•Rayon, Polyester
E-14
TROUBLESHOOTING
Before calling for service, please review the Troubleshooting chart below, since the problem may not
be a unit malfunction.
SYMPTOM
REMEDY (not a malfunction)
Odours and smoke are not
removed.
• Clean or replace the fi lters if they appear to be heavily soiled.
(See E-13)
The Clean Sign illuminates
green even when the air is
impure.
The Clean Sign illuminates
orange or red even when the
air is clean.
A clicking or ticking sound is
heard from the unit.
The discharged air has an
odour.
The unit does not operate
when cigarette smoke is in
the air.
Filter Indicator Light is
illuminated.
The Clean Sign are turned
off.
The Humidify Mode Indicator
Light does not illuminate
when the tank is not empty.
Water level in the tank does
not decrease or decreases
slowly.
The Clean Sign lights change
colour frequently.
Flashing of the Fan Speed
Indicator Light '
'.
• The air could be impure at the time the unit was plugged in.
Unplug the unit, wait one minute, and plug the unit in again.
• Sensor operation is affected if the odour sensor openings are dirty or
clogged. Gently clean the dust sensors.
(See E-9)
• Clicking or ticking sounds may be audible when the unit is generating
Plasumacluster ions.
• Check to see if the fi lter are heavily soiled.
• Clean or replace the fi lter.
• Plasmacluster Air Purifiers emit small traces of ozone which may
produce an odour.
• Is the unit installed in a location that is diffi cult for the sensor to de-
tect cigarette smoke?
• Are the dust sensor openings blocked or clogged?
(In this case, clean the openings.) (See E-9)
• After replacing fi lters, connect the power cord to an outlet and press
the Filter Reset Button.
(See E-9)
• Check to see if the Lights OFF Mode selected. If so, then press the
Lights Control Button to activate the indicator lights.
(See E-8)
• Check Styrofoam fl oat for impurities. Clean the HumidifyingTray. En-
sure unit is located on a level surface.
• Check to see if the Humidifying Tray and Water Tank are correctly
installed. Check the Humidifying Filter.
• Clean or replace the filter when it is heavily soiled.
(See E-11, E-12, E-13)
• The Clean Sign lights automatically change colours as impurities are
detected by the dust sensor and odour sensor.
• Abnormal fan motor
•
Turn power OFF to cancel the error
display, wait one minute, and then turn
power ON.
ENGLISH
E-15
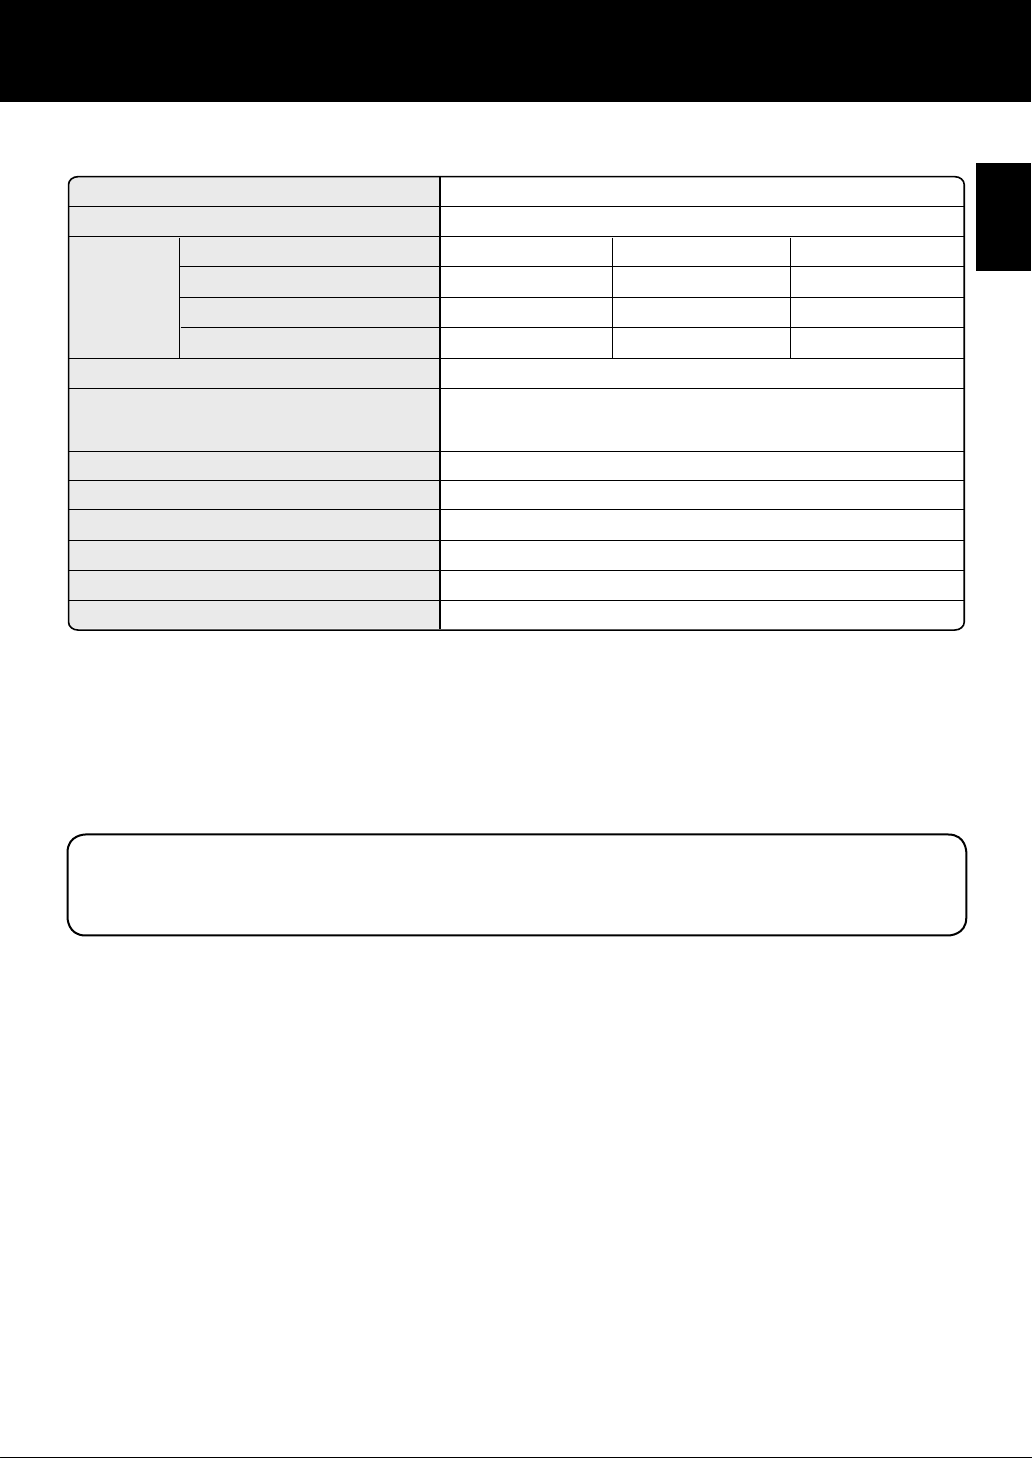
SPECIFICATIONS
Model
*1
*2
Size of a room which is appropriate for operating the unit at maximum fan speed.
•It indicates the space where a certain amount of dust particles can be removed in 30
minutes(JEM1467).
Size of a room in which approximately 7000 ions can be measured per cubic centimeter in the
center of the room (at a height of approximately 1.2 meters from the fl oor) when the product is
placed next to a wall and run at the MAX operation position.
Standby Power
In order to operate the electrical circuits while the power plug is inserted in the
wall outlet, this product consumes about 0.9W of standby power.
For energy saving, unplug the power cord when the unit is not in use.
*3 The class of the HEPA fi lter by EN 1822 is H10.
Power supply
Fan Speed
operation
Fan Speed Adjustment
Rated Power
Fan Speed
Humidifi cation
Recommended Room Size
High density Plasmacluster ion
recommended room size
Water tank capacity
Sensor
Filter type
Cord Length
Dimensions
Weight
KC-930EU
220-240V 50/60Hz
MAX
MED
LOW
27W
13W
4.5W
180m
3
/hour
126m
3
/hour
60m
3
/hour
350ml/hour
250ml/hour
140ml/hour
~21m
2 *1
~17m
2 *2
2.1L
odour sensor
Dust Collection (HEPA Filter
*3
)/ Deodorizing Filter
2.0m
375mm(W)x205mm(D)x535mm(H)
6.1kg

A. Information on Disposal for Users (private households)
1. In the European Union
Attention: If you want to dispose of this equipment, please do not use the ordinary dust
bin!
Used electrical and electronic equipment must be treated separately and in
accordance with legislation that requires proper treatment, recovery and recycling of
used electrical and electronic equipment.
Following the implementation by member states, private households within the EU
states may return their used electrical and electronic equipment to designated
collection facilities free of charge*. In some countries* your local retailer may also
take back your old product free of charge if you purchase a similar new one.
*) Please contact your local authority for further details.
If your used electrical or electronic equipment has batteries or accumulators, please
dispose of these separately beforehand according to local requirements.
By disposing of this product correctly you will help ensure that the waste undergoes
the necessary treatment, recovery and recycling and thus prevent potential negative
effects on the environment and human health which could otherwise arise due to
inappropriate waste handling.
2. In other Countries outside the EU
If you wish to discard this product, please contact your local authorities and ask for the
correct method of disposal.
For Switzerland: Used electrical or electronic equipment can be returned free of
charge to the dealer, even if you don’t purchase a new product. Further collection
facilities are listed on the homepage of
www.swico.ch or www.sens.ch.
B
. Information on Disposal for Business Users.
1. In the European Union
If the product is used for business purposes and you want to discard it:
Please contact your SHARP dealer who will inform you about the take-back of the
product. You might be charged for the costs arising from take-back and recycling.
Small products (and small amounts) might be taken back by your local collection
facilities.
For Spain: Please contact the established collection system or your local authority for
take-back of your used products.
2. In other Countries outside the EU
If you wish to discard of this product, please contact your local authorities and ask for
the correct method of disposal.
Attention: Your product is
marked with this symbol. It
means that used electrical
and electronic products
should not be mixed with
general household waste.
There is a separate
collection system for these
products.
EN

ENGLISH
Memo
Bitte lesen Sie sich diese Bedienungsanleitung vor der ersten
Inbetriebnahme Ihres neuen Luftreinigers sorgfältig durch.
Einige Geruchsbestandteile, die von dem Filter absorbiert werden, könnten
gespalten und durch den Luftaustritt wieder ausgegeben werden, so
dass zusätzlich Geruch entstehen könnte. Je nach Betriebsumgebung
und insbesondere bei Verwendung des Gerätes unter so extremen
Bedingungen, dass sie denen in einem herkömmlichen Haushalt nicht mehr
entsprechen, kann sich diese Geruchsentwicklung in einer kürzeren Zeit als
ursprünglich angenommen verstärken.
In diesem Fall empfehlen wir Ihnen den Erwerb des optionalen Ersatzfi lters.
HINWEIS
• Der Luftreiniger wurde für die Beseitigung von in der Luft enthaltenem Staub und Gerüchen
konzipiert; für eine Beseitigung schädlicher Gase (beispielsweise von in Zigarettenrauch
enthaltenem Kohlenmonoxid) ist er nicht geeignet. Wenn die Ursachen des Geruches weiterhin
vorhanden sind, kann der Geruch nicht vollständig entfernt werden (beispielsweise Gerüche von
Baumaterialien oder Haustieren).
• Wir empfehlen Ihnen, das Fenster etwas zu öffnen, wenn Sie rauchen, um den Luftaustausch zu
erleichtern.
Pollen, Staub, Partikel aus Zigarettenrauch,
Hautschuppen von Haustieren
Staubbeseitigung /
Geruchsbeseitigende Filter
Durch den Filter entfernte
Elemente
Zigarettenrauchgeruch,
Haushaltsgerüche
(Toilette / Kompost / Haustiere usw.)
Geruch
Staub

DEUTSCH
D-1
DEUTSCH
Wir danken Ihnen herzlich für den Kauf eines
Luftreinigers von SHARP. Bitte lesen Sie diese
Bedienungsanleitung sorgfältig, um genauere
Informationen über die korrekte Benutzung
zu erhalten. Bevor Sie das Produkt in Betrieb
nehmen, lesen Sie bitte unbedingt folgenden
Absatz: “Wichtige Sicherheitshinweise”.
Bewahren Sie die Bedienungsanleitung nach
dem Lesen an einem sicheren Ort auf, damit
Sie bei Bedarf nachschlagen können.
WICHTIGE SICHERHEITSHINWEISE
.....
D-2
• WARNUNG ...................................................
D-2
•
SICHEITHEITSHINWEISE FÜR DEN BETRIEB
.. D
-3
• RICHTLINIEN ZUR INSTALLATION ............
D-3
•
RICHTLINIEN ZUM UMGANG MIT FILTERN
... D
-3
BEZEICHNUNG DER EINZELNEN KOMPONENTEN
..
D-4
• ANZEIGEN AM HAUPTGERÄT ...................
D-4
• EXPLOSIONSZEICHUNG ...........................
D-4
• IM LIEFERUMFANG ....................................
D-5
• RÜCKSEITE .................................................
D-5
VORBEREITUNG
.........................................
D-6
• FILTERINSTALLATION ................................
D-6
• AUFFÜLLEN DES WASSERBEHÄLTERS ..
D-7
BETRIEB
.......................................................
D-8
• BEDIENUNG DES HAUPTGERÄTES .........
D-8
PFLEGE UND WARTUNG
.........................
D-9
• FILTER-ANZEIGELEUCHTE ........................
D-9
• RÜCKWAND UND SENSOREN ..................
D-9
• WASSERBEHÄLTER .................................
D-10
• GERÄT .......................................................
D-10
• LUFTBEFEUCHTUNGSWANNE ...............
D-11
• LUFTBEFEUCHTUNGSFILTER .................
D-12
•
RICHTLINIEN FÜR DEN FILTERAUSTAUSCH
..
D-13
STÖRUNGSBESEITIGUNG
.....................
D-14
TECHNISCHE DATEN
..............................
D-15
INHALT
LEISTUNGSMERKMALE
Die Plasmacluster-Technologie benutzt
Plasma-Entladungen, um dieselben
positiven und negativen Ionen wie in
der Natur („Plasmacluster-Ionen”) zu
produzieren und freizusetzen.
Dies ist eine einzigartige
Luftreinigungs-Technologie der SHARP
CORPORATION, um potentielle
Allergene wie abgestorbene Milben
oder deren Ausscheidungen *
1
, Viren *
2
sowie Schimmel und Bakterien *
3
, die
sich in der Luft befi nden, aufzuspalten
und zu deaktivieren. Sie wurde von
Drittorganisationen sowohl in Japan
als auch im Ausland belegt.
Wenn in der Luft eine hohe Dichte an
Plasmacluster-Ionen herrscht, wird der
Geruch von Zigarettenrauch, der sich
in Gardinen oder Sofas festgesetzt hat,
in etwa 80 Minuten *
4
beseitigt, und
wenn Kleidung direkt dem Luftstrom
des Gerätes ausgesetzt wird, das
Plasmacluster-Ionen produziert, wird
Schweißgeruch innerhalb einer Nacht (ca.
6 Stunden) bis auf einen praktisch nicht
mehr wahrnehmbaren Grad reduziert.
“Plasmacluster”-Technologie
*1 Graduiertenschule für höhere
Materialforschung, Universität
Hiroshima, Japan
Messung der Wirkung auf die
potentiellen Allergene von Milben in
der Luft in (13 m²)
*2 Retroscreen Virology, Ltd., London,
Vereinigtes Königreich
Messung des Anteils von eliminierten
Viren aus Luft in einer 1m³ großen Box
*3 Ishikawa Health Service Association,
Japan
Messung von Milben und Bakterien in
der Luft mittels eines Luftprüfgerätes
(13 m²)
*4 Japan Spinners Inspecting Foundation,
Japan
Analyse des geruchsbeseitigenden
Effekts an geruchsdurchtränkten
Stoffstücken

Bei der Verwendung elektrischer Geräte müssen eine Reihe grundlegender
Sicherheitshinweise einschließlich der folgenden beachtet werden:
D-2
WICHTIGE SICHERHEITSHINWEISE
WARNUNG
-
Bitte halten Sie sich an die folgenden Anweisungen, um das Risiko von Stromschlägen,
Bränden oder Verletzungen bei Personen zu vermeiden:
• Lesen Sie sich die Bedienungsanleitung vor der Inbetriebnahme sorgfältig durch.
• Verwenden Sie ausschließlich eine Steckdose mit einer Spannung von 220 ~ 240 Volt.
• Verwenden Sie das Gerät auf keinen Fall, wenn das Netzkabel oder der Netzstecker
beschädigt oder wenn der Anschluss an die Wandsteckdose instabil ist.
• Entfernen Sie regelmäßig den auf dem Stecker befi ndlichen Staub.
•
Stecken Sie niemals Ihre Finger oder irgendwelche Gegenstände in den Lufteinlass oder -auslass.
•
Halten Sie beim Entfernen des Netzsteckers stets den Stecker selbst und niemals das Kabel fest.
Anderenfalls kann es zu einem Kurzschluss und dadurch zu einem elektrischen Schlag bzw. Brand kommen.
• Fassen Sie den Stecker niemals mit feuchten Händen an.
• Verwenden Sie dieses Gerät niemals in der Nähe von Gasgeräten oder offenen Flammen.
•
Ziehen Sie den Netzstecker ab, bevor Sie das Gerät reinigen oder wenn Sie es nicht benutzen.
Anderenfalls kann es zu einem Kurzschluss und dadurch zu einem elektrischen Schlag aufgrund
mangelhafter Isolation und/oder zu einem Brand kommen.
•
Stellen Sie sicher, dass Sie das Gerät stets von der Stromversorgung abtrennen, bevor Sie den Wasserbehälter
auffüllen, das Gerät reinigen oder das Gerät über einen längeren Zeitraum hinweg nicht verwendet werden soll.
Anderenfalls kann es zu einem Kurzschluss und dadurch zu einem elektrischen Schlag bzw. Brand kommen.
• Falls das Netzkabel beschädigt ist, muss es durch den Hersteller selbst, eine seiner Service
Niederlassungen, ein durch Sharp autorisierten Dienstleister oder durch einen qualifi zierten
Techniker ausgetauscht werden, um mögliche Risiken zu vermeiden.
• Betreiben Sie das Gerät niemals, wenn Sie Insektenspray verwenden oder wenn es sich in
einem Raum befindet, in dem ölige Rückstände, Rauch von Räucherstäbchen, Funken eben
angezündeter Zigaretten, chemische Dämpfe o. ä. in der Luft vorhanden sind; dasselbe gilt für
Räume wie beispielsweise Badezimmer, in denen das Gerät feucht werden könnte.
• Lassen Sie bei der Reinigung des Geräts die gebotene Vorsicht walten. Stark ätzende
Reinigungsmittel können eine Beschädigung der Außenfl äche verursachen.
•
Die Servicearbeiten an diesem Luftreiniger sollten ausschließlich durch ein von Sharp autorisierten
Dienstleister ausgeführt werden. Konsultieren Sie bei irgendwelchen Fragen oder Problemen
hinsichtlich erforderlicher Einstellungen oder Reparaturen eine Service-Niederlassung in Ihrer Nähe.
• Entfernen Sie vor einem Transport des Geräts zuerst den Wasserbehälter und die
Luftbefeuchtungswanne und halten Sie das Gerät beim Transport an beiden Griffen fest.
• Trinken Sie niemals das Wasser aus der Luftbefeuchtungswanne oder dem Wasserbehälter.
•
Ersetzen Sie das Wasser im Wasserbehälter täglich durch frisches Leitungswasser und reinigen Sie den
Wasserbehälter und die Luftbefeuchtungswanne in regelmäßigen Abständen. (Siehe dazu Seite D-11 und D-12).
Lassen Sie das Wasser aus dem Wasserbehälter und der Luftbefeuchtungswanne ab, wenn Sie das Gerät über einen
längeren Zeitraum hinweg nicht verwenden. Falls das Wasser im Wasserbehälter bzw. in der Luftbefeuchtungswanne
belassen wird, kann es zu Schimmelpilz- oder Bakterienbildung kommen, was schlechte Gerüche zur Folge hat.
In einigen wenigen Fällen können die so entstandenen Bakterien sogar schädliche Auswirkungen
auf die Gesundheit haben.
•
Dieses Gerät ist nicht für die Benutzung durch Personen (einschließlich Kindern) gedacht, die nur über eingeschränkte
körperliche, sensorische oder geistige Fähigkeiten oder mangelndes Wissen oder Erfahrung verfügen. Es sei denn ihnen
wurde Aufsicht oder Anweisung zur Benutzung des Gerätes, von einer für deren Sicherheit verantwortliche Person, gegeben.
Kinder sollten beaufsichtigt werden, damit sie nicht mit dem Gerät spielen.
HINWEIS
- Störung des Radio- oder Fernsehempfangs
Falls dieser Luftreiniger eine Störung des Radio- oder Fernsehempfangs verursacht, versuchen Sie
bitte, die Störung durch eine oder mehrere der folgenden Maßnahmen zu beseitigen:
• Richten Sie die Empfangsantenne anders aus oder installieren Sie diese an einem anderen Ort.
• Vergrößern Sie den Abstand zwischen dem Gerät und dem Radio/Fernsehgerät.
• Schließen Sie das Gerät an eine Steckdose an, die mit einem anderen Stromkreis verbunden ist
als die Steckdose, an die das Radio/Fernsehgerät angeschlossen ist.
• Konsultieren Sie Ihren Händler oder einen erfahrenen Radio-/Fernsehtechniker.

DEUTSCH
D-3
SICHEITHEITSHINWEISE FÜR DEN BETRIEB
• Blockieren Sie niemals den Lufteinlass bzw. -auslass.
• Verwenden Sie das Gerät niemals in der Nähe oder auf heißen Objekten wie beispielsweise
Herde, oder an Orten, an denen es mit heißem Dampf in Kontakt kommen könnte.
• Betreiben Sie das Gerät ausschließlich in aufrechter Stellung.
• Halten Sie stets den Griff an beiden Seiten des Gerätes fest, wenn Sie es bewegen.
Wenn Sie das Gerät beim Tragen nur an der Rückabdeckung halten, könnte sich diese ablösen
und das Gerät herunterfallen, was zu Verletzungen führen könnte.
• Betreiben Sie das Gerät niemals, wenn die Filter, der Wasserbehälter oder die
Luftbefeuchtungswanne nicht ordnungsgemäß installiert sind.
• Waschen Sie den Filter niemals aus; er kann nicht wiederverwendet werden.
Die Filterleistung würde dadurch nicht verbessert, obendrein besteht die Gefahr von Stromschlä-
gen oder Fehlfunktionen.
• Reinigen Sie die Außenfl ächen des Geräts nur mit einem weichen und trockenen Tuch.
Verwenden Sie keine leicht fl üchtigen Flüssigkeiten und/oder Reinigungsmittel.
Anderenfalls könnte die Oberfl äche beschädigt oder rissig werden.
Darüber hinaus könnte es zu einer Fehlfunktion der Sensoren kommen.
RICHTLINIEN ZUR INSTALLATION
• Platzieren Sie das Gerät während des Betriebes in mindestens 2 m Entfernung zu anderen
Geräten, die elektrische Strahlung verwenden, wie beispielsweise Fernseher, Radiogeräte
oder Funkuhren.
• Meiden Sie Aufstellungsorte, an denen Möbel, Textilien oder andere Gegenstände mit dem
Lufteinlass bzw. -auslass in Kontakt kommen oder diesen blockieren könnten.
• Vermeiden Sie eine Verwendung an Orten, an denen das Gerät Kondensation oder rapiden
Temperaturschwankungen ausgesetzt wäre. (Sachgemäße Nutzungsbedingungen liegen bei
einer Raumtemperatur zwischen 0 und 35 °C vor.)
(Wenn es unvermeidbar ist, lassen Sie das Gerät 1 Stunde lang stehen, bevor Sie es einschalten).
• Platzieren Sie das Gerät auf einer stabilen Oberfl äche mit ausreichender Luftzufuhr.
Wenn das Gerät auf einem schweren Teppich aufgestellt wird, kann es leicht vibrieren.
• Meiden Sie Aufstellungsorte, an denen sich Fett oder öliger Rauch ansammelt. (beispielsweise
in Küchen usw.).
Anderenfalls könnte die Geräteoberfl äche rissig werden oder es könnte eine Fehlfunktion des Sen-
sors verursacht werden.
• Stellen Sie das Gerät 30~60 cm (1~2 ft) von der Wand entfernt auf, um eine ausreichende
Luftbewegung zu gewährleisten.
Mit der Zeit kann es zu einer Verunreinigung der Wand direkt hinter dem Luftauslass kommen.
Wenn Sie das Gerät über einen längeren Zeitraum hinweg am selben Ort verwenden, reinigen Sie
die dahinter befi ndliche Wand bitte regelmäßig und schützen Sie sie durch eine Vinylfolie o. ä., um
eine Verunreinigung der Wand zu vermeiden.
RICHTLINIEN ZUM UMGANG MIT FILTERN
• Befolgen Sie für eine ordnungsgemäße Pflege und Wartung der Filter alle in dieser
Bedienungsanleitung aufgeführten Anweisungen.
Verwenden Sie nur Filter, die für dieses Produkt vorgesehen sind.
D-4
ANZEIGEN AM HAUPTGERÄT
EXPLOSIONSZEICHUNG
BEZEICHNUNG DER EINZELNEN KOMPONENTEN
EIN/AUS-Taste
Plasmacluster-Ionen-EIN-/AUS-Taste
MODUS-Taste
Filter-Leuchtanzeige
Filter-Rückstelltaste
Leuchtanzeige für den
Luftbefeuchtungs-Modus
SAUBERKEITSANZEIGE
Grün Orange Rot
Rein Stark verunreinigt
AN-/AUS-
Leuchtanzeige für
die Plasmacluster-
Ionen
Geruchssensor
Leuchtanzeigen für die
Gebläsegeschwindigkeit
Handle
Main Unit
Main Unit Display
Hauptgerät-
Anzeige
Hauptgerät
Griff
Der Geruchssensor überwacht die
Raumluft ständig und ändert seine
Farbe je nach dem Reinheitsgrad
der Luft.
DEUTSCH
Handle
Tank Handle
Tank Cap
Power Cord
Plug
Float
Humidifying Tray
Humidifying Filter
Water Tank
(For humidifying)
Air Outlet
Filter
Tab
Back Panel
(Pre-Filter)
D-5
IM LIEFERUMFANG
•
Bedienungsanleitung
RÜCKSEITE
(Die Steckerform variiert je nach Bestimmungsland.)
(Staubbeseitigung /
Geruchsbeseitigende Filter)
Air Inlet
Date Label
Air outlet
Griff
Filter
Lasche
Rückwand
(Vorfi lter)
Luftauslass
Lufteinlass
Datumsaufkleber
Luftauslass
Netzkabel
Stecker
Tankgriff
Wasserbehälter
(zur Luftbefeuchtung)
Luftbefeuchtungsfi lter
Tankdeckel
Luftbefeuchtungswanne
Schwimmer

VORBEREITUNG
D-6
Ziehen Sie unbedingt den Netzstecker aus der
Steckdose.
Um die Qualität des Filters zu erhalten, ist er im Hauptgerät eingesetzt und in
einem Plastikbeutel verpackt. Stellen Sie vor der ersten Inbetriebnahme des
Geräts sicher, dass Sie den Filter aus dem Plastikbeutel nehmen.
Filter herausnehmen
Nehmen Sie die Rückwand ab.
Ziehen Sie die Lasche an der Oberseite der
Rückabdeckung.
Filter installieren
FILTERINSTALLATION
Nehmen Sie den Filter aus dem
Plastikbeutel.
Setzen Sie den Filter nicht verkehrt herum ein,
andernfalls wird das Gerät nicht einwandfrei
funktionieren.
Setzen Sie den Filter in das Hauptgerät ein.
1
2
2
1
1
Lasche
Befestigen Sie die Rückwand
wieder am Hauptgerät.
2
Tragen Sie das Datum der Inbetriebnahme
auf dem Datumsaufkleber ein.
3
Verwenden Sie das Datum als Richtlinie für
die Planung des Filteraustausches.
Datumsaufkleber
DEUTSCH
D-7
AUFFÜLLEN DES WASSERBEHÄLTERS
VORSICHT
Tankdeckel
•
Halten Sie das Gerät von Wasser fern. Sonst könnte ein Kurzschluss und/oder ein Stromschlag
verursacht werden.
• Verwenden Sie kein heißes Wasser (40 ºC), chemische Zusätze, aromatische Substanzen,
verunreinigtes Wasser oder andere schädliche Flüssigkeiten; anderenfalls kann es zu einer
Verformung bzw. Fehlfunktion kommen.
• Verwenden Sie ausschließlich frisches Leitungswasser. Die Verwendung einer anderen
Wasserquelle kann eine Schimmelpilz- bzw. Bakterienbildung fördern.
Im Luftreinigungsmodus kann das Gerät betrieben werden, ohne
dass zuerst der Wasserbehälter aufgefüllt werden muss. Wenn
Sie das Gerät allerdings im Luftreinigungs- und Luftbefeuchtungs
verwenden, sollten Sie den Wasserbehälter auffüllen.
1
Bauen Sie den Wasserbehälter aus, indem
Sie die Oberseite lösen.
2
Nehmen Sie den Deckel des
Wasserbehälters ab und befüllen Sie den
Wasserbehälter vorsichtig mit frischem
Leitungswasser.
3
Schließen Sie den Tankdeckel nach dem
Befüllen fest und sicher.
• Stellen Sie sicher, dass keinerlei Wasser austritt.
• Wischen Sie überschüssiges Wasser von der
Außenseite des Wasserbehälters ab.
• Halten Sie den Wasserbehälter beim Transport mit
beiden Händen fest und achten Sie darauf, dass die
Wasserbehälteröffnung immer nach oben weist.
4
Setzen Sie den Wasserbehälter wieder in
das Gerät ein.
Ersetzen Sie das Wasser im Wasserbehälter täglich
durch frisches Leitungswasser.
Die obere Lasche rastet mit einem Klicken ein, sobald
der Wasserbehälter ordnungsgemäß installiert ist.
Fan Speed Indicator Lights
Plasmacluster Ion Indicator Light
POWER ON/OFF
Button
MODE Button
Plasmacluster Ion
ON/OFF Button
NIEDRIGER Betrieb
Das Gerät arbeitet sehr ruhig bei
minimalen Lufteinlass.
MITTLERER Betrieb
Das Gerät arbeitet mit mittlerer
Gebläsegeschwindigkeit.
MAXIMALER Betrieb
Das Gerät arbeitet mit maximaler
Gebläsegeschwindigkeit.
AUTO-Betrieb
Die Gebläsegeschwindigkeit wird je nach Verunreinigungsgrad
der Luft automatisch umgeschaltet (zwischen HOCH und
NIEDRIG). Die Sensoren erfassen jede Verunreinigung und
sorgen so für eine effi ziente Luftreinigung.
BETRIEB
BEDIENUNG DES HAUPTGERÄTES
D-8
EIN/AUS-Taste
• Drücken Sie, um den Betrieb zu starten (kurzer
Signalton) und zu beenden (langer Signalton)
•
Plasmacluster-Leuchtanzeige und
Gebläsegeschwindigkeits-Leuchtanzeige an/abschalten.
•
Falls das Netzkabel nicht getrennt wurde, wird der Betrieb in dem
Modus wieder aufgenommen, in dem er zuletzt verwendet wurde.
MODUS-Taste
Plasmacluster-Ionen-EIN-/AUS-Taste
•
Drücken Sie zur Auswahl der gewünschten
Gebläsegeschwindigkeit die MODUS-Taste.
Die Anzeigeleuchten zeigen die gegenwärtig ausgewählte
Gebläsegeschwindigkeit an.
•
Der Betriebsmodus kann wie unten angegeben umgeschaltet werden.
Drücken Sie die Plasmacluster-Ionen-EIN-/AUS-Taste, um
den Plasmacluster-Ionen-Modus AN- und AUS zuschalten.
Wenn der Modus Plasmacluster-Ionen AN ist, leuchtet die
Plasmacluster-Ionen-Leuchtanzeige auf. (blau)
Wählen Sie für den Betrieb bitte entweder den Luftbefeuchtungs- oder den Luftreinigungsmodus.
Luftbefeuchtungsmodus: Füllen Sie den Wasserbehälter auf. (Siehe dazu Seite D-7)
Luftreinigungsmodus: Entleeren Sie den Wasserbehälter und den Luftbefeuchtungseinsatz.
Leuchtanzeigen für die Gebläsegeschwindigkeit
AN-/AUS-Gebläsenzeige für die Plasmacluster-Ionen
EIN/AUS-Taste
MODUS-Taste
Plasmacluster-
Ionen-EIN-/AUS-
Taste
DEUTSCH
D-9
PFLEGE UND WARTUNG
FILTER-ANZEIGELEUCHTE
Die Filter-Anzeigeleuchte leuchtet, um Sie darauf hinzuweisen, dass eine Wartung der
Rückwand, der Sensoren sowie des Luftbefeuchtungsfilters durchgeführt werden
muss. Die Anzeigeleuchte beginnt nach etwa 720 Betriebsstunden zu leuchten.
Bitte reinigen Sie das Gerät einschließlich sämtlicher Sensoren und Filter
regelmäßig, damit die optimale Leistung dieses Luftreinigers erhalten bleibt. Stellen
Sie bei der Reinigung des Geräts sicher, dass Sie zuerst das Netzkabel von der
Stromversorgung trennen, und handhaben Sie den Netzstecker niemals mit feuchten
Händen. Anderenfalls kann es zu Stromschlägen bzw. zu Personenschäden kommen.
Pfl egezyklus
Nach 720 Betriebsstunden
(30 Tage x 24 Stunden = 720)
Pfl egezyklus
Wann immer sich Staub auf dem Gerät
angesammelt hat oder alle 2 Monate
Stellen Sie die Filter-Anzeigeleuchte nach der
Wartung wieder zurück.
1
Schließen Sie den Netzstecker des Geräts wieder an die
Stromversorgung an.
Schalten Sie das Gerät ein und drücken Sie für 3
Sekunden die Rückstelltaste.
• Nun erlischt die Filter-Anzeigeleuchte.
• Selbst wenn die Filter-Anzeigeleuchte bereits erloschen
ist, empfi ehlt sich das Gedrückthalten der Rückstelltaste,
um den Wartungstimer ordnungsgemäß zurückzustellen.
2
Beseitigen Sie den Staub von der Sensoröffnung und Rückwand vorsichtig mit einem
Staubsauger-Aufsatz oder einem anderen geeigneten Gerät.
Rückwand
RÜCKWAND UND SENSOREN
<Wenn die Rückseite hartnäckige Verschmutzungen aufweist>
1
Bei hartnäckigen Verschmutzungen legen Sie die Rückwand in Wasser mit
Spülmittel.
(Ca. 10 min)
(Vermeiden Sie kräftiges Schrubben beim Waschen der Rückwand.)
2
Spülen Sie die Rückwand einige Male mit sauberem Wasser
ab, um sämtliche Reinigungsmittel-Rückstände zu beseitigen.
3
Lassen Sie überschüssiges Wasser vom Filter ablaufen.

D-10
PFLEGE UND WARTUNG
WASSERBEHÄLTER
Spülen Sie das Innere des Tanks aus, indem Sie eine kleine
Menge lauwarmen Wassers in den Wasserbehälter füllen, den
Tankdeckel fest und sicher schließen und den Wasserbehälter
schütteln. Zur Reinigung der Wasserbehälter-Innenseite
kann ein mildes Spülmittel verwendet werden; dieses
sollte allerdings verdünnt werden. Anschließend muss der
Wasserbehälter gründlich ausgespült werden, um sämtliche
Reiniger- Rückstände zu beseitigen.
(Beachten Sie bitte, dass der Wasserbehälter nicht
spülmaschinengeeignet ist.)
Behälterdeckel
Wasserbehälter
Pfl egezyklus
Bei täglicher Luftbefeuchtung
GERÄT
Pfl egezyklus
Wann immer sich Staub auf dem Gerät angesammelt hat oder alle 2 Monate
Reinigen Sie das Gerät regelmäßig, um eine Verunreinigung oder Fleckenbildung zu vermeiden.
Falls Flecken auf dem Gerät belassen werden, sind diese später schwer zu beseitigen.
Wischen Sie das Gerät mit einem trockenen, weichen Tuch ab.
Bei hartnäckigeren Verunreinigungen oder Flecken können Sie auch ein mit lauwarmem
Wasser angefeuchtetes Tuch verwenden.
Verwenden Sie keine leicht fl üchtigen Flüssigkeiten.
Benzin, Farbverdünner oder Polierpaste könnten die Geräteoberfl äche beschädigen.
Verwenden Sie keine Reinigungsmittel.
Die Zusatzstoffe eines Reinigungsmittels könnten die Geräteoberfl äche beschädigen.
Loading...