


SPLIT TYPE
ROOM AIR CONDITIONER
OPERATION MANUAL
CLIMATISEUR INDIVIDUEL
EN DEUX PARTIES
MODE D'EMPLOI
ACONDICIONADOR DE AIRE
DE DOBLE SERVICIO
MANUAL DE INSTRUCCIONES
CONDIZIONATORE D'ARIA
DA CAMERA TIPO SPLIT
MANUALE DI ISTRUZIONI
ZWEITEILIGES
KLIMAGERÄT
BEDIENUNGSANLEITUNG
ΑΙΡΚΟΝΤΙΣΙΟΝ ΔΩΜΑΤΙΟΥ ΤΥΠΟΥ SPLIT
ΕΓΧΕΙΡΙΔΙΟ ΛΕΙΤΟΥΡΓΙΑΣ
AR CONDICIONADO DE SALA
DE DUAS UNIDADES
MANUAL DE OPERAÇÃO
INDOOR UNIT
AY-XPC7JHR
AY-XPC9JHR
AY-XPC12JHR
Device of this mark is a trademark of Sharp Corporation.
Plasmacluster is a registered trademark or a trademark of Sharp Corporation
PORTUGUÊS ΛΛΗΝΙΚΑE DEUTSCH ITALIANO ESPAÑOL FRANÇAIS ENGLISH
Attention: Your product is marked with this symbol. It means that used electrical and electronic products should
not be mixed with general household waste. There is a separate collection system for these products.
Pb
A. Information on Disposal for Users (private households) 1. In the European Union
Attention: If you want to dispose of this equipment, please do not use the ordinary dust bin!
Used electrical and electronic equipment must be treated separately and in accordance with legislation that requires proper treatment, recovery and recycling of used electrical and electronic equipment.
Following the implementation by member states, private households within the EU states may return their used electrical and electronic equipment
to designated collection facilities free of charge*. In some countries* your local retailer may also take back your old product free of charge if you purchase a similar new one.
*) Please contact your local authority for further details.
If your used electrical or electronic equipment has batteries or accumulators, please dispose of these separately beforehand according to local requirements.
By disposing of this product correctly you will help ensure that the waste undergoes the necessary treatment, recovery and recycling and thus prevent potential negative effects on the environment and human health which could otherwise arise due to inappropriate waste handling.
2. In other Countries outside the EU
If you wish to discard this product, please contact your local authorities and ask for the correct method of disposal.
For Switzerland: Used electrical or electronic equipment can be returned free of charge to the dealer, even if you don’t purchase a new product. Further collection facilities are listed on the homepage of www.swico.ch or www.sens.ch.
B. Information on Disposal for Business Users.
1. In the European Union
If the product is used for business purposes and you want to discard it:
Please contact your SHARP dealer who will inform you about the take-back of the product. You might be charged for the costs arising from take-back and recycling. Small products (and small amounts) might be taken back by your local collection facilities.
For Spain: Please contact the established collection system or your local authority for take-back of your used products.
2. In other Countries outside the EU
If you wish to discard of this product, please contact your local authorities and ask for the correct method of disposal.
The battery supplied with this product contains traces of Lead.
For EU: The crossed-out wheeled bin implies that used batteries should not be put to the general household waste! There is a separate collection system for used batteries, to allow proper treatment and recycling in accordance with legislation. Please contact your local authority for details on the collection and recycling schemes.
For Switzerland: The used battery is to be returned to the selling point.
For other non-EU countries: Please contact your local authority for correct method of disposal of the used battery.
Contains fluorinated greenhouse gases covered by the Kyoto Protocol
R410A (Global warming potential 1980)
GB
|
|
|
|
|
|
|
|
|
|
|
|
|
|
|
|
|
|
|
|
|
|
|
|
|
|
|
ENGLISH |
Please read this manual carefully before using the product. |
|||
|
|
|
|||||
|
|
|
|
This manual should be kept in a safe place for handy reference. |
|||
CONTENTS
• IMPORTANT SAFETY INSTRUCTIONS....... |
GB-1 |
• PART NAMES................................................ |
GB-2 |
• USING THE REMOTE CONTROL ................ |
GB-4 |
• SETTING AIR PURIFYING FILTER ............. |
GB-5 |
• TIPS ON SAVING ENERGY.......................... |
GB-5 |
• AUXILIARY MODE ........................................ |
GB-5 |
• BASIC OPERATION...................................... |
GB-6 |
• TIPS ABOUT INDICATOR PANEL................. |
GB-7 |
• ADJUSTING THE AIR FLOW DIRECTION ... |
GB-8 |
• PLASMACLUSTER OPERATION ................. |
GB-9 |
• SELF CLEAN OPERATION........................... |
GB-9 |
• ONE-HOUR OFF TIMER............................... |
GB-10 |
• TIMER OPERATION ..................................... |
GB-10 |
• FULL POWER OPERATION ......................... |
GB-12 |
• MAINTENANCE ............................................ |
GB-12 |
• BEFORE CALLING FOR SERVICE .............. |
GB-14 |
• ADDITIONAL NOTES ON OPERATION ....... |
GB-15 |
IMPORTANT SAFETY
INSTRUCTIONS
WARNINGS FOR USE
1 Do not pull or deform the power supply cord. Pulling and misuse of the power supply cord can result in damage to the unit and cause electrical shock.
2 Be careful not to expose your body directly to the outlet air for a long time. It may affect your physical conditions.
3 When using the air conditioner for infants, children, elderly, bedridden, or disabled people make sure the room temperature is suitable for those in the room.
4 Never insert objects into the unit. Inserting objects can result in injury due to the high speed rotation of internal fans.
5 Ground the air conditioner without fail. Do not connect the grounding wire to gas pipe, water pipe, lightning rod or telephone grounding wire. Incomplete grounding may cause electric shock.
6 If anything is abnormal with the air conditioner (ex. a burning smell), stop the operation immediately and turn the circuit breaker OFF.
7 The appliance shall be installed in accordance with national wiring regulations. Improper cable connection can cause the power supply cord, plug and the electrical outlet to overheat and cause fire.
8 If the supply cord is damaged, it must be replaced by the manufacturer or its service agent or a similarly qualified person in order to avoid a hazard. Use only the manufacturespecified power cord for replacement.
9 Do not splash or pour water directly on the unit. Water can cause electrical shock or equipment damage.
WARNINGS FOR INSTALLATION/ REMOVAL/REPAIR
•Do not attempt to install/remove/repair the unit by yourself. Incorrect work will cause electric shock, water leak, fire etc. Consult your dealer or other qualified service personnel for the installation/ removal/repair of the unit.
CAUTIONS FOR USE
1 Open a window or door periodically to ventilate the room, especially when using gas appliances. Insufficient ventilation may cause oxygen shortage.
2 Do not operate the buttons with wet hand. It may cause electric shock.
3 For safety, turn the circuit breaker off when not using the unit for an extended period of time.
4 Check the outdoor unit mounting rack periodically for wear and to make sure it is firmly in place.
5 Do not put anything on the outdoor unit nor step on it. The object or the person may fall down or drop, causing injury.
6 This unit is designed for residential use. Do not use for other applications such as in a kennel or greenhouse to raise animals or grow plants.
7 Do not place a vessel with water on the unit. If water penetrates into the unit, electrical insulations may deteriorate and cause electric shock.
8 Do not block the air inlets nor outlets of the unit. It may cause insufficient performance or troubles.
9 Be sure to stop the operation and turn the circuit breaker off before performing any maintenance or cleaning. A fan is rotating inside the unit and you may get injured.
10This appliance is not intended for use by young children or infirm persons without supervision.
Young children should be supervised to ensure that they do not play with the appliance.
CAUTIONS FOR LOCATION/
INSTALLATION
•Make sure to connect the air conditioner to power supply of the rated voltage and frequency.
Use of a power supply with improper voltage and frequency can result in equipment damage and possible fire.
•Do not install the unit in a place where inflammable gas may leak. It may cause fire.
Install the unit in a place with minimal dust, fumes and moisture in the air.
•Arrange the drain hose to ensure smooth drainage. Insufficient drainage may cause wetting of the room, furniture etc.
•Make sure a leak breaker or a circuit breaker is installed, depending on the installation location, to avoid electrical shock.
ENGLISH
GB-1

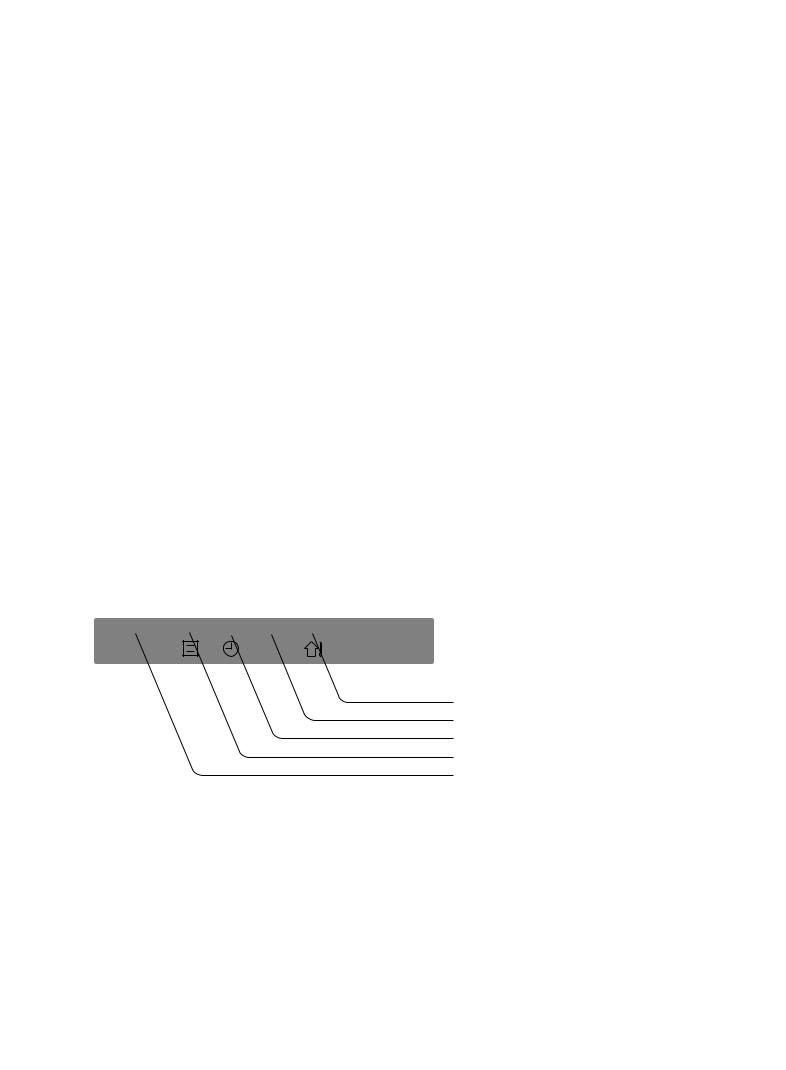
PART NAMES
INDOOR UNIT
1 |
1 |
Inlet (Air) |
|
2 |
2 Filter cover |
||
|
3 |
Air Filter |
|
|
4 |
Air Purifying Filter |
|
3 |
5 |
Receiver Window |
|
|
|
||
|
6 |
AUX Button |
|
4 |
7 |
Release Button |
|
5 |
8 |
Horizontal Adjustment Louvre |
|
|
9 |
Outlet (Air) |
|
6 |
10 |
Open Panel |
|
11 |
Remote Control |
||
|
|||
7 |
|
|
|
8 |
|
|
|
9 |
|
|
|
10
11
|
|
|
|
|
|
|
|
|
12 |
12 |
Receiver Window |
|
|
||
|
|
|
|
|
|
|
|
|
|
|
|||||
|
|
|
|
|
|||||||||||
|
|
|
|
|
|
|
|
|
|
||||||
|
|
|
|
|
|
|
|
|
|
13 |
TEMPERATURE Indicator |
|
|||
|
|
|
|
|
|
|
|
|
|
|
|||||
|
|
|
|
|
|
|
|
|
|
|
|||||
|
13 |
14 |
OUTDOOR Temp. Lamp (green |
) |
|||||||||||
|
14 |
15 |
FULL POWER Lamp (green |
) |
|||||||||||
|
15 |
||||||||||||||
|
16 |
TIMER Lamp (orange |
|
|
) |
|
|||||||||
|
16 |
|
|
|
|||||||||||
|
|
|
|
||||||||||||
|
|
|
|||||||||||||
|
|
|
|
|
|
|
|||||||||
|
17 |
17 |
OPERATION Lamp (red |
) |
|
||||||||||
|
18 |
18 |
PLASMACLUSTER Lamp (blue) |
||||||||||||
|
|
|
|
|
|
|
|
|
|
||||||
NOTE:
Actual units might vary slightly from those shown above.
GB-2
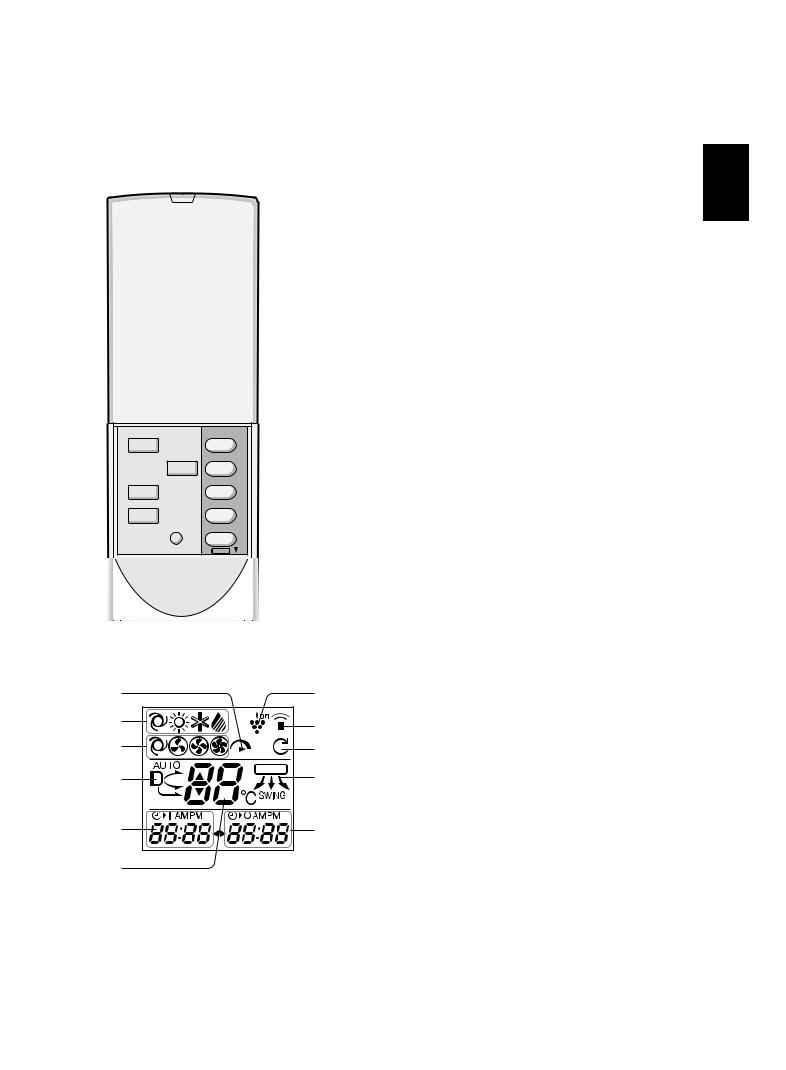
REMOTE CONTROL
1
2
3
4
5
6
7
8
9
10
11
12 |
13 |
14 |
15 |
16 |
17 |
18 |
19 |
20 |
1TRANSMITTER
2DISPLAY (Liquid Crystal Display)
3PLASMACLUSTER Button
4DISPLAY Button
5ON/OFF Button
6THERMOSTAT Button
7HORIZONTAL AIR FLOW Button
8VERTICAL AIR FLOW Button
9MODE Button
10TIMER ON Button (for setting the timer)
11TIMER OFF Button (for setting the timer)
12ONE-HOUR OFF TIMER Button
13TIME ADVANCE Button
14TIME REVERSE Button
15SELF CLEAN Button
16TIMER SET/CANCEL Button
17Indicates battery compartment is below this mark
18CLOCK Button
19FAN Button
20FULL POWER Button
L.C.D. REMOTE CONTROL DISPLAY |
|
|
|
|
|
|
21 |
FULL POWER Symbol |
|
21 |
27 |
22 |
MODE Symbols |
|
22 |
|
|
: AUTO |
: COOL |
28 |
|
: HEAT |
: DRY |
|
|
|
|||
23 |
|
|
||
29 |
23 |
FAN SPEED Symbols |
|
|
24 |
30 |
|
: AUTO |
: LOW |
|
|
|
||
|
|
|
: SOFT |
: HIGH |
25 |
31 |
24 |
VERTICAL AIR FLOW Symbol |
|
25 |
TIMER ON Indicator/CLOCK |
|
||
|
|
|
Indicates the on timer preset time or current time. |
|
26 |
|
26 |
TEMPERATURE Indicator |
|
|
27 |
PLASMACLUSTER Symbol |
|
|
|
|
|
||
|
|
28 |
TRANSMITTING Symbol |
|
|
|
29 |
SELF CLEAN Symbol |
|
|
|
30 |
HORIZONTAL AIR FLOW Symbol |
|
|
|
31 |
TIMER OFF Indicator |
|
|
|
|
Indicates the preset time for off timer or one-hour off |
|
|
|
|
timer. |
|
ENGLISH
GB-3
USING THE REMOTE CONTROL
LOADING BATTERIES
Use two size-AAA (R03) batteries.
1 Remove the remote control cover.
2 Insert batteries in the compartment, making sure the (+) and (-) polarities are correctly aligned.
•The display indicates “AM 6:00” when batteries are properly installed.
3 Reinstall the cover
Remote  control
NOTE:
•The battery life is approximately one year in normal use.
•When you replace the batteries, always change both batteries, and make sure they are the same type.
•If the remote control does not operate properly after replacing the batteries, take out the batteries and reinstall them again after 30 seconds.
•If you will not be using the unit for a long time, remove the batteries from the remote control.
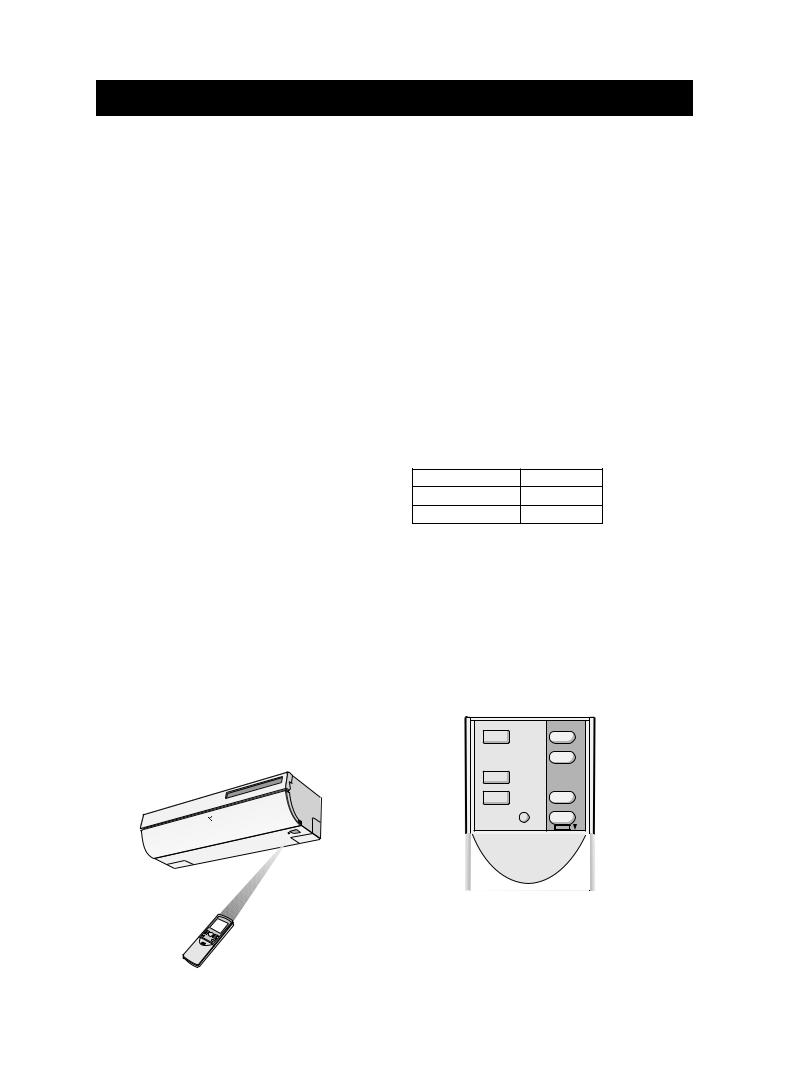
HOW TO USE THE REMOTE CONTROL
Point the remote control towards the unit’s signal receiver window and press the desired button. The unit generates a beep when it receives the signal.
•Make sure there is no curtain or other object between the remote control and the unit.
•The remote control can send signals from up to 7 metres away.
CAUTION:
•Do not allow the signal receiver window to receive strong direct sunlight, since it can adversely affect its operation. If the signal receiver window is exposed to direct sunlight, close a curtain to block the light.
•Using a fluorescent lamp with a quick starter in the same room may interfere with transmission of the signal.
•The unit can be affected by signals transmitted from the remote control of a television, VCR or other equipment used in the same room.
•Do not leave the remote control in direct sunlight or near a heater. Also, protect the unit and remote control from moisture and shock which can discolour or damage them.
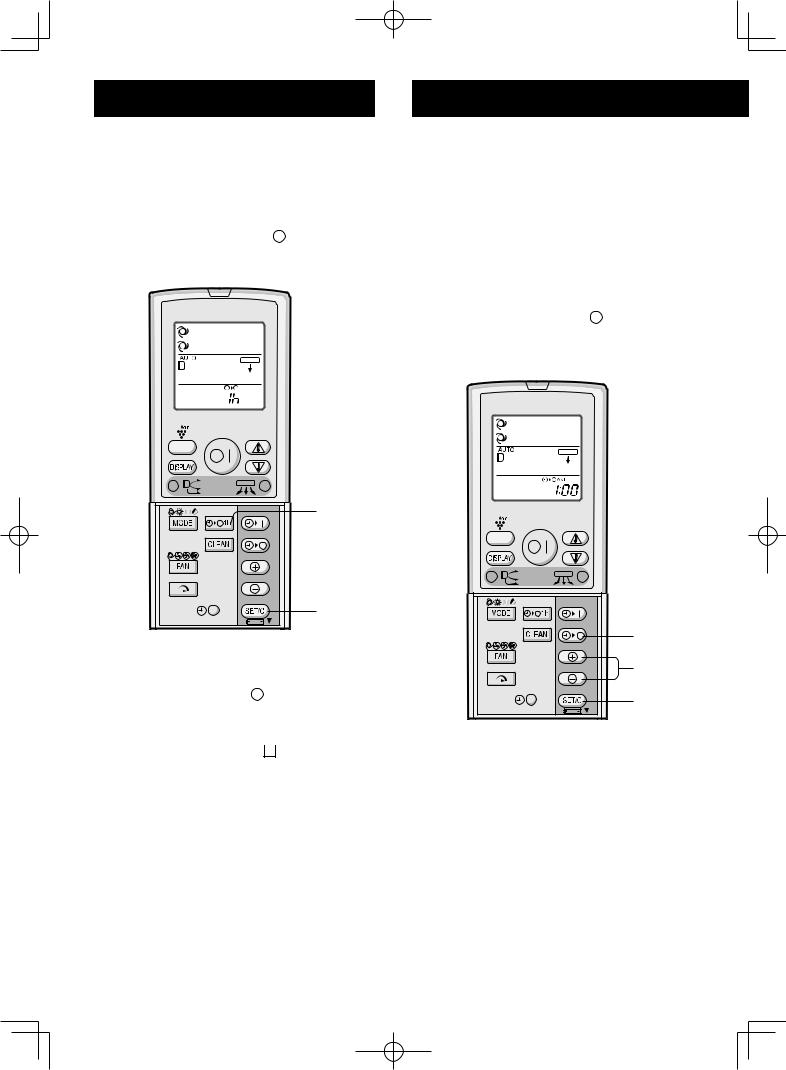
SET CURRENT CLOCK TIME
There are two clock modes: 12-hour mode and 24-hour mode.
Example: 5 o’clock in the afternoon
Clock |
Display |
12-hour mode |
PM 5:00 |
24-hour mode |
17:00 |
1 To set to the 12-hour mode, press the CLOCK button once in the first step.
To set to the 24-hour mode, press the CLOCK button twice in the first step.
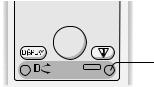
2 Press the TIME ADVANCE or REVERSE button to set the current time.
•Keep the button pressed to advance or reverse the time display quickly.
3 Press the SET/C button.
• The colon (:) blinks to indicate that the clock is functioning.

 2
2
3
1
NOTE:
•The current time cannot be set when the timer is operating.
GB-4
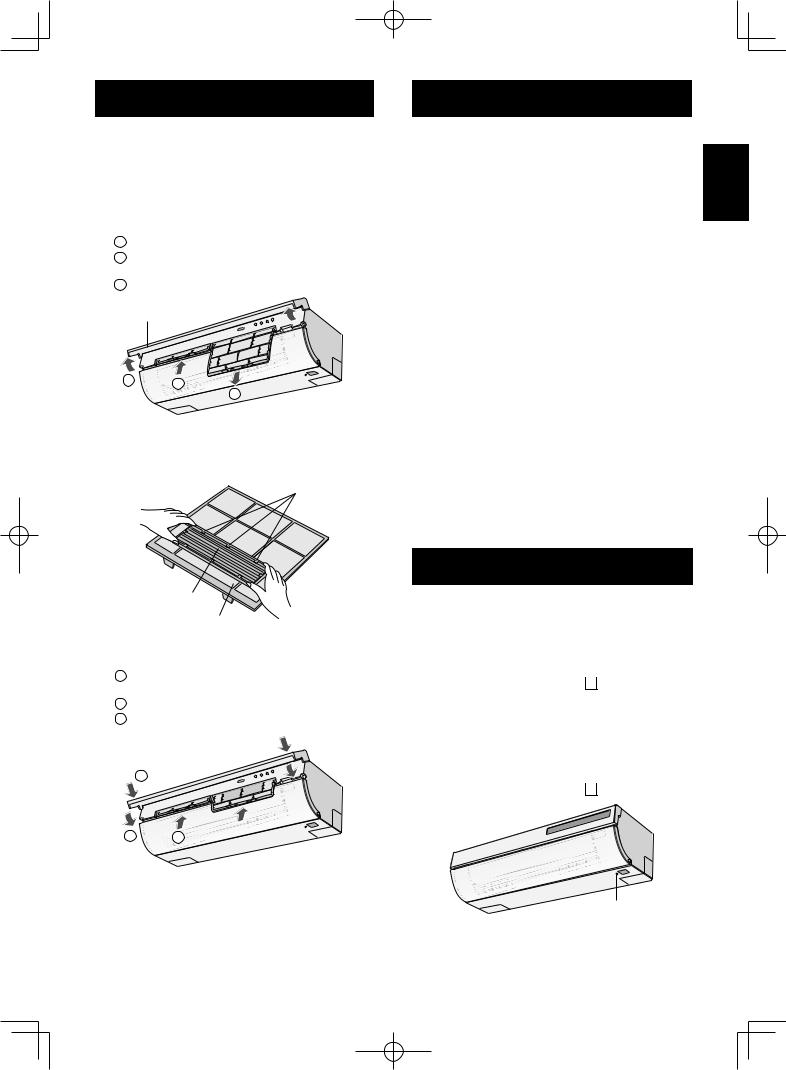
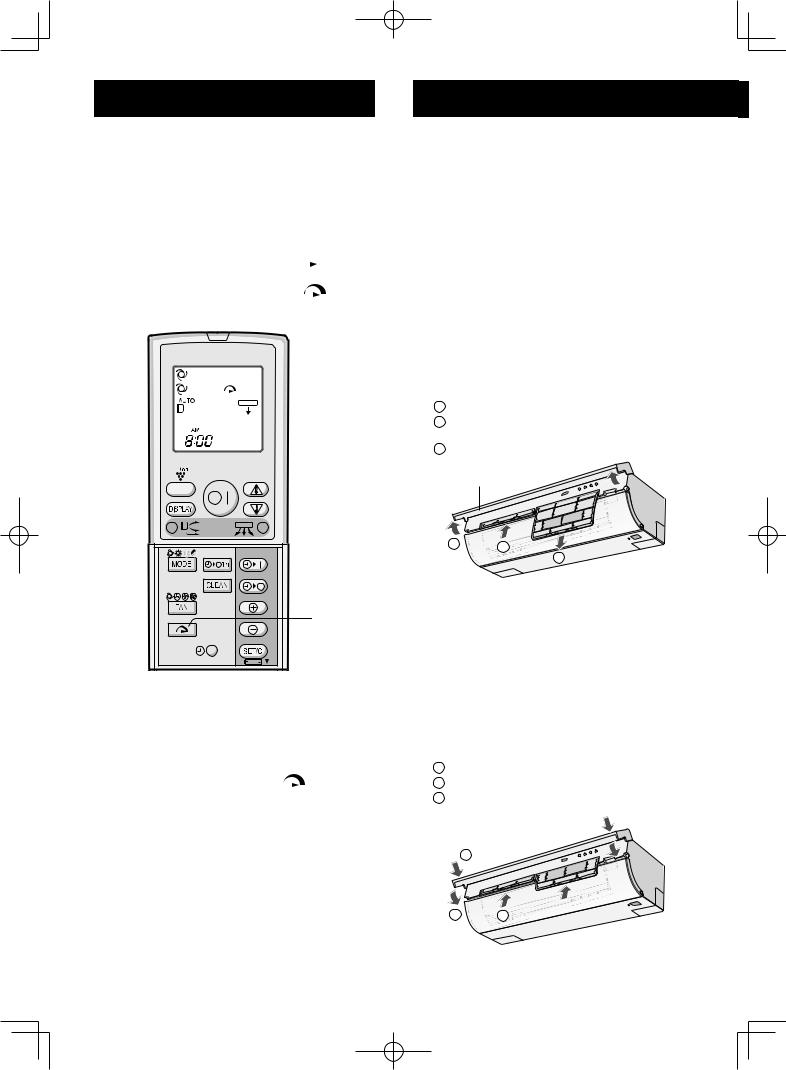
SETTING AIR PURIFYING FILTER
The air purifying filters are packed as accessory of this unit. During operation of the air conditioner, the filters remove dust and tobacco smoke from the air and discharges clean air.
1 Take out the air filters.
1Open the filter cover.
2Push the air filters up slightly to unlock them.
3Pull the air filters down to remove them.
Filter cover
1 |
2 |
|
3
2 Set the air purifying filter under the filter stoppers located on the air filter.
Filter stopper
Air purifying filter
Air filter
3 Reinstall the air filters.
1 Reinstall the air filters in the original positions.
2 Close the filter cover.
3 Push the arrow-marked of the panel firmly to lock it in place.
3
2 
 1
1

Precautions:
•The filters are sealed in a plastic bag to keep their dust collection effect.
Do not open the bag until using the filters. (Otherwise the filters life may get shorter.)
•Do not expose the filters to direct sunlight. (Otherwise they may deteriorate.)
TIPS ON SAVING ENERGY
Below are some simple ways to save energy when you use your air conditioner.
SET THE CORRECT TEMPERATURE
•Setting the thermostat 1°C higher than the desired temperature in the COOL mode and 2°C lower in the HEAT mode will save approximately 10 percent in power consumption.
•Setting the temperature lower than necessary during cooling operation will result in increased power consumption.
BLOCK DIRECT SUNLIGHT AND PREVENT DRAFTS
•Blocking direct sunlight during cooling operation will reduce power consumption.
•Close the windows and doors during cooling and heating operations.
SET PROPER AIR FLOW DIRECTION TO OBTAIN THE BEST AIR CIRCULATION
KEEP FILTER CLEAN TO ENSURE THE MOST EFFICIENT OPERATION
MAKE MOST OF THE TIMER OFF FUNCTION
DISCONNECT THE POWER CORD WHEN THE UNIT IS NOT USED FOR AN EXTENDED PERIOD OF TIME
•The indoor unit still consumes a small amount of power when it is not operating.
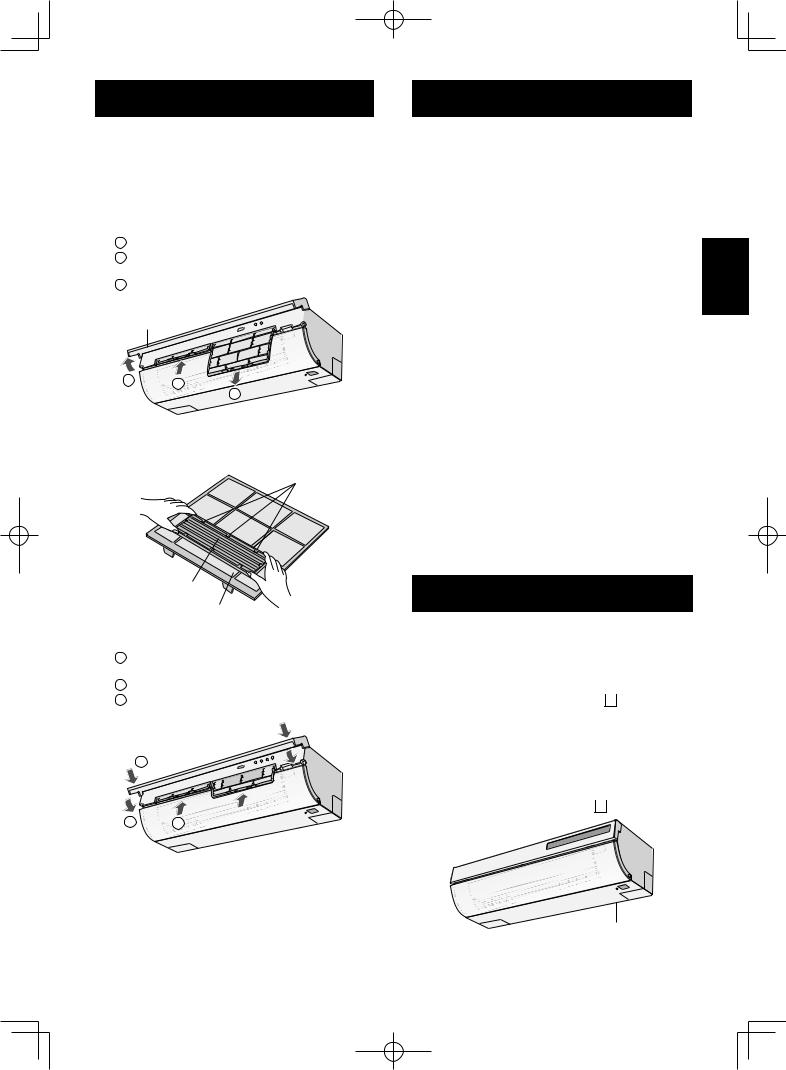
AUXILIARY MODE
Use this mode when the remote control is not available.
TO TURN ON
Lift the open panel of the indoor unit and press the AUX button.
•The red OPERATION lamp (  ) on the unit will light and the unit will start operating in the AUTO mode.
•The fan speed and temperature setting are set to AUTO.
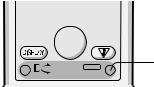
TO TURN OFF
Press the AUX. button again.
•The red OPERATION lamp (  ) on the unit will turn off.
AUX
NOTE:
•If the AUX button is pressed during normal operation, the unit will turn off.
ENGLISH
GB-5
BASIC OPERATION
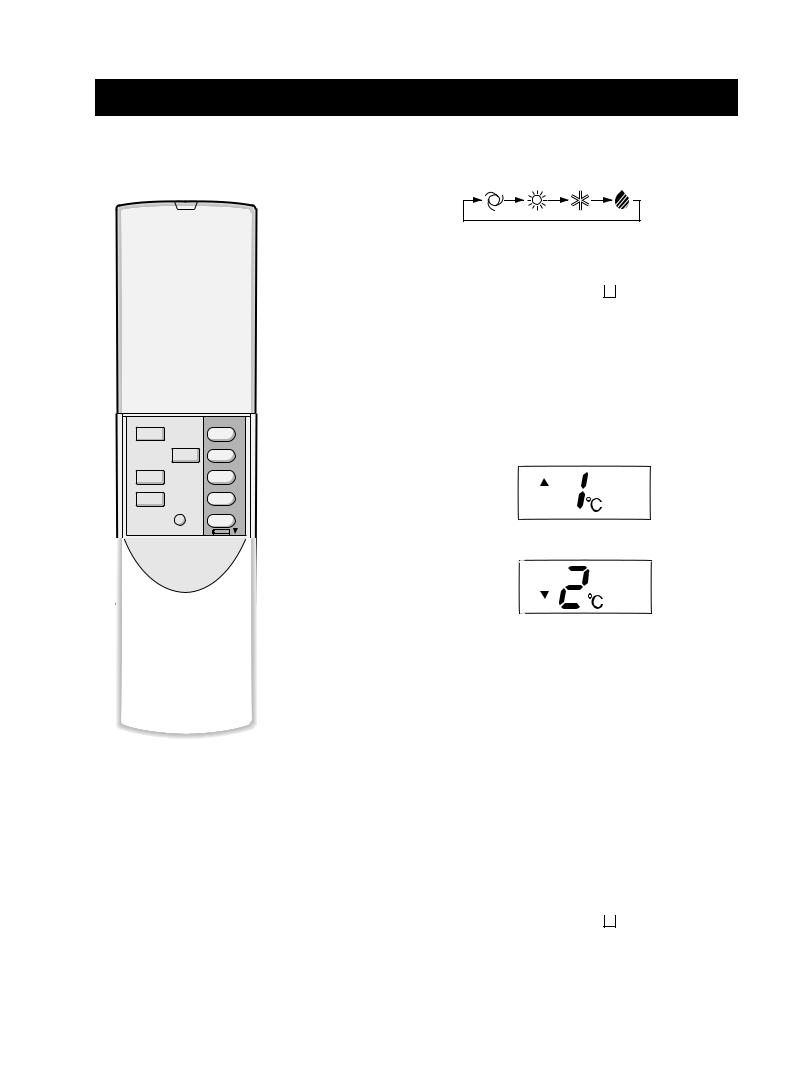
1 Press the MODE button to select the operation mode.
AUTO HEAT COOL DRY
2 |
2 |
|
|
5 |
3 |
3 |
|
1 |
|
4 |
|
Press the ON/OFF button to start operation.
•The red OPERATION lamp (  ) on the unit will light.
Press the THERMOSTAT button to set the desired temperature.
AUTO/DRY MODE
•The temperature can be changed in 1°C increments within the range of 2°C higher to 2°C lower from the temperature automatically determined by the air conditioner.
(Example: 1°C higher)
(Example: 2°C lower)
COOL/HEAT MODE
•The temperature can be set within the range of 18 to 32°C.
4 Press the FAN button to set the desired fan speed.
AUTO SOFT LOW HIGH
•In the DRY mode, the fan speed is preset to AUTO and cannot be changed.
5 To turn off the unit, press the ON/OFF button again.
•The red OPERATION lamp (  ) on the unit will turn off.
GB-6
When using your air-condi- tioner with multi-system
With a multi system air conditioner, multiple indoor units can be connected to one outdoor unit. When the setting mode differs among indoor unit(s), the indoor unit(s) operated later may not work.
•When the indoor unit(s) is/are operating in HEAT mode, the remaining unit(s) can not operate in COOL or DRY mode.
•When the indoor unit(s) is/are operating in COOL or DRY mode, the remaining unit(s) can not operate in HEAT mode.
When the mode of the indoor unit(s) later operated is/are different from those which is/are in operation, after a few seconds, a long BEEP will be emitted and the temperature indicator on the indicator panel will indicate” 
 ” and the OPERATION lamp and TIMER lamp will blink alternately. This shows that the later operated unit(s) is/are not working. In such case, change the mode to the same mode which the other indoor unit(s) is/are operating in.
TIPS ABOUT AUTO MODE
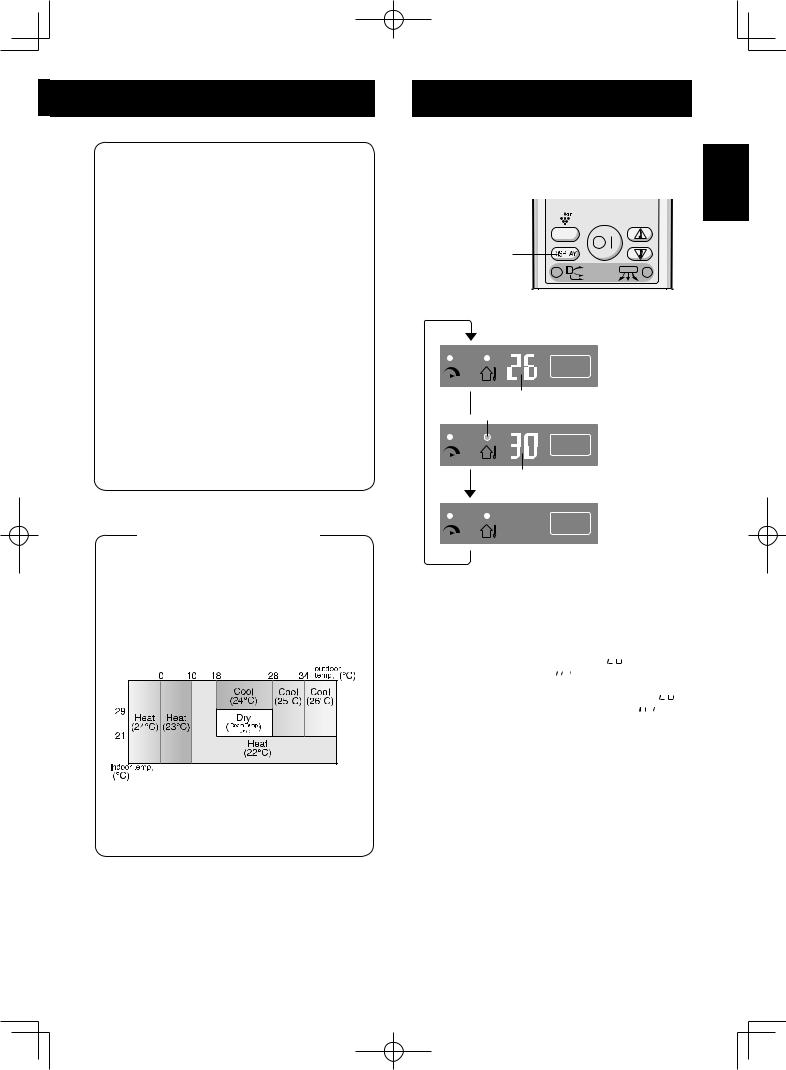
In the AUTO mode, the temperature setting and mode are automatically selected according to the room temperature and outdoor temperature when the unit is turned on.
•During operation, if the outdoor temperature changes, the temperature settings will automatically slide as shown in the chart.
Modes and Temperature Settings
The figures in ( ) are temperature settings
•When using your air-conditioner with multisystem, mode of the unit operated first will have priority over other unit(s) without reference to the above chart.
TIPS ABOUT INDICATOR
PANEL
The indicator panel will change each time |
ENGLISH |
|
you press the DISPLAY button in the fol- |
||
lowing manner. |
||
|
||
Display button |
|
The room temperature is displayed.
temperature Indiactor
 Outdoor Temp.Lamp light up
The outdoor temperature is displayed.
temperature Indiactor
No display.
NOTES:
•The displayed temperatures are rough estimates and may vary from the actual temperatures.
•Temperature display ranges
Room temperature: 0°C ~ 40°C ( 
 is displayed when less than 0°C and
 when higher than 40° C)
Outdoor temperature: –9°C ~ 45°C ( 
 is displayed when less than –9°C and
 when higher than 45°C)
•
 is displayed during the first about 0~120 seconds of operation while the temperatures are being detected.
•During SELF CLEAN operation, the indicator panel will display remaining time of the operation. Room and outdoor temperature will not be displayed even if you press the DISPLAY button.
Single use
•Only the room temperature can be displayed for 5 seconds when the unit is not in operation.
Multi use
• 
 is displayed for 5 seconds when the unit is not in operation.
GB-7

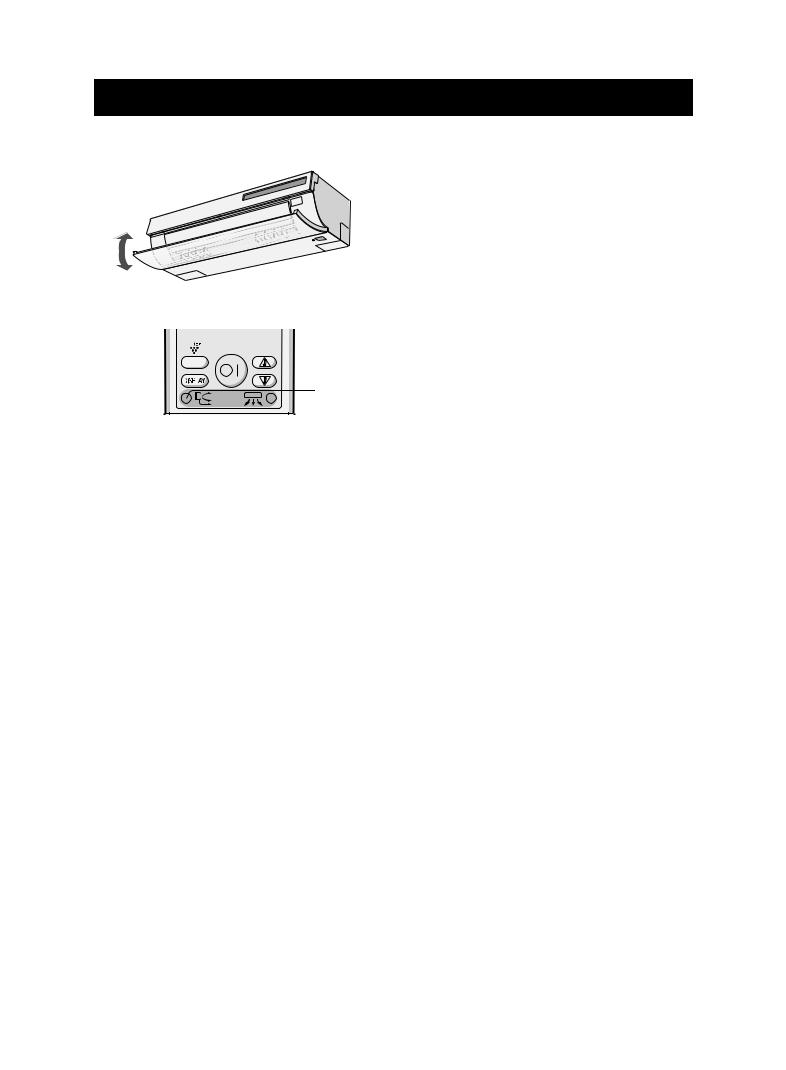
ADJUSTING THE AIR FLOW DIRECTION
VERTICAL AIR FLOW DIRECTION
1 Press the VERTICAL AIR FLOW button to set the desired air flow direction.
1
AUTO mode |
|
AUTO |
obliquely downward |
HEAT mode
AUTO obliquely downward downward
COOL/DRY mode
AUTO obliquely upward obliquely downward
HORIZONTAL AIR FLOW DIRECTION
1 Press the HORIZONTAL AIR FLOW button to set the desired air flow direction.
 1
1
CAUTION:
Never attempt to adjust the open panel and the louvres manually.
•Manual adjustment of the open panel and the louvres can cause the unit to malfunction.
TIPS ABOUT AIR FLOW DIRECTION “AUTO“
COOL mode |
10 minutes later |
The open panel will be set obliquely downward for 10 minutes, and then shift to obliquely upward to deliver cool air to the ceiling.
HEAT mode
The open panel will be set obliquely backward when outlet air temperature is low, and then shift to obliquely downward when outlet air becomes warm. When the room becomes warm, it will be set downward to deliver the warm air to the floor.
DRY mode
The open panel will be set obliquely upward.
When outlet air |
When outlet air |
When room |
temperature is low |
becomes warm |
becomes warm |
GB-8
PLASMACLUSTER OPERATION
The Plasmacluster Ion generator inside the air conditioner will release positive and negative plasmacluster ions into the room.
Approximately the same numbers of positive and negative ions released into the air will reduce some airborne mold.
1 During operation, press the PLASMACLUSTER button.
• The remote control will display “ 
 ”.
”.
•The blue PLASMACLUSTER lamp on the unit will light up.
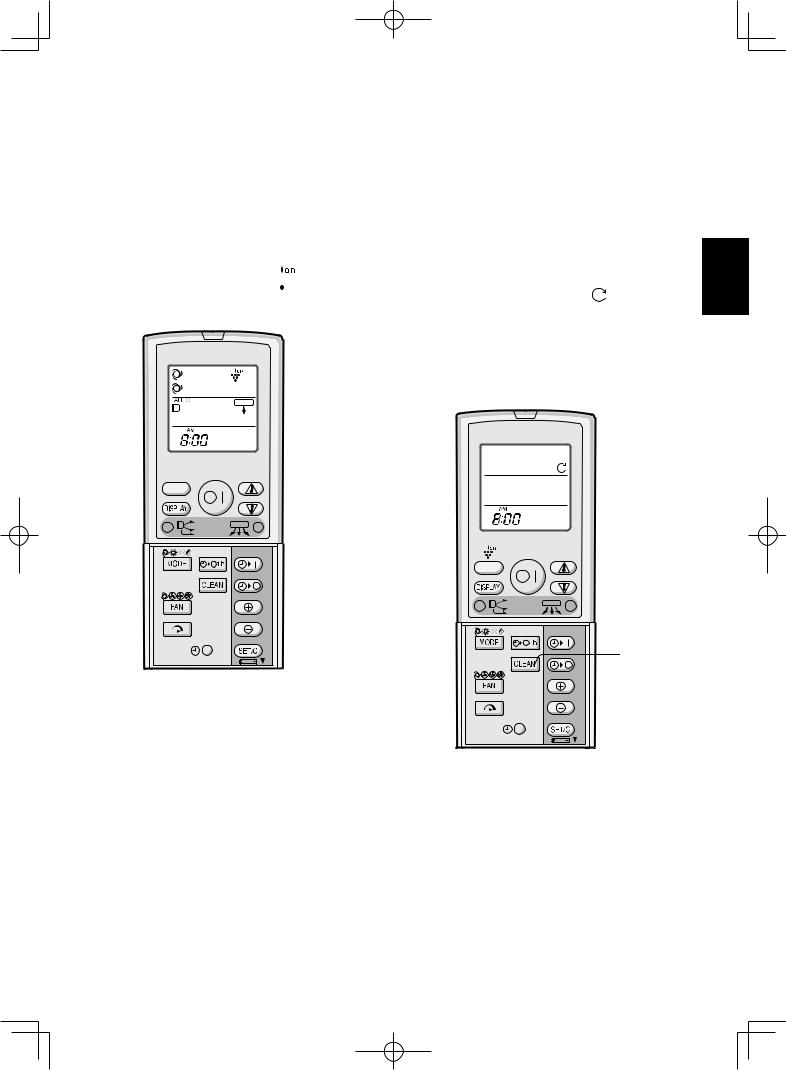
SELF CLEAN OPERATION
SELF CLEAN operation will reduce the growth mold fungus with Plasmacluster ions and dry inside of the air conditioner unit. Utilize the operation at seasonal change over terms.
Mold fungus already grown can not be eliminated by this operation.
1 Press the SELF CLEAN button when the unit is not operating.
• The remote control displays “ |
”. |
•The blue PLASMACLUSTER lamp on the unit will light up.
•The unit will stop operation after forty minutes.
•The remaining operation time will be indicated on the TEMPERATURE INDICATOR of the indoor unit in minute decrements.
ENGLISH


 1
1
TO CANCEL
Press the PLASMACLUSTER button again.
•The PLASMACLUSTER lamp on the unit will turn off.
NOTE:
•Use of the PLASMACLUSTER operation will be memorized, and it will be activated the next time you turn on the air conditioner.
•To turn off the PLASMACLUSTER lamp, press the DISPLAY button.
•To perform the PLASMACLUSTER operation without accompanying heat, cool or dry mode, press the PLASMACLUSTER button while the unit is not operating. The mode symbol of the remote control will go off and the fan speed can not be set AUTO.
1 |
TO CANCEL
Press the SELF CLEAN button.
Alternatively, turn the unit off by pressing the ON/OFF button.
•The blue PLASMACLUSTER lamp on the unit will turn off.
NOTE:
•You cannot set the temperature, fan speed, air flow direction or timer setting during the SELF CLEAN operation.
GB-9
ONE-HOUR OFF TIMER
When the ONE-HOUR OFF TIMER is set, the unit will automatically turn off after one hour.
1 Press the ONE-HOUR OFF TIMER
button.
•The remote control displays “ 


 ”.
”.
•The orange TIMER lamp (  ) on the unit will light up.
•The unit will stop operating after one hour.
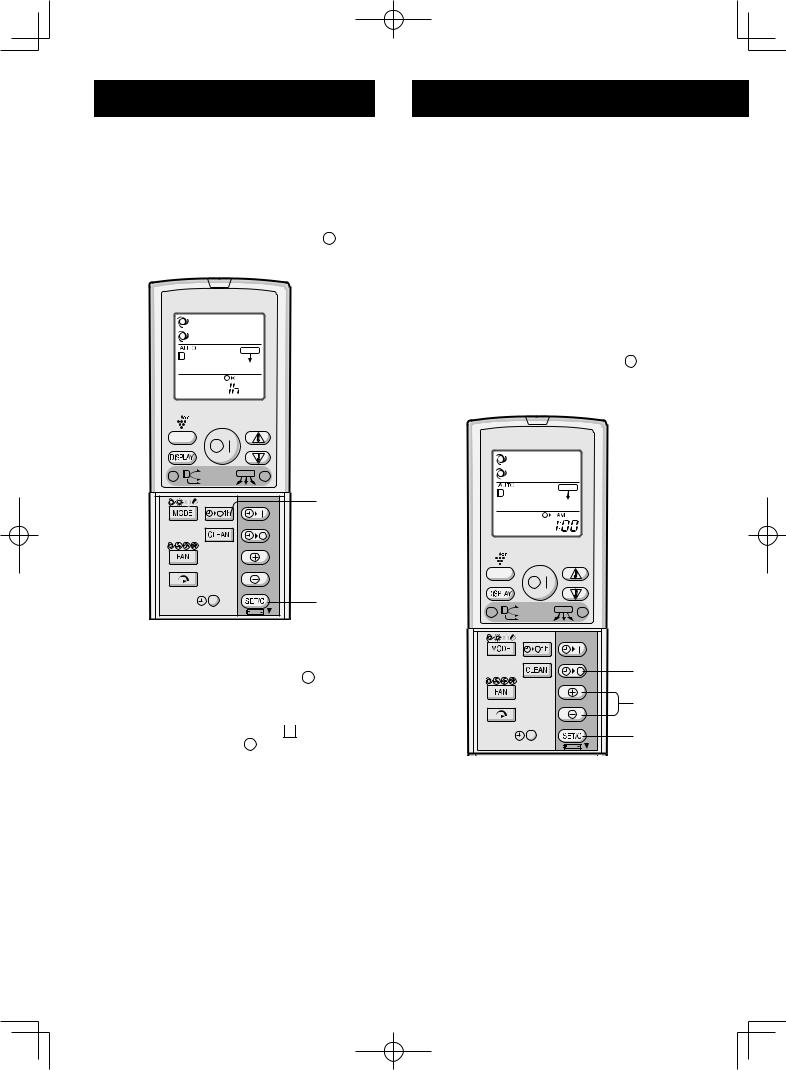
TIMER OPERATION
TIMER OFF
1 Press the TIMER OFF ( 
 ) button.
2 The TIMER OFF indicator will blink; press the TIME ADVANCE or REVERSE button to set the desired time.
(The time can be set in 10-minute increments.)
3 Point the remote control at the receiver window on the unit and press the TIMER SET (SET/C) button.
•The orange TIMER lamp (  ) on the unit will light.
•The unit will generate a beep when it receives the signal.
1 |
CANCEL |
TO CANCEL
Press the TIMER CANCEL (SET/C) button.
•The orange TIMER lamp (  ) on the unit will turn off.
Alternatively, turn the unit off by pressing the ON/OFF button.
•The red OPERATION lamp (  ) and the
orange TIMER lamp (  ) on the unit will turn off.
NOTE:
•The ONE-HOUR OFF TIMER operation has priority over TIMER ON and TIMER OFF operations.
•If the ONE-HOUR OFF TIMER is set while the unit is not operating, the unit will operate for an hour at the formerly set condition.
•If you wish to operate the unit for another hour before the ONE-HOUR OFF TIMER is activated, press the ONE-HOUR OFF TIMER button again during operation.
•If TIMER ON and/or TIMER OFF are set, TIMER CANCEL button cancels every setting.
1 |
2 |
3 |
TIPS ABOUT TIMER OFF OPERATION
When the TIMER OFF mode is set, the temperature setting is automatically adjusted to prevent the room from becoming excessively hot or too cold while you sleep. (Auto Sleep function)
COOL/DRY MODE:
•One hour after the time operation begins, the temperature setting rises 1°C higher than the original temperature setting.
HEAT MODE:
•One hour after the timer operation begins, the temperature setting drops 3°C lower than the original temperature setting.
GB-10

Before setting the timer, make sure the clock is properly set with the current time.
TIMER ON
1 Press the TIMER |
ON ( |
|
|
) button. |
|
|
|||
|
||||
|
|
|||
The TIMER ON |
indicator will blink; |
|||
2 press the TIME ADVANCE or REVERSE button to set the desired time.
(The time can be set in 10-minute increments.)
3 Point the remote control at the receiver window on the unit and press the TIMER SET (SET/C) button.
•The orange TIMER lamp (  ) on the unit will light.
•The unit will generate a beep when it receives the signal.
4 Select the operation condition.
1 |
2 |
3 |
NOTE:
•The unit will turn on prior to the set time to allow the room to reach the desired temperature by the programmed time. (Awaking function)
TO CANCEL TIMER MODE
Press the TIMER CANCEL (SET/C) button.
•The orange TIMER lamp (  ) on the unit will turn off.
•The current clock time will be displayed on the remote control.
CANCEL |
NOTE:
•If any TIMER ON, TIMER OFF and ONE-HOUR OFF TIMER are set, the TIMER CANCEL button cancels all settings.
TO CHANGE TIME SETTING
Cancel the TIMER setting first, then set it again.
COMBINED USE OF ON AND OFF TIMERS
You can use the ON and OFF timers in combination.
Example:
To stop operation at 11:00 p.m. and resume operation to bring the room temperature to the desired level by 7:00 a.m.
1 Set the TIMER OFF to 11:00 p.m. during operation.
2 Set the TIMER ON to 7:00 a.m.
The arrow ( or ) between the TIMER ON indicator and the TIMER OFF indicator shows which timer will activate first.
NOTE:
•You cannot programmed the ON-TIMER and OFF-TIMER to operate the unit at different temperatures or other settings.
•Either timer can be programmed to activate prior the other.
ENGLISH
GB-11
FULL POWER OPERATION
In this operation, the air conditioner works at the maximum power to makes the room cool or warm so rapidly that you can use it just after you come home.
1 To activate the FULL POWER operation, press the FULL POWER button during operation.
•The remote control will display “  ”.
”.
•The temperature display will go off.
• The green FULL POWER lamp ( |
) on |
||
the unit will light up. |
|
||
|
|
|
|
|
|
|
|
1 |
TO CANCEL
Press the FULL POWER button again.
•FULL POWER operation will also be cancelled when the operation mode is changed, or when the unit is turned off.
• The green FULL POWER lamp ( |
) on the unit |
will turn off. |
|
NOTE:
•You can not set the temperature or fan speed during the FULL POWER operation.
MAINTENANCE
BEFORE PERFORMING MAINTENANCE
Be sure to disconnect the power cord from the wall outlet or turn off the circuit breaker before performing any maintenance.
1 Turn off the unit.
2 Wait 15 seconds or more after the open panel is completely closed, and turn off the circuit breaker.
CLEANING THE FILTERS
The air filters should be cleaned every two weeks.
1 Turn off the unit.
2 Remove the filters.
1Lift the filter cover.
2Push the air filters up slightly to unlock them.
3Pull the air filters down to remove them.
Filter cover
1 |
2 |
|
1Reinstall the filters in the original positions.
2Close the filter cover.
3Push the arrow-marked of the panel firmly to lock it in place.
2 |
1 |
GB-12
CLEANING THE UNIT AND THE REMOTE CONTROL
•Wipe them with a soft cloth.
•Do not directly splash or pour water on them. It can cause electrical shock or equipment damage.
•Do not use hot water, thinner, abrasive powders or strong solvents.
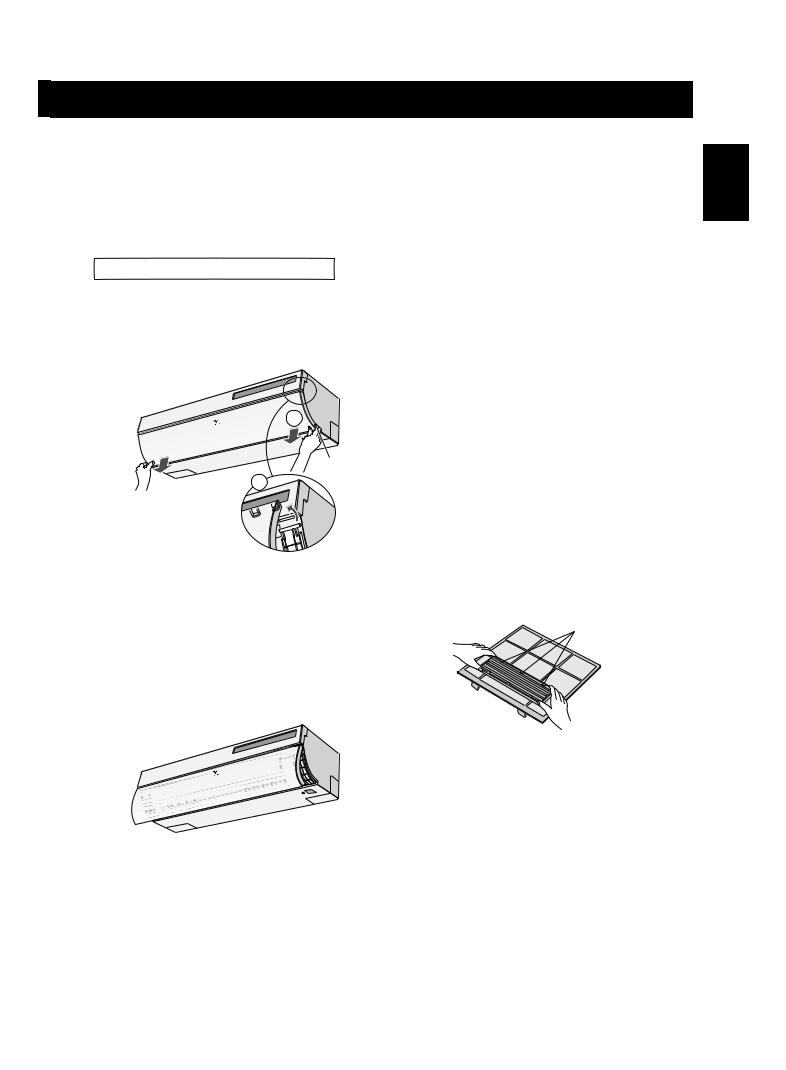
The open panel can be removed
REMOVAL
1 Push the release button and open the lower part of the open panel.
2 Lift the open panel up slightly and remove it.
Open panel
1
|
Release |
2 |
button |
ATTACHMENT
1 Hook both tabs on the shaft.
There is a shaft on each end of the unit.
2 Close the open panel.
Push the arrow-marked points on the open panel until it clicks.
1  Tab
Tab
Shaft
2


After attachment, be sure to close the open panel
firmly. Unacceptable
Acceptable
Open panel
MAINTENANCE AFTER AIR CONDITIONER SEASON
1 Operate the unit in the SELF CLEAN operation to allow the mechanism to thoroughly dry.
2 Stop the operation and unplug the unit. Turn off the circuit breaker, if you have one exclusively for the air conditioner.
3 Clean the filters, then reinstall them.
MAINTENANCE BEFORE AIR CONDITIONER SEASON
1 Makedirty. sure that the air filters are not
2 Make sure that nothing obstructs the air inlet or outlet.
CHANGING THE AIR PURIFYING FILTER
The filters should be changed every 3 ~ 6 months
1 Remove the air filters.
2 Change the air purifying filters.
1Take off the old air purifying filters from the air filters.
2Set the new air purifying filters, under the filter stoppers located on the air filters.
Filter stopper
3 Reinstall the air filters.
NOTE:
•The dirty air purifying filters are not washable for reuse. The new filters are available at your nearest dealer.
Replacement filter: Type AZ-F900F
Disposal of Filters
Please dispose of replaced filters according to the local disposal laws and regulations.
AIR PURIFYING filter materials Filter:Polypropylene Frame:Polyester
ENGLISH
GB-13
BEFORE CALLING FOR SERVICE
The following conditions do not denote equipment malfunctions
UNIT DOES NOT OPERATE
The unit will not operate if it is turned on immediately after it is turned off. The unit will not operate immediately after the mode is changed. This is to protect the internal mechanisms. Wait 3 minutes before operating the unit.
UNIT DOES NOT SEND OUT WARM AIR
The unit is preheating or de-icing.
ODORS
Carpet and furniture odors that entered into the unit may be sent out from the unit.
CRACKING NOISE
The unit may produce a cracking noise. This sound is generated by the friction of the front panel and other components expanding or connecting due to a temperature change.
A LOW BUZZING NOISE EMITTED
This is a sound emitted when the unit is generating Plasmacluster ions.
SWISHING NOISE
The soft, swishing noise is the sound of the refrigerant flowing inside the unit.
WATER VAPOUR
•In the COOL and DRY operation, water vapour can sometimes be seen at the air outlet due to the difference between the room air temperature and the air discharged by the unit.
•In the HEAT operation, water vapour may flow out of the outdoor unit during de-icing.
THE OUTDOOR UNIT DOES NOT STOP
After stopping the operation, the outdoor unit will rotate its' fan for about a minute to cool down the unit.
ODOR EMITTED FROM THE PLASMACLUSTER AIR OUTLET
This is the smell of ozone generated from the Plasmacluster Ion generator. The ozone concentration is very small, posing no adverse effect on your health. The ozone discharged into the air rapidly decomposes, and its density in the room will not increase.
When using your air conditioner with multisystem
INDOOR UNIT BECOMES WARM EVEN WHEN IDLE
This is because the refrigerant also floes through the idle indoor unit's pipes when the other unit is operated in HEAT mode.
INDOOR UNIT BECOMES WARM EVEN WHEN NOT DURING HEATING OPERATION
When the PLASMACLUSTER button is pressed while the unit is not operating, the PLASMACLUSTER operation will be performed without accompanying air conditioning mode (eg. HEATING or COOLING). At this time, you may feel warm air coming out from the unit air outlet if HEATING is performed with units in other rooms. Indoor fan will decrease its rotating speed and will turn ON and OFF depending on the room temperature.
UNIT DOES NOT OPERATE IN YOUR REQUESTED MODE
•When one indoor unit is operating in COOL or DRY mode, you can not operate the other unit in HEAT mode. (After a few seconds, a long BEEP will be emitted, and the temperature indicator on the indicator panel will indicate” 
 ” and the OPERATION lamp and TIMER lamp will blink alternately.)
•When one indoor unit is operating in HEAT mode, you can not operate the other unit in COOL nor DRY mode. (After a few seconds, a long BEEP will be emitted, and the temperature indicator on the indicator panel will indicate” 
 ” and the OPERATION lamp and TIMER lamp will blink alternately.)
UNIT DOES NOT SEND OUT AIR (PLASMACLUSTER operation without accompanying air conditioning mode, SELF CLEAN operation)
The other unit(s) is/are de-icing.
If the unit appears to be malfunctioning, check the following points before calling for service.
IF THE UNIT FAILS TO OPERATE
Check to see if the circuit breaker has tripped or the fuse has blown.
IF THE UNIT FAILS TO COOL (OR HEAT) THE ROOM EFFECTIVELY
•Check the filters. If dirty, clean them.
•Check the outdoor unit to make sure nothing is blocking the air inlet or outlet.
•Check the thermostat is proper setting.
•Make sure windows and doors are closed tightly.
•A large number of people in the room can prevent the unit from achieving the desired temperature.
•Check whether any heat-generating appliances are operating in the room.
IF THE UNIT FAILS TO RECEIVE THE REMOTE CONTROL SIGNAL
•Check whether the remote control batteries have become old and weak.
•Try to send the signal again with the remote control pointed properly towards the unit’s signal receiver window.
•Check whether the remote control batteries are installed with the polarities properly aligned.
Please call for service when TEMPERATURE INDICATOR on the indicator panel blink.
GB-14
ADDITIONAL NOTES ON
OPERATION
OPERATING TEMPERATURE RANGE
|
|
|
|
ENGLISH |
|
|
INDOOR TEMP. |
43˚C (Multi use) |
|
|
|
OUTDOOR TEMP. |
|
|
|
upper limit |
32˚C |
46˚C (Single use) |
|
|
|
|
||
COOLING |
|
|
|
|
lower limit |
21˚C |
–10˚C (Single use) |
|
|
|
|
|||
|
21˚C (Multi use) |
|
||
|
|
|
|
|
HEATING |
upper limit |
27˚C |
24˚C |
|
lower limit |
– |
–15˚C |
|
|
|
|
•The built-in protective device may prevent the unit from operating when used out of this range.
•Condensation may form on the air outlet if the unit operates continuously in the COOL or DRY mode when humidity is over 80 percent.
WHEN POWER FAILURE OCCURS
This air conditioner has a memory function to store settings when a power failure occurs.
After power recovery, the unit will automatically restart in the same settings which were active before the power failure, except for timer settings.
If the timers were set before a power failure, they will need to be re-set after power recovery.
PREHEATING FUNCTION
In the HEAT operation, the indoor fan may not start for two to five minutes after the unit is turned on to prevent cold air from blowing out of the unit.
DE-ICING FUNCTION
•When ice forms on the heat exchanger in the outdoor unit during the HEAT operation, an automatic de-icer provides heat for about 5 to 10 minutes to remove the ice. During de-icing, the inside and outside fans stop operating.
•After de-icing is completed, the unit automatically resumes operation in the HEAT mode.
HEATING EFFICIENCY
•The unit employs a heat pump that draws heat from the outside air and releases it into the room. The outside air temperature therefore greatly affects the heating efficiency.
•If the heating efficiency is reduced due to low outside temperatures, use an additional heater.
•It takes time to warm up and heat the entire room because of the forced air circulation system.
GB-15

Attention : votre produit comporte ce symbole. Il signifie que les produits électriques
et électroniques usagés ne doivent pas être mélangés avec les déchets ménagers généraux. Un système de collecte séparé est prévu pour ces produits.
Pb
A. Informations sur la mise au rebut à l'intention des utilisateurs privés (ménages)
1. Au sein de l'Union européenne
Attention : si vous souhaitez mettre cet appareil au rebut, ne le jetez pas dans une poubelle ordinaire !
Les appareils électriques et électroniques usagés doivent être traités séparément et conformément aux lois en vigueur en matière de traitement, de récupération et de recyclage adéquats de ces appareils.
Suite à la mise en oeuvre de ces dispositions dans les Etats membres, les ménages résidant au sein de l'Union européenne peuvent désormais ramener gratuitement* leurs appareils électriques et électroniques usagés sur des sites de collecte désignés.
Dans certains pays*, votre détaillant reprendra également gratuitement votre ancien produit si vous achetez un produit neuf similaire.
*) Veuillez contacter votre administration locale pour plus de renseignements.
Si votre appareil électrique ou électronique usagé comporte des piles ou des accumulateurs, veuillez les mettre séparément et préalablement au rebut conformément à la législation locale en vigueur.
En veillant à la mise au rebut correcte de ce produit, vous contribuerez à assurer le traitement, la récupération et le recyclage nécessaires de ces déchets, et préviendrez ainsi les effets néfastes potentiels de leur mauvaise gestion sur l'environnement et la santé humaine.
2. Pays hors de l'Union européenne
Si vous souhaitez mettre ce produit au rebut, veuillez contacter votre administration locale qui vous renseignera sur la méthode d'élimination correcte de cet appareil.
Suisse : les équipements électriques ou électroniques usagés peuvent être ramenés gratuitement au détaillant, même si vous n'achetez pas un nouvel appareil. Pour obtenir la liste des autres sites de collecte, veuillez vous reporter à la page d'accueil du site www.swico.ch ou www.sens.ch.
B. Informations sur la mise au rebut à l'intention des entreprises 1. Au sein de l'Union européenne
Si ce produit est utilisé dans le cadre des activités de votre entreprise et que vous souhaitiez le mettre au rebut :
Veuillez contacter votre revendeur SHARP qui vous informera des conditions de reprise du produit. Les frais de reprise et de recyclage pourront vous être facturés. Les produits de petite taille (et en petites quantités) pourront être repris par vos organisations de collecte locales.
Espagne : veuillez contacter l'organisation de collecte existante ou votre administration locale pour les modalités de reprise de vos produits usagés.
2. Pays hors de l'Union européenne
Si vous souhaitez mettre ce produit au rebut, veuillez contacter votre administration locale qui vous renseignera sur la méthode d'élimination correcte de cet appareil.
Les piles/accus fournies avec ce produit peuvent contenir des traces de Plomb.
Au sein de l’Union Européenne: Le symbole de la poubelle sur roues barrée laisse supposer que les piles/accus usagées ne doivent pas être mélangées avec les déchets ménagers ! Il existe un mode de collecte séparé pour les piles/accus usagées, ce qui permet d’effectuer un traitement et un recyclage en accord avec la législation. Veuillez contacter une autorité locale pour plus de renseignements sur le système mis en place.
Pour la Suisse: Les piles/accus usagées doivent être retournées chez votre détaillant.
Pour les pays hors Union Européenne: Veuillez contacter une autorité locale afin de connaître la bonne méthode à utiliser pour la collecte de vos piles/ accus usagées.
Contient des gaz à effet de serre fluorés relevant du protocole de Kyoto R410A (Potentiel de réchauffement planétaire 1980)
FR
|
|
|
|
|
|
|
|
|
|
|
|
|
|
|
|
|
|
|
|
|
|
|
|
|
|
|
FRANÇAIS |
Lire attentivement ce manuel avant d’utiliser l’appareil. Ce mode |
|||
|
|
|
|||||
|
|
|
|
d’emploi doit être conservé en lieu sûr et rester facile d’accès. |
|||
|
|
|
|
|
|
|
|
TABLE DES MATIÈRES
• CONSIGNES DE SÉCURITÉ IMPORTANTES........... |
FR-1 |
• NOMENCLATURE ...................................................... |
FR-2 |
• UTILISATION DE LA TÉLÉCOMMANDE.................... |
FR-4 |
• MISE EN PLACE DU FILTRE PURIFICATEUR D’AIR .. |
FR-5 |
• CONSEILS SUR LES ÉCONOMIES D’ÉNERGIE ...... |
FR-5 |
• MODE AUXILIAIRE..................................................... |
FR-5 |
• FONCTIONNEMENT DE BASE.................................. |
FR-6 |
• CONSEILS À PROPOS DU PANNEAU INDICATEUR . FR-7 |
|
• RÉGLAGE DE LA DIRECTION DU DÉBIT D’AIR....... |
FR-8 |
• FONCTIONNEMENT DU PLASMACLUSTER............ |
FR-9 |
• FONCTIONNEMENT DE NETTOYAGE |
FR-9 |
AUTOMATIQUE .......................................................... |
|
• EXTINCTION AU BOUT D’UNE HEURE .................... |
FR-10 |
• FONCTIONNEMENT DE LA MINUTERIE .................. |
FR-10 |
• FONCTIONNEMENT À PLEIN RÉGIME .................... |
FR-12 |
• ENTRETIEN................................................................ |
FR-12 |
• AVANT D’APPELER LE SERVICE APRÈS-VENTE.... |
FR-14 |
• AUTRES REMARQUES CONCERNANT |
FR-15 |
LE FONCTIONNEMENT............................................. |
|
CONSIGNES DE SÉCURITÉ IMPORTANTES
AVERTISSEMENTS CONCERNANT L’UTILISATION
1 |
Ne pas tirer ou déformer le cordon d’alimentation. |
Le fait de tirer sur le cordon d’alimentation ou une |
|
|
mauvaise utilisation de ce dernier peut endomma- |
2 |
ger l’appareil et provoquer une électrocution. |
Faire bien attention de ne pas s’exposer de manière |
|
prolongée directement à l’air évacué par le climatiseur. |
|
|
Cela peut avoir des conséquences nocives sur l’état |
3 |
physique. |
Lors de l’utilisation du climatiseur pour des nourris- |
|
sons, de jeunes enfants, des personnes âgées, des |
|
|
personnes alitées ou handicapées, s’assurer que la |
|
température de la pièce est appropriée aux person- |
4 |
nes qui s’y trouvent. |
Ne jamais insérer d’objet dans l’appareil. Le fait d’ |
|
insérer des objets peut provoquer des blessures à |
|
|
cause de la rotation à grande vitesse des ventilateurs |
5 |
internes. |
Toujours mettre le climatiseur à la terre. Ne pas |
|
connecter le fil de mise à la terre à un tuyau de gaz, |
|
|
un tuyau d’eau, un paratonnerre ou un fil de mise |
|
à la terre du téléphone. Une mise à la terre incom- |
6 |
plète risquerait de provoquer un choc électrique. |
Si l’on constate n’importe quelle anomalie dans le |
|
climatiseur (ex : une odeur de brûlé), l’arrêter immé- |
|
7 |
diatement et couper le disjoncteur. |
L’appareil doit être installé conformément aux |
|
réglementations de câblage nationales. Une |
|
|
connexion de câble incorrecte peut provoquer une |
|
surchauffe du cordon d’alimentation, de la fiche et |
8 |
de la prise électrique et provoquer un incendie. |
Si le cordon d’alimentation est endommagé, il doit être |
|
remplacé par le fabricant ou son agent d’entretien ou |
|
|
encore une personne possédant des qualifications |
|
similaires afin d’éviter tout danger. Utiliser uniquement |
|
le cordon d’alimentation spécifié par le fabricant pour |
9 |
le remplacement. |
Ne pas éclabousser ou verser de l’eau directement |
|
sur l’appareil. L’eau risquerait de provoquer une |
électrocution ou d’endommager l’appareil.
MISES EN GARDE POUR L’INSTALLATION/LE DÉMONTAGE/LA RÉPARATION
•Ne pas essayer d’installer/démonter/réparer soimême l’appareil. Un fonctionnement incorrect peut provoquer des chocs électriques, des fuites d’eau, des incendies etc. Consulter le revendeur ou un service de dépannage qualifié pour les opérations d’installation/démontage/réparation de l’appareil.
PRÉCAUTIONS D’EMPLOI
1 Ouvrir périodiquement une fenêtre ou une porte pour aérer la pièce, en particulier lors de l’utilisation d’ appareils à gaz. Une ventilation insuffisante risquerait de provoquer un manque d’oxygène.
Ne pas utiliser les touches avec les mains mouillées. Cela risquerait de provoquer une électrocution.
Par mesure de sécurité, couper le disjoncteur lorsque l’ appareil n’est pas utilisé pendant une période prolongée.
Vérifier périodiquement l’usure du rack de montage de l’unité extérieure afin de s’assurer qu’il est bien fixé en place.
Ne rien placer sur l’unité extérieure et ne pas marcher dessus. L’objet ou la personne risquerait de basculer ou de tomber et de se blesser.
Cet appareil est conçu pour une utilisation privée. Ne pas l’utiliser pour d’autres applications, comme par exemple dans un chenil ou une serre pour l’ élevage d’animaux ou la culture de plantes.
Ne pas placer de cuvette contenant de l’eau sur l’appareil. Si l’eau pénètre dans l’appareil, l’isolation électrique risquerait d’être détériorée et de provoquer une électrocution.
Ne pas bloquer les entrées et sorties d’air de l’appareil. Cela risquerait de provoquer un mauvais fonctionnement ou des pannes.
S’assurer d’arrêter l’utilisation et de couper le disjoncteur avant d’effectuer toute intervention d’entretien ou de nettoyage. Un ventilateur tourne à l’intérieur de l’appareil et pourrait causer des blessures.
10Cet appareil n’est pas destiné à être utilisé par des enfants en bas âge ou des personnes handicapées sans surveillance.
Les jeunes enfants doivent être surveillés afin de s’ assurer qu’ils ne jouent pas avec l’appareil.
PRÉCAUTIONS POUR L’EMPLACEMENT/INSTALLATION
•S’assurer de connecter le climatiseur à une alimentation électrique présentant une tension et une fréquence appropriées.
L’utilisation d’une alimentation ayant une tension et une fréquence incorrectes peut endommager l’appareil et provoquer un incendie.
•Ne pas installer l’appareil dans un endroit où il pourrait y avoir une fuite de gaz. Il risquerait de provoquer un incendie.
Installer l’appareil dans un endroit peu poussiéreux, sans fumées ni humidité dans l’air.
•Agencer le flexible de vidange de manière à assurer un écoulement facile. Un écoulement insuffisant risquerait de mouiller la pièce, les meubles etc.
•S’assurer qu’un disjoncteur de fuite ou un disjoncteur de circuit est installé, en fonction de l’emplacement d’ installation, pour éviter une électrocution.
FRANÇAIS
FR-1
NOMENCLATURE
UNITÉ INTÉRIEURE
1 |
1 |
Entrée (Air) |
|
2 |
2 |
Couvercle du filtre |
|
|
3 |
Filtre à air |
|
|
4 |
Filtre purificateur d’air |
|
3 |
5 |
Fenêtre de réception |
|
6 |
Touche AUX |
||
|
|||
4 |
7 |
Touche de libération |
|
5 |
8 |
Volet d’aération à réglage horizontal |
|
|
9 |
Sortie (Air) |
|
6 |
10 |
Panneau d’ouverture |
|
11 |
Télécommande |
||
|
|||
7 |
|
|
|
8 |
|
|
|
9 |
|
|
10
11
|
|
|
|
|
|
|
|
|
12 |
12 |
Fenêtre de réception |
|
|
|
|
|
|
|
|
|
|
|
|
|
|||
|
|
|
|
|
|||||||||
|
|
|
|
|
|
|
|
|
|
||||
|
|
|
|
|
|
|
|
|
|
13 |
Voyant TEMPÉRATURE |
|
|
|
|
|
|
|
|
|
|
|
|
|
|
||
|
|
|
|
|
|
|
|
|
|
|
|
||
|
13 |
14 |
Voyant Temp. EXTÉRIEURE (vert ) |
||||||||||
|
14 |
||||||||||||
|
15 |
Voyant PLEIN RÉGIME (vert |
) |
||||||||||
|
15 |
||||||||||||
|
16 |
Voyant MINUTERIE (orange |
|
) |
|||||||||
|
16 |
|
|||||||||||
|
|
||||||||||||
|
|
||||||||||||
|
17 |
17 |
Voyant MARCHE (rouge ) |
|
|
||||||||
|
18 |
18 |
Voyant PLASMACLUSTER (bleu) |
||||||||||
|
|
|
|
|
|
|
|
|
|
||||
REMARQUE :
Les unités réelles peuvent varier légèrement de celles représentées ci-dessus.
FR-2
TÉLÉCOMMANDE
1
2
3
4
5
6 |
7 |
8 |
9 |
10 |
11 |
12  13
13  14 15
14 15  16
16
 17 18
17 18  19 20
19 20
1ÉMETTEUR
2AFFICHAGE (Affichage à cristaux liquides)
3Touche PLASMACLUSTER.
4Touche AFFICHAGE
5Touche MARCHE/ARRÊT
6Touche THERMOSTAT
7Touche DÉBIT D’AIR HORIZONTAL
8Touche DÉBIT D’AIR VERTICAL
9Touche MODE
10Touche MINUTERIE DE MISE EN MARCHE (pour régler la minuterie)
11Touche MINUTERIE D’EXTINCTION (pour régler la minuterie)
12Touche EXTINCTION AU BOUT D’UNE HEURE
13Touche AVANCE DU TEMPS
14Touche RECUL DU TEMPS
15Touche NETTOYAGE AUTOMATIQUE
16Touche RÉGLAGE/ANNULATION DE LA MINUTERIE
17Indique que le compartiment des piles est en dessous de cette marque
18Touche HORLOGE
19Touche VENTILATEUR
20Touche PLEIN RÉGIME
AFFICHAGE LCD |
|
21 |
Symbole de PLEIN RÉGIME |
|
DE LA TÉLÉCOMMANDE |
|
|
||
|
22 |
Symboles de MODE |
|
|
21 |
27 |
|
||
|
: AUTO |
: FROID |
||
22 |
28 |
|
: CHAUFFAGE |
: SEC |
|
|
|
|
|
23 |
29 |
23 |
Symboles de VITESSE DU VENTILATEUR |
|
|
: AUTO |
: BASSE |
||
|
30 |
|
||
24 |
|
: FAIBLE |
: HAUTE |
|
|
|
|
||
|
|
24 |
Symbole de DÉBIT D’AIR VERTICAL |
|
25 |
31 |
25 |
Indicateur de MINUTERIE DE MISE |
|
|
EN MARCHE/HORLOGE |
|
||
|
|
|
|
|
|
|
|
Indique l’heure préréglée de la minuterie de |
|
26 |
|
|
mise en marche ou l’heure actuelle. |
|
|
26 |
Voyant de TEMPÉRATURE |
|
|
|
|
|
||
|
|
27 |
Symbole de PLASMACLUSTER |
|
|
|
28 |
Symbole de TRANSMISSION |
|
|
|
29 |
Symbole de NETTOYAGE AUTOMATIQUE |
|
|
|
30 |
Symbole de DÉBIT D’AIR HORIZONTAL |
|
|
|
31 |
Indicateur de MINUTERIE D’EXTINCTION |
|
|
|
|
Indique l’heure préréglée pour la minuterie |
|
|
|
|
d’extinction ou l’extinction au bout d’une heure. |
|
FRANÇAIS
FR-3

UTILISATION DE LA TÉLÉCOMMANDE
INSERTION DES PILES
Utiliser deux piles de format AAA (R03).
1 Retirer le couvercle de la télécommande.
2 Insérer les piles dans le compartiment, en s’assurant que les polarités (+) et (-) sont respectées.
•L’affichage indique “AM 6:00” lorsque les piles sont insérées correctement.
3 Remettre le couvercle en place.
Couvercle
la télécommande
REMARQUE :
•La durée d’utilisation des piles est d’environ un an dans des conditions d’utilisation normales.
•Lors du remplacement des piles, toujours remplacer les deux piles en même temps, et s’assurer qu’elles sont du même type.
•Si la télécommande ne fonctionne pas correctement après le remplacement des piles, sortir les piles et les remettre en place 30 secondes plus tard.
•Si l’appareil ne sera pas utilisé pendant une longue période, enlever les piles de la télécommande.
COMMENT UTILISER
LA TÉLÉCOMMANDE
Pointer la télécommande vers la fenêtre de réception du signal de l’appareil et appuyer sur la touche souhaitée. L’appareil émet un bip lorsqu’il reçoit le signal.
•S’assurer qu’il n’y a pas de rideau ou d’autre objet entre la télécommande et l’appareil.
•La télécommande peut envoyer des signaux depuis une distance de 7 mètres.
ATTENTION :
•Ne pas exposer la fenêtre de réception du signal aux rayons directs du soleil car ils peuvent gêner son fonctionnement. Si la fenêtre de réception du signal est exposée aux rayons directs du soleil, fermer un rideau pour bloquer la lumière.
•L’utilisation d’une lampe fluorescente avec un démarreur rapide dans la même pièce risque de créer des interférences avec la transmission du signal.
•L’appareil peut être affecté par les signaux transmis par la télécommande d’un téléviseur, d’un magnétoscope ou d’un autre équipement utilisé dans la même pièce.
•Ne pas laisser la télécommande exposée aux rayons directs du soleil ou près d’un radiateur. Protéger également l’appareil et la télécommande contre l’humidité et les chocs qui peuvent décolorer ou endommager l’appareil.
RÉGLER L’HEURE ACTUELLE DE L’HORLOGE
Il y a deux modes d’horloge : le mode 12 heures et le mode 24 heures.
Exemple : 5 heures de l’après-midi
Horloge |
Affichage |
Mode 12 heures |
PM 5:00 |
|
|
Mode 24 heures |
17:00 |
1 Pour activer le mode 12 heures, appuyer une fois sur la touche HORLOGE lors de la première étape.
Pour activer le mode 24 heures, appuyer deux fois sur la touche HORLOGE lors de la première étape.
2 Appuyer sur la touche AVANCE DU TEMPS ou RECUL DE TEMPS pour régler l’heure actuelle.
•Maintenir la touche enfoncée pour avancer ou reculer rapidement l’affichage de l’heure.
3 Appuyer sur la touche RÉG/ANN.
• Les deux points (:) clignotent pour indiquer que l’horloge fonctionne.
2 |
3 |
1 |
REMARQUE :
•L’heure actuelle ne peut pas être réglée lorsque la minuterie fonctionne.
FR-4
MISE EN PLACE DU FILTRE PURIFICATEUR D’AIR
Les filtres purificateurs d’air sont fournis en tant qu’accessoires de cet appareil. Pendant le fonctionnement du climatiseur, le filtre élimine de l’ air la poussière et la fumée de cigarette et génère de l’air propre.
1 Retirer les filtres à air.
1 Ouvrir le couvercle du filtre.
2 Pousser les filtres à air légèrement vers le haut pour les déverrouiller.
3 Tirer les filtres à air vers le bas pour les retirer. Couvercle du filtre 


1 |
2 |
|
3
2 Placer le filtre purificateur d’air sous les taquets de filtre situés sur le filtre à air.
Taquet de filtre
Filtre purificateur d’air
Filtre à air
3 Réinstaller les filtres à air.
1Réinstaller les filtres à air dans leur position d’origine
2Fermer le couvercle du filtre.
3Appuyer fermement sur la flèche située sur le panneau pour le verrouiller.
|
3 |
2 |
1 |
Précautions :
•Les filtres sont emballés dans un sac en plastique scellé afin de préserver leur capacité de collecte de la poussière.
Ne pas ouvrir le sac avant l’utilisation des filtres. (Sinon, la durée de vie des filtres sera plus courte.)
•Ne pas exposer les filtres directement à la lumière du soleil. (Sinon, ils pourraient se détériorer.)
CONSEILS SUR LES ÉCONOMIES D’ÉNERGIE
Voici quelques méthodes simples permettant d’ économiser de l’énergie lors de l’utilisation du climatiseur.
RÉGLER LE CLIMATISEUR À LA BONNE TEMPÉRATURE
•Le fait de régler le thermostat à une température de 1° C supérieure à la température souhaitée en mode FROID et de 2° C inférieure en mode CHAUFFAGE permet une économie d’environ 10 % de sa consommation électrique.
•Le fait de régler la température à un niveau inférieur au niveau nécessaire en mode climatisation augmente la consommation électrique.
BLOQUER LES RAYONS DIRECTS DU SOLEIL ET ÉVITER LES COURANTS D’AIR
•Le fait de bloquer les rayons directs du soleil pendant la climatisation permet de réduire la consommation électrique.
•Fermer les fenêtres et les portes pendant les opérations de refroidissement et de chauffage.
RÉGLER CORRECTEMENT LA DIRECTION DU DÉBIT D’AIR POUR OBTENIR LA MEILLEURE CIRCULATION D’AIR
MAINTENIR LE FILTRE PROPRE AFIN D’ASSURER UN FONCTIONNEMENT OPTIMAL
OPTIMISER L’UTILISATION DE LA FONCTION DE MINUTERIE D’EXTINCTION
DÉBRANCHER LE CORDON D’ALIMENTATION LORSQUE L’APPAREIL N’EST PAS UTILISÉ PENDANT UNE PÉRIODE PROLONGÉE
•L’unité intérieure continue à consommer une faible quantité de courant lorsqu’elle ne fonctionne pas.
MODE AUXILIAIRE
Utiliser ce mode si la télécommande n’est pas disponible.
POUR ALLUMER
Soulever le panneau d’ouverture de l’unité intérieure et appuyer sur la touche AUX.
•Le voyant rouge de MARCHE (  ) situé sur l’ appareil s’allume et l’appareil se met en marche en mode AUTO.
•La vitesse du ventilateur et le réglage de température sont en position AUTO.
POUR ÉTEINDRE
Appuyer de nouveau sur la touche AUX.
•Le voyant rouge de MARCHE (  ) situé sur l’appareil s’éteint.
AUX
REMARQUE :
•Si la touche AUX est enfoncée pendant le fonctionnement normal, l’appareil s’éteint.
FRANÇAIS
FR-5

FONCTIONNEMENT DE BASE
1 Appuyer sur la touche MODE pour sélectionner le mode de fonctionnement.
AUTO CHAUFFROID SEC FAGE
|
Appuyer sur la touche MARCHE/ARRÊT |
|
2 |
2 pour mettre en marche le climatiseur. |
|
• Le voyant rouge de MARCHE ( |
) situé sur |
|
5 |
l’appareil s’allume. |
|
Appuyer sur la touche THERMOSTAT pour |
||
3 régler la température désirée. |
|
|
3 |
MODE AUTO/SEC |
|
1 |
• La température peut être modifiée par incré- |
|
ments de 1° C dans un intervalle de 2° C de |
||
plus à 2° C de moins que la température auto- |
||
|
matiquement déterminée par le climatiseur. |
|
4 |
(Exemple : 1° C de plus) |
|
|
|
|
|
(Exemple : 2° C de moins) |
|
MODE FROID/CHAUFFAGE
• La température peut être réglée dans un intervalle de 18 à 32° C.
4 Appuyer sur la touche VENTILATEUR pour régler la vitesse de ventilation souhaitée.
AUTO FAIBLE BASSE HAUTE
• En mode SEC, la vitesse du ventilateur est pré-réglée sur AUTO et ne peut pas être modifiée.
5 Pour éteindre l’appareil, appuyer à nouveau sur la touche MARCHE/ARRÊT.
• Le voyant rouge de MARCHE (  ) situé sur l’appareil s’éteint.
FR-6

Utilisation du climatiseur avec des unités multiples
Avec un climatiseur multi-système, il est possible de connecter plusieurs unités intérieures à une unité extérieure. Lorsque le mode de réglage diffère entre les unités intérieures, l’unité intérieure (les unités intérieures) mise(s) en marche plus tard risque(nt) de ne pas fonctionner.
•Lorsque l’unité intérieure (les unités intérieures) fonctionne(nt) en mode CHAUFFAGE, l’unité (les unités) restante(s) ne peut(peuvent pas fonctionner mode FROID ou SEC.
•Lorsque l’unité intérieure (les unités intérieures) fonctionne(nt) en mode CHAUFFAGE, l’unité (les unités) restante(s) ne peut(peuvent) pas fonctionner mode FROID ou SEC.
Lorsque le mode de l’unité intérieure (des unités intérieures) mise(s) en marche plus tard est différent de celui de l’unité (des unités) déjà en marche, au bout de quelques secondes, un BIP retentit et l’indicateur de température situé sur le panneau indicateur affiche “ 
 ” et le voyant MARCHE et le voyant MINUTERIE se mettent à clignoter en alternance. Cela indique que l’unité (les unités) qui a (ont) été mise(s) en marche plus tard ne fonctionne(nt) pas. Dans ce cas, modifier le mode pour qu’il soit identique au mode de fonctionnement de l’autre (des autres) unité(s).
CONSEILS À PROPOS
DU MODE AUTO
En mode AUTO, les réglages de température et de mode sont sélectionnés automatiquement en fonction de la température de la pièce et de la température extérieure lorsque l’ appareil est allumé.
•Pendant le fonctionnement, si la température extérieure varie, les réglages de température glisseront automatiquement comme indiqué sur le tableau.
Modes et réglages de température
|
|
0 |
10 18 |
|
28 |
|
Temp. exté- |
||||
|
|
|
34 rieure (°C) |
||||||||
|
|
|
|
|
|
Froid |
|
Froid |
|
Froid |
|
29 |
|
|
|
|
|
(24 °C) |
|
(25 °C) |
(26 °C) |
|
|
Chaud |
Chaud |
|
|
Sec |
|
|
|
|
|
||
|
(24 °C) |
(23 °C) |
|
|
(Temp. pièce) |
|
|
|
|
|
|
21 |
|
|
-2°C |
|
|
|
|
|
|||
|
|
|
|
|
Chaud |
|
|
|
|
|
|
|
|
|
|
|
|
|
|
|
|
|
|
|
|
|
|
|
|
(22 °C) |
|
|
|
|
|
|
|
|
|
|
|
|
|
|
|
|
|
Temp. intérieure
(°C) Les chiffres entre ( ) sont les réglages de température
•Lorsque l’on utilise le climatiseur avec plusieurs unités, c’est le mode de l’unité mise en marche en premier qui a la priorité sur les autres unités, sans qu’il soit tenu compte du tableau ci-dessus.
CONSEILS À PROPOS
DU PANNEAU INDICATEUR
Le panneau indicateur change de la manière suivante à chaque fois que l’on appuie sur la touche AFFICHAGE.
Touche |
FRANÇAIS |
|
AFFICHAGE |
||
|
||
|
La température |
|
|
de la pièce est |
|
|
affichée. |
|
Voyant température |
|
|
Voyant Temp. extérieure allumé |
|
|
|
La température |
|
|
extérieure est |
|
|
affichée. |
|
Voyant température |
|
Pas d’affichage
REMARQUES :
•Les températures affichées sont des estimations approximatives et peuvent différer des températures réelles.
•Plages d’affichage de la température
Température de la pièce : 0° C ~ 40° C ( 

 est affiché lorsque la température est inférieure à 0° C et

 lorsqu’elle est supérieure à 40 °C)
Température extérieure : -9° C ~ 45° C ( 

 est affiché lorsque la température est inférieure à 9° C et
lorsqu’elle est supérieure à 45° C)
•
 est affiché pendant les 0~120 premières secondes de fonctionnement pendant la détection de la température.
•Pendant l’opération de NETTOYAGE AUTOMATIQUE, le panneau indicateur affiche le temps restant de l’opération. La température de la pièce et la température extérieure ne sont pas affichées même si l’on appuie sur la touche AFFICHAGE.
Utilisation mono-split
•Seule la température de la pièce peut être affichée pendant 5 secondes lorsque l’appareil n’est pas en marche.
Utilisation multi-split
• 
 est affiché pendant 5 secondes lorsque l’appareil n’est pas en marche.
FR-7
RÉGLAGE DE LA DIRECTION DU DÉBIT D’AIR
DIRECTION DU DÉBIT D’AIR VERTICAL |
DIRECTION DU DÉBIT D’AIR |
|
HORIZONTAL |
1 Appuyer sur la touche DÉBIT D’AIR VERTICAL pour régler la direction du débit d’air souhaitée.
1 Appuyer sur la touche DÉBIT D’AIR HORIZONTAL pour régler la direction du débit d’air souhaitée.
1
Mode AUTO |
|
AUTO |
oblique vers le bas |
Mode CHAUFFAGE
AUTO oblique vers le bas vers le bas
Mode FROID/SEC
AUTO oblique vers le haut oblique vers le bas
 1
1
ATTENTION :
Ne jamais essayer d’ajuster manuellement le panneau d’ouverture et les volets.
•Un réglage manuel du panneau d’ouverture et des volets de réglage peut provoquer un mauvais fonctionnement de l’appareil.
CONSEILS À PROPOS DE LA DIRECTION DU DÉBIT D’AIR “AUTO ”
Mode FROID
Le panneau d’ouverture est orienté de manière oblique vers le bas pendant 10 minutes puis il est déplacé dans une position oblique vers le haut pour envoyer l’air froid vers le plafond.
Mode CHAUFFAGE
Le panneau d’ouverture est orienté de manière oblique vers l‘arrière lorsque la température de l’air à la sortie est basse puis il est déplacé dans une position oblique vers le bas lorsque l’air à la sortie devient chaud. Lorsque la pièce se réchauffe, il est orienté vers le bas pour envoyer l’air chaud vers le sol.
Mode SEC
Le panneau d’ouverture est orienté de manière oblique vers le haut.
10 minutes plus tard
Lorsque la température |
Lorsque l’air à la sor- |
Lorsque la pièce |
de l’air à la sortie est |
tie devient chaud |
se réchauffe |
basse |
|
|
FR-8
|
|
|
FONCTIONNEMENT |
|
FONCTIONNEMENT DU |
DU PLASMACLUSTER |
|
NETTOYAGE AUTOMATIQUE |
L’ionisateur Plasmacluster à l’intérieur du climatiseur délivre des ions plasmacluster positifs et négatifs dans la pièce.
Une quantité à peu près identique d’ions négatifs et positifs permet de réduire la quantité de moisissure présente dans l’air.
1 Pendant le fonctionnement, appuyer sur la touche PLASMACLUSTER.
•La télécommande affiche “ 
 ”.
”.
•Le voyant bleu PLASMACLUSTER situé sur l’appareil s’allume.
La fonction NETTOYAGE AUTOMATIQUE permet de réduire la prolifération des moisissures à l’aide d’ions Plasmacluster et de sécher l’intérieur du climatiseur. Utiliser cette opération à chaque changement de saison.
Les champignons de moisissure déjà présents ne peuvent pas être éliminés par cette opération.
1 Appuyer sur la touche NETTOYAGE AUTOMATIQUE lorsque l’appareil n’est pas en marche.
• La télécommande affiche “ |
”. |
•Le voyant bleu PLASMACLUSTER situé sur l’appareil s’allume.
•L’appareil s’arrête de fonctionner au bout de quarante minutes.
•Le temps de fonctionnement restant est indiqué en minutes sur l’INDICATEUR DE TEMPÉRATURE de l’unité intérieure.
FRANÇAIS


 1
1
POUR ANNULER
Appuyer de nouveau sur la touche PLASMACLUSTER.
•Le voyant PLASMACLUSTER situé sur l’appareil s’éteint.
REMARQUE :
•L’utilisation de la fonction PLASMACLUSTER sera mémorisée et sera activée à la prochaine mise en marche du climatiseur.
•Pour éteindre le voyant PLASMACLUSTER, appuyer sur la touche AFFICHAGE.
•Pour utiliser la fonction PLASMACLUSTER sans utiliser le mode chauffage, froid ou sec, appuyer sur la touche PLASMACLUSTER pendant que l’appareil ne fonctionne pas. Le symbole de mode sur la télécommande disparaît et la vitesse du ventilateur ne peut pas être réglée sur AUTO.
1 |
POUR ANNULER
Appuyer sur la touche NETTOYAGE AUTOMATIQUE.
Alternativement, appuyer sur la touche MARCHE/ ARRÊT pour éteindre l’appareil.
•Le voyant bleu PLASMACLUSTER situé sur l’appareil s’éteint.
REMARQUE :
•Pendant l’opération de NETTOYAGE AUTOMATIQUE, il est impossible de régler ni la température, ni la vitesse du ventilateur, ni la direction du débit d’ air, ni la minuterie.
FR-9
EXTINCTION AU BOUT
D’UNE HEURE
Lorsque la minuterie EXTINCTION AU BOUT D’UNE HEURE est activée, l’appareil s’arrête de fonctionner au bout d’une heure.
1 Appuyer sur la touche EXTINCTION AU BOUT D’UNE HEURE.
•La télécommande affiche “ 


 ”.
”.
•Le voyant orange de MINUTERIE (  ) situé sur l’appareil s’allume.
•L’appareil s’arrête au bout d’une heure.
1 |
ANNULA- |
TION |
POUR ANNULER
Appuyer sur la touche ANNULATION
DE LA MINUTERIE (RÉG./ANN.).
•Le voyant orange de MINUTERIE (  ) situé sur l’appareil s’éteint.
Alternativement, appuyer sur la touche MARCHE/ ARRÊT pour éteindre l’appareil.
•Le voyant rouge de MARCHE (  ) et le voyant orange de MINUTERIE (
  ) situés sur l’appareil s’éteignent.
REMARQUE :
•La fonction EXTINCTION AU BOUT D’UNE HEURE a la priorité sur les fonctions MINUTERIE DE MISE EN MARCHE ET MINUTERIE D’EXTINCTION.
•Lorsque la minuterie d’EXTINCTION AU BOUT D’UNE HEURE est alors que l’appareil n’est pas en marche, l’appareil se met en marche pendant une heure selon la condition réglée précédemment.
•Si l’on veut utiliser l’appareil une autre heure avant que la fonction EXTINCTION AU BOUT D’UNE HEURE soit activée, appuyer à nouveau sur la touche EXTINCTION AU BOUT D’UNE HEURE pendant l’utilisation.
•Si les fonctions MINUTERIE DE MISE EN MARCHE et/ou MINUTERIE D’EXTINCTION sont activées, la touche ANNULATION DE LA MINUTERIE annule tous les réglages.
FONCTIONNEMENT
DE LA MINUTERIE
RIE D’EXTINCTION
1 Appuyer sur la touche MINUTERIE D’EXTINCTION ( 
 ).
).
2 Le voyant MINUTERIE D’EXTINCTION clignote ; appuyer sur la touche AVANCE DU TEMPS ou RECUL DE TEMPS pour régler l’ heure souhaitée.
(L’heure peut être réglée par incréments de 10 minutes.)
3 Pointer la télécommande vers la fenêtre de réception du signal de l’appareil et appuyer sur la touche RÉGLAGE DE LA MINUTERIE (RÉG./ANN.).
•Le voyant orange de MINUTERIE (  ) situé sur l’appareil s’allume.
•L’appareil émet un bip lorsqu’il reçoit le signal.
1 |
2 |
3 |
CONSEILS À PROPOS DE LA MINUTERIE D’EXTINCTION
Lorsque le mode MINUTERIE D’EXTINCTION est activé, la température est automatiquement réglée afin d’éviter que la pièce ne devienne ni trop chaude, ni trop froide lors de votre sommeil. (Fonction de veille automatique)
MODE FROID/SEC :
•Une heure après le début du fonctionnement, la température augmente de 1 ºC de plus que le réglage original du thermostat.
MODE DE CHAUFFAGE :
•Une heure après le début du fonctionnement de la minuterie, le réglage de la température descend 3 °C en-dessous du réglage de température original.
FR-10
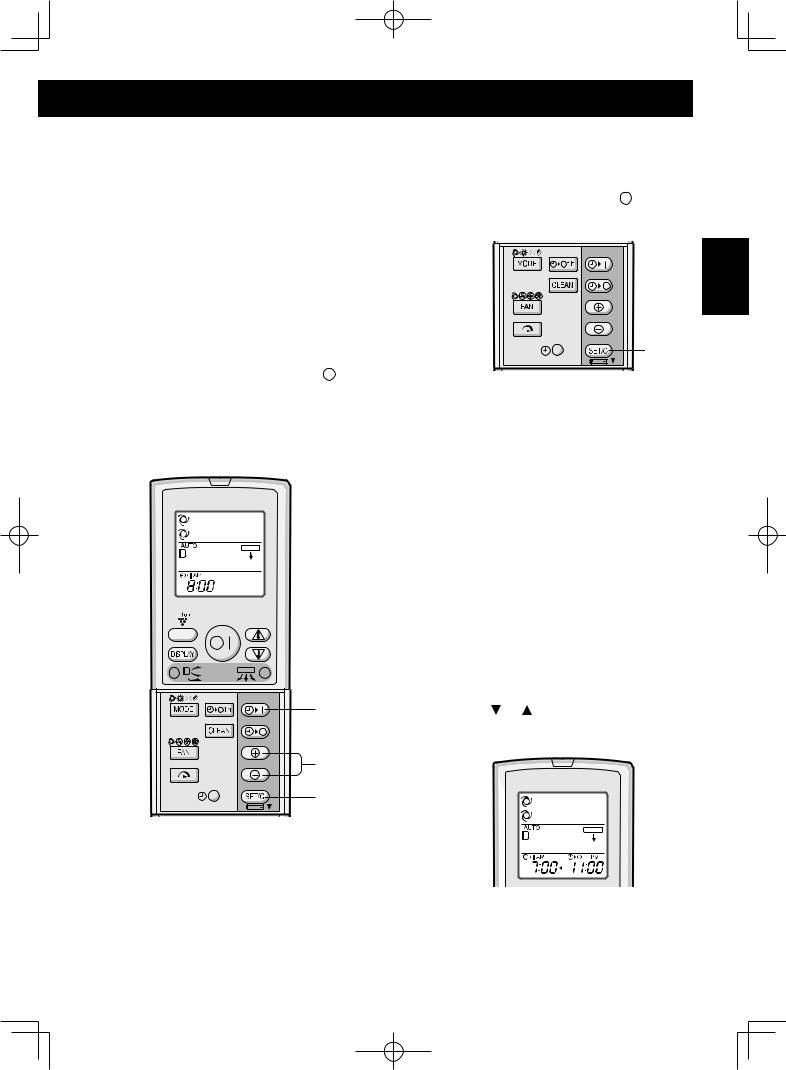
Avant de régler la minuterie, s’assurer que l’horloge est réglée correctement à l’heure actuelle. MINUTE-
MINUTERIE DE MISE EN MARCHE
1 Appuyer sur la touche MINUTERIE DE MISE EN MARCHE ( 
 ).
).
2 Le voyant MINUTERIE DE MISE EN MAR-
CHE clignote ; appuyer sur la touche AVANCE DU TEMPS ou RECUL DE TEMPS pour régler l’heure souhaitée.
(L’heure peut être réglée par incréments de 10 minutes.)
3 Pointer la télécommande vers la fenêtre de réception du signal de l’appareil et appuyer sur la touche RÉGLAGE DE LA MINUTERIE (RÉG./ANN.).
•Le voyant orange de MINUTERIE (  ) situé sur l’appareil s’allume.
•L’appareil émet un bip lorsqu’il reçoit le signal.
4 Sélectionnerment. la condition de fonctionne-
1 |
2 |
3 |
REMARQUE :
•L’appareil s’allume avant l’heure réglée afin de permettre à la pièce d’atteindre la température désirée à l’heure programmée. (Fonction de réveil)
POUR ANNULER LE MODE MINUTERIE
Appuyer sur la touche ANNULATION DE LA MINUTERIE (RÉG./ANN.).
•Le voyant orange de MINUTERIE (  ) situé sur l’appareil s’éteint.
•L’heure actuelle de l’horloge apparaît sur la télécommande.
FRANÇAIS |
ANNULA- |
TION |
REMARQUE :
•Si l’une des fonctions MINUTERIE DE MISE EN MARCHE, MINUTERIE D’EXTINCTION et EXTINCTION AU BOUT D’UNE HEURE est activée, la touche d’ANNULATION DE LA MINUTERIE annule tous les réglages.
POUR MODIFIER LE RÉGLAGE DE L’HEURE
Annuler d’abord le réglage MINUTERIE, puis le régler à nouveau.
UTILISATION COMBINÉE DES MINUTERIES DE MISE EN MARCHE/EXTINCTION
On peut utiliser les minuteries de MISE EN MARCHE et d’EXTINCTION de manière combinée.
Exemple :
Pour arrêter l’appareil à 11h00 du soir et le rallumer ensuite afin d’amener la pièce à la température souhaitée à 7h00 du matin.
1 Régler la fonction MINUTERIE D’EXTINCTION sur 11h00 du matin pendant que le climatiseur est en marche.
2 Régler la fonction MINUTERIE DE MISE EN MARCHE sur 7h00 du matin.
La flèche( ou ) entre le voyant MINUTERIE DE MISE EN MARCHE et le voyant MINUTERIE D’EXTINCTION montre quelle minuterie sera activée en premier.
REMARQUE :
•On ne peut pas programmer les minuteries de MISE EN MARCHE et d’EXTINCTION pour faire fonctionner l’appareil à différentes températures ou d’autres réglages.
•Chaque minuterie peut être programmée pour être activée avant l’autre.
FR-11
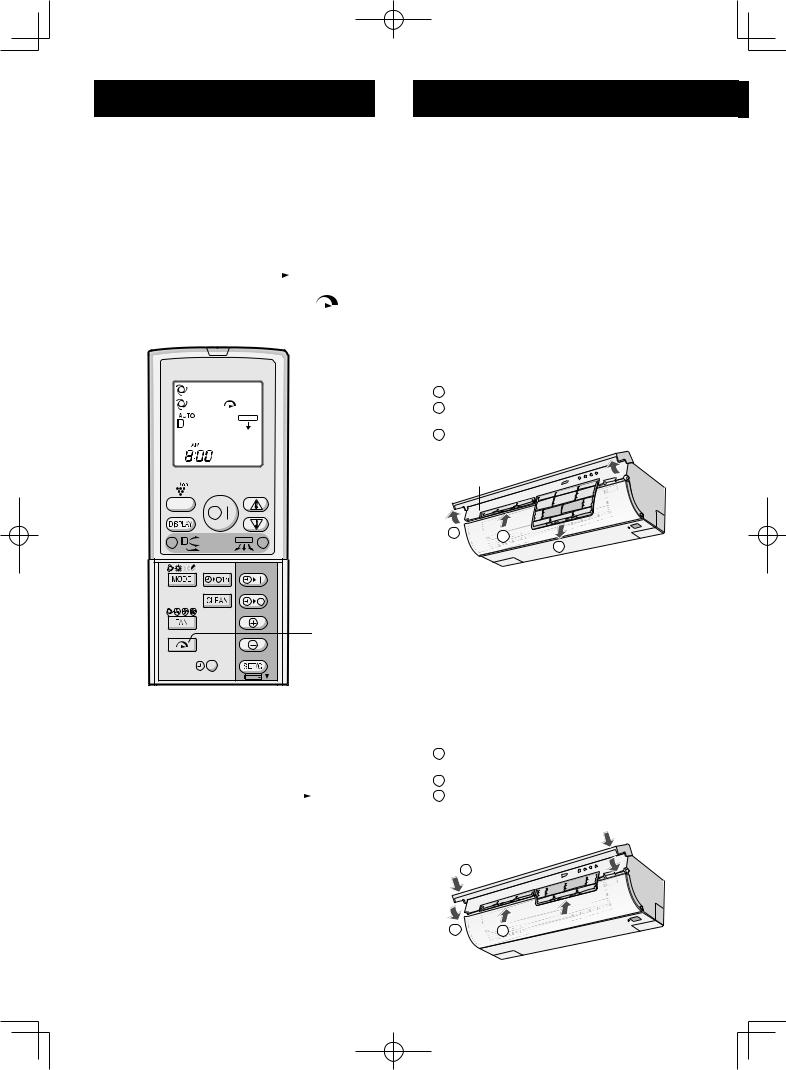
FONCTIONNEMENT À PLEIN RÉGIME
Dans ce mode de fonctionnement, le climatiseur fonctionne au régime maximum pour rafraîchir ou réchauffer l’atmosphère de la pièce si rapidement que l’on peut l’utiliser juste après être rentré chez soi.
1 Pour activer la fonction PLEIN RÉGIME, appuyer sur la touche PLEIN RÉGIME pendant le fonctionnement.
•La télécommande affiche “  ”.
”.
•L’affichage de température s’éteint.
• Le voyant vert de PLEIN RÉGIME ( |
) situé |
||
sur l’appareil s’allume. |
|
||
|
|
|
|
|
|
|
|
1 |
POUR ANNULER
Appuyer de nouveau sur la touche PLEIN RÉGIME.
•La fonction PLEIN RÉGIME est également annulée lorsque le mode de fonctionnement est modifié ou quand l’appareil est éteint.
•Le voyant vert de PLEIN RÉGIME (  ) situé sur l’appareil s’éteint.
REMARQUE :
•Pendant le fonctionnement à PLEIN RÉGIME, il est impossible de régler ni la température ni la vitesse du ventilateur.
ENTRETIEN
AVANT DE RÉALISER L’ENTRETIEN
S’assurer de débrancher le cordon d’alimentation de la prise murale ou couper le disjoncteur avant d’effectuer les travaux d’entretien.
1 Éteindre l’appareil.
2 Attendre 15 secondes ou plus après la fermeture complète du panneau d’ouverture et couper le disjoncteur de circuit.
NETTOYAGE DES FILTRES
Les filtres à air doivent être nettoyés toutes les deux semaines.
1 Éteindre l’appareil.
2 |
Enlever les filtres. |
||
1 |
Soulever le couvercle du filtre. |
||
|
2 |
Pousser les filtres à air légèrement vers le |
|
|
|
haut pour les déverrouiller. |
|
|
3 |
Tirer les filtres à air vers le bas pour les retirer. |
|
Couvercle du filtre |
|||
|
|
1 |
2 |
|
|
|
|
|
|
|
3 |
3 Retirer les filtres purificateurs d’air des filtres à air.
4 Nettoyer les filtres.
Utiliser un aspirateur pour éliminer la poussière. Si les filtres sont encrassés, les laver avec de l’ eau chaude et un détergent doux. Sécher les filtres à l’ombre avant de les remettre en place.
5 Réinstaller les filtres purificateurs d’air.
6 Réinstaller les filtres.
1 Réinstaller les filtres dans leur position d’origine.
2 Fermer le couvercle du filtre.
3 Appuyer fermement sur la flèche située sur le panneau pour le verrouiller.
3
2 |
1 |
FR-12
 Loading...