


CD-G10000DVD
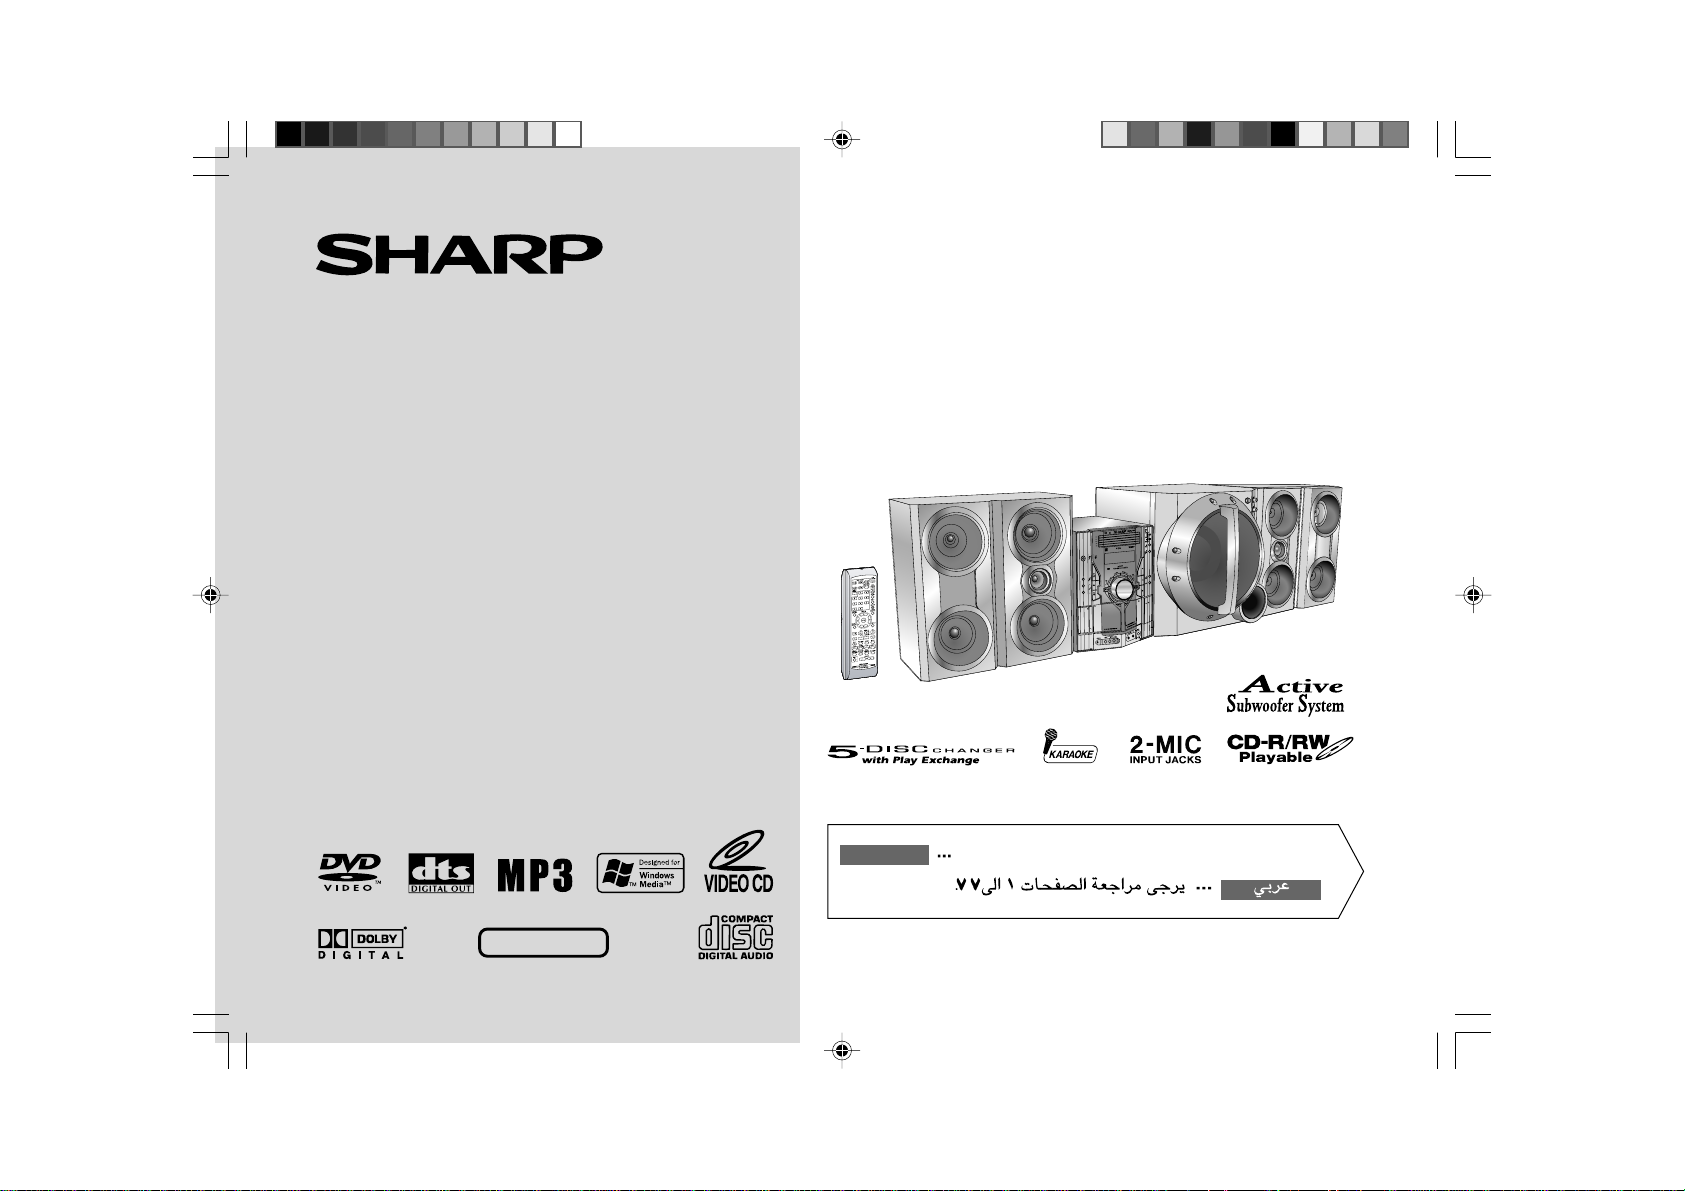
CD-G10000DVD (S)
TINSZA160AWZZ
DVD MINI SYSTEM
MODEL
CD-G10000DVD
SPEAKER SYSTEM
MODEL
CP-G10000
OPERATION MANUAL
NTSC/PAL
Thank you for purchasing this SHARP product.
To obtain the best performance from this product, please read this
manual carefully. It will guide you in operating your SHARP product.
CD-G10000DVD
CD-G10000DVD DVD Mini System consisting of CD-G10000DVD (main unit) and
GBOXSA043AWM1 (surround speaker system).
CP-G10000
CP-G10000 Speaker System consisting of CP-G10000 (front speaker system) and CP-
SW10000 (active subwoofer).
SHARP CORPORATION
Please refer to pages E-1 to E-77.
ENGLISH
*CD-G10000DVD(EN)Cover 05.1.17, 10:521
E-1
ENGLISH
Important Instruction
CD-G10000DVD (S)
TINSZA160AWZZ
CD-G10000DVD
CP-G10000
WARNINGS
I When the ON/STAND-BY button is set at STAND-BY position, mains voltage
is still present inside the unit. When the ON/STAND-BY button is set at
STAND-BY position, the unit may be brought into operation by the timer
mode or remote control.
I This unit contains no user serviceable parts. Never remove covers unless
qualified to do so. This unit contains dangerous voltages, always remove
mains plug from the socket before any service operation and when not in use
for a long period.
I T o prevent fire or shock hazard, do not expose this appliance to dripping or splashing.
No objects filled with liquids, such as vases, shall be placed on the apparatus.
CAUTION
I This product is classified as a CLASS 1 LASER product.
I This product contains a low power laser device. To ensure continued safety
do not remove any cover or attempt to gain access to the inside of the prod-
uct. Refer all servicing to qualified personnel.
NOTE
Audio-visual material may consist of copyrighted works which must not be re-
corded without the authority of the owner of the copyright.
Please refer to the relevant laws in your country.
Special notes
ENGLISH
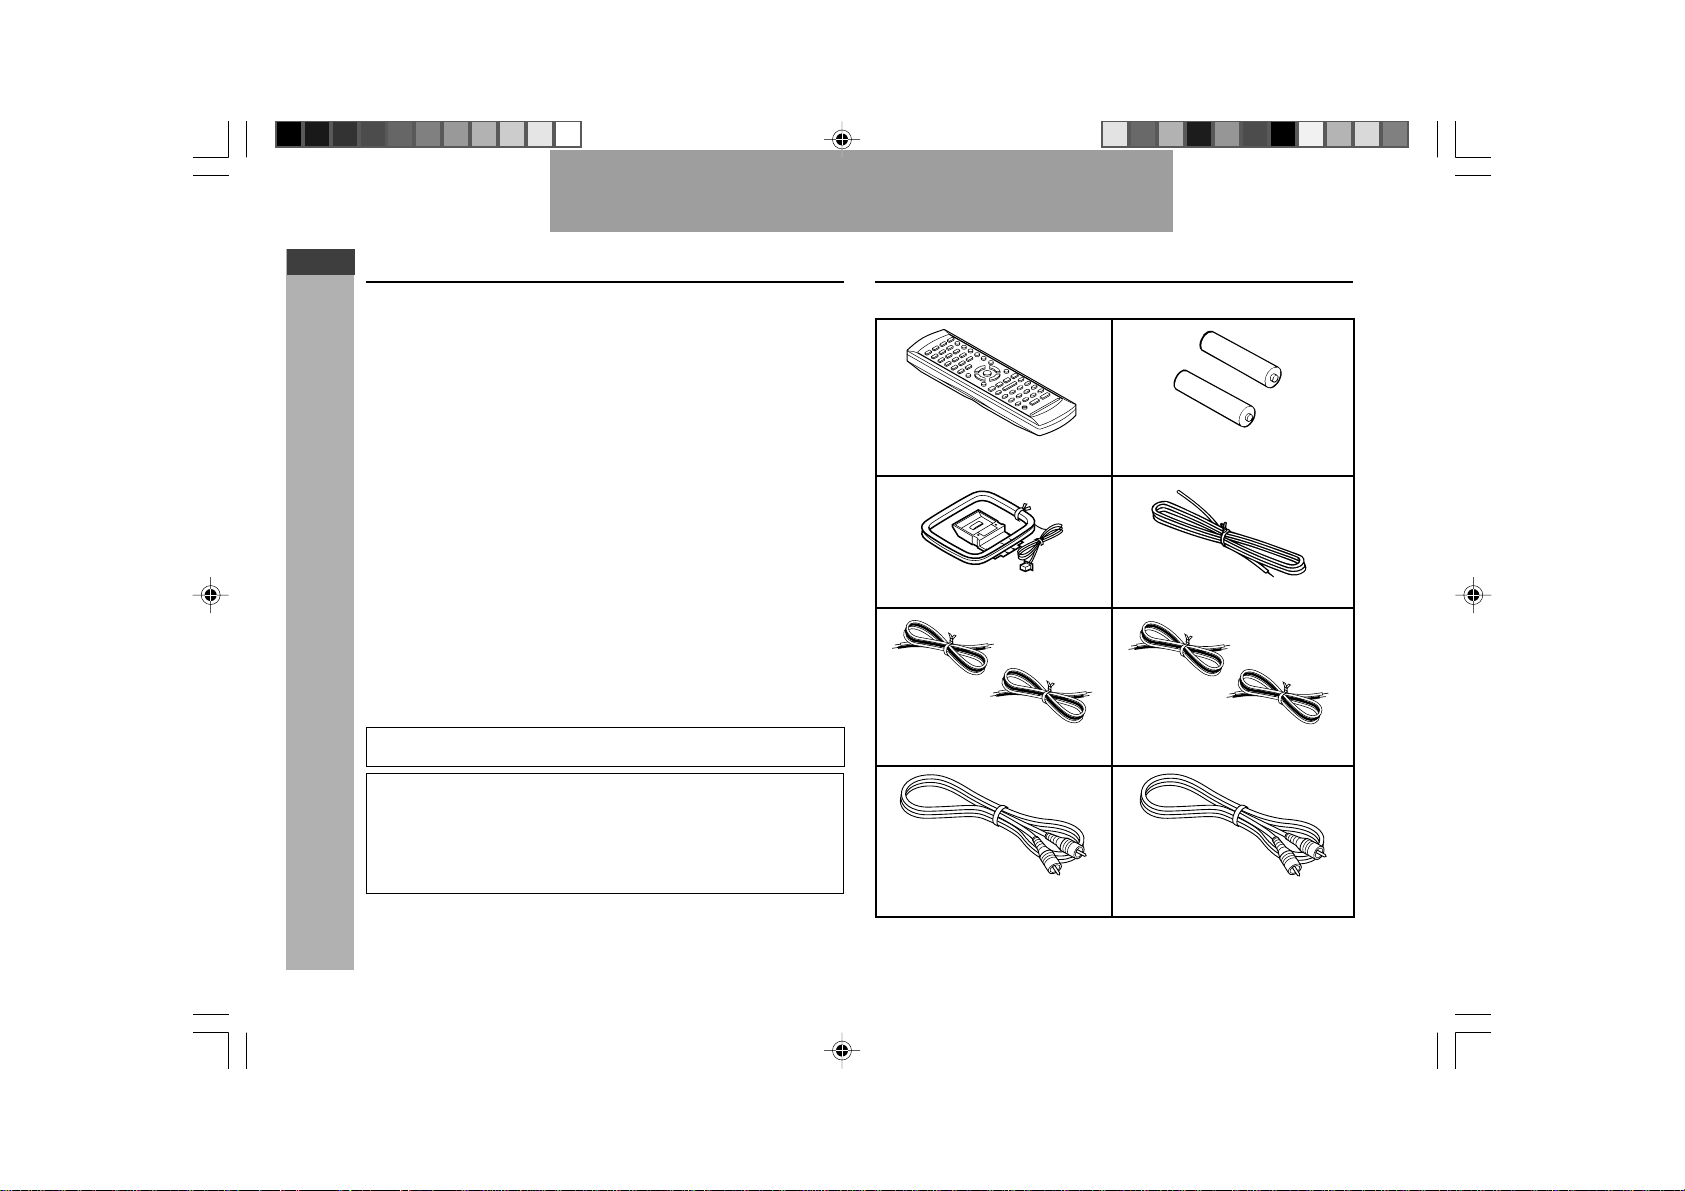
Remote control × 1
“AA” size battery (UM/SUM-3,
R6, HP-7 or similar) × 2
AM loop aerial × 1 FM aerial × 1
Accessories
Please confirm that the following accessories are included.
Subwoofer cable × 1
(Black)
Note:
Only the above accessories are included.
Video cable × 1
(Yellow)
Front speaker wire × 2
(Red/Black)
Copy Protection
This Player supports Macrovision copy protection. On DVDs that include a
copy protection code, if the contents of the DVD are copied using a VCR, the
copy protection code prevents the videotape copy from playing normally.
Apparatus Claims of U.S. Patent Nos. 4,631,603, 4,577,216, 4,819,098
and 4,907,093 licensed for limited viewing uses only.
This product incorporates copyright protection technology that is protected
by method claims of certain U.S. patents and other intellectual property
rights owned by Macrovision Corporation and other rights owners. Use of
this copyright protection technology must be authorized by Macrovision
Corporation, and is intended for home and other limited viewing uses only
unless otherwise authorized by Macrovision Corporation. Reverse engi-
neering or disassembly is prohibited.
Surround speaker wire × 2
(Grey/Black)
*CD-G10000DVD(EN)01 05.1.17, 10:461

E-2
ENGLISH
General Information
CD-G10000DVD (S)
TINSZA160AWZZ
CD-G10000DVD
CP-G10000
7
Contents
H Video CD/CD Playback Page
Video CD...................................................................................... 45
Preparation for video CD playback ...........................................45
Video CD playback ............................................................. 46 - 47
CD playback ........................................................................ 48 - 51
MP3/WMA disc .................................................................... 52 - 53
H Karaoke
Playing karaoke .................................................................. 54 - 55
H Radio
Listening to the radio ......................................................... 56 - 57
H Tape Playback
Listening to a cassette tape (TAPE 1 or TAPE 2)............. 58 - 60
H Tape Recording
Recording to a cassette tape............................................. 60 - 65
H Advanced Features
Timer and sleep operation ................................................. 66 - 69
Enhancing your system ..................................................... 70 - 71
H References
Troubleshooting chart........................................................ 72 - 74
Maintenance ................................................................................75
Specifications ..................................................................... 75 - 76
Glossary ......................................................................................77
H General Information Page
Precautions ................................................................................... 3
Controls and indicators ......................................................... 4 - 9
H Preparation for Use
System connections........................................................... 10 - 15
Subwoofer control ......................................................................16
Remote control ...........................................................................17
H Basic Operation
General control ........................................................................... 18
Setting the clock .........................................................................19
H DVD Explanation
Types of playable discs ..................................................... 20 - 21
Preparing to watch a DVD (DVDs)............................................. 22
H DVD Setting
Initial setup (OSD language setup) ........................................... 23
Setting up for playback of an NTSC disc .................................24
TV mode setup ............................................................................25
Parental setting................................................................... 26 - 27
Audio setting....................................................................... 28 - 29
Disc language setting ........................................................ 29 - 31
Changing the display mode....................................................... 32
H DVD Playback
Playing a DVD (DVDs) ................................................................33
Other disc play features..................................................... 34 - 35
H Advanced DVD Features
Using the function control ................................................. 36 - 41
Repeat playback .........................................................................42
Programme playback .................................................................43
Selecting titles from the menu ..................................................44
Setting parameters using the disc menu .................................44
1
2
3
4
5
6
7
8
9
SHARP TINSZA160AWZZ
(S)
10
*CD-G10000DVD(EN)02-05 05.1.17, 10:462

E-3
ENGLISH
General Information
CD-G10000DVD (S)
TINSZA160AWZZ
CD-G10000DVD
CP-G10000
H General
I Please ensure that the equipment is positioned in a well ventilated area
and ensure that there is at least 10 cm (4") of free space along the sides,
top and back of the equipment.
I Do not place active subwoofer system on the same surface as main
unit to prevent sound interruption during playback.
I Use the unit on a firm, level surface free from vibration.
I Keep the unit away from direct sunlight, strong magnetic fields, excessive
dust, humidity and electronic/electrical equipment (home computers,
facsimiles, etc.) which generate electrical noise.
I Do not place anything on top of the unit.
I Do not expose the unit to moisture, to temperatures higher than 60°C (140°F)
or to extremely low temperatures.
I If your system does not work properly, disconnect the AC power lead from
the wall socket. Plug the AC power lead back in, and then turn on your
system.
I In case of an electrical storm, unplug the unit for safety.
I Hold the AC power plug by the head when removing it from the wall socket,
as pulling the lead can damage internal wires.
I Do not remove the outer cover, as this may result in electric shock.
Refer internal service to your local SHARP service facility.
I The ventilation should not be impeded by covering the ventilation openings
with items, such as newspapers, tablecloths, curtains, etc.
I No naked flame sources, such as lighted candles, should be placed on the
apparatus.
I Attention should be drawn to the environmental aspects of battery disposal.
I This unit should only be used within the range of 5°C - 35°C (41°F- 95°F).
Precautions
10 cm (4") 10 cm (4")
10 cm (4")
10 cm (4")
Warning:
The voltage used must be the same as that specified on this unit.
Using this product with a higher voltage other than that which is specified is
dangerous and may result in a fire or other type of accident causing damage.
SHARP will not be held responsible for any damage resulting from use of this
unit with a voltage other than that which is specified.
H Volume control
The sound level at a given volume setting depends on speaker efficiency,
location and various other factors. It is advisable to avoid exposure to high
volume levels. Do not turn the volume on to full at switch on and listen to music
at moderate levels.
H Care of DVD/Video CD/CD discs
DVD/Video CD/CD discs are fairly resistant to damage, however mistracking
can occur due to an accumulation of dirt on the disc surface. Follow the
guidelines below for maximum enjoyment from your DVD/Video CD/CD
collection and player.
I Do not write on either side of the disc, particularly the non-label side from
which signals are read. Do not mark this surface.
I Keep your discs away from direct sunlight, heat, and excessive moisture.
I Always hold the DVD/Video CD/CDs by the edges. Fingerprints, dirt, or
water on the DVD/Video CD/CDs can cause noise or mistracking. If a DVD/
Video CD/CD is dirty or does not play properly, clean it with a soft, dry
cloth, wiping straight out from the centre, along the radius.
YES
Correct
NO
Floor
Table
*CD-G10000DVD(EN)02-05 05.1.17, 10:463
E-4
ENGLISH
General Information
CD-G10000DVD (S)
TINSZA160AWZZ
CD-G10000DVD
CP-G10000
7
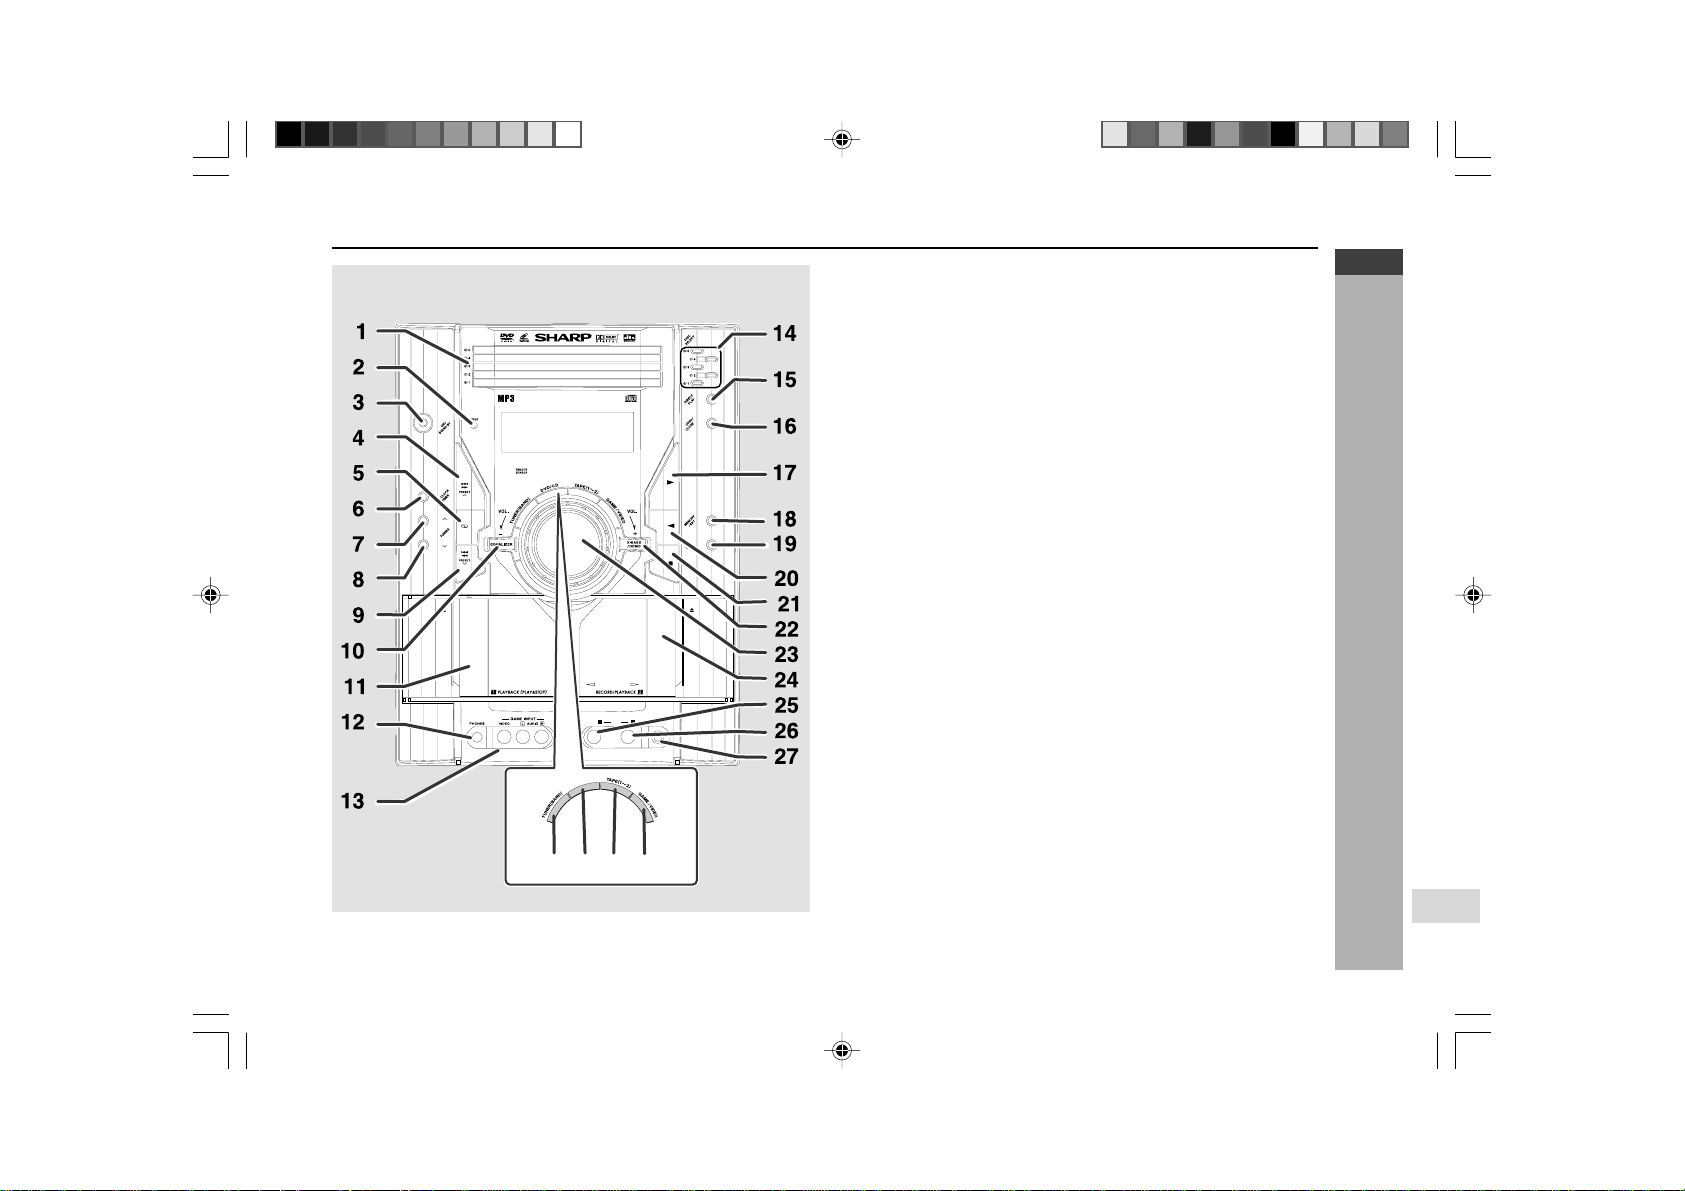
Controls and indicators
H Front panel
Reference page
1. Disc Trays............................................................................................ 22
2. Timer Set Indicator ............................................................................. 67
3. On/Stand-by Button ...................................................................... 18, 22
4.
DVD Chapter Skip/DVD/Video CD/CD/MP3/WMA Track Up or
Fast Forward, Tape 2 Fast Forward, Tuner Preset Up,
Time Up Button ....................................................... 19, 34, 49, 57, 60, 66
5. Tape 2 Reverse Mode Select Button.................................................
59
6. Clock/Timer Button...........................................................
19, 66, 68, 69
7. Tuning Up Button................................................................................
56
8. Tuning Down Button ...........................................................................
56
9.
DVD Chapter Skip/DVD/Video CD/CD/MP3/WMA Track Down or
Fast Reverse, Tape 2 Rewind, Tuner Preset Down,
Time Down Button .................................................. 19, 34, 49, 57, 60, 66
10. Equaliser Mode Select Button ...........................................................
18
11. Tape 1 Cassette Compartment ..........................................................
58
12. Headphone Socket .............................................................................
70
13. Game/Video Input Sockets ................................................................
70
14.
Disc Number select Buttons .............................................................
22, 33
15.
Disc Direct Play Button ...........................................................................
33
16. Disc Tray Open/Close Button ......................................................
22, 33
17.
DVD/Video CD/CD/MP3/WMA
Play, Tape 1 Play,
Tape 2 Forward Play Button.........................................................
33, 58
18. Memory/Set Button ...............................................
19, 43, 51, 57, 66, 69
19.
Tape 2 Record Pause Button............................................................... 61
20.
Tape 2 Reverse Play
Button ...............................................................
59
21.
DVD/Video CD/CD/MP3/WMA or Tape Stop
Button .....................
33, 60
22. Extra Bass/Demo Mode Button .........................................................
18
23. Volume Control ...................................................................................
18
24. Tape 2 Cassette Compartment ..........................................................
59
25. Microphone Socket 1..........................................................................
54
26. Microphone Socket 2..........................................................................
54
27. Microphone Level Control .................................................................
54
28.
Tuner (Band) Button............................................................................. 56
29. DVD/Video CD/CD/MP3/WMA Button ..........................................
22, 33
30. Tape (1V2) Button........................................................................
58, 59
31. Game/Video Button ......................................................................
54, 70
CD-G10000DVD
DVD MINI SYSTEM
5
-DISC
GHANGER
AUTO REVERSE
MIC
MIC LEVEL
MIN MAX
1 2
31302928
D
V
D
/
C
D
*CD-G10000DVD(EN)02-05 05.1.17, 10:464
E-5
ENGLISH
General Information
CD-G10000DVD (S)
TINSZA160AWZZ
CD-G10000DVD
CP-G10000
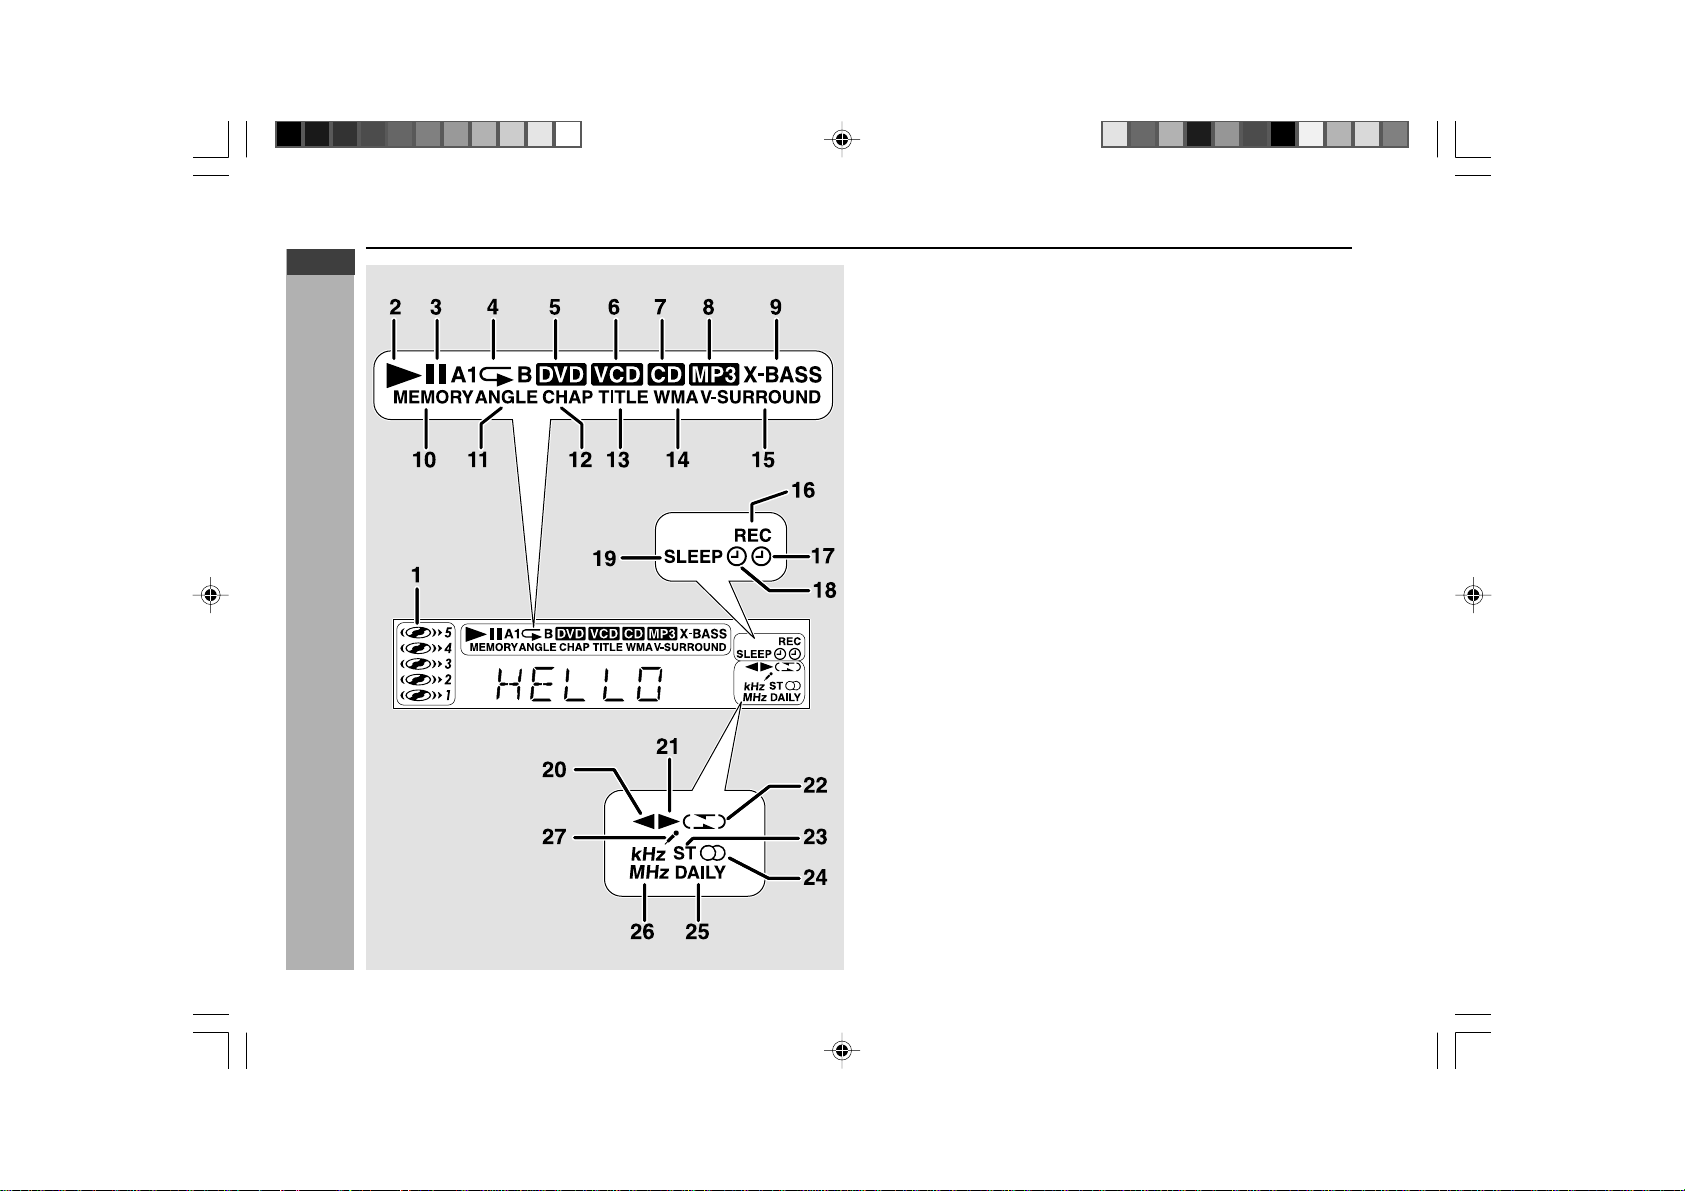
H Display
1. Disc Number Indicators
2. DVD/Video CD/CD/MP3/WMA Play Indicator
3. DVD/Video CD/CD/MP3/WMA Pause Indicator
4. DVD/Video CD/CD/MP3/WMA Repeat Indicator
5. DVD Indicator
6. VCD Indicator
7. CD Indicator
8. MP3 Indicator
9. Extra Bass Indicator
10. Memory Indicator
11. DVD Angle Indicator
12. DVD Chapter Indicator
13. DVD Title Indicator
14. WMA Indicator
15. Virtual Surround Indicator
16. Tape Record Indicator
17. Timer Recording Indicator
18. Timer Play Indicator
19. Sleep Indicator
20. Tape 2 Reverse Play Indicator
21. Tape Forward Play Indicator
22. Tape 2 Reverse Mode Indicator
23. FM Stereo Mode Indicator
24. FM Stereo Receiving Indicator
25. Daily Timer Indicator
26. Tuner Receiving Frequency Indicators
27. Karaoke Mode Indicator
Controls and indicators (continued)
*CD-G10000DVD(EN)02-05 05.1.17, 10:465
E-6
ENGLISH
General Information
CD-G10000DVD (S)
TINSZA160AWZZ
CD-G10000DVD
CP-G10000
7
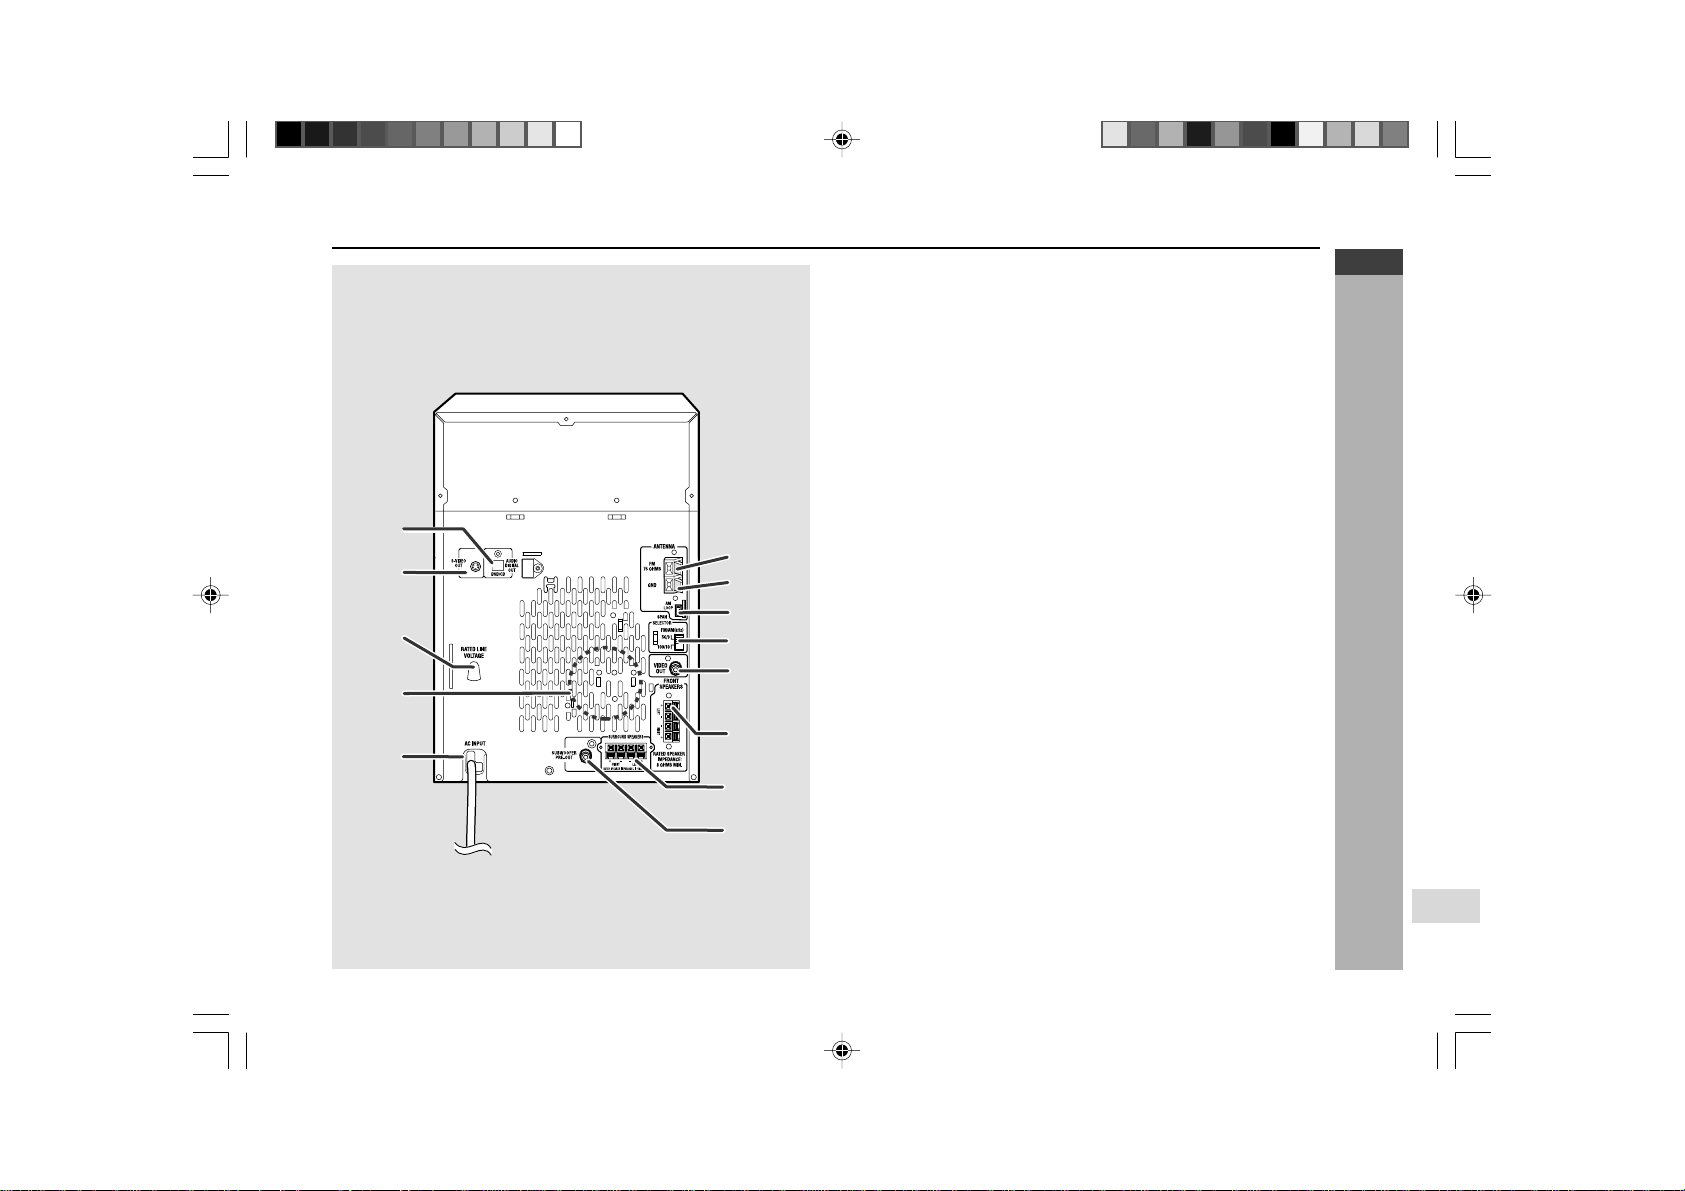
H Rear panel
Reference page
1. Audio Digital Out Socket.................................................................... 71
2. S-Video Output Socket ....................................................................... 22
3. AC Voltage Selector...................................................................... 13, 14
4. Cooling Fan
5. AC Power Lead ............................................................................. 13, 14
6. FM 75 Ohms Aerial Terminal........................................................ 10, 11
7. FM Aerial Earth Terminal.............................................................. 10, 11
8. AM Loop Aerial Socket................................................................. 10, 11
9. Span Selector Switch ......................................................................... 15
10. Video Output Socket .......................................................................... 12
11. Front Speaker Terminals.............................................................. 10, 11
12. Surround Speaker Terminals....................................................... 10, 11
13. Subwoofer Pre-output Socket ..................................................... 10, 14
Cooling fan:
This product is equipped with a cooling fan inside, which begins to run once the
power is on for better heat radiation.
13
7
10
11
8
9
6
12
3
1
5
4
2
*CD-G10000DVD(EN)06-09 05.1.17, 10:466
E-7
ENGLISH
General Information
CD-G10000DVD (S)
TINSZA160AWZZ
CD-G10000DVD
CP-G10000
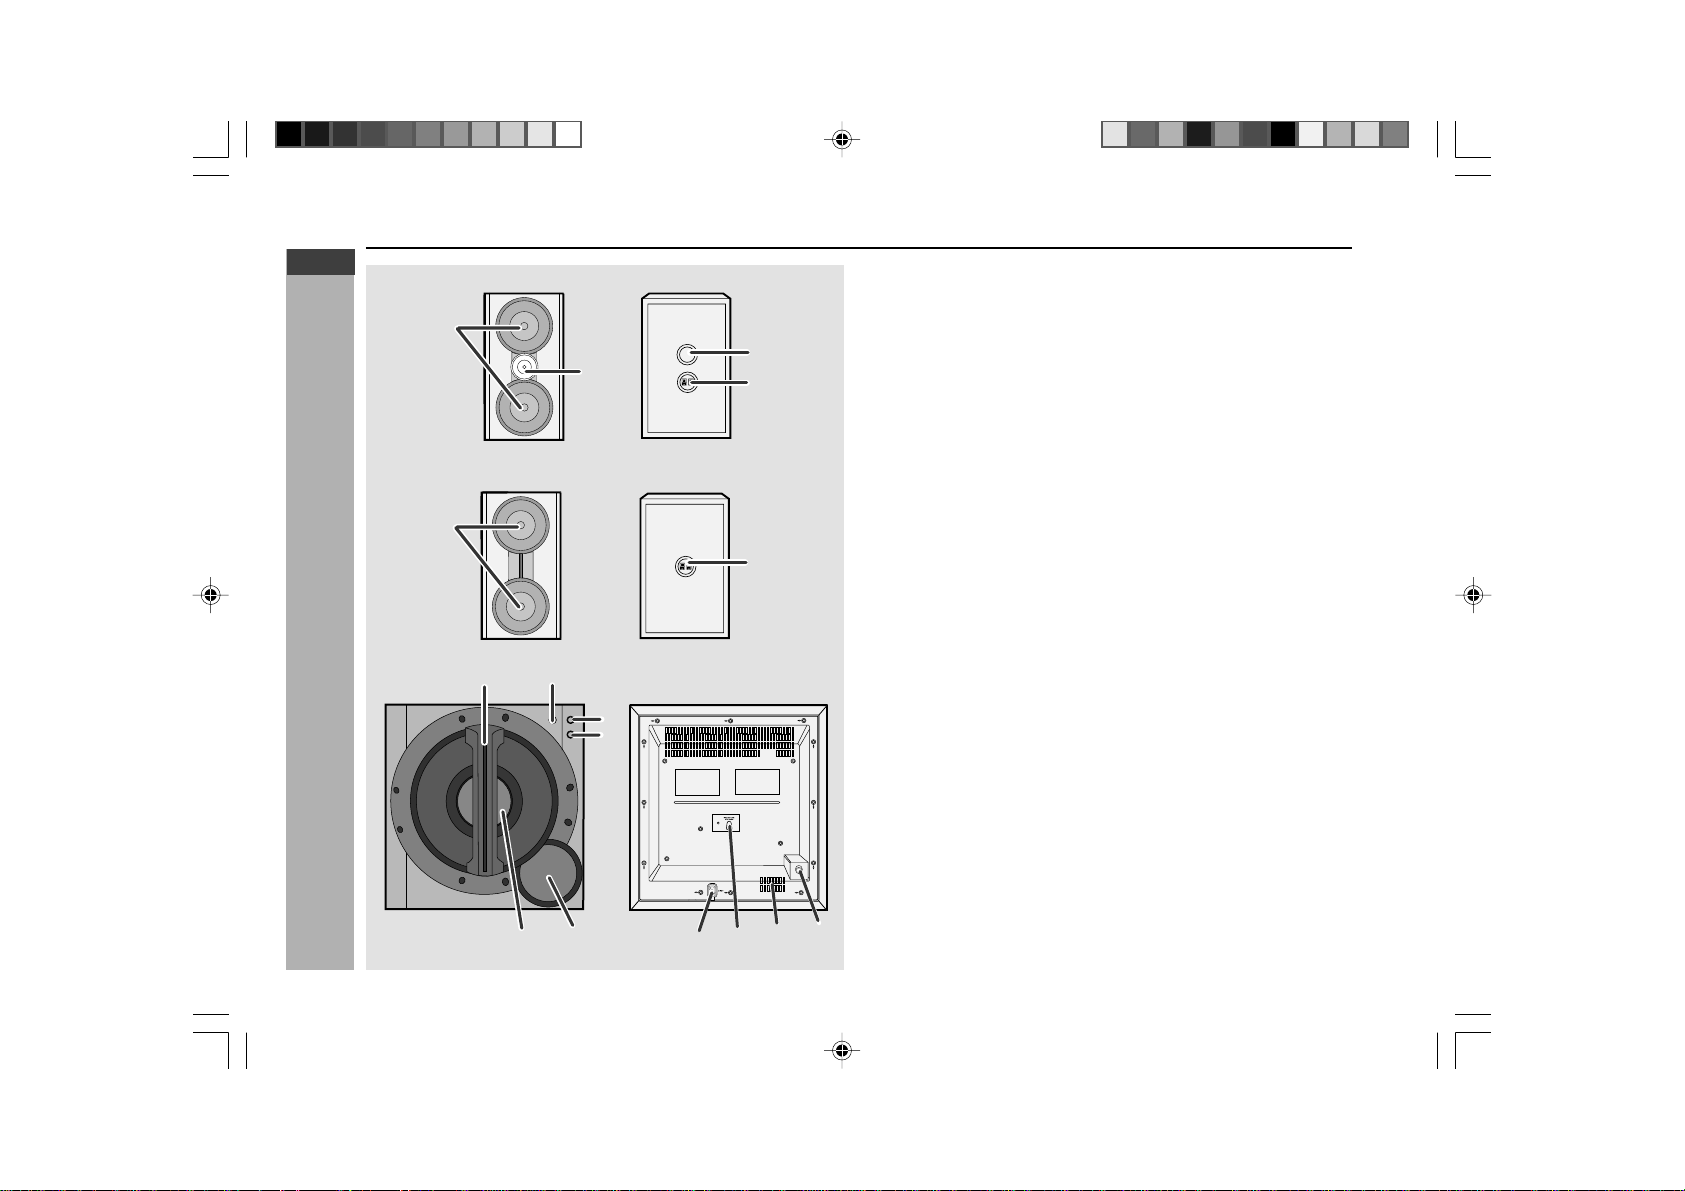
6
5
3
4
2 1
1
2
43
8
7
9
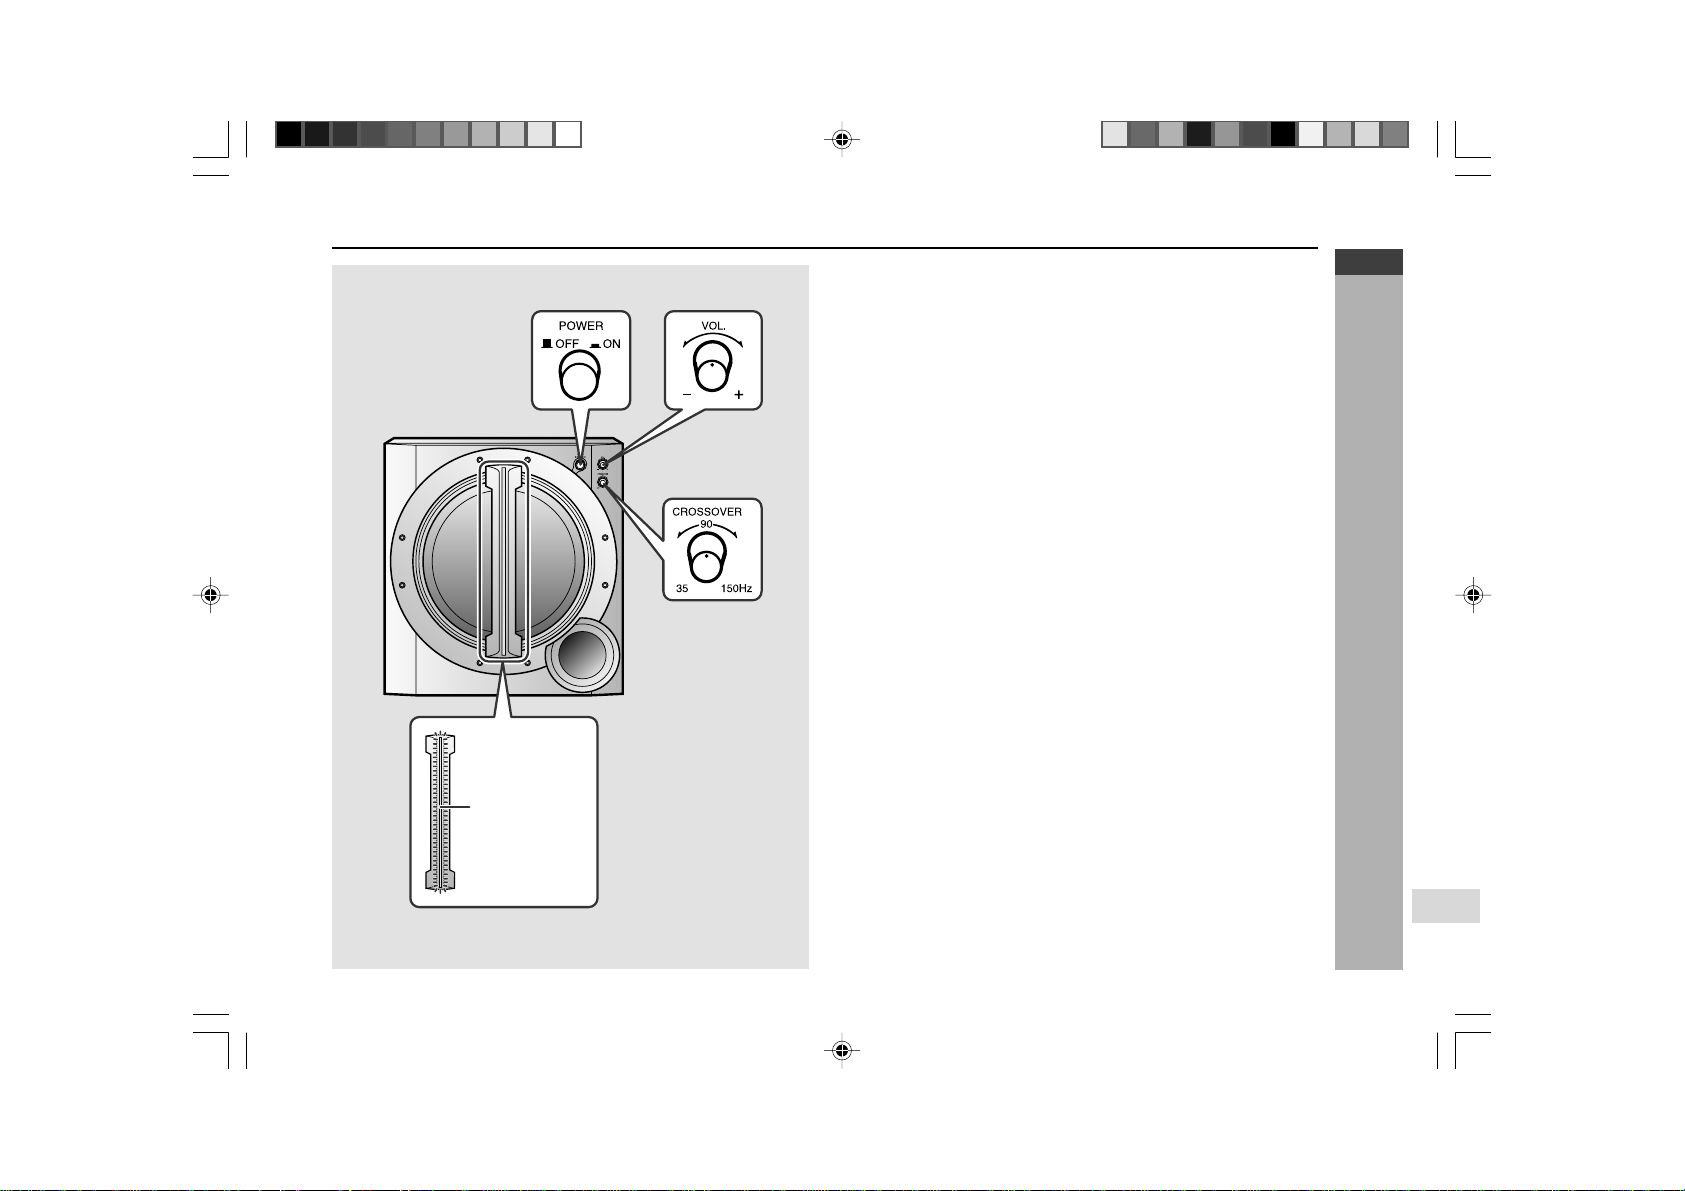
10
1
2
H Active Subwoofer
Reference page
1. Bass Reflex Duct
2. Subwoofer
3. Power Indicator ................................................................................... 14
4. Power Switch ...................................................................................... 14
5. Volume Control ................................................................................... 14
6. Crossover Frequency Control ........................................................... 14
7. Cooling Fan
8. AC Power Lead ............................................................................. 10, 14
9. AC Voltage Selector............................................................................ 14
10. Subwoofer Input Socket............................................................... 10, 14
H Front Speaker
1. Woofers
2. Tweeter
3. Bass Reflex Duct
4. Speaker Terminals
Controls and indicators (continued)
H Surround Speaker
1. Full-range Speakers
2. Speaker Terminals
*CD-G10000DVD(EN)06-09 05.1.17, 10:467
E-8
ENGLISH
General Information
CD-G10000DVD (S)
TINSZA160AWZZ
CD-G10000DVD
CP-G10000
7
1
2
20
21
22
23
24
25
26
27
28
3
4
5
6
7
8
9
10
18
19
11
15
33 34 35 36
37 38 39 40
29 30 31 32
16 17
12 13 14
GAME
/VIDEO
RRMCGA015AWSA
H Remote control
Reference page
1. Remote Control Transmitter................................................................ 17
2. Disc Number Select Buttons ................................................... 22, 33, 46
3. DVD Top Menu Button ......................................................................... 44
4. Clock/Timer Button ............................................................ 19, 66, 68, 69
5. Direct Search Button ..................................................................... 51, 52
6. Clear/Display Button ............................................................................ 43
7. Enter Button ................................................................................... 24, 28
8. Cursor Left Button ......................................................................... 27, 51
9. Memory/Dimmer Button ................................... 18, 19, 43, 51, 57, 66, 67
10. Cursor Down Button ................................................................ 24, 28, 51
11. Tape Record Pause Button ......................................... 61, 62, 63, 64, 65
12. DVD Chapter Skip/DVD/Video CD/MP3/ WMA Fast Reverse/Video CD/
CD/MP3/WMA Track Down/Tape Fast Wind and Tuner Preset Down,
Time Down Button ................................................................... 34, 35, 50
13. DVD/Video CD/CD/MP3/WMA Pause Button ...................................... 35
14. DVD Chapter Skip/DVD/Video CD/MP3/WMA Fast Forward/Video CD/
CD/MP3/WMA Track Up/Tape Fast Wind and T uner Preset Up,
Time Up Button ........................................................................ 34, 35, 50
15. Tape 2 Reverse Play Button .........................................55, 59, 61, 62, 63
16. DVD/Video CD/CD/MP3/WMA/Tape Stop Button .......................... 33, 51
17. DVD/Video CD/CD/MP3/WMA/Tape 1 Play/
Tape 2 Forward Play Button.......................................................... 33, 51
18. Shift Button .................................................................................... 24, 55
19. Volume Up or Down Button................................................................. 18
20. On/Stand-by Button ....................................................................... 18, 23
21. Echo Level Up/Down Button .............................................................. 54
22. DVD Direct Button................................................................................ 37
23. DVD Menu Button ................................................................................ 44
24. Return Button ................................................................................. 38, 39
25. CD Random Button .............................................................................. 50
26. Cursor Up Button ..................................................................... 24, 28, 51
27. Cursor Right Button....................................................................... 27, 51
28. DVD/Video CD Slow Button................................................................. 34
29. DVD/Video CD/CD/MP3/WMA Repeat Button..................................... 42
30. DVD Subtitle Button ............................................................................. 38
31. DVD Angle Button ................................................................................ 38
32. DVD Zoom Button ................................................................................ 41
33. DVD/Video CD/CD/MP3/WMA Button............................................ 23, 33
34. Tuner (Band) Button ............................................................................ 56
35. Tape (1
VV
VV
V 2) Button ....................................................................... 58, 59
36. Game/Video Button........................................................................ 54, 70
37. Equaliser Mode Select Button............................................................. 18
38. Extra Bass Button ................................................................................ 18
39. DVD 3-D Virtual Surround Button ....................................................... 39
40. DVD On Screen Button ........................................................................ 32
*CD-G10000DVD(EN)06-09 05.1.17, 10:468

E-9
ENGLISH
General Information
CD-G10000DVD (S)
TINSZA160AWZZ
CD-G10000DVD
CP-G10000
1
2
3
4
5
6
RRMCGA015AWSA
H Remote control with shift button
Reference page
1. Karaoke/Audio Mode Button ....................................................... 54, 55
2. DVD Setup Button......................................................................... 24, 28
3. DVD Sound Button ............................................................................. 39
4. DVD Super Picture Button ................................................................. 41
5. DVD/Video CD/CD A-B Repeat Button .............................................. 42
6. DVD Digital Gamma Button ............................................................... 40
Controls and indicators (continued)
*CD-G10000DVD(EN)06-09 05.1.17, 10:469
E-10
ENGLISH
Preparation for Use
CD-G10000DVD (S)
TINSZA160AWZZ
CD-G10000DVD
CP-G10000
7
Grey
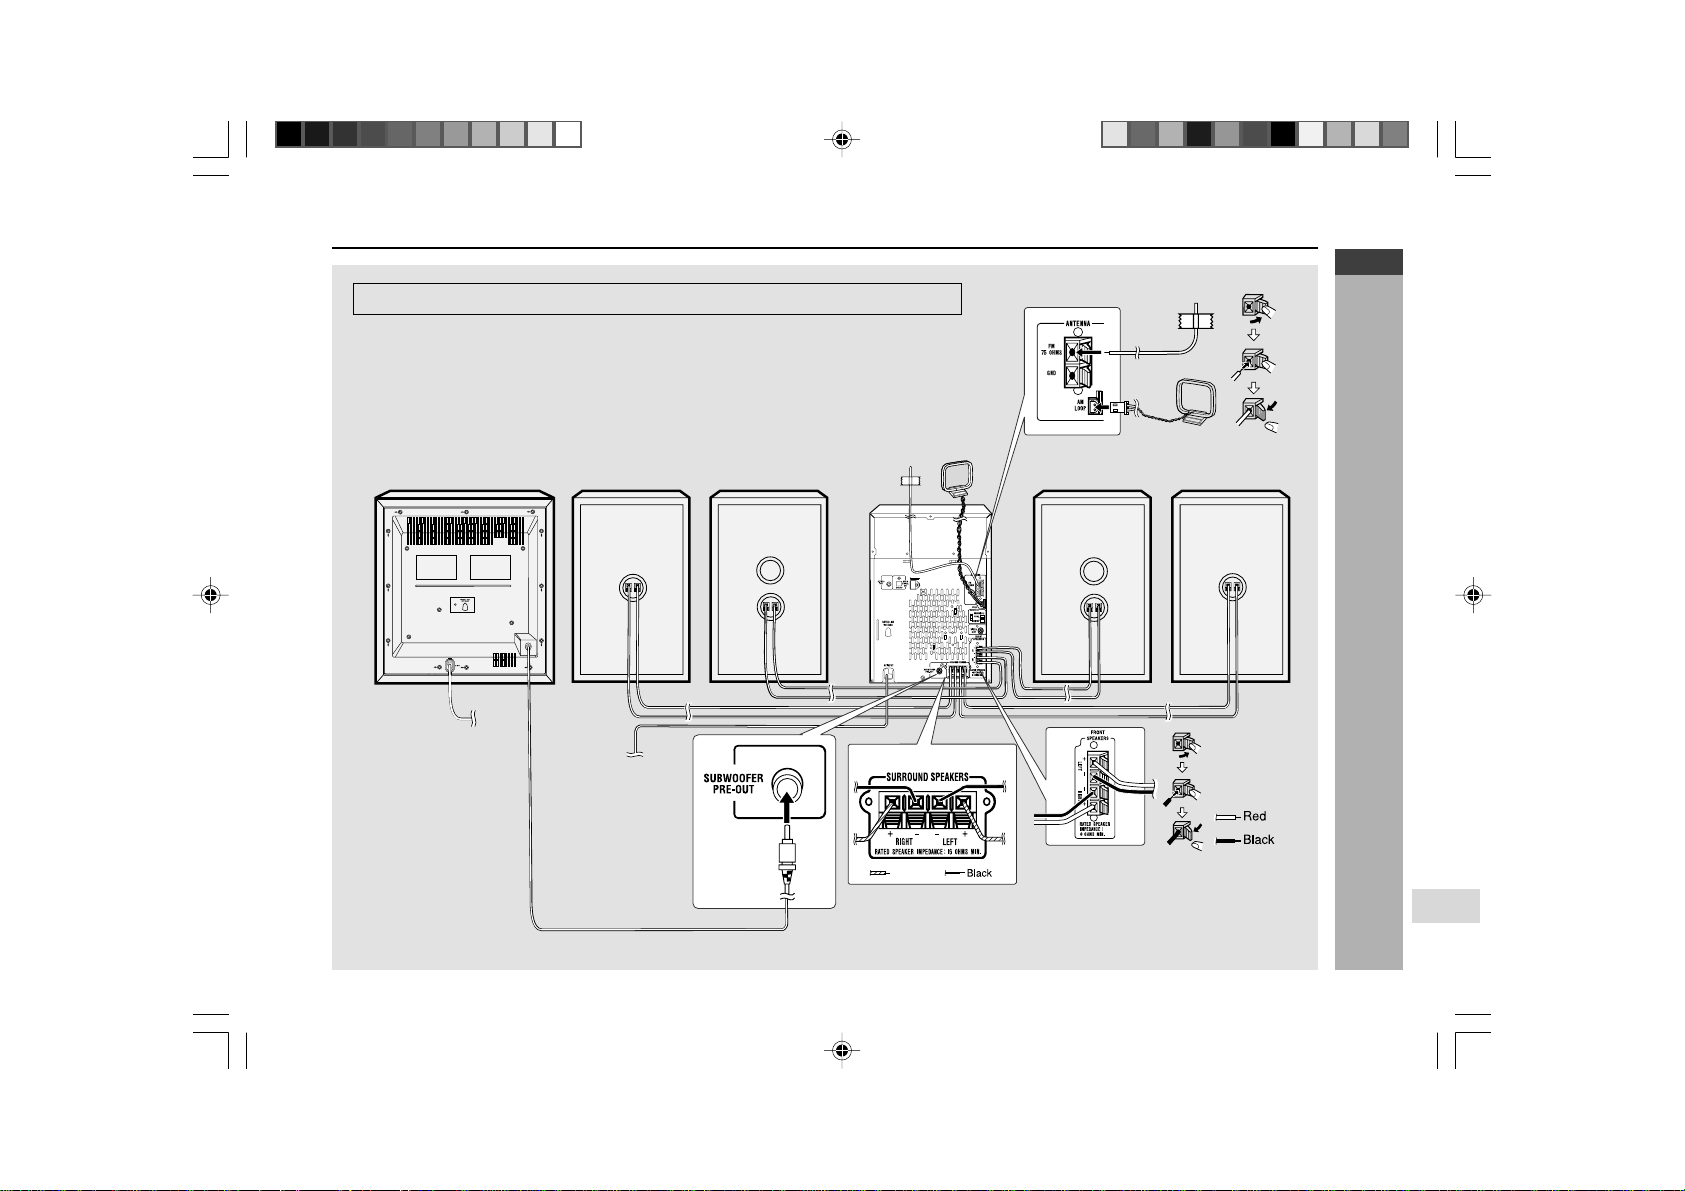
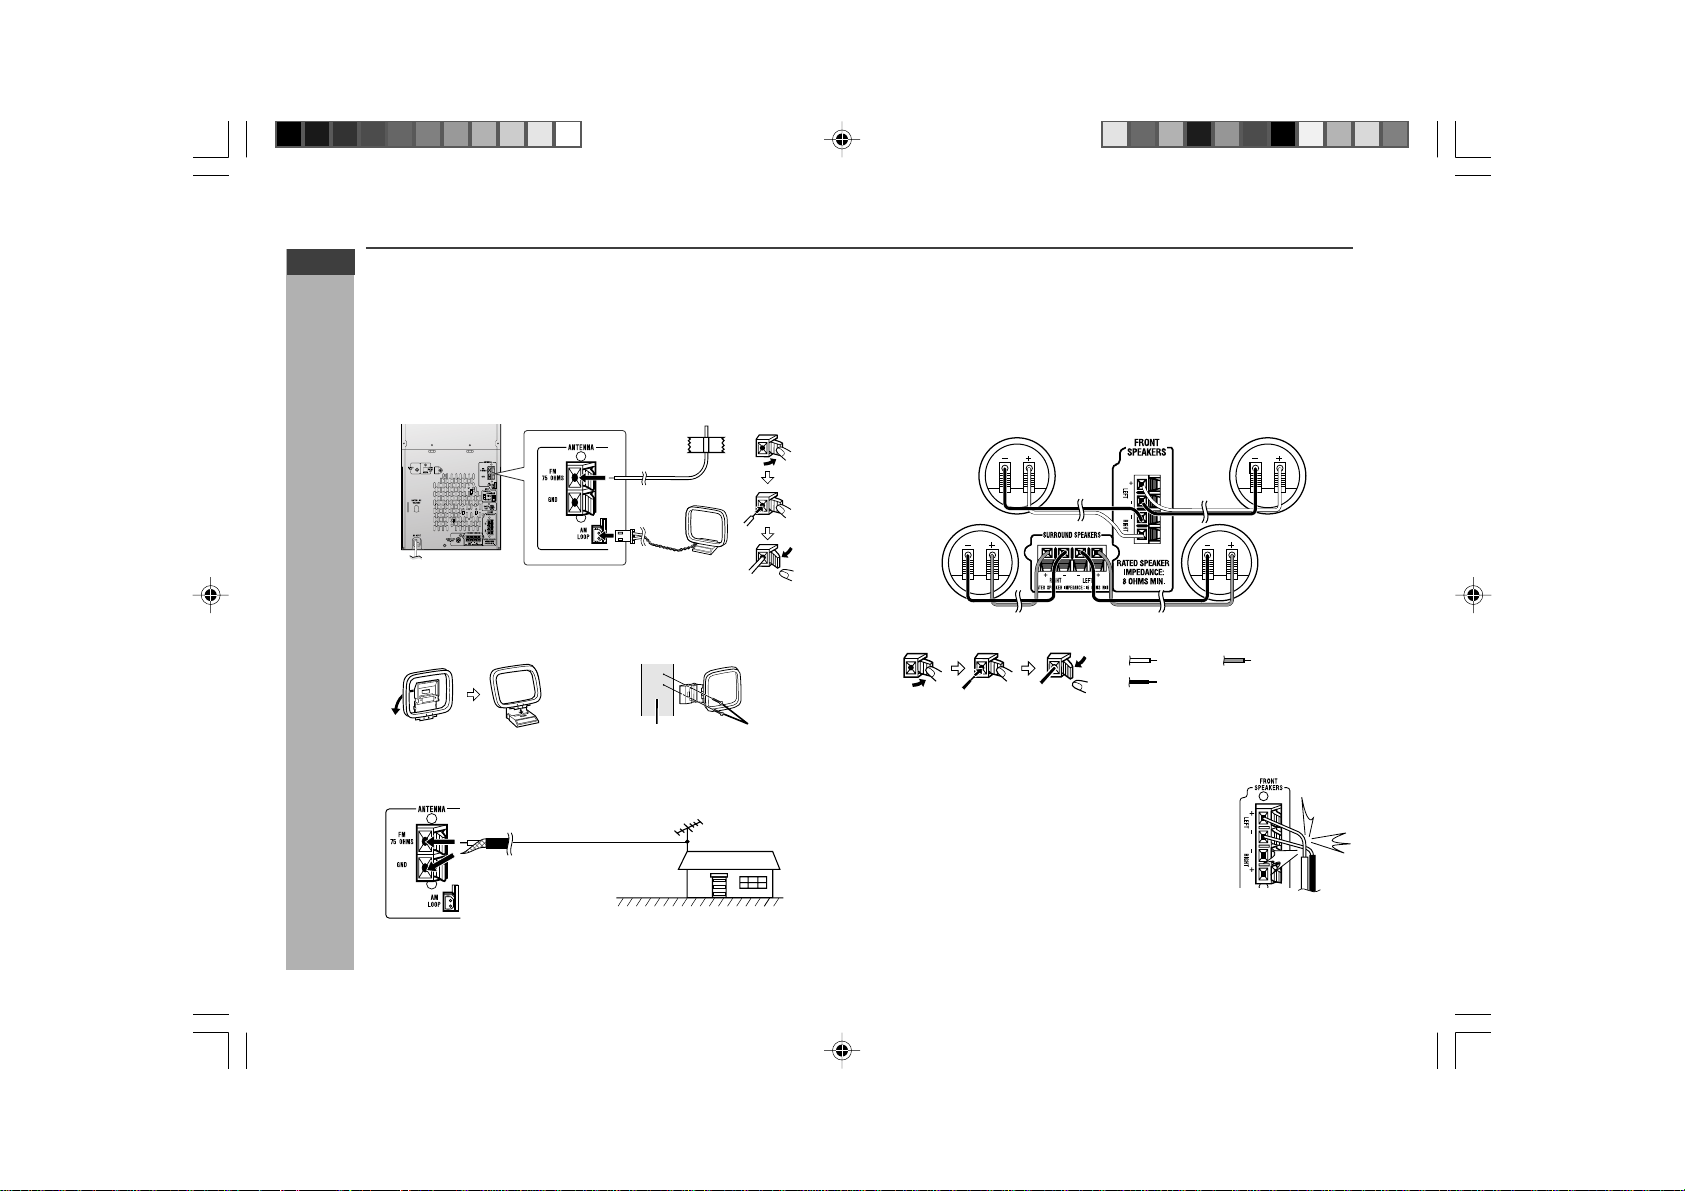
System connections
Active Subwoofer
Surround speaker
(right)
To a wall socket
(See page 13)
To a wall socket
(See page 14)
FM Aerial
AM Loop
Aerial
Make sure to unplug the AC power lead before making any connections.
Surround speaker
(left)
Front speaker
(right)
Front speaker
(left)
*CD-G10000DVD(EN)10-17 05.1.17, 10:4710
E-11
ENGLISH
Preparation for Use
CD-G10000DVD (S)
TINSZA160AWZZ
CD-G10000DVD
CP-G10000
System connections (continued)
Incorrect
H Aerial connection
Supplied FM aerial:
Connect the FM aerial wire to the FM 75 OHMS terminal and position the FM
aerial wire in the direction where the strongest signal can be received.
Supplied AM loop aerial:
Connect the AM loop aerial to the AM LOOP socket. Position the AM loop
aerial for optimum reception. Place the AM loop aerial on a shelf, etc., or attach
it to a stand or a wall with screws (not supplied).
Note:
Placing the aerial on the unit or near the AC power lead may cause noise
pickup. Place the aerial away from the unit for better reception.
Installing the AM loop aerial:
< Assembling > < Attaching to the wall >
Screws (not supplied)
Wall
External FM aerial:
Use an external FM aerial if you require better reception. Consult your dealer.
External
FM aerial
75 ohm
coaxial cable
Note:
When an external FM aerial is used, disconnect the supplied FM aerial wire.
H Speaker connection
Front speakers:
Connect the black wire to the FRONT SPEAKERS (-) terminal, and the red
wire to the FRONT SPEAKERS (+) terminal.
Surround speakers:
Connect the black wire to the SURROUND SPEAKERS (-) terminal, and the
grey wire to the SURROUND SPEAKERS (+) terminal.
Caution:
I Connect the speaker wires to the speakers first, then to the unit.
I Never mistake the FRONT SPEAKERS and the SURROUND SPEAKERS
terminals. The unit or the speakers may be damaged.
I If you use other speakers with impedance lower than
that specified, the unit may be damaged. Front
speakers: 8 ohms Surround speakers:16 ohms
I Do not mistake the right and the left channels. The
right speaker is the one on the right side when you
face the unit.
I Do not let the bare speaker wires touch each
other.
I Do not allow any objects to fall into or to be placed in
the bass reflex ducts.
I Do not stand or sit on the speakers. You may be
injured.
Red
Black
Grey
Front speaker (right)
Front speaker (left)
Surround speaker (right)
Surround speaker (left)
*CD-G10000DVD(EN)10-17 05.1.17, 10:4711
E-12
ENGLISH
Preparation for Use
CD-G10000DVD (S)
TINSZA160AWZZ
CD-G10000DVD
CP-G10000
7
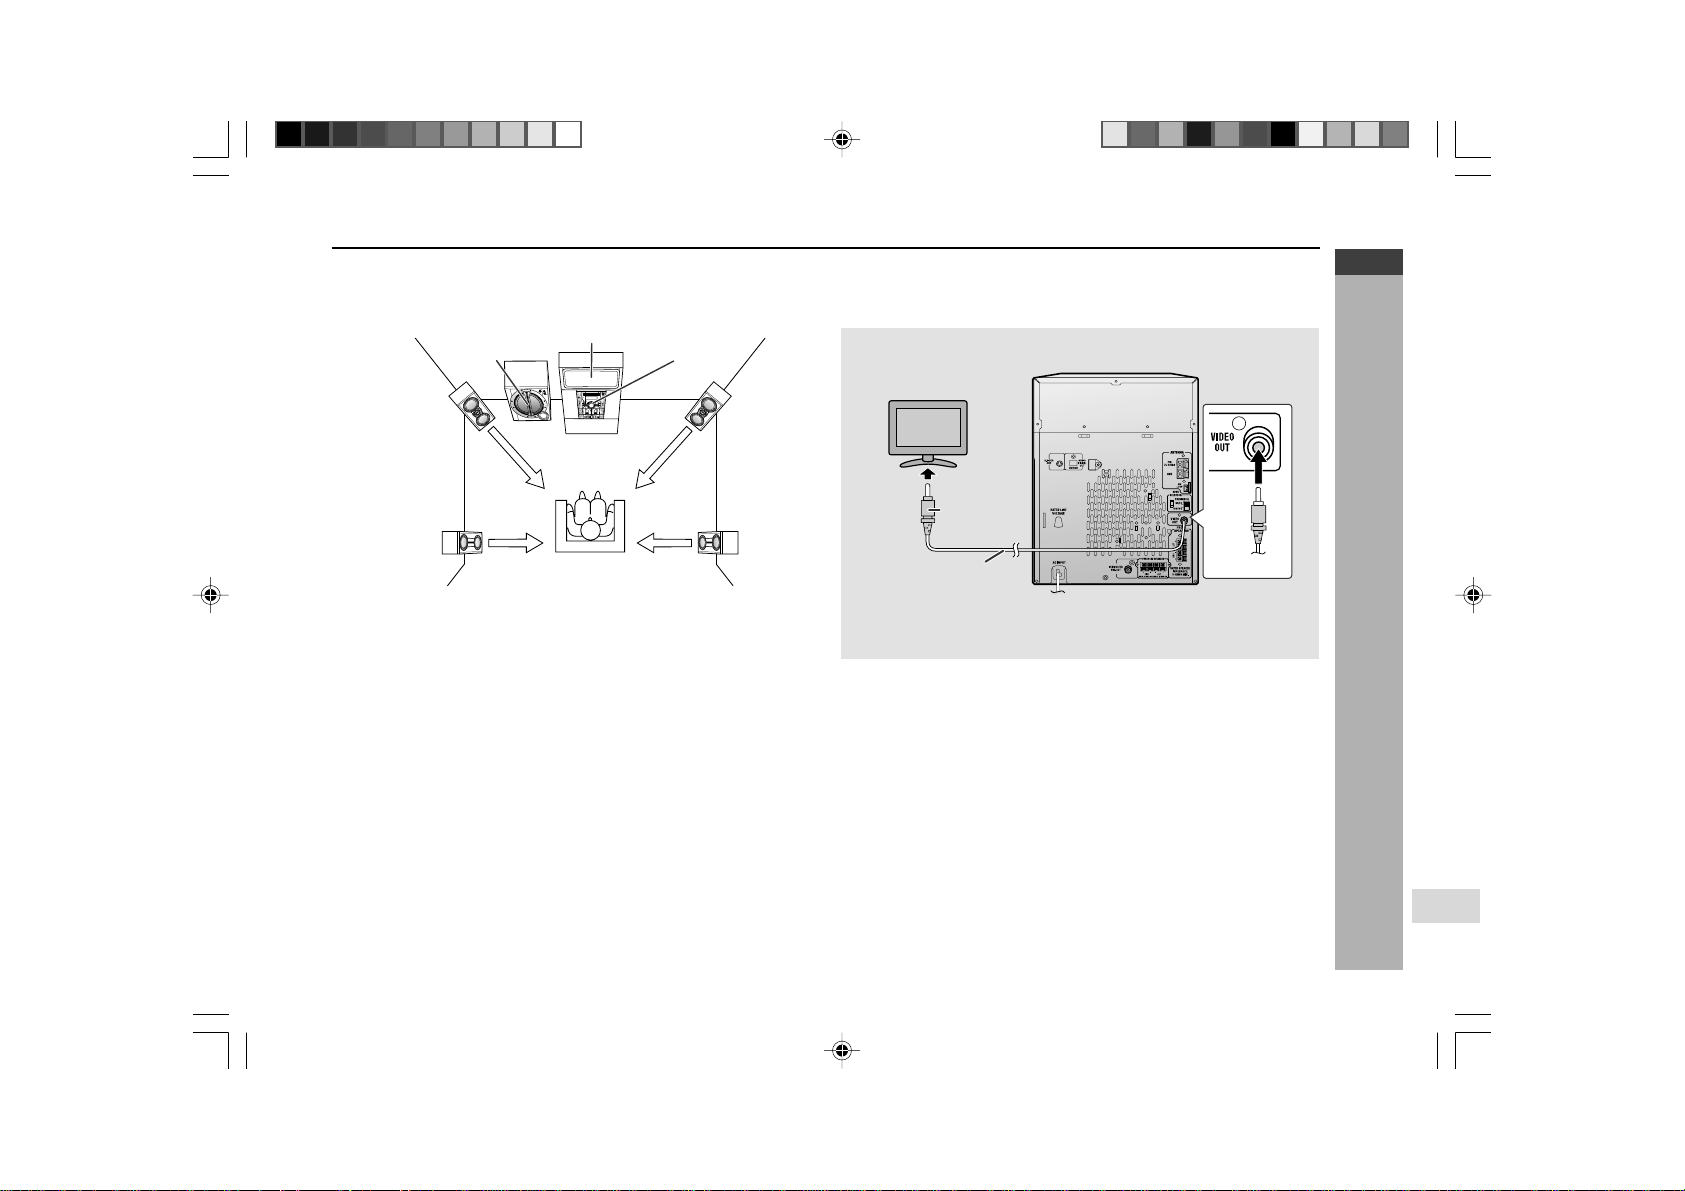
H Placing the speaker system
To enjoy the surround effect, we recommend that you place each speaker as
shown to the below.
Note:
The speaker grilles are not removable.
Caution:
I Do not place active subwoofer system on the same surface as main unit to
prevent sound interruption during playback.
Notes:
I The speakers are magnetically shielded.
Therefore, they do not affect the display even you use them near the TV.
However, some colour variation may occur, depending on the type of TV
used.
If colour variation occurs...
Turn off the TV (from the power switch).
After 15 - 30 minutes, turn the TV on again.
If the colour variation is still present...
Move the speakers further away from the TV.
I If any kind of magnet or an electromagnet is placed too close to the TV and
the system, irregular colours may appear on the TV screen.
H TV/monitor connection
If the TV/monitor has a video input, connect it to the VIDEO OUT socket on the
rear of the unit.
TV
To video
input socket
Video cable
(Yellow)
Yellow
Yellow
Active
subwoofer
Main unit
Front
speaker
(left)
TV
Surround
speaker
(left)
Front
speaker
(right)
Surround
speaker
(right)
*CD-G10000DVD(EN)10-17 05.1.17, 10:4712

E-13
ENGLISH
Preparation for Use
CD-G10000DVD (S)
TINSZA160AWZZ
CD-G10000DVD
CP-G10000
System connections (continued)
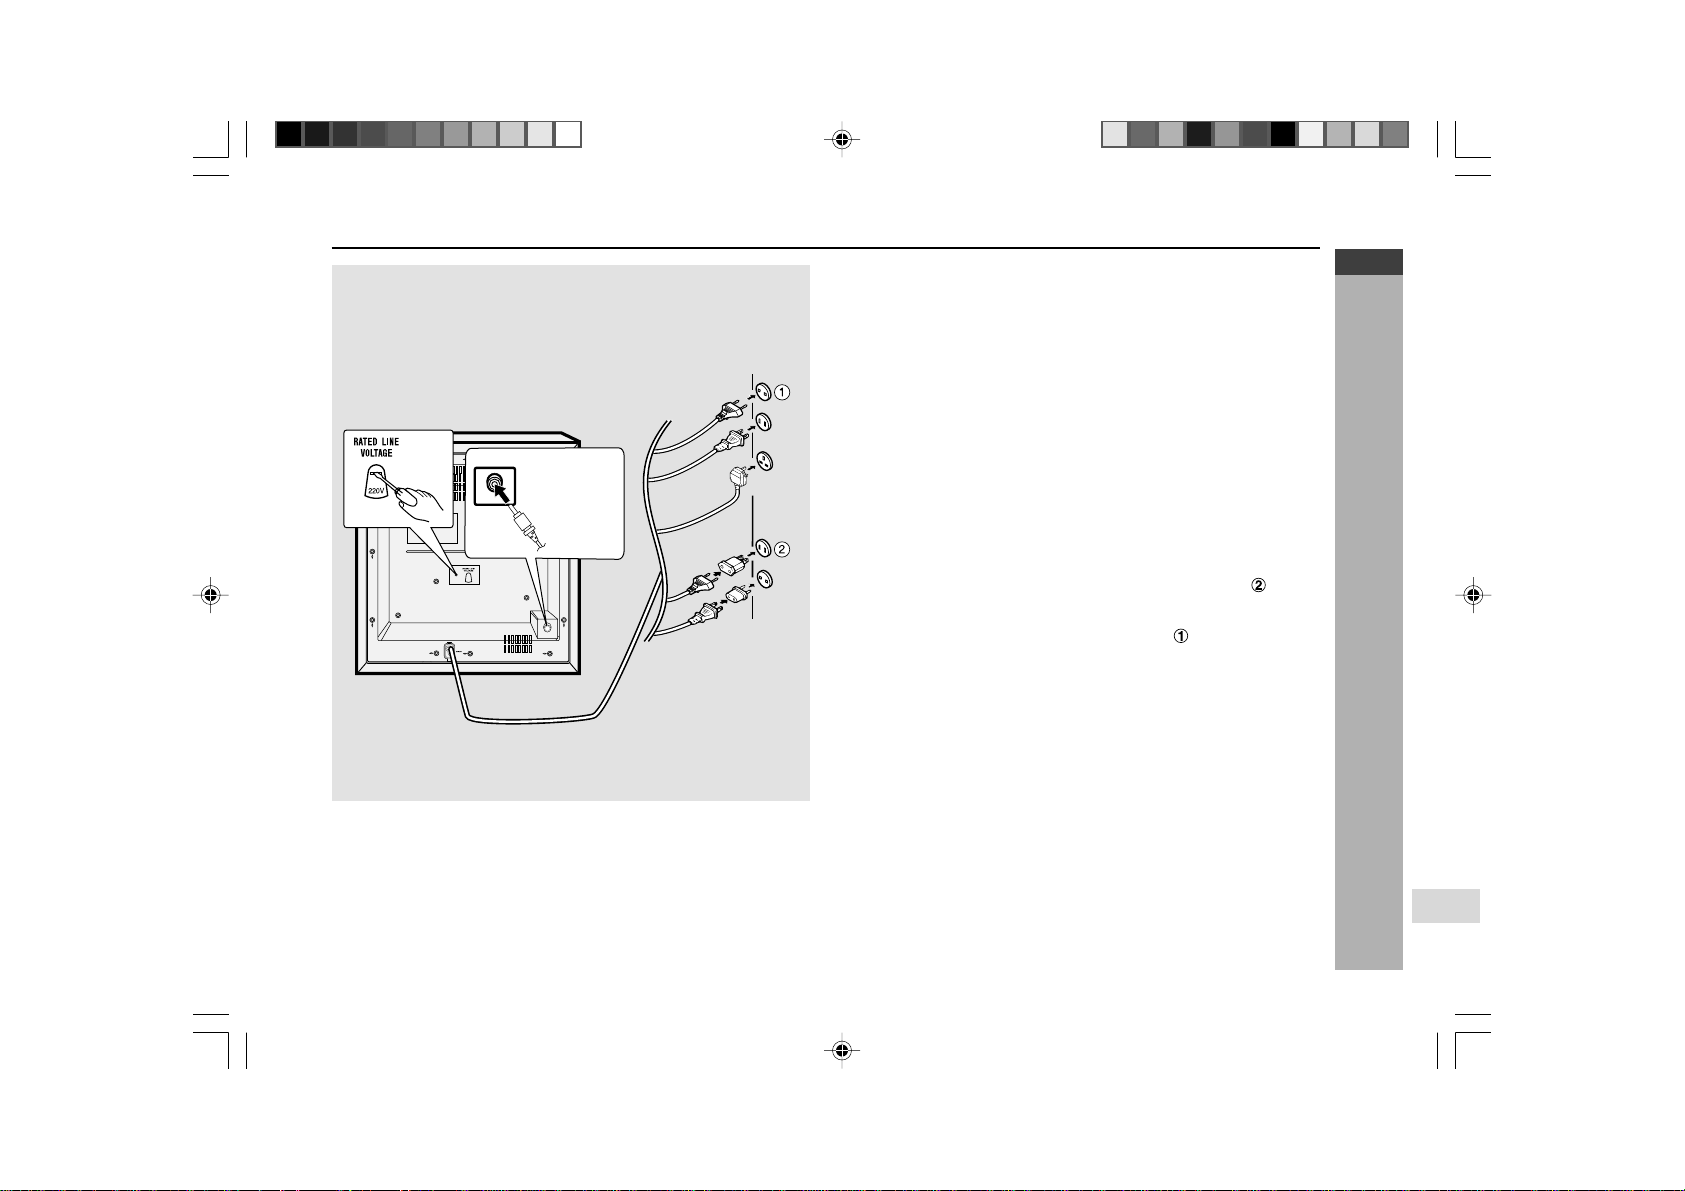
Main Unit
H Setting the AC voltage selector
Check the setting of the AC voltage selector located on the rear panel before
plugging the unit into a wall socket. If necessary, adjust the selector to correspond
to the AC power voltage used in your area.
Turn the selector with a screwdriver until the appropriate voltage number
appears in the window (110 V, 127 V, 220 V or 230 V - 240 V AC).
H Connecting the AC power lead
After checking all the connections have been made correctly, plug the AC power
lead of this unit into the wall socket. If you plug the unit first, the unit will enter
the demonstration mode (see page 15).
Notes:
I The unit will start the tape initialisation when plugged in to the AC socket.
During this process, initialising sound will be heard and the unit cannot be
turned on. Wait until the process is finished.
I Unplug the AC power lead from the wall socket if the unit will not be in use
for a prolonged period of time.
AC Plug Adaptor
In areas (or countries) where a wall socket as shown in illustration is used,
connect the unit using the AC plug adaptor supplied with the unit, as illustrated.
The AC plug adaptor is not included in areas where the wall socket and AC
power plug can be directly connected (see illustration ).
*CD-G10000DVD(EN)10-17 05.1.17, 10:4713
E-14
ENGLISH
Preparation for Use
CD-G10000DVD (S)
TINSZA160AWZZ
CD-G10000DVD
CP-G10000
7
Active Subwoofer
H Setting the AC voltage selector
Check the setting of the AC voltage selector located on the rear panel before
plugging the unit into a wall socket. If necessary, adjust the selector to correspond
to the AC power voltage used in your area.
Turn the selector with a screwdriver until the appropriate voltage number
appears in the window (110 V, 127 V, 220 V or 230 V - 240 V AC).
H Connecting the AC power lead
After checking all the connections have been made correctly, plug the AC power
lead of this unit into the wall socket.
Note:
I Unplug the AC power lead from the wall socket if the unit will not be in use
for a prolonged period of time.
AC Plug Adaptor
In areas (or countries) where a wall socket as shown in illustration is used,
connect the unit using the AC plug adaptor supplied with the unit, as illustrated.
The AC plug adaptor is not included in areas where the wall socket and AC
power plug can be directly connected (see illustration
).
H Connecting the subwoofer
Use the subwoofer cable to connect the SUBWOOFER PRE-OUT socket on
the main unit and the SUBWOOFER IN socket on the active subwoofer.
SUBWOOFER
IN
To subwoofer
input socket
*CD-G10000DVD(EN)10-17 05.1.17, 18:2814
E-15
ENGLISH
Preparation for Use
CD-G10000DVD (S)
TINSZA160AWZZ
CD-G10000DVD
CP-G10000
System connections (continued)
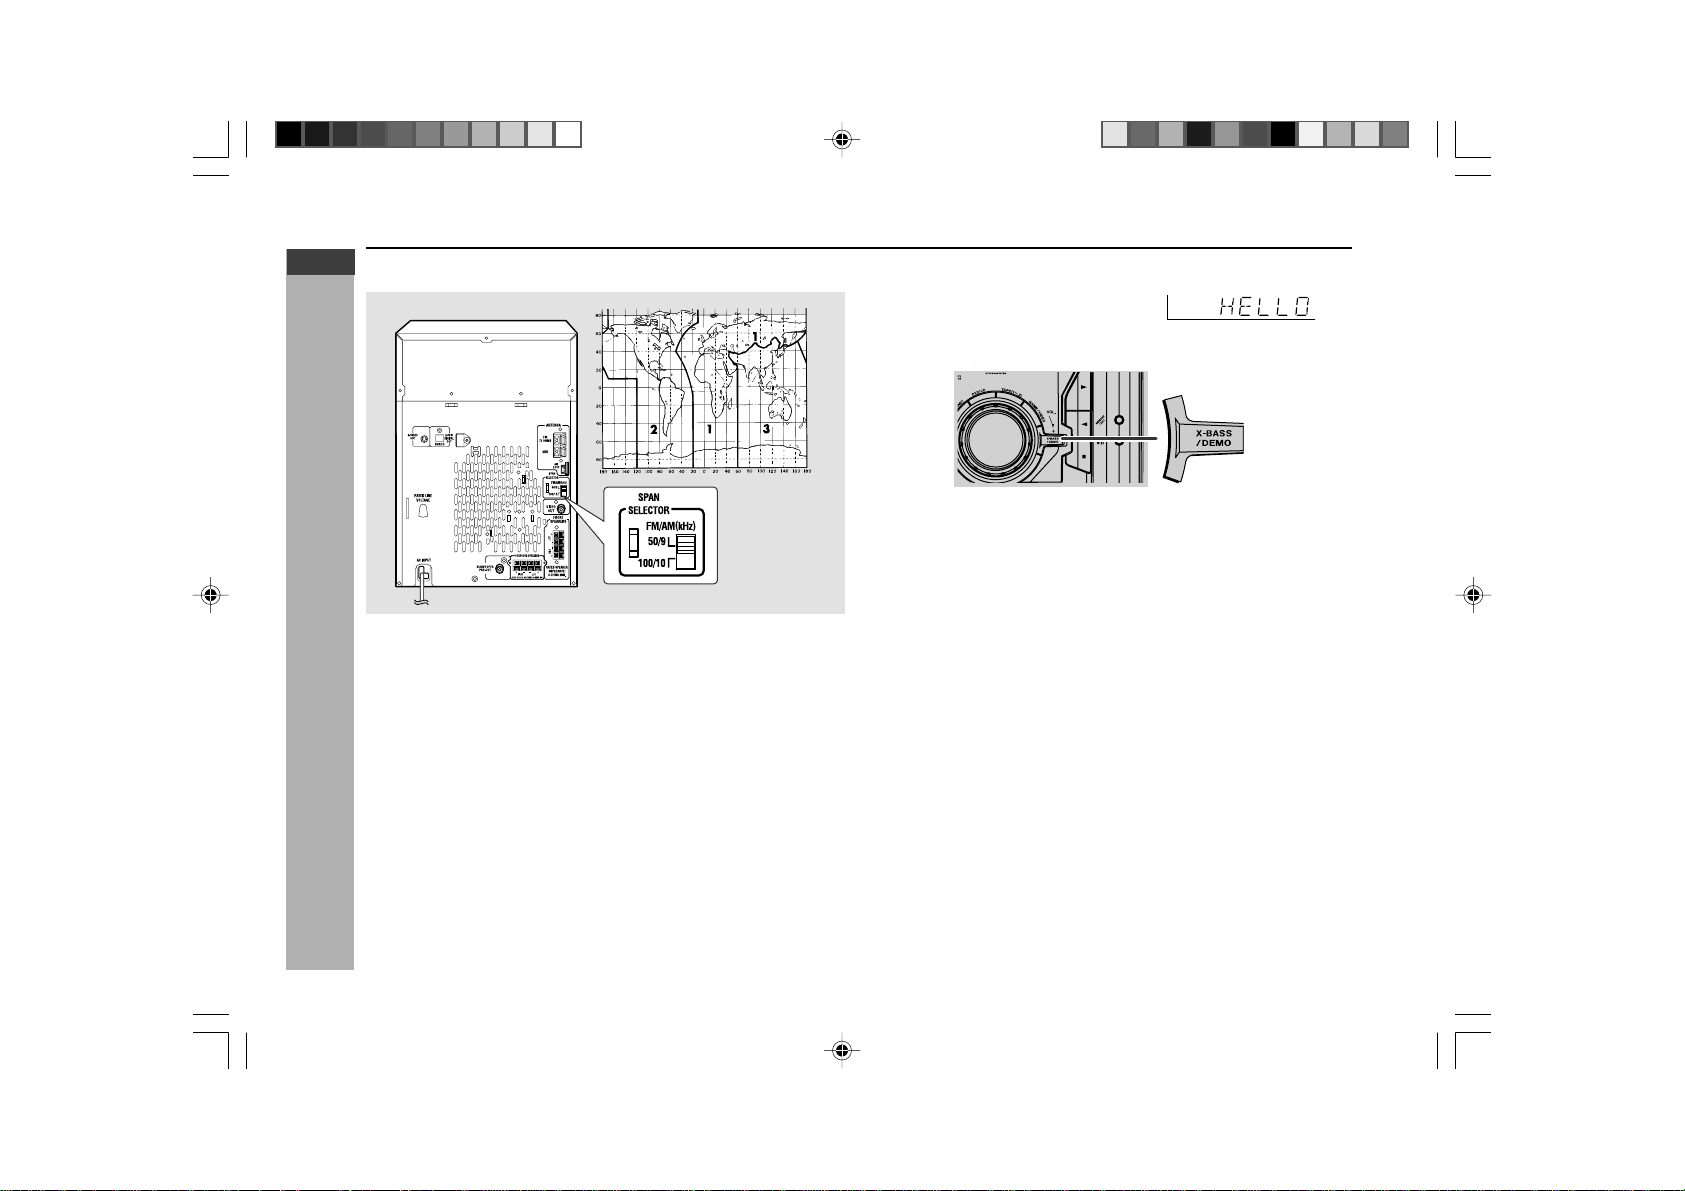
H Setting the FM/AM span selector
The International T elecommunication Union (ITU) has established that member
countries should maintain either a 100 kHz or a 50 kHz interval between
broadcasting frequencies of FM stations and 10 kHz or 9 kHz for AM station.
The illustration shows the 50/9 kHz zones (regions 1 and 3), and the 100/10
kHz zone (region 2).
Before using the unit, set the SPAN SELECTOR switch (on the rear panel) to
the interval (span) of your area.
To change the tuning zone:
1. Press the ON/STAND-BY button to enter the stand-by mode.
2. Set the SP AN SELECTOR switch (on the rear panel) as follows.
I For 50 kHz FM interval (9 kHz in AM) → 50/9
I For 100 kHz FM interval (10 kHz in AM) → 100/10
3. Whilst pressing down the I6 button and the X-BASS/DEMO button, press
the 5 3 PRESET X button until “CLEAR AL” appears.
Caution:
This operation will erase all data stored in memory including clock, timer settings,
tuner preset, and CD programme.
H Demonstration mode
The first time the unit is plugged in, the unit
will enter the demonstration mode.
You will see words scroll.
To cancel the demonstration mode:
When the unit is in the power stand-by mode (demonstration mode), press the
X-BASS/DEMO button. The demonstration mode will be cancelled and the
display will disappear.
To return to the demonstration mode:
When the unit is in the power stand-by mode, press the X-BASS/DEMO button.
Note:
When the power is on, the X-BASS/DEMO button can be used to select the
extra bass mode.
CD-G10000DVD
*CD-G10000DVD(EN)10-17 05.1.17, 10:4715
E-16
ENGLISH
Preparation for Use
CD-G10000DVD (S)
TINSZA160AWZZ
CD-G10000DVD
CP-G10000
7
Subwoofer control
H Power Switch
The POWER indicator lights up when you press the POWER switch to : ON.
Notes:
Observe the following to avoid malfunction and sound distortion.
I Do not set the volume too high on the main unit. The subwoofer may be
damaged.
I Before you switch on/off on the main unit, minimise the volume on the main
unit.
H Crossover frequency control
Adjusts the high frequency cut-off point. Frequencies higher than the set
frequency are removed.
To emphasise the bass, turn this control towards 35 Hz and increase the
volume.
H Volume control
Turn the VOLUME control clockwise to increase the volume, and turn it anti-
clockwise to decrease the volume.
Power Indicator
*CD-G10000DVD(EN)10-17 05.1.17, 15:0116
E-17
ENGLISH
Preparation for Use
CD-G10000DVD (S)
TINSZA160AWZZ
CD-G10000DVD
CP-G10000
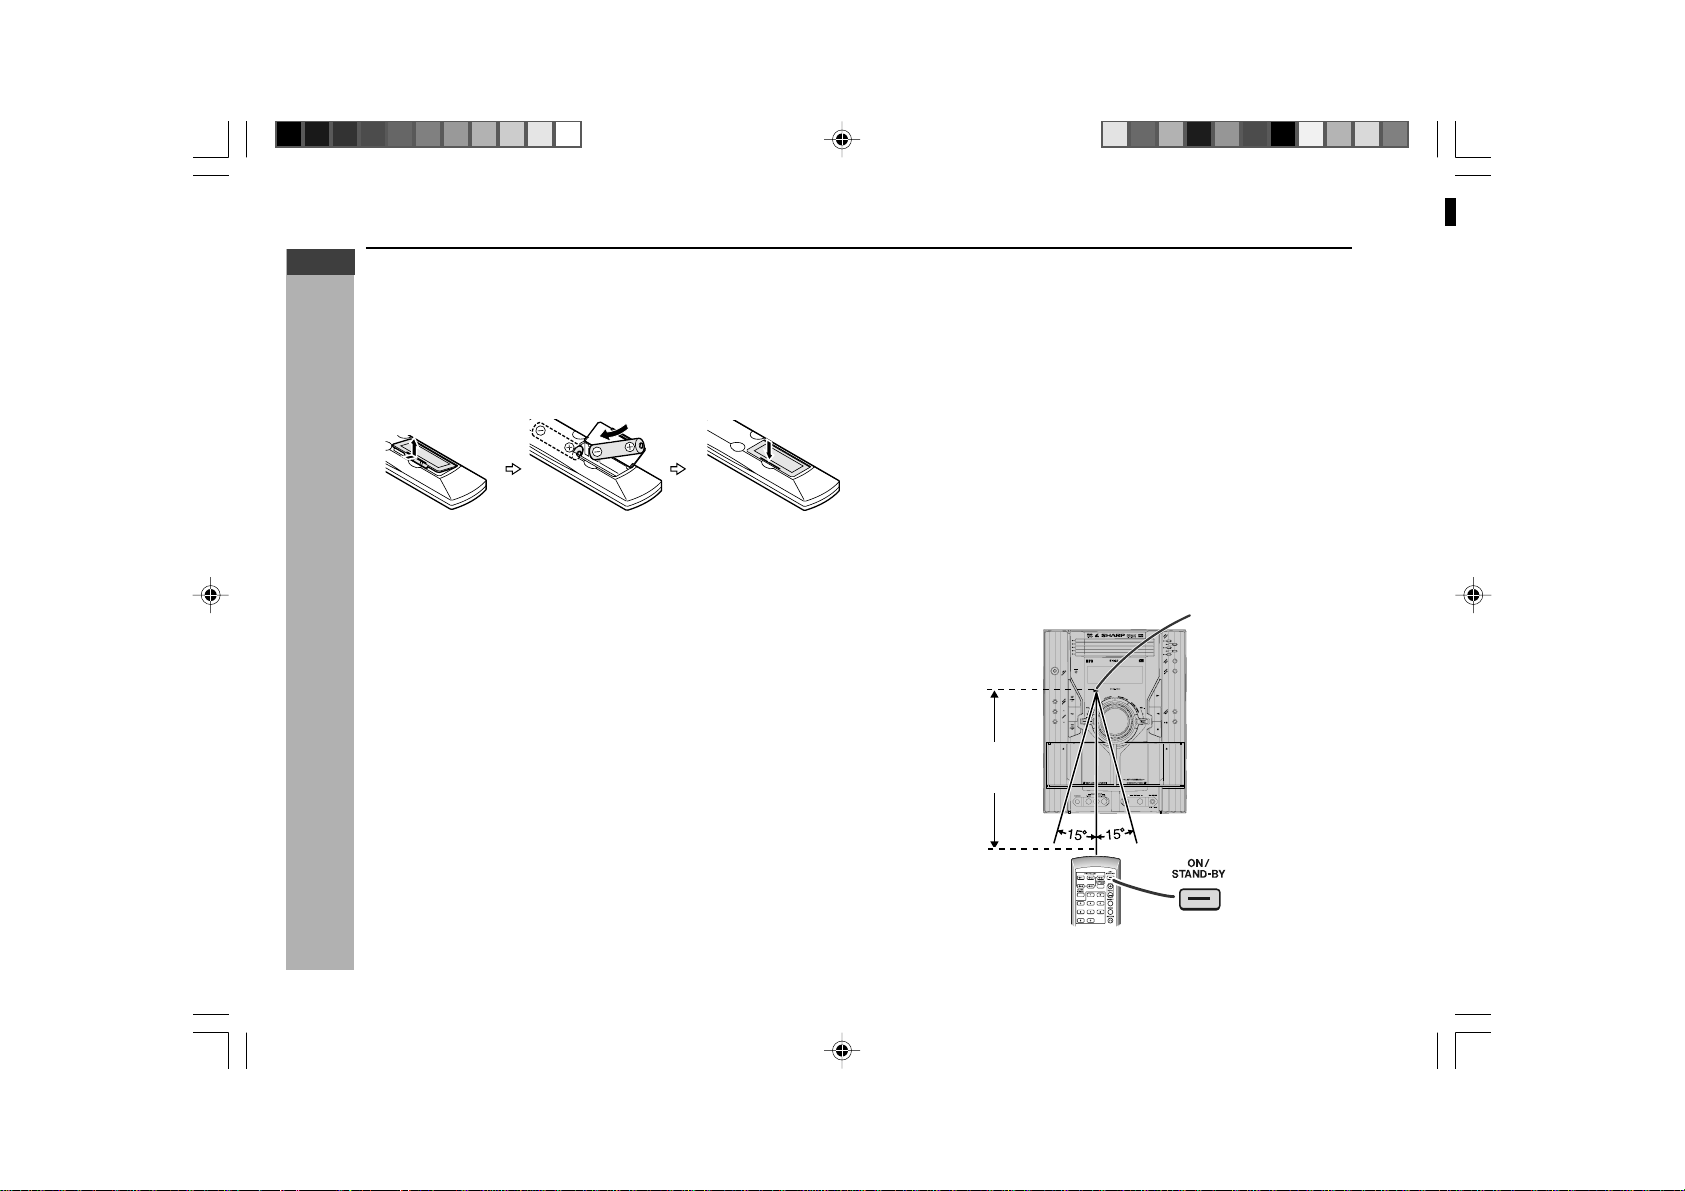
Remote control
H Battery installation
1 Open the battery cover.
2 Insert the batteries according to the direction indicated in the battery
compartment.
When inserting or removing the batteries, push them towards the ë battery
terminal.
3 Close the cover.
Precautions for battery use:
I Replace all old batteries with new ones at the same time.
I Do not mix old and new batteries.
I Remove the batteries if the unit is not to be to used for long periods of time.
This will prevent potential damage due to battery leakage.
Caution:
I Do not use rechargeable batteries (nickel-cadmium battery, etc.).
I Installing the batteries incorrectly may cause the unit to malfunction.
Notes concerning use:
I Replace the batteries if the operating distance is reduced or if the operation
becomes erratic. Purchase 2 “AA” size batteries (UM/SUM-3, R6, HP-7 or
similar).
I Periodically clean the transmitter on the remote control and the sensor on
the unit with a soft cloth.
I Exposing the sensor on the unit to strong light may interfere with operation.
Change the lighting or the direction of the unit.
I Keep the remote control away from moisture, heat, shock and vibrations.
H Test of the remote control
Check the remote control after checking all the connections have been made
correctly. (See pages 10 - 15).
Point the remote control directly at the remote sensor on the unit.
The remote control can be used within the range shown below:
Press the ON/STAND-BY button. Does the power turn on? Now , you can enjoy
music.
CD-G10000DVD
0.2 m - 6 m
(8" - 20')
Remote sensor
1
2
3
4
5
6
7
8
9
SHARP TINSZA160AWZZ
(S)
10
*CD-G10000DVD(EN)10-17 05.1.17, 10:4717
E-18
ENGLISH
Basic Operation
CD-G10000DVD (S)
TINSZA160AWZZ
CD-G10000DVD
CP-G10000
7
CD-G10000DVD
DVD MINI SYSTEM
5
-DISC
CHANGER
AUTO REVERSE
MIC
MIC LEVEL
MIN
MAX
12
Remote control operation:
Press the VOLUME (+ or -) button to increase or decrease the volume.
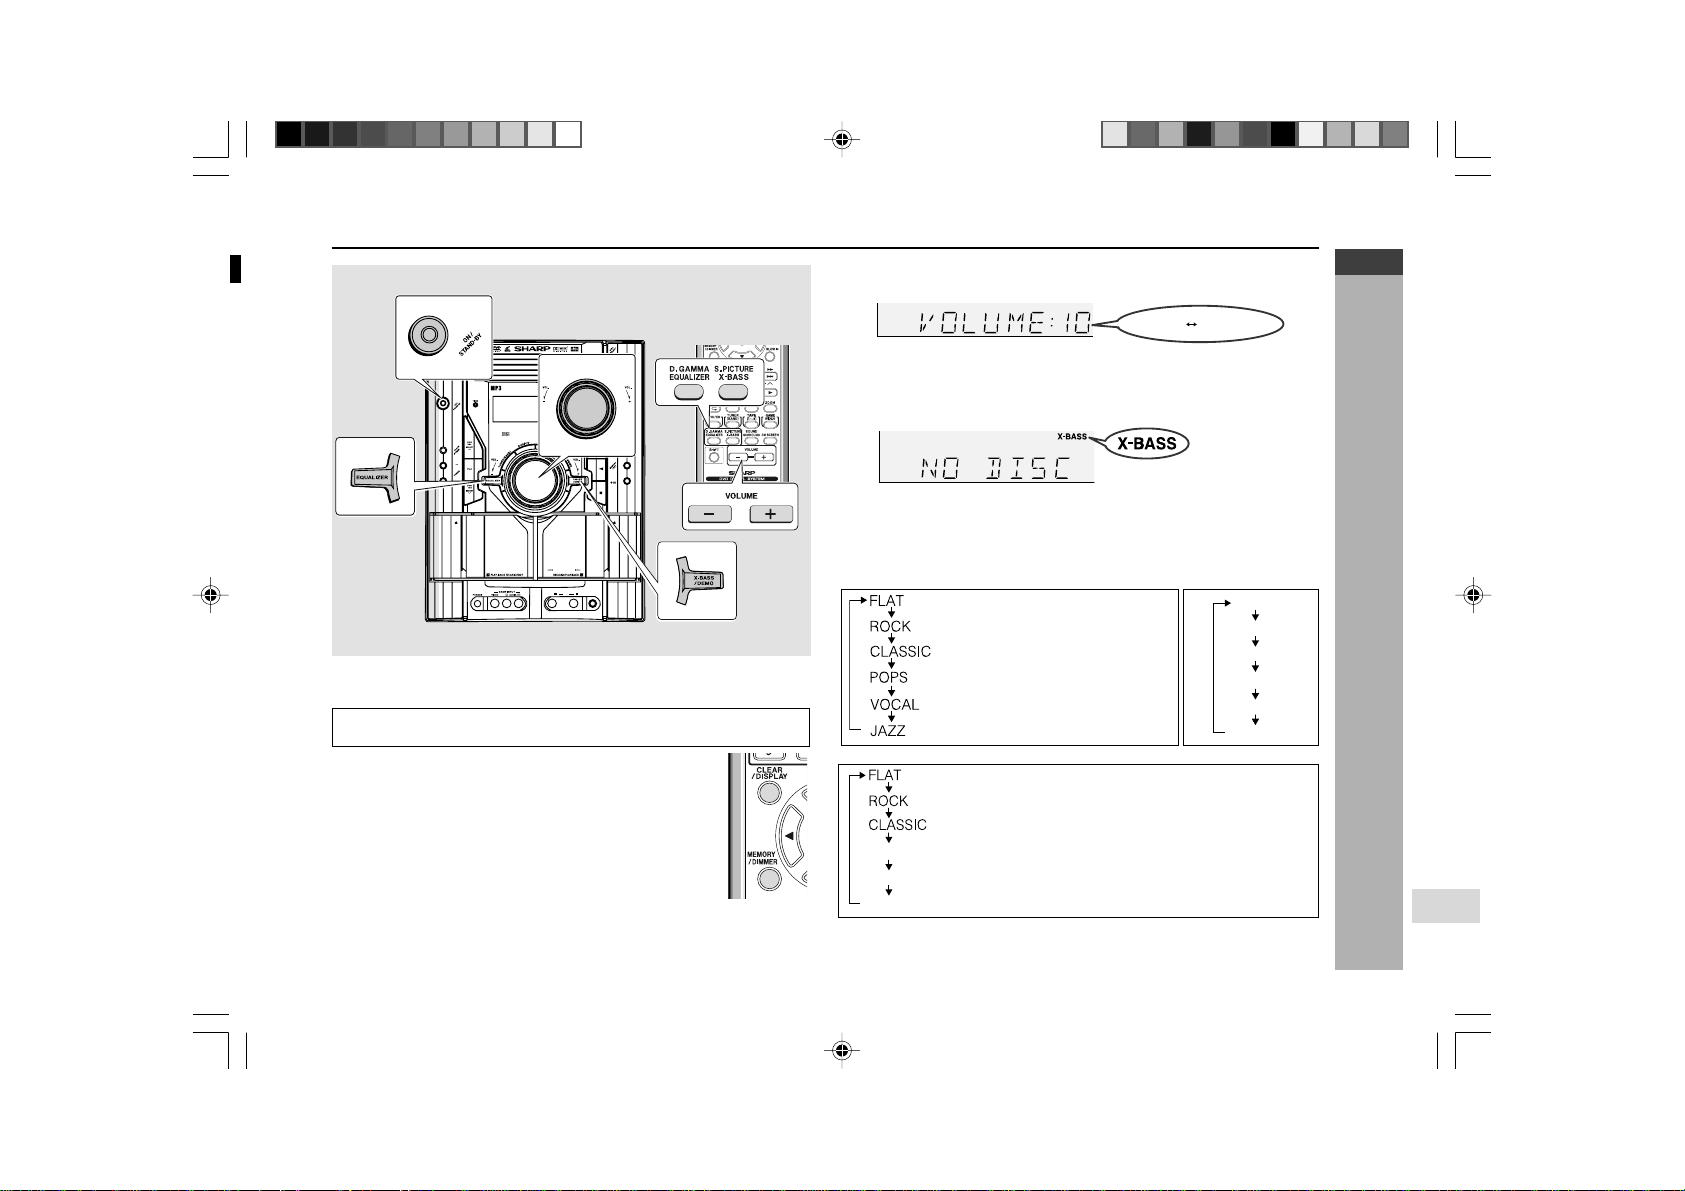
General control
H To turn the power on
Press the ON/STAND-BY button to turn the power on.
H Illumination light control
When the power is turned on, light illuminates around
the display. To turn on/off the light, hold down MEMORY/
DIMMER button on the remote control for more than 2
seconds.
After Use:
Press the ON/STAND-BY button to enter the power stand-by mode.
30 MAXIMUM0
.....
The Sound is not modified.
Bass and treble are emphasised.
Treble is cut a little.
Bass and treble are slightly emphasised.
Vocals (midrange tones) are emphasised.
Treble is slightly emphasised.
FLAT
MODE-1
MODE-2
MODE-3
MODE-4
MODE-5
H Volume control
Main unit operation:
When the VOLUME control is turned clockwise, the volume will increase. When
it is turned anti-clockwise, the volume will decrease.
ACTION
SPORTS
RACING
The Sound is not modified.
Bass and treble are emphasised.
Treble is cut a little.
Bass is emphasised.
Vocals and treble are emphasised.
Bass and treble are emphasised more.
For Game/Video mode
Note:
If the EQUALIZER button is pressed in the extra bass mode, it will be cancelled
automatically.
For Tuner, Tape and other than DVD/VCD disc For DVD/VCD disc only
H Equaliser
When the EQUALIZER button is pressed, the current mode setting will be
displayed. To change to a different mode, press the EQUALIZER button
repeatedly until the desired sound mode appears.
H Bass control
When the power is first turned on, the unit will enter the extra bass mode which
emphasises the bass frequencies, and “X-BASS” will appear. To cancel the
extra bass mode, press the X-BASS/DEMO (X-BASS) button.
1
2
3
4
5
6
7
8
9
SHARP TINSZA160AWZZ
(S)
10
*CD-G10000DVD(EN)18-19 05.1.17, 10:4718
E-19
ENGLISH
Basic Operation
CD-G10000DVD (S)
TINSZA160AWZZ
CD-G10000DVD
CP-G10000
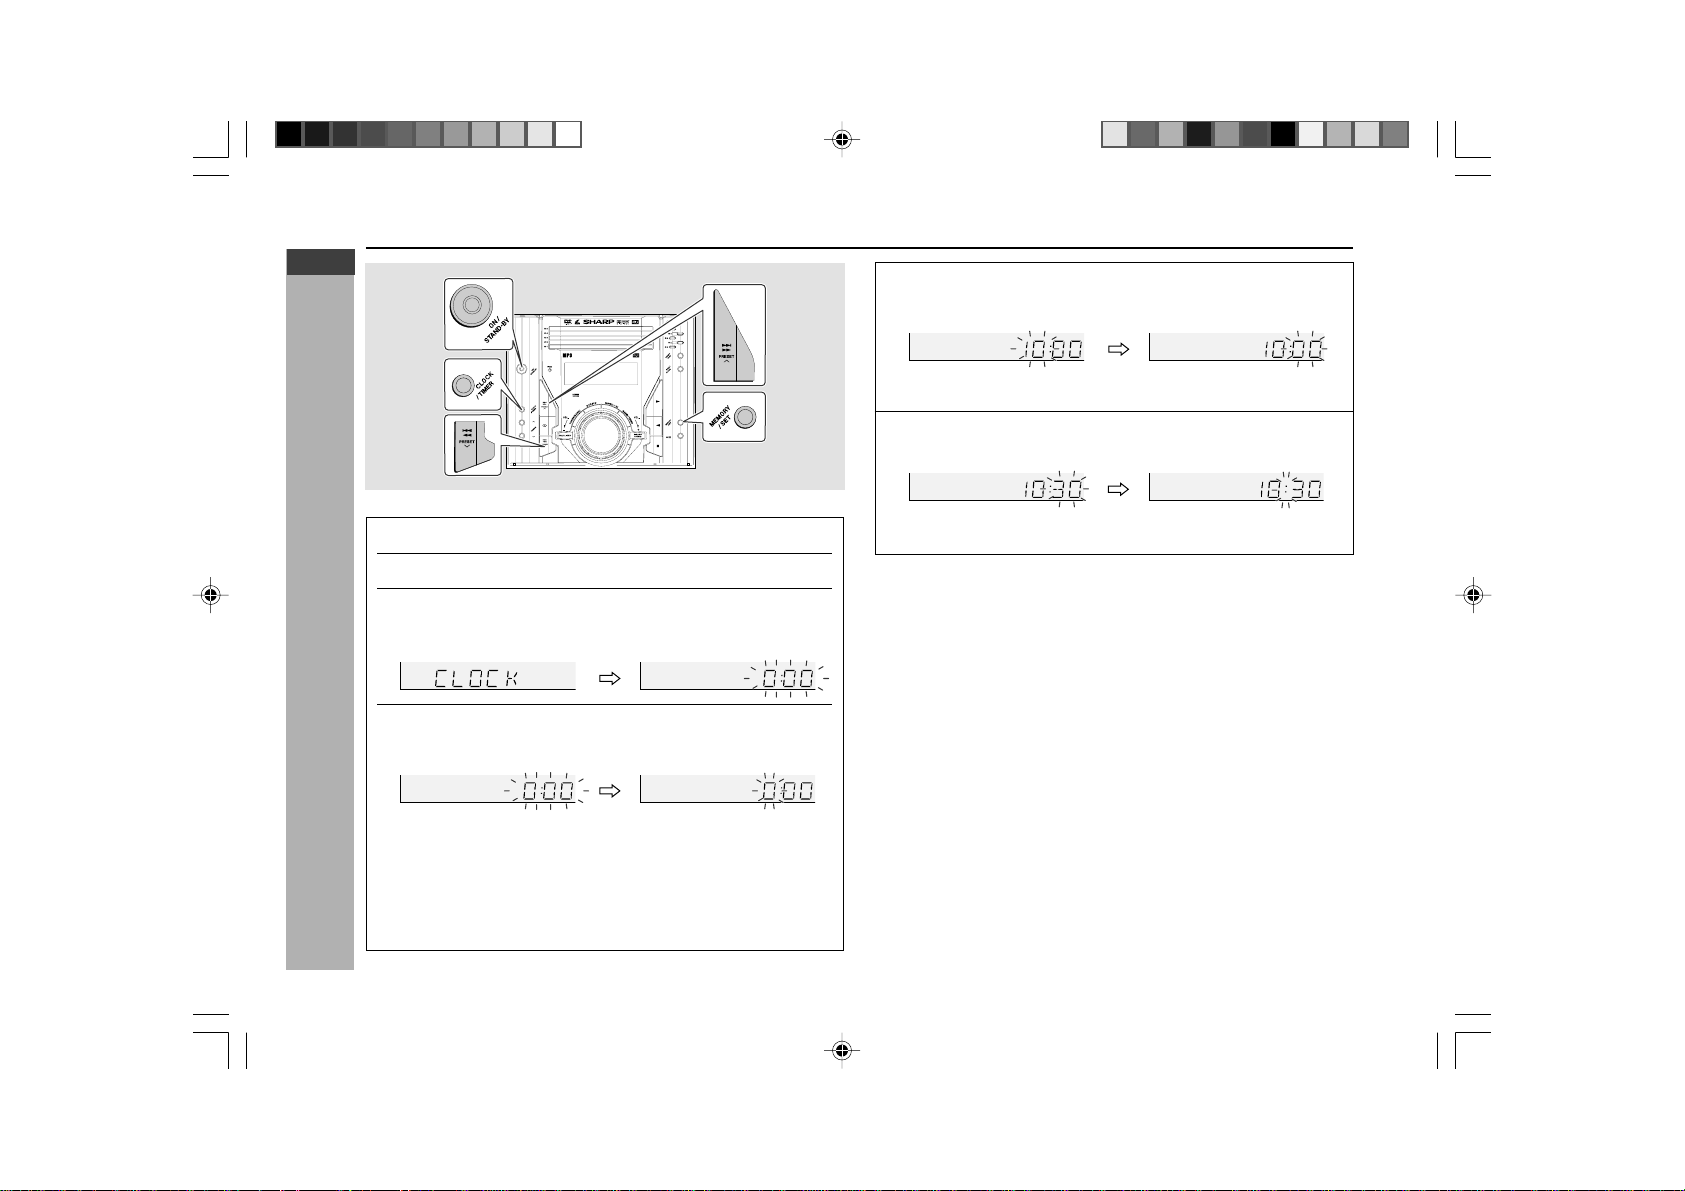
In this example, the clock is set for the 24-hour (0:00) display.
1
Press the ON/STAND-BY button to turn the power on.
2
Press the CLOCK/TIMER button.
3
Within 10 seconds, press the 5 3 or 2 4 button to
select “CLOCK”, and press the MEMORY/SET button.
4
Press the 5 3 or 2 4 button to select 24-hour or 12-
hour display and then press the MEMORY/SET button.
Setting the clock
CD-G10000DVD
DVD MINI SYSTEM
5
-DISC
CHANGER
5
Press the 5 3 or 2 4 button to adjust the hour and
then press the MEMORY/SET button.
Press the 5 3 or 2 4 button once to advance the time by 1
hour. Hold it down to advance continuously.
6
Press the 5 3 or 2 4 button to adjust the minutes
and then press the MEMORY/SET button.
Press the 5 3 or 2 4 button once to advance the time by 1
minute. Hold it down to change the time in 5-minutes intervals.
To confirm the time display:
[When the unit is in the stand-by mode]
Press the CLOCK/TIMER button.
The time display will appear for about 10 seconds.
[When the power is on]
Press the CLOCK/TIMER button.
Within 10 seconds, press the 5 3 or 2 4 button to display the time.
The time display will appear for about 10 seconds.
Note:
The “CLOCK” will appear or time will flash to confirm the time display when the
AC power supply is restored after a power failure or unplugging the unit. If
incorrect, readjust the clock as follows.
To readjust the clock:
Perform “Setting the clock” from step 1. If the “CLOCK” does not appear in step
3, step 4 (for selecting the 24-hour or 12-hour display) will be skipped.
To change the 24-hour or 12-hour display:
1 Clear all the programmed contents. [Refer to “Clearing all the memory
(reset)” on page 74 for details.]
2 Perform “Setting the clock” from step 1.
Note:
The clock can also be set with the remote control.
“0:00” → The 24-hour display will appear.
(0:00 - 23:59)
“AM 12:00” → The 12-hour display will appear.
(AM 12:00 - PM 11:59)
“AM 0:00” → The 12-hour display will appear.
(AM 0:00 - PM 11:59)
*CD-G10000DVD(EN)18-19 05.1.17, 10:4719
E-20
ENGLISH
DVD Explanation
CD-G10000DVD (S)
TINSZA160AWZZ
CD-G10000DVD
CP-G10000
7
Types of playable discs
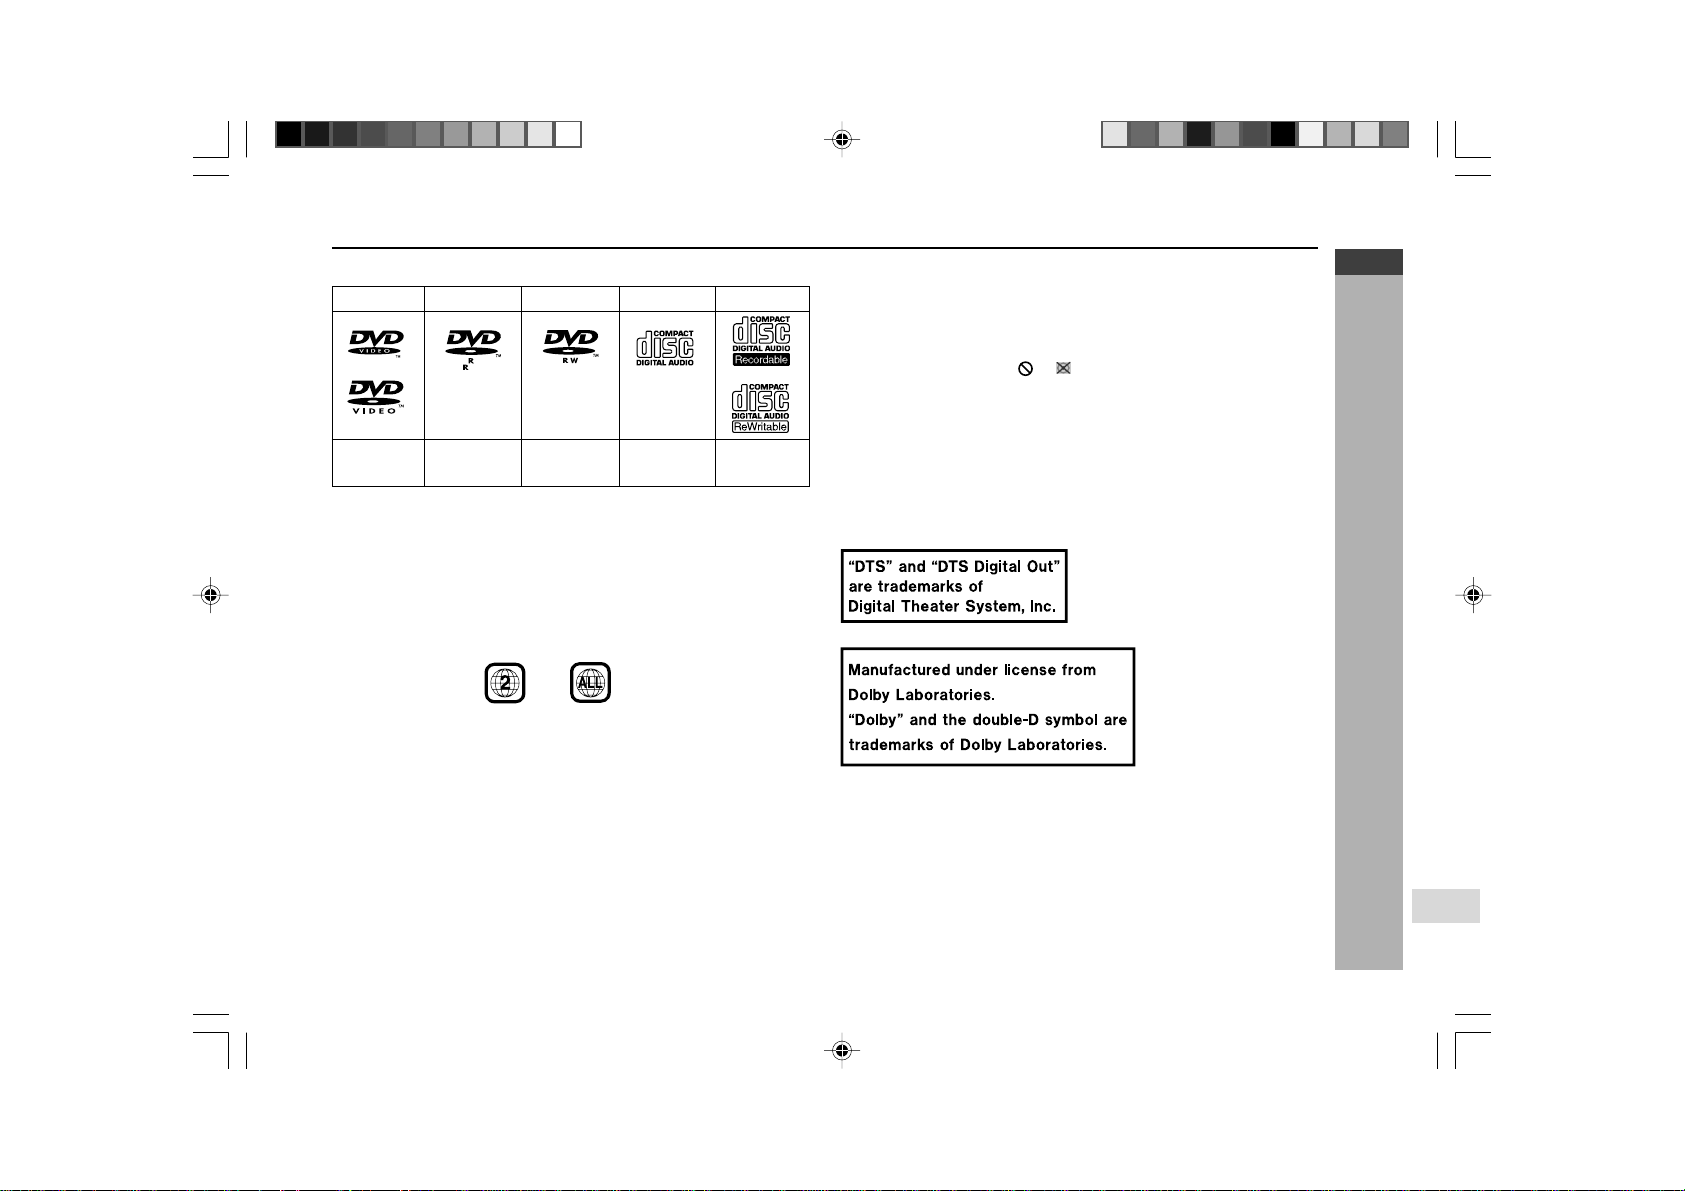
The unit can playback discs bearing any of the following marks:
See Note 1.
See Note 2.
See Note 3.
Note 1:
DVD video players and discs are designed with region numbers which dictate
the regions in which a disc can be played. If the region number on the disc you
want to play does not match the region number in your system, you will not be
able to play the disc.
The region number for this system is 2.
Sample disc display:
or
4.7
CD-R/CD-RW disc
recorded in MP3/
WMA format file
Disc recorded in
Video Mode (*)
Disc recorded in
Video Mode (*)
(*) playability depends on recording device or disc condition
(special disc, scratches, dirt or dirt on pick-up)
Note 2:
The specific playback functionality for some DVD discs is determined by the
disc manufacturer. Because this system plays disc data in accordance with the
disc manufacturer’s guidelines, some functions may not be available on some
discs. Be sure to read the instructions provided with the disc.
The “Prohibited” indicator or displayed during operation indicates
that such manufacturer-imposed restrictions apply.
Note 3:
This product supports the following modes.
I 2-channel (L/R) PCM audio
I Dolby Digital
I 2-channel MPEG audio
I 5.1 channel MPEG audio
I DTS audio (External decoder is required)
H DVD-R/DVD-RW Playback
I DVD-R disc that has been recorded in Video Mode.
I DVD-RW disc that has been recorded in Video Mode.
I Make sure the DVD-R/DVD-RW disc has been finalized after recording
process before playback on this unit.
I Further information about Video Mode, refer to DVD-R/DVD-RW recorder
operation manual.
DVD Video DVD-R
DVD-RW
Audio CD
CD-R/CD-RW
*CD-G10000DVD(EN)20-22 05.1.17, 10:4720
E-21
ENGLISH
DVD Explanation
CD-G10000DVD (S)
TINSZA160AWZZ
CD-G10000DVD
CP-G10000
H MP3 File Format
MP3 file format song data which is compressed in “MPEG 1 audio layer 3”
format file. MP3 file is file with [ .mp3 ] extensions. ( If file with [ .mp3 ] extensions
but not recorded in MP3 format, only noise could be heard if it is possible to
playback).
H WMA File Format
WMA is an audio file format developed by Microsoft with [ .wma ] extensions.
This type of audio file is being recorded through Microsoft Windows Operating
system.
H Disc that cannot be played
I This unit does not support below disc types:
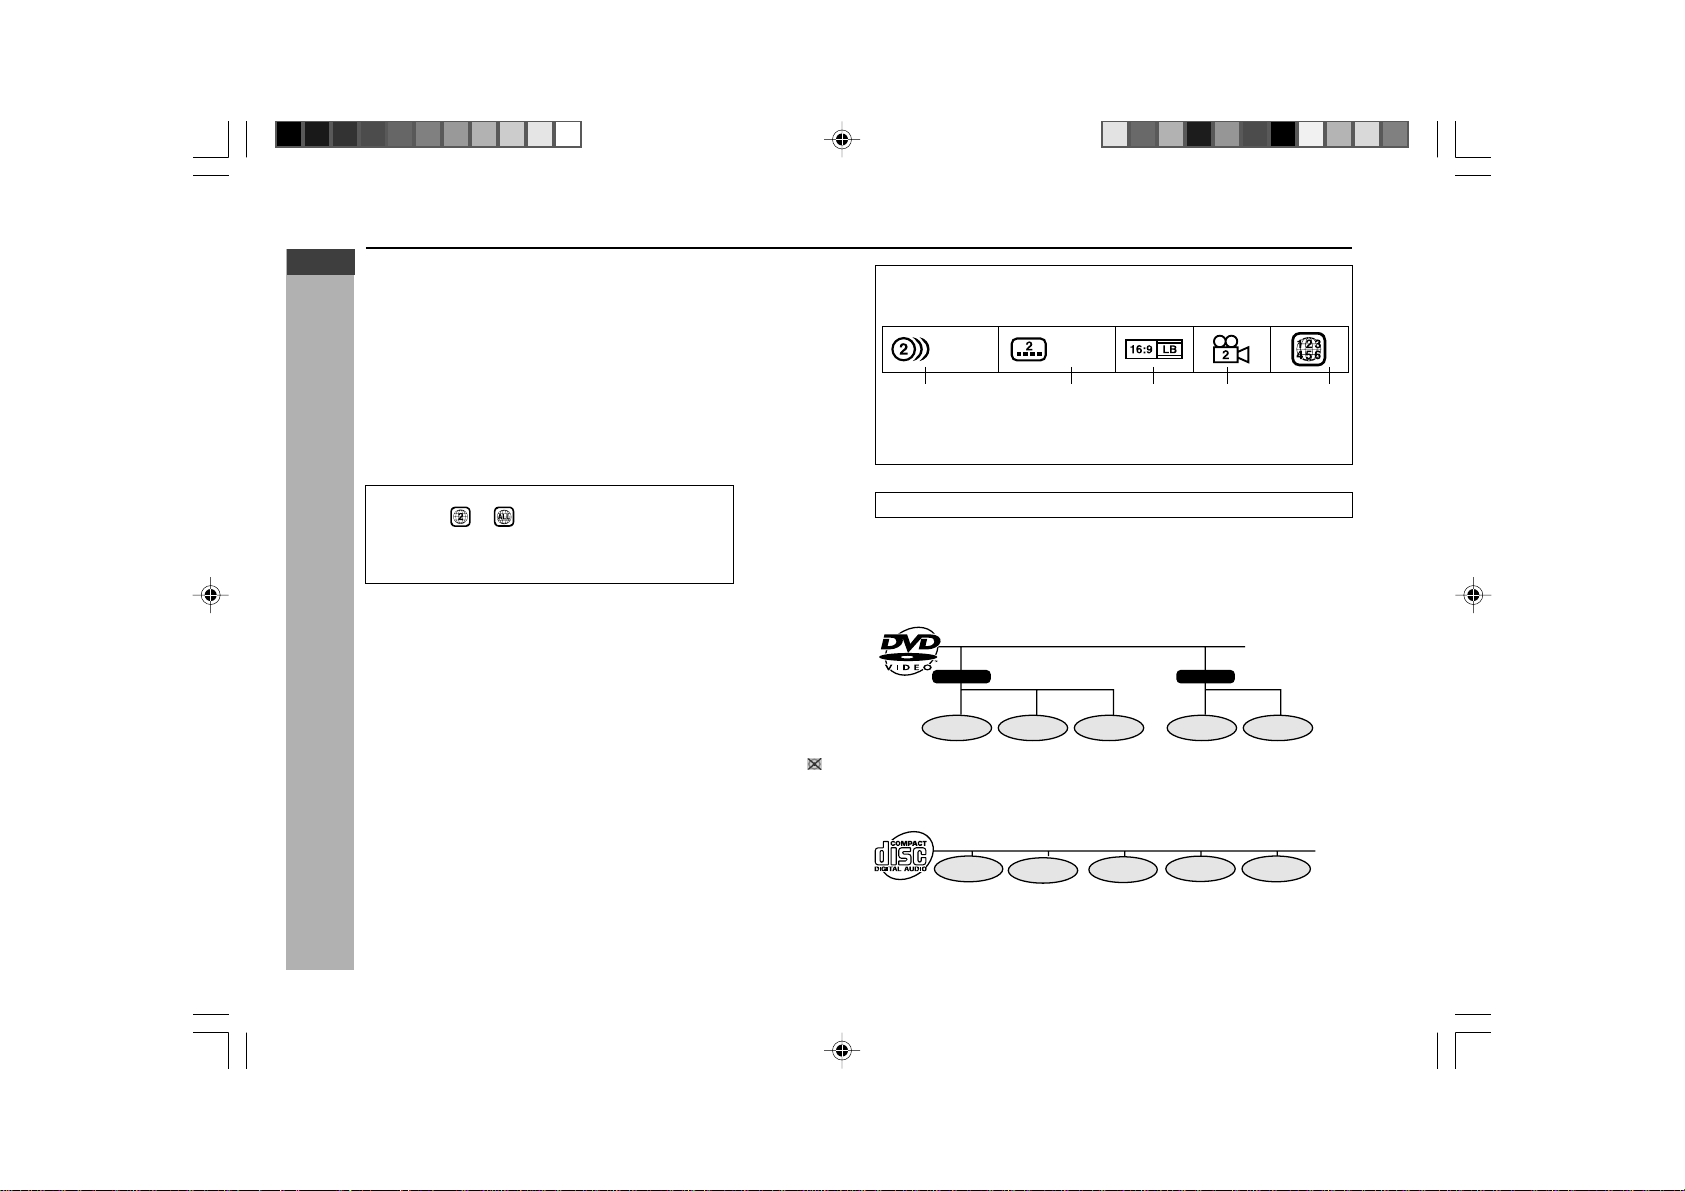
Title, chapter and track
DVDs are divided into “titles” and “chapters”. If the disc has more than one
movie on it, each movie would be a separate “title”. “Chapters” are subdivisions
of titles.
Example: DVD
Audio CDs are divided into “tracks”. You can think of a “track” as one tune on
an audio CD.
Example: Audio CD
Note:
Numbers identify each title, chapter and track on a disc. Most discs have these
numbers recorded on them.
Chapter 1
Title 1 Title 2
Chapter 2
Chapter 3 Chapter 1
Chapter 2
Track 1 Track 2 Track 3 Track 4 Track 5
1. English
2. Japanese
Type of subtitles
recorded
Video
format
Disc with
multiple
camera
angles
Region code
indicator
(See page 20.)
Number of
recorded audio
tracks
1. English
2. Japanese
Icons used on DVD discs
Sample Icons
II
II
I DVD discs that are not included
in region or
II
II
I SECAM system DVD
II
II
I DVD-ROM
II
II
I DVD-RAM
II
II
I DVD-Audio
II
II
I CDG
II
II
I Photo CD
II
II
I CD-ROM
II
II
I SACD
I Above disc sometimes cannot be playback, sometimes only pictures without
sound will appear or only sound can be heard. Playing the disc may damage
the speakers due to the possibility of enormous sound output or may even
cause hearing injuries whilst using headphone.
I If DVD disc with DTS is playback, no sound can be heard. Select other
sound output format to hear sound output.
I Disc that is sold in other region sometimes does not fit to standard. This
type of disc cannot be played.
I Depending on DVD restriction, operation of the disc may be different than
operation manual.
I When the system detects an incompatible disc, it displays indicator
.
When this happens, check the disc type.
Types of playable discs (continued)
*CD-G10000DVD(EN)20-22 05.1.17, 10:4721
E-22
ENGLISH
DVD Explanation
CD-G10000DVD (S)
TINSZA160AWZZ
CD-G10000DVD
CP-G10000
7
Preparing to watch a DVD (DVDs)
Video cable
(Supplied)
To TV with external terminals
S-VIDEO INPUT
VIDEO IN
CD-G10000DVD
DVD MINI SYSTEM
D
V
D
/
C
D
5
-DISC
GHANGER
S-Video cable
(commercially available)
D
V
D
/
C
D
To watch DVD video images on the TV:
1 Turn on the TV.
2 Set the TV to “AV”, “VIDEO”, etc.
3 Turn on the unit and start play.
See page 33 for playing disc.
Note:
There is no audio signal supplied to the TV.
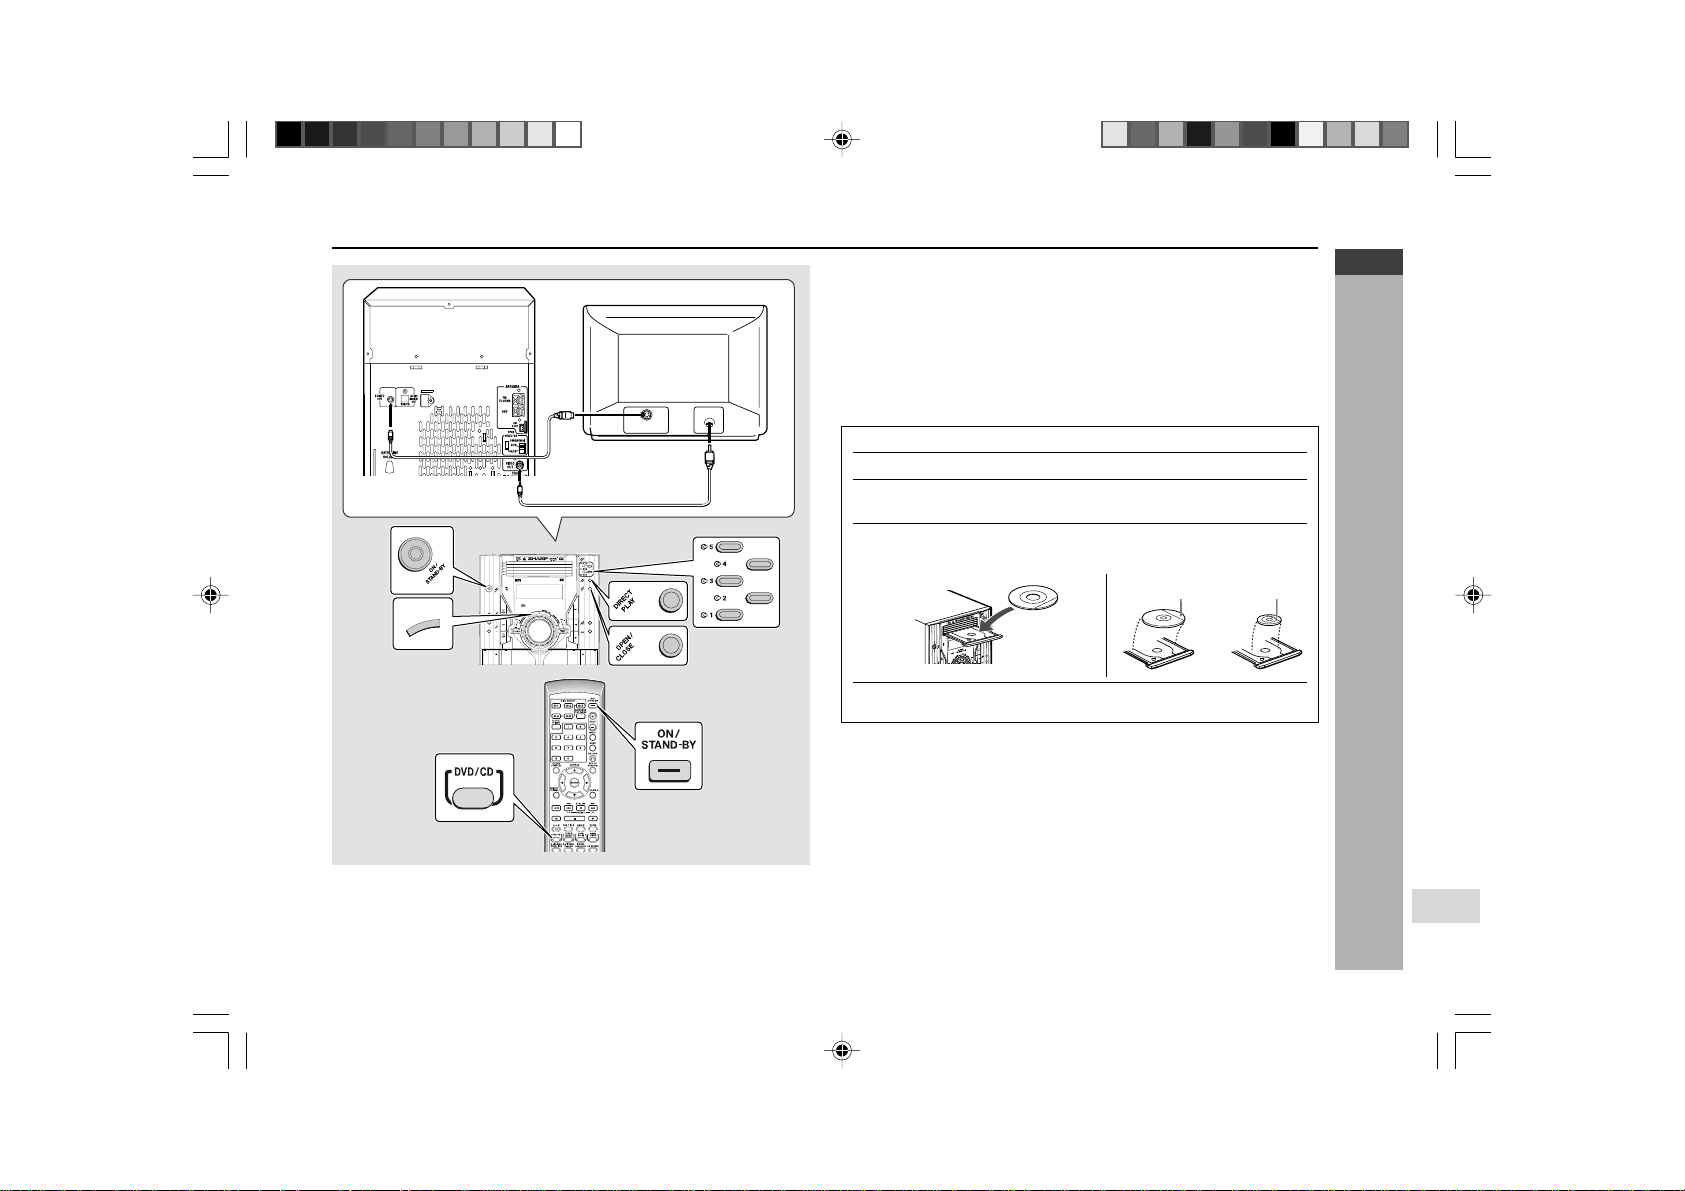
H Loading a DVD (DVDs)
1 Press the ON/STAND-BY button to turn the power on.
2 Press the DVD/CD button.
3 Press the s 1 button and within 5 seconds, press the OPEN/
CLOSE button to open the disc tray 1.
4 Place the DVD on the disc tray 1, label side up.
I
Be sure to place 8 cm (3
"
) DVD(s) in the middle of the disc positions.
5 Press the OPEN/CLOSE button to close the disc tray.
Caution:
I Do not place two discs in one disc tray.
I Do not play discs of special shapes (heart, octagon, etc.). It may cause
malfunctions.
I Do not push the disc tray whilst it is moving.
I If the power fails whilst the tray is open, wait until the power is restored.
I If the disc tray is stopped with force, “ER-CD20” will appear on the display
for 3 seconds and the unit will not function. If this occurs, press the ON/
STAND-BY button to enter the power stand-by mode and then turn the
power on again.
I If TV or radio interference occurs during CD operation, move the unit away
from the TV or radio.
I If a disc is damaged, dirty or loaded upside down, the disc will skip.
H Connecting to TV
Besides the supplied video cable, you can use a commercially available S-
video cable to connect your system to television equipped with an S-video
input socket and enjoy viewing high-quality images on the TV screen. Be sure
to turn both the system and the TV equipment off before connecting them.
12 cm (5")
8 cm (3")
*CD-G10000DVD(EN)20-22 05.1.17, 10:4722
E-23
ENGLISH
DVD Setting
CD-G10000DVD (S)
TINSZA160AWZZ
CD-G10000DVD
CP-G10000
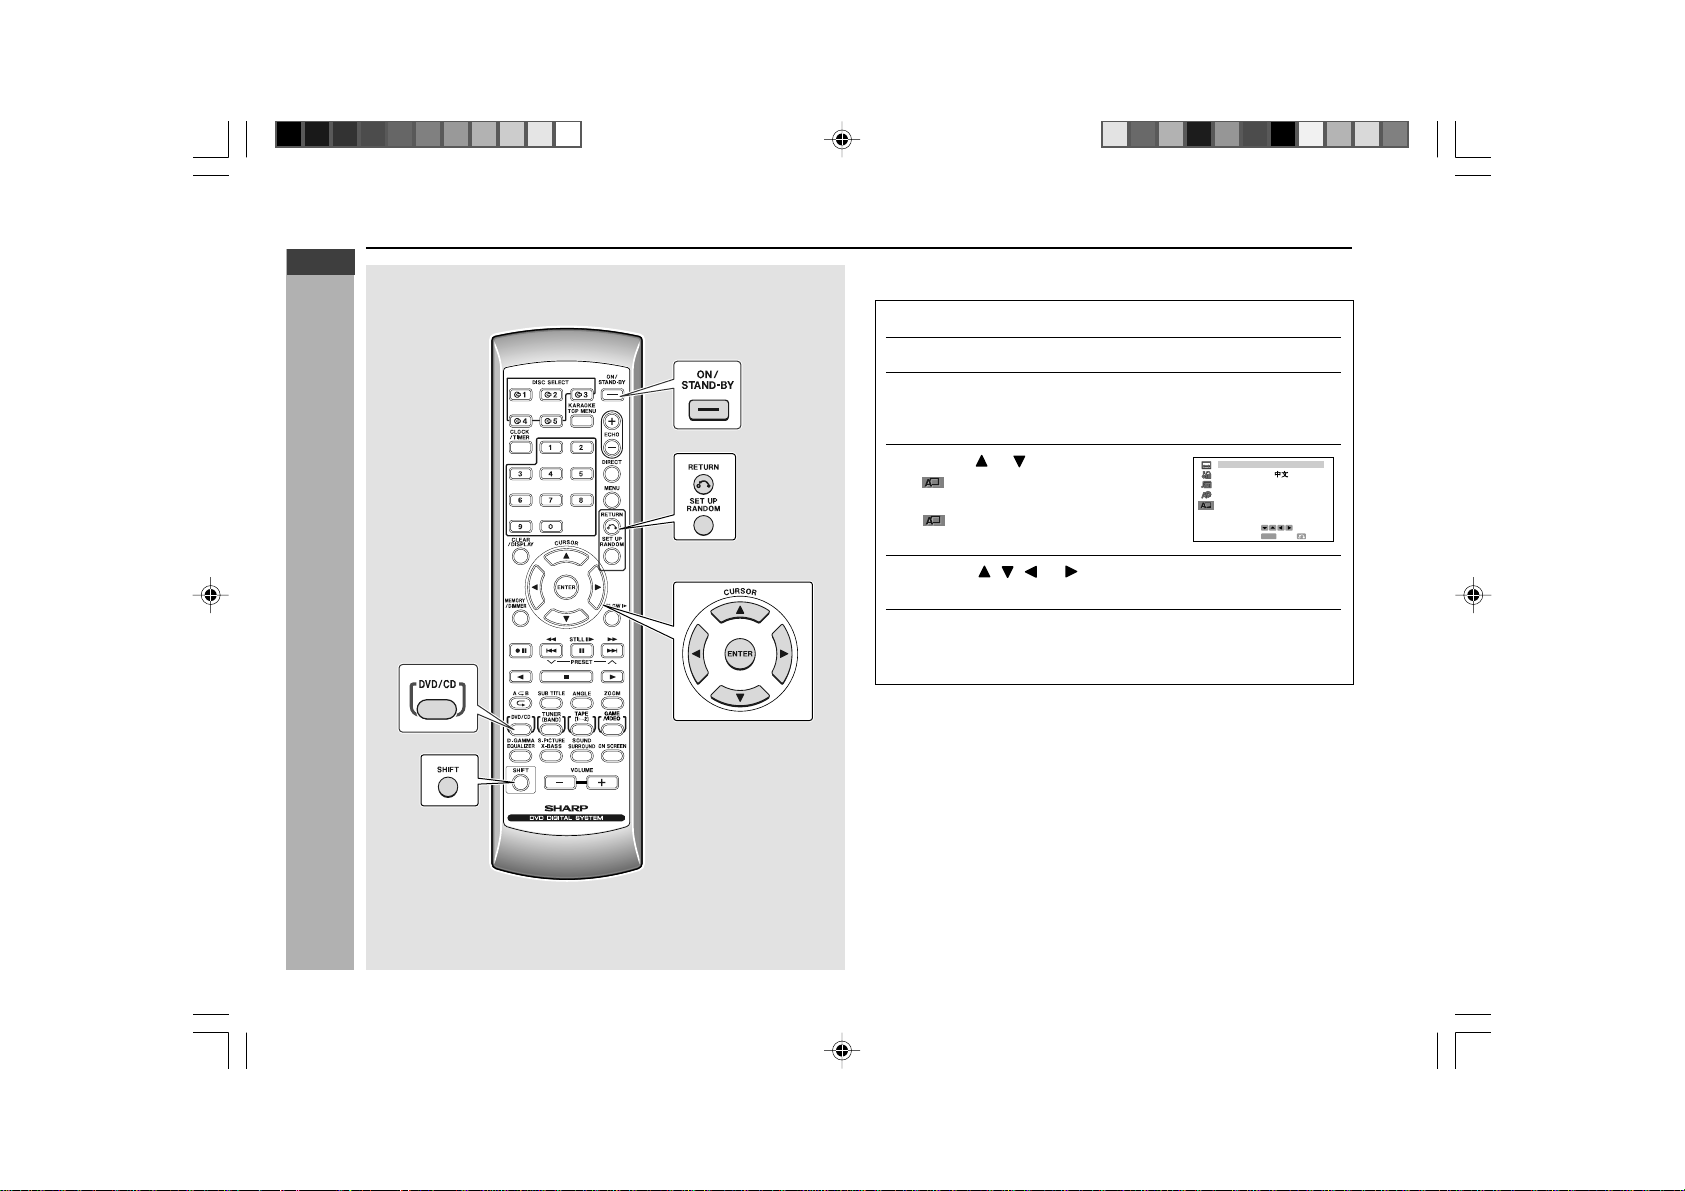
When you use the unit for the first time, you should set the language to be used
for the OSD (On Screen Display).
1
Press the ON/STAND-BY button to turn the power on.
2
Press the DVD/CD button.
3
Whilst the disc is stopped, press the SET UP button whilst
pressing down the SHIFT button to display the setup
screen.
4
Use the or button to select the
“
OSD LANGUAGE SETUP” and
then press the ENTER button.
“
OSD LANGUAGE SETUP”
screen appears.
5
Use the , , or button to select the language you
want to use.
6
Press the ENTER button to confirm the setting.
To exit the setup screen and return to the startup screen, press the SET
UP button whilst pressing down the SHIFT button or the RETURN button.
Notes:
I Once you go through this procedure, the screen appears in the language
selected in step 5 above from the next operation.
I You cannot open the setup screen whilst a playback operation is in progress.
If a disc is playing, stop playback first.
Initial setup (OSD language setup)
LSD ANGUAGEO
SELECT
ENTER
ENTER
RETURN
DEUTSCH
SVENSKA
NEDERLANDSFRANÇAIS
ITALIANO
ESPAÑOL
ENGL I SH
RRMCGA015AWSA
*CD-G10000DVD(EN)23-28 05.1.17, 10:4723
 Loading...