


 Loading...
E-MANUAL
Thank you for purchasing this Samsung product.
To receive more complete service, please register your product at
www.samsung.com
Model |
|
Serial No. |
To directly go to the page that provides instructions on how to use the manual for visually impaired users, select the Menu Learning Screen link below.
“Menu Learning Screen” Link
Contents
Guide
TV Viewing
77 Using the Guide
Connections
80 Recording Programmes
5Connection Guide
82 Setting Up a Schedule Viewing
6Connecting an Antenna (Aerial)
84 Using Timeshift
7Connecting to the Internet
|
|
84 |
Buttons and functions available while recording a |
|
10 |
Screen Sharing (Smart View) with your Mobile Device |
|
programme or Timeshift |
|
13 |
Connection Cables for External Devices |
86 |
Using the Channel List |
|
15 |
Switching between external devices connected to the TV |
87 |
Editing channels |
|
17 |
Connection Notes |
88 |
Using a Personal Favourites List |
|
Remote Control and Peripherals |
89 |
TV-Viewing Support Functions |
||
|
|
|
||
20 |
About the Samsung Smart Remote |
Picture and Sound |
||
23 |
About the Samsung Smart Remote (The Frame) |
96 |
Using the Intelligent Mode |
|
26 |
About the Samsung Smart Remote (The Sero) |
97 |
Adjusting the Picture Quality |
|
29 |
Connecting the Samsung Smart Remote to the TV |
99 |
Setting the Viewing Environment for External Devices |
|
30 |
Controlling External Devices with a Samsung Remote |
101 |
Picture Support Functions |
|
|
Control - Using the Universal Remote |
103 |
fi |
a Sound Mode and Expert Settings |
|
|
|||
31 |
Using Anynet+ (HDMI-CEC) |
105 |
Using the Sound Support Functions |
|
|
|
|||
32 |
Controlling the TV with a Keyboard, Mouse or Gamepad |
|
|
|
34 |
Entering Text using the On-Screen Virtual Keyboard |
System and Support |
||
|
|
|
||
|
|
107 |
Using the Time Functions and the Timers |
|
Smart Features |
110 |
Using the Auto Protection Time and Energy Saving |
||
|
|
|||
36 |
Using Smart Hub |
|
Functions |
|
44 |
Using a Samsung account |
111 |
Updating the TV's Software |
|
46 |
Using the Ambient Mode |
112 |
Audio and Video Functions for the Visually or Hearing |
|
|
|
|
Impaired |
|
51 |
Using the Shortcuts |
118 |
Using the Voice Recognition feature |
|
|
|
|||
53 |
Using Remote Access |
119 |
Using Other Functions |
|
|
|
|||
57 |
Using the Apps Service |
121 |
HbbTV |
|
|
|
|
||
61 |
Using the Gallery App |
122 |
Using a TV Viewing Card (“CI or CI+ Card”) |
|
|
|
|||
62 |
Using the SmartThings App |
125 |
Teletext Feature |
|
|
|
|||
63 |
Using the e-Manual |
|
|
|
66 |
Using the Internet |
Precautions and Notes |
||
|
|
|
||
67 |
Playing pictures/video/music |
129 |
Before Using the Recording and Timeshift Functions |
|
|
|
|
||
73 |
Using Bixby |
130 |
Supported broadcasting audio options |
|
|
|
|
||
131Read Before Using Apps
132Read Before Using the Internet Function
134 Read Before Playing Photo, Video or Music Files
142Read After Installing the TV
143Supported Resolutions for UHD Input Signals
144Resolutions for Input Signals supported by Q800T series or higher
145Supported Resolutions for FreeSync(VRR)
146Read Before Connecting a Computer (Supported Resolutions)
149 Supported Resolutions for Video Signals
151Read Before Using Bluetooth Devices
152Licences
Troubleshooting
Picture Issues
153 Testing the picture
Sound and Noise Issues
157 Testing the sound
Channel and Broadcast Issues
External Device Connectivity Issues
Network Issues
Anynet+ (HDMI-CEC) Issues
Remote Control Issues
Recording Issues
Apps
Media Files
Voice Recognition Issues
Other issues
Diagnosing TV operational issues
Getting Support
173 Getting support through Remote Management
173 Finding the contact information for service
173 Requesting service
FAQ
The TV Screen does not Display Properly
174 When the TV screen does not display properly
The TV does not Turn On
181 When your TV does not turn on
The Picture is Distorted, or No Sound Comes Out of the Sound Bar
187 When the TV does not connect with an external device properly
Internet Access is not Available
192 When the TV can't connect to the Internet
There is No Sound or the Speakers are Making an Odd Sound
197 When no sound comes out of the TV, or the sound is breaking up
The Remote Control does not Work
204 When the remote control does not work
Updating the Software
209 Updating the latest TV's software
Accessibility Guidance
Menu Learning Screen
216 Using the Remote control
218 Using the accessibility menu
222 Using the TV with Voice Guide on
224 Using the guide
227Using Schedule Viewing
228Using the Channel List
230Recording
233Using Smart Hub
237Launching the e-Manual
238Using Bixby
Guide
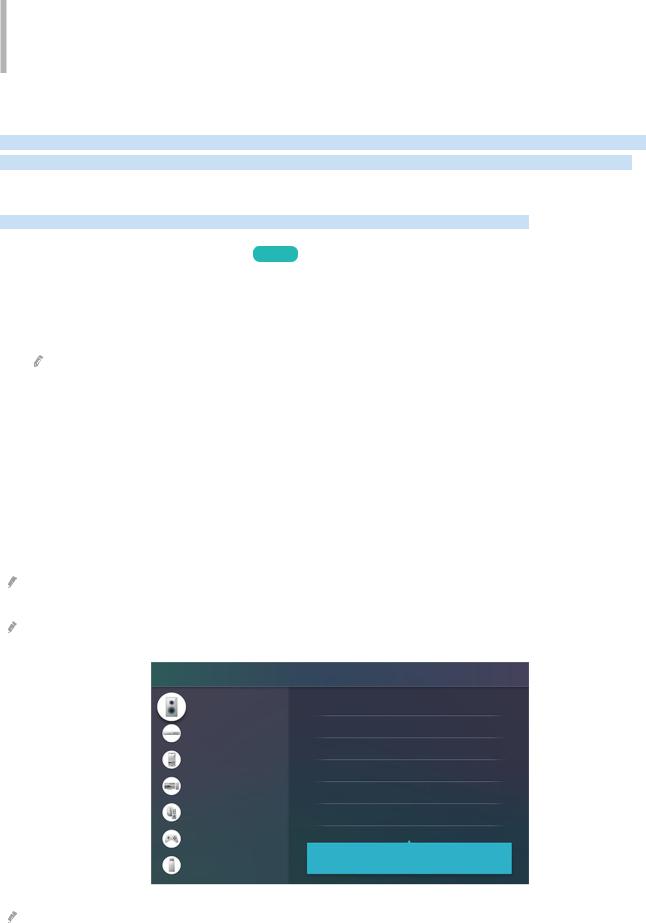
Learn how to use various features.
Connections
You can watch live broadcasts by connecting an antenna cable to your TV and can get access to the Internet by using a LAN cable or wireless access point. Using various connectors, you can also connect external devices.
Connection Guide
You can view detailed information about external devices that can be connected to the TV.


 Source
  Connection Guide Try Now
It shows you how to connect various external devices such as video devices, game consoles and PCs using pictures. If you select the connection method and an external device, the connection details appear.
• Audio Device: HDMI (ARC), Optical, Bluetooth, Wi-Fi, Wi-Fi Speaker Surround Setup
HDMI (ARC) is supported by some models. Check the HDMI port name of the purchased product's model.
•Video Device: HDMI
•Smartphone: Screen Sharing (Smart View), SmartThings, Apple AirPlay, NFC on TV
•PC: HDMI, Screen Sharing (Wireless), Apple AirPlay
•Input Device: Remote control, Keyboard, Mouse, USB Gamepad, Bluetooth Device
•Game Console: HDMI
•External Storage: USB Flash Drive, Hard Disk Drive (HDD)
Using HDMI Troubleshooting, you can check the connection to HDMI cable and external devices (takes approximately 2 minutes).
The connection method and available external devices may differ depending on the model.
Connection Guide
Audio Device
Video Device
Smartphone
PC
Input Device
Game Console
External Storage
HDMI (ARC)
Optical
Bluetooth
Wi-Fi
Wi-Fi Speaker Surround Setup
HDMI Troubleshooting
Connect audio devices, such as speakers, sound bars, headphones, or home theatres, to your TV.
The image on your TV may differ from the image above depending on the model and geographical area.
- 5 -
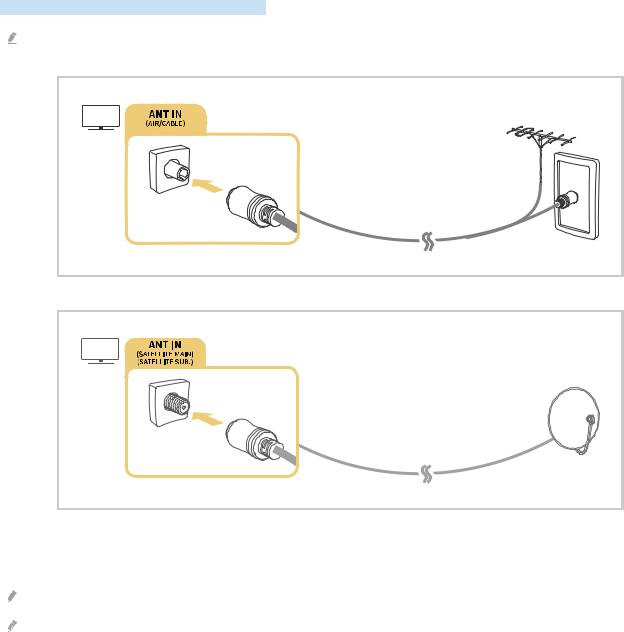
Connecting an Antenna (Aerial)
You can connect an antenna cable to your TV.
An antenna connection is not necessary if you connect a cable box or satellite box.
It is best to connect the both connectors using a Multi-Switch or DiSEqC Switch, etc and to set Aerial Connection Type to Dual.
A connection method may differ depending on the model or geographical area.
The DVB-T2 system may not be supported depending on the geographical area.
- 6 -

Connecting to the Internet
You can get access to the Internet through your TV.


 Settings
  General
  Network
  Open Network Settings Try Now
fi |
network settings to connect to an available network. |
Establishing a wired Internet connection


 Settings
  General
  Network
  Open Network Settings
  Wired
Wired
If you connect a LAN cable, the TV automatically accesses the Internet.
If the TV does not automatically connect to the network, refer to "Network Issues" in "Troubleshooting". Use a CAT 7 (*STP type) cable for the connection.
* Shielded Twisted Pair
The TV will not be able to connect to the Internet if your network speed is below 10 Mbps. This function may not be supported depending on the model.
- 7 -
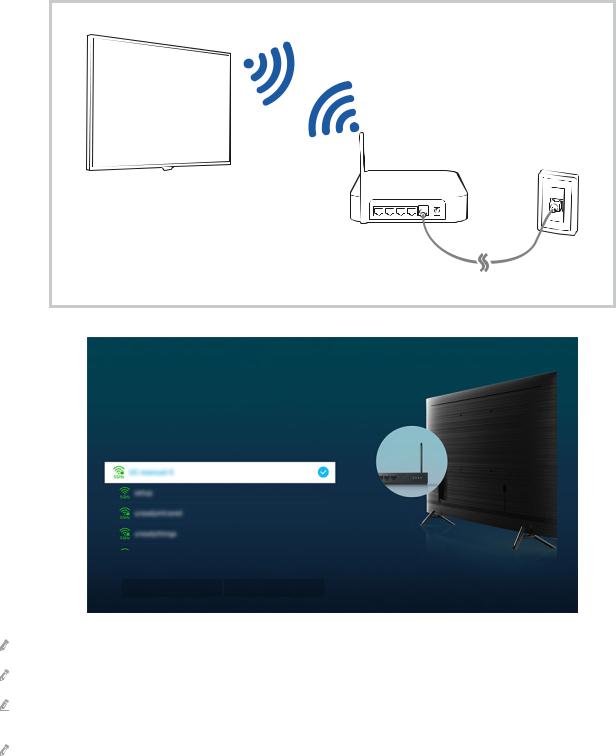
Establishing a wireless Internet connection


 Settings
  General
  Network
  Open Network Settings
  Wireless
Make sure that you have the wireless access point's SSID (name) and password settings before attempting to connect. The network name (SSID) and security key are available on the wireless access point's fi
screen. See the wireless access point's user manual for more information.
Wireless Connection
Select your wireless network.
Refresh |
Manage Saved Networks |
The image on your TV may differ from the image above depending on the model and geographical area.
If no wireless access point is found, select Add Network at the bottom of the list and enter the network name (SSID).
If your wireless access point has a WPS or PBC button, select Use WPS at the bottom of the list, and then push the WPS or PBC button on your access point within 2 minutes. The TV will connect automatically.
To view or delete previously connected network names (SSIDs), move the focus to Manage Saved Networks, and then press the Select button.
- 8 -

Checking the Internet connection status


 Settings
  General
  Network
  Network Status Try Now
View the current network and Internet status.
Resetting Your Network


 Settings
  General
  Network
  Reset Network Try Now
Restore the network settings to the factory default.
Turning on the TV with a mobile device


 Settings
  General
  Network
  Expert Settings
  Power On with Mobile
You can turn on the TV using a mobile device connected to the same network as the TV.
This function is available with a mobile device connected to the TV through the SmartThings app or the Apple AirPlay function.
Connecting an IP control device to the TV


 Settings
  General
  Network
  Expert Settings
  IP Remote
You can connect an IP control device to the TV remotely to manage your IP device.
To use this function, Power On with Mobile must be turned on.
Turning this feature on may allow other IP control devices to control your TV. We recommend turning this feature on only if an authorised third-party custom controller is installed and fi fi for a Samsung TV and if your Wi-Fi network is password protected.
This function may not be supported depending on the model or geographical area.
Changing the name of the TV


 Settings
  General
  System Manager
  Device Name Try Now
You can change the name of the TV on the network. Select User Input at the bottom of the list and change the name.
- 9 -

Screen Sharing (Smart View) with your Mobile Device
You can watch the screen of your mobile device on the TV screen through Smart View or Tap View.
For information on how to share the screen with your mobile device, refer to 

 Source
  Connection Guide
  Smartphone
  Screen Sharing (Smart View).
•To turn off Screen Sharing (Smart View), disconnect the mobile device or press the  button on the remote control.
•You can watch in full screen by setting the aspect ratio to 16:9 in Screen Sharing (Smart View) of your mobile device.
•Use AirPlay if you are an iPhone or iPad user. For more information, refer to 

 Source
  Connection Guide
 Smartphone
  Apple AirPlay.
•While content of your mobile device is playing on the TV, you can adjust the TV volume by using the volume button on the mobile device.
- 10 -
Using the Tap View
Tap your mobile device on the TV, you can watch the Multi View or mobile device's screen through the TV screen.
This function may not be supported depending on the model.
This function is available in Samsung mobile devices with Android 8.1 or higher.
1. Enable Tap View on your mobile device.
For more information about |
fi |
refer to 'Enabling the Tap View' below for how to set. |
2.Turn on the screen of your mobile device.
3.Tap your mobile device on the TV. The TV screen switches to Multi View or mobile device's screen.
When you perform Tap View in Ambient Mode feature or Art mode (only in The Frame models), only the mobile device's screen appears on the TV.
4. Watch the Multi View or mobile device's screen on the TV screen.
The displayed TV screen may differ depending on the model.
This function enables mirroring (Smart View) by detecting vibrations generated when you tap the mobile device on the TV. Be sure to tap away from the TV screen and bezel corners. It may be scratched or broken to the TV or mobile device screen. We recommend using your mobile device with the cover in place and lightly tap it on any external edge of the TV.
Enabling the Tap View
Enable Tap View in the SmartThings app.
Depending on the SmartThings app version, you may need to register the TV with your mobile device.
1.Launch the SmartThings app on your mobile device.
2.Select Settings (

 ) in SmartThings app on your mobile device.
3.When any mobile device is near the TV, set "Allow phone presence detection" to On.
4.Tap "Allow phone presence detection" and then set the "Remote Smart View" to On.
5.Enter the "Remote Smart View" by tapping, and then set the TV to connect from the device list to On.
Upon connection for the fi time, select Allow on a pop-up window of the TV.
- 11 -

Using the Multi View
While watching the TV, you can see content from your mobile device through mirroring (Smart View).
This function may not be supported depending on the model.
In some models, you can view the image on the camera connected to the SmartThings app of your mobile device. Q-Symphony is not supported by Multi View.
When an external device that connects to a receiver or Soundbar is used in Multi View, sound outputs from the TV speaker, not from the receiver or Soundbar.
The following menus can be set by pressing the down directional button on the TV's remote control.
•Select Content
Selects content to be displayed on the left screen.
Press the down directional button on the TV screen. Available content items appear.
•Watch Mobile/Camera
Enjoy your mobile content by mirroring (Smart View).
You can view the camera video connected to the SmartThings app on your mobile.
•Screen Size
Selects the desired size of Multi View.
•PIP Position
Selects the position of a small screen on the full screen. The focusing left or right screen appears as small window.
•Sound Output
You will hear the sound of the selected screen through another speaker connected to the TV.
This function may not be supported depending on the model.
•Sound Distribution
You will hear the sound of both screens at the same time by adjusting the ratio of each screens sound.
This function may not be supported depending on the model.
- 12 -

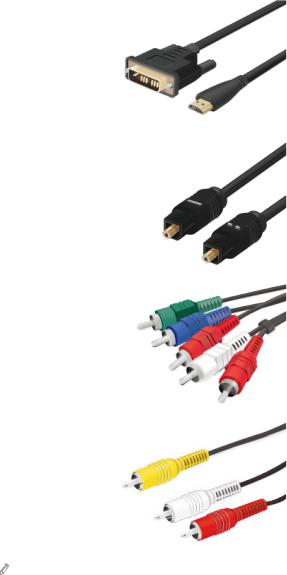
Connection Cables for External Devices
You can view detailed information about the connection cables for external devices that can be connected to the TV.
Cable name |
Image |
Description |
|
|
|
Each cable simultaneously transmits digital video and audio signals from an external device to the HDMI port on the TV.
HDMI to
Cables are divided into various types according to the types of input/
HDMI
output ports on external devices.
HDMI to
MINI HDMI
HDMI to
Micro HDMI
HDMI to
USB Type-C
HDMI to DisplayPort
Mini DisplayPort to
HDMI
- 13 -
Cable name |
Image |
Description |
|
|
|
DVI |
|
DVI to HDMI cables can transmit only digital video signals and not |
to |
|
|
|
audio signals. We recommend that you use HDMI to HDMI cables. |
|
HDMI |
|
|
|
|
|
|
|
|
|
|
Optical cables are used to transmit audio signals to external |
Optical |
|
speakers with low signal loss. |
|
|
Optical cables do not transmit video signals. |
|
|
|
|
|
Component cables transmit analogue signals. |
Component |
|
The video signal is separated and transmitted to the red, green and |
|
blue terminals to provide HD (1080i) pictures. The audio signal is |
|
|
|
|
|
|
transmitted to the red and white terminals. |
|
|
|
|
|
Composite cables transmit analogue signals. |
Composite |
|
The video signal is transmitted to the yellow terminal and the audio |
|
|
signal is transmitted to the red and white terminals. |
|
|
|
Available connection cables may differ depending on the model or geographical area.
- 14 -
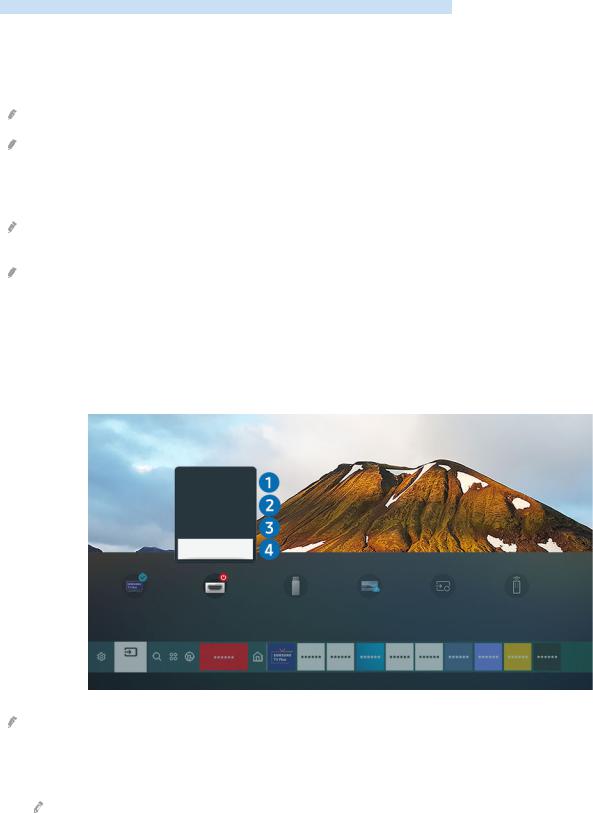
Switching between external devices connected to the TV
You can switch between TV programmes and the content of external devices.


 Source
When you select a connected external device on the Source screen, the output of the selected device is displayed on the TV's screen.
On the standard remote control, press the SOURCE button.
To control a device (Blu-ray player, game console, etc.) that supports universal remote control with the TV's remote control, connect the device to an HDMI port on the TV, and then turn on the device. The output displayed on the TV is automatically switched to the output of the device or you can fi universal remote control for the device automatically. For more information, refer to "Controlling External Devices with a Samsung Remote Control - Using the Universal Remote".
When a USB device is connected to the USB port, a pop-up message appears that lets you switch easily to the media content listed on the device.
This function may not be supported depending on the device and geographical area.
Editing the name and icon of an external device


 Source
You can change the port name for a connected external device or add it to the Home Screen.
Universal Remote
Edit
Information
Add to Home
Sources
Source
The image on your TV may differ from the image above depending on the model and geographical area.
1.Move the focus to a connected external device.
2.Press the up directional button. The following functions become available.
Available functions may differ depending on the port type.
- 15 -

1.Universal Remote
You can control external devices connected to the TV using a Samsung remote control. To control external devices, register them by following the instructions on the screen.
This function may not be supported depending on the model or geographical area.
For more information, refer to "Controlling External Devices with a Samsung Remote Control - Using the Universal Remote".
2.Edit
You can rename the input ports and change the device icons.
3.Information
You can view detailed information about an external device.
4.Add to Home
You can add the port of an external device to the Home Screen for quick switching.
Using additional functions
You can use the following features on the Source screen.
•Remote Access
Use the TV to access your PC via remote PC or Screen Sharing (Wireless).
For more information, refer to "Using Remote Access".
•Connection Guide
Displays device connection instructions.
For more information about the Connection Guide, refer to "Connection Guide".
•Universal Remote
Lets you register external devices to your Samsung remote control and control them using the Remote.
This function may not be supported depending on the model or geographical area.
For more information, refer to "Controlling External Devices with a Samsung Remote Control - Using the Universal Remote".
- 16 -

Connection Notes
When connecting an external device, note the following.
The number of connectors and their names and locations may differ with the model.
Refer to the external device's operating manual when connecting it to the TV. The number of external device connectors and their names and locations may differ with the manufacturer.
Connection notes for HDMI
•The following types of HDMI cables are recommended:
–High Speed HDMI Cable
–High Speed HDMI Cable with Ethernet
–Premium High Speed HDMI Cable
–Premium High Speed HDMI Cable with Ethernet
–Ultra High Speed HDMI Cable
•Use an HDMI cable with a thickness of 17 mm or less.
•Using a non-certified HDMI cable may result in a blank screen or a connection error.
•Some HDMI cables and devices may not be compatible with the TV due to different HDMI specifications.
•This TV does not support HDMI Ethernet Channel. Ethernet is a Local Area Network (LAN) built with coaxial cables standardised by the IEEE.
•Use a cable shorter than 3 m to get the best UHD viewing quality.
•Many computer graphics adaptors do not have HDMI ports, but have DVI or DisplayPort ports instead. If your PC does not support HDMI video out, connect your PC with a DVI to HDMI or HDMI to DisplayPort cable.
•When the TV is connected to an external device such as a DVD/BD player or a set-top box via HDMI, power sync mode will be automatically activated. In the power sync mode, the TV continues to detect and connect external devices via HDMI cable. This function can be deactivated by removing the HDMI cable of the connected device.
This function may not be supported depending on the model.
- 17 -

Connection notes for audio devices
•For better audio quality, it is a good idea to use an AV receiver.
•If you connect an external audio device using an optical cable, the Sound Output setting is automatically changed to the connected device. However, to make this happen, you must turn on the external audio device before connecting the optical cable. To manually change the Sound Output setting, do one of the following:
This function may not be supported depending on the model.
–Use the Quick Settings screen to change to the connected device:
Use the Select button to select Optical on the Sound Output menu. (

 Settings
  up directional button
  Sound Output).
–Use the Settings screen to change to the connected device:
Select Optical on the Sound Output menu. (

 Settings
  Sound
Sound  Sound Output).
Refer to the sound bar's user manual when connecting it to the TV.
•An unusual noise coming from a connected audio device while you are using it may indicate a problem with the audio device itself. If this occurs, ask for assistance from the audio device's manufacturer.
•Digital audio is only available with 5.1 channel broadcasts.
Connection notes for computers
•For the resolutions supported by the TV, refer to "Read Before Connecting a Computer (Supported Resolutions)".
•If you want to connect your PC and TV wirelessly, both of them must be connected to each other on the same network.
•When sharing content with other network-based devices such as those in an IP (Internet Protocol) storage system, sharing may not be supported due to the network’s configuration, quality or functionality, for example, if the network has an NAS (Network-Attached Storage) device.
- 18 -

Connection notes for mobile devices
•To use the Smart View function, the mobile device must support a mirroring function such as Screen Mirroring or Smart View. To check whether your mobile device supports the mirroring function, refer to the mobile device's user manual.
•To use Wi-Fi Direct, the mobile device must support the Wi-Fi Direct function. To check whether your mobile device supports Wi-Fi Direct function, refer to the mobile device's user manual.
•The mobile device and your Smart TV must be connected to each other on the same network.
•Use AirPlay if you are an iPhone or iPad user. For more information, refer to 

 Source
  Connection Guide
 Smartphone
  Apple AirPlay.
This function may not be supported depending on the model.
•The video or audio may stop intermittently, depending on network conditions.
•When sharing content with other network-based devices such as those in an IP (Internet Protocol) storage system, sharing may not be supported due to the network’s configuration, quality or functionality, for example, if the network has an NAS (Network-Attached Storage) device.
- 19 -

Remote Control and Peripherals
You can control TV operations with your Samsung Smart Remote. Pair external devices such as a keyboard for ease of use.
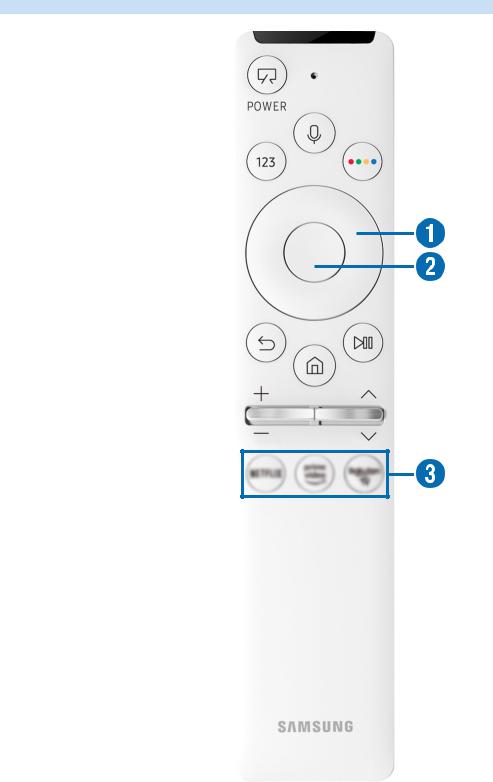
About the Samsung Smart Remote
Learn about the buttons on the Samsung Smart Remote.
- 20 -
Button |
|
Description |
||
|
|
|||
|
Runs Bixby. Press and hold the button, say a command, and then release the button to run |
|||
|
Bixby. |
|
|
|
(Bixby) |
When you press the button, the Explore Now menu appears at the bottom of the screen. To |
|||
|
move to the Explore Bixby screen, press the Select button. |
|||
|
The supported Bixby's languages and features may differ by geographical region. |
|||
|
|
|||
|
Each time you press this button, the coloured buttons window and the virtual numeric pad are |
|||
|
displayed alternately. |
|
|
|
|
• Use this button to access additional options that are specific to the feature in use. |
|||
|
• Press to bring up the virtual numeric pad on the screen. Use the numeric keypad to enter |
|||
(Colour / Number |
numeric values. Select numbers and then select Done to enter a numeric value. Use to |
|||
change the channel, enter a PIN, enter a ZIP code, etc. |
||||
button) |
||||
When pressed for 1 second or more for a channel that supports the teletext service, the |
||||
|
||||
|
TTX menu appears on the TV screen. For more information, refer to "Teletext Feature". |
|||
|
If the Colour Button appears with a number strip on the screen, select the Colour Button |
|||
|
and then select a |
fi colour by using the directional button (up/down/left/right). Use |
||
|
this to access additional options that are |
fi to the feature in use. |
||
In TV mode, press the button to enter Ambient Mode.
If you press the button when the TV is turned off, the TV turns on in Ambient Mode.
 (Ambient Mode)
When pressed for 1 second or more, the Shortcuts menu screen appears.
This function may not be supported depending on the model or geographical area.
Directional button
Moves the focus.
(up/down/left/right)
Select
Selects or runs a focused item. When pressed while you are watching a broadcast programme, detailed programme information appears.
Press to return to the previous menu. When pressed for 1 second or more, the running function  (Return) is terminated. When pressed while you are watching a programme, the previous channel
appears.
(Smart Hub) |
Press to return to the Home Screen. |
- 21 -

|
|
Button |
Description |
|
|
|
|
|
|
|
When pressed, the playback controls appear. Using these controls, you can control the media |
|
(Play/pause) |
content that is playing. |
|
|
|
||
|
|
|
Press the button to use the recording or Timeshift function while watching the broadcast. |
|
|
|
|
|
|
(Volume) |
Move the button up or down to adjust the volume. To mute the sound, press the button. When |
|
|
pressed for 1 second or more, the Accessibility Shortcuts appears. |
|
|
|
|
|
|
|
|
|
|
|
|
Move the button up or down to change the channel. To see the Guide screen, press the button. |
|
|
(Channel) |
When pressed for 1 second or more, the Channel List screen appears. |
|
|
|
|
|
|
|
Press and hold the button up or down to quickly change the channel. |
|
|
|
|
|
(Launch app button) |
Launch the app indicated by the button. |
|
|
This function may not be supported depending on the model or geographical area. |
||
|
|
|
|
|
|
|
|
Use the Samsung Smart Remote less than 6 m from the TV. The usable distance may vary with the wireless environmental conditions.
The images, buttons and functions of the Samsung Smart Remote may differ with the model or geographical area.
To use the Samsung Smart Remote to control a compatible external device that does not support HDMI-CEC (Anynet+), you must fi universal remote control for the device. For more information, refer to "Controlling External Devices with a Samsung Remote Control - Using the Universal Remote".
To use the Samsung Smart Remote to control a compatible external device that does support HDMI-CEC (Anynet+), connect the device to an HDMI port on the TV using an HDMI cable. For more information, refer to "Using Anynet+ (HDMI-CEC)".
- 22 -
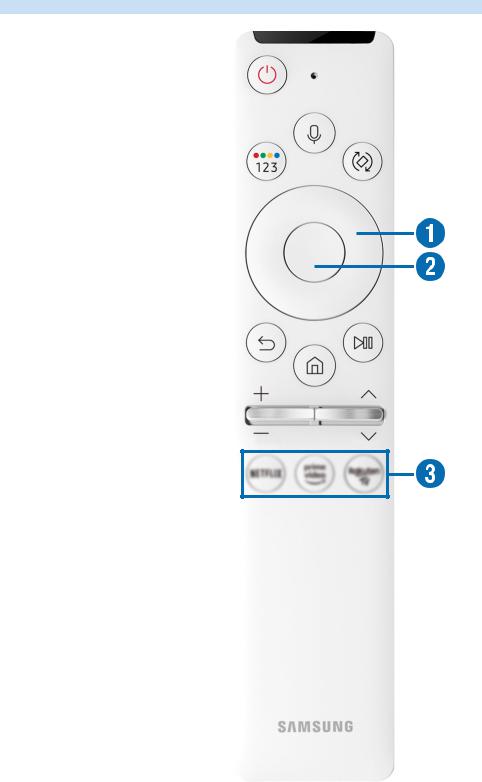
About the Samsung Smart Remote (The Frame)
Learn about the buttons on the Samsung Smart Remote that comes with The Frame.
- 23 -
Button |
Description |
|
|
When watching TV, press to switch to Art mode. In Art mode, press to switch to watching TV.
(Power) |
Press and hold to turn off the TV completely. |
When the TV turns off and on again, display the last used mode.
|
Runs Bixby. Press and hold the button, say a command, and then release the button to run |
||
|
Bixby. |
|
|
(Bixby) |
When you press the button, the Explore Now menu appears at the bottom of the screen. To |
||
|
move to the Explore Bixby screen, press the Select button. |
||
|
The supported Bixby's languages and features may differ by geographical region. |
||
|
|
||
|
Press to bring up the virtual numeric pad on the screen. Use the numeric keypad to enter |
||
|
numeric values. |
|
|
(Number button) |
Select numbers and then select Done to enter a numeric value. Use to change the channel, |
||
enter a PIN, enter a ZIP code, etc. |
|||
|
|||
|
When pressed for 1 second or more for a channel that supports the teletext service, the |
||
|
TTX menu appears on the TV screen. For more information, refer to "Teletext Feature". |
||
|
|
||
|
When pressed, coloured buttons appear on the screen. Use this button to access additional |
||
(Colour button) |
options that are |
fi to the feature in use. |
|
|
|
||
|
To immediately set Brightness while enjoying Art mode, press the button. |
||
Directional button
Moves the focus.
(up/down/left/right)
Select
Selects or runs a focused item. When pressed while you are watching a broadcast programme, detailed programme information appears.
Press to return to the previous menu. When pressed for 1 second or more, the running function  (Return) is terminated. When pressed while you are watching a programme, the previous channel
appears.
Press to return to the Home Screen.
 (Smart Hub)
Press in Art mode to switch to TV mode.
- 24 -

|
|
Button |
Description |
|
|
|
|
|
|
|
When pressed, the playback controls appear. Using these controls, you can control the media |
|
(Play/pause) |
content that is playing. |
|
|
|
||
|
|
|
Press the button to use the recording or Timeshift function while watching the broadcast. |
|
|
|
|
|
|
(Volume) |
Move the button up or down to adjust the volume. To mute the sound, press the button. When |
|
|
pressed for 1 second or more, the Accessibility Shortcuts appears. |
|
|
|
|
|
|
|
|
|
|
|
|
Move the button up or down to change the channel. To see the Guide screen, press the button. |
|
|
(Channel) |
When pressed for 1 second or more, the Channel List screen appears. |
|
|
|
|
|
|
|
Press and hold the button up or down to quickly change the channel. |
|
|
|
|
|
(Launch app button) |
Launch the app indicated by the button. |
|
|
This function may not be supported depending on the model or geographical area. |
||
|
|
|
|
|
|
|
|
Use the Samsung Smart Remote less than 6 m from the TV. The usable distance may vary with the wireless environmental conditions.
The images, buttons and functions of the Samsung Smart Remote may differ with the model or geographical area.
To use the Samsung Smart Remote to control a compatible external device that does not support HDMI-CEC (Anynet+), you must fi universal remote control for the device. For more information, refer to "Controlling External Devices with a Samsung Remote Control - Using the Universal Remote".
To use the Samsung Smart Remote to control a compatible external device that does support HDMI-CEC (Anynet+), connect the device to an HDMI port on the TV using an HDMI cable. For more information, refer to "Using Anynet+ (HDMI-CEC)".
- 25 -
About the Samsung Smart Remote (The Sero)
Learn about the buttons on the Samsung Smart Remote that comes with The Sero.
- 26 -
Button |
|
Description |
||
|
|
|||
|
Runs Bixby. Press and hold the button, say a command, and then release the button to run |
|||
|
Bixby. |
|
|
|
(Bixby) |
When you press the button, the Explore Now menu appears at the bottom of the screen. To |
|||
|
move to the Explore Bixby screen, press the Select button. |
|||
|
The supported Bixby's languages and features may differ by geographical region. |
|||
|
|
|||
|
Each time you press this button, the coloured buttons window and the virtual numeric pad are |
|||
|
displayed alternately. |
|
|
|
|
• Use this button to access additional options that are specific to the feature in use. |
|||
|
• Press to bring up the virtual numeric pad on the screen. Use the numeric keypad to enter |
|||
(Colour / Number |
numeric values. Select numbers and then select Done to enter a numeric value. Use to |
|||
change the channel, enter a PIN, enter a ZIP code, etc. |
||||
button) |
||||
When pressed for 1 second or more for a channel that supports the teletext service, the |
||||
|
||||
|
TTX menu appears on the TV screen. For more information, refer to "Teletext Feature". |
|||
|
If the Colour Button appears with a number strip on the screen, select the Colour Button |
|||
|
and then select a |
fi colour by using the directional button (up/down/left/right). Use |
||
|
this to access additional options that are |
fi to the feature in use. |
||
|
|
|
||
(Rotate) |
Press the button to rotate the screen. |
|
||
|
|
|
|
|
Directional button |
Moves the focus. |
|
|
|
(up/down/left/right) |
|
|
||
|
|
|
||
Select
Selects or runs a focused item. When pressed while you are watching a broadcast programme, detailed programme information appears.
|
Press to return to the previous menu. When pressed for 1 second or more, the running function |
|
is terminated. When pressed while you are watching a programme, the previous channel |
(Return) |
appears. |
|
When pressed for over 1 second in Portrait Mode, the content screen only for Portrait Mode |
|
appears. |
|
|
(Smart Hub) |
Press to return to the Home Screen. |
- 27 -

|
|
Button |
Description |
|
|
|
|
|
|
|
When pressed, the playback controls appear. Using these controls, you can control the media |
|
(Play/pause) |
content that is playing. |
|
|
|
||
|
|
|
Press the button to use the recording or Timeshift function while watching the broadcast. |
|
|
|
|
|
|
(Volume) |
Move the button up or down to adjust the volume. To mute the sound, press the button. When |
|
|
pressed for 1 second or more, the Accessibility Shortcuts appears. |
|
|
|
|
|
|
|
|
|
|
|
|
Move the button up or down to change the channel. To see the Guide screen, press the button. |
|
|
(Channel) |
When pressed for 1 second or more, the Channel List screen appears. |
|
|
|
|
|
|
|
Press and hold the button up or down to quickly change the channel. |
|
|
|
|
|
(Launch app button) |
Launch the app indicated by the button. |
|
|
This function may not be supported depending on the model or geographical area. |
||
|
|
|
|
|
|
|
|
Use the Samsung Smart Remote less than 6 m from the TV. The usable distance may vary with the wireless environmental conditions.
The images, buttons and functions of the Samsung Smart Remote may differ with the model or geographical area.
To use the Samsung Smart Remote to control a compatible external device that does not support HDMI-CEC (Anynet+), you must fi universal remote control for the device. For more information, refer to "Controlling External Devices with a Samsung Remote Control - Using the Universal Remote".
To use the Samsung Smart Remote to control a compatible external device that does support HDMI-CEC (Anynet+), connect the device to an HDMI port on the TV using an HDMI cable. For more information, refer to "Using Anynet+ (HDMI-CEC)".
When you launch an app by pressing the button on the Samsung Smart Remote in Portrait Mode, some apps may switch to Landscape according to their app policy.
- 28 -
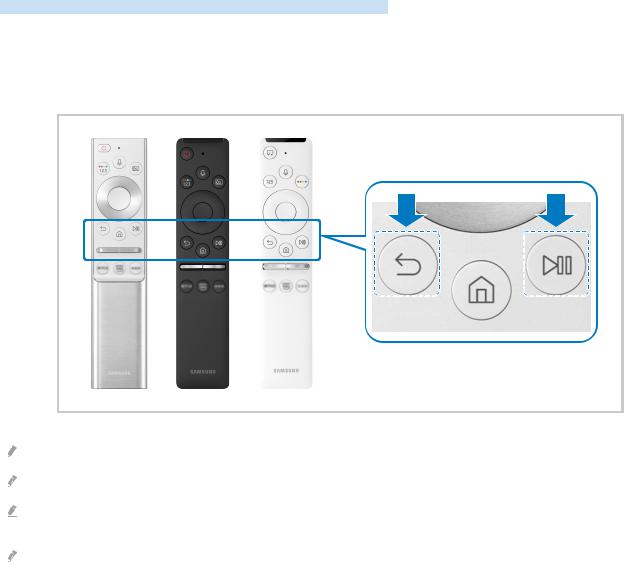
Connecting the Samsung Smart Remote to the TV
Connect the Samsung Smart Remote to your TV to operate the TV.
When you turn on the TV for the fi time, the Samsung Smart Remote pairs to the TV automatically. If the Samsung Smart Remote does not pair to the TV automatically, point it at the front of the TV, and then press and hold the  and
and  buttons simultaneously for 3 seconds or more.
The images, buttons and functions of the Samsung Smart Remote may differ with the model or geographical area. For more information about the Samsung Smart Remote, refer to "About the Samsung Smart Remote".
For more information about the Samsung Smart Remote that comes with The Frame, refer to "About the Samsung Smart Remote (The Frame)".
For more information about the Samsung Smart Remote that comes with The Sero, refer to "About the Samsung Smart Remote (The Sero)".
- 29 -

Controlling External Devices with a Samsung Remote Control - Using the Universal Remote
Control the TV and connected external devices with a Samsung remote control.


 Source
  Universal Remote
You can control external devices connected to the TV using a Samsung remote control. To control external devices, register them by following the instructions on the screen.
This function may not be supported depending on the model or geographical area.
You can also use the Anynet+ (HDMI-CEC) function to operate external Samsung devices with your TV's remote control without any additional setup. For more information, refer to "Using Anynet+ (HDMI-CEC)".
fi external devices connected to the TV may not support the universal remote feature.
Do not place any obstacles in front of an external device and TV's logo. It may cause signals from the remote control to be transmitted improperly.
The TV memorises both the external device and its connection port (HDMI 1, HDMI 2, etc.).
If you have fi |
controlling external devices with the Universal Remote, try adjusting the positions of the external |
devices. |
|
This function may not operate properly depending on the TV installation environment and the features of external devices.
- 30 -
Loading...