


Samsung PS64E8000, UA55ES7500M, PS60E8000, UA55ES8000, PS60E8000GM Manual
...E-MANUAL
Thank you for purchasing this Samsung product.
To receive more complete service, please register your product at
www.samsung.com/register
Model______________SerialNo.______________

Contents
Channel Menu |
|
|
• |
Connecting the TV |
1 |
• |
Using the INFO button |
|
|
(Now & Next guide) |
7 |
• Using the Channel Menu |
9 |
|
• |
Memorising Channels |
51 |
• |
Other Features |
57 |
Basic Feature |
|
|
• Changing the Preset Picture Mode |
62 |
|
• |
Adjusting Picture Settings |
65 |
• Changing the Picture Size |
70 |
|
• Changing the Picture Options |
81 |
|
• Using the TV with Your PC |
100 |
|
• Changing the Preset Sound Mode |
104 |
|
• |
Adjusting Sound Settings |
106 |
Preference Features |
|
|
• Connecting to the Network |
123 |
|
• Setting up a Wired Network |
134 |
|
• Setting up the Wireless Network |
147 |
|
• |
Managing the |
|
|
Network Connected Devices |
175 |
• |
Setting the Time |
186 |
• |
Blocking Programmes |
203 |
• |
Economical Solutions |
208 |
• Picture In Picture (PIP) |
212 |
|
• |
Other Features |
217 |
• |
Support Menu |
245 |

Advanced Features
•Using the 3D function
•Smart Hub
•Customizing the Home Screen
•Using Samsung Apps
•Search
•Your Video
•Family Story
•Fitness
•Kids
•Web Browser
•Skype
•SMART Interaction
•Specification for SMART Interaction
•AllShare Play
•Using the AllShare Play
•My list (In AllShare Play)
|
• Videos (In AllShare Play) |
599 |
|
271 |
• Photos (In AllShare Play) |
618 |
|
|
|
|
|
290 |
• Music (In AllShare Play) |
635 |
|
|
|
|
|
317 |
• Recorded TV (In AllShare Play) |
649 |
|
|
|
|
|
350 |
• |
Timeshift |
662 |
|
|
|
|
361 |
• Using the DLNA Function |
672 |
|
|
|
|
|
369 |
• Using the MHL function |
683 |
|
|
|
|
|
386 |
• |
Anynet+ (HDMI-CEC) |
689 |
|
|
|
|
441 |
|
|
|
453
469
499
502
543
555
582
586

Other Information |
|
• Using the Smart Touch Control |
773 |
|||
• |
Troubleshooting |
706 |
• |
Supported Subtitle and |
|
|
|
AllShare Play file formats |
805 |
||||
• |
Picture Quality (Troubleshooting) |
710 |
|
|||
• |
Teletext Feature |
814 |
||||
• |
Sound Quality (Troubleshooting) |
718 |
||||
• |
Anti-theft Kensington Lock |
820 |
||||
• |
No Picture / No Video (Troubleshooting) |
723 |
||||
• |
Licence |
825 |
||||
• Aerial(Air / Cable) Connection |
|
|||||
|
|
|
|
|||
|
(Troubleshooting) |
727 |
|
|
|
|
• |
PC Connection (Troubleshooting) |
730 |
|
|
|
|
• |
Network Connection (Troubleshooting) |
731 |
|
|
|
|
• Recording / Timeshift (Troubleshooting) |
732 |
|
|
|
||
• |
Others (Troubleshooting) |
741 |
|
|
|
|
• |
Anynet+ (HDMI-CEC) (Troubleshooting) |
754 |
|
|
|
|
• |
AllShare Play (Troubleshooting) |
762 |
|
|
|
|
• |
Smart Hub (Troubleshooting) |
763 |
|
|
|
|
• |
Web Browser (Troubleshooting) |
765 |
|
|
|
|
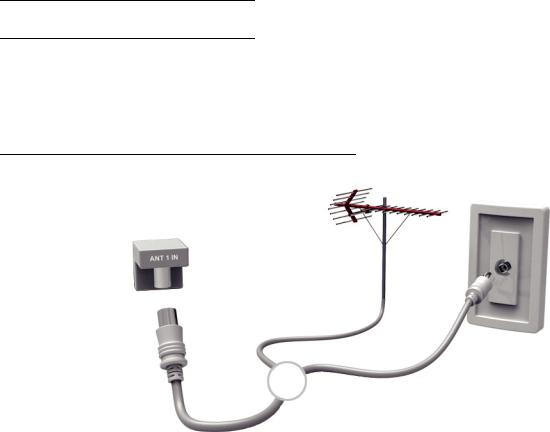
Connecting the TV
Connecting to an Antenna
<TV>
or
The displayed image may differ depending on the model.
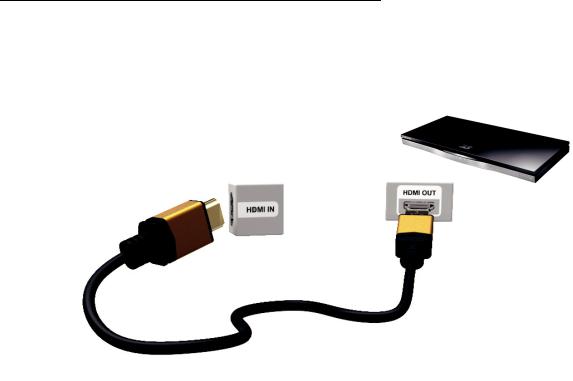
Connecting to an AV Device
Using a HDMI (up to 1080p)
<TV>
The displayed image may differ depending on the model.
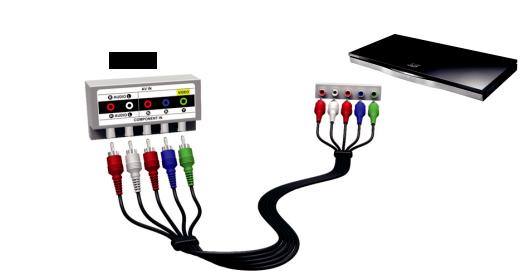
Using a Component (up to 1080p)
The displayed image may differ depending on the model.
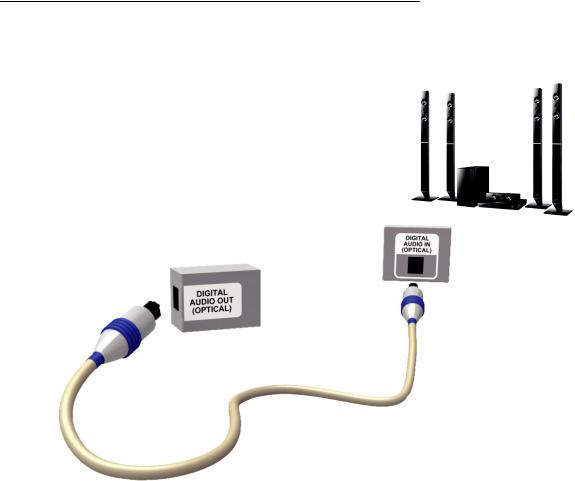
Connecting to an Audio device
Using an Optical (Digital) Connection
<TV>
The displayed image may differ depending on the model.
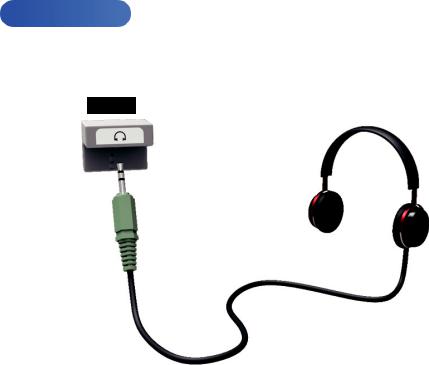
Using a Headphone Connection
for LED TV
The displayed image may differ depending on the model.
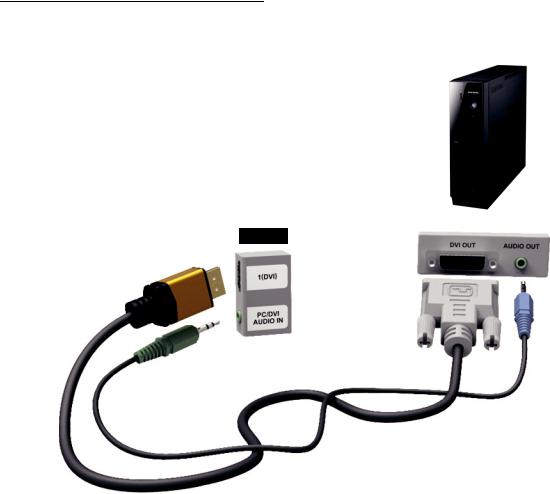
Connecting to a PC
Using an HDMI/DVI Cable
The displayed image may differ depending on the model.
Using the INFO button (Now & Next guide)
The display identifies the current channel and the status of certain audiovideo settings.
The Now & Next guide shows daily
TV programme information for each channel according to the broadcasting time.
●● Scroll l, r to view information for a desired programme while watching the current channel.
●● Scroll u, d to view information for other channels. If you want to move to the currently selected channel, select
E using your remote.
Some country, if Digital Text is set to
Enable, the EPG (Electronic Programme Guide) will work.
Using the Channel Menu
Press the ™ button to select the menu you want to use. Each screen will be displayed.
Guide
™ → Guide
The EPG (Electronic Programme Guide) information is provided by broadcasters. Using programme schedules provided by broadcasters, you can specify
programmes you want to watch in advance so that the channel
automatically changes to the selected programme channel at the specified time. Programme entries may appear blank or out of date depending on a channel status.
NNSome country, if Digital Text is set to Enable, the EPG (Electronic Programme Guide) will work.
Using Channel View
●● a (Sche. Mgr): Displays the Schedule
Manager.
●● b (-24 Hours): Viewing the list of programmes to be broadcasted before 24 hours.
●● { (+24 Hours): Viewing the list of programmes to be broadcasted after 24 hours.
●● } (Ch. Mode): Select the type of channels you want to display on the
Channel View window.
●● ` Information: Displays details of the selected programme.
●● k Page: Move to next or previous page.
●● E Watch / Enter: When selecting the current programme, you can watch the selected programme. / Displays detailed information of the selected channel.
NNThis function may not be supported depending on the country.

Channel
™ → Channel
Using this function, you can delete channels, set favourite channels and edit the channel name for analogue broadcasts.
NNThe available items may differ depending on the selected antenna source.
●● All
Shows all channels.
●● TV
Shows TV channels.
●● Radio
Shows radio channels.
●● Data/Other
Shows data channels and other channels.
●● Analogue
Shows analogue channels.
●● Favourites 1 – Favourites 5
Shows all favourite channels, in up to
five groups. Each group has separate channels.
NNThe TV displays favourites only if you have added favourites using Edit
Favourites in the Tools menu.
NNIf the highlight located in the Favourites 1 – Favourites 5 category, you can change the name of category by selecting b using your remote.
●● Recently Viewed
Shows the most recently viewed channels.
●● Most Viewed
Shows the most frequently viewed channels.
Using the coloured and function buttons with Channel
●● b Delete
Delete the selected channel(s).
●● ` Information
Displays details of the selected channel.
●● k Page
Scrolls the channel list to the next or previous page.
●● E Select / Deselect
Selects or deselects a channel.
●● T Tools
Displays the option menu.
●● R Return
Return to the previous menu.
Using the Tools menu with the Channel
●● Edit Favourites
Lets you assign channels you watch frequently to a favorites group and remove channels from a favorites group. You access Edit Favourites on the Tools menu.
1.Select Edit Favourites. The Edit
Favourites screen appears.
2.Select a using your remote. The selected channel will be added to the
favourite group.
NNAlso, you can select a channel in the Edit Favourites screen.
NNYou can add a favourite channel to any one of the groups. To change favourites group, select } using your remote. Each time you select }, a favourites group will be changed.
3.When done, select OK. The channel is made a favourite and is assigned
to the favourite group you selected.
N On the Channel screen, the TV displays the “ ” symbol next to the channel, indicating it is a favourite.
●Lock / Unlock
Lock a channel so that the channel cannot be selected and viewed.
N This function is available only when the Channel Lock is set to On.
● Rename channels
(Appears only if you have selected an analogue channel.)
Lets you assign a name of up to five characters to an analogue channel. For example, Food, Golf, etc. This makes it easier to find and select the channel.
●● Edit Channel Number
Edit the channel number by select the numbers.
NNThis function may not be supported depending on the region.
●● Sorting (digital channels only)
Change the list ordered by channel name or number.
●● Channel Info
Displays information of channel signal. The item may differ depending on channel.
●● Delete
Delete a channel to display the channels you want.
●● Select All / Deselect All
Select all channels in the list. / Deselect all channels you selected.
To delete a channel from a Category list on the Channel screen, follow these steps:
1.If you want to delete a channel, select a category of the channel.
2.Select a channel in the category list.
A c mark appears to the left of the channel.
NNYou can select more than one channel.
NNIf you select the selected channel again, a c mark disappears.
3.Open the Tools menu using your remote.
4.Select Delete. The message Delete the selected channels? appears.
Select OK.
NNYou can delete the selected channel
immediately by selecting b using
your remote.
NNWhen you delete a channel in the
Recently Viewed or Most Viewed category, the channel will disappear from the category list. But, the channel is not deleted.
To set channels as favourites, follow these steps:
1.Select the All category.
2.Select a channel. A c mark appears
to the left of the channel.
NNYou can select more than one channel.
NNIf you select the selected channel again, a c mark disappears.
3.Open the Tools menu using your remote.
4.Select the Edit Favourites. The Edit Favourites screen appears.
5.Select a using your remote. The selected channel will be moved to
 Loading...