Samsung QM85N, QM98N, QM75N, QM65N, QM55N User Manual
...
Smart Signage User Manual (By Model)
This manual provides information aboutyourSmart Signage including supportedtypes and product specifications permodel.
QBN (QB43N QB49N QB55N QB65N QB75N)
QMN (QM43N QM49N QM55N QM65N QM75N QM85N QM98N)
QEN (QE82N)
The colour and the appearance may differ depending on the product, and the content in the manual is subjectto changewithout priornoticeto improvethe performance.
Recommended hours of use perdayforthe QBN, QEN models is lessthan16 hours. Ifthe product is usedforlongerthan16 hours a day,thewarrantymaybevoid.
An administration fee may be charged in the following situations:
(a)Anengineeriscalledoutatyourrequest,butitisfoundthattheproducthasnodefect(i.e., wherethe usermanual has not been read).
(b)You bringthe unitto a repaircentre, but it isfoundthatthe product has no defect (i.e., wherethe usermanual has not been read).
Youwill be informed ofthe administrationfee amount before atechnicianvisits.
© Samsung Electronics
SamsungElectronicsownsthecopyrightforthismanual.UseorreproductionofthismanualinpartsorentiretywithouttheauthorizationofSamsungElectronicsisprohibited.TrademarksotherthanSamsungElectronicsare propertyoftheirrespectiveowners.

Table of contents
Preparations
Checking the Components |
3 |
|
|
Parts |
4 |
Q*43N/Q*49N/Q*55N/Q*65N/Q*75N |
4 |
QM85N |
5 |
QM98N |
6 |
QE82N |
7 |
Anti-theft Lock |
8 |
|
|
Ports |
9 |
Q*43N/Q*49N/Q*55N/Q*65N/Q*75N |
9 |
QM85N/QM98N |
10 |
QE82N |
11 |
|
|
Control menu |
12 |
Q*43N/Q*49N/Q*55N/Q*65N/Q*75N/QE82N/ |
|
QM98N |
12 |
QM85N |
13 |
|
|
Before Installing the Product (Installation |
|
Guide) |
14 |
Tilting Angle and Rotation |
14 |
Ventilation |
14 |
|
|
Installing the Wall Mount |
15 |
Preparing before installing Wall-Mount |
15 |
Installing the Wall Mount |
15 |
Wall Mount Kit Specifications (VESA) |
16 |
Specifications
General |
17 |
|
|
Preset Timing Modes |
19 |
Appendix
Licence |
21 |
2
Chapter 01
Preparations
Checking the Components
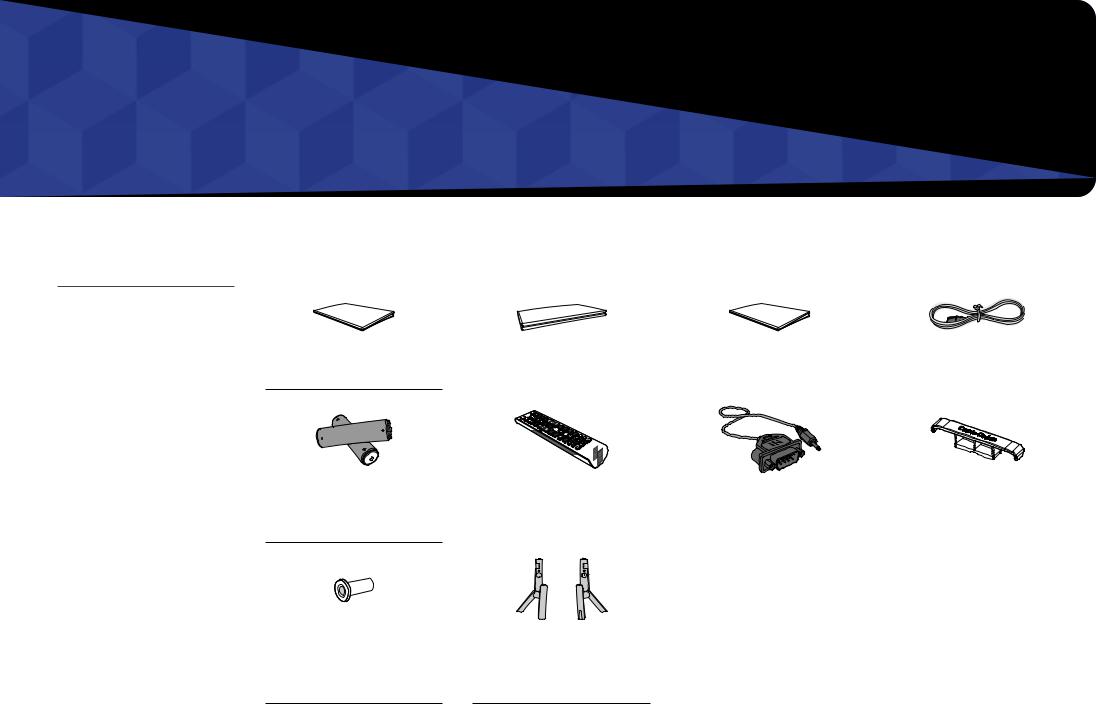
"" Contact the vendor where you purchased the product if any components are missing.
"" The appearance of the components maydifferfromtheimagesshown.
"" A stand is not provided with the product.Toinstallastand,youcan purchaseoneseparately.
"" The RS232C adapter can be used to connect to another monitor using the
D-SUB(9-pin)typeRS232Ccable.
Quick Setup Guide
Batteries (AAA x 2)
(Not available in some locations)
Holder-Ring x 4
(Supported models: Q*43N, Q*49N, Q*55N, Q*65N, Q*75N, QE82N)
Warranty card |
|
|
|
|
|
|
|
Regulatory guide |
|
|
Power cord |
||
(Not available in some locations) |
|
|
|
|||
|
|
|
|
|
|
|
|
|
|
|
|
|
|
|
|
|
|
HOLDER-CABLE |
Remote Control |
RS232C(IN) adapter |
|
(Supported models: Q*65N, |
|
|
|
|
|
Q*75N, QE82N, QM85N, QM98N) |
|
|
|
|
|
Stand (Supported model: QE82N)
3
Parts
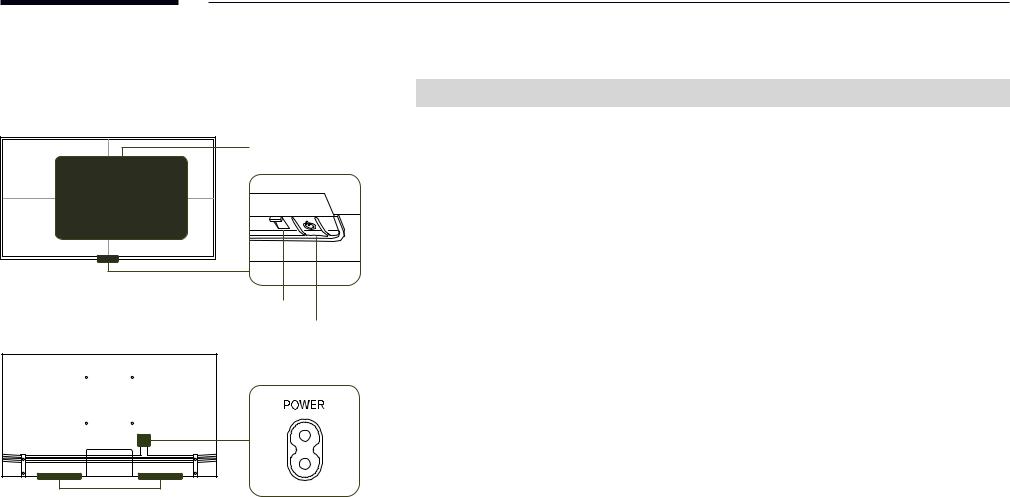
Q*43N/Q*49N/Q*55N/Q*65N/Q*75N
Remote sensor
Power indicator
Power button
Speaker
"" The colourand shape of parts maydifferfromwhat is shown. Specifications are subjectto changewithout
noticeto improve quality.
Parts |
Description |
|
|
|
|
|
Press a button on the remote control pointing at the sensor on the front of the product |
|
Remote sensor |
to performthe correspondingfunction. |
|
"" Using otherdisplaydevices inthe same space asthe remote control ofthis product |
||
|
||
|
can causethe otherdisplaydevicesto be inadvertentlycontrolled. |
|
|
|
|
Power button |
Turnsthe product on oroff. |
|
|
|
Usethe remote controlwithin 2.5 mto 4 mfromthe sensoronthe product at an angle of 30°fromthe left and right.
"" Store used batteries out of reach of children and recycle.
"" Do not use a newand used batterytogether. Replace both batteries atthe sametime.
"" Remove batterieswhenthe remote control is notto be usedforan extended period oftime.
"" To enhance the IR receiver performance, connect an External IR Sensor (sold separately) to the IR IN port.
4
QM85N
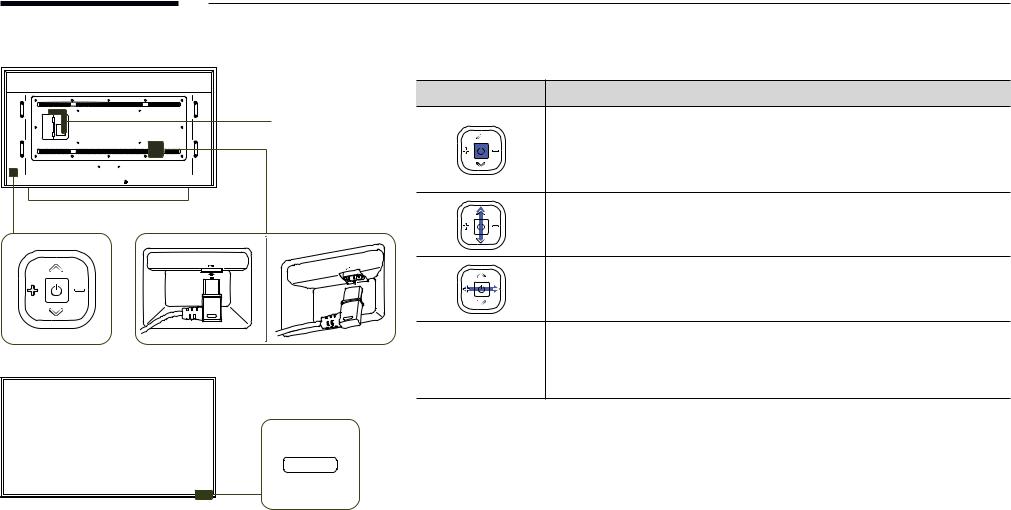
Network box mounting hole
Speaker
Power button
Remote sensor
"" The colourand shape of parts maydifferfromwhat is shown. Specifications are subjectto changewithout
noticeto improve quality.
Buttons |
Description |
Poweronthe product.
If you press the  button when the product is turned on, the control menu will be displayed.
"" To exit the OSD menu, press and hold the  buttonforat least one second.
Movetothe upperorlowermenu. You can also adjustthevalue of an option.
Movetothe left orright menu. You can also adjustthevalue of an option.
"" You can adjust the volume by moving the power button left or right when the control menu is not displayed.
Press a button on the remote control pointing at the sensor on the front of the product
Remote sensor
to performthe correspondingfunction.
"" Using otherdisplaydevices inthe same space asthe remote control ofthis product can causethe otherdisplaydevicesto be inadvertentlycontrolled.
Usethe remote controlwithin 7 mto10 mfromthe sensoronthe product at an angle of 30°fromthe left and right. "" Store used batteries out of reach of children and recycle.
"" Do not use a newand used batterytogether. Replace both batteries atthe sametime.
"" Remove batterieswhenthe remote control is notto be usedforan extended period oftime.
"" To enhance the IR receiver performance, connect an External IR Sensor (sold separately) to the IR IN port.
5
QM98N |
|
"" The colourand shape of parts maydifferfromwhat is shown. Specifications are subjectto changewithout |
|
|
|
noticeto improve quality. |
|
|
|
Parts |
Description |
|
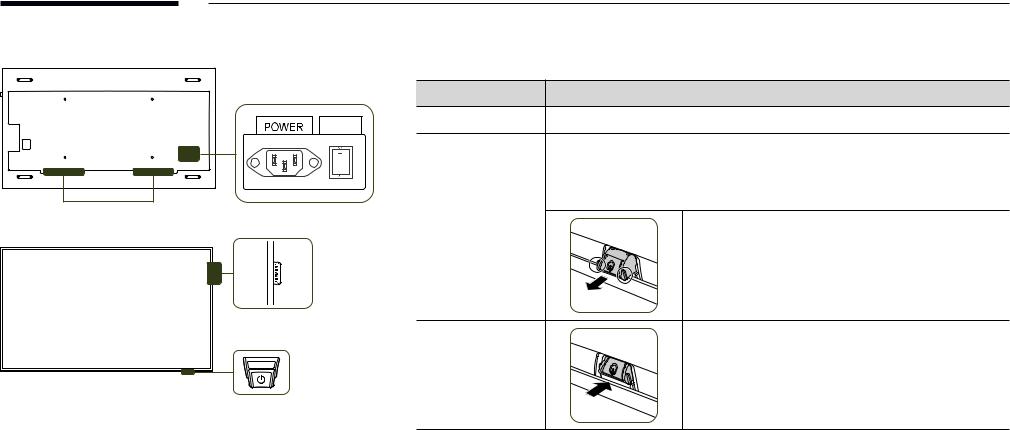
ON/OFF |
Spacer logo |
Do not pull onthe spacerlogo usingforce. The logo maytearorbreak off. |
|
|
|
|
|
|
|
Press a button on the remote control pointing at the bottom of the product face to |
|
|
|
performthefunction. The remote control sensoris located onthe bottom ofthe product. |
|
"" Using otherdisplaydevices inthe same space asthe remote control ofthis product |
|
Speaker |
can causethe otherdisplaydevicesto be inadvertentlycontrolled. |
|
|
||
Remote sensor |
|
|
|
To use remote/eco sensor, make surethe sliding powerbutton |
|
|
is protrudingfromthe bottom ofthe product. |
|
Spacer logo |
|
|
Power button |
To usethe powerbutton, make surethe sliding powerbutton |
|
is not protrudingfromthe bottom ofthe product. |
||
|
||
Remote sensor & Power button |
|
|
Usethe remote controlwithin 7 mto10 mfromthe sensoronthe product at an angle of 30°fromthe left and right. |
||
"" Store used batteries out of reach of children and recycle. |
||
"" Do not use a newand used batterytogether. Replace both batteries atthe sametime. |
||
"" Remove batterieswhenthe remote control is notto be usedforan extended period oftime. |
||
"" To enhance the IR receiver performance, connect an External IR Sensor (sold separately) to the IR IN port. |
||
6
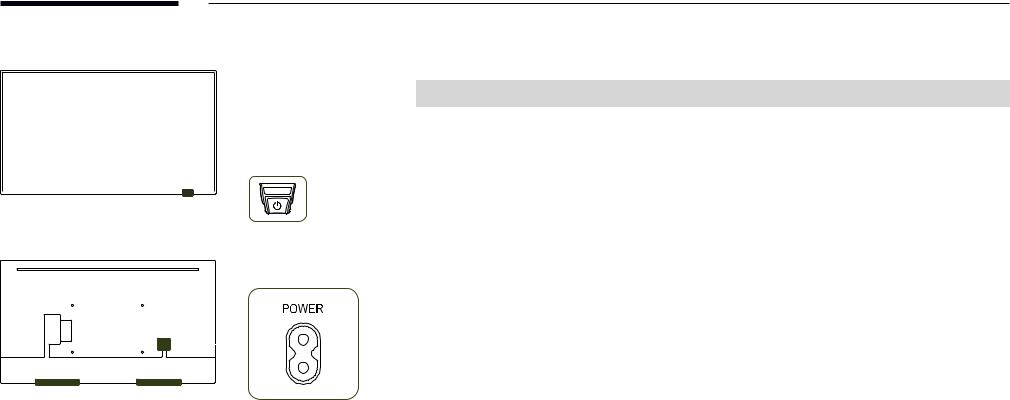
QE82N |
|
|
"" The colourand shape of parts maydifferfromwhat is shown. Specifications are subjectto changewithout |
||
|
|
|
|
noticeto improve quality. |
|
|
|
|
|
|
|
|
|
|
|
Parts |
Description |
|
|
|
|
|
|
|
|
|
|
|
Press a button on the remote control pointing at the bottom of the product face to |
|
|
|
|
Remote sensor |
performthefunction. The remote control sensoris located onthe bottom ofthe product. |
|
|
|
|
"" Using otherdisplaydevices inthe same space asthe remote control ofthis product |
|
|
|
|
|
|
|
|
|
|
|
|
can causethe otherdisplaydevicesto be inadvertentlycontrolled. |
|
|
|
|
|
|
|
|
|
|
Power button |
Turnsthe product on oroff. |
|
|
|
|||
|
|
|
|||
|
|
|
|
|
|
|
|
|
Usethe remote controlwithin 2.5 mto 4 mfromthe sensoronthe product at an angle of 30°fromthe left and |
||
|
|
|
|
|
|
|
Remote sensor & Power button |
right. |
||
|
|
|
|
|
|
|
|
|
|
|
|
|
|
|
|
|
|
|
|
|
"" Store used batteries out of reach of children and recycle. |
|
|
|
|
|
|
|
|
|
|
"" Do not use a newand used batterytogether. Replace both batteries atthe sametime. |
|
|
|
|
|
|
|
|
|
|
"" Remove batterieswhenthe remote control is notto be usedforan extended period oftime. |
|
|
|
|
|
|
|
|
|
|
|
|
|
|
|
|
|
|
|
|
|
|
|
|
|
|
|
|
|
|
|
|
|
|
|
|
|
|
|
|
|
|
|
|
|
|
|
|
|
|
|
|
|
|
|
|
|
|
|
|
|
|
|
|
|
|
|
|
|
|
|
|
|
|
|
|
|
|
|
|
|
|
|
|
|
|
|
|
|
|
|
|
|
|
|
|
|
|
|
Speaker
7
 Loading...