


Samsung AQV12FA, AQV09NSA, AQV09FC, AQV12NSA, AQV12FC Service Manual
...SPLIT-TYPEAIRCONDITIONER
INDOOR UNIT |
OUTDOOR UNIT |
Basic : AQV12FA |
|
Model: AQV09NSA |
|
AQV09FC |
|
AQV12NSA |
|
AQV12FC |
|
Model Code : AQV09NSAN |
AQV09NSAX |
AQV09FCN |
AQV09FCX |
AQV12NSAN |
AQV12NSAX |
AQV12FCN |
AQV12FCX |
AIR CONDITIONER |
THE FEATURE OF PRODUCT |
|
High Energy Efficiency BLDC |
|
Air Conditioner |
|
Simple Flat Grille Design |
|
good'sleep Mode |
|
:good'sleepModecanhelpyousleepquicklyand |
AQV09FCN,AQV12FCN,AQV09NSAN,AQV12NSAN |
soundlyandwakeuprefreshed. |
|
Multi Functional Cleaning System |
|
:SilverNanoHealthSystemandDeodorizing/ |
|
CatechinFilterareadopted. |
|
Silence Mode |
|
:Whenyouusethe"SilenceMode",youcan |
|
experienceextremelyquietoperationofyour |
|
airconditioner. |
AQV09FCX,AQV12FCX,AQV09NSAX,AQV12NSAX |
|
Refer to the service manual in the GSPN(see the rear cover) for the more information.

Contents
11. Precautions ........................................................................................................................................ |
1-1 |
1-1Installingtheairconditioner .......................................................................................................... |
1-1 |
1-2Powersupplyandcircuitbreaker ................................................................................................. |
1-1 |
1-3Duringoperation .............................................................................................................................. |
1-1 |
1-4Disposingoftheunit ....................................................................................................................... |
1-2 |
1-5Others ................................................................................................................................................. |
1-2 |
12. Product Specifications ............................................................................................................... |
2-1 |
2-1TheFeatureofProduct .................................................................................................................... |
2-1 |
2-2ProductSpecifications ..................................................................................................................... |
2-2 |
2-3TheComparativeSpecificationsofProduct ................................................................................ |
2-3 |
2-4AccessoryandOptionSpecifications ........................................................................................... |
2-5 |
13. Alignment and Adjustments ................................................................................................. |
3-1 |
3-1TestMode ........................................................................................................................................... |
3-1 |
3-2IndoorDisplayErrorandCheckMethod ..................................................................................... |
3-2 |
3-3OutdoorLEDErrorDisplayandCheckMethod .......................................................................... |
3-3 |
3-4SettingOptionSetupMethod ....................................................................................................... |
3-4 |
14. |
Disassembly and Reassembly .............................................................................................. |
4-1 |
|
4-1IndoorUnit ......................................................................................................................................... |
4-2 |
|
4-2OutdoorUnit .................................................................................................................................... |
4-5 |
15. |
Exploded Views and Parts List ............................................................................................. |
5-1 |
|
5-1IndoorUnit ......................................................................................................................................... |
5-1 |
|
5-2OutdoorUnit ..................................................................................................................................... |
5-3 |
|
5-3Ass’yControlIn ................................................................................................................................. |
5-5 |
|
5-4Ass’yControlOut .............................................................................................................................. |
5-7 |
16. |
Electrical Parts List ....................................................................................................................... |
6-1 |
17. |
Wiring Diagram .............................................................................................................................. |
7-1 |
|
7-1IndoorUnit ......................................................................................................................................... |
7-1 |
|
7-2OutdoorUnit .................................................................................................................................... |
7-2 |
18. |
Schematic Diagram ...................................................................................................................... |
8-1 |
|
8-1IndoorUnit ......................................................................................................................................... |
8-1 |
|
8-2OutdoorUnit .................................................................................................................................... |
8-2 |
|
|
|

Contents
19. |
Circuit Descriptions ...................................................................................................................... |
9-1 |
|
9-1PCBCircuitDescriptions .................................................................................................................. |
9-1 |
|
9-2RefrigeratingCycleDiagram .......................................................................................................... |
9-3 |
10. |
PCB Diagram ..................................................................................................................................... |
10-1 |
|
10-1IndoorPCB ....................................................................................................................................... |
10-1 |
|
10-2OutdoorPCB ................................................................................................................................... |
10-2 |
11. |
Operating Instructions .............................................................................................................. |
11-1 |
|
11-1NameofEachPart .......................................................................................................................... |
11-1 |
|
11-2WirelessRemoteControl-ButtonsandDisplay ........................................................................ |
11-3 |
|
11-3MainFunction ................................................................................................................................. |
11-4 |
12. |
Troubleshooting ............................................................................................................................ |
12-1 |
|
12-1Itemstobecheckedfirst .............................................................................................................. |
12-1 |
|
12-2FaultDiagnosisbySymptom ....................................................................................................... |
12-2 |
|
12-3PCBInspectionMethod ................................................................................................................ |
12-20 |
|
12-4MainPartInspectionMethod ...................................................................................................... |
12-22 |
13. |
Block Diagram ................................................................................................................................. |
13-1 |
|
13-1IndoorUnit ...................................................................................................................................... |
13-1 |
|
13-2OutdoorUnit ................................................................................................................................... |
13-3 |
14. |
Reference Sheet .............................................................................................................................. |
14-1 |
|
14-1IndexforModelName .................................................................................................................. |
14-1 |
|
14-2LowRefrigerantPressureDistribution ....................................................................................... |
14-2 |
|
14-3Pressure&Capacitymark ............................................................................................................. |
14-3 |
|
14-4Q&AforNon-trouble ................................................................................................................... |
14-4 |
|
14-5Cleaning/FilterChange ................................................................................................................. |
14-7 |
|
14-6Installation ....................................................................................................................................... |
14-9 |
|
14-7InstallationDiagramofIndoorUnitandOutdoorUnit .......................................................... |
14-10 |
1. Precautions
1-1 Installing the air conditioner
Usersshouldnotinstalltheairconditionerbythemselves.
Askthedealerorauthorizedcompanytoinstalltheairconditionerexceptthewindow-typeairconditionerinU.S.AandCanada. Ifyoudon’tinstalltheairconditionerproperly,itmaycauseafire,awaterleakageoranelectricshock.
Youmustinstalltheairconditioneraccordingtothenationalwiringregulationsandsafetyregulations.
Installtheindoorunithigherthan2.5mfromthefloortoavoidtheinjurycausedbytheoperationofthefan. (exceptthewindow-typeairconditioner)
Themanufacturerisnotresponsibleforanyaccidentsorinjurycausedbyanincorrectinstallation.
Wheninstallingthebuilt-intypeairconditioner,keepallelectriccablessuchasthepowercableandtheconnectioncordinpipes, ducts,orcablechannelstoprotectthemfromthedangerofimpactoranyotherincidents.
1-2 Power supply and circuit breaker
Ifthe powercordoftheairconditionerisdamaged,itmustbereplacedbythemanufacturer oraqualifiedpersoninordertoavoid
ahazard.
Theairconditionermustbepluggedintoanindependentcircuitifapplicableorconnectthepowercabletotheauxiliarycircuit breaker.
Anallpoledisconnectionfromthepowersupplymustbeincorporatedinthefixedwiringwithacontactopeningof>3mm.
Donotextendanelectriccordtotheairconditioner.
Theairconditionermustbepluggedinafteryoucompletetheinstallation.
1-3 During operation
Donotrepairtheairconditioneratyourdiscretion. Itisrecommendedtocontactaservicecenterdirectly.
Neverspillanykindofliquidontheairconditioner.
Ifthishappens,turnofftheairconditionerandcontactanauthorizedservicecenter.
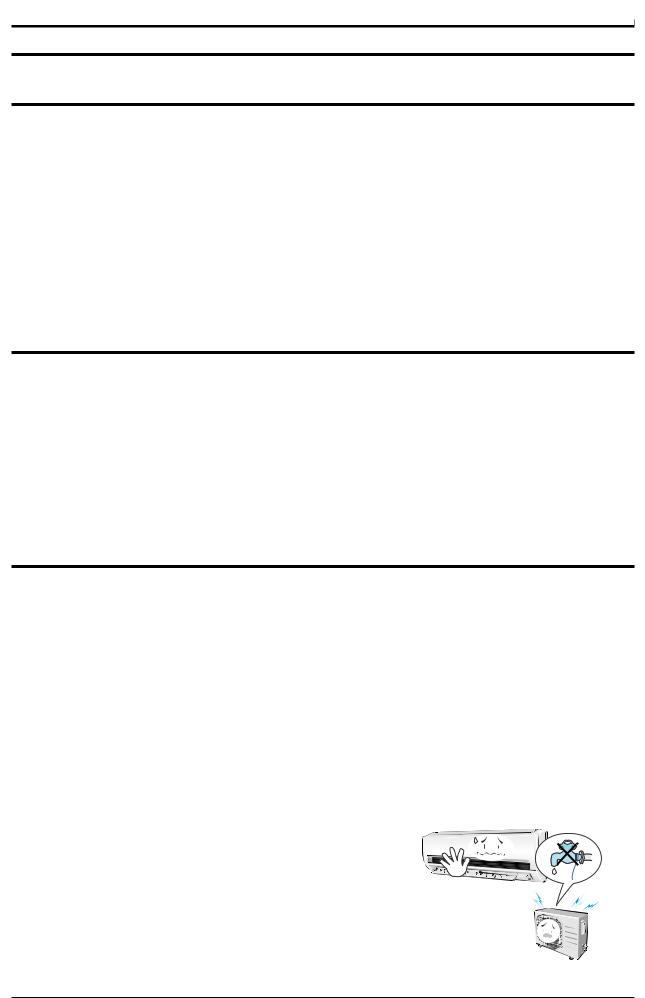
Donotinsertanythingbetweentheairflowbladestopreventdamageoftheinnerfanandconsequentinjury. Keepchildrenawayfromtheairconditioner.
Donotplaceanyobstaclesinfrontoftheairconditioner.
Donotsprayanykindofliquidintotheindoorunit.Ifthishappens,turnofftheairconditionerandcontactaservicecenter.
Makesurethattheairconditioneriswellventilatedatalltimes: Donotplaceaclothorothermaterialsoverit.
Removethebatteriesifyoudon’tusetheremotecontrolforalongtime.(Ifapplicable)
Usetheremotecontrolwithin7metersfromtheindoorunit.(Ifapplicable)
SamsungElectronics |
1-1 |

1-4 Disposing of the unit
Beforethrowingouttheairconditioner,removethebatteriesfromtheremotecontrol.
When you dispose of the air conditioner, consult your dealer. If pipes are removed incorrectly, refrigerant may blow out and cause airpollution.Whenitcontactswithyourskin,itcancauseskininjury.
Thepackageoftheairconditionershouldberecycledordisposedofproperlyforenvironmentalreasons.
1-5 Others
Neverstoreorloadtheairconditionerupsidedownorsidewaystopreventthedamagetothecompressor. Youngchildrenorinfirmpersonsshouldbealwayssupervisedwhentheyusetheairconditioner.
MaxcurrentismeasuredaccordingtoIECstandardforsafety.
CurrentismeasuredaccordingtoISOstandardforenergyefficiency.
1-2 |
SamsungElectronics |

2. Product Specifications
2-1 The Feature of Product
High Energy Efficiency BLDC Air Conditioner
BLDCTechniquearisestheefficiencyofairconditionerandmakesaroomcoolandwarmwithhighenergysaving.
Simple Flat Grille Design
WithaSmartandfashionablestyle,thehighimpressiveinteriordesignallowthisproducttosetplaceinanywhere.
good'sleep Mode
good'sleep Modecanhelpyousleepquicklyandsoundlyandwakeuprefreshed.
Multi functional cleaning system
WithSilverNanoHealthSystemandDeodorizing/CatechinFiltersmakesyourroommorerefreshed.
Silence Mode
Whenyouusethe“SilenceMode”,youcanexperienceextremelyquietoperationofyourairconditioner.
SamsungElectronics |
2-1 |

2-2 Product Specifications |
|
|
|
|
|
|||
|
|
|
Model |
AQV09NSA/AQV09FC |
AQV12NSA/AQV12FC |
|||
|
|
|
|
|
|
|
||
Item |
|
|
|
IndoorUnit |
OutdoorUnit |
IndoorUnit |
OutdoorUnit |
|
|
|
|
|
|||||
Type |
|
|
|
Wall-mounted |
Wall-mounted |
|||
|
Capacity |
Cooling |
kW |
0.99/2.50/3.20 |
0.99/3.30/3.80 |
|||
|
|
|
|
|
|
|||
|
Heating |
(Low/Std/Max) |
1.20/3.30/4.20 |
1.40/4.00/4.70 |
||||
|
|
|||||||
|
|
|
||||||
|
RunningFrequency |
Cooling |
Hz |
20/52/70 |
25/69/79 |
|||
|
|
|
|
|
|
|||
|
Heating |
(Low/Std/Max) |
25/64/75 |
30/76/88 |
||||
|
|
|||||||
|
|
|
||||||
|
Dehumidifying |
|
ℓ/h |
1.3 |
|
1.6 |
|
|
Performance |
AirVolume |
Cooling |
/min |
7.2/5.8/4.0 |
30 |
8.5/6.9/5.2 |
30 |
|
|
|
|
|
|
||||
Heating |
(H/M/L) |
7.8/6.6/4.6 |
29 |
9.2/7.5/6.0 |
29 |
|||
|
|
|||||||
|
|
|
||||||
|
Noise |
Cooling |
dB |
43/25 |
53 |
43/25 |
53 |
|
|
|
|
|
|
|
|||
|
Heating |
(H/L) |
43/25 |
53 |
43/25 |
53 |
||
|
|
|||||||
|
|
|
||||||
|
EnergyEfficiencyRatio |
Cooling |
W/W |
3.40 |
|
3.21 |
|
|
|
|
|
|
|
|
|||
|
Heating |
(Std) |
3.63 |
|
3.61 |
|
||
|
|
|
|
|||||
|
|
|
|
|
||||
|
Power |
|
ph-V-Hz |
1-220/240-50 |
1-220/240-50 |
|||
|
PowerConsumtion |
Cooling |
W |
270/735/980 |
320/1028/1210 |
|||
|
|
|
|
|
|
|||
|
Heating |
(Low/Std/Max) |
300/910/1100 |
350/1108/1400 |
||||
|
|
|||||||
|
|
|
||||||
|
OperatingCurrent |
Cooling |
A |
1.6/3.5/4.5 |
1.9/4.9/5.5 |
|||
|
|
|
|
|
|
|||
|
Heating |
(Low/Std/Max) |
1.7/4.4/5.2 |
2.2/5.2/6.2 |
||||
|
|
|||||||
|
|
|
||||||
Power |
PowerFactor |
Cooling |
% |
70/85/90 |
70/90/90 |
|||
|
|
|
|
|
|
|||
|
Heating |
(Low/Std/Max) |
70/85/90 |
70/90/90 |
||||
|
|
|||||||
|
|
|
||||||
|
|
Length |
m |
2 |
|
2 |
|
|
|
PowerCord |
NumberofCoreWire |
|
3 |
|
3 |
|
|
|
|
Capacity |
A |
10 |
|
10 |
|
|
|
OuterDimension |
WxHxD |
mm |
825x285x189 |
720x548x265 |
825x285x189 |
720x548x265 |
|
|
Weight(Net) |
|
kg |
7.8 |
31.5 |
9.4 |
31.5 |
|
|
RefrigerantPipe |
Liquid |
mmxL(m) |
Φ6.35x5 |
Φ6.35x5 |
|||
|
Gas |
mmxL(m) |
Φ9.52x5 |
Φ9.52x5 |
||||
|
|
|||||||
|
DrainHose |
|
DxL(mm) |
Φ18x550 |
Φ18x550 |
|||
Size |
|
Type |
|
Rotary,G4C090LUDER |
Rotary,G4C090LUDER |
|||
Compressor |
Type |
|
Hermetic |
Hermetic |
||||
|
|
|||||||
|
|
Motor |
|
|
|
|
|
|
|
|
RatedOutput |
|
853W |
853W |
|
||
|
OilType |
|
|
FREOLα68ES-T |
FREOLα68ES-T |
|||
|
|
Type |
|
Cross-flow |
Propeller |
Cross-flow |
Propeller |
|
|
Blower |
Type |
|
Resin/Steel |
Resin/Steel |
Resin/Steel |
Resin/Steel |
|
|
|
Motor |
|
|
|
|
|
|
|
|
RatedOutput |
W |
27 |
50 |
27 |
50 |
|
HeatExchanger |
|
|
2Row10Step |
1Row20Step |
2Row10Step |
1Row20Step |
||
RefrigerantControlUnit |
|
|
CheckValve,Capillary |
CheckValve,Capillary |
||||
FreezerOilCapacity |
|
cc |
320 |
|
320 |
|
||
RefrigeranttoChange(R410A) |
|
g |
800 |
|
850 |
|
||
ProtectionDevice(OLP) |
|
|
None |
None |
|
|||
CoolingTestCondition |
|
|
IndoorUnit:DB27°CWB19°C |
OutdoorUnit:DB35°CWB24°C |
||||
HeatingTestCondition |
|
|
IndoorUnit:DB20°CWB15°C |
OutdoorUnit:DB7°CWB6°C |
||||
|
|
cooling |
indoor |
16°C~32°C |
16°C~32°C |
|||
|
|
Outdoor |
-10°C~43°C |
-10°C~43°C |
||||
Operationconditonrange |
|
|||||||
|
indoor |
27°Corless |
27°Corless |
|||||
|
|
heating |
||||||
|
|
Outdoor |
-15°C~24°C |
-15°C~24°C |
||||
|
|
|
||||||
2-2 |
|
|
|
|
|
SamsungElectronics |
||

2-3 The Comparative Specifications of Product
Item |
|
Development Model |
Comparative Model |
|
|
|
|
||
|
AQV09NSAN/AQV09FCN |
AQV09FAN |
||
|
|
|||
|
|
|
|
|
|
IndoorUnit |
|
|
|
Design |
|
|
|
|
|
|
|
||
|
OutdoorUnit |
|
|
|
|
|
|
|
|
NetWeight |
IndoorUnit |
7.8kg |
7.8kg |
|
|
|
|
||
OutdoorUnit |
31.5kg |
31.5kg |
||
|
||||
|
|
|
|
|
OuterDimension |
IndoorUnit |
825x285x189(mm³) |
825x285x189(mm³) |
|
(WidthxHeightxDepth) |
OutdoorUnit |
720x548x265(mm³) |
720x548x265(mm³) |
|
|
|
|
|
|
Noise |
IndoorUnit |
43dB↓ |
43dB↓ |
|
|
|
|
||
OutdoorUnit |
53dB↓ |
53dB↓ |
||
|
||||
|
|
|
|
|
|
|
SilverNanoEvaporator |
SilverNanoEvaporator |
|
AirPurifyingSystem |
Filter |
CatechinFilter |
CatechinFilter |
|
|
|
DeodorizingFiter |
DeodorizingFiter |
|
|
|
|
|
|
IndoorDisplay |
ThreeColorLEDDisplay |
ThreeColorLEDDisplay |
||
|
|
|
|
|
|
|
|
|
|
Item |
|
Development Model |
Comparative Model |
|
|
|
|
||
|
AQV12NSAN/AQV12FCN |
AQV12FAN |
||
|
|
|||
|
|
|
|
|
|
IndoorUnit |
|
|
|
Design |
|
|
|
|
|
|
|
||
|
OutdoorUnit |
|
|
|
|
|
|
|
|
NetWeight |
IndoorUnit |
9.4kg |
8.4kg |
|
|
|
|
||
OutdoorUnit |
31.5kg |
31.5kg |
||
|
||||
|
|
|
|
|
OuterDimension |
IndoorUnit |
825x285x189(mm³) |
825x285x189(mm³) |
|
(WidthxHeightxDepth) |
OutdoorUnit |
720x548x265(mm³) |
720x548x265(mm³) |
|
|
|
|
|
|
Noise |
IndoorUnit |
43dB↓ |
43dB↓ |
|
OutdoorUnit |
53dB↓ |
53dB↓ |
||
|
||||
|
|
|
|
|
|
|
SilverNanoEvaporator |
SilverNanoEvaporator |
|
AirPurifyingSystem |
Filter |
CatechinFilter |
CatechinFilter |
|
|
|
DeodorizingFiter |
DeodorizingFiter |
|
|
|
|
|
|
IndoorDisplay |
ThreeColorLEDDisplay |
ThreeColorLEDDisplay |
||
|
|
|
|
|
SamsungElectronics |
2-3 |

2-4 Accessory and Option Specifications
2-4-1 Accessories
Item |
Descriptions |
Code-No. |
Q'TY |
Remark |
Ass'yPlateHanger |
DB7-02851B |
1 |
RemoteControl |
DB93-03170S |
1 |
BatteriesforRemoteControl |
DB47-90024A |
2 |
Indoor
Unit
|
TIONS |
OWNER'SINSTRUC |
|
ISMTRAUNZIUAOLNIDPEEINSRL'TRUSUOCCIONES |
|
MANANUUEALLDD'UTEIILNSISTRATUIO‚ÍNES |
|
GEBRAUM |
CHSANWEISUNG |
User’sManual |
DB98-28490A |
1 |
|
|
NS |
OWNER'SINSTRUCTIO |
||
MANZUIALONIDPEEINRSLT'URSUOCCIONES |
||
ISTRU |
INSTRU‚ÍES |
|
MANUALD'UTILISDE |
ATION |
|
GEBRAUMANUECHSANL |
WEISUNG |
|
InstallationManual |
DB98-28492A |
1 |
DB93-01549F (Europe)
3-wirePowerCable |
|
1 |
|
DB93-02431A (Australia)
2-4 |
SamsungElectronics |

Item |
Descriptions |
Code-No. |
Q'TY |
Remark |
|
4-wireAssemblyCable |
DB39-01092B |
1 |
|
|
(OnlyAustralia) |
|
||
|
|
|
|
DrainPlug |
DB67-20011A |
1 |
Outdoor |
|
Unit |
||||
|
|
|
RubberLeg |
DB73-00182A |
4 |
AssemblyPipe,ø6.35mm |
DB96-10453B |
1 |
AssemblyPipe,ø9.52mm |
DB96-10453F |
1 |
PET3FoamTubeInsulation |
DB72-50165A |
1 |
Accessory |
|
Box |
||||
|
|
|
VinylTape,Width50mm |
DB72-00459A |
1 |
DrainPlug |
DB67-20011A |
1 |
SamsungElectronics |
2-5 |
Product Specifications
Accessories(cont.)
Item |
Descriptions |
Code-No. |
Q'TY |
Remark |
RubberLeg |
DB73-00182A |
4 |
PipeClampsA |
DB39-20224A |
3 |
PipeClampsB |
DB39-20224B |
3 |
CementNail |
- |
6 |
Accessory |
|
Box |
||||
|
|
|
M4x16TappingScrews |
6002-000215 |
10 |
DrainHose,length2m |
DB62-00487A |
1 |
Putty100g |
DB98-10568A |
1 |
2-6 |
SamsungElectronics |

3. Alignment and Adjustments
3-1 Test Mode
How to Approach Test Mode
YoucanapproachtheTestModebypressingtheon/offswitchof indoorunitfor5seconds.
on/offswitch |
Test Mode Operation Option
Afterinstallingtheairconditioner,checkwhethereachsubordinateisnormallyoperatedornotbyoperatingtheTestMode.
•When an error occurs, display the Error Mode.
•Operation Mode : Coolmode.OperatethecoolmodebyoperatingthecompressorbyforcewithoutthecompressorON/OFF accordingtothesettemperature/indoortemperature.(Donotfollowtheantifreezecontrol)
•Up-down louver : Up-downswingmode
•Indoor Fan : High
•Because the Test Mode operate the cool mode by force not related to the set temperature / indoor temperature, check whether each subordinate is operated normally or not after completing installation and must turn off the power of the air conditioner.
SamsungElectronics |
3-1 |

3-2 Indoor Display Error and Check Method
|
|
LAMP |
|
|
|
||
|
|
|
|
|
|
|
|
Description |
OPERATION |
TIMER |
TURBO |
|
Main Checking Point |
||
|
|
|
|
|
|
||
|
|
|
|
|
|
|
|
|
|
|
|
|
|
|
|
|
|
|
|
|
|
|
|
Indoorunitroomtemperaturesensorerror |
|
|
|
|
3-2P |
||
(openorshort) |
|
|
|
||||
|
|
|
|
|
|
|
|
|
|
|
|
|
|
|
|
Indoorunitheatexchangertemperaturesensorerror |
|
|
|
|
3-3P |
||
(openorshort) |
|
|
|||||
|
|
|
|
|
|
|
|
|
|
|
|
|
|
|
|
Indoorfanmotormalfunction |
|
|
|
|
|
|
3-4P |
|
|
|
|
|
|
|
|
EEPROMerror |
|
|
|
|
OptionSetting |
||
|
|
|
|
|
|
|
|
Optionerror |
|
|
|
|
OptionSetting |
||
(optionwasn’tsetuporoptiondataerror) |
|
||||||
|
|
|
|
|
|
|
|
|
|
|
|
|
|
|
|
Outdooruniterror |
|
|
|
|
|
|
RemoteControlon/off |
|
|
|
|
OutdoorUnitPowerReset |
|||
|
|
|
|
|
|
|
|
|
|
|
|
|
|
|
|
|
|
|
|
|
●: Lampon, |
: Lampoff, : Lampblink |
|
3-2 |
SamsungElectronics |

3-3 Outdoor LED Error Display and Check Method
No. |
|
LED Display |
|
Explanation |
|
|
|
|
|||
Yellow |
Green |
Red |
|||
|
|
||||
|
|
|
|
|
|
1 |
○ |
○ |
○ |
Poweroff/VDDNG |
|
|
|
|
|
|
|
2 |
○ |
○ |
|
IPMOverCurrent(O.C) |
|
|
|
|
|
|
|
|
○ |
○ |
● |
|
|
3 |
|
|
|
AbnormalSerialcommunication |
|
○ |
● |
● |
|||
|
|
||||
|
|
|
|
|
|
4 |
○ |
|
○ |
CompressorStartingerror |
|
|
|
|
|
|
|
5 |
○ |
|
● |
NormalOperation |
|
|
|
|
|
|
|
6 |
○ |
● |
○ |
CompressorLockerror |
|
|
|
|
|
|
|
7 |
○ |
● |
|
DC-Linkvoltageunder/overerror |
|
|
|
|
|
|
|
8 |
|
○ |
|
Outdoortemperaturesensorerror |
|
|
|
|
|
|
|
9 |
|
○ |
● |
Dischargeovertemperature |
|
|
|
|
|
|
|
10 |
|
|
○ |
Dischargetemperaturesensorerror |
|
|
|
|
|
|
|
11 |
|
|
● |
Currentsensorerror |
|
|
|
|
|
|
|
12 |
|
● |
○ |
Compressorlimiterror |
|
|
|
|
|
|
|
13 |
|
● |
|
Coiltemperaturesensorerror |
|
|
|
|
|
|
|
14 |
|
● |
● |
1min.TimeoutCommunication |
|
|
|
|
|
|
|
15 |
● |
○ |
○ |
Fanerror |
|
|
|
|
|
|
|
16 |
● |
○ |
|
OTPerror |
|
|
|
|
|
|
|
17 |
● |
○ |
● |
Compressorrotationerror |
|
|
|
|
|
|
|
18 |
● |
|
○ |
Operationconditionsecession(Dualonly) |
|
|
|
|
|
|
|
19 |
● |
|
|
DC-Linkvoltagesensorerror |
|
|
|
|
|
|
|
20 |
● |
|
● |
I_Triperror/PFCOvercurrent |
|
|
|
|
|
|
|
21 |
● |
● |
○ |
GASLeakerror |
|
|
|
|
|
|
|
22 |
● |
● |
|
ACLineZeroCrossSignalout |
|
|
|
|
|
|
|
23 |
● |
● |
● |
PowerONreset(1sec) |
|
|
|
|
|
|
|
24 |
|
○ |
○ |
Capacitymissmatch |
|
|
|
|
|
|
|
25 |
○ |
|
|
TestOperationatCoolingMode |
|
|
|
|
|
|
|
26 |
|
|
|
TestOperationatHeatingMode |
|
|
|
|
|
|
●: LEDON, ○: LEDOFF, : LEDBLINK
SamsungElectronics |
3-3 |

3-4 Setting Option Setup Method
ex) Option No. : 


Step 1 : Enter the Option Setup mode.
1st |
Takeoutthebatteriesofremotecontrol. |
|
|
2nd |
Pressthetemperature |
buttonsimultaneouslyandinsert |
|
|
thebatteryagain. |
|
|
3rd |
Makesuretheremocondisplayshownas |
. |
|
Step 2 : Enter the Option Setup mode and select your option according to the following procedure.
1
|
Thedefaultvalueis |
. |
|
|
|
|
Otherwise,pushthe |
buttonto . |
|
|
|
|
Everytimeyoupushthebutton,thedisplaypanelreads |
or |
|
||
|
repeatedly. |
|
|
|
|
|
|
|
|
|
|
|
2 |
|
|
|
|
Pushthe |
buttontosetthedisplaypanelto . |
|
|
||
|
|
|
|||
|
Everytimeyoupushthebutton,thedisplaypanelreads |
|
|
||
|
|||||
|
... |
|
repeatedly. |
|
|
|
3 |
|
|
|
|
|
|
|
|
|
|
|
Pushthe |
buttontosetthedisplaypanelto . |
|
|
|
|
10 |
|
|
|
|
|
Everytimeyoupushthebutton,thedisplaypanelreads |
|
|
||
|
... |
|
repeatedly. |
|
|
|
|
|
|
|
|
|
4 |
|
|
|
|
|
Pushthe |
buttontosetthedisplaypanelto . |
|
|
|
|
Everytimeyoupushthebutton,thedisplaypanelreads |
|
|
||
|
... |
repeatedly. |
|
||
|
5 |
|
|
|
|
|
Pushthe |
buttontosetthedisplaypanelto . |
|
|
|
|
Everytimeyoupushthebutton,thedisplaypanelreads |
|
|
||
Settingisnotrequiredifyoumust |
... |
repeatedly. |
|
||
|
|
|
|
|
|
avaluewhichhasa default. |
6 |
|
|
|
|
|
|
|
|
|
|
|
Pushthe |
buttontosetthedisplaypanelto . |
|
|
|
|
Everytimeyoupushthebutton,thedisplaypanelreads |
|
|
||
|
... |
repeatedly. |
|
||
3-4 |
SamsungElectronics |

Alignment and Adjustments
7
Press  button,thenthedefaultvalueis
 .
.
8
|
Pushthe |
buttontosetthedisplaypanelto . |
|
|
|
||
Everytimeyoupushthebutton,thedisplaypanelreads |
|
|
|||||
|
|||||||
|
... |
repeatedly. |
|
||||
|
|
||||||
|
|
|
|
|
|
||
9
|
Pushthe |
buttontosetthedisplaypanelto . |
|
|
|
Everytimeyoupushthebutton,thedisplaypanelreads |
|
|
|||
|
|||||
|
... repeatedly. |
|
|||
|
|
|
|
|
|
|
10 |
|
|
|
|
Pushthe |
buttontosetthedisplaypanelto . |
|
|
||
|
|
|
|||
|
Everytimeyoupushthebutton,thedisplaypanelreads |
|
|
||
|
... repeatedly. |
|
|||
|
11 |
|
|
|
|
|
Pushthe |
buttontosetthedisplaypanelto . |
|
|
|
|
Everytimeyoupushthebutton,thedisplaypanelreads |
|
|
||
|
... repeatedly. |
|
|||
|
12 |
buttontosetthedisplaypanelto . |
|
|
|
Settingisnotrequiredifyoumust |
Pushthe |
|
|
||
avaluewhichhasa default. |
Everytimeyoupushthebutton,thedisplaypanelreads |
|
|
||
|
... repeatedly. |
|
|||
Step 3 : Upon completion of the selection, check you made right selections.
PresstheModeSelectionkey,  tosetthedisplaypartto
 andcheckthedisplaypart.
Thedisplaypartshows |
. |
PresstheModeSelectionkey,  tosetthedisplaypartto
  andcheckthedisplaypart.
Thedisplaypartshows |
. |
Step 4 : Pressing the ON/OFF button ( )
)
WhenpressingtheoperationON/OFFkeywiththedirectionofremotecontrolforunit,thesound’’Ding’’or’’Diriring’’
isheardandtheOPERATIONICON(  )lampofthedisplayisflickeringatthesametime,thentheinputofoptioniscompleted. (Ifthediriringsoundisn’theard,tryagainpressingtheON/OFFbutton.)
Step 5 : Unit operation test-run
First, Removethebatteryfromtheremotecontrol.
Second, Re-insertthebatteryintotheremotecontrol.
Third, PressON/OFFkeywiththedirectionofremotecontrolforset.
• Error Mode
1st |
Ifalllampsofindoorunitareflickering,Plugout,pluginpowerplugagainandpressON/OFFkeytoretry. |
2nd |
Iftheunitisnotworkingproperlyoralllampsarecontinuouslyflickeringaftersettingtheoptioncode,seeifthe |
|
correctoptioncodeissetupforitsmodel. |
SamsungElectronics |
3-5 |

Alignment and Adjustments
OPTION ITEMS
REMOCON |
SEG1 |
SEG2 |
SEG3 |
SEG4 |
SEG5 |
SEG6 |
SEG7 |
SEG8 |
SEG9 |
SEG10 |
SEG11 |
SEG12 |
|
MODEL |
|
|
|
|
|
|
|
|
|
|
|
|
|
AQV09NSAN |
0 |
8 |
4 |
7 |
7 |
7 |
1 |
7 |
5 |
2 |
4 |
E |
|
AQV09FCN |
|||||||||||||
|
|
|
|
|
|
|
|
|
|
|
|
||
|
|
|
|
|
|
|
|
|
|
|
|
|
|
AQV12NSAN |
0 |
9 |
4 |
7 |
7 |
7 |
1 |
7 |
5 |
2 |
4 |
E |
|
AQV12FCN |
|||||||||||||
|
|
|
|
|
|
|
|
|
|
|
|
||
|
|
|
|
|
|
|
|
|
|
|
|
|
3-6 |
SamsungElectronics |
4. Disassembly and Reassembly
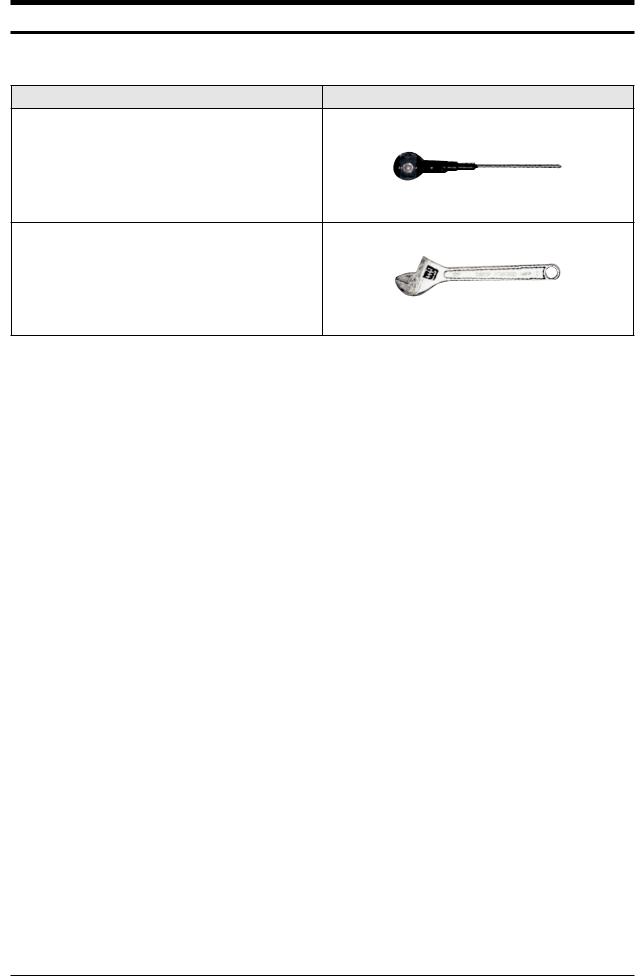
Necessary Tools
Item |
Remark |
+SCREWDRIVER
MONKEYSPANNER
SamsungElectronics |
4-1 |
4-1 Indoor Unit
No |
Parts |
Procedure |
Remark |
|
|
|
|
|
|
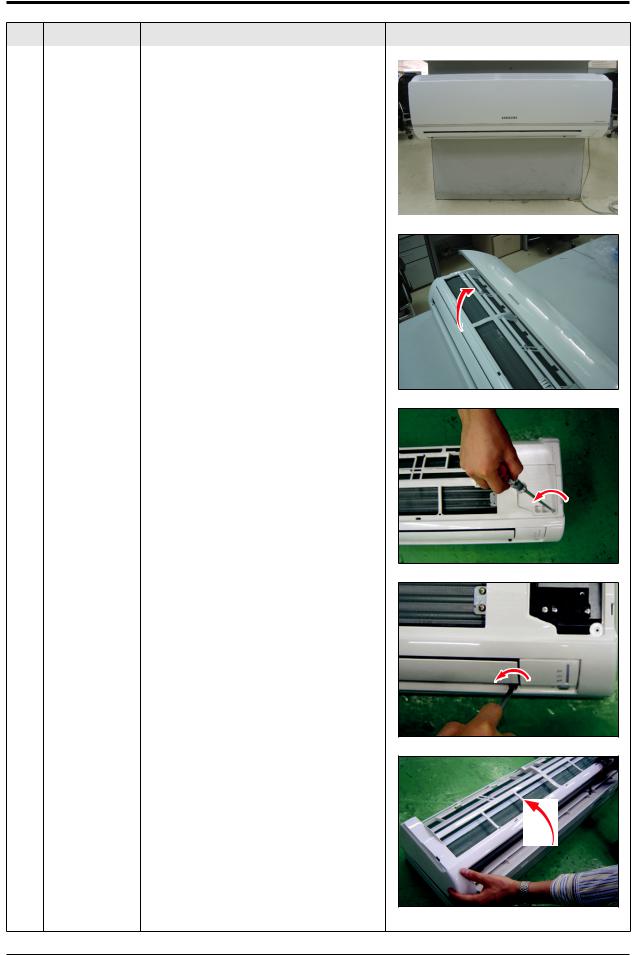
1 |
FrontGrille |
1) Stoptheairconditioneroperationand |
|
|
|
|
|||
|
|
shutoffthemainpower. |
|
|
|
|
|
|
|
2)OpentheFrontGrillebypullingrightand leftsidesofthehook.
3)Loosen1oftherightscrew(CCW)anddetach theTerminalCover.(Use+ScrewDriver.)
4)DetachthethermistorfromtheFrontGrille.
5) Loosen2fixingscrews(CCW)ofFrontGrille.
6)Unlock3hookstofixPanelFrontandTray Drain.(Use+ScrewDriver.)
4-2 |
SamsungElectronics |

Disassembly and Reassembly
No |
Parts |
Procedure |
Remark |
7)Unlock3hookstofixPanelFrontand Back-Body.
2 |
Control-In |
1) |
TakealltheconnectorofPCBuppersideout. |
|
|
|
|
||||
|
(Main PCB) |
|
(InclusionPowerCord) |
|
|
|
|
2) |
Detachtheoutdoorunitconnectionwirefrom |
|
|
|
|
|
theTerminalBlock. |
|
|
|
|
3) |
Loosen4fixingscrews(CCW)ofAss'y |
|
|
|
|
|
Control-In.(Use+ScrewDriver.) |
|
|
|
|
|
YoucandisassemblyAss'yControlIn |
|
|
|
|
|
withoutevaporatordisassembled. |
|
|
|
|
|
|
|
|
|
|
|
|
|
|
3 |
Tray Drain |
1) |
PullTrayDrainoutfromtheBackBody. |
|
|
|
|
||||
|
|
|
|
|
|
SamsungElectronics |
4-3 |
Disassembly and Reassembly
No |
Parts |
|
Procedure |
Remark |
|
|
|
|
|
|
|
4 |
Heat Exchanger |
1) |
Loosen2fixingearthscrews(CCW)ofright |
|
|
|
|
||||
|
|
|
side.(Use+ScrewDriver.) |
|
|
|
|
2) |
DetachtheConnectionPipe. |
|
|
|
|
3) |
DetachtheHolderPipeattherearside. |
|
|
|
|
|
|
|
|
4)Loosenthe4fixingscrews(CCW)ofrightand leftside.(Use+ScrewDriver.)
5)LiftingtheHeatExchangerupalittletopush theupsideforseparationfromtheindoor unit.
 First,checkComp.Downandthendisconnect theconnectionpipesbeforeyoudisassemble theEvaporatorfromindoorunit.
5 |
Fan Motor |
1) |
Loosenthefixingscrew(CCW). |
|
& |
|
(Use+ScrewDriver.) |
|
Cross Fan |
2) |
DetachtheFanMotorfromtheFan. |
|
|
3) |
DetachtheFanFromtheleftHolderBearing. |
4-4 |
SamsungElectronics |

4-2 Outdoor Unit
No |
Parts |
Procedure |
Remark |
|
|
|
|
1 |
Common Work |
1)Loosen1fixingscrew(CCW)oftheCover-Side. |
|
|
|
(Use+ScrewDriver.) |
|
2)Looseneach4screws(CCW)onbothrightand leftCabinetSideedgesandafixingscrewon theCabinetFrontlowertodetachtheCabinet Front.(Use+ScrewDriver.)
3)DetachtheCabinetFrontlikethepictureonthe rightside.
4)Loosen1screw(CCW)fixedtoassemblePlate ControlOutwithCabinet-SideRH.
(Use+ScrewDriver.)
SamsungElectronics |
4-5 |

Disassembly and Reassembly
No |
Parts |
Procedure |
Remark |
5)Loosen2fixingscrews(CCW)ontherearsideof Cabinet-SideRH.(Use+ScrewDriver.)
6)Loosen3screws(CCW)fixedtoassemble BracketValvewithCabinet-SideRH.(Use +ScrewDriver.)
7)Loosen2fixingscrews(CCW)ofCabinetSideLF. (Use+ScrewDriver.)
4-6 |
SamsungElectronics |

|
|
|
Disassembly and Reassembly |
|
|
|
|
No |
Parts |
Procedure |
Remark |
|
|
|
|
2 |
Ass’yControlOut |
1)DetachtheMotorWirefromthePCBofAss’y |
|
|
|
ControlOut. |
|
2)DetachseveralconnectorsfromthePCBofAss’ yControlOut.
3)Detach2ConnectWiresfromReactor.
4)Loosen1screw(CCW)fixedtoassembleAss’y ControlOutwithPartition.
(Use+ScrewDriver.)
SamsungElectronics |
4-7 |

Disassembly and Reassembly
No |
Parts |
Procedure |
Remark |
|
|
|
|
3 |
Fan |
1)Releasetherefrigerantatfirst. |
|
|
& |
2)Loosenfixingscrew(CW).(UseMonkey |
|
Motor Spanner.)
3)Disassemblethepipesinbothinletandoutlet withweldingtorch.
4)DetachtheHeatExchanger.
4 |
HeatExchanger |
1)Loosen2fixingscrews(CCW)onbothsides. |
|
|
(Use+ScrewDriver.) |
|
|
2)Disassemblethepipesinbothinletandoutlet |
|
|
withweldingtorch. |
|
|
3)DetachtheHeatExchanger. |
|
|
Beforeyoudisassemblethepipesand |
|
|
Condenser,besurethatthereshouldbeno |
|
|
refrigerantremainedintheunit. |
5 |
Ass’yValve4-Way |
1)Loosen4bolts(CCW)fixedtoassembleValve |
|
& |
ServicewithBracketValvelikethepictureon |
|
Ass’yValveEEV |
therightside.(UseMonkeySpanner.) |
|
|
2)Disassemblethepipesassembledthesuction |
|
|
anddischargesidesoftheCompressorwith |
|
|
weldingtorch. |
6 |
Compressor |
1)LoosentheNut(CCW)ofTerminalCover.(Use |
|
|
MonkeySpanner.) |
|
|
2)DetachtheTerminalCoveranddetachthe |
|
|
ConnectCompWirefromCompressor. |
|
|
3)DisassembletheFeltCompSound. |
|
|
4)Loosenthe3bolts(CCW)atthebottomof |
|
|
Compressorlikethepictureontherightside. |
|
|
(UseMonkeySpanner.) |
4-8 |
SamsungElectronics |

MEMO
SamsungElectronics |
4-9 |

5. Exploded Views and Parts List
5-1 Indoor Unit
|
|
|
|
|
|
|
|
|
|
|
|
|
|
|
|
|
|
|
|
|
|
|
|
|
|
|
|
|
|
|
|
|
|
|
|
|
|
|
|
|
|
|
|
|
|
|
|
|
|
|
|
|
|
|
|
|
|
|
|
|
|
|
||
|
|
|
|
|
|
|
|
|
|
|
|
|
|
|
|
|
|
|
|
|
|
|
|
|
|
|
|
|
|
|
|
|
|
|
|
|
|
|
|
|
|
|
|
|
5-1 |
SamsungElectronics |

Exploded Views and Parts List
Parts List
|
|
|
|
Q'TY |
|
|
No. |
Code No. |
Description |
Specification |
AQV09NSAN |
AQV12NSAN |
SA/SNA |
|
|
|
|
AQV09FCN |
AQV12FCN |
|
1 |
DB94-00454J |
ASS’YBACKBODY |
ASS’Y |
- |
1 |
SA |
|
DB94-00454H |
ASS’YBACKBODY |
ASS’Y |
1 |
- |
SA |
1-1 |
DB61-01632D |
BACKBODY |
HIPS |
1 |
1 |
SNA |
1-2 |
DB69-00834A |
CUSHIONBACKBODY |
EPS |
1 |
1 |
SNA |
1-3 |
DB96-03149A |
ASS’YSUPPORTEVAPRH |
HIPS |
- |
1 |
SA |
|
DB96-03149B |
ASS’YSUPPORTEVAPRH |
HIPS |
1 |
- |
SA |
1-4 |
DB31-00219A |
MOTORIN |
220-240V~,50/60Hz,ClassE |
1 |
1 |
SA |
1-5 |
DB94-00456A |
ASS’YCROSSFAN |
OD92xL635 |
1 |
1 |
SA |
1-6 |
DB97-02075A |
ASS’YBOLTSPECIAL |
ASS’Y |
1 |
1 |
SNA |
1-7 |
DB94-00455A |
ASS’YRUBBERBEARING |
ASS’Y |
1 |
1 |
SNA |
1-8 |
DB94-40007A |
ASS’YBEARINGMOTOR |
BEARING |
1 |
1 |
SA |
1-9 |
DB69-00833A |
CUSHIONEVAPUP |
EPS |
1 |
- |
SA |
2 |
DB96-06862B |
ASS’YEVAPTOTAL |
ASS’Y |
1 |
- |
SA |
|
DB96-06716B |
ASS’YEVAPTOTAL |
ASS’Y |
- |
1 |
SA |
2-1 |
DB63-00850A |
COVERBEARING |
ABS |
1 |
- |
SNA |
2-2 |
DB96-03171K |
ASS’YEVAP |
ASS’Y |
1 |
- |
SNA |
|
DB96-06563B |
ASS’YEVAP |
ASS’Y |
- |
1 |
SNA |
3 |
DB94-00457J |
ASS’YTRAYDRAIN |
ASS’Y |
1 |
1 |
SA |
3-1 |
DB63-00848A |
TRAYDRAIN |
ABS |
1 |
1 |
SNA |
3-2 |
DB61-01635C |
BLADE-H |
HIPS |
1 |
1 |
SA |
3-3 |
DB61-01636A |
BLADE-V |
PP |
1 |
1 |
SA |
3-4 |
DB63-00849A |
TRAYSTABILIZER |
ABS |
1 |
1 |
SNA |
3-5 |
DB69-00839A |
CUSHIONEPSTRAYRH |
EPS |
3 |
3 |
SA |
3-6 |
DB73-00180A |
RUBBERCAPDRAIN |
GUM-EPM |
3 |
3 |
SNA |
3-7 |
DB31-00371A |
ASS’YMOTORSTEPPING |
220-240V~,50/60Hz,ClassE |
1 |
1 |
SA |
3-8 |
DB94-00458B |
ASS’YDRAINHOSE |
ASS’Y |
1 |
1 |
SA |
4 |
DB93-05853A |
ASS’YCONTROLIN |
ASS’Y |
1 |
1 |
SA |
5 |
DB92-01237B |
ASS’YPANELFRONT |
ASS’Y |
1 |
1 |
SA |
5-1 |
DB64-00989E |
PANELFRONT |
HIPS |
1 |
1 |
SA |
5-2 |
DB92-01207B |
ASS’YGRILLEAIRINLET(AQV**NSAN) |
ASS’Y |
1 |
1 |
SA |
|
DB92-00848J |
ASS’YGRILLEAIRINLET(AQV**FCN) |
ASS’Y |
1 |
1 |
SA |
5-3 |
DB90-03094A |
ASS’YCOVERDISPLAY |
ASS’Y |
1 |
1 |
SA |
5-4 |
DB63-01591A |
GUARDAIRFILTER |
PP |
1 |
1 |
SNA |
6 |
DB97-02851B |
ASS’YPLATEHANGER |
ASS’Y |
1 |
- |
SNA |
7 |
DB61-01638B |
HOLDERPIPE |
PS |
1 |
1 |
SNA |
8 |
DB63-00844D |
COVERTERMINAL |
ABS |
1 |
1 |
SA |
9 |
DB93-05083C |
ASS’YREMOCON |
ARH-463 |
1 |
1 |
SA |
SamsungElectronics |
5-2 |
 Loading...