


4CHANNEL HEADPHONE AMP
Signal Class C


A U D I O
Processors
Safety Instructions/Consignes de sécurité/Sicherheitsvorkehrungen/Instrucciones de seguridad
WARNING: To reduce the risk of fire or electric shock, do not expose this unit to rain or moisture. To reduce the hazard of electrical shock, do not remove cover or back. No user serviceable parts inside. Please refer all servicing to qualified personnel.The lightning flash with an arrowhead symbol within an equilateral triangle, is intended to alert the user to the presence of uninsulated "dangerous voltage" within the products enclosure that may be of sufficient magnitude to constitute a risk of electric shock to persons. The exclamation point within an equilateral triangle is intended to alert the user to the presence of important operating and maintenance (servicing) instructions in the literature accompanying the product.
Important Safety Instructions
1.Please read all instructions before operating the unit.
2.Keep these instructions for future reference.
3.Please heed all safety warnings.
4.Follow manufacturers instructions.
5.Do not use this unit near water or moisture.
6.Clean only with a damp cloth.
7.Do not block any of the ventilation openings. Install in accordance with the manufacturers instructions.
8.Do not install near any heat sources such as radiators, heat registers, stoves, or other apparatus (including amplifiers) that produce heat.
9.Do not defeat the safety purpose of the polarized or grounding-type plug. A polarized plug has two blades with one wider than the other. A grounding type plug has two blades and a third grounding prong. The wide blade or third prong is provided for your safety. When the provided plug does not fit your outlet, consult an electrician for replacement of the obsolete outlet.
10.Protect the power cord from being walked on and pinched particularly at plugs, convenience receptacles and at the point at which they exit from the unit.
11.Unplug this unit during lightning storms or when unused for long periods of time.
12.Refer all servicing to qualified personnel. Servicing is required when the unit has been damaged in any way, such as power supply cord or plug damage, or if liquid has been spilled or objects have fallen into the unit, the unit has been exposed to rain or moisture, does not operate normally, or has been dropped.
ACHTUNG: Um die Gefahr eines Brandes oder Stromschlags zu verringern, sollten Sie dieses Gerät weder Regen noch Feuchtigkeit aussetzen.Um die Gefahr eines
Stromschlags zu verringern, sollten Sie weder Deckel noch Rückwand des Geräts entfernen. Im Innern befinden sich keine Teile, die vom Anwender gewartet werden können. Überlassen Sie die Wartung qualifiziertem Fachpersonal.Der Blitz mit Pfeilspitze im gleichseitigen Dreieck soll den Anwender vor nichtisolierter“gefährlicher Spannung” im Geräteinnern warnen. Diese Spannung kann so hoch sein, dass die Gefahr eines Stromschlags besteht. Das Ausrufezeichen im gleichseitigen Dreieck soll den Anwender auf wichtige Bedienungsund Wartungsanleitungen aufmerksam machen, die im mitgelieferten Informationsmaterial näher beschrieben werden.
Wichtige Sicherheitsvorkehrungen
1.Lesen Sie alle Anleitungen, bevor Sie das Gerät in Betrieb nehmen.
2.Bewahren Sie diese Anleitungen für den späteren Gebrauch gut auf.
3.Bitte treffen Sie alle beschriebenen Sicherheitsvorkehrungen.
4.Befolgen Sie die Anleitungen des Herstellers.
5.Benutzen Sie das Gerät nicht in der Nähe von Wasser oder Feuchtigkeit.
6.Verwenden Sie zur Reinigung des Geräts nur ein feuchtes Tuch.
7.Blockieren Sie keine Belüftungsöffnungen. Nehmen Sie den Einbau des Geräts nur entsprechend den Anweisungen des Herstellers vor.
8.Bauen Sie das Gerät nicht in der Nähe von Wärmequellen wie Heizkörpern,
Wärmeklappen, Öfen oder anderen Geräten (inklusive Verstärkern) ein, die Hitze erzeugen.
9.Setzen Sie die Sicherheitsfunktion des polarisierten oder geerdeten Steckers nicht außer Kraft. Ein polarisierter Stecker hat zwei flache, unterschiedlich breite Pole. Ein geerdeter Stecker hat zwei flache Pole und einen dritten Erdungsstift. Der breitere Pol oder der dritte Stift dient Ihrer Sicherheit. Wenn der vorhandene Stecker nicht in
Ihre Steckdose passt, lassen Sie die veraltete Steckdose von einem Elektriker ersetzen.
10.Schützen Sie das Netzkabel dahingehend, dass niemand darüber laufen und es nicht geknickt werden kann. Achten Sie hierbei besonders auf Netzstecker, Mehrfachsteckdosen und den Kabelanschluss am Gerät.
11.Ziehen Sie den Netzstecker des Geräts bei Gewittern oder längeren Betriebspausen aus der Steckdose.
12.Überlassen Sie die Wartung qualifiziertem Fachpersonal. Eine Wartung ist notwendig, wenn das Gerät auf irgendeine Weise, beispielsweise am Kabel oder
Netzstecker beschädigt wurde, oder wenn Flüssigkeiten oder Objekte in das Gerät gelangt sind, es Regen oder Feuchtigkeit ausgesetzt war, nicht mehr wie gewohnt betrieben werden kann oder fallen gelassen wurde.
ATTENTION: Pour éviter tout risque d’électrocution ou d’incendie, ne pas exposer cet appareil à la pluie ou à l’humidité. Pourévitertoutrisqued’électrocution,nepasôterle couvercleouledosduboîtier. Cet appareil ne contient aucune pièce remplaçable par l'utilisateur. Confiez toutes les réparations à un personnel qualifié. Le signe avec un éclair dans un triangle prévient l’utilisateur de la présence d’une tension dangereuse et non isolée dans l’appareil. Cette tension constitue un risque d’électrocution. Le signe avec un point d’exclamation dans un triangle prévient l’utilisateur d’instructions importantes relatives à l’utilisation et à la maintenance du produit.
Consignes de sécurité importantes
1.Veuillez lire toutes les instructions avant d’utiliser l’appareil.
2.Conserver ces instructions pour toute lecture ultérieure.
3.Lisez avec attention toutes les consignes de sécurité.
4.Suivez les instructions du fabricant.
5.Ne pas utiliser cet appareil près d’une source liquide ou dans un lieu humide.
6.Nettoyez l’appareil uniquement avec un tissu humide.
7.Veillez à ne pas obstruer les fentes prévues pour la ventilation de l’appareil. Installez l’appareil selon les instructions du fabricant.
8.Ne pas installer près d’une source de chaleur (radiateurs, etc.) ou de tout équipement susceptible de générer de la chaleur (amplificateurs de puissance par exemple).
9.Ne pas retirer la terre du cordon secteur ou de la prise murale. Les fiches canadiennes avec polarisation (avec une lame plus large) ne doivent pas être modifiées. Si votre prise murale ne correspond pas au modèle fourni, consultez votre électricien.
10.Protégez le cordon secteur contre tous les dommages possibles (pincement, tension, torsion,, etc.). Veillez à ce que le cordon secteur soit libre, en particulier à sa sortie du boîtier.
11.Déconnectez l’appareil du secteur en présence d’orage ou lors de périodes d’inutilisation prolongées.
12.Consultez un service de réparation qualifié pour tout dysfonctionnement (dommage sur le cordon secteur, baisse de performances, exposition à la pluie, projection liquide dans l’appareil, introduction d’un objet dans le boîtier, etc.).
PRECAUCION: Para reducir el riesgo de incendios o descargas, no permita que este aparato quede expuesto a la lluvia o la humedad. Para reducir el riesgo de descarga eléctrica, nunca quite la tapa ni el chasis. Dentro del aparato no hay piezas susceptibles de ser reparadas por el usuario. Dirija cualquier reparación al servicio técnico oficial. El símbolo del relámpago dentro del triángulo equilátero pretende advertir al usuario de la presencia de“voltajes peligrosos”no aislados dentro de la carcasa del producto, que pueden ser de la magnitud suficiente como para constituir un riesgo de descarga eléctrica a las personas. El símbolo de exclamación dentro del triángulo equilátero quiere advertirle de la existencia de importantes instrucciones de manejo y mantenimiento (reparaciones) en los documentos que se adjuntan con este aparato.
Instrucciones importantes de seguridad
1.Lea todo este manual de instrucciones antes de comenzar a usar la unidad.
2.Conserve estas instrucciones para cualquier consulta en el futuro.
3.Cumpla con todo lo indicado en las precauciones de seguridad.
4.Observe y siga todas las instrucciones del fabricante.
5.Nunca utilice este aparato cerca del agua o en lugares húmedos.
6.Limpie este aparato solo con un trapo suave y ligeramente humedecido.
7.No bloquee ninguna de las aberturas de ventilación. Instale este aparato de acuerdo a las instrucciones del fabricante.
8.No instale este aparato cerca de fuentes de calor como radiadores, calentadores, hornos u otros aparatos (incluyendo amplificadores) que produzcan calor.
9.No anule el sistema de seguridad del enchufe de tipo polarizado o con toma de tierra. Un enchufe polarizado tiene dos bornes, uno más ancho que el otro. Uno con toma de tierra tiene dos bornes normales y un tercero para la conexión a tierra. El borne ancho o el tercero se incluyen como medida de seguridad. Cuando el enchufe no encaje en su salida de corriente, llame a un electricista para que le cambie su salida anticuada.
10.Evite que el cable de corriente quede en una posición en la que pueda ser pisado o aplastado, especialmente en los enchufes, receptáculos y en el punto en el que salen de la unidad.
11.Desconecte de la corriente este aparato durante las tormentas eléctricas o cuando no lo vaya a usar durante un periodo de tiempo largo.
12.Dirija cualquier posible reparación solo al servicio técnico oficial. Deberá hacer que su aparato sea reparado cuando esté dañado de alguna forma, como si el cable de corriente o el enchufe están dañados, o si se han derramado líquidos o se ha introducido algún objeto dentro de la unidad, si esta ha quedado expuesta a la lluvia o la humedad, si no funciona normalmente o si ha caído al suelo.

TableofContents/Tabledesmatières/Inhalt/Indice
ENGLISH |
|
Introduction |
2 |
C•que8Features |
3 |
ControlsandConnectors |
|
Front Panel Layout |
4 |
Rear Panel Layout |
5 |
OperatingtheC•que8 |
|
Setting Up the C•que 8 |
6-7 |
C•que 8 Master section |
7 |
Stereo and Two Channel Modes |
8 |
C•que 8 Channels |
9 |
C•que8Connections |
|
Linking Multiple C•que 8’s |
10 |
Headphone Impedance and Sensitivity ratings |
11 |
Cue Mix Set-up for Multitrack Vocal Recording |
12 |
Cue Mix Set-up for Multitrack Rhythm section |
|
Recording |
13 |
StackingandTiltingtheC•que8 |
14 |
C•que8WiringGuide |
15 |
Specifications |
58 |
BlockDiagram |
60 |
FRANÇAIS |
|
Introduction |
16 |
FonctionsduC•que8 |
17 |
RéglagesetConnecteurs |
|
Face avant |
18 |
Face arrière |
19 |
UtilisationduC•que8 |
|
Configuration du C•que 8 |
20-21 |
Réglages généraux du C•que 8 |
21-22 |
Modes Stereo et 2 canaux |
23 |
C•que8-Connexions |
|
Couplage de plusieurs C•que 8’s |
24 |
Impédances et Sensibilités de casque |
25 |
Écoute au casque en enregistrement multipiste |
26 |
Écoute au casque en enregistrement multipiste d’une
section rythmique |
27 |
EmpilageetinclinaisonduC•que8 |
28 |
C•que8-Plandecâblage |
29 |
Caractéristiques |
58 |
Synoptique |
60 |
Copyright 2005, Samson Technologies Corp.
Printed March, 2005
Samson Technologies Corp. 575 Underhill Blvd.
P.O. Box 903
Syosset, NY 11791-903
Phone: 1-800-3-SAMSON (1-800-372-6766)
Fax: 516-364-3888 www.samsontech.com
DEUTSCHE |
30 |
Einleitung |
|
C•que8Features |
3 |
ReglerundAnschlüsse |
32 |
Vorderseite |
|
Rückseite |
33 |
C•que8bedienen |
34-35 |
C•que 8 einrichten |
|
C•que 8 Master-Sektion |
35 |
C•que 8 Kanäle |
36 |
Stereound 2-Channel-Modi |
37 |
C•que8Anschlüsse |
38 |
Mehrere C•que 8 koppeln |
Köpfhörer-Impedanz und Empfindlichkeits-Nennwerte
39
Cue-Mischung für Mehrspur-Gesangsaufnahme ein-
richten |
40 |
Cue-Mischung für Mehrspur-Rhythm Section- |
|
Aufnahme einrichten |
41 |
C•que8stapelnundkippen |
42 |
C•que8Verdrahtung |
43 |
TechnischeDaten |
59 |
Blockdiagramm |
60 |
ESPANOL
Introducción |
44 |
CaracterísticasdelC•que8 |
45 |
ControlesyConectores |
|
Panel frontal |
46 |
Panel trasero |
47 |
ManejodelC•que8 |
|
Configuración del C•que 8 |
48-49 |
Sección master del C•que 8 |
49 |
CanalesdelC•que8 |
50 |
Modos Stereo y 2-Channel |
51 |
Enlace de varios C•que 8 |
52 |
Conexiones del C•que 8 |
53 |
Valores de impedancia y sensibilidad de auriculares 53 Mezcla de escucha para grabación vocal multipistas 54 Mezcla de escucha para grabación multipistas de sec-
ción rítmica |
55 |
ColocaciónenpilaycuñadelC•que8 |
56 |
GuíadecableadodelC•que8 |
57 |
Especificacionestécnicas |
59 |
Diagramadebloques |
60 |

ENGLISH
Introduction
Congratulations on purchasing the Samson C•que 8 Headphone Amplifier! Although this unit is designed for easy operation, we suggest you take some time out first to go through these pages so you can fully understand how we’ve implemented a number of unique features. The C•que 8 is a compact, high-quality device that allows you to monitor any stereo or monophonic source signal (balanced or unbalanced) over as many as twelve separate headphones. Providing unusually high power levels and superb audio fidelity, the C•que 8 is compatible with virtually all popular headphone models. Front panel controls include a Master Input Level control and Stereo/2 Channel switch. Each headphone output has its own individual Shape Circuit Level Meters, and Level control.
Special output jacks on the rear panel allows any number of C•que 8 units to be linked together with no loss of signal. The C•que 8 can be used in a wide variety of applications, including recording studios, teaching labs, broadcast environments, and for live performance. In this manual, you’ll find a more detailed description of the features of the C•que 8, as well as a guided tour through the front and rear panels, step-by-step instructions for using the C•que 8, a reference chart that gives impedance and sensitivity ratings for a number of popular headphone models, and full specifications. You’ll also find a warranty card enclosed—please don’t forget to fill it out and mail it so that you can receive online technical support and so we can send you updated information about other Samson products in the future.
With proper care and adequate air circulation, your C•que 8 will operate trouble free for many years. We recommend you record your serial number in the space provided below for future reference.
Serial number:
Date of purchase:
Should your unit ever require servicing, a Return Authorization number (RA) must be obtained before shipping your unit to Samson. Without this number, the unit will not be accepted. Please call Samson at 1-800-3SAMSON (1-800-372-6766) for a Return Authorization number prior to shipping your unit. Please retain the original packing materials and if possible, return the unit in the original carton and packing materials.
2

C•que8Features
The Samson C•que 8 headphone amplifier utilizes the latest technology in gain management design. Here are some of it’s features:
•Four channel headphone mixer amplifier providing individual controls for each channel. Ideal for digital-audio- workstations, stage and studios.
•Dual headphone outputs; one rear, plus one front panel output per channel allowing a total of eight headphones connected at the same time.
•Maximum output power on each channel regardless of different headphone impedances.
•Left and Right Line inputs for master stereo bus on balanced TRS (Tip Ring Sleeve) 1/4”phone connectors.
•Inject input on TRS (Tip Ring Sleeve) unbalanced stereo phone connector allowing for the insertion of an additional stereo signal that is mixed with the stereo Line input for "more me" mixing.
•2-Channel/Stereo mode switch configures the C que 8 to operate in traditional stereo mode, or in 2-Channel, mono mode.
•Balance controls pan in Stereo mode, or the level balance between the Line and Inject inputs in 2-Channel mode.
•EQ Shape circuit on each channel provides a“music contour”equalization curve that boosts the low and high frequencies of the headphone output.
•Each channel has a six-segment, LED Output meter, with a range of –24 to clip, making it easy to monitor the channel output level.
•A six-segment Main Level meter provides a clear and accurate indication of Line input level with an operating range of –24 to clip.
•Stacking Rubber Bumpers are included allowing several C que 8’s, or other Samson C Class units, to be stacked on top of each other creating a neat array of high quality signal processors.
•Tilting Feet are also included so that the C class units can be positioned in a comfortable and ergonomic position on desktops and workstations.
•19”, 1 u (one rack space) rack-mount kit available.
•Three year extended warranty.
ENGLISH
3
ENGLISH
ControlsandConnectors
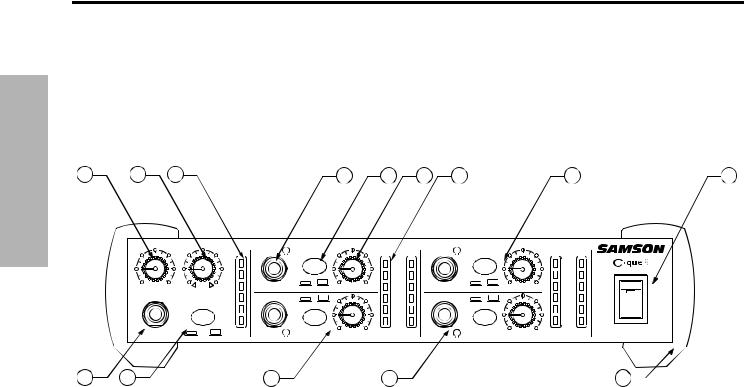
FRONT PANEL LAYOUT
1 |
2 |
3 |
4 |
5 |
6 |
7 |
8 |
9 |
10 |
11 |
12 |
13 |
14 |
1MASTERVOLUME - Controls the level being sent to the individual channels.
2BALANCE- Controls Left and Right Pan in Stereo
Mode or Level Balance between Main and Inject in 2 Channel Mode.
3MAIN MASTER LEVEL METER - Indicates the amount of signal being driven into the four channels from the
master volume control.
4HEADPHONE OUTPUT - 1/4TRS Connector for connecting any standard headphone.
5EQ SHAPE SWITCH - Provides Equalization Contour for music listening.
6CHANNELVOLUME - Controls the volume being sent to the individual headphone channels.
7CHANNEL LEVEL METER - Displays the amount of power being supplied to the channels.
8HEADPHONE CHANNEL 3 -The same knob and switch compliment is duplicated for Channel 3.
9MAIN POWER SWITCH -When turned on,activates the C•que 8.
10MASTER INJECT - StereoTRS front panel input for injecting a signal into the main mix.
112CH/STEREO SWITCH - Changes the global operating mode from normal stereo to 2-channel.
12HEADPHONE CHANNEL 2 -The same knob and switch compliment is duplicated for Channel 2.
13HEADPHONE CHANNEL 4 -The same knob and switch compliment is duplicated for Channel 4.
14STACKING BUMPERS - Sleek and highly functional, the rubber bumpers allow you to stack several
C• que 8’s or other Samson C class units. Angled feet are also included,providing a convenient tilting mechanism that allows easy operation on workstations or desktops.
4

ControlsandConnectors
REAR PANEL LAYOUT
A B C D E F G
ENGLISH
AAC INLET - AC power supply connector is here.
BCHANNEL 4 OUTPUT - Rear panel headphone output for Channel 4.
CCHANNEL 3 OUTPUT - Rear panel headphone output for Channel 3.
DCHANNEL 2 OUTPUT - Rear panel headphone output for Channel 2.
ECHANNEL 1 OUTPUT - Rear panel headphone output for
Channel 1.
FLINK OUTPUTS - Outputs that are tied to the main input for linking to another headphone amp or other device.
GLINE INPUT -The main signal input to the headphone amp.Plugging into the left jack only sends the signal to both the left and right.
5

ENGLISH
OperatingtheC•que8
SETTINGUPTHEC•que8
Setting up your C•que 8 Headphone Amplifier is a simple procedure, which takes only a few minutes.
Remove all packing materials (save them in case of need for future service) and plug the provided AC adapter cord in the rear AC inlet, but don’t plug the power cable into a wall outlet just yet.
•Connect the output from the device you want monitored to the Left/Right LINE INPUT jacks on the C•que 8 rear panel. The C•que 8 accepts both balanced and unbalanced signals. Generally, a balanced signal is preferable because it provides better signal-to-noise ratio and reduced extraneous noise.
•Set the controls to the following positions:
MASTER VOLUME – Off |
CHANNEL 1 VOLUME – 0 |
ST/2CH SWITCH – Out |
CHANNEL 1 SHAPE SWITCHOut |
MASTER BALANCECenter, 12:00 |
CHANNEL 2 - 4’s Controls - Set the Same as Channel 1 |
•Turn the master Volume knob and all four headphone Channel Output knobs to their minimum (fully counterclockwise) setting.
•Plug the C•que 8 power adapter into a wall outlet and switch the unit on by pressing the power switch.
•Apply a signal, like the output of a mixer playing a CD, to the C•que 8’s rear-panel Left/Right LINE INPUT jacks.
Raise the master VOLUME until the main meter reaches -18 to -12 dB.
•Connect a set of headphones to Channel 1 and slowly turn the channel’s Volume knob clockwise until you hear the desired level.
WARNING: Because the C•que 8 is capable of generating extremely high volume levels, always start with the channel
Volume knob at minimum and then slowly turn it up.
6

OperatingtheC•que8
SETTINGUPTHEC•que8-Continued
• |
Repeat the previous step for all Channels that have headphones connected, making sure to start the VOLUME |
|
|
knob completely counterclockwise and then slowly raising it until the desired level is achieved. If you have |
|
|
connected different models of headphones to the various Channel Headphone jacks, you may find that some |
ENGLISH |
|
mW of power input. The higher the dB rating, the louder the headphone. See the Reference chart on page 13 of |
|
|
require more gain than others to achieve the same volume. This kind of disparity will occur if the various head- |
|
|
phones have different impedances. The lower the impedance, the louder the headphone will sound compared |
|
|
to another, higher impedance headphone at the same VOLUME setting. Another factor affecting headphone |
|
|
loudness is called sensitivity. This is generally measured by determining the decibel (dB) level generated by 1 |
|
|
this manual for more details. |
|
• |
To achieve optimum signal-to-noise ratio, the master VOLUME should generally be set as high as possible, short |
|
|
of audible distortion. However, if this results in your getting blasted with signal even though the channel vol- |
|
|
ume is near minimum, you’ll need to decrease the Master Volume while raising one or more channel volume lev- |
|
|
els. Conversely, if you find that you have to raise one or more headphone Channel Volume knobs to maximum or |
|
|
near maximum to achieve the desired level, try increasing the master Volume level while decreasing the channel |
|
|
volume(s). |
|
C•que8MasterSection
1 MasterVolume
The C•que 8’s master VOLUME control is used to adjust the input signal connected to the main Left and Right inputs.
In addition, the master VOLUME control adjusts the level of the signal inserted in the INJECT, which is summed with the MAIN Left and Right input signal.
2 BalanceControl |
1 |
2 |
3 |
The C•que 8’s main channel has a BALANCE control, |
|
|
|
which controls how much signal is sent to the left or right |
|
|
|
headphone outputs. The control knob has a center detent |
|
|
|
which indicates that the left and right sides are balanced. In 2 |
|
|
|
Channel mode, the signal becomes mono and the BALANCE |
|
|
|
knob adjusts the level balance between the signals connect- |
|
|
|
ed to the LEFT inputs and signals connected to the RIGHT |
|
|
|
inputs. (For more information on 2-Channel mode, see the |
|
|
|
section“Mixing Signals in 2 Channel Mode”found on page 9 |
4 |
|
|
of this manual.) |
|
|
3 MasterLevelmeter
The C•que 8’s master section includes a 6 segment LED
LEVEL meter which monitors the input level from the MAIN Left and Right Inputs in Decibels (dBs) from –24 to OL (overload). If the LEVEL meter displays an OL signal, then turn down the signal using the master VOLUME control.
4 MasterInject
The C•que 8’s MASTER INJECT is a TRS input (Tip, Ring, Sleeve), that allows a second stereo signal to be inserted and summed together with the MAIN Left and Right signals. You can use a stereo signal from your mixers bus outputs or auxiliary sends to balance the mix between two stereo signals like rhythm tracks and vocals.
5 2Channel/Stereoswitch
The 2 CH/STEREO switch is used to change between the C que 8’s two global operating modes, 2-Channel and
Stereo. In Stereo mode the left and right Line inputs are mixed with the left and right Inject inputs, in stereo, with the
Balance knob controlling the left and right panning. In 2-Channel mode, the left and right LINE inputs are mixed with the left and right INJECT inputs into a single mono signal with the BALANCE knob controlling the level difference between the LEFT and RIGHT inputs.
7

ENGLISH
OperatingtheC•que8
C•que8 CHANNELS
6 HeadphoneOutput
The C•que 8’s Headphone Output jack accepts a standard 1/4”TRS connector for easy interface with most professional headphones. Once the master VOLUME has been set, the channels output level is set by the
VOLUME knob.
7 EQShape |
7 |
8 |
9 |
6 |
Each of the four C•que 8 channels features an EQ SHAPE switch allowing individual equalization contour for each channel. When the EQ SHAPE switch is in, the LED will illuminate indicating the EQ SHAPE circuit is engaged. The EQ SHAPE circuit provides a pre-set equalization curve designed to sound good on most program music.
In this mode, the low frequencies have a 6dB boost at
100Hz and the high frequency are boosted 6dB at 12kHz. When the EQ SHAPE switch is in the out position, frequency response of the channel is flat.
8 VOLUMEControl
The channel VOLUME control is used to adjust the channel headphone output. The volume control will adjust the level of the front panel headphone outputs, as well as that channel’s rear panel headphone outputs.
 9 CHANNELLEVELMeter
Each C•que 8 Channel has an 6 segment, LEDlevel meter which monitors the output of the channel in Decibels (dBs) –24 toOL (overload). If the LEVEL meter displays an OL signal, then turn down the channel
VOLUME, and if necessary, also turn down the master VOLUME .
8
OperatingtheC•que8
STEREOANDTWO-CHANNELMODES
All of the C•que 8’s four channels can be set to operate in two different modes: Stereo and 2 Channel.
StereoMode
Stereo mode is a normal operating mode where all mix inputs from MAIN and INJECT, maintain their stereo image throughout the signal path to each headphone output. The BALANCE control is used to adjust the stereo image , between the Left and Right side. To design a monitor mix in the Stereo mode, follow these steps:
•Press the ST/2CH switch to the OUT position, you’ll notice the switch LED is not illuminated indicating that thde main input is in STEREO mode.
•Make a Stereo connection from your mixer’s auxiliary or bus outputs to the main Left and Right Line inputs on the C•que 8’s rear panel.
•In the Stereo mode, the BALANCE control adjusts the loudness between the left and right headphone outputs.
MixingSignalsin2-ChannelMode
In 2- Channel mode, all mix inputs including MAIN and INJECT are summed to a mono signal. In this mode, the BALANCE control is used to adjust the loudness between the MAIN and the INJECT input. To design a monitor mix in the 2-Channel mode, follow these steps:
•Press the ST/2CH switch to the IN position, you’ll notice the
switch LED is now illuminated indicating that C•que 8 is in 2- Channel mode.
• |
Make a Stereo connection from your mixer’s auxiliary or bus |
|
outputs to the MAIN Left and Right LINE inputs on the C•que 8’s |
|
rear panel. |
• |
If a second mix is desired, make a Stereo connection from your |
|
mixer’s auxiliary or bus outputs to the INJECT located on the |
|
C•que 8’s front panel. |
•In the 2-CH mode you adjust the mix balance between the MAIN and the INJECT input by using the BALANCE control in the
Master Section.
ENGLISH
9
ENGLISH
C•que8Connections
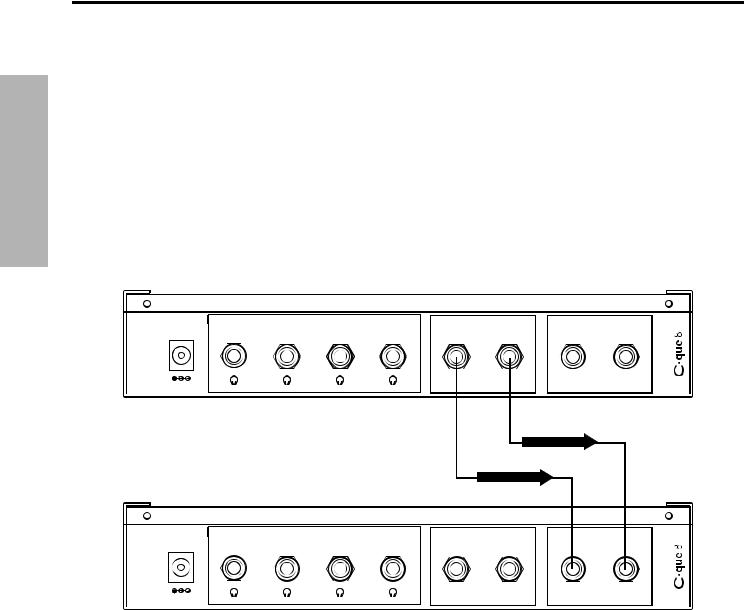
LINKING MULTIPLE C•que8’s
Any number of C•que 8’s can be linked together (daisy-chained), allowing you to monitor an input signal over more than twelve sets of headphones, or to give individual musicians more control over their own headphone mix. To do this, simply follow these basic steps:
•Make a connection between one C•que 8’s Left/Right Link outputs and the next one’s Left/Right Main inputs.
CH 4 |
CH 3 |
CH 2 |
CH 1 |
LINK OUTPUT |
LINE INPUT |
POWER |
|
|
|
|
|
AC IN |
|
|
|
|
|
18 V |
|
|
|
|
|
+ - |
|
|
|
|
|
MADE IN CHINA |
|
|
|
|
|
|
|
|
|
|
|
SIGNAL FLOW |
|
|
|
|
|
|
SIGNAL FLOW |
|
|
SAMSON |
CH 4 |
CH 3 |
CH 2 |
CH 1 |
|
|
|
|
|
|
|
|
|
|
|
POWER |
|
|
|
|
|
|
|
AC IN |
|
|
|
|
|
|
|
18 V |
|
|
|
|
|
|
|
+ - |
|
|
|
LEFT |
RIGHT |
LEFT |
RIGHT |
500mA |
|
|
|
BALANCED |
BALANCED |
||
MADE IN CHINA
Because the C•que 8 Stereo Link output jacks are electronically balanced, we recommend the use of 3-conductor cable and 1/4" TRS (Tip/Ring/Sleeve) connectors. Even when several C•que 8’s are linked together this way, there is no loss of power or audio fidelity—every Channel on every C•que 8 will sound just as loud and clear as if it were the only unit connected. The status of the front-panel Stereo/2 CH buttons affects only that unit and has no effect on any subsequent linked units.
10

C•que8Connections
HEADPHONEIMPEDANCEANDSENSITIVITYRATINGS
Virtually all headphones that terminate in a stereo 1/4" plug can be used with the C•que 8 Headphone Amplifier. This chart provides a partial listing of some of the more popular models, along with their impedance and sensitivity ratings. As described on page 7 of this manual, headphones with lower impedances (or higher sensitivity) will sound louder as compared to other, higher impedance (or lower sensitivity) headphones at the same channel Volume setting. Samson
Technologies has no connection with any of these manufacturers, nor do we endorse any particular models for use with the C•que 8. This is simply a reference listing for your convenience. For more information about any of these headphones, contact the manufacturer directly.
ENGLISH
SAMSON HEADPHONES |
|
|
Model |
Impedance |
Sensitivity /mW |
PH60 |
32 ohm |
100 dB |
RH100 |
64 ohm |
106 dB |
RH300 |
32 ohm |
106 dB |
RH600 |
40 ohm |
106 dB |
CH70 |
32 ohm |
103 dB |
CH700 |
64 ohm |
108 dB |
OTHER MANUFACTURER'S HEADPHONES |
|
||
Manufacturer |
Model |
Impedance |
Sensitivity /mW |
AKG |
K-141 |
600 ohm |
98 dB |
AKG |
K-240 |
600 ohm |
88 dB |
Beyer |
DT-150 |
250 ohm |
114 dB |
Beyer |
DT-801 |
250 ohm |
114 dB |
Fostex |
T-10 |
50 ohm |
91 dB |
Fostex |
T-20 |
50 ohm |
96 dB |
Fostex |
T-40 |
50 ohm |
98 dB |
Sennheiser |
HD-450 (original) |
70 ohm |
94 dB |
Sennheiser |
HD-450 Series II |
60 ohm |
94 dB |
Sony |
MDR-7502 |
45 ohm |
100 dB |
Sony |
MDR-7504 |
45 ohm |
103 dB |
Sony |
MDR-7506 |
63 ohm |
106 dB |
1

ENGLISH
TO LEFT AND RIGHT
LINE INPUT ON
REAR PANEL
MIX SECTION RHYTHM & 1 AUX CONSOLE FROM 12
|
|
MAIN |
CH 1 |
CH 1 |
CH 2 |
CH 3 |
CH 3 CH 4 |
|
|
|
|
|
|
|
OL |
|
|
|
|
|
|
|
0 |
0 L |
|
R -6 |
|
|
-6 |
|
-6 |
BALANCE |
|
|
|
|
|
|
|
|
|
-12 |
|
|
-12 |
|
-12 |
|
|
|
|
|
|
|
-18 |
|
|
|
|
|
|
|
-24 |
|
|
|
|
|
|
|
4 CHANNEL |
2 CH |
STEREO |
|
|
|
|
HEADPHONE AMP |
|
|
|
|
|
|
|||
VOCALLEAD
The following example shows a headphone mix for a vocal overdub session. The backing music and vocals are sent via the mixers auxiliary sends to the C que 8’s MAIN input. The lead vocal channel is connected from the console’s direct output to the C que 8’s master INJECT input. The C cue 8 is set to 2-channel mode,so that the BALANCE controls the level difference between the backing track and lead vocal.This allows the lead vocalist to control the balance between his track and the backing tracks for a“more me”mix.
 Connections8C•que

TO RIGHT LINE INPUT ON REAR PANEL
13 |
BACKING AND SECTION RHYTHM SEND AUX CONSOLE FROM |
FLOW SIGNAL |
|
MIX TRACKS |
|
|
|
MAIN |
0 |
10 L |
R -6 |
|
BALANCE |
|
|
|
-12 |
|
INJECT |
STEREO |
|
2 CH |
|
|
|
|
MAIN |
0 |
10 |
L |
R -6 |
|
VOLUME |
BALANCE |
|
|
|
|
-12 |
|
INJECT |
2 CH |
STEREO |
|
|
||
|
|
|
MAIN |
0 |
10 |
L |
R -6 |
|
VOLUME |
BALANCE |
|
|
|
|
-12 |
|
INJECT |
2 CH |
STEREO |
|
|
||
|
|
|
MAIN |
0 |
10 |
L |
R -6 |
|
VOLUME |
BALANCE |
|
|
|
|
-12 |
|
INJECT |
2 CH |
STEREO |
|
|
||

 0 10
0 10 
 0 10
0 10
0 |
10 |
0 |
10 |
Guitar |
SIGNAL FLOW |
Direct Out |
0 |
10 |
0 |
10 |
0 |
10 |
0 |
10 |
|
|
SIGNAL FLOW |
ct Out |
|
|
|
|
0 |
10 |
0 |
10 |
0 |
10 |
0 |
10 |
|
|
SIGNAL FLOW |
Guitar |
|
|
From Mixer Direct Out |
|
|
|
|
|
|
|
|
|
|
0 |
|
SHAPE OUT 0 |
10 |
SHAPE OUT 0 |
10 |
-6 |
|
||
|
|
-12 |
|
|
|
-12 |
|
|
|
|
|
|
|
-18 |
|
|
|
|
|
|
|
-24 |
|
CH 2 |
0 |
1100 |
CH 4 |
0 |
10 |
|
4 CHANNEL |
|
VOLUME |
|
VOLUME |
|
HEADPHONE AMP |
||
|
|
|
SIGNAL FLOW |
Keyboards From Mixer Direct Out |
|||
The following example shows a sophisticated cue mix for tracking a rhythm section during a recording session using five C que 8’s.The complete mix for all the musicians is sent via the console’s auxiliary send to the C
 que 8’s RIGHT LINE input and daisy-chained from unit to unit. Then signal from each instrument is connected from the console’s direct outputs to each of C
 que 8’s master INJECT inputs using a mono 1/4-inch (TIP/SLEEVE) cable.(By using a mono 1/4-inch cable only the Left Inject input is connected). The C
 cue 8’s are set to 2-channel mode,so that the BALANCE controls the level difference between the backing tracks and individual instruments.This allows the lead vocalist or musician to dial up his or her own track for a“more me”mix.
RECORDINGSECTION RHYTHMMULTITRACKFOR UP-SETMIXCUE |
Connections8C•que |
ENGLISH
ENGLISH
StackingandTiltingtheC que8
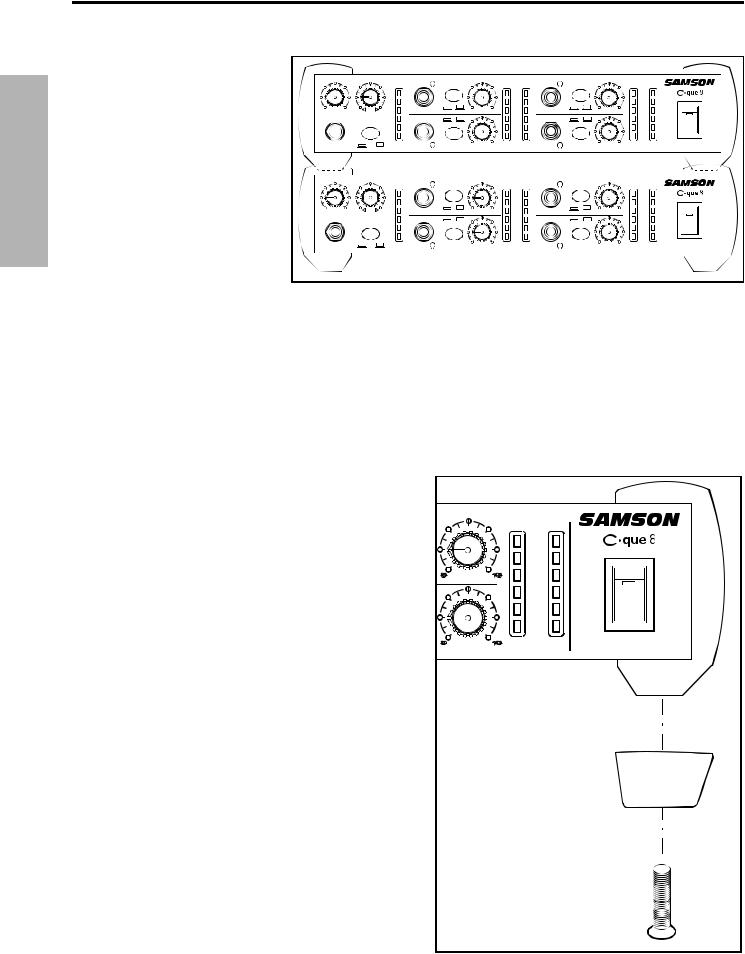
StackingtheC que8
You can stack one C cue 8, or any other Samson C Class units, on top of each other by simply lining up the bumpers.
Important Note: When stacking the C que 8, be sure that only the bottom unit has the tilting feet installed.
•Remove the bottom screw from right front bumper.
•Identify the right tilting foot by the locating“R”marking on the inside top.
•Position the angled foot under the right bumper as shown in the drawing.
InstallingtheTiltingFeet
You can install the tilting rubber feet included with your C que 8 so that you can set the unit at a comfortable operating angle on a workstation or desktop. Follow the simple instructions below to install the tilting feet.
•Remove the bottom screw from right front bumper.
•Identify the right tilting foot by the locating“R”marking on the inside top.
•Position the angled foot under the right bumper as shown in the drawing.
•Use the included 3 x 16mm screw to attach the foot.
•Repeat the steps above for the front left bumper.
14

C•que8WiringGuide
Unbalanced1/4”Connector
|
|
|
BalancedTRS1/4”Connector
|
|
|
|
|
|
|
|
||
|
|
|
|
|
|
|
|
|
|
|
|
|
||
|
|
|
|
|
InsertCable1/4”TRS connectortotwo1/4”can beusedtoconnectastereosignaltothe Master
Inject.
|
|
|
|
|
|
|
|
|
|
||
|
|
|
|
|
|
|
|
|
|
|
|
|
|
|
|
|
|
|
|
|
|
||
|
|
|
|
|
|
|
|
|
|
|
|
|
|
|
|
|
|
ENGLISH
Hot Common |
|
Common (1)Hot (2) |
|
|
|
|
|
1 |
2 |
2 |
1 |
|
|
|
|
|
3 |
Cold |
|
Solder Points |
End View |
||
Female XLR |
Cold (3) |
|
|
|
|
|
|
|
|
|
|
|
Hot (2) Common (1) |
Common Hot |
1 |
2 |
|
|
3 |
|
End View Solder Points |
Cold |
|
|
Cold (3) |
|
|
|
Male XLR |
15

FRANÇAIS
Introduction
Nous tenons à vous remercier d’avoir choisi l’amplificateur de casques Samson C•que 8. Bien que cet appareil ait été conçu pour être d’une extrême simplicité d’utilisation, nous vous suggérons vivement de lire ce mode d’emploi pour en comprendre toutes les fonctions. Le
C•que 8 est un appareil compact et de très haute qualité vous permettant d’écouter toute source mono ou stéréo (symétrique ou asymétrique) avec un maximum de douze casques. Offrant une puissance de sortie très puissante et une fidélité audio inhabituelle pour ce type d’équipement, le C•que 8 est compatible avec quasiment tous les types de casques du marché. Les réglages de face avant regroupent un niveau d’entrée général Master et un sélecteur stéréo/2 canaux. Chaque sortie casque possède son circuit Shape, son afficheur de niveau et son réglage de niveau de sortie. Les connecteurs de sortie spéciaux en face arrière vous permettent de coupler autant de C•que 8 que vous le souhaitez, sans perte de signal. Le C•que 8 peut être utilisé pour de très nombreuses applications, en studio d’enregistrement, dans les laboratoires pédagogiques, en radiodiffusion ou pour la scène. Dans ce mode d’emploi, vous trouverez des explications détaillées des fonctions du C•que
8, ainsi qu’une description des faces avant et arrière. Vous trouverez également les instructions pas-à-pas pour l’utilisation du C•que 8, un tableau de référence avec les valeurs d’impédances et de sensibilité pour les casques les plus utilisés, ainsi que le détail des caractéristiques techniques. Vous trouverez également une carte de garantie — n’oubliez pas de la remplir et de nous la renvoyer. Ceci vous donne accès à nos services techniques et nous permet de vous faire parvenir les informations sur les nouveaux produits Samson.
Avec une utilisation correcte et un refroidissement adéquat, le C•que 8 vous donnera satisfaction pendant de nombreuses années. Prenez le temps de noter le numéro de série pour toute référence future.
Numéro de série :
Date d’achat :
Si vous devez faire réparer cet appareil, vous devez obtenir un numéro d’autorisation auprès de nos services avant tout envoi. Sans ce numéro, l’appareil ne sera pas accepté. Appelez votre revendeur ou le distributeur de votre pays, ou Samson aux USA au 1-800-3SAMSON
(1-800-372-6766) pour obtenir un numéro d’autorisation avant d’expédier l’appareil. Conservez l’emballage d’origine pour toute expédition.
16

FonctionsduC•que8
L’amplificateur de casques Samson C•que 8 utilise les dernières technologies de gestion de gain. Voici quelques-unes de ses fonctions :
• |
Quadruple mélangeur/amplificateur de casques avec réglages individuels par canal. Idéal pour les stations |
|
|
audionumériques, la scène et le studio. |
|
• |
Doubles sorties casques : une à l’arrière, plus une sortie à l’avant par canal, pour un total de huit casques connec- |
FRANÇAIS |
|
tés simultanément. |
|
|
|
|
• |
Puissance de sortie maximale sur chaque canal, quelles que soient les différences d’impédance entre les |
|
|
casques. |
|
• |
Entrées ligne gauche et droite pour le bus stéréo général en Jacks 6,35 mm stéréo. |
|
• |
Entrée d’injection directe en Jack 6,35 mm stéréo asymétrique permettant l’insertion d’un signal stéréo supplé- |
|
|
mentaire mélangé avec le signal de l’entrée ligne permettant d’obtenir une écoute accentuée dans le mixage de |
|
|
la source pour le musicien le désirant. |
|
• |
Sélecteur de mode 2-canaux/stéréo permettant de configurer le C que 8 pour fonctionner en mode traditionnel |
|
|
stéréo ou en mode mono à 2 canaux individuels. |
|
• |
Le réglage de Balance contrôle le panoramique en mode stéréo ou l’équilibre entre les canaux Ligne et Injection |
|
|
Directe en mode 2-canaux. |
|
• |
Le circuit d’égalisation Shape sur chaque canal permet d’accentuer les fréquences graves et aiguës sur la sortie |
|
|
casque. |
|
• |
Chaque canal possède un afficheur de niveau de sortie à six Leds avec une plage comprise entre -24 dB et |
|
|
l’écrêtage, facilitant le contrôle des niveaux de sortie. |
|
• |
Un afficheur à six Leds (Main Level) indique de façon claire et précise le niveau de l’entrée Line sur une plage |
|
|
comprise entre -24 dB et l’écrêtage. |
|
• |
Les pieds en caoutchouc vous permettent d’empiler plusieurs C que 8, ou d’autres produits Samson de la |
|
|
gamme C. |
|
• |
Les pieds inclinés vous permettent de positionner les processeurs de la gamme C de façon confortable et |
|
|
ergonomique. |
|
• |
Kit de montage en Rack 19 pouces, 1 U disponible en option. |
|
• |
Garantie étendue de 3 ans (variable selon le pays de distribution). |
|
17
 Loading...