


OPERATOR’S MANUAL
MANUEL D’UTILISATION MANUAL DEL OPERADOR
40 VOLT CHAIN SAW
SCIE À CHAÎNE 40 V
MOTOSIERRA DE 40 V
RY40502
Your chain saw has been engineered and manufactured to our high standard for dependability, ease of operation, and operator safety. When properly cared for, it will give you years of rugged, trouble-free performance.
 WARNING: To reduce the risk of injury, the user must read and understand the operator’s manual before using this product.
Thank you for your purchase.
SAVE THIS MANUAL FOR FUTURE REFERENCE
Cette scie à chaîne a été conçue et fabriquée conformément aux strictes normes de fiabilité, simplicité d’emploi et sécurité d’utilisation. Correctement entretenue, elle vous donnera des années de fonctionnement robuste et sans problème.
 AVERTISSEMENT : Pour réduire les risques de blessures, l’utilisateur doit lire et veiller à bien comprendre le manuel d’utilisation avant d’employer ce produit.
Merci de votre achat.
Su motosierra ha sido diseñada y fabricada de conformidad con nuestras estrictas normas para brindar fiabilidad, facilidad de uso y seguridad para el operador. Con el debido cuidado, le brindará muchos años de sólido y eficiente funcionamiento.
 ADVERTENCIA: Para reducir el riesgo de lesiones, el usuario debe leer y comprender el manual del operador antes de usar este producto.
Le agradecemos su compra.
CONSERVER CE MANUEL POUR |
GUARDE ESTE MANUAL PARA |
FUTURE RÉFÉRENCE |
FUTURAS CONSULTAS |

TABLE OF CONTENTS |
|
TABLE DES MATIÈRES / ÍNDICE DE CONTENIDO |
|
Introduction........................................................................................................................................ |
2 |
Introduction / Introducción |
|
General Power Tool Safety Warnings............................................................................................ |
3-4 |
Avertissements règles de sécurité relatives aux outils électriques / Advertencias de seguridad para herramientas eléctricas |
|
Chain Saw Safety Warnings........................................................................................................... |
5-8 |
Avertissements de sécurité relatifs au scie à chaîne / Advertencias de seguridad de la motosierra |
|
Symbols....................................................................................................................................... |
9-10 |
Symboles / Símbolos |
|
Glossary of Terms............................................................................................................................ |
11 |
Glossaire / Glosario de términos |
|
Features..................................................................................................................................... |
12-13 |
Caractéristiques / Características |
|
Assembly................................................................................................................................... |
13-14 |
Assemblage / Armado |
|
Operation................................................................................................................................... |
14-22 |
Utilisation / Funcionamiento |
|
Maintenance.............................................................................................................................. |
23-29 |
Entretien / Mantenimiento |
|
Bar and Chain Combinations........................................................................................................... |
30 |
Combinaisons de guide et chaîne / Combinations de barra y cadena |
|
Troubleshooting............................................................................................................................... |
30 |
Dépannage / Corrección de problemas |
|
Warranty........................................................................................................................................... |
31 |
Garantie / Garantía |
|
Parts Ordering and Service................................................................................................ |
Back Page |
Commande de pièces et réparation / Pedidos de piezas y servicio.......................................................... |
Page arrière / Pág. posterior |
INTRODUCTION
INTRODUCTION / INTRODUCCIÓN
This product has many features for making its use more pleasant and enjoyable. Safety, performance, and dependability have been given top priority in the design of this product making it easy to maintain and operate.
* * *
Ce produit offre de nombreuses fonctions destinées à rendre son utilisation plus plaisante et satisfaisante. Lors de la conception de ce produit, l’accent a été mis sur la sécurité, les performances et la fiabilité, afin d’en faire un outil facile à utiliser et à entretenir.
* * *
Este producto ofrece numerosas características para hacer más agradable y placentero su uso. En el diseño de este producto se ha conferido prioridad a la seguridad, el desempeño y la fiabilidad, por lo cual se facilita su manejo y mantenimiento.
2

GENERAL POWER TOOL SAFETY RULES
 WARNING
Read all safety warnings and all instructions.
Failure to follow the warnings and instructions may result in electric shock, fire and/or serious injury.
Save all warnings and instructions for future reference.The term “power tool” in the warnings refers to your mains-operated (corded) power tool or battery-operated (cordless) power tool.
WORK AREA SAFETY
Keep work area clean and well lit. Cluttered or dark areas invite accidents.
Do not operate power tools in explosive atmospheres, such as in the presence of flammable liquids, gases or dust. Power tools create sparks which may ignite the dust or fumes.
Keep children and bystanders away while operating a power tool. Distractions can cause you to lose control.
ELECTRICAL SAFETY
Power tool plugs must match the outlet. Never modify the plug in any way. Do not use any adapter plugs with earthed (grounded) power tools. Unmodified plugs and matching outlets will reduce risk of electric shock.
Avoid body contact with earthed or grounded surfaces such as pipes, radiators, ranges and refrigerators. There is an increased risk of electric shock if your body is earthed or grounded.
Do not expose power tools to rain or wet conditions. Water entering a power tool will increase the risk of electric shock.
Do not abuse the cord. Never use the cord for carrying, pulling or unplugging the power tool. Keep cord away from heat, oil, sharp edges or moving parts. Damaged or entangled cords increase the risk of electric shock.
When operating a power tool outdoors, use an extension cord suitable for outdoor use.
Use of a cord suitable for outdoor use reduces the risk of electric shock.
If operating a power tool in a damp location is unavoidable, use a ground fault circuit interrupter (GFCI) protected supply. Use of a GFCI reduces the risk of electric shock.
PERSONAL SAFETY
Stay alert, watch what you are doing and use common sense when operating a power tool. Do not use a power tool while you are tired or under the influence of drugs, alcohol or medication. A moment of inattention while operating power tools may result in serious personal injury.
Use personal protective equipment. Always wear eye protection. Protective equipment such as dust mask, non-skid safety shoes, hard hat, or hearing protection used for appropriate conditions will reduce personal injuries.
Prevent unintentional starting. Ensure the switch is in the off-position before connecting to power source and/or battery pack, picking up or carrying the tool. Carrying power tools with your finger on the switch or energising power tools that have the switch on invites accidents.
Remove any adjusting key or wrench before turning the power tool on. A wrench or a key left attached to a rotating part of the power tool may result in personal injury.
Do not overreach. Keep proper footing and balance at all times. This enables better control of the power tool in unexpected situations.
Dress properly. Do not wear loose clothing or jewellery. Keep your hair, clothing and gloves away from moving parts. Loose clothes, jewellery or long hair can be caught in moving parts.
If devices are provided for the connection of dust extraction and collection facilities, ensure these are connected and properly used. Use of dust collection can reduce dustrelated hazards.
POWER TOOL USE AND CARE
Do not force the power tool. Use the correct power tool for your application. The correct power tool will do the job better and safer at the rate for which it was designed.
3 - English

GENERAL POWER TOOL SAFETY RULES
Do not use the power tool if the switch does not turn it on and off. Any power tool that cannot be controlled with the switch is dangerous and must be repaired.
Disconnect the plug from the power source and/or the battery pack from the power tool before making any adjustments, changing accessories, or storing power tools. Such preventive safety measures reduce the risk of starting the power tool accidentally.
Store idle power tools out of the reach of children and do not allow persons unfamiliar with the power tool or these instructions to operate the power tool. Power tools are dangerous in the hands of untrained users.
Maintain power tools. Check for misalignment or binding of moving parts, breakage of parts and any other condition that may affect the power tool’s operation. If damaged, have the power tool repaired before use. Many accidents are caused by poorly maintained power tools.
Keep cutting tools sharp and clean. Properly maintained cutting tools with sharp cutting edges are less likely to bind and are easier to control.
Use the power tool, accessories and tool bits etc. in accordance with these instructions, taking into account the working conditions and the work to be performed. Use of the power tool for operations different from those intended could result in a hazardous situation.
BATTERY TOOL USE AND CARE
Recharge only with the charger specified by the manufacturer. A charger that is suitable for one type of battery pack may create a risk of fire when used with another battery pack.
Use power tools only with specifically designated battery packs. Use of any other battery packs may create a risk of injury and fire.
When battery pack is not in use, keep it away from other metal objects, like paper clips, coins, keys, nails, screws or other small metal objects, that can make a connection from one terminal to another. Shorting the battery terminals together may cause burns or a fire.
Under abusive conditions, liquid may be ejected from the battery; avoid contact. If contact accidentally occurs, flush with water. If liquid contacts eyes, additionally seek medical help. Liquid ejected from the battery may cause irritation or burns.
SERVICE
Have your power tool serviced by a qualified repair person using only identical replacement parts. This will ensure that the safety of the power tool is maintained.
When servicing a power tool, use only identical replacement parts. Follow instructions in the Maintenance section of this manual.
Use of unauthorized parts or failure to follow Maintenance instructions may create a risk of shock or injury.
4 - English

CHAIN SAW SAFETY WARNINGS
Keep all parts of the body away from the saw chain when the chain saw is operating. Before you start the chain saw, make sure the saw chain is not contacting anything. A moment of inattention while operating chain saws may cause entanglement of your clothing or body with the saw chain.
Always hold the chain saw with your right hand on the rear handle and your left hand on the front handle. Holding the chain saw with a reversed hand configuration increases the risk of personal injury and should never be done.
Hold the power tool by insulated gripping surfaces only, because the saw chain may contact hidden wiring. Saw chains contacting a “live” wire may make exposed metal parts of the power tool “live” and could give the operator an electric shock.
Wear safety glasses and hearing protection. Further protective equipment for head, hands, legs and feet is recommended. Adequate protective clothing will reduce personal injury by flying debris or accidental contact with the saw chain.
Do not operate a chain saw in a tree. Operation of a chain saw while up in a tree may result in personal injury.
Always keep proper footing and operate the chain saw only when standing on fixed, secure and level surface. Slippery or unstable surfaces such as ladders may cause a loss of balance or control of the chain saw.
When cutting a limb that is under tension be alert for spring back. When the tension in the wood fibres is released the spring loaded limb may strike the operator and/or throw the chain saw out of control.
Use extreme caution when cutting brush and saplings. The slender material may catch the saw chain and be whipped toward you or pull you off balance.
Carry the chain saw by the front handle with the chain saw switched off and away from your body. When transporting or storing the chain saw always fit the guide bar cover.
Proper handling of the chain saw will reduce the likelihood of accidental contact with the moving saw chain.
Follow instructions for lubricating, chain tensioning and changing accessories. Improperly tensioned or lubricated chain may either break or increase the chance for kickback.
Keep handles dry, clean, and free from oil and grease. Greasy, oily handles are slippery causing loss of control.
Cut wood only. Do not use chain saw for purposes not intended. For example: do not use chain saw for cutting plastic, masonry or non-wood building materials. Use of the chain saw for operations different than intended could result in a hazardous situation.
CAUSES AND OPERATOR PREVENTION OF KICKBACK
Kickback may occur when the nose or tip of the guide bar touches an object, or when the wood closes in and pinches the saw chain in the cut.
Tip contact in some cases may cause a sudden reverse reaction, kicking the guide bar up and back towards the operator.
Pinching the saw chain along the top of the guide bar may push the guide bar rapidly back towards the operator.
Either of these reactions may cause you to lose control of the saw which could result in serious personal injury. Do not rely exclusively upon the safety devices built into your saw. As a chain saw user, you should take several steps to keep your cutting jobs free from accident or injury.
Kickback is the result of tool misuse and/or incorrect operating procedures or conditions and can be avoided by taking proper precautions as given below:
Maintain a firm grip, with thumbs and fingers encircling the chain saw handles, with both hands on the saw and position your body and arm to allow you to resist kickback forces.
Kickback forces can be controlled by the operator, if proper precautions are taken. Do not let go of the chain saw.
Do not overreach and do not cut above shoulder height. This helps prevent unintended tip contact and enables better control of the chain saw in unexpected situations.
5 - English

CHAIN SAW SAFETY WARNINGS
Only use replacement bars and chains specified by the manufacturer. Incorrect replacement bars and chains may cause chain breakage and/or kickback.
Follow the manufacturer’s sharpening and maintenance instructions for the saw chain.
Decreasing the depth gauge height can lead to increased kickback.
Do not start cutting until you have a clear work area, secure footing, and a planned retreat path from the falling tree. Cluttered areas invite accidents.
Keep ALL children, bystanders, visitors, and animals out of the work area while starting or cutting with the chain saw. Do not let visitors contact chain saw or extension cord.
Do not operate chain saw in explosive atmospheres, such as in the presence of flammable liquids, gases, or dust. Chain saws create sparks which may ignite the dust or fumes.
Dress Properly - Wear snug fitting clothing. Always wear heavy, long pants, long sleeves, overalls, jeans or chaps made of cut resistant material or ones that contain cut resistant inserts. Wear non-slip safety footwear. Wear non-slip heavy duty gloves to improve your grip and to protect your hands. Do not wear jewelry, short pants, sandals, or go barefoot. Do not wear loose fitting clothing, which could be drawn into the motor or catch the chain or underbrush. Secure hair so it is above shoulder level. Wear hearing and head protection.
Heavy protective clothing may increase operator fatigue, which could lead to heat stroke. During weather that is hot and humid, heavy work should be scheduled for early morning or late afternoon hours when temperatures are cooler.
Always wear eye protection with side shields marked to comply with ANSI Z87.1 as well as head and hearing protection when operating this equipment.
Always be aware of what you are doing when using the chain saw. Use common sense. Do not operate the chain saw when you are tired, ill, or under the influence of alcohol, drugs, or medication.
Do not expose the chain saw to rain.
Do not use the chain saw in damp or wet locations.
Always be aware of extension cord while operating chain saw. Take precautions to avoid tripping over cord. Keep cord away from chain and operator at all times. Never carry saw by the cord or pull it to disconnect from receptacle. Keep cord from oil and sharp edges.
Stay alert and pay attention to what you are doing. Use common sense when using this unit.
Keep all parts of your body away from the saw chain when the unit is running.
Never let anyone use your chain saw who has not received adequate instructions in its proper use. This applies to rentals as well as privately owned saws.
Before you start the unit, make sure the saw chain is not contacting any object.
Stop the chain saw before setting it down.
To avoid accidental starting, never carry the unit with your finger on the switch trigger.
Maintain the unit with care. Keep the cutting edge sharp and clean for best performance and to reduce the risk of injury. Follow instructions for lubricating and changing accessories.
Do not operate a chain saw with one hand! Use a firm grip with thumbs and fingers encircling the chain saw handles. Serious injury to the operator, helpers, bystanders, or any combination of these persons may result from one-handed operation. A chain saw is intended for twohanded use.
Guard against electric shock - Avoid body contact with grounded surfaces such as metal pipes and wire fences. There is an increased risk of electric shock if your body is grounded.
Do not operate a chain saw that is damaged, improperly adjusted, or not completely and securely assembled. Chain should slow to a stop when the switch trigger is released. If the chain continues to turn after the switch trigger has been released, have the unit serviced by an authorized service center.
Check for damaged parts. Check for alignment of moving parts, binding of moving parts, breakage of parts, mounting, and any other conditions that may affect its operation. A guard or
6 - English

CHAIN SAW SAFETY WARNINGS
other part that is damaged should be properly repaired or replaced by an authorized service center unless otherwise indicated elsewhere in this manual.
All chain saw service, other than the items listed in the operation and maintenance sections, should be performed by an authorized service center.
Always maintain a proper stance.
Do not use chain saw if switch does not turn it on and off. Have defective switch replaced by an authorized service center.
Do not adapt your powerhead to a bow guide or use it to power any attachments or devices not listed for the saw.
Disconnect chain saw from power supply when not in use, before servicing, and when making adjustments and changing attachments, such as saw chain and guard.
Do not cut vines and/or small underbrush.
Do not operate a chain saw in a tree, on a ladder, rooftop, scaffold, or other unstable support; this is extremely dangerous.
NOTE: The size of the work area depends on the job being performed as well as the size tree or work piece involved. For example, felling a tree requires a larger work area than making bucking cuts.
Do not force the chain saw. The job can be performed better and safer at the rate for which it was intended.
Always use the right product for your application. The chain saw should be used for cutting wood only. Never use the chain saw to cut plastic, masonry or non-wood building materials.
Store chain saw when not in use. Chain saw should be stored in a dry and high or locked area out of the reach of children. When storing chain saw place the scabbard on the bar and chain and store the chain saw in carrying case.
Use only with battery and charger listed. For use with 40V lithium-ion battery packs. See Tool/ Appliance/Battery Pack/Charger Correlation Supplement 988000842.
NOTE: Although the chain saw will work with all battery packs listed on the correlation supplement, for best performance, avoid
using first generation Ryobi 40V lithium-ion batteries [OP4026 (part numbers 130186012 or 130186006) and OP4015 (part number 1300208001)]. The chain speed will be significantly reduced if these batteries are used.
nBattery operated units do not have to be plugged into an electrical outlet; therefore, they are always in operating condition. Be aware of possible hazards even when unit is not operating.
nRemove the battery pack from the chain saw before cleaning, servicing, storing, removing material from the unit, changing accessories such as the bar and chain, or when not in use.
Save these instructions. Refer to them frequently and use them to instruct others who may use this product. If you loan someone this product, loan them these instructions also.
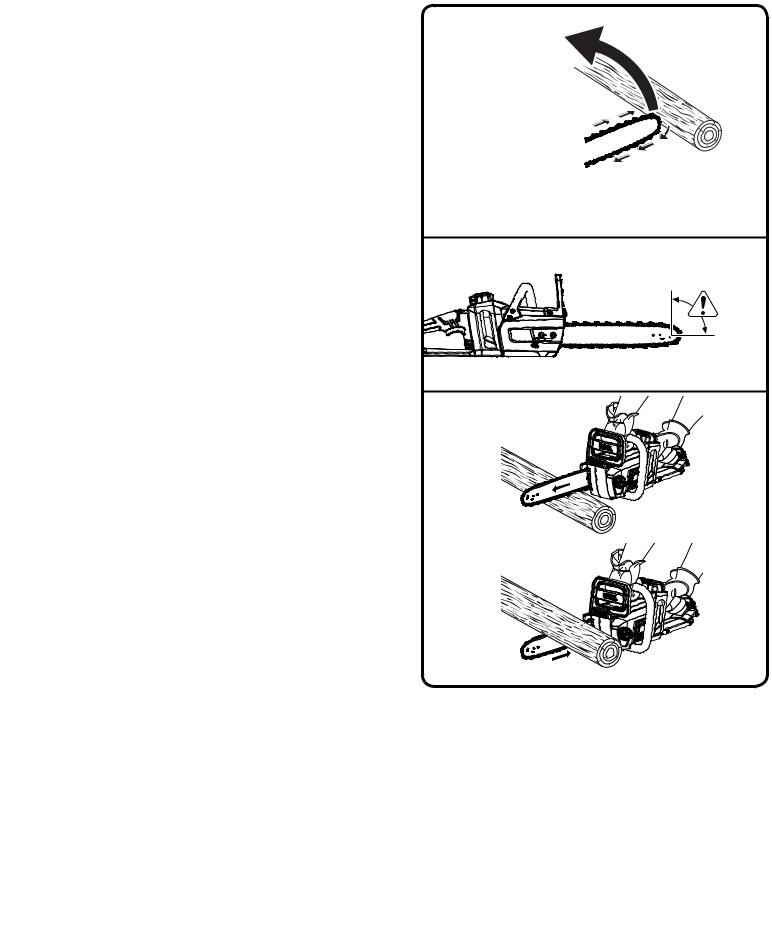
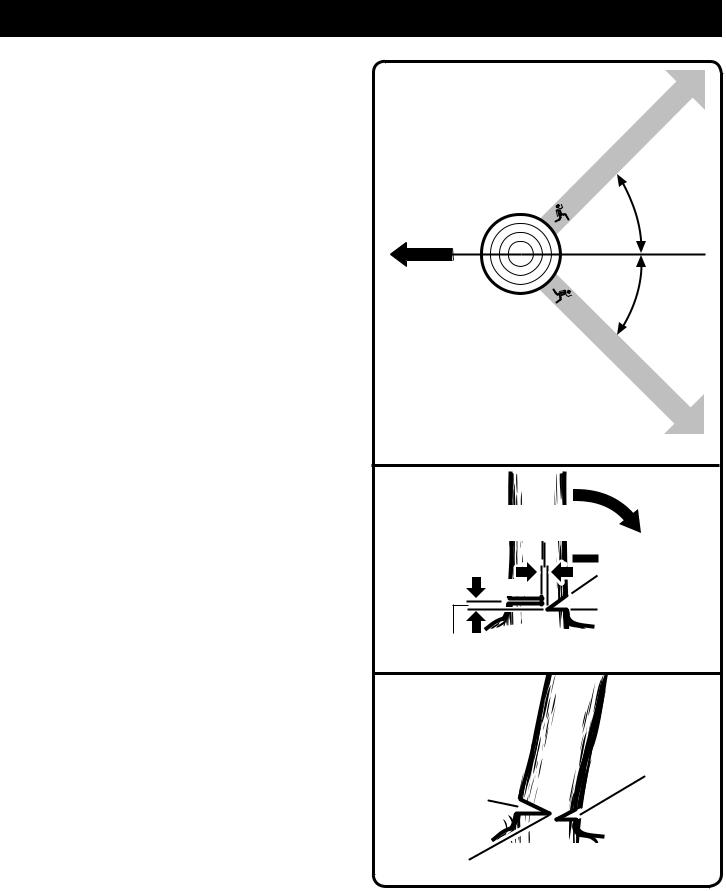
KICKBACK
See Figures 1 - 3.
nWARNING: Kickback may occur when the moving chain contacts an object at the upper portion of the tip of the guide bar or when the wood closes in and pinches the saw chain in the cut. Contact at the upper portion of the tip of the guide bar can cause the chain to dig into the object and stop the chain for an instant. The result is a lightning fast, reverse reaction which kicks the guide bar up and back toward the operator. If the saw chain is pinched along the top of the guide bar, the guide bar can be driven rapidly back toward the operator. Either of these reactions can cause loss of saw control which can result in serious injury. Do not rely exclusively upon the safety devices built into the saw. As a chain saw user, you should take several steps to keep your cutting jobs free from accident or injury.
nThe following precautions should be followed to minimize kickback:
•Always grip the saw firmly with both hands. Hold the saw firmly with both hands when the unit is running. Place your right hand on the rear handle and your left hand on the front handle with your thumbs and fingers encircling the chain saw handles. A firm grip together with a stiff left arm will help you maintain control of the saw if kickback occurs.
7 - English
CHAIN SAW SAFETY WARNINGS
•Make sure that the area in which you are cutting is free from obstructions. Do not let the nose of the guide bar contact a log, branch, fence, or any other obstruction that could be hit while you are operating the saw.
•Always cut with the unit running at full speed. Fully squeeze the throttle trigger and maintain a steady cutting speed.
•Use replacement parts such as low kickback chain, chain brakes and special guide bars that reduce the risks associated with rotational kickback. Use only the replacement guide bars and low kickback chains specified by the manufacturer for the saw.
nWith a basic understanding of kickback, you can reduce or eliminate the element of surprise. Sudden surprise contributes to accidents.
nKeep proper footing and balance at all times.
nDo not cut above shoulder height or overreach when cutting.
nFollow the sharpening and maintenance instructions for the saw chain.
nPush and Pull - This reaction force is always opposite to the direction the chain is moving where wood contact is made. Thus, the operator must be ready to control the PULL when cutting on the bottom edge of the bar, and PUSH when cutting along the top edge. See Figure 3.
UNDERSTANDING YOUR CHAIN SAW SAFETY DEVICES
LOW KICKBACK SAW CHAIN
The rakers (depth gauges) ahead of each cutter can minimize the force of a kickback reaction by preventing the cutters from digging in too deeply at the kickback zone. Only use replacement chain that is equivalent to original chain or has been certified as low kickback chain per ANSI B175.1.
Low kickback saw chain is chain that has met the kickback performance requirements of ANSI B175.1 - 1991 (American National Standard for Power Tools - Gasoline-Powered Chain Saws-Safety Requirements) when tested on the representative sample of chain saws below 3.8 c.i.d. specified in ANSI B175.1 - 1991.
ROTATIONAL
KICKBACK
Fig. 1
KICKBACK
DANGER ZONE
Fig. 2
PULL
PUSH
Fig. 3
As saw chains are sharpened during their useful life, they lose some of the low kickback qualities and extra caution should be used.
GUIDE BARS
Generally, guide bars with small radius tips have somewhat lower kickback potentials.
When making a replacement, be sure to order one of the RYOBI bars listed for the saw in this operator’s manual.
8 - English

SYMBOLS
The following signal words and meanings are intended to explain the levels of risk associated with this product.
SYMBOL |
SIGNAL |
MEANING |
|
|
|
|
DANGER: |
Indicates an imminently hazardous situation, which, if not avoided, will |
|
result in death or serious injury. |
|
|
|
|
|
|
|
|
WARNING: |
Indicates a potentially hazardous situation, which, if not avoided, |
|
could result in death or serious injury. |
|
|
|
|
|
|
|
|
CAUTION: |
Indicates a potentially hazardous situation, which, if not avoided, |
|
may result in minor or moderate injury. |
|
|
|
(Without Safety Alert Symbol) Indicates important information not NOTICE: related to an injury hazard, such as a situation that may result in
property damage.
Some of the following symbols may be used on this product. Please study them and learn their meaning. Proper interpretation of these symbols will allow you to operate the product better and safer.
SYMBOL |
NAME |
DESIGNATION/EXPLANATION |
|
Safety Alert |
Indicates a potential personal injury hazard. |
|
|
|
|
|
|
|
To reduce the risk of injury, user must read and |
|
|
|
|
|
|
Read Operator’s Manual |
understand operator’s manual before using this |
|
|
|
|
|
|
|
product. |
|
|
|
|
|
|
Wear Eye, Hearing, and |
Wear eye protection with side shields marked to comply |
|
|
|
|
|
|
with ANSI Z87.1 as well as hearing and head protection |
|
|
|
|
|
|
|
Head Protection |
|
|
|
|
|
|
|
when operating this equipment. |
|
|
|
|
|
|
|
|
|
|
|
|
|
|
|
Wet Conditions Alert |
Do not expose to rain or use in damp locations. |
|
|
|
|
|
|
|
|
|
|
|
|
|
|
Operate With Two |
Hold and operate the saw properly with both hands. |
|
|
|
|
|
|
Hands |
|
|
|
|
|
|
|
|
|
|
|
|
|
|
|
|
|
|
|
|
|
|
|
One Handed |
Do not operate the saw using only one hand. |
9 - English

SYMBOLS
Some of the following symbols may be used on this product. Please study them and learn their meaning. Proper interpretation of these symbols will allow you to operate the product better and safer.
SYMBOL |
NAME |
DESIGNATION/EXPLANATION |
|
Kickback |
DANGER! BEWARE OF KICKBACK. |
|
Bar Nose Contact |
Avoid bar nose contact. |
|
Wear Gloves |
Wear non-slip, heavy-duty protective gloves when |
|
handling the chain saw. |
|
|
|
|
|
Wear Safety Footwear |
Wear non-slip safety footwear when using this |
|
equipment. |
|
|
|
|
|
Keep Bystanders |
Keep all bystanders and animals at least 50 ft. away. |
|
Away |
|
|
|
|
|
Oil Indicator |
Pour bar and chain lubricant into oil tank where |
|
indicated. Do not use any other fluids. |
|
|
|
|
|
This product uses lithium-ion batteries. Local, state or |
|
Recycle Symbol |
federal laws may prohibit disposal of batteries in ordinary |
|
trash. Consult your local waste authority for information |
|
|
|
|
|
|
regarding available recycling and/or disposal options. |
V |
Volts |
Voltage |
|
Direct Current |
Type or a characteristic of current |
10 - English
GLOSSARY OF TERMS
Bucking
The process of cross cutting a felled tree or log into lengths.
Chain Saw Powerhead
A chain saw without the saw chain and guide bar.
Drive Sprocket or Sprocket
The toothed part that drives the saw chain.
Felling
The process of cutting down a tree.
Felling Back Cut
The final cut in a tree felling operation made on the opposite side of the tree from the notching undercut.
Front Hand Guard
A structural barrier between the front handle of a chain saw and the guide bar, typically located close to the hand position on the front handle.
Front Handle
The support handle located at or toward the front of the chain saw. This handle is for the left hand.
Guide Bar
A solid railed structure that supports and guides the saw chain.
Kickback
The backward or upward motion, or both, of the guide bar occurring when the saw chain near the nose of the top area of the guide bar contacts any object such as a log or branch, or when the wood closes in and pinches the saw chain in the cut.
Kickback (Pinch)
The rapid pushback of the saw which can occur when the wood closes in and pinches the moving saw chain in the cut along the top of the guide bar.
Kickback (Rotational)
The rapid upward and backward motion of the saw which can occur when the moving saw chain near the upper portion of the tip of the guide bar contacts an object, such as a log or branch.
Lock-out button
A movable stop that prevents the unintentional operation of the switch until manually actuated.
Low-Kickback Chain
A chain that complies with the kickback performance requirements of ANSI B175.1 when tested on a representative sample of chain saws.
Normal Cutting Position
Thosepositionsassumedinperformingthebucking and felling cuts.
Notching Undercut
A notch cut in a tree that directs the tree’s fall.
Rear Handle
The support handle located at or toward the rear of the saw. It normally contains the switch trigger. This handle is for the right hand.
Reduced Kickback Guide Bar
A guide bar which has been demonstrated to reduce kickback significantly.
Replacement Saw Chain
A chain that complies with the kickback performance requirements of ANSI B175.1 when tested with specific chain saws. It may not meet the ANSI performance requirements when used with other saws.
Saw Chain
A loop of chain having cutting teeth that cut the wood, and that is driven by the motor and is supported by the guide bar.
Springpole
A small tree (sapling) or limb that is bent or trapped under tension. It may “spring back” rapidly when cut, causing a dangerous situation.
Switch Trigger
A device that when operated will complete or interrupt an electrical power circuit to the motor of the chain saw.
11 - English
|
FEATURES |
|
|
PRODUCT SPECIFICATIONS |
|
Motor..................................................................................................................................... |
40 Volt DC |
Bar Length.................................................................................................................................... |
14 in. |
Chain oil tank capacity................................................................................................................... |
6 oz. |
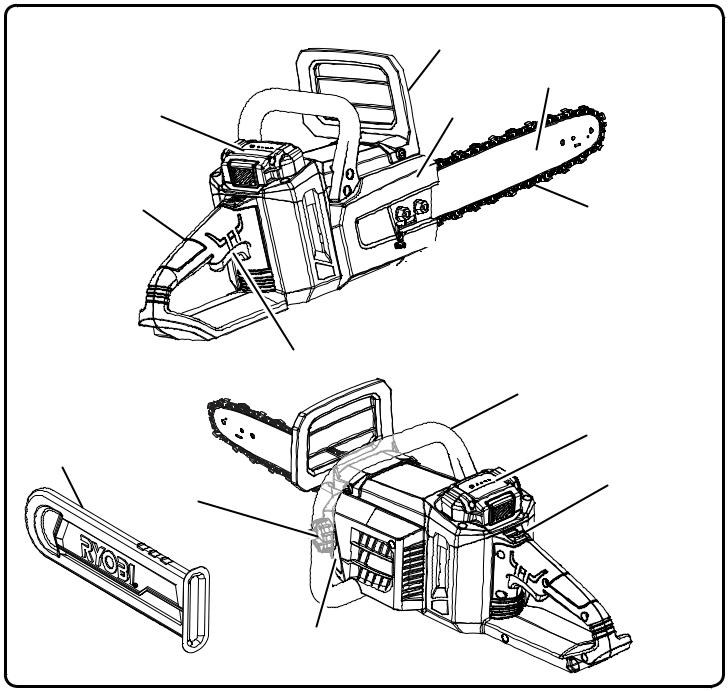
NOTE: This saw was designed for occasional light duty use and has some limitations as to what it can cut.
FRONT HAND
GUARD
GUIDE
BAR
BATTERY PACK |
CHAIN |
COVER |
REAR HANDLE
LOW KICKBACK
CHAIN


 CHAIN
CHAIN 

 TENSIONING
SCREW
|
SWITCH TRIGGER |
|
FRONT HANDLE |
|
BATTERY PACK |
SCABBARD |
LOCK-OUT |
|
|
CHAIN OIL |
BUTTON |
TANK CAP |
|
QUICK VIEW OIL
INDICATOR
Fig. 4
12 - English

FEATURES
KNOW YOUR CHAIN SAW
See Figure 4.
The safe use of this product requires an understanding of the information on the tool and in this operator’s manual as well as a knowledge of the project you are attempting. Before use of this product, familiarize yourself with all operating features and safety rules.
CHAIN TENSIONING SCREW
This feature allows user to adjust the tension of the chain.
GUIDE BAR
The factory-equipped guide bar has a small radius tip that offers a somewhat lower kickback potential.
LOCK-OUT BUTTON
A control feature designed to prevent the motor from being accidently started.
LOW KICKBACK CHAIN
The low kickback chain helps minimize the force of a kickback reaction by preventing the cutters from digging in too deeply at the kickback zone.
QUICK VIEW OIL INDICATOR
Semi-transparent oil reservoir that allows user to see when to add oil.
SWITCH TRIGGER
Squeeze the switch trigger to operate the unit after switch lock-out has been pushed in. Release the switch trigger to stop the unit.
ASSEMBLY
UNPACKING
This product has been shipped completely assembled.
Carefully remove the product and any accessories from the box. Make sure that all items listed in the packing list are included.
 WARNING:
Do not use this product if any parts on the Packing List are already assembled to your product when you unpack it. Parts on this list are not assembled to the product by the manufacturer and require customer installation. Use of a product that may have been improperly assembled could result in serious personal injury.
Inspect the product carefully to make sure no breakage or damage occurred during shipping.
Do not discard the packing material until you have carefully inspected and satisfactorily operated the product.
If any parts are damaged or missing, please call 1-800-860-4050 for assistance.
PACKING LIST
Chain Saw with Scabbard
Combination Wrench
Operator’s Manual
13 - English

|
ASSEMBLY |
WARNING: |
WARNING: |
If any parts are damaged or missing do not |
To prevent accidental starting that could cause |
|
operate this product until the parts are replaced. |
||
serious personal injury, always remove the |
||
Use of this product with damaged or missing |
||
battery pack from the product when assembling |
||
parts could result in serious personal injury. |
||
parts. |
||
|
 WARNING:
Do not attempt to modify this product or create accessories not recommended for use with this product. Any such alteration or modification is misuse and could result in a hazardous condition leading to possible serious personal injury.
OPERATION
DANGER:
Never cut near power lines, electric cords, or other electric sources. If bar and chain jams on any electrical cord or line, DO NOT TOUCH THE BAR OR CHAIN! THEY CAN BECOME ELECTRICALLY LIVE AND VERY DANGEROUS. Continue to hold the chain saw by the insulated rear handle or lay it down and away from you in a safe manner. Disconnect the electrical service to the damaged line or cord before attempting to free the bar and chain from the line or cord. Contact with the bar, chain, other conductive parts of the chain saw, or live electric cords or lines will result in death by electrocution, electric shock, or serious personal injury.
WARNING:
Do not allow familiarity with this product to make you careless. Remember that a careless fraction of a second is sufficient to inflict serious injury.
WARNING:
Always wear eye protection with side shields marked to comply with ANSI Z87.1 as well as head and hearing protection when operating this equipment. Failure to do so could result in objects being thrown into your eyes and other possible serious injuries.
 WARNING:
Do not use any attachments or accessories not recommended by the manufacturer of this product. The use of attachments or accessories not recommended can result in serious personal injury.
WARNING:
Never fell a tree or cut a log or limb that has a diameter greater that the length of the guide bar. Only properly trained professionals should perform these cuts. Performing these types of cuts can cause an accident and result in death or serious personal injury.
14 - English
OPERATION
Before each use, inspect the entire product for damaged, missing, or loose parts such as screws, nuts, bolts, caps, etc. Tighten securely all fasteners and caps and do not operate this product until all missing or damaged parts are replaced. Please call 1-800-860-4050 or contact an authorized service center for assistance.
APPLICATIONS
Youmayusethisproductforthefollowingpurposes:
Limbing and pruning branches from trees
Felling small trees
Bucking the fallen tree into shorter lengths
This product will accept Ryobi 40 V lithium-ion battery packs.
For complete charging instructions, refer to the Operator’s Manual for your Ryobi 40 V battery pack and charger model.
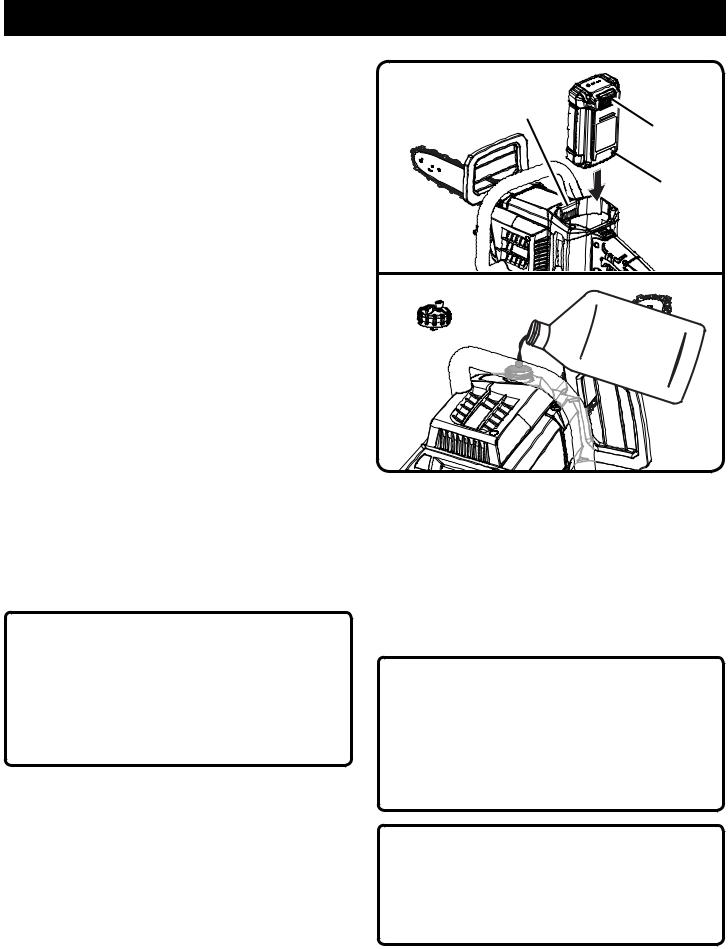
TO INSTALL/REMOVE BATTERY PACK
See Figure 5.
NOTE: Although the chain saw will work with all battery packs listed on the correlation supplement, for best performance, avoid using first generation Ryobi 40V lithium-ion batteries [OP4026 (part numbers 130186012 or 130186006) and OP4015 (part number 1300208001)]. The chain speed will be signifi-
cantly reduced if these batteries are used.
 WARNING:
Always remove battery pack from your tool when you are assembling parts, making adjustments, cleaning, carrying, transporting or when not in use. Removing battery pack will prevent accidental starting that could cause serious personal injury.
NOTE: To avoid serious personal injury, always remove the battery pack and keep hands clear of the look-out button when carrying or transporting the tool.
To install:
Place the battery pack in your chain saw. Align raised rib on battery pack with groove in chain saw’s battery port.
BATTERY
PORT
LATCH
BATTERY
PACK
Fig. 5
Fig. 6
Make sure the latch on bottom side of the battery pack snaps in place and that battery pack is secured in chain saw before beginning operation.
To remove:
Locate latch on bottom of battery pack and depress both sides to release the battery pack from the chain saw.
NOTICE:
When placing battery pack in your chain saw, be sure raised rib on battery pack aligns with groove in chain saw’s battery port and latches snap in place properly. Improper assembly of battery pack can cause damage to internal components.
NOTICE:
Remove battery pack from unit. Fill oil tank with bar and chain lubricant (not provided) before starting the chain saw. Failure to lubricate the chain will cause damage to the bar and chain.
15 - English

OPERATION
CHAIN OIL SYSTEM
See Figure 6.
Use bar and chain lubricant (not provided). That is formulated to perform over a wide temperature range with no dilution required.
NOTE: Do not use dirty, used or otherwise contaminated oils. Damage may occur to the bar or chain.
Carefully pour the bar and chain oil into the tank.
Check and fill the oil tank when battery is recharged, or as needed.
NOTE: It is normal for lubricant to seep from the saw when not in use. To prevent seepage, empty the oil tank after each use. When storing the unit for a long period of time (three months or longer) be sure the chain is lightly lubricated; this will prevent rust on the chain and bar sprocket.
LOCK-OUT BUTTON
SWITCH TRIGGER
STARTING AND STOPPING THE CHAIN
SAW
See Figure 7.
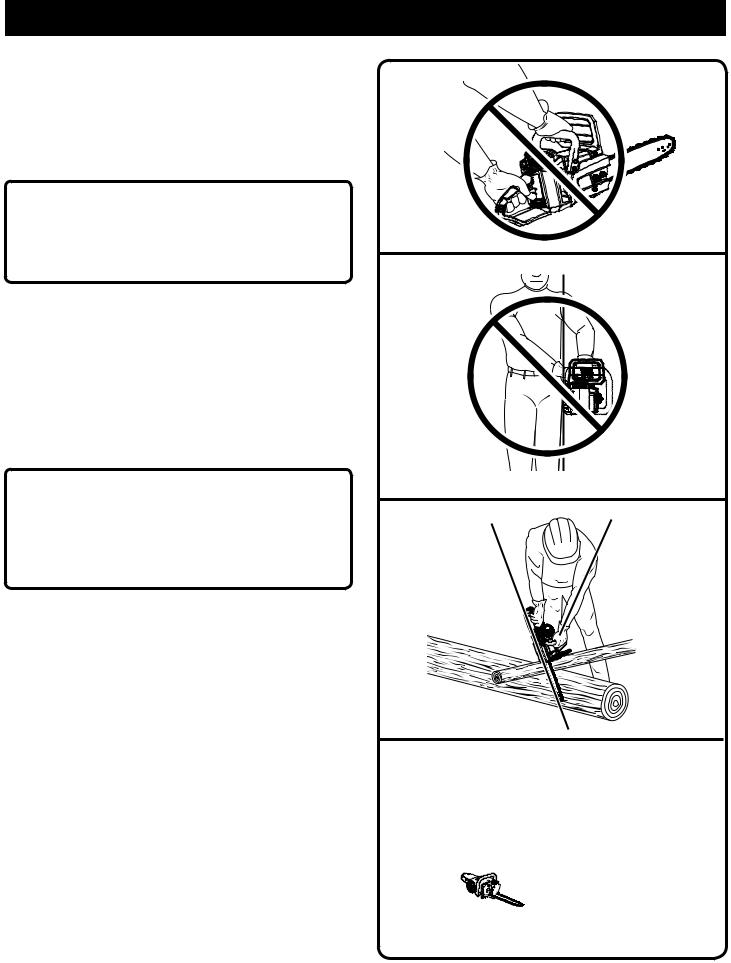
WARNING:
Keep body to the left of the chain line. Never straddle the saw or chain, or lean over past the chain line.
Starting the chain saw:
Slide and hold the lock-out button. This makes the switch trigger operational.
Press and hold the switch trigger, release the lock-out button and continue to squeeze the switch trigger for continued operation.
Stopping the chain saw:
Release the switch trigger to stop the chain saw.
Upon release of the switch trigger, the lock-out
button will be automatically reset to the lock position.
This cordless chain saw is designed for limbing and pruning type cutting, as well as cutting small trees.
PREPARATION FOR CUTTING
PROPER GRIP ON HANDLES
See Figures 8 - 10.
Refer to General safety rules earlier in this manual
for appropriate safety equipment.
16 - English
LOCK-OUT
BUTTON
SWITCH
TRIGGER
Fig. 7
Fig. 8
OPERATION
Wear non-slip gloves for maximum grip and protection.
Hold the saw firmly with both hands. Always keep your left hand on the front handle and your right hand on the rear handle so that your body is to the left of the chain line.
 WARNING:
Never use a left-handed (cross-handed) grip, or any stance which would place your body or arm across the chain line.
Maintain a proper grip on the saw whenever the unit is running. The fingers should encircle the handle and the thumb is wrapped under the handlebar. This grip is least likely to be broken (by a kickback or other sudden reaction of the saw). Any grip in which the thumb and fingers are on the same side of the handle, is dangerous because a slight kick of the saw can cause loss of control.
 WARNING:
Do not operate the switch trigger with your left hand and hold the front handle with your right hand. Never allow any part of your body to be in the chain line while operating a saw.
Fig. 9
CHAIN LINE |
Fig. 10 |
CHAIN LINE |
STRAIGHT ARM |
|
|
|
POSITION |
PROPER CUTTING STANCE
See Figures 11 - 12.
WARNING:
Always use the proper cutting stance described in this section. Never kneel when using the chain saw, except when felling a tree as illustrated in Figure 12. Kneeling could result in loss of stability and control of the chain saw, resulting in serious personal injury.
Weight should be balanced with both feet on solid ground.
Keep left arm with elbow locked in a “straight arm” position to withstand any kickback force.
Your body should always be to the left of the chain line.
Thumb should be on underside of handlebar.
17 - English
Fig. 11
Fig. 12
OPERATION
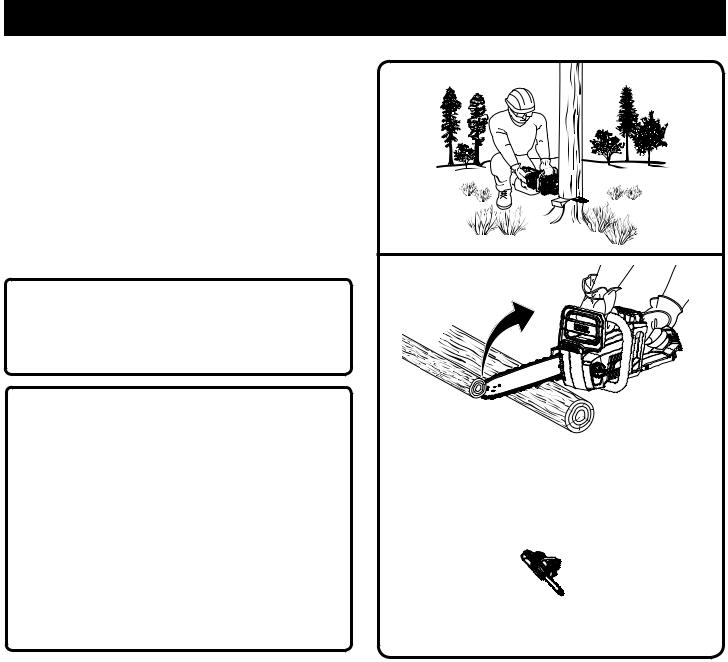
BASIC CUTTING PROCEDURE
Practice cutting a few small logs using the following technique to get the “feel” of using the saw before you begin a major sawing operation.
Take the proper stance in front of the wood with the saw off.
Squeeze the switch trigger and let the chain accelerate to full speed before entering the cut.
Begin cutting with the saw against the log.
Keep the unit running the entire time you are cutting, maintain a steady speed.
Allow the chain to cut for you; exert only light downward pressure. If you force the cut, damage to the bar, chain, or unit can result.
Release the switch trigger as soon as the cut is completed, allowing the chain to stop. If you run the saw without a cutting load, unnecessary wear can occur to the chain, bar, and unit.
Do not put pressure on the saw at the end of cut.
WORK AREA PRECAUTIONS
See Figure 13.
Cut only wood or materials made from wood, no sheet metal, no plastics, no masonry, no non-wood building materials.
Never allow children to operate the saw. Allow no person to use this chain saw who has not read this Operator’s Manual or received adequate instructions for the safe and proper use of this chain saw.
When felling a tree, keep everyone - helpers, bystanders, children, and animals - a safe distance from the cutting area. During felling operations, the safe distance should be a least twice the height of the largest trees in the felling area. During bucking opetations, keep a minimum distance of 15 feet between workers. Trees should not be felled in a manner that would endanger any person, strike any utility line or cause any property damage. If the tree does make contact with any utility line, the utility company should be notified immediately.
Always cut with both feet on solid ground to prevent being pulled off balance.
|
RETREAT |
PATH |
|
|
|
|
45° |
|
PLANNED LINE |
|
|
OF FALL |
45° |
|
|
RETREAT |
|
|
|
PATH |
Fig. 13
 HINGE
HINGE 

2 in. OR 1/10 DIA
NOTCH -
APPROX. 1/3
DIAMETER OF
TRUNK
BACK CUT |
|
2 in. |
Fig. 14 |
NOTCH
BACK CUT
HINGE
Fig. 15
18 - English
OPERATION
Do not cut above chest height, as a saw held higher is difficult to control against kickback forces.
Do not fell trees near electrical wires or buildings. Leave this operation for professionals.
Cut only when visibility and light are adequate for you to see clearly.
FELLING TREES
See Figures 13 - 16.
HAZARDOUS CONDITIONS
 WARNING:
Do not fell trees during periods of high wind or heavy precipitation. Wait until the hazardous weather has ended.
 WARNING:
Closely check for broken or dead branches, which could fall while cutting and do not cut near buildings or electrical wires if you do not know the direction of tree fall. Do not cut at night or during bad weather conditions, such as rain, snow, or strong winds, which can reduce visibility and control of the chain saw. If the tree you are felling makes contact with any utility line, you should discontinue use of the chain saw and immediately notify the utility company. Failure to follow these instructions could result in death or serious personal injury.
When felling a tree, it is important that you follow these warnings and instructions to prevent possible serious injury.
■n Do not cut down trees having an extreme lean or large trees with rotten limbs, loose bark, or hollow trunks. Have these trees pushed or dragged down with heavy equipment, then cut them up.
■n Do not cut trees near electrical wires or buildings.
■n Check the tree for damaged or dead branches that could fall and hit you during felling.
■n Periodically glance at the top of the tree during the backcut to assure the tree is going to fall in the desired direction.
WEDGE 
Fig. 16
KICKBACK
Fig. 17
Fig. 18
nIf the tree starts to fall in the wrong direction, or if the saw gets caught or hung up during the fall, leave the saw and save yourself!
Felling a tree - When bucking and felling operations are being performed by two or more persons, at the same time, the felling operation should be separated from the bucking operation by a distance of at least twice the height of the tree being felled. Trees should not be felled in a manner that would endanger any person, strike any utility line or cause any property damage. If the tree does make contact with any utility line, the utility company should be notified immediately.
Before any cuts are started, pick your escape route (or routes in case the intended route is blocked); clear the immediate area around the
19 - English

OPERATION
tree and make sure there are no obstructions in your planned path of retreat. Clear paths of safe retreat should extend back and diagonally (45°) to the rear of the planned line of fall. When the tree begins to fall, you should retreat away from the direction of fall along a retreat path and at least 20 feet away from the trunk in case it kicks back over the stump. See Figure 13.
Before felling is started, consider the force and direction of the wind, the lean and balance of the tree, and the location of large limbs. These things influence the direction in which the tree will fall. Do not try to fell a tree along a line different from its natural line of fall.
The chain saw operator should keep on the uphill side of the terrain as the tree is likely to roll or slide downhill after it is felled.
Remove dirt, stones, loose bark, nails, staples, and wire from the tree where felling cuts are to be made.
Notched Undercut. Cut a notch about 1/3 the diameter of the tree, perpendicular to the direction of fall. Make the cuts of the notch so they intersect at a right angle to the line of fall. This notch should be cleaned out to leave a straight line. To keep the weight of the wood off the saw, always make the lower cut of the notch before the upper cut. See Figure 14.
Felling Backcut. The backcut is always made level and horizontal, and at a minimum of 2 in. above the horizontal cut of the notch. See Figures 14 - 15.
Never cut through to the notch. Always leave a band of wood between the notch and backcut (approximately 2 in. or 1/10 the diameter of the tree). This is called “hinge” or “hingewood.” It controls the fall of the tree and prevents slipping or twisting or shoot-back of the tree off the stump. See Figures 14 - 15.
On large diameter trees, stop the back cut before it is deep enough for the tree to either fall or settle back on the stump. Then insert soft wooden or plastic wedges into the cut so they do not touch the chain. The wedges can be driven in, little by little, to help jack the tree over. See Figure 16.
As tree starts to fall, stop the chain saw and put it down immediately. Retreat along the cleared path, but watch the action in case something
LOG SUPPORTED AT ONE END:
LOAD FINISHING CUT 

 1ST CUT 1/3 DIA
LOG SUPPORTED AT BOTH ENDS:
LOAD
1ST CUT 1/3 DIA
FINISHING CUT |
Fig. 19 |
|
falls your way. Be alert for overhead limbs or branches that may fall and watch your footing.
 WARNING:
Never cut through to the notch when making a backcut. The hinge controls the fall of the tree, this is the section of wood between the notch and backcut.
BUCKING
See Figures 17 - 20.
Bucking is the term used for cutting a fallen tree to the desired log length.
Always make sure your footing is secure and your weight is distributed evenly on both feet.
Cut only one log at a time.
Support small logs on a saw horse or another log while bucking.
Keep a clear cutting area. Make sure that no objects can contact the guide bar nose and chain during cutting, this can cause kickback.
When bucking on a slope, always stand on the uphill side of the log. To maintain complete control of the chain saw when cutting through the log, release the cutting pressure near the end of the cut without relaxing your grip on the
20 - English
OPERATION
chain saw handles. Do not let the chain contact the ground. After completing the cut, wait for the saw chain to stop before you move the chain saw. Always stop the motor before moving from tree to tree.
Sometimes it is impossible to avoid pinching (with just standard cutting techniques) or difficult to predict which way a log will settle when cut. To avoid pinching while cutting, rotate or move the log so that the pinch is eliminated.
BUCKING LOGS UNDER STRESS
See Figures 19 - 20.
When the log is supported along its entire length, it should be cut from the top or overbucking.
When the log is supported on one end, cut 1/3 the diameter from the underside or underbucking. Then make the finishing cut by overbucking to meet the first cut.
As the log is being cut, it will tend to bend. The saw can become pinched or hung in the log if you make the first cut deeper than 1/3 of the diameter of the log.
Give special attention to logs under stress to prevent the bar and chain from pinching.
When bucking on a slope, always stand on the uphill side of the log as shown in figure 18. When “cutting through,” to maintain complete control of the chain saw, release the cutting pressure near the end of the cut without relaxing your grip on the chain saw handles. Do not let the chain contact the ground. After completing the cut, wait for the saw chain to stop before you move the chain saw. Always stop the motor before moving from tree to tree.
TYPES OF CUTTING USED
See Figure 20.
OVERBUCKING
Begin on the top side of the log with the bottom of the saw against the log; exert light pressure downward. Note that the saw will tend to pull away from you.
UNDERBUCKING
Begin on the under side of the log with the top of the saw against the log; exert light pressure upward. During underbucking, the saw will tend to push back at you. Be prepared for this reaction and hold the saw firmly to maintain control.
OVERBUCKING
UNDERBUCKING
Fig. 20
|
2 |
3 |
1 |
|
|
|
|
4 |
CUT LIMBS ONE AT A TIME AND LEAVE SUPPORT LIMBS
UNDER TREE UNTIL LOG IS CUT
Fig. 21
WARNING:
Never climb into a tree to limb or prune. Do not stand on ladders, platforms, a log, or in any position which can cause you to lose your balance or control of the saw.
LIMBING
See Figure 21.
Limbing is removing branches from a fallen tree.
Work slowly, keeping both hands on the chain saw with a firm grip. Always make sure your footing is secure and your weight is distributed evenly on both feet.
Leave the larger support limbs under the tree to keep the tree off the ground while cutting.
21 - English

OPERATION
Limbs should be cut one at a time. Remove the cut limbs from the work area often to help keep the work area clean and safe.
Branches under tension should be cut from the bottom up to avoid binding the chain saw.
Keep the tree between you and the chain saw while limbing. Cut from the side of the tree opposite the branch you are cutting.
PRUNING
See Figure 22.
Pruning is trimming limbs from a live tree.
Work slowly, keeping both hands on the chain saw with a firm grip. Always make sure your footing is secure and your weight is distributed evenly on both feet.
Do not cut from a ladder, this is extremely dangerous. Leave this operation for professionals.
Do not cut above chest height as a saw held higher is difficult to control against kickback.
When pruning trees it is important not to make the finishing cut next to the main limb or trunk until you have cut off the limb further out to reduce the weight. This prevents stripping the bark from the main member.
Underbuck the branch 1/3 through for your first cut.
Your second cut should overbuck to drop the branch off.
Now make your finishing cut smoothly and neatly against the main member so the bark will grow back to seal the wound.
WARNING:
If the limbs to be pruned are above chest height, hire a professional to perform the pruning. Failure to do so could result in serious personal injury.
SPRINGPOLES
See Figure 23.
A springpole is any log, branch, rooted stump, or sapling which is bent under tension by other wood so that it springs back if the wood holding it is cut or removed. On a fallen tree, a rooted stump has
LOAD |
SECOND CUT |
|
FIRST CUT
1/3 DIAMETER
FINISHING CUT
Fig. 22
SPRINGPOLE
Fig. 23
a high potential of springing back to the upright position during the bucking cut to separate the log from the stump. Watch out for springpoles, they are dangerous.
WARNING:
Springpoles are dangerous and could strike the operator, causing the operator to lose control of the chain saw. This could result in severe or fatal injury to the operator.
22 - English

MAINTENANCE
WARNING:
When servicing, use only identical replacement parts. Use of any other parts can create a hazard or cause product damage.
WARNING:
Always wear eye protection with side shields marked to comply with ANSI Z87.1 as well as head and hearing protection when operating this equipment. Failure to do so could result in objects being thrown into your eyes and other possible serious injuries.
REPLACING BAR AND CHAIN
See Figures 24 - 30.
 WARNING:
Remove the battery pack from the chain saw and make sure the chain has stopped before you do any work on the saw. Failure to do so may result in accidental starting and possible serious injury.
WARNING:
The safety instructions in this section are to protect the user from serious personal injury.
WARNING:
Toavoidseriouspersonalinjury,alwaysremovethe battery pack from the product when cleaning or performing any maintenance.
CAUTION:
Always wear gloves when handling the bar and chain; these components are sharp and may contain burrs.
 WARNING:
GENERAL MAINTENANCE |
Never touch or adjust the chain while the |
||
Before each use, inspect the entire product for |
motor is running. The saw chain is very sharp; |
||
damaged, missing, or loose parts such as screws, |
always wear protective gloves when performing |
||
nuts, bolts, caps, etc. Tighten securely all fasteners |
maintenance to the chain to avoid possible |
||
serious lacerations. |
|||
and caps and do not operate this product until all |
|||
|
|||
missing or damaged parts are replaced. Please call |
NOTE: When replacing the guide bar and chain, |
||
1-800-860-4050 or contact an authorized service |
|||
always use the specified bar and chain listed in |
|||
center for assistance. |
|||
the Bar and Chain Combinations section later |
|||
Avoid using solvents when cleaning plastic parts. |
|||
in this manual. |
|||
Most plastics are susceptible to damage from |
Remove the battery pack before you do any |
||
various types of commercial solvents and may be |
work on the chain saw. |
||
damaged by their use. Use clean cloths to remove |
n Remove the bar mounting nuts using the |
||
dirt, dust, oil, grease, etc. |
combination wrench provided. |
||
WARNING: |
|
n Remove the chain cover. |
|
|
n Remove the bar and chain from the mounting |
||
|
|
||
Do not at any time let brake fluids, gasoline, |
surface. |
||
petroleum-based products, penetrating |
n Remove the old chain from the bar. |
||
oils, etc., come |
in contact with plastic |
n Lay out the new saw chain in a loop and |
|
parts. Chemicals |
can damage, weaken or |
||
straighten any kinks. The cutters should face |
|||
destroy plastic which could result in serious |
in the direction of chain rotation. If they face |
|
personal injury. |
|
|
|
backwards, turn the loop over. |
|
|
|
|
|
|
n Place the chain drive links into the bar groove as |
|
|
shown. |
|
|
NOTE: Make certain of direction of chain. |
|
23 - English |
|

MAINTENANCE
nPosition the chain so there is a loop at the back of the bar.
nHold the chain in position on the bar and place the loop around the sprocket.
nFit the bar flush against the mounting surface so that the bar studs are in the long slot of the bar.
nReplace the chain cover ensuring that the adjusting pin in the chain cover is in the bar chain tensioning pin hole and that both bar studs are securely in their respective holes in the chain cover.
NOTE: The adjusting pin may need to be slightly repositioned with the chain tensioning screw so that it is aligned with the position of the bar chain tensioning pin hole.
nReplace the chain cover and bar mounting nuts.
nFinger-tighten the bar mounting nuts. The bar must be free to move for tension adjustment.
nRemove all slack from the chain by turning the chain tensioning screw clockwise until the chain seats snugly against the bar with the drive links in the bar groove.
nLift the tip of the guide bar up to check for sag.
nHold the tip of the guide bar up and tighten the bar mounting nuts securely.
The chain is correctly tensioned when there is no sag on the underside of the guide bar, the chain is snug, but it can be turned by hand without binding.
NOTE: If chain is too tight, it will not rotate. Loosen the bar nuts slightly and turn the tension adjuster 1/4 turn counterclockwise. Lift the tip of the guide bar up and retighten the bar nuts securely. Ensure that the chain will rotate without binding.
CHAIN |
|
|
TENSIONING |
BAR MOUNTING |
|
SCREW |
||
NUTS |
||
|
Fig. 24
CHAIN
MOUNTING
SURFACE CHAIN
COVER


 BAR
BAR 


BAR MOUNTING
NUTS
Fig. 25
CUTTERS |
CHAIN ROTATION |
|
CHAIN DRIVE LINKS
ADJUSTING THE CHAIN TENSION
See Figures 30 - 32.
WARNING:
Never touch or adjust the chain while the motor is running. The saw chain is very sharp. Always wear protective gloves when performing maintenance on the chain.
Remove the battery pack before you do any |
Fig. 26 |
work on the chain saw. |
|
24 - English |
|

MAINTENANCE
LIFT THE TIP OF THE GUIDE BAR UP TO CHECK
FOR SAG
CHAIN DRIVE |
|
|
|
LINKS |
|
|
Fig. 29 |
BAR |
|
|
|
|
|
|
|
GROOVE |
Fig. 27 |
|
|
|
|
|
|
|
CHAIN |
|
|
BAR STUDS |
COVER |
|
|
|
|
|
|
|
|
CHAIN |
BAR MOUNTING |
|
|
TENSIONING |
|
|
|
NUTS |
|
|
|
SCREW |
|
|
|
|
|
|
BAR |
|
Fig. 30 |
|
MOUNTING |
|
|
CHAIN |
NUTS |
|
|
|
|
|
|
TENSION PIN |
ADJUSTING |
|
|
HOLE |
PIN |
|
|
Fig. 28
nMake sure the bar mounting nuts are loosened to finger tight.
nTurn the chain tensioning screw clockwise to increase tension the chain.
NOTE: A cold chain is correctly tensioned when there is no slack on the underside of the guide bar, the chain is snug, and it can be turned by hand without binding.
APPROX. .050 in.
FLATS
n Retension the chain whenever the flats on the |
Fig. 31 |
||
drive links hang out of the bar groove. |
|
||
|
|
||
|
|
||
NOTE: During normal saw operation, the tem- |
≈ 0.050 in. |
||
perature of the chain increases. The drive links |
|||
of a correctly tensioned warm chain will hang |
|
||
approximately 0.050 in. out of the bar groove. |
|
||
The tip of the supplied combination wrench can |
|
||
be used as a guide to help determine the correct |
Fig. 32 |
||
warm chain tension. |
|||
|
|||
25 - English |
|
||

MAINTENANCE
NOTE: New chains tend to stretch; check the chain tension frequently and tension as required.
 CAUTION:
A chain tensioned while warm may be too tight upon cooling. Check the “cold tension” before next use to avoid possible injury.
CHAIN MAINTENANCE
See Figures 33 - 35.
 WARNING:
Remove the battery pack and make sure the chain has stopped before you do any work on the saw.
Use only low-kickback chain on this saw. This fast-cutting chain will provide kickback reduction when properly maintained.
For smooth and fast cutting, chain needs to be maintained properly. The chain requires sharpening when the wood chips are small and powdery, the chain must be forced through the wood during cutting, or the chain cuts to one side. During maintenance of your chain, consider the following:
Improper filing angle of the side plate can increase the risk of a severe kickback.
Raker (depth gauge) clearance.
Too low increases the potential for kickback.
Not low enough decreases cutting ability.
If cutter teeth have hit hard objects such as nails and stones, or have been abraded by mud or sand on the wood, have service dealer sharpen chain.
NOTE: Inspect the drive sprocket for wear or damage when replacing the chain. If signs of wear or damage are present in the areas indicated, have the drive sprocket replaced by a Ryobi Service dealer.
HOW TO SHARPEN THE CUTTERS
See Figures 36 - 37.
Be careful to file all cutters to the specified angles and to the same length, as fast cutting can be obtained only when all cutters are uniform.
Wear gloves for protection. Properly tension the chain prior to sharpening. Refer to Chain
RAKER CLEARANCE
.025 in.
Fig. 33
CHECK FOR WEAR
OR DAMAGE
DRIVE SPROCKET |
Fig. 34 |
CUTTING |
|
CORNER |
|
TOP PLATE |
SIDE PLATE |
RIVET HOLE |
DEPTH GAUGE |
|
|
HEEL |
TOE |
|
|
GULLET |
Fig. 35 |
|
Tension section earlier in this manual. Do all of your filing at the mid-point of the bar.
Use a 5/32 in. diameter round file and holder.
Keep the file level with the top plate of the tooth. Do not let the file dip or rock.
Using light but firm pressure, stroke towards the front corner of the tooth.
Lift file away from the steel on each return stroke.
Put a few firm strokes on every tooth. File all left hand cutters in one direction. Then move to the other side and file the right hand cutters in the opposite direction. Occasionally remove filings from the file with a wire brush.
26 - English

MAINTENANCE
 WARNING:
Improper chain sharpening increases the potential of kickback.
 WARNING:
Failure to replace or repair damaged chain can cause serious injury.
 WARNING:
The saw chain is very sharp, always wear protective gloves when performing maintenance to the chain.
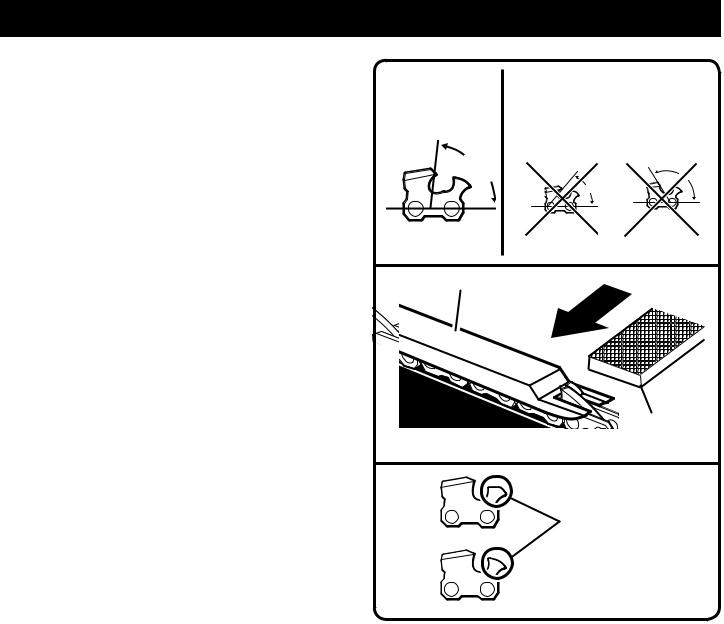
TOP PLATE FILING ANGLE
See Figure 38.
CORRECT 30° - File holders are marked with guide marks to align file properly to produce correct top plate angle.
LESS THAN 30° - For Cross Cutting.
MORE THAN 30° - Feathered Edge Dulls Quickly.
SIDE PLATE ANGLE
See Figure 39.
CORRECT - 80° Produced automatically if correct diameter file is used in file holder.
HOOK - “Grabs” and dulls quickly. Increases potential of KICKBACK.
Results from using a file with diameter too small, or file held too low.
BACKWARD SLOPE - Needs too much feed pressure, causes excessive wear to bar and chain.
Results from using a file with diameter too large, or file held too high.
DEPTH GAUGE CLEARANCE
See Figures 40 - 41.
The depth gauge should be maintained at a clearance of .025 in. Use a depth gauge tool for checking the depth gauge clearances.
Every time the chain is filed, check the depth gauge clearance.
Fig. 36
LEFT HAND
 CUTTERS
RIGHT HAND |
|
|
|
|
CUTTERS |
|
|
Fig. 37 |
|
|
|
|
||
|
|
|||
CORRECT TOP PLATE |
INCORRECT TOP PLATE FILING |
|||
FILING ANGLE |
|
ANGLE |
|
|
|
LESS |
MORE |
||
|
THAN 30° |
THAN 30° |
||
30° |
|
|
|
|
|
|
|
|
|
|
|
|
|
|
|
|
|
|
|
Fig. 38
Use a flat file and a depth gauge jointer to lower all gauges uniformly. Depth gauge jointers are available in .020 in. to .035 in. Use a .025 in. depth gauge jointer. After lowering each depth gauge, restore original shape by rounding the front. Be careful not to damage adjoining drive links with the edge of the file.
Depth gauges must be adjusted with the flat file in the same direction the adjoining cutter was filed with the round file. Use care not to contact cutter face with flat file when adjusting depth gauges.
27 - English
MAINTENANCE
GUIDE BAR MAINTENANCE
When the guide bar shows signs of wear, reverse it on the saw to distribute the wear for maximum bar life. The bar should be cleaned every day of use and checked for wear and damage.
Feathering or burring of the bar rails is a normal process of bar wear. Such faults should be smoothed with a file as soon as they occur.
A bar with any of the following faults should be replaced.
Wear inside the bar rails which permits the chain to lay over sideways.
Bent guide bar.
Cracked or broken rails.
Spread rails.
Lubricate guide bars with a sprocket at their tip weekly. Using a grease syringe, lubricate weekly in the lubricating hole. Turn the guide bar and check that the lubrication holes and chain groove are free from impurities.
NOTE: Do not replace the screw with an ordinary screw. Use only identical replacement parts from the manufacturer when replacing parts.
CORRECT SIDE |
INCORRECT SIDE PLATE |
|
PLATE FILING |
FILING ANGLE |
|
ANGLE |
|
|
|
HOOK |
BACKWARD |
|
|
SLOPE |
80° |
|
|
Fig. 39
DEPTH GAUGE JOINTER
FLAT FILE
Fig. 40
RESTORE ORIGINAL
SHAPE BY ROUNDING
THE FRONT
Fig. 41
28 - English
 Loading...