


Operation Manual
DVD AV RECEIVER
AVH-P5250DVD
AVH-P5250BT
English

 Contents
Thank you for purchasing this PIONEER product.
To ensure proper use, please read through this manual before using this product. It is especially important that you read and observe WARNINGs and CAUTIONs in this manual. Please keep the manual in a safe and accessible place for future reference.
 Be sure to read this
!DVD video disc region numbers 6
!Handling guideline 84
Precautions |
|
|
IMPORTANT SAFEGUARDS |
4 |
|
To ensure safe driving |
4 |
|
To avoid battery exhaustion |
5 |
|
Before You Start |
|
|
About this unit 6 |
|
|
Operating environment |
6 |
|
In case of trouble 6 |
|
|
Protecting your unit from theft 6 Resetting the microprocessor 7 Feature demo mode 7
Adjusting the response positions of the touch panels (Touch Panel Calibration) 7
Use and care of the remote control 8
 What’s what
Head unit 9
Remote control 10
 Basic Operations
Basic Operations 11
Operating the scroll bar and the scrubber bar 12
Activating the touch panel keys 12 Common operations for menu settings/
lists 13
Opening and closing the LCD panel 13
Ejecting a disc |
14 |
Ejecting an SD |
14 |
Setting the clock |
14 |
 Tuner
Tuner
Introduction of tuner operations 15
 Playing moving images
Introduction of video playback operations 16
 Playing audio
Introduction of sound playback operations 19
 Playing still images
Introduction of still image playback operations 22
Introduction of still image playback as a slideshow operations 23
 Bluetooth Telephone
Introduction of Bluetooth telephone operations 24
 TV tuner
Introduction of TV tuner operations 26
 Using Bluetooth wireless technology
Introduction of Bluetooth telephone
operations 27 |
|
|
Bluetooth audio operations |
|
28 |
Detailed instructions |
|
|
Storing and recalling stations |
30 |
|
Storing the strongest stations |
30 |
|
Tuning in to strong signals |
30 |
|
Switching the media file type |
30 |
|
Operating the DVD menu |
30 |
|
Operating this unit’s iPod function from your iPod 31
Random play (shuffle) 31
Playing all songs in random order (shuffle
all) 31 |
|
|
|
Repeating playback |
31 |
|
|
Playing videos from your iPod |
32 |
|
|
Browsing for a video/music on the iPod |
32 |
||
Resume playback (Bookmark) |
33 |
|
|
Frame-by-frame playback 33 |
|
|
|
Slow motion playback |
33 |
|
|
Searching for the part you want to play |
33 |
||
Changing audio language during playback (Multi-audio) 34
Changing the subtitle language during playback (Multi-subtitle) 34
 2
2 En
En

 Contents
Changing the viewing angle during playback
(Multi-angle) |
34 |
|
|
|
|
|
|
||
Return to the specified scene |
34 |
|
|
||||||
Selecting audio output |
35 |
|
|
|
|
||||
PBC playback |
35 |
|
|
|
|
|
|
||
Selecting tracks from the track title list |
35 |
||||||||
Selecting files from the file name list |
35 |
||||||||
Using advanced sound retriever |
36 |
|
|
||||||
Changing audiobook speed |
36 |
|
|
|
|||||
Displaying lists related to the currently |
|
||||||||
playing song (Link Search) |
36 |
|
|
||||||
Playing DivXÒ VOD content |
36 |
|
|
|
|||||
Capture an image in JPEG files |
37 |
|
|
||||||
Changing the wide screen mode |
37 |
|
|
||||||
Calling a number in the phone book |
38 |
|
|||||||
Selecting a number by alphabet search |
|
||||||||
mode |
|
38 |
|
|
|
|
|
|
|
Using the missed, received and dialed call |
|||||||||
lists |
39 |
|
|
|
|
|
|
|
|
Using the missed, received and dialed call |
|||||||||
lists |
39 |
|
|
|
|
|
|
|
|
Setting automatic answering |
39 |
|
|
||||||
Adjusting the other party’s listening |
|
|
|||||||
volume |
39 |
|
|
|
|
|
|
|
|
Switching the ring tone |
40 |
|
|
|
|
||||
Using the preset dial lists |
40 |
|
|
|
|||||
Making a call by entering phone number |
40 |
||||||||
Setting the private mode |
41 |
|
|
|
|
||||
Pairing from this unit |
41 |
|
|
|
|
|
|||
Using a Bluetooth device to pair |
41 |
|
|
||||||
Connecting to a Bluetooth device |
|
|
|
||||||
automatically |
42 |
|
|
|
|
|
|
||
Switching visible unit |
42 |
|
|
|
|
|
|||
Displaying BD (Bluetooth Device) |
|
|
|||||||
address |
42 |
|
|
|
|
|
|
|
|
Entering PIN code for Bluetooth wireless |
|
||||||||
connection |
43 |
|
|
|
|
|
|
||
Using a cellular phone to initiate a |
|
|
|||||||
connection |
43 |
|
|
|
|
|
|
||
Registering a connected cellular phone |
43 |
||||||||
Voice recognition 44 |
|
|
|
|
|
|
|||
Connecting a Bluetooth audio player |
44 |
||||||||
Connecting to a Bluetooth device |
|
||||
automatically |
44 |
|
|
|
|
Displaying BD (Bluetooth Device) |
|
||||
address 44 |
|
|
|
|
|
Menu operations |
|
|
|
|
|
Introduction of menu operations |
45 |
||||
Audio Adjustments |
46 |
|
|
|
|
Digital Signal Processor |
49 |
|
|||
Setting up the DVD player |
59 |
|
|||
System settings |
63 |
|
|
|
|
Entertainment settings |
70 |
|
|
||
Customizing menus |
71 |
|
|
|
|
Other Functions |
|
|
|
|
|
Changing the picture adjustment |
72 |
||||
Setting rear monitor output |
72 |
|
|||
Adjusting the response positions of the touch panels (Touch Panel
Calibration) |
73 |
|
Using an AUX source |
73 |
|
Using an external unit |
74 |
|
Additional Information |
||
Troubleshooting |
75 |
|
Error messages |
77 |
|
Understanding auto EQ/auto TA and EQ error messages 80
Understanding messages 81 Indicator list 83
Handling guideline 84
Compressed audio compatibility (disc, USB, SD) 87
iPod compatibility 88 Sequence of audio files 88
Using the display correctly |
89 |
|
Copyright and trademark |
90 |
|
Language code chart for DVD |
92 |
|
Specifications 94 |
|
|
En  3
3

Section |
|
01 |
Precautions |
IMPORTANT SAFEGUARDS
Please read all of these instructions regarding your display and retain them for future reference.
1Read this manual fully and carefully before operating your display.
2Keep this manual handy as a reference for operating procedures and safety information.
3Pay close attention to all warnings in this manual and follow the instructions carefully.
4Do not allow other persons to use this system until they have read and understood the operating instructions.
5Do not install the display where it may (i) obstruct the driver’s vision, (ii) impair the performance of any of the vehicle’s operating systems or safety features, including air bags, hazard lamp buttons or (iii) impair the driver’s ability to safely operate the vehicle.
6Do not operate this display if doing so in any way will divert your attention from the safe operation of your vehicle. Always observe safe driving rules and follow all existing traffic regulations. If you experience difficulty in operating the system or reading the display, park your vehicle in a safe location and make necessary adjustments.
7Please remember to wear your seat belt at all times while operating your vehicle. If you are ever in an accident, your injuries can be considerably more severe if your seat belt is not properly buckled.
8Never use headphones while driving.
9To promote safety, certain functions are disabled unless the parking brake is on, and the vehicle is not in motion.
10Never set the volume of your display so high that you cannot hear outside traffic and emergency vehicles.
 WARNING
!Do not attempt to install or service your display by yourself. Installation or servicing of the display by persons without training and experience in electronic equipment and automotive accessories may be dangerous and could expose you
to the risk of electric shock or other hazards.
To ensure safe driving
 WARNING
!LIGHT GREEN LEAD AT POWER CONNECTOR IS DESIGNED TO DETECT PARKED STATUS AND MUST BE CONNECTED TO THE POWER SUPPLY SIDE OF THE PARKING BRAKE SWITCH. IMPROPER CONNECTION OR USE OF THIS LEAD MAY VIOLATE APPLICABLE LAW AND MAY RESULT IN SERIOUS INJURY OR DAMAGE.
!To avoid the risk of damage and injury and the potential violation of applicable laws, this unit is not for use with a video screen that is visible to the driver.
!To avoid the risk of accident and the potential violation of applicable laws, no viewing of front seat video should ever occur while the vehicle is being driven.
!In some countries or states the viewing of images on a display inside a vehicle even by persons other than the driver may be illegal. Where such regulations apply, they must be obeyed and this unit’s DVD features should not be used.
When you attempt to watch a video image while driving, the warning Viewing of front seat video source while driving is strictly prohibited. will appear on the front display. To watch a video image on the front display, park your vehicle in a safe place and apply the parking brake.
 4
4 En
En

|
Section |
Precautions |
01 |
When using a display connected to REAR MONITOR OUTPUT
This unit’s REAR MONITOR OUTPUT is for connection of a display to enable passengers in the rear seats to watch the DVD or Video CD.
 WARNING
NEVER install the rear display in a location where the driver can watch a DVD or TV while driving.
When using the rear view camera
With an optional rear view camera, this unit can be used as an aid to keep an eye on trailers, or when backing into a tight parking spot.
 WARNING
!SCREEN IMAGE MAY APPEAR REVERSED.
!USE INPUT ONLY FOR REVERSE OR MIRROR IMAGE REAR VIEW CAMERA. OTHER USE MAY RESULT IN INJURY OR DAMAGE.
 CAUTION
!The rear view camera function is to be used as an aid to keep an eye on trailers, or while backing up. Do not use for entertainment purposes.
!Please note that the edges of the rear view camera images may differ slightly according to whether full screen images are displayed when backing up, and whether the images are
used for checking the rear when the vehicle is moving forward.
To avoid battery exhaustion
Keep the vehicle engine running when using this unit to avoid draining the battery power.
!When no power is supplied to this unit, such as when the vehicle battery is being
replaced, the microcomputer of this unit returns to its initial condition. We recommend that you transcribe the audio adjustment data.
 WARNING
Do not use with vehicles that do not feature an ACC position.
Precautions
En  5
5

Section
02  Before You Start
About this unit
CAUTION:
USE OF CONTROL OR ADJUSTMENT OR PERFORMANCE OF PROCEDURES OTHER THAN THOSE SPECIFIED HEREIN MAY RESULT IN HAZARDOUS RADIATION EXPOSURE.
CAUTION:
THE USE OF OPTICAL INSTRUMENTS WITH THIS PRODUCT WILL INCREASE EYE HAZARD.
 CAUTION
!Do not allow this unit to come into contact with liquids. Electrical shock could result. Also, damage to this unit, smoke, and overheating could result from contact with liquids.
!Keep this manual handy for future reference.
!Always keep the volume low enough to hear outside sounds.
!Avoid exposure to moisture.
!If the battery is disconnected or discharged, any preset memory will be erased.
In case of trouble
Should this product fail to operate properly, please contact your dealer or nearest authorized Pioneer Service Station.
Protecting your unit from theft
The front panel can be detached to deter theft.
!If the front panel is not detached from the head unit within four seconds of turning off the ignition, a warning tone will sound.
!You can turn off the warning tone. Refer to
Switching the warning tone on page 65.
 Important
!Handle gently when removing or attaching the front panel.
!Avoid subjecting the front panel to excessive shock.
!Keep the front panel out of direct sunlight and high temperatures.
!If removed, replace the front panel on the unit before starting up your vehicle.
DVD video disc region numbers
Only DVD video discs with compatible region numbers can be played on this player. You can find the region number of the player on the bottom of this unit and in this manual (refer to
Specifications on page 94).
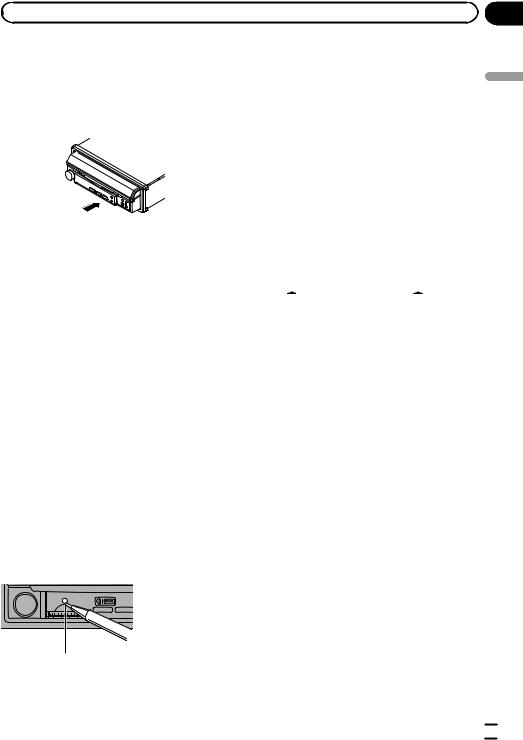
Removing the front panel
% Pinch the top and bottom of its right side and pull the front panel out.
Take care not pinch it too tightly or to drop it, and also avoid contact with water or other fluids to prevent permanent damage.
Operating environment
This unit should be used within the temperature ranges shown below.
Operating temperature range: -10 °C to +60 °C EN300328 ETC test temperature: -20 °C and +55 °C 
 6
6 En
En
|
Section |
Before You Start |
02 |
Re-attaching the front panel
1 Slide the front panel to the left.
Front panel and the head unit are connected on the left side. Make sure that the front panel has been properly connected to the head unit.
2 Press the right side of the front panel until it is firmly seated.
# If you can’t attach the front panel to the head unit successfully, try again. However, forcing the front panel into place may result in damage.
Resetting the microprocessor
By pressing RESET, you can reset the microprocessor to its initial settings without changing the bookmark information.
The microprocessor must be reset in the following situations:
!Before using this unit for the first time after installation
!If the unit fails to operate properly
!When strange or incorrect messages appear on the display
1Turn the ignition switch OFF.
2Press RESET with a pen tip or other pointed instrument.
For this function, verify the following section before operation. Refer to the previous page.
RESET button
 Note
Note
Switch your engine ON or set the ignition switch to ACC ON before pressing RESET in the following situations:
!After completing connections
!When erasing all stored settings
!When resetting the unit to its initial (factory) settings
Feature demo mode
The feature demo automatically starts when you select Off for the source and continues while the ignition switch is set to ACC or ON. To cancel the feature demo, press and hold MUTE/ . Press and hold MUTE/
 again to restart. Operating the feature demo while the car engine is turned off it may drain the battery power.
 Important
Failure to connect the red lead (ACC) of this unit to a terminal coupled with ignition switch on/off operations may lead to battery drain. 
Adjusting the response positions of the touch panels (Touch Panel Calibration)
If you feel that the touch panel keys on the screen deviate from the actual positions that respond to your touch, adjust the response positions of the touch panel. Refer to Adjusting the response positions of the touch panels (Touch Panel Calibration) on page 73.
Start You Before
En  7
7

Section
02  Before You Start
Use and care of the remote control
Installing the battery
Slide the tray on the back of the remote control out and insert the battery with the plus (+) and minus (–) poles aligned properly.
!When using for the first time, pull out the film protruding from the tray.
 Important
!Do not store the remote control in high temperatures or direct sunlight.
!Do not let the remote control fall onto the
floor, where it may become jammed under the brake or accelerator pedal.
 WARNING
Keep the battery out of the reach of children. Should the battery be swallowed, consult a doctor immediately.
 CAUTION
!Use one CR2025 (3 V) lithium battery.
!Remove the battery if the remote control is not used for a month or longer.
!There is a danger of explosion if the battery is incorrectly replaced. Replace only with the same or equivalent type.
!Do not handle the battery with metallic tools.
!Do not store the battery with metallic objects.
!If the battery leaks, wipe the remote control completely clean and install a new battery.
!When disposing of used batteries, comply with governmental regulations or environmental public institutions’ rules that apply in your country/area.
Using the remote control
Point the remote control in the direction of the front panel to operate.
!The remote control may not function properly in direct sunlight.
 8
8 En
En

|
Section |
What’s what |
03 |
Head unit
 CAUTION
!Use an optional Pioneer USB cable (CD-U50E) to connect the USB audio player/USB memory as any device connected directly to the unit will protrude out from the unit and may be dangerous.
!Do not use unauthorized products.
!For details on how to operate a navigation unit from this unit, refer to its operation manual.
 Note
Note
When the navigation unit is connected, press MODE to switch to the navigation display. Press MODE and hold to turn the display off.
Press MODE again to turn the display on.
what s What ’
|
Part |
|
Part |
|
MUTE/ |
|
|
1 |
( : AVH-P5250BT |
8 |
OPEN/CLOSE |
|
only) |
|
|
|
|
|
|
|
MENU |
|
AUX input jack (3.5 |
|
Displaying the |
|
mm stereo/video |
2 |
menu. |
9 |
jack) |
|
Returning to the |
|
Use to connect an |
|
normal display. |
|
auxiliary device. |
|
|
|
|
|
|
|
Auto EQ micro- |
|
MODE |
|
phone input jack |
3 |
Turning the infor- |
a Use to connect an |
|
|
mation display off. |
|
auto EQ micro- |
|
|
|
phone. |
|
|
|
|
|
|
|
USB port |
4 |
Disc loading slot |
b |
When connecting, |
open the USB con- |
|||
|
|
|
nector lid. |
|
|
|
|
5 |
SRC/OFF |
c |
RESET |
|
|
|
|
6 |
c/d(TRK) |
d |
SD memory card |
slot |
|||
|
|
|
|
7 |
h(eject) |
|
|
|
|
|
|
En  9
9

Section
03  What’s what
Remote control
|
|
|
|
|
|
|
|
|
|
|
|
|
|
||
|
|
|
|
|
|
|
|
|
|
|
|
|
|
|
|
|
Part |
Operation |
|
|
|
Use to operate fast for- |
|
|
|
ward, rewind and |
|
|
|
other track search |
|
d |
Thumb pad |
controls. Click to recall |
|
|
|
Menu. |
|
|
|
Use to select a menu |
|
|
|
on the DVD menu. |
|
|
|
Press to display the |
|
e |
RETURN |
PBC (playback con- |
|
trol) menu during PBC |
|||
|
|
||
|
|
playback. |
|
|
f |
Press to pause or re- |
|
|
sume playback. |
||
|
|
||
|
|
Press to return to the |
|
|
o |
previous track (chap- |
|
f |
|
ter). |
|
|
|
||
|
p |
Press to go to the next |
|
|
track (chapter). |
||
|
|
||
|
g |
Press to stop play- |
|
|
back. |
||
|
|
||
|
|
Press to select the |
|
g |
a/b(FOLDER/P.CH) |
next/previous disc/ |
|
|
|
folder. |
|
Part |
Operation |
|
|
|
Press to select the |
|
|
|
tuner band when |
|
|
|
tuner is selected as a |
|
|
|
source. Also used to |
|
|
|
cancel the control |
|
|
|
mode of functions. |
|
h |
BAND/ESC |
Press to switch be- |
|
tween modes when |
|||
|
|
||
|
|
playing discs with |
|
|
|
compressed audio |
|
|
|
and audio data (CD- |
|
|
|
DA) such as CD- |
|
|
|
EXTRA and MIXED- |
|
|
|
MODE CDs. |
|
|
|
|
|
|
|
Press to display the |
|
|
MENU |
DVD menu during |
|
i |
|
DVD playback. |
|
|
|
||
|
Press to return to the |
||
|
|
||
|
TOP MENU |
top menu during DVD |
|
|
|
playback. |
|
|
|
|
|
|
|
Press to change the |
|
|
AUDIO |
audio language during |
|
|
|
DVD playback. |
|
|
|
|
|
|
|
Press to change the |
|
j |
SUBTITLE |
subtitle language dur- |
|
|
|
ing DVD playback. |
|
|
|
|
|
|
|
Press to change the |
|
|
ANGLE |
viewing angle during |
|
|
|
DVD playback. |
|
|
|
|
|
|
|
Press to cycle through |
|
|
|
all the available rear |
|
k |
REAR SRC |
sources. |
|
|
|
Press and hold to turn |
|
|
|
the rear source off. |
|
|
|
|
 10
10 En
En
 Basic Operations
Basic Operations
1 2
Wed 28 may
12:45 PM
|
3 |
4 |
5 |
6 |
|
Radio |
Rear Front |
Rear |
|
|
View |
|
||
|
Disc |
|
|
|
|
iPod |
|
|
|
SD |
SD |
|
|
|
|
|
|
|
|
|
AUX |
|
|
|
1 Touch panel keys
1 |
|
|
|
|
|
Displaying the source menu. |
|
|
|
|
|
|
|
|
|
|
|
|
|
Switching to clock adjust- |
2 |
|
|
Wed 28 may |
|
|
ment display. |
|
|
12:45 PM |
|
Refer to Setting the clock on |
||
|
|
|
|
|
|
|
|
|
|
|
|
|
page 14. |
|
|
|
|
|
|
|
Source icon
Selecting a favorite source. 3 Radio When the source icon is not
displayed, it can be displayed by touching the screen.
Switching the output source
4 Rear Front for the rear monitor.
Refer to Setting rear monitor output on page 72.
5 |
|
Rear |
Switching the rear view |
|
View |
image on or off. |
|
|
|
||
|
|
|
|
|
|
|
|
6 |
|
|
Turning the unit off. |
|
|
||
|
|
|
|
|
|
|
|
Turning the unit on using the buttons 1 Press SRC/OFF to turn the unit on.
Turning the unit off using the buttons
1 Press SRC/OFF and hold until the unit turns off.
Selecting a source using the buttons
1 Press SRC/OFF to cycle through the sources listed below:
Selecting a source using the touch panel keys
1Touch the source icon and then touch the desired source name.
!Radio – Radio
!TV – Television
!AV – AV input
!Disc – Built-in DVD player
!USB/iPod – USB/iPod
!SD – SD memory card
!EXT1 – External unit 1
!EXT2 – External unit 2
!AUX – AUX
!TEL – Bluetooth telephone/audio
!When the source icon is not displayed, it can be displayed by touching the screen.
!While operating the menu, you cannot select a source by touching the source icon.
Adjusting the volume
1Rotate MUTE/ to increase or decrease the volume.
 Notes
Notes
!In this manual, iPod and iPhone will be referred to as “iPod”.
!The USB/iPod icon will change as follows:
—USB is displayed when a USB storage device is connected.
—iPod is displayed when an iPod is connected.
—USB/iPod is displayed when no device is connected.
!When appropriately set up, the image from the rear view camera can be displayed automatically. For details, refer to Setting the rear view camera (back up camera) on page 66.
!An external unit refers to a Pioneer product, such as those which will be available in the future. Although incompatible as a source, the basic functions of up to two external units can be controlled with this unit. When two external units are connected, the external units are
automatically allocated to external unit 1 or external unit 2.
Section
04 |
Operations Basic
En  11
11

Section
04  Basic Operations
Operating the scroll bar and the scrubber bar
1
 Audio
Audio
|
|
|
|
Fader/Balance |
F/R 0 L/R 0 |
||||||
|
|
|
|
Graphic EQ |
|
|
|
|
|
|
|
|
|
|
|
Super Bass |
|||||||
|
|
|
|
|
|
|
|
|
|
|
|
|
|
|
|
Auto EQ |
|
|
On |
|
|
|
|
|
|
|
|
|
|
|
|
|
|
|
|
|
|
|
|
Sonic Center Control |
|
L/R:0 |
|
||||
|
|
|
|
Loudness |
|
|
|
|
|
|
|
|
|
|
|
Subwoofer |
|
|
|
|
|||
|
|
|
|
|
|
Off |
|
|
|||
2 1
|
|
|
|
Wed 28 may |
|
|
|
|
12:45 PM |
Dolby D 96k24 |
Mch |
|
|
|
|
01 |
01 |
01 |
L+R |
Abcdeabcdeabcdeabcdeab |
|
|||
 8
8  12
12
|
|
|
01:45 |
-02:45 |
|
|
|
|
|
|
|
2
1Scroll icon
Appears when selectable items are hidden.
2Scrubber bar
Appears when the playback point can be specified or set by dragging.
Viewing the hidden items
1 Touch the scroll icon to view any hidden items.
Specifying the playback point
1Drag the scrubber bar on the screen.
(Not available when the scrubber bar is grayed out.)
Activating the touch panel keys
1 1
|
|
|
Wed 28 may |
|
|
|
12:45 PM |
01 |
01 |
01 |
L+R |
Abcdeabcdeabcdeabcdeab |
|
||
8 |
12 |
|
01:45 |
-02:45 |
|
1 |
2 |
1 |
|
|
Return |
3
1Touch panel keys
Perform various operations by touching the panel.
2Open/close keys
Control the touch panel key area by touching these keys.
Turning the display to simplified display.
Returning to the normal display by touching the screen
1 when playing moving images.
Returning to the normal display by touching same icon when playing audio.
2
Viewing the hidden touch panel keys.
3
Shorten the touch panel area.
 12
12 En
En

|
Section |
Basic Operations |
04 |
Common operations for menu settings/lists
(AVH-P5250BT only)
Starting the Bluetooth telephone menu.
Refer to Introduction of Bluetooth telephone operations on page 24.
Displaying the list menu.
Starting the search function.
Displaying the menu.
Refer to Introduction of menu operations on page 45.
Displaying still images as a slide show when listening to another source.
Viewing slide shows
Refer to Introduction of still image playback operations on page 22.
Returning to the previous display Returning to the previous list/category (the folder/category one level higher)
!Press and hold MENU to display
Picture Adjustment.
Refer to Changing the picture adjustment on page 72.
Opening and closing the LCD panel
The LCD panel will open or close automatically when the ignition switch is turned on or off. You can turn off the automatic close/open function. (Refer to page 6.)
!Do not close the LCD panel by force with your hands. That will cause a malfunction.
!The automatic close/open function will operate the display as follows.
—When the ignition switch is turned OFF while the LCD panel is opened, the LCD panel will close after six seconds.
—When the ignition switch is turned ON again (or turned to ACC), the LCD panel will open automatically.
—Removing or attaching the front panel will automatically close or open the LCD panel. (Refer to page 65.)
!When the ignition switch is turned OFF after the LCD panel has been closed, turning the ignition switch ON again (or turning it to ACC) will not open the LCD panel. In this case, press OPEN/CLOSE to open the LCD panel.
!When closing the LCD panel, check to make sure that it has closed completely. If the LCD panel has stopped halfway, leaving it like this could result in damage.
 CAUTION
Keep hands and fingers clear of the unit when opening, closing, or adjusting the LCD panel. Be especially cautious of children’s hands and fingers.
% Press OPEN/CLOSE to open the LCD panel.
# To close the LCD panel, press OPEN/CLOSE again.
Adjusting the LCD panel angle
 Important
!If you can hear the LCD panel knocking against your vehicle’s console or dashboard, touch the TILT keys to move the LCD panel a little forward.
!When adjusting the LCD panel angle, be sure to touch the TILT keys. Forcibly adjusting the LCD panel by hand may damage it.
Operations Basic
En  13
13

Section
04  Basic Operations
1 Display the system menu.
Refer to Introduction of menu operations on page 45.
2Touch TILT.
3Touch the TILT keys to adjust the LCD panel to an easily viewable angle.
The LCD panel angle continues changing as long as you touch and hold the TILT keys.
Laying the panel down.
Returning the panel to the upright position.
# As the set angle is saved, the LCD panel will automatically be adjusted to the same position the next time the LCD panel is opened.
Turning the LCD panel horizontally
When the LCD panel is upright and hinders the operation of the air conditioner, the panel can be turned horizontally temporarily.
% Press and hold OPEN/CLOSE to turn the LCD panel horizontally.
#To return to the original position, press and hold OPEN/CLOSE again.
#The LCD panel returns to the original position
automatically, indicated with a beeping sound 10 seconds after operation.
Ejecting an SD
1 Removing the front panel
Refer to Removing the front panel on page 6.
2Push an SD.
3Ejecting an SD
Setting the clock
1Switch to Clock Adjustment display.
Refer to Basic Operations on page 11.
2Select the item to set.
3Touch aor bto set the correct date and time.
Ejecting a disc
1Press h(eject).
2Eject a disc
 14
14 En
En

|
Section |
Tuner |
05 |
Introduction of tuner operations
1 2 3
Radio Local |
Wed 28 may |
12:45 PM |
Abcdeabcdeabcde |
87.50 |
Abcdeabcdeabcde |
|
Abcdeabcdeabcde |
|
|
MHz |
P.ch 2
Band:
FM1 87.50 MHz
4 5
1 Touch panel keys
Turning local seek tuning on
1and off.
Refer to Tuning in to strong signals on page 30.
Displaying the EQ (Audio function menu).
Refer to Using the equalizer on page 46.
2Touch and hold for more than two seconds to turn the autoequalizer on or off.
Refer to Using the auto-equali- zer on page 47.
Displaying the preset channel list.
3
Refer to Storing and recalling stations on page 30.
Refer to Storing the strongest stations on page 30.
4 |
|
Band: |
|
Selecting a band (FM1, FM2, |
|
|
|
FM3 for FM or AM). |
|
|
|
|
|
|
|
|
|
|
|
|
|
|
|
|
Recalling radio station frequencies assigned to preset
5  tuning keys.
Refer to Storing and recalling stations on page 30.
Manual tuning (step by step) using the buttons 1 Press cor d(TRK).
Seek tuning using the buttons 1 Press and hold cor d(TRK).
 Note
Note
Listening AM radio while an iPod is charged from this unit may generate noise. In this case, disconnect the iPod from this unit.
Tuner
En  15
15

Section
06  Playing moving images
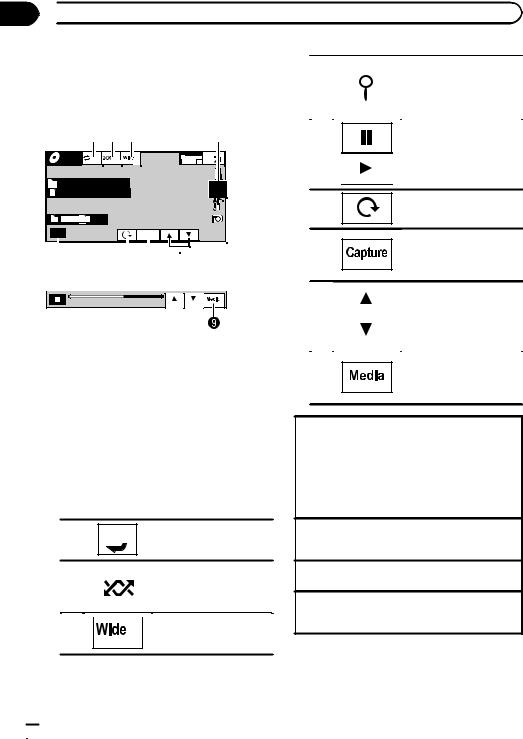
Introduction of video playback operations
You can view DVD/DVD-R/DVD-RW/CD/CD-R/ CD-RW/USB/SD/iPod.
|
|
|
Wed 28 may |
|
|
|
12:45 PM |
01 |
01 |
01 |
L+R |
Abcdeabcdeabcdeabcdeab |
|
||
 8
8  12
12
|
|
|
|
01:45 |
-02:45 |
|
|
|
|
|
|
|
|
|
|
Return
DVD video
Return
Video CD
iPod |
|
|
S.Rtrv |
Wed 28 may |
|
|
12:45 PM |
||
ALL |
Songs |
|
 Abcdeabcdeabcdeabcdeab
Abcdeabcdeabcdeabcdeab
 Abcdeabcdeabcdeabcdeab
2067/12345
|
|
|
|
01:45 |
-02:45 |
|
|
|
|
|
|
|
|
|
|
iPod video
|
|
|
|
|
|
|
|
|
|
|
|
01:45 |
-02:45 |
|
|
|
|
|
|
|
|
|
|
|
|
|
When playing a disc containing a mixture of various media file types
!If an iPod with video capabilities is connected to this unit using an interface cable such as the CD-IU50V (sold separately), you can enjoy the video contents of the iPod as an iPod source.
1 Touch panel keys
Selecting the repeat range.
1  Refer to Repeating playback on page 31.
During playback, touch the point at which you want to re-
2 sume playback the next time the disc is loaded.
Refer to Resume playback (Bookmark) on page 33.
Changing the screen mode.
3 Refer to Changing the wide screen mode on page 37.
Switching the equalizer curves.
Refer to Using the equalizer on page 46.
4 Touch and hold for more than two seconds to turn the auto-equalizer on or off. Refer to Using the autoequalizer on page 47.
Switching between audio languages during playback.
5 Refer to Changing audio language during playback (Multiaudio) on page 34.
Switching between subtitle languages during playback.
6 Refer to Changing the subtitle language during playback (Multi-subtitle) on page 34.
Switching among viewing angles during playback.
7 Refer to Changing the viewing angle during playback (Multi-angle) on page 34.
Switching the audio output, when playing video discs recorded with LPCM audio.
Refer to Selecting audio out-
8  put on page 35. Switching between stereo
and monaural audio output, when playing Video CD discs.
 16
16 En
En

|
Section |
Playing moving images |
06 |
9
a
b
c
d
e
f
g
Starting the search function. Refer to Searching for the part you want to play on page 33. Refer to Selecting files from the file name list on page 35. Displaying iPod menus. Refer to Playing videos from your iPod on page 32 and
Browsing for a video/music on the iPod on page 32.
Returning to normal playback during paused, slow motion, or frame-by-frame playback.
Pausing playback
Displaying the DVD menu during DVD playback. Refer to Operating the DVD menu on page 30.
Returning to the top menu during DVD playback.
Stopping playback. Stopping playback at the point set in Resume playback.
Touch one more time to stop playback completely.
Refer to Resume playback (Bookmark) on page 33.
Displaying arrow keys to operate the DVD menu.
Refer to Using the arrow keys on page 30.
Skipping to another title. Selecting a folder during DivX file playback.
Moving ahead one frame at a time during playback.
Refer to Frame-by-frame playback on page 33.
Touch and hold for more than two seconds to slow down playback speed.
Speeding up the playback speed in four steps during slow motion playback on DVD video/Video CD.
Speeding down the playback h speed in four steps, during
slow motion playback on Video CD.
Returning to the specified scene to which the DVD cur-
i Return rently being played has been preprogrammed to return.
Refer to Return to the specified scene on page 34.
|
|
|
|
|
|
|
|
Playing the video on your |
|
|
|
|
|
|
|
|
|
|
|
j |
|
|
|
|
|
|
|
iPod in a random order. |
Playing |
|
|
|
|
|
|
|
Refer to Random play (shuf- |
||
|
|
|
|
|
|
|
|
|
|
|
|
|
|
|
|
|
|
fle) on page 31. |
|
|
|
|
|
|
|
|
|
|
|
|
|
|
|
|
|
|
|
|
|
|
|
|
|
|
|
|
|
Switching the Advanced |
|
|
|
|
|
|
|
|
|
sound retriever function set- |
moving |
|
|
|
|
|
|
|
|
sound retriever on page 36. |
|
k |
|
|
|
|
|
|
|
ting when playing a video on |
|
|
|
|
|
|
|
|
your iPod. |
|
|
|
|
|
|
|
|
|
|
|
|
|
|
|
|
|
|
|
|
Refer to Using advanced |
images |
|
|
|
|
|
|
|
|
|
|
|
|
|
|
|
|
|
|
Conducting operation from |
|
|
|
|
|
|
|
|
|
|
|
|
|
|
|
|
|
|
|
your iPod and listening to it |
|
l |
|
|
|
|
|
|
|
using your car’s speaker’s. |
|
|
|
|
|
|
|
|
Refer to Operating this unit’s |
|
|
|
|
|
|
|
|
|
|
|
|
|
|
|
|
|
|
|
|
iPod function from your iPod |
|
|
|
|
|
|
|
|
|
|
|
|
|
|
|
|
|
|
|
on page 31. |
|
|
|
|
|
|
|
|
|
|
|
Switching between media file types to play on DVD/CD/
m 
 USB/SD.
Refer to Switching the media file type on page 30.
En  17
17

Section
06  Playing moving images
Playing back videos
1Insert the disc into the disc loading slot with the label side up.
Playback will automatically start.
!If you are playing a DVD or Video CD, a menu may appear. Refer to Operating the DVD menu on page 30 and PBC playback on page 35.
!When the automatic playback function is on, the unit will skip the DVD menu and automatically start playback from the first chapter of the first
title. Refer to Automatic playback of DVDs on page 62.
1If a disc has already been inserted, press SRC/ OFF or touch the source icon to select the source.
!When the source icon is not displayed, it can be displayed by touching the screen.
!Disconnect headphones from the iPod before connecting to this unit.
!Depending on the iPod model and the amount of data stored in the iPod, it may take some time for playback to begin.
!Use the touch panel keys to select the iPod after connecting it to this unit.
!No Device is displayed when disconnecting the
iPod.
1If a message is displayed after loading a disc con-
taining DivX VOD content, touch Play.
Refer to Playing DivXÒ VOD content on page 36.
Ejecting a disc
1Refer to Ejecting a disc on page 14 or Ejecting an SD on page 14.
Selecting a chapter using the buttons 1 Press cor d(TRK).
Fast forwarding or reversing using the buttons 1 Press and hold cor d(TRK).
!Fast forward/fast rewind may not always be possible on some discs. In such cases, normal playback will automatically resume.
 Notes
Notes
!This DVD player can play back a DivX file recorded on CD-R/RW or DVD-R/RW. (Please see the following section for files that can be played back. Refer to page 86.)
!Do not insert anything other than a DVD (-R/- RW) or CD (-R/-RW) into the disc loading slot.
!If the bookmark function is on, DVD playback resumes from the selected point. For more de-
tails, refer to Resume playback (Bookmark) on page 33.
!Some operations may not be available while watching a DVD due to the programming of
the disc. In such cases, the  icon appears on the screen.
!To ensure proper operation, connect the dock connector cable from the iPod directly to this unit.
!If the ignition switch is set to ACC or ON, the iPod battery will be charged while connected. However, the iPod battery is not charged when you select an SD as the source.
!While the iPod is connected to this unit, the iPod cannot be turned on or off.
However, the iPod can be turned on or off when you select an SD as the source.
 18
18 En
En

Playing audio |
|
|
|
|
||
Introduction of sound |
|
|
Switching the equalizer |
|||
playback operations |
|
|
curves. |
|||
|
|
Refer to Using the equali- |
||||
|
|
|
|
|
|
|
You can listen to DVD-R/DVD-RW/CD/CD-R/ |
|
zer on page 46. |
||||
CD-RW/USB/SD/iPod sound files. |
|
4 |
Touch and hold for more |
|||
|
than two seconds to turn |
|||||
|
|
|
|
|
|
|
|
1 2 |
3 4 |
|
5 |
|
the auto-equalizer on or |
|
|
|
|
|
|
off. |
ROM |
|
S.Rtrv |
Wed 28 may |
|
|
Refer to Using the auto- |
ALL Songs |
|
12:45 PM |
|
|
equalizer on page 47. |
|
|
|
|
|
|
|
|
Abcdeabcdeabcdeabcdeab |
|
|
|
Displaying a list of track |
||
Abcdeabcdeabcdeabcdeab |
|
|
|
|||
|
|
|
titles/file names to select |
|||
Abcdeabcdeabcdeabcdeab |
|
|
|
|||
|
|
|
songs on a CD. |
|||
87 |
125 |
|
|
|
|
|
|
|
|
|
Refer to Selecting tracks |
||
|
|
|
|
|
|
|
01:45 |
|
-02:45 |
|
|
|
from the track title list on |
|
|
|
|
page 35. |
||
|
|
|
|
|
|
|
6 |
|
7 |
8 |
9 |
|
Displaying the file name |
CD |
|
|
|
|
5 |
list to select the files. |
|
|
|
|
|
Refer to Selecting files |
|
f |
1 a b 3 4 i |
5 |
|
from the file name list on |
||
|
page 35. |
|||||
|
|
S.Rtrv |
|
|
|
Displaying iPod menus. |
iPod |
|
Wed 28 may |
|
|
Refer to Browsing for a |
|
ALL Songs |
|
12:45 PM |
|
|
||
|
|
|
|
|
|
video/music on the iPod |
Abcdeabcdeabcdeabcdeab |
|
|
|
on page 32. |
||
Abcdeabcdeabcdeabcdeab |
|
|
|
|
||
Abcdeabcdeabcdeabcdeab |
|
|
|
|
||
2067/12345 |
|
|
|
|
Pausing and starting |
|
|
|
|
|
|
6 |
|
|
|
|
|
|
playback |
|
01:45 |
|
-02:45 |
|
|
|
|
6 |
h |
g c d e |
|
|
||
iPod audio
7
You can control an iPod with this unit by using
a cable such as the CD-IU50 (sold separately).
1 Touch panel keys
|
|
|
|
|
|
Selecting the repeat |
8 |
1 |
|
|
|
|
|
range. |
|
|
|
|
|
|
Refer to Repeating play- |
|
|
|
|
|
|
|
|
|
|
|
|
|
|
|
|
back on page 31. |
|
|
|
|
|
|
|
|
|
|
|
|
|
|
|
|
|
|
|
|
|
|
|
Playing songs in random |
|
2 |
|
|
|
|
|
order. |
9 |
|
|
|
|
|
Refer to Random play |
||
|
|
|
|
|
|
|
|
|
|
|
|
|
|
(shuffle) on page 31. |
|
|
|
|
|
|
|
|
|
|
|
|
|
|
|
|
|
|
|
|
|
|
|
Switching the Advanced |
|
|
|
|
|
|
|
sound retriever function |
|
|
|
|
|
|
|
setting when playing |
a |
|
|
|
|
|
|
||
3 |
|
|
|
|
|
audio. |
|
|
|
|
|
|
|
||
|
|
|
|
|
|
Refer to Using advanced |
|
|
|
|
|
|
|
|
|
|
|
|
|
|
|
sound retriever on page |
|
|
|
|
|
|
|
36. |
|
|
|
|
|
|
|
|
|
Switching the text information to display on this unit when playing MP3/ WMA/AAC files.
Selecting a folder.
Switching between media file types on a DVD/CD/USB/SD. Refer to Switching the media file type on page 30.
Playing songs on the iPod in random order. Refer to Random play (shuffle) on page 31.
En
Section
07 |
audio Playing
 19
19

Section
07  Playing audio
Changing the speed of audiobook playback on
b the iPod.
Refer to Changing audiobook speed on page 36.
Switching to Link Search mode to play songs related to the currently
c
playing song on the iPod. Refer to Displaying lists related to the currently playing song (Link Search) on page 36.
|
|
|
Playing all songs on the |
|
|
|
iPod in random order. |
d |
|
|
Refer to Playing all songs |
|
|
|
in random order (shuffle |
|
|
|
|
|
|
|
all) on page 31. |
|
|
|
|
Conducting operation from your iPod and listening to it using your car’s
e speaker’s.
Refer to Operating this unit’s iPod function from your iPod on page 31.
2 Text information
Displaying the Songs list on the iPod.
f Refer to Searching for a video/music by category on page 32.
Displaying the Artists list on the iPod.
g Refer to Searching for a video/music by category on page 32.
Displaying the Albums list on the iPod.
h  Refer to Searching for a video/music by category on page 32.
3 Artwork display
Starting Album Link Play on your iPod
iwhen you touch the artwork display. Refer to Displaying lists related to the cur-
rently playing song (Link Search) on page 36.
Playing back sound
1 Insert the disc into the disc loading slot with the label side up.
Playback will automatically start.
1If a disc has already been inserted, press SRC/ OFF or touch the source icon to select the source.
!When the source icon is not displayed, it can be displayed by touching the screen.
!Disconnect headphones from the iPod before connecting to this unit.
!Depending on the iPod model and the amount of data stored in the iPod, it may take some time for playback to begin.
!Use the touch panel keys to select the iPod after connecting it to this unit.
!No Device is displayed when disconnecting the iPod.
Ejecting a disc
1Refer to Ejecting a disc on page 14 or Ejecting an SD on page 14.
Selecting a track using the buttons 1 Press cor d(TRK).
Fast forwarding or reversing using the buttons 1 Press and hold cor d(TRK).
 Notes
Notes
!When playing back files recorded as VBR (variable bit rate) files, the play time will not be correctly displayed if fast forward or reverse operations are used.
!To ensure proper operation, connect the dock connector cable from the iPod directly to this unit.
!If the ignition switch is set to ACC or ON, the iPod battery will be charged while connected. However, the iPod battery is not charged when you select an SD as the source.
!While the iPod is connected to this unit, the iPod cannot be turned on or off.
However, the iPod can be turned on or off when you select an SD as the source.
!If the characters recorded on the disc are not compatible with this unit, those characters will not be displayed.
!Text information may not be correctly displayed depending on the recorded environment.
 20
20 En
En
|
Section |
Playing audio |
07 |
!USB storage device that can be charged via USB will be recharged when plugged in and the ignition switch is set to ACC or ON.
However, the USB storage device that can be charged via USB will not be recharged when you select an SD as the source.
!Disconnect the USB portable audio player/ USB memory when you are done using it.
!When you select Clock or Speana on Select-
ing the background display on page 71, the artwork is not displayed.
audio Playing
En  21
21
Section
08  Playing still images
Introduction of still image |
|
|
|
|
Displaying the file name |
playback operations |
|
|
|
|
list to select the files. |
4 |
|
|
|
Refer to Selecting files from |
|
|
|
|
|
||
You can view still images saved in CD-R/CD- |
|
|
|
|
the file name list on page |
|
|
|
|
||
RW/USB/SD. |
|
35. |
|||
|
|
|
|
|
|
1 2 3 |
4 |
Photo |
|
|
Wed 28 may |
|
Off |
Full |
12:45 PM |
||
|
 Abcdeabcdeabcde
Abcdeabcdeabcde
|
|
2 |
|
2 |
|
|
|
|
|
|
|
|
|
|
|
|
|
|
|
|
|
|
|
|
|
|
|
|
|
|
|
|
|
|
|
|
|
|
|
|
|
|
|
Capture |
|
|
|
|
|
|
|
|
|
|
|
|
|
||
|
|
|
|
|
|
|
|
||||
|
|
|
|
|
|
|
|
|
|
|
|
5 |
6 7 |
8 |
|||||||||
CD
01:45 |
-02:45 |
When playing a disc containing a mixture of various media file types
When loading a CD-R/RW/USB/SD containing JPEG picture files, this unit starts a slideshow from the first folder/picture on the disc/device. The player displays the pictures in each folder in alphabetical order.
The table below shows the controls for viewing a slideshow.
1Touch panel keys
Touch any of the following touch panel keys to select the function to be adjusted.
Selecting the repeat range.
1  Refer to Repeating playback on page 31.
|
|
|
|
Playing files in a random |
|
|
|
||
2 |
|
|
|
order. |
|
|
|
Refer to Random play (shuf- |
|
|
|
|
|
|
|
|
|
|
fle) on page 31. |
|
|
|
||
|
|
|
|
|
|
|
|
|
Changing the screen mode |
|
|
|
|
3Refer to Changing the wide screen mode on page 37.
5 |
Starting or pausing the sli- |
|
deshow. |
||
|
6Rotating the displayed picture 90° clockwise
Capturing an image in
7JPEG files.
Refer to Capture an image in JPEG files on page 37.
8 |
|
Selecting a folder. |
|
||
|
|
|
|
|
|
Switching between media
9
file types.
Refer to Switching the media file type on page 30.
Playing still images
1Insert the disc into the disc loading slot with the label side up.
Playback will automatically start.
1If a disc has already been inserted, press SRC/ OFF or touch the source icon to select the source.
!When the source icon is not displayed, it can be displayed by touching the screen.
Ejecting a disc
1Refer to Ejecting a disc on page 14 or Ejecting an SD on page 14.
Selecting a file using the buttons 1 Press cor d(TRK).
Fast file searching
1 Press and hold cor d(TRK).
!You can search 10 JPEG files at a time.
 22
22 En
En

|
Section |
Playing still images |
08 |
 Notes
Notes
!This unit can play back a JPEG file recorded on CD-R/RW/ROM/SD/USB storage device. (Please see the following section for files that can be played back. Refer to page 86.)
!Files are played back in file number order and folders are skipped if they contain no files. (If
folder 01 (ROOT) contains no files, playback commences with folder 02.)
Introduction of still image playback as a slideshow operations
You can view still images saved in CD-R/CD- RW/USB/SD as a slideshow when listening to another source.
1 2 3 |
4 |
5 |
|||||||
|
|
|
|
|
|
|
|
|
|
|
|
|
|
|
|
|
|
|
|
|
|
|
Off |
|
|
Full |
|
|
|
|
|
|
|
||||||
|
|
|
|
|
|
|
|
|
|
|
|
|
|
|
|
|
|
|
|
|
|
|
|
|
|
|
|
|
|
|
|
|
|
|
|
|
|
|
|
|
|
|
|
|
Capture |
|
|
|
|
|
|
||
6 |
7 8 |
|||||
The table below shows the controls for viewing a slideshow.
1Touch panel keys
Touch any of the following touch panel keys to select the function to be adjusted.
Selecting the repeat range.
1  Refer to Repeating playback on page 31.
Playing files in a random
2
order.
Refer to Random play (shuffle) on page 31.
Changing the screen mode
3  Refer to Changing the wide screen mode on page 37.
4 |
|
|
|
|
|
Selecting a folder. |
|
|
|
|
|
||
|
|
|
|
|
|
|
|
|
|
|
|
|
|
|
|
|
|
|
|
|
|
|
|
|
|
|
|
5 |
|
|
|
|
|
|
Selecting a file. |
|
|
|
|
|
|
|
|
||
|
|
|
|
|
|
|
|
|
|
|
|
|
|
|
|
|
|
|
|
|
|
|
|
|
|
|
|
|
|
|
|
|
|
|
|
6 |
|
|
|
|
|
|
Starting or pausing the sli- |
|
|
|
|
|
|
|
|
||
|
|
|
|
|
|
|
||
|
|
|
|
|
|
|
||
|
|
|
|
|
|
deshow. |
|
|
|
|
|
|
|
|
|
|
|
|
|
|
|
|
|
|
|
Playing |
|
|
|
|
|
|
|
|
|
7 |
|
|
|
|
|
|
Rotating the displayed pic- |
|
|
|
|
|
|
|
|||
|
|
|
|
|
|
|
||
|
|
|
|
|
|
ture 90° clockwise |
|
|
|
|
|
|
|
|
|
|
|
|
|
|
|
|
|
|
|
still |
|
|
|
|
|
|
|
|
|
|
|
|
|
|
|
|
Capturing an image in |
|
8 |
|
|
|
|
|
|
JPEG files. |
|
|
|
|
|
|
|
|
Refer to Capture an image |
images |
|
|
|
|
|
|
|
in JPEG files on page 37. |
|
|
|
|
|
|
|
|
|
|
|
|
|
|
|
|
|
|
|
1 Start slideshow when listening to another source.
Refer to Common operations for menu settings/lists on page 13.
Displaying still images as a slide show.
2 Select the device containing the files that you want to display.
!Disc – Built-in DVD player
!USB – USB
!SD – SD memory card
#To cancel searching, touch Cancel.
 Note
Note
When the USB or SD source is selected, this unit cannot view still images on USB/SD as a slideshow.
En  23
23

Section
09  Bluetooth Telephone
Introduction of Bluetooth telephone operations
1
Radio |
Wed 28 may |
|
|
12:45 |
PM |
1 |
|
 Abcdeabcdeabcde
 Abcdeabcdeabcde
P.CH2
Off On
Band:
FM1 |
87.50 MHz |
4 5 7
1 2 6 3
Telephone standby display
|
|
|
Wed 28 may |
|
|
|
|
12:45 PM |
1 |
1 |
2 |
3 |
ABCDEHGHI 01 |
|
|
|
|||
|
|
|
012345678901 |
|
4 |
5 |
6 |
|
|
7 |
8 |
9 |
Off |
|
* |
0 |
# |
|
|
|
|
|
|
|
+ |
|
C |
|
|
|
|
|
8 a 9b |
|
When switching to the entering phone number mode
You can use Bluetooth telephone (AVH-P5250BT only).
 Important
!Since this unit is on standby to connect with your cellular phone via Bluetooth wireless technology, using it without the engine running can drain the battery power.
!Advanced operations that require attention such as dialing numbers on the monitor, etc., are prohibited while driving. Park your vehicle in a safe place when using these advanced operations.
!Operations available may be limited depending on the cellular phone connected to this unit.
!Be sure to park your vehicle in a safe place and apply the parking brake when performing this operation.
1Incoming call notice
Indicates that an incoming call has been received and has not been checked yet.
!Not displayed for calls made when your cellular phone is disconnected from this unit.
2Touch panel keys
|
|
|
|
Switching the mode to enter |
|
|
|
|
the phone number directly. |
1 |
|
|
|
Refer to Making a call by en- |
|
|
|
|
tering phone number on page |
|
|
|
|
40. |
|
|
|
|
|
|
|
|
|
Switching to the call history |
|
|
|
|
list. |
2 |
|
|
|
Refer to Using the missed, re- |
|
|
|
|
ceived and dialed call lists on |
|
|
|
|
page 39. |
|
|
|
|
|
|
|
|
|
Switching to the phone book |
|
|
|
|
mode. |
|
|
|
|
Refer to Calling a number in |
3 |
|
|
|
the phone book on page 38. |
|
|
|
|
Refer to Selecting a number |
|
|
|
|
by alphabet search mode on |
|
|
|
|
page 38. |
|
|
|
|
|
|
|
|
|
Turning automatic answering |
4 |
|
|
|
on or off. |
|
|
|
Refer to Setting automatic an- |
|
|
|
|
|
|
|
|
|
|
swering on page 39. |
|
|
|
|
|
|
|
|
|
|
|
|
|
|
Turning the ring tone for in- |
5 |
|
|
|
coming calls on or off. |
|
|
|
Refer to Switching the ring |
|
|
|
|
|
|
|
|
|
|
tone on page 40. |
|
|
|
|
|
|
|
|
|
|
|
|
|
|
Displaying the preset dial |
6 |
|
|
|
screen. |
|
|
|
Refer to Using the preset dial |
|
|
|
|
|
|
|
|
|
|
lists on page 40. |
|
|
|
|
|
|
|
|
|
|
|
|
|
|
Displaying the Bluetooth |
7 |
|
|
|
connection menu. |
|
|
|
Refer to the instructions |
|
|
|
|
|
|
|
|
|
|
from page 41 to page 43. |
|
|
|
|
|
|
|
|
|
|
|
|
|
|
Turning private mode on or |
8 |
|
|
|
off. |
|
|
|
Refer to Setting the private |
|
|
|
|
|
|
|
|
|
|
mode on page 41. |
|
|
|
|
|
|
|
|
|
|
 24
24 En
En

|
Section |
Bluetooth Telephone |
09 |
|
|
|
|
|
|
|
|
Adjusting the other party’s |
|
|
|
|
|
|
|
|
listening volume. |
9 |
|
|
|
|
|
|
|
Refer to Adjusting the other |
|
|
|
|
|
|
|
||
|
|
|
|
|
|
|
|
party’s listening volume on |
|
|
|
|
|
|
|
|
page 39. |
|
|
|
|
|
|
|
|
|
|
|
|
|
|
|
|
|
Accepting an incoming call. |
|
|
|
|
|
|
|
|
Making a phone call, when |
a |
|
|
|
|
selecting a phone number. |
|||
|
|
|
|
|
|
|
|
Switching between callers on |
|
|
|
|
|
|
|
|
hold. |
|
|
|
|
|
|
|
|
|
|
|
|
|
|
|
|
|
Ending a call. |
|
|
|
|
|
|
|
|
|
b |
|
|
Rejecting an incoming call. |
|||||
|
|
|
|
|
|
|
|
Canceling call waiting. |
|
|
|
|
|
|
|
|
|
Accepting an incoming call Ending a call
1 Press MUTE/ .
.
 Notes
Notes
!Private mode can only be operated while you are talking on the phone.
!To end the call, both you and the other caller must hang up your phones.
Setting up for hands-free phoning
Before you can use the hands-free phoning function you must set up the unit for use with your cellular phone. This entails establishing a Bluetooth wireless connection between this unit and your phone, registering your phone with this unit, and adjusting the volume level.
1Connection
First, you need to connect a Bluetooth telephone to this unit.
For detailed instructions on connecting your phone to this unit via Bluetooth wireless technology, see following section. Using a Bluetooth device to pair on page 41 and Pairing from this unit on page 41.
!You may also need to enter a PIN code into this unit. If your telephone requires a PIN code to establish a connection, look for the code on the telephone or in its accompanying documentation. Refer to Entering PIN code for Bluetooth wireless connection on page 43.
2Volume adjustment
Adjust the earpiece volume of your cellular phone to your preference. The unit will record the adjusted volume level as the default setting.
!The volume of the caller’s voice and ring tone may vary depending on the type of cellular phone.
!If there is a large volume difference between the ring tone and caller’s voice, the overall volume level may become unstable.
!Make sure to adjust the volume to a proper level before disconnecting the cellular phone from the unit. If the volume is muted (zero level) on your cellular phone, the volume level of your cellular phone remains muted even after the cellular phone is disconnected.
Telephone Bluetooth
En  25
25

Section
10  TV tuner
Introduction of TV tuner operations
1 2 3
TV |
Wed 28 may |
12:45 PM |
Band: |
CH12 |
P |
CH12 |
TV1 |
Manual tuning (step by step) using the buttons 1 Press cor d(TRK).
Seek tuning using the buttons 1 Press and hold cor d(TRK).
 Note
Note
Refer to Setting the TV signal on page 67 to set the TV signal.
Refer to Selecting the area group on page 67 to select the area group.
4 5
You can use this unit to control a TV tuner, such as the GEX-P5700TVP (sold separately).
For details concerning operation, refer to the TV tuner’s operation manual. This section provides information on TV operations with this unit, which differs from that described in the TV tuner’s operation manual.
1 Touch panel keys
|
|
|
|
|
Changing the screen mode. |
1 |
|
|
|
|
Refer to Changing the wide |
|
|
|
|
|
screen mode on page 37. |
|
|
|
|
|
|
|
|
|
|
|
Switching the equalizer |
|
|
|
|
|
curves. |
|
|
|
|
|
Refer to Using the equalizer |
|
|
|
|
|
on page 46. |
2 |
|
|
|
|
Touch and hold for more |
|
|
|
|
|
than two seconds to turn the |
|
|
|
|
|
auto-equalizer on or off. |
|
|
|
|
|
Refer to Using the auto- |
|
|
|
|
|
equalizer on page 47. |
|
|
|
|
|
|
|
|
|
|
|
Displaying the preset screen. |
|
|
|
|
|
Refer to Storing and recalling |
3 |
|
|
|
|
stations on page 30. |
|
|
|
|
|
Refer to Storing the strongest |
|
|
|
|
|
stations on page 30. |
|
|
|
|
|
|
|
|
|
|
||
4 |
|
Band: |
|
Selecting a band. |
|
|
|
|
|
||
|
|
|
|
|
|
|
|
|
|
|
|
|
|
|
|
|
Recalling radio station fre- |
|
|
|
|
|
|
|
|
|
|
|
quencies assigned to preset |
5 |
|
|
|
|
tuning keys. |
|
|
|
|
||
|
|
|
|
|
Refer to Storing and recalling |
|
|
|
|
|
stations on page 30. |
|
|
|
|
|
|
|
|
|
|
|
|
 26
26 En
En

 Using Bluetooth wireless technology
Introduction of Bluetooth telephone operations
2 3 1
TEL |
Wed 28 may |
12:45 PM |
Abcdeabc
Text  REG
REG
Scroll
4 5 6 7 8 9 a
You can control the Bluetooth telephone if you connect a Bluetooth adapter, such as the CDBTB200 (sold separately), to the AVHP5250DVD.
 Important
!In some countries, CD-BTB200 is not sold on the market.
!Since this unit is on standby to connect with your cellular phone via Bluetooth wireless technology, using it without the engine running can drain the battery power.
!Advanced operations that require attention such as dialing numbers on the monitor, using the phone book, etc., are prohibited while driving. Park your vehicle in a safe place when using these advanced operations.
!Operations available may be limited depending on the cellular phone connected to this unit.
1 Touch panel keys
Switching the equalizer curves.
Refer to Using the equalizer on page 46.
1 Touch and hold for more than two seconds to turn the auto-equalizer on or off. Refer to Using the autoequalizer on page 47.
|
|
|
|
|
|
|
|
Accepting an incoming call. |
|
|
|
|
|
|
|
|
Making a phone call, when |
2 |
|
|
|
|
|
|
|
selecting a phone number |
|
|
|
|
|
|
|
|
from the dialed and received |
|
|
|
|
|
|
|
|
call history. |
|
|
|
|
|
|
|
|
|
|
|
|
|
|
|
|
|
Ending a call. |
|
|
|
|
|
|
|
|
|
3 |
|
|
|
|
|
|
|
Rejecting an incoming call. |
|
|
|
|
|
|
|
|
Canceling call waiting. |
|
|
|
|
|
|
|
|
|
|
|
|
|
|
|
|
|
Displaying the received/ |
|
|
|
|
|
|
|
|
missed call history. |
|
|
|
|
|
|
|
|
Selecting a phone number |
4 |
|
|
|
|
|
|
|
from the call history. |
|
|
|
|
|
|
|
||
|
|
|
|
|
|
|
|
Refer to Using the missed, re- |
|
|
|
|
|
|
|
|
ceived and dialed call lists on |
|
|
|
|
|
|
|
|
page 39. |
|
|
|
|
|
|
|
|
|
|
|
|
|
|
|
|
|
|
|
|
|
|
|
|
|
|
Displaying the dialed call his- |
|
|
|
|
|
|
|
|
tory. |
|
|
|
|
|
|
|
|
Selecting a phone number |
5 |
|
|
|
|
|
|
|
from the call history. |
|
|
|
|
|
|
|
||
|
|
|
|
|
|
|
|
Refer to Using the missed, re- |
|
|
|
|
|
|
|
|
ceived and dialed call lists on |
|
|
|
|
|
|
|
|
page 39. |
|
|
|
|
|
|
|
|
|
|
|
|
|
|
|
|
|
Scrolling the phone number. |
|
|
|
|
|
|
|
|
Touch and hold for more |
|
|
|
|
|
|
|
|
than two seconds to activate |
|
|
|
|
Text |
|
|||
|
|
|
|
|
connection mode on this |
|||
|
|
|
Scroll |
|
||||
6 |
|
|
|
unit and establish a Blue- |
||||
|
|
|
|
|
|
|
||
|
|
|
|
|
|
|
|
tooth wireless connection |
|
|
|
|
|
|
|
|
from your phone. |
|
|
|
|
|
|
|
|
Refer to Using a cellular |
|
|
|
|
|
|
|
|
|
|
|
|
|
|
|
|
|
phone to initiate a connection |
|
|
|
|
|
|
|
|
on page 43. |
|
|
|
|
|
|
|
|
|
|
|
|
|
|
|
|
|
Registering connected cellu- |
|
|
|
|
|
|
|
|
lar phone to take full advan- |
|
|
|
|
|
|
|
|
tage of the features available |
|
|
|
|
|
|
|
|
with Bluetooth wireless tech- |
|
|
|
|
|
|
|
|
|
|
|
|
|
|
|
|
|
nology. |
7 |
|
|
|
|
|
|
|
Refer to Registering a con- |
|
|
|
|
|
|
|
|
nected cellular phone on |
|
|
|
|
|
|
|
|
page 43. |
|
|
|
|
|
|
|
|
Touch and hold for more |
|
|
|
|
|
|
|
|
|
|
|
|
|
|
|
|
|
than two seconds to termi- |
|
|
|
|
|
|
|
|
nate the Bluetooth wireless |
|
|
|
|
|
|
|
|
connection. |
|
|
|
|
|
|
|
|
|
Section
11 |
technology wireless Bluetooth Using
En  27
27

Section
11  Using Bluetooth wireless technology
8
9
a
Turning automatic answering on or off.
Refer to Setting automatic answering on page 39.
Touch and hold for more than two seconds to connect to a Bluetooth telephone automatically.
Refer to Connecting to a Bluetooth device automatically on page 42.
Turning the ring tone for incoming calls on or off. Refer to Switching the ring tone on page 40.
Touch and hold for more than two seconds to display the BD address of your cellular phone and the Bluetooth adapter.
Refer to Displaying BD (Bluetooth Device) address on page 42.
Switching between Bluetooth telephone and Bluetooth audio.
Touch and hold for more than two seconds to start voice recognition.
Refer to Voice recognition on page 44.
1Connection
First, you need to connect a Bluetooth telephone to this unit.
For detailed instructions on connecting your phone to this unit via Bluetooth wireless technology, see following section. Using a cellular phone to initiate a connection on page 43 and Registering a connected cellular phone on page 43.
2Volume adjustment
Adjust the earpiece volume of your cellular phone to your preference. The unit will record the adjusted volume level as the default setting.
!The volume of the caller’s voice and ring tone may vary depending on the type of cellular phone.
!If there is a large volume difference between the ring tone and caller’s voice, the overall volume level may become unstable.
!Make sure to adjust the volume to a proper level before disconnecting the cellular phone from the unit. If the volume is muted (zero level) on your cellular phone, the volume level of your cellular phone remains muted even after the cellular phone is disconnected.
Bluetooth audio operations
Setting up for hands-free phoning
Before you can use the hands-free phoning function you must set up the unit for use with your cellular phone. This entails establishing a Bluetooth wireless connection between this unit and your phone, registering your phone with this unit, and adjusting the volume level.
You can control Bluetooth audio if you connect a Bluetooth adapter, such as the CDBTB200 (sold separately), to the AVHP5250DVD.
 Important
!Depending on the Bluetooth audio player connected to this unit, the available operations will be limited to the following two levels:
—A2DP profile (Advanced Audio Distribution Profile): You can only playback songs on your audio player.
—AVRCP profile (Audio/Video Remote Control Profile): You can perform playback, pause playback, select songs, etc.
 28
28 En
En
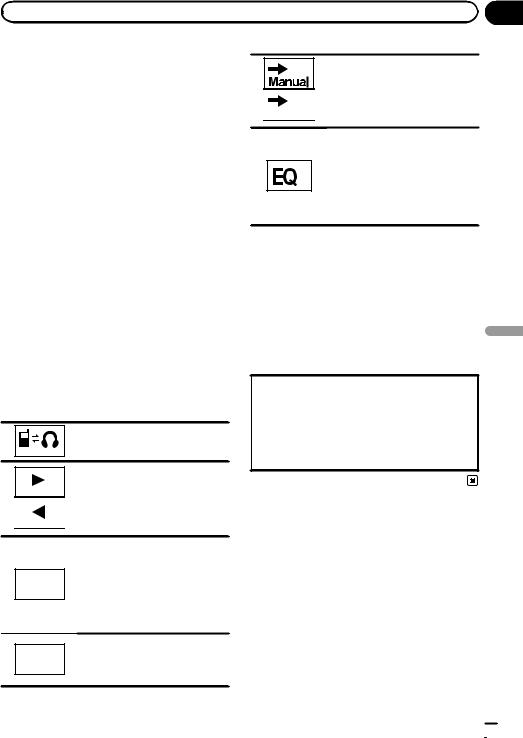
|
Section |
Using Bluetooth wireless technology |
11 |
!Since there are a number of Bluetooth audio players available on the market, available operations will vary extensively. When operating your player with this unit, refer to the instruction manual that came with your Bluetooth audio player as well as this manual.
!Information related to a song (such as the elapsed playing time, song title, song index, etc.) cannot be displayed on this unit.
!As the signal from your cellular phone may cause noise, avoid using it when you are listening to songs on your Bluetooth audio player.
!When a call is in progress on the cellular phone connected to this unit via Bluetooth wireless technology, the sound of the Bluetooth audio player connected to this unit is muted.
!When the Bluetooth audio player is in use, you cannot connect to a Bluetooth telephone automatically.
!Playback continues even if you switch from your Bluetooth audio player to another source while listening to a song.
1 Touch panel keys
Switching between Bluetooth telephone and Bluetooth audio.
Skipping back or forward to another track when Auto is set for the Auto/manual setting.
Performing fast forward or rewind when Manual is set for the Auto/ manual setting.
Pausing a song.
Touch and hold for more than two seconds to activate connection
F1 mode on this unit and establish a Bluetooth wireless connection from your player.
Refer to Connecting a Bluetooth audio player on page 44.
Playback starts.
F2 Touch and hold for more than two seconds to terminate the Bluetooth wireless connection.
Setting the action for cand d icons.
Auto
Switching the equalizer curves. Refer to Using the equalizer on page 46.
Touch and hold for more than two seconds to turn the auto-equalizer on or off.
Refer to Using the auto-equalizer on page 47.
Setting up for Bluetooth audio
Before you can use the Bluetooth audio function you must set up the unit for use with your Bluetooth audio player. This entails establishing a Bluetooth wireless connection between this unit and your Bluetooth audio player, and pairing your Bluetooth audio player with this unit.
1Connection
First, you need to connect a Bluetooth audio to this unit.
For detailed instructions on connecting your Bluetooth audio to this unit via Bluetooth wireless technology, see Connecting a Bluetooth audio player on page 44.
technology wireless Bluetooth Using
En  29
29
 Loading...