


DVD RDS AV RECEIVER
RADIO AV RDS CON DVD
DVD PLAYER COM RDS
AVH-X5650BT AVH-X4650DVD AVH-X2650BT AVH-X1650DVD
(B) Português Español English
Owner’s Manual
Manual de instrucciones
Manual do Proprietário

Contents |
Contents |
|
Precautions |
|
|
|
|
|
|
|
|
|
|
|
|
|
IMPORTANT SAFEGUARDS |
3 |
|
|||
|
To ensure safe driving |
3 |
|
|
||
|
To avoid battery exhaustion |
4 |
|
|||
|
Before you start |
|
|
|
||
|
About this unit |
4 |
|
|
|
|
|
DVD video disc region numbers |
4 |
||||
|
About this manual |
4 |
|
|
||
|
If you experience problems |
4 |
|
|||
|
Use and care of the remote control |
4 |
||||
|
Demo mode |
|
5 |
|
|
|
|
What’s what |
|
|
|
|
|
|
Head unit |
5 |
|
|
|
|
|
Home display |
|
6 |
|
|
|
|
Turning the source ON/OFF |
6 |
|
|||
|
Selecting a source |
6 |
|
|
||
|
Adjusting the volume |
6 |
|
|
||
|
Remote control |
7 |
|
|
|
|
 Common operations
Common operations for menu settings/
lists |
8 |
Operating the scroll icon and the scrubber
bar |
8 |
|
|
Activating the touch panel keys |
8 |
||
Using the rear view |
8 |
|
|
Using the rear monitor |
8 |
|
|
Using sound retriever |
8 |
|
|
Changing the wide-screen mode |
9 |
||
 Basic operations
Adjusting the angle of the LCD panel and
ejecting media |
9 |
|
|
Setting the clock |
9 |
|
|
Tuner |
|
|
|
Tuner operations |
10 |
|
|
Storing and recalling stations |
|
10 |
|
Displaying radio text |
10 |
|
|
Storing and recalling radio text |
|
10 |
|
Storing the strongest stations |
|
10 |
|
Tuning in to strong signals |
10 |
|
|
Receiving traffic announcements |
10 |
||
Receiving alarm broadcasts interrupting |
|
||||
regular broadcasts |
11 |
|
|
||
Using PTY functions |
11 |
|
|
||
Setting the FM tuning step |
11 |
|
|||
RDS setting |
11 |
|
|
|
|
Switching Auto PI Seek |
11 |
|
|||
Setting the AM tuning step |
11 |
|
|||
Disc (CD/DVD) |
|
|
|
||
Introducing movie operations |
12 |
|
|||
Sound playback operations |
13 |
|
|||
Switching the media file type |
13 |
|
|||
Operating the DVD menu |
13 |
|
|||
Random play (shuffle) |
14 |
|
|
||
Repeating playback |
14 |
|
|
||
Searching for the part you want to |
|
||||
play |
14 |
|
|
|
|
Selecting audio output |
14 |
|
|
||
PBC playback |
14 |
|
|
|
|
Selecting tracks from the track title |
|
||||
list |
14 |
|
|
|
|
Selecting files from the file name list |
14 |
||||
Playing DivXâ VOD content |
15 |
|
|||
iPod |
|
|
|
|
|
iPod control |
15 |
|
|
|
|
Sound playback operations |
15 |
|
|||
Moving images operations |
16 |
|
|||
Using this unit’s iPod function from your |
|
||||
iPod |
16 |
|
|
|
|
Shuffle play |
17 |
|
|
|
|
Repeating playback |
17 |
|
|
||
Playing videos from your iPod |
17 |
|
|||
Browsing for a video/music on the |
|
||||
iPod |
17 |
|
|
|
|
Changing audiobook speed |
18 |
|
|||
Displaying lists related to the song currently
playing (link search) |
18 |
|
AppRadio Mode |
|
|
AppRadio Mode operation |
18 |
|
Starting procedure |
19 |
|
Setting the Keyboard |
19 |
|
Smartphone link adaptor operations |
|
|||
Starting procedure |
20 |
|
|
|
USB |
|
|
|
|
Moving images operations |
20 |
|
|
|
Sound playback operations |
21 |
|
|
|
Music browse mode |
21 |
|
|
|
Still image playback operations |
22 |
|
||
Switching the media file type |
22 |
|
|
|
Random play (shuffle) |
22 |
|
|
|
Repeating playback |
22 |
|
|
|
Selecting files from the file name list |
22 |
|||
Displaying lists related to the song currently
playing (link search) |
22 |
|
|
||
Playing DivXâ VOD content |
23 |
|
|||
Capture an image in JPEG files |
23 |
|
|||
Bluetooth Audio |
|
|
|
|
|
Sound playback operations |
23 |
|
|||
Setting up for Bluetooth audio |
23 |
|
|||
Random play (shuffle) |
24 |
|
|
||
Repeating playback |
|
24 |
|
|
|
Using MIXTRAX |
|
|
|
|
|
MIXTRAX operation |
|
24 |
|
|
|
MIXTRAX EZ operation |
24 |
|
|
||
Starting MIXTRAX EZ operation |
24 |
|
|||
Setting MIXTRAX mode |
24 |
|
|
||
Setting the effect |
24 |
|
|
|
|
Bluetooth telephone |
|
|
|
||
Bluetooth telephone operations |
25 |
|
|||
Calling a number in the phone book |
26 |
||||
Selecting a number by alphabet search |
|
||||
mode |
26 |
|
|
|
|
Inverting names in phone book |
26 |
|
|||
Using the missed, received and dialed call
lists |
27 |
|
Setting automatic answering |
27 |
|
Adjusting the other party’s listening
volume |
27 |
|
Switching the ring tone |
27 |
|
Using the preset dial lists |
27 |
|
Making a call by entering phone number 27
Setting the private mode |
27 |
|
|
|||
Voice control |
27 |
|
|
|
|
|
TV tuner |
|
|
|
|
|
|
TV tuner operations |
28 |
|
|
|
||
Changing the wide-screen mode |
28 |
|
||||
Storing stations |
28 |
|
|
|
||
EPG function |
28 |
|
|
|
|
|
Settings |
|
|
|
|
|
|
Menu operations |
|
29 |
|
|
|
|
Audio adjustments |
|
|
|
|
||
Using fader/balance adjustment |
29 |
|
||||
Using balance adjustment |
29 |
|
||||
Using the equalizer |
29 |
|
|
|
||
Using the auto-equalizer |
30 |
|
|
|||
Using sonic center control |
30 |
|
||||
Adjusting loudness |
30 |
|
|
|
||
Using subwoofer output |
30 |
|
|
|||
Boosting the bass |
30 |
|
|
|
||
Using the high pass filter |
30 |
|
|
|||
Adjusting source levels |
31 |
|
|
|||
Setting up the video player |
|
|
||||
Setting the subtitle language |
31 |
|
||||
Setting the audio language |
31 |
|
||||
Setting the menu language |
31 |
|
||||
Setting the multi-angle DVD display |
32 |
|||||
Setting the aspect ratio |
32 |
|
|
|||
Setting the slideshow interval |
32 |
|
||||
Setting parental lock |
32 |
|
|
|
||
Setting the DivX subtitle file |
33 |
|
||||
Displaying the DivXâ VOD registration |
|
|||||
code |
33 |
|
|
|
|
|
Automatic playback of DVDs |
33 |
|
||||
System settings |
|
|
|
|
||
Switching the auxiliary setting |
34 |
|
||||
Setting AV input |
|
34 |
|
|
|
|
Setting the navigation system |
34 |
|
||||
Selecting MirrorLink Mode |
34 |
|
||||
Updating the firmware for the smartphone
link adaptor |
34 |
 2
2 En
En

 Contents
Displaying the smartphone link adaptor
firmware version |
34 |
|
|
|
||
Updating firmware |
34 |
|
|
|
||
Displaying the firmware version |
35 |
|||||
Setting MIXTRAX mode |
35 |
|
|
|||
Changing the picture adjustment |
|
|||||
(Brightness, Contrast, Color, Hue, Dimmer |
||||||
and Temperature) |
35 |
|
|
|
||
Selecting the system language |
35 |
|
||||
Setting Demo Mode |
36 |
|
|
|
||
Switching sound muting/attenuation |
36 |
|||||
Setting the rear output and subwoofer |
||||||
controller |
|
36 |
|
|
|
|
Using the keyboard |
36 |
|
|
|
||
Setting the ever scroll |
36 |
|
|
|
||
Setting the Bluetooth audio |
|
36 |
|
|||
Clearing Bluetooth memory |
|
36 |
|
|||
Updating Bluetooth software |
|
37 |
|
|||
Displaying the Bluetooth software |
|
|||||
version |
37 |
|
|
|
|
|
Setting the rear view camera (back up |
|
|||||
camera) |
37 |
|
|
|
|
|
Auto EQ (auto-equalizing) |
37 |
|
||||
Selecting the video format |
38 |
|
||||
Setting the video signal |
38 |
|
|
|||
Setting the steering wheel control |
39 |
|||||
Favorite menu |
|
|
|
|
|
|
Using the Favorite menu |
40 |
|
|
|||
Bluetooth connection menu |
|
|
||||
Bluetooth connection menu |
|
|
|
|||
operations |
40 |
|
|
|
|
|
Theme menu |
|
|
|
|
|
|
Selecting the illumination color |
41 |
|||||
Selecting the OSD (on-screen display) |
|
|||||
color |
41 |
|
|
|
|
|
Selecting the background display |
41 |
|||||
 Other functions
Adjusting the response positions of the touch panels (Touch Panel
Calibration) |
42 |
|
Using an AUX source |
42 |
|
Resetting the microprocessor |
43 |
Operating the sound mixer |
43 |
Connection |
|
Connecting the power cord |
45 |
When connecting to separately sold power
amp |
46 |
|
When connecting the external video |
||
component and the display |
46 |
|
When connecting with a rear view |
||
camera |
47 |
|
iPod with lightning connector |
47 |
|
iPod with 30-pin connector |
48 |
|
Optional Smartphone link adaptor (CD-
ML100) connection |
48 |
 Installation
Installation using the screw holes on the
side of the unit |
49 |
|
|
||
Installing the microphone |
|
49 |
|||
Additional information |
|
|
|||
Troubleshooting |
50 |
|
|
||
Error messages |
52 |
|
|
||
Understanding auto EQ error |
|
||||
messages |
54 |
|
|
|
|
Understanding messages |
|
54 |
|||
Indicator list |
54 |
|
|
|
|
Handling guidelines |
55 |
|
|
||
Audio compatibility (USB) |
|
57 |
|||
Compressed file compatibility (disc, |
|||||
USB) |
57 |
|
|
|
|
iPod compatibility |
58 |
|
|
||
Sequence of audio files |
58 |
||||
Using the display correctly |
|
58 |
|||
Bluetooth profiles |
59 |
|
|
||
License, Warranty Disclaimer & Limitation of |
|||||
Liability |
|
59 |
|
|
|
Language code chart for DVD |
61 |
||||
Specifications |
62 |
|
|
||
 Precautions
Thank you for purchasing this PIONEER product.
To ensure proper use, please read through this manual before using this product. It is especially important that you read and observe WARNINGs and CAUTIONs in this manual. Please keep the manual in a safe and accessible place for future reference.
IMPORTANT SAFEGUARDS
Please read all of these instructions regarding your display and retain them for future reference.
1Do not install the display where it may
(i)obstruct the driver’s vision, (ii) impair the performance of any of the vehicle’s operating systems or safety features, including air bags, hazard lamp buttons or
(iii)impair the driver’s ability to safely operate the vehicle.
2Do not operate this display if doing so in any way will divert your attention from the safe operation of your vehicle. Always observe safe driving rules and follow all existing traffic regulations. If you experience difficulty in operating the system or reading the display, park your vehicle in a safe location and make necessary adjustments.
3Please remember to wear your seat belt at all times while operating your vehicle. If you are ever in an accident, your injuries can be considerably more severe if your seat belt is not properly buckled.
4Never use headphones while driving.
5To promote safety, certain functions are disabled unless the parking brake is on, and the vehicle is not in motion.
6Never set the volume of your display so high that you cannot hear outside traffic and emergency vehicles.
 WARNING
!Do not attempt to install or service this product by yourself. Installation or servicing of this product by persons without training and experience in electronic equipment and automotive accessories may be dangerous and could expose you to the risk of electric shock, injury or other hazards.
!Do not attempt to operate the unit while driving. Make sure to pull off the road and park your vehicle in a safe location before attempting to use the controls on the device.
To ensure safe driving
 WARNING
!LIGHT GREEN LEAD AT POWER CONNECTOR IS DESIGNED TO DETECT PARKED STATUS AND MUST BE CONNECTED TO THE POWER SUPPLY SIDE OF THE PARKING BRAKE SWITCH. IMPROPER CONNECTION OR USE OF THIS LEAD MAY VIOLATE APPLICABLE LAW AND MAY RESULT IN SERIOUS INJURY OR DAMAGE.
!To avoid the risk of damage and injury and the potential violation of applicable laws, this unit is not for use with a video screen that is visible to the driver.
!To avoid the risk of accident and the potential violation of applicable laws, no viewing of front seat video should ever occur while the vehicle is being driven.
!In some countries or states the viewing of images on a display inside a vehicle even by persons other than the driver may be illegal. Where such regulations apply, they must be obeyed and this unit’s video features should not be used.
Section
01
English
En  3
3
Section
01  Precautions
02
When you attempt to watch a video image while driving, the warning “Viewing of front seat video source while driving is strictly prohibited.” will appear on the front display.
To watch a video image on the front display, park your vehicle in a safe place and apply the parking brake.
!Please note that the edges of the rear view camera images may differ slightly according to whether full screen images are displayed when backing up, and whether the images are used for checking the rear when the vehicle is moving forward.
When using a display connected to rear monitor output
The rear monitor output on this unit (V OUT) is used to connect a rear display that allows passengers in the rear seats to watch videos.
 WARNING
NEVER install the rear display in a location where the driver can watch videos while driving.
When using the rear view camera
With an optional rear view camera, this unit can be used as an aid to keep an eye on trailers, or when backing into a tight parking spot.
 WARNING
!SCREEN IMAGE MAY APPEAR REVERSED.
!USE INPUT ONLY FOR REVERSE OR MIRROR IMAGE REAR VIEW CAMERA. OTHER USE MAY RESULT IN INJURY OR DAMAGE.
 CAUTION
!The rear view camera function is to be used as an aid to keep an eye on trailers, or while backing up. Do not use for entertainment purposes.
To avoid battery exhaustion
Keep the vehicle engine running when using this unit to avoid draining the battery power.
!When no power is supplied to this unit, such as when the vehicle battery is being replaced, the microcomputer of this unit returns to its initial condition. We recommend that you transcribe the audio adjustment data.
 WARNING
Do not use with vehicles that do not feature an ACC position.
 Before you start
About this unit |
! If the battery is disconnected or discharged, |
|
any preset memory will be erased. |
CAUTION |
|
This product is a class 1 laser product classified under the Safety of laser products, IEC 60825-1:2007, and contains a class 1M laser module. To ensure continued safety, do not remove any covers or attempt to gain access to the inside of the product. Refer all servicing to qualified personnel.
DVD video disc region numbers
Only DVD video discs with compatible region numbers can be played on this player. You can find the region number of the player on the bottom of this unit and in this manual (refer to
Specifications on page 62).
CAUTION—CLASS 1M VISIBLE AND INVISIBLE
LASER RADIATION WHEN OPEN, DO NOT VIEW
DIRECTLY WITH OPTICAL INSTRUMENTS.
CAUTION:
USE OF CONTROL OR ADJUSTMENT OR PERFORMANCE OF PROCEDURES OTHER THAN THOSE SPECIFIED HEREIN MAY RESULT IN HAZARDOUS RADIATION EXPOSURE.
CAUTION:
THE USE OF OPTICAL INSTRUMENTS WITH THIS PRODUCT WILL INCREASE EYE HAZARD.
 CAUTION
!Do not allow this unit to come into contact with liquids. Electrical shock could result. Also, damage to this unit, smoke, and overheating could result from contact with liquids.
!Keep this manual handy for future reference.
!Always keep the volume low enough to hear outside sounds.
!Avoid exposure to moisture.
About this manual
!This unit features a number of sophisticated functions to ensure superior reception and operation. All the functions have been designed for the easiest possible use, but many are not self-explanatory. This operation manual will help you benefit fully from this unit’s potential and to maximize your listening enjoyment.
!This manual uses diagrams of actual screens to describe operations. However, the screens on some units may not match those shown in this manual depending on the model used.
If you experience problems
Should this product fail to operate properly, please contact your dealer or nearest authorized Pioneer Service Station.
Use and care of the remote control
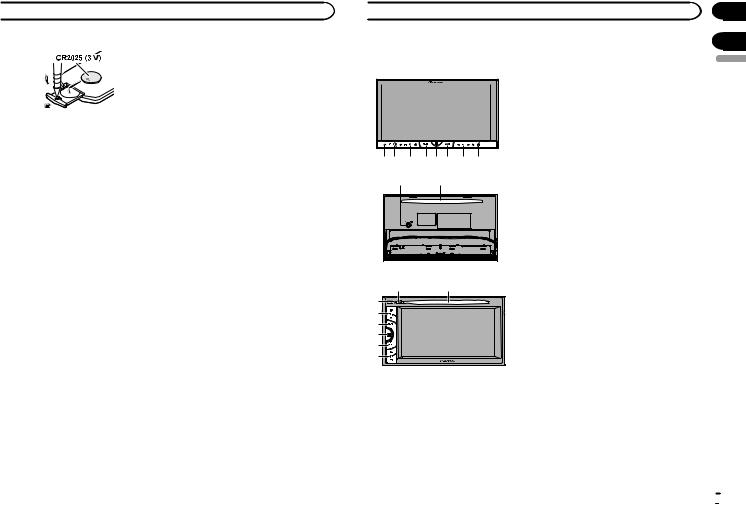
Installing the battery
Slide the tray on the back of the remote control out and insert the battery with the plus (+) and minus (–) poles aligned properly.
!When using for the first time, pull out the film protruding from the tray.
 4
4 En
En
 Before you start
 WARNING
!Keep the battery out of the reach of children. Should the battery be swallowed, consult a doctor immediately.
!Batteries (battery pack or batteries installed) must not be exposed to excessive heat such as sunshine, fire or the like.
 CAUTION
!Remove the battery if the remote control is not used for a month or longer.
!There is a danger of explosion if the battery is incorrectly replaced. Replace only with the same or equivalent type.
!Do not handle the battery with metallic tools.
!Do not store the battery with metallic objects.
!If the battery leaks, wipe the remote control completely clean and install a new battery.
!When disposing of used batteries, comply with governmental regulations or environmental public institutions’ rules that apply in your country/area.
Using the remote control
Point the remote control in the direction of the front panel to operate.
!The remote control may not function properly in direct sunlight.
 Important
!Do not store the remote control in high temperatures or direct sunlight.
!Do not let the remote control fall onto the floor, where it may become jammed under the brake or accelerator pedal.
Demo mode
The feature demo automatically starts when you select Off for the source and continues while the ignition switch is set to ACC or ON. To cancel the feature demo, press and hold MUTE. Press and hold MUTE again to restart. Operating the feature demo while the car engine is turned off it may drain the battery power.
 Important
The red lead (ACC) of this unit should be connected to the ignition on/off function. Failure to do so may result in battery drain.
 What’s what
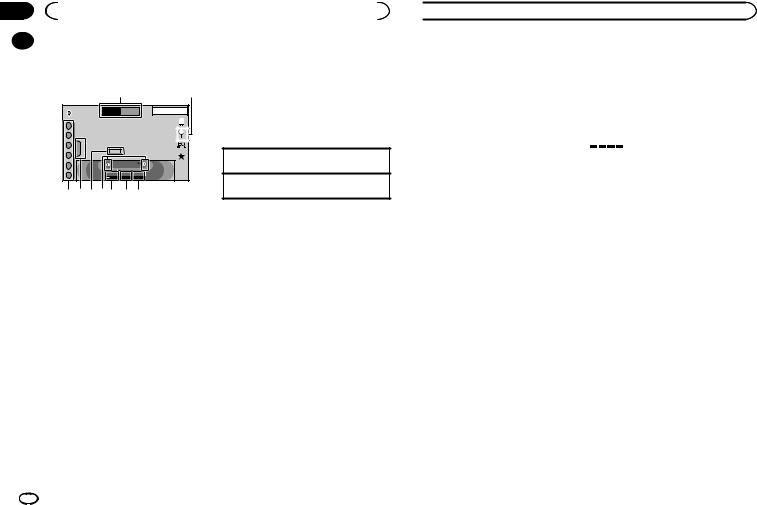
Head unit |
5 Home button |
|
AVH-X5650BTand AVH-X4650DVD |
Displaying the home display. |
|
The display returns to the Launcher screen |
||
|
|
while a 3rd-party application is being used in |
|
|
|
|
|
AppRadio Mode. |
|
|
Double-clicking the icon on the Launcher |
|
|
screen returns the display to the home dis- |
|
|
play. |
|
|
6 MODE |
|
1 2 3 4 5 6 7 8 |
When RGB input is not used |
||
! Press MODE to turn the display off. Press |
|||
|
|
||
9 |
a |
MODE again to turn the display on. |
|
When RGB input is used |
|||
|
|
||
|
|
! Press and hold MODE to turn the display |
|
|
|
off. Press MODE again to turn the display |
|
|
|
on. |
|
|
|
! When the navigation system is con- |
|
|
|
nected, press MODE to switch to the nav- |
|
|
|
igation display. |
|
|
|
! When an iPhone that is running an appli- |
|
|
|
cation that supports AppRadio Mode is |
|
AVH-X2650BTand AVH-X1650DVD |
connected, press MODE to switch to the |
||
8 |
a |
application display. You can use the appli- |
|
cation by touching the display. |
|||
1 |
|
||
|
! When a smartphone work with the Mirror- |
||
3 |
|
Link function is connected, press MODE |
|
4 |
|
to switch to the application display. You |
|
5 |
|
can use the application by touching the |
|
6 |
|
display. |
|
7 |
|
7 c/d(TRK) |
|
|
|
||
1 RESET
For details refer to Resetting the microprocessor on page 43.
2SRC/OFF
3+/– (VOLUME/VOL)
4MUTE
Press to mute. Press again to unmute.
8h(eject)
9Auto EQ microphone input jack
Use to connect an auto EQ microphone.
a Disc loading slot
Notes
!For details on how to operate a navigation system from this unit, refer to its operation manual.
Section
02
03
English
En  5
5
Section
03  What’s what
|
! For details on how to connect an iPod or |
Source on display |
|
|
||
|
|
|
||||
|
USB storage device to this unit, refer to |
1 |
|
|
|
|
|
When connecting with optional CD-IU201V |
|
|
|
|
|
|
cable on page 48. |
|
Radio |
|
|
|
|
|
|
|
AM |
12:22 |
|
|
|
|
|
|
JAN |
|
|
! For details on how to connect a smartphone |
|
Disc |
|
|
|
|
|
|
|
|||
|
with the MirrorLink function to this unit, refer |
|
|
|
|
|
|
to Optional Smartphone link adaptor (CD- |
|
iPod |
|
|
|
|
ML100) connection on page 48. |
|
Bluetooth Audio |
|
|
|
|
|
|
AUX |
S.Rtrv |
DB |
|
|
|
|
AV |
|
||
|
Home display |
|
App |
|
||
|
|
|
|
|||
Home display |
|
|
|
|
|
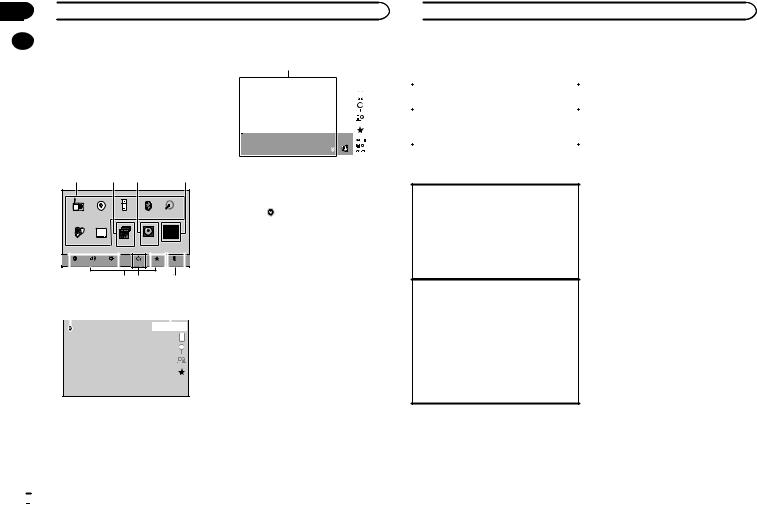
1 Source icon |
|
1 |
|
2 |
3 |
|
|
4 |
|
|
|
|
Selecting a favorite source. |
||||
|
|
|
|
|
|
|
|
|
|
|
|
|
|
|
When the source icon is not displayed, it can |
|
|
|
|
|
|
|
be displayed by pressing the home key or |
Radio |
Disc |
USB/iPod |
Bluetooth Audio |
AUX |
|
touching . |
|
|
|
|
|
|
OFF |
|
2 Apps/MirrorLink key |
AV |
TV |
Apps |
|
ON |
|
|
Switching to AppRadio Mode/MirrorLink |
RearView |
|
|
|
||||
|
|
|
|
|
|
|
Mode. |
|
|
Settings |
|
|
|
|
|
Video |
Audio |
System |
Theme |
Favorites |
Bluetooth |
|
|
|
|
7 6 |
|
5 |
|
3 Rear view key |
|
|
|
|
|
Displaying the rear view image. |
|||
Source off display |
|
|
|
|
For details refer to Using the rear view on |
||
|
|
|
|
page 8. |
|||
|
|
|
|
|
|
|
|
8 9
|
|
|
|
|
|
4 Source off key |
|
OFF |
|
|
|
|
|
|
|
AM |
12:12 |
|
|
|
|
|
1 JAN |
|
|
|
Turning the source off. |
|
|
|
|
|
|
|
5 Bluetooth key
Displaying the Bluetooth connection menu.
6 Theme key
Displaying the Theme menu.
7 Menu icon
Displaying the menu.
8 Source key
Displaying the source menu.
9 Clock key
Switching to clock adjustment display.
 What’s what
Turning the source ON/OFF |
— iPod is displayed when an iPod is connected |
|
(Function of AVH-X5650BT/AVH-X4650DVD) |
to USB input. |
|
— USB MTP is displayed when an MTP-compati- |
||
|
||
|
ble Android device (running Android OS 4.0 |
|
Turning the source on using the buttons |
or higher) is connected by MTP connection |
|
1 Press SRC/OFF to turn the source on. |
using a USB cable. |
|
Turning the source off using the buttons |
! TV is displayed when a TV tuner is connected |
|
via the RGB connection. |
||
1 Press and hold SRC/OFF until the source turns |
||
|
||
off. |
|
|
|
Adjusting the volume |
|
|
Selecting a source
Available source modes
!Radio – Radio tuner
!Disc – Built-in DVD and CD player
!USB, iPod, or USB MTP – USB/iPod/MTP
!Bluetooth Audio – Built-in Bluetooth audio (Function of AVH-X5650BT/AVH-X2650BT)
!AUX – AUX
!AV – AV input
!TV – Television
Selecting a source
!Using SRC/OFF
(Function of AVH-X5650BT/AVH-X4650DVD)
1Press SRC/OFF.
!Using the touch panel keys on the home display
1Touch the source icon and then touch the desired source name.
!When the source icon is not displayed, it can be displayed by touching the screen.
!While operating the menu, you cannot select a source by touching the source icon.
Notes
!The USB/iPod icon will change as follows:
—USB/iPod is displayed when no device is connected.
—USB is displayed when a USB storage device is connected to USB input.
% Press +/– (VOLUME/VOL) to adjust the volume.
 6
6 En
En
 What’s what
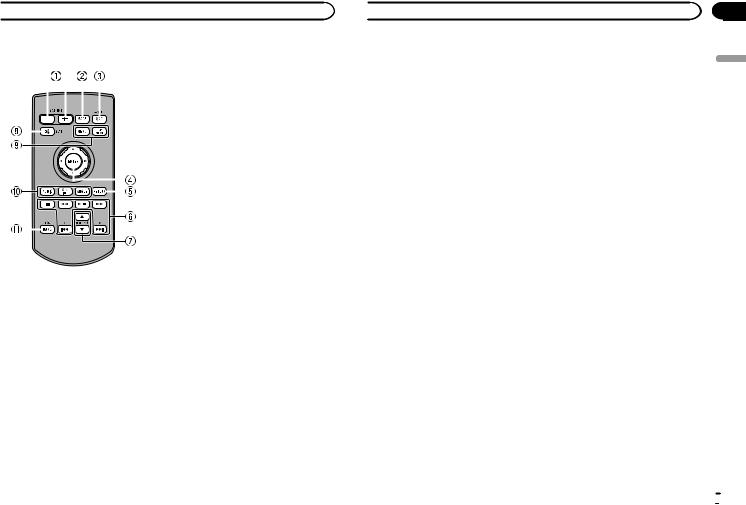
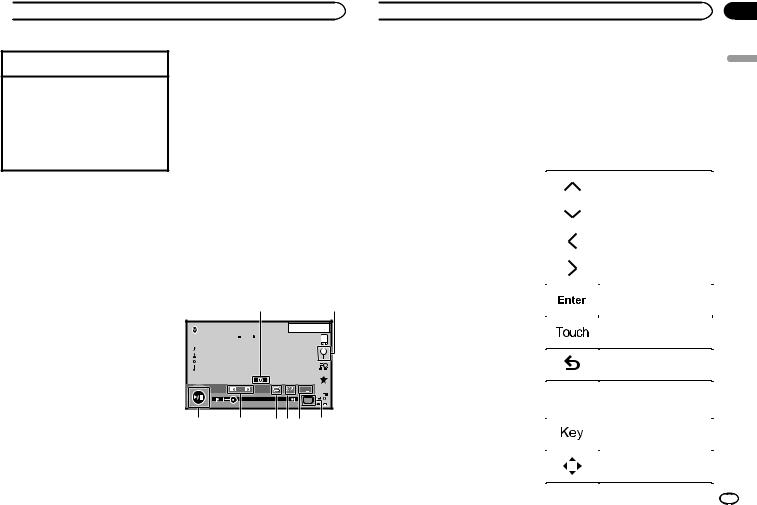
Remote control |
n |
|||||||||||||
|
|
|
|
|
|
|
|
|
|
|
|
|
Press to perform fast forward. |
|
|
|
|
|
|
|
|
|
|
|
|
|
|
Press to change the fast forward speed. |
|
|
|
|
|
|
|
|
|
|
|
|
|
|
o |
|
|
|
|
|
|
|
|
|
|
|
|
|
|
||
|
|
|
|
|
|
|
|
|
|
|
|
|
Press to return to the previous track (chap- |
|
|
|
|
|
|
|
|
|
|
|
|
|
|
||
|
|
|
|
|
|
|
|
|
|
|
|
|
ter). |
|
|
|
|
|
|
|
|
|
|
|
|
|
|
p |
|
|
|
|
|
|
|
|
|
|
|
|
|
|
Press to go to the next track (chapter). |
|
|
|
|
|
|
|
|
|
|
|
|
|
|
g |
|
|
|
|
|
|
|
|
|
|
|
|
|
|
||
|
|
|
|
|
|
|
|
|
|
|
|
|
Press to stop playback. |
|
|
|
|
|
|
|
|
|
|
|
|
|
|
If you resume playback, playback will start |
|
|
|
|
|
|
|
|
|
|
|
|
|
|
from the point where you stopped. Touch the |
|
|
|
|
|
|
|
|
|
|
|
|
|
|
key again to stop playback completely. |
|
|
|
|
|
|
|
|
|
|
|
|
|
|
7 FOLDER/P.CH |
|
|
|
|
|
|
|
|
|
|
|
|
|
|
||
|
|
|
|
|
|
|
|
|
|
|
|
|
Press to select the next or previous disc or |
|
|
|
|
|
|
|
|
|
|
|
|
|
|
folder. |
|
|
|
|
|
|
|
|
|
|
|
|
|
|
Press to recall radio station frequencies as- |
|
|
|
|
|
|
|
|
|
|
|
|
|
|
signed to preset tuning keys. |
|
|
|
|
|
|
|
|
|
|
|
|
|
|
8 MUTE |
|
|
|
|
|
|
|
|
|
|
|
|
|
|
Press to mute. Press again to unmute. |
|
1 +/– (VOLUME/VOL) |
9 MENU |
|||||||||||||
|
|
|
|
|
|
|
|
|
|
|
|
|
||
2 MODE |
Press to display the DVD menu during DVD |
|||||||||||||
playback. |
||||||||||||||
Turning the information display off. |
||||||||||||||
TOP MENU |
||||||||||||||
|
|
|
|
|
|
|
|
|
|
|
|
|
||
3 SRC/OFF |
Press to return to the top menu during DVD |
|||||||||||||
playback. |
||||||||||||||
Press to cycle through all the available sour- |
||||||||||||||
|
||||||||||||||
ces. Press and hold to turn the source off. |
a AUDIO |
|||||||||||||
|
|
|
|
|
|
|
|
|
|
|
|
|
||
4 Thumb pad |
Press to change the audio language during |
|||||||||||||
DVD playback. |
||||||||||||||
Use to select a menu on the DVD menu. |
||||||||||||||
Press to switch audio output for DivX/ |
||||||||||||||
|
|
|
|
|
|
|
|
|
|
|
|
|
||
5 RETURN |
MPEG-4. |
|||||||||||||
SUBTITLE |
||||||||||||||
Press to display the PBC (playback control) |
||||||||||||||
Press to change the subtitle language during |
||||||||||||||
menu during PBC playback. |
||||||||||||||
DVD/DivX/MPEG-4 playback. |
||||||||||||||
|
|
|
|
|
|
|
|
|
|
|
|
|
||
6 f |
ANGLE |
|||||||||||||
Press to change the viewing angle during |
||||||||||||||
Press to pause or resume playback. |
DVD playback. |
|||||||||||||
|
|
|
|
|
|
|
|
|
|
|
|
|
||
m |
|
|||||||||||||
Press to perform fast reverse. |
|
|||||||||||||
Press to change the fast reverse speed. |
|
|||||||||||||
 What’s what
b BAND/ESC
Press to select the tuner band when tuner is selected as a source. Also used to cancel the control mode of functions.
Press to switch between modes when playing the following types of data:
!Disc
Compressed audio and audio data (CD-DA) such as with CD-EXTRA and MIXED-MODE CDs
!USB storage device
Audio data, video data and photo data
Section
03
English
En  7
7

Section |
|
|
04 |
Common operations |
Common operations |
Common operations for menu settings/lists
(Function of AVH-X5650BT/AVH- X2650BT)
Starting the Bluetooth telephone menu.
For details refer to Bluetooth telephone on page 25.
Displaying the list menu.
Starting the search function.
Displaying the EQ (Audio function menu).
Displaying the Favorite menu.
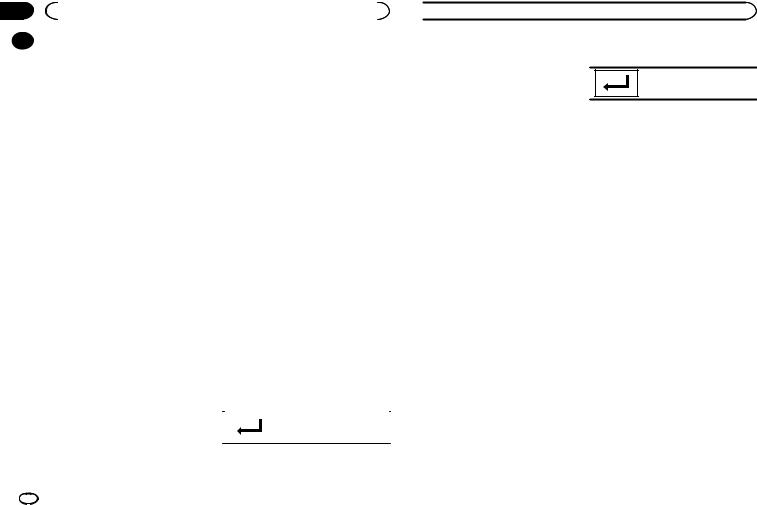
Operating the scroll icon and the scrubber bar
|
1 |
Audio |
|
Sonic Center Control |
L/R 0 |
Loudness |
Low |
Subwoofer |
On |
Bass Booster |
0 |
High Pass Filter |
125Hz |
Source Level Adjuster |
0 |
|
2 1 |
DVD-V |
|
|
1 JAN |
12:43 |
|
|
|
PM |
|||
01 |
|
01 |
|
||
|
|
DolbyMultichD 48kHzDolby16bitD |
|
||
|
MENU |
TOP |
1 |
1 |
|
FULL |
MENU |
|
|||
|
|
|
|
1/ 2 |
|
00'20'' |
|
|
-119'51'' |
|
|
|
3 |
|
|
|
|
1 Scroll icon
Appears when selectable items are hidden. Touch the scroll icon to view any hidden items.
2 Scrubber bar
Appears when items cannot be displayed on a single page only.
Drag the scrubber bar to view any hidden items.
Also, you can drag the list to view any hidden items.
3 Playback point
Specifying the playback point
Drag the playback point on the screen.
Activating the touch panel keys
Touch panel keys
DVD-V |
|
1 |
JAN |
12:43 |
|
|
|
PM |
|||
01 |
|
01 |
|
||
|
|
DolbyMultichD 48kHzDolby16bitD |
|
||
|
MENU |
TOP |
1 |
1 |
|
FULL |
MENU |
|
|||
|
|
|
|
1/ 2 |
|
00'20'' |
|
|
-119'51'' |
|
|
|
|
|
1 |
|
|
L+R |
1 |
|
|
Return |
|
|
|
|
|
2/ 2 |
|
07'24'' |
|
|
-112'47'' |
|
|
|
|
|
1 |
|
|
1 Tab key
Switching the touch panel keys on the display.
Using the rear view
A rear view camera sold separately is required for using the rear view mode. The below functions are available.
!Rear view camera
This unit can be setup to display the rear view image automatically when you move the shift lever to the REVERSE (R) position.
!Camera for rear view mode
The rear view can be turned on to display at all times.
The rear view camera needs to be set to a setting other than Off to turn on rear view mode.
For details about the settings, refer to Setting the rear view camera (back up camera) on page 37.
Using the rear view key to display the rear view
Displaying the rear view image by turning the rear view image on. When the rear view image is displayed, you can switch to the source display by touching the display. You can operate from the source display temporarily at this time. If you do not perform any operations within a few seconds, the display will return to the rear view image.
To turn off the rear view image, press the home button to return to the home display and then press this key again.
Using the rear monitor
Connecting a rear monitor, sold separately, to this unit allows images and videos to be viewed from the rear seats.
Notes
!You cannot use touch panel keys and operation screens from the rear monitor.
!Images and video will continue to be displayed whether the vehicle is in motion or stopped.
Using sound retriever
Automatically enhances compressed audio and restores rich sound.
Off —  —
— 

! 
 is more effective than
  .
.
 8
8 En
En

 Common operations
Notes
!This function is enabled for playback on the sources listed below.
—CD-DA
—MP3/WMA/AAC files on USB MTP storage devices
—MP3/WMA/AAC/WAV files on USB storage devices
—MP3/WMA/AAC files on CD media
—iPod
!The sound retriever setting is turned off when the MIXTRAX function is used in USB source mode.
Changing the wide-screen mode
Selecting the appropriate screen ratio for the playback video.
1Display the screen mode.
2Touch the desired wide mode setting.
FULL (full screen)
The 4:3 picture is enlarged in the horizontal direction only, granting viewers a 4:3 TV picture (normal picture) without any omissions.
ZOOM (zoom)
The 4:3 picture is enlarged in the same proportion both vertically and horizontally; ideal for a cinema sized picture (wide screen picture).
NORMAL (normal)
The 4:3 picture is displayed as is, granting viewers no sense of disparity as the proportions are the same as that of the normal picture.
Notes
!You cannot operate this function while driving.
!Different settings can be stored for each video source.
!When a video is viewed in a wide screen mode that does not match its original aspect ratio, it may appear different.
!Remember that using the wide mode feature of this system for commercial or public viewing purposes may constitute an infringement on the author’s rights protected by the Copyright Law.
!The video image will appear coarser when viewed in ZOOM mode.
!FULL/NORMAL is used for TV tuner of RGB connection.
!This function is enabled for playback on the sources listed below.
—Disc: DVD-V, Video-CD, DivX, MPEG-1, MPEG-2, MPEG-4
—USB: DivX, MPEG-1, MPEG-2, MPEG-4, JPEG
—iPod: Video
—AV: A/V data
—AUX: A/V data
—TV: RGB connection
|
|
|
|
|
|
|
|
|
|
|
|
|
Section |
|
|
Basic operations |
|
|
|
|
|
04 |
|||||
|
|
|
|
|
|
|
|
|
|
|
|
|
05 |
|
|
|
|
|
|
|
|
|
|
|
|
|
|
Adjusting the angle of the |
% Press hto eject a disc. |
|
|||||||||||
LCD panel and ejecting media |
Setting the clock |
English |
|||||||||||
|
|
|
|
CAUTION |
|||||||||
|
|
|
|
|
|||||||||
|
|
|
|
1 Touch the Clock key. |
|
||||||||
Keep hands and fingers clear of the unit when |
|
||||||||||||
The Clock Adjustment screen appears. |
|
||||||||||||
opening, closing, or adjusting the LCD panel. Be |
|
||||||||||||
Refer to Clock key on page 6. |
|
||||||||||||
especially cautious of children’s hands and fin- |
|
||||||||||||
|
|
|
|
|
|
||||||||
gers. |
2 Select the item to set. |
|
|||||||||||
|
|
|
|
|
|
|
|
|
|||||
Adjusting the LCD panel angle |
3 Touch aor bto set the correct date and |
|
|||||||||||
(Function of AVH-X5650BT/AVH-X4650DVD) |
|
||||||||||||
time. |
|
||||||||||||
|
|
|
|
|
|
|
|
|
|||||
1 Press h(eject) to display the ejecting |
Notes |
|
|||||||||||
menu. |
! You can select the date format. Touch |
|
|||||||||||
|
|
|
|
|
|
|
|
dd/mm/yy, yy/mm/dd or mm/dd/yy. |
|
||||
2 Adjust the LCD panel to an easily view- |
! You can select the time clock format. Touch |
|
|||||||||||
able angle. |
12hr (12-hour clock) or 24hr (24-hour clock). |
|
|||||||||||
|
|
|
|
|
|
|
|
|
|
|
|
|
|
|
|
|
|
|
|
|
Laying the panel down. |
|
|
|
Indicates that the display is |
|
|
|
|
|
|
|
|
|
|
|
|
|
|||
|
|
|
|
|
|
|
|
|
|
|
closed. |
|
|
|
|
|
|
|
|
|
|
|
|
||||
|
|
|
|
|
|
|
|
|
|
|
|
|
|
Returning the panel to the upright position.
# As the set angle is saved, the LCD panel will automatically be adjusted to the same position the next time the LCD panel is opened.
Ejecting a disc
(Function of AVH-X5650BT/AVH-X4650DVD)
1Press h(eject) to display the ejecting menu.
2Eject a disc.
Ejecting a disc.
Ejecting a disc
(Function of AVH-X2650BT/AVH-X1650DVD)
En  9
9
Section |
|
|
|
|
06 |
|
|
Tuner |
|
|
|
Tuner operations |
Storing and recalling radio text. |
|
|
|
|||
|
|
|||
|
|
Touch panel keys |
8 List key |
|
|
|
|
|
Displaying the preset channel list. |
|
|
1 |
|
2 |
|
FM |
1 AM |
8 AUG |
12:05 |
|
PM |
|||
Radio1 WWWWWWWW |
|
|
||
2 |
WWWWWWWW |
|
|
|
|
|
|
|
|
3 |
|
|
|
|
|
Text |
|
|
|
4 |
|
|
|
|
5 |
|
87.5 MHz |
|
|
|
|
|
||
6 |
Local |
TA |
News |
|
|
|
OFF |
OFF |
|
9 8 765 4 3 |
|
|||
9 Preset channel key
Selecting a preset channel.
Basic operations
Switching preset channels using the buttons 1 Press cor d(TRK).
Seek tuning using the buttons 1 Press and hold cor d(TRK).
1 Band key
Selecting a band (FM1, FM2 or FM3) by touching the left icon. Switching to the AM band by touching the right icon.
The icon for the selected band is highlighted.
2 Search key
Displaying the PTY information.
3 News key
Turning news program interruption on or off.
4 TA key
Turning TA (traffic announcement standby) on or off.
5 Local key
Setting the local seek level.
6 Tuning key
Tuning up or down manually.
Touch and hold down for more than two seconds to skip stations. Seek tuning starts as soon as you release. Touch again to cancel seek tuning.
7 Text key
Displaying radio text.
Notes
!Listening AM radio while an iPod is charged from this unit may generate noise. In this case, disconnect the iPod from this unit.
!Touch panel keys not listed under Tuner operations may appear on the display.
Refer to Indicator list on page 54.
Storing and recalling stations
You can easily store up to six stations for each band as presets.
1Display the preset screen.
Refer to Tuner operations on page 10. The preset screen appears in the display.
2Touch and hold down one of the preset tuning keys to store the selected frequency to the memory.
The selected radio station frequency has been stored in the memory.
3Touch the appropriate preset tuning key to select the desired station.
 Tuner
Tuner
Displaying radio text |
# To cancel the storage process, touch Cancel. |
|||||||||||||
(Only available on FM stations) |
Tuning in to strong signals |
|||||||||||||
Radio text data transmitted by RDS stations, |
||||||||||||||
such as station information, can be displayed |
Local seek tuning allows you to tune in to only |
|||||||||||||
on this tuner. |
||||||||||||||
those radio stations with sufficiently strong sig- |
||||||||||||||
! When no radio text is received, No Text ap- |
||||||||||||||
nals for good reception. |
|
|
|
|
|
|
||||||||
pears in the display. |
|
|
|
|
|
|
||||||||
|
|
|
|
|
|
|
|
|
|
|
|
|
||
|
FM: Off — |
|
— |
|
|
|
— |
|
|
|
|
|
— |
|
|
|
|
|
|
|
|
||||||||
Storing and recalling radio text
You can store data from up to six radio text transmissions to the Memo1 to Memo6 keys.
1Display the radio text you want to store in the memory.
Refer to Tuner operations on page 10.
2Touch and hold one of the keys to store the selected radio text.
The memory number is displayed and the selected radio text will be stored in the memory. The next time you press the same key in radio text display the stored text will be recalled from the memory.
Storing the strongest stations
BSM (best stations memory) automatically stores the six strongest stations in the order of their signal strength.
Storing broadcast frequencies with BSM may replace broadcast frequencies you have saved using the preset tuning keys.
1Display the preset screen.
Refer to Tuner operations on page 10. The preset screen appears in the display.
2Touch BSM to turn BSM on.
The six strongest broadcast frequencies will be stored under preset tuning keys in order of their signal strength.
AM: Off —  —
— 

The more  there are on the screen, the fewer the stations that can be selected. Only stations with the strongest signals in your local area can be selected.
If there are fewer  , this unit will be able to receive broadcasts from weaker stations.
Receiving traffic announcements
(Only available on FM stations)
Regardless of the source you are listening to, you can receive traffic announcements automatically with TA (traffic announcement standby).
1Tune in to a TP or enhanced other network’s TP station.
 indicator lights up.
2Turn Traffic announcement on.
Refer to Tuner operations on page 10.
# If the TA function is turned on when you are not tuned in to a TP or enhanced other network’s TP station, the  indicator lights up dimly.
3 Press +/– (VOLUME/VOL) to adjust the TA volume when a traffic announcement begins.
The newly set volume is stored in the memory and will be recalled for subsequent traffic announcements.
10 En
 Tuner
Tuner
4 Turn off the announcement while a traffic announcement is being received.
Refer to Tuner operations on page 10.
The tuner returns to the original source but remains in the TA function standby mode until the icon is touched again.
Receiving alarm broadcasts interrupting regular broadcasts
(Only available on FM stations)
You can choose to receive the alarm broadcast automatically regardless of the source being listened to.
Reception of the previous program resumes once the alarm broadcast ends.
Using PTY functions
(Only available on FM stations)
You can tune in to a station using PTY (program type) information.
Searching for an RDS station by PTY information
You can search for general types of broadcasting programs.
1Touch the search key.
2Touch  or
or  to select a program type.
There are four program types:
News&Info—Popular—Classics—Others
3Touch Start to begin the search.
The unit searches for a station broadcasting that type of program. When a station is found, its program service name is displayed.
#To cancel the search, touch Cancel.
#The program of some stations may differ from that indicated by the transmitted PTY.
# If no station is broadcasting the type of program you searched for, Not Found is displayed for about two seconds and then the tuner returns to the original station.
Using news program interruption
When a news program is broadcast from a PTY code news station, the unit can switch from any station to the news broadcast station. When the news program ends, reception of the previous program resumes.
Setting the FM tuning step
The tuning step remains at 50 kHz during manual tuning.
1 Turn the source off.
Refer to Turning the source ON/OFF on page 6.
2Display the system menu.
Refer to Menu operations on page 29.
3Touch FM Step on the system menu to select the FM tuning step.
Touching FM Step will switch the FM tuning step between 50 kHz and 100 kHz. The selected FM tuning step will appear.
RDS setting
(Only available on FM stations)
Limiting stations to regional programming
When AF is used, the regional function limits the selection of stations to those broadcasting regional programs.
1 Press the home button to switch to the home display.
|
|
|
|
|
Section |
|
|
Tuner |
|
|
|
06 |
|
2 |
Touch the system key to open the system |
2 |
Touch the system key to open the system |
|
|
|
|
|
|||||
|
|
|||||
menu. |
menu. |
|
English |
|||
3 |
Touch RDS Setup on the system menu. |
3 |
Touch Auto PI on the system menu to |
|
||
|
|
|||||
turn Auto PI Seek on.
4 Touch Regional on the menu to turn the regional function on.
# To turn the regional function off, touch Regional again.
Selecting alternative frequencies
When the tuner cannot get a good reception, the unit automatically searches for a different station in the same network.
1Press the home button to switch to the home display.
2Touch the system key to open the system menu.
3Touch RDS Setup on the system menu.
4Touch Alternative FREQ to turn AF on.
# To turn AF off, touch Alternative FREQ again.
Notes
!Sound may be temporarily interrupted by another program during an AF frequency search.
!The AF feature can be set for FM1, FM2, and
FM3.
# To turn Auto PI Seek off, touch Auto PI again.
Setting the AM tuning step
% Touch AM Step on the initial menu to select the AM tuning step.
Touching AM Step will switch the AM tuning step between 9 kHz and 10 kHz. The selected AM tuning step will appear in the display.
Switching Auto PI Seek
The unit can automatically search for a different station with the same programming, even during preset recall.
1 Press the home button to switch to the home display.
En 11

Section
07  Disc (CD/DVD)
|
|
Introducing movie operations |
Touch to change the fast forward and reverse |
|||||||||||||
|
|
|||||||||||||||
|
|
You can use this unit to view DVD/DVD-R/DVD- |
speed. |
|||||||||||||
|
|
|
||||||||||||||
|
|
RW/CD/CD-R/CD-RW movie files. |
|
|
|
2 Search key |
||||||||||
|
|
|
|
|
|
|
|
|
|
|
|
|
|
|
|
|
|
|
Touch panel keys |
|
|
|
|
|
|
|
Starting the search function. |
||||||
|
|
|
|
|
|
|
|
|
|
|||||||
|
DVD video |
|
|
|
|
|
|
|
|
3 Switch subtitle language key |
||||||
|
|
|
|
|
|
|
|
|
With DVDs/DivX files featuring multi-subtitle |
|||||||
1 |
|
|
|
|
|
|
|
2 |
||||||||
|
|
|
|
|
|
|
recordings, you can switch between subtitle |
|||||||||
|
|
|
|
|
|
|
|
|
|
|
|
|
|
|
|
|
|
|
|
|
|
|
|
|
|
|
|
|
|
|
|
|
languages during playback. |
|
|
DVD-V |
|
|
1 JAN |
12:43 |
|
|
||||||||
|
|
|
|
|
|
|
|
|
01 |
|
|
PM |
|
|
||
|
|
|
|
|
|
|
|
|
|
01 |
|
|
|
4 Switch audio language key |
||
|
|
|
|
|
|
|
|
|
|
|
|
|
|
|
|
|
|
|
|
|
|
|
|
|
|
|
|
|
|
|
|
|
With DVDs/DivX files that provides audio |
|
|
|
|
|
|
|
|
|
|
|
|
|
|
|
|
playback in different languages and different |
|
|
|
|
|
|
|
|
|
|
|
|
|
|
|
|
audio systems (Dolbyâ Digital, DTS, etc.), |
|
|
|
|
|
|
|
|
|
DolbyMultichD 48kHzDolby16bitD |
|
|
|
you can switch between languages/audio |
|||
|
|
|
|
|
FULL |
MENU MENU |
1 1 |
|
|
|
systems during playback. |
|||||
|
|
|
|
|
|
|
|
|
TOP |
|
1/ 2 |
|
|
Depending on the setting, the video may not |
||
|
|
|
|
|
|
|
|
|
|
|
|
|||||
|
|
00'20'' |
|
|
-119'51'' |
|
|
|
be played back with the audio system used |
|||||||
|
|
|
|
|
|
|
|
|
|
|
|
|
|
|
|
|
|
|
|
a 9 8 7 6 5 4 |
3 |
to record the DVD. |
|||||||||||
|
|
|
|
|||||||||||||
L+R |
1 |
Return |
5 TOP MENU key |
|
|
2/ 2 |
Returning to the top menu during DVD play- |
|
|
|
|
07'24'' |
|
-112'47'' |
back. |
|
|
|
|
g f e d c b |
6 MENU key |
|
|
|
Video CD |
|
Displaying the DVD menu during DVD play- |
|
back. |
|
|
|
FULL |
L+R |
Return |
00'20'' |
-119'51'' |
|
7 Slow-motion playback key |
|
|
|
Moving the selection ahead one frame at a |
9 8 h 7 e g b |
time during playback. |
||
|
|
|
Touch and hold down the key for more than |
When playing a disc containing a mixture of vari- |
two seconds to slow down playback speed. |
||
ous media file types |
|
|
Touching the key increases the playback |
FULL |
1 |
OFF |
speed over four incremental settings during |
|
|
Media |
slow motion playback from DVD video/Video |
00'15'' |
-00'59'' |
|
CD. |
|
|
|
|
9 8 7 |
e 4 i 3 |
8 Stop key |
|
|
|
|
|
1 Fast forward key/Reverse key |
|
Stopping playback. |
|
|
If you resume playback, playback will start |
||
Fast forwarding or reversing |
|
||
|
from the point where you stopped. Touch the |
||
|
|
|
|
|
|
|
key again to stop playback completely. |
 Disc (CD/DVD)
9 Screen mode key
Changing the screen mode.
Refer to Changing the wide-screen mode on page 9.
aPause and play key
Pausing playback.
Returning to normal playback during paused, stopped, slow motion, or frame-by- frame playback.
bReturn key
Returning to the specified scene to which the DVD currently being played has been preprogrammed to return.
This function cannot be used if a specified scene has not been preprogrammed on the DVD disc.
c Bookmark key
During playback, touch the point at which you want to resume playback the next time the disc is loaded.
!You can set one bookmark per DVD video. You can set up to five bookmarks total.
!To clear the bookmark on a disc, touch and hold the key during playback.
!The oldest bookmark is replaced by the new one.
d Arrow key
Displaying arrow keys to operate the DVD menu.
e Repeat key
Selecting the repeat range.
f Viewing angle key
With DVDs featuring multi-angle (scenes shot from multiple angles) recordings, you can switch among viewing angles during playback.
g Audio output key
Switching the audio output, when playing video discs recorded with LPCM audio.
h Slow key
Speeding down the playback speed in four steps, during slow motion playback on Video CD.
!There is no sound during slow motion playback.
!Images during slow motion playback may be unclear for some discs.
!Reverse slow motion playback is not available.
iMedia key
Switching between media file types to play on DVD/CD.
Basic operations
Playing back videos
1 Insert the disc into the disc loading slot with the label side up.
Playback will automatically start.
!If you are playing a DVD or Video CD, a menu may appear. Refer to Operating the DVD menu on page 13 and PBC playback on page 14.
!When the automatic playback function is on, the unit will skip the DVD menu and automatically start playback from the first chapter of the first title. Refer to Automatic playback of DVDs on page 33.
!When the source icon is not displayed, it can be displayed by touching the screen.
!If a message is displayed after loading a disc
containing DivX VOD content, touch Play. Refer to Playing DivXâ VOD content on page
15.
Ejecting a disc
! Refer to Ejecting a disc on page 9.
12 En
 Disc (CD/DVD)
Selecting a chapter using the buttons 1 Press cor d(TRK).
Fast forwarding or reversing using the buttons 1 Press and hold cor d(TRK).
!Fast forward/fast reverse may not always be possible on some discs. In such cases, normal playback will automatically resume.
!The fast forward/fast reverse speed depends on the length of time you press and hold down cor d(TRK). This function is not available for Video CD.
Notes
!This DVD player can play back a DivX file recorded on CD-R/RW, DVD-R/RW, or MPEG-1/ MPEG-2/MPEG-4. (Please see the following section for files that can be played back. Refer to DivX video files on page 56.)
!Do not insert anything other than a DVD-R/ RW or CD-R/RW into the disc loading slot.
!Some operations may not be available while watching a media due to the programming
of the disc. In such cases, the  icon appears on the screen.
!There may be touch panel keys not listed under Introducing movie operations on page 12 that appear on the screen.
Refer to Indicator list on page 54.
!With some DVDs, switching between languages/audio systems may only be possible using a menu display.
!You can also switch between languages/ audio systems using Video Setup menu. For details, refer to Setting the audio language on page 31.
!This unit will return to normal playback if you change the audio language during fast forward/fast reverse, pause or slow motion playback.
!With some DVDs, switching between subtitle languages may only be possible using a menu display.
!You can also switch between subtitle languages using Video Setup menu. For details, refer to Setting the subtitle language on page 31.
!This unit will return to normal playback if you change the subtitle language during fast forward/fast reverse, pause or slow motion playback.
!During playback of a scene shot from multiple angles, the angle icon is displayed. Use the Video Setup menu to turn the angle icon display on or off. For details, refer to Setting the multi-angle DVD display on page 32.
!You will return to normal playback if you change the viewing angle during fast forward/fast reverse, pause or slow motion playback.
Sound playback operations
You can use this unit to listen to DVD-R/DVD- RW/CD/CD-R/CD-RW sound files.
Touch panel keys
|
|
1 |
|
|
2 |
ROM1 |
|
1 JAN |
12:43 |
||
|
PM |
||||
1 |
|
|
|
||
|
Abcdefghi |
|
|
|
|
|
Abcdefghi |
|
|
|
|
|
Abcdefghi |
|
|
|
|
|
Abcdefghi |
|
|
|
|
|
|
|
S.Rtrv |
Dolby PLll |
|
|
|
|
Media |
|
|
|
00'37'' |
|
-08'43'' |
|
|
8 |
7 |
|
654 |
|
3 |
1 Information key |
|
|
|
|
|
Switching the text information to display on this unit when playing MP3/WMA/AAC files.
 Disc (CD/DVD)
2 Search key |
Operating the DVD menu |
||||
Displaying a list of track titles/file names to |
(Function for DVD video) |
||||
select songs on a CD. |
|||||
Some DVDs allow you to make a selection from |
|||||
Displaying the file name list to select the |
|||||
the disc contents using a menu. |
|||||
files. |
|||||
|
|
|
|
||
3 Media key |
Using the arrow keys |
||||
Switching between media file types on a |
1 Display arrow keys to operate the DVD |
||||
DVD or CD. |
|||||
menu. |
|||||
|
|||||
4 Sound retriever key |
2 Select the desired menu item. |
||||
Refer to Using sound retriever on page 8. |
|||||
|
|
|
|
||
5 Random key |
|
|
|
|
|
|
|
|
|
||
|
|
|
|
||
Playing songs in random order. |
|
|
|
|
|
6 Repeat key |
|
|
|
|
|
Selecting the repeat range. |
|
|
|
Selecting the desired menu item. |
|
7 Previous folder key/Next folder key |
|
|
|
||
|
|
|
|
||
Selecting a folder. |
|
|
|
|
|
|
|
|
|
||
8 Pause and play key |
|
|
|
|
|
Pausing and starting playback. |
|
|
|
|
|
|
|
|
|
||
|
|
|
Starting playback from the se- |
||
|
|
|
|
||
Switching the media file type |
|
|
|
lected menu item. |
|
|
|
|
|
||
|
|
|
|
||
When playing a digital media containing a mix- |
|
|
|
Operating the DVD menu by di- |
|
|
|
|
|||
ture of various media file types, such as DivX, |
|
|
|
||
|
|
|
rectly touching the menu item. |
||
MPEG-1, MPEG-2, MPEG-4 and MP3, you can |
|
|
|
||
|
|
|
|
||
|
|
|
|
||
switch between media file types to play. |
|
|
|
Back to previous display. |
|
|
|
|
|||
|
|
|
|
||
% Touch Media to switch media file types. |
|
|
|
|
|
|
|
|
|
||
CD-DA (audio data)—Music/ROM (compressed |
|
|
|
|
|
audio)—Video (DivX, MPEG-1, MPEG-2, MPEG-4 |
# When operating the DVD menu by directly touch- |
||||
video files) |
ing the menu item, touch the icon to operate. |
||||
Note |
|
|
|
|
|
|
|
|
Returning to the normal DVD |
||
Audio data (CD-DA) files on DVD-R/RW/ROM |
|
|
|
||
cannot be played back on this unit. |
|
|
|
video display. |
|
|
|
|
|
|
|
|
|
|
|
Displaying arrow keys. |
|
|
|
|
|
||
|
|
|
|
|
|
|
|
|
|
|
|
Section
07
English
En 13
Section |
|
|
|
|
|
|
|
|
|
07 |
|
|
Disc (CD/DVD) |
|
|
|
|
|
|
|
|
# Ways to display the menu will differ depending |
|
! If you perform title/chapter search or fast for- |
|||||
|
|
|
|||||||
|
|
|
|||||||
|
|
on the disc. |
|
|
ward/reverse during Chapter, the repeat play |
||||
|
|
# Depending on the contents of the DVD disc, this |
|
|
is set to off automatically. |
||||
|
|
function may not work properly. In such cases, use |
|
! If you perform track search or fast forward/ |
|||||
|
|
the touch panel keys to operate the DVD menu. |
|
|
reverse during Track, the repeat play range |
||||
|
|
|
|
|
|
|
changes to Disc. |
||
|
|
Random play (shuffle) |
|
! When Folder is selected, it is not possible to |
|||||
|
|
|
|
play back a subfolder of that folder. |
|||||
|
|
% Touch the random key. |
|
|
|
|
|
||
|
|
! |
On – Play back files in random order within |
Searching for the part you |
|||||
|
|
|
|
the repeat range, Folder and Disc. |
|||||
|
|
|
|
want to play |
|||||
|
|
! |
Off – Cancel random play. |
||||||
|
|
|
|
|
You can use the search function to find the part |
||||
|
|
Repeating playback |
you want to play. |
||||||
|
|
For DVD videos, you can select Title (title), |
|||||||
|
|
|
|
|
|||||
|
|
% Touch the repeat key. |
Chapter (chapter) or 10key (numeric keypad). |
||||||
|
|
|
! Disc – Play through the current disc |
For video CDs, you can select Track (track) or |
|||||
|
|
|
! Chapter – Repeat the current chapter |
10key (numeric keypad). |
|||||
|
|
|
! Title – Repeat the current title |
! Chapter search is not available when disc |
|||||
|
|
|
! Track – Repeat the current track |
|
|
playback is stopped. |
|||
|
|
! File – Repeat the current file |
! This function cannot be operated during |
||||||
|
|
! Folder – Repeat the current folder |
|
|
some DVD videos or Video CD playback fea- |
||||
|
|
! Disc/All – Repeat all files in the current disc |
|
|
turing PBC (playback control). |
||||
|
|
! |
All – Repeat all files |
1 Start the search function. |
|||||
|
|
Notes |
|||||||
|
|
Refer to Introducing movie operations on page |
|||||||
|
|
! This function cannot be operated during |
12. |
|
|
||||
|
|
|
Video CD playback featuring PBC (playback |
|
|
|
|
|
|
|
|
|
control). |
2 Touch the desired search option (e.g., |
|||||
|
|
! If you perform chapter search, fast forward/ |
Chapter). |
||||||
|
|
|
reverse, frame-by-frame playback or slow mo- |
|
|
|
|
|
|
|
|
|
tion playback, the repeat play will stop. |
3 Touch 0 to 9 to input the desired number. |
|||||
|
|
! When playing discs with compressed audio |
# To cancel the entered numbers, touch C. |
||||||
|
|
|
and audio data (CD-DA), playback is re- |
|
|
|
|
|
|
|
|
|
peated within the type of data currently play- |
4 Start playback from the selected part. |
|||||
|
|
|
ing even if Disc is selected. |
|
|
|
|
|
|
|
|
! If you select another folder during repeat |
|
|
|
Registering the numbers and |
|||
|
|
|
|
|
|||||
|
|
|
play, the repeat play range changes to |
|
|
|
|||
|
|
|
|
|
|
starting playback. |
|||
|
|
|
Disc/All. |
|
|
|
|||
|
|
|
|
|
|
|
|
||
|
|
! If you perform track search or fast forward/ |
|
|
|
|
|
||
|
|
|
|
|
|
|
|||
|
|
|
reverse during File, the repeat play range |
Note |
|||||
|
|
|
changes to Folder. |
With discs featuring a menu, you can also use |
|||||
|
|
|
|
|
|||||
the DVD menu to make your selection.
 Disc (CD/DVD)
Refer to Introducing movie operations on page 12.
Selecting audio output
When playing DVD video discs recorded with LPCM audio, you can switch the audio output. When playing video CDs, you can switch between stereo and monaural audio output.
!This function is not available when disc playback is stopped.
% Touch the audio output key to switch audio output types.
!L+R – Left and right
!Left – Left
!Right – Right
!Mix – Mixing left and right
Note
You may not be able to select or use this function depending on the disc and the playback location.
PBC playback
(Function for Video CDs)
During playback of Video CDs featuring PBC (playback control), PBC On is displayed.
1 Start the search function.
Refer to Introducing movie operations on page 12.
2Touch 10key to display the numeric keypad.
3Touch 0 to 9 corresponding to a menu number.
4 Start playback from the selected part.
Registering the numbers and starting playback.
Notes
!You can display the menu by touching Return during PBC playback. For details, refer to the instructions provided with the disc.
!PBC playback of a Video CD cannot be canceled.
!During playback of Video CDs featuring PBC (playback control), you cannot select the repeat play range or use the search function.
Selecting tracks from the track title list
You can select tracks to playback using the track title list which is a list of the tracks recorded on a disc.
1 Display the track title list.
Refer to Sound playback operations on page 13.
2 Touch your favorite track title.
Playback begins.
Selecting files from the file name list
(Function for compressed audio/DivX/MPEG-1/ MPEG-2/MPEG-4)
File name list is a list of file names (or folder names) from which you can select a file (or folder) to play back.
1 Touch the search key to display the file (or folder) name list.
14 En
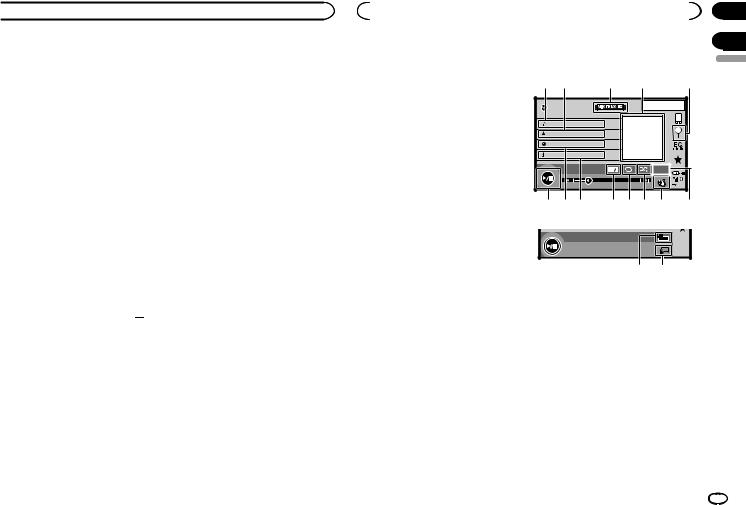
 Disc (CD/DVD)
2 Touch your favorite file (or folder) name. |
% If a message is displayed after loading a |
# When you have selected a folder, a list of the |
disc containing DivX VOD content, touch |
names of the files (or the folders) in it can be viewed. |
Play. |
Repeat this operation to select the desired file name. |
Playback of the DivX VOD content will start. |
# If folder 1 (ROOT) contains no files, playback |
# To skip to the next file, touch Next Play. |
starts from folder 2. |
# If you do not want to play the DivX VOD content, |
Note |
touch Stop. |
|
|
If part of the recorded information does not dis- |
|
play, a scroll key appears on the right side of list. |
|
Touch the scroll key to scroll. |
|
Playing DivXâ VOD content
Some DivX video on demand (VOD) content may only be playable a fixed number of times. When you load a disc containing this type of content, the number of times it has been played will be shown on-screen. You can then decide whether or not to play the disc.
!For DivX VOD content without this restriction, you can load the disc into your player and play the content as often as you like, with no message displayed.
!You can confirm the number of times that the content can be played by checking the
message, This DivX rental has used 

 out of
  views..
 Important
!In order to play DivX VOD contents on this unit, you first need to register the unit with your DivX VOD contents provider. For details
on your registration code, refer to Displaying the DivXâ VOD registration code on page 33.
!DivX VOD content is protected by a DRM (Digital Rights Management) system. This restricts playback of content to specific, registered devices.
|
|
|
Section |
|
|
iPod |
07 |
||
|
|
|
|
|
|
|
08 |
||
iPod control |
Touch panel keys |
|||
This manual applies to the following iPod models.
iPod with 30-pin connector
—iPod touch 4th generation
—iPod touch 3rd generation
—iPod touch 2nd generation
—iPod touch 1st generation
—iPod classic 160GB
—iPod classic 120GB
—iPod classic
—iPod with video
—iPod nano 6th generation
—iPod nano 5th generation
—iPod nano 4th generation
—iPod nano 3rd generation
—iPod nano 2nd generation
—iPod nano 1st generation
—iPhone 4S
—iPhone 4
—iPhone 3GS
—iPhone 3G
—iPhone
iPod with lightning connector
—iPod touch 5th generation
—iPod nano 7th generation
—iPhone 5
iPod audio (Control Audio) |
|
|
|
English |
|
1 2 |
3 |
|
4 |
5 |
|
|
|
|
|
|
|
|
|
|
1 JAN |
|
|
|
|
|
PM 12:43 |
|
|
Abcdefghi |
1/9 |
|
|
|
|
|
|
|
|
|
|
iPod |
|
|
|
|
|
Abcdefghi |
|
|
|
|
|
Abcdefghi |
|
|
|
|
|
Abcdefghi |
|
|
|
|
|
|
x 1 2 |
AllAll |
S.Rtrv |
|
|
|
|
|
ApprApp |
|
|
01'17'' |
|
|
-05'29'' |
|
|
d c b |
a 9 8 7 |
6 |
|
||
iPod audio (App Mode)
|
FULL |
f |
e |
1 Song title
Displaying the Songs list on the iPod.
The application name is displayed when you listen to music other than iPod music.
Sound playback operations
You can use the unit to listen iPod sound files.
Notes
!The play time may not display correctly.
!Display is changed when you listen to music other than iPod music.
2 Artist name
Displaying the Artists list on the iPod.
The song title is displayed when you listen to music other than iPod music.
3MIXTRAX EZ key
Starting MIXTRAX EZ.
Refer to MIXTRAX EZ operation on page 24.
4Artwork
Starting link search on your iPod when you touch the artwork display.
5 Search key
Displaying iPod menus.
En 15
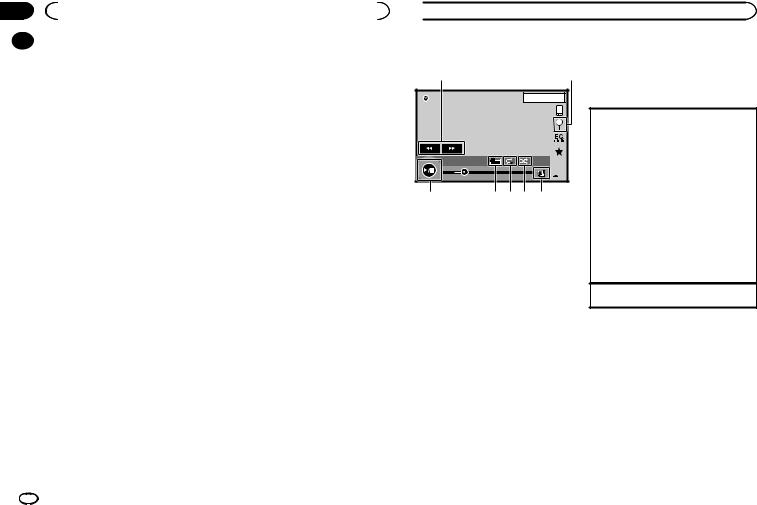
Section |
|
|
|
|
|
08 |
|
|
iPod |
|
|
|
|
6 Sound retriever key |
1 Set Device connection. |
||
|
|
||||
|
|
||||
|
|
|
Refer to Using sound retriever on page 8. |
Device connection can be set when all of the |
|
|
|
|
|
following conditions are met. |
|
|
|
7 iPod control mode key |
— The iPhone is not connected. |
||
|
|
Conducting operation from your iPod and lis- |
— No Bluetooth connection. |
||
|
|
tening to it using your car’s speakers. |
— The source is turned off. |
||
|
|
|
|
1 Turn the source off. |
|
|
|
8 Shuffle key |
Refer to Source off key on page 6. |
||
|
|
|
Playing songs on the iPod in random order. |
2 Press the home button to switch to the home |
|
|
|
|
|
display. |
|
|
|
9 Repeat key |
3 Touch the system key to open the system |
||
|
|
|
Selecting the repeat range. |
menu. |
|
|
|
|
|
4 Touch Device connection on the system |
|
|
|
a Change speed key |
menu. |
||
|
|
|
Changing the speed of audiobook playback |
5 Touch iPhone via Bluetooth to select. |
|
|
|
|
on the iPod. |
|
|
|
|
|
|
2 Connect the iPhone and this unit via |
|
|
|
b Genre |
Bluetooth connection. |
||
|
|
|
Displaying the Genres list on the iPod. |
Refer to Bluetooth connection menu on page 40. |
|
|
|
|
The album title is displayed when you listen |
Note |
|
|
|
|
to music other than iPod music. |
||
|
|
|
Artwork will not be displayed when sound play- |
||
|
|
|
|
||
|
|
c Album title |
back operations are performed using a |
||
|
|
Bluetooth connection. |
|||
|
|
|
Displaying the Albums list on the iPod. |
||
|
|
|
|
|
|
|
|
|
The artist name is displayed when you listen |
|
|
|
|
|
to music other than iPod music. |
Moving images operations |
|
|
|
|
|
||
|
|
d Pause and play key |
For iPod with 30-pin connector users |
||
|
|
|
Pausing and starting playback. |
You can use the unit to view iPod movie files. |
|
|
|
|
|
! Depending on your iPod, there may not be |
|
|
|
e Unit operation key |
any output unless you use CD-IU201S/CD- |
||
|
|
|
Performing operations from this unit and lis- |
IU201V (sold separately). Be sure to use CD- |
|
|
|
|
tening to the music on your iPod using your |
IU201S/CD-IU201V to connect your iPod. |
|
|
|
|
car’s speakers. |
For iPod with lightning connector users |
|
|
|
|
|
! To play movie files in iPod with this unit, con- |
|
|
|
f Screen mode key |
nect a CD-IV203 (sold separately) and Light- |
||
|
|
|
Changing the screen mode. |
ning Digital AV Adapter (Apple Inc. products) |
|
|
|
|
|
(sold separately) and install the CarMedia- |
|
|
|
Sound playback operations for Bluetooth |
Player app on your iPod. Refer to the CarMe- |
||
|
|
diaPlayer manual for more information. |
|||
|
|
(Function of AVH-X5650BT/AVH-X2650BT) |
|||
|
|
Refer to AppRadio Mode operation on page |
|||
|
|
When all of the following settings are made, |
|||
|
|
18. |
|
||
|
|
audio can be enjoyed on this unit using a |
|
||
|
|
|
|
||
|
|
Bluetooth connection. |
|
|
|
 iPod
iPod
Touch panel keys |
Returning to normal playback during |
paused, slow motion, or frame-by-frame play-
1 |
|
2 |
back. |
|
iPod |
|
1 JAN |
Basic operations |
|
|
PM 12:43 |
|||
|
2/3 |
|
||
|
2 |
Playing back videos |
||
|
|
|||
|
|
|
1 Touch the search key to pull up the iPod |
|
|
|
|
menus. |
|
|
|
|
2 Select a movie to play. |
|
|
|
|
Refer to Playing videos from your iPod on page |
|
|
FULL |
1 |
17. |
|
|
|
Appr |
||
02'35'' |
|
-21'54'' |
! When the source icon is not displayed, it |
|
7 |
6 5 4 3 |
can be displayed by touching the screen. |
||
! Disconnect headphones from the iPod be- |
||||
|
|
|
fore connecting it to this unit. |
|
1 Fast forward key/Reverse key |
! Depending on the iPod model and the |
|||
Fast forwarding or reversing |
amount of data stored in the iPod, it may |
|||
Touch to change the fast forward and reverse |
take some time for playback to begin. |
|||
speed. |
|
|
! Use the touch panel keys to select the iPod |
|
|
|
|
after connecting it to this unit. |
|
2 Search key |
|
|
! No Device is displayed when disconnect- |
|
Displaying iPod menus. |
|
ing the iPod. |
||
3 iPod control mode key |
|
Fast forwarding or reversing using the buttons |
||
|
1 Press and hold cor d(TRK). |
|||
Conducting operation from your iPod and lis- |
||||
|
||||
tening to it using your car’s speakers. |
Notes |
|||
|
|
|
||
4 Shuffle key |
|
|
! To ensure proper operation, connect the |
|
|
|
dock connector cable from the iPod directly |
||
Playing the video on your iPod in a random |
||||
to this unit. |
||||
order. |
|
|
||
|
|
! While the iPod is connected to this unit, the |
||
|
|
|
||
5 Repeat key |
|
|
iPod cannot be turned on or off. |
|
|
|
! Touch panel keys not listed under Moving im- |
||
Selecting the repeat range. |
||||
ages operations may appear on the display. |
||||
|
|
|
||
6 Screen mode key |
|
|
Refer to Indicator list on page 54. |
|
|
|
|
||
Changing the screen mode. |
Using this unit’s iPod |
|||
Refer to Changing the wide-screen mode on |
||||
page 9. |
|
|
function from your iPod |
|
|
|
|
||
7 Pause and play key |
|
You can listen to sound from applications on |
||
Pausing playback. |
|
|
your iPod using the car’s speakers when |
|
|
|
|
App Mode is selected. |
|
16 En
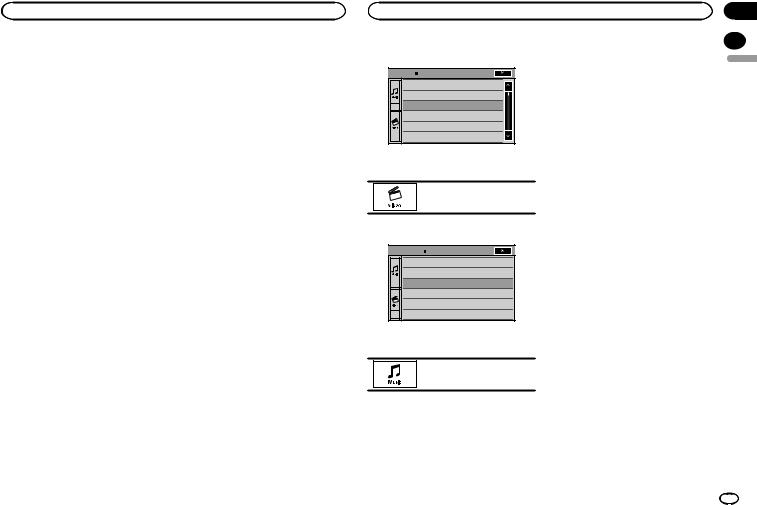
|
|
Section |
iPod |
iPod |
08 |
This function is not compatible with the following iPod models.
!iPod nano 1st generation
!iPod with video
Notes
!Video-related functions are not available to iPod with lightning connector users.
!While this function is in use, the iPod will not turn off even if the ignition key is turned off. Operate the iPod to turn off the power.
1Touch the iPod control mode key to switch to App Mode.
2Operate the connected iPod to select a video/song and play.
Notes
!The following functions are still accessible from the unit even if the control mode is set to App Mode.
However, the operation will depend on your applications.
—Playing/pausing
—Fast forwarding/reversing
—Tracking up/down
—Moving to a chapter up/down
!App Mode is compatible with the following iPod models.
—iPod touch 4th generation
—iPod touch 3rd generation
—iPod touch 2nd generation
—iPod touch 1st generation
—iPod classic 160GB
—iPod classic 120GB
—iPod classic
—iPod nano 6th generation
—iPod nano 5th generation
—iPod nano 4th generation
—iPod nano 3rd generation
—iPod nano 2nd generation
—iPhone 4S
—iPhone 4
—iPhone 3GS
—iPhone 3G
—iPhone
Shuffle play
%Touch the shuffle key.
!Songs – Play back videos/songs in the selected list in random order.
!Albums – Play back videos/songs from a randomly selected album in order.
!Off – Turn off shuffle play.
Repeating playback
%Touch the repeat key.
!One – Repeat just the current video/song
!All – Repeat all videos/songs in the selected list on the iPod
Playing videos from your iPod
Videos can be played on this unit if an iPod with video capabilities is connected.
!This unit can play back “Movies”, “Music videos”, “TV show”, “Video Podcast” and “Rented Movies” which are downloaded from the iTunes store.
Note
This function is not available to iPod with lightning connector users.
1 Touch Search to display iPod menus.
Refer to Search key on page 16.
2 Switch to iPod video mode.
ROOT |
Playlists |
Artists |
Albums |
Songs |
Podcasts |
Genres |
# If you want to switch to iPod video mode, touch the icon.
Switching to iPod video mode.
3 Play the video from the iPod.
ROOT |
Video Playlists |
Movies |
Music Videos |
TV Show s |
Video Podcasts |
Rented Movies |
# If you want to switch to iPod music mode, touch the icon.
Switching to iPod music mode.
Browsing for a video/music on the iPod
To make operating and searching easy, operations to control an iPod with this unit are designed to be as similar to the iPod as possible.
Note |
|
|
|
||
Video-related functions are not available to iPod |
English |
|
with lightning connector users. |
||
|
||
Searching for a video/music by |
|
|
category |
|
1Touch the search key to pull up the iPod menus.
Refer to Search key on page 16.
2Touch one of the categories in which you want to search for a video/music.
Category lists (for video)
!Video Playlists (video playlists)
!Movies (movies)
!Music Videos (music videos)
!TV Shows (TV shows)
!Video Podcasts (video podcasts)
!Rented Movies (rented movies)
!Video ITunesU (video ITunesU)
Category lists (for music)
!Playlists (playlists)
!Artists (artists)
!Albums (albums)
!Songs (songs)
!Podcasts (podcasts)
!Genres (genres)
!Composers (composers)
!Audiobooks (audiobooks)
3 Touch the title of the list that you want to play.
Repeat this operation until you find the desired video/music.
Notes
!Depending on the generation or version of the iPod, some functions may not be available.
!You can play playlists created with the computer application (MusicSphere). The application will be available on our website.
En 17
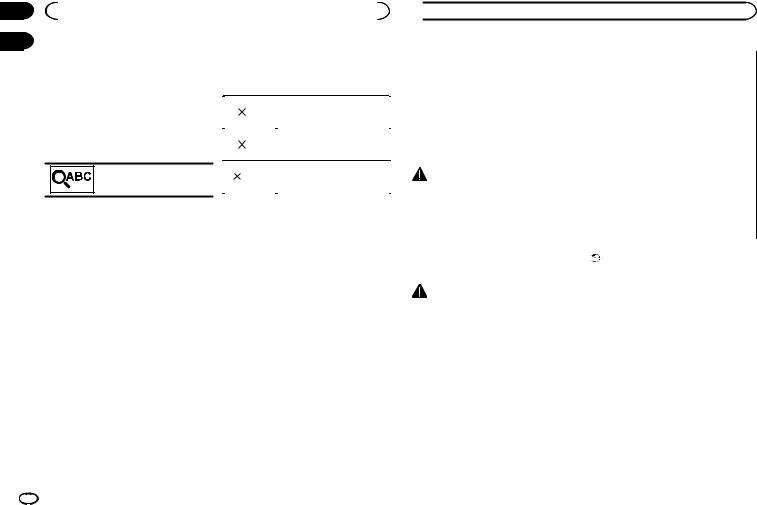
Section |
|
|
|
|
08 |
|
iPod |
|
|
09 |
|
|
|
|
|
|
|
|
|
|
! Playlists that you created with the computer |
Changing audiobook speed |
||
|
|
application (MusicSphere) are displayed in |
% Touch the change speed key to change |
|
|
|
abbreviated form. |
||
the speed.
Searching the list by alphabet
1 Select a category.
Refer to Searching for a video/music by category on page 17.
2 Switch to alphabet search mode.
Switching to alphabet search mode.
Alphabet search mode is displayed.
3 Touch the first letter of the title of the video/song you are looking for.
While searching, touch panel key operation is not available.
# To refine the search with a different letter, touch
Cancel.
4 Touch the title of the list that you want to play.
Repeat this operation until you find the desired song/video.
|
|
|
|
2 |
normalPlayback at a speed faster than |
|
|
|
|
|
|
|
|
|
|
1 |
Playback at normal speed |
|
|
|
|
|
|
|
|
|
|
1/2 |
normalPlayback at a speed slower than |
|
|
|
|
|
|
Displaying lists related to the song currently playing (link search)
Touch the artwork to open a list of the names of songs on the album currently playing. Touch the name of the song you want to play to start playing that song.
Note
If part of the recorded information does not display, a scroll key appears on the right side of list. Touch the scroll key to scroll.
 AppRadio Mode
AppRadio Mode operation |
! Pioneer is not liable for any issues that |
|
|
This system can switch to the AppRadio Mode, |
may arise from incorrect or flawed app- |
which you can display and operate the applica- |
based content. |
tion for iPhone on the screen. |
! The content and functionality of the sup- |
In AppRadio Mode, you can operate applica- |
ported applications are the responsibility |
tions with finger gestures such as tapping, drag- |
of the App providers. |
ging, scrolling or flicking on the screen of the |
! In AppRadio Mode, functionality through |
system. |
the product is limited while driving, with |
|
available functions determined by the App |
Install the AppRadio app on your iPhone. |
providers. |
|
! Availability of AppRadio Mode functional- |
WARNING |
ity is determined by the App provider, and |
not determined by Pioneer. |
|
Certain uses of an iPhone or smartphone |
! AppRadio Mode allows access to applica- |
may not be legal while driving in your juris- |
tions other than those listed (subject to |
diction, so you must be aware of and obey |
limitations while driving), but the extent to |
any such restrictions. |
which content can be used is determined |
If in doubt as to a particular function, only |
by the App providers. |
perform it while the car is parked. |
|
No feature should be used unless it is safe |
|
to do so under the driving conditions you |
Important |
are experiencing. |
! When listening to music and sounds from appli- |
|
cation simultaneously, see the following section. |
CAUTION |
Refer to Operating the sound mixer on page 43. |
|
|
While driving, you cannot enter text on your |
Notes |
iPod. |
! Applications operable by switching this sys- |
|
tem to AppRadio Mode are only those avail- |
|
able for AppRadio Mode. |
|
! Please check applications supported |
|
AppRadio Mode at |
|
http://www.pioneerelectronics.com/ |
|
AppRadioMode |
|
iPhone compatibility |
|
AppRadio Mode is compatible with the follow- |
|
ing iPod models. |
|
! iPod touch 5th generation (only with AVH- |
|
X5650BT/AVH-X2650BT) |
|
! iPod touch 4th generation |
|
! iPhone 5 (only with AVH-X5650BT/AVH- |
|
X2650BT) |
|
! iPhone 4S |
18 En

AppRadio Mode |
AppRadio Mode |
! iPhone 4
Starting procedure
1Install the AppRadio app on your iPhone.
2Set Device connection.
Device connection can be set when all of the following conditions are met.
—The iPhone is not connected.
—No Bluetooth connection.
—The source is turned off.
1Turn the source off.
Refer to Source off key on page 6.
2Press the home button to switch to the home display.
3Touch the system key to open the system menu.
4Touch Device connection on the system menu.
5Touch the desired setting.
—iPhone via Bluetooth (for iPod with lightning connector users)
—iPhone via USB (for iPod with 30-pin connector users)
3 After configuring Device connection, connect the iPhone to this unit.
#For iPod with lightning connector users
(Function of AVH-X5650BT/AVH-X2650BT)
—A Bluetooth connection is required for iPod with lightning connector. Refer to Bluetooth connection menu on page 40.
—Use the CD-IV203 (sold separately) and Lightning to VGA adapter (Apple Inc. products) (sold separately) when you use this function.
—Refer to When connecting with optional CDIV203 cable on page 47.
#For iPod with 30-pin connector users
—Use the CD-IU201S (sold separately) when you use this function.
—Refer to When connecting with optional CDIU201S cable on page 48.
4Start an application available for AppRadio Mode from the iPhone.
An image of the application is displayed on the screen of this system.
!You can start an application available for AppRadio Mode also from a launcher application.
5Press MODE.
# Press the home button to switch to the home display and then touch the Apps key to start the launcher application.
6 Operate the application.
Setting the Keyboard
 CAUTION
For your safety, the keyboard functionality is only available when the vehicle is stopped and the parking brake is engaged.
Depending on the application, you can input text on the display. In order to input text correctly using keyboard which appears on this unit, you need to set the language setting in this function. When the AppRadio Mode is used, the language setting for the keyboard set for the function and the language setting for the iPhone keyboard need to be the same.
!Keyboard is available only in AppRadio Mode.
When you tap a text input area of an application for iPhone, a keyboard will be displayed onscreen. You can input the desired text directly from this system.
!The language preference for the keyboard of this system should be same as the setting on your iPhone.
If the settings for this product and the iPhone are different, you may not be able to enter characters properly.
1Press the home button twice to switch from the AppRadio Mode display to the home display.
2Touch the system key to open the system menu.
3Touch Keyboard on the System menu to select desired language.
4Touch the desired language.
French (French)—German (German)—Greek
(Greek)—Russian (Russian)—English (US Eng- lish)—English (UK) (UK English)—Dutch (Dutch)—Italian (Italian)—Norwegian (Norwe- gian)—Swedish (Swedish)—Finnish (Finnish)
—Spanish (Spanish)—Portuguese (Portu- guese)—Chinese(Simplified) (Simplified Chi- nese)—Chinese(Traditional) (Traditional Chinese)—Arabic (Arabic)—Hebrew (Hebrew)
—Thai (Thai)
5 Tap the text input area on the application screen of the iPhone.
Touch  to hide the keyboard.
Section
09
English
En 19
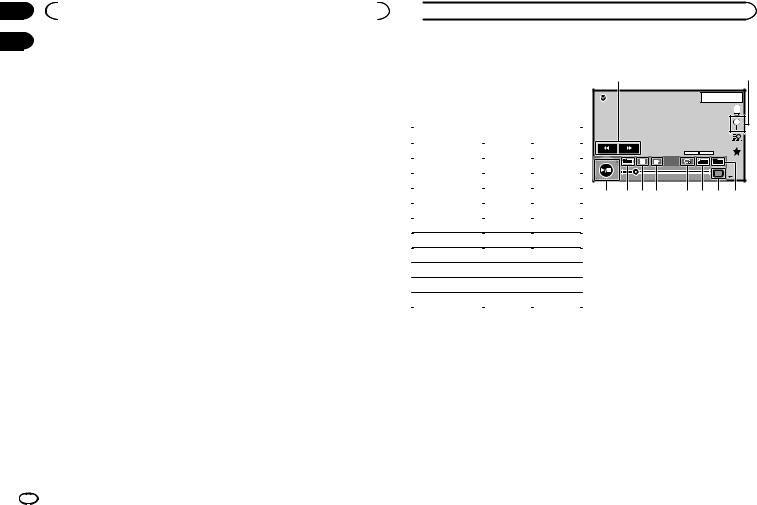
Section |
|
|
|
|
10 |
|
Smartphone link adaptor operations |
||
11 |
|
|
|
|
|
|
|
|
|
|
You can operate your smartphone on the unit’s |
! You must agree to obey the above rule on the |
||
|
display by using this function. |
caution screen. Be sure to follow the on- |
||
|
Only compatible smartphones work with the |
screen instructions. |
||
|
MirrorLink function. |
|
|
|
—For details on how to connect with smartphone link adaptor (CD-ML100) (sold separately), refer to Optional Smartphone link adaptor (CD-ML100) connection on page 48.
—For details about MirrorLink setting, refer to
Selecting MirrorLink Mode on page 34.
—For details about the sound mixer, refer to
Operating the sound mixer on page 43.
Starting procedure
1Connect your smartphone to the smartphone link adaptor (CD-ML100) (sold separately) with the RGB input.
2Press MODE.
#Press the home button to switch to the home display and then touch the MirrorLink key to start the launcher application.
#The smartphone’s screen appears on the unit’s display when you select MirrorLink and you can then operate your smartphone on the display.
3Operate the application.
—Press home button: Displays the home screen for MirrorLink.
—Press home button twice: Displays the home screen for the unit.
—Press d(TRK): Displays the menu screen for MirrorLink.
—Press c(TRK): Displays the previous screen for MirrorLink.
For details, refer to Head unit on page 5.
# You can operate the applications on the touch panel screen as well as on your smartphone screen.
 CAUTION
!Do not operate your smartphone while driving. Obey all relevant laws in your area.
 USB
USB
This unit is compliant with USB MSC (Mass Storage Class) and USB MTP (Media Transfer Protocol).
You can also use USB MTP (connecting to MTPcompatible Android devices using a USB cable); however some functions are not supported for MTP connection.
|
USB MSC |
USB MTP |
|
||
|
|
|
MP3 |
1 |
1 |
WMA |
1 |
1 |
WAV |
1 |
— |
AAC |
1 |
1 |
DivX |
1 |
— |
MPEG-1 |
1 |
— |
|
|
|
MPEG-2 |
1 |
— |
|
|
|
MPEG-4 |
1 |
— |
|
|
|
JPEG |
1 |
— |
|
|
|
Music browse mode |
1 |
— |
|
|
|
MIXTRAX EZ |
1 |
— |
|
|
|
Moving images operations
(Function of USB MSC)
You can use this unit to view USB storage device files.
Touch panel keys
1 |
|
|
2 |
USB |
1 JAN |
12:43 |
|
|
PM |
||
01 |
01 |
|
|
|
|
|
|
|
Multi ch Dolby D |
|
|
FULL |
1 |
1 |
|
00'20'' |
-119'51'' |
Media |
|
|
|
||
a 9 8 7 |
6 5 4 3 |
||
1Fast forward key/Reverse key
Fast forwarding or reversing
Touch to change the fast forward and reverse speed.
2Search key
Displaying the file name list to select the files.
3 Switch subtitle language key
With DivX files featuring multi-subtitle recordings, you can switch between subtitle languages during playback.
4 Media key
Switching between media file types to play on Music/Video/Photo.
5 Switch audio language key
With DivX files that provides audio playback in different languages and different audio systems (Dolby Digital, DTS, etc.), you can switch between languages/audio systems during playback.
6 Repeat key
Selecting the repeat range.
20 En
|
|
Section |
USB |
USB |
11 |
Refer to Repeating playback on page 22.
7 Slow-motion playback key
(Function for DivX file/MPEG-1/MPEG-2/ MPEG-4)
Moving the selection ahead one frame at a time during playback.
Touch and hold down the key for more than two seconds to slow down playback speed.
8Stop key
Stopping playback.
If you resume playback, playback will start from the point where you stopped. Touch the key again to stop playback completely.
9Screen mode key
Changing the screen mode.
Refer to Changing the wide-screen mode on page 9.
a Pause and play key
Pausing playback.
Returning to normal playback during paused, slow motion, or frame-by-frame playback.
Basic operations
Playing back videos
1Connect the USB device. Playback will automatically start.
When the source icon is not displayed, it can be displayed by touching the screen.
Fast forwarding or reversing using the buttons 1 Press and hold cor d(TRK).
Notes
!Touch panel keys not listed under Moving images operations may appear on the display. Refer to Indicator list on page 54.
!You can also switch between languages/ audio systems using Video Setup menu. For details, refer to Setting the audio language on page 31.
!This unit will return to normal playback if you change the audio language during fast forward/fast reverse, pause or slow motion playback.
!You can also switch between subtitle languages using Video Setup menu. For details, refer to Setting the subtitle language on page 31.
!This unit will return to normal playback if you change the subtitle language during fast forward/fast reverse, pause or slow motion playback.
Sound playback operations
You can use this unit to listen to USB audio files.
MTP connection
USB MTP (connecting to MTP-compatible Android devices using a USB cable) is supported only for MP3/WMA/AAC files in this function.
Notes
!The play time may not display correctly.
!When playing back files recorded as VBR (variable bit rate) files, the play time will not be correctly displayed if fast forward or reverse operations are used.
!To ensure proper operation, connect the dock connector cable from the iPod directly to this unit.
!While the iPod is connected to this unit, the iPod cannot be turned on or off.
!If the characters recorded on the USB storage device are not compatible with this unit, those characters will not be displayed.
! Text information may not be correctly dis- |
5 |
Sound retriever key |
played depending on the recorded environ- |
|
Refer to Using sound retriever on page 8. |
ment. |
|
|
! Disconnect the USB portable audio player/ |
6 |
Random key |
USB memory when you are done using it. |
|
Playing songs in random order. |
! When you select Speana on Selecting the |
|
|
background display on page 41, the artwork is |
7 |
Repeat key |
not displayed. |
|
Selecting the repeat range. |
Touch panel keys
|
|
1 2 |
3 |
USB6 |
|
JAN |
|
|
PM 12:43 |
||
1 |
|
||
|
Abcdefghi |
|
|
|
Abcdefghi |
|
|
|
Abcdefghi |
|
|
|
Abcdefghi |
|
|
|
|
All |
S.Rtrv |
|
|
|
Media |
|
00'01'' |
|
-00'03'' |
a |
9 8 7 65 4 |
||
1MIXTRAX EZ key
Starting MIXTRAX EZ. (Except for USB MTP)
2Information key
Switching the text information to display on this unit when playing MP3/WMA/AAC/WAV files.
3 Search key
Displaying the file name list to select the files.
4 Media key
Switching between media file types to play on USB.
8 DB key
Creating a database that enables searches by artist name, genre, and other options. Refer to Music browse mode on page 21.
9 Previous folder key/Next folder key
Selecting a folder.
a Pause and play key
Pausing and starting playback.
Basic operations
Playing back tracks
1Connect the USB device. Playback will automatically start.
When the source icon is not displayed, it can be displayed by touching the screen.
Fast forwarding or reversing using the buttons 1 Press and hold cor d(TRK).
Music browse mode
(Function for USB MSC)
This unit creates an index in order to facilitate browsing for a song. You can search by the categories such as albums and artists.
 CAUTION
!This function is not available when the USB storage device is locked.
English
En 21
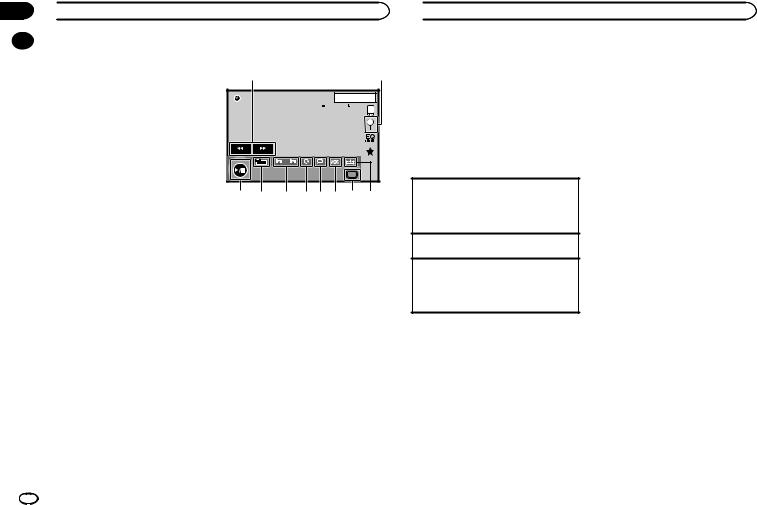
Section
11  USB
USB
|
! This function is not available when the free |
Touch panel keys |
|
||
|
space of USB storage device is less than |
|
5 MB. |
1 |
|
|
2 |
! While this unit creates an index, do not turn |
USB |
|
|
|
the unit off. It may cause loss of data on your |
|
1 JAN |
||
USB storage device. |
|
PM 12:43 |
||
4 |
4 |
|||
! If you switch to video or JPEG image display |
|
|
||
while a database is being created, or when a |
|
|
|
|
database could not be created, a message |
|
|
|
|
appears and database creation stops. |
|
|
|
|
1 Touch DB to create a database in Music |
NORMAL |
|
All |
|
browse mode. |
|
|
|
Media |
Refer to Sound playback operations on page 21. |
|
|
|
|
|
a 9 |
8 7 6 5 4 3 |
||
2 When “Save the Database to memory?” |
|
|
is displayed, touch “Yes”. |
1 |
Fast forward key/Reverse key |
Saving of the database is completed. If you do |
|
Selecting a picture. |
not save it, touch “No”. |
|
|
When the saving is completed, “Completed |
2 |
Search key |
saving Database to memory.” appears. |
|
Displaying the file name list to select the |
Music browse mode will start. |
|
files. |
3 Display a list and touch the tag key. |
3 |
Capture key |
4 Select a file. |
|
Capturing an image in JPEG files. |
|
|
|
|
4 |
Media key |
Still image playback operations |
|
Switching between media file types when |
|
there is more than one media file type saved |
|
|
|
|
(Function for USB MSC) |
|
to the USB device. This key does not appear |
You can use this unit to view still images saved |
|
if there is only one media file type saved to |
on a USB storage device. |
|
the USB device. |
|
5 |
Random key |
|
|
Playing files in a random order. |
|
6 |
Repeat key |
|
|
Selecting the repeat range. |
|
7 |
Rotate key |
|
|
Rotating the displayed picture 90° clockwise. |
 USB
USB
8 |
Previous folder key/Next folder key |
Random play (shuffle) |
|
Selecting a folder. |
% Touch the random key. |
|
|
|
9 |
Screen mode key |
! On – Play back files in random order within |
|
Changing the screen mode. |
the repeat range, Folder and Media. |
|
Refer to Changing the wide-screen mode on |
! Off – Cancel random play. |
page 9.
a Pause and play key
Starting or pausing the slideshow.
Basic operations
Playing still images
1Connect the USB device. Playback will automatically start.
!When the source icon is not displayed, it can be displayed by touching the screen.
Selecting a file using the buttons 1 Press cor d(TRK).
Fast file searching
1 Press and hold cor d(TRK).
!You can search 10 JPEG files at a time.
If there are fewer than 10 files, the search will cover the first or last file.
Notes
!Files are played back in file number order and folders are skipped if they contain no files. (If folder 1 (ROOT) contains no files, playback commences with folder 2.)
!Touch panel keys not listed under Still image playback operations may appear on the display.
Refer to Indicator list on page 54.
Switching the media file type
% Touch Media to switch between media file types.
Repeating playback
%Touch the repeat key.
!Folder – Repeat the current folder
!All – Repeat all files
!When Folder is selected, it is not possible to play back a subfolder of that folder.
!If you select USB source, the repeat play range changes to All.
Selecting files from the file name list
(Function for compressed audio/DivX/MPEG-1/ MPEG-2/MPEG-4)
Operation is the same as that for Disc.
Refer to Selecting files from the file name list on page 14.
Displaying lists related to the song currently playing (link search)
Touch the artwork to open a list of the names of songs on the album currently playing. Touch the name of the song you want to play to start playing that song.
Notes
!If part of the recorded information does not display, a scroll key appears on the right side of list. Touch the scroll key to scroll.
!This function is available for USB devices in Music browse mode.
22 En
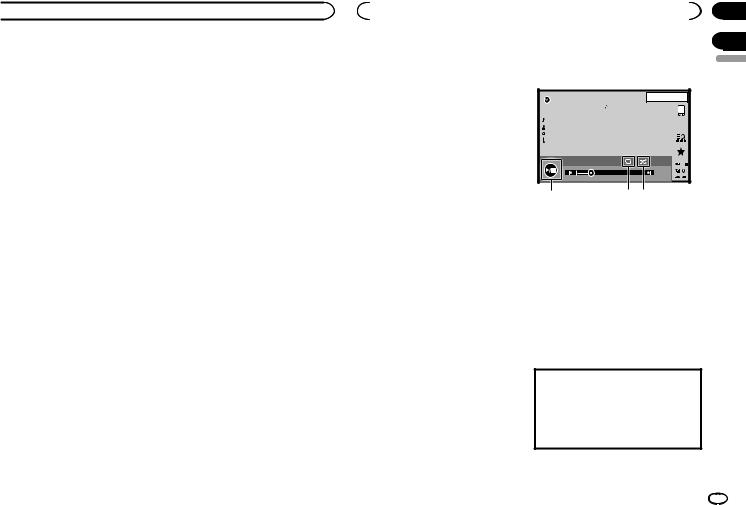
 USB
USB
Playing DivXâ VOD content
Operation is the same as that for Disc.
Refer to Playing DivXâ VOD content on page 15.
Capture an image in JPEG files
You can capture image data and use it as wallpaper. Images can be stored and recalled easily in this unit.
!Only one image can be stored on this unit. Old image is overwritten with the new one.
1Touch fto pause the slide show when the desired image is displayed.
2Touch Capture to capture the desired image.
3When “Do you save this image?” is displayed, touch Yes.
While storing the image to this unit, “Saving the image. During the save, please don’t turn off the engine.” is displayed. When the process is finished, “Image saved.” is displayed.
# To cancel the storage process, touch No.
|
|
|
Section |
|
|
Bluetooth Audio |
11 |
||
|
|
|
|
|
|
|
12 |
||
Sound playback operations |
Touch panel keys |
|||
(Function of AVH-X5650BT/AVH-X2650BT)
You can use this unit to listen to Bluetooth audio files.
Notes
!Depending on the Bluetooth audio player connected to this unit, the available operations will be limited to the following two levels:
—A2DP profile (Advanced Audio Distribution Profile): You can only playback songs on your audio player.
—AVRCP profile (Audio/Video Remote Control Profile): You can perform playback, pause playback, select songs, etc.
!As there is a wide variety of Bluetooth audio players available on the market, operations available with specific models may vary extensively. When attempting to run a Bluetooth audio player using this unit, refer to the instruction manual that came with the player as well as to this manual for assistance.
!As the signal from your cellular phone may cause noise, avoid using it when you are listening to songs on your Bluetooth audio player.
!The sound from a Bluetooth audio player connected to this unit will be muted while a call is in progress on a cellular phone connected to this unit via Bluetooth wireless technology.
!The play time may not display correctly.
!Depending on the type of Bluetooth audio player you have connected to this unit, operation and information display may not be available for some functions.
|
22 JAN |
English |
|
|
12:22 |
||
|
|
AM |
|
|
8888 |
|
|
Bluetooth |
|
|
|
Abcdefghi |
|
|
|
Abcdefgh |
|
|
|
Abcdefgh |
|
|
|
Abcdefgh |
|
|
|
|
|
|
DB |
88'88'' |
-88'88'' |
|
|
3 |
2 1 |
|
|
1 Random key
Playing songs in random order.
2 Repeat key
Selecting the repeat range.
3 Pause and play key
Pausing and starting playback.
Setting up for Bluetooth audio
Before you can use the Bluetooth audio function you must establish a Bluetooth wireless connection between the unit and your Bluetooth audio player.
1Connection
First, you need to connect a Bluetooth audio to this unit.
For detailed instructions on connecting your Bluetooth audio to this unit via Bluetooth wireless technology, refer to Bluetooth connection menu on page 40.
En 23

Section
12  Bluetooth Audio
13
Notes
!When playing back files recorded as VBR (variable bit rate) files, the play time will not be correctly displayed if fast forward or reverse operations are used.
!To ensure proper operation, connect the dock connector cable from the iPod directly to this unit.
!While the iPod is connected to this unit, the iPod cannot be turned on or off.
!If the characters recorded on your Bluetooth audio player are not compatible with this unit, those characters will not be displayed.
!Text information may not be correctly displayed depending on the recorded environment.
Random play (shuffle)
%Touch the random key.
!On – Play back files in random order.
!Off – Cancel random play.
Repeating playback
%Touch the repeat key.
!One – Repeat the current song only
!All – Repeat all songs
 Using MIXTRAX
MIXTRAX operation |
2 Touch the system key to open the system |
|
MIXTRAX is original technology for creating |
menu. |
|
|
||
non-stop mixes of selections from your audio li- |
3 Touch MIXTRAX Setup on the system |
|
brary, complete with DJ effects that make them |
||
menu. |
||
sound as if a DJ is right there with you playing |
||
MIXTRAX setting items are displayed. |
||
the music. |
||
! Short Playback Mode – When turned on, se- |
||
|
||
|
lect an audio track playback length. |
|
MIXTRAX EZ operation |
60s (60 sec.)—90s (90 sec.)—120s (120 sec.) |
|
—150s (150 sec.)—180s (180 sec.)—Random |
||
|
||
You can use this unit to play iPod/USB audio |
(random)—Off (off) |
|
files. |
When Random is selected, the playback time |
|
MIXTRAX EZ is used to add a variety of sound ef- |
varies between 60 s, 90 s, 120 s, 150 s, and |
|
fects between songs for arranging the pauses |
180 s selected at random when the playback |
|
between songs. It allows you to enjoy listening |
song changes. |
|
to music non-stop. |
! Display Effect – When Display Effect is set |
|
! This function is only available when a file on |
to on, the artwork display can be moved ac- |
|
a USB storage device or a song on an iPod is |
cording to the music type. |
|
being played. |
! Cut-In Effect – When Cut-In Effect is set to |
|
! This function is not available when the con- |
on, sound effects will play between tracks. |
|
trol mode is set to App Mode. |
! Effect Setting – Use Effect Setting to set up |
|
! Depending on the file/song, sound effects |
the sound effect you want to insert between |
|
may not be available. |
tracks. |
|
! Depending on the file/song, non-stop play- |
|
|
back may not be available. |
Setting the effect |
|
Note |
||
You can change the settings for fixed sounds |
||
You cannot use this function with USB MTP. |
||
and sound effects. |
||
|
||
Starting MIXTRAX EZ operation |
There are six different fixed sounds available |
|
that can be inserted for playback between |
||
% Touch MIXTRAX EZ. |
tracks. |
|
The sound effects are used as effects to signal |
||
Refer to MIXTRAX EZ key on page 15 and 21. |
the end of a song being played and the begin- |
|
|
ning of the next song in series. |
|
Setting MIXTRAX mode |
The fixed sounds and sound effects are set as |
|
combinations as MIXTRAX sounds. |
||
|
||
Turn on this function to play back audio files |
Fixed sounds |
|
using MIXTRAX. |
||
1 Press the home button to switch to the |
! Phaser – A fixed sound that sounds like surg- |
|
ing waves. |
||
home display. |
||
! Roll – A fixed sound that repeats playback of |
||
|
a certain sound. |
24 En

 Using MIXTRAX
!Turntable – A fixed sound that mimics DJ scratching.
!Flanger2 – A rushing sound that mimics that rising and falling sounds of a jet engine.
!Reverb – A fixed sound effect that creates a reverberation effect.
!Echo2 – A fixed sound effect that creates an echoing effect.
Sound effects
!Cross Fade – A sound effect that creates a fade in and fade out effect between songs.
!Flanger1 – A rushing sound that mimics that rising and falling sounds of a jet engine.
!Echo1 – A sound effect that creates an echoing effect.
!Loop – A sound effect that repeats playback of one section of a song track.
Note
Cross Fade cannot be selected for iPod audio files.
Setting sounds and sound effects as presets using the preset key
The Standard and Simple sound effects are set already as default presets.
% Touch Standard or Simple to check the settings.
The registered preset sound effect for the key that was touched is set as a preset.
Registering sounds and sound effects as presets
Registers a desired combination of sounds and sound effects to Custom.
Touch Custom to easily set the desired sound or sound effect.
2 Add a check mark to the desired sound effect by touching the option.
The marked sound effect is registered as a preset in Custom.
Notes
!If a sound effect is touched in the selection screen for Standard or Simple, the Custom screen is automatically displayed and the sound effect is registered to Custom.
!You can listen to fixed sounds to hear examples by touching the speaker icon.
1 Touch Custom.
 Bluetooth telephone
Bluetooth telephone operations
(Function of AVH-X5650BT/AVH-X2650BT) You can use Bluetooth telephone.
 Important
!Leaving the unit on standby to connect to your phone via Bluetooth while the engine is not running can drain the battery.
!Advanced operations that require attention such as dialing numbers on the monitor, using the phone book, etc., are prohibited while driving. Be sure to park your vehicle in a safe place and apply the parking brake before proceeding.
!Bluetooth connection menu cannot be selected while driving.
!Operations available may be limited depending on the cellular phone connected to this unit.
!If you are unable to complete the connection using this unit, use the device to connect to the unit.
!If you connect more than one device at a time, connected device may not operate properly. Connecting one device at a time is recommended.
Touch panel keys
Telephone standby display
d e 1
13 ARP12:25
PM
 1
1

Abcdefghi
1234567890123456
Auto |
Tone |
ON |
OFF |
87 6 5 432
When switching to the entering phone number mode
|
|
|
|
13 APR |
12:25 |
|
|
|
|
PM |
|
|
|
|
1 |
|
|
1 |
2 |
3 |
Abcdefghi |
|
|
|
|
|
XXXXXXXXXXXXXXXX |
||
4 |
5 |
6 |
|
|
|
7 |
8 |
9 |
|
|
|
* |
0 |
# |
|
|
|
C |
|
+ |
Private |
Vol |
|
|
ON |
|
|
||
|
|
|
c b |
a 9 |
|
1Close key
Display is closed.
2Preset dial key
Displaying the preset dial screen.
3 Phone book key
Switching to the phone book mode.
4 Setting key
Displaying the Bluetooth connection menu.
5 Tone key
Turning the ring tone for incoming calls on or off.
6 Auto-answer key
Turning automatic answering on or off.
7 History key
Switching to the missed, received and dialed call lists.
8 Key pad key
Switching the mode to enter the phone number directly.
9 On-hook key
Ending a call.
Rejecting an incoming call. Canceling call waiting.
Section
13
14
English
En 25
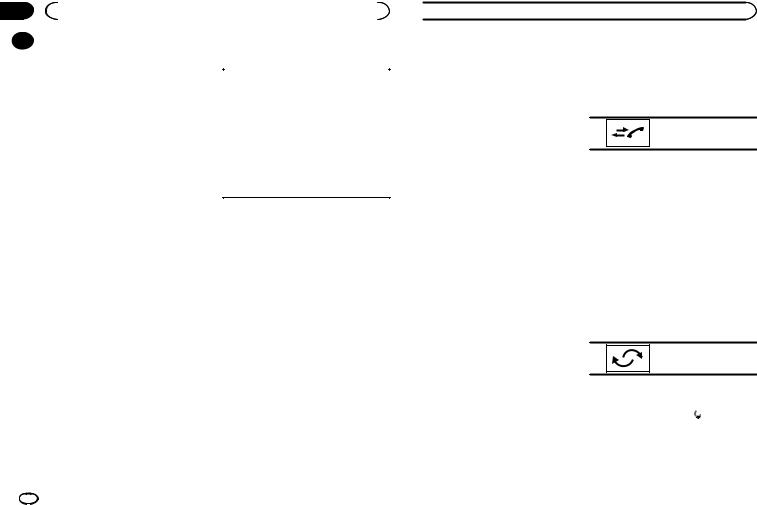
Section |
|
|
|
|
|
14 |
|
|
Bluetooth telephone |
|
|
|
|
a Volume key |
Setting up for hands-free phoning |
||
|
|
||||
|
|
||||
|
|
|
Adjusting the other party’s listening volume. |
|
|
|
|
b Private mode key |
1 Connection |
||
|
|
First, you need to connect a Bluetooth tele- |
|||
|
|
|
Turning private mode on or off. |
||
|
|
|
phone to this unit. |
||
|
|
|
|
||
|
|
c Off-hook key |
For detailed instructions on connecting your |
||
|
|
phone to this unit via Bluetooth wireless tech- |
|||
|
|
|
Accepting an incoming call. |
||
|
|
|
nology, refer to Pairing from this unit on page |
||
|
|
|
Making a phone call, when selecting a |
||
|
|
|
40. |
|
|
|
|
|
phone number. |
|
|
|
|
|
2 Volume adjustment |
||
|
|
|
Switching between callers on hold. |
||
|
|
|
Adjust the earpiece volume of your cellular |
||
|
|
|
|
||
|
|
d Voice control key |
phone to your preference. The unit will record |
||
|
|
the adjusted volume level as the default set- |
|||
|
|
Notes |
|||
|
|
ting. |
|||
|
|
! Private mode can only be operated while you |
|
|
|
|
|
Notes |
|||
|
|
|
are talking on the phone. |
||
|
|
|
! The volume of the caller’s voice and ring |
||
|
|
! To end the call, both you and the other caller |
|||
|
|
|
must hang up your phones. |
tone may vary depending on the type of cellu- |
|
|
|
! Touch panel keys not listed under Bluetooth |
lar phone. |
||
|
|
|
telephone operations may appear on the dis- |
! If there is a large volume difference between |
|
|
|
|
play. |
the ring tone and caller’s voice, the overall |
|
|
|
|
Refer to Indicator list on page 54. |
volume level may become unstable. |
|
|
|
|
|
! Make sure to adjust the volume to a proper |
|
|
|
Text information |
level before disconnecting the cellular phone |
||
|
|
e Incoming call notice |
from the unit. If the volume is muted (zero |
||
|
|
level) on your cellular phone, the volume |
|||
|
|
|
Indicates that an incoming call has been re- |
level of your cellular phone remains muted |
|
|
|
|
ceived and has not been checked yet. |
even after the cellular phone is discon- |
|
|
|
|
! Not displayed for calls made when your |
nected. |
|
|
|
|
cellular phone is disconnected from this |
|
|
|
|
|
unit. |
Calling a number in the |
|
|
|
|
|
||
|
|
|
|
phone book |
|
|
|
|
|
The contacts on your phone will normally be |
|
|
|
|
|
transferred automatically when the phone is |
|
|
|
|
|
connected. If it is not, use your phone menu to |
|
|
|
|
|
transfer the contacts. The visibility of this unit |
|
|
|
|
|
should be on when you use the phone menu. |
|
|
|
|
|
Refer to Switching visible unit on page 41. |
|
|
|
|
|
After finding the number you want to call in the |
|
|
|
|
|
phone book, you can select the entry and make |
|
|
|
|
|
the call. |
|
 Bluetooth telephone
1Touch the phone book key to switch to the phone book mode.
2Select the phone number list.
The detailed phone number list of the selected entry is displayed.
3 Select the phone number.
# If you want to store the phone number, touch and hold the list.
4Touch the off-hook key to make the call.
5Touch the on-hook key to end the call.
Note
The contacts on your phone will normally be transferred automatically when the phone is connected. If it is not, use your phone menu to transfer the contacts. The visibility of this unit should be on when you use the phone menu. Refer to Switching visible unit on page 41.
Selecting a number by alphabet search mode
If a lot of numbers are registered in the phone book, you can search for the phone number by alphabet search mode.
1Touch the phone book key to switch to the phone book mode.
2Touch ABC to switch to alphabet search mode.
3Touch the first letter of the entry you are looking for.
The Phone Book entries starting with that letter (e.g. “Ben”, “Brian” and “Burt” when “B” is selected) will be displayed.
# The order of the first name and last name may be different from that of the cellular phone.
4 Touch the list to display the phone number list of the selected entry.
#If several phone numbers are included in an entry, select one by touching the list.
#If you want to switch to the call history list, touch the icon.
Switching to the call history list.
5Touch the off-hook key to make the call.
6Touch the on-hook key to end the call.
Inverting names in phone book
When your cellular phone is connected to this unit, the first and last names of your contacts may be registered to the phone book in reverse order. You can use this function to change the order back.
(Inverting the names in the phone book)
1Touch the phone book key to switch to the phone book mode.
2Invert names in phone books.
Inverting names in phone books.
3 “Would you like to invert all names?” appears. Touch Yes to continue.
While the names are inverted, is displayed.
# If the inversion fails, “Invert Name Error” appears. In such cases, try again from the beginning.
Note
Inverting the names of your contacts from this unit does not affect the data on your Bluetooth device.
26 En
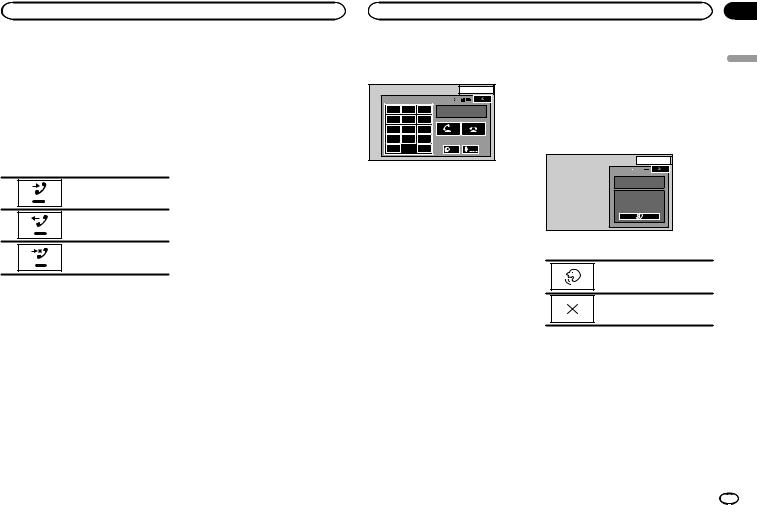
|
|
Section |
Bluetooth telephone |
Bluetooth telephone |
14 |
Using the missed, received and dialed call lists
The 80 most recent calls dialed, received, and missed are stored in the memory. You can browse them and call numbers from these lists.
1Touch the history key to display the call history list.
2Select Missed Calls, Dialed Calls or Received Calls.
Displaying the received call list.
Displaying the dialed call list.
Displaying the missed call list.
3 Touch the list number to select a phone number.
Name and phone number are displayed in the detailed list.
# If you want to store the phone number, touch and hold the list.
4Touch the off-hook key to make the call.
5Touch the on-hook key to end the call.
Setting automatic answering
If this function is on, this unit automatically answers all incoming calls.
% Touch the auto-answer key to turn automatic answering on or off.
Adjusting the other party’s listening volume
To maintain the good sound quality, this unit can adjust the other party’s listening volume. If the volume is not loud enough for the other party, use this function.
% Touch the volume key to select Far-End VOL.
1—2—3
#This function can be performed even while talking on the phone.
#Settings can be stored for each device.
Switching the ring tone
You can select whether or not to use this unit’s ring tone. If this function is set to on, the ring tone for this unit will sound.
1Connect your cellular phone to this unit.
2Touch the tone key to turn the ring tone on or off.
Using the preset dial lists
You can easily store up to six phone numbers as presets.
1Touch the preset dial key to display the preset screen.
2Touch one of the phone numbers to select.
# If you want to delete a preset phone number, touch and hold the phone number you wish to delete.
3Touch the off-hook key to make the call.
4Touch the on-hook key to end the call.
Making a call by entering phone number
|
|
|
|
13 APR |
12:25 |
|
|
|
|
PM |
|
|
|
|
1 |
|
|
1 |
2 |
3 |
Abcdefghi |
|
|
|
|
|
XXXXXXXXXXXXXXXX |
||
4 |
5 |
6 |
|
|
|
7 |
8 |
9 |
|
|
|
* |
0 |
# |
|
|
|
C |
|
+ |
Private |
Vol |
|
|
ON |
|
|
||
1Touch the key pad key to start entering the phone number.
2Touch the number icons to input the numbers.
# Up to 32 digits can be entered.
3Touch the off-hook key to make the call.
4Touch the on-hook key to end the call.
Note
Entering phone number mode cannot be operated unless a Bluetooth telephone is connected to this unit.
Setting the private mode
During a conversation, you can switch to private mode (talk directly on your cellular phone).
% Touch the private mode key to turn private mode on or off.
Voice control
If your cellular phone is equipped with the voice control feature, you can use voice commands to make calls, for example.
!Operation varies depending on the type of cellular phone. Refer to the instruction manual that came with your cellular phone for detailed instructions.
!When an iPhone running iOS 6.1 or later is used.
Siri Eyes Free Mode is available with this product.
1 Touch the voice control key.
The display switches to the voice control screen. You can also switch to the voice control screen by pressing and holding down the home button while the source is on.
13 ARP12:25
PM
 1
1 

I'm Listening...
2 Start voice control.
Indicates that continuous calls can be made uninterrupted.
Indicates that the display is closed.
Notes
!In order for your voice commands to be recognized and interpreted correctly, ensure that conditions are suitable for recognition.
!Please note that wind blowing through the vehicle windows and noise coming from outside the vehicle can interfere with voice command operation.
!For optimum pick-up, the microphone should be placed directly in front of the driver at a suitable distance.
!Speaking too soon after the start of the command may cause voice recognition to fail.
!Speak slowly, deliberately, and clearly.
English
En 27
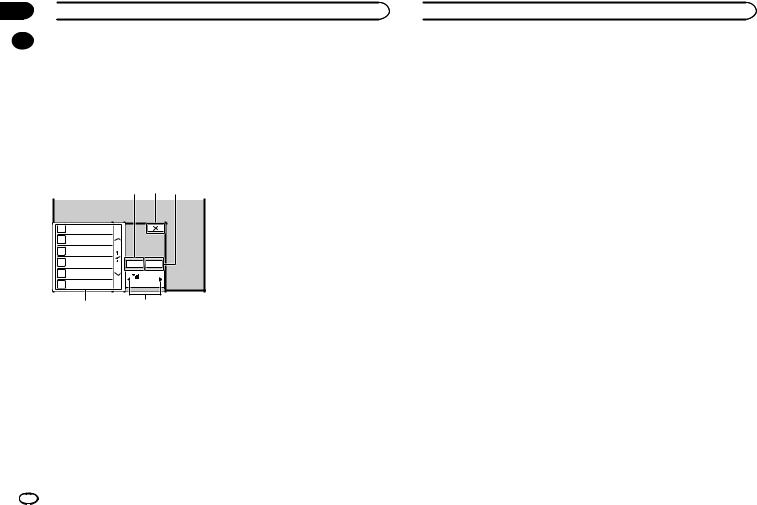
Section
15  TV tuner
|
TV tuner operations |
Changing the wide-screen |
|||
|
|||||
|
This unit can be used to control a TV tuner such |
mode |
|||
|
as the GEX-1550DTV (sold separately). |
You can select a desired mode to enlarge a 4:3 |
|||
|
|
|
|
||
|
Note |
picture to a 16:9 picture. |
|||
|
|
|
|||
|
Text may not display correctly depending on the |
% Press cor d(TRK) to change the wide- |
|||
|
language selected in the language settings. If |
||||
|
screen mode. |
||||
|
this occurs, text will display in the default lan- |
||||
|
! |
FULL (full screen) |
|||
|
guage of the TV tuner instead. For details, refer |
||||
|
|
The 4:3 picture is enlarged in the horizontal |
|||
|
to Selecting the system language on page 35. |
|
|||
|
|
direction only, granting viewers a 4:3 TV pic- |
|||
|
|
|
|
|
|
|
Touch panel keys |
|
ture (normal picture) without any omissions. |
||
|
! |
NORMAL (normal) |
|||
|
|
|
|
||
1 2 3 |
|
|
The 4:3 picture is displayed as is, granting |
||
|
|
viewers no sense of disparity as the propor- |
|||
|
|
|
|
|
|
|
|
|
|
|
tions are the same as that of the normal pic- |
|
|
|
|
|
ture. |
1 |
111 wwwww |
|
|
|
|
2 |
222 wwwww |
ProgramTitle |
Storing stations |
||
3 |
333 wwwww |
|
|||
|
|
This function stores stations that you listen to |
|||
4 |
444 wwwww |
EPG |
Menu |
||
automatically. |
|||||
5 |
555 wwwww |
|
|
||
CH |
222 |
Broadcast frequencies stored during this step |
|||
6 |
666 wwwww |
may replace broadcast frequencies saved previ- |
|||
|
|
||||
|
5 |
|
4 |
ously with the preset channel keys. |
|
|
|
|
|||
1 EPG key
Opens the channel programming broadcast schedule.
2 Close key
Closes the display of the broadcast schedule.
3Menu key
4Channel select key
Used to switch between preset channels.
5 Preset channel key
Used to select a preset channel.
1Touch the menu key to open the menu display.
2Touch Channel Search to start channel searching.
Preset channels are listed in order of channel frequency.
!To cancel storing the broadcast frequencies, touch Cancel.
EPG function
You can use this function to view the channel programming broadcast schedule.
1 Touch the EPG key to display the EPG list.
 TV tuner
2 Touch one of the list items to display the channel programming schedule for the selected item.
Note
This function is not available for stations that do not transmit programming schedules.
28 En
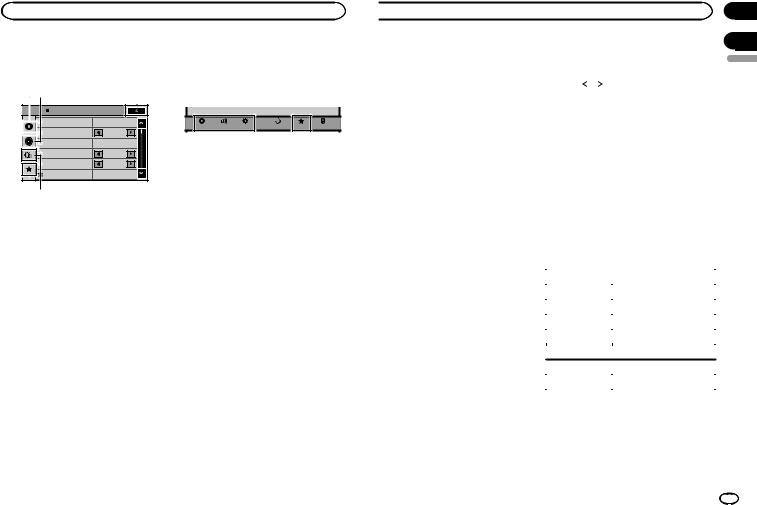
Settings |
|
|
|
|
|
|
Menu operations |
|
1 Press the home button to switch to the |
||||
Touch panel keys |
|
home display. |
|
|
|
|
|
|
|
|
|
|
|
1 2 |
3 |
2 Touch any of the following touch panel |
||||
keys to select the menu to be adjusted. |
||||||
Audio |
|
|
|
|
|
|
Sonic Center Control |
L/R 0 |
|
|
|
Settings |
|
|
|
|
|
|
||
|
|
Video |
Audio |
System |
Theme |
Favorite Bluetooth |
Loudness |
Low |
|
|
|
|
|
Subwoofer |
On |
|
|
|
|
|
Bass Booster |
0 |
|
|
|
|
|
High Pass Filter |
125Hz |
|
|
|
|
|
Source Level Adjuster |
0 |
|
|
|
|
|
5 4 |
|
|
|
|
|
|
1 Video setup key |
|
|
|
|
|
|
Refer to Setting up the video player on page |
|
|
|
|
|
|
31. |
|
|
|
|
|
|
2 Audio function key
Refer to Audio adjustments on page 29.
3 Close key
Returning to the current source display.
4 System key
Refer to System settings on page 34.
5 Favorite key
You can choose menus within each menu (Audio function menu, etc.) and register them to this favorite menu.
Refer to Favorite menu on page 40.
Notes
!You can display the Video Setup menu when a Disc or USB source is selected.
!If you start the Video Setup menu, playback is stopped.
!You cannot display the Audio function menu when the mute function is on or a JPEG file is playing.
 Audio adjustments
Using fader/balance adjustment 3 |
Touch Balance on the audio function |
|||
Fader/Balance displays when Rear Speaker is |
menu. |
|
||
|
|
|
||
set to Full on the System Menu. |
4 |
Touch or |
to adjust the left/right |
|
You can change the fader/balance setting to pro- |
||||
speaker balance. |
||||
vide an ideal listening environment for all of the |
||||
Range: L 15 to |
R 15 |
|||
|
||||
occupied seats.
Note
1Press the home button to switch to the home display.
2Touch the audio function key to open the audio menu.
3Touch Fader/Balance on the audio function menu.
4Touch  or
or  to adjust the front/rear speaker balance.
Range: F 15 L/R 0 to R 15 L/R 0
#Select F/R 0 L/R 0 when only using two speakers.
5Touch  or
or  to adjust the left/right speaker balance.
Range: F/R 0 L 15 to F/R 0 R 15
Note
You can also set the fader/balance by dragging the dot on the displayed table.
You can also set the balance by dragging the dot on the displayed table.
Using the equalizer
You can adjust the equalization to match the car’s interior acoustic characteristics as desired.
Recalling equalizer curves
There are seven stored equalizer curves which you can easily recall at any time. Here is a list of the equalizer curves.
Display |
Equalizer curve |
|
S.Bass |
Super bass |
|
Powerful |
Powerful |
|
Natural |
Natural |
|
Vocal |
Vocal |
|
Flat |
Flat |
Using balance adjustment
Balance displays when Rear Speaker is set to Subwoofer on the System Menu. This setting will allow you to adjust the balance between right/left sound output.
1Press the home button to switch to the home display.
2Touch the audio function key to open the audio menu.
Custom1 |
Custom 1 |
Custom2 |
Custom 2 |
|
|
!The equalizer curves for Custom1 and Custom2 can be adjusted.
!You cannot select Custom1 and Custom2 when using the auto-equalizer.
!When Flat, no changes are made to the sound. You can check the effects of the equalizer curves by switching alternatively between Flat and another equalizer curve.
Section
16
17
English
En 29

Section |
|
|
|
|
17 |
|
Audio adjustments |
|
|
|
1 |
Press the home button to switch to the |
5 Touch the table to adjust the level of the |
|
|
||||
|
||||
|
home display. |
equalizer band. |
||
|
|
|
Range: +12dB to –12dB |
|
2 |
Touch the audio function key to open the |
|
|
|
|
audio menu. |
Using the auto-equalizer |
||
|
|
|
||
3 Touch Graphic EQ on the audio function menu.
# You cannot select or adjust the equalizer curves of Custom1 and Custom2 when using the autoequalizer.
4 Touch the desired setting. S.Bass—Powerful—Natural—Vocal—Flat— Custom1—Custom2
Adjusting the 8-band graphic equalizer
You can adjust the level of each band for the equalizer curves.
!A separate Custom1 curve can be created for each source. If you make adjustments when a curve other than Custom2 is selected, the equalizer curve settings will be stored in Custom1.
!A Custom2 curve that is common for all sources can be created. If you make adjustments when the Custom2 curve is selected, the Custom2 curve will be updated.
1Press the home button to switch to the home display.
2Touch the audio function key to open the audio menu.
3Touch Graphic EQ on the audio function menu.
4Touch the desired setting.
S.Bass—Powerful—Natural—Vocal—Flat—
Custom1—Custom2
The auto-equalizer is an equalizer curve created by auto EQ (refer to Auto EQ (auto-equalizing) on page 37).
You can turn the auto-equalizer on or off.
If you connect an optional microphone to this unit, you can use this function.
1Press the home button to switch to the home display.
2Touch the audio function key to open the audio menu.
3Touch Auto EQ to turn the auto-equalizer on or off.
# You cannot use this function if auto EQ has not been carried out.
Using sonic center control
Sound that is suited for the listening position can easily be created with this function.
1Press the home button to switch to the home display.
2Touch the audio function key to open the audio menu.
3Touch Sonic Center Control on the audio function menu.
4Touch  or
or  to select a listening position. Range: Left 7 to Right 7
 Audio adjustments
Adjusting loudness |
7 Touch cor dnext to Frequency to select |
|
Loudness compensates for deficiencies in the |
the cut-off frequency. |
|
50Hz—63Hz—80Hz—100Hz—125Hz |
||
low-frequency and high-frequency ranges at low |
||
Only frequencies lower than those in the se- |
||
volume. |
||
lected range are outputted from the subwoofer. |
||
|
||
1 Press the home button to switch to the |
Boosting the bass |
|
home display. |
||
2 Touch the audio function key to open the |
You can boost the bass level. |
|
|
||
audio menu. |
1 Press the home button to switch to the |
|
|
||
3 Touch cor dto select a desired level for |
home display. |
|
|
||
loudness. |
2 Touch the audio function key to open the |
|
Off (off)—Low (low)—Mid (mid)—High (high) |
||
audio menu. |
||
|
||
Using subwoofer output |
3 Touch cor dto select a desired level. |
|
This unit is equipped with a subwoofer output |
Range: 0 to +6 |
|
|
||
which can be turned on or off. |
Using the high pass filter |
|
! The cut-off frequency and output level can be |
||
adjusted when the subwoofer output is on. |
Use this function when wanting to listen only to |
|
|
||
1 Press the home button to switch to the |
high-frequency sounds. Only frequencies higher |
|
than the high-pass filter (HPF) cutoff are output |
||
home display. |
||
from the speakers. |
||
|
||
2 Touch the audio function key to open the |
1 Press the home button to switch to the |
|
audio menu. |
||
home display. |
||
|
||
3 Touch Subwoofer on the audio function |
2 Touch the audio function key to open the |
|
menu. |
||
audio menu. |
||
|
||
4 Touch On or Off next to Subwoofer to |
3 Touch cor dnext to High Pass Filter to |
|
turn the subwoofer output on or off. |
||
select cut-off frequency. |
||
|
||
5 Touch Normal or Reverse next to Phase |
Off (off)—50Hz—63Hz—80Hz—100Hz— |
|
125Hz |
||
to select the phase of subwoofer output. |
||
Only frequencies higher than those in the se- |
||
|
||
6 Touch cor dnext to Level to adjust the |
lected range are output from the front or rear |
|
speakers. |
||
output level of the subwoofer. |
||
|
||
Range: +6 to –24 |
|
30 En
 Loading...