


 Loading...
AV Receiver/DVD Player with 7.0 inch Display and Dolby Digital/DTS Multi Channel Surround
ENGLISH
Owner’s Manual
AVH-P7490DVD
Product This Using Before
This product conforms to CEMA cord colors.

Contents |
|
Be sure to read this. |
|
Discs Compatible with this Product .................... |
12 |
Disc Operation ...................................................... |
13 |
Dear Customer ........................................................ |
5 |
Before Using This Product .................. |
6 |
IMPORTANT SAFEGUARDS .................................... |
6 |
•PLEASE READ ALL OF THESE INSTRUCTIONS REGARDING YOUR DISPLAY AND RETAIN THEM FOR FUTURE REFERENCE
About This Product .................................................. |
7 |
•Video System of a Connected Component
•Output Setting of the DVD Player
•Be Sure to Adjust Picture Brightness
•Preventing the Battery from Becoming Exhausted
About This Manual .................................................. |
8 |
To Ensure Safe Driving ............................................ |
9 |
•When Using a Display connected to Rear Video Output
Important ................................................................ |
9 |
Condition Memory ................................................ |
10 |
Resetting the Microprocessor .............................. |
10 |
Precaution.............................................................. |
11 |
When using the 50-Disc Type Multi-CD Player .... |
11 |
Discs Compatible with this Product .................... |
12 |
• Features of This Player |
|
• What the Marks on DVDs Indicate |
|
• Disc Organization |
|
Main Features of DVD Player ................................ |
15 |
Care of Discs ........................................................ |
16 |
• Precaution |
|
Detaching and Replacing the Front Panel ............ |
17 |
• Theft Protection |
|
Key Finder ............................................................ |
18 |
•DVD Player
•Setting the Remote Control for AV Receiver Operation
•Setting the Remote Control for DVD Player Operation
Using the Remote Control .................................... |
21 |
• Batteries |
|
Operation of the Display .................... |
22 |
Deploying the Display .......................................... |
22 |
Screen Angle Adjustment .................................... |
23 |
Closing the Display .............................................. |
24 |
Changing the Wide Mode .................................... |
25 |
Switching the Video Source ................................ |
26 |
Operation for Each Source Unit ........ |
27 |
To Listen to Music ................................................ |
27 |
• When using the DVD player |
|
Virtual Theater Quick Tour ................ |
29 |
Menu Structure...................................................... |
30 |
Information Screen ................................................ |
31 |
• Switching the Information Screen |
|
Using the Screen Pictures |
|
(Selecting the NAVI, VTR etc.) .... |
33 |
Selecting the Navigation Picture .......................... |
33 |
Selecting the Video Source .................................. |
33 |
• Switching the Video ON/OFF Mode |
|
• Selecting the Video Source |
|
Selecting the BGTV, BGVTR .................................. |
34 |
Selecting the Picture to Rear Display.................... |
35 |
Adjusting the Picture ............................................ |
36 |
Built-In Tuner ........................................ |
37 |
Basics .................................................................... |
37 |
Operation at the Function Menu Screen .............. |
38 |
• Accessing the Tuner Function Menu |
|
• Exit from the Tuner Function Menu |
|
Operating Each Function ...................................... |
39 |
• Best Stations Memory (BSM) |
|
• Local Seek Tuning |
|
• TA Function |
|
• Seek Select |
|
• PGM button |
|
Display the Flip-Down Plate .................................. |
41 |
Recalling Preset Stations by Preset |
|
Frequency List .............................................. |
41 |
Using the RDS Functions .................... |
42 |
PTY Function .......................................................... |
42 |
• Searching the PTY |
|
• PTY Alarm |
|
• Canceling Announcements |
|
TA Function .......................................................... |
45 |
• Activating/Deactivating the TA Function |
|
Radio Text ............................................................ |
47 |
• Radio Text display |
|
• Storing Radio Text in memory |
|
• Recalling preset Radio Text |
|
1

DVD Player |
|
(Control with AV Receiver) .......... |
49 |
Basics .................................................................... |
49 |
Operation at the Function Menu Screen |
|
(DVD, Video CD) ............................................ |
50 |
• Accessing the DVD Function Menu |
|
(DVD, Video CD) |
|
• Exit from the DVD Function Menu |
|
(DVD, Video CD) |
|
Operating Each Function ...................................... |
51 |
• Repeat Play |
|
• Pause |
|
• PGM button |
|
Operation at the Function Menu Screen (CD) ...... |
53 |
•Accessing the DVD Function Menu (CD)
•Exit from the DVD Function Menu (CD)
Operating Each Function ...................................... |
54 |
• Repeat Play |
|
• Random Play |
|
• Scan Play |
|
• Pause |
|
• PGM button |
|
Multi-CD Player .................................... |
57 |
Basics .................................................................... |
57 |
Operation at the Function Menu Screen .............. |
58 |
•Accessing the Multi-CD Function Menu
•Exit from the Multi-CD Function Menu
Operating Each Function ...................................... |
59 |
•Repeat Play
•Random Play
•Scan Play
•ITS Play
•Pause
•Compression and DBE
•PGM button
Display the Flip-Down Plate .................................. |
62 |
Disc Title Input ...................................................... |
63 |
Getting Text Displayed |
|
(for CD TEXT compatible type) ...................... |
64 |
Selecting Discs by Disc Title List .......................... |
65 |
ITS (Instant Track Selection).................................. |
65 |
• ITS Programming (ITS) |
|
• Erase a Track Program |
|
• Erase a Disc Program |
|
TV Tuner ................................................ |
67 |
Basics .................................................................... |
67 |
Operation at the Function Menu Screen .............. |
68 |
•Accessing the TV Tuner Function Menu
•Exit from the TV Tuner Function Menu
CD Player .............................................. |
69 |
Basics .................................................................... |
69 |
Operation at the Function Menu Screen .............. |
70 |
•Accessing the CD Function Menu
•Exit from the CD Player Function Menu
MD Player .............................................. |
71 |
Basics .................................................................... |
71 |
Operation at the Function Menu Screen .............. |
72 |
• Accessing the MD Function Menu |
|
• Exit from the MD Function Menu |
|
Basic Operations of DVD Player ........ |
73 |
Selecting the DVD ................................................ |
73 |
Disc (DVD/Video CD/CD) Playback ...................... |
74 |
• Working with the Menu Screen |
|
Chapter and Track Advance/Return .................... |
75 |
•Skipping to the Next Chapter/Track
•Returning to the Previous Chapter/Track
Specifying Title/Chapter/Track |
|
(Direct Search) .............................................. |
76 |
• Specifying Title |
|
• Specifying Chapter |
|
• Specifying Track |
|
Disc Fast Forward/Reverse .................................. |
77 |
• Fast Forward |
|
• Fast Reverse |
|
Stopping Playback ................................................ |
78 |
Playback Variations of |
|
DVD Player ...................................... |
79 |
Still, Frame-by-Frame and Slow Motion |
|
Playback ........................................................ |
79 |
• Still Playback |
|
• Frame-by-Frame Playback |
|
• Slow Motion Playback |
|
Changing Audio Language during Playback |
|
(Multi-Audio) ................................................ |
80 |
Changing the Subtitle Language during Playback
(Multi-Subtitle) ............................................ |
81 |
Changing the Viewing Angle during Playback |
|
(Multi-Angle) ................................................ |
82 |
2

Contents |
|
Operating DVD Player with |
|
Information Displays .................... |
83 |
Calling up Information Displays .......................... |
83 |
Operating with the Information |
|
Display 1 of a DVD ........................................ |
84 |
•Searching for a Desired Scene, Starting Playback from a Specified Time
•Selecting Audio, Subtitle and Angle
Operating with the Information |
|
Display 2 of a DVD ........................................ |
86 |
• Selecting Repeat Range |
|
• Selecting Audio Output |
|
Operating with the Information |
|
Display of a Video CD .................................. |
87 |
•Searching for a Desired Scene, Starting Playback from a Specified Time
•Selecting Repeat Range
•Selecting Audio Output
Operating with the Information |
|
Display of a CD ............................................ |
89 |
•Searching for a Desired Track
•Selecting Repeat Range
•Setting Random Play
•Setting Scan Play
Adjusting Audio (Basic) ...................... |
91 |
Accessing the Audio Menu .................................. |
91 |
• Exit from the Audio Menu |
|
Proper Setting for the In-car Acoustic |
|
Characteristics .............................................. |
92 |
Cabin Equalizer ...................................................... |
92 |
• Operation at the Audio Setting Menu |
|
Position Selector.................................................... |
93 |
Balance Adjustment .............................................. |
93 |
Adjustments for Speaker ...................................... |
94 |
• Operation at the Speaker Setting Menu |
|
Equalizer Curve ...................................................... |
96 |
Source Level Adjustment (SLA) ............................ |
97 |
Sound Field Control (SFC) ...................................... |
98 |
Dynamic Range Control ........................................ |
99 |
Direct Control ON/OFF .......................................... |
99 |
Loudness Adjustment .......................................... |
100 |
Fine Adjusting Audio (Expert) .......... |
101 |
Before Getting Started ........................................ |
101 |
Adjusting for the Speakers In Use ...................... |
101 |
•Accessing the Speaker Setting Menu
•Adjusting the Speakers’ Output Levels using a Test Tone
•Selecting a Crossover Frequency
•Correcting the Subwoofer’s Phase
Adjusting the Cabin Equalizer (Expert) ................ |
104 |
•Accessing the Expert Setting Menu
•Operation at the Expert Setting Menu
•Adjusting 3-Band Parametric Equalizer
•Adjusting the Speakers’ Output Level
•Adjusting the Time Alignment
•Storing the Adjusted Cabin EQ into Memory
•Reset Adjusted Cabin EQ
Adjusting the Equalizer Curves .......................... |
109 |
Changing the Initial Settings of |
|
AV Receiver .................................. |
111 |
Accessing the Initial Settings Menu .................. |
111 |
• Exit from the Initial Settings Menu |
|
Correcting Distorted Sound ................................ |
112 |
Setting the Time .................................................. |
112 |
Adjusting the Display Position ............................ |
113 |
Changing the Pattern of Plate ............................ |
113 |
Changing Initial Settings of |
|
DVD Player .................................... |
115 |
Calling up the SET UP MENU ............................ |
115 |
Setting the Subtitle (SUBTITLE LANG.) .............. |
117 |
•Setting Subtitles and Assist Subtitles ON/OFF
•Setting the Subtitle Language
Setting the Audio Language (AUDIO LANG.) |
.... 120 |
Setting the Menu Language (MENU LANG.) ...... |
121 |
Setting the Parental Lock (PARENTAL) .............. |
121 |
• Setting the Code Number and Level |
|
• Changing the Level |
|
Setting Aspect Ratio (TV ASPECT) .................... |
124 |
Setting Angle Mark Display (ANGLE) ................ |
125 |
Setting for Digital Output (DIGITAL OUTPUT) |
.... 126 |
Setting Digital and Analog Audio Output |
|
(OUTPUT SELECTION) ................................ |
127 |
Setting Remote Control Code Type |
|
(REMOTE CODE SELECT) ............................ |
128 |
3

Setting the Display ............................ |
129 |
Operating the Setting Menu .............................. |
129 |
•Entering the Display Setting Menu
•Switching the Video Select Setting
•Setting the Automatic Open Mode
•Adjusting the Bright
•Adjusting the Color
•Adjusting the Hue
•Adjusting the Dimmer
Other Functions of AV Receiver ...... |
133 |
Switching the Center Screen and |
|
Time Display in the Center Room................ |
133 |
Switching the Color of the Spectrum |
|
Analyzer ...................................................... |
133 |
Listening Sounds or Viewing Images from |
|
Additional Units .......................................... |
134 |
• Accessing the Set Up Menu |
|
• Switching the AUX Source |
|
•Switching the Video Mode |
|
• Switching the Speaker Input Mode |
|
AUX Title Input .................................................... |
136 |
Muting Function .................................................. |
136 |
• Navigation Unit Muting |
|
• Cellular Telephone Muting |
|
Others .................................................. |
137 |
Using the Display Correctly ................................ |
137 |
•Handling the Display
•About the Liquid Crystal Display (LCD) Screen
•Keeping the Display in Good Condition
•About the Small Fluorescent Tube
If You Forget Your Code Number ........................ |
139 |
Error Message .................................................... |
139 |
Language Code Chart ........................................ |
140 |
Setting the Remote Control ................................ |
141 |
•Setting the Dipswitches
•Using it as a Navigation System Remote Control
Troubleshooting .................................. |
143 |
Terms .................................................... |
149 |
Installation .......................................... |
151 |
Connecting the Units .......................................... |
151 |
•Routing the Optical Cable
•Connecting the Power Cord of AV Receiver
•Connecting the Power Cord of DVD player
•Connecting to a Sold Separately Power Amp
•Speaker Input Jack Connection
•Connecting the System
•VIDEO Input/Output Connection of AV Receiver
•Rear Video Output of DVD player
Installation .......................................................... |
163 |
•Installing the AV Receiver
•Installing the DVD Player (DIN Front/Rearmount)
•Installing the DVD Player (DIN Front-mount)
•Installing the DVD Player (DIN Rear-mount)
•Installing the Voice Guidance Speaker
•Installing the Remote Control Unit
•Installing the Center Speaker
Specifications .................................... |
171 |
Continued overleaf. |
4 |

Selecting fine audio equipment such as the unit you’ve just purchased is only the start of your musical enjoyment. Now it’s time to consider how you can maximize the fun and excitement your equipment offers. This manufacturer and the Electronic Industries Association’s Consumer Electronics Group want you to get the most out of your equipment by playing it at a safe level. One that lets the sound come through loud and clear without annoying blaring or distortion—and, most importantly, without affecting your sensitive hearing.
Sound can be deceiving. Over time your hearing “comfort level” adapts to higher volumes of sound. So what sounds “normal” can actually be loud and harmful to your hearing. Guard against this by setting your equipment at a safe level BEFORE your hearing adapts.
To establish a safe level:
•Start your volume control at a low setting.
•Slowly increase the sound until you can hear it comfortably and clearly, and without distortion.
Once you have established a comfortable sound level:
• Set the dial and leave it there.
Taking a minute to do this now will help to prevent hearing damage or loss in the future. After all, we want you listening for a lifetime.
We Want You Listening For A Lifetime
Used wisely, your new sound equipment will provide a lifetime of fun and enjoyment. Since hearing damage from loud noise is often undetectable until it is too late, this manufacturer and the Electronic Industries Association’s Consumer Electronics Group recommend you avoid prolonged exposure to excessive noise. This list of sound levels is included for your protection.
Decibel
Level Example
30 Quiet library, soft whispers
40 Living room, refrigerator, bedroom away from traffic
50 Light traffic, normal conversation, quiet office
60 Air conditioner at 20 feet, sewing machine
70 Vacuum cleaner, hair dryer, noisy restaurant
80 Average city traffic, garbage disposals, alarm clock at two feet.
THE FOLLOWING NOISES CAN BE DANGEROUS UNDER CONSTANT EXPOSURE
90 Subway, motorcycle, truck traffic, lawn mower
100 Garbage truck, chain saw, pneumatic drill
120 Rock band concert in front of speakers, thunderclap
140 Gunshot blast, jet plane
180 Rocket launching pad
Information courtesy of the Deafness Research Foundation.
5

Before Using This Product
IMPORTANT SAFEGUARDS
PLEASE READ ALL OF THESE INSTRUCTIONS REGARDING YOUR DISPLAY AND RETAIN THEM FOR FUTURE REFERENCE
1. |
Read this manual fully and carefully before operating your display. |
|
|
|
|||
2. |
Keep this manual handy for future reference. |
|
|
Before |
|||
3. |
Pay close attention to all warnings in this manual and follow the instructions |
||
|
|||
|
carefully. |
Using |
|
4. |
Do not allow other persons to use this system until they have read and under- |
||
|
|||
|
stood the operating instructions. |
This |
|
5. |
Do not install the display where it may (i) obstruct the driver’s vision, (ii) |
||
|
impair the performance of any of the vehicle’s operating systems or safety |
Product |
|
|
|
||
|
features, including air bags, or (iii) impair the driver’s ability to safely oper- |
|
|
|
ate the vehicle. |
|
|
6. |
As with any accessory in your vehicle’s interior, the display should not divert |
|
|
|
your attention from the safe operation of your vehicle. If you experience dif- |
|
|
|
ficulty in operating the system or reading the display, please park safely |
|
|
|
before making adjustments. |
|
|
7. |
Do not attempt to install or service your display by yourself. Installation or |
|
|
|
servicing of the display by persons without training and experience in elec- |
|
|
|
tronic equipment and automotive accessories may be dangerous and could |
|
|
|
expose you to the risk of electric shock or other hazards. |
|
|
8. |
Please remember to wear your seat belt at all times while operating your |
|
|
|
vehicle. If you are ever in an accident, your injuries can be considerably more |
|
|
|
severe if your seat belt is not properly buckled. |
|
6

Product This Using Before
7
About This Product
This product is a combination of an AV Receiver and a DVD Player featuring a 7-inch wide display. Almost all operations can be performed with the AV Receiver, using the remote control with the operation mode switch set to “AUDIO”. To operate the DVD Player, set the operation mode switch to “DVD”. (Refer to “Setting the Remote Control for DVD Player Operation” on page 20.)
The tuner frequencies on this product are allocated for use in North America. Use in other areas may result in improper reception.
This product features a “Virtual Theater” Graphical User Interface which is referred to in this manual as the “Virtual Theater Quick Tour”. Once you understand the basic structure of the “Virtual Theater”, you will be able to navigate quite easily throughout it.
The basic structure of the “Virtual Theater” is actually quite simple. Everything is centralized around a base location known as the “Center Room”. (Refer to “Virtual Theater Quick Tour” on page 29.)
Dolby* Digital/DTS** Compatibility
You can enjoy the atmosphere and excitement provided by DVD-Video software featuring 5.1 channel recordings.
1 


*Manufactured under license from Dolby Laboratories. “Dolby”, “Pro Logic”, and the double-D symbol are trademarks of Dolby Laboratories.
**“DTS” and “DTS Digital Surround” are registered trademarks of Digital Theater Systems, Inc.
This equipment has been tested and found to comply with the limits for a class B digital device, pursuant to Part 15 of the FCC Rules. These limits are designed to provide reasonable protection against harmful interference in a residential installation. This equipment generates, uses and can radiate radio frequency energy and, if not installed and used in accordance with the instructions, may cause harmful interference to radio communications. However, there is no guarantee that interference will not occur in a particular installation. If this equipment does cause harmful interference to radio or television reception, which can be determined by turning the equipment off and on, the user is encouraged to try to correct the interference by one or more of the following measures:
–Reorient or relocate the receiving antenna.
–Increase the separation between the equipment and receiver.
–Connect the equipment into an outlet on a circuit different from that to which the receiver is connected.
–Consult the dealer or an experienced radio/TV technician for help.
Information to User
Alteration or modifications carried out without appropriate authorization may invalidate the user’s right to operate the equipment.
[For Canadian model]
This Class B digital apparatus complies with Canadian ICES-003.

Video System of a Connected Component
This product is NTSC system compatible. When connecting an external component to this product, be sure the component is compatible with the same video systems. If it is not, images will not be correctly reproduced.
Output Setting of the DVD Player
When using a DVD Player for the first time, make the “Digital Output Setting (DIGITAL OUTPUT)” and “Digital and Analog Audio Output Setting (OUTPUT SELECTION)” as follows:
Function |
Setting |
DIGITAL OUTPUT |
Dolby D/LPCM |
|
|
OUTPUT SELECTION |
48 kHz |
|
|
Refer to “Setting for Digital Output” on page 126 and “Setting Digital and Analog Audio Output” on page 127.
Precaution:
• Be sure to set the correct position. If not, no audio can be output.
Be Sure to Adjust Picture Brightness
Although the angle at which the LCD can be positioned and viewed clearly is limited because of its design, visibility can be improved by adjusting the pictures brightness. When first using the display, adjust the picture to a brightness that allows clear visibility at the angle of use.
(Refer to page 131.)
Preventing the Battery from Becoming Exhausted
When using this product, be sure your car engine is running. If you use this product when your engine is not running, the battery will become exhausted.
About This Manual
This product features a number of sophisticated functions ensuring superior reception and operation. All are designed for the easiest possible use, but many are not self-explanatory. This operation manual is intended to help you benefit fully from their potential and to maximize your listening enjoyment.
We recommend that you familiarize yourself with the functions and their operation by reading through the manual before you begin using this product. It is especially important that you read and observe the “Precaution” on page 11 and in other sections.
In the explanation on DVD Player operation, when there are restrictions concerning which discs can be operated, compatible discs are indicated with an icon.
Product This Using Before
8

Product This Using Before
To Ensure Safe Driving
 WARNING
•To avoid the risk of accident and the potential violation of applicable laws, this product is not for use with a video screen that is visible to the driver.
•In some countries or states the viewing of images on a display inside a vehicle even by persons other than the driver may be illegal. Where such regulations apply, they must be obeyed.
To ensure safe vehicle operation, do not operate this product during driving. If you try to view pictures from a DVD-Video disc or other sources on the front display while the parking brake is not engaged, this warning will appear:
When you park your car in a safe place and apply the parking brake, the picture appears on the screen.
When Using a Display connected to Rear Video Output
This product’s Rear video output is for connection of a display to enable passengers in the Rear seats to watch the Video or DVD.
 WARNING
•NEVER install the display in a location that enables the Driver to watch the Video or DVD while Driving.
Important
The serial number of this device is located on the top of the DVD player. For your own security and convenience, be sure to record this number on the enclosed warranty card.
9
Condition Memory
This function memorizes audio language, subtitle language, angle number, audio output (L, R) and aspect ratio made during disc playback for up to 30 discs. Without any special operations, the final setting details during playback of a disc are memorized. The next time a disc is played, the previous settings are automatically applied.
Note:
•With some discs, audio language and subtitle language are automatically specified, in which case condition memory does not function.
•When the number of discs exceeds 30, settings for the latest disc replace those for the least recent disc.
Resetting the Microprocessor
When the ignition switch is turned OFF, pressing the RESET button lets you reset the microprocessor to its initial settings without changing SET UP MENU settings, Condition Memory and other settings.
Press the RESET button in the following cases.
•When this unit fails to operate correctly.
•When strange (incorrect) messages appear on the display.
1.Turn the ignition switch OFF.
2.Press the RESET button.
Use a pen tip or other pointed instrument.
Note:
•After completing connections or when you want to erase all memorized settings or return the unit to its initial (factory) settings, switch your engine ON or set the ignition switch to ACC ON before pressing the RESET button.
Product This Using Before
10

Product This Using Before
Precaution
CAUTION: USE OF CONTROL OR ADJUSTMENT OR PERFORMANCE OF PROCEDURES OTHER THAN THOSE SPECIFIED HEREIN MAY RESULT IN HAZARDOUS RADIATION EXPOSURE.
CAUTION: THE USE OF OPTICAL INSTRUMENTS WITH THIS PRODUCT WILL INCREASE EYE HAZARD.
•Keep this manual handy as a reference for operating procedures and precautions.
•Always keep the volume low enough for outside sounds to be audible.
•Protect this product from moisture.
•If the battery is disconnected, the preset memory will be erased and must be reprogrammed.
After-sales Service for Pioneer Products
Please contact the dealer or distributor from where you purchased the product for its after-sales service (including warranty conditions) or any other information. In case the necessary information is not available, please contact the companies listed below:
Please do not ship your product to the companies at the addresses listed below for repair without advance contact.
7U.S.A. |
7CANADA |
Pioneer Electronics (USA) Inc. |
Pioneer Electronics of Canada, Inc. |
CUSTOMER SUPPORT |
CUSTOMER SATISFACTION |
DIVISION |
DEPARTMENT |
P.O. Box 1760 |
300 Allstate Parkway |
Long Beach, CA 90801-1760 |
Markham, Ontario L3R OP2 |
800-421-1404 |
(905) 479-4411 |
|
1-877-283-5901 |
For warranty information please see the Limited Warranty sheet included with your product.
When using the 50-Disc Type Multi-CD Player
The available functions of the 50-Disc Type Multi-CD Player are described in this manual. Note that other 50-Disc Type Multi-CD Player functions cannot be used with this product.
11
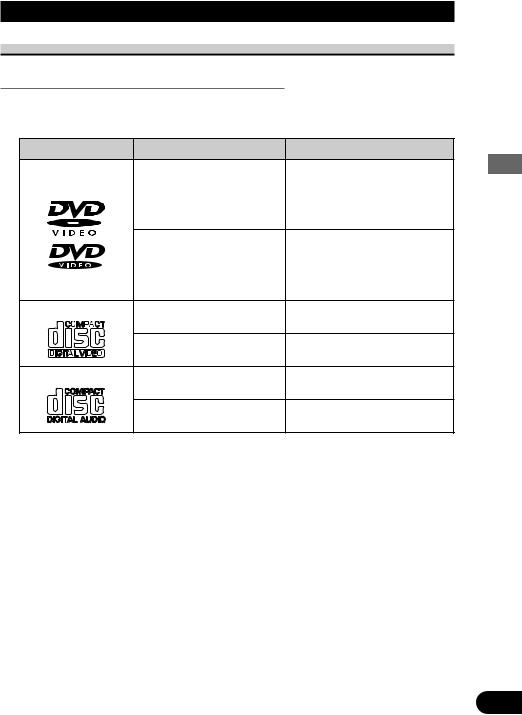
Discs Compatible with this Product
Features of This Player
Compatible with DVD, Video CD and CD Formats
DVD, Video CD and CD discs that display the logos shown below can be played back on this player. For more information on discs compatible with this player, refer to the table below.
Disc types and logos |
Diameter/Playable sides |
Playback time |
|
|
DVD VIDEO |
|
Digital audio/Digital video (MPEG 2) |
DVD VIDEO |
12 cm (5 in.)/single-sided |
1 layer |
133 min. |
|
2 layer |
242 min. |
|
|
12 cm (5 in.)/double-sided |
1 layer |
266 min. |
|
|
2 layer |
484 min. |
|
DVD VIDEO |
|
Digital audio/Digital video (MPEG 2) |
|
8 cm (3 in.)/single-sided |
1 layer |
41 min. |
|
|
2 layer |
75 min. |
|
8 cm (3 in.)/double-sided |
1 layer |
82 min. |
|
|
2 layer |
150 min. |
VIDEO CD |
VIDEO CD |
|
Digital audio/Digital video (MPEG 1) |
|
12 cm (5 in.)/single-sided |
|
Max. 74 minutes |
|
VIDEO CD single |
|
Digital audio/Digital video (MPEG 1) |
|
8 cm (3 in.)/single-sided |
|
Max. 20 minutes |
CD |
CD |
|
Digital audio |
|
12 cm (5 in.)/single-sided |
|
Max. 74 minutes |
|
CD single |
|
Digital audio |
|
8 cm (3 in.)/single-sided |
|
Max. 20 minutes |
The disc format logos shown above are found on disc labels or on disc jackets.
Note:
•With some DVD-Video discs, you may not be able to use certain functions.
•Playback of some DVD-Video discs may not be possible.
•With DVD-R/DVD-RW discs, only recordings made in the Video format (Video mode) can be played back. DVD-RW discs recorded in the Video Recording format (VR mode) cannot be played back.
•Even with DVD-R/DVD-RW discs featuring recordings made in the Video format (Video mode), playback may not be possible with this product due to disc characteristics or scratches or dirt on the disc. Dirt or condensation on the lens inside this product may also prevent playback.
•Playback of CD-R/RW and DVD-R/RW discs that have not been finalized is not possible.
•Playback of discs recorded with a PC using the correct format is possible, but depending on the application software settings, environment and other factors, playback may not be possible. (For details, inquire at the store or dealer's where you purchased the application software.)
•Playback of CD-TEXT discs is possible, but display of titles and other information is not possible.
•CD-Extra discs can be played back as music CDs.
Product This Using Before
12
Before |
Precaution: |
|
• Playback of DVD-Audio and CD-ROM discs is not possible. This player can only playback |
||
|
||
|
discs bearing the marks shown on page 12. |
|
|
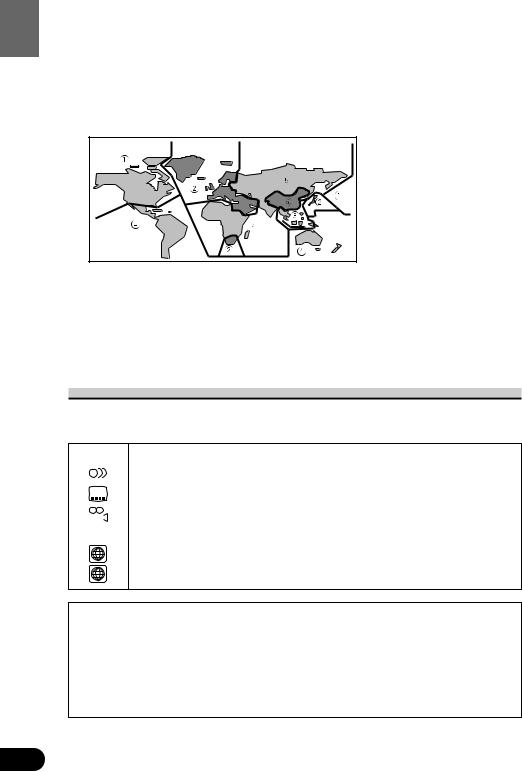
• DVDs that have incompatible region numbers (see page 150) cannot be played on this |
|
ProductThisUsing |
player. The region number of the player can be found on the top of this product. |
|
The illustration below shows the regions and corresponding region numbers. |
||
|
•Normal playback of CD-R/CD-RW discs other than those recorded with a music CD recorder may not be possible.
•Playback of music CD-R/CD-RW discs, even those recorded with a music CD recorder, may not be possible with this product due to disc characteristics or scratches or dirt on the disc. Dirt or condensation on the lens inside this product may also prevent playback.
•If you insert a CD-RW disc into this product, time to playback will be longer than when you insert a conventional CD or CD-R disc.
•Read the precautions with the CD-R/CD-RW discs before using.
What the Marks on DVDs Indicate
The marks below can be found on DVD disc labels and packages. They indicate the type of images and audio recorded on the disc, and the functions you can use.
|
Mark |
Meaning |
||
2 |
|
Indicates the number of audio systems. |
||
|
|
|
|
|
2 |
|
Indicates the number of subtitle languages. |
||
|
|
|
|
|
|
|
|
|
Indicates the number of viewing angles. |
|
|
3 |
|
|
|
|
|
||
|
|
|
|
|
|
|
|
|
Indicates the picture size (aspect ratio: screen width-to-height ratio) type. |
|
16 : 9 |
LB |
||
|
|
|
|
|
|
|
|
|
|
1 |
|
Indicates the number of the region where playback is possible. |
||
|
|
|
|
|
ALL
7 Disc Operation
With some DVDs, depending on the intentions of the disc’s producer, certain operations may be prohibited. Also, with discs enabling menu operation and two-way operation during playback, the way titles and chapters are organized may prevent certain operations such as Repeat play.
If this happens with this player, the prohibited mark “  ” is displayed. The prohibited mark “
  ” may not appear on some discs.
13
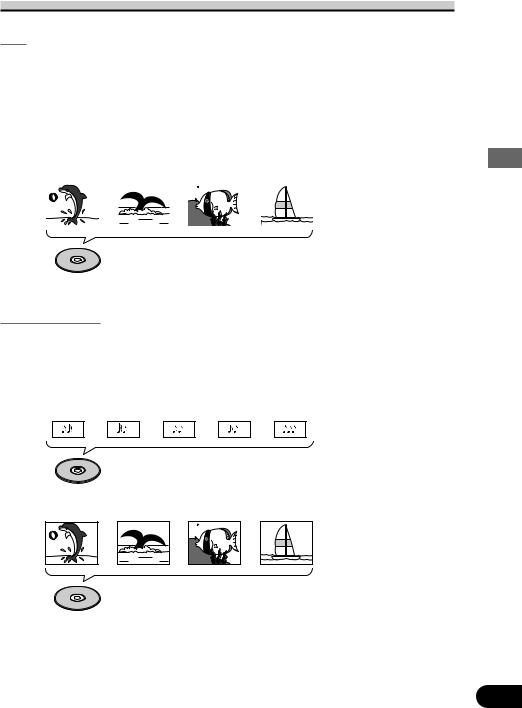
Disc Organization
DVD
On DVD-Video discs, the contents are divided into titles which are in turn divided into chapters.
With video material, a single work (movie etc.) usually corresponds to a single title, with different scenes corresponding to separate chapters. With karaoke discs, one song corresponds to one title.
However, some discs are not organized like this, so bear this in mind when using the Search function.
|
Title 1 |
|
|
|
|
Title 2 |
|
||||
|
|
|
|
|
|||||||
Chapter 1 |
|
Chapter 2 |
|
Chapter 1 |
|
Chapter 2 |
|||||
|
|
|
|
|
|
|
|
|
|
|
|
|
|
|
|
|
|
|
|
|
|
|
|
DVD
Video CD and CD
On CDs and Video CDs, the contents are divided into tracks. One track usually corresponds to one song. On some discs, tracks may also feature an index.
With Video CDs featuring PBC (Playback Control), you can use a menu to perform playback operations. It may not be possible to use functions such as Repeat and Search.
Track 1 |
Track 2 |
Track 3 |
Track 4 |
Track 5 |
|
CD |
|
|
|
Track 1 |
Track 2 |
Track 3 |
Track 4 |
|
Video CD
Product This Using Before
14

Product This Using Before
Main Features of DVD Player
You can play back DVDs, Video CDs (PBC compatibility) and CDs.
Repeat Play
Still Image &
Frame-By-Frame Playback
Slow Motion Playback
Multi-Aspect
Multi-Audio
Multi-Subtitle
Multi-Angle
Video CDs featuring PBC Compatibility
Parental Lock
You can enjoy different kinds of repeat play.
You can view still images or playback of one frame at a time.
Slow motion playback is possible.
Switching between Wide screen, Letter box and Panscan display is possible.
You can switch between multiple audio systems recorded on a DVD as desired.
You can switch between multiple subtitle languages recorded on a DVD as desired.
You can switch between multiple viewing angles of a scene recorded on a DVD as desired.
You can play back Video CDs featuring PBC (Playback Control).
You can use this to prevent your children viewing violent or adult oriented scenes.
This product incorporates copyright protection technology that is protected by method claims of certain U.S. patents and other intellectual property rights owned by Macrovision Corporation and other rights owners.
Use of this copyright protection technology must be authorized by Macrovision Corporation, and is intended for home and other limited viewing uses only unless otherwise authorized by Macrovision Corporation. Reverse engineering or disassembly is prohibited.
15
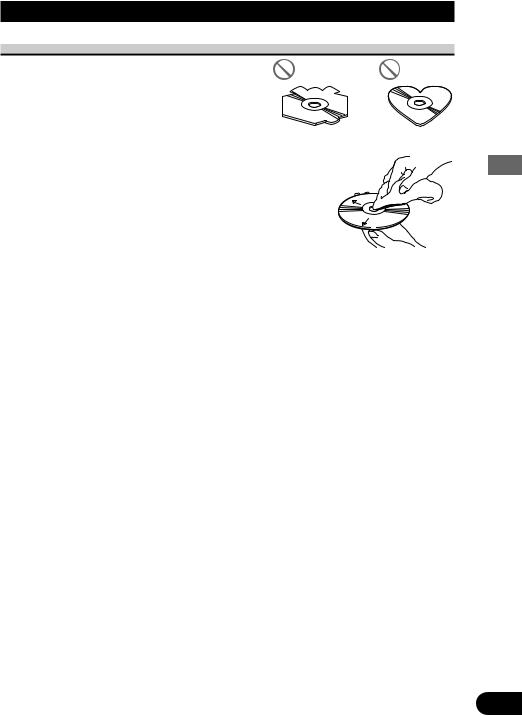
Care of Discs
Precaution
• This product is designed for use with conventional, fully circular discs only. Use of shaped discs are not recommended for this product.
• Check all discs before playing and discard cracked, scratched or warped discs.
•Wipe dirty or damp discs outward from the center with a soft cloth.
•Avoid touching the recorded (iridescent) surface when
handling discs.
• Store discs in their cases when not in use.
• Keep discs out of direct sunlight and high temperatures.
•Do not affix labels or apply chemicals to discs.
•Condensation may collect inside the player when using the
heater in cold weather, interfering with playback. Turn it off for an hour or so and wipe damp discs with a soft cloth.
•Road shocks may interrupt disc playback.
•Never insert anything other than discs. Do not attach a label or tape to a disc.
•The use of benzine, thinner, insecticide, or other volatile chemicals may damage the disc surface.
Product This Using Before
16
Product This Using Before
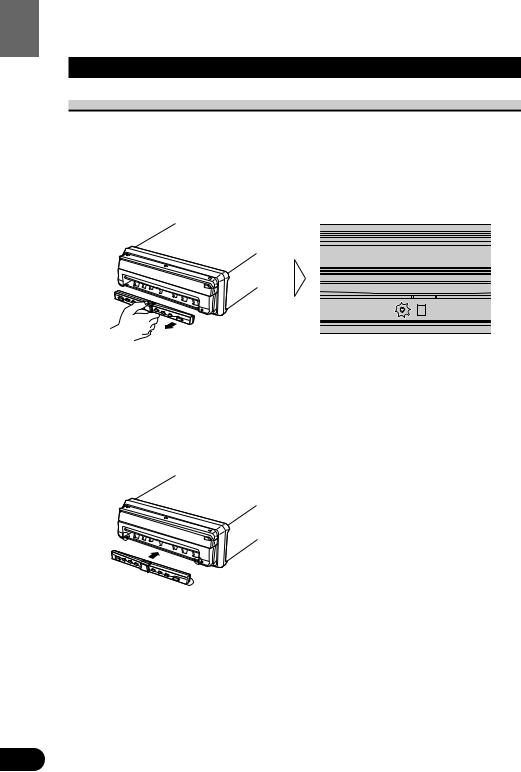
Detaching and Replacing the Front Panel
Theft Protection
The front panel of the DVD player is detachable to discourage theft.
When the front panel is detached, the display closes automatically and cannot be opened. So, you will not be able to operate this product.
Detaching the Front Panel
• Eject the front panel.
The LED indicator will flash while the front panel is being detached.
Note:
• Take care not to grip it too tightly or drop it.
Replacing the Front Panel
• Replace the front panel by clipping it into place.
Align the groove on the bottom of the front panel with the guide on the main body, and clip in.
Precaution:
•When replacing the front panel, avoid pressing any of the buttons.
•Avoid subjecting the front panel to excessive shocks.
•Keep the front panel out of direct sunlight and high temperatures.
17
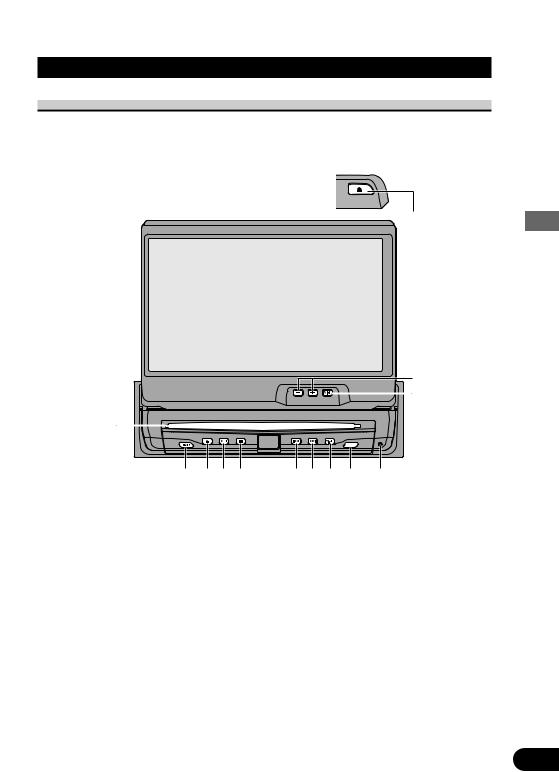
Key Finder
DVD Player
The following diagram shows the display when it is deployed.

 !1
!1
!2
!3
q
w e r t |
y u i o !0 |
q Disc loading slot w POWER button e Eject button
r PLAY/PAUSE (6) button t STOP (7) button
y PREVIOUS (4) button
i V.SOURCE button o RGB button !0RESET button
!1OPEN/CLOSE (0) button !2ANGLE buttons !3WIDE button
uNEXT (¢) button
Note:
•The DVD player plays one standard 12 cm (5 in.) or 8 cm (3 in.) single disc at a time. Do not use an adapter when playing 8 cm (3 in.) disc.
•Do not insert anything into the Disc Loading Slot other than discs that are compatible with this product.
•The DVD function can be turned ON/OFF with the disc remaining in the DVD player. (Refer to page 73.)
•A disc left partially inserted after ejection may incur damage or fall out.
Product This Using Before
18
Product This Using Before
Setting the Remote Control for AV Receiver Operation
To operate this system’s AV Receiver, set the remote control’s operation mode switch to “AUDIO”.
q |
u |
|
w |
i |
|
|
|
|
|
o |
|
e |
!0 |
|
r |
!1 |
!4 |
|
!2 |
|
t |
|
|
y |
!3 |
|
q Joystick |
i VOLUME |
w Remote control operation mode switch |
Move upward or downward to adjust |
e TA button |
the volume. |
r PGM button |
If it is pressed, the volume is reduced |
t 5/∞/2/3 buttons |
(by about 90%). |
y DISPLAY button |
Press once more to return to the original |
u RETURN button |
volume level. |
|
o MENU button |
|
!0RT button |
|
!1SOURCE button |
|
!2V.SEL button |
|
!3BAND button |
|
!4Buttons 1–6 |
19
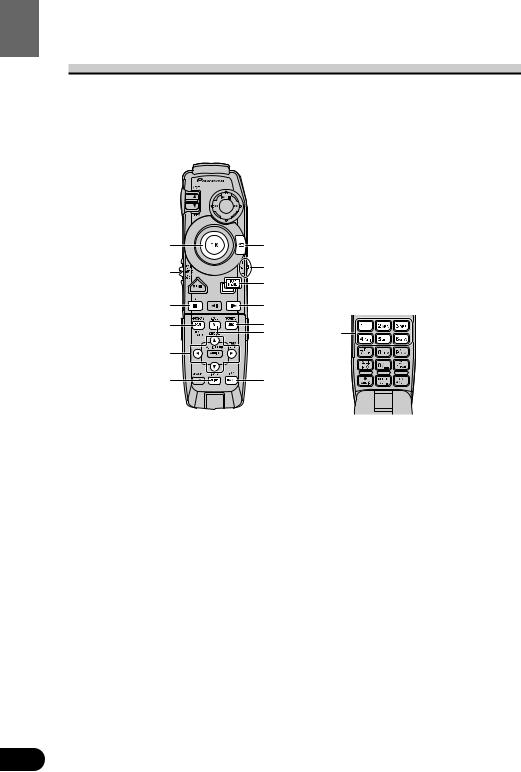
Setting the Remote Control for DVD Player Operation
To operate this system’s DVD Player, set the remote control’s operation mode switch to “DVD”.
q |
i |
|
|
|
|
w |
o |
|
e |
!0 |
|
!1 |
|
|
r |
|
|
|
|
|
t |
!2 |
|
y |
!3 |
|
!4 |
|
|
|
|
|
|
|
!7 |
u |
!5 |
!8 |
|
!6 |
|
q NEXT/PREV button |
!1TOP MENU button |
w Joystick |
!2STEP (E) button |
e Remote control operation mode switch |
!3STEP (e) button |
r MENU button |
!4Number buttons |
t STOP (7) button |
!5AUDIO button |
y POWER button |
!6SUBTITLE button |
u DISPLAY button |
!7CLEAR button |
i Control stick |
!8ANGLE button |
o RETURN button |
|
!0VOLUME |
|
Move upward or downward to adjust |
|
the volume. |
|
If it is pressed, the volume is |
|
reduced (by about 90%). |
|
Press once more to return to the |
|
original volume level. |
|
Product This Using Before
20
Product This Using Before
Using the Remote Control
This product is equipped with a remote control for convenient operation.
•Point the control in the direction of the signal reception on the color display to operate.
•When the control is not in use, attach it firmly to the provided mounting base.
Precaution:
•Do not store the remote control in high temperatures or direct sunlight.
•The control may not function properly in direct sunlight.
•Do not let the remote control fall onto the floor, where it may become jammed under the brake or accelerator pedal.
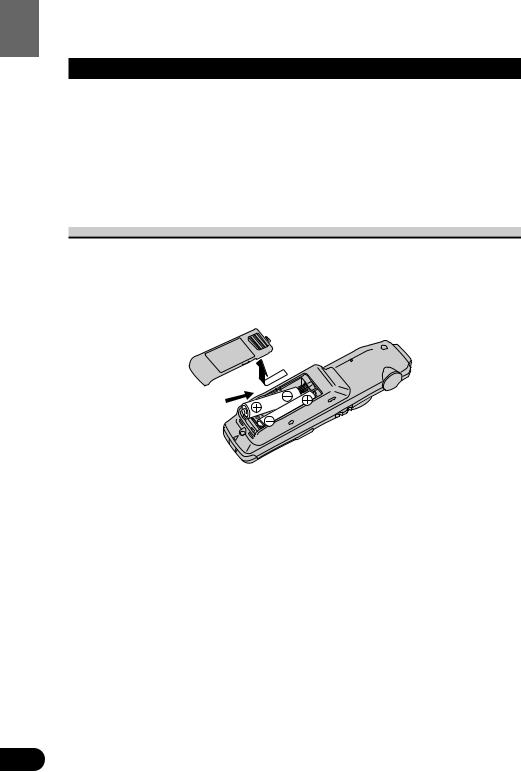
Batteries
•Remove the cover on the back of the remote control and insert the batteries with the (+) and (–) poles pointing in the proper direction.
Precaution:
•Use only UM-4, AAA or IEC LR03 1.5 V batteries.
•Remove the batteries if the remote control is not to be used for a month or longer.
•Do not attempt to recharge the batteries supplied with remote control.
•Do not mix new and used batteries.
•In the event of battery leakage, wipe the remote control completely clean and install new batteries.
•We recommended using alkaline batteries as replacements.
•When disposing of used batteries, please comply with governmental regulations or environmental public institution’s rules that apply in your country/area.
21
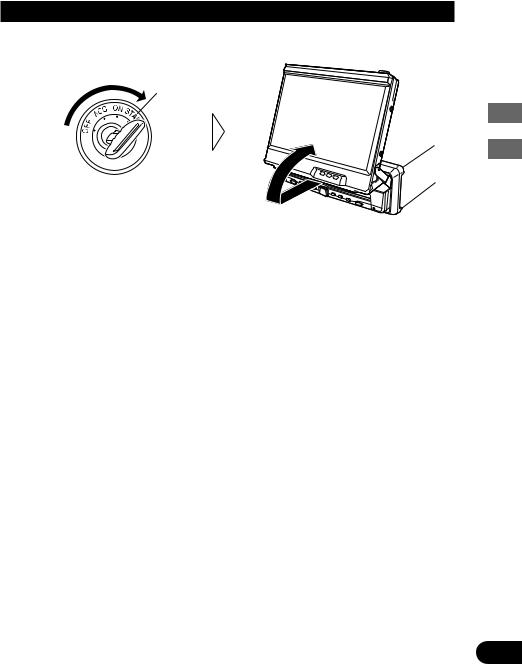
Operation of the Display
Deploying the Display
• Turn your vehicle’s engine ON.
The display will be automatically deployed by the automatic close/open mode.
If the display is not automatically deployed, press the OPEN/CLOSE button.
Note:
•The automatic close/open mode will operate the display as follows.
*When the ignition switch is turned OFF while the display is deployed, the display will be closed after approximately 6 seconds.
When the ignition switch is turned ON again (or turned to ACC), the display will be deployed automatically.
*Installing the front panel will automatically deploy the display. (Refer to page 17.)
•The automatic close/open mode can be switched ON/OFF. (Refer to page 130.)
•When the ignition switch is turned OFF after the display has been closed, turning the ignition switch ON again (or turning it to ACC) will not deploy the display. In this case, press the OPEN/CLOSE button to deploy the display.
Display the of Product/Operation This Using Before
22
Display the of Operation
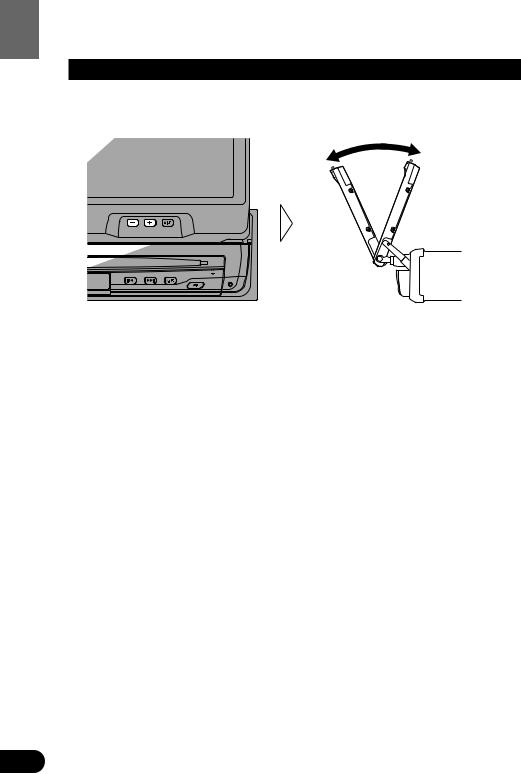
Screen Angle Adjustment
The angle of this product’s screen continues changing as long as you keep pressing the ANGLE button.
• Adjust the screen to an easily viewable angle.
Precaution:
•If you can hear the display knocking against your vehicle’s console or dashboard, press the ANGLE button on the (–) side to move the screen a little forward.
Note:
•When adjusting the angle, be sure to press the ANGLE button. Forcible adjusting of the display by hand may damage it.
•The adjusted angle of the display will be memorized and automatically returned to the next time the display is deployed.
23

Closing the Display
• Turn the vehicle’s engine OFF.
The display will be automatically closed by the automatic close/open mode. If the display does not close automatically, press the OPEN/CLOSE button.
Note:
•When closing the display, check to make sure that it has closed completely. If the display has stopped halfway, leaving it like this could result in damage to it.
•The automatic close/open mode will operate the display as follows.
*When the ignition switch is turned OFF while the display is deployed, the display will be closed after approximately 6 seconds.
When the ignition switch is turned ON again (or turned to ACC), the display will be deployed automatically.
*Removing the front panel will close the display. (Refer to page 17.)
•The automatic close/open mode can be switched ON/OFF. (Refer to page 130.)
•When the ignition switch is turned OFF after the display has been closed, turning the ignition switch ON again (or turning it to ACC) will not deploy the display. In this case, press the OPEN/CLOSE button to deploy the display.
Display the of Operation
24

Display the of Operation
Changing the Wide Mode
You can select a desired mode for enlarging a 4:3 picture to a 16:9 one.
• Select the desired mode in the following order:
Full (FULL) =Just (JUST) =Cinema (CINEMA) =Zoom (ZOOM) =Normal (NORMAL)
Full (FULL)
A 4:3 picture is enlarged in the horizontal direction only, enabling you to enjoy a 4:3 TV picture (normal picture) without any omissions.
Just (JUST)
The picture is enlarged slightly at the center and the amount of enlargement increases horizontally to the ends, enabling you to enjoy a 4:3 picture without sensing any disparity even on a wide screen.
Cinema (CINEMA)
A picture is enlarged by the same proportion as FULL or ZOOM in the horizontal direction and by an intermediate proportion between FULL and ZOOM in the vertical direction; ideal for a cinema-sized picture (wide-screen picture) where captions lie outside.
Zoom (ZOOM)
A 4:3 picture is enlarged in the same proportion both vertically and horizontally; ideal for a cinema-sized picture (wide-screen picture).
Normal (NORMAL)
A 4:3 picture is displayed as it is, giving you no sense of disparity since its proportions are the same as that of the normal picture.
Note:
•Different settings can be memorized for the AV, VCR and RGB video. In addition, different settings can also be memorized for a component (AV) connected to the AV-BUS input.
•The Wide Mode used for menu setting is switched to Full (FULL). The Wide Mode will return when the menu setting is deleted.
•When video is viewed in a wide mode that dose not match its original aspect ratio, it may appear differently.
•Remember that using the wide mode feature of this system for commercial or public viewing purpose may constitute an infringement on the author’s rights protected by the Copyright Law.
•Video will appear roughened when viewed in CINEMA or ZOOM mode.
25

Switching the Video Source
7 Switching to RGB
You can watch videos from the AV-Receiver. Usually set the video source to RGB.
• Switch to RGB.
Repeat the preceding operation to switch to the previous video source.
Note:
•If you select the “AVM” video select setting in the display setting menu, video is locked to RGB. (See page 130.)
7 Switching to AV and VCR
You can switch between video from a component connected to the DVD player’s video input (VCR) and video from the built-in DVD player or component connected to AV-BUS input (AV).
Note:
•When switched to AV, you can watch video from the AV-BUS component selected with the AV Receiver’s source select.
•Select the desired video source in following order:
AV =VCR
Note:
•If you select the “AVM” video select setting in the display setting menu, video is locked to RGB. (See page 130.)
Display the of Operation
26
Unit Source Each for Operation
Operation for Each Source Unit
To Listen to Music
The following explains the initial operations required before you can listen to music. Initially, set the remote control’s operation mode switch to “AUDIO”. (Refer to “Setting the Remote Control for AV Receiver Operation” on page 19.) Also set the display’s video source to RGB. (Refer to “Switching the Video Source” on page 26.)
1. Select the desired source (e.g. Multi-CD Player).
Each press changes the Source ...
Each press of the SOURCE button selects the desired source in the following order:
DVD Player =TV =VIDEO =Tuner =MD Player =CD Player =Multi-CD Player =External 1 =External 2 =AUX =Speaker Input
Note:
•External Unit refers to a Pioneer product (such as one available in the future) that, although incompatible as a source, enables control of basic functions by this product. Two External Units can be controlled by this product, although “External” is displayed whether you select External Unit 1 or External Unit 2. When two External Units are connected, the allocation of them to External Unit 1 or External Unit 2 is automatically set by this product.
•In the following cases, the sound source will not change:
*When the sound source from another product is not connected to this product.
*When no magazine is set in the Multi-CD player.
*When no disc is set in the DVD player.
*When no disc is set in the CD player.
*When no disc is set in the MD player.
*When the AUX (auxiliary input), VIDEO and Speaker Input are set to OFF. (See pages 134, 135.)
•When this product’s blue/white lead is connected to the car’s Auto-antenna relay control terminal, the car’s Auto-antenna extends when this product’s source is switched ON. To retract the antenna, switch the source OFF.
27
2. Select the desired picture.
Each press changes the picture ...
Each press of the V.SEL button selects the source in the following order:
Source Screen =Navigation Unit (NAVI) =TV Tuner Unit (BGTV) =Video (BGVTR)
Note:
•Select “Source Screen” to hear/view playback of normal audio/video sources.
•You can select the Pioneer Navigation Unit only when that unit is switched on.
•You can select the TV Tuner Unit only when connecting it to this product. (The video source selected with the TV Tuner is displayed.)
•To select the VIDEO mode, switch the VIDEO mode ON in the Set Up Menu. (See page 33.)
3.Raise or lower the volume.
4. Turn the source OFF.
Unit Source Each for Operation
Hold for 1 second
When using the DVD player
You can switch on and off the DVD player independently from other units. Switching the AV Receiver off independently does not switch the DVD player off. You have to switch the DVD player off separately.
•If, while “DVD” is selected as source, you switch off the DVD player, you can confirm it on the display.
28

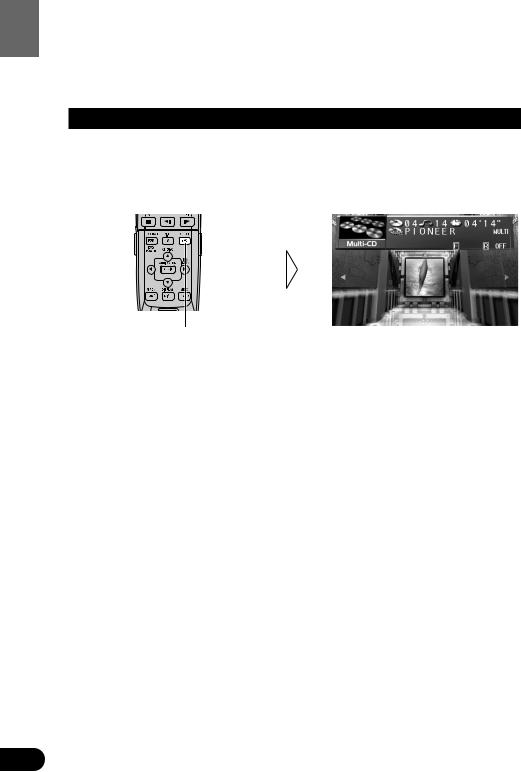
Tour Quick Theater Virtual
Virtual Theater Quick Tour
Move the joystick up to move in virtual space to the Spectrum Analyzer Room. The spectrum analyzer features a graph indicating the frequency of the sound currently in play.
When the power is turned on, the Center Room screen is displayed automatically. The screen appearing at the center of the room can be changed. (See page 133.)
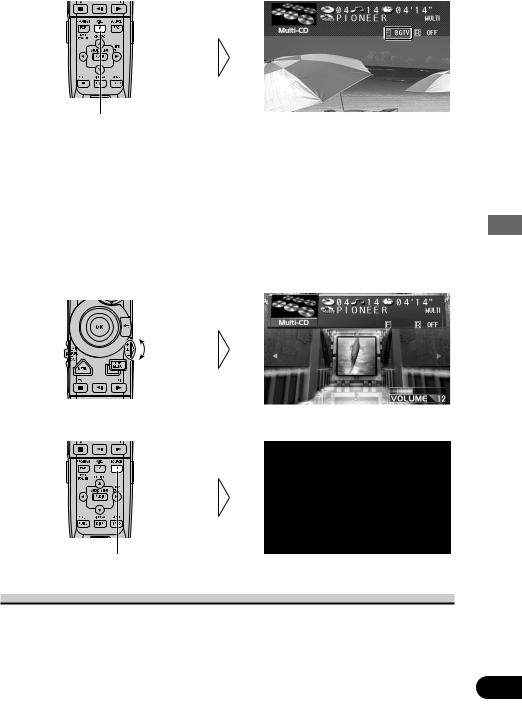
Move the joystick left to move to the entrance of the Function Menu Screen. If you click the joystick, you switch to the Function Menu Screen. Further explanation on how to use the Function Menu Screen will follow.
Move the joystick right to move to the Power Band Room. This screen provides a visual image of the volume settings. Click the joystick to change the power band display as below.
Monaural display j4-band display
29
Loading...