


DVD RDS AV RECEIVER
AVH-P3100DVD
Operation Manual
English

 Contents
Thank you for purchasing this PIONEER product.
Please read through this manual before using the product for the first time, to ensure proper use. After reading, please keep the manual in a safe and accessible place for future reference.
 Be sure to read this
!DVD video disc region numbers 7
!When an operation is prohibited 9
!Handling guideline of discs and player 93
Precautions |
|
|
|
|
|
|
IMPORTANT SAFEGUARDS |
5 |
|
||||
To ensure safe driving |
5 |
|
|
|||
To avoid battery exhaustion |
6 |
|
||||
Before You Start |
|
|
|
|
||
About this unit |
7 |
|
|
|
|
|
About this manual |
7 |
|
|
|
||
Visit our website |
|
7 |
|
|
|
|
In case of trouble |
8 |
|
|
|
||
Features |
8 |
|
|
|
|
|
When an operation is prohibited |
9 |
|||||
Resetting the microprocessor 9 |
|
|||||
Feature demo mode |
9 |
|
|
|||
What’s what |
|
|
|
|
|
|
Head unit |
10 |
|
|
|
|
|
Optional remote control 10 |
|
|
||||
Basic Operations |
|
|
|
|||
Power ON/OFF |
11 |
|
|
|
||
Selecting a source |
11 |
|
|
|||
Adjusting the volume |
12 |
|
|
|||
Touch panel key basic operation |
12 |
|||||
Built-in DVD player basic operations 14
 Radio
Radio
Listening to the radio 16 Storing and recalling broadcast
frequencies 17
Displaying the PTY information 17 Using radio text 17
Introduction of advanced tuner operation 18
Storing the strongest broadcast frequencies 18
Tuning in strong signals |
18 |
|
|
||
Selecting alternative frequencies |
18 |
|
|||
Receiving traffic announcements |
19 |
|
|||
Using PTY functions |
20 |
|
|
|
|
PTY list 20 |
|
|
|
|
|
Playing DVD discs |
|
|
|
|
|
Watching a DVD |
22 |
|
|
|
|
Selecting titles from the title list |
23 |
|
|||
Displaying information of DVD-VR |
23 |
|
|||
Skipping back or forward to another title |
23 |
||||
Operating the DVD menu |
23 |
|
|
||
Selecting the play mode |
24 |
|
|
||
Resume playback (Bookmark) 24 |
|
||||
CM skip/CM back |
24 |
|
|
|
|
Frame-by-frame playback |
24 |
|
|
||
Slow motion playback |
24 |
|
|
||
Pausing playback |
25 |
|
|
|
|
Searching for the part you want to play |
25 |
||||
Changing audio language during playback (Multi-audio) 25
Changing the subtitle language during playback (Multi-subtitle) 26
Changing the viewing angle during playback
(Multi-angle) 26 |
|
Return to the specified scene |
26 |
Automatic playback of DVDs |
26 |
Introduction of advanced DVD operation 26
Repeating play |
27 |
|
Selecting audio output |
27 |
|
Playing Video CDs |
|
|
Watching a Video CD |
28 |
|
PBC playback |
28 |
|
Frame-by-frame playback 29 Slow motion playback 29 Pausing playback 29
Searching for a desired scene, starting playback from a specified time 29
Introduction of advanced Video CD operation 29
Repeating play 30
2 |
En |

 Contents
Selecting audio output 30
 Playing CDs
Listening to a CD 31
Selecting tracks from the track title list 31 Pausing playback 31
Switching the media file type 32 Using advanced sound retriever 32
Introduction of advanced CD operation 32
Repeating play 32 |
|
Playing tracks in random order |
32 |
Scanning tracks of a CD 32 |
|
Playing compressed audio |
|
Listening to compressed audio |
33 |
Selecting files from the file name list 34 Pausing playback 34
Switching the media file type 34 Using advanced sound retriever 34
Introduction of advanced compressed audio operation 34
Repeating play 35
Playing tracks in random order 35 Scanning folders and tracks 35
 Playing DivX/JPEG files
Watching a DivX/JPEG 36 Viewing a JPEG slideshow 37 Playing DivX® VOD content 37
Selecting files from the file name list 37 Displaying text information on DivX/JPEG
disc 38
Pausing playback 38
Switching the media file type 38 Searching for the part you want to play 38 Changing audio language during playback
(Multi-audio) 38
Changing the subtitle language during playback (Multi-subtitle) 38
Capture an image in JPEG files 38 Introduction of advanced DivX/JPEG
operation 39
Repeating play 39
Playing tracks in random order 39
 Playing songs in a USB storage device
Basic Operations |
40 |
|
|
|
Selecting files from the file name list |
40 |
|||
Pausing compressed audio playback |
41 |
|||
Switching the media file type 41 |
|
|
||
Using advanced sound retriever |
41 |
|
||
Introduction to advanced operations |
41 |
|||
Using iPod |
|
|
|
|
Basic Operations |
42 |
|
|
|
Playing video |
43 |
|
|
|
Browsing for a song/video 43 |
|
|
||
Displaying text information on iPod |
|
|||
Video 44 |
|
|
|
|
Pausing playback |
44 |
|
|
|
Using advanced sound retriever |
44 |
|
||
Repeating play |
44 |
|
|
|
Playing songs/videos in a random order (shuffle) 45
Playing all songs in a random order (shuffle all) 45
Operating this unit’s iPod function from your iPod 45
Selecting songs from lists related to the
currently playing song 45 |
|
Changing audiobook speed |
45 |
Changing the screen mode |
46 |
 Audio Adjustments
Introduction of audio adjustments 47 Using balance adjustment 47
Using the equalizer |
47 |
Adjusting loudness |
48 |
Using subwoofer output 48 |
|
Boosting the bass 48 |
|
Using the high pass filter |
49 |
Adjusting source levels |
49 |
 Setting up the DVD player
Introduction of DVD setup adjustments 50
En  3
3


 Contents
Setting the subtitle language |
|
50 |
|
Setting the audio language |
50 |
||
Setting the menu language |
51 |
||
Setting the angle icon display |
51 |
||
Setting the aspect ratio |
51 |
|
|
Setting the slide show interval |
51 |
||
Setting the parental lock |
52 |
|
|
Setting the DivX subtitle file |
52 |
||
Displaying your DivX® VOD registration
code 53 |
|
Setting for digital output |
53 |
Initial Settings |
|
Adjusting initial settings |
54 |
Switching the auxiliary setting 54 |
|
Setting the rear output and subwoofer
controller 54 |
|
Setting the FM tuning step |
55 |
Switching Auto PI Seek 55 |
|
Selecting menu language |
55 |
Switching the sound muting/attenuation 56 Setting the TV signal 56
Entering PIN code for Bluetooth wireless connection 56
Correcting distorted sound 56
Auto TA and EQ (auto-time alignment and auto-equalizing) 57
Resetting the audio functions 57
 System settings
Introduction of system adjustments 58
Changing the wide screen mode |
58 |
Changing the picture adjustment |
59 |
Setting the AV input 59 |
|
Setting the clock 60
Setting for rear view camera (back up camera) 60
 Entertainment settings
Introduction of entertainment settings 61
Selecting the background display |
61 |
Selecting the illumination color |
61 |
Selecting the OSD color 62
 Other Functions
Adjusting the response positions of the
touch panels (Touch Panel |
||
Calibration) |
63 |
|
Using the AUX source |
63 |
|
Using the external unit |
64 |
|
Available accessories |
|
|
Bluetooth Audio |
66 |
|
Bluetooth Telephone 68 |
||
TV tuner 75 |
|
|
Digital Signal Processor |
76 |
|
Additional Information |
||
Troubleshooting |
87 |
|
Error messages |
89 |
|
Understanding auto TA and EQ error |
||
messages 91 |
|
|
Understanding messages 92 |
||
Handling guideline of discs and player 93
DVD discs |
93 |
|
DVD-R/DVD-RW discs |
94 |
|
AVCHD recorded discs |
94 |
|
CD-R/CD-RW discs 94 |
|
|
Dual Discs |
94 |
|
Compressed audio compatibility 95 |
||
Handling guideline and supplemental
information |
95 |
|
|
|
|
Example of a hierarchy |
96 |
|
|||
iPod compatibility |
96 |
|
|
||
About handling the iPod |
97 |
|
|||
JPEG picture files |
97 |
|
|
||
DivX video files |
97 |
|
|
|
|
Using the display correctly 98 |
|
||||
Language code chart for DVD |
100 |
||||
Copyright and trademark notice |
101 |
||||
Terms |
103 |
|
|
|
|
Specifications |
106 |
|
|
||
Index |
108 |
|
|
|
|
 4
4 En
En

|
Section |
Precautions |
01 |
|
|
IMPORTANT SAFEGUARDS
Please read all of these instructions regarding your display and retain them for future reference.
1Read this manual fully and carefully before operating your display.
2Keep this manual handy as a reference for operating procedures and safety information.
3Pay close attention to all warnings in this manual and follow the instructions carefully.
4Do not allow other persons to use this system until they have read and understood the operating instructions.
5Do not install the display where it may (i) obstruct the driver’s vision, (ii) impair the performance of any of the vehicle’s operating systems or safety features, including air bags, hazard lamp buttons or (iii) impair the driver’s ability to safely operate the vehicle.
6Do not operate this display if doing so in any way will divert your attention from the safe operation of your vehicle. Always observe safe driving rules and follow all existing traffic regulations. If you experience difficulty in operating the system or reading the display, park your vehicle in a safe location and make necessary adjustments.
7Please remember to wear your seat belt at all times while operating your vehicle. If you are ever in an accident, your injuries can be considerably more severe if your seat belt is not properly buckled.
8Never use headphones while driving.
9To promote safety, certain functions are disabled unless the parking brake is on, and the vehicle is not in motion.
10Never set the volume of your display so high that you cannot hear outside traffic and emergency vehicles.
 WARNING
!Do not attempt to install or service your display by yourself. Installation or servicing of the display by persons without training and experience in electronic equipment and automotive accessories may be dangerous and could expose you
to the risk of electric shock or other hazards.
To ensure safe driving
 WARNING
!LIGHT GREEN LEAD AT POWER CONNECTOR IS DESIGNED TO DETECT PARKED STATUS AND MUST BE CONNECTED TO THE POWER SUPPLY SIDE OF THE PARKING BRAKE SWITCH. IMPROPER CONNECTION OR USE OF THIS LEAD MAY VIOLATE APPLICABLE LAW AND MAY RESULT IN SERIOUS INJURY OR DAMAGE.
!To avoid the risk of damage and injury and the potential violation of applicable laws, this unit is not for use with a video screen that is visible to the driver.
!To avoid the risk of accident and the potential violation of applicable laws, the front DVD or TV (sold separately) feature should never be used while the vehicle is being driven. Also, rear displays should not be in a location where they are visibly distracting to the driver.
!In some countries or states the viewing of images on a display inside a vehicle even by persons other than the driver may be illegal. Where such regulations apply, they must be obeyed and this unit’s DVD features should not be used.
When you attempt to watch a DVD, Video CD or TV while driving, the warning Viewing of front seat video source while driving is strictly prohibited. will appear on the front display.
Precautions
En |
5 |
Section |
|
|
|
|
01 |
|
Precautions |
|
|
|
|
|
|
|
|
To watch a DVD, Video CD or TV on the front |
To avoid battery exhaustion |
||
|
display, park your vehicle in a safe place and |
Be sure to run the vehicle engine while using |
||
|
apply the parking brake. |
|||
|
this unit. Using this unit without running the |
|||
|
|
|
||
|
When using a display |
engine can result in battery drainage. |
||
|
! When no power is supplied to this unit be- |
|||
|
connected to V OUT |
cause of a replacement of the vehicle bat- |
||
|
This unit’s V OUT is for connection of a dis- |
tery or for some similar reason, the |
||
|
microcomputer of this unit is returned to |
|||
|
play to enable passengers in the rear seats to |
|||
|
its initial condition. We recommend that |
|||
|
watch the DVD or TV. |
|||
|
you transcribe the audio adjustment data. |
|||
|
|
|
||
|
|
WARNING |
WARNING |
|
|
NEVER install the rear display in a location that |
|||
|
Do not use with vehicles that do not feature an |
|||
|
enables the driver to watch the DVD or TV while |
|||
|
ACC position. |
|||
|
driving. |
|||
|
|
|
||
|
When using a rear view camera |
|
|
|
|
With an optional rear view camera, you are |
|
|
|
|
able to use this unit as an aid to keep an eye |
|
|
|
|
on trailers, or backing into a tight parking |
|
|
|
|
spot. |
|
|
|
 WARNING
!SCREEN IMAGE MAY APPEAR REVERSED.
!USE INPUT ONLY FOR REVERSE OR MIRROR IMAGE REAR VIEW CAMERA. OTHER USE MAY RESULT IN INJURY OR DAMAGE.
 CAUTION
!The rear view camera function is to be used as an aid to keep an eye on trailers, or while backing up. Do not use for entertainment purposes.
!Please note that the edges of the rear view camera images may differ slightly according to whether full screen images are displayed when backing up, and whether the images are
used for checking the rear when the vehicle is moving forward.
6 |
En |
|
Section |
Before You Start |
02 |
|
|
If you want to dispose this product, do not mix it with general household waste. There is a separate collection system for used electronic products in accordance with legislation that requires proper treatment, recovery and recycling.
Private households in the member states of the EU, in Switzerland and Norway may return their used electronic products free of charge to designated collection facilities or to a retailer (if you purchase a similar new one).
For countries not mentioned above, please contact your local authorities for the correct method of disposal.
By doing so you will ensure that your disposed product undergoes the necessary treatment, recovery and recycling and thus prevent potential negative effects on the environment and human health.
About this unit
The tuner frequencies on this unit are allocated for use in Western Europe, Asia, the Middle East, Africa and Oceania. Use in other areas may result in poor reception. The RDS (radio data system) function operates only in areas with FM stations broadcasting RDS signals.
 CAUTION
!Do not allow this unit to come into contact with liquids. Electrical shock could result. Also, damage to this unit, smoke, and overheating could result from contact with liquids.
!“CLASS 1 LASER PRODUCT”
This product contains a laser diode of higher class than 1. To ensure continued safety, do
not remove any covers or attempt to gain access to the inside of the product. Refer all servicing to qualified personnel.
!The Pioneer CarStereo-Pass is for use only in Germany.
!Keep this manual handy as a reference for operating procedures and precautions.
!Always keep the volume low enough so that you can hear sounds from outside the vehicle.
!Protect this unit from moisture.
!If the battery is disconnected or discharged, the preset memory will be erased and must be reprogrammed.
DVD video disc region numbers
DVD video discs that have incompatible region numbers cannot be played on this player. The region number of the player can be found on the bottom of this unit and this manual (refer to Specifications on page 106).
About this manual
This unit features a number of sophisticated functions ensuring superior reception and operation. All the functions have been designed for the easiest possible use, but many are not self-explanatory. This operation manual will help you benefit fully from this unit’s potential and to maximize your listening enjoyment. We recommend that you familiarize yourself with the functions and their operation by reading through the manual before you begin using this unit. It is especially important that you read and observe WARNINGs and CAUTIONs in this manual.
Visit our website
Visit us at the following site:
Start You Before
En |
7 |

Section
02  Before You Start
http://www.pioneer.co.uk
!Register your product. We will keep the details of your purchase on file to help you refer to this information in the event of an insurance claim such as loss or theft.
!We offer the latest information about Pioneer Corporation on our website.
2 standard, UDF 1.02) and USB storage device (FAT 16, FAT 32).
AAC file playback
You can play back AAC files recorded on CD- R/RW/ROM (ISO9660 Level 1/Level 2 standard), DVD-R/RW/ROM (ISO9660 Level 1/Level 2 standard, UDF 1.02) and USB storage device (FAT 16, FAT 32).
In case of trouble
Should this product fail to operate properly, contact your dealer or nearest authorized Pioneer Service Station.
DivX® video compatibility
Refer to DivX compatibility on page 98.
JPEG picture file playback
You can play back JPEG picture files recorded on CD-R/RW/ROM and USB storage device.
Features
Touch panel key operation
It is possible to operate this unit by using touch panel key.
Also, scroll bar and scrubber bar can be controlled at your fingertip.
DVD-R/RW compatibility
It is possible to play back DVD-R/RW discs recorded with the video format and Video Recording format. (Refer to DVD-R/DVD-RW discs on page 94.)
Video CDs featuring PBC compatibility
It is possible to play back Video CDs featuring PBC (playback control).
CD playback
Music CD/CD-R/RW playback is possible.
MP3 file playback
You can play back MP3 files recorded on CD- R/RW/ROM (ISO9660 Level 1/Level 2 standard), DVD-R/RW/ROM (ISO9660 Level 1/Level 2 standard, UDF 1.02) and USB storage device (FAT 16, FAT 32).
WMA file playback
You can play back WMA files recorded on CD- R/RW/ROM (ISO9660 Level 1/Level 2 standard), DVD-R/RW/ROM (ISO9660 Level 1/Level
Dolby Digital/DTS compatibility
When using this unit with a Pioneer multichannel processor, you can enjoy the atmosphere and excitement provided by DVD movie and music software featuring 5.1 channel recordings.
Portable audio player compatibility
!Make inquiries to the manufacturer about your USB portable audio player/USB memory.
This unit corresponds to the following.
—USB MSC (Mass Storage Class) compliant portable audio player and memory
—WMA, MP3 and AAC file playback
—JPEG file playback
iPod compatibility
This unit can control, listen to songs and view videos on an iPod.
For details about the supported iPod, refer to iPod compatibility on page 96.
Hands-free phoning
Using Bluetooth adapter (e.g. CD-BTB200), this unit realizes effortless hands-free phoning with Bluetooth wireless technology.
Bluetooth audio player compatibility
Using Bluetooth adapter (e.g. CD-BTB200), you can control Bluetooth audio player featuring Bluetooth wireless technology.
8 |
En |

|
Section |
Before You Start |
02 |
|
|
About DivX
DivX is a compressed digital video format created by the DivX® video codec from DivX, Inc. This unit can play DivX video files recorded on CD-R/RW/ROM and DVD-R/RW/ROM discs.
Keeping the same terminology as DVD video, individual DivX video files are called “Titles”. When naming files/titles on a CD-R/RW or a DVD-R/RW disc prior to burning, keep in mind that by default they will be played in alphabetical order.
Official DivX® Certified product
Plays all versions of DivX® video (including DivX® 6) with standard playback of DivX® media files
2 Press RESET with a pen tip or other pointed instrument.
RESET button
 Note
Note
After completing connections or when you want to erase all memorized settings or return the unit to its initial (factory) settings, switch your engine ON or set the ignition switch to ACC ON before pressing RESET.
Start You Before
When an operation is prohibited
When you are watching a DVD and attempt to perform an operation, it may not be performed because of the programming on the disc.
When this happens, the icon  appears on the screen.
!The icon  may not appear with certain discs.
Resetting the microprocessor
Pressing RESET lets you reset the microprocessor to its initial settings without changing the bookmark information.
The microprocessor must be reset under the following conditions:
!Prior to using this unit for the first time after installation
!If the unit fails to operate properly
!When strange or incorrect messages appear on the display
1 Turn the ignition switch OFF.
Feature demo mode
The feature demo automatically starts when you select the source Off. The demo continues while the ignition switch is set to ACC or ON. To cancel the feature demo, press and hold MUTE. To restart the feature demo, press and hold MUTE again. Remember that if the feature demo continues operating when the car engine is turned off, it may drain battery power.
 Important
The red lead (ACC) of this unit should be connected to a terminal coupled with ignition switch on/off operations. If this is not done, the vehicle battery may be drained.
En |
9 |
Section
03  What’s what
|
|
|
||||||||
|
|
|
|
|
|
|
|
|
|
|
|
|
|
|
|
|
|
|
|
|
|
|
|
|
|
|
|
|
|
|
|
|
|
|
|
|
|
|
|
|
|
|
|
|
|
|
|
|
|
|
|
|
|
|
|
|
|
|
|
|
|
|
|
|
|
|
|
|
|
|
|
|
|
|
|
|
|
|
|
|
|
|
|
|
|
|
|
|
|
|
|
|
|
|
|
|
|
|
|
|
|
|
|
|
|
|
|
|
|
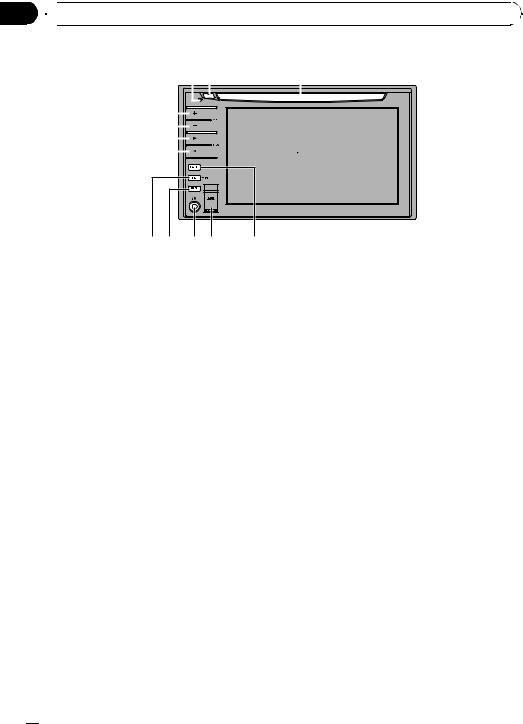
Head unit
1 c/d(TRK) buttons
Press to do manual seek tuning, fast forward, reverse and track search controls.
2 +/– (VOL) buttons
Press to increase or decrease the volume.
3 RESET button
Press to return to the factory settings (initial settings).
4 h(eject) button
Press to eject a disc from this unit.
5Disc loading slot
Insert a disc to play.
6DISP OFF button
Press to turn the information display on or off.
7 USB port
Use to connect a USB storage device.
!When connecting, open up the USB connector lid.
!Use a USB cable to connect the USB storage device to the USB port. Since the USB storage device is projected forward from the unit, it is dangerous to connect directly.
Pioneer CD-U50E USB cable is also available. For details, consult your dealer.
8AUX1 input jack (3.5 mm stereo/video jack)
Use to connect an auxiliary device.
9MUTE button
Press to turn off the sound. To turn on the sound, press again.
a SRC/OFF button
Press to cycle through all the available sources. Press and hold to turn the source off.
Optional remote control
The remote control CD-R55 is sold separately.
For details concerning operations, see the remote control manual.
 10
10 En
En
 Basic Operations
Power ON/OFF |
! USB/iPod – USB/iPod |
||
|
|
! TEL – Bluetooth telephone |
|
1 |
! BT Audio – Bluetooth audio player |
||
|
|
! AUX-1 – AUX 1 |
|
|
|
! AUX-2 – AUX 2 |
|
|
|
! AV – AV input |
|
|
|
! TV – Television |
|
|
|
! EXT-1 – External unit 1 |
|
|
|
! EXT-2 – External unit 2 |
|
|
|
! RearView – Rear view camera |
|
1 Source icon |
! Off – Turn the unit off |
||
# When the source icon is not displayed, you |
|||
|
|
||
|
|
can display it by touching the screen. |
|
Turning the unit on |
# While operating the menu, you cannot select |
||
% When using the touch panel keys, |
a source by touching the source icon. |
||
# To close source select menu, touch ESC. |
|||
touch the source icon and then touch the |
% When using the button, press SRC/OFF |
||
desired source name. |
|||
The source names are displayed and select- |
repeatedly to select a desired source. |
||
able ones are highlighted. |
|
||
% When using the button, press SRC/OFF |
Notes |
||
! In the following cases, the sound source will |
|||
to turn the unit on. |
|||
not change. |
|||
|
|
||
Turning the unit off |
— When no unit corresponding to the se- |
||
lected source is connected. |
|||
% When using the touch panel keys, |
— When there is no disc or magazine in the |
||
player. |
|||
touch the source icon and then touch Off. |
|||
— When AUX (auxiliary input) is set to off |
|||
# When the source icon is not displayed, you |
|||
(refer to page 54). |
|||
can display it by touching the screen. |
|||
— When the AV (AV input) is not set to Video |
|||
|
|
||
% When using the button, press SRC/OFF |
(refer to page 59). |
||
and hold until the unit turns off. |
! In the following cases, USB/iPod icon will be |
||
|
|
changed. |
|
|
|
— USB is displayed when USB storage device |
|
Selecting a source |
is connected. |
||
— iPod is displayed when iPod is connected. |
|||
You can select a source you want to listen to. |
|||
— USB/iPod is displayed when no device is |
|||
To switch to the DVD player, load a disc in the |
connected. |
||
unit. |
! AUX1 is set to Video by default. Set the AUX1 |
||
% When using the touch panel keys, |
to Off when not in use (refer to Switching the |
||
auxiliary setting on page 54). |
|||
touch the source icon and then touch the |
|||
! Charging the portable audio player using |
|||
desired source name. |
|||
car’s DC power source while connecting it to |
|||
The source names are displayed and select- |
|||
AUX input may generate noise. In this case, |
|||
able ones are highlighted. |
|||
stop charging. |
|||
! Disc – Built-in DVD player |
|||
|
|||
! Radio – Radio |
|
||
Section
04
Operations Basic
En  11
11
Section |
|
|
|
|
04 |
Basic Operations |
|
|
|
|
|
|
|
|
! |
RearView (rear view camera) cannot be se- |
Touch panel key basic |
||
|
lected by pressing SRC/OFF. |
operation |
||
! |
Image from rear view camera can be dis- |
|||
|
|
|||
|
played automatically when the appropriate |
Activating the touch panel keys |
||
|
setting is conducted. For details, refer to Set- |
|
|
|
|
ting for rear view camera (back up camera) on |
1 |
|
|
|
page 60. |
|
||
|
|
|
||
!External unit refers to a Pioneer product (such as ones available in the future) that, although incompatible as a source, enables control of basic functions with this unit. Two external units can be controlled with this unit. When two external units are connected, the external unit is automatically allocated to external unit
1 or external unit 2 by this unit. |
|
|
|
2 |
|||
! When this unit’s blue/white lead is connected |
|||
|
|
||
to the vehicle’s auto-antenna relay control |
1 Information area |
||
terminal, the vehicle’s antenna extends when |
|||
Shows the various information depending |
|||
this unit’s source is turned on. To retract the |
on the source. |
||
antenna, turn the source off. |
|
|
|
|
2 Touch panel keys |
||
|
Touch to do various operations. |
||
Adjusting the volume
% Press + or – to adjust the sound level.
1Touch the screen to activate the touch panel keys corresponding to each source.
The touch panel keys appear on the display.
#To go to the next group of touch panel keys, touch NEXT.
#To return to the previous group of touch panel keys, touch PREV.
2Touch Hide to hide the touch panel keys.
#If you do not use the touch panel keys within
30seconds, they will be hidden automatically when selecting video sources.
 12
12 En
En

|
Section |
Basic Operations |
04 |
|
|
Operating the menu
|
|
|
|
|
|
|
|
|
|
|
|
|
||
1 Function Menu key
Touch to switch to the functions for each source.
2 Audio Menu key
Touch to switch to the sound quality control menu.
3 System Menu key
Touch to switch to the setup functions menu.
4 Entertainment Menu key
Touch to switch to the entertainment setup menu.
5 ESC key
Touch to cancel the control mode of functions.
6 Back key
Touch to return to the previous display.
1 Touch AV Menu to display Menu.
The menu names are displayed and operable ones are highlighted.
# When AV Menu is not displayed, you can display it by touching the screen.
2Touch the desired key to display the function names you want to operate.
3Touch ESC to return to the display of each source.
Operating the scroll bar and the scrubber bar
1
2
1Scroll bar
2Scrubber bar
This unit features touch operation of scroll bar and scrubber bar.
If the menu has multiple pages or list has more than five selections, you can drag the scroll bar on the left side of the menu to view the hidden objects. For the disc and USB storage device operation, you can specify the playback point by dragging the scrubber bar.
Operations Basic
En  13
13

Section
04  Basic Operations
Scroll bar operation
% If you see the scroll bar on the left side of the screen, drag upward or downward to view the hidden object.
# Touching  or
or  can also display the hidden object.
Scrubber bar operation
This operation is available for the following sources:
!DVD-video, DVD-VR
!Video CD
!CD
!Compressed audio files (disc/USB)
!DivX
% Drag the scrubber bar on the screen to specify the playback point.
# Drag operation is not available when the scrubber bar is grayout.
Built-in DVD player basic operations
Playing a disc
% Insert a DVD (-R/-RW), CD (-R/-RW) into the disc loading slot.
Playback will automatically start.
#Be sure to turn up the label side of a DVD (-R/-RW), CD (-R/-RW).
#After a DVD (-R/-RW), CD (-R/-RW) has been inserted, use touch panel keys to select the DVD player.
#When a DVD (-R/-RW), CD (-R/-RW) is loaded in this unit, touch the source icon and then touch Disc to select Disc.
#If you are playing a DVD or Video CD, a menu may appear. Refer to Operating the DVD menu on page 23 and PBC playback on page 28.
#When the automatic playback function is on, this unit will cancel the DVD menu and automatically start playback from the first chapter of the first title. Refer to Automatic playback of DVDs on page 26.
# To eject a DVD (-R/-RW), CD (-R/-RW), press h (eject).
 Notes
Notes
!The DVD player plays one, standard, 12-cm DVD (-R/-RW), CD (-R/-RW) at a time. Playing back an 8-cm disc is not possible with this unit.
!Do not insert anything other than a DVD (-R/- RW), CD (-R/-RW) into the disc loading slot.
!If bookmark function is on, DVD playback resumes from the selected point. For more details, refer to Resume playback (Bookmark) on page 24.
!If a DVD (-R/-RW), CD (-R/-RW) contains a mixture of various media file types such as DivX and MP3, you can switch between media file types to play. Refer to Switching the media file type on the next page.
!If you cannot insert a disc completely or if after you insert a disc the disc does not play, check that the label side of the disc is up. Press hto eject the disc, and check the disc for damage before inserting it again.
!There is sometimes a delay between starting up disc playback and the sound being issued. When being read, Format Read is displayed.
!If an error message is displayed, refer to Error messages on page 89.
Basic playback controls
The table below shows the basic controls for playing discs. The following chapters cover other playback features in more details.
Key What it does
Starts playback, pauses a disc that’s playing
for restarts a paused disc.
gStops playback.
 14
14 En
En

 Basic Operations
Skips to the start of the current track, chapter or file, then to previous tracks/chapters/files.
o! Performs fast reverse by touching and holding o.
Skips to the next track, chapter or file.
p! Performs fast forward by touching and holding p.
 Note
Note
You may find with some DVD or Video CD discs that some playback controls do not work in certain parts of the disc. This is not a malfunction.
Switching the media file type
When playing a disc containing a mixture of various media file types such as DivX and MP3, you can switch between media file types to play.
!This unit allows playback of the following media file type recorded on CD-R/RW/ROM discs.
—Audio data (CD-DA)
—Compressed audio files
—DivX video files
—JPEG picture files
!In case of DVD-R/RW/ROM, this unit does not allow playback of audio data (CD-DA) or JPEG picture files.
% Touch Media to switch between media file types.
Touch Media repeatedly to switch between the following media file types:
CD (audio data (CD-DA))—ROM-Audio (compressed audio)—DivX (DivX video files)— JPEG (JPEG picture files)
Section
04
Operations Basic
En  15
15
Section |
|
|
|
|
|
|
|
|
|
|
|
|
05 |
|
Radio |
|
|
|
|
|
|
|
|||
|
|
|
|
|
|
|
|
|
|
|
|
|
|
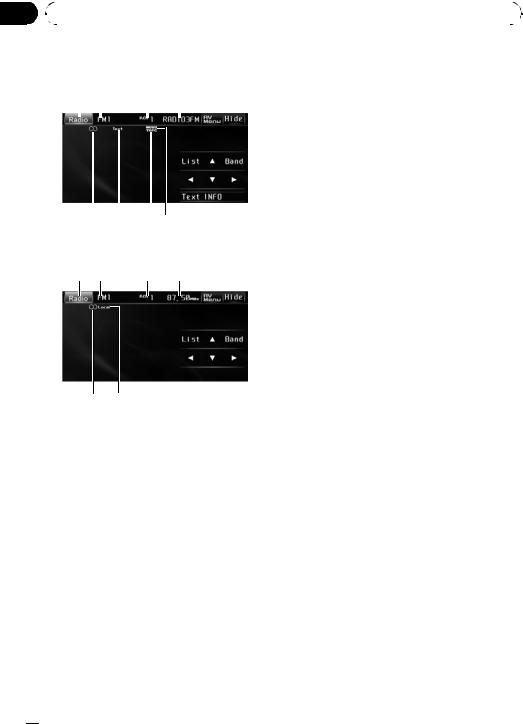
Listening to the radio |
4 Program service name |
||||||||||
|
|
|
|
|
|
|
|
|
|
|
Shows the name of broadcast program (pro- |
|
|
1 2 |
3 |
4 |
|
gram service name). |
|||||||
|
5 |
NEWS indicator |
||||||||||
|
|
|
|
|
|
|
|
|
|
|||
|
|
|
|
|
|
|
|
|
|
|
Appears when the set news program is re- |
|
|
|
|
|
|
|
|
|
|
|
|
ceived. |
|
|
|
|
|
|
|
|
|
|
|
|
||
|
|
|
|
|
|
|
|
|
|
6 |
TRFC indicator |
|
|
|
|
|
|
|
|
|
|
|
|
Appears when a TP station is tuned in. |
|
|
|
|
|
|
|
|
|
|
|
7 |
Text indicator |
|
|
|
|
|
|
|
|
|
|
|
|
Shows when the radio text is received. |
|
8 7 65
RDS
1 2 |
3 |
9 |
8 a
Non-RDS or MW/LW
These are the basic steps necessary to operate the radio. More advanced tuner operation is explained starting in the following section. Refer to page 18.
!This unit’s AF (alternative frequencies search) function can be turned on and off. AF should be off for normal tuning operation (refer to page 18).
!RDS (radio data system) contains inaudible information that helps search for the radio stations.
1 Source icon
Shows which source has been selected.
2 Band indicator
Shows which band the radio is tuned to, MW/LW or FM.
3 Preset number indicator
Shows which preset has been selected.
8 5(stereo) indicator
Appears when the selected frequency is being broadcast in stereo.
9 Frequency indicator
Shows the frequency to which the tuner is tuned.
a Local indicator
Appears when local seek tuning is on.
1Touch the source icon and then touch Radio to select the radio.
2Touch Band to select a band.
Touch Band until the desired band (FM1, FM2, FM3 for FM or MW/LW) is displayed.
3To perform manual tuning, briefly touch cor d.
#You can also perform manual tuning by pressing cor d(TRK).
4To perform seek tuning, keep touching cor dfor about one second and release.
The tuner will scan the frequencies until a broadcast strong enough for good reception is found.
#You can cancel seek tuning by briefly touching either cor d.
#If you keep touching cor dyou can skip stations. Seek tuning starts as soon as you release the key.
#You can also perform seek tuning by pressing and holding cor d(TRK).
 16
16 En
En

|
Section |
Radio |
05 |
|
|
 Notes
Notes
!Listening MW/LW radio while an iPod is charged from this unit may generate noise. In this case, disconnect the iPod from this unit.
!RDS service may not be provided by all stations.
!RDS functions such as AF and TA are only ac-
tive when your radio is tuned to an RDS station.
Storing and recalling broadcast frequencies
You can easily store up to six broadcast frequencies for later recall.
!Six stations for each band can be stored in memory.
1Touch List to display the preset list.
2When you find a frequency that you want to store in memory keep touching one of preset tuning keys P1 to P6 until the beep sounds.
The selected radio station frequency has been stored in memory.
The next time you touch the same preset tuning key the radio station frequency is recalled
from memory.
# When P1 to P6 are not displayed, you can dis-
play them by touching List.
# You can also use aand bto recall radio station frequencies assigned to preset tuning keys
P1 to P6.
3Touch ESC to return to the ordinary display.
Displaying the PTY information
PTY (program type ID code) information can be displayed.
% Touch INFO.
PTY is displayed for eight seconds.
PTY (program type ID code) information is listed in the following section. Refer to page 20.
Using radio text
This tuner can display radio text data transmitted by RDS stations, such as station information, the name of the currently broadcast song and the name of the artist.
!The tuner automatically memorizes the three latest radio text broadcasts received, replacing text from the least recent reception with new text when it is received.
Displaying radio text
You can display the currently received radio text and the three most recent radio texts.
1Touch Text to display radio text.
Radio text for the currently broadcasting sta-
tion is displayed.
# You can cancel radio text display by touching
ESC.
# When no radio text is received, No Text appears in the display.
2Touch PREV or NEXT to recall the three most recent radio texts.
# If there is no radio text data in memory the display will not change.
Storing and recalling radio text
You can store data from up to six radio text transmissions for keys Memo1 to Memo6.
1Display the radio text you want to store in memory.
Refer to Displaying radio text on this page.
2Touch any keys Memo1 to Memo6 and hold to store the selected radio text.
The memory number will display and the selected radio text will be stored in memory. The next time you press the same button in
the radio text display the stored text is recalled from memory.
Radio
En  17
17

Section
05  Radio
Radio
Introduction of advanced |
MW/LW: Off—Level1—Level2 |
|
tuner operation |
Larger setting number is higher level. The |
|
highest level setting allows reception of only |
||
|
||
1 Touch AV Menu and then touch |
the strongest stations, while lower settings let |
|
Function Menu to display the function |
you receive progressively weaker stations. |
|
names. |
|
|
The function names are displayed and oper- |
Selecting alternative |
|
able ones are highlighted. |
||
2 Touch ESC to return to the frequency |
frequencies |
|
display. |
When the tuner cannot get a good reception, |
|
# To return to the previous display, touch |
the unit automatically searches for a different |
|
Back. |
station in the same network. |
|
|
% Touch AF on the function menu to turn |
|
Storing the strongest |
AF on. |
|
broadcast frequencies |
# To turn AF off, touch AF again. |
|
|
BSM (best stations memory) automatically stores the six strongest broadcast frequencies in the order of their signal strength.
!Storing broadcast frequencies with BSM may replace broadcast frequencies you have saved using P1 to P6.
% Touch BSM on the function menu to turn BSM on.
BSM begins to flash. While BSM is flashing the six strongest broadcast frequencies will be stored under preset tuning keys P1 to P6 in order of their signal strength. When finished, BSM stops flashing.
# To cancel the storage process, touch BSM again.
 Notes
Notes
!Only RDS stations are tuned in during seek tuning or BSM when AF is on.
!When you recall a preset station, the tuner may update the preset station with a new frequency from the station’s AF list. (This is only available when using presets on the FM1 or FM2 bands.) No preset number appears on the display if the RDS data for the station received differs from that for the originally stored station.
!Sound may be temporarily interrupted by another program during an AF frequency search.
!AF can be turned on or off independently for each FM band.
Tuning in strong signals
Local seek tuning lets you tune in only those radio stations with sufficiently strong signals for good reception.
% Touch Local on the function menu to set the sensitivity.
Touch Local repeatedly until the desired level of sensitivity appears in the display.
There are four levels of sensitivity for FM and two levels for MW/LW:
FM: Off—Level1—Level2—Level3—Level4
Using PI Seek
If the tuner cannot find a suitable station, or reception status becomes bad, the unit automatically searches for a different station with the same programming. During the search, PI Seek is displayed and the output is muted.
 18
18 En
En

|
Section |
Radio |
05 |
|
|
Using Auto PI Seek for preset stations
When preset stations cannot be recalled, as when travelling long distances, the unit can be set to perform PI Seek during preset recall.
!The default setting for Auto PI Seek is off. Refer to Switching Auto PI Seek on page 55.
Limiting stations to regional programming
When AF is used, the regional function limits the selection of stations broadcasting regional programs.
% Touch Regional on the function menu to turn the regional function on.
# To turn the regional function off, touch
Regional again.
 Notes
Notes
!Regional programming and regional networks are organized differently depending on the country (i.e., they may change according to the hour, state or broadcast area).
!The preset number may disappear from the display if the tuner tunes in a regional station which differs from the originally set station.
!The regional function can be turned on or off independently for each FM band.
2Touch TA on the function menu. dTRFC appears in the display. Traffic an-
nouncement standby is now on.
# If you turned TA function on while tuned in to neither a TP nor an enhanced other network’s TP
station, dimmed TRFC indicator lights.
# To turn traffic announcements standby off, touch TA again.
3Press +/– (VOL) to adjust the TA volume when a traffic announcement begins.
The newly set volume is stored in memory and recalled for subsequent traffic announcements.
4Touch TA while a traffic announcement is being received to cancel the announcement.
The tuner returns to the original source but remains in the standby mode until TA is touched again.
 Notes
Notes
!The system switches back to the original source following traffic announcement reception.
!Only TP and enhanced other network’s TP sta-
tions are tuned in during seek tuning or BSM when TA is on.
Radio
Receiving traffic announcements
TA (traffic announcement standby) lets you receive traffic announcements automatically, no matter what source you are listening to. TA can be activated for both a TP station (a station that broadcasts traffic information) or an enhanced other network’s TP station (a station carrying information which cross-references TP stations).
1 Tune in a TP or enhanced other network’s TP station.
TRFC indicator lights.
En  19
19

Section
05  Radio
Radio
Using PTY functions |
Receiving PTY alarm broadcasts |
You can tune in a station by using PTY (program type) information.
Searching for an RDS station by PTY information
When the emergency PTY code broadcasts, the unit receives it automatically (ALARM appears). When the broadcasting ends, the system returns to the previous source.
You can search for general types of broadcasting programs, such as those listed in the following section. Refer to this page.
1Touch PTY on the function menu.
2Touch cor dto select a program type.
There are four program types:
News&Inf—Popular—Classics—Others
3Touch dto begin the search.
The unit searches for a station broadcasting that program type. When a station is found, its program service name is displayed.
PTY (program type ID code) information is listed in the following section. Refer to this page.
#To cancel the search, touch c.
#The program of some stations may differ from that indicated by the transmitted PTY.
#If no station is broadcasting the type of program you searched for, Not Found is displayed for about two seconds and then the tuner returns to the original station.
PTY list
General |
Specific |
Type of program |
|
|
|
News&Inf |
News |
News |
|
|
|
|
Affairs |
Current affairs |
|
|
|
|
Info |
General information and |
|
|
advice |
|
|
|
|
Sport |
Sports |
|
|
|
|
Weather |
Weather reports/meteoro- |
|
|
logical information |
|
|
|
|
Finance |
Stock market reports, |
|
|
commerce, trading, etc. |
|
|
|
Popular |
Pop Mus |
Popular music |
|
|
|
|
Rock Mus |
Contemporary modern |
|
|
music |
|
|
|
|
Easy Mus |
Easy listening music |
|
|
|
|
Oth Mus |
Non-categorized music |
|
|
|
|
Jazz |
Jazz |
|
|
|
|
Country |
Country music |
|
|
|
|
Nat Mus |
National music |
|
|
|
|
Oldies |
Oldies, golden oldies |
Using news program interruption
When a news program is broadcast from a PTY code news station, the unit can switch from any station to the news broadcast station. When the news program ends, reception of the previous program resumes.
% Touch News on the function menu.
News program interruption standby is now on.
#To turn off news program interruption, touch News again.
#A news program can be canceled by touching
News.
|
Folk Mus |
Folk music |
|
|
|
Classics |
L. Class |
Light classical music |
|
|
|
|
Classic |
Classical music |
|
|
|
 20
20 En
En
 Radio
Radio
Others |
Educate |
Educational programs |
|
|
|
|
Drama |
Radio plays and serials |
|
|
|
|
Culture |
National or regional cul- |
|
|
ture |
|
|
|
|
Science |
Nature, science and tech- |
|
|
nology |
|
|
|
|
Varied |
Light entertainment |
|
|
|
|
Children |
Children’s |
|
|
|
|
Social |
Social affairs |
|
|
|
|
Religion |
Religious affairs or ser- |
|
|
vices |
|
|
|
|
Phone In |
Phone in |
|
|
|
|
Touring |
Travel programs; not for |
|
|
traffic announcements |
|
|
|
|
Leisure |
Hobbies and recreational |
|
|
activities |
|
|
|
|
Document |
Documentaries |
|
|
|
Section
05
Radio
En  21
21

Section
06  Playing DVD discs
Watching a DVD |
5 |
Audio language indicator |
|||||||
|
|
|
|
|
|
|
|
Shows which audio language has been se- |
|
1 |
2 |
3 |
4 |
lected. |
|||||
For DVD-VR, only the number of the audio |
|||||||||
|
|
|
|
|
|
|
|
||
|
|
|
|
|
|
|
|
language is displayed. |
|
|
|
|
|
|
|
|
|
||
|
|
|
|
|
|
6 |
Digital format indicator |
||
|
|
|
|
|
|
|
|
Shows when a signal encoded in the corre- |
|
|
|
|
|
|
|
|
|
sponding format is detected. |
|
7 Channel/sampling frequency/quantization bits
5 6 7 8 9 Depending on the file format, some informa-
tion may not be displayed.
DVD video
8 Subtitle language indicator
1 2 3 4 Shows which subtitle language has been selected.
9 Viewing angle indicator
Shows which viewing angle has been selected.
a Playing method indicator
Shows which playing method (Original or Playlists) has been selected.
5 6 7 |
a |
DVD-VR
These are the basic steps necessary to play a DVD with your DVD player. More advanced DVD operation is explained starting in the following section. Refer to page 26.
1 Source icon
Shows which source has been selected.
2Title number indicator
Shows the title currently playing.
3Chapter number indicator
Shows the chapter currently playing.
4Play time indicator
Shows the elapsed playing time of the current chapter.
1Touch the source icon and then touch Disc to select the DVD player.
#If no disc is loaded in the unit, you cannot select Disc (DVD player). Insert a disc in the unit. (Refer to page 14.)
#With some discs, a menu may be displayed. (Refer to Operating the DVD menu on the next page.)
2Touch the screen to display the touch panel keys.
#Touch Hide to hide the touch panel keys.
3To skip back or forward to another chapter, touch oor p.
Touching pskips to the start of the next chapter. Touching oonce skips to the start of the current chapter. Touching it again will skip to the previous chapter.
#You can also skip back or forward to another chapter by pressing cor d(TRK).
 22
22 En
En

|
Section |
Playing DVD discs |
06 |
|
|
4 To perform fast forward or reverse, keep touching oor p.
If you keep touching oor pfor five seconds, the icon mor nis highlighted. When this happens, fast reverse/fast forward continues even if you release oor p. To resume playback at a desired point, touch f.
#Fast forward/fast reverse may not be possible at certain locations on some discs. If this happens, normal playback automatically resumes.
#You can also perform fast reverse/fast forward by pressing and holding cor d(TRK).
Selecting titles from the title list
Title list lets you see the list of titles on a disc and select one of them to play back.
! This function is available for DVD-VR.
1Touch List.
2Touch your favorite title.
That selection will begin to play.
3Touch ESC to return to the ordinary display.
Displaying information of DVD-VR
Information of DVD-VR can be displayed. ! This function is available for DVD-VR.
% Touch INFO.
Touch INFO repeatedly to switch between the following settings:
Indicators—title name
#If specific information has not been recorded on a DVD-VR disc, No xxxx will be displayed (e.g., No Title).
#If the characters recorded on the disc are not
compatible with this unit, those characters will not be displayed.
Skipping back or forward to another title
% To skip back or forward to another title, touch aor b.
Touching askips to the start of the next title. Touching bskips to the start of the previous title.
Title numbers are displayed for eight seconds.
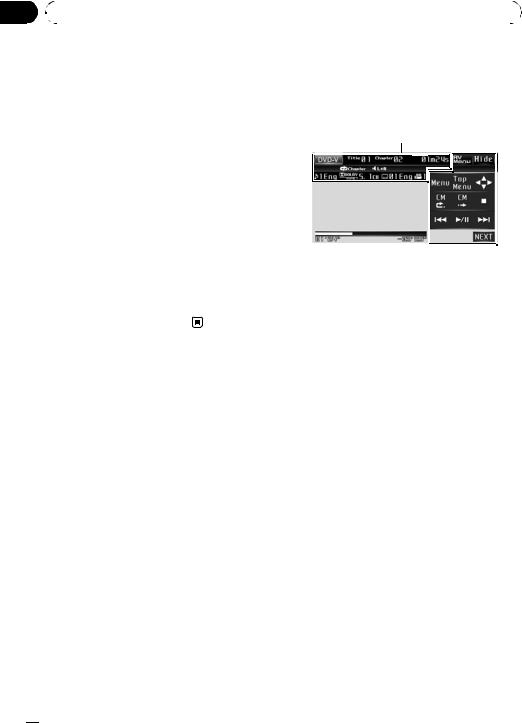
Operating the DVD menu
Some DVDs allow you to select from the disc contents using a menu.
!This function is available for DVD video.
!You can display the menu by touching Menu or Top Menu while a disc is playing. Touching either of these keys again lets you start playback from the location selected from the menu. For details, refer to the instructions provided with the disc.
Using DVD menu direct touch control
This function allows you to operate the DVD menu by touching the menu item directly.
% Touch the desired menu item on the DVD menu directly.
# Depending on the contents of DVD discs, this function may not work properly. In this case, using touch panel keys operate the DVD menu.
Using the touch panel keys
1 Touch 
 to display touch panel keys to operate the DVD menu.
#When the touch panel keys are not displayed, you can display them by touching the screen.
#To switch to the DVD menu direct touch control, touch Touch.
2 Touch a, b, cor dto select the desired menu item.
discs DVD Playing
En  23
23

Section
06  Playing DVD discs
3 |
Touch . |
CM skip/CM back |
|
Playback starts from the selected menu item. |
This function skips a reproduced image for a |
||
# |
The way to display the menu differs depending |
||
|
|||
on the disc. |
specified time. If the currently playing disc |
|
contains commercials, it is possible to skip |
||
|
||
|
them. |
Selecting the play mode
You have two methods for playing DVD-VR disc; Original (original) and Playlists (playlist).
!Titles created with DVD recorders are called original. Based on original, rearranged titles are called playlist. Playlists are created on DVD-R/RW discs.
!This function is available for DVD-VR.
% Touch Mode Change to switch the play mode.
If the play mode is changed, playback starts from the beginning of the selected play mode.
Resume playback (Bookmark)
The Bookmark function lets you resume playback from a selected scene the next time the disc is loaded.
! This function is available for DVD video.
% During playback, touch Bookmark at the point you want to resume playback next time.
The selected scene will be bookmarked so that playback resumes from that point next time.
#To clear the bookmark on a disc, keep touching Bookmark during playback.
#You can also bookmark a disc by pressing and holding hat the point you want to bookmark. Next time you load the disc, playback will resume from the bookmarked point. Note that you can only bookmark one disc using this method. To clear the bookmark on a disc, press h.
#You can bookmark up to six discs including the disc that is bookmarked using h.
#The oldest bookmark is replaced by the new one.
% To skip progressively backward or forward, touch  or
or  .
.
Each time you touch  or
or  it changes steps in the following order:
CM back
5 sec.—15 sec.—30 sec.—1.0 min.—2.0 min.—3.0 min.—0 sec.
CM skip
30 sec.—1.0 min.—1.5 min.—2.0 min.—3.0 min.—5.0 min.—10.0 min.—0 sec.
Frame-by-frame playback
This lets you move ahead one frame at a time during playback.
% Touch rduring playback.
Each time you touch r, you move ahead one frame.
#To return to normal playback, touch f.
#With some discs, images may be unclear during frame-by-frame playback.
#If a DVD-VR disc contains a still image, touch
rwhile displaying a still image to switch to the next image or video.
Slow motion playback
This lets you slow down playback speed.
% Keep touching runtil 

 is displayed during playback.
The icon 

 is displayed, forward slow motion playback begins.
#Touching qor rduring slow motion playback, you can change the playback speed in four steps as follows:
1/16—1/8—1/4—1/2
#To return to normal playback, touch f.
 24
24 En
En

|
Section |
Playing DVD discs |
06 |
|
|
 Notes
Notes
!There is no sound during slow motion playback.
!With some discs, images may be unclear during slow motion playback.
!Reverse slow motion playback is not possible.
Pausing playback
% Touch fduring playback.
# To resume playback at the same point that you turned pause on, touch fagain.
Searching for the part you want to play
You can use the search function to find the part you want to play.
For DVD video, you can select Title (title), Chapter (chapter), Time (time) or 10key (numeric keypad).
For DVD-VR, you can select Title (title), Chapter (chapter) or Time (time).
!Chapter search and time search are not possible when disc playback has been stopped.
1Touch Search.
2Touch the desired search option (e.g., Chapter).
3Touch 0 to 9 to input the desired number.
#To cancel the inputted numbers, touch C.
#In the time search function, to select 1 hour
11minutes, convert the time into 071 minutes 00 seconds and touch 0, 7, 1, 0 and 0 in that order.
4 Touch  .
.
This starts playback from the selected part.
 Note
Note
With discs featuring a menu, you can also touch Menu or Top Menu and then make selections from the displayed menu.
Changing audio language during playback (Multi-audio)
DVDs can provide audio playback with different languages and different systems (Dolby Digital, DTS etc.). With DVDs featuring multiaudio recordings, you can switch between languages/audio systems during playback.
% Touch Audio during playback.
Each time you touch Audio it switches between audio systems.
 Notes
Notes
!With some DVDs, switching between languages/audio systems may only be possible using a menu display.
!You can also switch between languages/audio systems using Setup. For details, refer to Setting the audio language on page 50.
!Only digital output of DTS audio is possible. If this unit’s optical digital outputs are not connected, DTS audio will not be output, so select an audio setting other than DTS.
!Display indications such as Dolby D and 5.1ch indicate the audio system recorded on the DVD. Depending on the setting, playback may not be with the same audio system as that indicated.
!Touching Audio during fast forward/fast re-
verse, pause or slow motion playback returns you to normal playback.
discs DVD Playing
En  25
25

Section |
|
|
|
|
|
06 |
|
Playing DVD discs |
|
|
|
|
|
|
|
|
|
|
Changing the subtitle |
Return to the specified scene |
|||
|
language during playback |
You can return to the specified scene where |
|||
|
(Multi-subtitle) |
|
the DVD you are currently playing has been |
||
|
With DVDs featuring multi-subtitle recordings, |
preprogrammed to return. |
|||
|
! This function is available for DVD video. |
||||
|
you can switch between subtitle languages |
||||
|
|
|
|||
|
during playback. |
|
% Touch Return to return to the specified |
||
|
% Touch Subtitle during playback. |
scene. |
|||
|
# If a specified scene has not been prepro- |
||||
|
Each time you touch Subtitle it switches be- |
||||
|
grammed in DVD disc, this function is not possi- |
||||
|
tween subtitle languages. |
|
|||
|
|
ble. |
|||
|
|
|
|
||
|
|
Notes |
|
|
|
|
! With some DVDs, switching between subtitle |
Automatic playback of DVDs |
|||
|
|
languages may only be possible using a menu |
When a DVD disc with DVD menu is inserted, |
||
|
|
display. |
|
||
|
|
|
this unit will cancel the DVD menu automati- |
||
|
! You can also switch between subtitle lan- |
||||
|
cally and start playback from the first chapter |
||||
|
|
guages using Setup. For details, refer to Set- |
|||
|
|
of the first title. |
|||
|
|
ting the subtitle language on page 50. |
|||
|
|
! This function is available for DVD video. |
|||
|
! Touching Subtitle during fast forward/fast re- |
||||
|
! Some DVDs may not operate properly. If |
||||
|
|
verse, pause or slow motion playback returns |
|||
|
|
this function is not fully operated, turn this |
|||
|
|
you to normal playback. |
|
||
|
|
|
function off and start playback. |
||
|
|
|
|
||
|
Changing the viewing angle |
% Touch Auto Play to turn automatic play- |
|||
|
back on. |
||||
|
during playback (Multi-angle) |
# To turn automatic playback off, touch |
|||
|
With DVDs featuring multi-angle (scenes shot |
Auto Play again. |
|||
|
# When the automatic playback is on, you can- |
||||
|
from multiple angles) recordings, you can |
||||
|
not operate repeating play of DVD disc (refer to |
||||
|
switch among viewing angles during play- |
||||
|
Repeating play on the next page). |
||||
|
back. |
|
|||
|
|
|
|
||
|
! This function is available for DVD video. |
|
|
||
|
! During playback of a scene shot from mul- |
Introduction of advanced |
|||
|
|
tiple angles, the angle icon |
is dis- |
||
|
|
DVD operation |
|||
|
|
played. Turn angle icon display on or off |
|||
|
|
using Setup. For details, refer to Setting the |
1 Touch AV Menu and then touch |
||
|
|
angle icon display on page 51. |
|
||
|
|
|
Function Menu to display the function |
||
|
|
|
|
||
|
% Touch Angle during playback of a scene |
names. |
|||
|
The function names are displayed and oper- |
||||
|
shot from multiple angles. |
|
|||
|
|
able ones are highlighted. |
|||
|
|
|
|
||
|
|
Note |
|
2 Touch ESC to return to the playback dis- |
|
|
|
|
|
||
|
Touching Angle during fast forward/fast reverse, |
play. |
|||
|
pause or slow motion playback returns you to |
# To return to the previous display, touch |
|||
|
normal playback. |
|
Back. |
||
 26
26 En
En

 Playing DVD discs
Repeating play
There are three repeat play ranges for DVD playback.
% Touch Repeat on the function menu to select the repeat range.
!Disc – Play through the current disc
!Chapter – Repeat the current chapter
!Title – Repeat the current title
#If you perform chapter search or fast forward/ reverse, the repeat play range changes to Disc.
Selecting audio output
When playing DVD video discs recorded with LPCM audio, you can switch the audio output.
!This function is not possible when disc playback has been stopped.
!If you select Linear PCM, when playing a disc recorded on a dual mono mode, you can operate this function. (Refer to Setting for digital output on page 53.)
% Touch L/R Select on the function menu to select the audio output.
Touch L/R Select repeatedly until the desired audio output appears in the display.
!L+R – left and right
!Left – left
!Right – right
!Mix – mixing left and right
#Depending on the disc and the playback location on the disc, the function may not be select-
able, indicating that operating this function is not possible.
Section
06
discs DVD Playing
En  27
27

Section
07  Playing Video CDs
Watching a Video CD |
# During PBC playback, a menu may be dis- |
|||||
|
|
|
|
|
|
played if you perform these operations. |
1 |
2 |
3 |
# You can also skip back or forward to another |
|||
track by pressing cor d(TRK). |
||||||
|
|
|
|
|
|
4 To perform fast forward or reverse, |
|
|
|
|
|
|
|
|
|
|
|
|
|
keep touching oor p. |
|
|
|
|
|
|
If you keep touching oor pfor five sec- |
|
|
|
|
|
|
onds, the icon mor nis highlighted. |
|
|
|
|
|
|
When this happens, fast reverse/fast forward |
|
|
|
|
|
|
continues even if you release oor p. To |
|
|
|
|
|
|
resume playback at a desired point, touch |
These are the basic steps necessary to play a |
f. |
|||||
Video CD with your DVD player. More ad- |
# Fast forward/fast reverse may not be possible |
|||||
vanced Video CD operation is explained start- |
at certain locations on some discs. If this hap- |
|||||
ing in the following section. Refer to the next |
pens, normal playback automatically resumes. |
|||||
page. |
|
|
|
|
# You can also perform fast reverse/fast forward |
|
by pressing and holding cor d(TRK).
1 Source icon
Shows which source has been selected.
2 Track number indicator
Shows the number of the track playing.
3 Play time indicator
Shows the elapsed playing time of the current track.
1Touch the source icon and then touch Disc to select the DVD player.
#If no disc is loaded in the unit, you cannot select Disc (DVD player). Insert a disc in the unit. (Refer to page 14.)
#With a Video CD featuring the PBC (playback control) function, a menu is displayed. (Refer to PBC playback on this page.)
2Touch the screen to display the touch panel keys.
#Touch Hide to hide the touch panel keys.
3To skip back or forward to another track, briefly touch oor p.
Touching pskips to the start of the next track. Touching oonce skips to the start of the current track. Touching it again will skip to the previous track.
PBC playback
During playback of Video CDs featuring PBC (Playback Control), PBC ON is displayed. You can operate PBC menu with 10Key.
1 When PBC menu is displayed, touch Search and then touch 10key.
# Depending on the discs, the menu may be two or more pages long. In such case, touch o or pto display the next or previous menu.
2Touch 0 to 9 corresponding to a menu number and then touch  to start playback.
Playback starts from the selected menu item.
3Touch ESC to hide the touch panel keys.
 Notes
Notes
!You can display the menu by touching Return during PBC playback. For details, refer to the instructions provided with the disc.
!PBC playback of Video CD cannot be canceled.
 28
28 En
En

|
Section |
Playing Video CDs |
07 |
|
|
!During playback of Video CDs featuring PBC (Playback Control), PBC ON, search and time
search functions cannot be used nor can you select the range for repeat play.
Frame-by-frame playback
This lets you move ahead one frame at a time during playback.
% Touch rduring playback.
Each time you touch r, you move ahead one frame.
#To return to normal playback, touch f.
#With some discs, images may be unclear during frame-by-frame playback.
Slow motion playback
This lets you slow down playback speed.
% Keep touching runtil 

 is displayed during playback.
The icon 

 is displayed, forward slow motion playback begins.
#Touching qor rduring slow motion playback, you can change the playback speed in four steps as follows:
1/16—1/8—1/4—1/2
#To return to normal playback, touch f.
 Notes
Notes
!There is no sound during slow motion playback.
!With some discs, images may be unclear during slow motion playback.
!Reverse slow motion playback is not possible.
Pausing playback
% Touch fduring playback.
# To resume playback at the same point that you turned pause on, touch fagain.
Searching for a desired scene, starting playback from a specified time
You can use the search function to search for a desired scene by specifying a track, and the time search function to specify the time on a disc at which play starts.
!During playback of Video CDs featuring PBC (playback control), this function cannot be operated.
!Time search is not possible when disc playback has been stopped.
1Touch Search.
2Touch Track (track), Time (time) or 10key (numeric keypad).
3Touch 0 to 9 to input the desired number.
#To cancel the inputted numbers, touch C.
#In the time search function, to select 1 hour 11 minutes, convert the time into 071 minutes 00 seconds and touch 0, 7, 1, 0 and 0 in that order.
4 Touch  .
.
This starts playback from the selected scene.
Introduction of advanced Video CD operation
1Touch AV Menu and then touch Function Menu to display the function names.
The function names are displayed and operable ones are highlighted.
2Touch ESC to return to the playback display.
# To return to the previous display, touch
Back.
CDs Video Playing
En  29
29

Section
07  Playing Video CDs
Repeating play
There are two repeat play ranges for the Video CD playback: Track (track repeat) and Disc (disc repeat).
!During playback of Video CDs featuring PBC (playback control), this function cannot be operated.
% Touch Repeat on the function menu to select the repeat range.
!Disc – Repeat the current disc
!Track – Repeat the current track
#If you perform track search or fast forward/reverse, the repeat play range changes to Disc.
Selecting audio output
You can switch between stereo and monaural audio output.
!This function is not possible when disc playback has been stopped.
% Touch L/R Select on the function menu to select the audio output.
Touch L/R Select repeatedly until the desired audio output appears in the display.
!L+R – left and right
!Left – left
!Right – right
!Mix – mixing left and right
 30
30 En
En
 Loading...