


 Loading...
SLR Digital Camera


 /
/


Operating Manual
For optimum camera performance, please read the Operating Manual before using the camera.

Thank you for purchasing this PENTAX e/yDigital Camera. Please read this manual before using the camera in order to get the most out of all the features and functions. Keep this manual safe, as it can be a valuable tool in helping you to understand all the camera capabilities.
Lenses you can use
In general, lenses that can be used with this camera are DA, DA L, D FA and FA J lenses and lenses that have an Aperture s(Auto) position.
To use any other lens or accessory, see p.46 and p.240.
Regarding copyrights
Images taken using the e/ythat are for anything other than personal enjoyment cannot be used without permission according to the rights as specified in the Copyright Act. Please take care, as there are cases where limitations are placed on taking pictures even for personal enjoyment during demonstrations, performances or of items on display. Images taken with the purpose of obtaining copyrights also cannot be used outside the scope of use of the copyright as laid out in the Copyright Act, and care should be taken here also.
Regarding trademarks
PENTAX, K-m/K2000 and smc PENTAX are trademarks of HOYA CORPORATION. PENTAX PHOTO Browser, PENTAX PHOTO Laboratory and SDM are trademarks of HOYA CORPORATION.

 SDHC logo is a trademark.
This product includes DNG technology under license by Adobe Systems Incorporated.

 The DNG logo is either registered trademarks or trademarks of Adobe Systems Incorporated in the United States and/or other countries.
All other brands or product names are trademarks or registered trademarks of their respective companies.
To users of this camera
•There is a possibility that recorded data may be erased or that the camera may not function correctly when used in surroundings such as installations generating strong electromagnetic radiation or magnetic fields.
•The liquid crystal panel used in the monitor is manufactured using extremely high precision technology. Although the level of functioning pixels is 99.99% or better, you should be aware that 0.01% or fewer of the pixels may not illuminate or may illuminate when they should not. However, this has no effect on the recorded image.
This product supports PRINT Image Matching III. PRINT Image Matching enabled digital still cameras, printers and software help photographers to produce image more faithful to their intentions. Some functions are not available on printers that are not PRINT Image Matching III compliant.
Copyright 2001 Seiko Epson Corporation. All Rights Reserved. PRINT Image Matching is a trademark of Seiko Epson Corporation.
The PRINT Image Matching logo is a trademark of Seiko Epson Corporation.
Regarding PictBridge
PictBridge allows the user to connect the printer and digital camera directly, using the unified standard for the direct printout of images. You can print images directly from the camera through a few simple operations.
•There is a possibility that the illustrations and the display screen of the monitor in this manual are different from the actual product.

1
 FOR USING YOUR CAMERA SAFELY
We have paid close attention to the safety of this product. When using this product, we request your special attention regarding items marked with the following symbols.
 Warning
 Caution
This symbol indicates that violating this item could cause serious personal injuries.
This symbol indicates that violating this item could cause minor or medium personal injuries, or material losses.
 ABOUT THE CAMERA
 Warning
•Do not disassemble or modify the camera. High voltage areas are present inside the camera, with the risk of electric shock.
•If the camera interior is exposed due to dropping or otherwise damaging the camera, never touch the exposed portion. There is the risk of electric shock.
•To avoid the risk of it being swallowed by mistake, keep the SD Memory Card out of the reach of small children. Seek medical attention immediately if a memory card is accidentally swallowed.
•Wrapping the strap around your neck is dangerous. Take care that small children do not hang the strap over their necks.
•Do not look directly at the sun through the camera with a telephoto lens attached, as viewing the sun may damage your eyes. Viewing the sun directly with a telephoto lens may lead to a loss of eyesight.
•Be sure to store the batteries out of the reach of children. Placing them in mouth may cause an electrical shock.
•Always use the AC adapter exclusively developed for this product, with the specified power and voltage. Using an AC adapter not exclusive to this product, or using the exclusive AC adapter with an unspecified power or voltage can cause a fire, electric shock, or camera breakdown.
•If any irregularities occur during use, such as smoke or a strange odor, stop use immediately, remove the batteries or the AC adapter, and contact your nearest PENTAX Service Center. Continued use could cause a fire or electric shock.
•During thunderstorms, unplug and discontinue use of the AC adapter. Continued use could cause equipment failure, a fire or electric shock.

2
 Caution
•Do not short the batteries or dispose of the batteries in fire. Do not disassemble the batteries. The batteries could explode or catch fire.
•Of the batteries that can be used in this camera (AA Ni-MH batteries, AA lithium batteries and AA alkaline batteries), only the Ni-MH batteries can be recharged. Recharging other batteries can cause a fire or explosion.
•Remove the batteries from the camera immediately if they become hot or begin to smoke. Be careful not to burn yourself during removal.
•Some portions of the camera heat up during use. There is the risk of low temperature burns when holding such portions for long periods.
•Do not place your finger over or cover the flash with clothing when discharging the flash. Fingers or clothing may be burned.
•To reduce the risk of hazards, use only CSA/UL Certified power supply cord set, cord is Type SPT-2 or heavier, minimum NO.18 AWG copper, one end with a molded-on male attachment plug cap (with a specified NEMA configuration), and the other is provided with a molded-on female connector body (with a specified IEC nonindustrial type configuration) or the equivalent.
 PRECAUTIONS FOR BATTERY USAGE
•Only use the specified batteries with this camera. Use of other batteries can cause a fire or explosion.
•Replace all the batteries at the same time. Do not mix battery brands, type or an old battery with a new one. It may cause explosion or a fire.
•The batteries should be inserted correctly with regard to polarity (+ and –) marked on the batteries and the camera. Not inserting batteries correctly may cause explosion or a fire.
•Do not disassemble the batteries. Of the batteries that can be used in this camera, only the AA Ni-MH batteries can be recharged. Disassembling the batteries or attempting to charge non-rechargeable batteries could result in explosion or leakage.
 Care to be Taken During Handling
•When traveling, take the Worldwide Service Network that is included in the package. This will be useful if you experience problems abroad.

3
•When the camera has not been used for a long time, confirm that it is still working properly, particularly prior to taking important pictures (such as at a wedding or during traveling). Pictures cannot be guaranteed if recording, playback or transferring your data to a computer, etc. is not possible due to a malfunction of your camera or recording media (SD Memory Card), etc.
•Do not clean the product with organic solvents such as thinner, alcohol or benzene.
•Do not subject the camera to high temperatures or high humidity. Do not leave the camera in a vehicle, as the temperature can get very high.
•Do not store the camera with preservatives or chemicals. Storage in high temperatures and high humidity can cause mold to grow on the camera. Remove from the case and store in a dry and well-ventilated location.
•Do not subject the camera to strong vibrations, shocks, or pressure. Use a cushion to protect the camera from vibrations of motorcycles, automobiles, or ships.
•The temperature range for camera use is 0°C to 40°C (32°F to 104°F).
•The monitor may appear black under high temperatures, but will return to normal as temperatures normalize.
•The monitor may respond more slowly at low temperatures. This is due to liquid crystal properties, and is not a fault.
•Periodic inspections are recommended every one to two years to maintain high performance.
•Sudden temperature changes will cause condensation on the inside and outside of the camera. Place the camera in your bag or a plastic bag, and remove the camera after temperature of the camera and surroundings are equalized.
•Avoid contact with garbage, mud, sand, dust, water, toxic gases, or salts. These could cause a camera breakdown. Wipe dry any rain or water drops on the camera.
•Refer to “Precautions When Using the SD Memory Card” (p.43) regarding the SD Memory Card.
•Use a lens brush to remove dust accumulated on the lens or viewfinder. Never use a spray blower for cleaning as it may damage the lens.
•Please contact PENTAX Service Center for professional cleaning of the CCD. (This will involve a fee.)
•Please do not press forcefully on the monitor. This could cause breakage or malfunction.
•Depending on a user's physical condition, some users may experience itching, break out in a rash or suffer from eczema. If an abnormality occurs, immediately discontinue using the camera and seek medical attention.

4
Regarding Product Registration
In order to better serve you, we request that you complete the product registration, which can be found on the CD-ROM supplied with the camera or on the PENTAX website. Thank you for your cooperation.
Refer to the PENTAX PHOTO Browser 3/PENTAX PHOTO Laboratory 3 Operating Manual for more information.

5
Contents |
|
FOR USING YOUR CAMERA SAFELY .............................................. |
1 |
ABOUT THE CAMERA ........................................................................ |
1 |
PRECAUTIONS FOR BATTERY USAGE ........................................... |
2 |
Care to be Taken During Handling ...................................................... |
2 |
Contents............................................................................................... |
5 |
Composition of the Operating Manual ............................................... |
11 |
Before Using Your Camera |
13 |
e/yCamera Characteristics................................... |
14 |
Checking the Contents of the Package ...................................... |
16 |
Names and Functions of Working Parts .................................... |
17 |
Capture Mode .................................................................................... |
18 |
Playback Mode .................................................................................. |
20 |
Display Indicators......................................................................... |
22 |
Monitor ............................................................................................... |
22 |
Viewfinder .......................................................................................... |
28 |
How to Change Function Settings .............................................. |
30 |
Using Direct Keys .............................................................................. |
30 |
Using the Control Panel ..................................................................... |
31 |
Using the Menus ................................................................................ |
32 |
Using the Help Function .............................................................. |
34 |
Getting Started |
35 |
Attaching the Strap ...................................................................... |
36 |
Inserting the Batteries.................................................................. |
37 |
Battery Level Indicator ....................................................................... |
39 |
Approximate Image Storage Capacity and Playback Time |
|
(New Batteries) .................................................................................. |
39 |
Using the AC Adapter (Optional) ....................................................... |
40 |
Inserting/Removing the SD Memory Card.................................. |
42 |
Recorded Pixels and Quality Level .................................................... |
44 |
Attaching the Lens ....................................................................... |
46 |
Adjusting the Viewfinder Diopter................................................ |
48 |
Turning the Camera On and Off.................................................. |
49 |
Initial Settings............................................................................... |
50 |
Setting the Display Language ............................................................ |
50 |
Setting the Date and Time ................................................................. |
54 |
6 |
|
Basic Operations |
57 |
|
|
||
|
|
|
|
|
|
Basic Shooting Operation ........................................................... |
58 |
|
|
Holding the Camera ........................................................................... |
58 |
|
|
Letting the Camera Choose the Optimal Settings.............................. |
59 |
|
|
Using a Zoom Lens ...................................................................... |
64 |
|
|
Using the Built-in Flash ............................................................... |
65 |
|
|
Setting Flash Mode ............................................................................ |
65 |
|
|
Compensating Flash Output .............................................................. |
70 |
|
|
Allowing Shooting while Charging the Flash...................................... |
71 |
|
|
Playing Back Pictures .................................................................. |
72 |
|
|
Playing Back Images ......................................................................... |
72 |
|
|
Deleting Images ................................................................................. |
73 |
|
|
Shooting Functions |
75 |
|
|
|
|
|
|
How to Operate the Shooting Functions.................................... |
76 |
|
|
Direct Keys Setting Items................................................................... |
76 |
|
|
Rec. Mode Menu Setting Items.......................................................... |
77 |
|
|
Custom Setting Menu Setting Items .................................................. |
78 |
|
|
Selecting the Appropriate Capture Mode................................... |
80 |
|
|
Picture Mode...................................................................................... |
81 |
|
|
HMode........................................................................................... |
82 |
|
|
Exposure Mode.................................................................................. |
84 |
|
|
Setting the Exposure.................................................................... |
85 |
|
|
Effect of Aperture and Shutter Speed ................................................ |
85 |
|
|
Setting the Sensitivity......................................................................... |
87 |
|
|
Changing the Exposure Mode ........................................................... |
89 |
|
|
Selecting the Metering Method ........................................................ |
101 |
|
|
Adjusting the Exposure .................................................................... |
104 |
|
|
Focusing...................................................................................... |
109 |
|
|
Using the Autofocus......................................................................... |
109 |
|
|
Setting the AF Mode ........................................................................ |
111 |
|
|
Selecting the Focusing Area (AF Point)........................................... |
113 |
|
|
Fixing the Focus (Focus Lock)......................................................... |
114 |
|
|
Adjusting the Focus Manually (Manual Focus) ................................ |
116 |
|
|
Checking the Composition, Exposure and Focus Before |
|
|
|
Shooting (Digital Preview)......................................................... |
119 |
|
|
|
|

7
Using Shake Reduction Function to Prevent Camera |
|
Shake ........................................................................................... |
121 |
Taking Pictures Using the Shake Reduction Function..................... |
121 |
Shooting with the Self-Timer............................................................ |
125 |
Shooting with the Remote Control (Optional) .................................. |
128 |
Continuous Shooting ................................................................. |
130 |
Taking Pictures Using Digital Filters ........................................ |
132 |
Using the Flash |
135 |
Flash Characteristics in Each Exposure Mode........................ |
136 |
Using Slow-Speed-Sync .................................................................. |
136 |
Distance and Aperture when Using the Built-in Flash............ |
138 |
Lens Compatibility with the Built-in Flash ............................... |
139 |
Using an External Flash (Optional)........................................... |
140 |
Shooting Settings |
149 |
Setting the File Format............................................................... |
150 |
Setting the JPEG Recorded Pixels .................................................. |
150 |
Setting the JPEG Quality Level........................................................ |
151 |
Setting the File Format..................................................................... |
152 |
Setting the gButton Function ................................................. |
154 |
Setting the Image Finishing Tone (Custom Image)................. |
157 |
Additional Settings for Shooting .............................................. |
159 |
Setting the White Balance................................................................ |
159 |
Setting the Color Space ................................................................... |
164 |
Playback Functions |
165 |
Playback Functions Operation.................................................. |
166 |
Playback Menu Setting Items .......................................................... |
166 |
Enlarging Images........................................................................ |
167 |
Displaying Multiple Images ....................................................... |
169 |
Multi-image Display Screen ............................................................. |
169 |
Calendar Display/Folder Display...................................................... |
171 |
Joining Multiple Images (Index) ....................................................... |
172 |
Rotating Images.......................................................................... |
175 |
Comparing Images ..................................................................... |
176 |
Slideshow.................................................................................... |
177 |
Setting the Slideshow Display.......................................................... |
177 |
Starting the Slideshow ..................................................................... |
178 |

8
Deleting Multiple Images ........................................................... |
180 |
Deleting Selected Images ................................................................ |
180 |
Deleting a Folder.............................................................................. |
182 |
Deleting All Images .......................................................................... |
183 |
Protecting Images from Deletion (Protect) .............................. |
184 |
Protecting Single Images ................................................................. |
184 |
Protecting All Images ....................................................................... |
185 |
Connecting the Camera to AV Equipment ............................... |
186 |
Processing Images |
187 |
Changing the Image Size........................................................... |
188 |
Changing the Number of Recorded Pixels and Quality Level |
|
(Resize)............................................................................................ |
188 |
Cutting Out Part of the Image (Cropping) ........................................ |
190 |
Processing Images with Digital Filters..................................... |
192 |
Editing RAW Images .................................................................. |
195 |
Editing a RAW Image....................................................................... |
195 |
Printing from the Camera |
199 |
Setting the Printing Service (DPOF) ......................................... |
200 |
Printing Single Images ..................................................................... |
200 |
Settings for All Images ..................................................................... |
202 |
Printing Using PictBridge .......................................................... |
203 |
Setting USB Connection .................................................................. |
204 |
Connecting the Camera to the Printer ............................................. |
205 |
Printing Single Images ..................................................................... |
206 |
Printing All Images ........................................................................... |
208 |
Printing Images Using the DPOF Settings....................................... |
209 |
Disconnecting the USB Cable.......................................................... |
209 |
|
9 |
Camera Settings |
211 |
How to Operate the Set-up Menu .............................................. |
212 |
Set-up Menu Setting Items .............................................................. |
212 |
Formatting the SD Memory Card .............................................. |
214 |
Setting the Beep Setting, Date and Time, and Display |
|
Language..................................................................................... |
215 |
Turning the Beep On and Off........................................................... |
215 |
Changing the Date and Time and the Display Style ........................ |
216 |
Setting the World Time .................................................................... |
216 |
Setting the Display Language .......................................................... |
219 |
Adjusting the Monitor and the Menu Display .......................... |
220 |
Setting the Text Size........................................................................ |
220 |
Setting the Guide Display Time ....................................................... |
220 |
Setting the Status Display................................................................ |
221 |
Adjusting the Brightness of the Monitor ........................................... |
221 |
Adjusting the Color of the Monitor.................................................... |
222 |
Setting the Display for Instant Review ............................................. |
222 |
Setting the Folder Name/File Number Naming Convention ... |
224 |
Selecting the Folder Name .............................................................. |
224 |
Selecting the File Number Setting ................................................... |
224 |
Selecting the Video Output Format and Power Settings ........ |
225 |
Selecting the Video Output Format.................................................. |
225 |
Setting Auto Power Off .................................................................... |
225 |
Setting the Battery Type .................................................................. |
226 |
Setting the Operation of the Power Lamp........................................ |
227 |
Using Pixel Mapping .................................................................. |
228 |
Selecting Capture Mode Settings to Save in the Camera....... |
229 |
Resetting to Default Settings |
231 |
Resetting Rec. Mode/Playback/Set-up Menu ........................... |
232 |
Resetting the Custom Menu ...................................................... |
233 |
10 |
|
Appendix |
235 |
|
|
||
|
|
|
|
|
|
Default Settings .......................................................................... |
236 |
|
|
Functions Available with Various Lens Combinations........... |
240 |
|
|
Notes on [19. Using Aperture Ring] ................................................. |
241 |
|
|
Cleaning the CCD ....................................................................... |
243 |
|
|
Removing Dust by Shaking the CCD (Dust Removal)..................... |
243 |
|
|
Detecting Dust on the CCD (Dust Alert) .......................................... |
244 |
|
|
Removing Dust with a Blower .......................................................... |
246 |
|
|
Optional Accessories................................................................. |
248 |
|
|
Error Messages........................................................................... |
252 |
|
|
Troubleshooting ......................................................................... |
255 |
|
|
Main Specifications.................................................................... |
258 |
|
|
Glossary ...................................................................................... |
262 |
|
|
Index ............................................................................................ |
267 |
|
|
WARRANTY POLICY .................................................................. |
272 |
|
|
|
|

11
 Composition of the Operating Manual
This Operating Manual contains the following chapters.
1 |
Before Using Your Camera |
1 |
|
|
Explains camera characteristics, accessories and the names and functions of |
||
|
|
||
|
various parts. |
|
|
|
|
2 |
|
2 |
Getting Started |
||
|
Explains your first steps from purchasing the camera to taking pictures. Be sure to |
|
|
|
read it and follow the instructions. |
3 |
|
|
|
||
3 |
Basic Operations |
||
|
|||
|
Explains the procedures for taking and playing back pictures. |
4 |
|
|
|
||
4 |
Shooting Functions |
||
|
|||
|
Explains the shooting-related functions. |
5 |
|
|
|
||
5 |
Using the Flash |
||
|
|||
|
Explains how to use the built-in flash and the external flash. |
|
|
|
|
6 |
|
6 |
Shooting Settings |
||
|
|||
|
Explains the procedures for configuring image processing and setting the file format. |
|
|
|
|
7 |
|
7 |
Playback Functions |
||
|
Explains the procedures for playing back, deleting, and protecting pictures. |
|
|
|
|
8 |
|
8 |
Processing Images |
||
|
Explains the procedures for changing the image size, using image filters and |
|
|
|
processing pictures taken in RAW format. |
9 |
|
|
|
||
9 |
Printing from the Camera |
||
|
|||
|
Explains the procedures for setting the print settings and printing pictures while |
10 |
|
|
directly connected to a printer. |
||
|
|
||
10 Camera Settings |
|
||
|
Explains the procedures for changing the camera settings, such as the monitor |
11 |
|
|
settings and the image file naming convention. |
|
|
|
|
|
|
11 |
Resetting to Default Settings |
12 |
|
|
Explains the procedure for resetting all settings to their default settings. |
||
|
|
||
12 Appendix
Explains troubleshooting, introduces optional accessories and provides various resources.

12
The symbols used in this Operating Manual are explained below.
1 |
Shows reference page number explaining a related operation. |
|
|
|
Shows useful information. |
Shows precautions to take when operating the camera.

1 Before Using Your
Camera
Check the package contents and names and functions of working parts before use.
e/yCamera Characteristics .......... |
14 |
Checking the Contents of the Package .............. |
16 |
Names and Functions of Working Parts ............ |
17 |
Display Indicators ................................................ |
22 |
How to Change Function Settings ...................... |
30 |
Using the Help Function ...................................... |
34 |

14e/yCamera
Characteristics
•Features a 23.5×15.7 mm CCD with approximately 10.2 million effective
1
Using Before
Camera Your
pixels for high precision and a wide dynamic range.
•Features Shake Reduction (SR), an image sensor shifting shake reduction system. This enables you to capture sharp pictures with minimal camera shake regardless of the lens type.
•Features a viewfinder similar to that of a conventional 35 mm camera, with a magnification of approximately 0.85 and field of view of approximately 96%, for easier manual focusing.
•Features a large 2.7-inch monitor with approximately 230,000 dots, a wide viewing angle and brightness and color adjusting functions for high-precision viewing performance.
•Uses AA lithium batteries, rechargeable AA Ni-MH batteries or AA alkaline batteries.
•Features a help function that lets you check how to use the camera while using it. If you do not know how to use a certain function, press the g(Help) button to display its explanation on the monitor. When you are
already familiar with the camera’s operation, you can also assign 4 other functions to the gbutton making the camera's setup more convenient.
•A user-friendly design has been implemented in various parts of the camera. The large text, high-contrast monitor and easy-to-use menus make the camera easier to operate.
•The CCD features a special SP coating against dust deposit. The Dust Removal function also shakes the CCD for removing collected dust.
•Features Digital Filters to internally process the image in the camera. You can use digital filters like B&W or Soft while taking pictures or to process images after taking pictures.
•Features Custom Image which allows you to adjust settings while previewing the edited image, enabling a wider range of expression.
•Records in the versatile JPEG format or the high quality and fully editable RAW format. You can also select JPEG+RAW and record in both formats. Pictures taken in RAW format can be easily processed internally by the camera.
•Features Sensitivity Priority mode Kthat automatically adjusts aperture and shutter speed according to the set sensitivity.

The captured area (view angle) will differ between the e/yand 35 mm SLR cameras even if the same lens is used because the format size for 35 mm film and CCD are different.
Sizes for 35 mm film and CCD |
|
35 mm film |
: 36×24 mm |
e/yCCD : 23.5×15.7 mm
Angles of view being equal, the focal length of a lens used with a 35 mm camera must be approximately 1.5 times longer than that of e/y. To obtain an angle of view framing the same area, divide the focal length of the 35 mm lens by 1.5.
Example) To capture the same image as a 150 mm lens attached to a 35 mm camera
150÷1.5=100
Use a 100 mm lens with the e/y.
Inversely, multiply the focal length of the lens used with the e/yby 1.5 to determine the focal length for 35 mm cameras.
Example) If 300 mm lens is used with the e/y 300×1.5=450
Focal length is equivalent to a 450 mm lens on a 35 mm camera.
Shake Reduction (SR)
Shake Reduction (SR) on the e/yfeatures a PENTAX original system which uses magnetic force to move the image sensor at high speeds, compensating camera shake.
The camera may generate some operating noise when it is shaken, such as when changing the composition of a picture. It is not a malfunction.
Help Function
The guides displayed for the e/yhelp function have been designed for use in combination with a DA or DA L lens.
When using another lens with the aperture ring not set to the s(Auto) position, some of the guides displayed may not match the actual conditions.
15
1
Using Before
Camera Your

16Checking the Contents of the Package
1
Using Before
Camera Your
The following accessories are packaged with your camera. Check that all accessories are included.
Hot shoe cover FK |
Eyecup FQ |
Body mount cover |
(Installed on camera) |
(Installed on camera) |
(Installed on camera) |
USB cable |
Strap |
Software (CD-ROM) |
||
I-USB7 |
O-ST84 |
|
S-SW84 |
|
|
|
|
|
|
|
|
|
|
|
Four AA lithium batteries |
Operating Manual |
Quick Guide |
||
|
|
|
(this manual) |
|
|
|
|
|
|
|
|
|
|
|
PENTAX PHOTO Browser 3/
PENTAX PHOTO Laboratory 3
Operating Manual

Names and Functions of Working
Parts
Power lamp |
Hot shoe |
|
|
||
Self-timer lamp/ |
Strap lug |
|
Remote control receiver |
||
|
||
Card cover |
Mirror |
|
|
||
Lens mount index |
AF coupler |
|
(red dot) |
AF |
|
|
MF |
|
Lens unlock button |
Lens information |
|
|
contacts |
|
Built-in flash |
Diopter |
|
|
adjustment lever |
|
|
Viewfinder |
|
|
UP |
|
USB/Video terminal |
Card access |
|
lamp |
||
|
||
Terminal cover |
Monitor |
|
Battery cover |
Tripod socket |
unlock lever |
|
Battery cover |
17
1
Using Before
Camera Your
* In the second illustration, the camera is shown with the Eyecup FQ removed.

18
1
Using Before
Camera Your
 Capture Mode
Functions of buttons, dials and levers used during shooting are noted.
The factory default settings are explained here. Depending on the button, these settings can be changed.
1 |
5 |
2 |
6 |
3 |
|
|
MF |
7 |
4 |
AF |
|
|
|
|
|
|
9 |
|
|
0 |
8 |
|
a |
|
|
|
UP |
|
b |
|
|
c |
|
|
d |
|
|
e |
1 g(Help) button
Displays an explanation of the function or operation on the monitor. (p.34)
You can also assign other functions to this button. (p.154)
2 Shutter release button
Press to capture images. (p.62)
3 Main switch
Move to turn the power on/off. (p.49)
4 Lens unlock button
Press to detach lens. (p.47)
5 mcbutton
Sets the EV compensation and aperture values. (p.91, p.98, p.104)
6 Mode dial
Changes Capture mode. (p.80)
7 Focus mode lever
Switches between autofocus mode (p.109) and manual focus mode (p.116).
8 Kbutton
Press to pop up the built-in flash. (p.65)
9 e-dial
Sets the shutter speed, aperture, sensitivity and EV compensation values.
0 =button
You can select the function of this button either to focus on the target or to memorize the exposure value. (p.100, p.105, p.110)
a Qbutton
Switches to Playback mode. (p.72, p.166)
b Mbutton
Turns the status screen display on the monitor on/off. (p.23)
c 3button
Displays the [ARec. Mode 1] menu (p.77). Next, press the four-way controller (5) to display other menus.
d 4button
Displays the control panel (p.23). When the control panel or a menu screen is displayed, press the button to confirm the selected item.
eFour-way controller (2345)
Opens the Drive Mode/Flash Mode/White Balance/ Sensitivity setup menu (p.76).
When the control panel or a menu screen is displayed, use this to move the cursor or change items.
19
1
Using Before
Camera Your

20
1
Using Before
Camera Your
 Playback Mode
Functions of buttons, dials and levers used during playback are noted.
3
1
2
|
MF |
|
AF |
|
4 |
|
5 |
UP |
6 |
|
7 |
|
8 |
9
0

1 Shutter release button
Press halfway to switch to Capture mode.
2 Main switch
Move to turn the camera on and off. (p.49)
3 g(Help) button
Displays an explanation of the function or operation on the monitor. (p.34)
4 e-dial
Use this to enlarge an image (p.167) or display multiple images at the same time (p.169).
5 Q button
Press to switch to Capture mode.
6 Mbutton
Press to show shooting information on the monitor. (p.24)
7 3button
Press to display the [Q Playback 1] menu
(p.166). Next, press the fourway controller (5) to display other menus.
8 4button
Saves the setting you selected in the menu or playback screen.
9Four-way controller (2345)
Use this to move the cursor or change items in the menu or playback screen.
0 ibutton
Press to delete images. (p.73)
References to Button Names
In this Operating Manual, the buttons of the fourway controller are referred to in the following way.
21
1
Using Before
Camera Your

22 Display Indicators
1
Using Before
Camera Your
 Monitor
The following indicators appear on the monitor depending on the status of the camera.
Monitor
The brightness or the color of the monitor can be adjusted. (p.221, p.222)
At Start-up or when Operating the Mode Dial
Guides appear on the monitor for 3 seconds (default setting) when the camera is switched on or the mode dial is turned.
Select Off for [Guide display] in [R Set-up 1] menu to not show indicators. (p.220)
1 |
|
P Program Automatic |
|
Exposure |
|
|
|
P
 07/07/2008 10:30AM
2 3
1 Capture mode (p.80) |
3 Current date and time (p.54) |
2World time (p.216)
(only when set to Destination)

Capture Mode
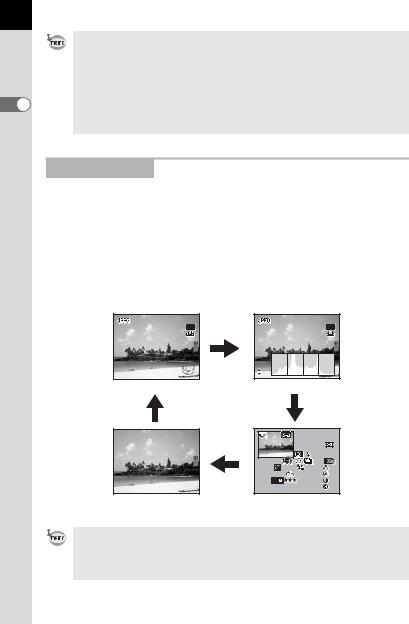
While shooting, the status screen is displayed showing the current shooting function settings. Press the 4button to display the control panel and change settings.
Status screen/Control panel
(The items are displayed here for explanatory purposes. The Actual display may differ.)
|
1/1000 12345 |
|
|
F 11 |
+1.3 |
|
|
AWB AUTOISO 3200 |
1.0 |
AF.A |
|
OK |
OFF |
JPEG 10M |
|
|
|
|
|
|
|
|
|
|
|
|
|
|
|
1 |
|
|
|
2 |
|
3 |
|
4 |
|
|
|
|
|
|
|
|
|
|
|
|
|
|
|
|
|
|
|
5 |
|
|
|
|
6 |
|
|
|
|
7 |
|
|
8 |
|
|
|
|
9 |
|
|
|
|
11 |
|
13 |
|
14 |
10 |
|
|
||||
|
12 |
|
15 |
|
16 |
17 |
|
|
18 |
|
||
|
|
19 |
|
20 |
21 |
|
|
22 |
|
|||
|
23 |
|
|
|
|
|
||||||
|
|
|
|
|
|
|
|
|
|
|
|
|
4 |
|
|
|
|
M |
|
|
|
|
|
|
|
|
|
||||
|
|
|
|
|
|
|
|
|
|
|
|
|
|
|
|
|
|
|
|
Scene mode |
|
|
|
|
|
|
|
|
|
|
|
|
|
|
|||
|
|
|
|
|
|
|
|
24 |
|
|
|
|
|
|
||||
|
Night Scene |
|
|
|
|
|
|
|
|
|
|
|
|
|
||||
|
|
|
|
|
|
|
|
|
|
|
|
|
|
|
||||
|
|
|
|
|
|
|
|
|
|
|
|
|
|
|
|
|
|
|
|
|
|
|
|
|
|
|
|
|
|
7 |
|
|
|
|
|
|
|
|
|
|
|
|
|
|
|
|
|
|
|
|
|
|
|
|
|
|
|
|
|
|
|
AWB |
AUTOISO 3200 |
|
|
|
11 |
13 |
14 |
10 |
|
|
|||
|
1.0 |
|
|
|
AF.A |
|
|
|
|
|
12 |
15 |
16 |
17 |
|
18 |
|
|
|
|
|
|
|
|
|
|
|
|
|
||||||||
|
|
|
|
|
|
|
|
|
|
|
|
|
|
|
|
|
||
|
|
|
OFF |
JPEG |
10M |
|
|
|
|
|
19 |
20 |
21 |
|
22 |
|
||
|
|
|
|
|
|
|
|
|
|
|
|
|
|
|
|
|
|
|
1 |
Capture mode (p.80) |
13 |
Drive Mode (p.76) |
2 |
AE lock icon (p.105) |
14 |
White Balance (p.159) |
3 |
World Time (p.216) |
15 |
Custom Image (p.157) |
4 |
Battery level (p.39) |
16 |
Focus mode (p.109) |
5 |
Shutter speed (p.85) |
17 |
AE metering (p.101) |
6 |
Recordable image number |
18 |
Shake Reduction (p.121) |
7 |
H(Scene) mode (p.82) |
19 |
Digital Filter (p.132) |
8 |
Aperture (p.85) |
20 |
File format (p.152) |
9 |
EV Compensation (p.104) |
21 |
JPEG recorded pixels (p.150) |
10 |
ISO Sensitivity (p.87) |
22 |
JPEG quality (p.151) |
11 |
Flash Mode (p.65) |
23 |
Guide key |
12 |
Flash exposure compensation |
24 |
Explanation of the selected |
|
(p.70) |
|
function |
23
1
Using Before
Camera Your
24
1
Using Before
Camera Your
• Settings that cannot be changed due to the current camera setup cannot be selected.
•The status screen will disappear after the time set for [3. Meter Operating Time] in the [ACustom Setting 1] menu (the default setting is 10 seconds). Press the Mbutton to display it again.
•When the [21. Display status] setting in the [ACustom Setting 3] menu is set to Off, the status screen is displayed only when the Mbutton is pressed. (p.221)
Playback Mode
The camera switches display information when you press the M button during playback.
Standard |
Captured images and indicators are displayed. |
Histogram display |
Images and histogram (Brightness/RGB) are displayed. |
Detailed information |
Detailed showing of how and when the images were taken |
display |
is displayed. |
No info. display |
Only captured images are displayed. |
100-0001 |
100-0001 |
|
M |
1/2000 |
|
F2.8 |
RGB |
Standard |
Histogram display |
M M
P |
100-0001 |
M |
AF.S |
|
|
|
24mm |
1/2000 |
|
|
|
F2.8 |
+1.5 |
- 0.5 |
±0 |
ISO |
200 |
G2 A1 |
±0 |
JPEG |
10 |
AdobeRGB |
±0 |
07 / 07 / 2008 |
10 : 39 AM |
±0 |
|
No info. display |
Detailed information display |
The information that is shown first during playback is the same as that of the last playback in the previous session. The [Standard] screen can always be displayed first by setting [Playback Display] to P (Off) in [Memory] (p.229) in the [ARec. Mode 3] menu.

Detailed information display
P 100-0001
AF.S


|
|
|
24mm |
1/2000 |
|
|
|
F2.8 |
+1.5 |
- 0.5 |
±0 |
ISO |
200 |
G2 A1 |
±0 |
JPEG |
10 |
AdobeRGB |
±0 |
07 / 07 / 2008 |
10 : 39 AM |
±0 |
|
|
|
|
|
|
|
|
|
|
1 |
|
3 |
|
|
|
14 |
|
|
2 |
|
4 |
15 |
16 |
|
|
|
|
|
|
|||
|
|
|
|
5 |
6 |
|
17 |
7 |
|
8 |
9 |
10 |
18 |
||
11 |
12 |
|
|
13 |
|
19 |
|
23 |
|
24 |
|
25 |
26 |
20 |
|
27 |
28 |
29 |
|
30 |
21 |
||
|
|
|
31 |
|
|
|
22 |
|
|
|
|
|
|
|
|
1 |
Rotation information |
18 |
Image Tone |
2 |
Captured image |
19 |
Saturation/Filter Effect |
3 |
Protect setting |
20 |
Hue/Toning |
4 |
Capture mode |
21 |
Contrast |
5 |
AE metering |
22 |
Sharpness/Fine Sharpness |
6 |
Flash Mode |
23 |
Sensitivity |
7 |
Shutter speed |
24 |
White Balance |
8 |
Shake Reduction |
25 |
GM compensation (Adjust White |
9 |
Drive Mode |
|
Balance) |
10 |
Exposure bracket |
26 |
BA compensation (Adjust White |
11 |
Aperture |
|
Balance) |
12 |
EV Compensation |
27 |
File format |
13 |
Flash exposure compensation |
28 |
JPEG recorded pixels |
14 |
Folder number-File number |
29 |
JPEG quality |
15 |
Focus mode |
30 |
Color space |
16 |
AF area |
31 |
Shooting date/time |
17 |
Lens focal length |
|
|
* Indicators 6 and 13 only appear for images in which the flash was discharged.
25
1
Using Before
Camera Your
26
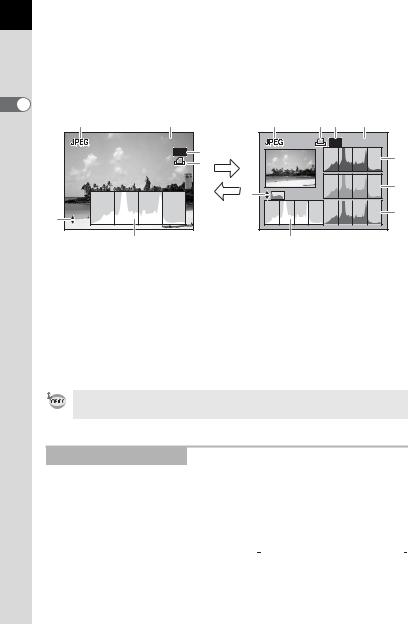
Histogram Display
The e/yfeatures two histogram displays. The “Brightness histogram” shows the distribution of brightness and the “RGB histogram” shows the distribution of color intensity. Press the four-way controller (23) to switch between “Brightness histogram” and “RGB histogram”.
1 |
|
|
|
|
Before |
|
1 |
2 |
|
|
|
100-0001 |
23 |
|
|
|
3 |
||
Your Using |
|
|
4 |
|
|
|
|
23 |
|
Camera |
6 |
|
|
|
RGB |
|
|
||
|
|
5 |
|
Brightness histogram
1 |
4 |
3 |
2 |
|
|
|
100-0001 |
|
|
|
7 |
6 |
|
|
8 |
|
|
|
|
|
|
|
9 |
|
5 |
|
|
RGB histogram
1 |
File format |
6 |
Switch Brightness histogram/ |
2 |
Folder number-File number (p.224) |
|
RGB histogram |
3 |
Protect setting (p.184) |
7 |
Histogram (R) |
4 |
DPOF settings (p.200) |
8 |
Histogram (G) |
5 |
Histogram (Brightness) (p.26) |
9 |
Histogram (B) |
*Indicator 3 only appears for images with Protect setting and indicator 4 only appears for images with DPOF settings.
Areas affected by bright or dark portions blink if [Bright/Dark area] warning is set to O(On) in [Playback dsp. methd.] in the [Q Playback 2] menu. (p.168)
Using the Histogram
A histogram shows the brightness distribution of an image. The horizontal axis represents brightness (dark at the left and bright at the right) and the vertical axis represents the number of pixels.
pixels→ |
|
|
|
|
|
|
Number of |
|
|
|
|
|
|
|
|
|
|
|
|
|
|
|
(Dark) ←Brightness→ (Bright) |
|
|
||
|
|
|
|
|
||
Dark |
|
portions |
Bright portions |
|
|
|
|
|
|||||

The shape and the distribution of the histogram before and after shooting tells you whether the exposure level and contrast are correct or not, and lets you decide if you need to use EV compensation and take a picture again.
1Adjusting the Exposure (p.104)
Understanding Brightness
When the brightness is correct and there are no overly light or dark areas, the graph peaks in the middle. If the image is too dark, the peak is on the left side, and if it is too bright, the peak is on the right side.
|
|
|
|
|
|
|
Dark image |
|
Image with few bright |
|
Bright image |
|
|
|
or dark areas |
|
|
When the image is too dark, the part to the left is cut off (dark portions with no detail) and when the image is too bright, the part to the right is cut off (bright portions with no detail).
Bright portions blink red on the monitor and dark portions blink yellow when [Bright/Dark area] is On.
1Playing Back Images (p.72)
1Setting the Display for Instant Review (p.222)
Understanding Color Balance
Distribution of color intensity is displayed for each color in the RGB histogram. The right side of the graphs look similar for images that have White Balance adjusted well. If only one color is lopsided to the left, that color is too intense.
1Setting the White Balance (p.159)
27
1
Using Before
Camera Your

28
1
Using Before
Camera Your
 Viewfinder
The following information appears in the viewfinder.
2
1 


 1
1
3 |
4 |
5 |
6 |
7 |
8 |
9 |
10 |
||||||||
|
|
|
|
|
|
|
|
|
|
|
|
|
|
|
|
|
|
|
|
|
|
|
|
|
|
|
|
|
|
|
|
|
|
|
|
|
|
|
|
|
|
|
|
|
|
|
|
11
1AF frame (p.48)
2Spot metering frame (p.101)
3Flash status (p.65)
Lit: when flash is available.
Blinks: when flash is recommended but not set.
4Picture mode icon (p.80)
The icon for Picture mode in use appears.
U(Normal mode in I), =(Portrait), s (Landscape), q(Macro), \(Moving Object), .(Night Scene Portrait)
5Shake Reduction (p.121)
Appears when the Shake Reduction function is activated.
6Shutter speed (p.85)
Shutter speed when capturing or adjusting.
Underlined when shutter speed can be adjusted with the e-dial.
7Aperture value (p.85)
Aperture value when capturing or adjusting.
Underlined when aperture value can be adjusted with the e-dial.
Loading...