Pentax IQZoom 105WR User Manual

CAMERA USE
(Written by Josey Paul, Streamkeeper volunteer, 7/20/2000)
Simplified instructions for the Pentax IQZoom105WR (with date)
Basic features:
The IQZoom105WR is easy and fun to use. This is a Class 5 weather-resistant camera, which means you can drop it in the surf, wash the dirt and salt off under a faucet and it will be fine. It is not waterproof. It is not an underwater camera, but you can shoot it all day in the rain. It is fully automated and has a 38mm to 105 mm zoom lens that goes from a mild wide angle to a 2.8 power telephoto. It prints the date on each photograph. It takes high-quality 35mm photographs.
Your only worry with this camera is the battery, which can handle about a dozen rolls of 36exposure film. So carry a spare and watch for the low-battery warning on the LCD screen (see last page).
The easy way to take pictures:
1.Turn on the camera.
2.Aim.
3.Zoom in or out (with zoom lever on top right side of camera).
4.Push the shutter release (black button on top right side of camera).
The camera does everything else. It advances the film automatically after each shot. It even rewinds automatically after the last shot.
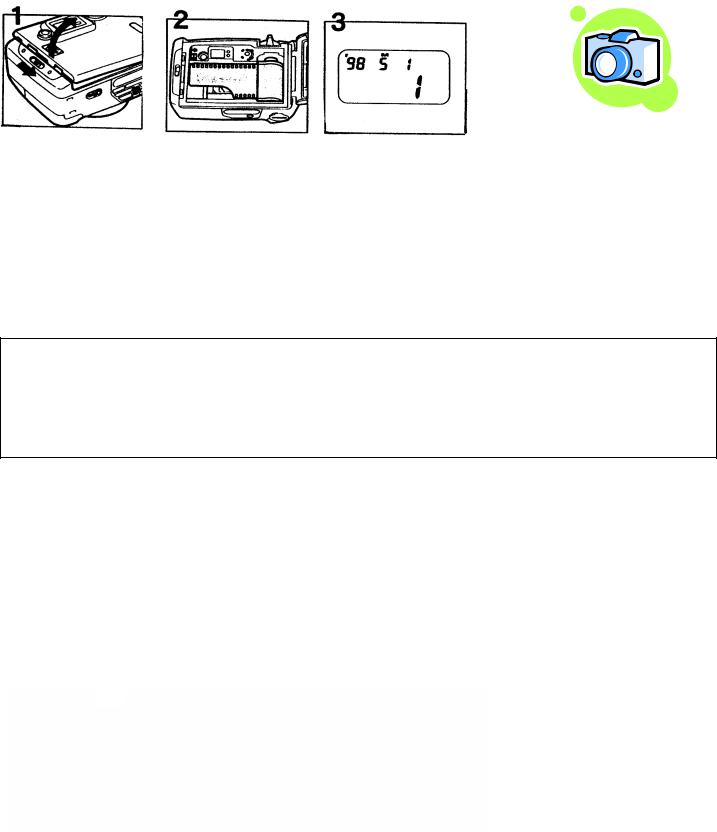
Loading Film:
1.Turn the camera off.
2.Open the back. (Push down the small lever on the left side of the back of the camera.)
3.Insert the cartridge in the slot on the right.
4.Stretch the film leader to the take up spool on the left. The tip of the film should line up with the line etched on the upper left side and indicated by a small arrow.
5.Close the back.
The film advances automatically. The computer screen on the top of the camera should show “1,” to indicate that it is ready to take the first shot. If it shows an “E,” you probably didn’t stretch the film far enough or you left it with too much slack. Open the camera and try again.
Field Procedures |
111h Edition, 2009 |

CAMERA USE
Advanced shooting techniques:
This camera will take fine photographs almost every time with nothing more than a point-and- shoot strategy.
The camera will tell you if it sees a potential problem. The trick is to press the shutter release lightly before you take a shot. When you do so, the green LED next to the eyehole will either blink or shine steadily. If it blinks, the camera is having trouble with the focus. If the red LED blinks, the flash is not yet fully charged for the shot. If the red LED shines steadily, the camera intends to use the flash.
However, some tricky lighting or focusing situations will foil the camera’s digital brain. For those situations, advanced-photography techniques are possible with any or all of the four buttons that surround the computer screen on the top of the camera.
Your friends, the buttons, and how to use them to improve your shooting:
Press the AF Button twice and you will see “Spot AF” on the computer screen. In this setting, the camera will focus on only what is in the very center of the screen. You can lock this focus as you might want to do if you are taking a photo of a person sitting off center in front of distant scenery. To lock the spot focus, aim at the person and press the shutter release just firmly enough to light the green LED. Then, while holding the shutter release in this half-depressed position, reframe the picture and take the shot. This locking feature also works for exposure control.
Press the AF Button again, and you are back to automatic.
The Timed-Release Button (lower right button) can delay the shutter release. With a blank computer screen, the shutter releases when you snap the shot. Press this button once, and you will see a clock symbol. When this symbol shows, the shutter will release 10 seconds after you press the shutter-release button. This is a handy feature if you want to take a picture with you in it.
Press the button again, and you will see a symbol for the remote-control switch. In this setting, the shutter will release 3 seconds after you press the remote. You will need to see Streamkeepers staff if you want to use the remote.
Press the button again, and you are back to a normal release.
The Red-Eye Button (upper left button) is for people pictures when using a flash. Press this button once, and you will see a symbol for an eye. In this setting, the flash shoots twice, once just before the shutter release. The first flash forces the pupil to close, reducing the red-eye effect often seen with flash photography.
Press the button again, and you are back to normal.
Field Procedures |
11th Edition, 2009 |
 Loading...