


|
AF |
DISP |
CQ-DFX572N |
OPEN |
|
TA |
P·SET/DISC |
||||
|
|
||||
|
|
|
BAND |
TUNE |
|
SRC |
|
|
TRACK |
SET/APM
S |
|
|
O |
VO |
|
UR |
|
|
CE |
LUME |
FOLDER |
|
CD RECEIVER WITH CHANGER CONTROL |
|
|
EON PTY CT |
MP3 CD Player/Receiver with CD Changer Control
CQ-DFX572N
Operating Instructions
Bedienungsanleitung Manuel d’instructions Gebruiksaanwijzing Bruksanvisning Manuale di istruzioni Manual de Instrucciones
TEXT
¡Please read these instructions carefully before using this product and keep this manual for future reference.
¡Bitte lesen Sie diese Bedienungsanleitung vor der Verwendung dieses Produktes aufmerksam durch und bewahren Sie sie danach für spätere Nachschlagzwecke sorgfältig auf.
¡Prière de lire ces instructions attentivement avant d’utiliser le produit et garder ce manuel pour l’utilisation ultérieure.
¡Leest u deze instructie alstublieft zorgvuldig door voor u dit product in gebruik neemt en bewaar deze handleiding voor later gebruik. ¡Läs igenom denna bruksanvisning noga innan produkten tas i bruk. Spara bruksanvisningen för framtida behov.
¡Si prega di leggere attentamente queste istruzioni prima di usare questo prodotto e di conservare questo manuale per usi futuri. ¡Lea con atención estas instrucciones antes de utilizar el producto y guarde este manual para poderlo consultar en el futuro.

 Contents
|
Page |
Precautions ................................................... |
4 |
Components.................................................. |
5 |
General .......................................................... |
6 |
Radio.............................................................. |
8 |
Radio Data System (RDS) ............................ |
10 |
CD Player....................................................... |
16 |
MP3 Player..................................................... |
18 |
 Inhaltsverzeichnis
|
Seite |
Vorsichtsmaßnahmen .................................. |
46 |
Komponenten.............................................. |
47 |
Allgemeines................................................... |
48 |
Radio.............................................................. |
50 |
Radio-Daten-System (RDS)-Empfang ......... |
52 |
CD-Spieler ..................................................... |
58 |
MP3-Spieler ................................................... |
60 |
 Table des matières
 Inhoudsopgave
|
Page |
Mesures de précaution.................................. |
88 |
Éléments constitutifs .................................... |
89 |
Généralités ..................................................... |
90 |
Autoradio........................................................ |
92 |
Réception radio RDS ..................................... |
94 |
Lecteur de CD .............................................. |
100 |
Lecteur de MP3 ............................................ |
102 |
|
Bladzijde |
Voorzorgen ................................................... |
130 |
Componenten............................................... |
131 |
Algemeen...................................................... |
132 |
Radio............................................................. |
134 |
Radio Data Systeem (RDS) ......................... |
136 |
CD-speler...................................................... |
142 |
MP3-speler.................................................... |
144 |
 Innehåll
 Contenuto
 Indice
|
Sida |
Observera .................................................... |
172 |
Medföljande delar ....................................... |
173 |
Allmänt......................................................... |
174 |
Radiomottagning ........................................ |
176 |
RDS (Radio Data System) .......................... |
178 |
CD-spelare................................................... |
184 |
MP3-spelare................................................. |
186 |
|
Pag. |
Precauzioni.................................................. |
214 |
Componenti................................................. |
215 |
Generali ....................................................... |
216 |
Radio............................................................ |
218 |
RDS (Radio Data System) .......................... |
220 |
Lettore CD ................................................... |
226 |
Lettore MP3 ................................................ |
228 |
|
Pag. |
Precauciones .............................................. |
256 |
Componentes.............................................. |
257 |
Generalidades ............................................. |
258 |
Radio............................................................ |
260 |
Sistema da datos |
|
radiofónicos (RDS) ............................... |
262 |
Reproductor de CD..................................... |
268 |
2 |
CQ-DFX572N |
|

CD Changer Control ..................................... |
22 |
Speaker Connections ................................... |
38 |
Audio Setting-AUDIO MENU ........................ |
24 |
Fuse ............................................................... |
38 |
Display Setting-PICTURE MENU ................. |
26 |
Maintenance .................................................. |
39 |
Function Setting-FUNCTION MENU ............ |
28 |
Troubleshooting............................................ |
40 |
Installation..................................................... |
30 |
Specifications ............................................... |
45 |
Anti-Theft System ......................................... |
33 |
|
|
Electrical Connections ................................. |
34 |
|
|
Steuerung des CD-Wechslers ..................... |
64 |
Audio-Einstellung <AUDIO-Menü>.............. |
66 |
Bildeinstellung <PICTURE-Menü> .............. |
68 |
Funktionseinstellung <FUNCTION-Menü> . 70 |
|
Einbau............................................................ |
72 |
Diebstahlschutz ............................................ |
75 |
Elektrischer Anschluß .................................. |
76 |
Anschluß der Lautsprecher ......................... |
80 |
Sicherung ...................................................... |
80 |
Pflege ............................................................. |
81 |
Störungsbeseitigung.................................... |
82 |
Technische Daten ......................................... |
87 |
Commande de changeur de CD ................. |
106 |
Définition de sortie audio-Menu AUDIO.... |
108 |
Définition d'image-Menu PICTURE............ |
110 |
Définition de fonction-Menu FUNCTION ... |
112 |
Installation .................................................... |
114 |
Système antivol............................................ |
117 |
Branchements électriques .......................... |
118 |
Branchment des haut-parleurs |
...................122 |
Fusible .......................................................... |
122 |
Entretien ....................................................... |
123 |
En cas de difficulté ...................................... |
124 |
Données techniques.................................... |
129 |
Bediening van de CD-wisselaar ................. |
148 |
Geluidsinstelling - AUDIO Menu................ |
150 |
Beeldinstelling - PICTURE Menu............... |
152 |
Functie-instelling - FUNCTION Menu ........ |
154 |
Installatie ..................................................... |
156 |
Anti-diefstal systeem.................................. |
159 |
Elektrische aansluitingen .......................... |
160 |
Aansluitingen luidsprekers........................ |
164 |
Zekering....................................................... |
164 |
Onderhoud .................................................. |
165 |
Verhelpen van storingen ............................ |
166 |
Technische gegevens................................. |
171 |
CD-växlarstyrning....................................... |
190 |
Ljudinställningar-ljudmeny ........................ |
192 |
Bildskärmsinställningar-bildmeny ............ |
194 |
Visning av funktionsmeny ......................... |
196 |
Montering .................................................... |
198 |
Stöldskyddsanordning............................... |
201 |
Elektriska anslutningar .............................. |
202 |
Anslutning av högtalare............................. |
206 |
Säkring......................................................... |
206 |
Underhåll ..................................................... |
207 |
Felsökning................................................... |
208 |
Tekniska data .............................................. |
213 |
Controllo del cambia CD ............................ |
232 |
Sistema antifurto ........................................ |
243 |
Impostazione dell'audio-Menu AUDIO ..... |
234 |
Collegamenti elettrici ................................. |
244 |
Impostazione dell'immagine |
|
Collegamenti degli altoparlanti ................. |
248 |
-Menu PICTURE ..................................... |
236 |
Fusibile ........................................................ |
248 |
Impostazione della funzione |
|
Manutenzione.............................................. |
249 |
-Menu FUNCTION.................................... |
238 |
Correzione dei difetti di funzionamento ... |
250 |
Installazione ................................................ |
240 |
Dati tecnici................................................... |
255 |
Reproductor MP3........................................ |
270 |
Control del cambiador de discos CD........ |
274 |
Ajuste de audio-Menú de AUDIO............... |
276 |
Ajuste de la imagen-Menú de PICTURE ... |
278 |
Ajuste de la función-Menú de FUNCTION.. |
280 |
Instalación ................................................... |
282 |
Sistema antirrobo ....................................... |
285 |
Conexiones eléctricas................................ |
286 |
Conexiones de los altavoces..................... |
290 |
Fusible ......................................................... |
290 |
Mantenimiento ............................................ |
291 |
Solución de problemas .............................. |
292 |
Especificaciones......................................... |
297 |
CQ-DFX572N |
3 |
|
|
|
|

E N G L I S H
1
Panasonic welcomes you to their constantly growing family of electronic products owners.
We endeavor to give you the advantages of precise electronic and mechanical engineering, manufactured with carefully selected components, and assembled by people who are proud of the reputation their work has built for our company. We know this product will bring you many hours of enjoyment, and after you discover the quality, value and reliability we have built into it, you too will be proud to be a member of our family.
Precautions
Volume Level |
Disc Mechanism |
For your driving safety, keep the volume level low enough |
Do not insert coins or any small objects. Keep screwdrivers |
to be aware of road and traffic conditions. |
and other metallic objects away from the disc mechanism |
|
and disc. |
Car Washing
To avoid electrical shorts which may cause fire, or other damage, do not expose this product (including the speakers and CDs) to water or excessive moisture.
Car Ventilation
If your car is parked for several hours in direct sunlight, the temperature inside the car may become very high. It is advisable to drive the car and give the interior a chance to cool down before switching the unit on.
Service
This product is made of precision parts. Do not attempt to disassemble or adjust any parts. For repair, please consult your nearest authorized Panasonic Service Center.
Note: The preset memory is cleared to return to the original factory setting when the power connector or battery is disconnected.
Power Supply
This product is designed to be used in a car having a 12-
Volt negative ground battery system.
|
Laser Product |
|
||
Label Indications and Their Locations |
CLASS 1 LASER PRODUCT |
|||
¡APPREIL À LASER DE CLASSE |
||||
DANGER! |
|
|||
|
¡KLASS 1 LASER APPARAT |
|||
Invisible laser radiation |
¡LUOKAN 1 LASERPLAITE |
|||
when open. Avoid direct |
|
Caution Label |
||
exposure to beam. |
|
|
DANGER! Invisible laser radiation when |
|
|
|
|
open. Avoid direct exposure to beam. |
|
|
|
|
ADVARSEL! Usynligt laserlys udstråles |
|
|
|
|
ved åbning. Undgå direkte bestråling. |
|
Caution: This product utilizes a laser. |
|
VARO! Avattaessa ja suojalukitus |
||
|
ohitettaessa olet alttiina näkymättömälle |
|||
Use of controls or adjustments or performance of procedures other than |
lasersäteilylle. Älä katso säteeseen. |
|||
those specified herein may result in hazardous radiation exposure. |
VARNING! Osynlig lasersträlning när |
|||
|
|
|
denna del är öppnad och spärren är |
|
Laser products: |
|
urkopplad. Betrakta ej strälen. |
||
|
ADVERSEL! Usynlig laserstråling når |
|||
Wave Length |
780 nm |
|
deksel åpnes og sikkerhedslås brytes. |
|
Laser Power |
No hazardous radiation is emitted with safety protection. |
Unngå eksponering for strålen. |
||
|
||||
|
|
|
Deck Ass’y |
|
Do not take apart this unit or attempt to make any changes |
(Upper Side) |
|||
yourself. |
|
|
|
|
This unit is a very intricate device that uses a laser pickup to retrieve |
|
|||
information from the surface of compact discs. The laser is carefully |
|
|||
shielded so that its rays remain inside the cabinet. |
|
|
||
Therefore, never try to disassemble the player or alter any of its parts |
VORSICHT! UNSICHTBARE LASERSTRAHLUNG! |
|||
since you may be exposed to laser rays and dangerous voltages. |
|
|||
|
|
|
WENN ABDECKUNG GEÖFFNET IST, NICHT DEM |
|
|
|
|
LASERSTRAHL AUSSETZEN. |
|
4 |
CQ-DFX572N |
|
Components |
|
|
|
• Operating Instructions ........................................................................................ |
1 |
Components |
|
|
|
• Supplied Hardware................................................................... |
1 set (a page 30) |
|
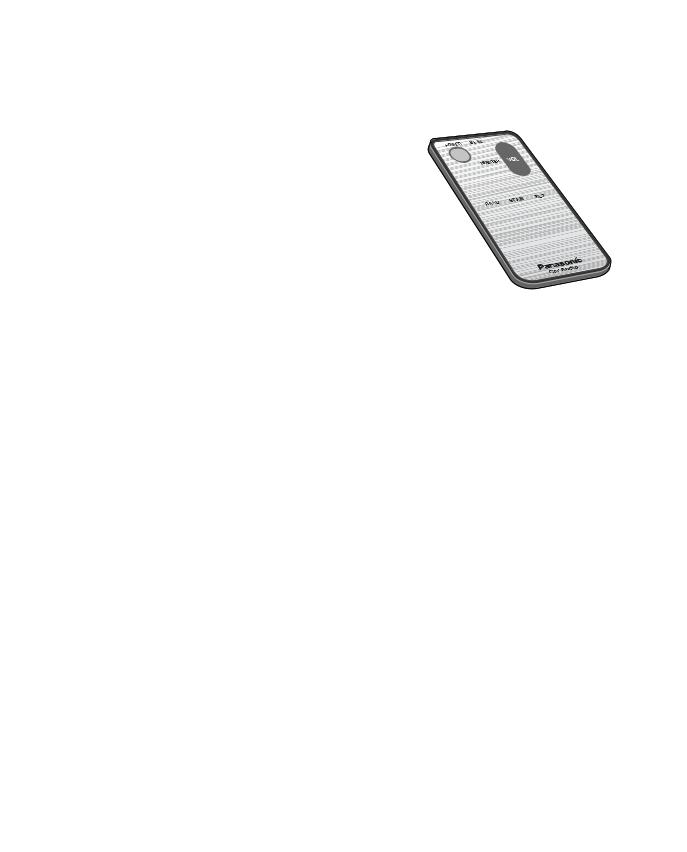
• Remote Control Unit ........................................................................................... |
1 |
|
• Lithium Battery (CR2025)................................................................................... |
1 |
|
• Warranty Card..................................................................................................... |
1 |
E N G L I S H
2
Remote
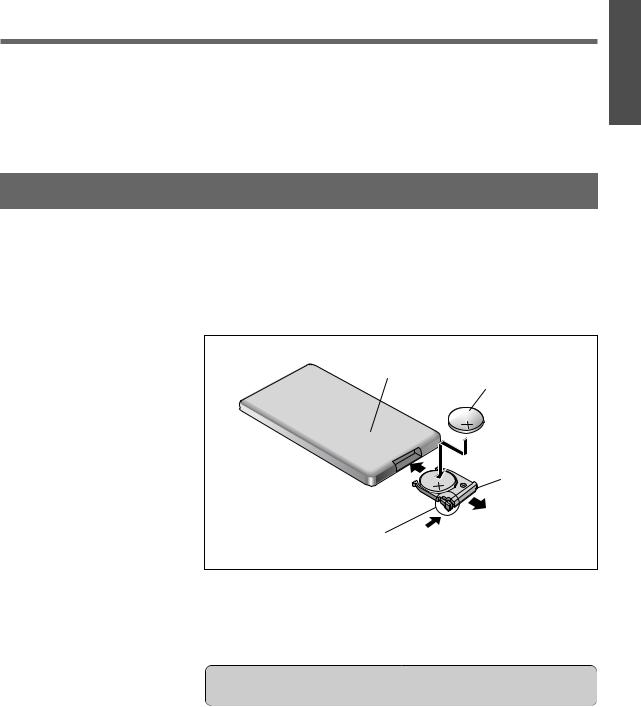
Battery Installation
Battery Notes
Caution: Improper use of batteries may cause overheating, an explosion or ignition, resulting in injury or a fire. Battery leakage may damage the unit.
¡Do not disassemble or short the battery. Do not throw a battery into a fire.
¡Keep batteries away from children to avoid the risk of accidents. ¡Follow local regulations when disposing of batteries.
CQ-DFX572N |
5 |
|
|
|
|
E N G L I S H
3
General
|
TA |
PW |
R |
|
SRC |
|
|
|
|
|
|
CONTROL |
|
|
WITH |
CHANGER |
S |
|
|
|
U |
|
RECEIVER |
|
O |
CD |
|
[MUTE] |
R |
|
||
C |
|
|
|
E |
|
|
|
|
|
|
[]] [[] (Mute/Attenuation) |
|
|
|
(Adjust) |
[]] [[]
Power
Turn your car's ignition key to ACC or ON position.
ON : Press [SRC] / [SOURCE].
OFF : Press [SRC] / [SOURCE] again and hold for more than 1 second.
Note: If the security function is set to ON, the security message is shown with a warning alarm. (Default: S-LED ON)
(a Page 28 about Security Function setting)
ACC Selection
If your car has the ACC position on the ignition switch, set the ACC selection to ON. (Default: ACC OFF)
(a Page 28)
ACC ON is attached to the functional descriptions under the ACC selection ON condition.
Demonstration Message
When you use this unit for the first time, a demonstration message appears on the display.
Press [DISP] to change to regular mode.
Scrolling....
Note: To display the message again, press [SRC] / [SOURCE] for 4 seconds or more when turning power on. ACC ON
Source
Press [SRC] / [SOURCE] to change the source.
Radio |
CD Player |
MP3 Player |
OR |
(a Page 8) |
(CD is in the player. |
|
a Page 16) |
(MP3 data disc is in the player. a Page 18)
Auxiliary
Note: Connect to external devices.
CD Changer
(A optional CD changer is connected and magazine is in the changer. a Page 22)
6 |
CQ-DFX572N |
|
|

Volume
Up
Down
Setting Range : 0 to 40
Note: The sound level for each source is stored in memory. (For radio, one volume setting for AM, one volume setting for all FMs)
Mute / Attenuation
(Only for remote control)
ON : Press [MUTE].
OFF : Press again.
Decreasing volume range depends on setting. (Mute / Attenuation setting a Page 28)
Clock Display
When the power is set to OFF and ACC is set to ON, press [DISP].
(Clock time)
(Display off)
When the power is set to ON, refer to the description for each source mode.
|
|
|
|
E |
|
|
|
|
N |
|
|
|
|
G |
|
|
|
|
L |
Clock Setting |
I |
|||
S |
||||
Select the radio AM mode.(a Page 8) |
H |
|||
|
||||
Press and hold [DISP] for more than 2 seconds. |
4 |
|||
|
|
|
|
|
|
|
|
|
|
|
|
|
|
|
|
|
|
|
|
Adjust HOUR.
[[] : put forward hour. []] : put back hour.
Press [DISP].
Adjust MINUTE.
[[] : put forward minute. []] : put back minute.
Press [DISP].
Note: When a broadcast of FM Radio Data System is received, the clock is put right automatically by the Clock Time service. (a Page 10)
CQ-DFX572N |
7 |
|
|
|
|

E Radio
N
G
L
I
S [}] [{]
H
(Preset station/Select)
5 |
[DISP] |
OPEN
P·SET/DISC
|
|
|
TUNE |
AF |
DISP |
BAND |
TRACK |
|
|
|
|
|
TA |
P |
W |
R |
|
||
|
|
SRC
U |
PUSH |
S |
|
O |
|
R |
|
C |
|
E |
|
[MENU] (Menu/Return)
1 Radio
Press [SRC] mode.
Radio
2 Band
Press [BAND]
AM
3
[]] : Lower frequency
Press and hold [[] or []] for more than 0.5 seconds, then release. Seeking will start.
FM Stereo Indicator
[SOURCE]
(Source)
[SEL]
(Menu/Return)
Preset buttons [1] to [6]
(Preset Station)
|
[}] [{] |
[BAND] |
(Preset sta- |
(Band/Auto preset |
tion/Select) |
memory/Set) |
|
[]] [[] |
[DISP] |
(Tune) |
|
FM Monaural Reception
Noise is significantly decreased when weak signals are received from an FM broadcast station.
q Press [MENU].
w Press [}] or [{].
e Press [BAND].
r Press [}] or [{].
t Press [BAND].
Local Tuning
Only stations with good reception are detected in seek tuning.
q Press [MENU].
w Press [}] or [{].
e Press [BAND].
r Press [}] or [{].
t Press [BAND].
8 |
CQ-DFX572N |
|
Station Preset
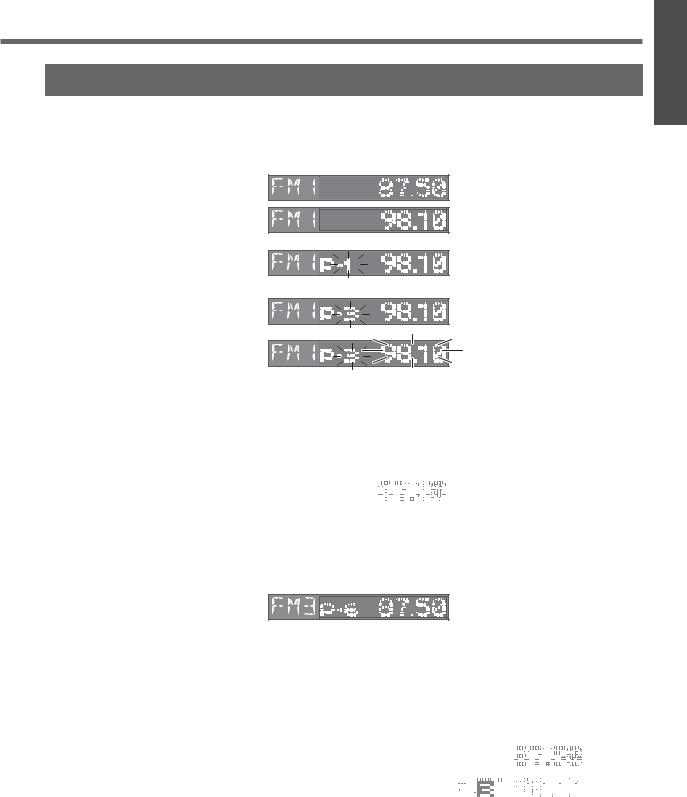
Up to 6 stations can be stored in each of the FM1, FM2, FM3 and AM (LW/MW) band selections.
Manual Preset Memory
Manually save a station in preset memory.
q [BAND] w []] or [[]
e [}] or [{]
r [}] or [{]
t [}] or [{]
:Select a band.
:Tuning a station.
:Hold for more than 2 seconds.
:Select the preset number.
:Hold for more than 2 seconds.
Notes:
¡Frequency setting can be performed even after selecting a preset number. ¡To suspend preset write, press [DISP].
Auto Preset Memory
Automatically save stations with good reception in the preset memory.
q [BAND] |
: Select a band. |
|
|
|
|
|
|
w [BAND] |
: Hold for more than |
|
|
|
2 seconds. |
|
|
¡The 6 stations with good reception will be automatically saved in the memory under preset number 1 to 6.
¡Once set, the preset stations are sequentially scanned for 5 seconds each.
¡To stop the scanning, press [}] or [{]. (Pressing one of the buttons from [1] to [6] on the remote control also can stop the scanning.)
Note: New stations overwrite existing saved stations after following this procedure.
|
Preset Station Calling |
|||
q [BAND] |
: Select a band. |
|
|
|
|
|
|
||
w [}] or [{] |
: Select the preset number for tuning in the preset |
|
|
|
|
|
|
||
|
|
|
||
|
station. |
|
|
|
|
|
|
|
|
■To enter preset number directly from the remote control, select a band (Step q above) and press one of the buttons from [1] to [6] on the remote control.
E N G L I S H
6
CQ-DFX572N |
9 |
|
|
|
|
E N G L I S H
Radio Data System (RDS)
RDS Basics
7Some FM stations are broadcasting added data compatible with RDS. This radio set offers convenient functions using such data.
RDS service availability varies with areas. Please understand if RDS service is not available in your area, the following service is not available, either. This chapter explains the summary and operation regarding RDS.
The following functions are available when receiving RDS stations.
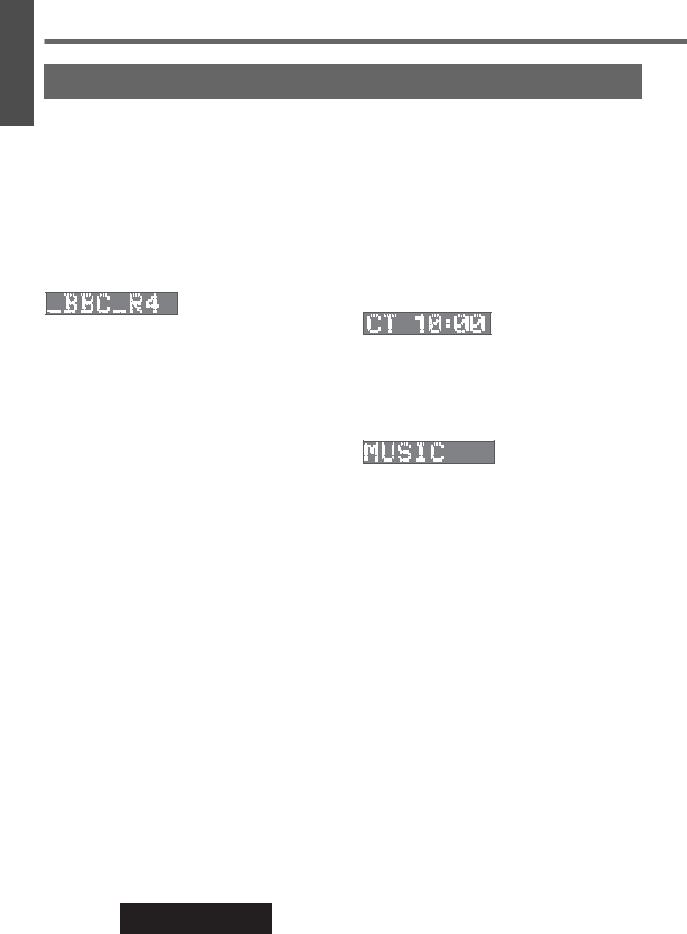
Program Service Name (PS)
Display
The name of station is displayed.
Alternative Frequency (AF)
When reception is poor, an RDS station broadcasting the same program is tuned in automatically.
Traffic Program (TP)
Some RDS FM stations periodically provide traffic announcement.
The station which broadcast the traffic announcement is called Traffic Program (TP).
Traffic Announcement (TA)
Radio announcements on traffic conditions.
Clock Time (CT) Service
When receiving an RDS station, the CT service automatically adjusts the time.
"NO CT" is displayed in areas where CT service is not available. (a Page 7 for Clock Adjustment)
Program Type (PTY) Display
RDS FM stations provide a program type identification signal.
Example: news, rock, classical music, etc.(a Page 13)
10 |
CQ-DFX572N |
|
Alternative Frequency (AF)
Alternative Frequency (AF) Mode |
|
|
|
(Default) |
Default: AF mode is active. |
|
|
lights when AF is on. |
|
|
|
|||
(Press and hold [TA] on the main unit for more than 2 |
|
|
|
|
|
|
|
|
|
seconds to switch the AF mode on or off.) |
|
|
|
|
AF ON : AF, Best Station and PI Seek function are active. |
|
|
|
|
E N G L I S H
8
[TA] |
[DISP] (Return) |
|
|
(AF mode) |
|
|
|
|
OPEN |
|
|
P·SET/DISC |
|
|
|
CQ-DFX572N |
|
|
|
|
TUNE |
AF |
DISP |
BAND |
TRACK |
|
|
|
|
TA |
|
|
|
PW |
R |
|
|
|
|
|
|
FOLDER |
|
|
|
|
|
|
SRC |
|
|
|
|
|
|
|
|
CONTROL |
|
|
PUSHCD |
WITH |
CHANGER |
S |
|
|
||
R |
RECEIVER |
|
||
U |
|
|
|
|
O |
|
|
|
|
C |
|
|
|
|
|
E |
|
|
[}] [{] (Select) |
|
|
|
|
|
|
|
[MENU] (Menu/Return) |
||
AF Level and Region (REG) Mode
q Press [MENU] / [SEL] to display the menu. w Press [}] or [{] to select an item.
|
Auto Preset Memory |
|
When AF ON is selected, only RDS |
|
stations will be memorized |
[BAND] |
automatically. |
(Set) |
(a Page 9 for auto preset memory) |
|
Note: When AF is set to OFF, |
|
stations other than RDS |
|
stations will also be saved in the |
|
memory. |
AF Level |
REG Mode |
||
|
|
|
|
Press [BAND] to change the AF level.
Changes the selection range of AF and PI Seek.
Press [BAND] to switch on or off in turn.
|
|
Low level AF sensitivity |
|
|
The frequency is changed only for programs |
|
|
|
|
||
|
|
|
|
|
within the region. |
|
(Default) |
|
|
||
|
|
|
|
||
|
|
High level AF sensitivity |
|
|
The frequency is changed also for programs |
|
|
|
|
||
|
|
|
|
outside the region. |
|
|
|
|
|
||
|
|
|
|
(Default) |
|
Notes:
¡When REG mode is switched from OFF to ON or vise versa, AF mode turns on automatically. ¡Press [MENU] / [SEL] or [DISP] to return to the regular mode.
Preset Memory (AF ON Setting)
Preset Station Calling (Best Station)
AF self-tuning selects a station with good reception when the preset tuning is activated.
For Poor Sound Quality (PI Seek) (Only for remote control)
If reception is poor when tuning in a preset station, press the same preset number button. The same station with better reception will be searched for.
Press the same preset number button again to cancel.
[SEL] (Menu/Return)
Preset buttons [1] to [6]
[}] [{]
(Select)
[BAND]
(Set)
[DISP]
(Return)
CQ-DFX572N |
11 |
|

E N G L I S H
9
Radio Data System (RDS) (continued)
Traffic Announcement (TA)
Traffic Announcement (TA) Mode
Press [TA] on the main unit to switch the TA mode on. (Press again to switch the TA mode off)
TA ON : If the station received is not a TP station, the unit automatically searches for a TP station to tune in to it. When the TP station received begins a traffic announcement, you can hear it from the unit.
TA Mode
Lights when TA is ON
Traffic Announcement receiving display
|
[VOLUME] |
[]] [[] |
|
|
(TP seek tuning) |
||
[DISP] |
(TA Volume) |
||
|
[TA]
(TA mode) |
|
|
|
|
|
|
CQ-DFX572N |
|
AF |
|
|
|
TA |
|
|
PW |
R |
|
|
|
|
|
|
SRC |
|
|
|
|
|
|
CONTROL |
|
|
WITH |
CHANGER |
S |
|
|
|
U |
|
RECEIVER |
|
O |
|
|
|
R |
|
|
|
C |
|
|
|
|
E |
|
|
|
OPEN |
P·SET/DISC |
|
|
TUNE |
BAND |
TRACK |
FOLDER
[}] [{] (Select)
 [MENU] (Menu/Return)
TA Volume Set
Traffic announcements are broadcast at the TA volume level. q Press [MENU] / [SEL] to display the menu.
w Press [}] or [{] to select TA VOL.
e Press [BAND] to store the current volume level as the TA volume level.
Note: Press [MENU] / [SEL] or [DISP] to return to the regular mode.
To listen to only traffic announcements
While listening to an FM station which is not currently broadcasting traffic announcement, turn the [VOLUME] to the counterclockwise or press [VOL{] (remote control) to set the volume to 0. The traffic announcement will be output at the TA volume level.
TA Standby Mode
When set to TA on with the unit in another mode (CD, MP3, CD changer, AUX), it will automatically switch to radio mode and output the traffic announcement.
When the traffic announcement has finished, the unit will return to the previous mode.
[BAND] |
TP Seek Tuning |
(Set) |
When TA ON is selected, only TP |
|
station will be searched. |
|
Press and hold [[] or []] for |
|
more than 0.5 seconds, then |
|
release. Seeking will start. |
TP Auto Preset Memory
When TA ON is selected, only TP stations will be memorized automatically. (a Page 9 for auto preset memory)
TP Auto Search
When reception of a TP station is poor, TP Auto Search will automatically search for a TP station with better reception. (Only when in Muting in TA Mode.)
[SEL] |
[VOL}] [VOL{] |
|
(Menu/Return) |
||
(Volume) |
||
|
|
[]] [[] |
|
(TP seek tuning) |
|
[}] [{] |
[BAND] |
(Select) |
|
|
(Set) |
|
[DISP]
(Return)
12 |
CQ-DFX572N |
|
Program Type (PTY) Reception
Program Type (PTY) Mode
PTY Mode
Press and hold [MENU] / [SEL] for more than 2 seconds to switch the PTY display mode on. (Press and hold again to switch the PTY display mode off.) PTY ON : PTY function described below becomes enabled after selecting to the
PTY mode.
E
N
G
L
I
S
H
10
[DISP] (Return) |
|
|
|
|
|
|
OPEN |
|
|
P·SET/DISC |
|
|
|
CQ-DFX572N |
|
|
|
|
TUNE |
AF |
DISP |
BAND |
TRACK |
TA
PW |
R |
|
FOLDER
[BAND]
(PTY search/Set)
SRC
S
O U R C E

 PUSHCD
RECEIVER
WITH |
CHANGER |
|
CONTROL
[]] [[] (PTY select)
[}] [{] (Select)
[MENU]
(PTY mode/Menu/Return)
PTY Language Selection
ENGLISH DEUTSCH FRANÇAIS NEDERLANDS SVENSKA ITALIANO |
ESPAÑOL |
|||||
q Press [MENU] / [SEL] to display the RDS-PTY |
w Press [}] or [{] to select the language, and press |
|||||
|
menu and press [BAND]. |
|
[BAND]. |
|||
|
|
|
|
|
|
|
|
|
|
|
|
|
|
|
|
|
|
|
|
|
|
|
|
|
|
|
|
|
|
|
|
|
|
|
|
|
|
|
|
|
|
(Default : English)
Note: Press [MENU] / [SEL] or [DISP] to return to the regular mode.
PTY Selection
q Press [[] to change the program type as shown below. ([]] : opposite direction)
w Select the desired program type and press [BAND]. Seek will start to tune in to a station broadcasting the selected program type. 
Press [BAND] again to cancel.
|
SPEECH |
/ MUSIC |
/ NEWS |
/ AFFAIRS |
/ |
|
|
||||||
|
INFO |
/ SPORT |
/ EDUCATE |
/ DRAMA |
/ |
|
|
CULTURE / SCIENCE / VARIED |
/ POP M |
/ |
|||
|
ROCK M |
/ EASY M |
/ LIGHT M |
/ CLASSICS / |
||
|
OTHER M / WEATHER/ FINANCE |
/ CHILDREN / |
||||
|
SOCIAL |
/ RELIGION / PHONE IN / TRAVEL |
/ |
|||
|
LEISURE |
/ JAZZ |
/ COUNTRY / NATION M / |
|||
|
OLDIES |
/ FOLK M |
/ DOCUMENT |
|
|
|
|
|
|||||
|
|
|
|
|
|
|
Note: When there is no corresponding program type station, “NONE” is displayed for 2 seconds.
[SEL]
(PTY mode/Menu/Return)
|
[]] [[] |
|
(PTY select) |
|
[}] [{] |
[BAND] |
(Select) |
|
|
(PTY search/Set) |
|
|
[DISP] (Return) |
CQ-DFX572N |
13 |
|
E
N
G
L
I
S
H
11
Radio Data System (RDS) (continued)
Program Type (PTY) Reception
PTY Preset Call
Program types are stored in memory under preset memory number 1 to 6 as shown in the table on the next page. To select the desired program type, press [}] or [{] or preset buttons on the remote control.
PW |
R |
|
SRC
S
O U R C E
|
|
|
AF |
|
|
|
TA |
|
E |
N |
U |
H |
M |
|
|
S |
|
|
|
U |
|
|
|
P |
|
|
|
VOLUME
DISP
 CQ-DFX572N
CONTROL
WITH |
CHANGER |
CD RECEIVER
|
OPEN |
|
P·SET/DISC |
|
|
|
TUNE |
[BAND] |
BAND |
TRACK |
(Preset PTY search) |
FOLDER
[}] [{] (PTY preset call/Change)
PTY Preset Change
q Select the desired program type by using PTY Selection or PTY Preset Call.
w Press and hold [}] or [{] for more than 2 seconds until the preset number blinks.
e Press [}] or [{] to select the desired preset number.
r Press and hold [}] or [{] for more than 2 seconds to save the new preset number.
*On the remote control, select the program type and press and hold the preset buttons for more than 2 seconds.
Preset PTY Search
q Select a desired program type by PTY preset call. w Press [BAND] to tune in the same program type
station.
Press [BAND] again to cancel.
Note: When there is no corresponding program type station, “NONE” is displayed for 2 seconds.
Note: To suspend preset write, press [DISP]. |
Preset buttons |
|
[1] to [6] |
|
[}] [{] |
(PTY preset call/Change)
[BAND]
(Preset PTY search)
14 |
CQ-DFX572N |
|
 Loading...