


NEPTUNE 5
NEPTUNE 7
NEPTUNE 8
english |
Operating Instructions................................ |
1-18 |
deutsch |
Betriebsanleitung...................................... |
19-36 |
français |
Notice d’utilisation .................................... |
37-54 |
nederlands Gebruiksaanwijzing .................................. |
55-72 |
|
italiano |
Istruzioni sull’uso...................................... |
73-90 |
norsk |
Driftsinstruks........................................... |
91-108 |
svensk |
Bruksanvisning ..................................... |
109-126 |
dansk |
Driftsvejledning ..................................... |
127-144 |
suomi |
Käyttöohje.............................................. |
145-162 |
slovensći |
Navodilo za uporabo ............................... |
163-180 |
hrvatski |
Uputstvo za rad ....................................... |
181-198 |
slovenský |
Prevádzkový návod.................................. |
199-216 |
český |
Provozní návod ........................................ |
217-234 |
polski |
Instrukcja obsługi.................................... |
235-252 |
magyar |
Kezelési utasítás ..................................... |
253-270 |
русский |
Руководство по эксплуатации ............... |
271-288 |
español |
Instrucciones de manejo ...................... |
289-306 |
português |
Instruções de operação........................ |
307-324 |
ελληνικά |
Οδηγίες λειτουργίας.............................. |
325-342 |
türkçe |
Ýþletme kýlavuzu..................................... |
343-360 |
301002099 - 2005-01-10

NEPTUNE 5 / 7 / 8
1 |
2
3
4
5
6
30
29
7
8
28 


 9
9
27 |
10 |
|
26 |
11 |
|
25 |
||
|
||
24 |
|
|
23 |
|
22
12
21
20
psi bar
 13 14
13 14
15
16
17
18
19

NEPTUNE 5 / 7 / 8
Contents |
english |
|
|
Symbols used to mark |
|
|
|
|
instructions |
|
............................................................................................ |
2 |
1 |
Important safety |
|
|
|
|
instructions |
|
............................................................................................ |
2 |
2 |
Description |
2.1 |
Purpose................................................................................ |
4 |
|
|
2.2 |
Operating elements .............................................................. |
5 |
3 |
Before starting the cleaner |
3.1 |
Transport and assembly ....................................................... |
5 |
|
|
3.2 |
Set the brake ........................................................................ |
5 |
|
|
3.3 |
Install Crank handle for high pressure hose reel/cord reel... |
6 |
|
|
3.4 |
Fill up detergent tanks .......................................................... |
6 |
|
|
3.5 |
Fill up tank for Nilfisk-Alto AntiStone (Anti-Scale) ................ |
6 |
|
|
3.6 |
Adjusting the Nilfisk-Alto AntiStone (Anti-Scale) device....... |
6 |
|
|
3.7 |
Fill up fuel tank ..................................................................... |
7 |
|
|
3.8 |
Connecting the high pressure hose...................................... |
7 |
|
|
3.9 |
Connecting the water supply ................................................ |
7 |
|
|
3.10 |
Electrical connection ............................................................ |
8 |
|
|
3.11 |
Antifreeze - before first use .................................................. |
8 |
4 |
Control / Operation |
4.1 |
Connections ......................................................................... |
8 |
|
|
4.2 |
Switching on the cleaner ...................................................... |
9 |
|
|
4.3 |
Pressure regulation (Tornado Lance)................................... |
9 |
|
|
4.4 |
Pressure regulation (VarioPress Gun)1).............................. |
10 |
|
|
4.5 |
Using cleaning agents ........................................................ |
10 |
5 |
Applications and methods |
5.1 |
Techniques ......................................................................... |
10 |
|
|
5.2 |
Some typical cleaning tasks ............................................... |
11 |
6 |
After using the cleaner |
6.1 |
Switching off the cleaner .................................................... |
13 |
|
|
6.2 |
Disconnecting supply lines ................................................. |
13 |
|
|
6.3 |
Rolling up the electrical lead and storing accessories ....... |
13 |
|
|
6.4 |
Storing the cleaner (below 0°C (32°F / Freezing)............... |
13 |
7 |
Maintenance |
7.1 |
Maintenance Schedule....................................................... |
14 |
|
|
7.2 |
Maintenance work .............................................................. |
14 |
8 |
Troubleshooting |
8.1 |
Indications on Display ........................................................ |
16 |
|
|
8.2 |
Indication lights on control panel ........................................ |
17 |
|
|
8.3 |
Other Faults........................................................................ |
17 |
9 |
Further information |
9.1 |
Recycling the cleaner ......................................................... |
17 |
|
|
9.2 |
Warranty............................................................................. |
18 |
|
|
9.3 |
Technical data .................................................................... |
18 |
|
|
9.4 |
EU Declaration of Conformity............................................. |
18 |
1) Options / model variants |
1 |

NEPTUNE 5 / 7 / 8
english Symbols used to mark instructions
instructions these operating instructions which must be observed to prevent risks
to persons are marked with this danger symbol.
|
T h i s |
i n d i - |
|
c a t e s |
t i p s |
|
and instructions |
|
|
to simplify work |
|
a n d |
to ensure safe opera- |
|
tion. |
|
|
Before using the |
This symbol is used to |
high - pressure |
mark safety instruc- |
cleaner, be sure |
tions that must be |
to also read the |
observed to prevent |
enclosed operat- |
damage to the machine |
ing instr uctions |
and its performance. |
and keep them within reach at |
|
all times. |
|
O p e r a t i o n s marked with this symbol should only be carried out by Nilfisk-
A l t o S e r v i c e
Technicians.
1 Important safety instructions
For your own safety
The high-pressure cleaner should only be used by authorized persons who have been instructed in its use.
Although extremely easy to operate, children should not be allowed to use the cleaner.
General
Use of the high-pressure cleaner is subject to the applicable local regulations.
Besides the operating instructions and the binding accident prevention regulations valid in the country of use, observe recognized regulations for safety and proper use.
Do not use any unsafe work techniques.
Transport
Transport of the high-pressure cleaner is easy on its large wheels.
For safe transport in and on vehicles we recommend preventing the equipment from sliding and tilting. Secure it with tie-downs and apply the parking brake on the castor wheel.
For transport at temperatures around or below freezing 0°C (32°F), anti-freeze should be drawn into the pump beforehand (see chapter 6).
Before starting the cleaner
If your 3-phase cleaner was supplied without a plug, have it fi tted with a suitable 3-phase plug with ground, by a qualifi ed electrician.
Before use, check that the highpressure cleaner is safe and in proper condition.
Regularly check whether the power cord is damaged or shows signs of ageing.
Use the high-pressure cleaner only when the power cord is in a safe condition. (risk of electric shock using damaged cord!).
Check the rated voltage of the high-pressure cleaner before connecting it to the mains power supply. Ensure that the voltage shown on the rating plate corresponds to the voltage of the power supply.
We strongly recommend that the power supply to the high pressure cleaner be connected via a residual current circuit breaker. This device stops the supply of electricity if the leakage current to the ground exceeds 30 mA for 30 ms or it has an ground tester circuit.
Please observe the regulations and provisions applicable in your area. Before putting the highpressure cleaner into service, carry out a visual check of all the major components.
2 |
1) Options / model variants |

NEPTUNE 5 / 7 / 8
CAUTION!
High-pressure water jets can be dangerous if misused. The jet must not be directed at persons, animals, live electrical equipment or the cleaner itself.
Wear appropriate protective clothing and eye protection.
Do not direct the jet towards yourself or towards other persons in order to clean clothes or footwear.
During operation of the cleaner, recoil forces are produced at the gunvalve and spray lance and, when the spray lance is held at an angle, a torque is also created. The gunvalve and spray lancemust therefore be held fi rmly in both hands.
Do not use the cleaner when other people without protective clothing are in the working area.
Check that cleaning will not result in dangerous substances (e.g. asbestos, oil) being washed off the object to be cleaned and harming the environment.
Do not clean delicate parts made of rubber, fabric, etc. with the 0° jet. Keep some distance between high pressure nozzle and surface in order to prevent the surface from damage.
Do not use the high-pressure hose for lifting loads.
Store the cleaner where  it will not be exposed
to frost!
Never operate the cleaner without water. Even brief shortages of water result in severe damage to the pump seals.
Operation
Keep cabinet and service door closed during operation.
CAUTION!
Unsuitable extension cords can represent a source of danger. Always unwind cord from the reels completely to prevent the power cord overheating.
Connectors and couplings of extension cords must be watertight.
Extension cords are not recommended, however if necessaray refer to the following recommendations:
Cord length |
Cross section |
||
m |
|
|
|
up to16 A |
up to 25 A |
||
|
|||
|
|
|
|
up to 20 m |
ø1.5mm² |
ø2.5mm² |
|
(US: 30 ft) |
14 gauge |
12 gauge |
|
(US: 50 ft) |
12 gauge |
10 gauge |
|
(US: 75 ft) |
10 gauge |
not recom- |
|
|
|
mended |
|
20 to 50 m |
ø2.5mm² |
ø4.0mm² |
|
|
|
|
|
Do not damage the power cord (e.g. by driving over it, pulling or crushing it).
with Bio-Diesel (DIN 51606). english However, our experience has
shown that the fuel quality is often outside the recognized standards. An organic product like Bio-Diesel can be affected by long-term storage (e.g. over the winter), extreme temperatures, or improper transportation.When the condition of the fuel is outside the standards, trouble may occur which cannot be covered by the Warranty.
If the machine is to be operated at fuel stations or in other potentially hazardous areas, the machine may only be employed outside the hazard areas defined in the German „Technical Guidelines for Infl ammable Fluids“ applicable at the point of use due to the potential explosion hazard posed by the burner.
If the machine is to be operated indoors, the local building regulations must be observed for the discharge of the exhaust fumes into the atmosphere. Ensure an adequate supply of fresh air.
If the machine is to be connected to a fl ue gas stack, then local building regulations must be observed. We will be glad to provide tips for connection systems, on request.
CAUTION!
Do not touch or cover the exhaust. Risk of burns and fire.
NOTE!
The maximum permissible working pressure and temperature are printed on the high-pressure hose.
Electrical equipment
Disconnect the power cord by grasping the plug only (do not pull or tug the power cord).
|
CAUTION! |
CAUTION! |
|
Do not use the cleaner if the |
Unsuitable fuels (e.g. gasoline) |
Never spray electrical equip- |
|
power cord or high-pressure |
must not be used as they can |
ment with water: risk of elect- |
|
hose is damaged. |
explode and catch fire. |
trical shock and short-circuit. |
|
Ensure adequate air circulation. |
Use clean fuel only, free of |
The cleaner may only be con- |
|
Do not cover the cleaner or oper- |
moisture and contamination. |
nected to a correctly installed |
|
ate it in inadequately ventilated |
Contact your dealer for fuel |
plug socket. |
|
rooms! |
source and type recommenda- |
|
|
|
tions. |
Switching on the cleaner may |
|
|
This machine can be used |
cause voltage fluctuations. |
|
|
Voltage fl uctuations should not |
||
|
|
occur if the impedance at the |
|
|
|
|
|
1) Options / model variants |
|
transfer point is less than 0.15 3 |
|
|
|
If in doubt ask your local electric- |
|

NEPTUNE 5 / 7 / 8
english ity supplier.
Maintenance and repair
CAUTION!
Always remove the plug from the power supply before cleaning or carrying out maintenance work on the cleaner.
Carry out only the maintenance operations described in the operating instructions. Use only original Nilfi sk-Alto spare parts. Do not make any technical modifi cations to the high-pres- sure cleaner.
Ensure that the machine is regularly serviced by authorized Nilfisk-Alto dealers in accordance with the maintenace plan. Failure to do so will void the warranty.
CAUTION!
High-pressure hoses, fittings and couplings are important for the safety of the cleaner. Use only high-pressure parts approved by the manufacturer!
The power cord must not differ from the version specifi ed by the manufacturer and may only be changed by an electrician.
Please contact your local authorized Nilfi sk-Alto equipment distributor for all other maintenance or repair needs!
Testing
The cleaner conforms to the German „Guidelines for Liquid Spray Jet Devices“. The high-pressure cleaner must be subjected to a safety examination in accordance with the „Accident Prevention Regulations for Working with Liquid Spray Jet Devices“ as required, but at least every 12 months, by an authorised inspector.
After all repairs or modifications to electrical equipment, the protective conductor resistance, the insulation resistance and the leakage current must be measured. Furthermore, a visual inspection of the mains power lead, a voltage and current measurement and a function test must be carried out. Our after-
sales service technicians are at your disposal as authorised inspectors.
The complete „Accident Prevention Regulations for Working with Liquid Spray Jet Devices“ are available from the Carl Heymanns Verlag KG, Luxemburger Strasse 449, 50939 Cologne or from the appropriate association of employers’ liability insurances.
The pressure-bearing parts of this high-pressure cleaner have been manufactured in accordance with § 9 of the German Pressure Vessels Ordinance and successfully subjected to a pressure test.
Unloader valve
Pump pressure is reduced by means of an "unloader valve" which returns water to the inlet side of the pump at a minimum pressure. The point at which this occurs is set and sealed at the factory and must not be adjusted.
2 Description
2.1Purpose
This high-pressure cleaner has been designed for professional use in
–Agriculture
–Industry
–Transport industry
–Automotive
–Municipal Facilities
–Janitorial
–Construction
–Food Industry
etc.
Chapter 5 describes the use of the high-pressure cleaner for various cleaning jobs.
Always use the cleaner as described in these operating instructions. Any other use may damage the cleaner or the surface to be cleaned or may result in severe injury to persons.
4 |
1) Options / model variants |
30 Grip for top cover
|
|
|
NEPTUNE 5 / 7 / 8 |
2.2 |
Operating elements |
12 |
Main switch ON/OFF - cold english |
|
|
|
water/hot water |
See fold-out page at front of these |
13 |
Display (Temperature or |
|
operating instructions. |
|
Codes) |
|
1 |
Spray lance |
14 |
Temperature control |
15 |
Low fuel indicator |
||
2 |
Spray lance storage |
16 |
Low Nilfisk-Alto AntiStone |
3 |
Control panel |
|
(Anti-Scale) indicator |
4 |
Crank handle for |
17 |
Service interval due/expired |
|
High pressure hose reel |
18 |
Pump oil low |
|
(Neptune ..X)1) |
19 |
Detergent metering knob |
|
Cord reel (Neptune ..X2)1) |
20 |
Pressure gauge |
5 |
Fuel level gauge |
21 |
Power ON |
6 |
Tank fi ller for fuel |
22 |
Castor with parking brake |
7 |
Receptacle for service |
23 |
Water supply connection |
|
crane and lifting ring1) |
24 |
Tank fi ller for anti-freeze |
8 |
Top cover release |
25 |
Tank fi ller for Nilfi sk-Alto |
9 |
Service door release |
|
Anti-Scale |
10 |
Crank handle for |
26 |
Canister for detergent B1) |
|
High pressure hose reel |
27 |
High pressure hose reel |
|
(Neptune ..X2)1) |
|
(Neptune ..X)1) |
11 |
High pressure hose connec- |
28 |
Power cord reel |
|
tion for machines without |
|
(Neptune ..X2)1) |
|
hose reel |
29 |
Tank fi ller for detergent A |
3 Before starting the cleaner
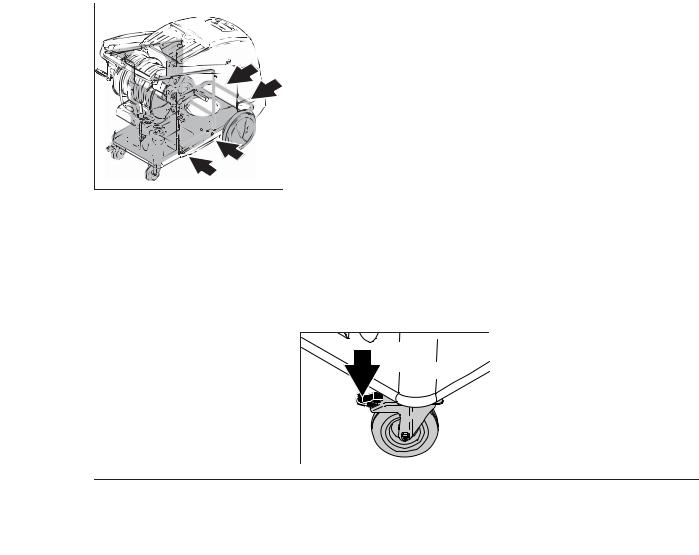
3.1Transport and assembly
1.The safest way to lift the machine is to use a fork-lift truck The arrows in the illustration indicate the best places to position the fork.
3.2Set the brake
2.It is also possible to lift the machine by hand from the pallet. Due to the weight this work should be done by at least three persons.
CAUTION!
Do not hold the plastic tank to lift the machine as it could become detached from the frame.
The best places to hold the machine are
–on the handle
–on the frame between the front wheels and the guide rollers.
Every fuel-burning appliance, such as pressure washers, depends upon a proper mix of fuel and air (by weight) for proper combustion.
Therefore some adjustment of the air supply to the burner may be necessary to take account of altitude and the resulting air pressure.This is true whether your fuel is ‘Natural gas’, Propane or Diesel.
Your Nilfisk-Alto hot water pressure washer was thoroughly tested and adjusted for optimum performance before it left our factory.The factory is located at approximately 200m (650 ft) above sea level, and the combustion settings are optimal for that elevation.
If your location is higher than 1200m (3900 ft) above sea level, your burner may require re-ad- justment for proper performance and best fuel economy. Contact your Dealer or Nilfisk-Alto for assistance.
1.Before using the cleaner for the first time, check it carefully for any faults or damage.
2.Run the machine only when it is in perfect working condition.
3.Set the brake.
1) Options / model variants |
5 |
 Loading...