


Nikon
FA
INSTRUCTION MANUAL
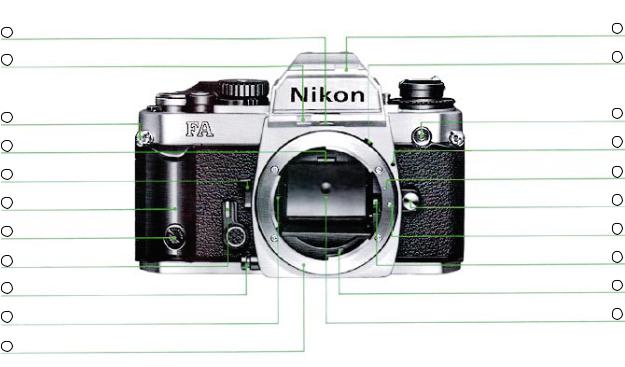
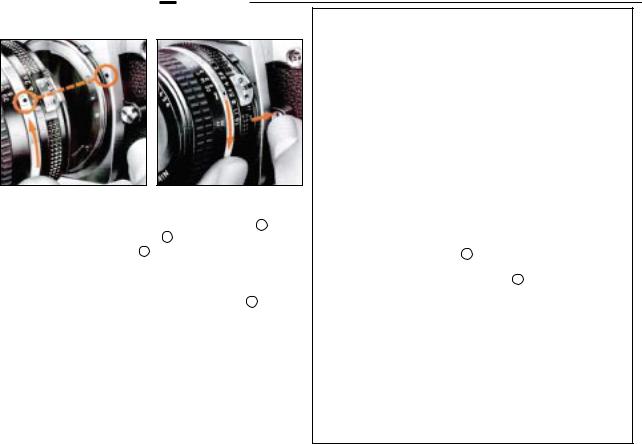
NOMENCLATURE
1Aperture-direct-readout (ADR) window
2Shutter speed indication illumination window
3Neckstrap eyelet
4Focusing screen holder release latch
5Depth-of-field preview lever
6Handgrip
7Handgrip attachment screw
8Self-timer lever
9Metering control button
10Aperture coupling lever
11Lens mounting flange
LCD illumination window 12
Meter coupling lever 13
Sync terminal 14
Lens mounting index 15
Lens type signal pin 16
Lens release button 17
Lens release pin 18
Focal length indexing lever 19
Maximum aperture indexing lever 20
Reflex mirror 21
3
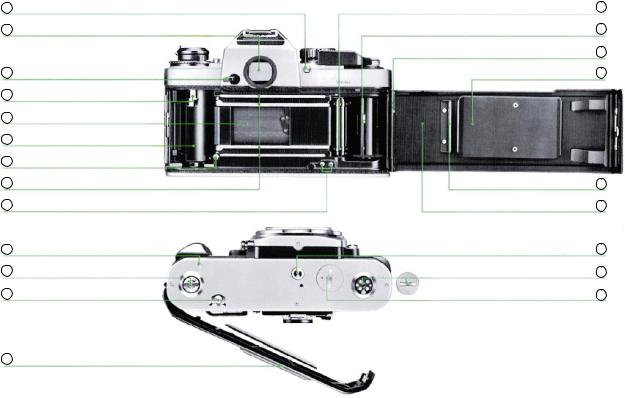
22Shutter speed dial locking button
23Viewfinder eyepiece
24Eyepiece shutter lever
25Film rewind fork
26Shutter curtains
27Film cartridge chamber
28Film guide pin
29Film guide rails
30Data back contacts
31Motor drive shutter release coupling (for MD-12)
32Motor drive coupling
33Film rewind button
34 Memo holder
Film sprockets 35
Film take-up spool 36
Camera back locking catch 37
Film pressure plate 38
Film roller 39
Camera back 40
Tripod/motor drive coupling socket 41
Motor drive electrical contacts (with cover) 42
Battery clip 43
4

44Aperture/distance index
45Focusing ring
46Mounting ring
47Infrared focusing index
48Meter coupling ridge
49Meter coupling shoe
50Hot-shoe contact
51Exposure compensation index
52Exposure compensation scale
53Exposure compensation dial
54Film rewind knob
55ASA/ISO film speed index
56ASA/ISO film speed scale
57Film rewind crank
58Camera back locking lever
59Exposure compensation dial locking button
60Ready-light contact
61TTL flash auto-stop signal contact
Depth-of-field indicators 62
Distance scale 63
Aperture scale 64
Aperture ring 65
Aperture-direct-readout (ADR) scale 66
Monitor contact 67
Shooting mode selector 68
Shutter release fingerguard 69
Shutter release button 70
Frame counter 71
Multiple exposure lever 72
Shooting mode index 73
Film advance lever 74
Shutter speed dial 75
Film plane indicator 76
Shutter speed index 77
Accessory shoe 78
5

CONTENTS
NOMENCLATURE. . . . . . . . . . . . . . . . . . . . . . . . . . . . . . . . . . . 3 - 5 FOREWORD . . . . . . . . . . . . . . . . . . . . . . . . . . . . . . . . . . . . . . . . . . 7 BASIC OPERATION . . . . . . . . . . . . . . . . . . . . . . . . . . . . . . . . 8 - 38 INSTALLING BATTERIES. . . . . . . . . . . . . . . . . . . . . . . . . . . . . . 8 CHECKING BATTERY POWER . . . . . . . . . . . . . . . . . . . . . . . . . 9 MOUNTING THE LENS. . . . . . . . . . . . . . . . . . . . . . . . . . . . 10 -11 Usable Lenses . . . . . . . . . . . . . . . . . . . . . . . . . . . . . . . . . . . . . 10 Al-S Nikkor: An Updated Version of Al-Nikkor Lenses . . . . . . . . . 11 LOADING FILM . . . . . . . . . . . . . . . . . . . . . . . . . . . . . . . . . 12 - 15 Frame Counter . . . . . . . . . . . . . . . . . . . . . . . . . . . . . . . . . . . . . 15 Film Advance Lever . . . . . . . . . . . . . . . . . . . . . . . . . . . . . . . . . . 15 Memo Holder. . . . . . . . . . . . . . . . . . . . . . . . . . . . . . . . . . . . . . . 15 SETTING FILM SPEED. . . . . . . . . . . . . . . . . . . . . . . . . . . . . . . 16
SELECTING THE SHOOTING MODE . . . . . . . . . . . . . . . . 17 - 31 Viewfinder Information . . . . . . . . . . . . . . . . . . . . . . . . . . . . . . . . 19 P(Programmed) Mode . . . . . . . . . . . . . . . . . . . . . . . . . . . . 20 - 23 S (Shutter-Priority) Mode . . . . . . . . . . . . . . . . . . . . . . . . . . 24 - 27 A (Aperture-Priority) Mode . . . . . . . . . . . . . . . . . . . . . . . . . 28 - 29 M (Manual) Mode . . . . . . . . . . . . . . . . . . . . . . . . . . . . . . . . 30 - 31 HOLDING THE CAMERA . . . . . . . . . . . . . . . . . . . . . . . . . 32 - 33 Detachable Handgrip . . . . . . . . . . . . . . . . . . . . . . . . . . . . . . . . . 33 FOCUSING . . . . . . . . . . . . . . . . . . . . . . . . . . . . . . . . . . . . 34 - 35 TAKING PICTURES . . . . . . . . . . . . . . . . . . . . . . . . . . . . . . . . . 36 UNLOADING FILM . . . . . . . . . . . . . . . . . . . . . . . . . . . . . . 37 - 38
TECHNICAL INFORMATION /
PHOTOGRAPHlC TECHNIQUES. . . . . . . . . . . . . . . . . . 39 - 62 EXPOSURE METERING SYSTEM . . . . . . . . . . . . . . . . . . . 39 - 45 Metering Control Button . . . . . . . . . . . . . . . . . . . . . . . . . . . . . . . 40 Comparison of Automatic Multi-Pattern and
Centerweighted Metering . . . . . . . . . . . . . . . . . . . . . . . . 41 - 45
RELATIONSHIP BETWEEN SHUTTER SPEED
AND APERTURE. . . . . . . . . . . . . . . . . . . . . . . . . . . . . . 46 - 47 DEPTH OF FIELD . . . . . . . . . . . . . . . . . . . . . . . . . . . . . . . 48 - 49 EXPOSURE COMPENSATION . . . . . . . . . . . . . . . . . . . . . 50 - 53 In Automatic Exposure Modes . . . . . . . . . . . . . . . . . . . . . . 50 - 51 In the Manual Mode. . . . . . . . . . . . . . . . . . . . . . . . . . . . . . . . . . 52 Duplication Work and Photomicrography . . . . . . . . . . . . . . . . . . 53
STOP-DOWN EXPOSURE MEASUREMENT . . . . . . . . . . . . . . 54
6
MULTIPLE EXPOSURE PHOTOGRAPHY . . . . . . . . . . . . . . . . 55
UNMANNED PHOTOGRAPHY . . . . . . . . . . . . . . . . . . . . . 56 - 57 Self-Timer . . . . . . . . . . . . . . . . . . . . . . . . . . . . . . . . . . . . . . . . . 56 Eyepiece Shutter . . . . . . . . . . . . . . . . . . . . . . . . . . . . . . . . . . . . 57 INFRARED PHOTOGRAPHY . . . . . . . . . . . . . . . . . . . . . . . . . . 57 FLASH PHOTOGRAPHY . . . . . . . . . . . . . . . . . . . . . . . . . . 58 - 61 Accessory Shoe and Sync Terminal . . . . . . . . . . . . . . . . . . . . . . 59 Ready-Light Indication in the Viewfinder. . . . . . . . . . . . . . . . . . . 60 Nikon FA/Speedlight Combination Chart . . . . . . . . . . . . . . . . . . 61 CLOSE UP PHOTOGRAPHY . . . . . . . . . . . . . . . . . . . . . . . . . . 62 Close-Up Equipment . . . . . . . . . . . . . . . . . . . . . . . . . . . . . . . . . 62
ACCESSORIES . . . . . . . . . . . . . . . . . . . . . . . . . . . . . . . . . . . 63 - 69 ELECTRONIC FLASH UNITS . . . . . . . . . . . . . . . . . . . . . . . . . . 63 Speedlight SB-15 . . . . . . . . . . . . . . . . . . . . . . . . . . . . . . . . . . . 63 Speedlight SB-16B . . . . . . . . . . . . . . . . . . . . . . . . . . . . . . . . . . 63 Speedlight SB-18 . . . . . . . . . . . . . . . . . . . . . . . . . . . . . . . . . . . 63 MOTOR DRIVES. . . . . . . . . . . . . . . . . . . . . . . . . . . . . . . . . . . . 64 Motor Drive MD-15 . . . . . . . . . . . . . . . . . . . . . . . . . . . . . . . . . . 64 Motor Drive MD-12 . . . . . . . . . . . . . . . . . . . . . . . . . . . . . . . . . . 64 MISCELLANEOUS. . . . . . . . . . . . . . . . . . . . . . . . . . . . . . . 65 - 69 Data Back MF-16 . . . . . . . . . . . . . . . . . . . . . . . . . . . . . . . . . . . 65 Interchangeable Focusing Screens . . . . . . . . . . . . . . . . . . . 66 - 67 Filters . . . . . . . . . . . . . . . . . . . . . . . . . . . . . . . . . . . . . . . . . . . . 68 Lens Hoods . . . . . . . . . . . . . . . . . . . . . . . . . . . . . . . . . . . . . . . . 68 Anti-Cold Battery Pack DB-2 . . . . . . . . . . . . . . . . . . . . . . . . . . . 69 Cable Release AR-3 . . . . . . . . . . . . . . . . . . . . . . . . . . . . . . . . . 69 Right-Angle Viewing Attachment DR-3 . . . . . . . . . . . . . . . . . . . . 69 Eyepiece Magnifier DG-2. . . . . . . . . . . . . . . . . . . . . . . . . . . . . . 69 Rubber Eyecup . . . . . . . . . . . . . . . . . . . . . . . . . . . . . . . . . . . . . 69 Eyepiece Correction Lenses . . . . . . . . . . . . . . . . . . . . . . . . . . . 69 Camera Cases . . . . . . . . . . . . . . . . . . . . . . . . . . . . . . . . . . . . . 69 Neckstraps . . . . . . . . . . . . . . . . . . . . . . . . . . . . . . . . . . . . . . . . 69
EV RANGE OF THE CAMERA . . . . . . . . . . . . . . . . . . . . . . 70 - 71 What is EV? . . . . . . . . . . . . . . . . . . . . . . . . . . . . . . . . . . . . . . . 70 EV Chart . . . . . . . . . . . . . . . . . . . . . . . . . . . . . . . . . . . . . . 70 - 71 TIPS ON CAMERA CARE . . . . . . . . . . . . . . . . . . . . . . . . . 72 - 73 TIPS ON BATTERY USE. . . . . . . . . . . . . . . . . . . . . . . . . . . . . . 74
ABOUT THE LIQUID CRYSTAL DISPLAY (LCD) . . . . . . . . . . . 74
SPECIFICATIONS . . . . . . . . . . . . . . . . . . . . . . . . . . . . . . . 75 - 77

FOREWORD
Welcome to Nikon’s exciting world of picture-taking ease.
To put you in total control, the Nikon FA offers three automatic exposure modes, in addition to full manual override. For fastbreaking events, the programmed mode automatically sets both shutter speed and aperture for correct exposure in any light. Or when action must be stopped or blurred, such as in sports photography, shutter priority lets you choose the shutter speed manually, then the FA automatically sets the aperture to match. If depth of field is important, aperture. priority allows you to select the precise aperture with the matching shutter speed set automatically.
But possibly even more important are the FA’s two separate metering methods. In Nikon’s revolutionary automatic multipattern metering system, the brightness from 5 areas of the focusing screen is analyzed by the camera’s microcomputer; this automatically ensures the correct exposure-even in tricky lighting situations-without any exposure compensation whatsoever.
Traditional centerweighted metering is reserved for the manual mode, but is usable in any of the three automatic modes with the metering control button. Other features of the FA include 1/4000sec. top shutter speed, 1/250sec. flash sync, interchangeable focusing screens, and a comprehensive line of Nikon accessories.
Before using the camera, please read this instruction manual from cover to cover. A few minutes invested now will pay off in years of rewarding picture-taking experiences.
7
BASIC OPERATION
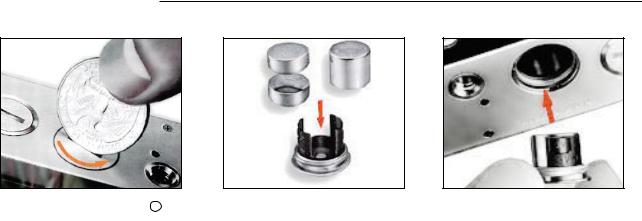
INSTALLING BATTERIES
1. |
Remove the battery clip. 43 |
2. |
Insert batteries. Wipe the bat- |
3. |
Reattach the battery clips. Slip |
Use a coin to unscrew it in |
tery terminals clean and insert |
the clip back into the camera |
|||
counter clockwise direction |
the batteries, making sure that the + |
body and screw it tightly into place. |
|||
signs are up. Useable batteries for the
Nikon FA camera are:
• One 3V lithium battery
• Two 1.55V silver-oxide batteries
(3.1V)
• Two 1.5V alkaline-manganese batteries (3V)
8
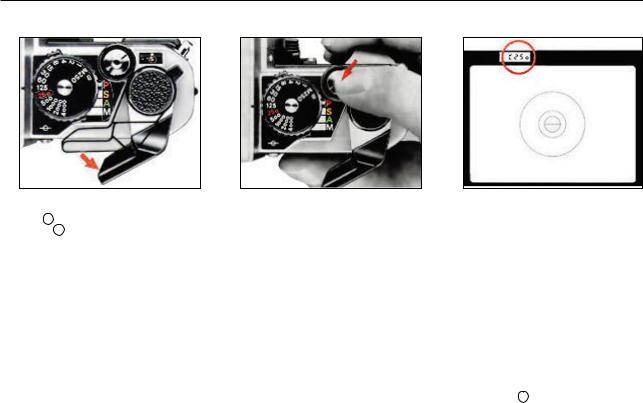
CHECKING BATTERY POWER
Pull out the film advance lever
1. 74 to unlock the shutter release button 70 . The lever doubles as a shutter release button lock.
Depress the shutter release 2. button halfway to activate the exposure meter.
Check the LCD. Confirm that the 3. LCD (liquid crystal display) is shown at the upper left in the viewfinder. This indicates that battery installation is correct and power is sufficient. If necessary, replace with a
new set.
With sufficient battery power, the LCD stays on for 16sec. after you take your finger off the button. If the batteries are almost depleted, the LCD will turn off immediately when you take your finger off the button. In this case, replace batteries as soon as possible. With exhausted batteries, you cannot trip the shutter unless the shutter speed dial 75 is set at a mechanical setting of M250 or B.
• The LCD does not appear when the shutter dial is set at M250 or B
9
BASIC OPERATION continued
MOUNTING THE LENS
Lenses usable with the Nikon FA are Al-S Nikkor, Nikon Series
E, Al-Nikkor, most Al-modified, and certain special lenses shown at the right. First line up the aperture/distance index 44 on the lens with the lens mounting index 15 on the camera body. Then twist the lens mounting ring 46 counterclockwise until the lens clicks into place Confirm that the aperture/distance index is exactly at the top.
To remove: While pushing the lens release button lens mounting ring clockwise until the lens comes off
• When changing lenses with him loaded in the camera, be careful not to expose the mirror box to direct sunlight.
10
Usable Lenses
The following lenses are usable with the Nikon FA: Al-S Nikkor lenses
Nikon Series E lenses
Al Nikkor (including Al-modified Nikkor) lenses Reflex Nikkor 500mm f/8
PC Nikkor 28mm f/3.5 Medical-Nikkor 120mm f/4 IF
Ref ex-Nikkor 1000mm f/11 (No.143001 or higher)
Ret ex-Nikkor 2000mm f/11 (No.200311 or higher)
PC-Nikkor 28mm f/4 (No 180901 or higher)
PC-Nikkor 35mm f/2.8 (No 851000 or lower or No. 906201 or higher)
Zoom-Nikkor 180-600mm f/8 ED (No.174167 or higher)
Zoom-Nikkor 200-600mm f/9.5 (No.300491 or higher)
Zoom-Nikkor 360-1200mm f/11 ED (No.174088 or higher)
•The last seven lenses having serial numbers not listed above cannot be mounted on the FA as they hit the cam era's meter coupling lever 13 However, they can be used after modification. In addition, Al-modification of most non-AI lenses having a meter coupling shoe 49 is available. Do not attempt to mount older Nikkor lenses which have not been Al-modified, as they might damage the camera. For further information concerning lens modification, please contact your local authorized Nlkon dealer
•The following lenses cannot be used on the FA even if they are modified to have the Al facility:
55mm f/1.2 (No. 184711-970110) 28mm f/3.5 (No. 625611-999999) 35mm U14 (No. 385001-400000)
•If you use lenses other than those manufactured by Nikon, proper performance may not be obtained and they may even damage the camera.
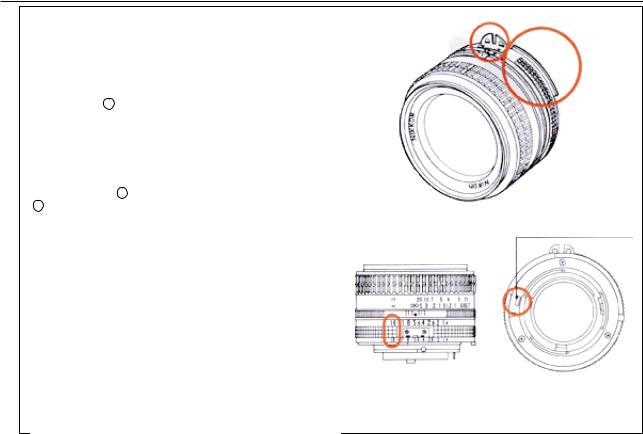
Al-S Nikkor: An Updated Version of Al-Nikkor Lenses
In 1977, Nikon introduced Al-Nikkor lenses which feature full aperture metering via Nikon's "Automatic Maximum Aperture
Indexing" or "Al" system. Just by mounting an Al lens on the camera, the maximum aperture is automatically indexed into the camera's metering system. All Al-type lenses feature a meter coupling ridge 48 and a meter coupling shoe having two holes
(Illust. 1).
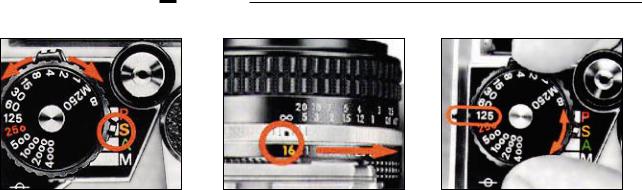
Then in 1981, Nikon modified their entire line of Al-Nikkor lenses, so that they would be fully compatible with the upcoming Nikon FA. These new lenses, called Al-S Nikkor, are easily distinguishable by (a) an orange minimum aperture on both regular aperture 64 and aperture-direct-readout (ADR) scales
66 (Illust. 2), and (b) a special notch on the bayonet mount
(Illust. 3). In addition, the Al-S symbol appears on the front cover on the instruction manual for each lens.
When used with the Nikon FA in the programmed mode, Al-S lenses provide either a normal or high-speed program depending on the focal length in use; in the shutter-priority mode, they give you uniform exposure control in any lighting situation.
Nikon Series E lenses also have the same features as Al-S Nikkors, but do not have a meter coupling shoe. Of course, older Al-Nikkor and Al modified Nikkor lenses can be used with all current and older Nikon cameras, including the FA Nikon's new series of teleconverters–the TC-201, TC-301, TC-14A and
TC-14B–have been specially designed for Al-S Nikkor lenses, but can be used with older Al-type lenses, too As soon as they are attached, they automatically switch the FA to the high-speed program in the programmed mode.
Illust.1
Al-Type Lens
Lens type signal notch
Illust.2 |
|
|
|
|
|
|
|
Illust.3 |
|
|
|
|
|
|
|
|
|
|
|
|
|
|
|
|
|
|
Al-S Nikkor Lens |
||
|
|
|
|
|
11
BASIC OPERATION continued
LOADING FILM
Open the camera back 40 While |
Insert the |
film cartridge. |
Insert the film leader in the |
1. pushing the camera back locking |
2. Position the cartridge in the film |
3. take. Pull the leader across the |
|
lever 58 counterclockwise, pull up the |
cartridge chamber |
27 with the leader |
camera and insert it into any one of |
film rewind knob 54 until the camera |
pointing towards the takeup spool 36 ; |
the slots in the takeup spool. |
|
back pops open. |
then push the rewind knob back down |
|
|
|
to secure the cartridge in place. You |
|
|
can use any type of 35mm film on the market. It is advisable to handle film in the shade to avoid direct exposure to sunlight.
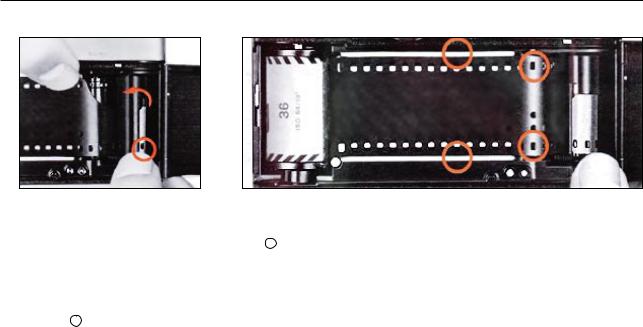
Engage the film’s perforations 4. with the sprocket teeth. Turn the takeup spool slightly with your thumb, so that the first or second perforation at the bottom edge of the film s engaged with the small tooth at the bottom of the slot in the takeout spool, and the top and bottom perforations mesh securely with the sprockets 35
Advance the film by rotating the takeup spool further with your thumb. Make 2. sure the perforations on both film edges are securely engaged with the sprocket teeth. Also confirm that the film is properly seated between both film guide rails 29 and there is no film slack Then close the camera back until it snaps shut.
13
BASIC OPERATION continued
Take up film slack. Fold out the |
Make blank exposure. To dispose of the first few frames exposed during film |
6. film rewind crank 57 and rotate |
7. loading, continue to alternately ad vance the film and depress the shutter release |
gently in the direction of the arrow on |
button until the frame counter 71 reaches frame 1. While making blank exposures, |
the film rewind knob untill you feel a |
check that the rewind knob is rotating, indicating the film has been loaded correctly |
slight resistance. Then fold the crank |
and is being advanced. If the knob does not rotate, reload the film. |
back in. |
|
|
•Do not take pictures prior to frame 1, because the meter does not function properly |
|
and the shutter fires at a fixed speed of 1/250sec. regardless of the shutter speed dial |
|
setting To indicate blank exposures. the LCD displays C250 when the shooting mode |
|
selector is set at the P, S, or A position or M C250 at M. |
14
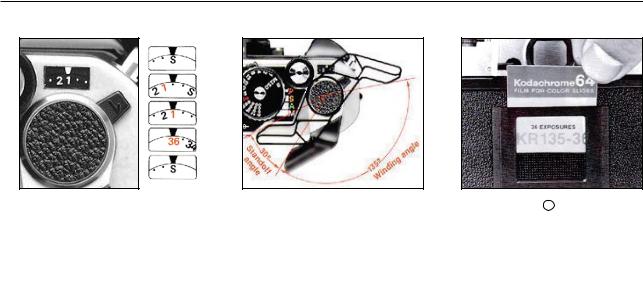
Frame Counter
The additive type frame counter is graduated from S, two dots, 1, 2, 4— up to 36—in even numbers with odd numbers indicated by white dots in between The frame counter ad" advances a single frame by one complete stroke of the film advance lever. After reaching frame 36 of a 36exposure roll of film m, the counter will not operate. however, film will be advanced until the actual end of the film roll. The frame counter automatically resets to S when the camera back is opened.
Film Advance Lever
To advance the film, wind the lever to the right completely until it stops The lever returns to the standoff position as soon as you take your thumb off the lever. A single complete stroke advances the film one frame and simultaneously cocks the shutter.
•If the lever becomes difficult to operate at the beginning of the roll, this means that' the film is not winding onto the takeup spool properly. In this case, rewind the film immediately and load again
Memo Holder 34
To remind yourself of the type of film and number of exposures, clip off the end of the film carton and insert it into the memo holder. Of course. you car use the holder to store something else like your name card or a handwritten note
15
BASIC OPERATION continued
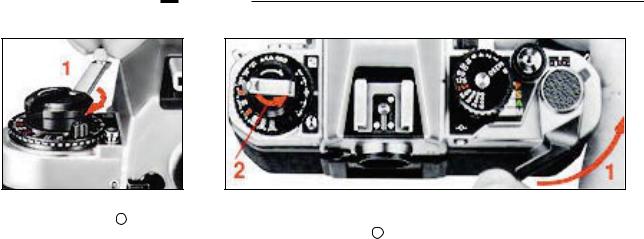
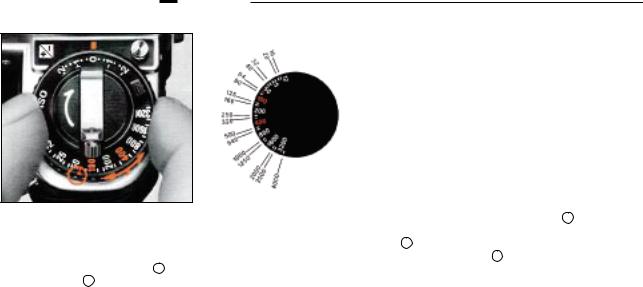
SETTING FILM SPEED
To program the camera to give the correct exposure with a particular film, you must set the camera to the correct film speed
Lift up the ASA/ISO film speed ring and rotate it in either direction until the red index dot 55 is opposite the film speed in use. The scale 56 on the ASA/ISO dial has settings from
ASA/ISO 12 to 4000 Two lines between each number stand for intermediate settings, such as 64, 80, etc.
The film speed, indicated by an ASA/ISO number printed on both the film carton and cartridge, is a numerical rating of the film's sensitivity to a given amount of light: the higher the number, the greater the sensitivity, and vice versa.
•Make sure that the exposure compensation dial 53 is set at 0. If not, turn the dial until the 0 click stops opposite the red index line 51 while depressing the exposure compensation dial locking button 59 .
16

SELECTING THE SHOOTING MODE
The Nikon FA offers four shooting modes: three automatic exposure modes, including P (programmed), S (shutter-priority), and A (aperture-priority), in addition to M (manual) mode.
Moreover, the FA utilizes an automatic multi-pattern metering system in all three automatic modes to ensure correct exposure even in difficult lighting situations In this system, light is individually measured from five separate areas of the focusing screen and then analyzed by the camera's microcomputer, giving you the automatically corrected exposure without the need for manual exposure compensation In the manua mode, regular centerweighted metering is always n operation Just center the main subject in the viewfinder to get correct exposure. Selection of centerweighted metering is also possible in all automatic modes by depressing the metering control button 9 (refer to page 40 for more information). The metering system in use also depends on which lens is mounted on the camera (see page 18).
Each shooting mode has its own advantages as explained below. Choose your desired mode and set the shooting mode selector 68 to the appropriate click-stop. Intermediate settings cannot be used According to the shooting mode you select, you must also set the shutter speed and/or aperture which will then be displayed in the viewfinder.
P (Programmed)
The optimum combination of shutter speed and aperture is automatically set by the FA's microcomputer, depending upon scene brightness, film speed, and lens focal length in use For short lenses (less than 135mm), the FA uses a normal program to ensure correct exposure. But with telephotos of 135mm or longer, the camera automatically switches to a special
highspeed program to reduce the possibility of camera shake caused by slow shutter speeds The P mode not only greatly simplifies operation but also lets you concentrate on picture composition, making it desirable for fast-breaking action when there isn't time to think.
S (Shutter Priority)
You set the shutter speed manually and the FA's microcomputer automatically selects the matching aperture. This mode is good for stopping fast action and required when motion is an important factor in your pictures, such as in sports photography
A (Aperture-Priority)
Select the lens aperture first; then the FA’s microcomputer selects the matching shutter speed for you. This mode is recommended when the rendition of depth must be controlled exactly. For instance, you may want to blur out the background in portraiture or make everything come out sharp in scenic photography.
M (Manual)
You set both the shutter speed and aperture manually according to the desired effect. Necessary exposure information is shown in the viewfinder With this mode, it's possible to create intentional overor underexposed photos It's also good under specie shooting situations. Time exposures at the B setting or mechanical release at M250 are performed n the manual mode.
Flash photography with flash units other than Nikon dedicated flash units should also be performed in this mode.
17

BASIC OPERATION |
|
continued |
|
|
|
|
|
|
|
|
||||
|
|
|
|
|
|
|
|
|
||||||
Usable Shooting Modes/Metering Method Combination Chart |
|
|
|
|
|
|
||||||||
|
|
|
|
|
|
|
|
|
|
|
|
|
|
|
|
|
|
|
|
|
|
|
Shooting mode |
|
|
Metering method |
|
||
Lens or accessory |
|
|
|
|
|
|
P |
|
|
|
|
|||
|
|
|
|
|
|
S |
A |
M |
|
|
|
|||
|
|
|
|
|
|
|
normal |
high-speed |
automatic multi-pattern |
centerweighted |
|
|||
|
|
|
|
|
|
|
|
|
|
|
||||
|
|
|
|
|
|
|
|
|
|
|
|
|
|
|
|
|
|
|
|
X |
O |
O |
O |
O |
O |
O |
|
||
Al-S Nikkor |
|
135mm or longer |
|
|
||||||||||
|
105mm or shorter |
|
|
O |
X |
O |
O |
O |
O |
O |
|
|||
|
|
|
|
|
||||||||||
Al-Nikkor |
|
|
|
|
|
O |
X |
O |
O |
O |
O |
O |
|
|
|
|
|
|
|
|
|
|
|
|
|
|
|
||
Nikon Series E |
|
135mm or longer |
|
|
X |
O |
O |
O |
O |
O |
O |
|
||
|
100mm or shorter |
|
|
O |
X |
O |
O |
O |
O |
O |
|
|||
|
|
|
|
|
||||||||||
Al-modified Nikkor |
|
|
|
|
|
O |
X |
O |
O |
O |
X |
O |
|
|
|
|
|
|
|
|
|
|
|
|
|
|
|
|
|
PC-Nikkor |
|
|
|
|
|
X |
X |
X |
X |
O |
X |
O |
|
|
|
|
|
|
|
|
|
|
|
|
|
|
|
|
|
Reflex-Nikkor |
|
|
|
|
|
|
X |
|
O |
O |
X |
O |
|
|
|
|
|
|
|
|
|
|
|
|
|
|
|
|
|
Medical-Nikkor |
|
|
|
|
|
X |
X |
X |
X |
O |
X |
O |
|
|
|
|
|
|
|
|
|
|
|
|
|
||||
Teleconverters TC-201, TC-301, TC-14A |
|
X |
O |
O |
O |
O |
O |
O |
|
|||||
and TC-14B |
|
|
|
|
|
|
||||||||
|
|
|
|
|
|
|
|
|
|
|
|
|
||
|
|
|
|
|
|
|
|
|
|
|
||||
Teleconverters TC-200, TC-300 and TC-14 |
|
O |
X |
O |
O |
O |
X |
O |
|
|||||
|
|
|
|
|
|
|
|
|
|
|
|
|
|
|
Bellows, K ring |
|
|
|
|
|
X |
X |
X |
O |
O |
X |
O |
|
|
|
|
|
|
|
|
|
|
|
|
|
|
|
|
|
O = In operation or possible
X = Not possible
=Because Reflex-Nikkor have a fixed aperture, the shutter speed is shifted according to the aperture, just as in the A mode.
•When using any Nikon teleconverter attached to lenses of f/1.8 or faster, no exposure compensation is required in
the P, S, or A mode, but is necessary in the M mode as explained in the teleconverter's instruction manual.
18

|
|
|
|
|
|
|
|
|
Viewfinder Information |
|
|
|
|
|
|
|
|
|
1. LCD exposure display. Appears when the exposure meter is |
|
|
|
|
|
|
|
|
|
turned on to show you the shutter speed or aperture selected by |
5 |
1 |
2 |
3 |
|
the camera in an automatic exposure mode or the shutter speed |
||||
|
|
|
|
|
|
|
|
|
you set in the manual mode. Although the shutter speed and/or |
|
|
|
|
|
|
|
|
|
aperture is controlled steplessly in the automatic exposure |
|
|
|
|
|
|
|
|
|
modes, intermediate shutter speeds or f-numbers appear in the |
|
|
|
|
|
|
|
|
|
display as discrete numbers which are closest to actual shutter |
|
|
|
|
|
|
4 |
|
speeds or f numbers. |
|
|
|
|
|
|
|
|
|||
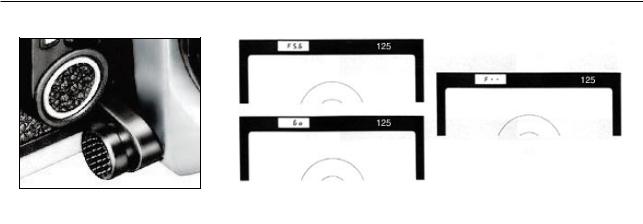
2. ADR f-number. Appears in the A or M mode to show you the aperture set on the lens (Al-S Nikkor, Nikon Series E, and Al Nikkor, including Al-modified lenses).
3. Shutter speed indication. Appears only in the S mode to show you the shutter speed set on the shutter speed dial.
4. LED exposure compensation mark. Appears when the exposure compensation dial is not set to O to indicate exposure compensation.
5. Flash ready-light. Lights up to indicate flash readiness of N nikon dedicated electronic flash units
19
BASIC OPERATION continued
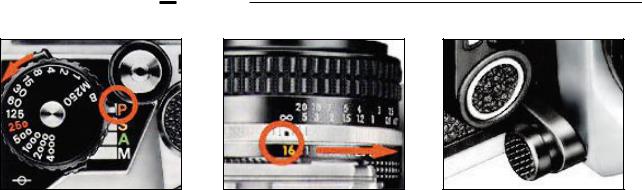
P (PROGRAMMED) MODE
1. Set the mode selector to P.
Set the lens to it’s minimum 2. aperture (the largest f-num- ber). The shutter speed dial can be set at any position except M250 and B
Confirm that automatic multi- 3. pattern metering is in operation by making sure that the metering control button is in the normal “out” position and the red index is not on top (refer to page 40 for more information).
20
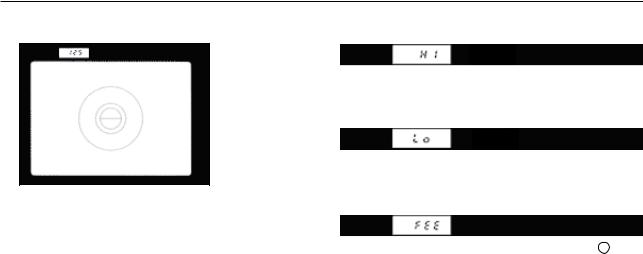
Look through the viewfinder and check the exposure
4. information. Depress the shutter release button halfway and you will see the LCD showing the shutter speed (as a reciprocal) selected by the camera to provide correct exposure.
Note that a slow shutter speed results in blurred images (techniques for avoiding blurred images are explained on page
46).
Warning Indications
If the LCD shows Hl, this means the scene is too-bright, indicating over exposure may occur. In this case, use a neutral density (ND) filter or change to a slower speed film
If the LCD displays Lo, this means the scene is too dark, indicating under exposure may occur. Use an electronic flash or change to faster film.
If the LCD shows FEE, this means the aperture ring 65 is not set at f/11 or a larger f-number. Reset the lens to its minimum aperture. When using an Al-modified Nikkor lens, a Nikon
Teleconverter TC-200, TC-300, or TC-14, or a PK ring this warning will not appear. So, be sure to set the aperture to its minimum. However, even if the aperture is set incorrectly, you can stil get the correct exposure (in most cases), but the programmed aperture will be restricted to the range between the lens maximum aperture and the actual aperture you set on the lens.
21
BASIC OPERATION continued
Programmed Exposure Measurement Graph
In the programmed automatic exposure mode, the FA provides the optimum combination of aperture and shutter speed to match the film speed in use and the brightness of the scene.
These combinations were arrived at through intensive research and then fed into the FA's microcomputer to provide a predetermined exposure program. Thus, when actual exposure measurement takes place at the time of shooting, the ideal combination on is selected, resulting in perfect exposures for every shot.
Moreover, the FA features two different exposure programs to match the lens focal length (applies only to Al-S Nikkor and Nikon Series E lenses) The normal program is for lenses less than 135mm; the high-speed program is for 135mm and longer
(including zoom lenses whose longest focal length exceeds 135mm). To minimize camera shake with telephoto lenses, the high speed program does not go below 1/125 sec until the lens maximum aperture is reached: then slower speeds are progressively chosen. With all other lenses, the normal program is in operation The h gin-speed program is also automatically chosen by the FA when a Nikon Teleconverter TC-201, TC-301,
TC-14A, or TC-14B is attached to Al S, Nikon Series E, and Al-Nikkor (including AI-modified) lenses; with Nikon Teleconverters TC-200, TC-300, or TC 14, the normal program is in operation.
The black line represents the norma program for an Al-S or Al-Nikkor 50mm f/1.4 lens with ASA/ISO 100 film,whereas the green line represents the high-speed program for an Al-S Nikkor
135mm l/2 lens. For lenses with different maximum apertures (e.g. an Al-S or Al-Nikkor 24mm f/2 8 which is indicated by a red line or an Al-S Nikkor 200mm f/4 by a pink line), the graph is read from that particular aperture until intersection with the diagonal line and then downward along the same line. Solid program lines represent automatic multi-pattern metering, whereas solid and dotted lines centerweighted metering. In extremely bright lighting situations such as snow scenes, scenes at the beach etc exposure compensation of approx +2 EV is required with conventions centerweighted metering.
Taking this into consideration, automatic multi pattern metering s pre programmed to automatically make exposure compensation by reducing extreme brightness to EV 16-1/3.
22

•The following lenses cannot be used in the P or S mode
Zoom-Nikkor 50-300mm f/4 5 ED (older Al type without orange minimum aperture on ADR sea/e)
Al modified Micro-Nikkor 105mm f/4
•When using a Nikon Teleconverfer TC 200, TC-300 or TC 14, the shutter speed may vary by approx. one step from that displayed in the view finder. However you will still obtain the correct exposure.
•With a teleconverter attached, shutter speeds become slower.
Than those indicated by the normal or high-speed program line, respectively. Similarly, with an Al modified Nikkor or PK ring attached, shutter speeds become slower. While the actual shutter speed will be the one indicated by the LCD and correct exposure is assured even in these cases, be sure to check the
LCD to avoid blurred images at slower shutter speeds.
23
BASIC OPERATION continued
S (SHUTTER-PRIORITY) MODE
1. Set the mode selector to S.
Set the lens to it’s minimum 2. aperture.
Set the shutter speed dial to 3. the desired shutter speed. The numbers on the dial are reciprocals, e.g., 4000 means 1/4000sec. The 250 engraved in red indicates the fastest sync speed for an electronic flash unit. Each setting has a click stop; intermediate settings cannot be used. Use fast shutter speed to freeze motion or use slow speeds to produce a deliberate blur. Note that in the S mode, M250 and B settings cannot be used. (to prevent accidental missetting of the dial, a locking mechanism is provided.)
24
Confirm that automatic multi- 4. pattern metering is in operation by making sure that the metering control button is in the normal “out” position and the red index is not on top (refer to page 40 for more information)
Look through the viewfinder and check the exposure information. The
5. shutter speed you set is shown at The upper right-hand corner. When the shutter release button is depressed halfway, the LCD at the upper left-hand corner shows the aperture (a number preceded by F) selected by the camera to match the shutter speed you selected
If the LCD shows the shutter speed (a number without F), this means you cannot obtain the correct exposure at the shutter speed you selected and the camera is overriding your choice by automatically selecting a slower or Faster speed.
With an Al-modified Nikkor lens, Nikon Teleconverter TC-200, TC-300 or TC-14, PK ring or bellows attachment attached, the LCD shows F - -, instead of the aperture selected by the camera. In the same way, a shutter speed will appear instead of the
F - -, if the camera automatically modifies the shutter speed you selected to obtain correct exposure
25
 Loading...