


 Loading...
RAZR V3i
GSM
motorola.com

HELLOMOTO
Introducing your new Motorola RAZR V3i GSM wireless phone. Here’s a quick anatomy lesson.
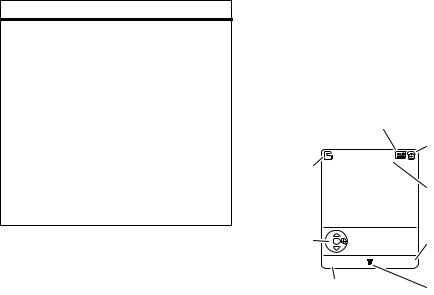
Smart Key |
Voice Key |
Volume Keys |
Right Soft Key |
Menu Key |
Message Key |
Open menus. |
|
Left Soft Key |
Power/End Key |
Turn on/off, hang up, exit menus. |
|
Browser Key |
Navigation Key |
|
Navigate menus. |
Send Key |
Center Key |
Make & answer calls. |
|
|
Select menu items. |
1

Charge Indicator Light |
Camera Lens |
Volume Keys |
Bluetooth Indicator Light |
Adjust camera zoom when camera is active & |
|
flip is closed. |
|
|
Voice Key |
Smart Key |
|
Take photo when camera is active & flip is |
External Display |
closed. |
See incoming call information, use as camera |
|
viewfinder when camera is active & flip is |
|
closed. |
Mini-USB Port |
|
Insert stereo headset, battery charger, |
|
& other phone accessories. |
|
2

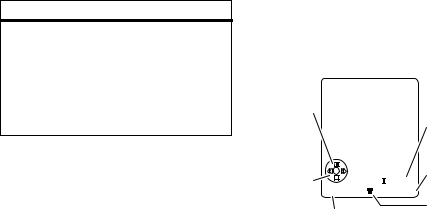
Home Screen
Service Provider 10/15/07
2 Press the Menu Key
Personal |
Camera |
ato open the |
|
Main Menu. |
|||
|
|
1 Press & hold the
Power Key Puntil the display lights up, to turn on your phone.
Main Menu
Games & Apps
|
|
3 Press the |
Exit |
Select |
Navigation Key S |
up/down/left/right to highlight a menu feature.
4 Press the
Center Key s to select it.
3
Motorola, Inc.
Consumer Advocacy Office
1307 East Algonquin Road Schaumburg, IL 60196 www.hellomoto.com
1-800-331-6456 (United States)
1-888-390-6456 (TTY/TDD United States for hearing impaired) 1-800-461-4575 (Canada)
Certain mobile phone features are dependent on the capabilities and settings of your service provider’s network. Additionally, certain features may not be activated by your service provider, and/or the provider’s network settings may limit the feature’s functionality. Always contact your service provider about feature availability and functionality. All features, functionality, and other product specifications, as well as the information contained in this user’s guide are based upon the latest available information and are believed to be accurate at the time of printing. Motorola reserves the right to change or modify any information or specifications without notice or obligation.
MOTOROLA and the Stylized M Logo are registered in the US Patent & Trademark Office. All other product or service names are the property of their respective owners. The Bluetooth trademarks are owned by their proprietor and used by Motorola, Inc. under license. Java and all other Java-based marks are trademarks or registered trademarks of Sun Microsystems, Inc. in the U.S. and other countries. Macintosh is a registered trademark of Apple Computer, Inc.
© Motorola, Inc., 2006.
Caution: Changes or modifications made in the radio phone, not expressly approved by Motorola, will void the user’s authority to operate the equipment.
Software Copyright Notice
The Motorola products described in this manual may include copyrighted Motorola and third-party software stored in semiconductor memories or other media. Laws in the United States and other countries preserve for Motorola and third-party software providers certain exclusive rights for copyrighted software, such as the exclusive rights to distribute or reproduce the copyrighted software. Accordingly, any copyrighted software contained in the Motorola products may not be modified, reverse-engineered, distributed, or reproduced in any manner to the extent allowed by law. Furthermore, the purchase of the Motorola products shall not be deemed to grant either directly or by implication, estoppel, or otherwise, any license under the copyrights, patents, or patent applications of Motorola or any third-party software provider, except for the normal, non-exclusive, royalty-free license to use that arises by operation of law in the sale of a product.
Manual Number: 6809504A48-O
4

contents
menu map. . . . . . . . . . . . 7 Use and Care . . . . . . . . . 9 essentials . . . . . . . . . . . 10 about this guide . . . . . 10 SIM card. . . . . . . . . . . . 11 battery . . . . . . . . . . . . 12 turn it on & off . . . . . . 14 make a call . . . . . . . . . 15 answer a call. . . . . . . . 15 store a phone number
in the phonebook . . . . 15 call a stored
phone number . . . . . . 16 search the phonebook 16 your phone number . . 17
main attractions . . . . . . 18 photos . . . . . . . . . . . . 18 video clips. . . . . . . . . . 20 multimedia messages 24 Bluetooth® wireless. . 25 voice commands . . . . 30 memory card . . . . . . . 32 airplane mode. . . . . . . 36 phone updates . . . . . . 36
basics. . . . . . . . . . . . . . . 37 display . . . . . . . . . . . . 37 text entry . . . . . . . . . . 40 volume . . . . . . . . . . . . 44 navigation key. . . . . . . 45 smart key . . . . . . . . . . 45 external display. . . . . . 45 handsfree speaker . . . 46
codes & passwords . . 47 lock & unlock phone . . 48 customize . . . . . . . . . . . 49 ring style. . . . . . . . . . . 49 time & date. . . . . . . . . 50 wallpaper . . . . . . . . . . 50 screen saver . . . . . . . . 51 themes . . . . . . . . . . . . 51 display appearance . . . 52 answer options. . . . . . 53 calls . . . . . . . . . . . . . . . . 54 turn off a call alert. . . . 54 recent calls . . . . . . . . . 54 redial. . . . . . . . . . . . . . 55 return a call. . . . . . . . . 56 notepad . . . . . . . . . . . 56
(continued next page)
contents 5
calls (continued)
hold or mute a call . . . . 56 call waiting. . . . . . . . . . 56 caller ID . . . . . . . . . . . . 57 emergency calls . . . . . 57 international calls. . . . . 58 1-touch dial . . . . . . . . . 58 voicemail . . . . . . . . . . . 59
other features . . . . . . . . 60 advanced calling . . . . . 60 phonebook. . . . . . . . . . 63 messages . . . . . . . . . . 67 instant messaging . . . . 69 personalize . . . . . . . . . 70 call times & costs . . . . 73 handsfree . . . . . . . . . . 75 data & fax calls . . . . . . 76 network . . . . . . . . . . . . 77 personal organizer . . . . 78 security . . . . . . . . . . . . 80 fun & games . . . . . . . . 81
6 contents
service and repairs . . . . 83 SAR Data . . . . . . . . . . . . 84 EU Conformance . . . . . . 86 Safety Information . . . . 88 Industry Canada Notice 93 FCC Notice . . . . . . . . . . . 94 Warranty. . . . . . . . . . . . . 95 Hearing Aids . . . . . . . . . 99 WHO Information . . . . 100 Registration . . . . . . . . . 100 Export Law. . . . . . . . . . 101 Recycling . . . . . . . . . . . 101 Driving Safety . . . . . . . 102 index. . . . . . . . . . . . . . . 104
menu map
main menu
n Phonebook
s Recent Calls
•Received Calls
•Dialed Calls
•Notepad
•Call Times
•Call Cost *
•Data Times
•Data Volumes
e Messages
•Create Message
•Message Inbox
•MMS Templates
•Quick Notes
•Voicemail
•Email Msgs
•Outbox
•Drafts
•Browser Msgs *
•Info Services *
E
Q
á
h
Bluetooth Link |
É Tools |
|
|
|
• |
Handsfree |
• |
SIM Apps * |
|
• |
Device History |
• |
Calculator |
|
• |
Setup |
• |
Datebook |
|
|
|
• |
Shortcuts |
|
Games & Apps |
• |
Voice Records |
||
|
|
• |
Alarm Clock |
|
Web Access |
• |
Dialing Services |
||
• |
Browser |
|
• |
Fixed Dial |
• |
Web Shortcuts |
|
• |
Service Dial * |
• |
Stored Pages |
|
• |
Quick Dial |
• |
History |
• |
IM * |
|
• |
Go To URL |
w Settings |
|
|
• |
Browser Setup |
|
||
• |
Web Sessions |
• |
(see next page) |
|
Multimedia |
|
|
|
|
• |
Themes |
This is the standard main |
||
• |
Camera |
|||
• |
Pictures |
menu layout. Your phone’s |
||
• |
Sounds |
|||
• |
Videos |
menu may be different. |
||
• |
Video Camera |
|||
* optional features
menu map |
7 |
settings menu
l Personalize
•Home Screen
•Main Menu
•Voice Dial Setup
•Skin
•Greeting
•Wallpaper
•Screen Saver
•Quick Dial *
t Ring Styles
•Style
•style Detail
L Connection
•USB Settings
•Bluetooth Link
•Sync
H Call Forward
•Voice Calls
•Fax Calls
•Data Calls
•Cancel All
•Forward Status
U In-Call Setup
•Dialing Prefix
•In-Call Timer
•Call Cost Setup *
•My Caller ID
•Talk and Fax
•Answer Options
•Call Waiting
•Hearing Aid
Z
m
S
J
%
Initial Setup |
j Network |
||
• |
Time and Date |
• |
New Network |
• |
1-Touch Dial |
• |
Network Setup |
• |
Display Timeout |
• |
Available Networks |
• |
Backlight |
• |
My Network List * |
• |
TTY Setup * |
• |
Service Tone |
• |
Scroll |
• |
Network Jingle |
• |
Language |
• |
Call Drop Tone |
• |
Brightness |
u Security |
|
• |
DTMF |
||
• |
Master Reset |
• |
Phone Lock |
• |
Master Clear |
• |
Lock Application |
|
|
• |
Fixed Dial |
Phone Status |
• |
Restrict Calls |
|
• |
My Tel. Numbers |
• |
SIM PIN |
• |
Credit Info/Available * |
• |
New Passwords |
• |
Active Line * |
• |
Certificate Mgmt |
• |
Battery Meter |
c Java Settings |
|
• |
Storage Devices |
||
• |
Voice Dial Languages * |
• |
Java System |
• |
Software Update * |
• |
Delete All Apps |
• |
Other Information |
• |
App Vibration |
|
|
• |
App Volume |
Headset |
• |
App Priority * |
|
• |
Auto Answer |
• |
App Backlight |
• |
Voice Dial |
• Set Standby App * |
|
Car Settings |
• |
DNS IP * |
|
|
|
||
• |
Auto Answer |
|
|
• |
Auto Handsfree |
* optional features |
|
• |
Power-Off Delay * |
||
• |
Charger Time * |
|
|
Airplane Mode
•Airplane Mode
•Prompt at Startup
8 menu map
Use and Care
To care for your Motorola phone, please keep it away from:
liquids of any kind
Don’t expose your phone to water, rain, extreme humidity, sweat, or other moisture.
extreme heat or cold
Avoid temperatures below -10°C/14°F or above 45°C/113°F.
microwaves
Don’t try to dry your phone in a microwave oven.
dust and dirt
Don’t expose your phone to dust, dirt, sand, food, or other inappropriate materials.
cleaning solutions
To clean your phone, use only a dry soft cloth. Don’t use alcohol or other cleaning solutions.
the ground
Don’t drop your phone.
Use and Care |
9 |

essentials
CAUTION: Before using the phone for the first time, read the
Important Safety and Legal Information included in the grayedged pages at the back of this guide.
about this guide
This guide shows how to locate a menu feature as follows:
Find it: Press a> s Recent Calls > Dialed Calls
This means that, from the home screen:
1Press the menu key ato open the menu.
2Press the navigation key Sto scroll to s Recent Calls, and press the
center key sto select it.
3Press the navigation key Sto scroll to Dialed Calls, and press the center key sto select it.
10 essentials

symbols
This means a feature is network, SIM card, or subscription dependent and may not be available in all areas. Contact your service provider for more information.
This means a feature requires an optional accessory.
SIM card
Your Subscriber Identity Module (SIM) card contains personal information like your phone number and phonebook entries.
Caution: Don’t bend or scratch your SIM card. Keep it away from static electricity, water, and dirt.
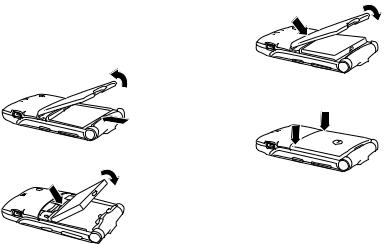
1If necessary, press in the battery door release latch and remove the battery door.
2Hold the SIM card with the notch in the lower left corner and the gold plate facing down. Slide the SIM card under the metal clip and into the card slot as shown.
essentials 11
battery |
3. |
|
|
battery installation |
|
1. |
|
|
4. |
2.
12 essentials

battery charging
New batteries
are not fully charged. Plug the travel charger
into the mini-USB port on
your phone as shown. Plug the
other end into an electrical outlet. Your phone might take several seconds to start charging the battery. The battery charge indicator light shows when the battery is charging. The display shows Charge Complete when finished.
Tip: Relax, you can’t overcharge your battery. It will perform best after you fully charge and discharge it a few times.
Note: You can charge your battery by connecting a cable from your phone’s mini-USB port to a USB
port on a computer. Both your phone and the computer must be turned on, and your computer must have the correct software drivers installed. Cables and software drivers are available in Motorola Original data kits, sold separately.
battery tips
Battery life depends on the network, signal strength, temperature, features, and accessories you use.
• Always use Motorola Original batteries
and chargers. The warranty does not cover damage
caused by non-Motorola batteries and/or chargers.
•New batteries or batteries stored for a long time may take more time to charge.
essentials 13

•When charging your battery, keep it near room temperature.
•When storing your battery, keep it uncharged in a cool, dark, dry place.
•Never expose batteries to temperatures below -10°C (14°F) or above 45°C (113°F). Always take your phone with you when you leave your vehicle.
•It is normal for batteries to gradually wear down and require longer charging times. If you notice a change in your battery life, it is probably time to purchase a new battery.
Contact your local recycling center for proper battery disposal.
Warning: Never dispose of batteries in a fire because they may explode.
14 essentials
Before using your phone, read the battery safety information in the “Safety and General Information” section included in the gray-edged pages at the back of this guide.
turn it on & off
Caution: On power up, the phone may prompt you to enter your SIM card PIN code to unlock the SIM card. If you enter an incorrect PIN code three times before the correct code, your SIM card is disabled, and your display shows SIM Blocked. Contact your service provider.
To turn on your phone,  press and hold the
  power key Ountil the

 keypad or display lights
  up. If prompted, enter
  your eight-digit SIM card
 PIN code and/or four-digit unlock code.
To turn off your phone, press and hold Ofor two seconds.
make a call
Enter a phone number and press the send key Nto make a call.
To voice dial a call, see page 30.
To “hang up,” close the phone flip or press the end key O.
Note: Closing the phone flip doesn’t end a call when the handsfree speaker is turned on (for more information about the handsfree speaker, see page 46).
answer a call
When your phone rings and/or vibrates, just open the phone flip or press the send key N to answer.
To “hang up,” close the phone flip or press the end key O.
Note: Closing the phone flip doesn’t end a call when the handsfree speaker is turned on (for more information about the handsfree speaker, see page 46).
store a phone number in the phonebook
You can store a phone number in your
Phonebook.
Note: When you create a new phonebook entry, you must specify whether you want to store the entry in phone memory or on the SIM card. You can’t set a picture ID or special alerts for entries stored on the SIM card.
1Enter a phone number in the home screen.
essentials 15
2Press the Store key.
3Enter a name and other details for the phone number. To edit details, scroll to them and press the center key s.
4Press the Done key to store the number.
To store an email address, see page 63. To edit or delete a phonebook entry, see page 63.
call a stored phone number
Find it: a> n Phonebook
1Scroll to the phonebook entry.
2Press Nto call the entry.
To voice dial a phonebook entry, see page 30.
search the phonebook
To set the phonebook search method, press a> nPhonebook, then press a> Setup
> Search Method > Jump To or Find.
To search for a phonebook entry, press the keypad key that contains the first letter of the entry. Jump To method immediately jumps to the first entry that begin with the key’s letters. Find method prompts you to enter the name or speed number for the entry, depending on how the phonebook list is sorted.
16 essentials

your phone number
From the home screen, press a#to see your number.
Tip: Want to see your phone number while you’re on a call? Press a> My Tel. Numbers.
To store or edit your name and phone number on your SIM card, press the
Edit key while showing your number. If
you don’t know your phone number, contact your service provider.
essentials 17

main attractions
You can do much more with your phone than make and receive calls!
photos
take a photo
Press a> h Multimedia > Camera to see the camera viewfinder.
Timer |
Remaining |
|
Shots |
Camera Mode |
|
(Photo or |
|
Video) |
IMAGE |
|
AREA |
Press S |
|
up/down to |
Zoom |
see camera |
|
settings, press |
1x |
left/right to Exit |
Capture |
change. |
|
Return to previous screen.
Resolution
Storage (Phone or Memory Card)
Press a to open
Pictures Menu.
Take a photo.
18 main attractions
1Point the camera lens at the photo subject.
2Press the Capture key to take a photo.
3Press the Send key to send the photo in a multimedia message (see page 24).
or
Press ato select a storage option:
Store Only, Apply as Wallpaper, Apply as Screen Saver, or Apply as Phonebook Entry.
or
Press the Discard key to delete the photo and return to the active viewfinder.
Shortcut: After taking a photo, press the center key .sto quickly store it and return to the camera viewfinder.
Note: You can’t assign a photo to a phonebook entry stored on the SIM card.
self portrait
When the camera viewfinder is active, you can close the phone flip to show the viewfinder image in the external display. Press the smart key (see illustration on page 2) to take a photo. Open the flip to send, store, or discard the photo.
camera settings
When the viewfinder is active, press ato select camera options:
options
Go To |
See stored pictures and photos. |
Pictures |
Press ato perform various |
|
operations (such as Delete, Rename, |
|
or Move) on a picture. |
|
|
Go To Video |
Switch to the video camera. |
Mode |
|
main attractions |
19 |
options
Switch |
See and store pictures on your |
Storage |
phone or memory card. |
Device |
Note: This option appears only |
|
|
|
when a memory card is |
|
installed. |
|
|
Auto-Timed |
Set a timer for the camera to |
Capture |
take a photo. |
|
|
Pictures |
Adjust photo settings: |
Setup |
• Resolution |
|
• Shutter Tone |
|
|
View Free |
See how much memory |
Space |
remains for storing pictures. |
video clips
record a video clip
Press a> hMultimedia > Video Camera to see the video camera viewfinder.
|
Resolution |
Storage |
|
|
|
(Phone or |
|
|
|
Memory Card) |
|
Camera Mode |
8 |
||
|
|
||
(Photo or |
|
Remaining |
|
Video) |
|
Video Minutes |
|
Press S |
Zoom |
Start video |
|
up/down to |
capture. |
||
see camera |
1x |
|
|
Exit |
Capture |
||
settings, press |
|||
left/right to |
|
Press a |
|
change. |
Return to |
to open Videos |
|
|
previous screen. |
Menu. |
|
20 main attractions

Note: You can zoom only before you start recording.
Tip: If you want to send your video in a multimedia message, the video length must be set to MMS. To set length, press
a> Videos Setup > Video Length.
1Point the camera lens at the video subject.
2Press the Capture key to begin video recording.
3Press the Stop key to stop video recording.
4Press the Options key to select a storage option: Send in Message or Store Only.
or
Press the Discard key to delete the video clip.
If you choose to send the video clip in a message, see “send a multimedia message” on page 24.
When the video camera viewfinder is active, press ato select video options:
options
Go To |
See stored video clips. Press |
Videos |
ato perform various |
|
operations (such as Delete, Rename, |
|
or Move) on a video clip. |
|
|
Go To Photo |
Switch to the picture camera. |
Mode |
|
|
|
Switch |
See and store video clips on |
Storage |
your phone or memory card. |
Device |
Note: This option appears only |
|
|
|
when a memory card is |
|
installed. |
main attractions |
21 |
options
Videos |
Adjust video settings: |
Setup |
• Auto Repeat |
|
• Video Length |
|
• Resolution |
|
• Recording Sound |
|
|
View |
See how much memory |
Free Space remains for storing video clips.
play a video clip
Find it: Press a> h Multimedia > Videos
> video clip
Press Sup |
|
|
|
|
|
|
to pause/play, |
|
|
|
|
|
|
press down to |
|
|
|
|
|
Timer shows |
stop. |
|
|
|
|
|
% played. |
|
|
|
|
|
|
See video clip |
Press S |
|
|
Video Clip Name |
|||
|
|
information. |
||||
|
00:07/00:12 |
|
|
|||
left/right to |
|
|
|
|
|
|
skip to |
|
|
|
|
|
|
Back |
|
Details |
|
|||
previous/ |
|
|
|
|
|
Press a |
next video |
Return to |
to open Videos |
||||
clip. |
previous screen. |
Menu. |
||||
From the stored video clips list, press ato select video options.
22 main attractions

Note: Your phone’s options may vary. Some options are not available for preinstalled videos.
options
Send In |
Insert a video clip in a new |
Message |
message. |
|
Note: This option appears only |
|
when the video clip is small |
|
enough to send. |
|
|
Switch |
See and store video clips on |
Storage |
your phone or memory card. |
Device |
Note: This option appears only |
|
|
|
when a memory card is |
|
installed. |
|
|
New |
Activate the video camera to |
|
record a new video clip. |
|
|
Details |
See video clip information. |
options
Rename |
Rename a video clip. |
Delete |
Delete marked video clip(s). |
|
|
Move |
Move video clip(s) to another |
|
device, delete original(s) from |
|
phone memory. |
|
|
Copy |
Copy video clip(s) to another |
|
device, leave original(s) on |
|
phone. |
|
|
Mark/ |
Mark one or more video clips |
Unmark |
that you want to delete, move, |
|
copy, or assign to a category. |
|
|
Categories |
Create new category, or see |
|
video clips in a selected |
|
category. |
|
|
Assign to |
Assign video clip(s) to a |
Category |
category. |
main attractions |
23 |

options
Videos Adjust video settings.
Setup
View See how much memory
Free Space remains for storing video clips.
multimedia messages
For more messaging features, see page 67.
send a multimedia message
A Multimedia Messaging Service
(MMS) message contains pages with text and media objects (including
photos, sounds, or video clips). You can send the multimedia message to other MMS-capable phones, and to email addresses.
24 main attractions
Find it: Press R> Create Message > New Multimedia Msg
1Press keypad keys to enter text on the page (for more information about text entry, see page 40).
To insert a picture, sound, video clip, voice record, quick note, or contact info on the page, press a> Insert. Select the file type and the file.
To insert another page in the message, enter text or objects on the current page and press a> Insert > New Page. You can enter more text and objects on the new page.
2When you finish the message, press a > Message Options to set message options (such as Subject and Priority).
3When you finish setting message options, press the Done key.

4Press the Send To key to select message recipients. You can:
•Select one or more entries from your phonebook (press Sto scroll to an entry, and press the select key sto select it.
•Select New Number or New Email Address to enter a phone number or email address.
5Press the Send key to send the message.
To save or cancel the message, press a
> Save to Drafts or Abort Message.
receive a multimedia message
When you receive a multimedia message or letter, your phone plays an alert and the display shows New Message with a message indicator (such as r).
Press the Read key to open the message.
•Pictures and animations show as you read the message.
•Sound files play as you read the message. Use the volume keys to adjust the sound volume.
•Attached files are added to the end of the message. To open an attachment, scroll to the file indicator/filename and press the View key (image), Play key (sound), or Open key (phonebook vCard, datebook vCalendar entry, or unknown file type).
Bluetooth® wireless
Your phone supports Bluetooth wireless connections. You can connect your phone with a Bluetooth headset or car kit to make handsfree calls. You can connect your phone with a phone or
main attractions |
25 |
computer that supports Bluetooth connections to exchange files.
Note: The use of wireless phones while driving may cause distraction. Discontinue a call if you can’t concentrate on driving. Additionally, the use of wireless devices and their accessories may be prohibited or restricted in certain areas. Always obey the laws and regulations on the use of these products.
Note: Your phone's Bluetooth features and Bluetooth Class 1 power levels are not allowed for outdoor operation in France. To avoid unlawful interference with radio signals, do not use the Bluetooth features in France unless you are indoors.
For maximum Bluetooth security, you should always connect Bluetooth devices in a safe, private environment.
turn Bluetooth power on or off
Find it: Press a> EBluetooth Link > Setup > Power > On
Note: To extend battery life, use this procedure to set Bluetooth power to Off when not in use. Your phone will not connect to another device until you set Bluetooth power back to On and connect your phone to the device again.
use a headset or handsfree car kit
Before you try to connect your phone to a handsfree device, make sure the device is on and ready in pairing or bonding mode (see the user’s guide for the device). You can connect your phone with only one device at a time.
26 main attractions
Find it: Press a> E Bluetooth Link > Handsfree > [Look For Devices]
Your phone lists the devices it finds within range.
1Scroll to a device in the list.
2Press the center key sto connect to the device.
When your phone is connected, the Bluetooth indicator à shows in the home screen and the external Bluetooth indicator light flashes.
Shortcut: When Bluetooth power is on, your phone can automatically connect to a handsfree device you have used before. Just turn on the device and move it near the phone.
copy files to another device
You can copy a photo, picture, video clip, sound file, phonebook entry, datebook event, or bookmark to another phone or computer that supports Bluetooth connections.
Note: You can’t copy some copyrighted objects.
Before you try to copy a file to another device, make sure the receiving device is on and ready in discoverable mode.
1On your phone, scroll to the object that you want to copy to the other device.
2Press a, then select:
• Copy for a photo, picture, video clip, or sound file.
• Share Phonebook Entry for a phonebook entry.
• Send for a datebook event or bookmark.
main attractions |
27 |
3Select a recognized device name, or
[Look For Devices] to search for an unrecognized device where you want to copy the object.
Note: Once you connect your phone to a Bluetooth device, that device can start a similar Bluetooth connection with your phone. Your display shows the Bluetooth indicator à when there is a Bluetooth connection.
receive files from another device
Before you try to receive a file from another device, make sure your phone’s Bluetooth power is on (see page 26).
1Send the file from the device.
If your phone and the sending device don’t recognize each other, place your phone in discoverable mode so the
sending device can locate it. Press a> EBluetooth Link > Setup > Find Me.
2Press the Accept key to accept a file from another device. Your phone notifies you when file transfer is complete, and saves the file.
send files to a printer
You can send a photo, picture, message, phonebook entry, or datebook event from your phone to a printer that supports Bluetooth connections.
Note: You can print A4 or US Letter size pages. To print another size, copy the object to a linked computer and print it from there. You cannot print Quick Notes, MMS Templates, or a phonebook Mailing List.
1On your phone, scroll to the object that you want to print, then press a> Print.
28 main attractions
Loading...