


 Loading...
V3
GSM
Welcome
Welcome to the world of Motorola digital wireless communications! We are pleased that you have chosen the Motorola V3 GSM wireless phone.
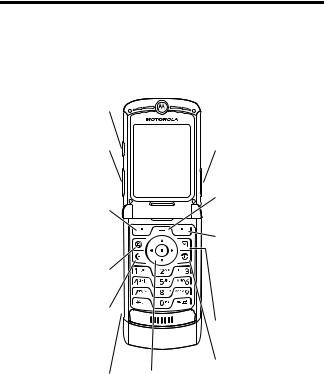
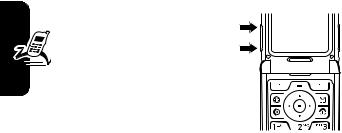
Smart Key |
|
Voice Key |
|
|
Create voice |
Volume Keys |
|
records & voice |
|
dial names. |
|
Left Soft Key |
|
|
Perform function |
|
Menu Key |
in lower left |
|
|
display. |
|
Right Soft Key |
|
|
|
|
|
Perform function |
Operator Key |
|
in lower right |
|
display. |
|
Send Key |
|
|
Make & answer |
|
Message Key |
calls. |
|
|
Accessory |
4-Way |
Power & End Key |
Turn phone |
||
Connector Port |
Navigation Key |
on/off, end calls, |
Insert charger & |
with Center |
exit menu |
phone |
Select |
system. |
accessories. |
|
|
1
Check It Out!
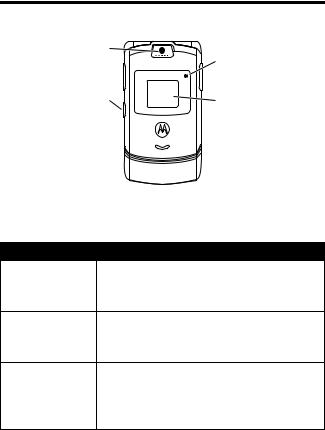
Camera Lens |
Bluetooth® |
|
|
|
LED Indicator |
Smart Key |
|
|
Take self-portrait |
External Display |
|
photo with |
View incoming |
|
camera when flip |
call information, |
|
is closed. |
use as camera |
|
|
|
viewfinder when |
|
|
flip is closed. |
Feature |
Description |
|
Take Photo |
Press CAMERA (-) to activate the |
|
|
camera, point lens at subject, press |
|
|
CAPTURE (+) to take a photo. |
|
Take |
Activate the camera, close the flip, use |
|
Self-Portrait |
viewfinder to aim lens, press smart key to |
|
(flip closed) |
take a photo. |
|
Send Photo |
Send a photo to a phone number or |
|
|
email address: |
|
|
Take photo, then press STORE (+) |
|
|
> Send. |
|
2

Feature |
Description |
|||||
Set Photo as |
Assign a photo to a phonebook entry to |
|||||
Picture ID |
allow picture caller ID: |
|||||
|
Take photo, then press STORE (+) |
|||||
|
> Apply as Phonebook Entry. |
|||||
Send |
Send a multimedia message |
|||||
Multimedia |
with pictures, animations, |
|
|
|
|
|
|
|
|
|
|||
|
||||||
|
||||||
Message |
sounds, and videos: |
|
|
|
||
|
|
|||||
|
E> Create Message |
|||||
|
> New Multimedia Msg |
|||||
Wireless |
Set up a Bluetooth® wireless connection |
|||||
Connection |
to a headset accessory, car kit, or |
|||||
|
external device: |
|||||
|
M> Settings > Connection > Bluetooth Link |
|||||
|
> Setup > Power > On, press BACK (-), |
|||||
|
press > Handsfree > [Look For Devices] |
|||||
3
Motorola, Inc.
Consumer Advocacy Office
1307 East Algonquin Road
Schaumburg, IL 60196
www.motorola.com
1-800-331-6456 (United States)
1-888-390-6456 (TTY/TDD United States for hearing impaired) 1-800-461-4575 (Canada)
MOTOROLA and the Stylized M Logo are registered in the US Patent & Trademark Office. America Online, AOL, the America Online & Design logo, the AOL & Design logo, AIM, and the Triangle Logo, are registered trademarks of America Online, Inc. in the United States and/or other countries. Instant Messenger is a trademark of America Online, Inc. The Bluetooth trademarks are owned by their proprietor and used by Motorola, Inc. under license. Java and all other Java-based marks are trademarks or registered trademarks of Sun Microsystems, Inc. in the U.S. and other countries. All other product or service names are the property of their respective owners.
© Motorola, Inc. 2004.
The information contained in Motorola’s user’s guides is believed to be correct at the time of printing. Motorola reserves the right to change or modify any information or specifications without notice. The contents of Motorola’s user’s guides are provided “as is.” Except as required by applicable law, no warranties of any kind, either express or implied, including, but not limited to, the implied warranties of merchantability and fitness for a particular purpose, are made in relation to the accuracy, reliability, or contents of this guide.
Caution: Changes or modifications made in the radio phone, not expressly approved by Motorola, will void the user’s authority to operate the equipment.
Manual number: 6809491A59-O
4

Contents
Getting Started . . . . . . . . . . . . . . . . . . . . . . . . . . . . . . . . . . 8 About This Guide . . . . . . . . . . . . . . . . . . . . . . . . . . . . . . . 8 Installing the SIM Card . . . . . . . . . . . . . . . . . . . . . . . . . . . 9 Battery Tips . . . . . . . . . . . . . . . . . . . . . . . . . . . . . . . . . . 10 Installing the Battery . . . . . . . . . . . . . . . . . . . . . . . . . . . . 11 Charging the Battery. . . . . . . . . . . . . . . . . . . . . . . . . . . . 11 Turning Your Phone On. . . . . . . . . . . . . . . . . . . . . . . . . . 13 Turning Your Phone Off. . . . . . . . . . . . . . . . . . . . . . . . . . 13 Adjusting Volume . . . . . . . . . . . . . . . . . . . . . . . . . . . . . . 14 Making a Call . . . . . . . . . . . . . . . . . . . . . . . . . . . . . . . . . 14 Answering a Call. . . . . . . . . . . . . . . . . . . . . . . . . . . . . . . 15 Viewing Your Phone Number . . . . . . . . . . . . . . . . . . . . . 15
Highlight Features . . . . . . . . . . . . . . . . . . . . . . . . . . . . . . 16 Taking and Sending a Photo. . . . . . . . . . . . . . . . . . . . . . 16 Sending a Multimedia Message . . . . . . . . . . . . . . . . . . . 19 Using a Bluetooth® Wireless Connection. . . . . . . . . . . . 23 Learning to Use Your Phone . . . . . . . . . . . . . . . . . . . . . . 26 Using the Display . . . . . . . . . . . . . . . . . . . . . . . . . . . . . . 26 Using the 4-Way Navigation Key. . . . . . . . . . . . . . . . . . . 30 Using the Operator Key . . . . . . . . . . . . . . . . . . . . . . . . . 31 Using the Message Key . . . . . . . . . . . . . . . . . . . . . . . . . 31 Using Menus. . . . . . . . . . . . . . . . . . . . . . . . . . . . . . . . . . 32 Entering Text. . . . . . . . . . . . . . . . . . . . . . . . . . . . . . . . . . 34 Using the Smart Key. . . . . . . . . . . . . . . . . . . . . . . . . . . . 46 Using the External Display . . . . . . . . . . . . . . . . . . . . . . . 46 Using the Handsfree Speaker. . . . . . . . . . . . . . . . . . . . . 48 Changing a Code, PIN, or Password . . . . . . . . . . . . . . . 48 Locking and Unlocking Your Phone . . . . . . . . . . . . . . . . 49
5
If You Forget a Code, PIN, or Password . . . . . . . . . . . . 50 Using the Phonebook . . . . . . . . . . . . . . . . . . . . . . . . . . 51 Setting Up Your Phone . . . . . . . . . . . . . . . . . . . . . . . . . . 54 Setting a Ring Style. . . . . . . . . . . . . . . . . . . . . . . . . . . . 54 Changing the Call Alert . . . . . . . . . . . . . . . . . . . . . . . . . 55 Setting the Time and Date . . . . . . . . . . . . . . . . . . . . . . 55 Setting a Wallpaper Image . . . . . . . . . . . . . . . . . . . . . . 56 Setting a Screen Saver Image . . . . . . . . . . . . . . . . . . . 57 Changing Phone Skin . . . . . . . . . . . . . . . . . . . . . . . . . . 58 Setting a Phone Theme . . . . . . . . . . . . . . . . . . . . . . . . 58 Setting Answer Options. . . . . . . . . . . . . . . . . . . . . . . . . 59 Setting Display Brightness . . . . . . . . . . . . . . . . . . . . . . 60 Adjusting the Backlight . . . . . . . . . . . . . . . . . . . . . . . . . 60 Setting Display Timeout . . . . . . . . . . . . . . . . . . . . . . . . 61 Storing Your Name and Phone Number . . . . . . . . . . . . 61 Calling Features . . . . . . . . . . . . . . . . . . . . . . . . . . . . . . . 62 Turning Off a Call Alert . . . . . . . . . . . . . . . . . . . . . . . . . 62 Viewing Recent Calls . . . . . . . . . . . . . . . . . . . . . . . . . . 62 Redialing a Number . . . . . . . . . . . . . . . . . . . . . . . . . . . 64 Using Automatic Redial. . . . . . . . . . . . . . . . . . . . . . . . . 64 Returning an Unanswered Call . . . . . . . . . . . . . . . . . . . 65 Using the Notepad . . . . . . . . . . . . . . . . . . . . . . . . . . . . 65 Putting a Call On Hold or Mute . . . . . . . . . . . . . . . . . . . 66 Using Call Waiting. . . . . . . . . . . . . . . . . . . . . . . . . . . . . 66 Using Caller ID (Incoming Calls) . . . . . . . . . . . . . . . . . . 67 Calling an Emergency Number . . . . . . . . . . . . . . . . . . . 68 Dialing International Numbers. . . . . . . . . . . . . . . . . . . . 68 Calling With 1-Touch Dial . . . . . . . . . . . . . . . . . . . . . . . 68 Using Voicemail. . . . . . . . . . . . . . . . . . . . . . . . . . . . . . . 69
6
Phone Features . . . . . . . . . . . . . . . . . . . . . . . . . . . . . . . . 71
Main Menu . . . . . . . . . . . . . . . . . . . . . . . . . . . . . . . . . . . 71
Settings Menu. . . . . . . . . . . . . . . . . . . . . . . . . . . . . . . . . 72
Feature Quick Reference . . . . . . . . . . . . . . . . . . . . . . . . 73
Calling Features . . . . . . . . . . . . . . . . . . . . . . . . . . . . . . . 73
Messages . . . . . . . . . . . . . . . . . . . . . . . . . . . . . . . . . . . . 74
Phonebook . . . . . . . . . . . . . . . . . . . . . . . . . . . . . . . . . . . 75
Personalizing Features . . . . . . . . . . . . . . . . . . . . . . . . . . 79
AOL® Instant Messenger™ . . . . . . . . . . . . . . . . . . . . . . 80
Email. . . . . . . . . . . . . . . . . . . . . . . . . . . . . . . . . . . . . . . . 81
Menu Features . . . . . . . . . . . . . . . . . . . . . . . . . . . . . . . . 82
Special Dialing Features. . . . . . . . . . . . . . . . . . . . . . . . . 83
Call Monitoring . . . . . . . . . . . . . . . . . . . . . . . . . . . . . . . . 84
Handsfree Features . . . . . . . . . . . . . . . . . . . . . . . . . . . . 84
Data and Fax Calls . . . . . . . . . . . . . . . . . . . . . . . . . . . . . 85
Bluetooth® Wireless Connections . . . . . . . . . . . . . . . . . 86
Network Features . . . . . . . . . . . . . . . . . . . . . . . . . . . . . . 88
Personal Organizer Features . . . . . . . . . . . . . . . . . . . . . 88
Security. . . . . . . . . . . . . . . . . . . . . . . . . . . . . . . . . . . . . . 90
News and Entertainment . . . . . . . . . . . . . . . . . . . . . . . . 90
Troubleshooting . . . . . . . . . . . . . . . . . . . . . . . . . . . . . . . . 93
Specific Absorption Rate Data . . . . . . . . . . . . . . . . . . . . 94
AOL® Instant Messenger™ License. . . . . . . . . . . . . . . . 96
European Union Directives Conformance Statement. 100
Index . . . . . . . . . . . . . . . . . . . . . . . . . . . . . . . . . . . . . . . . 101
7

Getting Started
Getting Started
CAUTION: Before using the phone for the first time, read the Important Safety and Legal Information included in the gray-edged pages at the back of this guide.
032259o
About This Guide
This guide describes the basic features of your phone.
Selecting a Menu Feature
Use the menu system to access your phone’s features. This guide shows you how to select a menu feature from the home screen as follows:
Find the Feature M> Recent Calls > Dialed Calls
This example shows that, from the home screen, you must press the menu key Mto open the menu, scroll to and select sRecent Calls, then scroll to and select Dialed Calls.
Press the 4-way navigation key Sto scroll and highlight a menu feature. Press SELECT (+) to select the highlighted menu feature.
8
Optional Features
This label identifies an optional network, SIM
card, or subscription-dependent feature that
may not be offered by all service providers in all geographical areas. Contact your service
provider for more information.
Optional Accessories
This label identifies a feature that requires an optional Motorola Original™ accessory.
Installing the SIM Card
Your Subscriber Identity Module (SIM) card contains your phone number, service details, and phonebook/message memory.
Caution: Do not bend or scratch your SIM card. Avoid exposing your SIM card to static electricity, water, or dirt.
Slide the SIM card under the retention strap to insert it into the card slot as shown below:
1. 2.
Started Getting
9

Battery Tips
Battery life depends on the network, signal strength, temperature, features, and accessories you use.
• Always use Motorola Original batteries and chargers. The warranty does not
cover damage caused by using non-Motorola batteries and/or chargers.
Started |
• New batteries or batteries stored for a long time may |
|
|
||
Getting |
take more time to charge. |
|
• When charging your battery, keep it near room |
||
|
||
|
temperature. |
|
|
• When storing your battery, keep it uncharged in a |
|
|
cool, dark, dry place, such as a refrigerator. |
|
|
• Never expose batteries to temperatures below -10°C |
|
|
(14°F) or above 45°C (113°F). Always take your |
|
|
phone with you when you leave your vehicle. |
|
|
• It is normal for batteries to gradually wear down and |
|
|
require longer charging times. If you notice a change |
|
|
in your battery life, it is probably time to purchase a |
|
|
new battery. |
|
|
Contact your local recycling center for proper |
|
|
battery disposal. |
|
|
Warning: Never dispose of batteries in a fire because they |
|
|
may explode. |
|
|
Before using your phone, read the battery safety |
|
|
information in the “Safety and General Information” section |
|
|
included in the gray-edged pages at the back of this guide. |
10
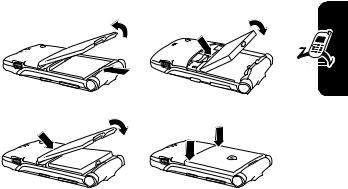
Installing the Battery
1. 2.
3. 4.
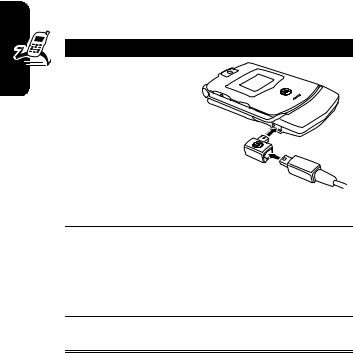
Charging the Battery
New batteries are shipped partially charged. Before you can use your phone, you need to install and charge the battery as described below. Some batteries perform best after several full charge/discharge cycles.
Started Getting
11
Getting Started
Tip: The angle connector provided with your phone makes it easier for you to use the phone with an attached battery
charger or phone accessory.
Action
1 Insert the travel charger plug into the detachable angle connector as shown.
2 Insert the angle connector plug into the USB connector port on your phone.
3Plug the other end of the travel charger into the appropriate electrical outlet.
Note: It may take up to 10 seconds for your phone to provide a visible or audible indication that the battery is charging.
4When your phone indicates Charge Complete, remove the travel charger and angle connector.
Note: You can safely leave the travel charger connected to the phone after charging is complete. This will not damage the battery.
12

Turning Your Phone On
Action
1 Press and hold the power key Pfor
2 seconds to turn the phone on.
Note: It may take up to 4 seconds for the
display to illuminate after you turn the phone on.
2If necessary, enter your SIM card PIN code and press OK (+) to unlock the SIM card.
Caution: If you enter an incorrect PIN code
3 times in a row, your SIM card is disabled and your phone displays SIM Blocked.
3If necessary, enter your 4-digit unlock code and press OK (+) to unlock the phone.
At startup, you may be prompted to personalize your phone. Select YES (-) to set personal phone options, or NO (+) to go to the home screen. For more information about personalizing your phone, see page 79.
Turning Your Phone Off
Action
Press and hold the power key Pfor 2 seconds to turn the phone off.
Started Getting
13
Getting Started
Adjusting Volume
Press the up or down volume keys to:
• silence an incoming call alert
• increase or decrease earpiece volume during a call
•increase or decrease ringer volume when the home screen is visible (flip must be open)
Tip: At the lowest volume setting, press the down volume key once to switch to vibrate alert. Press it again to switch to silent alert. Press the up volume key to switch back to vibrate alert, then ring alert.
Making a Call
You must be in the home screen to dial a phone number (see page 26).
|
Press |
To |
1 |
keypad keys |
dial the phone number |
|
|
|
2 |
N |
make the call |
|
|
|
3 |
O |
end the call and “hang up” the |
|
|
phone when you are finished |
|
|
|
|
|
|
Tip: You can also close the phone flip to end the call.
14

Answering a Call
When you receive a call, your phone rings and/or vibrates and displays an incoming call message.
When the phone flip is active, open the phone to answer the call. (To activate, press M> Settings
> In Call Setup > Answer Options > Open To Answer.)
If the phone flip is not active:
|
Press |
To |
1 |
Nor |
answer the call |
|
ANSWER (-) |
|
|
|
|
2 |
O |
end the call and “hang up” the |
|
|
phone when you are finished |
|
|
|
|
|
|
Viewing Your Phone Number
To view your phone number from the home screen, press
M#.
While you are on a call, press M> My Tel. Numbers.
Note: Your phone number must be stored on your SIM card to use this feature. To store your phone number on the SIM card, see page 61. If you do not know your phone number, contact your service provider.
Started Getting
15
Highlight Features
Highlight Features
You can do much more with your phone than make and receive calls!
Taking and Sending a Photo
Shortcut: From the home screen, press CAMERA (-) to activate the camera.
To activate your phone’s camera from the menu system:
Find the Feature M> Multimedia > Camera
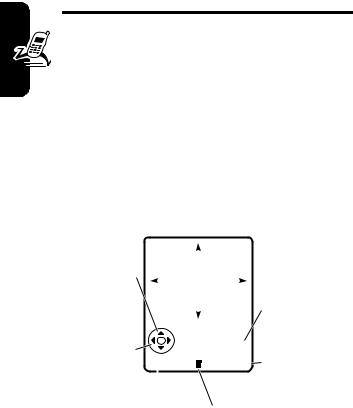
The active viewfinder image appears on your display.
Press Sup or |
|
|
|
|
|
|
|
|
|
|
|
|
|
|
|
|
|
|
|
|
|
|
|
|
|
|
|
|
|
down to zoom |
|
|
|
|
|
|
|
|
|
|
|
|
|
|
in or out. |
|
|
|
|
|
|
|
|
|
|
|
|
|
|
|
|
|
|
|
IMAGE |
|
|
|||||||
|
|
|
|
|
|
|
|
|||||||
Press Sleft |
|
|
|
|
|
AREA |
|
|
|
|
|
|
Photo Storage |
|
|
|
|
|
|
|
|
|
|
|
|
|
|
||
|
|
|
|
|
|
|
|
|
|
|
|
|
Space Used |
|
|
|
|
|
|
|
|
|
|
|
|
|
|
||
or right to |
|
|
|
|
|
|
|
|
|
|
|
|
|
|
|
|
|
|
|
|
|
|
|
|
|
|
|
|
|
decrease or |
|
|
|
|
Photo Viewfinder |
|
||||||||
increase image |
|
|
|
|
Memory Used:72% |
Press |
||||||||
|
|
|
|
|
|
|
|
|
|
|
|
|
||
brightness. |
|
|
|
|
|
|
|
|
|
|
|
|
|
CAPTURE (+) |
BACK |
|
|
|
CAPTURE |
||||||||||
Press BACK (-) |
|
to exit |
|
|
|
|
|
|
|
|
to take a photo. |
|||
|
|
|
Press Mto open |
|||||||||||
|
|
|
||||||||||||
the camera application. |
|
|
My Pictures Menu. |
|||||||||||
16

Point the camera lens at the photo subject, then:
|
Press |
To |
1 |
CAPTURE (+) |
take a photo |
2 |
STORE (+) |
view storage options |
|
|
If you choose to store the |
|
|
photo, continue to step 3. |
|
or |
|
|
DISCARD (-) |
delete the photo and return to |
|
|
active viewfinder |
|
|
|
3 |
S |
scroll to Send, Store in Online Alb, |
|
|
Store in Phone, Apply as Wallpaper, |
|
|
Apply as Screen Saver, or |
|
|
Apply as Phonebook Entry |
4 |
SELECT (+) |
perform the storage option |
|
|
|
Taking a Self-Portrait
Action
1From the home screen, press CAMERA (-) to activate the camera, then close the flip.
or
Close the flip, then press and hold the smart key to activate the camera and external display viewfinder.
2Use the external viewfinder to aim the camera lens.
Features Highlight
17

Highlight Features
Action
3Press the smart key to take a photo.
4Wait 5 seconds for your phone to save the photo
and reset the external viewfinder.
or
Open the flip to store or discard the photo.
Adjusting Camera Settings
Press Mto open the My Pictures Menu when the camera is active. The My Pictures Menu can include the following options:
Option |
Description |
|
View Phone Album |
View pictures and photos |
|
|
stored on your phone. |
|
|
|
|
Auto-Timed Capture |
Set a timer for the camera to |
|
|
take a photo. |
|
|
|
|
Pictures Setup |
Open the setup menu to |
|
|
adjust the following settings: |
|
|
|
•Lighting Conditions: Set to Automatic, Sunny, Cloudy, Indoor (Home), Indoor (Office), or Night.
•Exposure: Set to +2, +1, 0, -1, or -2.
•Resolution: Set the camera to capture photos at the following resolutions: MMS (160x120 pixels), Medium (320x240 pixels, or High (640x480 pixels)
18
Option |
Description |
|
|
|
• Shutter Tone: Activate a tone that sounds when you take a photo. Can be set to None, Chimp, Quack, Flix,
Boing, or Click.
View Free Space |
See how much memory |
|
remains for storing pictures. |
|
|
Sending a Multimedia Message
A Multimedia Messaging Service (MMS)
multimedia message contains one or more pages
with text and embedded media objects (including photos, pictures, animations, sounds, voice
records, and video clips). You can send a multimedia message to other MMS-capable phones, and to email addresses.
Tip: The layout of all pages in a multimedia message is defined by the layout of the first page. To display a media object at the top of the page, insert it in the first half of the message text. To display a media object at the bottom of the page, insert it in the second half of the message text.
Find the Feature |
E> Create Message |
|
|
|
> New Multimedia Msg |
|
|
|
|
Press |
To |
1 |
keypad keys |
enter text on the page |
|
|
|
2 |
M |
open the MMS Menu |
3 |
S |
scroll to Add Media |
4 |
SELECT (+) |
display a list of items you can |
|
|
insert |
Features Highlight
19

Highlight Features
|
Press |
To |
5 |
S |
scroll to My Pictures, |
|
|
Record Voice, Sound, Video, |
|
|
New Page, Quick Note, or |
|
|
Contact Info |
6 |
SELECT (+) |
select the file type |
7 |
S |
highlight the file you want |
|
|
|
8 |
SELECT (+) |
insert the file |
|
|
To add another page to the |
|
|
message, continue to step 9. |
|
|
|
9 |
M |
open the MMS Menu to insert a |
|
|
new page |
|
|
|
10 |
S |
scroll to Add Media |
11 |
SELECT (+) |
display a list of items you can |
|
|
insert |
|
|
|
12 |
S |
scroll to New Page |
13 |
SELECT (+) |
insert a new page after the |
|
|
current page |
Repeat steps 1 to 8 to enter contents for the new page.
20

When you finish composing the multimedia message:
|
Press |
To |
||||
1 |
OK (+) |
store the message |
||||
2 |
S |
scroll to a Mobile Number/Email |
||||
|
|
option: |
||||
|
|
Highlight an existing |
||||
|
|
phonebook entry. |
||||
|
|
Or highlight [One Time Entry] to |
||||
|
|
enter one or more phone |
||||
|
|
numbers or email addresses. |
||||
|
|
Or highlight |
||||
|
|
[New Phonebook Entry] to enter a |
||||
|
|
number/address and add it to |
||||
|
|
the phonebook. |
||||
|
|
|
|
|
|
|
3 |
ADD (+) |
add the phonebook entry to |
||||
|
|
the list of recipients |
||||
|
|
Repeat steps 2 and 3 to add |
||||
|
|
additional phonebook entries |
||||
|
|
to the list. |
||||
|
or |
|
|
|
|
|
|
SELECT (+) |
select [One Time Entry] or |
||||
|
|
[New Phonebook Entry] |
||||
4 |
DONE (+) |
store the numbers/addresses |
||||
5 |
S |
scroll to Subject |
||||
|
|
|
|
|
|
|
|
|
|
|
|
|
|
|
|
|
|
|
|
|
|
|
|
|
|
|
|
|
|
|
|
|
|
|
|
|
|
|
|
|
|
6 |
EDIT/ADD (-) |
select Subject |
||||
Features Highlight
21

|
|
|
|
|
|
Press |
To |
|
|
|
7 |
keypad keys |
enter the subject |
||||
|
|
|
|
|
||||
|
|
|
8 |
OK (+) |
store the subject |
|||
|
|
|
9 |
EDIT/ADD (-) |
select Attachments to attach a |
|||
|
|
|
|
|
|
|
file to the message, if desired |
|
|
|
|
|
|
|
|
||
|
|
|
|
|
|
|
||
|
|
|
|
|
||||
|
|
|
10 |
S |
scroll to Picture, Sounds, or Video |
|||
Features |
|
11 |
SELECT (+) |
select the file type |
||||
12 |
S |
highlight the file you want |
||||||
|
|
|||||||
|
|
|
|
|
||||
|
|
|
13 |
SELECT (+) |
attach the file |
|||
Highlight |
|
14 |
BACK (-) |
return to the message editor |
||||
15 |
S |
scroll to Receipt to request a |
||||||
|
|
|||||||
|
|
|
|
|
|
|
receipt, if desired |
|
|
|
|
|
|
||||
|
|
|
16 |
EDIT/ADD (-) |
select Receipt |
|||
|
|
|
17 |
ADD (+) or |
activate/deactivate the |
|||
|
|
|
|
|
|
REMOVE (+) |
delivery report |
|
|
|
|
18 |
DONE (-) |
return to the message editor |
|||
|
|
|
19 |
SEND (+) |
send the message |
|||
|
|
|
|
|
|
or |
|
|
Mview message details, save the message in the drafts folder, or cancel the message
22

Using a Bluetooth® Wireless
Connection
Your phone supports Bluetooth wireless connections. You can set up a wireless link with a Bluetooth headset or handsfree car kit, or connect to a computer or hand-held device to exchange and synchronize data.
Note: Your phone's Bluetooth features and Bluetooth Class 1 power levels are not allowed for outdoor operation in France. To avoid unlawful interference with radio signals, do not use the Bluetooth features in France unless you are indoors.
Turning Bluetooth Power On or Off
The preferred method for connecting your phone to a Bluetooth headset or handsfree car kit is to turn on Bluetooth power on your phone, then connect your phone to the headset or car kit.
To turn Bluetooth power on:
Find the Feature M> Settings > Connection
>Bluetooth Link > Setup
>Power > On
This procedure turns Bluetooth power on and leaves it on until you turn it off. When your phone’s Bluetooth power is on, your handsfree accessory can automatically reconnect to the phone when you turn on the accessory or move it within range of the phone.
Note: To extend battery life, use the above procedure and set Bluetooth power to Off when not in use.
Features Highlight
23

Highlight Features
Searching for Other Devices
To connect your phone to a Bluetooth headset or handsfree device:
Find the Feature M> Settings > Connection
> Bluetooth Link
> Handsfree
> [Look For Devices]
If Bluetooth power is turned off, your phone prompts you to Temporarily Power On? the Bluetooth power setting. Press
YES (-) to proceed. Alternatively, set Power to On in the Setup menu to turn Bluetooth power on and leave it on.
Your phone scans for and displays a list of device(s) located within range of the phone.
Note: If your phone is already connected to a device, you must disconnect from it to search for other devices.
To connect to a device, highlight the device name and press SELECT (+).
The device may request permission to bond with your phone. Select YES (-) and enter the correct PIN code to create a secure connection with the device. When the connection is made, the Bluetooth indicator à displays in the home screen, and the external Bluetooth LED indicator flashes.
24

Sending Objects to Another Device
You can use a Bluetooth wireless connection to send a picture, sound, video, phonebook entry, datebook event, or bookmark from your phone to another phone, computer, or hand-held device.
Sending a Picture, Sound, or Video
Highlight the object on your phone that you want to send to the other device, then press M> Copy.
Select a recognized device name listed in the Object Exchange menu, or [Look For Devices] to search for the device to which you want to send the object.
Sending a Phonebook Entry, Datebook Event, or Bookmark
Highlight the item on your phone that you want to send to the other device, then press M> Send.
Select a recognized device name listed in the Object Exchange menu, or [Look For Devices] to search for the device to which you want to send the item.
Features Highlight
25
Learning to Use Your Phone
Learning to Use Your Phone
See page 1 for a basic phone diagram.
Using the Display
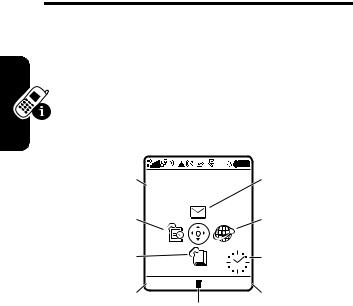
The home screen is displayed when you are not on a call or using the menu. You must be in the home screen to dial a phone number.
Date |
Service Provider |
|
Messages |
|
|
10/15/05 |
|
|
|
Recent Calls |
|
|
Browser |
|
Phonebook |
|
|
Clock |
|
Left Soft Key |
CAMERA |
BROWSER |
Right Soft Key |
|
Menu Indicator |
||||
Label |
Label |
|||
Press the 4-way navigation key Sup, down, left, or right to select a menu feature icon. If you select a menu icon by mistake, press Oto return to the home screen.
The menu indicator M shows that you can press the menu key Mto enter the main menu.
26

Labels at the bottom corners of the display show the current soft key functions. Press the left soft key -or right soft key +to perform the indicated function.
Notes:
•Your home screen may appear different than shown. For example, the menu feature icons normally are
hidden to allow a better view of the wallpaper image. You can still select the menu icons when they are hidden from view. To show or hide menu icons,
see page 80.
• Your phone can display an analog or digital clock in the home screen (see page 79).
• Your phone’s display normally is visible only when the |
Learning |
|
display backlight is on, or when the display is viewed |
||
|
||
in direct sunlight. To extend battery life, the backlight |
|
|
turns off automatically when no activity is detected for |
to |
|
a specified time. The backlight turns back on when |
||
Use |
||
you open the flip or press any key. To set the time that |
||
|
||
the backlight stays on, see page 60. |
Your |
|
• To further extend battery life, you can set the display |
||
Phone |
||
to turn off (in addition to the backlight) when no |
||
|
||
activity is detected for a specified time. The display |
|
|
turns back on when you open the flip or press any key. |
|
|
To set the time that the display stays on, see page 61. |
|
27

Learning to Use Your Phone
The following status indicators can display:
|
|
5. Call |
6. Messaging |
|
|
||
4. |
Roam |
Status |
Presence |
7. |
Message |
||
3. |
Signal |
|
|
|
|
8. |
Battery |
|
|
|
|
||||
|
Strength |
|
Service Provider |
|
|
Level |
|
|
|
10/15/05 |
|
|
|
|
|
2. |
GPRS |
|
|
|
|
9. |
Ring Style |
1. |
Data |
|
|
|
|
|
|
|
Transmission |
|
|
|
|
||
|
|
|
|
|
|
|
|
|
|
|
CAMERA |
BROWSER |
|
|
|
1. Data Transmission Indicator – Show connection and data transmission status. The Bluetooth® wireless connection indicator à shows when a Bluetooth connection is active. Other indicators can include:
4 |
= secure packet |
7 |
= unsecure packet |
|
data transfer |
|
data transfer |
3 |
= secure |
6 |
= unsecure |
|
application |
|
application |
|
connection |
|
connection |
2 |
= secure Circuit |
5 |
= unsecure CSD |
|
Switch Data |
|
call |
|
(CSD) call |
|
|
28
Loading...