


M I T E L ® E X P R E S S M E S S E N G E R
S Y S T E M A D M I N I S T R A T I O N M A N U A L

NOTICE
The information contained in this document is believed to be accurate in all respects but is not warranted by Mitel Corporation (MITEL). The information is subject to change without notice and should not be construed in any way as a commitment by MITEL or any of its affiliates or subsidiaries. MITEL and its affiliates and subsidiaries assume no responsibility for any error or omissions in this document. Revisions of this document or new editions of it may be issued to incorporate any such changes.
Nothing in this document may be reproduced in any manner, either wholly or in part for any use whatsoever, without written permission from Mitel Corporation.
TRADEMARKS
Mitel design is a registered trademark of Mitel Corporation.
SX-200 is a registered trademark of Mitel Corporation.
This product contains software licensed from Annabooks.
Portions of software copyright ” 1994 Datalight, Inc.
All other product names specified in this document are trademarks of their corresponding owners.
Mitel Express Messenger System Administration Manual Release 4.0
9109-080-025-NA
December 2002, Issue 5
£,¥, Trademark of Mitel Corporation. ¤ Copyright 2002, Mitel Corporation. All rights reserved.
Printed in Canada.
*
www.mitel.com/messaging

Table of Contents
Table of Contents |
|
SECTION 1: INTRODUCTION ........................................................................... |
4 |
Intended Audience .................................................................................... |
5 |
How to use this Document........................................................................ |
6 |
Useful Tips ................................................................................................ |
7 |
Additional References............................................................................. |
11 |
Testing Mitel Express Messenger.......................................................... |
12 |
Setting Up Express Messenger for the First Time ............................... |
12 |
SECTION 2: SETTING UP MITEL EXPRESS MANAGER .............................. |
15 |
Installing Express Manager onto a PC.................................................. |
15 |
Connecting your PC to Express Messenger........................................... |
16 |
Starting Mitel Express Manager ........................................................... |
18 |
Logging In To Express Messenger From Express Manager ................ |
19 |
About the Login Passcodes..................................................................... |
20 |
SECTION 3: ABOUT MAILBOXES .................................................................. |
21 |
Reserved Mailboxes ................................................................................ |
21 |
General Usage Mailboxes....................................................................... |
22 |
Single-Digit Mailboxes............................................................................ |
26 |
Menu Tree Maiboxes (Multi-Level Auto Attendant) ............................ |
29 |
Hospitality Mailboxes............................................................................. |
32 |
About the Auto Attendant ...................................................................... |
33 |
SECTION 4: CHANGING MAILBOX PARAMETERS ...................................... |
35 |
Accessing the System Administrator’s Mailbox.................................... |
36 |
New (or Repeat) Installation.................................................................. |
38 |
Add, Edit, or Delete a Mailbox from a Telephone................................. |
39 |
Add, Edit, or Delete a Mailbox from Express Manager........................ |
45 |
SECTION 5: PERFORMING SYSTEM ADMINISTRATION FROM A |
|
TELEPHONE .................................................................................................... |
53 |
Setting Date, Time, and Business Hours .............................................. |
53 |
Recording System Greetings .................................................................. |
54 |
Setting or Changing System Parameters.............................................. |
60 |
Setting and Changing Passcodes ........................................................... |
64 |
Creating Distribution Lists .................................................................... |
65 |
Message Notification............................................................................... |
67 |
Using FAX Finder................................................................................... |
73 |
i

|
Table of Contents |
SECTION 6: PERFORMING SYSTEM ADMINISTRATION FROM |
|
EXPRESS MANAGER ..................................................................................... |
75 |
Setting the Date, Time, and Business Hours........................................ |
75 |
Selecting Alternate Greetings................................................................ |
76 |
Setting the FAX parameters .................................................................. |
77 |
Setting and Displaying Site Information .............................................. |
78 |
Changing Passcodes................................................................................ |
79 |
Setting Up Notification........................................................................... |
80 |
Using FAX Finder................................................................................... |
82 |
Setting FAX Parameters ........................................................................ |
83 |
Selecting the Directory Prompt (First or Last Name) .......................... |
84 |
Enabling Softkey Support ...................................................................... |
84 |
Enabling Auto attendant Transfer to Any PBX Extension.................. |
85 |
Setting the Automatic Route Select Code ............................................. |
85 |
Setting the Account Code Access Code.................................................. |
85 |
Enabling or Disabling Personal Contact Numbers............................... |
86 |
Setting the Voice Prompt Language ...................................................... |
86 |
Setting the Language Change Mailbox Number .................................. |
87 |
Setting up RAD Ports ............................................................................. |
88 |
Setting up a DID Server ......................................................................... |
91 |
Enabling the Bilingual Voice Prompts Option...................................... |
94 |
Enabling the Hospitality Option............................................................ |
95 |
Enabling the PMS Option ...................................................................... |
96 |
Enabling Express Messenger Release 4.0 Options............................... |
98 |
Performing Backups ............................................................................... |
99 |
Performing Restores ............................................................................. |
101 |
Performing Upgrades............................................................................ |
102 |
Upgrading from Release 1.0 to Release 2.0 Software......................... |
105 |
Upgrading from Release 1.0 to Release 2.1 Software......................... |
106 |
Upgrading from Release 2.0 to Release 2.1 Software......................... |
106 |
Upgrading to Release 3.0 Software...................................................... |
107 |
Upgrading an Express Messenger Card to Support |
|
Additional Ports or Release 3.0 Software Features............................ |
110 |
Upgrading to Release 4.0 Software Features...................................... |
112 |
Viewing System Logs............................................................................ |
112 |
ii

|
Table of Contents |
SECTION 7: PERFORMING MAINTENANCE AND TROUBLESHOOTING. 113 |
|
APPENDIX A: MITEL EXPRESS MANAGER MENUS .................................. |
121 |
APPENDIX B: GLOSSARY ............................................................................ |
133 |
APPENDIX C: EXPRESS MANAGER SYSTEM MESSAGES ...................... |
135 |
APPENDIX D: EXPRESS MANAGER SYSTEM LOG MESSAGES |
|
(DIAG.DAT) .................................................................................................... |
145 |
APPENDIX E: PMS PROTOCOL SUPPORT ................................................ |
171 |
INDEX............................................................................................................. |
173 |
iii

Introduction
Section 1: Introduction
Welcome to Mitel£ Express Messenger, the complete voice messaging system designed to improve communication between your company, clients, customers, and employees.
Features provided by Express Messenger include:
xAn Automated Attendant that plays different greetings during open and closed business hours, provides a company directory that uses extension numbers or names as the dialing method, and allows single-digit option selection.
xSubscriber mailboxes that are passcode protected.
xA tutorial that assists new subscribers with mailbox setup.
xSimple message retrieval.
xEasy to use menus that allow subscribers to send urgent, private, or certified messages.
xNotification of waiting messages whether subscribers are in or out of the office.
Express Messenger’s Automated Attendant provides two immediate benefits for your company:
xYour receptionist has more time for calls that require special assistance and other activities within your business.
xAll telephone calls are answered automatically. Even when an employee is not available, callers can leave a message before hanging up.
4

Introduction
Express Messenger includes tools to help get your voice mail up and running quickly. After that, you can customize the system to meet your specific business needs.
Two important topics are at the end of Section 1:
xTesting Express Messenger
xSetting Up Express Messenger for the First Time.
Intended Audience
This document is written for the System Administrator responsible for the Express Messenger voice mail system.
Typical System Administrator duties include:
xAdding and changing mailboxes. Mailboxes are where employees send and listen to messages.
xRecording company greetings and announcements.
xSetting up outside notification numbers for pagers, cellular phones, and so forth.
xBacking up the system.
xAnswering employee questions.
xMaintaining the voice mail system.
5

Introduction
How to use this Document
An Express Messenger dealer has already installed Express Messenger on your PBX and performed the necessary system programming to make it work for you. Read the System Administration Manual from beginning to end to find out how to optimize Express Messenger to your business requirements.
Use the glossary in Appendix B if you are unsure of any terminology used here.
Conventions
This System Administration Manual uses the following conventions.
xVoice Prompts and Responses
Italics represent references to the spoken word, such as examples of the company and mailbox greetings.
xBoxes
NOTE: A box surrounds important notes that provide additional information about a topic or refer you to other material.
CAUTION: Cautions alert you to the possibility of damage to equipment or software.
WARNING: Warnings alert you to the possibility of personal injury.
xTelephone Keys
Square brackets always surround numbers or letters that you enter from the telephone keypad. For example:
[1] [2] ... [0] [#] [*]
If you need to press several keys in succession, the square brackets surround all the numbers. For example:
[1234]
xMailbox Numbers
Depending on your PBX dial plan, mailbox numbers can be 2, 3, 4, or 5 digits.
xButtons and Flexible Buttons
Angle brackets always surround telephone button names and flexible button functions. For example:
¢Message² ¢Microphone² ¢Hold²
6

Introduction
Useful Tips
Some people are reluctant to use their telephone for anything other than making calls. Encourage users to experiment with different options offered by Mitel Express Messenger.
Here are some tips to help everyone benefit from having a voice mail system.
xExplaining Mitel Express Messenger to Customers
The best way to make customers feel comfortable about Express Messenger is through employees who are enthusiastic about it customers will sense their
positive attitude. If employees use their mailboxes and return calls in a timely fashion, customers will feel secure about the new system.
Encourage employees to keep their mailbox greeting current and to check for messages frequently, particularly if their telephone doesn’t have a message
light or if they have been away from their office. Respond to messages promptly not two or three days later.
xMailbox Greetings
Employee mailboxes use two types of greetings: "permanent" and "temporary". Callers always hear the permanent greeting unless you record a temporary greeting. A permanent greeting should be general enough to cover all situations. A temporary greeting describes a specific situation and lasts for a user-specified number of days.
Here are examples of both types of greetings:
Permanent greeting:
"You have reached Christine Conner. I can’t answer your call right now, so please leave your name, number, and a short message I will get back to you as soon as possible. If you
need immediate assistance, press [0] and ask to be transferred to my associate, Julie Jones."
Temporary greeting:
"Hi! You have reached Julie Jones. I will be on vacation from Friday, June 18, through Friday, June 25. I’ll be back on Monday, June 28, so please leave a message and I’ll get back to you as soon as possible. If you require immediate assistance, press [0] and ask to be transferred to Christine Conner."
The mailbox user specifies the number of days for the temporary greeting to last, from 01 to 99, expiring at midnight of the last day. If specified to last only one day, the message starts immediately and expires at midnight of the day the user records it.
Employees who create a new temporary greeting every day show callers that they are really using Express Messenger.
7

Introduction
xDuration of Messages in a Mailbox
Express Messenger saves messages for 15 days. A System Administrator can change the number of days, on a mailbox-by-mailbox basis, by using Express Manager. Express Messenger deletes each saved message as soon as the message is older than the specified number of days.
xSaved Messages and System Size
If too many messages are saved on Express Messenger at any one time, the system will become full and not be able to take new messages.
If Express Messenger’s storage space is 90% full, users will hear this warning when they log into their mailboxes:
“The system is nearly full. Please erase any unnecessary messages.”
If Express Messenger’s storage space is 98% full, its limit has been reached and it will stop taking messages. Users will hear:
“I’m sorry, but the system is full. Please try again at a later time.”
x“Reply” and “Forward”
“Reply” and “Forward” options in the “Listen” menu only work with other mailboxes within this Express Messenger. Users cannot reply to a message that originates from an outside line or forward a message to an outside telephone number.
xType Ahead
Callers always hear a menu when Express Messenger answers the telephone. If you know which keys to use, press them immediately and move through the system as fast as you wish. Although the menus are brief, voice prompts are only for convenience. Occasionally, when interrupting prompts, the system may not detect the key. In this case, press the key again.
xMessage Length and Conditions
Express Messenger does not limit the length of any message. However, after five minutes, Express Messenger interrupts the caller and asks if they wish to continue recording. If there is no reply, Express Messenger stops recording and disconnects the line. Similarly, if the caller stops talking for more than four seconds or has a very faint connection, Express Messenger gives them the option to continue recording.
8
Introduction
xPhantom Messages
To eliminate unwanted or unintended messages, Express Messenger automatically stops recording a message if it hears a steady, non-voice tone, such as dial tone. Express Messenger may interpret background noise, such as in a factory, as a steady tone and mistakenly disconnect the caller. Using a car telephone when the car windows are open can also cause an unwanted disconnection. The caller should try again from a quieter location.
xMusic-on-Hold
There is always a delay between the time Express Messenger answers an outside call and the time someone answers the telephone or Express Messenger sends the call to a mailbox. On most telephone systems, the caller hears nothing while Express Messenger transfers the call unless you install Music-on-Hold. Music can be alternated with product advertisements to keep callers interested while they wait for an answer to their call.
Note: Express Messenger ports can operate as Recorded Announcement Devices (RAD) to provide Music-on-Hold or other audio. For more information, see page 88.
xThe Operator’s Mailbox
Messages left in the operator’s mailbox (mailbox 0) need to be checked regularly. Assign someone the task of frequently checking the operator’s mailbox and forwarding any messages to the appropriate persons.
If the operator is away from the telephone or unable to answer (such as at night or when the business is closed), callers may become irritated if they have to wait through too many rings before being transferred to the operator’s mailbox. To avoid irritating callers in this manner, either set the call forwarding on the operator’s telephone to Express Messenger or set a shorter transfer-recall time.
The default passcode for the operator's mailbox is [99, 999, or 9999].
xThe Operator's Telephone
A special feature of Express Messenger is that the auto attendant attempts to transfer calls to the operator even if the console is busy. This allows the operator an opportunity to put the current call on hold and answer the new call.
xMessage Notification to Extensions
If a subscriber's telephone does not have a message light, Express Messenger can use the Message Notification feature to inform the subscriber when messages arrive in their mailbox.
One of the five available notification methods is to ring any internal extension number. If you enter the mailbox owner's extension as the alternate number, that extension will ring when a message arrives. Refer to Message Notification in the Section 4, Changing Mailbox Parameters for more information.
9

Introduction
xBilingual Prompts
Express Messenger can be set up to play voice mail prompts in two of three languages: English, French or Spanish. Outside callers choose the language they want when prompted by the auto attendant. Subscribers can request their preferred language from the system administrator.
NOTE: Support for bilingual voice prompts is an optional feature of Mitel Express Messenger Release 3.0.
xRecord A Call
Subscribers can use Express Messenger to record their telephone conversations. The recordings are stored in the subscriber’s mailbox separated from regular voice mail messages.
NOTE: Record A Call is an optional feature of SX-200 EL/ML LIGHTWARE 18, Release 1. For more information, see the SX-200 EL/ML Technical Documentation. Instructions on using Record A Call are included in the telephone user guides produced with Superset Manual Maker (PN 9132-900-000-NA, Issue 8).
IMPORTANT: Record a Call should only be used in conjunction with the laws of the jurisdiction where the call is placed from and/or the laws of the jurisdiction of the place being called. MITEL is not liable for misuse of this feature in a manner that does not conform with the applicable law; for example: laws involving wiretapping, eavesdropping, electronic surveillance, call recording etc. Dealers should warn the customer in writing that they are responsible to use this feature in accordance with the law and that in many jurisdictions both parties must be made aware that the call is being recorded in order to comply.
10

Introduction
Additional References
Installation Guide
Your Express Messenger dealer used an Installation Guide to install Express Messenger into your PBX. An Installation Worksheet is included with the Installation Guide. Ask your dealer for a copy of the Installation Guide.
User Guide
Each Express Messenger subscriber should have a User Guide for daily message management. It provides step-by-step instructions on how to call Express Messenger, set up a personal mailbox, and send or retrieve messages. The guide is on the Documentation diskettes included with the Express Messenger card and on the Manual Maker web site at http://edocs.mitel.com/manual /maker.
User Guide information is not repeated in this manual. Keep a copy of the User Guide with this manual.
Instructions on using Record A Call are included in the telephone user guides produced with Manual Maker.
Wallet Card
Each subscriber should also have a Wallet Card for quick reference to the Express Messenger Menu system.
Front Desk User Guide & Guest User Guide
In hotel or motel applications, the front desk attendant should have a front desk user guide. This guide provides instructions on how to administer guest mailboxes.
A guide on using Express Messenger from a guest phone should be left in each guest room. The guide can be ordered by calling Mitel Networks Customer Service. Specify part number 51001140A for the English/French version or 51001154A for the English/Spanish version. PDF versions of the guide are also available for downloading from the Manual Maker web site at http://edocs.mitel.com/manual /maker.
11

Introduction
Testing Mitel Express Messenger
Perform the following tests to verify that Mitel Express Messenger is working properly.
Because PBX programming frequently blocks users from accessing an outside line and then dialing back in to the main number (tying up two Central Office trunks in the process), parts of this test may need to be performed from off-site. The System Administrator could call in from home and then verify the message upon arrival.
1.Call the business using an outside line. Verify that you hear the company open or closed greeting (as appropriate) and that the message is clear and understandable.
2.Call the business using several outside lines. Verify the number of rings allowed before Express Messenger answers.
3.Call the business using an outside line. When Express Messenger answers, press 0 and verify that Express Messenger transfers the call to the attendant.
4.Call the Express Messenger hunt group using an internal line. Verify that you do not hear the company greeting. Verify the number of rings allowed before answer.
5.Call the Express Messenger hunt group using an internal line. Verify that you do not hear the company greeting. When Express Messenger answers, press 0 and verify that Express Messenger transfers the call to the attendant.
Setting Up Express Messenger for the First Time
When first setting up Express Messenger, perform the following activities (detailed procedures for each activity are elsewhere in this manual). Do all activities from a telephone first (some activities cannot be performed from Express Manager). Keep the Installation Worksheet in front of you because much of the information you will be prompted for is on that sheet.
You can set up Express Messenger to operate either as a unilingual or bilingual system. A unilingual system prompts users in English (the default language), French or Spanish. A bilingual system provides prompts in two of the three available languages.
NOTE: Spanish prompts are only available on MEM Release 2.1 systems or later and French prompts on MEM Release 3.0 or later. Bilingual operation is an optional feature of MEM Release 3.0. For more information, see Enabling the Bilingual Prompts Option on page 94.
12

Introduction
Unilingual Systems
To set up a system with greetings and prompts in one language:
1.Enter the necessary information onto the Express Messenger Installation Worksheet.
2.Identify the Message Center number for accessing Express Messenger ports (provided by the PBX installer).
3.To log in, dial the Express Messenger message center number.
Express Messenger answers and prompts you for a mailbox number.
4.Enter the system administrator mailbox number: default is [99, 999, or 9999].
5.To set up a system to prompt in the current language (default English), press 1, and then skip to step 7.
OR
6.To set up a system to prompt in another language:
dial the Technician’s passcode (default 8642), followed by 9. Express Messenger prompts you for a Technician’s Function Code.
dial 20001 for English, 20002 for Spanish, or 20003 for French. You are prompted for another Function Code.
dial 10281. The system resets.
After the system resets, log into the administrator’s mailbox again. The system is now prompting in the selected language. Continue the set up at step 7.
7.Express Messenger prompts you for a passcode.
8.Enter the default passcode [1234].
9.Enter [1] for a new installation.
10.Set the number of digits for mailbox length to 2, 3, or 4 digits (default is 3 digits).
11.Enter current date and time in 24-hour format.
12.Program the opening and closing time for each day of the week.
13.Enter the Operator’s extension number.
14.Create a mailbox for each user’s extension.
15.Create the required single digit mailboxes.
16.Prepare and record primary company greetings for open hours and closed hours.
17.Set the Send Message access code (the code is provided by the PBX installer on the Installation Worksheet as Feature Access Code 41).
13

Introduction
Bilingual Systems
To set up a system with greetings and prompts in two languages:
1.Follow the above procedure to set up the system to operate in one language.
2.Log into the administrator mailbox.
3.When prompted for a passcode, dial the Technician’s passccode (default 8642).
4.Dial 9.
Express Messenger prompts for another Technician’s function code.
5.Dial 20272 followed by the 11-digit code required to enable the Bilingual Voice Prompts option. You must call the Mitel Corporation order desk to get the code. For more information on enabling the Bilingual Voice Prompts language, see page 94.
Express Messenger responds with “Enabled.”
6.Set the default language (if different than the language specified in step 1) by dialing 20001 for English, 20002 for Spanish, or 20003 for
French.
7.Set the alternate language by dialing 20011 for English, 20012 for Spanish, or 20013 for French.
8.Dial 10281 to reset the system.
9.After the system resets, log into the System Administrator Mailbox again.
10.When prompted, enter the default passcode (1234).
11.Using the Greetings menu (press 4 from the main menu) to verify existing greetings and then record new greetings in the alternate language, including the bilingual welcome greeting.
14

Setting up Mitel Express Manager
Section 2: Setting up Mitel Express Manager
For optimum performance, install the Mitel Express Manager program on your PC’s hard drive. You do not need to shut down your voice mail system while installing Express Manager on your computer.
Installing Express Manager onto a PC
The following software must be resident on your PC to install and run Express Manager:
xDOS version 3.3 or higher
xWindows 3.1 or higher.
To install the Express Manager software on your PC’s hard drive:
1.Place the disk labeled Mitel Express Manager into your 3 1/2" floppy drive.
2.At the DOS prompt, change to the drive in which you placed the disk. For example,
C!a: [Enter]
3.At the DOS prompt, run the install program.
A:\!install [Enter]
Installation of Express Manager will continue automatically until completion. Carefully read and follow any notification about software or documentation changes that display on your screen.
Installation is complete when the DOS prompt returns to your screen. You can now use Express Manager to maintain your company’s voice mail system.
15

Setting up Mitel Express Manager
Connecting your PC to Express Messenger
You Run Express Manager from DOS on your PC. You can connect your PC
xdirectly to a port on the Express Messenger Card, or
xremotely through a modem connection that allows you to communicate to Express Messenger using your telephone system.
Express Manager requires the following hardware:
xIBM or IBM-compatible 286 computer (PC) or higher with a minimum of 2 MB of disk space and 640 KB of memory (RAM).
xVGA monitor (color or monochrome).
xExpress Messenger voice mail card installed in the PBX.
xInternal or external modem.
Connecting your PC Directly to the Express Messenger Card
1.Plug one end of the custom RS-232 cable into an unused COM port on the PC.
2.Plug the other end of the cable into the Express Messenger card connector. You must open the PBX door to connect the cable.
The custom RS-232 cable is a PC-to-PC cable with 9-pin female DB9 connectors on each end. Wires between pines 1 and 4 and between 2 and 3 of the connectors cross over within the cable; that is, it is a null modem cable.
Note that Mitel Corporation does not supply the cable. Two recommended cables are
Belkin F3B207-06 (6 feet)
Belkin F3B207-10 (10 feet).
16

Setting up Mitel Express Manager
3.Access a DOS prompt.
Navigate to the directory that contains the Express Messenger application by typing
CD EXPRESS [Enter]
4.To start Express Manager, type
EXPRESS [Enter]
The Express Manager Login screen appears after several seconds.
5.Select Login from the File menu and enter the Administrator passcode (default [1234]).
6.Program Express Messenger as described in this manual.
7.After you have completed your programming session, remove the cable and replace the PBX front door.
Connecting your PC Remotely
Figure 1 illustrates the proper connection for remote access to Express Messenger. A serial port on your remote PC connects through a modem to the voice mail system.
To connect a PC remotely
1.Connect a PC directly to the Express Messenger card and login to Express Manager application (see Connecting Your PC Directly to the Express Messenger Card on page 16 for instructions).
2.Select the Options menu, then Communications, and then complete the Serial Port Setup window according to the requirements of the remotely located PC port that is connected to your modem. Refer to Communications on page 125 for instructions on how to complete this window.
3.Disconnect the local PC from the Express Manager card and replace the PBX front door.
4.Connect your remotely located PC to a modem.
5.Access a DOS prompt.
6.Navigate to the directory that contains the Express Manager application by typing
CD EXPRESS [Enter]
7.To start Express Manager, type
EXPRESS [Enter]
8.Select Login from the File menu.
9.Enter the Administrator passcode ([1234] unless changed during installation) and the telephone number of the voice mail system (auto attendant) in the initial login window.
17

Setting up Mitel Express Manager
Figure 1 - Remote Connection to Express Messenger
Starting Mitel Express Manager
Follow the steps below to start the Express Manager program on your PC.
1.Using DOS, change to the EXPRESS directory created on your hard drive during the installation process.
CD EXPRESS [Enter]
2.At your DOS prompt, run the EXPRESS program.
EXPRESS [Enter]
Your screen now displays an Initial Menu Bar, which allows you to change port setups, log in to Express Messenger as a System Administrator, or return to the DOS prompt. Standard DOS prompts and menu options are not described in this document.
NOTE: You can also start Express Manager from Windows by adding the program to your Windows desktop. See the your Windows documentation for more information.
To exit from a menu, press <Esc>.
Before Express Manager can communicate with Express Messenger, set up the Communications Serial Port Setup window to correspond to the requirements of your COM port and your modem. Refer to your PC and modem manuals.
18
Setting up Mitel Express Manager
Logging In To Express Messenger From Express Manager
Follow these steps to log in to Express Manager, after Express Manager has been started as just described. Each screen is described following this procedure.
1.From the initial screen (Figure 45), click on Ok, in the About window.
2.From the File menu, shown in Figure 46, click on File.
3.From the Login window (Figure 47), enter the Administrator’s password; If you are connecting through a modem, enter the telephone number of the voice mail system (auto attendant), and then click Ok.
CAUTION: Always wait at least 10 seconds between logins.
4.From the seven available menus, select the menu and window for the activities to be performed.
5.At the end of a session, log out from the File menu.
19

Setting up Mitel Express Manager
About the Login Passcodes
The passcode you use to log in to the Express Manager determines which menu items are available to you. There are two types of passcodes:
xManager
Log in using the Manager passcode to perform all the system administration, mailbox management, and maintenance functions except, installing (or reinstalling) Express Messenger, accessing Remote Files and changing the Administrator Passcode or passcode length.
xAdministrator
Log in using the Administrator passcode to allow all manager functions plus authority to install (or re-installing) Express Messenger, and access to Remote Files and Administrative Passcodes functions.
IMPORTANT: Give the Manager passcode to the person that performs the day-to-day operations, such as adding mailboxes and changing greetings. The Manager passcode provides limited access to the database thereby reducing the likelihood of novice users causing serious disruptions to the system. (Note that users are still prompted to begin a new installation when they enter the Manager Passcode but get the response “Invalid Selection” when they attempt to do so.)
To protect system security, keep the passcodes confidential.
20

About Mailboxes
Section 3: About Mailboxes
Mitel Express Messenger uses different types of mailboxes. Some are reserved for system functions and others are available for general use. Each mailbox type has different characteristics and uses. Mailbox numbers normally correspond to a telephone’s extension number.
This section describes the different mailbox types. It also describes how the Auto Attendant handles a mailbox number that is not the same as the extension number.
Read this section to determine how to use the different mailbox features. Refer to the next section, Changing Mailbox Parameters, for step-by-step instructions on how to add, edit, or delete mailboxes and how to enable or disable other Express Messenger features.
Reserved Mailboxes
The Operator
Mailbox 0 is reserved for the Operator's mailbox. Callers will leave messages in this mailbox if they,
xdo not know who to contact,
xare calling from a rotary dial telephone and cannot access menus or mailboxes.
Check for messages left in the Operator’s mailbox several times each day. The default passcode for the operator's mailbox is [99, 999, or 9999]. If the passcode length has been changed, add the appropriate number of zeros to the end of the passcode; for example, [123400].
The Directory
Mailbox 9 is reserved for the personnel directory. It cannot take messages. Callers use it to reach an employee by dialing the first six letters of the employee’s first or last name (as defined).
Administrative Functions
Mailboxes 90 through 97 or 990 through 997 or 9990 through 9997 are reserved for Express Messenger self-administrative functions.
The Modem
Mailbox 98 is reserved for the Express Messenger built-in modem used for remote administration or maintenance.
21

About Mailboxes
The System Administrator’s Mailbox
Mailbox 99 or 999 or 9999 is reserved for the system administrator. It is not associated with an extension and does not take messages. Any touch-tone telephone in your company can access this mailbox. The default passcode is [1234]. To maintain system security, change this passcode at first login.
General Usage Mailboxes
Express Messenger has four types of mailboxes:
xExtension
xMessage-Only
xTransfer-Only
xInformation-Only
The system administrator assigns mailbox types. Each type serves a different purpose and has its own characteristics. Mailbox types are described on the following pages.
NOTE: These examples assume that your PBX is programmed so that the Express Messenger Auto Attendant answers your primary business number(s). If that is not true, then the Operator sends calls to Express Messenger only when the caller wants to leave a voice message.
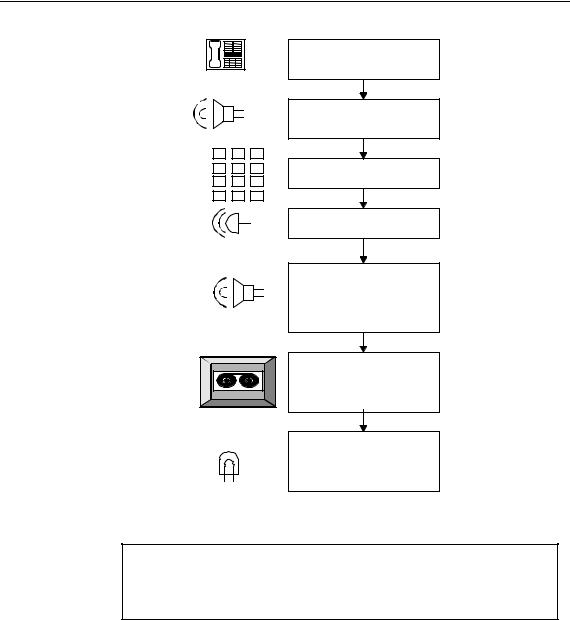
Extension Mailbox
An extension mailbox is the default mailbox type. The mailbox number is usually the same as the subscriber’s extension number. Figure 2 shows the calling sequence for an Extension mailbox.
22
About Mailboxes
Telephone
K |
|
|
|
|
E 1 |
2 |
3 |
||
Y |
4 |
5 |
6 |
|
P |
||||
7 |
8 |
9 |
||
A |
||||
* |
0 |
# |
||
|
||||
BELL
Device
Storage
Light
An outside caller calls the company telephone number
Express Messenger answers an outside caller with the company greeting
The caller enters an extension number on the keypad
The extension rings
If the line is busy or unanswered, Express Messenger asks the caller if they wish to leave a message
Express Messenger records a message in the associated mailbox
Express Messenger turns on the telephone message light (if available)
Figure 2 - Extension Mailbox Calling Sequence
NOTE: For telephones without message lights, you can set up message notification to the subscriber’s extension number. See Message Notification on page 67.
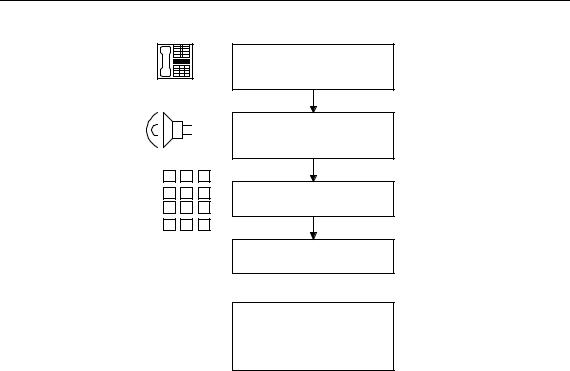
Message-Only Mailbox
A message-only mailbox takes messages and turns on the message light of the associated extension. Unlike an extension mailbox, the phone does not ring after the caller enters the extension number. Instead, Express Messenger immediately asks the caller to leave a message.
A message-only mailbox does not require an associated extension. In this case, Express Messenger cannot turn on a message light; instead, the mailbox owner must periodically check for messages.
Message-only mailboxes are for people who do not have telephones or who are not in the office very often.
23

About Mailboxes
Examples:
Out-of-town sales representatives
Delivery drivers
Part-time and seasonal employees
Frequent customers.
Figure 3 illustrates how a message-only mailbox works.
Outside caller initiates the call
Telephone
KEYPAD
1
 2
2
 3
3
4
 5
5
 6
6
7
 8
8
 9 *
9 * 
 0
0
 #
#
Express Messenger answers an outside caller with the company greeting
The caller enters an extension number on the keypad
The caller bypasses the telephone and goes directly to Express Messenger
Express Messenger asks the caller if they wish to leave a message
Device |
Storage |
Light |
Express Messenger records a message in the associated mailbox
Express Messenger turns on the telephone message light (if available)
Figure 3 - Message-only Mailbox Calling Sequence
24

About Mailboxes
Transfer-Only Mailbox
A transfer-only mailbox is associated with an extension but does not take messages. When a caller dials this extension he will hear, "You are being transferred to <mailbox name>." If the extension is busy or unanswered, Express Messenger returns the caller to the company greeting. No message is taken.
Add transfer-only mailboxes for areas in your company where you need a telephone but don’t want messages taken.
Figure 4 shows a Transfer-only mailbox calling sequence.
Outside caller initiates the call
Telephone
Express Messenger answers an outside caller with the company greeting
KEYPAD
1 |
2 |
3 |
|
|
|
4 |
5 |
6 |
The caller enters an |
||
extension number on the |
|||||
7 |
8 |
9 |
|||
keypad |
|||||
|
|
|
|||
* |
0 |
# |
|
|
|
|
|
|
|
|
|
|
|
|
The station rings |
||
BELL |
|
|
|
||
|
|
|
|||
|
|
|
|
|
|
|
|
|
If the line is busy or |
||
|
|
|
unanswered, no message is |
||
|
|
|
taken - Express Messenger |
||
|
|
|
returns the caller to the |
||
|
|
|
company greeting |
||
|
|
|
|
|
|
Figure 4 - Transfer-only Mailbox Calling Sequence
Examples:
Conference rooms
FAX machines
Modem hookups
Lab areas.
Information-Only Mailbox
An information-only mailbox, also referred to as a bulletin board, is not associated with a specific extension number and does not take messages. Instead, it plays a greeting that provides information to callers. The information could be any message that your company wants customers to hear but does not need a person to say.
Figure 5 shows an Information-only mailbox calling sequence.
25
About Mailboxes
Telephone
KEYPAD |
1 |
2 |
3 |
|
4 |
5 |
6 |
||
|
||||
|
7 |
8 |
9 |
|
|
* |
0 |
# |
Outside caller initiates the call
Express Messenger answers an outside caller with the company greeting
The caller enters an extension number on the keypad
Express Messenger plays the mailbox greeting, which is information for the caller.
After listening to the information, the caller can hang up, dial 0 to reach the Operator, or dial another extension number.
Figure 5 - Information-only Mailbox Calling Sequence
Examples:
Business hours
The company address
General announcements
Product updates.
Single-Digit Mailboxes
Mailboxes 1 through 8 are referred to as single-digit mailboxes, and can be any one of the four types of general use mailboxes.
They are most effective when referenced in the company greeting, so that the caller needs to enter only one number to receive the information they want or to reach the most frequently dialed extensions.
Three typical uses for single-digit mailboxes follow. For the first two, assume callers hear this company greeting, in which the numbers 1 and 2 refer to singledigit mailboxes.
"Thank you for calling ABC Industries. If you know the number of the person you wish to reach, enter it now. For a personnel directory, press 9. For business hours, press 1. To reach customer service, press 2. If you wish to speak to an operator, press 0 or hold on the line."
26

About Mailboxes
Example 1:
Mailbox 1 is an Information-Only mailbox. A typical greeting for mailbox 1 could be:
"ABC Industries is open for business Monday through Friday from 9 am to 6 p.m. and on Saturdays from 9am to 1 p.m.”
The caller listens to the information and hangs up when they are done.
Example 2:
Mailbox 2 is an Extension mailbox. For this example, we’ll assume extension 214 is the Customer Service telephone.
When the caller presses 2, extension 214 rings. The caller might hear the following greeting if the telephone is busy or not answered.
"All of our Customer Service representatives are busy at the moment. Please leave your name, telephone number and a brief message. Someone will get back to you as soon as possible."
You need to record the appropriate name and greeting for mailbox 2 for this setup to work correctly.
If extension 214 also belongs to a subscriber, such as the customer service secretary, callers can dial 214 directly to reach that person. The secretary can have a personal greeting identifying himself or herself as the owner of the mailbox but only if Mailbox 2 is programmed as a Transfer-Only mailbox. Express Messenger saves all department and personal messages in mailbox 214.
A subscriber can serve as the destination for any number of single-digit mailboxes.
NOTE: Always add a new single digit mailbox first before changing the company greeting to refer to it.
Figure 6 shows the calling sequence for a Single-digit mailbox.
27

|
|
|
|
About Mailboxes |
|
|
|
|
|
|
|
|
2 |
|
|
214 |
|
|
Customer Service |
|
|
||
|
Department |
|
Customer Service |
||
|
Mailbox type: Transfer-Only |
|
Secretary |
||
|
|
|
|
||
Telephone |
|
|
|
|
|
|
|
|
|
|
|
|
|
|
|
|
|
|
Extension 214 rings |
|
|
|
|
|
|
|
|
|
|
|
|
|
|
|
|
|
If line is busy or |
|
|
|
|
|
unanswered, Express |
|
|
|
|
|
Messenger asks the caller if |
|
|
|
|
|
they wish to leave a |
|
|
|
|
|
message |
|
|
|
|
|
|
|
|
|
|
Device |
Storage |
Express Messenger records a message in the associated mailbox (214)
Light
Express Messenger turns on the telephone message light (if available)
Figure 6 - Single-digit Mailbox Calling Sequence
After a caller enters a single digit at the greeting, Express Messenger will wait to see if another digit follows. To prevent this slight pause, assign single-digit mailbox numbers that are not the first digit of other mailbox or extension numbers.
Example 3:
Mailbox 8 is programmed as the Language Change mailbox, a special mailbox used to present callers with auto attendant voice prompts in a second language. In this example, when a caller presses 8, all subsequent auto attendant prompts the caller hears will be in French.
"Thank you for calling ABC Industries. For service in French, press 8."
You need to record prompts for mailbox 2 in the appropriate language for this setup to work correctly. For more information, see Recording System Greetings on page 54.
28
 Loading...