


INSTALLATION GUIDE
112 DECT Phone (Universal) and RFP 12 Single Cell Base Station
A
B
© Copyright 2015, Mitel Networks Corporation. All Rights Reserved. The Mitel word and logo are trademarks of Mitel Networks Corporation.
Any reference to third party trademarks are for reference only and Mitel makes no representation of the ownership of these marks.
.Description
The Mitel® 112 DECT Phone (Universal) and Mitel RFP 12 Single Cell Base Station provide SIP call processing features on a cordless handset. The base station supports up to twenty cordless handsets.
The base station connects to the network via a LAN cable. The base station extends the SIP phone functionality from the communications platform to the phones. You can purchase additional phones and chargers from the Mitel Customer Service order desk.
The phone has an indoor signal range of up to 50 meters (150 feet) from the base station and an outdoor range of up to 300 meters (900 feet). Note that this range can be limited by concrete or metal barriers. To extend the signal range, you can purchase an optional repeater.
Figure A provides an overview of the completed installation.
What You Received
•Mitel 112 DECT Phone
•Phone charging cradle with hard wired power supply adapter. The power supply adapter kit contains multiple, attachable, voltage connector plugs.
•Mitel RFP 12 Single Cell Base station
•Ethernet cable
•Power supply adapter for base station. The power supply adapter kit contains multiple, attachable, voltage connector plugs.
What You Require
•MiVoice Business Communications Platform or
•MiVoice Office 250 Communications Platform
Base Station Rear Panel Components (See Figure B )
# |
Description |
|
|
|
RESET button: Press to activate configuration changes or to enable handset |
||
|
registration. The first |
handset automatically registers with the base station |
|
|
after approximately 30 seconds. To register each additional handset on the |
||
|
same base station, you must first reboot the base station by pressing the RE- |
||
|
SET button on the rear panel of the base station. |
||
|
You can also reset the base station configuration (including the admin user |
||
|
name and password) to the default values using the this button. Press and |
||
|
hold the Reset button for greater than 10 seconds to reset the base station. |
||
|
Note that you cannot reset the base station while a call is being supported on |
||
|
a handset that is registered to the base station. |
||
|
LAN Port: Connects to LAN via Ethernet cable. |
||
|
|
||
|
Power Input: Connects to the AC power adapter for the base station. |
||
|
|
|
|
|
Base Station LED |
|
|
|
State |
|
Meaning |
|
OFF |
|
No power |
|
FLASHING GREEN |
|
Initialization in progress |
|
SOLID GREEN |
|
Ethernet connection is available (Normal op- |
|
|
|
eration) |
|
FLASHING ORANGE |
|
No IP address |
|
SOLID ORANGE |
|
Reset required. |
|
FLASHING RED |
|
Factory setting in progress |
|
|
|
OR |
|
|
|
Ethernet connection not available OR |
|
|
|
Handset registration/deregistration failed. |
|
SOLID RED |
|
Factory reset warning after a long press (10 |
|
|
|
seconds or more) of the Reset button |
|
|
|
OR |
|
|
|
Error condition. Replace base station if error |
|
|
|
condition persists. |
Installation
Connect the Cables
1.Connect the LAN cable into the LAN port on the back of the base station.
2.Connect the other end of the LAN cable to a LAN jack.
3.Connect the power supply adapter cable to the power input jack. See
in Figure |
B . |
4. Plug the |
supply adapter into an appropriate wall outlet. Ensure the |
LED on the base station flashes yellow.
Install Handset Batteries
1.Release the battery cover at the bottom of the back panel and remove.
2.Insert rechargable batteries in the handset.
3.Replace the back panel and slide shut.
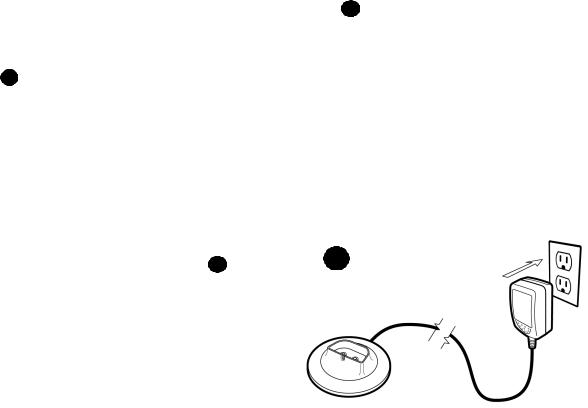
Set Up Handset Charger
1.Install the appropriate 2-prong wall outlet connector into the charger power supply adapter. To remove the currently installed connector, depress the small tab and slide it up.
2.Plug the charger’s power supply adapter into an appropriate wall outlet.
3.Place the handset in the charger. When you place the first handset in the charger, the handset automatically registers with the base station. After the first handset is registered, there is a 5 minute period during which you can register additional handsets. To register additional handsets after the 5 minute period has expired, you must press the Reset button on the base station to start a new 5 minute registration period.
G
4.Charge the batteries. We recommend that you charge the batteries fully before first use. Initially, it takes approximately 10 hours to fully charge the batteries. Normally, it takes approximately 6 hours.
Configuration Requirements
You must complete the following configuration before the handset is fully functional:
1.License and program the Mitel 112 DECT Phone as a SIP Phone:
•For MiVoice Business systems, program the SIP phone with a SIP device type. Refer to the MiVoice Business System Administration Tool online help for instructions.
•For MiVoice Office 250 systems, see the MiVoice Office 250 Features and Programming Guide and/or the Database Programming online help for instructions on how to program SIP phones.
2.Configure the handsets and base station to support SIP telephony. Refer to the Mitel 112 VoIP System Guide for instructions.
NOTE: The communication platform documentation, Mitel 112 VoIP System Guide, and Mitel 112 DECT Phone Quick Reference Guides are available on the Mitel Customer Documentation web site at http://edocs.mitel.com.
2
 Loading...