


M I T E L
5312/5324
IP Phone User Guide

5312/5324 IP Phone Quick Reference Guide
This guide provides information for frequently used features. For more information about these and other features, refer to the user guide. For voice mail information, refer to the voice mail user guide for your system.
Feature Buttons
Most of the following feature codes work when your IP phone is idle. However, if you are on an active call or if the IP phone is off-hook, you may need to press
 (Special) to activate the feature before you enter the feature code.
If you make a mistake when entering numbers or characters, you can press  (Hold) to move the cursor to the left and delete the characters entered, or you can press * to cancel the feature.
Button |
|
Action |
|
|
|
||
(Up) |
Provides volume control. |
||
(Down) |
Scrolls through feature options. |
||
|
|
||
(Speaker) |
Activates Handsfree Mode. |
||
Activates features. |
|||
|
|||
|
|
||
(Mute) |
Mutes the microphone during a |
||
|
call. |
|
|
|
|
||
(Directory) |
Activates the contact and feature |
||
|
DIrectory. |
||
|
|
||
|
Activates features while on a call. |
||
(Special) |
The |
(Special) button does not |
|
cancel features. To cancel |
|||
|
|||
|
features, press the Star button (*). |
||
|
|
||
(Redial) |
Calls the last external number |
||
|
dialed. You cannot redial internal |
||
|
numbers. |
||
|
|
||
(Hold) |
Places the current call on hold. |
||
|
Left/Backspace when entering |
||
|
dialpad characters. |
||
|
|
||
(Transfer) |
Transfers the current call. |
||
|
Right/Forward when entering |
||
|
dialpad characters. |
||
|
|
||
(Message) |
Connects to voice mailbox and |
||
|
notifies when you have |
||
|
messages. |
||
|
Toggles between Alpha Mode and |
||
|
Numeric Mode when entering |
||
|
dialpad characters. |
||
|
|
|
|
Commonly Used Feature Codes
Contact your system administrator for more information about system features.
Feature |
Code |
|
|
ACD Agent – Log In/Out |
328 |
|
|
Automatic IC Call Access – On/Off |
361 |
|
|
Automatic Trunk Call Access – On/Off |
360 |
|
|
Background Music – On/Off |
313 |
|
|
Call Forward – All Calls |
355 |
|
|
Call Logging |
333 |
|
|
Conference |
5 |
|
|
Default Station |
394 |
|
|
Directory |
307 |
|
|
Display Time And Date |
300 |
|
|
Do-Not-Disturb – On/Off |
372 |
|
|
Dynamic Extension Express – On/Off |
364 |
|
|
Dynamic Extension Express Handoff |
388 |
|
|
Handsfree – On/Off |
319 |
|
|
Headset – On/Off |
317 |
|
|
Hold – Individual |
336 |
|
|
Hold – System |
335 |
|
|
Hunt Group – Remove/Replace |
324 |
|
|
Message – Cancel Left Message |
366 |
|
|
Message – Delete Message |
368 |
|
|
Message – Leave Message |
367 |
|
|
Message – View Messages Menu |
365 |
|
|
Microphone Mute – On/Off |
314 |
|
|
Page Receive – On/Off |
325 |
|
|
Program Buttons |
397 |
|
|
Program Station Password |
392 |
|
|
Programmable Buttons – Default |
395 |
|
|
Queue (Callback) Request |
6 |
|
|
Record-A-Call |
385 |
|
|
Reverse Transfer (Call Pick-Up) |
4 |
|
|
Ring Tone Selection |
398 |
|
|
Station Speed Dial |
382 |
|
|
Station Speed Dial – Programming |
383 |
|
|
Switch Keymap |
399 |
|
|
System Forward – On/Off |
354 |
|
|
System Speed Dial |
381 |
|
|
View Button Assignments |
396 |
|
|
Mitel® 5312/5324 IP Phone User Guide – Issue 2, June 2010

Answering Calls
Lift the handset, or press  (Speaker) to answer a call while using a headset or to answer a call in Handsfree Mode.
Placing Emergency Calls
Dial the emergency number (911 U.S. or 999/112 Europe). The system immediately places the emergency call as soon as you dial the number, even if you do not select an outside line.
Placing Internal (Intercom) Calls
With or without the handset lifted, dial the extension number. If you enter incorrect digits, you can press  (Hold) to move the cursor backward, deleting the last digits entered. If you are using Handsfree Mode, listen for the double tone, and then begin to speak.
Placing External Calls
Press the Outgoing button, an unlit Call button, or enter the Outgoing Call access code (8 is the default code), and then dial the number.
Redialing External Numbers
With or without the handset lifted, press the  (Redial). The system automatically selects
a line and dials the number.
Transferring Calls to Other Extensions
1.While on the call, press  (Transfer), and then enter the extension number.
2.Do one of the following:
•Wait for an answer, announce the call, and then hang up. If the extension is unavailable, press the flashing IC or Call button to return to the caller.
•Hang up to transfer the call and disconnect the call from your IP phone.
Forwarding Calls
1.Press the Fwd button, and then enter the feature code, if applicable. ENTER FORWARD DEST appears.
2.Enter the extension number, or press the Outgoing button or enter the Outgoing Call access code (8 is the default code), and then dial the telephone number.
Placing Conference Calls
1.While on the first call, press the Conf button to place the call on hold. CALL NEXT PARTY TO CNF appears.
2.Place a call to the next conference party. For external calls, press the Outgoing button or enter the Outgoing Call access code (8 is the default code), and then dial the number.
3.After the party answers, announce the conference, and then press the Conf button to place the call on hold. If necessary, repeat this step to add the remaining conference party.
4.Press the Conf button again to start the conference. CNF IN PROGRESS appears.
Viewing and Responding to Messages
1.With the handset on-hook, press  (Message). Messages are displayed as first in/first out. If there is more than one message, you can
repeatedly press  (Message) to scroll through the messages.
2.When the desired message is displayed, press #, or lift the handset for privacy, and then press # to respond. (If your handset is off-hook and you
press  (Message), you automatically place a call to the party or message center who left the message.)
Using Do-Not-Disturb
1.Press the DND button, and then do one of the following:
•Press  (Up) or
  (Down) to scroll through the messages.
•Enter the two-digit number for the DND message.
2.After selecting the message, enter the additional text for the DND description, if applicable.
3.Press  (Speaker), or lift and replace the handset.
Placing a Page Announcement
1.Press 7.
2.Enter the page-zone number (0 to 9).
3.After the tone, make your announcement, and then hang up.
Mitel® 5312/5324 IP Phone User Guide – Issue 2, June 2010

Contents
Contents
Getting Started |
1 |
|
|
Welcome . . . . . . . . . . . . . . . . . . . . . . . . . . . . . . . . . . . . . . . . . . . . . . . . . . . . . . . . . . . . . . . . . . . . . . . 1
About Your Phone . . . . . . . . . . . . . . . . . . . . . . . . . . . . . . . . . . . . . . . . . . . . . . . . . . . . . . . . . . . . . . . 1
5312 IP Phone Features . . . . . . . . . . . . . . . . . . . . . . . . . . . . . . . . . . . . . . . . . . . . . . . . . . . . . . . 2
5324 IP Phone Features . . . . . . . . . . . . . . . . . . . . . . . . . . . . . . . . . . . . . . . . . . . . . . . . . . . . . . . 3
Phone Feature Descriptions. . . . . . . . . . . . . . . . . . . . . . . . . . . . . . . . . . . . . . . . . . . . . . . . . . . . . 4
Handset . . . . . . . . . . . . . . . . . . . . . . . . . . . . . . . . . . . . . . . . . . . . . . . . . . . . . . . . . . . . . . . . 4
Display . . . . . . . . . . . . . . . . . . . . . . . . . . . . . . . . . . . . . . . . . . . . . . . . . . . . . . . . . . . . . . . . . 4
Display Buttons . . . . . . . . . . . . . . . . . . . . . . . . . . . . . . . . . . . . . . . . . . . . . . . . . . . . . . . . . . 4
Ring/Message Indicator . . . . . . . . . . . . . . . . . . . . . . . . . . . . . . . . . . . . . . . . . . . . . . . . . . . . 4
Speaker . . . . . . . . . . . . . . . . . . . . . . . . . . . . . . . . . . . . . . . . . . . . . . . . . . . . . . . . . . . . . . . . 4
Feature Buttons . . . . . . . . . . . . . . . . . . . . . . . . . . . . . . . . . . . . . . . . . . . . . . . . . . . . . . . . . . 5
Dialpad Buttons . . . . . . . . . . . . . . . . . . . . . . . . . . . . . . . . . . . . . . . . . . . . . . . . . . . . . . . . . . 5
Programmable Buttons. . . . . . . . . . . . . . . . . . . . . . . . . . . . . . . . . . . . . . . . . . . . . . . . . . . . . 6
Phone Signals . . . . . . . . . . . . . . . . . . . . . . . . . . . . . . . . . . . . . . . . . . . . . . . . . . . . . . . . . . . . . . . . . . 6
Comfort and Safety Tips . . . . . . . . . . . . . . . . . . . . . . . . . . . . . . . . . . . . . . . . . . . . . . . . . . . . . . . . . . 7
Using a Headset. . . . . . . . . . . . . . . . . . . . . . . . . . . . . . . . . . . . . . . . . . . . . . . . . . . . . . . . . . . . . . . . . 7
Using the 5310 IP Conference Unit . . . . . . . . . . . . . . . . . . . . . . . . . . . . . . . . . . . . . . . . . . . . . . . . . 8
Turning the Conference Unit On and Off . . . . . . . . . . . . . . . . . . . . . . . . . . . . . . . . . . . . . . . 8
Adjusting the Conference Unit Volume . . . . . . . . . . . . . . . . . . . . . . . . . . . . . . . . . . . . . . . . 8
Muting the Conference Unit . . . . . . . . . . . . . . . . . . . . . . . . . . . . . . . . . . . . . . . . . . . . . . . . . 8
Placing the Conference Unit in Presentation Mode . . . . . . . . . . . . . . . . . . . . . . . . . . . . . . . 9
Using the Line Interface Module (LIM). . . . . . . . . . . . . . . . . . . . . . . . . . . . . . . . . . . . . . . . . . . . . . 10
Making and Answering Calls Using the Analog Button . . . . . . . . . . . . . . . . . . . . . . . . . . . . . . . 11
Making and Answering Calls Using the Failover Mode . . . . . . . . . . . . . . . . . . . . . . . . . . . . . . . 12
Personalizing Your Phone |
13 |
|
|
Adjusting the Viewing Angle . . . . . . . . . . . . . . . . . . . . . . . . . . . . . . . . . . . . . . . . . . . . . . . . . . . . . 13 Installing Designation Cards . . . . . . . . . . . . . . . . . . . . . . . . . . . . . . . . . . . . . . . . . . . . . . . . . . . . . 14 Changing Volume Levels . . . . . . . . . . . . . . . . . . . . . . . . . . . . . . . . . . . . . . . . . . . . . . . . . . . . . . . . 15 Changing the Ring Tone . . . . . . . . . . . . . . . . . . . . . . . . . . . . . . . . . . . . . . . . . . . . . . . . . . . . . . . . . 15 Adjusting the Display Contrast . . . . . . . . . . . . . . . . . . . . . . . . . . . . . . . . . . . . . . . . . . . . . . . . . . . 15 Changing the Language . . . . . . . . . . . . . . . . . . . . . . . . . . . . . . . . . . . . . . . . . . . . . . . . . . . . . . . . . 16 Listening to Background Music . . . . . . . . . . . . . . . . . . . . . . . . . . . . . . . . . . . . . . . . . . . . . . . . . . . 16 Using the Dialpad Buttons to Enter Characters . . . . . . . . . . . . . . . . . . . . . . . . . . . . . . . . . . . . . . 17
Mitel® 5312/5324 IP Phone User Guide – Issue 2, June 2010 |
Page iii |

Contents
Using Programmable Buttons . . . . . . . . . . . . . . . . . . . . . . . . . . . . . . . . . . . . . . . . . . . . . . . . . . . . 19
Default Access Codes . . . . . . . . . . . . . . . . . . . . . . . . . . . . . . . . . . . . . . . . . . . . . . . . . . . . . . . . 20 Outside Line Access Codes . . . . . . . . . . . . . . . . . . . . . . . . . . . . . . . . . . . . . . . . . . . . . . . . 20 Extension Numbers . . . . . . . . . . . . . . . . . . . . . . . . . . . . . . . . . . . . . . . . . . . . . . . . . . . . . . 20 Default Feature Codes. . . . . . . . . . . . . . . . . . . . . . . . . . . . . . . . . . . . . . . . . . . . . . . . . . . . . . . . 21
Viewing Button Assignments . . . . . . . . . . . . . . . . . . . . . . . . . . . . . . . . . . . . . . . . . . . . . . . . . . . . . 23 Resetting Programmable Buttons . . . . . . . . . . . . . . . . . . . . . . . . . . . . . . . . . . . . . . . . . . . . . . . . . 23 Resetting the IP Phone to the Default Settings . . . . . . . . . . . . . . . . . . . . . . . . . . . . . . . . . . . . . . 24 Switching Keymaps. . . . . . . . . . . . . . . . . . . . . . . . . . . . . . . . . . . . . . . . . . . . . . . . . . . . . . . . . . . . . 24 Activating Door Relay . . . . . . . . . . . . . . . . . . . . . . . . . . . . . . . . . . . . . . . . . . . . . . . . . . . . . . . . . . . 24
Answering and Placing Calls |
25 |
|
|
Answering Calls. . . . . . . . . . . . . . . . . . . . . . . . . . . . . . . . . . . . . . . . . . . . . . . . . . . . . . . . . . . . . . . . 25
Answering Waiting Calls . . . . . . . . . . . . . . . . . . . . . . . . . . . . . . . . . . . . . . . . . . . . . . . . . . . . . . 25 Using Automatic Call Access . . . . . . . . . . . . . . . . . . . . . . . . . . . . . . . . . . . . . . . . . . . . . . . . . . . 25 Redirecting Calls . . . . . . . . . . . . . . . . . . . . . . . . . . . . . . . . . . . . . . . . . . . . . . . . . . . . . . . . . . . . 26
Using Automatic Trunk Answer . . . . . . . . . . . . . . . . . . . . . . . . . . . . . . . . . . . . . . . . . . . . . . . . . . . 26 Placing Calls . . . . . . . . . . . . . . . . . . . . . . . . . . . . . . . . . . . . . . . . . . . . . . . . . . . . . . . . . . . . . . . . . . 27
Placing Emergency Calls . . . . . . . . . . . . . . . . . . . . . . . . . . . . . . . . . . . . . . . . . . . . . . . . . . . . . . 27 Placing Emergency Calls using the LIM Line. . . . . . . . . . . . . . . . . . . . . . . . . . . . . . . . . . . . . . . 27 Placing Internal Calls . . . . . . . . . . . . . . . . . . . . . . . . . . . . . . . . . . . . . . . . . . . . . . . . . . . . . . . . . 28 Requesting a Callback (Queuing the Phone). . . . . . . . . . . . . . . . . . . . . . . . . . . . . . . . . . . 28 Using Camp-on . . . . . . . . . . . . . . . . . . . . . . . . . . . . . . . . . . . . . . . . . . . . . . . . . . . . . . . . . 28 Placing External Calls . . . . . . . . . . . . . . . . . . . . . . . . . . . . . . . . . . . . . . . . . . . . . . . . . . . . . . . . 29 Redialing a Number . . . . . . . . . . . . . . . . . . . . . . . . . . . . . . . . . . . . . . . . . . . . . . . . . . . . . . . . . . 29
Using Speed Dial . . . . . . . . . . . . . . . . . . . . . . . . . . . . . . . . . . . . . . . . . . . . . . . . . . . . . . . . . . . . . . . 30
Using System Speed Dial . . . . . . . . . . . . . . . . . . . . . . . . . . . . . . . . . . . . . . . . . . . . . . . . . . . . . 30 Using Station Speed Dial . . . . . . . . . . . . . . . . . . . . . . . . . . . . . . . . . . . . . . . . . . . . . . . . . . . . . . 30 Storing Station Speed-Dial Numbers . . . . . . . . . . . . . . . . . . . . . . . . . . . . . . . . . . . . . . . . . 30 Dialing Station Speed-Dial Numbers . . . . . . . . . . . . . . . . . . . . . . . . . . . . . . . . . . . . . . . . . 30 Deleting Station Speed-Dial Entries. . . . . . . . . . . . . . . . . . . . . . . . . . . . . . . . . . . . . . . . . . 31 Assigning Speed-Dial Numbers to Programmable Buttons . . . . . . . . . . . . . . . . . . . . . . . . 31
Using the Directory . . . . . . . . . . . . . . . . . . . . . . . . . . . . . . . . . . . . . . . . . . . . . . . . . . . . . . . . . . . . . 32 Using Account Codes . . . . . . . . . . . . . . . . . . . . . . . . . . . . . . . . . . . . . . . . . . . . . . . . . . . . . . . . . . . 33
Page iv |
Mitel® 5312/5324 IP Phone User Guide – Issue 2, June 2010 |

Contents
Call Features |
35 |
|
|
Using Handsfree Mode . . . . . . . . . . . . . . . . . . . . . . . . . . . . . . . . . . . . . . . . . . . . . . . . . . . . . . . . . . 35 Using Ring Intercom Always . . . . . . . . . . . . . . . . . . . . . . . . . . . . . . . . . . . . . . . . . . . . . . . . . . . . . 35 Using Mute . . . . . . . . . . . . . . . . . . . . . . . . . . . . . . . . . . . . . . . . . . . . . . . . . . . . . . . . . . . . . . . . . . . . 35 Placing Calls On Hold . . . . . . . . . . . . . . . . . . . . . . . . . . . . . . . . . . . . . . . . . . . . . . . . . . . . . . . . . . . 36 Entering a Hookflash. . . . . . . . . . . . . . . . . . . . . . . . . . . . . . . . . . . . . . . . . . . . . . . . . . . . . . . . . . . . 36 Transferring Calls . . . . . . . . . . . . . . . . . . . . . . . . . . . . . . . . . . . . . . . . . . . . . . . . . . . . . . . . . . . . . . 36
Transferring Calls to Other Extensions . . . . . . . . . . . . . . . . . . . . . . . . . . . . . . . . . . . . . . . . . . . 36 Transferring Calls to External Numbers . . . . . . . . . . . . . . . . . . . . . . . . . . . . . . . . . . . . . . . . . . . 37 Using Reverse Transfer . . . . . . . . . . . . . . . . . . . . . . . . . . . . . . . . . . . . . . . . . . . . . . . . . . . . . . . 37
Viewing Your System Information . . . . . . . . . . . . . . . . . . . . . . . . . . . . . . . . . . . . . . . . . . . . . . . . . 37 Viewing Caller ID Information . . . . . . . . . . . . . . . . . . . . . . . . . . . . . . . . . . . . . . . . . . . . . . . . . . . . . 37 Forwarding Calls . . . . . . . . . . . . . . . . . . . . . . . . . . . . . . . . . . . . . . . . . . . . . . . . . . . . . . . . . . . . . . . 37
Manual Call Forwarding . . . . . . . . . . . . . . . . . . . . . . . . . . . . . . . . . . . . . . . . . . . . . . . . . . . . . . . 38 System Forwarding . . . . . . . . . . . . . . . . . . . . . . . . . . . . . . . . . . . . . . . . . . . . . . . . . . . . . . . . . . 38
Using Dynamic Extension Express . . . . . . . . . . . . . . . . . . . . . . . . . . . . . . . . . . . . . . . . . . . . . . . . 39 Placing Conference Calls . . . . . . . . . . . . . . . . . . . . . . . . . . . . . . . . . . . . . . . . . . . . . . . . . . . . . . . . 41
Adding a Conference Party . . . . . . . . . . . . . . . . . . . . . . . . . . . . . . . . . . . . . . . . . . . . . . . . . . . . 41 Transferring a Conference . . . . . . . . . . . . . . . . . . . . . . . . . . . . . . . . . . . . . . . . . . . . . . . . . . . . . 41 Dropping Out of a Conference . . . . . . . . . . . . . . . . . . . . . . . . . . . . . . . . . . . . . . . . . . . . . . . . . . 41 Ending a Conference and Placing all Parties on Hold . . . . . . . . . . . . . . . . . . . . . . . . . . . . . . . . 42
Using Record-A-Call . . . . . . . . . . . . . . . . . . . . . . . . . . . . . . . . . . . . . . . . . . . . . . . . . . . . . . . . . . . . 42 Using Group Listen . . . . . . . . . . . . . . . . . . . . . . . . . . . . . . . . . . . . . . . . . . . . . . . . . . . . . . . . . . . . . 42 Using Call Logging . . . . . . . . . . . . . . . . . . . . . . . . . . . . . . . . . . . . . . . . . . . . . . . . . . . . . . . . . . . . . 43 Using Secondary Extension Buttons. . . . . . . . . . . . . . . . . . . . . . . . . . . . . . . . . . . . . . . . . . . . . . . 44 Using Configuration Assistant . . . . . . . . . . . . . . . . . . . . . . . . . . . . . . . . . . . . . . . . . . . . . . . . . . . . 45
Changing Your Station Password . . . . . . . . . . . . . . . . . . . . . . . . . . . . . . . . . . . . . . . . . . . . . . . 45 Accessing Configuration Assistant. . . . . . . . . . . . . . . . . . . . . . . . . . . . . . . . . . . . . . . . . . . . . . . 45 Changing the Dynamic Extension Express Settings . . . . . . . . . . . . . . . . . . . . . . . . . . . . . . . . . 46 Changing the DND Settings. . . . . . . . . . . . . . . . . . . . . . . . . . . . . . . . . . . . . . . . . . . . . . . . . . . . 46 Changing the Manual Call Forwarding Settings. . . . . . . . . . . . . . . . . . . . . . . . . . . . . . . . . . . . . 47
Using Remote Programming . . . . . . . . . . . . . . . . . . . . . . . . . . . . . . . . . . . . . . . . . . . . . . . . . . . . . 48
Changing the Dynamic Extension Express Settings . . . . . . . . . . . . . . . . . . . . . . . . . . . . . . . . . 48 Changing the DND Settings. . . . . . . . . . . . . . . . . . . . . . . . . . . . . . . . . . . . . . . . . . . . . . . . . . . . 49 Changing the Manual Call Forwarding Settings. . . . . . . . . . . . . . . . . . . . . . . . . . . . . . . . . . . . . 49 Changing Your Station Password . . . . . . . . . . . . . . . . . . . . . . . . . . . . . . . . . . . . . . . . . . . . . . . 50
Mitel® 5312/5324 IP Phone User Guide – Issue 2, June 2010 |
Page v |

Contents
Messages |
51 |
|
|
Leaving Messages at Other Extensions . . . . . . . . . . . . . . . . . . . . . . . . . . . . . . . . . . . . . . . . . . . . 51 Viewing and Responding to Messages . . . . . . . . . . . . . . . . . . . . . . . . . . . . . . . . . . . . . . . . . . . . . 52
Canceling Messages Left at Other Extensions . . . . . . . . . . . . . . . . . . . . . . . . . . . . . . . . . . . . . 52 Deleting Waiting Inter-Station Messages. . . . . . . . . . . . . . . . . . . . . . . . . . . . . . . . . . . . . . . . . . 52
Using Do-Not-Disturb (DND). . . . . . . . . . . . . . . . . . . . . . . . . . . . . . . . . . . . . . . . . . . . . . . . . . . . . . 53 Using Reminder Messages . . . . . . . . . . . . . . . . . . . . . . . . . . . . . . . . . . . . . . . . . . . . . . . . . . . . . . . 54 Paging Other System Users . . . . . . . . . . . . . . . . . . . . . . . . . . . . . . . . . . . . . . . . . . . . . . . . . . . . . . 55
Placing a Page Announcement . . . . . . . . . . . . . . . . . . . . . . . . . . . . . . . . . . . . . . . . . . . . . . . . . 55 Enabling or Disabling the Paging Feature . . . . . . . . . . . . . . . . . . . . . . . . . . . . . . . . . . . . . . . . . 55
Hunt Groups |
57 |
|
|
Logging in to ACD Hunt Groups . . . . . . . . . . . . . . . . . . . . . . . . . . . . . . . . . . . . . . . . . . . . . . . . 57 Logging out of ACD Hunt Groups . . . . . . . . . . . . . . . . . . . . . . . . . . . . . . . . . . . . . . . . . . . . . . . 58 Stopping the ACD Hunt Group Wrap-up Timer . . . . . . . . . . . . . . . . . . . . . . . . . . . . . . . . . . . . . 58
Other Hunt Group Features . . . . . . . . . . . . . . . . . . . . . . . . . . . . . . . . . . . . . . . . . . . . . . . . . . . . . . 59
Requesting Agent Help . . . . . . . . . . . . . . . . . . . . . . . . . . . . . . . . . . . . . . . . . . . . . . . . . . . . . . . 59 Diverting Hunt Group Calls . . . . . . . . . . . . . . . . . . . . . . . . . . . . . . . . . . . . . . . . . . . . . . . . . . . . 59
Hunt Group Supervisor Features . . . . . . . . . . . . . . . . . . . . . . . . . . . . . . . . . . . . . . . . . . . . . . . . . . 60
Accepting or Rejecting Agent Help Calls . . . . . . . . . . . . . . . . . . . . . . . . . . . . . . . . . . . . . . . . . . 60 Monitoring Calls . . . . . . . . . . . . . . . . . . . . . . . . . . . . . . . . . . . . . . . . . . . . . . . . . . . . . . . . . . . . . 60 Stealing Hunt Group Calls . . . . . . . . . . . . . . . . . . . . . . . . . . . . . . . . . . . . . . . . . . . . . . . . . . . . . 60 Using Barge-In . . . . . . . . . . . . . . . . . . . . . . . . . . . . . . . . . . . . . . . . . . . . . . . . . . . . . . . . . . . . . . 61
Troubleshooting |
63 |
|
|
Contact Information. . . . . . . . . . . . . . . . . . . . . . . . . . . . . . . . . . . . . . . . . . . . . . . . . . . . . . . . . . . . . 63
Error Messages . . . . . . . . . . . . . . . . . . . . . . . . . . . . . . . . . . . . . . . . . . . . . . . . . . . . . . . . . . . . . . . . 63
Troubleshooting Tips . . . . . . . . . . . . . . . . . . . . . . . . . . . . . . . . . . . . . . . . . . . . . . . . . . . . . . . . . . . 64
Index |
67 |
|
|
Page vi |
Mitel® 5312/5324 IP Phone User Guide – Issue 2, June 2010 |

Notice
This guide is released by Mitel Networks Corporation and provides information necessary to use the 5312 and 5324 IP Phones. The guide contents, which reflect current Mitel standards, are subject to revision or change without notice.
Some features or applications mentioned may require a future release and are not available in the initial release. Future product features and applications are subject to availability and cost. Some features or applications may require additional hardware, software, or system administrator assistance.
For sales, service, or technical support, contact your local authorized provider:
Enter provider information above.
If you do not know the contact information for your local provider, use the “Partners” link at the top of the Mitel home page (www.mitel.com) to find a location near you.
If you have any questions or comments regarding this user guide or other technical documentation, contact the Technical Publications Department (USA) at:
tech_pubs@mitel.com
Mitel® is a registered trademark of Mitel Networks Corporation.
All other trademarks mentioned in this document are the property of their respective owners, including Mitel Networks Corporation. All rights reserved.
© 2009-2010 Mitel Networks Corporation
Personal use of this material is permitted. However, permission to reprint/republish this material for advertising or promotional purposes or for creating new collective works for resale or redistribution to servers or lists, or to reuse any copyrighted component of this work in other works must be obtained from Mitel.
Mitel® 5312/5324 IP Phone User Guide – Issue 2, June 2010 |
Page i |

Important Safety Instructions and Precautions
Remember the following safety guidelines when using the IP phone.
Programming Emergency Numbers
Make sure to do the following when programming emergency numbers and/or making test calls to emergency numbers:
•Remain on the line and briefly explain to the dispatcher the reason for the call.
•Perform tests during off-peak hours such as early morning or late evenings.
Safety Notices
The following notices may appear on the product or in the technical documentation.
Notice |
Description |
|
|
Caution indicates a potentially hazardous situation which, if not avoided, may result in minor or moderate injury and/or damage to the equipment or property.
Warning indicates a potentially hazardous situation which, if not avoided, could result in death or serious injury.
Danger indicates an imminently hazardous situation which, if not avoided, will result in death or serious injury.
The exclamation point within an equilateral triangle indicates that important operating and maintenance (servicing) instructions are included in the literature accompanying the product.
Maintenance and Repair
There are no user serviceable parts inside the IP phones. For repairs, return the IP phone to an authorized Mitel provider.
NOTE |
Changes or modifications not expressly approved by Mitel may void the user’s right to operate the |
|
equipment. |
||
|
||
|
|
Page ii |
Mitel® 5312/5324 IP Phone User Guide – Issue 2, June 2010 |
Power Requirements
 CAUTION
Phone Damage Hazard. To avoid damaging the IP phone, make sure the IP phone is connected to the proper power supply before powering on. Contact your system administrator for more information.
The IP phone requires any one of the following power supplies:
•Mitel 48-volt DC Ethernet power adaptor 100-240 volt AC 50-60Hz (ES) -part number 50005301
•An industry-standard IEEE 802.3af Power over Ethernet (PoE) power supply unit
If your IP phone uses a centralized PoE power supply unit, do not use the 48-volt DC Ethernet power adaptor. If necessary, contact your system administrator for assistance before connecting your IP phone to the centralized power source.
Make sure the IP phone is plugged into an uninterruptible power supply (UPS). If your IP phone is plugged into the UPS and the power fails, it should remain powered on for about 10 minutes. If the IP phone is not plugged into a UPS and the power fails, the current call is dropped and you will not be able to use the IP phone until the power is restored.
Software Updates
 CAUTION
Phone Damage Hazard. Do not use your IP phone or disconnect it from the power supply while it is updating software.
The IP phone may require occasional software updates when new versions are available. The IP phone is configured to download the updates automatically. Contact your system administrator for more information.
Product Disposal Instructions
This symbol indicates that the product is classified as electrical or electronic equipment and should not be disposed of with other commercial or household waste at the end of its working life. For appropriate disposal and recycling instructions, contact your local Mitel provider.
The Waste of Electrical and Electronic Equipment (WEEE) Directive (2002/96/EC) was established by the European Union to minimize negative impact on the environment, control hazardous substances, and curtail landfill expansion by using the best available recovery and recycling techniques.
Mitel® 5312/5324 IP Phone User Guide – Issue 2, June 2010 |
Page iii |

Phone Usage
This equipment is not for connection to the telephone network or public coin phone service. It is only for use when connected to Mitel systems.
 WARNING
When using your IP phone equipment, basic safety precautions should always be followed to reduce the risk of fire, electric shock and injury to persons, including the following:
•Do not use this product near water, for example, near a bath tub, wash bowl, kitchen sink or laundry tub, in a wet basement, or near a swimming pool.
•Avoid using a phone (other than a cordless type) during an electrical storm. There may be a remote risk of electric shock from lightning.
•Do not use the IP phone to report a gas leak in the vicinity of a leak.
•Do not connect directly to the Public Switched Telephone Network (PSTN). Any connection of this phone to an off premise application, an out of plant application, any other exposed plant application, or to any equipment other than the intended application may result in a safety hazard, and/or defective operation, and/or equipment damage. “Exposed plant” means where any portion of the circuit is subject to accidental contact with electric lighting or power conductors operating at a voltage exceeding 300 volts between conductors or is subject to lightning strikes.
•The socket outlet, if used, shall be located near the equipment and shall be easily located by the user.
•Use only Mitel approved power adaptors.
•The handset supplied with the IP phone is not certified for use with any other phone. Use of the handset with any other phone may have the potential to cause hearing loss in the event of a lighting strike on the outside plant wiring.
Page iv |
Mitel® 5312/5324 IP Phone User Guide – Issue 2, June 2010 |

Notice to Canadian Customers
The Class B digital apparatus complies with Canadian ICES-003.
Notice to U.S. Customers
This equipment has been tested and found to comply with the limits for a Class B digital device, pursuant to Part 15 of the FCC Rules. These limits are designed to provide reasonable protection against harmful interference in a residential installation. This equipment generates, uses, and can radiate radio frequency energy and, if not installed and used in accordance with the instructions, may cause harmful interference to radio communications. However, there is no guarantee that interference will not occur in a particular installation. If this equipment does cause harmful interference to radio or television reception, which can be determined by turning the equipment off and on, the user is encouraged to try to correct the interference by one or more of the following measures:
•Reorient or relocate the receiving antenna.
•Increase the separation between the equipment and receiver.
•Connect the equipment into an outlet on a circuit different from that to which the receiver is connected.
•Consult the dealer or an experienced radio/TV technician for help.
Notice to European Customers
We, Mitel Networks LTD.
Of, Mitel Castlegate Business Park
Portskewett
Caldicot
NP26 5YR
UK
Declare that for the hereinafter mentioned product the presumption of conformity with the applicable essential requirements of DIRECTIVE 1999/5/EC OF THE EUROPEAN
PARLIAMENT (RTTE DIRECTIVE) AND OF THE COUNCIL is given.
Mitel IP Phones: 5312 and 5324
Any unauthorized modification of the product voids this Declaration.
For a copy of the original signed Declaration of Conformity (in full conformance with EN45014), please contact the Regulatory Approvals Manager at the above address.
Mitel® 5312/5324 IP Phone User Guide – Issue 2, June 2010 |
Page v |

Getting Started
Getting Started
Welcome
The instructions in this guide are for using the Mitel 5312/5324 Internet Protocol (IP) Phone on the Mitel 5000 Communications Platform (CP). The Quick Reference Guide located at the beginning of this guide is an overview of frequently used features.
Your IP phone should be powered on and ready to use. If the display is blank, or if the display name, extension number, or time or date are incorrect, contact your system administrator for assistance.
Because a variety of voice mail products work with the 5000 CP, this guide does not include voice mail instructions. For voice mail instructions, refer to the voice mail user guide for your system. For example, refer to the Enterprise Messaging, Basic Voice Mail, and Embedded Voice Mail Card User Guide, part number 835.3205, or the Mitel NuPoint Unified Messaging User Guide on the Mitel Web site (http://edocs.mitel.com). Contact your system administrator for more information about your voice mail system.
Because many phone features can be programmed to perform various tasks, NOTE some features may work differently than the descriptions in this guide. Contact
your system administrator for more information.
About Your Phone
The 5312 and 5324 IP Phones are full-feature, dual port phones that provide voice communication over an IP network. Both phones have a back-lit liquid crystal display (LCD), display-assisted feature access, on-hook dialing, and a Ring/Message Indicator.
For one-touch feature access, the 5312 IP Phone has 12 programmable buttons and the 5324 IP Phone has 24 programmable buttons. Both phones have 10 fixed feature buttons to access commonly used features such as Transfer, Redial, Mute, and so on.
Mitel® 5312/5324 IP Phone User Guide – Issue 2, June 2010 |
Page 1 |

Getting Started
5312 IP Phone Features
The 5312 IP Phone is shown here. See “Phone Feature Descriptions” on page 4 for more information about the IP phone features.
1 |
2 |
3 |
4
7
5
 6
6
1 |
– Handset |
5 |
– Dialpad buttons |
2 |
– Display |
6 |
– Programmable buttons |
3 |
– Ring/Message Indicator |
7 |
– External speaker |
4 |
– Feature buttons |
|
|
Page 2 |
Mitel® 5312/5324 IP Phone User Guide – Issue 2, June 2010 |

Getting Started
5324 IP Phone Features
The 5324 IP Phone is shown here. See “Phone Feature Descriptions” on page 4 for more information about the IP phone features.
1 |
2 |
3 |
4 |
5
8
6
7
1 |
– Handset |
5 |
– Feature buttons |
2 |
– Display |
6 |
– Dialpad buttons |
3 |
– Display buttons |
7 |
– Programmable buttons |
4 |
– Ring/Message Indicator |
8 |
– External speaker |
Mitel® 5312/5324 IP Phone User Guide – Issue 2, June 2010 |
Page 3 |

Getting Started
Phone Feature Descriptions
The following sections describe default configurations. Your IP phone may be programmed differently. Contact your system administrator for more information. See “5312 IP Phone Features” on page 2 and “5324 IP Phone Features” on page 3 for phone feature locations.
Handset
The handset provided with this equipment is hearing aid compatible (HAC). If you are using a headset or if you are in Handsfree Mode, you do not need to use the handset. See “Using a Headset” on page 7 and “Using Handsfree Mode” on page 35 for more information.
Display
The display provides a two-line, 20-character viewing area for using features and identifying callers. When idle, the display shows user information and the time and date.
Display Buttons
The 5324 IP Phone (only) has three Display buttons under the Display. In some features, the left and right Display buttons provide back (<<) and forward (>>) navigation. The center Display button always displays user and system information. See “Viewing Your System Information” on page 37 for more information.
Ring/Message Indicator
The Ring/Message Indicator flashes or stays lit to indicate call, message, and feature activity. For more information about messaging features, see “Messages” on page 51. Ring/Message Indicator signals are described in the following table.
Indicator Signals |
Description |
|
|
Rapidly flashing |
You have an incoming call. |
|
|
Slowly flashing |
You have a waiting message or callback message. |
|
|
On |
You are on a call or using a feature. |
|
|
Off |
Your IP phone is idle. |
|
|
Speaker
The speaker provides audio for handsfree calls and background music. See “Using Handsfree Mode” on page 35 for information about handsfree calls. See “Listening to Background Music” on page 16 for more information about background music.
NOTE |
The 5312 IP Phone uses half-duplex audio when using the speakerphone (both |
|
parties cannot talk at the same time). |
||
|
||
|
|
Page 4 |
Mitel® 5312/5324 IP Phone User Guide – Issue 2, June 2010 |

Getting Started
Feature Buttons
Feature buttons provide quick access to commonly used features. See the following table for descriptions.
Button |
|
Action |
|
|
|
|
|
(Up) |
(Down) |
Provides volume control for the ringer, handset, and |
|
|
|
speaker. |
|
|
|
Scrolls through feature options. |
|
|
|
||
(Speaker) |
Activates Handsfree Mode (speakerphone). See |
||
|
|
“Using Handsfree Mode” on page 35. |
|
|
|
Activates features. |
|
|
|
|
|
(Mute) |
|
Temporarily turns off your microphone during a call. |
|
|
|
||
(Directory) |
Activates the contact and feature Directory. See |
||
|
|
“Using the Directory” on page 32. |
|
|
|
|
|
(Special) |
|
Activates features while on a call. The |
(Special) |
|
|
button does not cancel features. To cancel features, |
|
|
|
press the Star button (*). |
|
Redial |
Calls the last external number dialed. You cannot |
||
|
|
redial internal numbers. |
|
|
|
|
|
(Hold) |
|
Places the current call on hold. |
|
|
|
Left/backspace when entering dialpad characters. |
|
|
|
See “Using the Dialpad Buttons to Enter Characters” |
|
|
|
on page 17. |
|
|
|
|
|
(Transfer) |
Transfers the current call. |
|
|
|
|
Right/forward when entering dialpad characters. See |
|
|
|
“Using the Dialpad Buttons to Enter Characters” on |
|
|
|
page 17. |
|
|
|
||
(Message) |
Connects to your voice mailbox and flashes to notify |
||
|
|
you of waiting messages. |
|
|
|
Toggles between Alpha Mode and Numeric Mode |
|
|
|
when entering dialpad characters. |
|
|
|
|
|
Dialpad Buttons
Use the dialpad buttons to dial phone numbers, enter feature codes, and to enter characters when using features that require text input.
Mitel® 5312/5324 IP Phone User Guide – Issue 2, June 2010 |
Page 5 |

Getting Started
Programmable Buttons
The 5312 IP Phone has 12 programmable buttons.The 5324 IP Phone has 24 programmable buttons. The top seven buttons on both models are programmed by the system administrator and cannot be reprogrammed. However, you can program the remaining buttons for quick access to features or speed-dial entries. See “Using the Dialpad Buttons to Enter Characters” on page 17 for instructions.
Button |
Action |
|
|
DND |
Turns Do-Not-Disturb (DND) mode on or off. |
|
|
Outgoing |
Selects an outgoing line for external calls. |
|
|
Call 1 |
Selects an outside line or answers a call. |
|
|
Call 2 |
Selects an outside line or answers a call. |
|
|
IC |
Answers an intercom (internal) call. |
|
|
Comfy |
Places a conference call. |
|
|
Fwd |
Forwards the call to the specified number. |
|
|
Phone Signals
The IP Phone has several audio and visual signals to indicate feature activity. The following are a few helpful tips:
•Lit or blinking buttons indicate call or feature activity.
•All phone button lamps illuminate at the same time for a few seconds when the IP phone is reset or powered on.
•The following actions may cause an error tone: o Pressing an invalid button combination.
o Selecting a restricted feature.
o Dialing a restricted or invalid number. o Dialing too slowly between digits.
o Waiting too long before performing the next step. To correct an error tone, hang up and try again.
•Many features “time-out” if you wait too long before performing the next step. If this happens, you must start over.
•“Off-hook” means the handset is lifted. “On-hook” means the handset is in the cradle.
•If your IP phone does not have a lamp under the speaker button, the large message indicator lamp on the top right of the IP phone indicates that the speakerphone is in use.
Page 6 |
Mitel® 5312/5324 IP Phone User Guide – Issue 2, June 2010 |
Getting Started
Comfort and Safety Tips
Observe the following comfort and safety tips when using the IP phone:
•Do not cradle the handset: Prolonged use of the handset can lead to neck, shoulder, or back discomfort, especially if you cradle the handset between your neck and shoulder. If you frequently use the IP phone, you might find a headset more comfortable. See “Using a Headset” on page 7.
•Adjust the viewing angle: The built-in stand tilts to give you a better view of the buttons. See “Adjusting the Viewing Angle” on page 13.
•Protect your hearing: Because prolonged exposure to loud sounds can contribute to hearing loss, keep the volume at a moderate level. You can adjust the volume levels of the handset receiver or headset. See “Changing Volume Levels” on page 15.
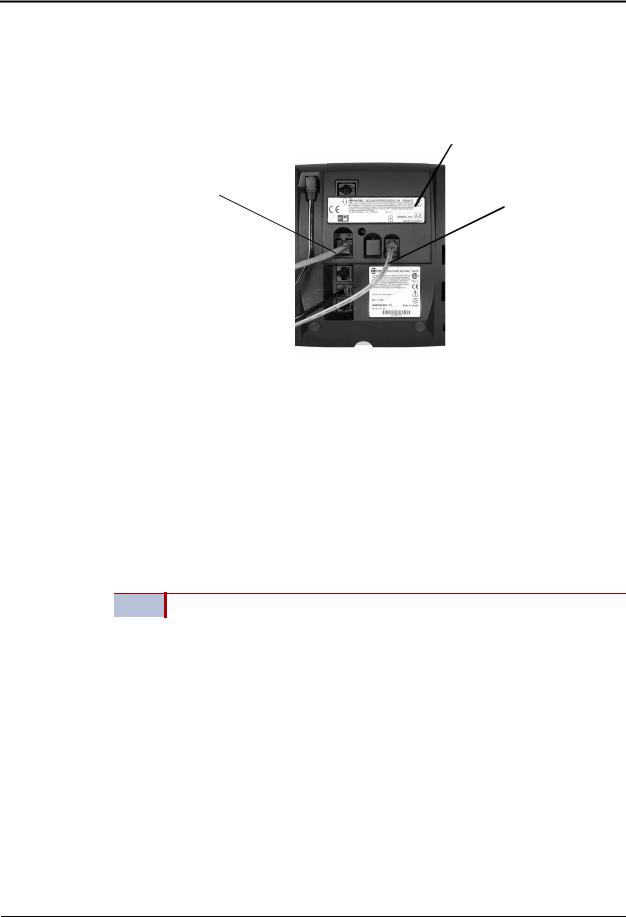
Using a Headset
When using a headset, press |
(Speaker) to connect to or disconnect from calls. The |
|
Headset icon |
appears when the headset is in use. You cannot use the handset or |
|
speakerphone when the IP phone is in Headset Mode. Disconnecting the headset automatically enables the handset.
|
The headset must be hearing aid compatible (HAC). |
NOTES |
If your headset has a power-saver mode, make sure the system administrator has |
|
enabled the “Headset Connect Tone” feature. If this is not enabled, you may miss |
|
the first few seconds of an incoming call. |
|
|
To connect and activate the headset:
1.Insert the headset jack into the Headset port  located on the back of the IP phone.
2.Dial 317 (Headset on/off). HEADSET MODE ON appears.
Because Headset Mode disables the handset and speakerphone, you NOTE must turn off Headset Mode before you can use the handset or
speakerphone.
To turn off Headset Mode and activate the handset and speakerphone:
Dial 317 (Headset on/off). HEADSET MODE OFF appears.
Mitel® 5312/5324 IP Phone User Guide – Issue 2, June 2010 |
Page 7 |

Getting Started
Using the 5310 IP Conference Unit
Your 5324 phone can use the 5310 IP Conference Unit (shown below) for full-duplex, advanced IP conferencing. Use the Conference Controller touch screen to turn the Conference Unit on or off, to adjust the volume or to put the Conference Unit into Presentation mode. You can only run one Conference Controller session at a time. If the 5310 Conference Unit is not connected to your IP phone, the Conference Controller application is not available.
Installation instructions are included with the unit.
Mitel 5310 IP Conference Unit
5310 IP Conference Unit
For information about placing conference calls and adding parties to the conference, see “Placing Conference Calls” on page 47.
Turning the Conference Unit On and Off
The following instructions describe how to turn the Conference Unit on and off.
To turn the Conference Unit on and off:
Use the Speaker button on the IP phone, or use the On/Off button on the optional remote control mouse.
NOTE |
Turning the 5310 Conference Unit off terminates the active call. To continue the call |
|
either pick up the handset or press the Speaker button on the IP phone. |
||
|
Adjusting the Conference Unit Volume
The following instructions describe how to adjust the Conference Unit volume.
To adjust the Conference Unit volume:
Press Volume Up or Volume Down.
Muting the Conference Unit
You can mute the Conference Unit so that conversation or noise near the Conference Unit cannot be heard by individuals being conferenced.
To mute the Conference Unit:
Use the Mute button on the IP phone, or use the Mute button on the optional remote control mouse.
Although pressing the fixed Mute button on the IP phone itself mutes the audio on the NOTE attached 5310 conferencing unit, the orange mute LED indicator on the conference
unit does not light up. However, if using the optional remote control mouse to mute the conference unit, the orange mute indicator does light up as designed.
Page 8 |
Mitel® 5312/5324 IP Phone User Guide – Issue 2, June 2010 |

Getting Started
Placing the Conference Unit in Presentation Mode
Presentation Mode should be used when only one individual will be speaking into the Conference Unit. If another individual near the unit wishes to speak, you should disable Presentation Mode. Presentation Mode minimizes extraneous noise.
To enable/disable Presentation Mode:
Use the Presentation button on the optional remote control mouse.
Mitel® 5312/5324 IP Phone User Guide – Issue 2, June 2010 |
Page 9 |
Getting Started
Using the Line Interface Module (LIM)
The LIM is an optional device that adds an analog phone line capability to your 5324 phone. In the event of a network failure, the IP phone can be configured to use the public switched telephone network (PSTN) to provide continued basic telephony until service in restored. The analog line can also be used for emergency calls and local calling.
|
Line Interface Module |
Ethernet |
Analog PSTN |
Connection |
|
|
Connection |
You can use the LIM to:
•allow incoming and outgoing analog PSTN calls directly to and from the IP phone
•provide survivability (failover) in the event IP connectivity is lost
•provide emergency dialing support (emergency calls can be programmed to connect through the analog PSTN connection)
If you have a LIM connected to your 5324 phone, all programming of the LIM, except the Analog button (key), is done by the Installer when your IP phone is installed. To program the Analog button, see “Using Programmable Buttons” on page 24.
The LIM operates in one of the following two modes, as determined by your System
Administrator:
•LIM Mode: You can use the LIM line at any time.
•Failover Mode: You can use the LIM line only when the IP connection has failed.
NOTE Handsfree and on-hook dialing are not supported on the LIM line.
For information on emergency number dialing using the LIM, see “Placing Emergency Calls using the LIM Line” on page 33.
Page 10 |
Mitel® 5312/5324 IP Phone User Guide – Issue 2, June 2010 |

Getting Started
Making and Answering Calls Using the Analog Button
To make a call using the Analog line:
1.Lift the handset.
2.Press the button you programmed as Analog Line. ANALOG CALL appears.
3.Dial the number.
When you make an external call over the analog line, a prefix dialing number is not required. If your IP phone’s Analog Line button has the Privacy option enabled, you
NOTE cannot access the analog line when another phone is using the analog line (button is solid orange).To access the analog line, the user of the other phone must first hang up. To determine whether the Privacy option is enabled, contact your System Administrator.
To answer a Call using the analog line:
1.Lift the handset.
2.Press the Analog Line button that is highlighted.
To answer a waiting call on the analog line:
If you have subscribed to an analog call waiting service, you may use the hookswitch
NOTE or press the Star button (*) to answer a waiting analog call. When you are on an analog call and a waiting analog call arrives, you hear a beep. This feature may not
be supported in all regions.
To answer a waiting analog call or return to the original analog call:
1.Do one of the following:
•Press and release the hookswitch.
•Press the Star button (*) to cancel.
2.Press the button you have programmed as Analog Line.
To put a current call on hold to answer an incoming analog call:
Press the highlighted Analog Line button.
To switch between the current call and the held call when one of the calls is using the analog line, do one of the following:
•If your current call is using the analog line, press the flashing Line button of the held call. The analog call is automatically put on hold.
•If your current call is using an IP line, press the highlighted Analog Line button. The IP line is automatically put on hold.
To end a current call when an incoming analog call arrives:
Press the Star button (*) and then press the highlighted Analog Line button. The current call ends and you are connected to the caller on the analog line.
To end the current analog call when an incoming call arrives:
Press the Star button (*) to cancel. The current analog call ends and you are connected to the new caller.
Mitel® 5312/5324 IP Phone User Guide – Issue 2, June 2010 |
Page 11 |

Getting Started
Making and Answering Calls Using the Failover Mode
To make a call using the analog line during an IP connection failure:
1.Lift the handset. IP FAIL: ANALOG CALL appears.
2.Dial the number.
To answer a call using the analog line during an IP connection failure:
Lift the handset. The call is answered. IP FAIL: ANALOG CALL appears.
Page 12 |
Mitel® 5312/5324 IP Phone User Guide – Issue 2, June 2010 |
 Loading...