


 Loading...
MITEL
5000 COMMUNICATIONS PLATFORM (CP)
MITEL 5320e/5330e/5340e
USER GUIDE

NOTICE
This guide is released by Mitel Networks Corporation and provides information necessary to use the 5320e/5330e/5340e IP Phones. The guide contents, which reflect current Mitel standards, are subject to revision or change without notice.
Some features or applications mentioned may require a future release and are not available in the initial release. Future product features and applications are subject to availability and cost. Some features or applications may require additional hardware, software, or system administrator assistance.
For sales, service, or technical support, contact your local authorized provider:
Enter provider information above.
If you do not know the contact information for your local provider, use the “Partners” link at the top of the Mitel home page (www.mitel.com) to find a location near you.
If you have any questions or comments regarding this user guide or other technical documentation, contact the Technical Publications Department (USA) at:
tech_pubs@mitel.com
Mitel® is a registered trademark of Mitel Networks Corporation.
All other trademarks mentioned in this document are the property of their respective owners, including Mitel Networks Corporation. All rights reserved.
© 2008-2013 Mitel Networks Corporation
Personal use of this material is permitted. However, permission to reprint/republish this material for advertising or promotional purposes or for creating new collective works for resale or redistribution to servers or lists, or to reuse any copyrighted component of this work in other works must be obtained from Mitel.
ii

Table of Contents
Chapter 1: Getting Started
Welcome. . . . . . . . . . . . . . . . . . . . . . . . . . . . . . . . . . . . . . . . . . . . . . . . . . . . . . . . . . . . . . . . . . . . . 3
About Your IP Phone . . . . . . . . . . . . . . . . . . . . . . . . . . . . . . . . . . . . . . . . . . . . . . . . . . . . . . . . . . . 4 5320e/5330e IP Phone Features . . . . . . . . . . . . . . . . . . . . . . . . . . . . . . . . . . . . . . . . . . . . . . . . . 4 5340e IP Phone Features . . . . . . . . . . . . . . . . . . . . . . . . . . . . . . . . . . . . . . . . . . . . . . . . . . . . . . 6
Phone Feature Descriptions . . . . . . . . . . . . . . . . . . . . . . . . . . . . . . . . . . . . . . . . . . . . . . . . . . . . 6 Handset . . . . . . . . . . . . . . . . . . . . . . . . . . . . . . . . . . . . . . . . . . . . . . . . . . . . . . . . . . . . . . . . . 6 Display . . . . . . . . . . . . . . . . . . . . . . . . . . . . . . . . . . . . . . . . . . . . . . . . . . . . . . . . . . . . . . . . . . 7 Ring/Message Indicator . . . . . . . . . . . . . . . . . . . . . . . . . . . . . . . . . . . . . . . . . . . . . . . . . . . . . 7 Speaker . . . . . . . . . . . . . . . . . . . . . . . . . . . . . . . . . . . . . . . . . . . . . . . . . . . . . . . . . . . . . . . . . 7 Feature Buttons . . . . . . . . . . . . . . . . . . . . . . . . . . . . . . . . . . . . . . . . . . . . . . . . . . . . . . . . . . . 7 Dialpad Buttons . . . . . . . . . . . . . . . . . . . . . . . . . . . . . . . . . . . . . . . . . . . . . . . . . . . . . . . . . . . 8 Programmable Buttons . . . . . . . . . . . . . . . . . . . . . . . . . . . . . . . . . . . . . . . . . . . . . . . . . . . . . . 8 Menu Buttons (5340e IP Phones only) . . . . . . . . . . . . . . . . . . . . . . . . . . . . . . . . . . . . . . . . . . 9 Navigation Page Buttons . . . . . . . . . . . . . . . . . . . . . . . . . . . . . . . . . . . . . . . . . . . . . . . . . . . . 9 External Speaker . . . . . . . . . . . . . . . . . . . . . . . . . . . . . . . . . . . . . . . . . . . . . . . . . . . . . . . . . . 9
Phone Signals. . . . . . . . . . . . . . . . . . . . . . . . . . . . . . . . . . . . . . . . . . . . . . . . . . . . . . . . . . . . . . . . 10
Comfort and Safety Tips . . . . . . . . . . . . . . . . . . . . . . . . . . . . . . . . . . . . . . . . . . . . . . . . . . . . . . . . 10
Viewing the Phone Information. . . . . . . . . . . . . . . . . . . . . . . . . . . . . . . . . . . . . . . . . . . . . . . . . . . 11
Using a Headset . . . . . . . . . . . . . . . . . . . . . . . . . . . . . . . . . . . . . . . . . . . . . . . . . . . . . . . . . . . . . . 12
Using the 5310 IP Conference Unit . . . . . . . . . . . . . . . . . . . . . . . . . . . . . . . . . . . . . . . . . . . . . . . 13 Accessing/Exiting the Conference Controller Application . . . . . . . . . . . . . . . . . . . . . . . . . . . 13 Turning the Conference Unit On and Off . . . . . . . . . . . . . . . . . . . . . . . . . . . . . . . . . . . . . . . 13 Adjusting the Conference Unit Volume . . . . . . . . . . . . . . . . . . . . . . . . . . . . . . . . . . . . . . . . . 14 Muting the Conference Unit . . . . . . . . . . . . . . . . . . . . . . . . . . . . . . . . . . . . . . . . . . . . . . . . . 14 Placing the Conference Unit in Presentation Mode . . . . . . . . . . . . . . . . . . . . . . . . . . . . . . . 14
Using the Line Interface Module (LIM) . . . . . . . . . . . . . . . . . . . . . . . . . . . . . . . . . . . . . . . . . . . . . 15 Making and Answering Calls Using the Analog Button . . . . . . . . . . . . . . . . . . . . . . . . . . . . . . . 16 Making and Answering Calls Using the Failover Mode . . . . . . . . . . . . . . . . . . . . . . . . . . . . . . . 17
Chapter 2: Personalizing Your Phone
Overview. . . . . . . . . . . . . . . . . . . . . . . . . . . . . . . . . . . . . . . . . . . . . . . . . . . . . . . . . . . . . . . . . . . . 21
Adjusting the Viewing Angle . . . . . . . . . . . . . . . . . . . . . . . . . . . . . . . . . . . . . . . . . . . . . . . . . . . . . 21
Changing Volume Levels . . . . . . . . . . . . . . . . . . . . . . . . . . . . . . . . . . . . . . . . . . . . . . . . . . . . . . . 22
Changing the Ring Tone. . . . . . . . . . . . . . . . . . . . . . . . . . . . . . . . . . . . . . . . . . . . . . . . . . . . . . . . 22
Adjusting the Display Contrast and Brightness. . . . . . . . . . . . . . . . . . . . . . . . . . . . . . . . . . . . . . . 23
iii

Mitel 5320e/5330e/5340e User Guide
Changing the Language . . . . . . . . . . . . . . . . . . . . . . . . . . . . . . . . . . . . . . . . . . . . . . . . . . . . . . . . 23
Changing the Text Size on the Display. . . . . . . . . . . . . . . . . . . . . . . . . . . . . . . . . . . . . . . . . . . . . 24
Using the Screen Saver . . . . . . . . . . . . . . . . . . . . . . . . . . . . . . . . . . . . . . . . . . . . . . . . . . . . . . . . 25
Viewing Call History . . . . . . . . . . . . . . . . . . . . . . . . . . . . . . . . . . . . . . . . . . . . . . . . . . . . . . . . . . . 27
Viewing Call History . . . . . . . . . . . . . . . . . . . . . . . . . . . . . . . . . . . . . . . . . . . . . . . . . . . . . . .27
Deleting Call Records . . . . . . . . . . . . . . . . . . . . . . . . . . . . . . . . . . . . . . . . . . . . . . . . . . . . . .28
Reviewing Call Record Icons . . . . . . . . . . . . . . . . . . . . . . . . . . . . . . . . . . . . . . . . . . . . . . . .28
Cutomizing Your Contact List . . . . . . . . . . . . . . . . . . . . . . . . . . . . . . . . . . . . . . . . . . . . . . . . . . . . 29 Adding Names to Your Contact List . . . . . . . . . . . . . . . . . . . . . . . . . . . . . . . . . . . . . . . . . . .29 Editing Your Contact List . . . . . . . . . . . . . . . . . . . . . . . . . . . . . . . . . . . . . . . . . . . . . . . . . . .29 Dialing from Your Contact List . . . . . . . . . . . . . . . . . . . . . . . . . . . . . . . . . . . . . . . . . . . . . . .30
Specifying Audio Feedback Options. . . . . . . . . . . . . . . . . . . . . . . . . . . . . . . . . . . . . . . . . . . . . . . 30
Using the Dialpad Buttons to Enter Characters . . . . . . . . . . . . . . . . . . . . . . . . . . . . . . . . . . . . . . 31
Using Programmable Buttons. . . . . . . . . . . . . . . . . . . . . . . . . . . . . . . . . . . . . . . . . . . . . . . . . . . . 33
Outside Line Access Codes . . . . . . . . . . . . . . . . . . . . . . . . . . . . . . . . . . . . . . . . . . . . . . . . .34
Extension Numbers . . . . . . . . . . . . . . . . . . . . . . . . . . . . . . . . . . . . . . . . . . . . . . . . . . . . . . .34
Listening to Background Music. . . . . . . . . . . . . . . . . . . . . . . . . . . . . . . . . . . . . . . . . . . . . . . . . . . 38
Viewing Button Assignments . . . . . . . . . . . . . . . . . . . . . . . . . . . . . . . . . . . . . . . . . . . . . . . . . . . . 38
Resetting Programmable Buttons. . . . . . . . . . . . . . . . . . . . . . . . . . . . . . . . . . . . . . . . . . . . . . . . . 38
Resetting the IP Phone to the Default Settings . . . . . . . . . . . . . . . . . . . . . . . . . . . . . . . . . . . . . . |
39 |
Switching Keymaps . . . . . . . . . . . . . . . . . . . . . . . . . . . . . . . . . . . . . . . . . . . . . . . . . . . . . . . . . . . |
39 |
Activating Door Relay . . . . . . . . . . . . . . . . . . . . . . . . . . . . . . . . . . . . . . . . . . . . . . . . . . . . . . . . . . 40
Chapter 3: Answering and Placing Calls
Overview. . . . . . . . . . . . . . . . . . . . . . . . . . . . . . . . . . . . . . . . . . . . . . . . . . . . . . . . . . . . . . . . . . . . 43
Answering Calls . . . . . . . . . . . . . . . . . . . . . . . . . . . . . . . . . . . . . . . . . . . . . . . . . . . . . . . . . . . . . . 43
Answering Waiting Calls . . . . . . . . . . . . . . . . . . . . . . . . . . . . . . . . . . . . . . . . . . . . . . . . . . . . . .43
Using Automatic Call Access . . . . . . . . . . . . . . . . . . . . . . . . . . . . . . . . . . . . . . . . . . . . . . . . . . .43
Redirecting Calls . . . . . . . . . . . . . . . . . . . . . . . . . . . . . . . . . . . . . . . . . . . . . . . . . . . . . . . . . . . .44
Using Automatic Trunk Answer. . . . . . . . . . . . . . . . . . . . . . . . . . . . . . . . . . . . . . . . . . . . . . . . . . . 44
Placing Calls . . . . . . . . . . . . . . . . . . . . . . . . . . . . . . . . . . . . . . . . . . . . . . . . . . . . . . . . . . . . . . . . . 45 Placing Emergency Calls . . . . . . . . . . . . . . . . . . . . . . . . . . . . . . . . . . . . . . . . . . . . . . . . . . . . . .45 Placing Emergency Calls using the LIM Line . . . . . . . . . . . . . . . . . . . . . . . . . . . . . . . . . . . . . . .45
Placing Internal Calls . . . . . . . . . . . . . . . . . . . . . . . . . . . . . . . . . . . . . . . . . . . . . . . . . . . . . . . . .46 Requesting a Callback (Queuing the Phone) . . . . . . . . . . . . . . . . . . . . . . . . . . . . . . . . . . . .46
iv

Table of Contents
Using Camp-on . . . . . . . . . . . . . . . . . . . . . . . . . . . . . . . . . . . . . . . . . . . . . . . . . . . . . . . . . . . 46
Placing External Calls . . . . . . . . . . . . . . . . . . . . . . . . . . . . . . . . . . . . . . . . . . . . . . . . . . . . . . . . 47
Redialing a Number . . . . . . . . . . . . . . . . . . . . . . . . . . . . . . . . . . . . . . . . . . . . . . . . . . . . . . . . . . 47
Using Speed Dial . . . . . . . . . . . . . . . . . . . . . . . . . . . . . . . . . . . . . . . . . . . . . . . . . . . . . . . . . . . . . 48 Using System Speed Dial . . . . . . . . . . . . . . . . . . . . . . . . . . . . . . . . . . . . . . . . . . . . . . . . . . . . . 48
Using Station Speed Dial . . . . . . . . . . . . . . . . . . . . . . . . . . . . . . . . . . . . . . . . . . . . . . . . . . . . . . 48 Storing Station Speed-Dial Numbers . . . . . . . . . . . . . . . . . . . . . . . . . . . . . . . . . . . . . . . . . . 48 Dialing Station Speed-Dial Numbers . . . . . . . . . . . . . . . . . . . . . . . . . . . . . . . . . . . . . . . . . . 49 Deleting Station Speed-Dial Entries . . . . . . . . . . . . . . . . . . . . . . . . . . . . . . . . . . . . . . . . . . . 49 Assigning Speed-Dial Numbers to Programmable Buttons . . . . . . . . . . . . . . . . . . . . . . . . . 49
Using the Directory . . . . . . . . . . . . . . . . . . . . . . . . . . . . . . . . . . . . . . . . . . . . . . . . . . . . . . . . . . . . 51
Using Account Codes . . . . . . . . . . . . . . . . . . . . . . . . . . . . . . . . . . . . . . . . . . . . . . . . . . . . . . . . . . 52
Chapter 4: Call Features
Overview. . . . . . . . . . . . . . . . . . . . . . . . . . . . . . . . . . . . . . . . . . . . . . . . . . . . . . . . . . . . . . . . . . . . 55
Using Handsfree Mode . . . . . . . . . . . . . . . . . . . . . . . . . . . . . . . . . . . . . . . . . . . . . . . . . . . . . . . . . 55
Using Ring Intercom Always. . . . . . . . . . . . . . . . . . . . . . . . . . . . . . . . . . . . . . . . . . . . . . . . . . . . . 55
Using Mute . . . . . . . . . . . . . . . . . . . . . . . . . . . . . . . . . . . . . . . . . . . . . . . . . . . . . . . . . . . . . . . . . . 55
Placing Calls On Hold. . . . . . . . . . . . . . . . . . . . . . . . . . . . . . . . . . . . . . . . . . . . . . . . . . . . . . . . . . 56
Entering a Hookflash . . . . . . . . . . . . . . . . . . . . . . . . . . . . . . . . . . . . . . . . . . . . . . . . . . . . . . . . . . 56
Transferring Calls . . . . . . . . . . . . . . . . . . . . . . . . . . . . . . . . . . . . . . . . . . . . . . . . . . . . . . . . . . . . . 57
Transferring Calls to Other Extensions . . . . . . . . . . . . . . . . . . . . . . . . . . . . . . . . . . . . . . . . . . . 57
Transferring Calls to External Numbers . . . . . . . . . . . . . . . . . . . . . . . . . . . . . . . . . . . . . . . . . . . 57
Using Reverse Transfer . . . . . . . . . . . . . . . . . . . . . . . . . . . . . . . . . . . . . . . . . . . . . . . . . . . . . . . 57
Viewing Your System Information. . . . . . . . . . . . . . . . . . . . . . . . . . . . . . . . . . . . . . . . . . . . . . . . . 58
Viewing Caller ID Information . . . . . . . . . . . . . . . . . . . . . . . . . . . . . . . . . . . . . . . . . . . . . . . . . . . . 58
Forwarding Calls. . . . . . . . . . . . . . . . . . . . . . . . . . . . . . . . . . . . . . . . . . . . . . . . . . . . . . . . . . . . . . 58
Manual Call Forwarding . . . . . . . . . . . . . . . . . . . . . . . . . . . . . . . . . . . . . . . . . . . . . . . . . . . . . . . 58
System Forwarding . . . . . . . . . . . . . . . . . . . . . . . . . . . . . . . . . . . . . . . . . . . . . . . . . . . . . . . . . . 59
Using Dynamic Extension Express. . . . . . . . . . . . . . . . . . . . . . . . . . . . . . . . . . . . . . . . . . . . . . . . 60
Using the Handoff - Push/Pull Feature . . . . . . . . . . . . . . . . . . . . . . . . . . . . . . . . . . . . . . . . . . . 61
Receiving Message Waiting Indications . . . . . . . . . . . . . . . . . . . . . . . . . . . . . . . . . . . . . . . . . . 62
Placing Ad Hoc Conference Calls. . . . . . . . . . . . . . . . . . . . . . . . . . . . . . . . . . . . . . . . . . . . . . . . . 63 Adding a Conference Party . . . . . . . . . . . . . . . . . . . . . . . . . . . . . . . . . . . . . . . . . . . . . . . . . . . . 63
v

Mitel 5320e/5330e/5340e User Guide
Transferring a Conference . . . . . . . . . . . . . . . . . . . . . . . . . . . . . . . . . . . . . . . . . . . . . . . . . . . . .63 Dropping Out of a Conference . . . . . . . . . . . . . . . . . . . . . . . . . . . . . . . . . . . . . . . . . . . . . . . . . .64 Ending a Conference and Placing all Parties on Hold . . . . . . . . . . . . . . . . . . . . . . . . . . . . . . . .64
Using Meet-Me Conferencing . . . . . . . . . . . . . . . . . . . . . . . . . . . . . . . . . . . . . . . . . . . . . . . . . . . . 65 Conference Assistant . . . . . . . . . . . . . . . . . . . . . . . . . . . . . . . . . . . . . . . . . . . . . . . . . . . . . . . . .65 Access Codes . . . . . . . . . . . . . . . . . . . . . . . . . . . . . . . . . . . . . . . . . . . . . . . . . . . . . . . . . . . . . .65 Setting Up a Meet-Me Conference . . . . . . . . . . . . . . . . . . . . . . . . . . . . . . . . . . . . . . . . . . . . . .65 Joining a Meet-Me Conference . . . . . . . . . . . . . . . . . . . . . . . . . . . . . . . . . . . . . . . . . . . . . . . . .66 Dropping Out of a Meet-Me Conference . . . . . . . . . . . . . . . . . . . . . . . . . . . . . . . . . . . . . . . . . .66 Putting a Meet-Me Conference on Hold . . . . . . . . . . . . . . . . . . . . . . . . . . . . . . . . . . . . . . . . . . .67 Transferring a Meet-Me Conference . . . . . . . . . . . . . . . . . . . . . . . . . . . . . . . . . . . . . . . . . . . . .67
Using Record-A-Call . . . . . . . . . . . . . . . . . . . . . . . . . . . . . . . . . . . . . . . . . . . . . . . . . . . . . . . . . . . 68
Using Group Listen . . . . . . . . . . . . . . . . . . . . . . . . . . . . . . . . . . . . . . . . . . . . . . . . . . . . . . . . . . . . 68
Using Call Logging . . . . . . . . . . . . . . . . . . . . . . . . . . . . . . . . . . . . . . . . . . . . . . . . . . . . . . . . . . . . 69
Using Secondary Extension Buttons. . . . . . . . . . . . . . . . . . . . . . . . . . . . . . . . . . . . . . . . . . . . . . . 70
Using Hot Desking . . . . . . . . . . . . . . . . . . . . . . . . . . . . . . . . . . . . . . . . . . . . . . . . . . . . . . . . . . . . 71
Using the Configuration Assistant. . . . . . . . . . . . . . . . . . . . . . . . . . . . . . . . . . . . . . . . . . . . . . . . . 72 Changing Your Station Passcode . . . . . . . . . . . . . . . . . . . . . . . . . . . . . . . . . . . . . . . . . . . . . . .72 Accessing the Configuration Assistant . . . . . . . . . . . . . . . . . . . . . . . . . . . . . . . . . . . . . . . . . . . .72 Changing the Dynamic Extension Express Settings . . . . . . . . . . . . . . . . . . . . . . . . . . . . . . . . .73 Changing the DND Settings . . . . . . . . . . . . . . . . . . . . . . . . . . . . . . . . . . . . . . . . . . . . . . . . . . . .73 Changing the Manual Call Forwarding Settings . . . . . . . . . . . . . . . . . . . . . . . . . . . . . . . . . . . . .74 Managing Meet-Me Conferencing Access Codes . . . . . . . . . . . . . . . . . . . . . . . . . . . . . . . . . . .74
Using Remote Programming. . . . . . . . . . . . . . . . . . . . . . . . . . . . . . . . . . . . . . . . . . . . . . . . . . . . . 76 Changing the Dynamic Extension Express Settings . . . . . . . . . . . . . . . . . . . . . . . . . . . . . . . . .76 Changing the DND Settings . . . . . . . . . . . . . . . . . . . . . . . . . . . . . . . . . . . . . . . . . . . . . . . . . . . .77 Changing the Manual Call Forwarding Settings . . . . . . . . . . . . . . . . . . . . . . . . . . . . . . . . . . . . .77 Changing Your Station Passcode . . . . . . . . . . . . . . . . . . . . . . . . . . . . . . . . . . . . . . . . . . . . . . .78
Chapter 5: Messages
Overview. . . . . . . . . . . . . . . . . . . . . . . . . . . . . . . . . . . . . . . . . . . . . . . . . . . . . . . . . . . . . . . . . . . . 81
Leaving Messages at Other Extensions . . . . . . . . . . . . . . . . . . . . . . . . . . . . . . . . . . . . . . . . . . . . 81
Viewing and Responding to Messages. . . . . . . . . . . . . . . . . . . . . . . . . . . . . . . . . . . . . . . . . . . . . 82 Canceling Messages Left at Other Extensions . . . . . . . . . . . . . . . . . . . . . . . . . . . . . . . . . . . . .82
vi

Table of Contents
Deleting Waiting Inter-Station Messages . . . . . . . . . . . . . . . . . . . . . . . . . . . . . . . . . . . . . . . . . . 82
Using Do-Not-Disturb (DND) . . . . . . . . . . . . . . . . . . . . . . . . . . . . . . . . . . . . . . . . . . . . . . . . . . . . 83
Using Reminder Messages. . . . . . . . . . . . . . . . . . . . . . . . . . . . . . . . . . . . . . . . . . . . . . . . . . . . . . 84
Paging Other System Users . . . . . . . . . . . . . . . . . . . . . . . . . . . . . . . . . . . . . . . . . . . . . . . . . . . . . 85 Placing a Page Announcement . . . . . . . . . . . . . . . . . . . . . . . . . . . . . . . . . . . . . . . . . . . . . . . . . 85 Enabling or Disabling the Page Feature . . . . . . . . . . . . . . . . . . . . . . . . . . . . . . . . . . . . . . . . . . 85
Chapter 6: Hunt Groups
Overview. . . . . . . . . . . . . . . . . . . . . . . . . . . . . . . . . . . . . . . . . . . . . . . . . . . . . . . . . . . . . . . . . . . . 89
Logging in to ACD Hunt Groups . . . . . . . . . . . . . . . . . . . . . . . . . . . . . . . . . . . . . . . . . . . . . . . . . . 89
Logging out of ACD Hunt Groups . . . . . . . . . . . . . . . . . . . . . . . . . . . . . . . . . . . . . . . . . . . . . . . . . 90
Stopping the ACD Hunt Group Wrap-up Timer . . . . . . . . . . . . . . . . . . . . . . . . . . . . . . . . . . . . . . 90
Other Hunt Group Features . . . . . . . . . . . . . . . . . . . . . . . . . . . . . . . . . . . . . . . . . . . . . . . . . . . . . 91
Requesting Agent Help . . . . . . . . . . . . . . . . . . . . . . . . . . . . . . . . . . . . . . . . . . . . . . . . . . . . . . . 91
Diverting Hunt Group Calls . . . . . . . . . . . . . . . . . . . . . . . . . . . . . . . . . . . . . . . . . . . . . . . . . . . . 91
Hunt Group Supervisor Features . . . . . . . . . . . . . . . . . . . . . . . . . . . . . . . . . . . . . . . . . . . . . . . . . 92
Accepting or Rejecting Agent Help Calls . . . . . . . . . . . . . . . . . . . . . . . . . . . . . . . . . . . . . . . . . . 92
Monitoring Calls . . . . . . . . . . . . . . . . . . . . . . . . . . . . . . . . . . . . . . . . . . . . . . . . . . . . . . . . . . . . . 92
Stealing Hunt Group Calls . . . . . . . . . . . . . . . . . . . . . . . . . . . . . . . . . . . . . . . . . . . . . . . . . . . . . 92
Using Barge-In . . . . . . . . . . . . . . . . . . . . . . . . . . . . . . . . . . . . . . . . . . . . . . . . . . . . . . . . . . . . . . 93
Chapter 7: Cordless Devices
Overview. . . . . . . . . . . . . . . . . . . . . . . . . . . . . . . . . . . . . . . . . . . . . . . . . . . . . . . . . . . . . . . . . . . . 97
Cordless Module. . . . . . . . . . . . . . . . . . . . . . . . . . . . . . . . . . . . . . . . . . . . . . . . . . . . . . . . . . . . . . 98
Handset and Headset Combinations . . . . . . . . . . . . . . . . . . . . . . . . . . . . . . . . . . . . . . . . . . . . . . 99
Pairing the Cordless Module and Devices . . . . . . . . . . . . . . . . . . . . . . . . . . . . . . . . . . . . . . . . . . 99
Using a Cordless Device as a Remote Control . . . . . . . . . . . . . . . . . . . . . . . . . . . . . . . . . . . . . 100
Alerting Tones and LEDs . . . . . . . . . . . . . . . . . . . . . . . . . . . . . . . . . . . . . . . . . . . . . . . . . . . . . . 100
Low Battery Level . . . . . . . . . . . . . . . . . . . . . . . . . . . . . . . . . . . . . . . . . . . . . . . . . . . . . . . . . . . . 101
Cordless Handset . . . . . . . . . . . . . . . . . . . . . . . . . . . . . . . . . . . . . . . . . . . . . . . . . . . . . . . . . . . . 101
Cordless Handset Features . . . . . . . . . . . . . . . . . . . . . . . . . . . . . . . . . . . . . . . . . . . . . . . . . . . 101
Answering Calls . . . . . . . . . . . . . . . . . . . . . . . . . . . . . . . . . . . . . . . . . . . . . . . . . . . . . . . . . . . . 102
Hanging Up . . . . . . . . . . . . . . . . . . . . . . . . . . . . . . . . . . . . . . . . . . . . . . . . . . . . . . . . . . . . . . . 102
Cordless Handset LEDs . . . . . . . . . . . . . . . . . . . . . . . . . . . . . . . . . . . . . . . . . . . . . . . . . . . . . 102
vii

Mitel 5320e/5330e/5340e User Guide
Cordless Headset . . . . . . . . . . . . . . . . . . . . . . . . . . . . . . . . . . . . . . . . . . . . . . . . . . . . . . . . . . . . 103
Cordless Headset Features . . . . . . . . . . . . . . . . . . . . . . . . . . . . . . . . . . . . . . . . . . . . . . . . . . .103
Answering Calls . . . . . . . . . . . . . . . . . . . . . . . . . . . . . . . . . . . . . . . . . . . . . . . . . . . . . . . . . . . .103
Hanging Up . . . . . . . . . . . . . . . . . . . . . . . . . . . . . . . . . . . . . . . . . . . . . . . . . . . . . . . . . . . . . . .104
Cordless Headset LEDs . . . . . . . . . . . . . . . . . . . . . . . . . . . . . . . . . . . . . . . . . . . . . . . . . . . . . .104
Using the Cordless Devices Application . . . . . . . . . . . . . . . . . . . . . . . . . . . . . . . . . . . . . . . . .104
Chapter 8: Troubleshooting
Overview. . . . . . . . . . . . . . . . . . . . . . . . . . . . . . . . . . . . . . . . . . . . . . . . . . . . . . . . . . . . . . . . . . . 109
Contact Information . . . . . . . . . . . . . . . . . . . . . . . . . . . . . . . . . . . . . . . . . . . . . . . . . . . . . . . . . . |
109 |
Error Messages . . . . . . . . . . . . . . . . . . . . . . . . . . . . . . . . . . . . . . . . . . . . . . . . . . . . . . . . . . . . . |
110 |
Troubleshooting Tips . . . . . . . . . . . . . . . . . . . . . . . . . . . . . . . . . . . . . . . . . . . . . . . . . . . . . . . . . 111
Index
viii

CHAPTER 1
GETTING STARTED

Mitel 5320e/5330e/5340e User Guide
2
Getting Started
Welcome
The instructions in this guide are for using the Mitel 5320e/5330e/5340e Internet Protocol (IP) Phone on the Mitel 5000 Communications Platform (CP). The Quick Reference Guide located at the beginning of this guide is an overview of frequently used features.
Your IP phone should be powered on and ready to use. If the display is blank, or if the display name, extension number, or time or date are incorrect, contact your system administrator for assistance.
Because a variety of voice mail products work with the 5000 CP, this guide does not include voice mail instructions. For voice mail instructions, refer to the voice mail user guide for your system. For example, refer to the Enterprise Messaging, Unified Voice Messaging, and Embedded Voice Mail Card User Guide, part number 835.3205, or the Mitel NuPoint Unified Messaging User Guide on the Mitel Web site (http://edocs.mitel.com). Contact your system administrator for more information about your voice mail system.
Because many phone features can be programmed to perform various tasks, some features may work differently than the descriptions in this guide. Contact your system administrator for more information.
3
Mitel 5320e/5330e/5340e User Guide
About Your IP Phone
The IP Phones are full-feature, dual port phones that provide voice communication over an IP network. All phones have a 160 x 320 (pixels) liquid crystal display (LED), self-labeling programmable buttons, on-hook dialing, and a Ring/Message Indicator.
For one-touch feature access, the 5320e IP Phone has 8 programmable buttons, the 5330e IP Phone has 33 programmable buttons, and the 5340e IP Phone has 42 programmable buttons. It includes an embedded screen saver application and text size control.
5320e/5330e IP Phone Features
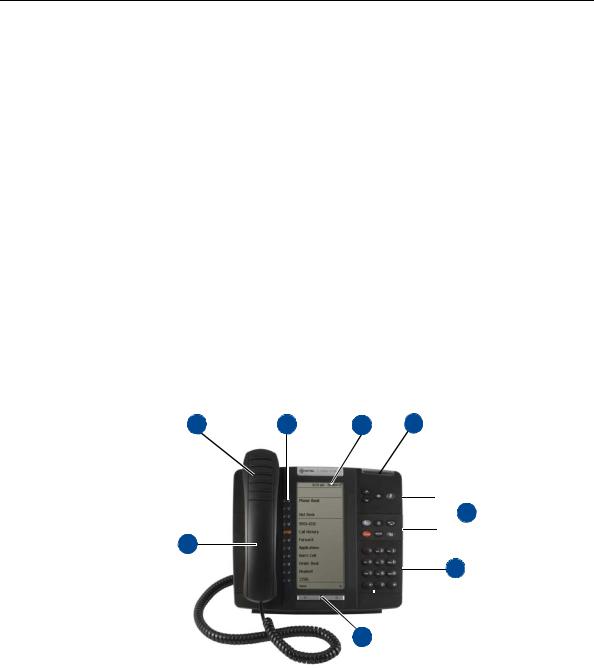
The 5320e and 5330e IP Phones are shown here.1 See “5320e/5330e IP Phone Features” on page 4 for more information about the IP phone features.
5320e IP Phone
1 |
2 |
3 |
4 |

 5
5
8
6
7
1. These images are examples of how your IP phone may be programmed.
4
Getting Started
5330e IP Phone
1 |
2 |
3 |
4 |
5
8
6
7
1 |
– Handset (see page 6) |
5 |
– Feature buttons (see page 7) |
2 |
– Programmable buttons (see page 8)1 |
6 |
– Dialpad buttons (see page 8) |
3 |
– Display (see page 7)2 |
7 |
– Navigation buttons (see page 9) |
4 |
– Ring/Message Indicator (see page 7) |
8 |
– External Speaker (see page 9) |
1.The top three buttons on the 5320e IP Phone do not have LEDs.
2.The 5320e IP Phone does not have a backlit display.
5

Mitel 5320e/5330e/5340e User Guide
5340e IP Phone Features
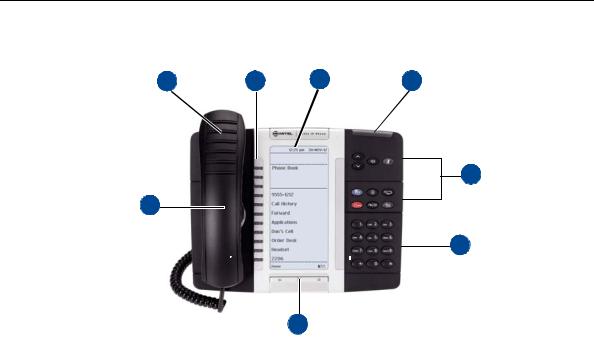
The 5340e IP Phone is shown here.2 See “Phone Feature Descriptions” on page 6” for more information about the IP phone features.
1 |
2 |
3 |
4 |
 5
5
6
9 8 7
1 – Handset (see page 6)
2 – Display (see page 7)
3 – Menu buttons (see page 9)
4 – Ring/Message Indicator (see page 7)
5 – Feature buttons (see page 7)
6 – Dialpad buttons (see page 8)
7 – Programmable buttons (see page 8)
8 – Navigation buttons (see page 9)
9 – External Speaker (see page 9)
Phone Feature Descriptions
The following sections describe default configurations. Your IP phone may be programmed differently. Contact your system administrator for more information. See “5320e/5330e IP Phone Features” on page 4 and “5320e/5330e IP Phone Features” on page 4 for phone feature locations.
Handset
The handset provided with this equipment is hearing aid compatible (HAC). If you are using a headset or if you are in Handsfree Mode, you do not need to use the handset. See “Using Handsfree Mode” on page 41 for more information.
2. This image is an example of how your IP phone may be programmed.
6

Getting Started
Display
The display provides a 160 x 320 (pixels) high-resolution viewing area for selecting and using features and identifying callers. When idle, the display shows user information, the system time and date, and feature button assignments. Consider the following when using the display:
•The 5320e IP Phone does not have a backlit display.
•You can adjust the display Contrast and Brightness levels (see page 23).
•You can control the size of the text that appears on the display for programmable buttons (see page 24).
5330e and 5340e IP Phones include an embedded screen saver that you can configure for your display. Configuration options include the screen saver timeout, display image, and brightness options (see page 25).
Ring/Message Indicator
The Ring/Message Indicator flashes or stays lit to indicate call, message, and feature activity. For more information about messaging features, see “Messages” on page 79. Ring/Message Indicator signals are described in the following table.
Indicator Signals |
Description |
|
|
Rapidly flashing |
You have an incoming call. |
|
|
Slowly flashing |
You have a waiting message or callback message. |
|
|
On |
You are on a call or using a feature. |
|
|
Off |
Your IP phone is idle. |
|
|
Speaker
The speaker provides audio for handsfree calls and background music. See “Using Handsfree Mode” on page 55 for information about handsfree calls. See “Listening to Background Music” on page 38 for more information about background music.
Feature Buttons
Feature buttons provide quick access to commonly used features. See the following table for descriptions.
|
|
Button |
Action |
|
|
|
|
|
|
|
|
(Up) or |
(Down |
Provides volume control for the ringer, handset, and speaker. |
|
|
|
|
Scrolls through feature options. |
|
|
|
|
|
|
|
(Speaker) |
|
Activates Handsfree Mode/speakerphone (see page 55). |
|
|
|
|
Activates features. |
|
|
|
|
|
|
|
|
|
|
|
|
(Mute) |
|
Temporarily turns off your microphone during a call. |
|
|
|
|
|
7

Mitel 5320e/5330e/5340e User Guide
|
|
|
Button |
Action |
|
|
|
|
|
|
|
|
|
(Applications) |
Activates the Applications menu to perform the following options: |
||
|
|
|
|
• Call History (see page 27) |
|
|
|
|
|
|
|
|
|
|
|
• Use the conference unit (see page 13) |
|
|
|
|
|
• Program the following settings in the Settings application: |
|
|
|
|
|
o Change the language on the display (see page 23). |
|
|
|
|
|
o Change the text size on the display (see page 24) |
|
|
|
|
|
o Adjust the display brightness (see page 23) |
|
|
|
|
|
o Use the screen saver (see page 25) |
|
|
|
|
|
o Specify audio feedback options (see page 30) |
|
|
|
|
|
o View phone information (see page 11) |
|
|
|
|
|
• Customize your contact list (for the 5340e IP phone only, see page 29) |
|
|
|
|
|
• Use cordless devices (see page 95) |
|
|
|
|
|
You may have additional applications available for customized use. If so, |
|
|
|
|
|
they will appear on the Applications menu on your phone. |
|
|
|
|
|
|
|
|
(Special) |
Activates features while on a call. The |
(Special) button does not cancel |
||
|
|
|
|
features. To cancel features, press the Star button (*). |
|
|
|
|
(Redial) |
Calls the last external number dialed. You cannot redial internal numbers. |
|
|
|
|
|
|
|
|
|
|
(Hold) |
Places the current call on hold and retrieves a call from hold. |
|
|
|
|
|
Left/backspace when entering dialpad characters (see page 31). |
|
|
|
|
|
|
|
|
|
|
(Transfer) |
Transfers the current call. |
|
|
|
|
|
Right/forward when entering dialpad characters (see page 31). |
|
|
|
|
|
|
|
|
(Message) |
Displays station messages. |
|
||
|
|
|
|
Toggles between Alpha Mode and Numeric Mode when entering dialpad |
|
|
|
|
|
characters. |
|
|
|
|
|
|
|
Dialpad Buttons
Use the dialpad buttons to dial phone numbers, enter feature codes, and to enter characters when using features that require text input.
Programmable Buttons
The IP Phones have self-labeling, programmable buttons. The 5320e IP Phone has 11 programmable buttons. The 5330e IP Phone has 33 programmable buttons. The 5340e IP Phone has 42 programmable buttons. Each phone has the following buttons that are programmed by the system administrator and cannot be reprogrammed; however, you can program the remaining buttons for quick access to features or speed-dial entries. See “Using Programmable Buttons” on page 24.
Button |
Action |
|
|
Do-Not-Disturb |
Turns Do-Not-Disturb (DND) mode on or off. |
|
|
Outgoing |
Selects an outgoing line for external calls. |
|
|
Call 1 |
Selects an outside line or answers a call. |
|
|
8
|
|
Getting Started |
|
|
|
|
|
|
|
Button |
Action |
|
|
|
|
Call 2 |
Selects an outside line or answers a call. |
|
|
|
|
Intercom |
Answers an intercom (internal) call. |
|
|
|
|
Conference |
Places a conference call. |
|
|
|
|
Forward |
Forwards the call to the specified number. |
|
|
|
Menu Buttons (5340e IP Phones only)
The 5340e IP Phone has eight dynamic menu buttons at the top of the Display that change depending on the feature and menu currently displayed. You can use the menu buttons to view and select feature options.
Navigation Page Buttons
The IP Phones have three Navigation Page icons located in the bottom right hand corner of the display to navigate between the IP phone’s three display pages. When a page icon in the bottom right-hand corner of the Display blinks, it means that there is real-time activity on the page where the number or feature is located.
If you navigate to the second or third pages, you must use the Navigation Page buttons to return to the first page. You are not automatically returned to the first page after using features or when the IP phone is idle. You can also press the  (Home) button on the 5340e IP Phone (only) to return to the first page.
External Speaker
The speaker provides audio for handsfree calls and background music. See “Using Handsfree Mode” on page 55 for information about handsfree calls. See “Listening to Background Music” on page 38 for more information about background music.
9

Mitel 5320e/5330e/5340e User Guide
Phone Signals
The IP Phones have several audio and visual signals to indicate feature activity. The following are a few helpful tips:
•Lit or blinking buttons indicate call or feature activity.
•All phone button lamps illuminate at the same time for a few seconds when the IP phone is reset or powered on.
•The following actions may cause an error tone:
•Pressing an invalid button combination.
•Selecting a restricted feature.
•Dialing a restricted or invalid number.
•Dialing too slowly between digits.
•Waiting too long before performing the next step.
To correct an error tone, hang up and try again.
•Many features “time-out” if you wait too long before performing the next step. If this happens, you must start over.
•“Off-hook” means the handset is lifted. “On-hook” means the handset is in the cradle.
•If your IP phone does not have a lamp under the speaker button, the large message indicator lamp on the top right of the IP phone indicates that the speakerphone is in use.
Comfort and Safety Tips
Observe the following comfort and safety tips when using the IP phone:
•Do not cradle the handset: Prolonged use of the handset can lead to neck, shoulder, or back discomfort, especially if you cradle the handset between your neck and shoulder. If you frequently use the IP phone, you might find a headset more comfortable. “Using a Headset” on page 12.
•Adjust the viewing angle: The built-in stand tilts to give you a better view of the buttons. See “Adjusting the Viewing Angle” on page 15.
•Protect your hearing: Because prolonged exposure to loud sounds can contribute to hearing loss, keep the volume at a moderate level. You can adjust the volume levels of the handset receiver or headset. See “Changing Volume Levels” on page 16.
10
Getting Started
Viewing the Phone Information
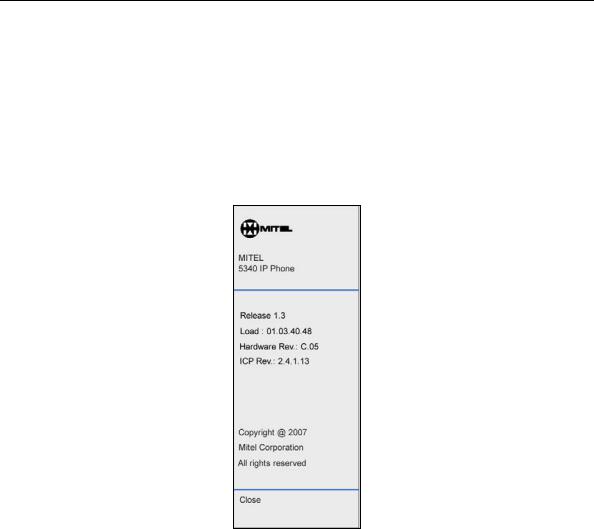
You can use the phone to view system or phone information.
To view system information:
1.Press  (Applications).
2.Press Settings, and then press About 5320e/5330e/5340e IP Phone. A screen similar to the following appears.
3.Press Close to exit the Applications menu.
11

Mitel 5320e/5330e/5340e User Guide
Using a Headset
When using a headset, press  (Speaker) to connect to or disconnect from calls. The Headset icon
  appears when the headset is in use. You cannot use the handset or speakerphone when the IP phone is in Headset Mode. Disconnecting the headset automatically enables the handset.
Note: The headset must be hearing aid compatible (HAC).
If your headset has a power-saver mode, make sure the system administrator has enabled the
S“Headset Connect Tone” feature. If this is not enabled, you may miss the first few seconds of an incoming call.
To connect and activate the headset:
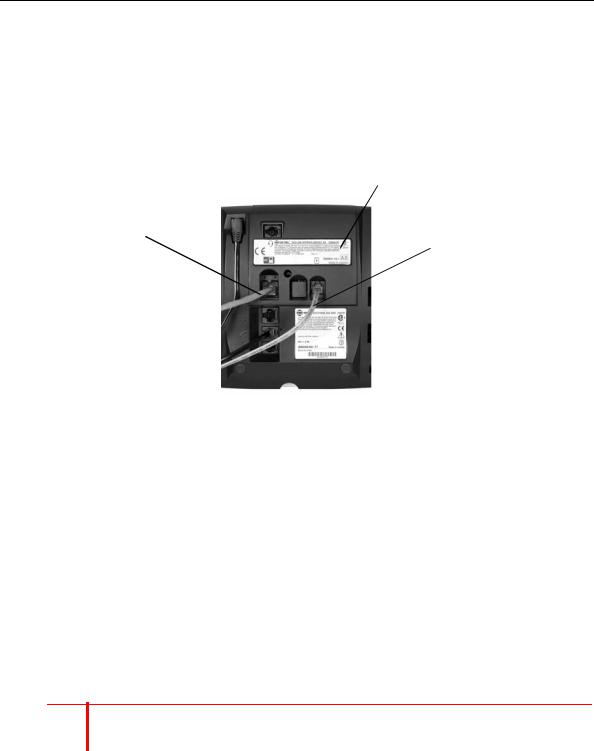
1.Insert the headset jack into the Headset port  located on the back of the IP phone.
2.Dial 317 (Headset on/off). HEADSET MODE ON appears.
Note: Because Headset Mode disables the handset and speakerphone, you must turn off Headset Mode before you can use the handset or speakerphone.
To turn off Headset Mode and activate the handset and speakerphone:
Dial 317 (Headset on/off). HEADSET MODE OFF appears.
12
Getting Started
Using the 5310 IP Conference Unit
Your IP phone can use the 5310 IP Conference Unit (shown below) for full-duplex, advanced IP conferencing. Use the Conference Controller touch screen to turn the Conference Unit on or off, to adjust the volume or to put the Conference Unit into Presentation mode. You can only run one Conference Controller session at a time. If the 5310 Conference Unit is not connected to your IP phone, the Conference Controller application is not available.
Installation instructions are included with the unit.
Mitel 5310 IP Conference Unit
5310 IP Conference Unit
For information about placing conference calls and adding parties to the conference, see “Placing Conference Calls” on page 47.
Accessing/Exiting the Conference Controller Application
You must first access the Conference Controller application to use the Conference Unit.
To access the Conference Controller application: |
||
1. |
Press |
(Applications). |
2. |
Press Conference Unit. |
|
To exit the Conference Controller application: |
||
• Press Close in the Conference Controller application. |
||
Turning the Conference Unit On and Off
The following instructions describe how to turn the Conference Unit on and off.
To turn the Conference Unit on and off:
Press Turn On or Turn Off in the Conference Controller application. If applicable, the icon appears in the IP phone status line while the Conference Unit is on.
Note: Turning the 5310 Conference Unit off terminates the active call. To continue the call either pick up the handset or press the Speaker button on the IP phone.
13

Mitel 5320e/5330e/5340e User Guide
Adjusting the Conference Unit Volume
The following instructions describe how to adjust the Conference Unit volume.
To adjust the Conference Unit volume:
•Press Volume Up or Volume Down.
Muting the Conference Unit
You can mute the Conference Unit so that conversation or noise near the Conference Unit cannot be heard by individuals being conferenced.
To mute the Conference Unit:
•Press Mute.
Placing the Conference Unit in Presentation Mode
Presentation Mode should be used when only one individual will be speaking into the Conference Unit. If another individual near the unit wishes to speak, you should disable Presentation Mode. Presentation Mode minimizes extraneous noise.
To enable/disable Presentation Mode:
•Toggle Presentation Mode on or off in the Conference Controller application.
14
Getting Started
Using the Line Interface Module (LIM)
The LIM is an optional device that adds an analog phone line capability to your IP phone. In the event of a network failure, the IP phone can be configured to use the public switched telephone network (PSTN) to provide continued basic telephony until service in restored. The analog line can also be used for emergency calls and local calling.
|
Line Interface Module |
Ethernet |
Analog PSTN |
Connection |
|
|
Connection |
You can use the LIM to:
•allow incoming and outgoing analog PSTN calls directly to and from the IP phone
•provide survivability (failover) in the event IP connectivity is lost
•provide emergency dialing support (emergency calls can be programmed to connect through the analog PSTN connection)
If you have a LIM connected to your IP phone, all programming of the LIM, except the Analog button (key), is done by the Installer when your IP phone is installed. To program the Analog button, see “Using Programmable Buttons” on page 24.
The LIM operates in one of the following two modes, as determined by your System Administrator:
•LIM Mode: You can use the LIM line at any time.
•Failover Mode: You can use the LIM line only when the IP connection has failed.
 Note: Handsfree and on-hook dialing are not supported on the LIM line.
For information on emergency number dialing using the LIM, see “Placing Emergency Calls using the LIM Line” on page 33.
15

Mitel 5320e/5330e/5340e User Guide
Making and Answering Calls Using the Analog Button
To make a call using the Analog line:
1.Lift the handset.
2.Press the button you programmed as Analog Line. ANALOG CALL appears.
3.Dial the number.
Note: When you make an external call over the analog line, a prefix dialing number is not required. If your IP phone’s Analog Line button has the Privacy option enabled, you cannot access the analog line when another phone is using the analog line (button is solid orange).To access the analog line, the user of the other phone must first hang up. To determine whether the Privacy option is enabled, contact your System Administrator.
To answer a Call using the analog line:
1.Lift the handset.
2.Press the Analog Line button that is highlighted.
To answer a waiting call on the analog line:
Note: If you have subscribed to an analog call waiting service, you may use the hookswitch or press the Star button (*) to answer a waiting analog call. When you are on an analog call and a waiting analog call arrives, you hear a beep. This feature may not be supported in all regions.
To answer a waiting analog call or return to the original analog call:
1.Do one of the following:
•Press and release the hookswitch.
•Press the Star button (*) to cancel.
2.Press the button you have programmed as Analog Line.
To put a current call on hold to answer an incoming analog call:
•Press the highlighted Analog Line button.
To switch between the current call and the held call when one of the calls is using the analog line, do one of the following:
•If your current call is using the analog line, press the flashing Line button of the held call. The analog call is automatically put on hold.
•If your current call is using an IP line, press the highlighted Analog Line button. The IP line is automatically put on hold.
To end a current call when an incoming analog call arrives:
•Press the Star button (*) and then press the highlighted Analog Line button. The current call ends and you are connected to the caller on the analog line.
16

Getting Started
To end the current analog call when an incoming call arrives:
•Press the Star button (*) to cancel. The current analog call ends and you are connected to the new caller.
Making and Answering Calls Using the Failover Mode
To make a call using the analog line during an IP connection failure:
1.Lift the handset. IP FAIL: ANALOG CALL appears.
2.Dial the number.
To answer a call using the analog line during an IP connection failure:
•Lift the handset. The call is answered. IP FAIL: ANALOG CALL appears.
17

Mitel 5320e/5330e/5340e User Guide
18

CHAPTER 2
PERSONALIZING YOUR PHONE

Mitel 5320e/5330e/5340e User Guide
20
Personalizing Your Phone
Overview
This chapter describes features you can use to personalize your IP phone.
Adjusting the Viewing Angle
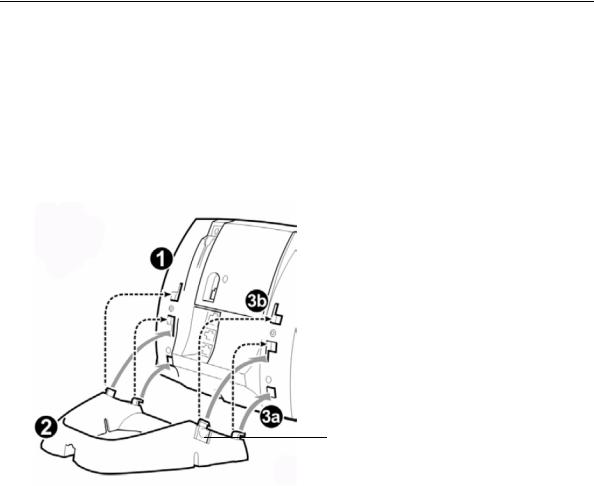
You can tilt the IP phone stand for a better view of the buttons and display.
Press tabs on both sides to release and detach unit.
To adjust the viewing angle:
1.Turn the IP phone so it faces away from you.
2.Hold the base firmly, and then press the tabs on the sides of the stand to release and detach the base unit.
3.Hinge the hooks on the base unit into the notches on the back of the IP phone, and then snap into place as follows:
•For a high-angle mount, hinge the two lower hooks into the bottom set of notches, and then snap the two upper hooks into the middle set of notches.
•For a low-angle mount, hinge the two lower hooks into the middle set of notches, and then snap the two upper hooks into the top set of notches.
21

Mitel 5320e/5330e/5340e User Guide
Changing Volume Levels
You can change the following volume levels:
•Ringer (alerting tone)
•Handset
•Headset
•Background music
•External speaker
Note: Turning the external speaker volume down to the lowest levels may prevent you from hearing the feature “warning tones” that notify you when errors occur (for example, when you enter an incorrect feature code).
You must be using the feature to change the volume level. For example, if you want to change the handset volume level, you must be using the handset. However, you can adjust the ringer (alerting tone) volume level when the IP phone is idle.
To change a volume level:
While using the feature, press  (Up) to increase the volume, or press
  (Down) to decrease the volume. The volume level is automatically saved.
Changing the Ring Tone
You can select one of nine different ring tones.
To change the ring tone:
1.With the handset on-hook, dial 398.
2.Do one of the following to listen to (or turn off) ring tones:
•Press 0 or the RINGER OFF menu button (5340e IP Phones only) to turn the ringer off.
•Press (Up) or (Down) or 1 to 9 to listen to ring tones.
•Press the PREVIOUS or NEXT menu button (5340e IP Phones only) to listen to and select a ring tone.
3.Press  (Speaker), #, the ACCEPT menu button (5340e IP Phones only), or lift and replace the handset to select the ring tone.
22
Loading...