


SX-2000 LW
Table of contents
 Loading...
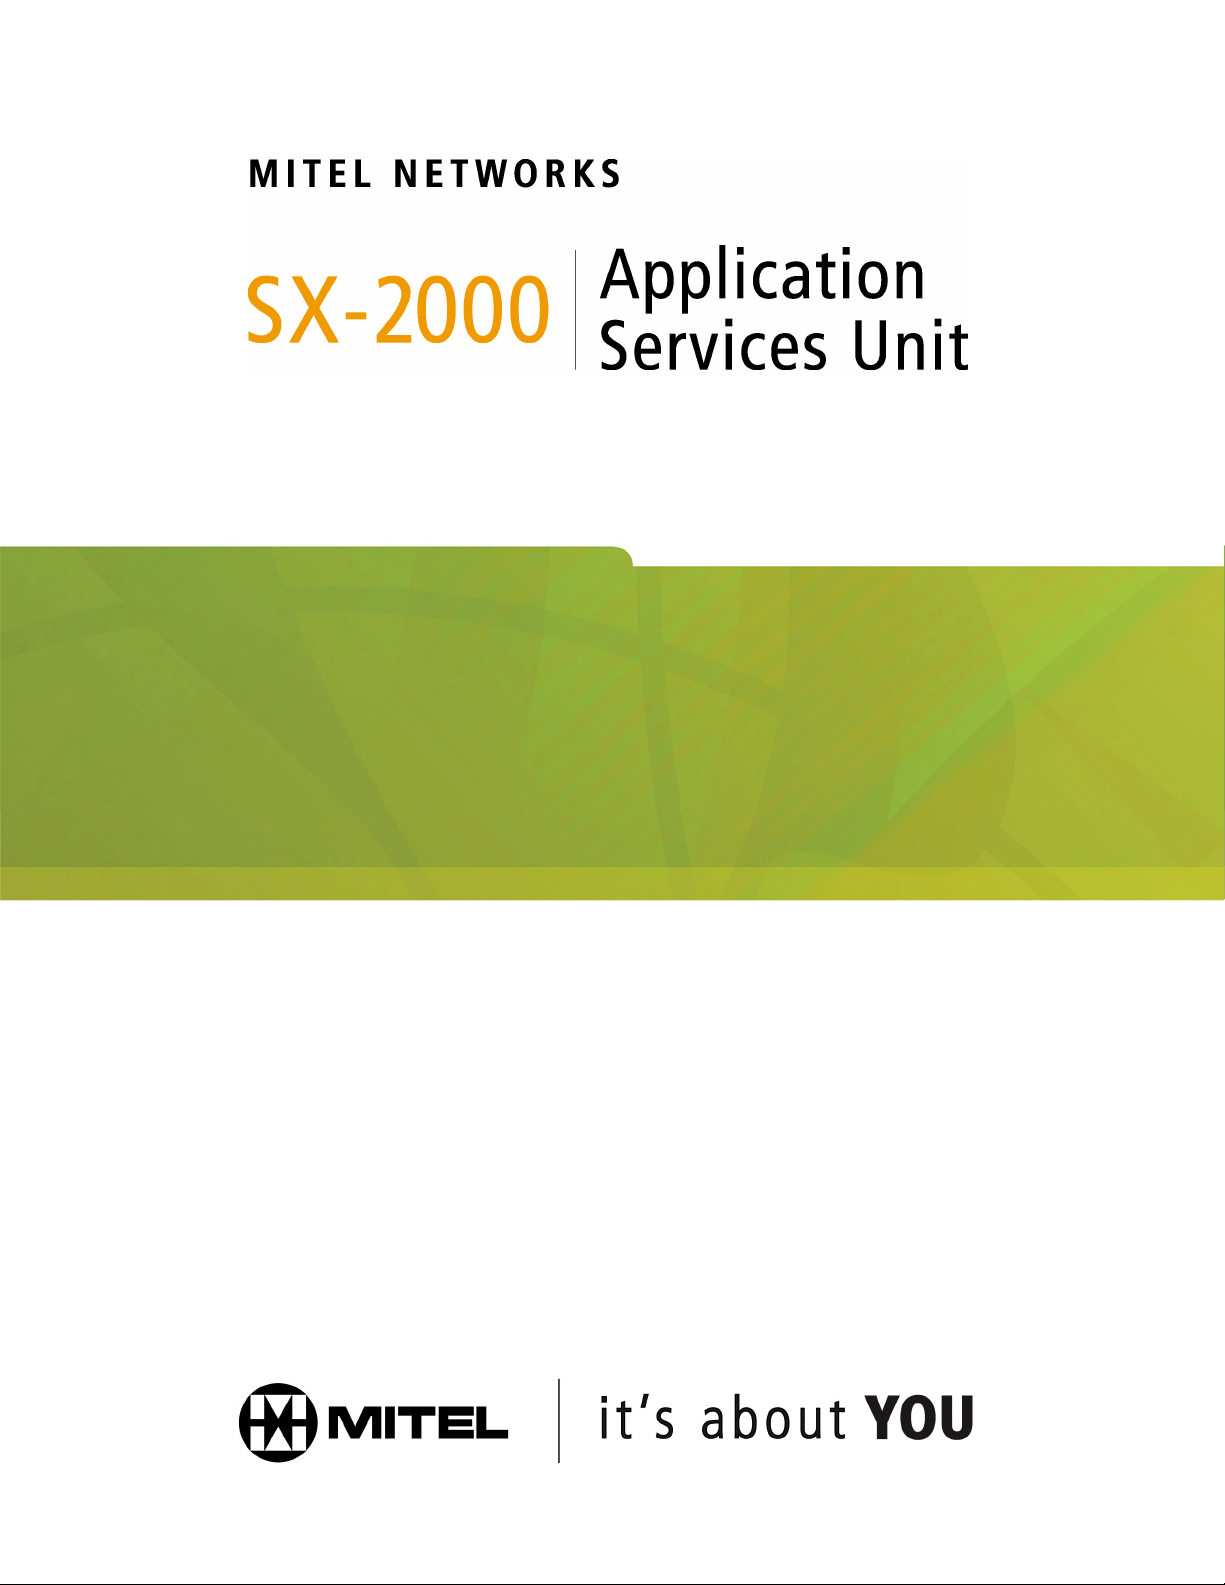
INSTALLATION & MAINTENANCE GUIDE

2
NOTICE
The information contained in this document is believed to be accurate in all respects but is not
warranted by Mitel Networks Corporation (MITEL®). The information is subject to change without
notice and should not be construed in any way as a commitment by Mitel or any of its affiliates or
subsidiaries. Mitel and its affiliates and subsidiaries assume no responsibility for any errors or
omissions in this document. Revisions of this document or new editions of it may be issued to
incorporate such changes.
Trademarks
SX-2000 and MiTAI are trademarks of Mitel Networks Corporation.
Windows and TAPI are trademarks of Microsoft Corporation
Other product names mentioned in this document may be trademarks of their respective
companies and are hereby acknowledged.
Copyright
, Trademark of MITEL Networks Corporation
©Copyright 2003, MITEL Networks Corporation
All rights reserved

3
Table of Contents
ABOUT THE SX-2000 APSU® ................................................................................. 4
SX-2000 Light CTI Connectivity........................................................................................... 4
INSTALLING THE SX-2000 APSU ........................................................................... 5
Required Components......................................................................................................... 5
Installation Instructions ........................................................................................................5
Installing The MiTAI Client................................................................................................... 7
Configuring The MiTAI Client............................................................................................... 8
Upgrading The SX-2000 ApSU Software............................................................................. 8
About The SX-2000 ApSU Software Load........................................................................... 8
TROUBLESHOOTING ............................................................................................ 11
Check The LED Indicators................................................................................................. 11
FTP Client Cannot Connect To SX-2000 ApSU ................................................................ 11
MiTAI Client Cannot Connect To MiTAI Server On SX-2000 ApSU .................................. 12
Reconfiguring The SX-2000 ApSU Flash Memory ............................................................13
4
About The SX-2000 ApSU®
The Mitel Networks
TM
SX-2000 Application Services Unit (ApSU) is a fiber connected MiTAI
TM
server for the SX-2000 that replaces the Application Fiber Card (AFC). It is a low cost and
maintenance-free unit that supports:
• MiTAI remote clients Version 10 or later,
• Mitel Client/Server TSP 3.0 or later.
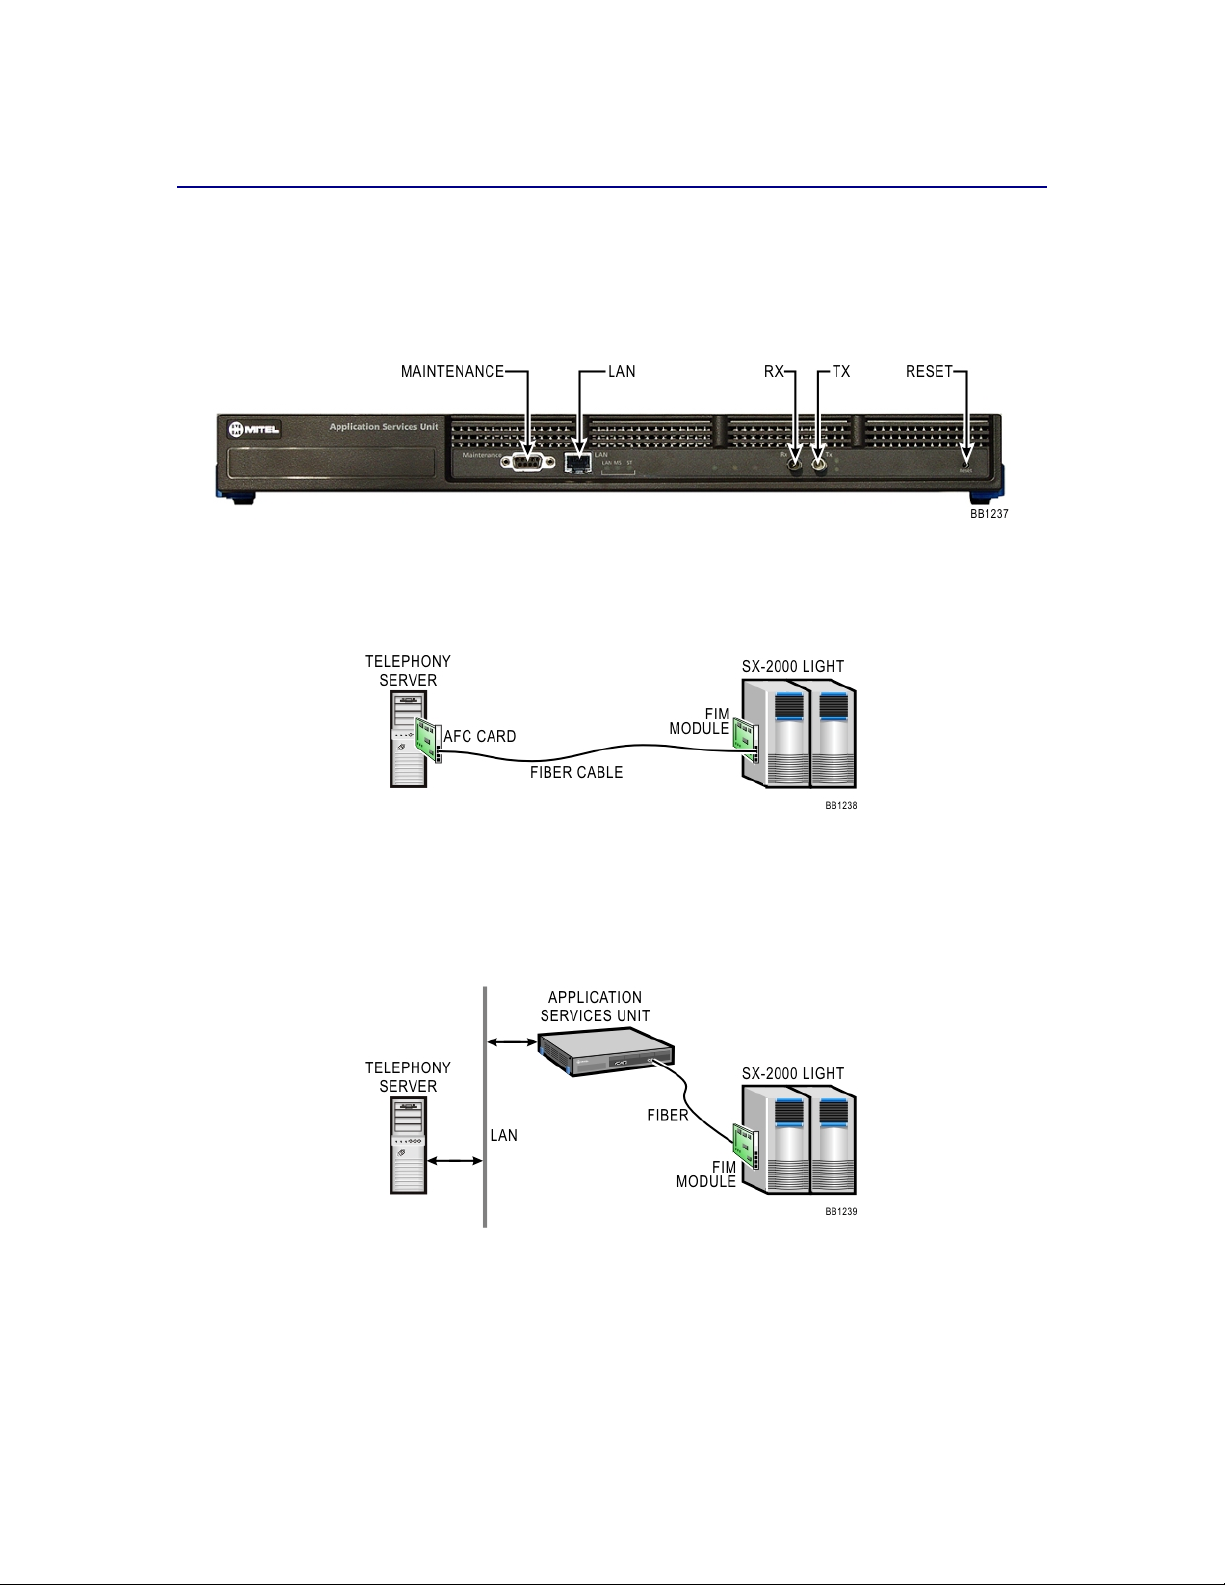
SX-2000 Light CTI Connectivity
Currently, the MiTAI server for the SX-2000 resides on a PC and communicates with the SX-2000
PBX via fiber optic cable using the AFC (Application Fiber Card).
SX-2000 CTI Connectivity using the AFC - Application Fiber Card
The AFC is being replaced with the SX-2000 ApSU which provides a MiTAI server that will be
able to service multiple MiTAI and TAPI clients over the network using standard network cards.
The SX-2000 ApSU will reduce the overall cost of hardware and simplify the deployment and
maintenance of telephony applications.
SX-2000 CTI connectivity using the SX-2000 Application Services Unit

5
Installing The SX-2000 ApSU
Required Components
To install the SX-2000 Applications Services Unit (SX-2000 ApSU), you require:
• SX-2000 ApSU
• RJ45 Ethernet cable for connecting to the LAN
• fiber-optic cable that is connected to the SX-2000 PBX
• personal computer (PC) with a connection to the same LAN as the SX-2000 ApSU, an
FTP client and Hyperterminal or a similar program for communicating over a serial port
• serial cable to connect the SX-2000 ApSU to the PC’s COM port.
Note: Some Windows operating systems such as XP or 2000 may already have an FTP client
and Hyperterminal included.
Installation Instructions
The following instructions assume that the SX-2000 ApSU has the factory-installed SX-2000
ApSU software already installed.
1. Log into a CDE session on the SX-2000 PBX.
Note: You program the SX-2000 ApSU on the SX-2000 in exactly the same manner as the AFC
card.
2. Program a Fiber Distributed Digital Services Unit (FD DSU) in the Cabinet Assignment form
for the physical location identifier (PLID) of the Fiber Interface Module (FIM) carrier card that
will be used to connect to the SX-2000 ApSU.
3. Program a “Communications Proc” card for the second circuit in the same cabinet in the
System Configuration form. For example, if the cabinet used for the SX-2000 ApSU is #4, the
System Configuration form should display PLID 4 1 1 as “Fiber Interface”. PLID 4 1 2 should
then be programmed as “Communication Proc”. When the SX-2000 ApSU is operational, the
Installed Card Type field should be displayed as “Communication Proc”.
4. Connect the PC to the SX-2000 ApSU using the serial cable.
5. Connect the SX-2000 ApSU to the LAN with the Ethernet cable.
6. Connect the SX-2000 ApSU to the SX-2000 PBX with the fiber cable.
7. Initiate the serial-port communications program (for example, Hyperterminal) on the PC.
Settings should be defined as 38400, 8-N-1 and flow control should be set to ‘None’.
8. Connect the power cable to the SX-2000 ApSU. It should initiate automatically and output
should begin appearing in the Hyperterminal window on the PC screen. If the SX-2000 ApSU
has already been powered up, a soft reset can be performed by using the Reset button
recessed into the front of the SX-2000 ApSU's casing.
Note: As with other fiber connections, the two green LED’s beside the SX-2000 ApSU's fiber
connectors should be lit steady. If not, try switching the connections so that the red
connector is inserted where the blue connector was and the blue connector is inserted
where the red connector was previously.
9. Press any key on the keyboard when prompted by Hyperterminal to stop the auto-boot
process. A prompt should appear reading: [MC269AA Boot]-:
Loading...