


 Loading...
MITEL
5540 IP Console
User Guide
Release 1.0
NOTICE
The information contained in this document is believed to be accurate in all respects but is not warranted
by Mitel Networks™ Corporation (MITEL®). The information is subject to change without notice and should not be construed in any way as a commitment by Mitel or any of its affiliates or subsidiaries. Mitel and its affiliates and subsidiaries assume no responsibility for any errors or omissions in this document. Revisions of this document or new editions of it may be issued to incorporate such changes.
No part of this document can be reproduced or transmitted in any form or by any means - electronic or mechanical - for any purpose without written permission from Mitel Networks Corporation.
Mitel Networks is a trademark of Mitel Networks Corporation.
Other product names mentioned in this document may be trademarks of their respective companies and are hereby acknowledged.
NOTICE TO CANADIAN CUSTOMERS
This Class A digital apparatus complies with Canadian ICES-003.
NOTICE TO U.S. CUSTOMERS
This equipment has been tested and found to comply with the limits for a Class A digital device, pursuant to Part 15 of the FCC Rules. These limits are designed to provide reasonable protection against harmful interference when the equipment is operated in a commercial environment. This equipment generates, uses, and can radiate radio frequency energy and, if not installed and used in accordance with the instruction manual, may cause harmful interference to radio communications. Operation of this equipment in a residential area is likely to cause harmful interference in which case the user will be required to correct the interference at his own expense.
Changes or modifications not expressly approved by Mitel Networks™ Corporation may void the user’s right to operate the equipment.
Mitel 5540 IP Console User Guide (for Mitel Communications Director (MCD))
October 2009
®, ™Trademark of Mitel Networks Corporation. © Copyright 2009, Mitel Networks Corporation All rights reserved.

Table of Contents
Chapter 1: Getting Started
Introduction . . . . . . . . . . . . . . . . . . . . . . . . . . . . . . . . . . . . . . . . . . . . . . . . . . . . . . . . . . . . . . . . . . . 3
Using this Guide . . . . . . . . . . . . . . . . . . . . . . . . . . . . . . . . . . . . . . . . . . . . . . . . . . . . . . . . . . . . . . . 3 Conventions . . . . . . . . . . . . . . . . . . . . . . . . . . . . . . . . . . . . . . . . . . . . . . . . . . . . . . . . . . . . . . . . . 3
About the Console . . . . . . . . . . . . . . . . . . . . . . . . . . . . . . . . . . . . . . . . . . . . . . . . . . . . . . . . . . . . . 4
Before you begin . . . . . . . . . . . . . . . . . . . . . . . . . . . . . . . . . . . . . . . . . . . . . . . . . . . . . . . . . . . . . 4
Console Components . . . . . . . . . . . . . . . . . . . . . . . . . . . . . . . . . . . . . . . . . . . . . . . . . . . . . . . . . 4
Corded Handset and Headset Ports . . . . . . . . . . . . . . . . . . . . . . . . . . . . . . . . . . . . . . . . . . . . 5
Console Rear Ports . . . . . . . . . . . . . . . . . . . . . . . . . . . . . . . . . . . . . . . . . . . . . . . . . . . . . . . . 5
Console Keys . . . . . . . . . . . . . . . . . . . . . . . . . . . . . . . . . . . . . . . . . . . . . . . . . . . . . . . . . . . . . 6
Adjusting the Console. . . . . . . . . . . . . . . . . . . . . . . . . . . . . . . . . . . . . . . . . . . . . . . . . . . . . . . . . . . 8 Adjusting the Ringer Volume . . . . . . . . . . . . . . . . . . . . . . . . . . . . . . . . . . . . . . . . . . . . . . . . . . . . 8 Adjusting the Handset and Headset Receiver Volume . . . . . . . . . . . . . . . . . . . . . . . . . . . . . . . . 8 Adjusting the Contrast Control . . . . . . . . . . . . . . . . . . . . . . . . . . . . . . . . . . . . . . . . . . . . . . . . . . . 8 Adjusting the Display Brightness . . . . . . . . . . . . . . . . . . . . . . . . . . . . . . . . . . . . . . . . . . . . . . . . . 9 Turning the Console Bell (Ringer) Off/On . . . . . . . . . . . . . . . . . . . . . . . . . . . . . . . . . . . . . . . . . . 9 Switching to Night/Day Service . . . . . . . . . . . . . . . . . . . . . . . . . . . . . . . . . . . . . . . . . . . . . . . . . . 9 Setting the Console Language . . . . . . . . . . . . . . . . . . . . . . . . . . . . . . . . . . . . . . . . . . . . . . . . . 10 Changing the Attendant Present/Absent Status . . . . . . . . . . . . . . . . . . . . . . . . . . . . . . . . . . . . 10 Programming Firmkeys . . . . . . . . . . . . . . . . . . . . . . . . . . . . . . . . . . . . . . . . . . . . . . . . . . . . . . . 10
Using a Cordless Headset with the Console . . . . . . . . . . . . . . . . . . . . . . . . . . . . . . . . . . . . . . . . 12
Connecting the Cordless Headset . . . . . . . . . . . . . . . . . . . . . . . . . . . . . . . . . . . . . . . . . . . . . . . 12 Using the Cordless Headset for Operational Mode . . . . . . . . . . . . . . . . . . . . . . . . . . . . . . . 13 Using the Cordless Headset for Training Mode . . . . . . . . . . . . . . . . . . . . . . . . . . . . . . . . . . 14
Guidelines for Cordless Headset Operation . . . . . . . . . . . . . . . . . . . . . . . . . . . . . . . . . . . . . . . 15 Answering Calls Using a Cordless Headset . . . . . . . . . . . . . . . . . . . . . . . . . . . . . . . . . . . . . . . 15 Making Calls Using a Cordless Headset . . . . . . . . . . . . . . . . . . . . . . . . . . . . . . . . . . . . . . . . . . 15 Powering the Console . . . . . . . . . . . . . . . . . . . . . . . . . . . . . . . . . . . . . . . . . . . . . . . . . . . . . . . . 15
Chapter 2: Call Handling
Answering Calls . . . . . . . . . . . . . . . . . . . . . . . . . . . . . . . . . . . . . . . . . . . . . . . . . . . . . . . . . . . . . . 19 New Call Indication . . . . . . . . . . . . . . . . . . . . . . . . . . . . . . . . . . . . . . . . . . . . . . . . . . . . . . . . . . 19 When Multiple Calls are Waiting . . . . . . . . . . . . . . . . . . . . . . . . . . . . . . . . . . . . . . . . . . . . . . . . 20
Transferring Calls . . . . . . . . . . . . . . . . . . . . . . . . . . . . . . . . . . . . . . . . . . . . . . . . . . . . . . . . . . . . . 20
iii

Table of Contents
Misdialed Numbers . . . . . . . . . . . . . . . . . . . . . . . . . . . . . . . . . . . . . . . . . . . . . . . . . . . . . . . . . . 20 Reaching a Busy Destination or an Extension with Do Not Disturb Activated . . . . . . . . . . . . . . 20 Reaching an Extension with an Advisory Message . . . . . . . . . . . . . . . . . . . . . . . . . . . . . . . . . . 21
Placing Calls . . . . . . . . . . . . . . . . . . . . . . . . . . . . . . . . . . . . . . . . . . . . . . . . . . . . . . . . . . . . . . . . . 21
Placing a Call on Hold . . . . . . . . . . . . . . . . . . . . . . . . . . . . . . . . . . . . . . . . . . . . . . . . . . . . . . . . . 21 Hold Recall . . . . . . . . . . . . . . . . . . . . . . . . . . . . . . . . . . . . . . . . . . . . . . . . . . . . . . . . . . . . . . . . 22 Stacked Hold . . . . . . . . . . . . . . . . . . . . . . . . . . . . . . . . . . . . . . . . . . . . . . . . . . . . . . . . . . . . . . . 23
Setting up Conferences and Call Splitting . . . . . . . . . . . . . . . . . . . . . . . . . . . . . . . . . . . . . . . . . . 23
Answering Recalls . . . . . . . . . . . . . . . . . . . . . . . . . . . . . . . . . . . . . . . . . . . . . . . . . . . . . . . . . . . . 24
Answering Intercepts to the Console . . . . . . . . . . . . . . . . . . . . . . . . . . . . . . . . . . . . . . . . . . . . . . 24
Paging from the Console . . . . . . . . . . . . . . . . . . . . . . . . . . . . . . . . . . . . . . . . . . . . . . . . . . . . . . . 25 PA Paging . . . . . . . . . . . . . . . . . . . . . . . . . . . . . . . . . . . . . . . . . . . . . . . . . . . . . . . . . . . . . . . . . 25 Extension Paging . . . . . . . . . . . . . . . . . . . . . . . . . . . . . . . . . . . . . . . . . . . . . . . . . . . . . . . . . . . . 26 Call Park . . . . . . . . . . . . . . . . . . . . . . . . . . . . . . . . . . . . . . . . . . . . . . . . . . . . . . . . . . . . . . . . . . 26
Placing Ringing or Paging Intercom Calls . . . . . . . . . . . . . . . . . . . . . . . . . . . . . . . . . . . . . . . . . . 27
Setting and Canceling Do Not Disturb on an Extension . . . . . . . . . . . . . . . . . . . . . . . . . . . . . . . . 27
Setting and Canceling Message Waiting on an Extension . . . . . . . . . . . . . . . . . . . . . . . . . . . . . . 28
Overriding Busy or Do Not Disturb . . . . . . . . . . . . . . . . . . . . . . . . . . . . . . . . . . . . . . . . . . . . . . . . 28
Redialing the Last Number . . . . . . . . . . . . . . . . . . . . . . . . . . . . . . . . . . . . . . . . . . . . . . . . . . . . . . 28
Phonebook . . . . . . . . . . . . . . . . . . . . . . . . . . . . . . . . . . . . . . . . . . . . . . . . . . . . . . . . . . . . . . . . . . 29
Setting up a Serial Call . . . . . . . . . . . . . . . . . . . . . . . . . . . . . . . . . . . . . . . . . . . . . . . . . . . . . . . . . |
30 |
Using Tone Signaling . . . . . . . . . . . . . . . . . . . . . . . . . . . . . . . . . . . . . . . . . . . . . . . . . . . . . . . . . . |
31 |
Flashing on Trunks . . . . . . . . . . . . . . . . . . . . . . . . . . . . . . . . . . . . . . . . . . . . . . . . . . . . . . . . . . . . |
31 |
Answering a Call with Night Service Enabled. . . . . . . . . . . . . . . . . . . . . . . . . . . . . . . . . . . . . . . . |
31 |
Using Directed Call Pickup . . . . . . . . . . . . . . . . . . . . . . . . . . . . . . . . . . . . . . . . . . . . . . . . . . . . . . |
32 |
Last Call Retrieve . . . . . . . . . . . . . . . . . . . . . . . . . . . . . . . . . . . . . . . . . . . . . . . . . . . . . . . . . . . |
32 |
Multiple Console Operation . . . . . . . . . . . . . . . . . . . . . . . . . . . . . . . . . . . . . . . . . . . . . . . . . . . . . 32
Inter-Console Calls and Transfers . . . . . . . . . . . . . . . . . . . . . . . . . . . . . . . . . . . . . . . . . . . . . . . 32
iv

Table of Contents
Centralized Attendant Service (CAS) . . . . . . . . . . . . . . . . . . . . . . . . . . . . . . . . . . . . . . . . . . . . . . 33 Voice mail . . . . . . . . . . . . . . . . . . . . . . . . . . . . . . . . . . . . . . . . . . . . . . . . . . . . . . . . . . . . . . . . . . . 33
Chapter 3: Using System Functions
Viewing System Alarm Information. . . . . . . . . . . . . . . . . . . . . . . . . . . . . . . . . . . . . . . . . . . . . . . . 37
Viewing 911 Call Alarms. . . . . . . . . . . . . . . . . . . . . . . . . . . . . . . . . . . . . . . . . . . . . . . . . . . . . . . . 38 Emergency Call Notification and Cordless Headsets . . . . . . . . . . . . . . . . . . . . . . . . . . . . . . . . 38
Setting System Date and Time . . . . . . . . . . . . . . . . . . . . . . . . . . . . . . . . . . . . . . . . . . . . . . . . . . . 39
Canceling Call Forwarding . . . . . . . . . . . . . . . . . . . . . . . . . . . . . . . . . . . . . . . . . . . . . . . . . . . . . . 40
Canceling Do Not Disturb . . . . . . . . . . . . . . . . . . . . . . . . . . . . . . . . . . . . . . . . . . . . . . . . . . . . . . . 40
Displaying the Console Identity . . . . . . . . . . . . . . . . . . . . . . . . . . . . . . . . . . . . . . . . . . . . . . . . . . 41
Chapter 4: Using Extension Functions
Viewing Extension Status . . . . . . . . . . . . . . . . . . . . . . . . . . . . . . . . . . . . . . . . . . . . . . . . . . . . . . . 45
Setting/Canceling Call Forwarding . . . . . . . . . . . . . . . . . . . . . . . . . . . . . . . . . . . . . . . . . . . . . . . . 45
Setting/Canceling Do Not Disturb . . . . . . . . . . . . . . . . . . . . . . . . . . . . . . . . . . . . . . . . . . . . . . . . . 46
Setting/Clearing Message Waiting . . . . . . . . . . . . . . . . . . . . . . . . . . . . . . . . . . . . . . . . . . . . . . . . 46
Setting/Clearing Advisory Messages . . . . . . . . . . . . . . . . . . . . . . . . . . . . . . . . . . . . . . . . . . . . . . 47
Clearing All Features . . . . . . . . . . . . . . . . . . . . . . . . . . . . . . . . . . . . . . . . . . . . . . . . . . . . . . . . . . 47
Taking an Extension Out of Service . . . . . . . . . . . . . . . . . . . . . . . . . . . . . . . . . . . . . . . . . . . . . . . 48
Chapter 5: Using Trunk Functions
Viewing Trunk Status . . . . . . . . . . . . . . . . . . . . . . . . . . . . . . . . . . . . . . . . . . . . . . . . . . . . . . . . . . 51 Viewing Trunk Group Busy Status . . . . . . . . . . . . . . . . . . . . . . . . . . . . . . . . . . . . . . . . . . . . . . . . 51 Accessing Specific Trunks . . . . . . . . . . . . . . . . . . . . . . . . . . . . . . . . . . . . . . . . . . . . . . . . . . . . . . 53 Taking a Trunk Out of Service . . . . . . . . . . . . . . . . . . . . . . . . . . . . . . . . . . . . . . . . . . . . . . . . . . . 53
Chapter 6: Hotel/Motel Features
Displaying and Changing Room Data. . . . . . . . . . . . . . . . . . . . . . . . . . . . . . . . . . . . . . . . . . . . . . 57 Listing/Counting Rooms by Occupancy and Condition Status . . . . . . . . . . . . . . . . . . . . . . . . . . . 58
v

Mitel 5540 IP Console - User Guide
Changing Room Occupancy and Condition Status. . . . . . . . . . . . . . . . . . . . . . . . . . . . . . . . . . . . 59
Checking-In/Checking-Out . . . . . . . . . . . . . . . . . . . . . . . . . . . . . . . . . . . . . . . . . . . . . . . . . . . . . . 60
Setting/Canceling Wake-up Calls . . . . . . . . . . . . . . . . . . . . . . . . . . . . . . . . . . . . . . . . . . . . . . . . . 60
Setting Room Call Restrictions . . . . . . . . . . . . . . . . . . . . . . . . . . . . . . . . . . . . . . . . . . . . . . . . . . . 61
Blocking Room-to-Room Calls . . . . . . . . . . . . . . . . . . . . . . . . . . . . . . . . . . . . . . . . . . . . . . . . . . . 61
Monitoring Guest Rooms . . . . . . . . . . . . . . . . . . . . . . . . . . . . . . . . . . . . . . . . . . . . . . . . . . . . . . . 62
Displaying/Clearing a Message Register . . . . . . . . . . . . . . . . . . . . . . . . . . . . . . . . . . . . . . . . . . . 62
Printing Reports . . . . . . . . . . . . . . . . . . . . . . . . . . . . . . . . . . . . . . . . . . . . . . . . . . . . . . . . . . . . . . 63
Chapter 7: Reference
Telephone Directory . . . . . . . . . . . . . . . . . . . . . . . . . . . . . . . . . . . . . . . . . . . . . . . . . . . . . . . . . . . 67
Class of Service/Restriction . . . . . . . . . . . . . . . . . . . . . . . . . . . . . . . . . . . . . . . . . . . . . . . . . . . . . 68
Console Display Abbreviations . . . . . . . . . . . . . . . . . . . . . . . . . . . . . . . . . . . . . . . . . . . . . . . . . . . 69
Advisory Messages for Display Telephones . . . . . . . . . . . . . . . . . . . . . . . . . . . . . . . . . . . . . . . . . 70
Glossary . . . . . . . . . . . . . . . . . . . . . . . . . . . . . . . . . . . . . . . . . . . . . . . . . . . . . . . . . . . . . . . . . . . . 71
Busy out . . . . . . . . . . . . . . . . . . . . . . . . . . . . . . . . . . . . . . . . . . . . . . . . . . . . . . . . . . . . . . . .71
Camp-on . . . . . . . . . . . . . . . . . . . . . . . . . . . . . . . . . . . . . . . . . . . . . . . . . . . . . . . . . . . . . . . .71
Central Office (CO) . . . . . . . . . . . . . . . . . . . . . . . . . . . . . . . . . . . . . . . . . . . . . . . . . . . . . . . .71
Class of Restriction (COR) . . . . . . . . . . . . . . . . . . . . . . . . . . . . . . . . . . . . . . . . . . . . . . . . . .71
Class of Service (COS) . . . . . . . . . . . . . . . . . . . . . . . . . . . . . . . . . . . . . . . . . . . . . . . . . . . . .71
DISA (Direct Inward System Access) . . . . . . . . . . . . . . . . . . . . . . . . . . . . . . . . . . . . . . . . . .71
Hardware . . . . . . . . . . . . . . . . . . . . . . . . . . . . . . . . . . . . . . . . . . . . . . . . . . . . . . . . . . . . . . .71
Hunt Group . . . . . . . . . . . . . . . . . . . . . . . . . . . . . . . . . . . . . . . . . . . . . . . . . . . . . . . . . . . . . .71
LDN Keys (Listed Directory Number) . . . . . . . . . . . . . . . . . . . . . . . . . . . . . . . . . . . . . . . . . .72
PABX (Private Automatic Branch Exchange) . . . . . . . . . . . . . . . . . . . . . . . . . . . . . . . . . . . .72
Recall . . . . . . . . . . . . . . . . . . . . . . . . . . . . . . . . . . . . . . . . . . . . . . . . . . . . . . . . . . . . . . . . . .72
Software . . . . . . . . . . . . . . . . . . . . . . . . . . . . . . . . . . . . . . . . . . . . . . . . . . . . . . . . . . . . . . . .72
Trunk . . . . . . . . . . . . . . . . . . . . . . . . . . . . . . . . . . . . . . . . . . . . . . . . . . . . . . . . . . . . . . . . . . .72
Trunk Identification . . . . . . . . . . . . . . . . . . . . . . . . . . . . . . . . . . . . . . . . . . . . . . . . . . . . . . . . . . . . 73
Index . . . . . . . . . . . . . . . . . . . . . . . . . . . . . . . . . . . . . . . . . . . . . . . . . . . . . . . . . . . . . . . . . . . . . . . 75
vi

Chapter 1
Getting Started

Mitel 5540 IP Console - User Guide
2

Introduction
Introduction
Take a few minutes to explore this guide – it contains all the information you need to operate the 5540 IP Console.
The first section introduces you to the console. You will learn what each group of keys does and how to interpret information on the console display. This section also contains information about how to use this guide.
A note about feature availability
The features available on your telephone system have been selected by your company and may not include all the features described in this guide.
Using this Guide
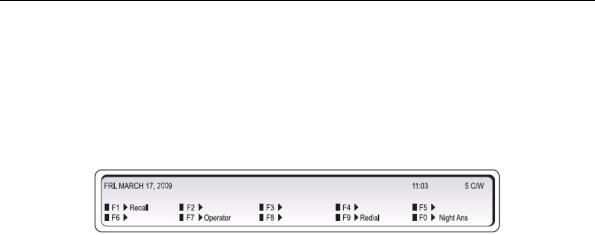
Some of the procedures in this guide include an illustration of the console display. The illustration shows how the display will look when you are performing the procedure.
Note the abbreviations in the upper half of the display. The following table explains the meaning of those abbreviations. For explanations of the other abbreviations, including those used in the lower half of the display, see page 69.
Abbreviation |
Definition |
|
|
DST |
The DESTINATION (called) party |
|
|
SRC |
The SOURCE (calling) party |
|
|
>>><<< Appears on either the SRC or DST line to indicate which party is currently connected to the console
COS |
Shows the Class of Service assigned to the extension or trunk that is currently |
|
connected to the console |
|
|
COR |
Shows the Class of Restriction assigned to the extension or trunk that is currently |
|
connected to the console |
|
|
C/W |
Preceded by a number to indicate how many calls are waiting to be answered |
|
|
Conventions
This guide uses the following conventions to differentiate between the two types of console keys:
•Fixed keys appear in bold letters—for example, Answer or Hold.
•Softkeys appear in bold letters within brackets—for example, [Bell On] or [Conference] .
3
Mitel 5540 IP Console - User Guide
About the Console
Before you begin
Before operating the console, check that the display shows [F1> through [F0> and the correct time and date. Also, make sure the handset is plugged into the side of the console.
If any problems occur, contact your communications department for assistance.
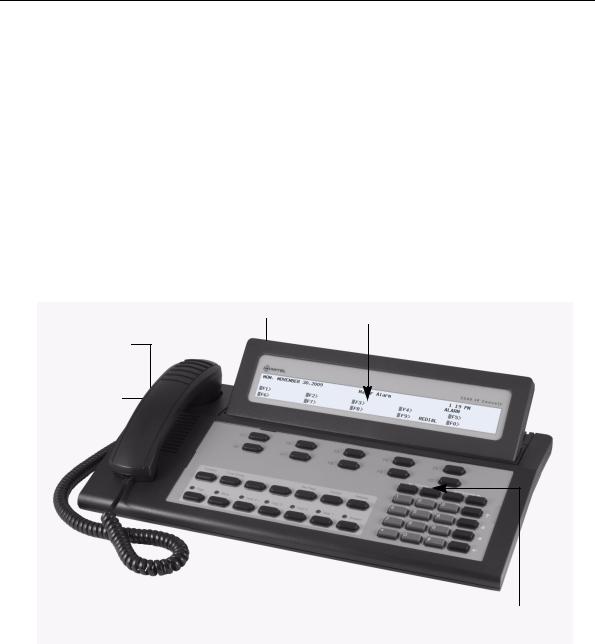
Console Components
The illustration below shows the main parts of the console.
Cable Connections LCD Display
Training Jack
Handset and
Headset Jack
Volume and
Contrast Controls
4
About the Console
Corded Handset and Headset Ports
There are two jacks on the left side. One is for the handset or headset that you use; the other is for the handset or headset used by the person training or monitoring new attendants.
Console Rear Ports
The cabling required to connect the console to the telephone system is located at the rear of the console. The cables should be connected by a qualified system installer and should not be adjusted by unauthorized personnel. The Cordless Headset port is the last port on the right side. For more information on cordless headset operation, see “Using a Cordless Headset with the Console” on page 12
 Note: The PKM is currently not supported on Mitel Communications Director (MCD).
5

Mitel 5540 IP Console - User Guide
Console Keys
The console has three types of keys: Dialpad keys, Softkeys and Fixed Keys.
Dialpad keys
The dialpad on the right side of the console has 20 keys, including the standard 12 dialing keys.
Ringer Volume keys: The Volume and Volume keys increase or decrease the loudness of the console ringer and handset volume.
Contrast Control keys: The Contrast and Contrast keys increase or decrease the display contrast and brightness.
Cursor Control keys: The  ,
,  ,
,  and
and  keys are used in the following circumstances:
 (Backspace): Press this key to correct mistakes when dialing extension or trunk numbers or when entering Function key information.
Note: If you enter an invalid extension, for example a Console or Hunt Group extension, you will hear a re-order tone. This indicates the entry is invalid. You can use the [EXIT] softkey to back out because the Backspace cursor key will not work. It only works for invalid station/set numbers.
Fixed Keys
The Fixed keys are arranged in two rows of seven keys. You use them to perform basic operations such as answering calls and placing calls on hold.
6

About the Console
Each key in the bottom row has a lamp that indicates the status of a call or feature. For example, when you use a Hold key to place a call on hold, the lamp above the key lights.
Use this key… |
When you want to… |
|
|
Function |
activate softkeys (explained in the next section), which are used for operations such |
|
as setting the console date and time and switching the console to Night Service. |
|
|
Trunk Group |
see which trunk groups are busy. |
|
|
Cancel |
clear misdialed information. |
|
|
Set Page |
page extension users using their telephone speakers. |
|
|
Release |
disconnect or transfer calls. |
|
|
Page |
make an announcement over the paging system. |
|
|
Block |
restrict selected extensions/guest rooms from calling |
|
each other. |
|
|
Hold |
place calls to the console on hold. Hold 1 through 3 are direct holds. Pressing |
|
Hold 1, Hold 2, or Hold 3 places a call on hold at that location. Pressing Hold 4+ |
|
accesses five additional hold slots. |
|
|
Answer |
answer incoming calls to the console on a “first-come, firstserved” basis. |
|
|
Softkeys
Softkeys have functions that change depending on the state of the call you are handling or the feature you are using. For example, when you call a busy extension the display will show the softkey functions that are available for handling the call. One of these functions is Override, another is Msg Waiting.
The [F1> to [F0> labels on the display correspond to the [F1> to [F0> keys on the consoles. To use a softkey function, press the [F1> to [F0> key that corresponds to the display label for that function.
Console Display
During call handling, the upper two lines identify the SOURCE or calling party [SRC] and the DESTINATION or called party [DST].
The two lower lines, labeled [F1> to [F0>, show the current softkey labels. For example, if [F8> is labeled [Override], pressing [F8> lets you override a busy extension’s conversation. At another time, the same key, [F8>, could be labeled [Night 1]. Now, pressing [F8> places the console in Night 1 operation.
7

Mitel 5540 IP Console - User Guide
Adjusting the Console
Adjusting the Ringer Volume
To raise or lower the ringer volume while the console is ringing:
1.Press and release the Volume key to increase or the Volume key to decrease the volume.
2.Repeat until the ringing is at the volume you want.
Adjusting the Handset and Headset Receiver Volume
The Volume keys adjust the volume of the console ringer and the volume of the handset and headset receiver. Although you can have a handset and a headset connected to the console at the same time, the receiver volume for each is not individually adjustable; any volume adjustments you make affect both the handset and the headset.
To adjust the handset and headset receiver volume while a call is in progress and the console is not ringing, or while the console is idle:
•Press Volume repeatedly to increase the volume or Volume to decrease it.
! |
WARNING: Because continuous exposure to loud sounds can contribute to |
hearing loss, keep the volume at a moderate level. |
Adjusting the Contrast Control
To adjust the display contrast:
1.Press the Contrast key until you reach the desired level of contrast.
2.Press the Contrast key to decrease the contrast to the desired level.
8

Adjusting the Console
Adjusting the Display Brightness
To dim or brighten the display:
1. Press and hold Function.
Note: When the Function key is pressed, the display shows the available softkeys. These softkeys can be ignored as the display will revert to normal when the F1 key is pressed.
2.Press the Contrast key until you reach the desired level of brightness.
3.Press the Contrast key to decrease the brightness to the desired level.
4.Press F1 when finished.
 Note: The backlight on the 5540 IP console is always on and does not dim.
Turning the Console Bell (Ringer) Off/On
When the bell is off, a flashing Answer key and the C/W indicator on the display are the only indications that calls are waiting to be answered.
To turn the bell on or off:
1.Press Function.
2.Press [Bell Off] or [Bell On].
Switching to Night/Day Service
Incoming calls that normally ring the console during the day can ring another answering point at night. Your system may have one or two night service modes called Night 1 and Night 2. The mode you should select depends on system programming.
Any attendant can switch the system into night or day service. When the system is in night service, the night status indicator (Night 1 or Night 2) displays on all consoles.
To switch to night or day service:
1.Press Function.
2.Press [Att Function].
3.Press [Chg Service].
4.Press [Night 1], [Night 2], or [Day] as required.
9

Mitel 5540 IP Console - User Guide
Setting the Console Language
The console can display call-handling information and softkey prompts in English, French or Spanish. (Other languages may be available depending on system programming.)
To change languages:
1.Press Function.
2.Press [Att Function].
3.Press [Language].
4.Press the softkey that corresponds to the language you want.
Changing the Attendant Present/Absent Status
You can change the Attendant status to "Absent" when you plan to be away from your desk and want calls to the console directed to an alternate answering position.
To change the Attendant Present/Absent status:
1.Press Function.
2.Press [Att Function].
3.Press [Att Absent] to place the console in Attendant Absent mode or [Att Present] to return to Attendant Present mode.
Programming Firmkeys
You can program the Firmkeys (two unlabeled keys next to Trunk Group) to access various optional feature packages. The feature packages your company has purchased determines which of the following functions are available for you to program to a key. For more information about the features, see the cross-reference provided, or ask your communications department.
•“Phonebook” on page 29
•“Hotel/Motel Features” on page 55
•“Viewing Trunk Status” on page 51
•SMDA - Station Message Details Accounting
•Direct Page
•Autovon Trunk
•Select Opt - Selection Option (Used when you need more than four Firmkeys)
You can also program a Firmkey to provide quicker access to Alarm information, a standard feature described in “Viewing System Alarm Information” on page 37.
10

Adjusting the Console
To program Firmkeys:
1.Press Function.
2.Press [Att Function].
3.Press [Firmkeys].
The display shows the current Firmkey programming.
4.Press the blank Firmkey (not the softkey) you want to program repeatedly until the desired options appears at that location.
For example, to program the Phone Book option to the third Firmkey from the left, continue pressing that key until [Phonebook] appears at the [F3> location on the display.
5.Press [Save].
6.Repeat steps 4 and 5 to program the next firmkey.
7.Press [Exit].
To use the Select Options key (when more than four Firmkeys are required):
1.Press the firmkey you programmed as the Select Opt key.
2.Press the softkey that corresponds to the feature you want.
11
Mitel 5540 IP Console - User Guide
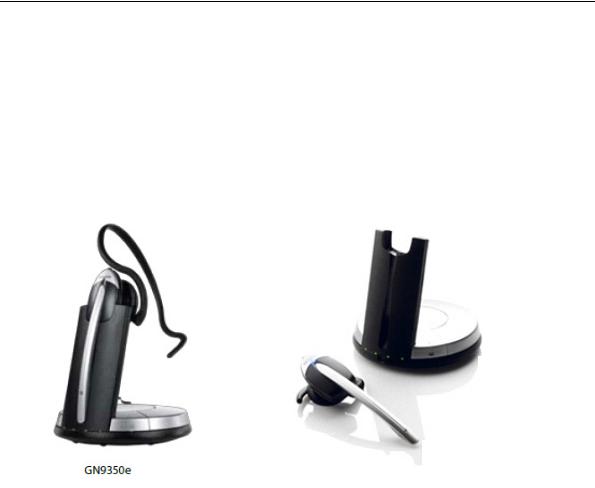
Using a Cordless Headset with the Console
The 5540 IP Console supports the Jabra GN9350e Cordless Headset. For details on how to operate these headsets, please refer to the manufacturer’s documentation.
Connecting the Cordless Headset
The GN9350e is comprised of a base station and a cordless headset.
Base Station
Cordless Headset
You can connect the GN9350e base station to the 5540 IP Console in one of two ways:
•in training mode
•in operational mode
Training mode allows a supervisor to hear the conversation via the handset or cordless headset for training purposes. Audio can be heard over both.
Operational mode allows audio only on the cordless headset or the handset.
12

Using a Cordless Headset with the Console
Using the Cordless Headset for Operational Mode
1.Unplug the handset cord from the 5540 IP Console.
2.Plug the console handset cord into the handset port of the cordless base station.
3.Plug the base’s telephone cord to the handset port of the 5540 IP Console.
4.Connect the Cordless Headset cable between the AUX port of the cordless base station and the Wireless Port at the back of the 5540 IP Console.
13

Mitel 5540 IP Console - User Guide
Using the Cordless Headset for Training Mode
1.Unplug the handset cord from the 5540 IP Console.
2.Plug the console handset cord into the headset port of the 5540 IP Console.
3.Plug the base station’s telephone cord to the handset port of the 5540 IP Console.
4.Connect the Cordless Headset cable between the AUX port of the cordless base station and the Wireless Port at the back of the 5540 IP Console.
14
Using a Cordless Headset with the Console
Guidelines for Cordless Headset Operation
The guidelines below will assist you in answering and receiving calls using the Cordless Headset:
•When the headset is in the cradle, it is in the IDLE state.
•When the headset is removed from the cradle, it is in the TALK state.
•The headset must be in an IDLE state in order to hear ringing for an incoming call.
•The headset must be in the TALK state in order to hear ringback for an outgoing call.
Table 1: Cordless Headset Operation
|
IDLE |
TALK |
|
|
|
Headset |
BLUE LED is OFF |
BLUE LED is FLASHING |
|
|
|
Base Station |
BLUE LED is SOLID |
BLUE LED is FLASHING |
|
|
|
Answering Calls Using a Cordless Headset
1.Remove the headset from its base and answer the call, or if wearing the headset, press the Talk button (Silver portion on top).
2.To end the call, press the Talk button, even if the call was terminated by the other end.
Note: If you do not press the Talk button to end the call, the Cordless Headset remains in the TALK state and you will not be able to hear incoming calls.
Making Calls Using a Cordless Headset
1.Press the Talk button (Silver portion) on the headset.
2.Place the call from the Console and hear ringback.
3.Press the Talk button to end the call, even if the call was terminated by the other end.
For other details on how to operate these headsets, please refer to the manufacturer’s documentation.
Powering the Console
The 5540 IP Console is powered by the Power over Ethernet (POE) connection.
15

Mitel 5540 IP Console - User Guide
16

Chapter 2
Call Handling

Mitel 5540 IP Console - User Guide
18
Answering Calls
Answering Calls
Ringing and a flashing Answer key indicate the arrival of a call. The number next to C/W in the display indicates how many calls are waiting to be answered.
The information displayed next to the softkeys [F1> to [F0> indicate the actions you can take by pressing the corresponding softkey.
For example, you can answer an outside (trunk) call by pressing [Ldn 1] (Listed Directory Number 1), or an internal (extension) call by pressing [Dial 0].
The following softkey prompts can accompany an incoming call:
•[Recall]
•[Redial]
•[Ldn 1], [Ldn 2], ... [Ldn 6] in positions F2-F7.
•or any pre-programmed customer-specific information (for example, your company may choose to display [Line 1] instead of [Ldn 1].
To answer calls:
Do one of the following:
•Press Answer to answer the first call in the queue.
•Press a softkey (F1 – F0) to answer a specific type of call.
The first line of the display shows >>> SRC followed by an extension number and name for an internal call, or a trunk number for an external call. The DST line (the second line) remains blank until you dial a destination number.
New Call Indication
When you are engaged in a call, a single burst of ringing signals the next incoming call. Subsequent calls do not ring the console—even with the New Call Ring turned on. The only way to tell that calls are waiting is by the C/W indicator on the console display.
The console can be programmed at the system level to provide a single burst of tone at regular intervals when calls are waiting.
19

Mitel 5540 IP Console - User Guide
When Multiple Calls are Waiting
You cannot answer a new call until the one you are engaged in is transferred, disconnected, or put on hold.
Transferring Calls
When a caller requests to speak to someone, ask the caller to wait a moment, and then transfer the call to the requested destination.
To transfer a call:
1. Dial the destination number.
The caller is automatically placed on hold while you complete the transfer.
2.When you hear ringing, press Release to connect the caller to the destination and release the console from the call.
Misdialed Numbers
If you do not want to complete dialing, or if you misdial a number, either
•Press  to erase the misdialed digits, and then dial the correct number. - or-
•Press Cancel to return to the Source party, and then redial the number.
Reaching a Busy Destination or an Extension with Do Not Disturb Activated
If the called destination is busy or the extension has Do Not Disturb activated, the display will show “Busy” or “DND” on the DST line.
In both cases, your options for handling the call are the same, except for the Callback option, which only applies when calling a busy destination.
To handle a call to a busy destination or an extension with Do Not Disturb activated:
•Press [Source] to return to the caller requesting the transfer.
•Press Cancel to disconnect the destination so that you can dial a new one.
•Press Release to camp the caller on to the busy destination or disconnect the source. (For an explanation of camp-on, see page 71.) If the transfer is not allowed, you will hear a beep. Press [Source] to retrieve the original party.
•Press [Override] to break into the busy extension. For more information on using Override, see page 28.
20
Loading...