

Page 1

848 Titrino plus
Manual
8.848.8008EN
Page 2

Page 3

Metrohm AG
CH-9100 Herisau
Switzerland
Phone +41 71 353 85 85
Fax +41 71 353 89 01
info@metrohm.com
www.metrohm.com
848 Titrino plus
8.848.8008EN
Manual
08.2012 jb/ebe
Page 4

Teachware
Metrohm AG
CH-9100 Herisau
teachware@metrohm.com
This documentation is protected by copyright. All rights reserved.
Although all the information given in this documentation has been
checked with great care, errors cannot be entirely excluded. Should you
notice any mistakes please send us your comments using the address
given above.
Documentation in additional languages can be found on
http://documents.metrohm.com.
Page 5

■■■■■■■■■■■■■■■■■■■■■■
Table of contents
1 Introduction 1
1.1 Instrument description ......................................................... 1
1.1.1 Titration and measuring modes ................................................ 1
1.1.2 Connectors .............................................................................. 2
1.1.3 Intended use ........................................................................... 2
1.2 About the documentation ................................................... 2
1.2.1 Symbols and conventions ........................................................ 3
1.3 Safety instructions ................................................................ 4
1.3.1 General notes on safety ........................................................... 4
1.3.2 Electrical safety ........................................................................ 4
1.3.3 Tubing and capillary connections ............................................. 5
1.3.4 Flammable solvents and chemicals ........................................... 5
1.3.5 Recycling and disposal ............................................................. 5
2 Overview of the instrument 7
Table of contents
3 Installation 9
3.1 Setting up the instrument .................................................... 9
3.1.1 Packaging ................................................................................ 9
3.1.2 Checks .................................................................................... 9
3.1.3 Location .................................................................................. 9
3.2 Connecting a sensor ............................................................. 9
3.3 Connecting a stirrer ............................................................ 11
3.4 Connecting a balance ......................................................... 12
3.5 Connecting a keyboard, printer and other USB devi-
ces ........................................................................................ 12
3.6 Connecting instruments to the remote connector .......... 15
3.7 Attaching the exchange unit ............................................. 16
4 Titrations 17
4.1 Dynamic equivalence point titration (DET) ....................... 17
4.2 Monotonic equivalence point titration (MET) .................. 17
4.3 Endpoint titration (SET) ..................................................... 18
848 Titrino plus
5 Operation 19
5.1 Switching the instrument on and off ............................... 19
5.2 Fundamentals of operation ............................................... 20
5.2.1 The keypad ............................................................................ 20
5.2.2 Structure of the dialog windows ............................................ 21
■■■■■■■■
III
Page 6

Table of contents
■■■■■■■■■■■■■■■■■■■■■■
5.2.3 Navigating in the dialog ......................................................... 21
5.2.4 Entering text and numbers ..................................................... 22
5.2.5 Selecting from a selection list ................................................. 23
5.3 Formula editor .................................................................... 23
5.4 Methods .............................................................................. 25
5.4.1 Creating a new method ......................................................... 25
5.4.2 Saving a method ................................................................... 26
5.4.3 Loading a method ................................................................. 27
5.4.4 Exporting a method ............................................................... 28
5.5 Control ................................................................................. 29
5.6 Sample data ........................................................................ 30
5.6.1 Entering sample data in the main dialog ................................ 30
5.6.2 Requesting sample data at the start of the determination ...... 31
5.7 Sample table ....................................................................... 32
5.7.1 General ................................................................................. 32
5.7.2 Editing the sample data ......................................................... 33
5.7.3 Sending the sample size from a balance ................................. 35
5.8 Carrying out a determination ............................................ 35
5.9 Live modifications .............................................................. 37
5.9.1 Editing the sample data of the running determination ............ 37
5.9.2 Editing the sample table while a determination is running ...... 38
5.9.3 Editing the live parameters ..................................................... 39
5.10 Results ................................................................................. 40
5.11 Statistics .............................................................................. 41
5.12 Printing a report manually ................................................. 43
5.13 Manual Control ................................................................... 44
5.13.1 Dosing ................................................................................... 45
5.13.2 Measuring ............................................................................. 49
5.13.3 Stirring .................................................................................. 50
6 System settings 52
6.1 Basic settings ...................................................................... 52
6.2 Managing sensors .............................................................. 56
6.2.1 General ................................................................................. 56
6.2.2 Editing the sensor data .......................................................... 56
6.3 Managing solutions ............................................................ 58
6.3.1 General ................................................................................. 58
6.3.2 Editing the solution data ........................................................ 58
■■■■■■■■
IV
6.4 Managing common variables ............................................ 60
6.4.1 General ................................................................................. 60
6.4.2 Editing common variables ...................................................... 61
6.5 File management ................................................................ 62
848 Titrino plus
Page 7

■■■■■■■■■■■■■■■■■■■■■■
7 Parameters 68
Table of contents
6.6 Configuring external devices ............................................. 63
6.7 Instrument diagnosis .......................................................... 66
6.7.1 Loading program versions and language files ......................... 66
6.7.2 Diagnosis functions ............................................................... 67
7.1 Dynamic equivalence point titrations (DET) ..................... 68
7.1.1 Start conditions ..................................................................... 68
7.1.2 Titration parameters .............................................................. 69
7.1.3 Stop conditions ..................................................................... 74
7.1.4 Evaluation ............................................................................. 76
7.1.5 Calculation ............................................................................ 79
7.1.6 Statistics ................................................................................ 81
7.1.7 Reports .................................................................................. 81
7.2 Monotonic equivalence point titrations (MET) ................ 83
7.2.1 Start conditions ..................................................................... 83
7.2.2 Titration parameters .............................................................. 84
7.2.3 Stop conditions ..................................................................... 89
7.2.4 Evaluation ............................................................................. 90
7.2.5 Calculation ............................................................................ 93
7.2.6 Statistics ................................................................................ 95
7.2.7 Reports .................................................................................. 95
7.3 Endpoint titrations (SET) .................................................... 97
7.3.1 Conditioning ......................................................................... 97
7.3.2 Start conditions ..................................................................... 98
7.3.3 Titration parameters ............................................................ 100
7.3.4 Control parameters EP1 ....................................................... 102
7.3.5 Control parameters EP2 ....................................................... 105
7.3.6 Stop conditions ................................................................... 105
7.3.7 Calculation .......................................................................... 106
7.3.8 Statistics .............................................................................. 108
7.3.9 Reports ................................................................................ 108
7.4 pH calibration (CAL) ......................................................... 110
7.4.1 Calibration parameters ........................................................ 110
7.4.2 Buffers ................................................................................. 112
7.4.3 Reports ................................................................................ 113
8 Operation and maintenance 114
8.1 Quality Management and validation with Metrohm .... 114
9 Troubleshooting 115
9.1 SET titration ...................................................................... 115
9.2 Miscellaneous ................................................................... 116
848 Titrino plus
■■■■■■■■
V
Page 8

Table of contents
■■■■■■■■■■■■■■■■■■■■■■
10 Appendix 117
10.1 Exchange unit ................................................................... 117
10.1.1 Maximum dosing and filling rate .......................................... 117
10.1.2 Parameters for the preparing (PREP) ..................................... 117
10.2 Stirring rate ....................................................................... 118
10.3 Balance .............................................................................. 118
10.4 USB devices ....................................................................... 119
10.4.1 6.2147.000 numerical USB keypad ...................................... 119
10.4.2 Key assignment of a USB keyboard ...................................... 120
10.4.3 PC mouse ............................................................................ 120
10.4.4 Printer ................................................................................. 121
10.5 System initialization ......................................................... 121
10.6 Remote interface .............................................................. 122
10.6.1 Pin assignment of the remote interface ................................ 122
10.6.2 Status diagram of the remote interface ................................ 124
10.7 Remote control via an RS-232 connection ..................... 125
10.7.1 Commands and variables ..................................................... 126
10.8 Arithmetic algorithms in the 848 Titrino plus ............... 127
11 Technical specifications 130
11.1 Measuring inputs .............................................................. 130
11.1.1 Potentiometry ...................................................................... 130
11.1.2 Polarizer .............................................................................. 130
11.1.3 Temperature ........................................................................ 131
11.2 Dosing drive ...................................................................... 132
11.3 Interfaces .......................................................................... 132
11.4 Mains connection ............................................................. 132
11.5 Safety specifications ........................................................ 132
11.6 Electromagnetic compatibility (EMC) ............................. 133
11.7 Ambient temperature ...................................................... 133
11.8 Reference conditions ........................................................ 134
11.9 Dimensions ........................................................................ 134
12 Warranty (Guarantee) 135
13 Accessories 137
■■■■■■■■
VI
13.1 Scope of delivery .............................................................. 137
13.2 Optional accessories ........................................................ 138
Index 144
848 Titrino plus
Page 9

■■■■■■■■■■■■■■■■■■■■■■
Table of figures
Figure 1 Front 848 Titrino plus ........................................................................ 7
Figure 2 Rear 848 Titrino plus ......................................................................... 8
Figure 3 Connecting pH or redox electrodes ................................................... 9
Figure 4 Connecting a reference electrode .................................................... 10
Figure 5 Connecting a temperature sensor .................................................... 10
Figure 6 Connecting a polarizable electrode .................................................. 11
Figure 7 Connecting a stirrer ......................................................................... 11
Figure 8 Connecting a balance ...................................................................... 12
Figure 9 Connecting USB devices .................................................................. 13
Figure 10 Connecting the USB stick ................................................................ 14
Figure 11 Connecting the 6.2147.000 USB keyboard with USB stick and
printer ............................................................................................. 14
Figure 12 Connecting the USB hub with USB stick, printer and the 6.2148.030
RS-232/USB Box (for connecting balances). ...................................... 15
Figure 13 Connecting a remote cable ............................................................. 15
Figure 14 Attaching the exchange unit ........................................................... 16
Figure 15 Reagent dosing for DET ................................................................... 17
Figure 16 Reagent dosing for MET .................................................................. 17
Figure 17 Reagent dosing for SET ................................................................... 18
Figure 18 Keypad 848 Titrino plus ................................................................... 20
Figure 19 Directory structure on the USB flash drive ........................................ 62
Figure 20 Tubbs method for determining the equivalence point ...................... 79
Figure 21 Rotational speed depending on stirring rate .................................. 118
Figure 22 Pin assignment of remote socket and remote plug ........................ 122
Figure 23 Remote status diagram DET/MET ................................................... 124
Figure 24 Remote status diagram SET ........................................................... 124
Figure 25 Remote status diagram CAL .......................................................... 125
Figure 26 Connecting the RS-232/USB Box to the PC .................................... 125
Table of figures
848 Titrino plus
■■■■■■■■
VII
Page 10

Page 11

■■■■■■■■■■■■■■■■■■■■■■
1 Introduction
1.1 Instrument description
The 848 Titrino plus is a titrator for volumetric titrations for universal applications. Methods can be created and stored under a new name. The
methods can be exported to a connected USB flash drive. This function
makes it possible for you to copy methods quickly and easily from one
instrument to another. The remote connector enables the integration of
the instrument in a Metrohm automation system.
1.1.1 Titration and measuring modes
The following titration and measuring modes are supported:
■ DET
Dynamic equivalence point titration. The reagent is added in variable
volume steps.
Measuring modes:
– pH (pH measurement)
– U (potentiometric voltage measurement)
– Ipol (voltametric measurement with selectable polarization cur-
rent)
– Upol (amperometric measurement with selectable polarization
voltage)
■ MET
Monotonic equivalence point titration. The reagent is added in con-
stant volume steps.
Measuring modes:
– pH (pH measurement)
– U (potentiometric voltage measurement)
– Ipol (voltametric measurement with selectable polarization cur-
rent)
– Upol (amperometric measurement with selectable polarization
voltage)
■ SET
Endpoint titration at one or two specified endpoints.
Measuring modes:
– pH (pH measurement)
– U (potentiometric voltage measurement)
– Ipol (voltametric measurement with selectable polarization cur-
rent)
– Upol (amperometric measurement with selectable polarization
voltage)
1 Introduction
848 Titrino plus
■■■■■■■■
1
Page 12

1.2 About the documentation
■ CAL
1.1.2 Connectors
The instrument is equipped with the following connectors:
■ MSB connector (Metrohm Serial Bus)
■ USB (OTG) connector
■ Sensor connectors
■ Remote connector
■■■■■■■■■■■■■■■■■■■■■■
Electrode calibration.
Measuring mode:
– pH (calibration of pH electrodes)
For connecting a stirrer.
The 6.2151.100 adapter can be used to connect, for example, a
printer, a USB flash drive or a USB keyboard.
Four connectors for the following sensor types:
– pH or redox electrodes
– reference electrodes
– polarizable electrodes
– temperature sensors (Pt1000 or NTC)
For connecting a Dosimat or sample changer. The Dosimat enables
automatic addition of an auxiliary solution.
1.1.3 Intended use
The 848 Titrino plus is designed for usage as a titrator in analytical laboratories. Its main application field is volumetric titration.
This instrument is suitable for processing chemicals and flammable samples. The usage of the 848 Titrino plus therefore requires that the user
have basic knowledge and experience in the handling of toxic and caustic
substances. Knowledge with respect to the application of the fire prevention measures prescribed for laboratories is also mandatory.
1.2 About the documentation
Caution
Please read through this documentation carefully before putting the
instrument into operation. The documentation contains information
and warnings which the user must follow in order to ensure safe operation of the instrument.
■■■■■■■■
2
848 Titrino plus
Page 13
■■■■■■■■■■■■■■■■■■■■■■
1.2.1 Symbols and conventions
The following symbols and formatting may appear in this documentation:
Method Dialog text, parameter in the software
File ▶ New Menu or menu item
[Next] Button or key
1 Introduction
Cross-reference to figure legend
The first number refers to the figure number, the second to the instrument part in the figure.
Instruction step
Carry out these steps in the sequence shown.
Warning
This symbol draws attention to a possible life hazard
or risk of injury.
Warning
This symbol draws attention to a possible hazard due
to electrical current.
Warning
This symbol draws attention to a possible hazard due
to heat or hot instrument parts.
Warning
This symbol draws attention to a possible biological
hazard.
Caution
This symbol draws attention to a possible damage of
instruments or instrument parts.
Note
This symbol marks additional information and tips.
848 Titrino plus
■■■■■■■■
3
Page 14
1.3 Safety instructions
1.3 Safety instructions
1.3.1 General notes on safety
Warning
This instrument may only be operated in accordance with the specifications in this documentation.
This instrument has left the factory in a flawless state in terms of technical
safety. To maintain this state and ensure non-hazardous operation of the
instrument, the following instructions must be observed carefully.
1.3.2 Electrical safety
The electrical safety when working with the instrument is ensured as part
of the international standard IEC 61010.
Warning
■■■■■■■■■■■■■■■■■■■■■■
Only personnel qualified by Metrohm are authorized to carry out service
work on electronic components.
Warning
Never open the housing of the instrument. The instrument could be
damaged by this. There is also a risk of serious injury if live components
are touched.
There are no parts inside the housing which can be serviced or replaced
by the user.
Mains voltage
Warning
An incorrect mains voltage can damage the instrument.
Only operate this instrument with a mains voltage specified for it (see
rear panel of the instrument).
■■■■■■■■
4
848 Titrino plus
Page 15
■■■■■■■■■■■■■■■■■■■■■■
Protection against electrostatic charges
Warning
Electronic components are sensitive to electrostatic charges and can be
destroyed by discharges.
Do not fail to pull the mains cable out of the mains connection socket
before you set up or disconnect electrical plug connections at the rear
of the instrument.
1.3.3 Tubing and capillary connections
Caution
Leaks in tubing and capillary connections are a safety risk. Tighten all
connections well by hand. Avoid applying excessive force to tubing
connections. Damaged tubing ends lead to leakage. Appropriate tools
can be used to loosen connections.
1 Introduction
Check the connections regularly for leakage. If the instrument is used
mainly in unattended operation, then weekly inspections are mandatory.
1.3.4 Flammable solvents and chemicals
Warning
All relevant safety measures are to be observed when working with
flammable solvents and chemicals.
■ Set up the instrument in a well-ventilated location (e.g. laboratory
flue).
■ Keep all sources of flame far from the workplace.
■ Clean up spilled fluids and solids immediately.
■ Follow the safety instructions of the chemical manufacturer.
1.3.5 Recycling and disposal
This product is covered by European Directive 2002/96/EC, WEEE – Waste
from Electrical and Electronic Equipment.
848 Titrino plus
The correct disposal of your old equipment will help to prevent negative
effects on the environment and public health.
■■■■■■■■
5
Page 16

1.3 Safety instructions
■■■■■■■■■■■■■■■■■■■■■■
More details about the disposal of your old equipment can be obtained
from your local authorities, from waste disposal companies or from your
local dealer.
■■■■■■■■
6
848 Titrino plus
Page 17
■■■■■■■■■■■■■■■■■■■■■■
2
5
4
3
1
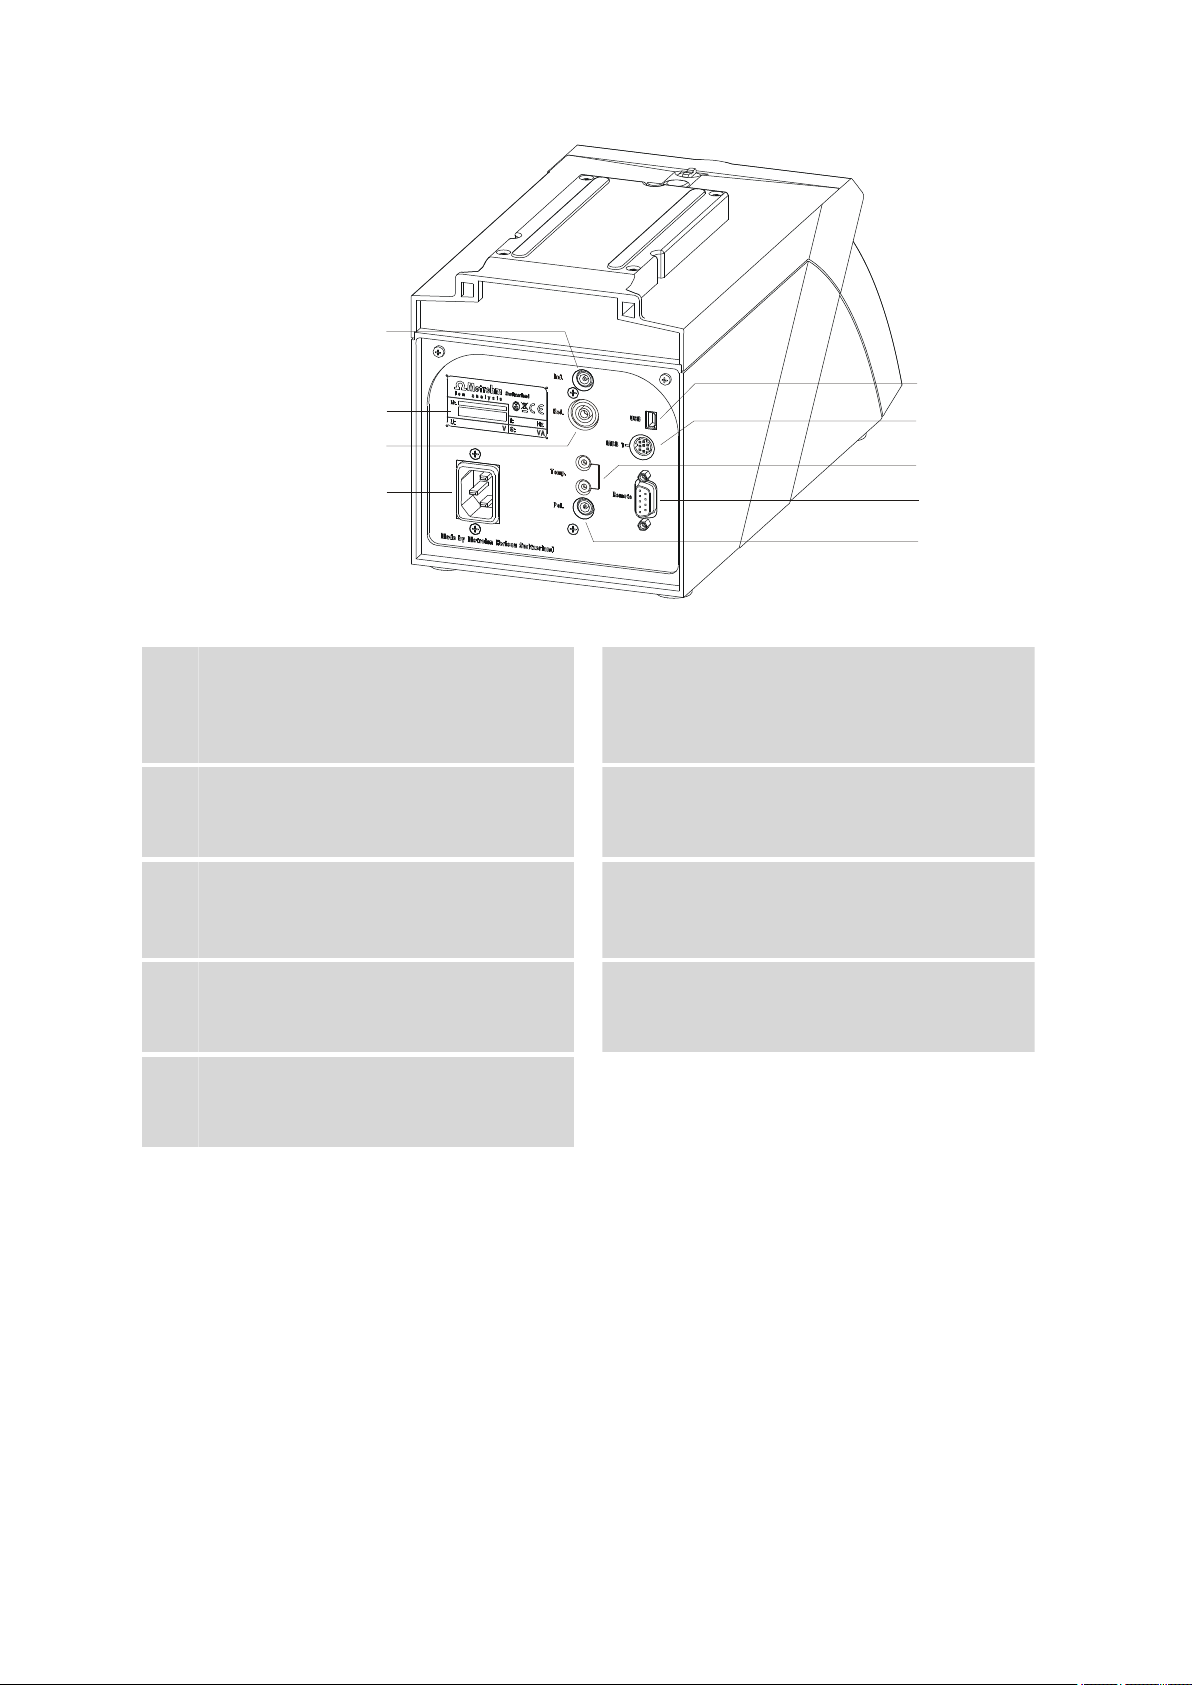
2 Overview of the instrument
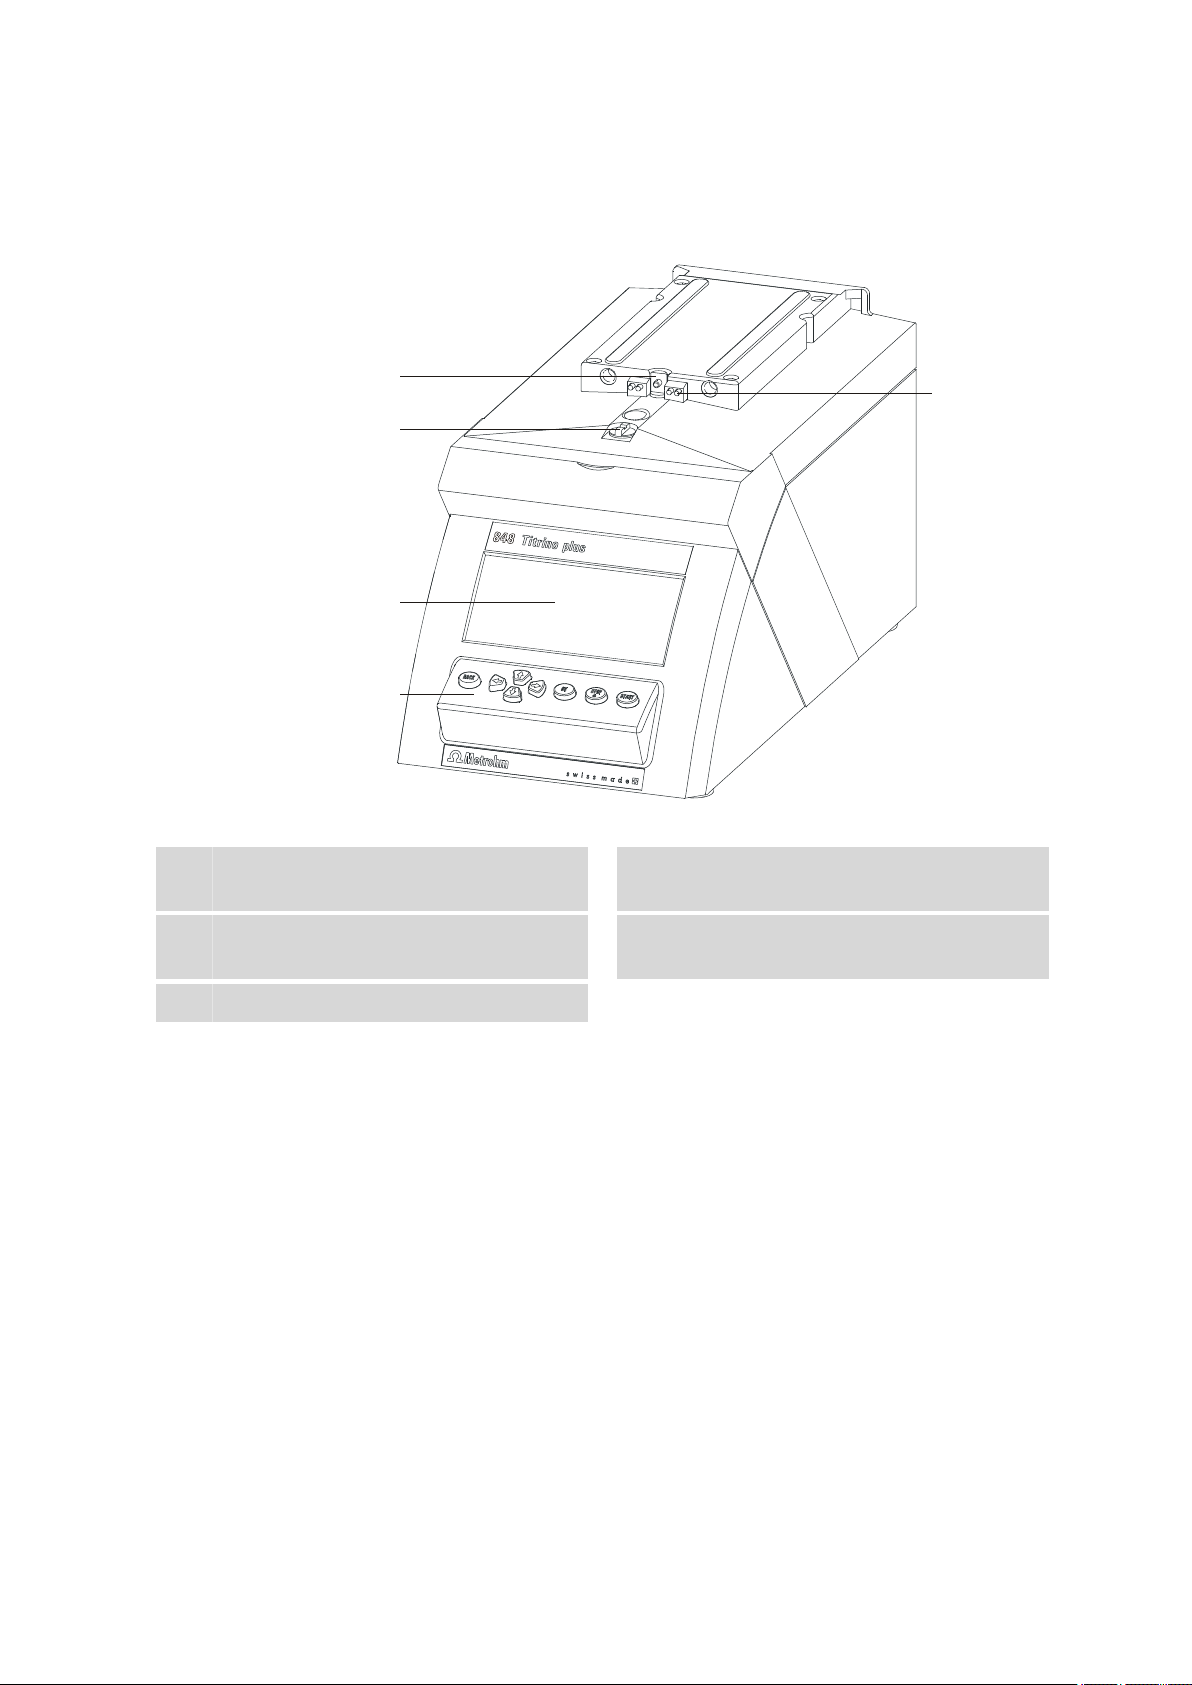
2 Overview of the instrument
Figure 1 Front 848 Titrino plus
Piston rod
1
Of the dosing drive.
Coupling
3
For switching the flat stopcock.
Keypad
5
Contact pins
2
For the data chip.
Display
4
848 Titrino plus
■■■■■■■■
7
Page 18
2
4
8
6
5
9
1
3
7
Figure 2 Rear 848 Titrino plus
■■■■■■■■■■■■■■■■■■■■■■
Electrode connector (Ind.)
1
For connecting pH or redox electrodes with
integrated or separate reference electrode.
Socket F.
Electrode connector (Ref.)
3
For connecting reference electrodes. Socket
B, 4 mm.
USB (OTG) connector
5
For connecting printers, USB sticks, USB
hubs, etc.
Temperature sensor connector (Temp.)
7
For connecting temperature sensors of the
Pt1000 or NTC types. Two B sockets, 2 mm.
Electrode connector (Pol.)
9
For connecting polarizable electrodes, e.g.
double Pt electrodes. Socket F.
Type plate
2
Contains specifications concerning mains
voltage and serial number.
Mains connection socket
4
MSB connector
6
Metrohm Serial Bus.
For connecting a stirrer. Mini DIN, 9-pin.
Remote connector
8
For connecting instruments with a remote
interface. D-Sub, 9-pin.
■■■■■■■■
8
848 Titrino plus
Page 19

■■■■■■■■■■■■■■■■■■■■■■
3 Installation
3.1 Setting up the instrument
3.1.1 Packaging
The instrument is supplied in highly protective special packaging together
with the separately packed accessories. Keep this packaging, as only this
ensures safe transportation of the instrument.
3.1.2 Checks
Immediately after receipt, check whether the shipment has arrived complete and without damage by comparing it with the delivery note.
3.1.3 Location
The instrument has been developed for operation indoors and may not be
used in explosive environments.
3 Installation
Place the instrument in a location of the laboratory which is suitable for
operation, free of vibrations, protected from corrosive atmosphere, and
contamination by chemicals.
The instrument should be protected against excessive temperature fluctuations and direct sunlight.
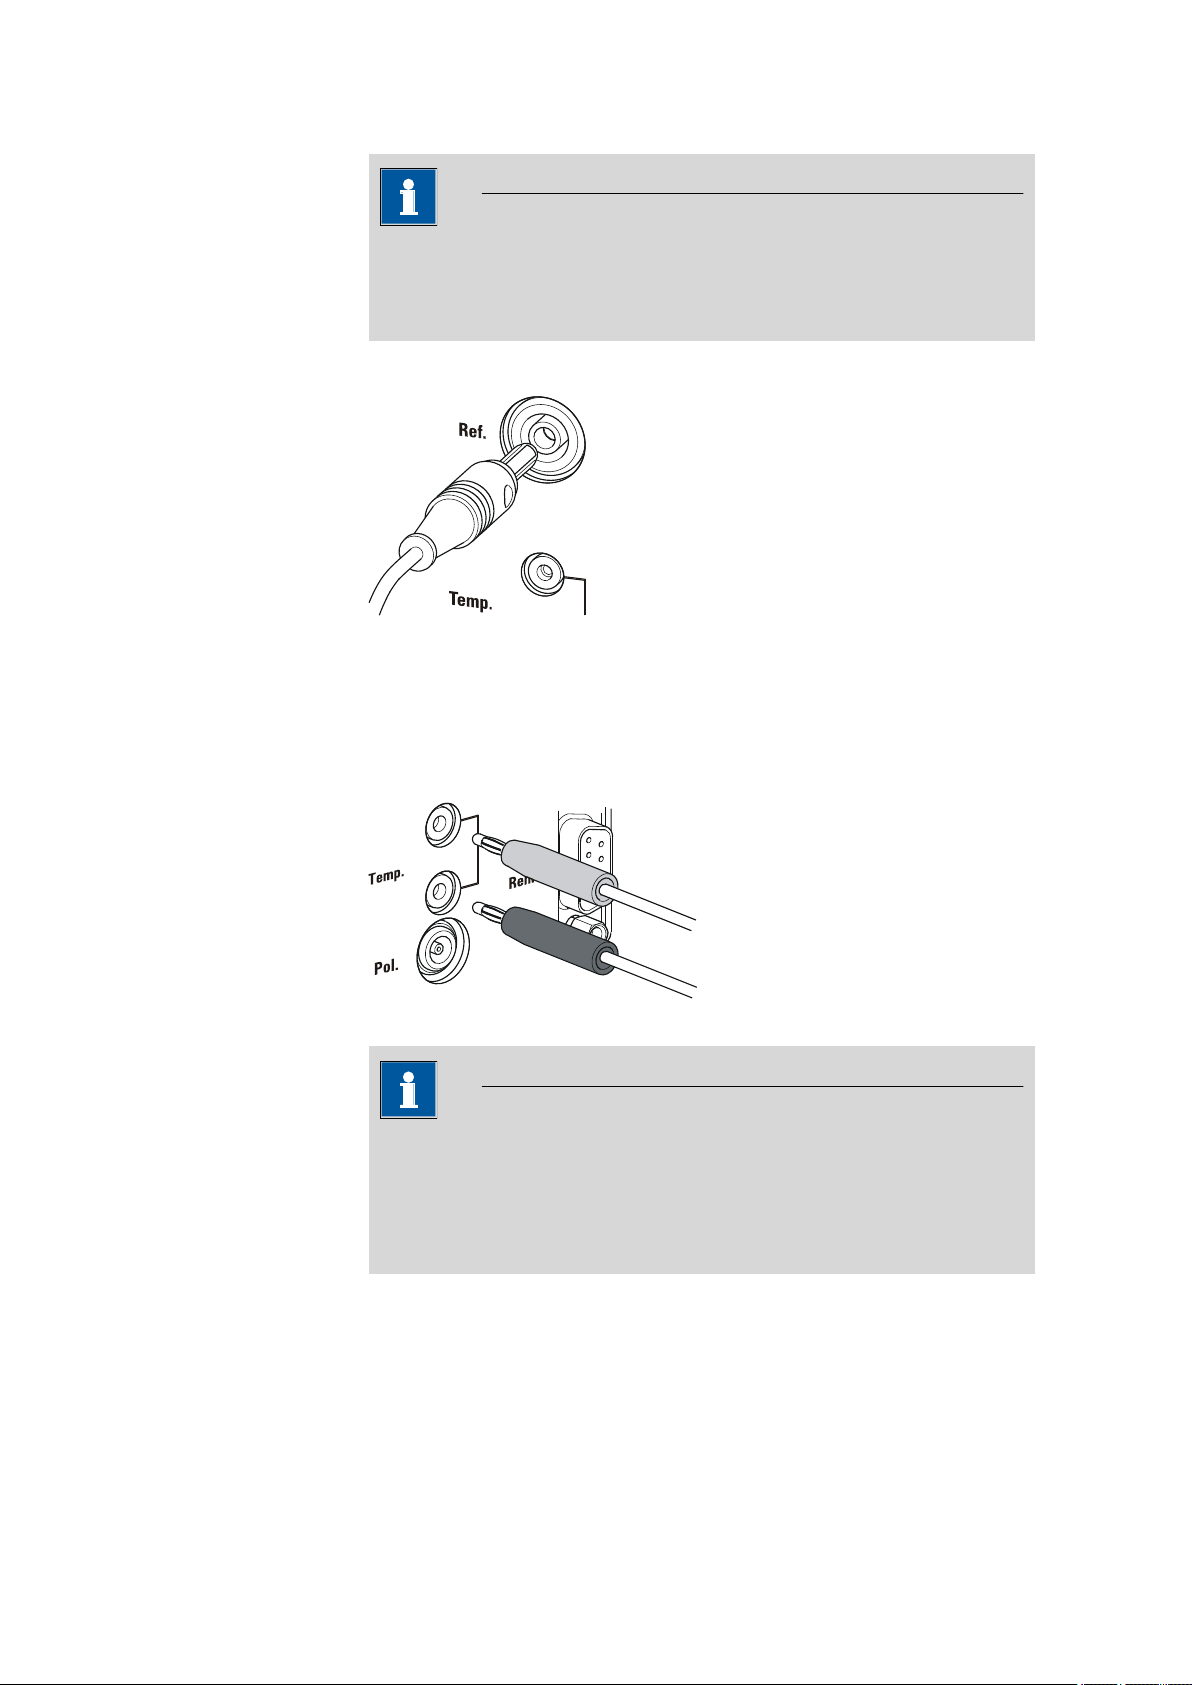
3.2 Connecting a sensor
Connecting pH or redox electrodes
Figure 3
Connecting pH or redox electrodes
848 Titrino plus
■■■■■■■■
9
Page 20
3.2 Connecting a sensor
■■■■■■■■■■■■■■■■■■■■■■
Note
The electrode cable is protected against accidental disconnection of the
cable by means of a pull-out protection feature. If you wish to remove
the plug, then you must first retract the outer plug sleeve.
Connecting a reference electrode
Figure 4 Connecting a reference electrode
Connecting a temperature sensor or an electrode with integrated temperature sensor
Temperature sensors of the Pt1000 or NTC type can be connected to the
Temp. connector.
Figure 5
Connecting a temperature sensor
Note
The red plug must always be plugged into the red socket at the temperature sensor for the purpose of shielding against disruptions.
If you use an electrode with an integrated NTC probe, then you must
plug the red plug into the red socket.
■■■■■■■■
10
848 Titrino plus
Page 21
■■■■■■■■■■■■■■■■■■■■■■
3 Installation
Connecting a polarizable electrode
Figure 6 Connecting a polarizable electrode
Note
The electrode cable is protected against accidental disconnection of the
cable by means of a pull-out protection feature. If you wish to remove
the plug, then you must first retract the outer plug sleeve.
3.3 Connecting a stirrer
You can connect the following stirrers:
■ 801 Stirrer
■ 803 Ti Stand
■ 804 Ti Stand (requires rod stirrer)
Figure 7
Make sure that the flat side of the plug matches the marking on the
socket.
Connecting a stirrer
Caution
848 Titrino plus
■■■■■■■■
11
Page 22
3.4 Connecting a balance
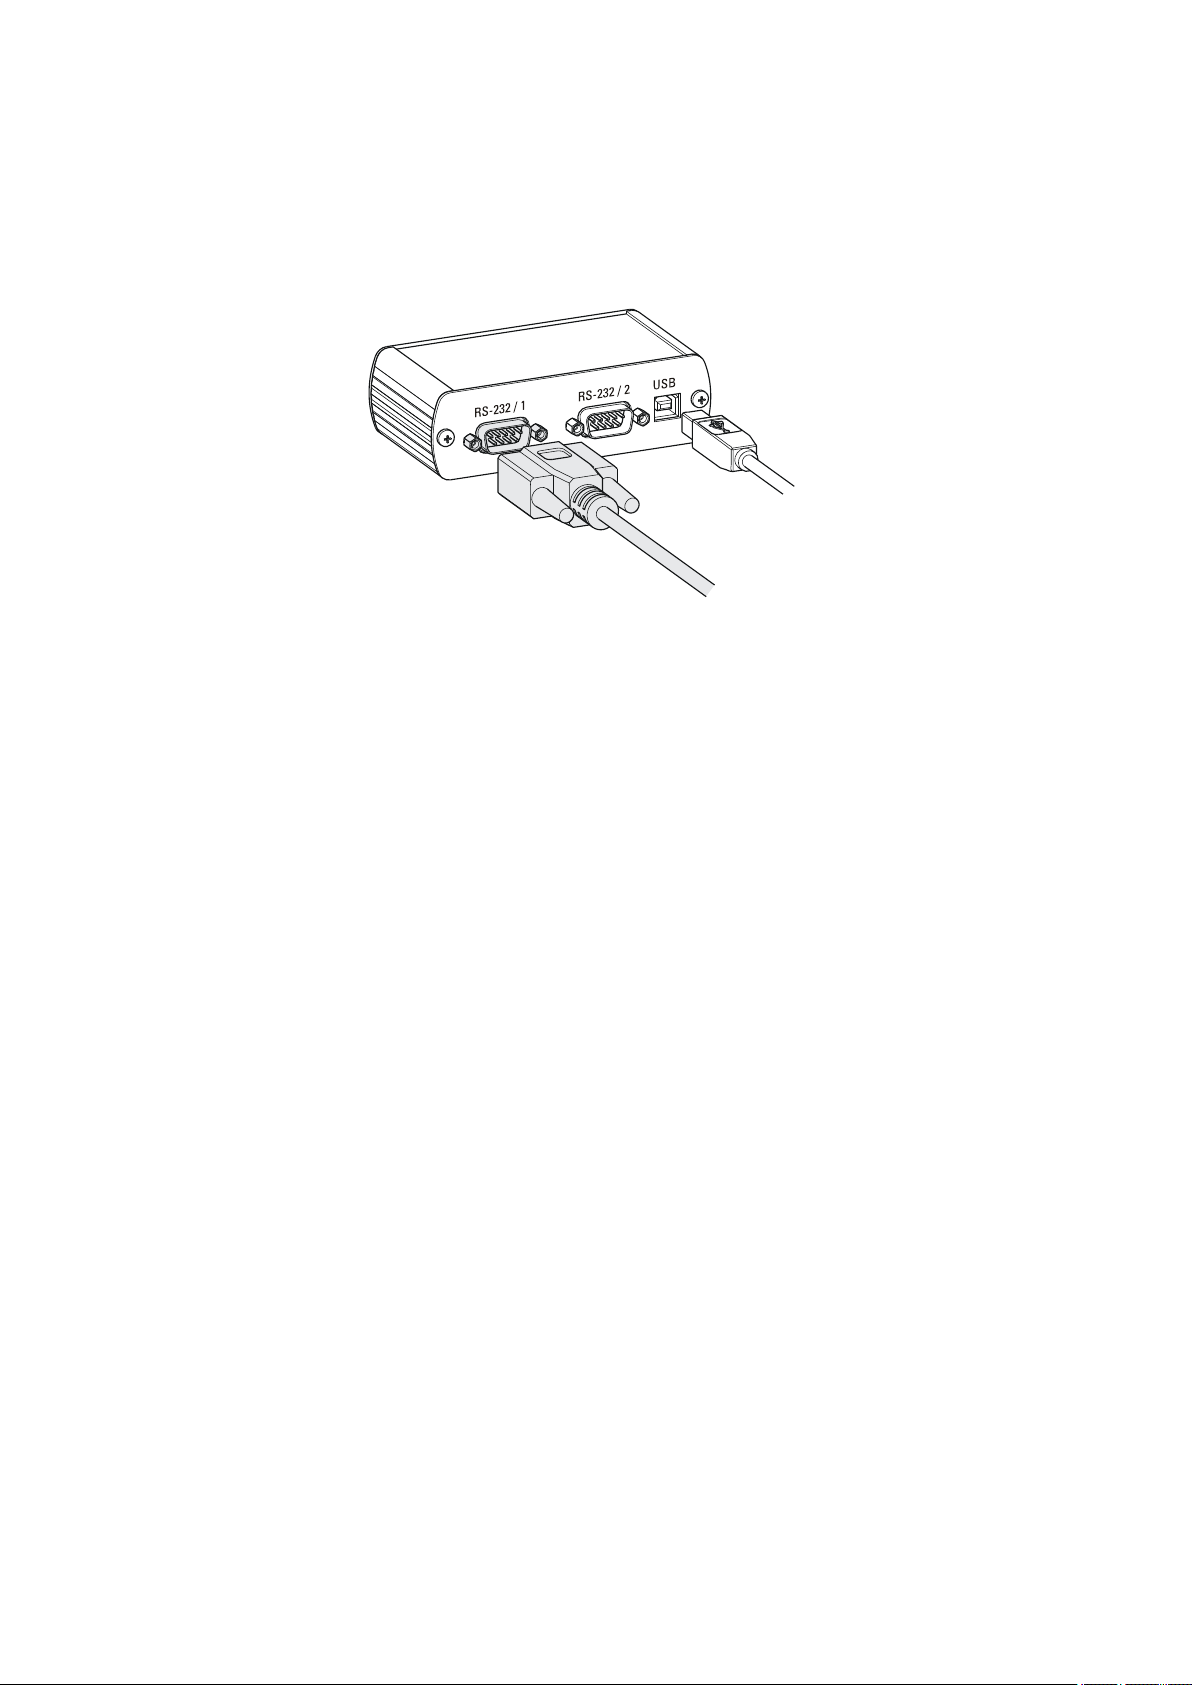
3.4 Connecting a balance
Balances are equipped with a serial RS-232 interface as a rule. To connect
a balance, you require a 6.2148.030 RS-232/USB Box.
Figure 8 Connecting a balance
When a 6.2151.020 USB cable is used, then the 6.2148.030 RS-232/USB
Box can be connected to the 848 Titrino plus by means of a USB hub or a
6.2151.100 adapter (see Chapter 3.5, page 12).
■■■■■■■■■■■■■■■■■■■■■■
Connect the 9-pin plug of the respective balance connecting cable to the
RS 232/1 connector. Consult the user manual of the balance in order to
select the correct connecting cable.
The parameters for the RS-232 interface on the instrument must match
those on the balance (see "Editing the COM1 settings", page 64). Additionally consult the user manual of the balance.
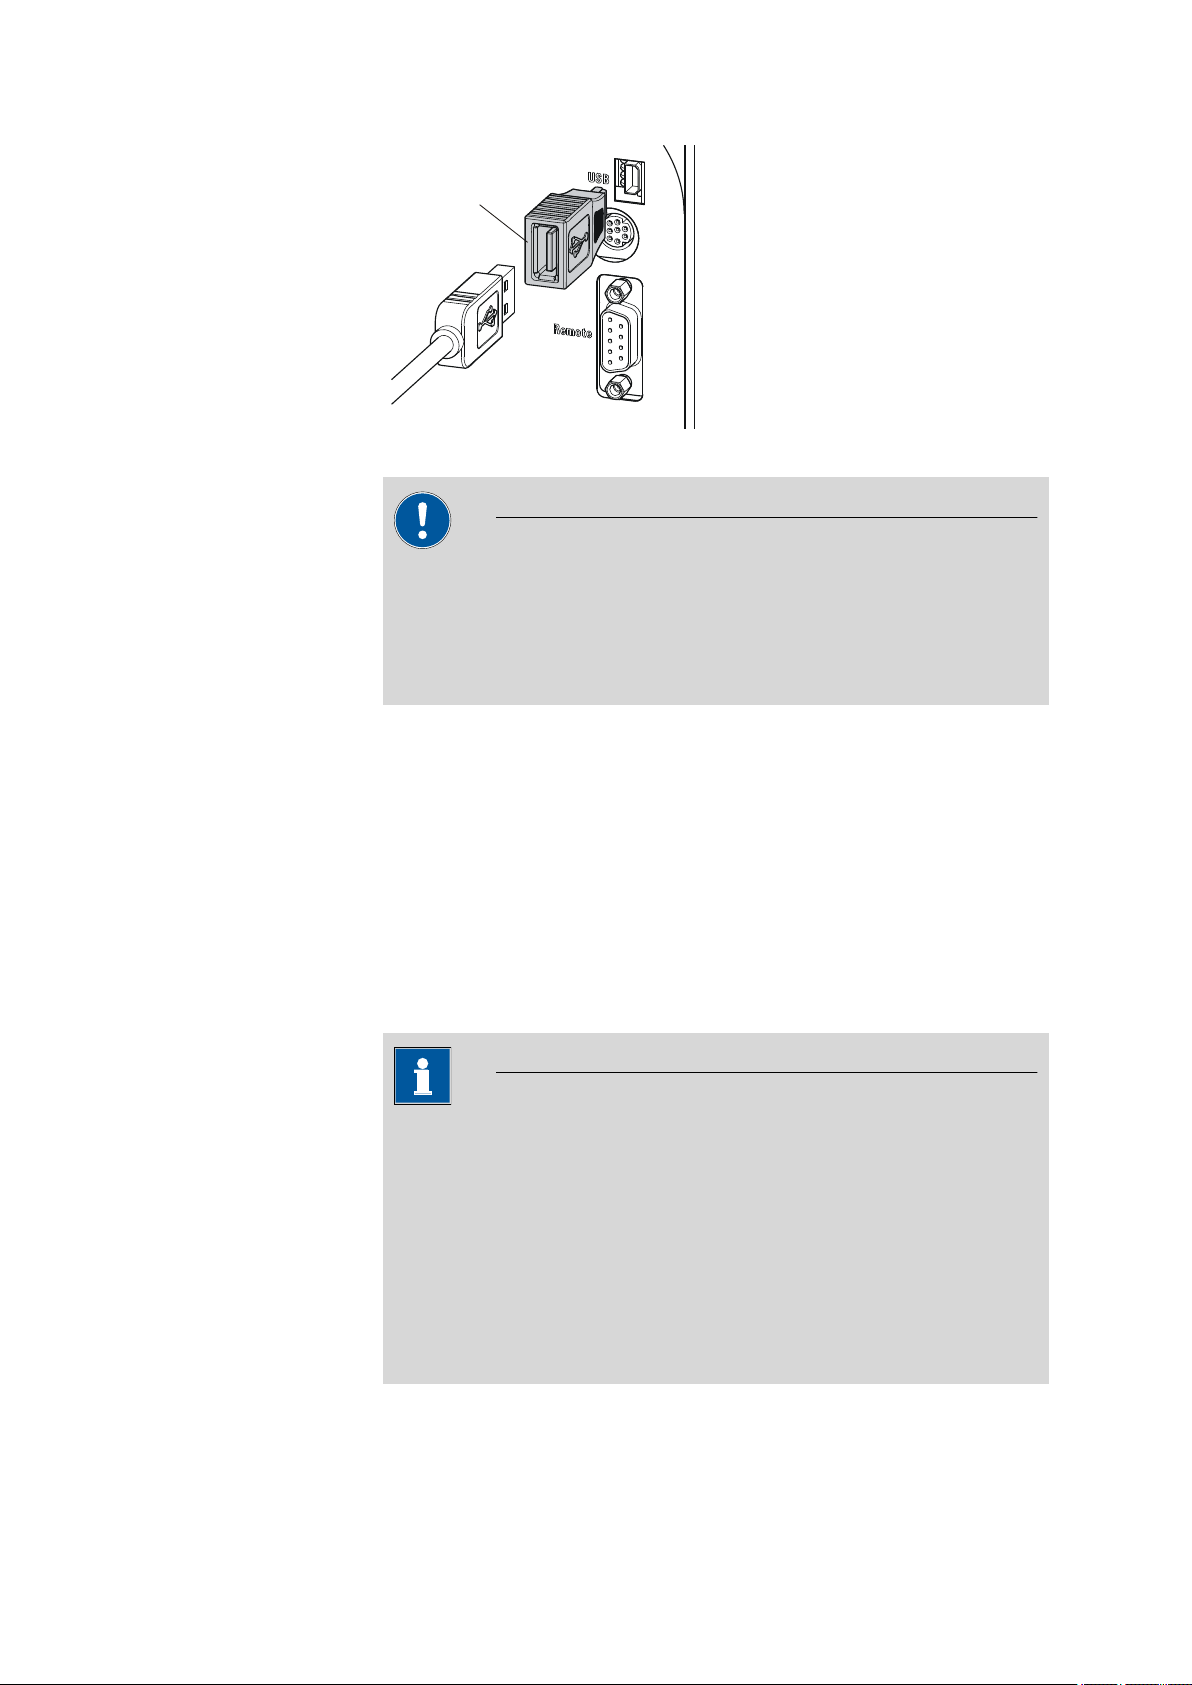
3.5 Connecting a keyboard, printer and other USB devices
The 848 Titrino plus has a USB (OTG) connector. Use the provided
6.2151.100 adapter USB MINI (OTG) - USB A for connecting USB devices
as e.g. printers, keyboards or USB sticks, see the following figure.
■■■■■■■■
12
848 Titrino plus
Page 23
■■■■■■■■■■■■■■■■■■■■■■
6.2151.100
3 Installation
Figure 9 Connecting USB devices
Caution
Switch the instrument off before connecting or disconnecting a USB
device or a USB stick.
The 848 Titrino plus can only recognize the device immediately after
switching on.
The following devices can be operated directly on the USB connector
with the 6.2151.100 adapter:
■ USB sticks (for the backup or storing of methods)
■ 6.2147.000 numerical USB keypad
■ 6.2148.030 RS-232/USB Box (for connecting balances or for the
RS-232 remote control)
■ USB hub (with or without an own power supply)
The 6.2147.000 numerical USB keypad serves for comfortable numerical input and for navigating in the dialog. In addition, it provides two USB
connectors. Connect additional USB devices to the keypad.
Note
Most of the USB devices need a so-called hub in order to work correctly.
A USB hub is a distributor to which several USB devices can be connected. USB hubs are available in specialty stores in a number of different
models.
The USB (OTG) connector of the 848 Titrino plus has no such hub. The
6.2147.000 numerical USB keypad has a USB hub and two USB connectors.
848 Titrino plus
■■■■■■■■
13
Page 24
3.5 Connecting a keyboard, printer and other USB devices
USB MINI (OTG)-USB
USB stick
6.2151.100
USB MINI (OTG)-USB
USB stick
Keypad
6.2147.000
6.2151.100
Printer
The following devices can only be connected to a 6.2147.000
numerical keypad or to a USB hub:
■ Printer (with USB connector, use the 6.2151.020 connecting cable)
■ Barcode reader (with USB cable)
■ Mouse (PC mouse with USB cable, for navigating in the dialog)
The following devices can only be connected to a USB hub:
■ PC keyboard (with USB cable, for the comfortable input of letters and
numbers)
■ Keypad with numerical keypad (with USB cable)
If you wish to connect several different instruments without own
power supply, then you must possibly use a USB hub with own power
supply (self powered). The USB (OTG) connector of the 848 Titrino plus is
not designed for supplying power to several devices with elevated electricity requirements.
Also observe the instructions in chapter 10.4, page 119.
Examples:
■■■■■■■■■■■■■■■■■■■■■■
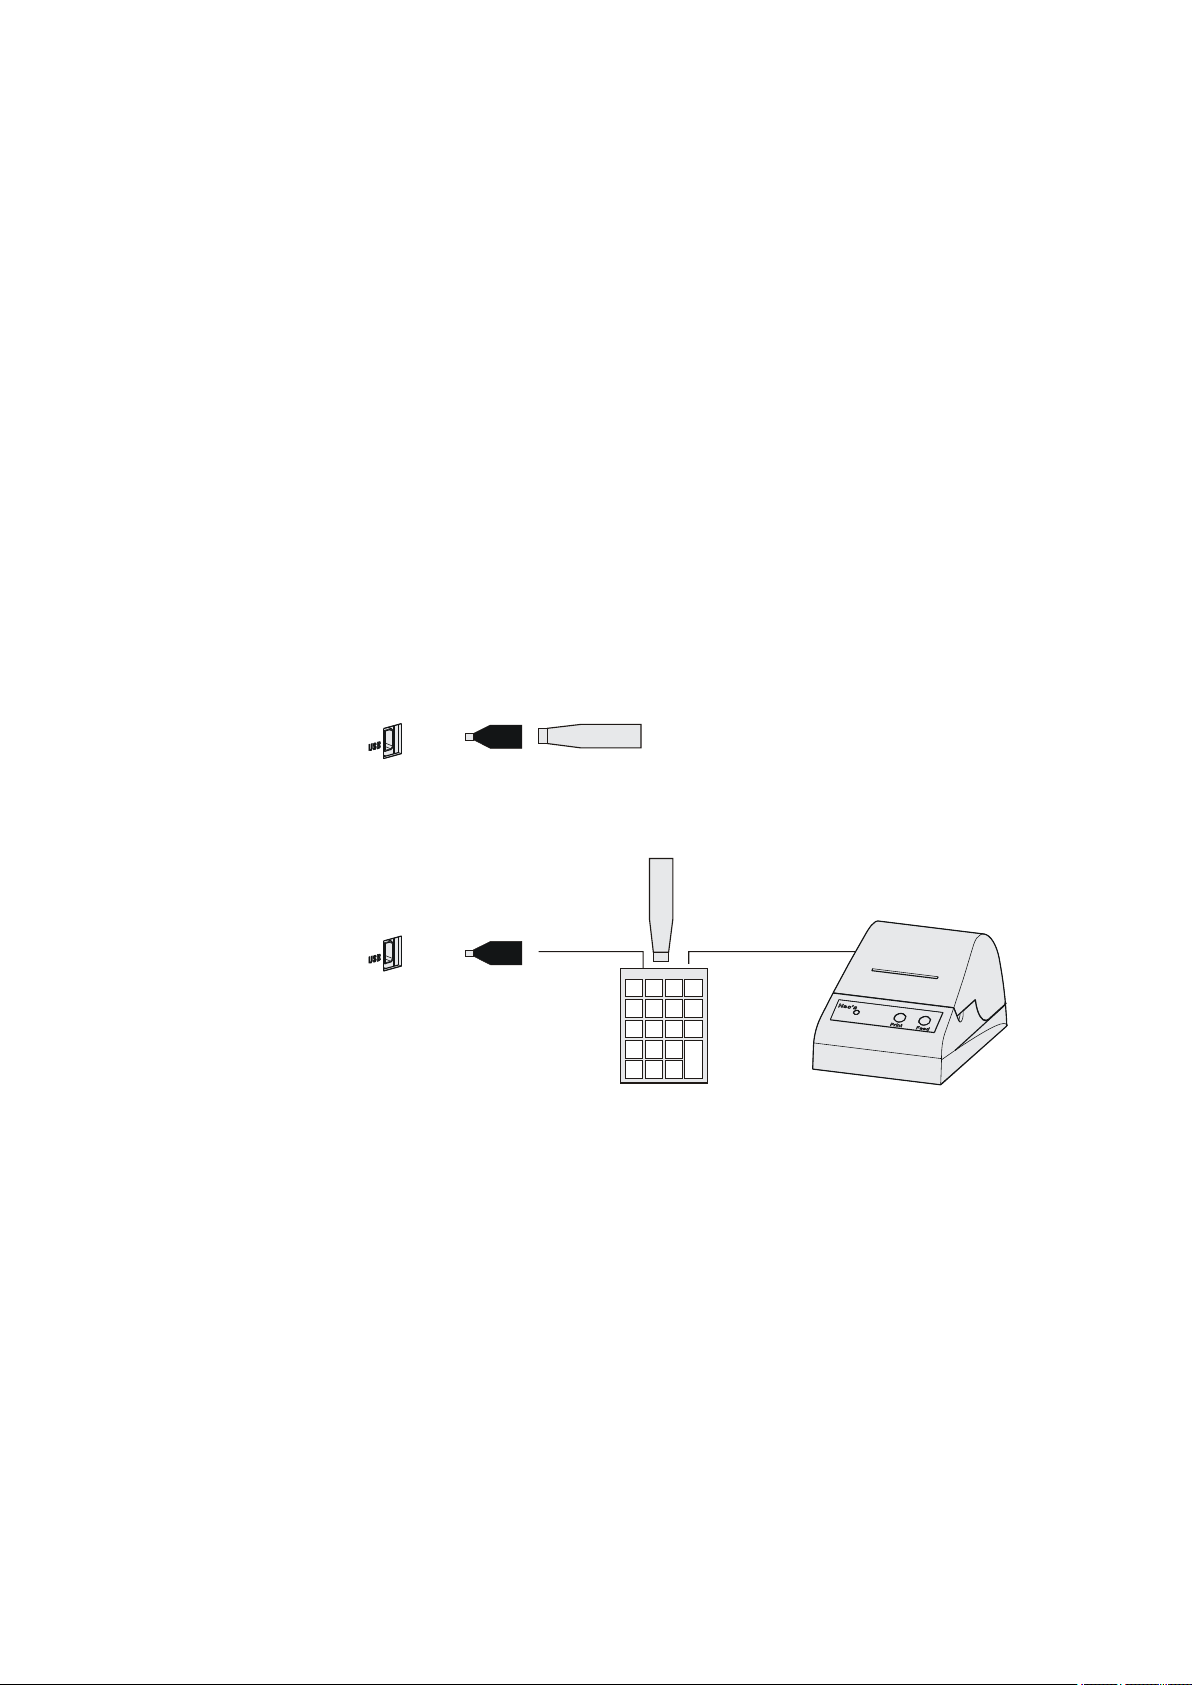
Figure 10
Connecting the USB stick
Figure 11 Connecting the 6.2147.000 USB keyboard with USB stick and
printer
■■■■■■■■
14
848 Titrino plus
Page 25
■■■■■■■■■■■■■■■■■■■■■■
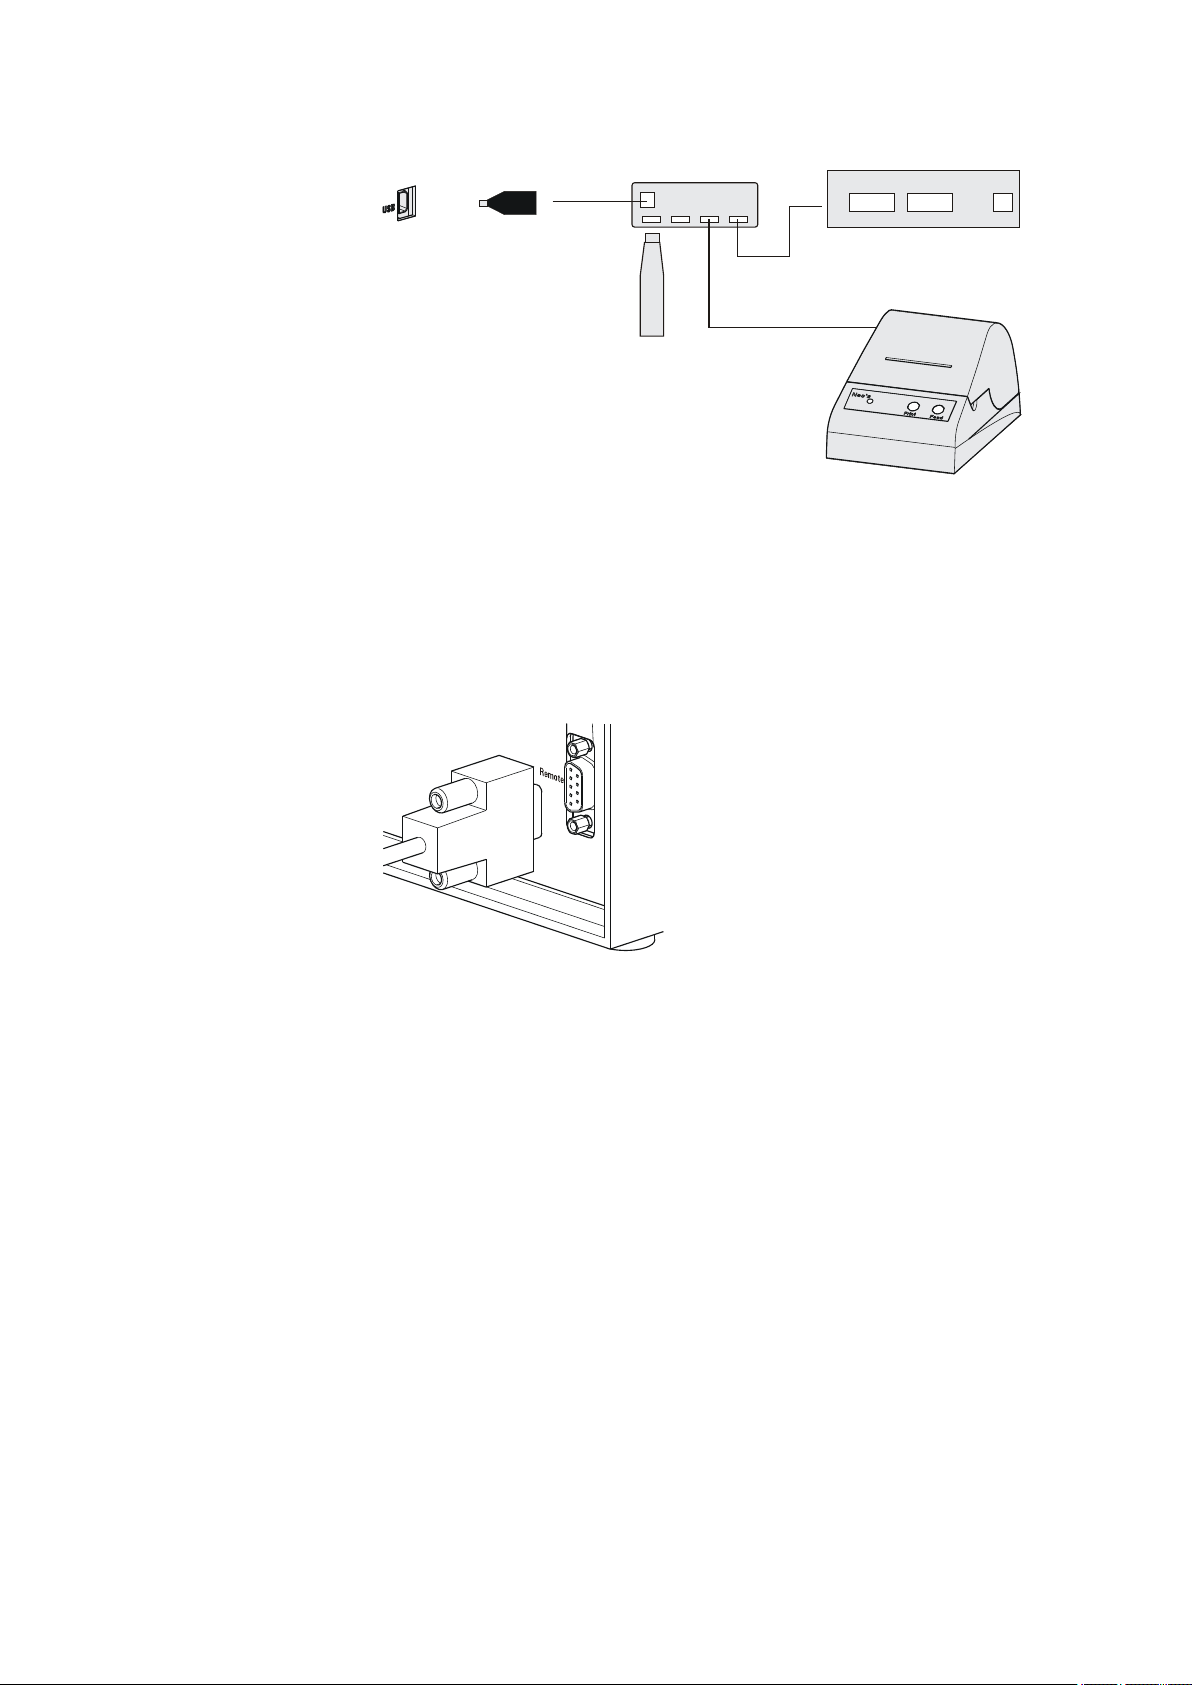
USB MINI (OTG)-USB
USB stick
USB-Hub
RS-232/USB Box
6.2148.030
6.2151.100
Printer
3 Installation
Figure 12 Connecting the USB hub with USB stick, printer and the
6.2148.030 RS-232/USB Box (for connecting balances).
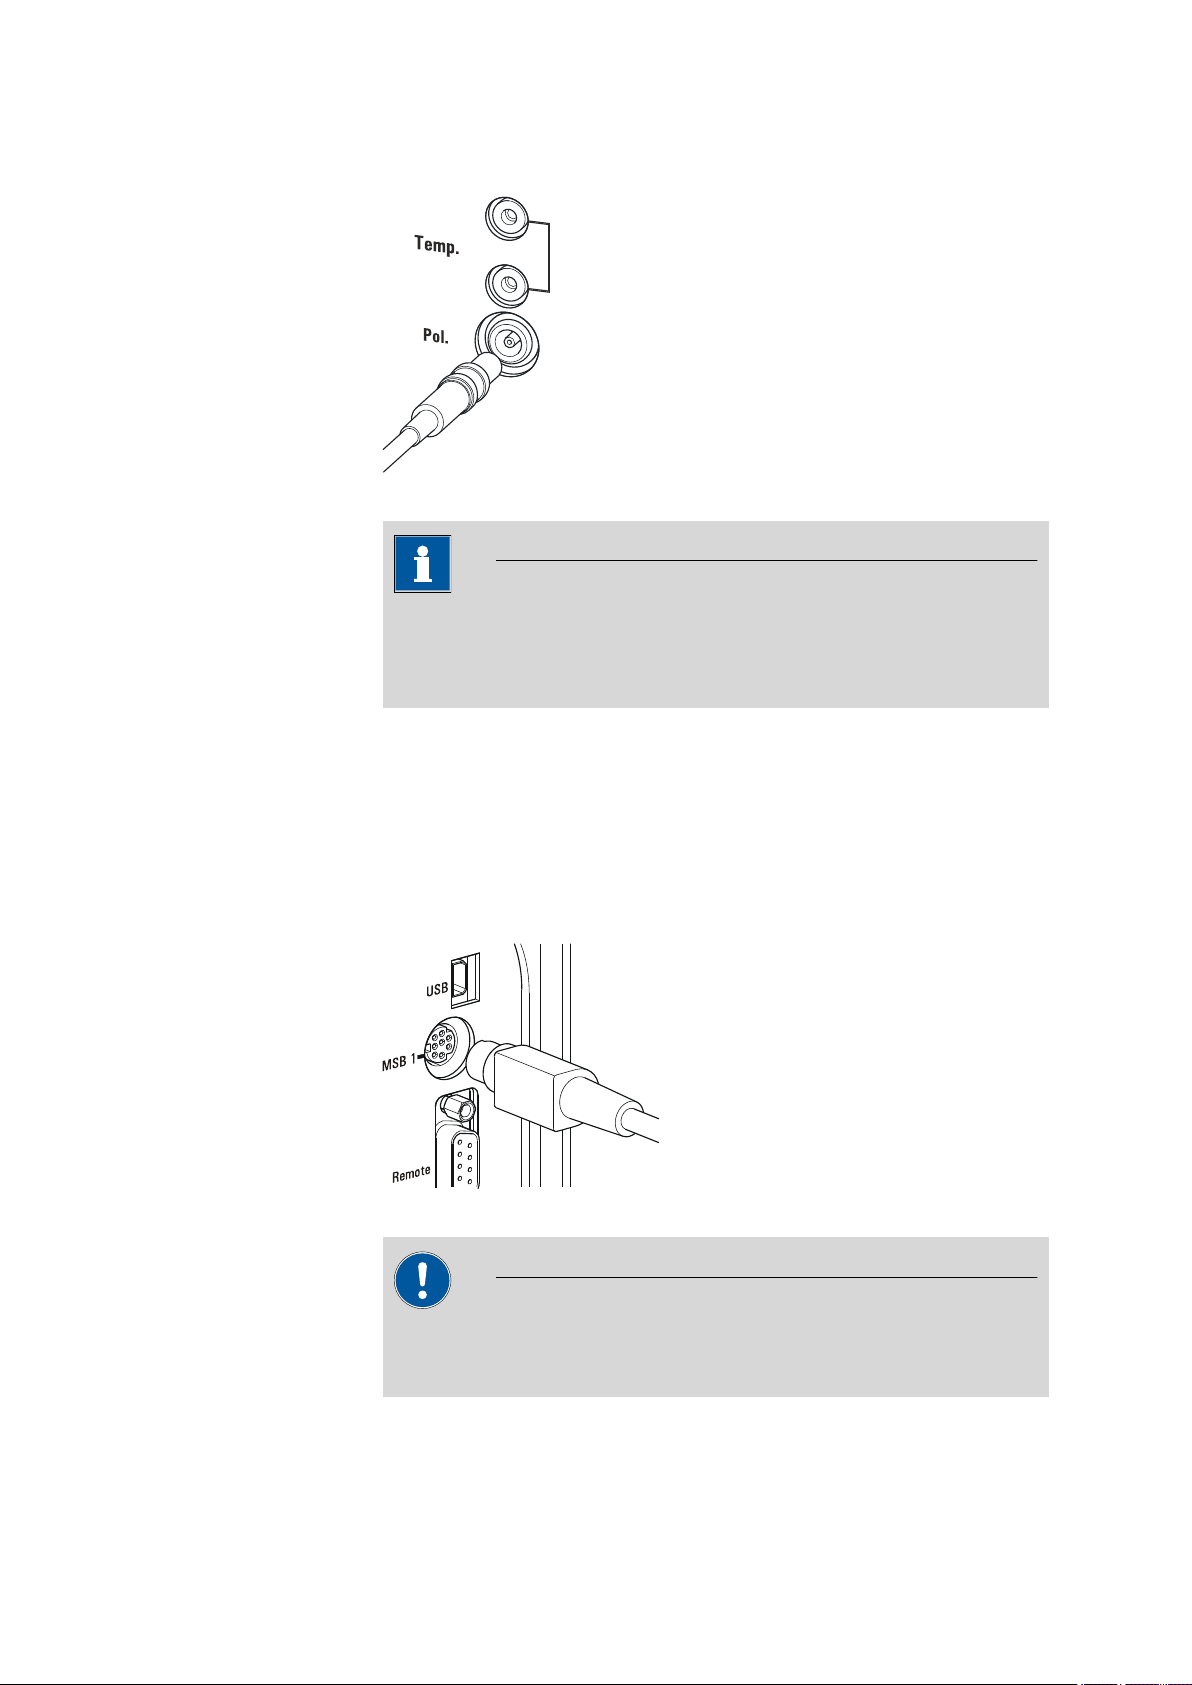
3.6 Connecting instruments to the remote connector
The 848 Titrino plus can be integrated in an automation system with the
aid of a remote cable.
848 Titrino plus
Figure 13
Connecting a remote cable
A variety of different connecting cables are available for connecting
Metrohm instruments (e.g. sample changers) (see Optional Accessories
chapter).
■■■■■■■■
15
Page 26
3.7 Attaching the exchange unit
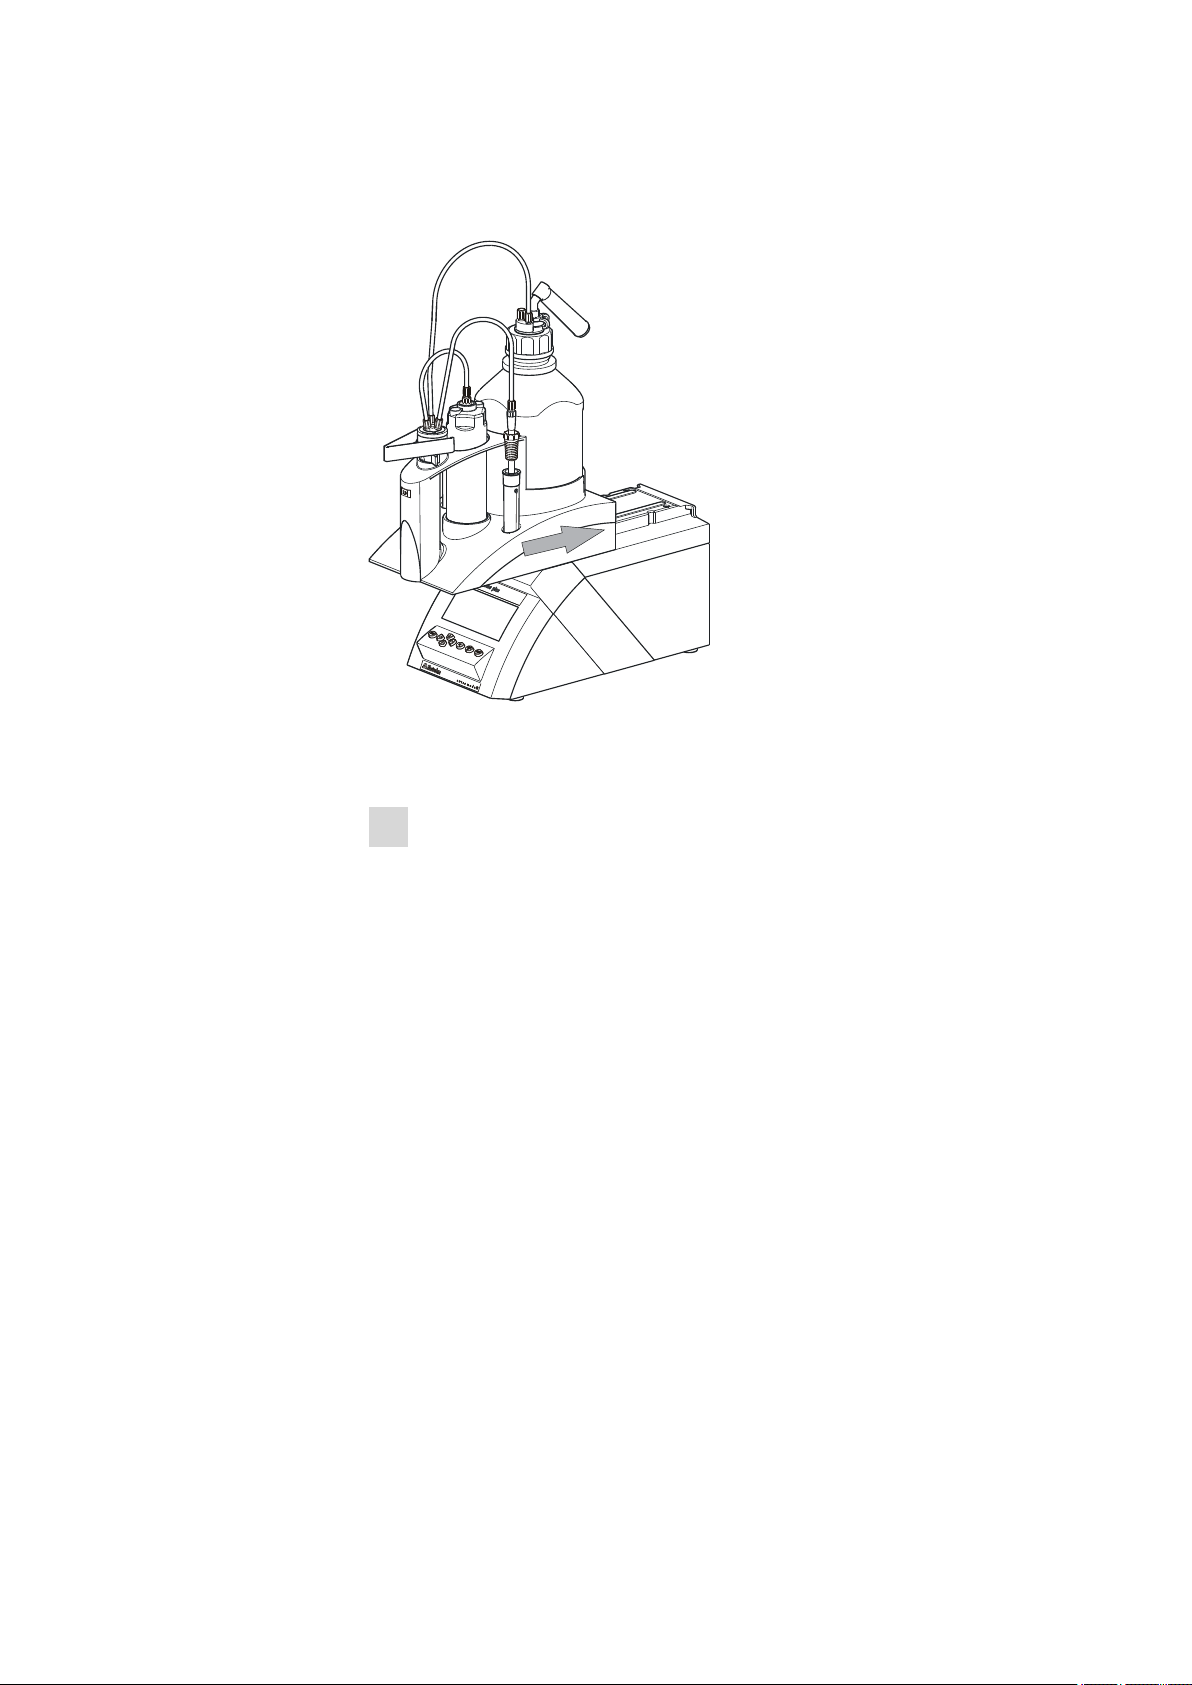
3.7 Attaching the exchange unit
■■■■■■■■■■■■■■■■■■■■■■
Figure 14 Attaching the exchange unit
To attach the exchange unit, proceed as follows:
Slide the exchange unit from the front onto the 848 Titrino plus and
1
push all the way to the rear.
It must snap in audibly.
■■■■■■■■
16
848 Titrino plus
Page 27
■■■■■■■■■■■■■■■■■■■■■■
U/mV
V/mL
U/mV
4 Titrations
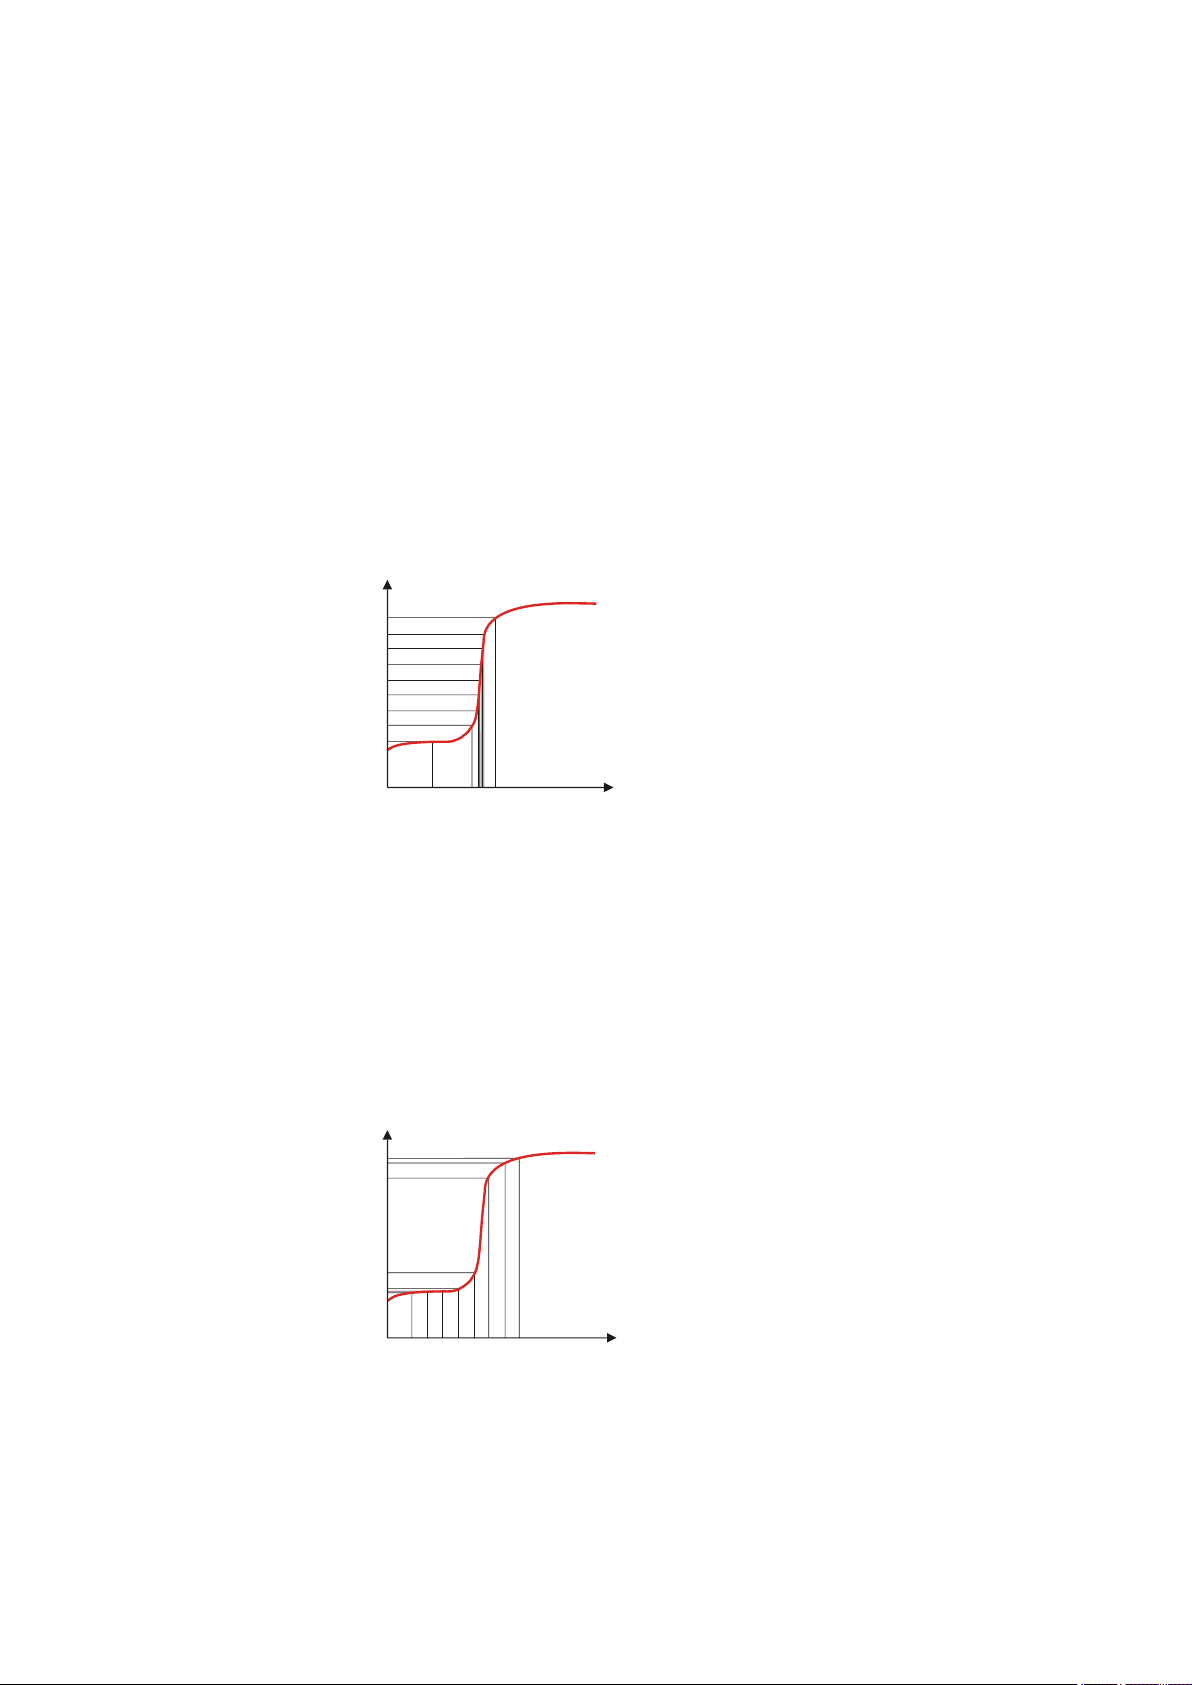
4.1 Dynamic equivalence point titration (DET)
Dynamic equivalence point titration is a titration mode for all standard
titrations. The reagent is added in variable volume steps. The volume
increments vary as a function of the slope of the curve. An attempt is
made to achieve constant measured value alterations with each dosing.
The optimal volume for dosing is determined from the measured value
alterations of the previous dosings. Measured value acceptance is driftcontrolled (equilibrium titration) or after a waiting time. Equivalence points
are evaluated automatically.
4 Titrations
Figure 15
Reagent dosing for DET
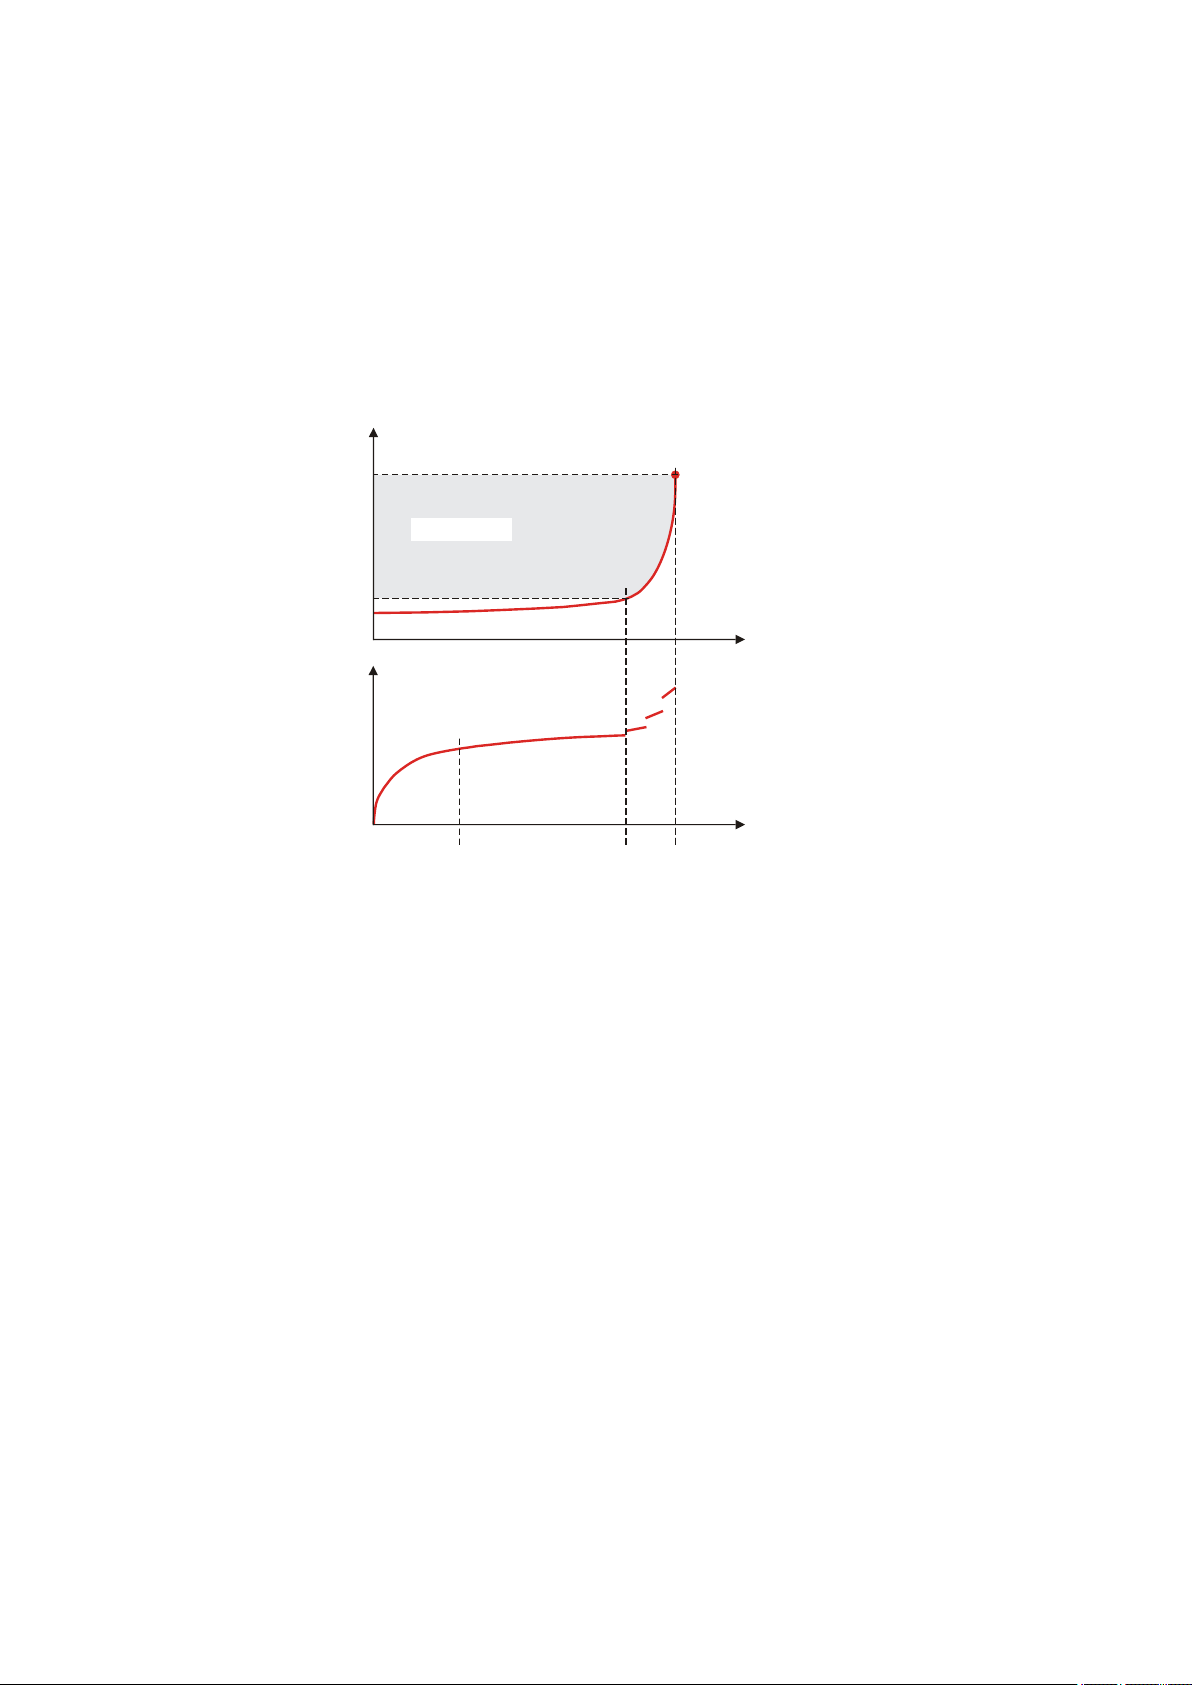
4.2 Monotonic equivalence point titration (MET)
Monotonic equivalence point titration is a titration mode for titrations
with relatively high signal fluctuations or suddenly occurring potential
jumps and for slow titrations or slow-response electrodes. The reagent is
added in constant volume steps. Measured value acceptance is drift-controlled (equilibrium titration) or after a waiting time. Equivalence points are
evaluated automatically.
Figure 16
Reagent dosing for MET
848 Titrino plus
■■■■■■■■
17
Page 28
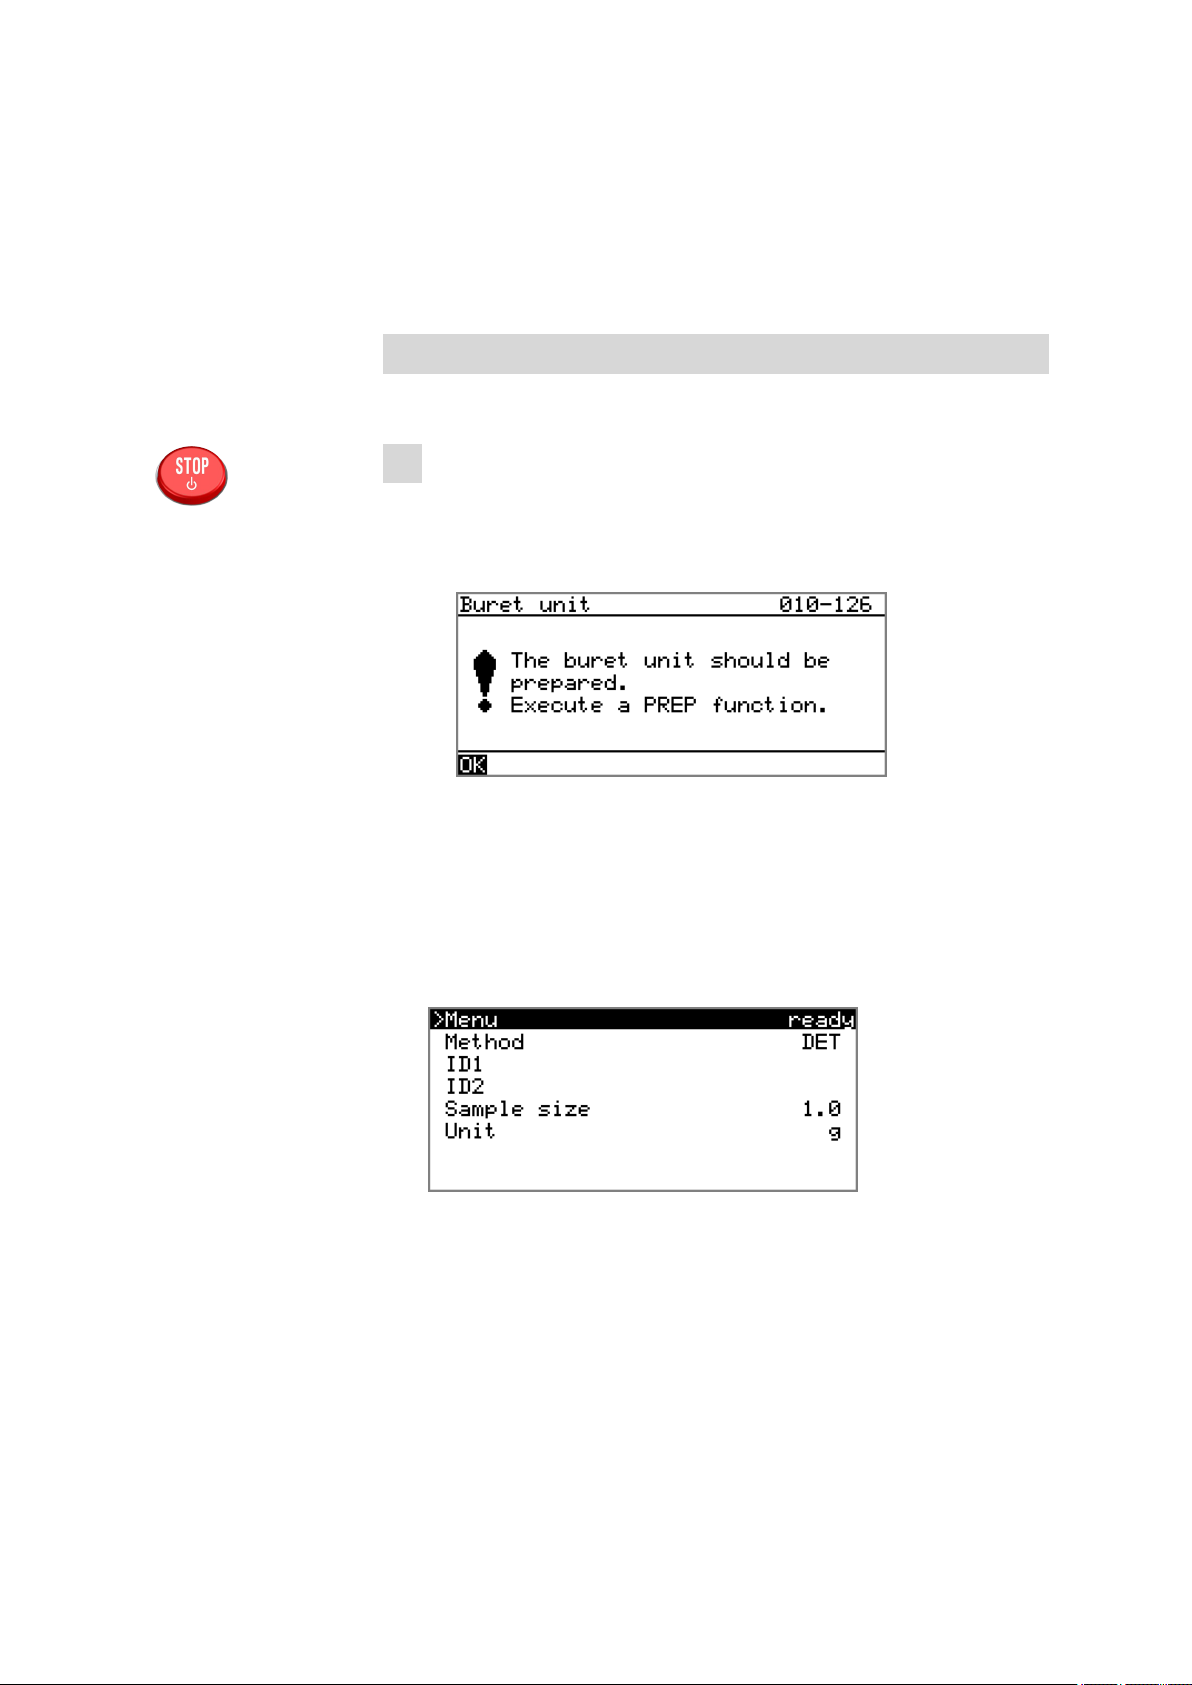
4.3 Endpoint titration (SET)
t/s
EP
Continuous
dosing
Initial
dosing
V/mL
V/mL
U/mV
Control range
4.3 Endpoint titration (SET)
Endpoint titration is a titration mode for rapid routine determinations to a
preset endpoint (e.g. titrations in accordance with special norms) and
titrations for which reagent overflow must be avoided. The titration termination at the endpoint takes place either drift-controlled or after a waiting
period. The volume dosed until the endpoint is used for calculating the
content of the sample.
■■■■■■■■■■■■■■■■■■■■■■
Figure 17 Reagent dosing for SET
■■■■■■■■
18
848 Titrino plus
Page 29
■■■■■■■■■■■■■■■■■■■■■■
5 Operation
5.1 Switching the instrument on and off
Switching on the instrument
Proceed as follows:
■ Press the red [STOP] key.
1
The instrument is initialized and a system test performed. This
process takes some time.
■ If a buret unit has been attached, then a request appears to carry
out the PREP function:
5 Operation
All tubings and the cylinder are rinsed with the PREP (Preparing)
function. The preparing of the buret unit is described in chapter
"Preparing the buret unit (PREP)", page 45.
■ Confirm the message with [OK].
The display of this message can be deactivated in the system settings (see "PREP warning", page 54).
The main dialog is displayed:
848 Titrino plus
■■■■■■■■
19
Page 30

5.2 Fundamentals of operation
Switching off the instrument
The instrument is switched off with the [STOP] key. The fact that the key
needs to be pressed down for an extended time prevents accidental
switch off.
Proceed as follows:
■ Keep the red [STOP] key pressed down for at least 3 s.
1
A progress bar is displayed. If the key is released during this time,
then the instrument will not be switched off.
5.2 Fundamentals of operation
5.2.1 The keypad
■■■■■■■■■■■■■■■■■■■■■■
Figure 18
Keypad 848 Titrino plus
BACK Apply the input and exit the dialog.
⇧ ⇩ Move the selection bar either up or down by one
line at a time. Select the character to be entered
in the text editor.
⇦ ⇨ Select the character to be entered in the text and
number editor. Select the individual functions in
the function bar.
OK Confirm the selection.
STOP Stop an ongoing method run or a manual func-
tion. Switch the instrument on or off.
START Start a method run or a manual function.
■■■■■■■■
20
848 Titrino plus
Page 31
■■■■■■■■■■■■■■■■■■■■■■
5.2.2 Structure of the dialog windows
The current dialog title is displayed on the left-hand side of the title bar.
The current status of the system is displayed in the upper right-hand corner:
ready The instrument is in normal status.
cond.busy The working medium is being conditioned.
cond.ok The working medium is conditioned.
busy A method has been started.
hold A method has been paused.
5 Operation
Some dialogs have a so-called function bar on the bottom line. The functions contained therein can be selected with the arrow keys [⇦] or [⇨]
and executed with [OK].
5.2.3 Navigating in the dialog
The selection bar is displayed in inverted style. Use the arrow keys [⇧] and
[⇩] to move the selection bar upward or downward one line at a time. If
a dialog text is marked with ">", then additional settings are available in
a subordinate dialog. Use [OK] to access this dialog.
Example: System settings
848 Titrino plus
■■■■■■■■
21
Page 32

5.2 Fundamentals of operation
Use the [BACK] key to return to the next higher level.
5.2.4 Entering text and numbers
In the editing dialog for text input or numerical input, select the individual
characters with the arrow keys. Use [OK] to apply the character in the
input field. The following functions are available:
■■■■■■■■■■■■■■■■■■■■■■
Editing function
Description
Accept The modification is applied and the editing dialog
is exited.
Cancel The editing dialog is exited without applying the
modification.
Clear The content of the input field is deleted com-
pletely.
The character left of the cursor is deleted (backspace).
Text editor only
The cursor within the input field is shifted to the
left by one character each time that [OK] is
pressed.
Text editor only
The cursor within the input field is shifted to the
right by one character each time that [OK] is
pressed.
■■■■■■■■
22
[BACK] The modification is applied and the editing dialog
is exited.
The [BACK] key has the same function as Accept.
A commercially available USB keyboard can be connected to make it easier to enter text and numbers. The assignment of the keys on the PC keyboard is described in chapter 10.4.2, page 120.
848 Titrino plus
Page 33

■■■■■■■■■■■■■■■■■■■■■■
5.2.5 Selecting from a selection list
In a selection list, select the individual entries with the arrow keys [⇧] and
[⇩]. Accept the selection with [OK] or [BACK].
5.3 Formula editor
The formulas for the calculations are entered with the formula editor. The
formula editor is equipped with an automatic syntax check. This is triggered as soon as a formula is applied. The generally valid rules of priority
apply for the calculation operations.
5 Operation
Variable
C00 Sample size
EP# Volume of endpoint EP# (# = 1…9)
CI# Sample identification (# = 1…2)
R# Result (# = 1…5)
FP# Volume of fixed endpoint FP# (# = 1…9)
CV0# Common variable (# = 1…5)
SMN# Mean value of result R# (# = 1…5)
TITER Titer of selected solution
CONC Concentration of selected solution
Var List of additional variables (see "Variables", page 24)
Templates List of predefined calculation formulas (see "Calculation
Description
templates", page 24)
848 Titrino plus
■■■■■■■■
23
Page 34

5.3 Formula editor
■■■■■■■■■■■■■■■■■■■■■■
"#" stands for a sequential number that you must enter manually. Example: if you apply the variable EP# in the formula, only EP is entered. You
will still need to enter the number yourself.
The meanings of the editing functions are explained in chapter 5.2.4,
page 22.
Variables
Pressing Var displays a list with additional variables. You can enter these
variables either directly into the formula or also by selecting them from the
list and applying them with [OK].
Variable
Description
MIM Initial measured value, i.e. measured value prior to the
processing of the start conditions
MSM Start measured value, i.e. measured value after the pro-
cessing of the start conditions
MCV End volume, i.e. total dosed volume at the end of the
titration
ET# Temperature at endpoint EP# (# = 1…9)
EM# Measured value of endpoint EP# (# = 1…9)
ED# Time at endpoint EP# (# = 1…9)
MSV Start volume
MEN Electrode zero point pH(0)
MSL Electrode slope
DD Duration of the entire determination
MST Start temperature
MCT End temperature
■■■■■■■■
24
FT# Temperature at fixed endpoint FP# (# = 1…9)
FM# Measured value of fixed endpoint FP# (# = 1…9)
FD# Time at fixed endpoint FP# (# = 1…9)
For Molw, see the following section.
Calculation templates
Pressing Templates displays a list with calculation templates. You can
apply these templates directly with [OK].
848 Titrino plus
Page 35

■■■■■■■■■■■■■■■■■■■■■■
5 Operation
Note
Some templates contain the wildcard Molw, which stands for the
molar mass of the sample. You must replace this wildcard with the correct value in the calculation formula.
The templates available:
Template Description
Content % Content in %
Unit of the sample size = g
Content mmol/L Content in mmol/L
Unit of the sample size = mL
Content mol/L Content in mol/L
Unit of the sample size = mL
Content g/L Content in g/L
Content ppm Content in ppm
Titer Titer calculation
Blank mean value Blank value as mean value of single results
Blank single value Blank value as single value
5.4 Methods
5.4.1 Creating a new method
Proceed as follows to create a new method:
1
Open the method table
■ In the main dialog, select Method and press [OK].
Unit of the sample size = mL
Unit of the sample size = g
Unit of the sample size = g
848 Titrino plus
The method table opens:
■■■■■■■■
25
Page 36

5.4 Methods
■■■■■■■■■■■■■■■■■■■■■■
2
Select a titration and measuring mode
■ In the function bar, select New and press [OK].
■ Select Mode and press [OK].
■ Select the desired titration mode in the selection list and apply
with [OK].
■ Select Measured quantity and press [OK].
■ Select the desired measuring mode in the selection list and apply
with [OK].
■ Press [BACK].
The method is now loaded and is displayed in the main dialog under
Method.
If a new method has been created, then the individual parameters can be
modified under Menu ▶ Parameters.
5.4.2 Saving a method
If you modify method parameters, then you can save these as your own
method. A maximum of 100 methods can be saved.
To save a method, proceed as follows:
1
Opening the method table
■ In the main dialog, select Method and press [OK].
The method table opens:
■■■■■■■■
26
848 Titrino plus
Page 37

■■■■■■■■■■■■■■■■■■■■■■
2
Modifying/applying the method name
■ In the function bar, select Store and press [OK].
A method name will be suggested for new methods. If the
method has already been saved once, then the method name will
be displayed:
5 Operation
Applying the name:
■ Press [BACK].
The method will be saved and the method table is displayed.
Entering a new name:
■ Press [OK].
The text editor opens.
■ Enter a method name (max. 12 characters) and apply with
Accept or [BACK].
■ Press [BACK].
The method will be saved and the method table is displayed.
5.4.3 Loading a method
To load a method, proceed as follows:
1
Open the method table
■ In the main dialog, select Method and press [OK].
The method table with the stored methods opens:
848 Titrino plus
■■■■■■■■
27
Page 38

5.4 Methods
2
Select a method
■ Select the desired method.
3
Load the method
■ In the function bar, select Load and press [OK].
The method is now loaded and is displayed in the main dialog under
Method.
5.4.4 Exporting a method
The methods can be exported to a connected USB flash drive.
■■■■■■■■■■■■■■■■■■■■■■
Note
This function is possible only if a USB flash drive is connected as an
external storage medium.
To export a method, proceed as follows:
1
Opening the method table
■ In the main dialog, select Method and press [OK].
The method table with the stored methods opens:
2
Selecting the method
■ Select the desired method.
■■■■■■■■
28
848 Titrino plus
Page 39

■■■■■■■■■■■■■■■■■■■■■■
5.5 Control
Sample table
5 Operation
3
Exporting the method
■ In the function bar, select Export and press [OK].
The method is being exported. The directory structure on the USB
flash drive is listed in chapter 6.5, page 62.
Menu ▶ Control
In the dialog Control, the settings for the execution of a single determination or of one sample series are defined.
If this parameter is activated, the sample data for a sample series can be
entered in a table (see Chapter 5.7, page 32).
Selection on | off
Default value off
Autostart
Number of autostarts
If this parameter is activated, a new determination is started automatically
at the end of a determination. This continues until the number specified
has been reached (see Number of autostarts).
Selection on | off
Default value off
This parameter is visible only when Autostart = on.
Number of automatic starts.
Input range 1 - 50
Selection table
Default value table
table
The number of automatic starts corresponds to the number of samples
in the sample table.
848 Titrino plus
■■■■■■■■
29
Page 40

5.6 Sample data
It may be necessary to reset the autostart counter manually before the
quantity defined above has been reached. Proceed as follows:
■ Deactivate autostart.
■ Exit the Control dialog.
■ Activate autostart again.
5.6 Sample data
You can enter the sample data (identification, sample size, etc.) in a variety of ways:
■ Directly in the main dialog.
■ Using the sample table. This is particularly useful with sample series.
The sample table is a table in which the sample data for up to 99 samples can be entered (see Chapter 5.7, page 32).
■ Automatic request immediately after the start of the determination (see
Chapter 5.6.2, page 31).
■■■■■■■■■■■■■■■■■■■■■■
Note
You can also send the sample size and the unit from a connected balance
in any case. With some balances, the sample identification and method
can be also sent (see Chapter 10.3, page 118).
5.6.1 Entering sample data in the main dialog
For a sample, you can enter the sample data directly in the main dialog,
even while the determination is running (see Chapter 5.9, page 37).
ID1
Sample identification. The sample identification can be used in calculations
as the variable CI1.
Entry max. 10 characters
Default value empty
■■■■■■■■
30
848 Titrino plus
Page 41

■■■■■■■■■■■■■■■■■■■■■■
ID2
Sample size
Unit
5 Operation
Sample identification. The sample identification can be used in calculations
as the variable CI2.
Entry max. 10 characters
Default value empty
Sample size. The value of the sample size can be used in calculations as
the variable C00.
Input range –999999999 - 9999999999
Default value 1.0
Unit of the sample size.
Selection g | mg | µg | mL | µL | pieces | User-defined
Default value g
User-defined
A user-defined unit can be created. This will be added to the selection
list. The previous entry will be overwritten as soon as the new unit has
been defined.
5.6.2 Requesting sample data at the start of the determination
The sample data can be requested immediately after the start of the determination in order to ensure that the sample data entry is not forgotten.
This automatic request is indispensable when you reweigh your samples.
The corresponding parameters must be activated under Start conditions
for this purpose. If the parameter Hold at request is activated, then the
run will be paused and must be continued with [START] after the input
of the sample data. If Hold at request is deactivated, then the titration
will be started in the background. This dialog will be displayed until the
entering of the sample data is confirmed with [START], even if the the
titration is already completed. This ensures that the sample data is available for calculations.
848 Titrino plus
■■■■■■■■
31
Page 42

5.7 Sample table
5.7 Sample table
5.7.1 General
The sample table is a table in which the sample data for up to 99 samples
can be entered. The sample data can also be entered while a determination is running (see Chapter 5.9.2, page 38).
Activating the sample table
Proceed as follows to activate the sample table (parameter Sample table
= on).
1
Opening the main menu
■ In the main dialog, select Menu and press [OK].
■■■■■■■■■■■■■■■■■■■■■■
2
Opening the control dialog
■ Select the menu item Control and press [OK].
3
Activating the sample table
■ Select Sample table and press [OK].
■ Select the entry on in the selection list and apply with [OK].
■ Press [BACK].
The menu item Sample table is displayed in the main menu:
■■■■■■■■
32
848 Titrino plus
Page 43

■■■■■■■■■■■■■■■■■■■■■■
Edit
5 Operation
The sample table contains numbered lines. The identification (ID1) and
the sample size of each sample are displayed.
Edit the data of the selected line, see following chapter.
Delete
Delete the selected line from the sample table.
Insert
Insert a new line above the line selected.
New
Delete the sample table completely. This function is visible only if the
instrument is in ready status.
5.7.2 Editing the sample data
You will see at the very bottom the line number of the selected line and
the line number of the last line containing data. In this example, the first
line is opened and the sample table contains four lines.
848 Titrino plus
One can scroll between the individual data sets with the keys [⇦] and [⇨].
■■■■■■■■
33
Page 44

5.7 Sample table
Method
ID1
■■■■■■■■■■■■■■■■■■■■■■
Inserting a new line
If you find yourself on the last line (i.e. Line 4 of 4 in the above example),
you can add a new line to the sample table by pressing [⇨] again. The
sample data of the previous sample will be applied thereby.
Method used for processing the sample.
Selection Selection of stored methods | empty
Default value empty
empty
The currently loaded method is used.
Sample identification. The sample identification can be used in calculations
as the variable CI1.
Entry max. 10 characters
Default value empty
ID2
Sample size
Unit
Sample identification. The sample identification can be used in calculations
as the variable CI2.
Entry max. 10 characters
Default value empty
Sample size. The value of the sample size can be used in calculations as
the variable C00.
Input range –999999999 - 9999999999
Default value 1.0
Unit of the sample size.
Selection g | mg | µg | mL | µL | pieces | User-defined
Default value g
User-defined
A user-defined unit can be created. This will be added to the selection
list. The previous entry will be overwritten as soon as the new unit has
been defined.
■■■■■■■■
34
848 Titrino plus
Page 45

■■■■■■■■■■■■■■■■■■■■■■
5.7.3 Sending the sample size from a balance
If the sample size is sent directly from the balance, then it will always be
entered in a new line at the end of the sample table. It does not matter
which line is selected or whether the sample table is even opened. In the
above example, the sample size is entered in line 5.
Note
If you would like to enter the sample size in a particular line, then you
must open the corresponding editing dialog (i.e. the Sample data dialog is displayed).
5 Operation
If the editing dialog for the sample size is opened, then the sent value
will be ignored.
5.8 Carrying out a determination
The sample size can be entered in the following ways when a determination is carried out:
■ Enter manually on the instrument
■ Send automatically from a connected balance. Consult the user manual
for the balance for this purpose.
The following instructions describe how to enter the sample size on the
848 Titrino plus.
1
Load the method
■ See Chapter Loading a method, Page 27.
2
Prepare the sample
Note
848 Titrino plus
Calculate the amount of the sample in such a way that a titrant
consumption of 10...90 % of the cylinder volume will result.
■■■■■■■■
35
Page 46

5.8 Carrying out a determination
■■■■■■■■■■■■■■■■■■■■■■
■ Weigh in or measure the sample in a sample vessel.
■ Add solvent.
■ Place the sample vessel on the stirrer.
■ Immerse electrode and buret tip in solution.
3
Enter the sample size
■ In the main dialog, select Sample size and press [OK].
The editing dialog opens.
■ Enter the sample size and apply with Accept or [BACK].
4
Start the titration
■ Press [START].
The titration starts and the curve is displayed:
The axes are scaled automatically. The run is paused with Hold.
Continue is now displayed instead. This can be used to continue the
run.
The stirring rate can be modified during titration with the Stirrer
function. The following dialog is opened by pressing [OK]:
The stirring rate can be reduced with Stir– and increased with Stir+.
Off switches the stirrer off. On is displayed now instead. This can be
used to switch the stirrer back on. This dialog is exited with [BACK].
After the completion of the titration, the results dialog is displayed:
■■■■■■■■
36
848 Titrino plus
Page 47

■■■■■■■■■■■■■■■■■■■■■■
Canceling a determination manually
A determination can be canceled at any time with the [STOP] key.
5.9 Live modifications
5.9.1 Editing the sample data of the running determination
The sample data can be entered or modified in the main dialog while a
determination is running. In calculations always the sample data entered
at the end of the titration in the main dialog is used.
Proceed as follows to edit the sample data:
1
Displaying the main dialog
■ Press [BACK].
5 Operation
The main dialog is displayed. The determination continues to run in
the background.
2
Editing the sample data
■ Edit the sample data and apply with Accept or [BACK].
3
Displaying the live dialog
■ Press [BACK].
or
■ Select Menu and press [OK].
■ Select the menu item Live dialog and press [OK].
The live dialog is displayed once again.
848 Titrino plus
■■■■■■■■
37
Page 48

5.9 Live modifications
■■■■■■■■■■■■■■■■■■■■■■
Note
If the determination is finished while an editing dialog is opened (e.g. of
the sample size), then this will be closed automatically and the results
dialog will be displayed. The value entered must be entered once more
and the determination must be recalculated.
Make sure that the editing dialogs are closed before the determination
is finished.
5.9.2 Editing the sample table while a determination is running
You can insert new lines or delete existing ones or edit sample data while
a determination is running.
Note
We recommend that the editing dialogs always be closed in order to
ensure that no problems occur during the run and that the current data
is always available for calculation purposes.
Editing the sample table
Proceed as follows to edit the sample table:
1
Displaying the main dialog
■ Press [BACK].
The main dialog is displayed. The determination continues to run in
the background.
2
Opening the main menu
■ Select Menu and press [OK].
3
Selecting the sample data
■ Select the menu item Sample table and press [OK].
■ Select the desired line.
■■■■■■■■
38
848 Titrino plus
Page 49

■■■■■■■■■■■■■■■■■■■■■■
■ In the function bar, select Edit and press [OK].
4
Editing the sample data
■ Edit the sample data and apply with Accept or [BACK].
Note
In addition to the sample data, the method can also be modified,
except in cases where the determination is running.
5
Displaying the live dialog
■ Select the menu item Live dialog in the main menu and press
[OK].
or
■ Press [BACK] in the main dialog.
The live dialog is displayed once again.
5 Operation
Editing the sample data of the running determination
When you use the sample table, the editing of the sample data of the running determination proceeds as described in chapter 5.9.1, page 37. In
addition, you have the option of editing these in the sample table. The
first line always contains the sample data of the running determination.
Simply select for this purpose the Sample table(see "Editing the sample
table", page 38) menu item in the main menu.
5.9.3 Editing the live parameters
Certain method parameters can be edited while a determination is being
carried out. The only parameters that can be modified are those that can
be selected. Nevertheless, all of the parameters are visible. The modified
parameters are taken into account at once. If you modify, for instance,
the start conditions after the start volume has been dosed, then these
modifications will not be taken into account until the next determination.
Proceed as follows to edit the parameters:
1
Displaying the main dialog
■ Press [BACK].
The main dialog is displayed. The determination continues to run in
the background.
848 Titrino plus
■■■■■■■■
39
Page 50

5.10 Results
■■■■■■■■■■■■■■■■■■■■■■
2
Opening the main menu
■ Select Menu and press [OK].
3
Editing the method parameters
■ Select the menu item Parameters and press [OK].
■ Change the desired parameters accordingly.
4
Displaying the live dialog
■ Select the menu item Live dialog in the main menu and press
[OK].
5.10 Results
Curve
or
■ Press [BACK] in the main dialog.
The live dialog is displayed once again.
Menu ▶ Results
After the completion of the titration, the results dialog is displayed:
The calculated result and details concerning the endpoint are shown in
the overview.
Recalculate
■■■■■■■■
40
Display the curve of the current determination.
Recalculate the current determination. The procedure will be executed
immediately.
848 Titrino plus
Page 51
■■■■■■■■■■■■■■■■■■■■■■
Statistics
5 Operation
Display the statistical overview of a determination series (see Chapter
5.11, page 41).
Displaying the curve
The curve of the current determination can be displayed with the Curve
function.
The arrow keys [⇦] and [⇨] can be used to move to the individual measuring points. A cross hair is used to show the current position on the curve.
The data (volume, measured value, time, etc.) for the respective measuring point is indicated on the right-hand side.
Recalculating
All of the results are recalculated with the Recalculate function. This is
necessary if, for example, the calculation, the titer or the sample size has
been modified.
5.11 Statistics
Menu ▶ Results ▶ Statistics
The statistical overview of a determination series can be displayed in the
Results dialog with the Statistics function.
Note
Recalculation cannot be undone.
Note
This function is visible only if statistics has been activated.
848 Titrino plus
■■■■■■■■
41
Page 52

5.11 Statistics
Details
Reset
■■■■■■■■■■■■■■■■■■■■■■
The mean value (Mean), the absolute and the relative standard deviation
(s abs and s rel) are displayed in the overview. For the mean value, the
number of individual results from which it has been calculated is displayed
in parentheses. In this example, it is 3. The Statistics line shows how
many determinations have already been carried out and how many determinations are to be carried out in total. All three determinations were carried out in this example.
Display additional data.
Delete all statistics data.
Increase
On/Off
Add a further determination to the determination series.
Displaying statistical details
Additional data from the determination series can be displayed with the
Details function.
The result and the sample size of each determination are shown.
Remove the selected determination from the statistics. The line will then
be marked with an asterisk (*), the statistics will be recalculated automatically. If several calculations are defined in the method, then all the results
will be removed from the statistics.
■■■■■■■■
42
Deleting statistical data
All statistical data is deleted with the Reset function. The statistics data is
deleted automatically in the following cases:
848 Titrino plus
Page 53

■■■■■■■■■■■■■■■■■■■■■■
■ When all of the determinations of the determination series have been
carried out and a new determination has been started afterwards.
■ When a new method is loaded.
Adding a determination to a determination series
You can use the function Increase to add an additional sample to a
determination series, e.g. because a determination was faulty and had to
be removed from the statistics. The second number in the Statistics line
will be increased automatically by one.
5.12 Printing a report manually
Menu ▶ Print reports
Proceed as follows to print a report manually:
1
Opening the main menu
■ In the main dialog, select Menu and press [OK].
5 Operation
2
Opening the print dialog
■ Select the menu item Print reports and press [OK].
The dialog window with the available reports opens:
3
Selecting the report
■ Select the desired report and press [OK].
The report is printed out.
The following reports can be printed out manually:
848 Titrino plus
■■■■■■■■
43
Page 54

5.13 Manual Control
■■■■■■■■■■■■■■■■■■■■■■
Results Result report with determination properties,
sample data, calculated results, etc.
Curve Curve report. The width of the curve is defined in
the system settings (see "Graphics width", page
64).
Measuring point
Measuring point list report.
list
Parameters Report with all method parameters of the loaded
method.
System System report with system settings, solution list,
external devices, etc.
Calculations/Statistics
Calculation report. The statistics are also printed
out in the case of multiple determinations. The
individual determinations with the respective
sample size, the mean value, the absolute and
the relative standard deviation are printed out
for each result.
PC/LIMS Machine-readable report with all of the data for
a determination. This report can be saved as a
TXT file to a connected USB flash drive or sent to
a terminal program or a LIMS via an RS-232
interface. The definition is made in the system
settings (see "PC/LIMS report", page 63).
Report as in
method
The reports that are defined in the method will
be printed out.
5.13 Manual Control
Menu ▶ Manual control
The following functions are available in the manual control:
■ Dosing
■ Measuring
■ Stirring
The available subfunctions are listed for each function in the function bar.
■■■■■■■■
44
848 Titrino plus
Page 55
■■■■■■■■■■■■■■■■■■■■■■
5.13.1 Dosing
5 Operation
Note
The Stirrer function can only be selected if a stirrer is connected.
The following dosing functions are available in the manual control:
Prepare buret unit
(PREP)
Continuous dosing
Rinse the cylinder and tubings of the buret unit
(see Chapter 10.1.2, page 117).
Dose while the [START] key is pressed.
(DOS)
Dose fixed volume
Dose a specified volume.
(ADD)
Preparing the buret unit (PREP)
The PREP function is used to rinse the cylinder and tubings of the buret
unit and fill them air bubble-free. You should carry out this function
before the first determination or once per day.
Proceed as follows:
1
Open the manual control
■ In the main dialog, select Menu and press [OK].
The main menu opens.
■ Select the menu item Manual control and press [OK].
Manual control opens.
2
Select the dosing function
■ Select the Dosing item.
848 Titrino plus
■ In the function bar, select PREP and press [OK].
The following message is displayed:
■■■■■■■■
45
Page 56

5.13 Manual Control
■■■■■■■■■■■■■■■■■■■■■■
3
Start the preparing
Caution
Make sure that the buret tip is directed into a vessel that can
accommodate the volume of your buret unit several times over.
■ Select Yes and confirm the message with [OK].
Preparing is carried out.
Continuous dosing (DOS)
Continuous dosing will be carried out with the DOS function for as long
as you keep the [START] key pressed down.
Proceed as follows:
1
Open the manual control
■ In the main dialog, select Menu and press [OK].
The main menu opens.
■ Select the menu item Manual control and press [OK].
Manual control opens.
2
Select the dosing function
■ Select the Dosing item.
■■■■■■■■
46
■ In the function bar, select DOS and press [OK].
848 Titrino plus
Page 57

■■■■■■■■■■■■■■■■■■■■■■
3
Configure the dosing function
Note
■ The dosing and filling rate should be decreased for viscous liq-
uids.
■ The maximum dosing and filling rate depends on the cylinder
volume (see Chapter 10.1.1, page 117) .
■ Enter the dosing rate.
■ Enter the filling rate.
4
Start dosing
■ Press [START].
5 Operation
The status changes to busy, the dosed volume is displayed. When a
cylinder volume has been added, the dosing cylinder will be refilled
automatically.
5
Fill the cylinder
■ Press [STOP] or [BACK].
The dosing cylinder is filled. If you start the filling with [BACK], then
the dialog will also be exited.
Dosing a particular volume (ADD)
You can dose a particular volume with the ADD function.
Proceed as follows:
1
Open the manual control
■ In the main dialog, select Menu and press [OK].
The main menu opens.
■ Select the menu item Manual control and press [OK].
Manual control opens.
848 Titrino plus
■■■■■■■■
47
Page 58

5.13 Manual Control
2
Select the dosing function
■ Select the Dosing item.
■ In the function bar, select ADD and press [OK].
3
Configure the dosing function
■■■■■■■■■■■■■■■■■■■■■■
Note
■ The dosing and filling rate should be decreased for viscous liq-
uids.
■ The maximum dosing and filling rate depends on the cylinder
volume (see Chapter 10.1.1, page 117) .
■ Enter the desired volume.
■ Enter the dosing rate.
■ Enter the filling rate.
4
Start dosing
■ Press [START].
The status changes to busy, the dosed volume is displayed. When a
cylinder volume has been added, the dosing cylinder will be refilled
automatically.
5
Fill the cylinder
■ Press [STOP] or [BACK].
■■■■■■■■
48
The dosing cylinder is filled. If you start the filling with [BACK], then
the dialog will also be exited.
848 Titrino plus
Page 59

■■■■■■■■■■■■■■■■■■■■■■
5.13.2 Measuring
Open the dialog for manual measurement as follows:
1
Open the manual control
■ In the main dialog, select Menu and press [OK].
The main menu opens.
■ Select the menu item Manual control and press [OK].
Manual control opens.
2
Select a measuring mode
■ Select the Measure item.
5 Operation
■ In the function bar, select the measuring mode and press [OK].
3
Configure the measuring mode
■ Select the desired electrode from the sensor list.
The selection depends on the measuring mode. Sensors are
defined under System ▶ Sensors.
■ Enter the measuring temperature if no temperature sensor is con-
nected. If a temperature sensor is connected then the temperature will be measured automatically.
This temperature is used for automatic temperature compensation
with pH measurements.
4
Start the measurement
■ Press [START].
848 Titrino plus
■■■■■■■■
49
Page 60

5.13 Manual Control
5.13.3 Stirring
■■■■■■■■■■■■■■■■■■■■■■
The status changes to busy. The current measured value and the
measuring temperature are displayed.
5
Stop the measurement
■ Press [STOP] or [BACK].
The measurement is stopped. The status changes back again to
ready. If you stop the measurement with [BACK], then the dialog
will also be exited.
You can control a connected stirrer manually.
Proceed as follows:
1
Open the manual control
■ In the main dialog, select Menu and press [OK].
The main menu opens.
■ Select the menu item Manual control and press [OK].
Manual control opens.
2
Set the stirring rate
■ Select the Stirrer item.
■ In the function bar, select Stir– or Stir+.
The stirring rate will be increased or decreased by one step each
time the [OK] key is pressed.
The algebraic sign changes the direction in which the stirring is
done. When the stirrer is viewed from above, this means:
– "+": counterclockwise rotation
– "–": clockwise rotation
■■■■■■■■
50
848 Titrino plus
Page 61

■■■■■■■■■■■■■■■■■■■■■■
3
Switch on the stirrer
■ In the function bar, select On and press [OK].
The stirrer is started and stirs at the rate which has been set. Off is
now displayed in the function bar.
4
Switch off the stirrer
■ In the function bar, select Off and press [OK].
The stirrer is stopped.
5 Operation
848 Titrino plus
■■■■■■■■
51
Page 62

6.1 Basic settings
6 System settings
6.1 Basic settings
Menu ▶ System ▶ Settings
This chapter contains a description of general instrument settings.
User name
A user name can be entered here for the report. This parameter will only
be printed if a user has been defined.
Entry max. 12 characters
Default value empty
Instrument name
A instrument name can be entered here for the report. This parameter will
only be printed if a designation has been defined.
■■■■■■■■■■■■■■■■■■■■■■
Serial number
Program version
Time
Date
Language
Entry max. 10 characters
Default value empty
Serial number of the instrument. This is printed as a part of the instrument
identification in the report header.
Version number of the instrument software. This is printed as a part of the
instrument identification in the report header.
Current time. Only valid numbers can be entered.
Format: hh:mm:ss
Current date. Only valid numbers can be entered.
Format: YYYY:MM:DD
Setting the dialog language. An additional language can be selected
besides English.
■■■■■■■■
52
848 Titrino plus
Page 63

■■■■■■■■■■■■■■■■■■■■■■
Dialog type
6 System settings
Note
In order to ensure that a second language can be selected, it must first
be installed. This installation must be carried out by specialist personnel.
In chapter Language files, page 66, you will find details regarding the
installation of a second language.
The user dialog can be limited for routine operations. One can operate
normally with methods in the limited dialog. However, no settings can be
made or methods deleted.
The resetting of the dialog will take effect as soon as you exit the main
menu.
The limitation of the dialog results in the following:
■ The menu items System, Parameters and Control are not shown in
the main menu.
■ Methods can only be loaded, but not deleted, exported or created.
Note
If the limited dialog for routine operation is activated, then the expert
dialog cannot be activated during ongoing operation. To change the
dialog type, the 848 Titrino plus must be switched off and then back on
again. The expert dialog can be forced as soon as the instrument is started up again. Then it is possible to enter whatever settings one wishes,
e.g. the changing of the dialog type. If the instrument is switched off
again without changing the dialog type, then the routine dialog will
remain activated.
Forcing the expert dialog:
■ Switch on the instrument.
■ Wait for the display of the instrument logo with the lettering easy,
safe, precise.
■ Press the [STOP] key once again and hold it down while also briefly
pressing the [BACK] key.
■ Release both keys once again.
Selection
Expert | Routine
Default value Expert
848 Titrino plus
Expert
Complete dialog.
■■■■■■■■
53
Page 64

6.1 Basic settings
Contrast
■■■■■■■■■■■■■■■■■■■■■■
Routine
Limited dialog for routine operations.
The contrast of the display can be adjusted with the arrow keys [⇦] and
[⇨].
■ [⇦]: the contrast will be decreased by one step each time the key is
pressed.
■ [⇨]: the contrast will be increased by one step each time the key is
pressed.
Input range 150 - 240
Default value 212
Note
Alternatively, the contrast can also be modified in the following manner:
Beep
PREP warning
Keep the red [STOP] key pressed down. As soon as the progress bar
appears, also press the arrow key [⇩] or [⇧] repeatedly.
This method will, however, cause the contrast to be modified by several
steps.
If this parameter is activated, then a short beep will sound in the following
cases:
■ When a key is pressed.
■ At the end of the determination.
■ When the system remains conditioned without interruption for 10 sec-
onds.
Selection on | off
Default value on
If this parameter is activated, then the recommendation will be made to
carry out the function PREP (Preparing):
■ After the instrument is switched on.
■ Each time a buret unit is attached.
■■■■■■■■
54
All tubing and the cylinder are rinsed with this function (see Chapter
10.1.2, page 117).
848 Titrino plus
Page 65

■■■■■■■■■■■■■■■■■■■■■■
Temperature sensor
R (25 °C)
6 System settings
Selection on | off
Default value on
The instrument supports the use of two different temperature measurement techniques:
■ NTC (Negative Temperature Coefficient)
■ Pt1000 (platinum resistance)
Select the type here that has been connected to the instrument. If you use
an NTC sensor, it is required that two characteristics for the sensor be
entered in addition. These characteristics are listed in the specifications of
the sensor.
Selection Pt1000 | NTC
Default value Pt1000
This parameter is visible only when Temperature sensor = NTC.
B value
Nominal resistance of the NTC sensor at 25 °C.
Input range 1000 - 99999 ohm
Default value 30000 ohm
This parameter is visible only when Temperature sensor = NTC.
Material constant of the NTC sensor. B values of NTC sensors are frequently based on different reference temperatures (usually 25 °C and
50…100 °C).
Input range 1000 - 9999 K
Default value 4100 K
848 Titrino plus
■■■■■■■■
55
Page 66

6.2 Managing sensors
6.2 Managing sensors
6.2.1 General
Menu ▶ System ▶ Sensors
Three standard sensors are defined in the sensor list: pH electrode,
Metal electrode and Temperature sensor. These sensors cannot be
deleted or renamed. The sensor list can contain a maximum of 10 sensors.
Every sensor is identified with an unambiguous name. This means that it is
not possible to use the same name twice, e.g. for a pH electrode and for a
metal electrode.
■■■■■■■■■■■■■■■■■■■■■■
Edit
Edit the data of the selected sensor, see following chapter.
New
Add a new sensor to the list, see following chapter.
The following sensor types can be selected:
■ pH electrode
■ Metal electrode
■ Temperature sensor
■ Other sensor, e.g. Spectrosense
Delete
Delete the selected sensor from the list.
6.2.2 Editing the sensor data
Name
The designation of the sensor is used for unambiguous identification.
Entry max. 24 characters
Default value empty
Type
■■■■■■■■
56
The sensor type is displayed.
848 Titrino plus
Page 67

■■■■■■■■■■■■■■■■■■■■■■
Slope
pH(0)
Calibration temp.
6 System settings
This parameter only appears for pH electrodes.
Slope of the pH electrode. With a 1-point calibration, only pH(0) can be
calculated, 100.0 % is used as the slope.
Input range –999.9 - 999.9 %
Default value 100.0 %
This parameter only appears for pH electrodes.
pH value of the pH electrode at 0 mV. Apart from the slope, pH (0) is the
second characteristic of the calibration curve.
Input range –20.000 - 20.000
Default value 7.000
This parameter only appears for pH electrodes.
Calibration date
Monitoring
Time interval
Temperature at which the last calibration was carried out.
Input range –20.0 - 150.0 °C
Default value 25.0 °C
This parameter only appears for pH electrodes.
Date of the last calibration.
This parameter only appears for pH electrodes.
Activating and deactivating the calibration monitoring.
Selection on | off
Default value off
This parameter is visible only when Monitoring = on.
You will be notified that this time interval (in days) has elapsed when starting a method. You can then select whether or not you would still like to
start the method.
848 Titrino plus
Input range 1 - 999 d
Default value 999 d
■■■■■■■■
57
Page 68

6.3 Managing solutions
6.3 Managing solutions
6.3.1 General
Menu ▶ System ▶ Solutions
Solutions can be used in intelligent buret units or in non-intelligent buret
units. Intelligent buret units have a built-in data chip on which the data for
the reagent is stored. This data is automatically read out during attachment and entered in the solution list.
The name and the type are specified for each solution in the solution list.
The asterisk (*) on the right-hand side indicates that this buret unit is
attached (only for intelligent buret units). An unlimited number of solutions in buret units with data chip can be added to the solution list. The
number of solutions in buret units without data chip is limited to 10 items.
■■■■■■■■■■■■■■■■■■■■■■
Meaning of the type:
■ EU: exchange unit without data chip
■ IEU: exchange unit with integrated data chip
Edit
Edit the data of the selected solution, see following chapter.
New
Add a new solution to the list, see following chapter.
Delete
Delete the selected solution from the list.
6.3.2 Editing the solution data
Name
The designation of the solution is used for unambiguous identification.
Entry max. 24 characters
Default value empty
Type
The model of the buret unit is displayed.
■■■■■■■■
58
848 Titrino plus
Page 69

■■■■■■■■■■■■■■■■■■■■■■
Cylinder volume
Concentration
Concentration unit
6 System settings
Cylinder volume of the buret unit in mL. The cylinder volume is automatically read out with intelligent buret units.
Selection 1 | 5 | 10 | 20 | 50
Default value 20
Concentration of the solution.
Input range –999999999 - 9999999999
Default value 1.000
Unit of the concentration.
Selection µmol/mL | mmol/L | mol/L | g/L | mg/L | mg/mL |
µg/L | ppm | % | mEq/L | User-defined
Default value mol/L
Titer
Titer unit
User-defined
A user-defined unit can be created. This will be added to the selection
list. The previous entry will be overwritten as soon as the new unit has
been defined. A blank entry can be generated this way as well.
Titer of the solution.
Input range –999999999 - 9999999999
Default value 1.000
Unit of the titer.
Selection µmol/mL | mmol/L | mol/L | g/L | mg/L | mg/mL |
µg/L | ppm | % | mEq/L | empty | User-defined
Default value empty
User-defined
A user-defined unit can be created. This will be added to the selection
list. The previous entry will be overwritten as soon as the new unit has
been defined. A blank entry can be generated this way as well.
Date titer det.
Monitoring
848 Titrino plus
Date of the last titer determination.
Activating and deactivating the titer monitoring.
■■■■■■■■
59
Page 70

6.4 Managing common variables
Selection on | off
Default value off
Time interval
This parameter is visible only when Monitoring = on.
You will be notified that this time interval (in days) has elapsed when starting a method. You can then select whether or not you would still like to
start the method.
Input range 1 - 999 d
Default value 999 d
6.4 Managing common variables
6.4.1 General
Menu ▶ System ▶ Common variables
The instrument offers the possibility of saving five method-independent
variables, so-called common variables. These variables remain saved in
the instrument and can be used in future calculations. Common variables
are useful, e.g. for the following applications:
■■■■■■■■■■■■■■■■■■■■■■
Edit
Delete
■ Determination of a blank value which will be taken into account during
the content determination of the sample.
■ Determination of the content of a standard solution, which will be
taken into account during the content determination of the sample.
The common variables have the non-changeable designation CV01…
CV05. The value is displayed for every variable. No unit can be assigned
to the common variables.
See the following chapter for editing the data of the selected common
variable.
Set the selected common variable to invalid.
■■■■■■■■
60
848 Titrino plus
Page 71

■■■■■■■■■■■■■■■■■■■■■■
6.4.2 Editing common variables
The common variables can be modified as follows:
■ Manually in this dialog.
■ Automatic assignment from the determination run. A calculation result
must be configured accordingly for this purpose (see below).
Assigning a result automatically to a common variable
Proceed as follows:
1
Opening the editing dialog of the result
■ Select the menu item Parameters ▶ Calculation and press
[OK].
■ Select the result whose value is to be assigned to a common vari-
able.
■ In the function bar, select Edit and press [OK].
6 System settings
2
Adjusting the result properties
■ Select the parameter Save as CV and press [OK].
■ Select the entry on in the selection list and apply with [OK].
The assignment of the result to a common variable occurs automatically
according to the following scheme:
■ Result R1 ⇨ Common Variable CV01
■ Result R2 ⇨ Common Variable CV02
■ etc.
Note
If you have set the parameter Statistics to on, then the mean value of
the results will be assigned to the respective common variable.
848 Titrino plus
■■■■■■■■
61
Page 72
6.5 File management
6.5 File management
Menu ▶ System ▶ File management
Note
This menu item is visible only if a USB flash drive has been connected as
an external storage medium.
Methods can be imported and deleted from a USB flash drive in this dialog. Only methods located in the Files directory are displayed in the list
(see "Directory structure on the USB flash drive", page 62).
A backup of the system can be created (all data and settings). Similarly, an
existing backup can be reloaded.
Import
Import the selected method.
■■■■■■■■■■■■■■■■■■■■■■
Delete
Backup
Restore
Delete the selected method.
Create a backup of all data and settings on the USB flash drive.
Note
Only one backup can be created on the same USB flash drive.
If a backup is already stored on the flash drive, then this will be overwritten as soon as the function is performed once again.
Load the backup from a connected USB flash drive.
Directory structure on the USB flash drive
A directory with the instrument number will be created on the USB flash
drive. The structure within this directory appears as follows:
■■■■■■■■
62
Figure 19
Directory structure on the USB flash drive
848 Titrino plus
Page 73

■■■■■■■■■■■■■■■■■■■■■■
Backup All of the files of the backup are stored in this
directory. The directory is created as soon as a
backup is created for the first time.
Files Exported methods are stored in this directory.
The directory is created as soon as a backup is
exported for the first time.
Only methods located in this directory can be
imported.
pc_lims_report PC/LIMS reports are stored in this directory as
TXT files. The directory is created as soon as a
PC/LIMS report is printed for the first time.
6.6 Configuring external devices
Menu ▶ System ▶ External devices
PC/LIMS report
Specification of the storage location for the PC/LIMS report. The PC/LIMS
report is a machine-readable report with all of the important data for a
determination. It can be saved as follows:
6 System settings
Printer
■ as a TXT file on a USB flash drive.
■ to a LIMS via an RS-232 interface. The 6.2148.030 RS-232/USB Box is
required for this purpose.
Selection COM2 | USB Stick
Default value USB Stick
COM2
The report is sent via the serial COM2 interface. The interface parameters set in the dialog COM2 settings are used (see "Editing the COM2
settings", page 65).
USB Stick
The report will be saved as a TXT file on the USB flash drive in the
folder pc_lims_report.
If a printer is connected, then the printer type needs to be defined here in
order for the reports to be printed out correctly.
The printers that have the designation ESC-POS are so-called POS printers
(point-of-sale printers), i.e. they print on continuous paper.
Selection Citizen (ESC-POS) | Custom (ESC-POS) | Epson |
Epson (ESC-POS) | HP DeskJet | HP LaserJet |
Seiko (ESC-POS)
Default value HP DeskJet
848 Titrino plus
■■■■■■■■
63
Page 74

6.6 Configuring external devices
Graphics width
Keyboard layout
Balance
■■■■■■■■■■■■■■■■■■■■■■
Adjust the width of the curve to be printed out to the paper width of the
printer to be used. The default value depends on the selected printer. The
height of the curve is 2/3 of the width.
Input range 100 - 3000 Pixels
A commercially available USB keyboard can be connected to make it easier to enter text and numbers. Specify the country-specific keyboard layout.
Selection English US | French FR | German CH | German
DE | Spanish ES
Default value English US
If you have connected a balance, then you must define the balance type
here.
Selection AND | Mettler | Mettler AT | Mettler AX |
Ohaus | Precisa | Sartorius | Shimadzu
Default value Sartorius
The following table indicates the balance type that needs to be selected
for the balance model:
Balance
Balance type
AND AND
Mettler AB, AE, AG, AM,
Mettler
AJ, PE, PM, PJ, PR, XP, XS
Mettler AT Mettler AT
Mettler AX, MX, UMX, PG,
Mettler AX
AB-S, PB-S
Ohaus Voyager, Explorer,
Ohaus
Analytical Plus
Precisa Precisa
Sartorius Sartorius
■■■■■■■■
64
Shimadzu BX, BW Shimadzu
Editing the COM1 settings
Menu ▶ System ▶ External devices ▶ COM1 settings
848 Titrino plus
Page 75

■■■■■■■■■■■■■■■■■■■■■■
Baud rate
Data bits
Stop bits
6 System settings
The interface parameters for the connected balance are set under COM1
settings.
Transfer rate in characters per second.
Selection 1200 | 2400 | 4800 | 9600 | 19200 | 38400 |
57600 | 115200
Default value 9600
Number of data bits.
Selection 7 | 8
Default value 8
Number of stop bits.
Selection 1 | 2
Default value 1
Parity
Handshake
Type of parity testing.
Selection even | none | odd
Default value none
Type of the data transfer protocol.
Selection hardware | software | none
Default value hardware
Note
If communications problems occur, set the parameter Handshake to
software, and make another attempt.
Editing the COM2 settings
Menu ▶ System ▶ External devices ▶ COM2 settings
The interface parameters for instruments connected to the RS-232/2 connector of the RS-232/USB Box (e.g. PC) are set under COM2 settings.
The parameters and input ranges are identical to those for the COM1
interface.
848 Titrino plus
■■■■■■■■
65
Page 76

6.7 Instrument diagnosis
6.7 Instrument diagnosis
6.7.1 Loading program versions and language files
Menu ▶ System ▶ Diagnosis
New program versions or language files can be loaded from a USB flash
drive. The corresponding file must be saved on the USB flash drive in a
directory with the instrument number (e.g. 848 or 863).
You can distinguish between language files and program files by noting
how the file name is constructed.
Program files
They are instrument-specific. The file name has the following structure:
5XXXyyyy.bin where
■■■■■■■■■■■■■■■■■■■■■■
XXX =
yyyy =
Instrument type (e.g. 848 for the 848 Titrino plus)
Program version
Language files
They can be recognized by means of the two-digit language code in the
file name. A language file contains the dialog texts for various instrument
types. It is not instrument-specific. The file name has the following structure:
5848xxxxYY.bin where
xxxx =
YY =
Version number
Language, e.g. DE (German), FR (French), ES (Spanish)
Loading a file
Proceed as follows:
1
Connecting the USB flash drive
■ Plug in the USB flash drive with the 6.2151.100 adapter (USB
MINI (OTG) - USB A) at the instrument's USB port.
■ Switch on the instrument.
2
Opening the update dialog
■ Under Menu ▶ System ▶ Diagnosis, select the menu item
Software update.
■ Press [OK].
■■■■■■■■
66
848 Titrino plus
Page 77

■■■■■■■■■■■■■■■■■■■■■■
6 System settings
3
Opening the file selection
■ Press [OK].
The selection list with the program and language files present on the
USB flash drive opens.
4
Selecting the file
■ Use the arrow keys to select the required file.
■ Press [OK].
5
Starting the update
■ Press [START].
The update process is started, it runs automatically. At the end of the
process, the instrument will be switched off automatically and
switched back on again. No user intervention is required.
6.7.2 Diagnosis functions
Electronic and mechanical functional groups in Metrohm instruments can
and should be checked as part of regular maintenance by specialist personnel from Metrohm. Please ask your local Metrohm representative
regarding the precise terms and conditions involved in concluding a corresponding maintenance agreement.
848 Titrino plus
■■■■■■■■
67
Page 78

7.1 Dynamic equivalence point titrations (DET)
■■■■■■■■■■■■■■■■■■■■■■
7 Parameters
7.1 Dynamic equivalence point titrations (DET)
7.1.1 Start conditions
Menu ▶ Parameters ▶ Start conditions
The parameters that are carried out before the start of titration are
defined under Start conditions.
Activation pulse
Output of an activation pulse on a remote line. This activation pulse starts
a connected Dosimat.
Selection on | off
Default value off
Start delay time
Start volume
Dosing rate
Waiting time after the start of the determination, before titration takes
place. An auxiliary solution can, e.g. be added with a Dosimat during this
time (parameterization at the Dosimat). The Activation pulse parameter
must however be switched on for this purpose.
Input range 0 - 999999 s
Default value 0 s
Volume that is dosed prior to the start of the titration.
Input range 0.00000 - 9999.99 mL
Default value 0.00000 mL
Rate at which the start volume is dosed. The maximum dosing rate
depends on the cylinder volume (see Chapter 10.1.1, page 117).
Input range 0.01 - 166.00 mL/min
Selection max.
Default value max.
Pause
■■■■■■■■
68
Waiting time, e.g. in case of a slow response of the electrode after the
start or reaction time after the dosing of a start volume.
Input range 0 - 999999 s
Default value 0 s
848 Titrino plus
Page 79

■■■■■■■■■■■■■■■■■■■■■■
Request sample ID
Request sample size
Request sample unit
7 Parameters
Selection of the sample identification that is queried in the method run.
Selection off | ID1 | ID2 | ID1&ID2
Default value off
If this parameter is switched on, then the value for the sample size will be
queried.
Selection on | off
Default value off
If this parameter is switched on, then the unit for the sample size will be
queried.
Selection on | off
Default value off
Hold at request
If this parameter is switched on, then the method run will be paused during the query. If the parameter is switched off, the titration will be started
in the background.
Selection on | off
Default value on
7.1.2 Titration parameters
Menu ▶ Parameters ▶ Titration parameters
The parameters that influence the sequence of the entire titration are
defined under Titration parameters.
Titration rate
Three predefined sets of parameters can be selected for the titration rate.
Selection slow | optimal | fast | user
Default value optimal
slow
For titrations in which the finest details are also to be visible. This could
however also lead to an increase in noise, which could result in unwanted equivalence points.
optimal
For all standard titrations. The parameters have been optimized for the
most frequent applications.
848 Titrino plus
■■■■■■■■
69
Page 80

7.1 Dynamic equivalence point titrations (DET)
fast
For fast and less critical titrations.
user
The individual titration parameters can be modified.
Select the optimal titration rate when you are developing a new titration method. This parameter is suitable for virtually all titrations and
only needs adaptation in special cases.
The settings of the individual titration rates are listed in table 1, page
72.
Meas. point density
This parameter is visible only when Titration rate = user.
A small value means small volume increments, i.e. a high measuring point
density. The curve then shows all the finest details which also include
noise; this could cause unwanted equivalence points to be found. A larger
value, i.e. a smaller measuring point density, permits quicker titrations. If
you are using a dosing device with a small cylinder volume then a smaller
measuring point density value may be beneficial. However, you should
also set a smaller signal drift and a higher EP criterion at the same time.
■■■■■■■■■■■■■■■■■■■■■■
Note
Min. increment
Max. increment
Input range 0 - 9
Default value 4
This parameter is visible only when Titration rate = user.
This smallest permitted volume increment is added at the start of the titration and with steep curves in the region of the equivalence point. Very
small values should only be used if a low titrant consumption is expected;
otherwise unwanted equivalence points could be evaluated.
Input range 0.05 - 999.90 µL
Default value 10.00 µL
This parameter is visible only when Titration rate = user.
A maximum volume increment should be selected in the following cases:
■ when titration consumption is very low up until the equivalence point
is reached.
■ when a start volume is dosed up until shortly before the equivalence
point is reached.
■■■■■■■■
70
848 Titrino plus
Page 81

■■■■■■■■■■■■■■■■■■■■■■
Dosing rate
7 Parameters
■ when the change of direction in the jumping range is very abrupt,
because otherwise it could easily happen that an excessively large volume will be dosed in the region of the equivalence point.
The value should not be less than 1/100 cylinder volume.
Input range 0.1 - 9999.9 µL
Selection off
Default value off
Note
It is not advisable to select similar volumes for the minimum and the
maximum increment. Monotonic equivalence point titration (MET) is
appropriate for these applications.
This parameter is visible only when Titration rate = user.
Signal drift
Rate at which the volume increments are dosed. The maximum dosing
rate depends on the cylinder volume (see Chapter 10.1.1, page 117).
Input range 0.01 - 166.00 mL/min
Selection max.
Default value max.
This parameter is visible only when Titration rate = user.
Maximum permissible drift for the measured value acceptance, i.e. maximum change of the measured value per minute. This type of titration is
often referred to as equilibrium titration.
Note
A constant measured value is often only achieved after a certain time,
as mixing and the reaction itself require a certain time. The response
time of an electrode can also increase with time, i.e. reaching a constant measured value takes longer and longer. Drift-controlled measured value acceptance is particularly advisable in such cases, as the
measured values are only accepted when equilibrium has almost been
achieved.
848 Titrino plus
Measuring mode pH, U and Ipol:
Input range
0.1 - 999.0 mV/min
Default value 50.0 mV/min
■■■■■■■■
71
Page 82

7.1 Dynamic equivalence point titrations (DET)
Selection off
off
Measured value acceptance will take place after the maximum waiting
time has elapsed. This can be useful when the titration reaction proceeds slowly or the electrode is slow to respond.
Measuring mode Upol:
Input range 0.01 - 99.90 µA/min
Default value 50.00 µA/min
Selection off
off
Measured value acceptance will take place after the maximum waiting
time has elapsed. This can be useful when the titration reaction proceeds slowly or the electrode is slow to respond.
Min. waiting time
This parameter is visible only when Titration rate = user.
The measured value is not accepted until the minimum waiting time has
elapsed, even if the signal drift has already been reached. The minimum
waiting time is only important for drift-controlled measurements.
■■■■■■■■■■■■■■■■■■■■■■
Input range 0 - 999999 s
Default value 0 s
Max. waiting time
This parameter is visible only when Titration rate = user.
If signal drift has been switched off or has not yet been reached, then the
measured value will be accepted when the maximum waiting time has
elapsed.
Input range 0 - 999999 s
Default value 26 s
Table 1 Standard values for predefined titration rates for DET
Titration rate
slow optimal fast
Meas. point density 2 4 6
Min. increment 10.00 µL 10.00 µL 30.00 µL
Max. increment off off off
Dosing rate maximum maximum maximum
■■■■■■■■
72
848 Titrino plus
Page 83

■■■■■■■■■■■■■■■■■■■■■■
Titration rate
slow optimal fast
Signal drift
7 Parameters
– pH, U and Ipol
– Upol
20.0 mV/min
20.0 µA/min
50.0 mV/min
50.0 µA/min
Min. waiting time 0 s 0 s 0 s
Max. waiting time 38 s 26 s 21 s
Temperature
Manually entered titration temperature. If a temperature sensor is connected then the temperature will be measured continuously. This value is
used for temperature correction in pH measurements.
Input range –20.0 - 150.0 °C
Default value 25.0 °C
Sensor
Selection of the sensor from the sensor list. The selection depends on the
measuring mode. Sensors are defined under System ▶ Sensors.
Selection Selection of configured sensors
Solution
Selection of the solution from the solution list. We recommend always
selecting the solution. This ensures that the correct data (titer, concentration, etc.) is always used for the calculation. Solutions are defined under
System ▶ Solutions.
80.0 mV/min
80.0 µA/min
I(pol)
848 Titrino plus
For buret units with integrated data chip, a check is made in the method
run to verify whether the correct solution has been attached and whether
the type of dosing drive matches. For buret units without integrated data
chip, the cylinder volume and the type of dosing drive are checked. The
validity of the titer is checked for the selected solution at the start of the
determination.
Selection
Selection of configured solution | not defined
Default value not defined
not defined
No check takes place.
The polarization current is the current that is applied at a polarizable electrode during the voltametric measurement. This parameter is available
only with I(pol) determinations.
■■■■■■■■
73
Page 84

7.1 Dynamic equivalence point titrations (DET)
Input range –125 - 125 µA (Increment: 1)
Default value 5 µA
U(pol)
The polarization voltage is the voltage applied to the polarizable electrode
during an amperometric measurement. This parameter is available only
with U(pol) determinations.
Input range –1250 - 1250 mV (Increment: 10)
Default value 400 mV
Electrode test
For polarizable electrodes, an electrode test can be carried out. A check is
made that the electrode is properly connected and that no short-circuit is
present. The electrode test is carried out when the determination is started. This parameter is available only with I(pol) and U(pol) determinations.
Selection on | off
Default value off
■■■■■■■■■■■■■■■■■■■■■■
Stirrer
When this parameter is switched on, then the stirrer is switched on at the
start of the determination.
Selection on | off
Default value on
Stirring rate
Setting the stirring rate. It can be set in steps of –15 to +15. The default
setting 8 corresponds to 1000 U/min. The formula for calculating the rotational speed is specified in chapter 10.2, page 118. The optimum stirring
rate can be tested in the manual control.
The algebraic sign of the stirring rate changes the direction in which the
stirring is done. When the stirrer is viewed from above, this means:
■ "+": counterclockwise rotation
■ "–": clockwise rotation
Input range –15 - 15
Default value 8
7.1.3 Stop conditions
Menu ▶ Parameters ▶ Stop conditions
■■■■■■■■
74
The conditions for stopping a titration are defined under Stop conditions.
848 Titrino plus
Page 85

■■■■■■■■■■■■■■■■■■■■■■
Stop volume
Stop meas. value
7 Parameters
The titration is stopped when the specified volume has been dosed since
the start of the titration. This volume should be adjusted to the size of the
titration vessel in order to prevent the contents from running over.
Input range 0.00000 - 9999.99 mL
Default value 100.000 mL
Selection off
The titration is stopped when the specified measured value has been
reached since the start of the titration.
Measuring mode pH:
Input range –20.000 - 20.000
Selection off
Default value off
Measuring mode U, Ipol:
Input range –1250.0 - 1250.0 mV
Selection off
Default value off
Stop EP
Volume after EP
Measuring mode Upol:
Input range
–125.0 - 125.0 µA
Selection off
Default value off
The titration is stopped when the specified number of equivalence points
has been found.
Input range 1 - 9
Default value 9
Selection off
This volume will be added when the number of equivalence points
defined under Stop EP has been found. The curve shape after the equivalence point can also be seen this way.
Input range 0.01000 - 9999.99 mL
Selection off
Default value off
848 Titrino plus
■■■■■■■■
75
Page 86

7.1 Dynamic equivalence point titrations (DET)
Stop time
The titration is stopped when the specified time has elapsed since the start
of the titration.
Input range 0 - 999999 s
Selection off
Default value off
Filling rate
Rate at which the dosing cylinder is filled after the titration. The maximum
filling rate depends on the cylinder volume (see Chapter 10.1.1, page
117).
Input range 0.01 - 166.00 mL/min
Selection max.
Default value max.
7.1.4 Evaluation
Menu ▶ Parameters ▶ Evaluation
■■■■■■■■■■■■■■■■■■■■■■
Window
Lower limit
The parameters for the evaluation of the titration curve are defined under
Evaluation.
Switch this parameter on when equivalence points are to be recognized
only in one particular measured value range (window) of the curve. Only
one window can be defined.
Selection on | off
Default value off
This parameter is visible only when Window = on.
Measured value for the lower limit.
Measuring mode pH:
Input range –20.000 - 20.000
Default value –20.000
Measuring mode U, Ipol:
Input range –1250.0 - 1250.0 mV
Default value –1250.0 mV
■■■■■■■■
76
Measuring mode Upol:
Input range
–125.00 - 125.00 µA
Default value –125.00 µA
848 Titrino plus
Page 87

■■■■■■■■■■■■■■■■■■■■■■
Upper limit
EP criterion
7 Parameters
This parameter is visible only when Window = on.
Measured value for the upper limit.
Measuring mode pH:
Input range –20.000 - 20.000
Default value 20.000
Measuring mode U, Ipol:
Input range –1250.0 - 1250.0 mV
Default value 1250.0 mV
Measuring mode Upol:
Input range
–125.00 - 125.00 µA
Default value 125.00 µA
The equivalence point criterion found (ERC = Equivalence point Recognition Criterion) is compared with this value. Equivalence points whose ERC
is less than the value defined here will be ignored.
EP recognition
Input range 0 - 200
Default value 5
This parameter allows you to filter out only the equivalence points that are
being sought.
for Window = off
Selection all | greatest | last | off
Default value all
all
All equivalence points will be recognized.
greatest
Only the equivalence point with the greatest ERC value, i.e. the steepest jump, will be recognized.
last
Only the last equivalence point will be recognized.
off
No evaluation takes place.
848 Titrino plus
for Window = on
Selection
first | greatest | last
Default value first
■■■■■■■■
77
Page 88

7.1 Dynamic equivalence point titrations (DET)
first
Only the first equivalence point will be recognized.
greatest
Only the equivalence point with the greatest ERC value, i.e. the steepest jump, will be recognized.
last
Only the last equivalence point will be recognized.
Fixed EP1 at
The associated volume will be interpolated from the measuring point list
for the measured value entered. The fixed endpoint must lie between the
first and the final entry in the measuring point list.
Measuring mode pH:
Input range –20.000 - 20.000
Selection off
Default value off
Measuring mode U, Ipol:
Input range –1250.0 - 1250.0 mV
Selection off
Default value off
■■■■■■■■■■■■■■■■■■■■■■
Fixed EP2 at
Measuring mode Upol:
Input range
–125.00 - 125.00 µA
Selection off
Default value off
See Fixed EP1 at.
Evaluation and equivalence point criterion with DET
The equivalence points (EP) are localized in a way similar to the Tubbs
method [1][2]. The volume value of the equivalence point (VE) is shifted
from the point of inflection (see arrow) towards the smaller circle of curvature for real asymmetric titration curves.
[1] C. F. Tubbs, Anal. Chem. 1954, 26, 1670–1671.
[2] E. Bartholomé, E. Biekert, H. Hellmann, H. Ley, M. Weigert, E. Weise,
Ullmanns Encyklopädie der technischen Chemie, Bd. 5, Verlag Chemie,
Weinheim, 1980, S. 659.
■■■■■■■■
78
848 Titrino plus
Page 89

■■■■■■■■■■■■■■■■■■■■■■
V
E
pH
V/mL
7 Parameters
Figure 20 Tubbs method for determining the equivalence point
The figure shows that the evaluation also requires measuring points from
the measuring point list after the equivalence point as well.
For the recognition of the EPs found the set EP criterion is compared with
the ERC (Equivalence point Recognition Criterion) found. The ERC is the
first derivative of the titration curve combined with a mathematical function which is more sensitive for flat jumps than for steeper ones. EPs
whose ERC is smaller than the defined EP criterion will not be recognized.
The ERC is displayed in the results dialog for each discovered and recognized EP. If you adjust the EP criterion after the fact in order to recognize
more or fewer EPs, then you can initiate the reevaluation in the results dialog with the [Recalc] key.
7.1.5 Calculation
7.1.5.1
Edit
General
Menu ▶ Parameters ▶ Calculation
A maximum of five calculations can be defined in one method. A series of
variables (raw data from the determination, previously calculated results) is
available for the calculations. Definition can be made for each calculation
as to whether the result is to be saved as a titer or as a common variable.
The result name is specified in the list for each calculation.
Edit the data of the selected calculation, see following chapter.
848 Titrino plus
■■■■■■■■
79
Page 90

7.1 Dynamic equivalence point titrations (DET)
Delete
Delete the selected calculation.
7.1.5.2 Editing a calculation
Result name
The result name is the text which will be shown in the result view and in
the report.
Entry 12 characters
Default value empty
R1=…R5=
Shows the calculation formula. A special editor is opened for the definition (see Chapter 5.3, page 23).
Entry 44 characters
Default value empty
Decimal places
Number of decimal places used to display the result.
■■■■■■■■■■■■■■■■■■■■■■
Result unit
Save as titer
Input range 0 - 5
Default value 2
The result unit is displayed and saved together with the result.
Selection % | mol/L | mmol/L | g/L | mg/L | mg/mL | ppm |
g | mg | mL | mg/piece | °C | µL | mL/min | User-
defined
Default value %
User-defined
A user-defined unit can be created. This will be added to the selection
list. The previous entry will be overwritten as soon as the new unit has
been defined. A blank entry can be generated this way as well.
The result can be saved as titer for this selected solution. If statistics has
been switched on, then the current mean value of the determination series will be saved.
Selection on | off
Default value off
Save as CV
■■■■■■■■
80
The calculated result can be saved as a method-independent variable, a
so-called common variable. The result is then also available in other meth-
848 Titrino plus
Page 91

■■■■■■■■■■■■■■■■■■■■■■
7.1.6 Statistics
Statistics
Number of samples
7 Parameters
ods for calculations. If statistics has been switched on, then the current
mean value of the determination series will be saved.
Selection on | off
Default value off
Menu ▶ Parameters ▶ Statistics
The statistics calculation of a multiple determination is switched on under
Statistics and it is defined how many determinations the series contains.
If this funtion is switched on, then statistics calculations will be carried out
for all of the defined results.
Selection on | off
Default value off
The number of determinations that are carried out for the statistics calculations.
7.1.7 Reports
Results
Curve
If an additional determination must be added to the determination series,
because one determination was incorrect, for example, then this can be
accomplished in the statistical overview (see Chapter 5.11, page 41).
Input range 2 - 20
Default value 3
Menu ▶ Parameters ▶ Reports
The reports that will be printed out automatically in connection with a
determination are defined under Reports.
The result report contains the calculated results, equivalence points and
endpoints, sample data, etc.
Selection on | off
Default value off
Curve report. The width of the curve is defined in the system settings (see
"Graphics width", page 64).
848 Titrino plus
Selection on | off
Default value off
■■■■■■■■
81
Page 92

7.1 Dynamic equivalence point titrations (DET)
Calculations/Statistics
Output of the calculation formulas for the individual results. The results
are printed with the maximum resolution. This makes recalculation with
an external program possible. The following data is printed out in addition
when statistics is switched on:
■ Result and sample size of the individual determinations
■ Mean value as well as absolute and relative standard deviation
Selection on | off
Default value off
Measuring point list
Output of the measuring point list.
Selection on | off
Default value off
Parameters
All of the parameters of the current method are printed out with the parameter report.
■■■■■■■■■■■■■■■■■■■■■■
PC/LIMS
Selection on | off
Default value off
The PC/LIMS report is a machine-readable report with all of the data
important for a determination. The PC/LIMS report can be saved as a TXT
file on a USB storage medium or sent via an RS-232 interface to a LIMS.
The output location is defined in the system settings (see "PC/LIMS
report", page 63).
The file name of the TXT file is constructed as follows: PC_LIMS_Report-
ID1-YYYYMMDD-hhmmss.txt.
Selection on | off
Default value off
■■■■■■■■
82
848 Titrino plus
Page 93

■■■■■■■■■■■■■■■■■■■■■■
7.2 Monotonic equivalence point titrations (MET)
7.2.1 Start conditions
Menu ▶ Parameters ▶ Start conditions
The parameters that are carried out before the start of titration are
defined under Start conditions.
Activation pulse
Output of an activation pulse on a remote line. This activation pulse starts
a connected Dosimat.
Selection on | off
Default value off
Start delay time
Waiting time after the start of the determination, before titration takes
place. An auxiliary solution can, e.g. be added with a Dosimat during this
time (parameterization at the Dosimat). The Activation pulse parameter
must however be switched on for this purpose.
7 Parameters
Start volume
Dosing rate
Pause
Input range 0 - 999999 s
Default value 0 s
Volume that is dosed prior to the start of the titration.
Input range 0.00000 - 9999.99 mL
Default value 0.00000 mL
Rate at which the start volume is dosed. The maximum dosing rate
depends on the cylinder volume (see Chapter 10.1.1, page 117).
Input range 0.01 - 166.00 mL/min
Selection max.
Default value max.
Waiting time, e.g. in case of a slow response of the electrode after the
start or reaction time after the dosing of a start volume.
Input range 0 - 999999 s
Default value 0 s
Request sample ID
848 Titrino plus
Selection of the sample identification that is queried in the method run.
■■■■■■■■
83
Page 94

7.2 Monotonic equivalence point titrations (MET)
Selection off | ID1 | ID2 | ID1&ID2
Default value off
Request sample size
If this parameter is switched on, then the value for the sample size will be
queried.
Selection on | off
Default value off
Request sample unit
If this parameter is switched on, then the unit for the sample size will be
queried.
Selection on | off
Default value off
Hold at request
If this parameter is switched on, then the method run will be paused during the query. If the parameter is switched off, the titration will be started
in the background.
■■■■■■■■■■■■■■■■■■■■■■
Selection on | off
Default value on
7.2.2 Titration parameters
Menu ▶ Parameters ▶ Titration parameters
The parameters that influence the sequence of the entire titration are
defined under Titration parameters.
Titration rate
Three predefined sets of parameters can be selected for the titration rate.
Selection slow | optimal | fast | user
Default value optimal
slow
For titrations in which the finest details are also to be visible. This could
however also lead to an increase in noise, which could result in unwanted equivalence points.
optimal
For all standard titrations. The parameters have been optimized for the
most frequent applications.
fast
For fast and less critical titrations.
user
The individual titration parameters can be modified.
■■■■■■■■
84
848 Titrino plus
Page 95

■■■■■■■■■■■■■■■■■■■■■■
Volume increment
7 Parameters
Note
Select the optimal titration rate when you are developing a new titration method. This parameter is suitable for virtually all titrations and
only needs adaptation in special cases.
The settings of the individual titration rates are listed in table 2, page
87.
This parameter is visible only when Titration rate = user.
Volume that is dosed in each dosing step. The choice of the correct volume increment is a basic requirement for achieving high accuracy. A good
guideline is 1/20 of the expected EP volume. For steep jumps the volume
increment should tend toward 1/100 and for flat jumps toward 1/10 of
the EP volume.
Small volume increments are used for determining blank values or with
very asymmetrical curves. The accuracy of the evaluation cannot be
increased by using smaller increments as the measured value alterations
between two measuring points are then of the same order of magnitude
as the noise.
Dosing rate
Signal drift
Input range
0.00005 - 999.900 mL
Default value 0.10000 mL
This parameter is visible only when Titration rate = user.
Rate at which the volume increments are dosed. The maximum dosing
rate depends on the cylinder volume (see Chapter 10.1.1, page 117).
Input range 0.01 - 166.00 mL/min
Selection max.
Default value max.
This parameter is visible only when Titration rate = user.
Maximum permissible drift for the measured value acceptance, i.e. maximum change of the measured value per minute. This type of titration is
often referred to as equilibrium titration.
848 Titrino plus
■■■■■■■■
85
Page 96

7.2 Monotonic equivalence point titrations (MET)
A constant measured value is often only achieved after a certain time,
as mixing and the reaction itself require a certain time. The response
time of an electrode can also increase with time, i.e. reaching a constant measured value takes longer and longer. Drift-controlled measured value acceptance is particularly advisable in such cases, as the
measured values are only accepted when equilibrium has almost been
achieved.
Measuring mode pH, U and Ipol:
Input range
Default value 50.0 mV/min
Selection off
off
Measured value acceptance will take place after the maximum waiting
time has elapsed. This can be useful when the titration reaction proceeds slowly or the electrode is slow to respond.
■■■■■■■■■■■■■■■■■■■■■■
Note
0.1 - 999.0 mV/min
Min. waiting time
Max. waiting time
Measuring mode Upol:
Input range
0.01 - 99.90 µA/min
Default value 50.00 µA/min
Selection off
off
Measured value acceptance will take place after the maximum waiting
time has elapsed. This can be useful when the titration reaction proceeds slowly or the electrode is slow to respond.
This parameter is visible only when Titration rate = user.
The measured value is not accepted until the minimum waiting time has
elapsed, even if the signal drift has already been reached. The minimum
waiting time is only important for drift-controlled measurements.
Input range 0 - 999999 s
Default value 0 s
This parameter is visible only when Titration rate = user.
■■■■■■■■
86
If signal drift has been switched off or has not yet been reached, then the
measured value will be accepted when the maximum waiting time has
elapsed.
848 Titrino plus
Page 97
■■■■■■■■■■■■■■■■■■■■■■
Input range 0 - 999999 s
Default value 26 s
Table 2 Standard values for predefined titration rates for MET
Titration rate
slow optimal fast
Volume increment 0.05000 mL 0.10000 mL 0.20000 mL
Dosing rate maximum maximum maximum
Signal drift
7 Parameters
– pH, U and Ipol
– Upol
20.0 mV/min
20.0 µA/min
50.0 mV/min
50.0 µA/min
Min. waiting time 0 s 0 s 0 s
Max. waiting time 38 s 26 s 21 s
Temperature
Manually entered titration temperature. If a temperature sensor is connected then the temperature will be measured continuously. This value is
used for temperature correction in pH measurements.
Input range –20.0 - 150.0 °C
Default value 25.0 °C
Sensor
Selection of the sensor from the sensor list. The selection depends on the
measuring mode. Sensors are defined under System ▶ Sensors.
Selection Selection of configured sensors
Solution
Selection of the solution from the solution list. We recommend always
selecting the solution. This ensures that the correct data (titer, concentration, etc.) is always used for the calculation. Solutions are defined under
System ▶ Solutions.
80.0 mV/min
80.0 µA/min
848 Titrino plus
For buret units with integrated data chip, a check is made in the method
run to verify whether the correct solution has been attached and whether
the type of dosing drive matches. For buret units without integrated data
chip, the cylinder volume and the type of dosing drive are checked. The
validity of the titer is checked for the selected solution at the start of the
determination.
Selection
Selection of configured solution | not defined
Default value not defined
■■■■■■■■
87
Page 98

7.2 Monotonic equivalence point titrations (MET)
not defined
No check takes place.
I(pol)
The polarization current is the current that is applied at a polarizable electrode during the voltametric measurement. This parameter is available
only with I(pol) determinations.
Input range –125 - 125 µA (Increment: 1)
Default value 5 µA
U(pol)
The polarization voltage is the voltage applied to the polarizable electrode
during an amperometric measurement. This parameter is available only
with U(pol) determinations.
Input range –1250 - 1250 mV (Increment: 10)
Default value 400 mV
Electrode test
For polarizable electrodes, an electrode test can be carried out. A check is
made that the electrode is properly connected and that no short-circuit is
present. The electrode test is carried out when the determination is started. This parameter is available only with I(pol) and U(pol) determinations.
■■■■■■■■■■■■■■■■■■■■■■
Stirrer
Selection on | off
Default value off
When this parameter is switched on, then the stirrer is switched on at the
start of the determination.
Selection on | off
Default value on
Stirring rate
Setting the stirring rate. It can be set in steps of –15 to +15. The default
setting 8 corresponds to 1000 U/min. The formula for calculating the rotational speed is specified in chapter 10.2, page 118. The optimum stirring
rate can be tested in the manual control.
The algebraic sign of the stirring rate changes the direction in which the
stirring is done. When the stirrer is viewed from above, this means:
■ "+": counterclockwise rotation
■ "–": clockwise rotation
Input range –15 - 15
Default value 8
■■■■■■■■
88
848 Titrino plus
Page 99

■■■■■■■■■■■■■■■■■■■■■■
7.2.3 Stop conditions
Menu ▶ Parameters ▶ Stop conditions
The conditions for stopping a titration are defined under Stop conditions.
Stop volume
The titration is stopped when the specified volume has been dosed since
the start of the titration. This volume should be adjusted to the size of the
titration vessel in order to prevent the contents from running over.
Input range 0.00000 - 9999.99 mL
Default value 100.000 mL
Selection off
Stop meas. value
The titration is stopped when the specified measured value has been
reached since the start of the titration.
7 Parameters
Stop EP
Measuring mode pH:
Input range –20.000 - 20.000
Selection off
Default value off
Measuring mode U, Ipol:
Input range –1250.0 - 1250.0 mV
Selection off
Default value off
Measuring mode Upol:
Input range
–125.0 - 125.0 µA
Selection off
Default value off
The titration is stopped when the specified number of equivalence points
has been found.
Input range 1 - 9
Default value 9
Selection off
Volume after EP
848 Titrino plus
This volume will be added when the number of equivalence points
defined under Stop EP has been found. The curve shape after the equivalence point can also be seen this way.
■■■■■■■■
89
Page 100

7.2 Monotonic equivalence point titrations (MET)
Input range 0.01000 - 9999.99 mL
Selection off
Default value off
Stop time
The titration is stopped when the specified time has elapsed since the start
of the titration.
Input range 0 - 999999 s
Selection off
Default value off
Filling rate
Rate at which the dosing cylinder is filled after the titration. The maximum
filling rate depends on the cylinder volume (see Chapter 10.1.1, page
117).
Input range 0.01 - 166.00 mL/min
Selection max.
Default value max.
■■■■■■■■■■■■■■■■■■■■■■
7.2.4 Evaluation
Window
Lower limit
Menu ▶ Parameters ▶ Evaluation
The parameters for the evaluation of the titration curve are defined under
Evaluation.
Switch this parameter on when equivalence points are to be recognized
only in one particular measured value range (window) of the curve. Only
one window can be defined.
Selection on | off
Default value off
This parameter is visible only when Window = on.
Measured value for the lower limit.
Measuring mode pH:
Input range –20.000 - 20.000
Default value –20.000
■■■■■■■■
90
Measuring mode U, Ipol:
Input range –1250.0 - 1250.0 mV
Default value –1250.0 mV
848 Titrino plus
 Loading...