


User Guide
English ( 2 – 15 )
Manual del usuario
Español ( 16 – 30 )
Manuel d'utilisation
Français ( 31 – 46 )
Guida per l'uso
Italiano ( 47 – 61 )
Benutzerhandbuch
Deutsch ( 62 – 76 )
Appendix
English ( 78 )

User Guide (English)
Box Contents
•M-Audio Keystation Mini 32
•USB Cable
•Ignite Card
•Quickstart Guide
•Safety & Warranty Manual
Support
For the latest information about this product (system requirements, compatibility information, etc.) and product registration, visit m-audio.com/keystationmini32.
For additional product support, visit m-audio.com/support.
Recommended Download
Ignite (airmusictech.com/getignite): We recommend downloading Ignite, a music creation tool designed by AIR Music Technology to be easiest way to capture, build, and share musical ideas. Ignite works well on its own or as a writing companion to the production capabilities of your software.
Connecting Your Keyboard
1.Plug the USB cable provided with your Keystation Mini 32 keyboard to a free USB port on your computer.
2.Plug the other end of the USB cable into the USB input on the Keystation Mini 32 keyboard.
The single USB cable not only powers the keyboard but also sends MIDI data to and from your computer system.
If you intend to use your Keystation Mini 32 with a USB hub, make sure the USB hub uses an external power supply. Using a passive USB hub which does not use a power supply may not provide enough power if other devices are connected to the hub.
We do not recommend connecting an audio interface to the same USB hub as the Keystation Mini 32.
You can also use Keystation Mini 32 with your iPad to control supported music creation apps.
Connecting your Keystation Mini 32 to an iPad requires the iPad Camera Connection Kit, which is available from the Apple Store.
Getting Started
Once you have finished the installation, you will need to configure your music software for use with Keystation Mini 32. Connect Keystation Mini 32 to your computer and then open your software. In your software’s Preferences, Options, or Device Set-Up menu, select Keystation Mini 32. (In Windows XP SP3, Keystation Mini 32 will appear in your software under the name USB Audio Device.) Windows Vista, Windows 8, Windows 7, and Mac OS X will recognize the device as Keystation Mini
For further information about configuring your software to receive MIDI data from your Keystation Mini 32, and using software instruments with the application, refer to the documentation provided with that product.
2
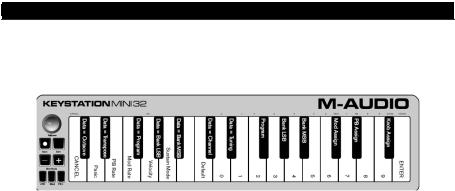
Keybed
The Keystation Mini 32 keybed has 2 1/2 playable octaves. The range of the keyboard is approximately in the middle of an 88 note keyboard. Using the Oct/Data “+” or “-” buttons, you can access the full 88 keyboard range of a large piano keyboard.
Octave/Data Buttons (Oct/Data)
The assignable Octave buttons are used to shift the keyboard up or down in one-octave increments (12 semitones at a time). This extends the range of the keyboard up to four Octaves in either direction, which lets you play notes that lie outside of the 32 keys.
In their default state, such as when you first switch on your Keystation keyboard, the buttons are backlit in red. However, when you press either of them the color of that button turns green indicating that the octave change is active.
If you press the octave “+” button once, the button will turn green indicating the keyboard’s octave is now shifted up. If you press the octave “+” key again, you will shift one more octave up, and so on.
To shift the octave down, press the octave “-” button and notice that the button turns green. If only the octave “-” key is lit green, the octave is shifted down and, if only the octave “+” key is lit in green, the octave is shifted up.
To return the octave shift to 0, press both the octave “+” and “-” buttons together. Both LEDs will return to their normal red color at half brightness, indicating that the octave shift has returned to 0.
You can assign other functions to these buttons in Edit Mode.
Pitch Bend Buttons
As the name indicates, the assignable pitch bend buttons are primarily used to bend the notes played on the keyboard up or down. Pressing and releasing these buttons while playing lets you play phrases not normally associated with keyboards, such as guitar-style phrases.
Your sound source determines if and how far you can bend the note. The usual setting is two semitones; however you should refer to the documentation provided with your sound source for information about how to change the Pitch Bend range.
You can also reassign these buttons in Edit Mode.
Modulation Button
The modulation button takes the place of a wheel that is typically used for modulation of the sound you are playing. The depression of the button mimics the rotation of a wheel. This type of real-time controller was originally introduced on electronic keyboard instruments to give the performer options such as adding vibrato, just like players of acoustic instruments do.
Just like the pitch bend buttons, the modulation button is fully MIDI-assignable.
The default Continuous Controller number (MIDI CC) for Modulation is 1.
You can also reassign this button in Edit Mode.
3
Volume Knob
The Volume Knob sends a MIDI message that controls the volume of the notes you are playing.
The Volume Knob is assigned the default Continuous Controller number (MIDI CC) of 7 and can also be assigned to different parameters, such as pan (balance), attack, reverb, chorus and many more.
Refer to your MIDI hardware or software documentation to confirm that it is able to receive MIDI Volume messages.
Sustain Button
The Sustain button can be used for sustaining the sound that you are playing, without having to keep your hands on the keyboard (just like the sustain pedal on a piano). Pressing the Sustain button engages Sustain; pressing it again disengages Sustain.
You can change how this button behaves in Edit Mode.
Edit Button
The Edit button is used to access the advanced Keystation Mini 32 functions located on the keybed.
Pressing the Edit button switches your keyboard into Edit Mode. The Edit button turns blue, and you can use the keys to select various advanced functions and enter data.
Depending on the function, your keyboard will exit Edit Mode as soon as a function is selected, or the Cancel or Enter keys are pressed. At this point, the Edit button light will dim, and the keyboard can be used for playing notes again.
Edit Mode
Octave/Data Buttons
By default the Octave/Data “+” and “-” buttons are used for shifting the Keystation Mini 32 keybed up or down one octave at a time. Whenever you power up the keyboard, the octave setting will be at the default value of “0,” and the buttons will be red in color at half-brightness.
When the “+” button is used for raising the octave it will either illuminate or flash at full-brightness based on the octave chosen, and the “-” remains at half-brightness. Pressing the “-” button has the opposite affect, such that it will illuminate or flash at full-brightness based on the octave chosen, while the “+” button remains at half-brightness. The following table lists the colors used to identify each octave:
OFF |
GREEN |
ORANGE |
RED |
RED Flashing |
|
|
|
|
|
0 |
+1 |
+2 |
+3 |
+4 |
|
|
|
|
|
0 |
-1 |
-2 |
-3 |
-4 |
|
|
|
|
|
If the Octave/Data buttons have been assigned to one of the 6 additional functions as described in “Reassigning the Octave/Data Buttons”, you can reassign and use them for their default function (Octave) using the method described below.
4
To reassign the “+” and “-” buttons to the Octave function and choose a new octave setting:
1.Press the Edit button. The Edit button light will illuminate to full brightness indicating that the keyboard is in Edit mode.
2.Press the “DATA = OCTAVE” key (C#, first black key on the left).
The keyboard exits Edit mode as soon as the “DATA = OCTAVE” key is pressed and both Octave buttons “+” and “-” will be red at half-brightness.
3.Press either the “+” or “-” button to raise or lower the octave.
To return to the default octave setting:
Simultaneously press the “+” and “-” buttons. Both buttons will return to red at half-brightness.
The Data=Octave assignment is retained when the keyboard is turned off.
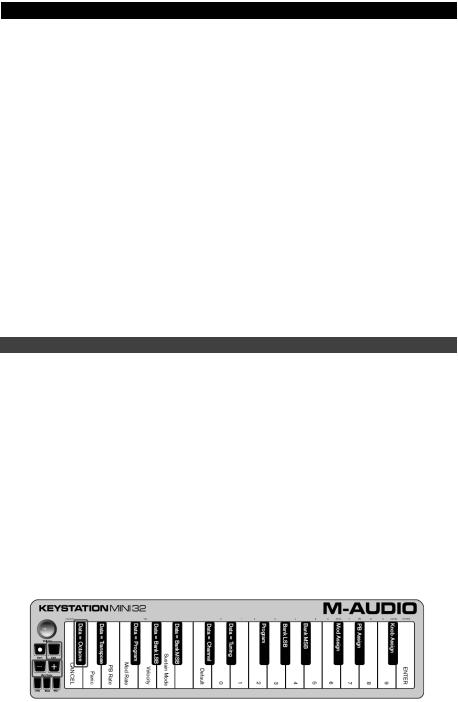
Reassigning the Octave/Data Buttons
In addition to setting an octave shift, the Octave/Data “+” and “-” buttons can also be assigned to control any one of the six additional MIDI functions described in this section.
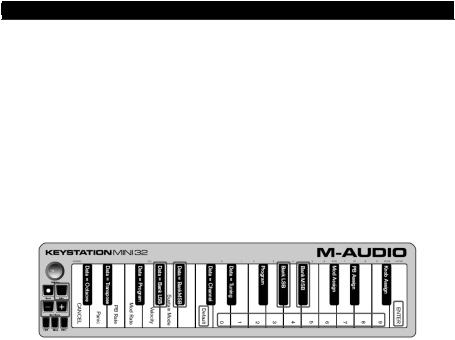
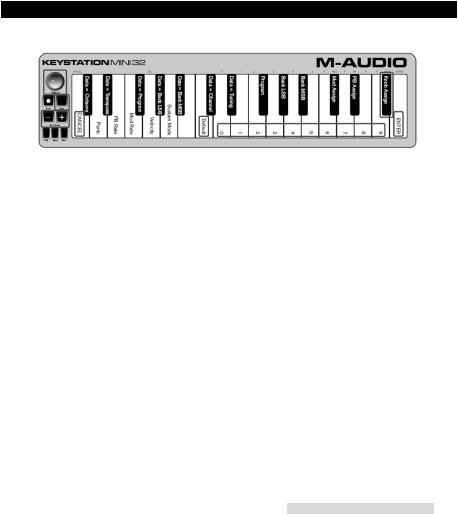
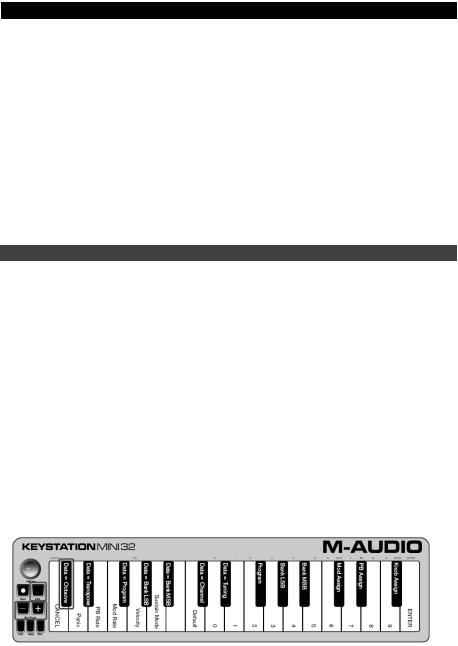
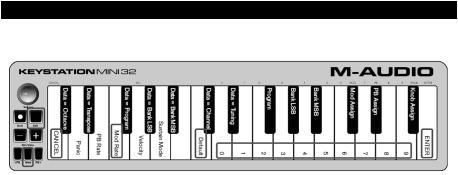
In the diagram below, you will see that the first 7 black keys are labeled “DATA = ________.” Use these keys to select which function to assign to the Octave/Data buttons. When assigned to these functions, both buttons will remain lit, regardless of the current setting of that function.
The six additional functions that you can assign the Octave/Data button to are described in the following sections:
Transpose
In some cases it may be useful to raise or lower the pitch by a number of semitones (half-steps) as opposed to an entire octave. For example, if you are playing a song with a singer that is having difficulty singing the top notes, you may want to reduce the pitch by one or two semitones. This is achieved using the Transpose function. When assigned to this parameter, the keyboard can be transposed a maximum of one octave in either direction. The Data=Octave assignment is retained when the keyboard is turned off.
To assign the Octave “+” and “-” buttons to the Transpose function:
1.Press the Edit button. The Edit button light will illuminate to full brightness.
2.Press the “DATA = TRANSPOSE” key, (D#, 2nd black key from the left).
The keyboard exits Edit Mode as soon as the “DATA = TRANSPOSE” key is pressed, and the Edit light will return to half brightness.
1.Press the “+” key and you will hear the pitch of the note get higher. Press the “-” key and you will hear the pitch get lower.
2.Press both “+” and “-” together to cancel Transpose and return Transpose to zero.
The DATA=TRANSPOSE assignment is retained when the keyboard is turned off.
5
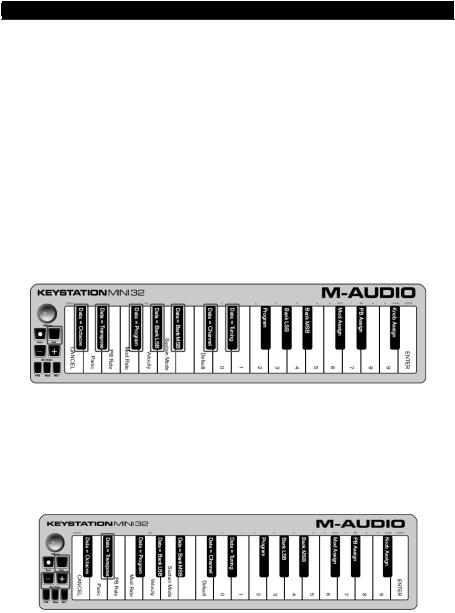
Program Change
Program Changes are used to change the instrument or voice you are using. For example, you could use this function to change the instrument to a bass sound.
You can send a program change by:
•Sending an Incremental or Decremental program change using the Octave/Data buttons in conjunction with the “Data=Program” key, which lets you step through each program number in either direction. If your MIDI hardware or software can receive MIDI Program changes, the buttons will increment or decrement between 0 and 127.
– or –
•Entering the program number using the numerical keys (0 - 9) in conjunction with the “PROGRAM” key on your Keystation Mini 32.
Both methods are explained below:
To send Incremental or Decremental Program Change messages:
1.Press the Edit button to engage Edit Mode. The Edit button light will illuminate to full brightness.
2.Press the “Data=Program” key, which is the black key above F (F#, 3rd black key from the left).
3.The Edit Mode button will return to half brightness as soon as the “Data=Program” key has been pressed.
4.Press the Octave/Data “+” or “-” button to step upwards or downwards through the sounds while continuing to play notes, until you find the instrument you want to use.
Pressing the “+” and “-” buttons simultaneously will recall Program 0, which selects a grand piano sound if you are playing a General MIDI (GM) Instrument.
The Data=Program assignment is retained when the keyboard is turned off. However, the setting is not.
To send a Program Change message using the numerical keys:
1.Press the Edit button to enter Edit Mode. The Edit button will illuminate to full brightness.
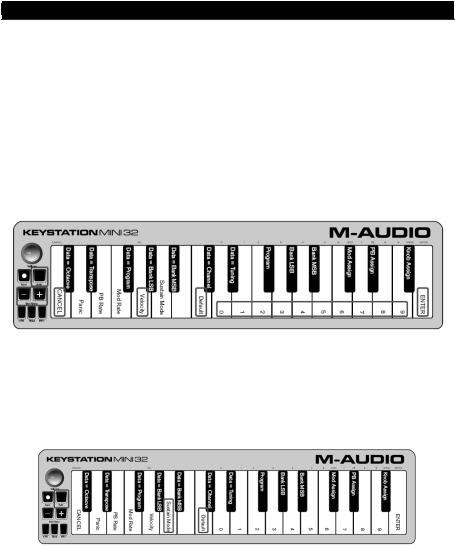
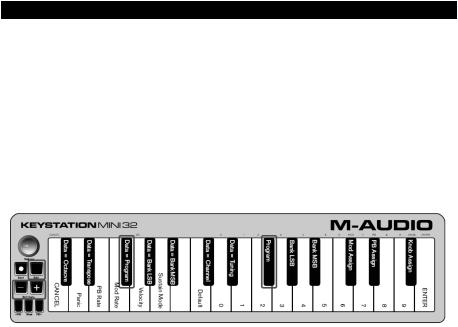
2.Press the “PROGRAM” key (F#, 6th black key from the right).
3.Use the numerical keys (0 - 9) to enter the program number for the instrument you wish to play.
4.Press the “ENTER” key (G, last white key on the right) to exit Edit Mode. The Edit button will return to half brightness indicating that programming is complete.
If you have made an error while entering the numerical data value, press the CANCEL key (C, first white key on the left). This exits Edit Mode without sending a program change message.
To return Program function to the default setting (Program 0):
1.Press the Edit button to enter Edit Mode. The Edit button will illuminate to full brightness.
2.Press the “PROGRAM” key (F#, 6th black key from the right as indicated in the graphic above).
3.Press the “DEFAULT” key (C, 8th white key from the left). The Edit light will dim to half brightness indicating that programming is complete.
The program change message has been sent, selecting the default value of General MIDI Instrument “0” (Grand Piano).
6
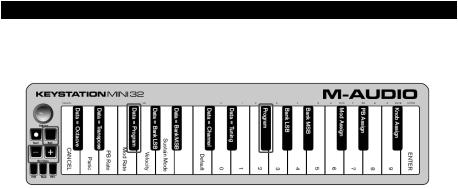
Bank LSB and Bank MSB
Program Changes are most commonly used to change instruments and voices. However, the number of instruments accessible via Program Changes is limited to 128. However, some devices have more than 128 patches and require a different method of accessing these extra sounds. Most modern hardware synthesizers and many software synthesizer programs have hundreds of patches that are organized in banks of sounds.
Generally, these devices use Bank LSB and Bank MSB messages to access the banks, then use program changes within the banks to access specific patches. Most devices only accept MSB messages, but you should refer to the documentation for your device or software to confirm which bank message must be sent first, as this is determined by each manufacturer.
You can send either message type by:
•Sending an Incremental or Decremental change using the Octave/Data buttons, which lets you step through each bank number in either direction.
– or – |
|
• |
Entering the bank number using the numerical keys (0 - 9) on your Keystation Mini 32. |
|
Both methods are explained below for each message type: |
To send Incremental/Decremental Bank LSB changes using the Oct/Data buttons:
1.Press the Edit button to enter Edit Mode. The Edit button will illuminate to full brightness.
2.Press the “DATA = BANK LSB” key (G#, 4th black key from the left).
3.Press the Octave/Data “+” or “-” button to step upwards or downwards through the Bank LSB values. This takes you through each bank of sounds.
To send Incremental/Decremental Bank MSB changes using the Oct/Data buttons:
1.Press the Edit button to enter Edit Mode. The Edit button will illuminate to full brightness.
2.Press the “Data = Bank MSB” key (A#, 5th black key from the left).
3.Press the Octave/Data “+” or “-” button to step upwards or downwards through the Bank MSB values. This takes you through each bank of sounds.
The Data=Bank LSB, Data=Bank MSB value or any data assigned to LSB or MSB is not retained when the keyboard is turned off. However, the assignment data keys will be.
To send Bank LSB Changes using the numerical keys:
1.Press the Edit button to enter Edit Mode. The Edit button will illuminate to full brightness.
2.Press the “BANK LSB” key (G#, 5th black key from the right).
3.Use the numerical keys (0 - 9) to enter the Bank LSB number for the bank of sounds you wish to access.
4.Press the “ENTER” key (G, last white key on the right). The Edit button will return to half brightness indicating that programming is complete.
To send Bank MSB Changes using the numerical keys:
1.Press the Edit button to enter Edit Mode. The Edit button will illuminate to full brightness.
2.Press the “BANK MSB” key (A#, 4th black key from the right).
3.Use the numerical keys (0 - 9) to enter the Bank MSB number for the bank of sounds you wish to access.
4.Press the “ENTER” key (G, last white key on the right). The Edit button will return to half brightness indicating that programming is complete.
To recall the default bank number (0):
Simultaneously press the “+” and “-” buttons.
7
Channel
MIDI data from the keyboard can be sent on any of 16 MIDI Channels. However, certain MIDI devices and software require transmission of MIDI data on a specific channel number. If this is the case, you can change the MIDI channel number as described below.
To change the MIDI Channel number:
1.Press the Edit button to enter Edit Mode. The Edit button will illuminate to full brightness.
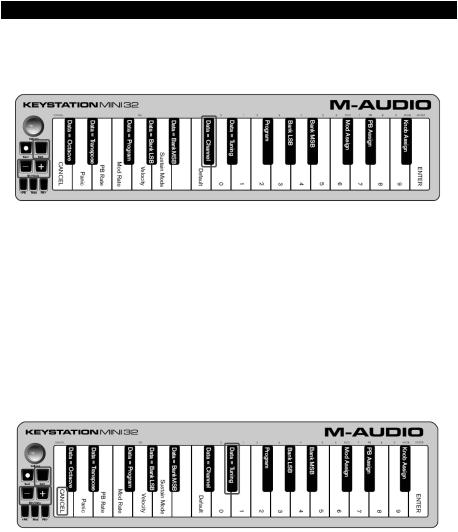
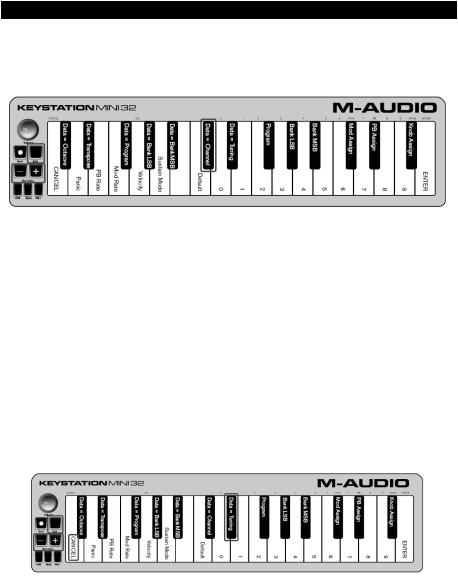
2.Press the “DATA = CHANNEL” (named C#, 6th black key from the left). The Edit button light will return to half-brightness.
3.Press the Octave/Data “+” or “-” button to step upwards or downwards through the MIDI Channel numbers.
Pressing both the “+” and “-” buttons together will recall Channel 1. When Channel 16 is reached and “+” is pressed, Channel 1 will be selected. The "+" and "-" button LEDs will not change, since it is not possible to have a Channel with a negative value. For example, if a device specifies that you need to send data on Channel 10, press the + button nine times to change from the channel 1 to select Channel 10.
The Data=Channel value is retained when the keyboard is turned off.
Tuning
The Tuning function can be used to alter the instrument being controlled to have its pitch shifted to be slightly sharp or slightly flat. The default Tuning value is 64, and it can be raised to 128 or lowered to 0 as described below.
Check your third party hardware or software documentation to confirm that your sound source responds to “MIDI Master Tune.”
To assign the “+” and “-” keys to control the Tuning function:
1.Press the Edit button to enter into Edit Mode. The Edit button light will illuminate to full brightness.
2.Press the “DATA = TUNING” key (D#, seventh black key from the right). The Edit button will return to half-brightness. The Oct/Data “+” button will illuminate green, and the “-” button will be red.
3.Press “+” or “-” while continuing to play notes until the instrument is tuned to the pitch that you want.
Selecting a value below the default setting of 64, changes the Oct/Data “-” button from red to green. Selecting a value greater than 64, changes the Oct/Data “+” button from red to green.
To return the tuning to the default setting (concert pitch):
Press the Oct/Data “-” and “+” buttons simultaneously. Both buttons will return to their default value of red at half-brightness.
8
Modulation Button
It is possible to assign other MIDI controls to the Modulation button, such as:
•01 Modulation
•07 Volume
•10 Pan (balance)
•05 Portamento
There are 131 parameters in total including the 128 standard MIDI Control Change messages (MIDI CCs). However, for these parameters to have any effect on the sound, the receiving MIDI device or software must be able to read and respond to these MIDI effect messages. Most devices will at least respond to volume, modulation, and pan data.
The process of assigning an effect to the Modulation button and reverting to the default setting is explained below.
To assign a parameter to the Modulation button using the numerical keys:
These instructions use the example of assigning the parameter number 131 (Channel Aftertouch) to the Modulation button, but the concept also applies when assigning other parameters.
1.Press the Edit button. The Edit button light will illuminate to full brightness.
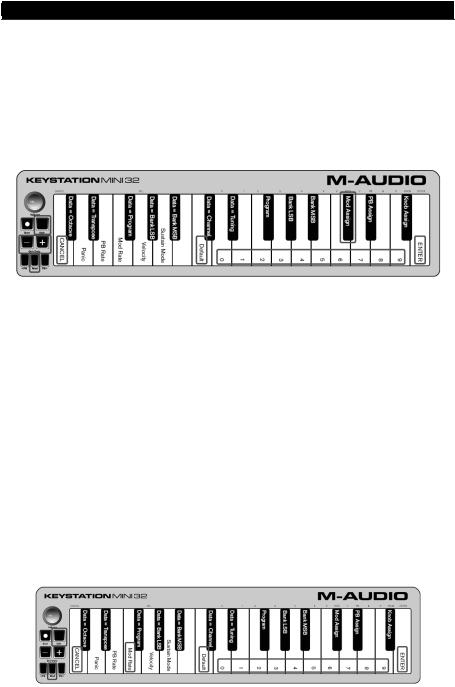
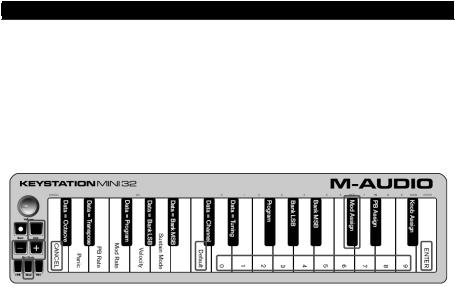
2.Press the “MOD ASSIGN” key (C#, 3rd black key from the left).
3.Press E (10th white key from the right) to enter “1.”
4.Press G (8th white key from the right) to enter “3.”
5.Press E (10th white key from the right) to enter “1.”
6.Press the “ENTER” key (G, last white key on the right). The Edit button will dim to half brightness indicating that programming is complete.
If you have made an error while entering the numerical data value, you can press the CANCEL key (C, first white key on the left) to exit Edit Mode without changing the effect assigned to the Modulation button.
The Modulation button assignment is retained when the keyboard is turned off.
To return the Modulation button to the default settings:
1.Press the Edit button to engage Edit Mode and the Edit button light will illuminate to full brightness.
2.Press the “MOD ASSIGN” key (C#, 3rd black key from the left).
3.Press the “DEFAULT” key (C, 8th white key from the left). The Edit light will dim to half brightness indicating that programming is complete.
Modulation Rate
It is possible to alter the sensitivity of the Modulation button effects using the “Mod Rate” function. This lets you adjust the ramp up time for effects assigned to the Modulation button. The range for Modulation Rate is 0 - 127, with a default setting of 64. The lower the value, the slower the rate and vice versa.
9
As an example, the following set of instructions and accompanying table of values explains how to use the “Mod Rate” function when changing the ramp time from the default value of 64 to 127.
Value |
|
|
Rate |
|
|
|
|
0 |
|
Ramp occurs slowly |
|
|
|
|
|
64 [default] |
|
Ramp occurs relatively quickly |
|
|
|
|
|
126 |
|
Ramp occurs very quickly |
|
|
|
|
|
127 |
|
|
No ramp. Only one value is sent – min. or |
|
|
max |
|
|
|
|
|
|
|
|
|
To adjust the Modulation Rate:
1.Press the Edit button. The Edit button light will illuminate to full brightness.
2.Press the “Mod Rate” key (F, 4th white key from the left).
3.Press E (10th white key from the right) to enter “1.”
4.Press F (9th white key from the right) to enter “2.”
5.Press D (4th white key from the right) to enter “7.”
If you have made an error while entering the numerical data value, you can press the “CANCEL” key (C, first white key on the left) to exit Edit Mode without making any changes.
As an alternative to steps 3 through 5, you can use the “+” and “-” buttons to change the value.
6.Press the “ENTER.” key (G, last white key on the right.)
7.Press the “Mod” button to hear change in the effect rate.
The Mod Rate value is retained when the keyboard is turned off.
To return the Modulation Rate to the default settings:
1.Press the Edit button. The Edit button light will illuminate to full brightness.
2.Press the “Mod Rate” key (F, 4th white key from the left).
3.Press the “DEFAULT” key (C, 8th white key from the left). The Edit light will dim to half brightness indicating that programming is complete.
Pitch Bend Buttons
To assign the Pitch Bend buttons to a parameter:
1.Press the Edit button. The Edit button light will illuminate to full brightness.
2.Press the “PB ASSIGN” key (D#, 2nd black key from the right).
3.Use the Numerical Data Entry keys (0-9) to enter the number of the effect.
If you have made an error while entering the numerical data value, you can press the “CANCEL” key (C, first white key on the left) to exit Edit Mode without making any changes. As an alternative to steps 3 through 5, you can use the “+” and “-” buttons to change the value.
4.Press the “ENTER” key (G, last white key on the right); the Edit light will dim to half brightness indicating that programming is complete.
5.Press the Pitch Bend “>” button to increase the value of the effect.
The Pitch Bend button assignments are retained when the keyboard is turned off.
To return the Pitch Bend buttons to the default parameter:
1.Press the Edit button. The Edit button light will illuminate to full brightness.
2.Press the “PB ASSIGN” key (D#, 2nd black key from the right).
3.Press the “DEFAULT” key (C, 8th white key from the left). The Edit light will dim to half brightness indicating that programming is complete.
10
Pitch Bend Rate
It is possible to alter the sensitivity of the Pitch Bend buttons using the Pitch Bend Rate function. This lets you adjust the pitch bend ramp up time. The default setting is 80, with a range of 0 - 127. As shown in the following table, the lower the value, the slower the Pitch Bend Rate and vice versa.
Value |
|
|
Rate |
|
|
|
|
0 |
|
Ramp occurs slowly |
|
|
|
|
|
80 [default] |
|
Ramp occurs relatively quickly |
|
|
|
|
|
126 |
|
Ramp occurs very quickly |
|
|
|
|
|
127 |
|
|
No ramp. Only one value is sent – min. |
|
|
or max |
|
|
|
|
|
|
|
|
|
The Pitch Bend Rate can be adjusted using the “PB RATE” key in conjunction with the numerical keys. The following instructions use the example of changing the Pitch Bend Rate to 127.
To adjust the Pitch Bend Rate:
1.Press the Edit button to engage Edit Mode and the Edit button light will illuminate to full brightness.
2.Press the “PB RATE” key (E, 3rd white key from the left).
3.Press E (10th white key from the right) to enter “1.”
4.Press F (9th white key from the right) to enter “2.”
5.Press D (4th white key from the right) to enter “7.”
If you make an error while entering the value, press the “CANCEL” key to exit Edit Mode without making any changes. As an alternative to steps 3 through 5, you can use the “+” and “-” buttons to change the value.
6.Press the “ENTER” key (G, last white key on the right); the Edit light will dim to half brightness indicating that programming is complete.
7.Press the “PB>” button while playing to hear how the Pitch Bend will occur faster than before.
The PB Rate setting is retained when the keyboard is turned off.
To return the Pitch Bend Rate to the default setting:
1.Press the Edit button. The Edit button light will illuminate to full brightness.
2.Press the “PB RATE” key (E, 3rd white key from the left).
3.Press the “DEFAULT” key (C, 8th white key from the left). The Edit light will dim to half brightness indicating that programming is complete.
11
Volume Knob
To assign the Volume Knob to an effect:
1.Press the Edit button. The Edit button light will illuminate to full brightness.
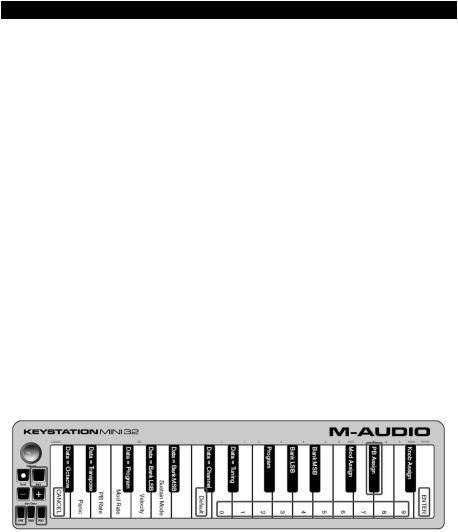
2.Press the “KNOB ASSIGN” key (F#, 1st black key from the right).
3.Use the Numerical Data Entry keys (0 - 9) to enter the number of the parameter you want to assign to the Volume Knob.
If you have made an error while entering the parameter number, you can press the “CANCEL” key (C, first white key on the left) to exit Edit Mode without making any changes. As an alternative to step 3, you can use the “+” and “-” buttons to change the parameter.
4.Press the “ENTER” key (G, last white key on the right); the Edit light will dim to half brightness indicating that programming is complete.
5.Move the Volume knob clockwise to increase the parameter value.
The Volume Knob assignment is retained when the keyboard is turned off.
To return the Volume Knob to its default parameter (07 - Volume):
1.Press the Edit button. The Edit button light will illuminate to full brightness.
2.Press the “KNOB ASSIGN” key (F#, 1st black key from the right).
3.Press the “DEFAULT” key (C, 8th white key from the left). The Edit light will dim to half brightness indicating that programming is complete.
Velocity
When you play your Keystation Mini 32, the sound you hear will be affected by how hard you press the key. Pressing the key very lightly will result in the sound from your software being heard very softly, while pressing the key very hard will result in it being heard very loudly. Normal playing will result in the sound from your software to be heard somewhere in between.
Your Keystation Mini 32 offers the velocity settings described in the table below, called Velocity Curves. While the keyboard is in Edit mode, you can follow the instructions below to choose a Velocity Curve that either suits your playing style or the kind of “feel” or dynamics you want an instrument part to have.
|
Value entered |
|
Curve |
Notes |
|
|
|
|
The curve generates lower |
0 |
|
Low |
velocities for the same force, |
|
|
|
|
|
making it easier to play softly. |
|
|
|
|
|
|
1 [default setting] |
|
Normal |
This curve is mid-way between the |
|
|
other two. |
||
|
|
|
|
|
|
|
|
|
|
|
|
|
|
The curve generates higher |
2 |
|
High |
velocities for the same force, |
|
|
|
|
|
making it easier to play loudly. |
|
|
|
|
|
|
|
|
|
This curve outputs velocity values |
3 |
|
Stepped |
of 100 and 127 only, as used in |
|
|
|
|
|
some drum machines. |
|
|
|
|
|
|
|
|
|
Velocity is fixed at the selected |
|
From 4 to 127 |
Fixed |
value. All notes will play at the |
|
|
|
|
|
specified velocity. |
|
|
|
|
|
12
To select a new Velocity Curve:
1.Press the Edit button to engage Edit Mode and the Edit button light will illuminate to full brightness.
2.Press the “VELOCITY” key (G, 5th white key from the left).
3.Use the Numerical Data Entry keys (0 - 9) to enter the number of the Velocity Curve you want to use.
If you have made an error while entering the Effect number, you can press the “CANCEL” key (C, first white key on the left) to exit Edit Mode without making any changes.
As an alternative to step 3, you can use the “+” and “-” buttons to change the value.
4.Press the “Enter” key G (last white key on the right) to commit the change. The Edit button will dim to normal half brightness indicating that programming is complete.
The Velocity Curve setting is retained when the keyboard is turned off.
To return the Velocity Curve to the default setting, perform the following steps:
1.Press the Edit button to engage Edit Mode. The Edit button light will illuminate to full brightness.
2.Press G (5th white key from the left), representing “Velocity.”
3.Press C (8th white key from the left), representing “Default”, the Edit light will dim to half brightness indicating that programming is complete.
Sustain Mode
The Sustain button can work in two different modes called Latching and Momentary. Latching mode is the default setting in which momentarily pressing the Sustain button and playing a note causes it to sustain after it has been played without keeping your hands on the keyboard. However, the sound will not stop until the button is pressed again.
Momentary mode works in the same manner as a traditional sustain pedal, such that holding the Sustain button down and playing a note causes it to sustain until the button is released.
To change the Sustain mode from Latching to Momentary:
1.Press the Edit button. The Edit button light will illuminate to full brightness.
2.Press the “SUSTAIN MODE” key (A, 6th white key from the left). The Edit mode button will dim to half brightness indicating that programming is complete.
Now holding the Sustain button down and playing a note will cause it to sustain until the button is released.
The Sustain Mode setting is retained when the keyboard is turned off.
To return the Sustain button to Latching mode (default):
1.Press the Edit button. The Edit button light will illuminate to full brightness.
2.Press the “SUSTAIN MODE” key (A, 6th white key from the left). The Edit mode button will dim to half brightness indicating that programming is complete.
Now pressing the Sustain button and playing a note will cause it to sustain until the button is pressed a second time.
13

Troubleshooting
Troubleshooting MIDI Functionality
Keystation Mini 32 has been designed to make working with MIDI on your computer as simple as possible. However, you may experience some difficulties. In many cases, the keyboard is not at fault, as the problem lies with the receiving device or software. To counter this, the Panic and Full Reset functions are available to assist you.
Panic Button (All Notes Off + Reset All Controllers)
If there are notes that will not stop playing, or if you find there is an effect on a voice that you do not want, you can send a Reset All Controllers MIDI message.
To send a Reset All Controllers message:
1.Press the Edit button to enter Edit Mode and the Edit button will illuminate to full brightness.
2.Press the “PANIC.” key (D, 2nd white key from the left):
•An “All Notes off” MIDI message is sent.
•MIDI Controller 121, Value 0 and MIDI Controller 123, Value 0 is sent out on ALL MIDI Channels 1 - 16
•Edit Mode will disengage as soon as the Panic button is pressed, the Edit light will go to half brightness indicating that programming is complete.
Full Reset
To send a Full Reset message:
1.Make sure your computer is running.
2.Switch on the Keystation Mini 32 by plugging in the USB Cable from your computer while simultaneously holding down the Oct/Data “+” and “-” buttons.
This will reset all Data=_____ and controller assignments to the following values:
Parameter |
Factory Default |
Program Number |
000 |
|
|
Bank MSB Number |
000 |
|
|
Bank LSB Number |
000 |
|
|
Channel Number |
00 (channel 1) |
|
|
Octave shift |
000 |
|
|
Transpose shift |
000 |
|
|
Modulation Button MIDI CC |
001 |
|
|
Volume Knob MIDI CC |
007 |
|
|
Pitch Bend Buttons |
Pitch Bend |
|
|
Octave Buttons - Assignment |
Data = Octave |
|
|
Velocity |
1 = Normal |
|
|
14
General Troubleshooting
Here are answers to common questions you may have while using your Keystation keyboard:
My M-Audio hardware suddenly stopped working.
If your M-Audio hardware suddenly stops working, try the following:
•Disconnect, wait 10 seconds, reconnect.
•Try connecting to different USB ports.
•Try using a different USB cable.
I have plugged the Keystation into my computer but the lights on the keyboard will not work.
Not all USB ports are powerful enough for a device such as a Keystation Mini 32. Try plugging it into another USB Port to see if that remedies the problem. You can also connect a powered USB hub to your computer and then plug your Keystation Mini 32 into the hub.
When I press a key, there is a delay before I hear the note.
This delay, which occurs more often on Windows systems, is known as latency. This issue is caused by the time it takes for your recording software to receive and process the MIDI data transmitted from your Keystation Mini 32, and then send the resulting audio signal to your audio interface or sound card, and out to your speakers or headphones.
Make sure you are using a compatible audio interface. Refer to m-audio.com for a selection of USB, PCI and FireWire audio interfaces.
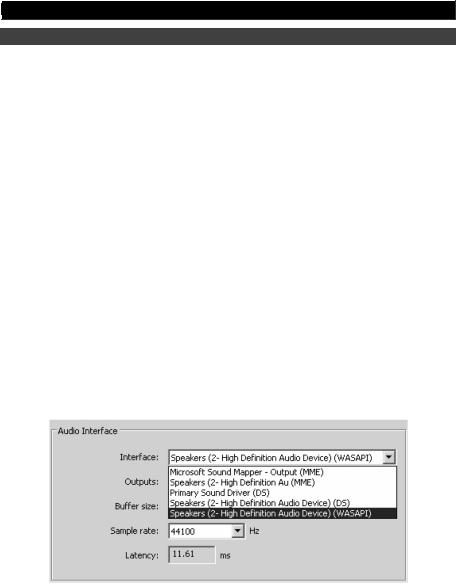
To reduce the amount of latency, you will need to select a new driver from the available choices listed in the audio preferences (or audio options) window within your software. If you are not sure how to access the audio preferences, refer to the documentation provided with your software for instructions about how to do so.
The following screenshot is an example of the different settings you are likely to find in the audio preferences for your software. However, you should refer to the user guide for the program as the layout or the window may be different. Looking at the window, you will notice that the current driver being used by your software appears in one of the sections, and that the current amount of latency appears is another section.
Windows Vista, Windows 8, and Windows 7 users should refer to the documentation or the manufacturer’s website for their audio interface or sound card, to confirm that it is a WASAPI compatible device.
If you are still experiencing a latency issue, you can find further troubleshooting information on our website at: m-audio.com/support.
15

Manual del usuario (Español)
Contenido de la caja
•M-Audio Keystation Mini 32
•Cable USB
•Ignite Tarjeta
•Guía de inicio rápido
•Manual sobre la seguridad y garantía
Soporte
Para obtener la información más reciente acerca de este producto (requisitos de sistema, información de compatibilidad, etc.), y registro del producto, visite m-audio.com/keystationmini32.
Para soporte adicional del producto, visite m-audio.com/support.
Descargas recomendadas
Ignite (airmusictech.com/getignite): Recomendamos bajar Ignite, una herramienta de creación musical diseñada por Air Music Technology, la manera más fácil de capturar, construir y compartir ideas musicales. Ignite funciona bien por sí mismo o como complemento de redacción de las capacidades de producción de su software.
Conexión del teclado
1.Enchufa el cable USB provisto con tu teclado Keystation Mini 32 a un puerto USB libre en tu ordenador.
2.Enchufa el otro extremo del cable USB en la entrada USB del teclado Keystation Mini 32.
El cable USB no solo alimenta el teclado, sino que también envía y recibe datos MIDI del ordenador.
Si intentas usar tu Keystation Mini 32 con un hub USB, verifica que este utilice una fuente de alimentación externa. Un hub USB pasivo sin fuente de alimentación puede no suministrar la energía suficiente si tiene otros dispositivos conectados.
No recomendamos conectar un interface de audio al mismo hub USB que el Keystation Mini 32.
También puede utilizar el Keystation Mini 32 con su iPad para controlar las aplicaciones de creación de música compatibles.
Conectar tu Keystation Mini 32 a un iPad requiere el kit iPad Camera Connection, que vende el Apple Store.
Primeros pasos
Una vez finalizada la instalación, deberá configurar su software musical para funcionar con el Keystation Mini 32. Conéctelo a su computadora y luego abra su software. En los menús de Preferences (Preferencias), Options (Opciones) o Device Set-Up (Configuración de dispositivo) de su software, seleccione el Keystation Mini 32. (En Windows XP SP3, Keystation Mini 32 aparecerá en tu software bajo el nombre Dispositivo de audio USB.) Windows Vista, 7 y Mac OS X reconocerán el dispositivo como Keystation Mini 32.
Para más datos sobre cómo configurar tu software para recibir datos MIDI de Keystation Mini 32, y el uso de instrumentos en software con la aplicación, consulta la documentación provista con ese producto.
16
Placa del teclado
Las teclas del Keystation Mini 32 cubren 2½ octavas. La tesitura del teclado está aproximadamente al medio de un teclado de 88 notas. Con los botones Oct/Data “+” o “-”, se puede acceder a la extensión completa de 88 teclas de un piano grande.
Botones de octava/datos (Oct/Data)
Los botones de octava asignables se usan para subir o bajar el teclado en pasos de una octava (12 semitonos por vez). Esto amplía la tesitura del teclado hasta cuatro octavas en cualquier dirección, lo que te permite tocar notas fuera de las 32 teclas.
En su estado predeterminado, como cuando enciendes por primera vez tu teclado Keystation, los botones están retroiluminados en rojo. Sin embargo, cuando pulse cualquiera de ellos, ese botón se ilumina con luz verde para indicar que el cambio de octava está activado.
Si pulsas el botón de octava “+” una vez, este se iluminará en verde para indicar que el teclado ha subido una octava. Si pulsas la tecla de octava “+” nuevamente, subirá otra octava, y así sucesivamente.
Para desplazar la octava hacia abajo, oprima el botón Oct “-” y note que el botón se ilumina con luz verde. Si solo se ilumina con luz verde la tecla Oct “-” la octava está desplazada hacia abajo y si solo se ilumina con luz verde la tecla Oct “+”, la octava está desplazada hacia arriba.
Para devolver el cambio de octava a su estado original (volver a 0), pulsa a la vez los botones de octava “+” y “-”. Ambos LEDs volverán a su color rojo a medio brillo normal, lo que indica que el cambio de octava ha vuelto a 0.
Puede asignar otras funciones a estos botones en el modo Edición.
Botones de inflexión tonal
Como el nombre lo indica, los botones de inflexión tonal asignables se usan principalmente para portar las notas arriba o abajo. Pulsar y soltar estos botones mientras tocas te permite fraseos no vinculados normalmente a teclados, como los de guitarra. La fuente de sonido determina si y cuánto puedes portar la nota. La configuración habitual es dos semitonos, no obstante debes consultar la documentación provista con la fuente de sonido para información sobre cómo cambiar el intervalo de inflexión tonal.
Puede asignar otras funciones a estos botones en el modo Edición.
Botón de modulación
El botón de modulación reemplaza a una rueda que típicamente se utiliza para modular el sonido que estás tocando. La presión sobre el botón imita la rotación de la rueda. Este tipo de controlador en tiempo real fue introducido originalmente en instrumentos electrónicos de teclado para dar al intérprete opciones como la de agregar vibrato, como lo hacen los intérpretes de instrumentos acústicos.
Al igual que los botones de inflexión tonal, el botón de modulación es totalmente asignable por MIDI. El número predeterminado de controlador continuo (CC MIDI) para modulación es 1.
También puede reasignar este botón en el modo Edición.
Rueda de volume
La rueda de volumen envía un mensaje MIDI que controla el volumen de las notas que se tocan. La rueda de volumen que tiene asignado el número predeterminado de controlador continuo (CC MIDI) 7, y puede también asignarse a diversos parámetros, como panorama (balance), ataque, reverb, chorus y muchos otros.
Consulte la documentación de su hardware o software MIDI para confirmar que sea capaz de recibir mensajes de volumen MIDI.
17
Botón Sustain
El botón Sustain (Sust) o botón de resonancia se puede usa para prolongar el sonido que tocas, sin necesidad de mantener las manos en el teclado (al igual que el pedal de resonancia en el piano). Pulsar el botón Sustain active la resonancia; al soltarlo, esta se desactiva.
También puede modificar el comportamiento de este botón en el modo Edición.
Botón Edit
El botón Edit se usa para acceder a las funciones avanzadas de Keystation Mini 32 en el teclado mismo. Pulsar el botón Edit conmuta el teclado al “Modo de edición”.
El botón Edit se ilumina en azul, y puedes usar las teclas para seleccionar varias funciones avanzadas e introducir datos.
Según la función, el teclado saldrá del modo de edición apenas se seleccione una función, o cuando se pulsen las teclas Cancelar o Intro. En este punto, la luz del botón Edit (Edición) se atenúa y el teclado puede ser usado para tocar notas nuevamente.
Modo de edición
Botones Oct/Data
En forma predeterminada, los botones Oct/Data “+” y “-” se usan para transportar el teclado Keystation Mini 32 una octava de forma ascendente o descendente por vez. Cuando enciendes el teclado, la configuración de octava estará en el valor predeterminado de “0” y los botones serán de color rojo a medio brillo.
Cuando se usa el botón “+” para subir la octava, este se encenderá o parpadeará a pleno brillo según la octava escogida, y el “-” permanecerá a medio brillo. Pulsar el botón “-” tiene el efecto opuesto, dado que se iluminará o parpadeará a pleno brillo según la octava escogida, mientras que el botón “+” permanecerá a medio brillo. La tabla siguiente indica los colores utilizados para identificar cada octava:
Si los botones Oct/Data se han asignado a una de las 6 funciones adicionales, puedes reasignarlos y usarlos para su function predeterminada (Octava) con el método que se describe a continuación.
APAGADO |
VERDE |
NARANJA |
ROJO |
ROJO |
|
|
|
|
parpadeando |
|
|
|
|
|
0 |
+1 |
+2 |
+3 |
+4 |
|
|
|
|
|
0 |
-1 |
-2 |
-3 |
-4 |
|
|
|
|
|
Para reasignar los botones “+” y “-” a la función Octava y seleccionar una nueva configuración de octavas:
1.Pulsa el botón Edit. El botón Edit se encenderá a pleno brillo, lo que indica que el teclado está en modo de edición.
2.Pulsa la tecla “Datos = Octava” (Do#, primera tecla negra a la izquierda).
El teclado sale del modo de edición apenas se pulsa la tecla “Datos = Octava” y ambos botones de octava “+” y “-” se iluminarán en rojo a medio brillo.
3.Pulsa el botón “+” o “-” para subir o bajar la octava.
18

Para volver a la configuración predeterminada de octava:
Pulsa simultáneamente los botones “+” y “-”. Ambos botones volverán al color rojo a medio brillo.
La asignación de Datos = Octava se mantiene aunque se apague el teclado.
Reasignación de los botones Oct/Data
Además de establecer un cambio de octava, los botones Oct/Data “+” y “-” también pueden asignarse al control de cualquiera de las seis funciones MIDI adicionales que se describen en esta sección.
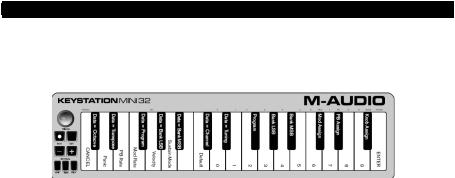
En el diagrama de abajo, verás que las primeras 7 teclas negras están etiquetadas “Datos = ________”. Utilice estas teclas para seleccionar la función a asignar a los botones Oct/Data. Cuando se asignan a estas funciones, ambos botones permanecerán encendidos, sin importar la configuración actual de esa función.
Las seis funciones adicionales que puede asignar al botón Oct/Data se describen en las siguientes secciones:
Transportar
En algunos casos puede ser útil subir o bajar la altura un cierto número de semitonos en lugar de toda una octava. Por ejemplo, si estás tocando una canción con un cantante que tiene dificultad para alcanzar las notas más altas, puedes bajar la altura en uno o dos semitonos. Esto se logra con la función Transportar. Cuando se asigna a este parámetro, el teclado se puede transportar en un máximo de uno octava en cualquier dirección.
Para asignar los botones de octavas “+” y “-” a la función Transportar:
1.Pulsa el botón Edit. Se encenderá el botón Edit a pleno brillo.
2.Pulsa la tecla “Datos = Transportar”, (Re#, 2ª tecla negra desde la izquierda).
El teclado sale del modo de edición apenas se pulsa la tecla “Datos = Transportar”, y la luz de Edit volverá a medio brillo.
1.Pulsa la tecla “+” y escucharás cómo sube el tono de la nota. Pulsa la tecla “-” y escucharás cómo baja.
2.Pulsar “+” y “-” juntos para cancelar Transportar y volver el control a cero.
La asignación de Datos = Transportar se mantiene cuando se apaga el teclado.
19
Cambio de programa
Los cambios de programa se usan para cambiar el instrumento o la “voz” que se está usando. Por ejemplo, podrías usar esta función para cambiar el instrumento a un sonido de bajo. Para hacerlo, necesitas enviar un mensaje de cambio de programa de 32.
Puedes enviar un cambio de programa mediante:
•Enviar un cambio de programa ascendente o descendente con los botones Oct/Data conjuntamente con la tecla “Datos = Programa”, que te permite pasar por cada número de programa en cualquier dirección. Si tu hardware o software MIDI puede recibir cambios de programa MIDI, los botones subirán o bajarán entre 0 y 127.
—o bien—
•Introducir el número de programa con las teclas numéricas (0 - 9) conjuntamente con la tecla “Programa” activada en tu Keystation Mini 32.
Ambos métodos se explican abajo:
Para enviar mensajes de cambio de programa ascendentes o descendentes:
1.Pulsa el botón Edit para entrar en el modo de edición. Se encenderá el botón Edit a pleno brillo.
2.Pulsa la tecla “Datos = Programa”, que es la tecla negra arriba de Fa (Fa#, 3ª tecla negra desde la izquierda).
3.El botón del modo de edición volverá a medio brillo apenas se haya pulsado la tecla “Datos = Programa”.
4.Pulsa el botón Oct/Data “+” o “-” para subir o bajar por los sonidos mientras sigues tocando las notas, hasta que encuentres el instrumento que deseas usar.
Pulsar los botones “+” y “-” simultáneamente rellamará el Programa 0, que selecciona un sonido de piano de cola si estás tocando un instrumento General MIDI (GM).
La asignación de Datos = Programa se mantiene cuando se apaga el teclado, aunque no la configuración.
Para enviar un mensaje de cambio de programa con las teclas numéricas:
1.Pulsa el botón Edit para entrar en el modo de edición. Se encenderá el botón Edit a pleno brillo.
2.Pulsa la tecla “Programa” (Fa#, 6ª tecla negra desde la derecha).
3.Usa las teclas numéricas (0 - 9) para introducir el número de programa del instrumento que deseas tocar.
4.Pulsa la tecla “INTRO” (Sol, la última tecla blanca a la derecha) para salir del modo de edición. El botón Edit volverá a medio brillo, lo que indica que se ha completado la programación.
Si has cometido un error al introducir los datos numéricos, pulsa la tecla CANCELAR (Do, primera tecla blanca a la izquierda). Esto sale del modo de edición sin enviar un mensaje de cambio de programa.
Para volver la función Programa a la configuración predeterminada (Programa 0):
1.Pulsa el botón Edit para entrar en el modo de edición. Se encenderá el botón Edit a pleno brillo.
2.Pulsa la tecla “PROGRAMA” (Fa#, 6ª tecla negra desde la derecha), según se indica en el gráfico arriba).
3.Pulsa la tecla “PREDETERMINADO” (Do, octava tecla blanca desde la izquierda). La luz de edición disminuirá a medio brillo, lo que indica que la programación está completa.
El mensaje de cambio de programa se ha enviado, seleccionando el valor predeterminado de instrument General MIDI “0” (piano de cola).
20
Banco LSB y banco MSB
Los cambios de programa se usan más comúnmente para cambiar instrumentos y voces. No obstante, la cantidad de instrumentos accesible mediante cambios de programa se limita a 128. No obstante, algunos equipos tienen más de 128 patches y requieren un método distinto para acceder a esos sonidos extra. Los sintetizadores en hardware más modernos y muchos programas sintetizadores en software tienen cientos de patches que se organizan en bancos de sonidos.
Generalmente, estos dispositivos usan mensajes de bancos LSB y MSB para acceder a los bancos, y usan cambios de programa dentro de estos para acceder a patches específicos. La mayoría de los dispositivos únicamente aceptan mensajes MSB, pero debes referirte a la documentación del software o de tu dispositivo para confirmer qué mensaje de banco se debe enviar primero, dado que esto depende de cada fabricante.
Puede enviar cualquier tipo de mensaje al:
•Enviar un cambio incremental o decremental utilizando los botones Oct/Data, lo que le permite ir
paso a paso por cada número de banco en cualquier sentido.
- o -
•Introducir el número de banco utilizando las teclas numéricas (0 a 9) de su Keystation Mini 32. Ambos métodos se explican a continuación para cada tipo de mensaje:
Para enviar cambios del banco LSB ascendentes/descendentes con los botones Oct/Data:
1.Pulsa el botón Edit para entrar en el modo de edición. Se encenderá el botón Edit a pleno brillo.
2.Pulsa la tecla “Datos = Banco LSB” (Sol#, 4ª tecla negra desde la izquierda).
3.Pulsa los botones Oct/Data “+” o “-” para subir o bajar por los valores del banco LSB. Esto te lleva por cada banco de sonidos.
Para enviar cambios de banco MSB ascendentes/descendentes con los botones Oct/Data:
1.Pulsa el botón Edit para entrar en el modo de edición. Se encenderá el botón Edit a pleno brillo.
2.Pulsa la tecla “Datos = Banco MSB” (La#, 5ª tecla negra desde la izquierda).
3.Pulsa los botones Oct/Data “+” o “-” para subir o bajar por los valores del banco MSB. Esto te lleva por cada banco de sonidos.
El valor Datos = Banco LSB, Datos = Banco MSB o cualquier dato asignado a LSB o MSB no se mantiene cuando se apaga el teclado, pero sí las teclas de datos de asignación.
Para rellamar el número de banco predeterminado (0): Pulsa simultáneamente los botones “-” y “+”.
Para enviar cambios de LSB de banco utilizando las teclas numéricas:
1.Pulse el botón Edit para entrar al modo Edición. El botón Edit se iluminará con brillo máximo.
2.Pulse la tecla “BANK LSB” (Sol #, 5ta tecla negra desde la derecha).
3.Utilice las teclas numéricas (0 a 9) para introducir el número de LSB del banco de sonidos al que desea acceder.
4.Pulse la tecla “ENTER” (Sol, la última tecla blanca de la derecha). El botón Edit volverá a medio brillo indicando que se completó la programación.
Para enviar cambios de MSB de banco utilizando las teclas numéricas:
1.Pulse el botón Edit para entrar al modo Edición. El botón Edit se iluminará con brillo máximo.
2.Pulse la tecla “BANK MSB” (La #, 4ta tecla negra desde la derecha).
3.Utilice las teclas numéricas (0 a 9) para introducir el número de MSB del banco de sonidos al que desea acceder.
4.Pulse la tecla “ENTER” (Sol, la última tecla blanca de la derecha). El botón Edit volverá a medio brillo indicando que se completó la programación.
21
Canal
Desde el teclado se pueden enviar datos MIDI por cualquiera de 16 canales MIDI. No obstante, ciertos dispositivos y software MIDI requieren que los datos se transmitan por un número de canal específico. Si este es el caso, puedes modificar el número de canal MIDI como se indica a continuación.
Para cambiar el número de canal MIDI:
1.Pulsa el botón Edit para entrar en el modo de edición. Se encenderá el botón Edit a pleno brillo.
2.Pulsa la tecla “Datos = Canal” (Do#, 6ª tecla negra desde la izquierda). El botón Edit volverá a medio brillo.
3.Pulsa el botón Oct/Data “+” o “-” para ir hacia arriba o hacia abajo por los números de canal MIDI.
Pulsar los botones “+” y “-” juntos rellamará el canal 1.
Cuando se llega al canal 16 y se pulsa “+”, el selector vuelve al canal 1. Los LED de los botones "+" y "-" no cambiarán, ya que no es posible tener un canal con un valor negativo. Por ejemplo, si un dispositivo especifica que necesitas enviar datos por el canal 10, pulsa el botón “+” nueve veces para pasar del canal 1 al canal 10.
El valor Data = Canal se mantiene cuando se apaga el teclado.
Afinación
La función de afinación se puede utilizar para subir o bajar ligeramente el tono del instrumento que se controla. El valor predeterminado de afinación es 64, y se puede subir a 128 o bajar a 0 como se indica a continuación.
Consulta la documentación de tu hardware o software de otros fabricantes para confirmar que si tu fuente de sonido responde al comando “MIDI Master Tune”.
Para asignar los botones “+” y “-” para controlar la función de Afinación:
1.Pulsa el botón Edit para entrar en el modo de edición. Se encenderá el botón Edit a pleno brillo.
2.Pulsa la tecla “Datos = Afinación” (Re#, séptima tecla negra desde la derecha). El botón Edit volverá a medio brillo. El botón Oct/Data “+” se iluminará en verde, y el botón “-” estará en rojo.
3.Pulsa “+” o “-” mientras sigues tocando notas, hasta que el instrumento esté afinado como lo deseas.
Seleccionar un valor por debajo de la configuración predeterminada de 64, cambia el botón Oct/Data “-” de rojo a verde. Seleccionar un valor mayor de 64, cambia el botón Oct/Data “+”de rojo a verde.
Para volver la afinación a la configuración predeterminada (tono de concierto):
Pulsa los botones Oct/Data “-” y “+” simultáneamente. Ambos botones volverán a su valor predeterminado de color rojo a medio brillo.
22
Botón de modulación
Es posible asignar otros controles MIDI al botón de modulación, como:
•01 Modulación
•07 Volumen
•10 Panorama (balance)
•05 Portamento
Hay 131 parámetros en total que incluyen los 128 mensajes estándar de cambio de control MIDI (CCs de MIDI). No obstante, para que estos parámetros tengan algún efecto en el sonido, el dispositivo MIDI o el software receptor debe poder leer y responder a estos mensajes de efectos MIDI. La mayoría de los dispositivos responderán, como mínimo, a los datos de volumen, modulación y panorama.
A continuación se explica el proceso de asignar un efecto al botón de modulación (Mod), y cómo volver a la configuración predeterminada.
Para asignar un parámetro al botón de modulación con las teclas numéricas:
Estas instrucciones usan el ejemplo de asignar el número de parámetro 131 (Channel Aftertouch) al botón de modulación, pero el concepto también se aplica cuando se asignan otros parámetros.
1.Pulsa el botón Edit. Se encenderá el botón Edit a pleno brillo.
2.Pulsa la tecla “Asignar Mod” (Do#, 3ª tecla negra desde la izquierda).
3.Pulsa Mi (10ª tecla blanca desde la derecha) para introducir el número “1”.
4.Pulsa Sol (8ª tecla blanca desde la derecha) para introducir “3”.
5.Pulsa Mi (10ª tecla blanca desde la derecha) para introducir el número “1”.
6.Pulsa la tecla “INTRO” (Sol, la última tecla blanca a la derecha). El botón Edit se atenuará a medio brillo, lo que indica que la programación está completa.
Si has cometido un error al introducir los datos numéricos, puedes pulsar la tecla CANCELAR (Do, primera tecla blanca a la izquierda) para salir del modo de edición sin cambiar el efecto asignado al botón de modulación.
La asignación del botón de modulación se mantiene cuando se apaga el teclado.
Para volver el botón de modulación a las configuraciones predeterminadas:
1.Pulsa el botón Edit para entrar en el modo de edición, el que se encenderá a pleno brillo.
2.Pulsa la tecla “ASIGNAR MOD” (Do#, 3ª tecla negra desde la izquierda).
3.Pulsa la tecla “PREDETERMINADO” (Do, octava tecla blanca desde la izquierda). La luz de edición disminuirá a medio brillo, lo que indica que la programación está completa.
Velocidad de modulación
Es posible alterar la sensibilidad de los efectos del botón de modulación con la función “Velocidad de modulación”. Esto permite ajustar la velocidad de cambio de los efectos asignados a ese botón. La pendiente de velocidad de modulación cubre un intervalo de 0 a 127, con una configuración predeterminada de 64. Cuanto más bajo el valor, más lenta la velocidad del cambio y viceversa.
23
Por ejemplo, el conjunto de instrucciones y el cuadro de valores siguientes explican cómo usar la function Velocidad de modulación (“Mod Rate”) al cambiar el tiempo de ataque del valor predeterminado de 64 a 127.
Valor |
Velocidad |
|
|
0 |
Pendiente de cambio lento |
|
|
64 [predeterminado] |
Pendiente de cambio relativamente rápido |
|
|
126 |
Pendiente de cambio muy rápido |
|
|
127 |
Sin pendiente. Se envia solamente un valor: min. o máx. |
|
|
Para ajustar la profundidad de modulación:
1.Pulsa el botón Edit. Se encenderá el botón Edit a pleno brillo.
2.Pulsa la tecla “VELOCIDAD DE MODULACIÓN” (Fa, 4ª tecla blanca desde la izquierda).
3.Pulsa Mi (10ª tecla blanca desde la derecha) para introducir el número “1”.
4.Pulsa Fa (9ª tecla blanca desde la derecha) para introducir “2”.
5.Pulsa Re (4ª tecla blanca desde la derecha) para introducir “7”.
Si has cometido un error al introducir los datos numéricos, puedes pulsar la tecla “CANCELAR” (Do, primera tecla blanca a la izquierda) para salir del modo de edición sin hacer cambios.
Como una alternativa a los pasos 3 a 5, puedes usar los botones “+” y “-” para cambiar el valor.
6.Pulsa la tecla “INTRO” (Sol, la última tecla blanca a la derecha).
7.Pulsa el botón “Mod” para escuchar el cambio en la velocidad del efecto.
El valor de velocidad de modulación se mantiene al apagar el teclado.
Para volver la velocidad de modulación a las configuraciones predeterminadas:
1.Pulsa el botón Edit. Se encenderá el botón Edit a pleno brillo.
2.Pulsa la tecla “VELOCIDAD DE MODULACIÓN” (Fa, 4ª tecla blanca desde la izquierda).
3.Pulsa la tecla “PREDETERMINADO” (Do, octava tecla blanca desde la izquierda). La luz de edición disminuirá a medio brillo, lo que indica que la programación está completa.
24
 Loading...