


User Guide
English ( 2 – 6 )
Guía del usuario
Español ( 7 – 11 )
Guide d’utilisation
Français ( 12 – 16 )
Guida per l’uso
Italiano ( 17 – 21 )
Benutzerhandbuch
Deutsch ( 22 – 26 )
Appendix
English ( 27 )
1

User Guide (English)
Introduction
Box Contents
BX5 D3
Power Cable
Acoustic Foam Pad
User Guide
Safety & Warranty Manual
Support
For the latest information about this product (documentation, technical specifications, system
requirements, compatibility information, etc.) and product registration, visit m-audio.com.
For additional product support, visit m-audio.com/support.
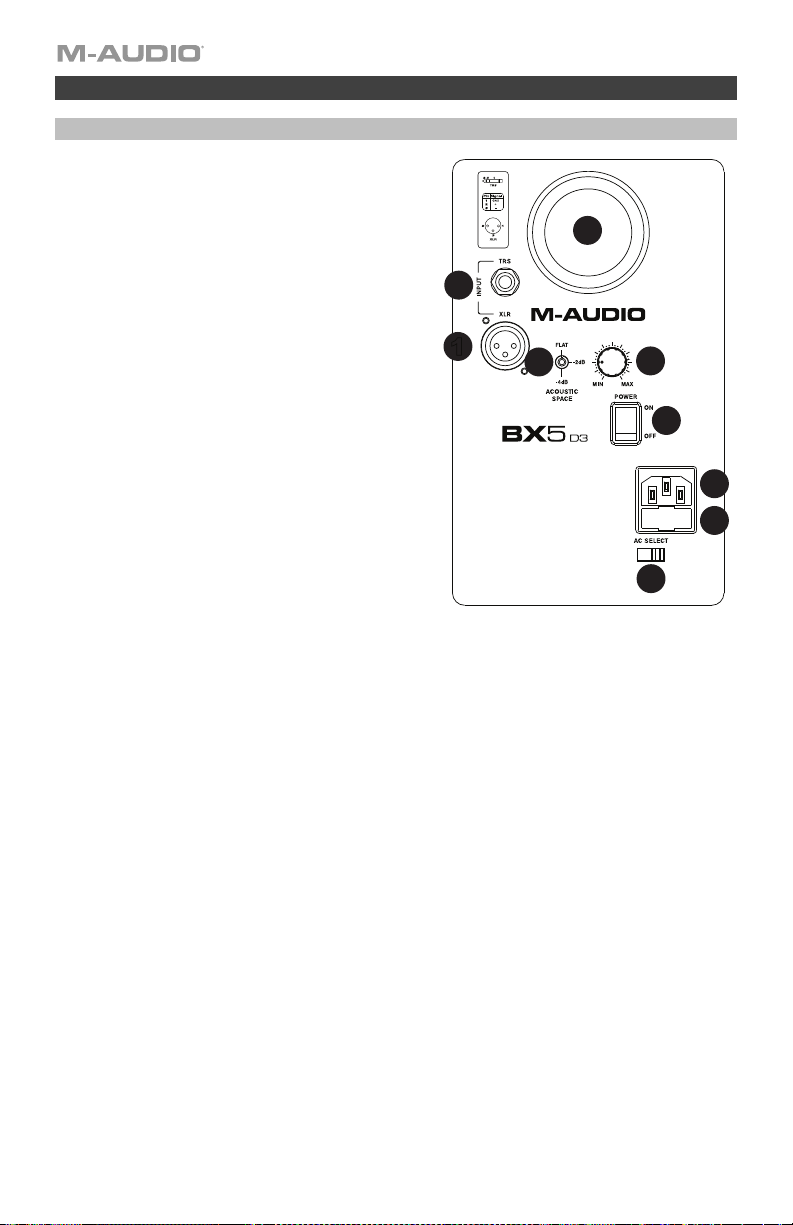
Setup
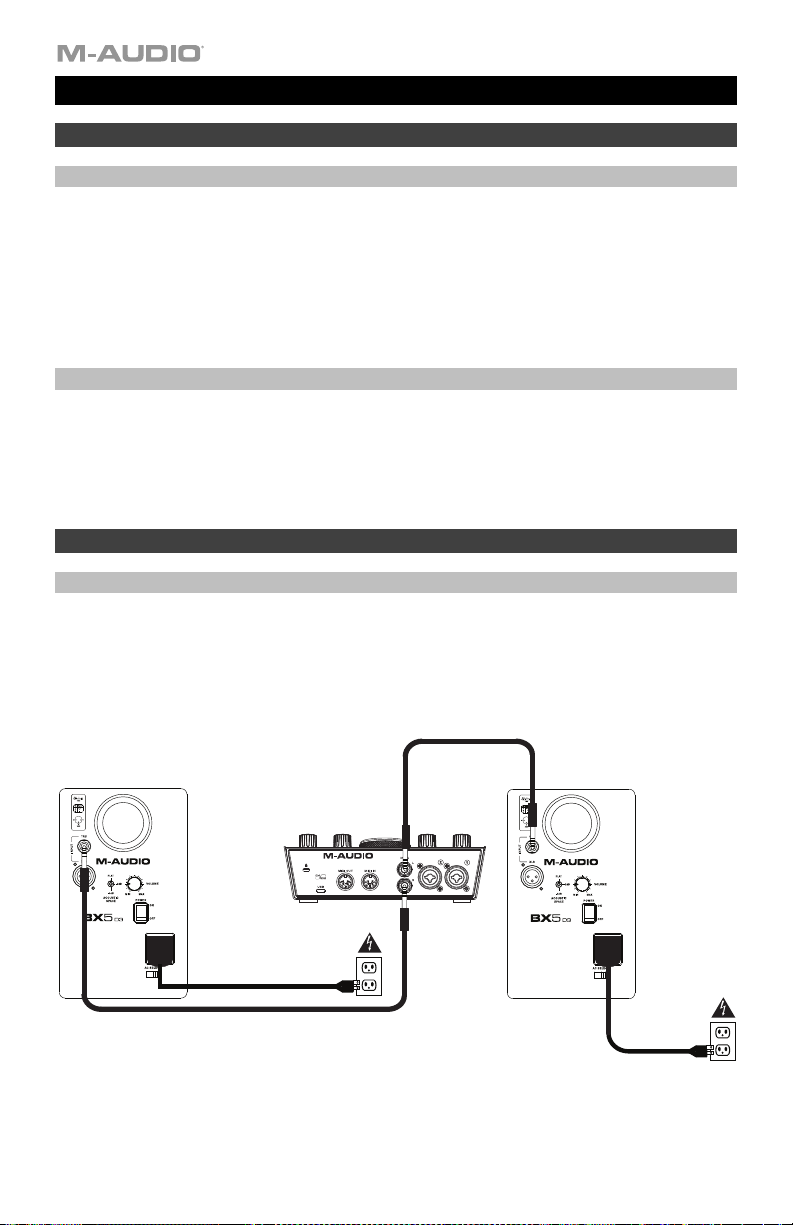
Connection Diagram
Items not listed under Introduction > Box Contents are sold separately.
2
Audio
Interface
2X2M
M-TRACK
C -SERIES
MIC/LINE
MIC/LINE
Power
Features
2
4
5
6
7
9
8
3
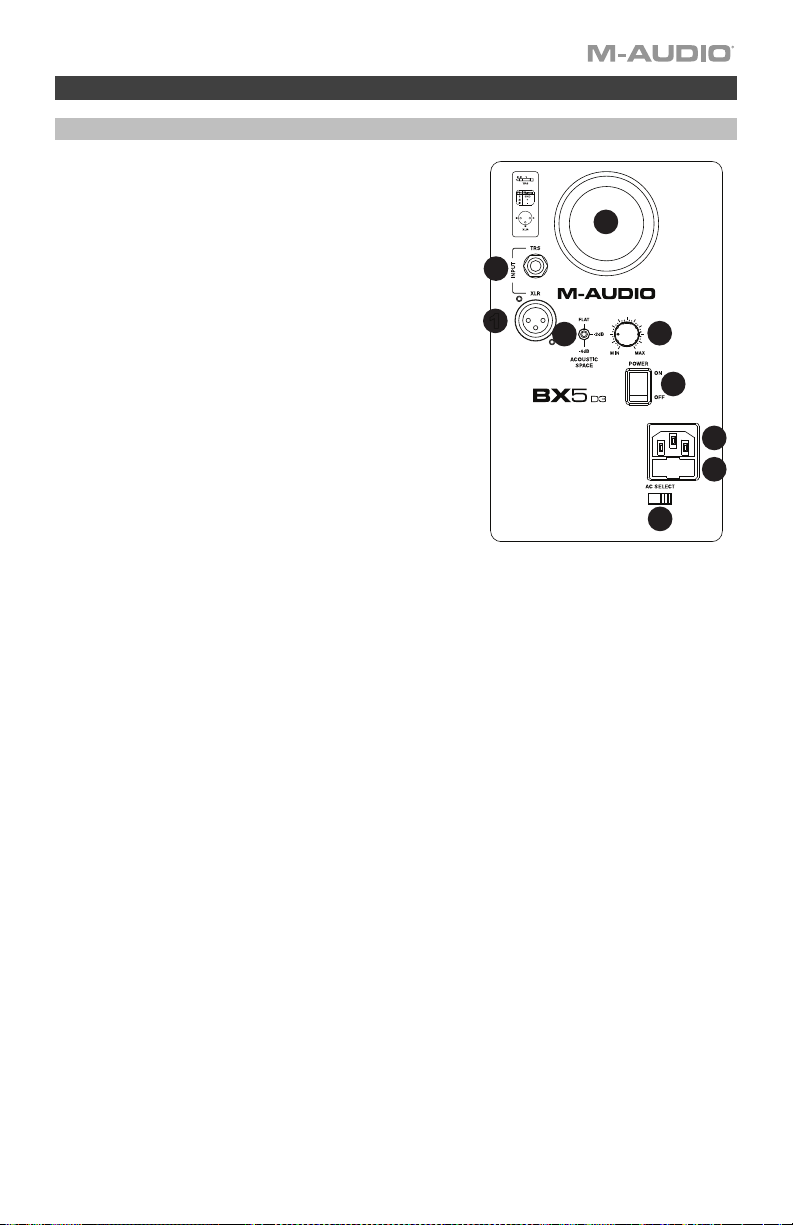
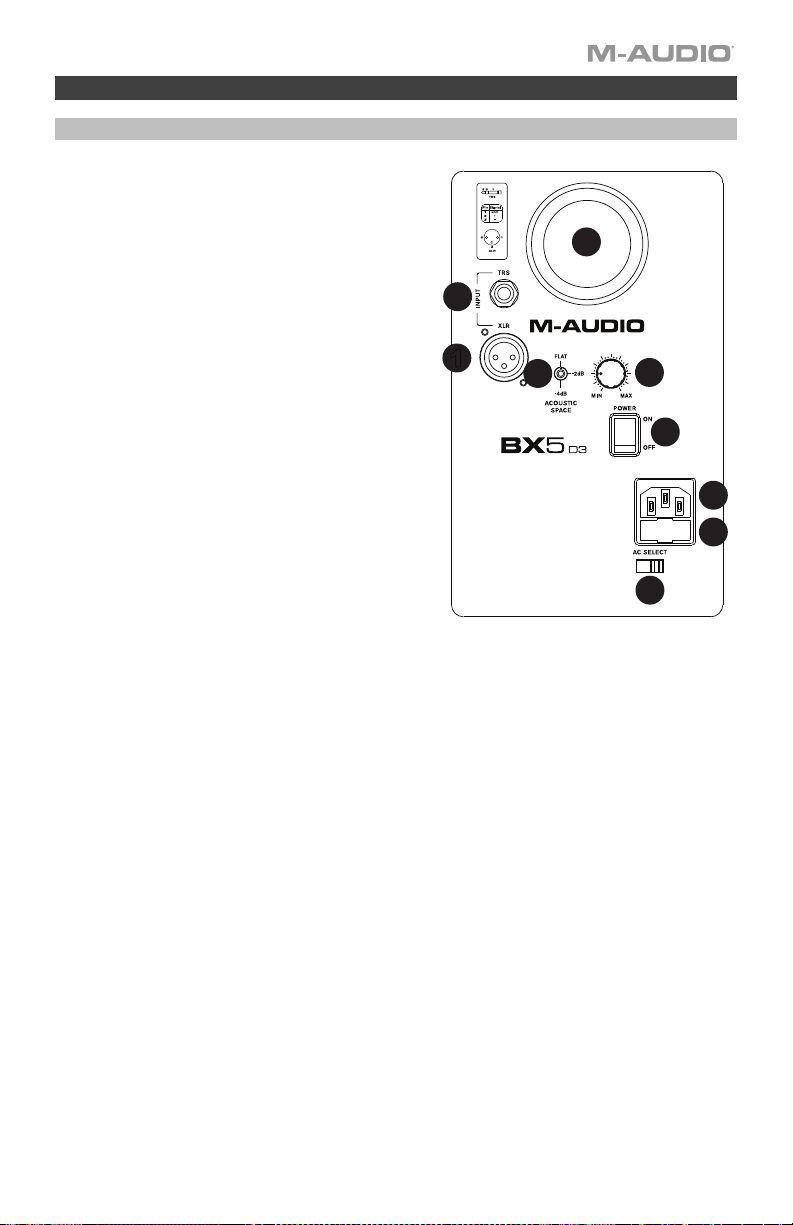
Rear Panel
1. XLR Input: This jack accepts XLR input
connections with either balanced or unbalanced
wiring. The input wiring of an XLR connector
should be as follows:
• XLR Pin 1: signal ground (shield)
• XLR Pin 2: signal positive (+)
• XLR Pin 3: signal negative (–)
2. TRS Input: This jack accepts 1/4" (6.35 mm)
connections with either balanced or unbalanced
wiring. For balanced wiring, a three-conductor
TRS plug is necessary. The input wiring of a TRS
connector should be as follows:
• TRS Tip: signal positive (+)
• TRS Ring: signal negative (–)
• TRS Sleeve: signal ground (shield)
3. Acoustic Space Switch: Your BX5 D3 monitors
should ideally be placed at least one foot away
from the nearest wall, ceiling, or other large, flat
surface. However, this may be impractical due to
space limitations within your studio. For that reason, BX5 D3 monitors feature an acoustic
space switch. This switch compensates for placement near walls.
Tip: Be sure to leave at least 3" of space between the rear of the speaker and a wall to
allow the rear-firing port to "breathe" properly. Placing the speaker any closer than 3" may
adversely affect low-frequency response.
4. Sub-Frequency Vent Port: This port aids in reproduction of very low frequencies by
discharging frequencies below 60 Hz and to act as a cooling mechanism to prevent
overheating. This port should not be blocked.
5. Volume Control: Use the volume control to set the output from the BX5 D3 to proper
levels as required.
6. Power Switch: This switch turns the monitor on and off.
Note: This product does not have a standby/low-power mode.
7. Power Receptacle: Accepts a detachable 3-conductor IEC power cord in order to power
the monitor.
8. Fuse Holder: Holds the external main fuse.
9. Voltage-Select Switch: Provides two selections, 115V AC and 230V AC, and should be
set to match the "house supply" (receptacle) mains voltage of the country or location in
which the speaker is used. The 115V setting is correct for the USA, while the 230V setting
is correct for most of the UK and Europe.
2
1
4
3
5
6
7
8
9
3

Front Panel
1. HF Driver: The tweeter outputs the high
frequencies.
2. LF Driver: The woofer outputs the low frequencies.
1
3. Speaker Placement LED: Helps to locate an
optimal speaker placement location for stereo
3
imaging and frequency reproduction. When the LED
turns bright, the speaker is in an ideal setup
location.
Installation
2
For optimal performance of the BX5 D3, please read the following thoroughly and carefully
prior to installation.
Precautions
• Handling: Please do not touch the speaker cone. The BX5 D3 is packaged in the box
tightly, so your attention is required when taking the monitor out of the box. To avoid
possible damage to the speaker unit, hold both sides of the monitor in order to pull it out
of the box. The speaker cone should not be touched in order to avoid damage even after
it is out of the box.
• Correct Power Operation: Since the BX5 D3 contains its own amplifier, it must be
connected to a power outlet using the detachable AC cable provided. Before connecting
power, please make sure that the Voltage-Select Switch located on the speaker's rear
panel is set to the appropriate position, as described in the rear-panel features list
appearing earlier in this manual.
WARNING! Use of improper Voltage-Select Switch combinations may result in hazardous
conditions and/or damage to speaker components not covered by speaker warranty.
Note: This product does not have a standby/low-power mode.
• Connections: You can connect either an XLR balanced cable or TRS
balanced/unbalanced cable from the input of each BX5 D3 to your corresponding
preamp, computer, mixer, or game console outputs. We recommend that you use highquality balanced or unbalanced cables for input connections. Also, ALWAYS turn off the
power of the BX5 D3 and turn the volume of the BX5 D3 down to a minimum before
making the necessary connections.
Note: When using an unbalanced cable there is a greater chance of experiencing noise issues.
If you are using an unbalanced cable and you are experiencing noise issues, try connecting a
balanced TRS cable or XLR cable.
4

Setup
The configuration and placement of your BX5 D3 monitors on speaker stands or your desktop
workstation may affect the performance of the speakers. Use the following tips to achieve the
best performance out of your BX5 D3 monitors.
Tip: If possible, place your BX5 D3 monitors on speaker stands instead of your desktop. Desks
tend to resonate sympathetically at low frequencies and may adversely affect the bass
response of your monitors. If speaker stands are not possible due to space restrictions and you
notice a buildup in bass, try placing the monitors on isolation pads to acoustically de-couple
the monitors from the desk.
XLR Balanced Connection
Assure that the power switch of the BX5 D3 is turned off and that the volume control of the
BX5 D3 is turned down to a minimum. Connect the male end of an XLR balanced cable to the
balanced input of the BX5 D3.
TRS Balanced/Unbalanced Connection
Assure that the power switch of the BX5 D3 is turned to off and that the volume control of the
BX5 D3 is turned down to a minimum. Connect the male end of a TRS balanced or TS
unbalanced cable to the TRS input of the BX5 D3.
Connecting to Preamp or Computer Outputs
Before connecting, make sure the output device's power has been turned off. Plug the XLR
balanced, TRS balanced or TS unbalanced cable to the corresponding output connectors of a
pre‑amplifier, audio interface, mixer, computer, or game console.
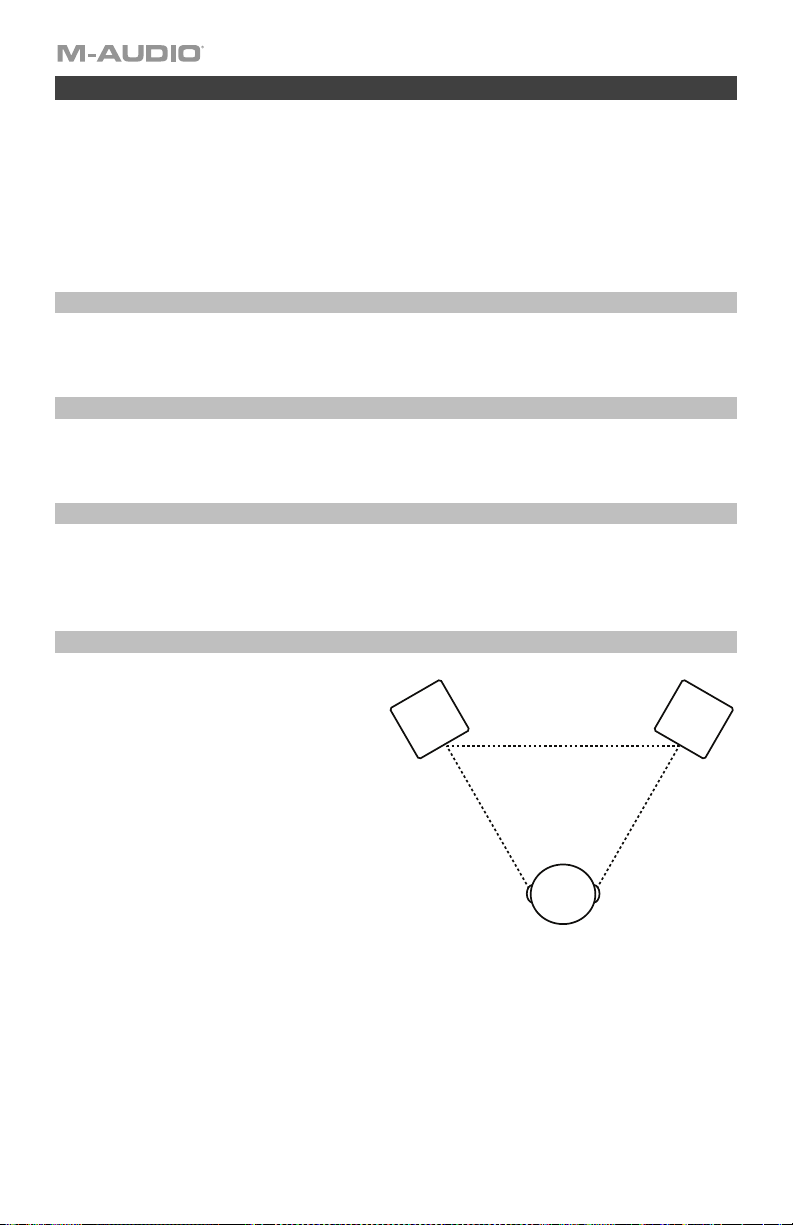
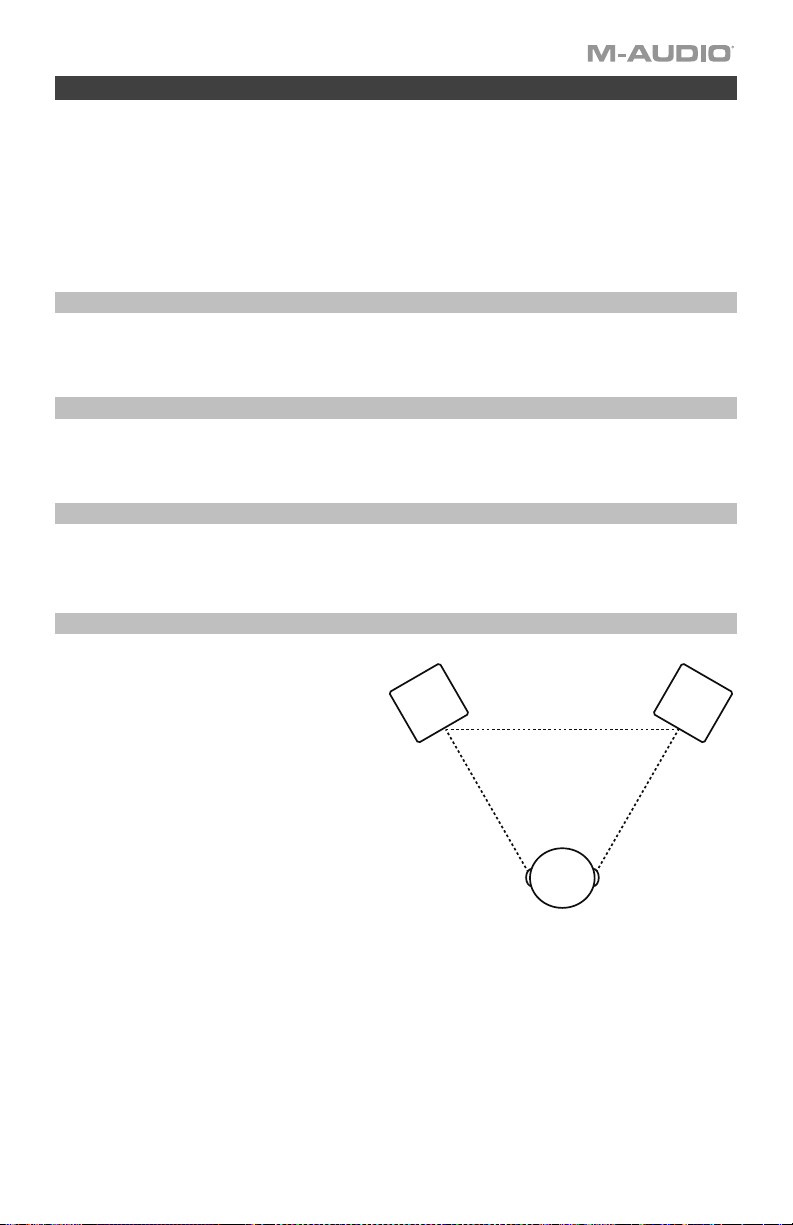
Speaker Placement
The placement of your speakers has a huge
impact on how well they will perform in your
studio. Although nearfield studio monitors are
designed to be more forgiving when it comes
to placement, you should do your best to make
sure they form an equilateral triangle relative to
your head. In other words, make sure that each
speaker is equally distant from both your head
as well as the other speaker. Once each
speaker has been placed, rotate the speakers
slightly so that the drivers are pointing toward
the listener.
Take a look at the diagram on the right. Notice
that the distance from the listener’s head to
each speaker is the same as the distance
between the left and right speakers. Also note
that the speakers are turned slightly so that the
drivers are facing the listener. This is an ideal
setup but if it is not practical (or possible) to do
this, try to match this setup as closely as
possible.
Left Speaker
The speakers and listener should
be at the three corners of a
triangle having equal length sides.
Right Speaker
Listener
5
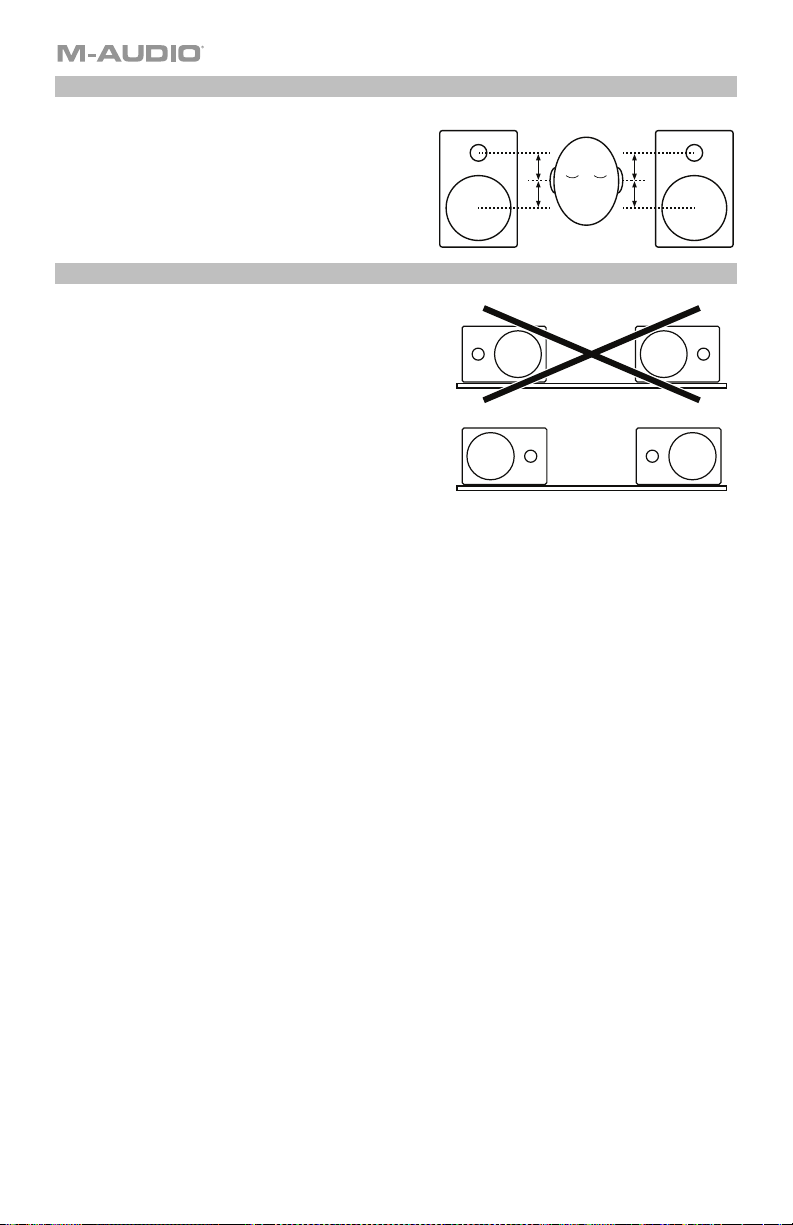
Speaker Height
The ideal height for BX5 D3 is so that the speaker is
parallel to the ground and that the midpoint of the
woofer and tweeter is at ear-height.
The diagram to the right demonstrates the ideal
placement height of the speakers relative to the listener.
Notice that the listener’s ears are directly between the
woofer and tweeter.
tweeter/woofer midpoint
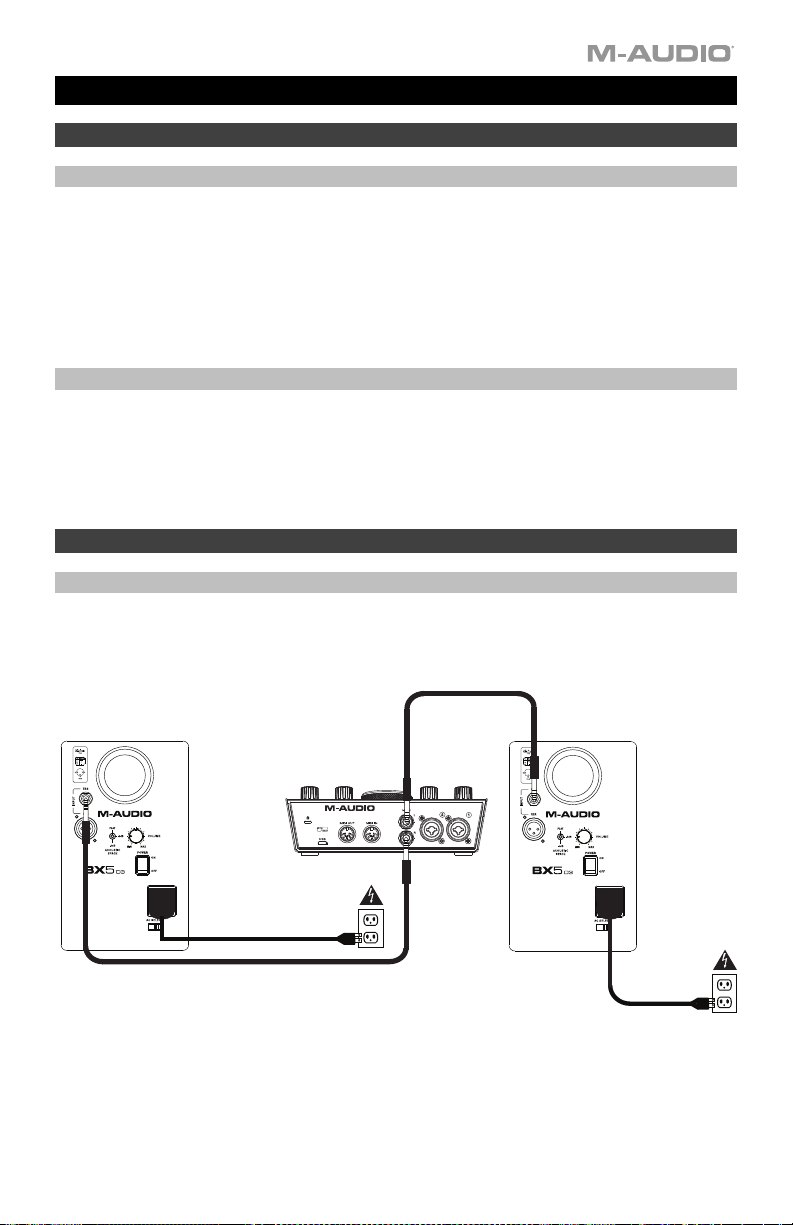
Speaker Orientation
If possible, place the BX5 D3 monitors in their upright
position and avoid laying the speakers on their sides. The
BX5 D3 woofer and tweeter are vertically aligned and will
provide the best performance when the speakers are
placed upright. Placing them on their sides may create
strong reflections from nearby surfaces resulting in
spectrally unbalanced sound.
If your BX5 D3 monitors must be oriented horizontally due
to space or line-of-sight considerations, place the speakers
so that their tweeter is on the “inside” to improve imaging.
Declaration for Always-On Products for Regulation (EC) No. 1275/2008:
To provide audio signal at the noise floor level, this studio monitor speaker product should be in the “always on” status for
terminal users to use. The requirement of a power management function as provided under point 2(d) of Annex II would be
“inappropriate for the intended use’’ of the equipment. This product is an exception to the design requirements as provided
under Annex II, thus an “off,” “standby” and/or “another condition” mode and a power management function is not
appropriate for its intended use. When not using this product, we suggest switching it off.
6
Guía del usuario (Español)
Introducción
Contenido de la caja
BX5 D3
Cable de alimentación
Almohadilla acústica de espuma
Guía del usuario
Manual sobre la seguridad y garantía
Soporte
Para obtener la información más reciente acerca de este producto (documentación,
especificaciones técnicas, requisitos de sistema, información de compatibilidad, etc.) y
registrarlo, visite m-audio.com.
Para soporte adicional del producto, visite m-audio.com/support.
Instalación
Diagramas de conexión
Los elementos que no se enumeran en Introducción > Contenido de la caja se venden por separado.
Interfaz de
audio
M-TRACK
C -SERIES
MIC/LINE
2X2M
MIC/LINE
Suministro eléctrico
7
2
4
5
6
7
9
8
3
Características
Panel trasero
1. Entrada XLR: Este conector XLR admite señales
de entrada balanceadas y no balanceadas. El
cableado de la entrada XLR se realiza de acuerdo
con el siguiente esquema:
• Patilla 1: Tierra (Masa)
• Patilla 2: Positivo (+)
• Patilla 3: Negativo (–)
2. Entrada TRS: Este conector 1/4 pulg. (6,35 mm)
admite señales de entrada balanceadas y no
balanceadas. Si desea establecer una línea
balanceada deberá utilizar conectores TRS (tipring-sleeve) balanceados, con cables de tres
conductores. El cableado de la entrada TRS se
realiza de acuerdo con el siguiente esquema:
• Punta: Positivo (+)
• Anillo: Negativo (–)
• Pantalla: Tierra (Masa)
3. Interruptor de acústica de espacio: Los
monitores BX5 D3 deben colocarse idealmente
como mínimo a 30 cm (1 pie) de distancia de la
pared más cercana, el cielo raso u otra superficie
grande y plana. Sin embargo, esto puede no ser
factible debido a las limitaciones de espacio de su
estudio. Por esta razón, los monitores BX5 D3
incluyen un interruptor de acústica de espacio.
Este interruptor compensa la ubicación de las
paredes cercanas.
Consejo: Asegúrese de dejar como mínimo 7,5 cm (3 pulg.) de espacio entre la parte trasera del
altavoz y la pared, para permitir que el puerto trasero "respire" apropiadamente. Si se coloca el altavoz
a menos de 7,5 cm, puede afectarse perjudicialmente la respuesta en frecuencias bajas.
4. Puerto de subfrecuencias: Este puerto ayuda en la reproducción de frecuencias muy bajas al
descargar las frecuencias inferiores a 60 Hz y actuar como mecanismo de enfriamiento para evitar el
recalentamiento. Este puerto no debe bloquearse.
5. Control de volumen: Este control de volumen permite establecer el nivel de emitido por el BX5 D3.
6. Switch de encendido: Prende y apaga el monitor.
Nota: Este producto no tiene un modo de espera/ahorro de energía.
7. Toma de alimentación: Esta toma admite un cable de alimentación de tres conductor IEC, a través
8. Portafusible: Acoge el fusible externo principal.
9. Conmutador de selección de tensión: Dispone de dos opciones (115V CA y 230V CA). Coloque este
8
del cual el monitor recibe la alimentación necesaria.
interruptor de manera que el valor de tensión de red corresponda con el tipo de corriente eléctrica
disponible en el país o región donde desee utilizar los monitores. El ajuste "115V" es el adecuado
para los Estados Unidos de América, mientras que en la mayoría de los países europeos se emplea
una tensión de 230V.
2
1
4
3
5
6
7
8
9

Panel frontal
1. Driver de frecuencia agudos: Emite las
frecuencias altas.
2. Driver de frecuencia graves: Emite las frecuencias
1
bajas.
3. LED de posicionamiento de altavoz: Ayuda a
3
detectar la ubicación óptima del altavoz para sonido
estéreo y reproducción de frecuencias. Cuando el
LED se ilumina, el altavoz se encuentra en la
ubicación ideal.
2
Instalación
Por favor, antes de instalar los BX5 D3 y con el fin de obtener el máximo rendimiento de los
monitores, lea atentamente las siguientes instrucciones.
Precauciones
• Manipulación de los monitores: Evite tocar los monitore por los cono. Los BX5 D3
apretados dentro del embalaje. Retírelo de la caja con precaución. Con el fin de evitar
posibles daños, sujete los monitor por los lados al sacarlo de la caja y evite tocar los
cono, incluso después de haber desembalado los monitore.
• Alimentación: Los monitores BX5 D3 contienen su propio amplificador y por
consiguiente, necesitan recibir alimentación eléctrica a través del cable de alimentación
CA suministrado. Antes de conectar los monitores a la red eléctrica, asegúrese de que el
interruptor de selección de tensión (situado en la parte trasera de los monitores) se
encuentra en la posición adecuada. (Consulte la sección anterior).
¡ATENCIÓN!: El uso de un valor de tensión inapropiado podría provocar situaciones
peligrosas y/o daños en los componentes del monitor que no están cubiertos por la
garantía.
Nota: Este producto no tiene un modo de espera/ahorro de energía.
• Conexiones: Puede conectar la entrada balanceada XLR o la entrada TRS balanceada o
no balanceada de ambos monitores a las salidas del dispositivo que desee monitorizar
(preamplificador, ordenador, mezclador, consola, etc.). Conecte las entradas utilizando
cables balanceados o no balanceados de alta calidad. Antes de proceder a su conexión,
asegúrese de que los BX5 D3 están APAGADOS y ponga el volumen en su posición
mínima.
Nota: Cuando se usa un cable no balanceado, existe una mayor probabilidad de experimentar
problemas relacionados con el ruido. Si está usando un cable no balanceado y está
experimentando problemas con el ruido, intente conectar un cable TRS o XLR balanceado.
9

Configuración
La configuración y colocación de los monitores BX5 D3 en los soportes de altavoces sobretu mesa
de trabajo puede influir en las prestaciones de los monitores. Sigue los consejos que proponemos a
continuación para obtener el mejor rendimiento de tus monitores BX5 D3.
Consejo: Si es posible, coloque sus monitores BX5 D3 sobre unos soportes en lugar dehacerlo
directamente sobre el escritorio. Los escritorios suelen resonar con las frecuencia másbajas,
pudiendo afectar negativamente la respuesta de graves de sus monitores. Si por falta de espacio no
es posible colocar unos soportes y se observa un aumento de frecuencias graves, coloque los
monitores sobre las almohadillas de aislamiento paraseparar acústicamente los monitores del
escritorio.
Conexión XLR balanceada
Asegúrese de que el BX5 D3 está apagado y ponga el volumen en su posición mínima. Conecte el
conector XLR macho de un cable balanceado en la entrada balanceada del BX5 D3.
Conexión TRS balanceada/ no balanceada
Asegúrese de que el BX5 D3 está apagados y ponga el volumen en su posición mínima. Conecte un
cable TRS balanceado o un cable TS no balanceado en la entrada TRS del BX5 D3.
Conexión con las salidas de un preamplificador, computadora o consola de
juegos
Antes de conectar el monitor, asegúrese de que los dispositivos de salida están apagados. Conecte
la entrada balanceada XLR o la entrada TRS balanceada o no balanceada de ambos monitores a las
salidas del dispositivo que desee monitorizar (preamplificador, ordenador, interfaz de audio,
mezclador, consola, etc.).
Ubicación de los Altavoces
La ubicación de los altavoces tiene un gran
impacto sobre la bondad de la reproducción en
el estudio. Si bien los monitores para estudio
de campo cercano están diseñados para ser
más flexibles en lo referente a la ubicación,
debe hacer lo posible para asegurar que
formen un triángulo equilátero en relación con
su cabeza. En otras palabras, asegúrese de
que cada altavoz esté equidistante tanto con
respecto a su cabeza como al otro altavoz. Una
vez colocado cada altavoz, gírelos ligeramente
de modo que los drivers apunten al oyente.
Eche un vistazo al diagrama de la derecha.
Note que la distancia desde la cabeza del
oyente hasta cada altavoz es igual a la
distancia entre los altavoces derecho e
izquierdo. Observe también que los altavoces
están ligeramente girados de modo que los
drivers queden mirando hacia el oyente. Esta
es una configuración ideal, pero si no es
práctico (o posible) hacerla, trate de acercarse
a la misma lo más posible.
10
Altavoz izquierdo Altavoz derecho
Oyente
Los altavoces y el oyente deben estar en las
tres esquinas de un triángulo equilátero.

Altura del Altavoz
La altura ideal del BX5 D3 es tal que el altavoz
quede paralelo al piso y que el punto medio
entre el woofer y el tweeter esté a la altura del
oído.
El diagrama de abajo muestra la altura de
ubicación ideal de los altavoces en relación al
oyente. Observe que los oídos del oyente están
directamente entre el woofer y el tweeter.
punto medio entre tweeter/woofer
Orientación de los monitores
Si es posible, coloca los monitores BX5 D3 en posición
vertical, y evita la posición horizontal. El woofer y el
altavoz de altos de BX5 D3 están alineados verticalmente
y ofrecen las mejores prestaciones cuando se usan en
esta posición. Si se colocan horizontalmente, las
superficies cercanas pueden crear fuertes reflexiones
que den como resultado un sonido desequilibrado en el
espectro.
Si sólo es posible la colocación horizontal de los
monitores BX5 D3, ponlos de manera que los altavoces
de altos se dirijan hacia el "interior," con el fin de mejorar
la imagen estéreo.
Declaración sobres productos encendidos permanentemente según la reglamentación (EC) Nro. 1275/2008:
Para proporcionar señales de audio al nivel del piso de ruido, el producto altavoz del monitor de estudio debe estar en estado
“siempre encendido” para ser usado por los usuarios finales. El requerimiento de una función de administración de energía tal
como se presenta en el punto 2 (d) del Anexo II sería “inapropiado para el uso previsto” del equipo. Este producto es una
excepción a los requerimientos de diseño tal como se presentan bajo del Anexo II, por lo cual los modos “apagado”, “en
espera” y/o “otra condición” y la función de administración de energía no son apropiadas para su uso previsto. Cuando no
esté utilizando este producto, sugerimos apagarlo.
11
Guide d’utilisation (Français)
Présentation
Contenu de la boîte
BX5 D3
Câble d’alimentation
Pad mousse acoustique
Guide d’utilisation
Consignes de sécurité et informations concernant la garantie
Assistance
Pour les toutes dernières informations concernant la documentation, les spécifications
techniques, la configuration requise, la compatibilité et l’enregistrement du produit, veuillez
visiter m-audio.com.
Pour toute assistance supplémentaire, veuillez visiter le site m-audio.com/support.
Démarrage
Schéma de connexion
Les éléments qui ne figurent pas dans la section Présentation > Contenu de la boîte sont
vendus séparément.
12
Interface
audio
2X2M
M-TRACK
C -SERIES
MIC/LINE
MIC/LINE
Alimentation
Caractéristiques
2
4
5
6
7
9
8
3
Face arrière
1. Entrée XLR : Cette prise accepte des entrées
XLR avec des câbles aussi bien symétriques
qu'asymétriques. Le câblage du connecteur
XLR d'entrée devra être le suivant :
• Broche XLR 1 : Masse / Blindage
• Broche XLR 2 : Point chaud (+)
• Broche XLR 3 : Point froid (-)
2. Entrée TRS : Cette prise accepte des jacks
6,35 mm (1/4 po) avec des câbles aussi bien
symétriques qu'asymétriques. En cas de
câblage symétrique, une fiche symétrique à
trois conducteurs est nécessaire. Le câblage du
connecteur TRS d'entrée devra être le suivant :
• Pointe : Point chaud (+)
• Bague : Point froid (–)
• Corps : Masse / Blindage
3. Acoustic spazio interrupteur : Vos moniteurs
BX5 D3 devraient idéalement être placés à au
moins un pied du mur, du plafond ou de toute
autre grande surface plane la plus proche.
Cependant, c'est peut-être peu pratique en
raison du manque d'espace dans votre studio.
Pour cette raison, les moniteurs BX5 D3
disposent d'un acoustique espacio interrupteur.
Cet interrupteur compense pour le placement
près de murs.
Conseil : Assurez-vous d’avoir au moins 3 po d’espace entre l’arrière du caisson haut-parleur et
le mur pour permettre à la sortie arrière de « respirer » correctement. Placer le haut-parleur à
moins de 3 po pourrait affecter la réponse basse fréquence.
4. Port de sous-fréquences : Cet évent contribue à la reproduction des très basses fréquences
en déchargeant les fréquences inférieures à 60 Hz et en agissant comme mécanisme de
refroidissement afin d'éviter la surchauffe. Cet évent ne doit pas être obstrué.
5. Contrôle de volume : Utilisez la commande de volume pour régler le niveau des moniteurs
BX5 D3.
6. Interrupteur d'alimentation : Ce commutateur met le moniteur sous et hors tension.
7. Prise d'alimentation : Permet la connexion d'un câble d'alimentation 3 conducteur CEI.
8. Porte-fusible : Contient le fusible externe principal.
9. Interrupteur de selection de la tension : Deux positions sont disponibles : 115V CA et 230V
Remarque : Ce produit ne dispose pas de mode de veille ou d’économie d’énergie.
CA. Elles doivent être sélectionnées en fonction de la tension de secteur du lieu où les
enceintes sont utilisées. Si vous vous trouvez aux Etats-Unis, placez l'interrupteur en position
115V; dans la plupart des pays européens vous devrez sélectionner la position 230V.
2
1
4
3
5
6
7
8
9
13

Face avant
1. Driver de fréquences hautes: Ce haut-parleur permet
d’assurer la réponse en hautes fréquences.
2. Driver de fréquences de basses: Ce haut-parleur
permet d’assurer la réponse en basses fréquences.
3. DEL de positionnement : Elle permet de trouver
l'emplacement optimal pour la reproduction précise
d'images stéréoscopiques et de fréquences. Lorsque la
DEL devient très lumineuse, l’enceinte est en position
optimale.
1
3
2
Installation
Pour que les performances des moniteurs BX5 D3 soient optimales, veuillez lire attentivement ce qui
suit avant de procéder à leur installation.
Précautions à prendre
• Manipulation : Veillez à ne pas tenir les moniteur par les cône. Les moniteur BX5 D3 emballé
esta de façon très serrée, retirez-les de la boîte avec précaution. Afin d'éviter que les moniteur
ne soit endommagés, tenez-les toujours par les deux côtés lorsque vous les retirez de la boîte.
Même lorsque les moniteur ont déjà été sortis de la boîte, évitez de toucher leurs cône. Ceci
pourrait les il.
• Alimentation correcte : Les BX5 D3 intégrant leur propre amplificateur, ils doivent être
connectés à une prise de courant à l'aide des câbles d'alimentation CA fournis. Avant de les
relier au secteur, veuillez vous assurer que l'interrupteur de sélection de tension situé sur la
face arrière des moniteurs est réglé sur la position appropriée (comme indiqué plus haut dans
ce manuel dans la liste des caractéristiques de la face arrière).
ATTENTION! Un mauvais réglage de l'interrupteur de sélection de tension peut donner lieu à
des situations dangereuses et/ou provoquer des dommages au niveau des composants des
moniteurs. Ces situations et ces dommages ne sont pas couverts par la garantie des moniteurs.
Remarque : Ce produit ne dispose pas de mode de veille ou d’économie d’énergie.
Connexions : Vous pouvez connecter soit un câble symétrique XLR, soit un câble
symétrique/asymétrique TRS pour relier l'entrée de chaque BX5 D3 aux sorties correspondantes
d'un préamplificateur, d'un ordinateur, console de mixage, ou d'une console. Pour les connexions
aux entrées, nous vous recommandons d'utiliser des câbles symétriques ou asymétriques haute
qualité. Avant d'effectuer les connexions nécessaires, mettez TOUJOURS les moniteurs BX5 D3
hors tension et réduisez leur volume au minimum.
Remarque : L’utilisation d’un câble asymétrique augmente les risques d'éprouver des bruits
parasitaires. Si vous utilisez un câble asymétrique et que vous éprouvez des bruits parasitaires,
essayez d’utiliser un câble TRS symétrique ou un câble XLR.
14

Configuration
La configuration et le positionnement de vos moniteurs BX5 D3 sur des pieds, ou le bureau de votre
station de travail peut affecter les performances des haut-parleurs. Suivez les conseils suivants pour
obtenir les meilleures performances avec vos moniteurs BX5 D3.
Conseil : Si possible, placez vos moniteurs BX5 D3 sur des supports au lieu de les situer sur votre
bureau. Les bureaux ont tendance à résonner aux basses fréquences et peuvent affecter la réponse
des basses de vos moniteurs. Si les supports de moniteurs ne sont pas possibles en raison de
l’espace et que vous remarquez des problèmes de basses, essayez de situer les moniteurs sur des
coussinets isolants pour délier acoustiquement les moniteurs du bureau.
Connexion XLR symétrique
Assurez-vous que l'interrupteur d'alimentation de l'enceinte BX5 D3 est en position "éteint" et que la
commande de volume est réglée au minimum. Connectez l'extrémité mâle d'un câble XLR
symétrique à l'entrée symétriqu du moniteur BX5 D3.
Connexion TRS symétrique/asymétrique
Assurez-vous que l'interrupteur d'alimentation de l'enceinte BX5 D3 est en position "éteint" et que la
commande de volume est réglée au minimum. Connectez un câble TRS symétrique ou TS
asymétrique à l'entrée TRS du moniteur BX5 D3.
Connexion aux sorties d'un préamplificateur ou d'un ordinateur
Avant d'effectuer la connexion, assurez-vous que l'alimentation des dispositifs de sortie est coupée.
Branchez un câble symétrique XLR, un câble TRS symétrique, ou encore un câble TS asymétrique
aux connecteurs de sortie d'un préamplificateur, interface audio, console de mixage, d'un
ordinateur ou d'une console.
Placement des haut-parleurs
Le placement de vos haut-parleurs aura un impact
énorme sur leur performance dans votre studio.
Bien que les haut-parleurs de proximité sont
conçus pour être plus compatissants lorsqu’il
s'agit de placement, il est tout de même préférable
de vous assurer qu'ils forment un triangle
équilatéral par rapport à votre tête. En d'autres
termes, assurez-vous que les haut-parleurs sont à
la même distance de votre tête ainsi que de l’un et
l’autre. Une fois que chaque haut-parleur a été
positionné, pivotez-les légèrement afin que les
transducteurs des haut-parleurs soient pointés
vers l'auditeur.
Regardez le diagramme de droite. Veuillez
remarquer que la distance entre la tête de
l'auditeur et chaque haut-parleur est la même que
la distance entre les haut-parleurs gauche et droit.
Remarquez également que les haut-parleurs sont
tournés légèrement afin que les transducteurs
fassent face à l'auditeur. Il s'agit d'une installation
idéale, mais s’il n'est pas pratique (ou possible) de
le faire, essayez de vous rapprocher de cette
configuration le plus possible.
Haut-parleur
gauche
Les haut-parleurs et l'auditeur
doivent former un triangle
ayant des côtés de mêmes
Haut-parleur
droit
Auditeur
15

Hauteur des haut-parleurs
Pour être à la hauteur idéale, le BX5 D3 doit être
parallèle au sol et le milieu entre le haut-parleur
d’extrêmes graves et le haut parleur des aigus doit
être à la hauteur des oreilles.
Le diagramme à droite montre la hauteur de
placement idéale des haut-parleurs par rapport à
l'auditeur. Veuillez remarquer que les oreilles de
l'auditeur sont directement entre le haut-parleur
d’extrêmes graves et le haut-parleur des aigus.
Plein centre entre le haut-parleur d’extrêmes
graves et le haut-parleur des aigus
Orientation des haut-parleurs
Dans la mesure du possible, posez les moniteurs BX5 D3
à la vertical et évitez de les coucher sur le côté. Le
woofer et le tweeter du moniteur BX5 D3 sont alignés
verticalement et produiront les meilleurs résultats en
position verticale. En les posant sur un côté,
d'importantes réflexions peuvent se créer sur les
surfaces proches et déséquilibrer le spectre audio
global.
Si vos moniteurs BX5 D3 doivent être orientés à
l'horizontal du fait de restrictions d'espace, ou pour ne
pas obstruer le champ de vision, positionnez les
tweeters vers l'intérieur pour obtenir une meilleure image
stéréo.
Déclaration concernant le Règlement de la Commission de l’Union européenne 1275/2008 :
Afin de fournir un signal au plancher de bruit, cette enceinte de studio doit être en mode veille afin que les utilisateurs finaux
puissent l’utiliser. L’exigence d’une fonction de gestion de l’énergie comme prévue au point 2(d) de l’Annexe II serait «
incompatible avec l’usage prévu » de l’équipement. Ce produit fait exception aux exigences de conception comme prévues à
l’Annexe II, ainsi un mode arrêt, veille et/ou un autre état et une fonction de gestion de l’énergie seraient incompatibles avec
l’usage prévu de l’appareil. Nous recommandons de mettre ce produit hors tension lorsqu’il n’est pas utilisé.
16

Guida per l’uso (Italiano)
Introduzione
Contenuti della confezione
BX5 D3
Cavo di alimentazione
Pad acustica gomma
Guida per l’uso
Istruzioni di sicurezza e garanzia
Assistenza
Per le ultime informazioni in merito a questo prodotto (documentazione, specifiche tecniche,
requisiti di sistema, informazioni sulla compatibilità, ecc.) e per effettuarne la registrazione,
recarsi alla pagina m-audio.com.
Per ulteriore assistenza, recarsi alla pagina m-audio.com/support.
Installazione
Schema dei collegamento
Elementi non elencati sotto Introduzione > Contenuti della confezione sono venduti separatamente.
Interfaccia
audio
2X2M
M-TRACK
C -SERIES
MIC/LINE
MIC/LINE
Alimentazione
17

2
4
5
6
7
9
8
3
Caratteristiche
Pannello posteriore
1. Ingresso XLR: Questo jack accetta collegamenti di
ingressi XLR con cablaggio bilanciato o sbilanciato.
Il cablaggio di ingresso di un connettore XLR deve
seguire lo schema seguente:
• XLR Pin 1: massa (schermo)
• XLR Pin 2: segnale positivo (+)
• XLR Pin 3: segnale negativo (-)
2. Ingresso TRS: Questo ingresso accetta connettori
jack 6,35 mm (1/4") con cablaggio bilanciato o
sbilanciato. Per il cablaggio bilanciato è necessario
un connettore TRS a tre conduttori. Il cablaggio di
ingresso di un connettore TRS deve seguire lo
schema seguente:
• TRS Tip: segnale positivo (+)
• TRS Ring: segnale negativo (-)
• TRS Sleeve: massa (schermo)
3. Acustica spazio interruttore: i monitor BX5 D3
devono essere collocati ad almeno 30 cm dalla
parete più vicina, dal soffitto o da qualsiasi altra
superficie ampia e piatta. Però ciò può essere poco
pratico a causa di limiti di spazio imposti dal proprio
studio. Per questo motivo, i monitor BX5 D3 sono
dotati di un acustica spazio interruttore. Questo
interruttore compensa per il collocamento vicino alle
pareti.
Suggerimento: lasciare almeno 7 cm di spazio tra la parte posteriore dell'altoparlante e la parete per
lasciar "respirare" correttamente la porta posteriore. Collocare l'altoparlante a meno di 7 cm può
influire negativamente sulla risposta delle basse frequenze.
4. Porta d'uscita d'aria: Questa porta aiuta nella riproduzione di bassissime frequenze scaricando
frequenze al di sotto di 60 Hz e agisce come meccanismo di raffreddamento per evitare il
surriscaldamento. Questa porta non deve essere bloccata.
5. Controllo volume: Utilizzare il controllo del volume per impostare il livello in uscita in base ai livelli
richiesti.
6. Interruttore di alimentazione: consente di accendere e spegnere l'alimentazione dei monitor.
Nota bene: questo prodotto non dispone di una modalità standby/a basso consumo.
7. Presa di alimentazione: Accetta il conduttore di IEC che serve per alimentare il monitor.
8. Portafusibile: Alloggio per il fusibile principale esterno.
9. Selettore di tensione: Offre 2 selezioni - 115V c.a. e 230V c.a. e deve essere impostato in base alla
18
tensione de rete in uso nel paese o nella regione in cui viene utilizzato il monitor. L'impostazione a
115V è corretta per gli USA, mentre quella a 230V viene utilizzata in gran parte di paesi europei.
2
1
4
3
5
6
7
8
9

Pannello frontale
1. Driver alta frequenza: Serve per l'uscita delle
frequenze alte.
2. Driver bassa frequenza: Serve per l'uscita delle
frequenze basse.
1
3
3. LED di posizionamento dell’altoparlante: aiuta a
individuare la sede ottimale per il posizionamento
dell’altoparlante in termini di imaging stereo e
riproduzione di frequenza. Quando il LED si illumina,
l’altoparlante si trova nella posizione ideale.
2
Installazione
Per ottenere prestazioni ottimali dai BX5 D3, leggere attentamente quanto segue prima
dell'installazione.
Precauzioni
• Manipolazione: Non toccare mai i cono degli altoparlanti. I BX5 D3 è imballati in modo
sicuro, quindi è necessaria particolare attenzione al momento dell'estrazione dei monitore
dalla scatola. Per evitare possibili danni agli monitore, afferrare entrambi i lati del
monitore allo scopo di estrarlo dalla scatola. Evitare di toccare i cono degli altoparlanti
anche dopo aver estratto i monitor della scatola.
• Utilizzo corretto dell'alimentazione: Poiché i BX5 D3 contengono un proprio
amplificatore, quest'ultimo deve essere collegato a una presa elettrica mediante il cavo
c.a. scollegabile fornito nella confezione. Prima di collegare l'alimentazione, assicurarsi
che il selettore di tensione presente nel pannello posterior degli altoparlanti sia stato
impostato nella posizione appropriata, come descritto in precedenza in questo manuale.
ATTENZIONE! L'uso di una tensione inadeguata può comportare condizioni pericolose
e/o danni a componenti degli altoparlanti non coperti dalla garanzia.
Nota bene: questo prodotto non dispone di una modalità standby/a basso consumo.
• Collegamenti: È possibile collegare l'ingresso XLR bilanciato o l'ingresso TRS
bilanciato/sbilanciato di ciascun monitor BX5 D3 alle uscite corrispondenti di
preamplificatore, computer o mixer. È consigliato l'utilizzo di cavi bilanciati o sbilanciati di
alta qualità per i collegamenti in ingresso. Spegnere SEMPRE l'alimentazione degli BX5
D3 e abbassare al minimo il volume prima di eseguire i collegamenti.
Nota bene: quando si utilizza un cavo non bilanciato vi è una maggiore probabilità di
sperimentare problematiche legate al rumore. Se si utilizza un cavo non bilanciato e si
sperimentano problemi di rumore, provare a collegare un cavo TRS o XLR bilanciato.
19
Configurazione
La configurazione e il posizionamento dei monitor BX5 D3 su supporti per altoparlanti o sulla
stazione di lavoro desktop possono influire sulle prestazioni degli altoparlanti. Avvalersi dei
seguenti suggerimenti per ottenere le migliori prestazioni dei monitor BX5 D3.
Suggerimento: Se possibile, collocare i monitor BX5 D3 su appositi supporti invece che su
banco. I banchi tendono a risuonare alle basse frequenze e possono influire negativamente
sulla risposta ai bassi dei monitor. Se non è possibile adottare appositi supporti per altoparlanti
per motivi di spazio e si nota un accumulo nei bassi, provare a collocare i monitor un pad
isolante per disaccoppiare acusticamente i monitor dal banco.
Collegamento bilanciato XLR
Assicurarsi che l'interruttore di alimentazione del BX5 D3 sia stato disattivato e che il controllo
del volume sia stato abbassato al minimo. Collegare l'estremità maschio di un cavo bilanciato
XLR all'ingresso bilanciato del BX5 D3.
Collegamento TRS bilanciato / sbilanciato
Assicurarsi che l'interruttore di alimentazione del BX5 D3 sia stato disattivato e che il controllo
del volume sia stato abbassato al minimo. Collegare un cavo bilanciato TRS o un cavo
sbilanciato TS all'ingresso TRS del BX5 D3.
Collegamento alle uscite del preamplificatore o del computer
Prima di effettuare il collegamento, assicurarsi che l'alimentazione degli impianti d'uscita sia
stata disattivata. Collegare il cavo XLR bilanciato, TRS bilanciato o TS sbilanciato ai connettori
di uscita corrispondenti di preamplificatore, interfaccia audio, mixer, computer o console di
gioco.
Disposizione delle casse
La disposizione delle casse ha un notevole
impatto sulle loro prestazioni nel vostro studio.
Nonostante le casse nearfield (a campo vicino)
siano progettate per essere piuttosto adattabili in
fatto di posizionamento, bisogna fare il possibile
affinché formino un triangolo equilatero con la
testa. In altre parole, assicuratevi che ogni cassa
sia equidistante dalla vostra testa e dall’altra
cassa. Una volta posizionate, ruotare leggermente
le casse in modo che i driver siano puntati verso
l'ascoltatore.
Osservate lo schema a destra. La distanza della
testa dell'ascoltatore da ciascuna cassa equivale
alla distanza che intercorre tra la cassa destra e
quella sinistra. Si nota inoltre che le casse sono
leggermente girate, in modo da trovarsi di fronte
all'ascoltatore. Questa è la disposizione ideale,
ma se non risulta pratica (o possibile), si
suggerisce di rispettarla il più possibile.
20
Cassa sinistra
Le casse e l'ascoltatore
dovrebbero trovarsi ai tre
angoli di un triangolo avente
lati di lunghezza equivalente.
Cassa destra
Ascoltatore

Altezza casse
L’altezza ideale delle casse dell'BX5 D3 è tale per cui la
cassa è parallela al terreno e il punto centrale tra woofer
e tweeter si trova all’altezza dell’orecchio.
Lo schema a destra mostra il posizionamento ideale in
altezza delle casse rispetto all'ascoltatore. Va notato che
le orecchie dell'ascoltatore si trovano direttamente tra il
woofer e il tweeter.
Punto centrale tweeter/woofer
Orientamento degli altoparlanti
Se possibile, collocare i monitor BX5 D3 in posizione
eretta, evitandone il posizionamento orizzontale. Il
woofer e il tweeter BX5 D3 sono allineati verticalmente e
offrono prestazioni ottimali se collocati in verticale.
Posizionandoli in orizzontale si potrebbero creare forti
riflessioni dalle superfici vicine e il suono risulterà
spettralmente non bilanciato.
Se i monitor BX5 D3 devono essere orientati in modo
orizzontale per motivi di spazio o di linea di vista,
collocarli in modo che il tweeter si trovino verso
l'"interno", per migliorare l'imaging.
Dichiarazione in materia di prodotti sempre accesi (modalità stand-by) secondo il Regolamento CE N. 1275/2008:
Per fornire un segnale audio al livello base del rumore e garantire l’utilizzo agli utenti finali, questo altoparlante da studio deve
essere “sempre acceso”. Il requisito di una funzione di gestione dell’alimentazione secondo quanto stabilito al punto 2(d)
dell’Allegato II sarebbe “inadeguato all’uso previsto’’ del dispositivo. Questo prodotto è un’eccezione ai requisiti di
progettazione di cui all’Allegato II, in quanto una modalità “off”, “standby” e/o “altra condizione” o una funzione di gestione
dell’alimentazione non sono adeguati per il suo uso previsto. Quando il prodotto non è in uso, si consiglia di spegnerlo.
21

Benutzerhandbuch (Deutsch)
Einführung
Lieferumfang
BX5 D3
Netzkabel
Akustisch schaumgummi Pad
Benutzerhandbuch
Sicherheitshinweise und Garantieinformationen
Kundendienst
Für die neuesten Informationen zu diesem Produkt (Dokumentation, technische Daten,
Systemanforderungen, Informationen zur Kompatibilität etc.) und zur Produktregistrierung
besuchen Sie bitte: m-audio.com.
Um weitere Unterstützung zu Ihrem Produkt zu erhalten, besuchen Sie m-audio.com/support.
Setup
Teile, die nicht unter Einführung > Lieferumfang angegeben sind, sind separat erhältlich.
22
Audio-Interface
2X2M
M-TRACK
C -SERIES
MIC/LINE
MIC/LINE
Strom

Funktionen
2
4
5
6
7
9
8
3
Rückseite
1. XLR-Eingang: Über den XLR-Eingang können
sowohl symmetrische als auch unsymmetrische
Audioquellen angeschlossen werden. Das
Anschlussdiagramm für die Belegung des XLREINGANGS sieht wie folgt aus:
• XLR Pin 1: Masse (Erdung)
• XLR Pin 2: Positiv (+)
• XLR Pin 3: Negativ (–)
2. Klinkeneingang (Stereo): Über den 6,35 mm
(1/4") Klinkeneingang können sowohl
symmetrische als auch unsymmetrische Kabel
angeschlossen werden. Für die symmetrische
Signalführung ist eine 6,35 mm- (1/4"-)
Stereoklinke (3 Leiter) erforderlich. Das
Anschlussdiagramm für die Belegung des
KLINKENEINGANGS sieht wie folgt aus:
• Spitze: Positiv (+)
• Ring: Negativ (–)
• Schaft: Masse (Erdung)
3. Akustischen abstand schalter: Sollten Ihre BX5
D3 idealerweise mindestens einen Fuß von der
nächsten Wand, Decke oder jeder anderen großen,
ebene Fläche entfernt sein. Dies ist in Ihrem Studio
vielleicht aus Platzgründen aber nicht
durchführbar. Aus diesem Grund verfügen BX5 D3
über einen akustischen abstand schalter. Dieser
Schalter kompensiert die Platzierung in der Nähe von Wänden.
Tipp: Achten Sie darauf, einen Abstand von mindestens 3" zwischen der Rückseite des Lautsprechers
und der Wand zu lassen, damit das nach hinten abstrahlende Rohr "atmen" kann. Das Platzieren der
Lautsprecher näher als 3" kann sich nachteilig auf die Basswiedergabe auswirken.
4. Bassreflexöffnung: Diese Öffnung unterstützt die Reproduktion von besonders tiefen Frequenzen,
indem Frequenzen unterhalb von 60 Hz ausgegeben werden. Gleichzeitig dient sie als
Kühlvorrichtung, um ein Überhitzen zu vermeiden. Diese Öffnung sollte nicht blockiert werden.
5. Lautstärkeregler: Über diesen Lautstärkeregler kann der Schallpegel des abgestrahlten Signals
eingestellt werden.
6. Netzschalter: dieser Schalter aktiviert bzw. deaktiviert den Monitor.
Hinweis: Dieses Produkt verfügt über keinen Standby/Energiesparmodus.
7. Netzanschluss: Für abnehmbare 3-Leiter-IEC-Netzkabel.
8. Sicherungshalter: Von außen zugängliche Netzsicherung.
9. Spannungsumschalter: Über diesen Schalter können Sie Versorgungsspannung (115V AC und 230V
AC) einstellen. Beachten Sie bitte, dass die Versorgungsspannung je nach Land variieren kann. In den
USA sind 115V (AC) gängig, während in Großbritannien und in den meisten Ländern Resteuropas mit
230V (AC) gearbeitet wird.
2
1
4
3
5
6
7
8
9
23

Vorderseite
1. Hochtöner: Gibt die hohen Frequenzen wieder.
2. Tieftöner: Gibt tiefe Frequenzen wieder.
3. LED für die Lautsprecherplatzierung: Hilft Ihnen,
1
den optimalen Lautsprecheraufstellort für die
Stereoabbildung und Frequenzwiedergabe zu
finden. Wenn die LED leuchtet, befindet sich der
3
Lautsprecher an einem idealen Ort.
2
Installation
Bevor Sie die BX5 D3 installieren, lesen Sie sich bitte die folgenden Ausführungen aufmerksam
durch, denn sie enthalten wichtige Hinweise zur optimalen Ausnutzung der Monitorleistung.
Sicherheitshinweise
• Handling: Greifen Sie beim Herausnehmen der Monitor nicht in die Lautsprecherhörne.
Die BX5 D3 relativ fest in der Verpackung, sodass Sie hier besonders vorsichtig vorgehen
sollten. Halten Sie die Monitor mit beiden Händen an den Seiten fest und ziehen Sie sie
nach es aus dem Karton. Achten Sie darauf, dass Sie die Hörne auch nach dem
Auspacken nicht berühren.
• Betrieb: Die BX5 D3 verfügen über eine eingebaute Hochleistungsendstufe und müssen
demzufolge an das Versorgungsnetz angeschlossen werden. Nutzen Sie hierzu das
mitgelieferte Netzkabel. Vergewissern Sie sich, dass die richtige Versorgungsspannung
am Spannungsumschalter (Monitorrückseite) eingestellt ist, bevor Sie die BX5 D3 an das
Versorgungsnetz anschließen (siehe den vorstehenden Abschnitt).
ACHTUNG! Ist die Versorgungsspannung falsch eingestellt, besteht die Gefahr, dass u.a.
die von der Garantie ausgeschlossenen Bauteile beschädigt werden.
Hinweis: Dieses Produkt verfügt über keinen Standby/Energiesparmodus.
• Anschluss: Für den Anschluss Ihrer Audioquelle (Vorverstärker, Computer, Mixer,
Spielkonsole) können Sie den XLR-Eingang (symmetrisch) bzw. den Klinkeneingang
(Mono oder Stereo) der BX5 D3 nutzen. Verwenden Sie nur qualitativ hochwertige Stereobzw. Monokabel für den Anschluss der Audioquellen. Schalten Sie die BX5 D3 aus und
drehen Sie die Lautstärkeregler bis auf Null herunter, bevor Sie die Audioquellen
anschließen.
Hinweis: Bei Verwendung eines unsymmetrischen Kabels besteht die Gefahr, dass
Störgeräusche auftreten. Wenn Sie ein unsymmetrisches Kabel verwenden und Störgeräusche
hören, sollten Sie ein symmetrisches TRS-Kabel oder XLR-Kabel anschließen.
24
Konfiguration
Konfiguration und Positionierung der BX5 D3-Monitore auf Lautsprecherstativen oder Ihrer
Arbeitsfläche können die Leistung der Lautsprecher beeinflussen. Folgende Tipps können
dabei behilflich sein, die beste Leistung aus Ihren BX5 D3-Monitoren herauszuholen.
Tipp: Wenn möglich, montieren Sie Ihre BX5 D3-Monitore auf Stative und stellen Sie sie nicht
auf den Tisch. Tische u.Ä. schwingen bei tiefen Frequenzen mit und können so die
Basswiedergabe der Lautsprecher beeinträchtigen. Falls Sie die Lautsprecher aus Platzmangel
nicht auf Stativen betreiben können und Sie eine zu basslastige Wiedergabe wahrnehmen,
stellen Sie die Monitore auf spezielle Isolationsplatten um sie von der Tischplatte zu trennen.
XLR-Anschluss (symmetrisch)
Vergewissern Sie sich, dass der Monitore ausgeschaltet und der Lautstärkeregler
heruntergedreht sind. Schließen Sie den XLR-Stecker des Verbindungskabels an die XLREingangsbuchse.
Klinkenanschluss (wahlweise symmetrisch bzw. unsymmetrisch)
Vergewissern Sie sich, dass der Monitore ausgeschaltet und der Lautstärkeregler
heruntergedreht sind. Schließen Sie den Stecker des Stereo- oder Monokabels an den
Klinkeneingang der BX5 an.
Anschluss von Vorverstärker oder Computer
Stellen Sie sicher, dass die anzuschließenden Geräte ausgeschalten sind. Schließen Sie
Geräte über ein XLR-Kabel (Stereo) bzw. ein Klinkenkabel (Mono- oder Stereo) audio-interface,
Mixer, an die Monitore an.
Positionierung der Lautsprecher
Die Positionierung der Lautsprecher hat einen
großen Einfluss darauf, wie gut sie im Studio
klingen. Obwohl Nahfeld-Studiomonitore ohnehin
eher darauf ausgelegt sind, eine schlechte
Positionierung auszugleichen, sollten Sie
möglichst darauf achten, dass die Lautsprecher
und Ihr Kopf ein gleichseitiges Dreieck bilden. Mit
anderen Worten: Sorgen Sie dafür, dass jeder
Lautsprecher jeweils den gleichen Abstand zum
anderen Lautsprecher und Ihrem Kopf hat. Sind
die Lautsprecher platziert, drehen Sie jeden
Lautsprecher leicht, so dass sie zum Hörer
zeigen.
Sehen Sie sich das Diagramm auf der rechten
Seite an. Beachten Sie, dass der Abstand vom
Kopf des Hörers zu jedem Lautsprecher so groß
wie der Abstand zwischen dem linken und dem
rechten Lautsprecher sein soll. Denken Sie auch
daran die Lautsprecher leicht zu drehen, so dass
sie zum Hörer zeigen. Das wäre die ideale
Aufstellung - falls dies praktisch nicht
durchführbar ist, versuchen Sie dieser Aufstellung
so nahe wie möglich zukommen.
Linker
Lautsprecher
Die Lautsprecher und Hörer sollten sich
jeweils in den drei Ecken eines
gleichseitigen Dreiecks befinden.
Rechter
Lautsprecher
Hörer
25

Höhe der Lautsprecher
Die BX5 D3 befinden sich in idealer Höhe, wenn die
Lautsprecher parallel zum Boden stehen und der
Mittelpunkt zwischen Woofer und Hochtöner auf
Ohrhöhe ist.
Das Diagramm rechts zeigt die ideale Lautsprecherhöhe
in Relation zum Hörer. Beachten Sie, dass die Ohren
des Hörers unmittelbar zwischen Woofer und
Hochtöner sind.
Mittelpunkt zwischen Hochtöner/Woofer
Ausrichtung der Lautsprecher
Wenn möglich, stellen Sie die BX5 D3-Monitore senkrecht
auf und legen Sie sie nicht auf die Seite. Die Tief- und
Hochltöner der BX5 D3-Monitore sind senkrecht
ausgerichtet und liefern beste Ergebnisse, wenn sie
aufrecht stehen. Wenn Sie sie auf die Seite legen, kann
dies zu starken Reflexionen von nahegelegenen
Oberflächen und einem spektral unausgewogenem
Klangbild führen.
Falls Sie die BX5 D3-Monitore aus Platz- oder
Sichtgründen dennoch auf die Seite legen müssen,
verbessern Sie das Stereobild, indem Sie die Hochtöner
nach innen drehen.
Erklärung zu stets eingeschalteten Produkten laut Richtlinie (EG) Nr. 1275/2008:
Um ein Audiosignal mit niedrigem Grundrauschen zu gewährleisten, sollte dieser Studio-Monitor-Lautsprecher für
Endbenutzer im Modus „stets eingeschaltet“ betrieben werden. Das Erfordernis einer Energieverwaltungsfunktion, wie unter
Punkt 2 (d) Anhang II angegeben, wäre „für den Verwendungszweck des Geräts unangemessen“. Dieses Produkt stellt eine
Ausnahme für die im Anhang II angegebenen Design-Anforderungen dar, daher eignen sich die Modi „Aus“, „Standby“
und/oder „Anderer Zustand“ und Energieverwaltungsfunktionen nicht für den Verwendungszweck des Geräts. Bei
Nichtverwendung empfehlen wir, das Produkt auszuschalten.
26

Appendix (English)
K
Technical Specifications
High-Frequency Driver
1” (25.4 mm), 40W
Low-Frequency Driver
Frequency Response
Input Impedance
5” (127 mm), 60W
52 Hz – 35 kHz
20
Ω (balanced)
10 KΩ (unbalanced)
Power Voltage: 100–120V, 50/60 Hz
220–240V, 50/60 Hz
Consumption: 100W
Fuse
220–240V~ T1AL 250V
100–120V~ T1.6AL 250V
Dimensions
(width x depth x height)
Weight
6.9” x 7.8” x 10”
176 x 197 x 254 mm
12.3 lb / 5.6 kg
Specifications are subject to change without notice.
Trademarks & Licenses
M-Audio is a trademark of inMusic Brands, Inc., registered in the U.S. and other countries.
All other product or company names are trademarks or registered trademarks of their respective owners.
27

Manual Version 1.6
 Loading...