


User Guide
English ( 3 – 10 )
Guía del usuario
Español ( 11 – 18 )
Guide d’utilisation
Français ( 19 – 26 )
Guida per l’uso
Italiano ( 27 – 34 )
Benutzerhandbuch
Deutsch ( 35 – 42 )
Appendix
English ( 43 )

2
User Guide (English)
Introduction
Features
•Easy, intuitive operation for any application
•Wide-range 30–20,000 Hz frequency response delivers detailed, natural sound
•3-capsule condenser microphone element, including single-point stereo
•4 selectable polar patterns to customize your ideal recording
•Polar patterns: cardioid, figure-8, omnidirectional, and stereo
•1/8” headphone jack and internal headphone amplifier
•USB/direct mixing control with mic volume control enables zero-latency recording and monitoring
•Microphone mute control ensures privacy
•LCD display shows polar pattern and currently selected control level
•Studio-quality recording and playback for accurate reproduction
•Convenient desktop mounting with threaded insert for optional stand-mounting
•Integrated stand fits easily into any setup
Box Contents
Uber Mic |
Mini-USB Cable |
Integrated Microphone Stand |
User Guide |
Microphone Stand Extender |
Safety & Warranty Manual |
|
|
Support |
|
Visit m-audio.com to view and download the latest documentation, system requirements, and other information about your product.
For additional product support, visit m-audio.com/support.
How to Receive your Pro Tools | First M-Audio Edition Software
1.Visit m-audio.com/softwaredownloads to create an account (if you don’t already have one) and log in.
2.Follow the on-screen instructions to register Uber Mic.
3.Download your software.
4.Windows users should also download the driver from m-audio.com/drivers.
3
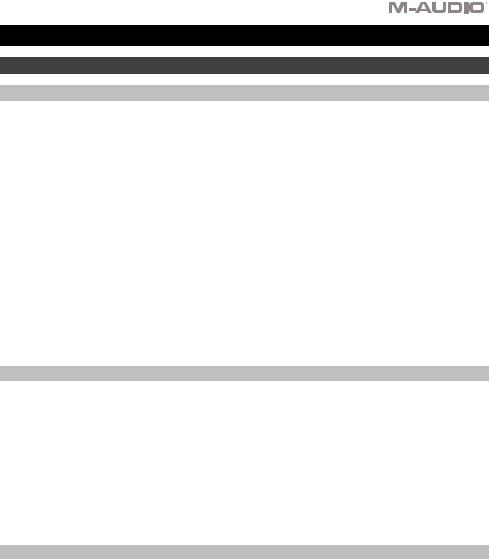
Setup
Items not listed under Introduction > Box Contents are sold separately.
Connection Diagrams
Microphone
Computer
Headphones
(rear |
(front |
panel) |
panel) |
Microphone Stand Extender (optional)
Setup with a boom stand: Connect the included microphone stand extender to Uber Mic’s bottom panel threaded mount. Then connect the microphone stand extender to the boom pole mount.
Note: When connecting a boom pole to Uber Mic, the mini-USB port may be blocked from use. Use the included microphone stand extender to have extra room to connect the USB cable and headphone cable to Uber Mic. Remove the “star” washer as this will also block the USB and headphone ports.
Microphone
Stand Extender
Remove the “Star”
Washer
4
Recommended Installation
Software: We've included Pro Tools | First M-Audio Edition with your Uber Mic so you can get started making music with professional software right out of the box. Register your Uber Mic on m-audio.com, and follow the Pro Tools | First M-Audio Edition install instructions in your User Account.
Note for Windows users: To use your Uber Mic with Pro Tools | First M-Audio Edition, download the Uber Mic Windows driver from m-audio.com.
Quickstart
1.Connect Uber Mic to a USB port on your computer.
2.Set Uber Mic as your default recording and playback device in your computer settings. See the Audio Setup section for more details.
3.Adjust the Polar Pattern selector for the source you are recording. See the Operation > Polar Patterns section for more details.
4.Set the computer’s sound input volume. See the Operation > Adjusting Audio Settings section for more details.
5.Set the computer’s sound output volume. See the Operation > Adjusting Audio Settings section for more details.
6.Open your favorite voice chat, streaming, podcasting, or recording software. To set up Uber Mic with your software, open your software’s Preferences, Device Setup, or Options to configure it to send and receive audio with the Uber Mic. Please consult your software manual for more information.
7.Speak into the microphone and turn the Mic Gain knob to adjust the level of the signal that the microphone sends to your computer. Set this knob so the gain is at a “healthy” level but not so high that the signal “clips” or peaks, causing distortion in the audio.
8.Turn the Headphone Volume knob to adjust the volume level and listen to the audio signal with headphones connected to Uber Mic’s headphone output or use speakers connected to your computer’s sound card.
9.Turn the USB-Mic knob to adjust the blend of the signals sent to the headphone output. Turn it toward Mic to hear more of the microphone signal, or turn it toward USB to hear more of your computer’s output signal.
5

Audio Setup
To set Uber Mic as your default recording and playback device, follow the directions below based on your computer’s operating system.
Windows:
1.Use the included USB cable to connect the Uber Mic to your computer.
2.In the Taskbar, locate the Volume Control “speaker” icon. Right-click it and select Playback Devices.
Alternatively, go to Start Menu > Control Panel (or Settings > Control Panel in Classic View) > Hardware and Sound > Sound.
3.In the Windows Sound control panel, select the Playback tab and select M-Audio Uber Mic as the default device.
4.Click the Recording tab and select M-Audio Uber Mic as the default device.
5.Click Properties in the lower-right corner.
6.In the new window, click the Advanced tab and select 2-channel, 16-bit, 48000 Hz (DVD Quality) as the default format.
7.Uncheck both boxes under Exclusive Mode.
8.Click OK to close the Properties window.
9.Click OK to close the Sound control panel.
macOS:
1.Use the included USB cable to connect the Uber Mic to your computer.
2.Go to Applications > Utilities > Audio MIDI Setup.
3.In the Audio Devices window, select M-Audio Uber Mic in the left column.
4.Right-click or press Ctrl and click M-Audio Uber Mic, and select Use this device for sound input.
5.Right-click or press Ctrl and click M-Audio Uber Mic, and select Use this device for sound output (to monitor the mic/computer signals through Uber Mic’s headphone output).
6.Quit Audio MIDI Setup.
Setting Up Uber Mic with Your Software
Note for Windows users: To use your Uber Mic with Pro Tools | First M-Audio Edition, download the Uber Mic Windows driver from m-audio.com.
Be sure your audio software program is set up to receive audio from the Uber Mic. This can usually be done in your software's Preferences, Device Setup, or Options. Please consult your software manual for more information.
To set up Uber Mic with Pro Tools | First M-Audio Edition:
1.Use the included USB cable to connect the Uber Mic to your computer.
2.Open Pro Tools | First M-Audio Edition.
3.Go to Setup > Playback Engine….
4.Open the Playback Engine dropdown menu and select M-Audio Uber Mic.
Note: You may need to save and restart your project.
5.Select your Sample Rate and then click OK to close the Setup window.
You can now add audio tracks to receive audio from Uber Mic and stream recorded audio back through the Uber Mic Headphone Output.
6

Features
Front View |
|
Rear View |
Underside |
||||||
|
|
|
|
|
|
|
|
|
|
|
|
|
|
|
|
|
|
|
|
1 |
5 |
8 |
|
2 |
|||
|
|||
3 |
6 |
9 |
|
4 |
|
||
7 |
|
||
|
|
1.Display: This display shows the current polar pattern (Pattern) and last setting (Mic Gain or Headphone Volume) that you adjusted on the microphone.
2.Headphone Volume: Turn this knob to adjust the volume of the headphone output.
3.Mute: Press this button to mute or unmute the microphone signal sent to your computer. This button will flash while muted and be solidly lit while unmuted. (When muted, you will still hear the microphone signal if the Mic-USB knob is turned toward Mic, but be assured that Uber Mic is not sending audio to your computer.)
4.Mic-USB: Turn this knob to adjust the blend of the signals sent to the headphone output. Turn it toward Mic to hear more of the microphone signal, or turn it toward USB to hear more of your computer’s output signal.
Tip: If you are playing audio on your computer and not using the microphone, we recommend turning this knob fully toward the USB setting.
5.Power Light: This name badge will illuminate when Uber Mic is powered on.
6.Pattern Selector: Turn this knob to select the microphone’s polar pattern, which determines how the microphone picks up sound in its surrounding environment. See the following Operation > Polar Patterns section to learn more about this.
7.Mic Gain: Turn this knob to adjust the level of the signal the microphone sends to your computer. Set this knob so the gain is at a “healthy” level but not so high that the signal “clips” or peaks, causing distortion in the audio.
Note: “Clipping” is indicated by your software’s volume level meter exceeding 0 dB and usually turning red.
8.Headphone Output: Connect 1/8” (3.5 mm) stereo headphones to this output to listen to the audio signal from the microphone and/or your computer. Use the Headphone Volume knob to adjust the volume level. Use the Mic-USB knob to adjust the blend of the two signals.
Note: When using voice chat applications, do not connect the Headphone output to powered speakers. This can result in an acoustic feedback loop or poor conversation quality.
9.Mini-USB Port: Use a standard mini-USB cable (included) to connect this port to a USB port on your computer (if you connect it to a USB hub, make sure it is a powered hub). The computer’s USB port provides ample power to Uber Mic. Uber Mic is class-compliant, so you do not need to install any additional drivers.
7
Operation
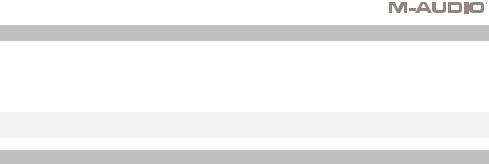
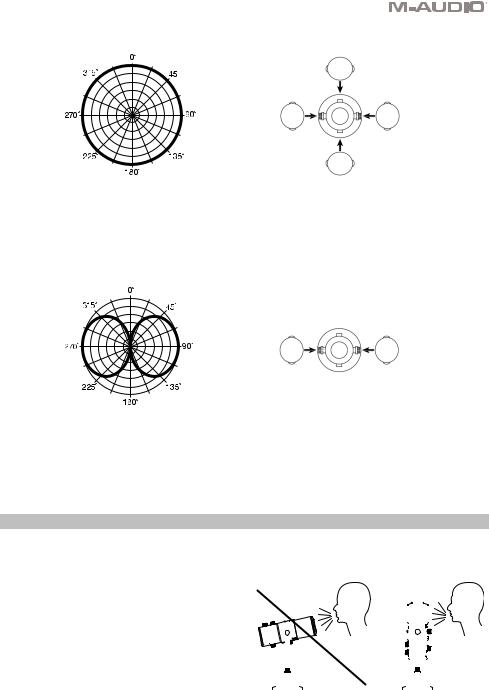
Polar Patterns
To select the microphone’s polar pattern, turn the Pattern Selector knob to the desired setting.
Figure 8 (bidirectional)
Cardioid Omni
Figure 8 |
Stereo |
Front
Side |
Side |
|
Rear |
Bidirectional means that the microphone picks up sound at the front and rear of the microphone. Sound from the sides of the microphone is not picked up. Use this pattern setting with two or more subjects (one source facing the front of the microphone and the other source facing the back of the microphone) for interviews, instruments, or vocal duets.
Cardioid
|
Front |
Side |
Side |
|
Rear |
Cardioid means that the microphone picks up sound directly in front of the microphone. Sound from the sides and rear of the microphone is not picked up. This pattern setting is ideal for use with podcasts, voiceovers, vocals, and instruments.
8
Omni
Front
Side |
Side |
Rear
Omni means that the microphone picks up sound equally from all directions. Use this pattern setting in situations where you want to capture the ambience of the room. Start by placing the front of the microphone at the primary sound source. This pattern setting is ideal for conference calls, field recordings, or events/orchestra.
Stereo
Front
Side |
Side |
Rear
Stereo means that the microphone picks up sound at the left and right sides of the microphone. To start, point the front of the microphone at the sound source, within 2 inches or several feet. Move the sound source to the left or right side of the microphone to get more of the source in either the left or right channel. This pattern setting is ideal for vocals, choir, or instruments. If you are using recording software, set the recording channel as a stereo track (2 channels). This will ensure that your stereo recording is captured properly.
Microphone Placement
Uber Mic is a side-address microphone, which receives sound from an angle perpendicular to the mic—as opposed to a front-address mic, which accepts sound from the “end” of the microphone. See the diagrams below for proper mic placement.
|
Incorrect mic |
|
|
Correct mic |
|||||||
|
|
placement |
|
|
placement |
||||||
|
|
|
|
|
|
|
|
|
|
|
|
|
|
|
|
|
|
|
|
|
|
|
|
|
|
|
|
|
|
|
|
|
|
|
|
|
|
|
|
|
|
|
|
|
|
|
|
|
|
|
|
|
|
|
|
|
|
|
|
|
|
|
|
|
|
|
|
|
|
|
|
|
|
|
|
|
|
|
|
|
|
|
|
|
|
|
|
|
|
|
|
|
|
|
|
|
|
|
|
|
|
|
|
|
|
|
|
|
|
|
|
|
|
|
|
|
|
|
|
|
|
|
|
|
|
|
|
|
|
|
|
9
Adjusting Volume Settings
See the steps below for the best order to adjust volume from the different sources when voice chatting, streaming, podcasting, or recording.
1.Turn the Mic Gain knob to adjust the level of the signal that is sent to your computer. Set this knob so the gain is at a “healthy” level but not so high that the signal “clips” or peaks, causing distortion in the audio.
Note: “Clipping” is indicated by your software’s volume level meter exceeding 0 dB and usually turning red.
2.Turn the Headphone Volume knob to adjust the volume level and listen to the audio signal with headphones connected to Uber Mic’s headphone output or use speakers connected to your computer sound card.
3.Turn the USB-Mic knob to adjust the blend of the signals sent to the headphone output. Turn it toward Mic to hear more of the microphone signal, or turn it toward USB to hear more of your computer’s output signal.
4.Set the computer’s sound input volume:
•Windows: In the Taskbar, locate the Volume Control “speaker” icon. Right-click it and select Recording Devices. In the Windows Sound control panel, click the Recording tab and click Properties in the lower-right corner. Click on the Levels tab, and adjust the Microphone volume slider to a “healthy” level without distortion.
Note: “Clipping” is indicated by your software’s volume level meter exceeding 0 dB and usually turning red.
•macOS: From the Apple menu, select System Preferences. Select the Sound icon. Select the Input tab and adjust the input volume to about 80%. Increase or decrease this setting to get the signal to a “healthy” level without distortion.
Note: “Clipping” is indicated by your software’s volume level meter exceeding 0 dB and usually turning red.
5.Set the computer’s sound output volume:
•Windows: In the Taskbar, locate the Volume Control “speaker” icon. Right-click it and select Playback Devices. In the Windows Sound control panel, click the Playback tab and click Properties in the lower-right corner. Click on the Levels tab, and adjust the volume slider to a “healthy” level without distortion.
•macOS: From the Apple menu, select System Preferences. Select the Sound icon. Select the Output tab and adjust the volume to 100%.
10
Guía del usuario (Español)
Introducción
Características
•Funcionamiento fácil e intuitivo para cualquier aplicación
•Su respuesta en frecuencia amplia de 30 - 20.000 Hz garantiza un sonido natural y detallado
•Elemento de micrófono condensador de 3 cápsulas, incluyendo estéreo de un solo punto
•Cuatro patrones polares seleccionables para personalizar su grabación ideal
•Patrones polares: cardiode, figura 8, omnidireccional y estéreo
•Conector para auriculares de 3,5 mm (1/8 pulgadas) y amplificador para auriculares interno
•Su control de mezcla USB/directo con control de volumen de micrófono permite una grabación y monitorización con latencia cero
•El control de silenciamiento del micrófono garantiza la privacidad
•Su pantalla LCD muestra el patrón polar y el nivel de control actualmente seleccionado
•Grabación con calidad de estudio y reproducción para brindar una reproducción precisa
•Cómodo montaje para escritorio con inserción roscada para montaje opcional en pie de micrófono
•Su pie integrado se ubica fácilmente en cualquier instalación
Contenido de la caja
Uber Mic |
Cable mini USB |
Soporte integrado del micrófono |
Guía del usuario |
Alargador del soporte del micrófono |
Manual sobre la seguridad y garantía |
|
|
Soporte |
|
Visite m-audio.com para ver y descargar la documentación más reciente, los requisitos del sistema y demás información relativa a su producto.
Para obtener soporte adicional del producto, visite m-audio.com/support.
11

Instalación
Los elementos que no se enumeran en Introducción > Contenido de la caja se venden por separado.
Diagramas de conexión
Micrófono
Ordenador
|
Auriculares |
(panel |
(panel |
trasero) |
delantero) |
Alargador del soporte del micrófono
(opcional)
Instalación con un soporte de brazo giratorio: Conecte el alargador del soporte del micrófono incluido al montaje roscado del panel inferior delUber Mic. Luego conecte el alargador del soporte del micrófono al montaje del brazo giratorio.
Nota: Al conectar el brazo giratorio al Uber Mic, el puerto mini USB podría quedar obstruido. Utilice el alargador del soporte del micrófono incluido a fin de crear un espacio adicional para conectar el cable USB y el cable de los auriculares al Uber Mic. Retire las arandelas de estrella ya que también obstruirán el puerto USB y el puerto de los auriculares.
Retire las arandelas |
Alargador del soporte |
de estrella |
del micrófono |
12 |
|

Instalación recomendada
Software: Hemos incluido Pro Tools | First M-Audio Edition con su Uber Mic de modo que puede comenzar a hacer música con software profesional en cuanto lo saca de la caja. Registre su Uber Mic en m-audio.com y siga las instrucciones de instalación de Pro Tools | First M-Audio Edition en su Cuenta de usuario.
Nota para los usuarios de Windows: Para utilizar su Uber Mic con Pro Tools | First M-Audio Edition, descargue el controlador para Windows para el Uber Mic desde m-audio.com.
Inicio rápido
1.Conecte el Uber Mic a un puerto USB disponible en su ordenador.
2.Configure el Uber Mic como su dispositivo de grabación y reproducción predeterminado en la configuración de su ordenador. Para más detalles, consulte la sección Ajuste del audio.
3.Ajuste el selector Polar Pattern (patrón polar) para la fuente que está grabando. Para más detalles, consulte la sección Funcionamiento > Patrones polares.
4.Ajuste el volumen de entrada de audio de su ordenador. Para más detalles, consulte la sección
Funcionamiento > Cómo modificar los ajustes de volumen.
5.Ajuste el volumen de salida de audio de su ordenador. Para más detalles, consulte la sección
Funcionamiento > Cómo modificar los ajustes de volumen.
6.Abra su software de chat de voz, streaming, podcasting o grabación favorito. Para configurar su Uber Mic con su software, abra Preferences (Preferencias), Device Setup (Configuración de dispositivo) u Options (Opciones) de su software a fin de configurarlo para enviar y recibir audio mediante el Uber Mic. Para más información, consulte el manual de su software.
7.Hable al micrófono y gire la perilla Mic Gain para ajustar el nivel de la señal que el micrófono envía a su ordenador. Ajuste esta perilla de manera que la ganancia este a un nivel “saludable” pero no tan alto que la señal se “recorte” o llegue al pico, causando distorsiones en el audio.
8.Gire la perilla volumen de los auriculares para ajustar el nivel de volumen y escuchar la señal de audio con auriculares conectados a la salida para auriculares del Uber Mic o para usar altavoces conectados a la tarjeta de sonido de su ordenador.
9.Gire la perilla USB-Mic para ajustar la mezcla de las señales de enviadas a la salida de auriculares. Gírela hacia Mic para escuchar más de la señal del micrófono, o gírela hacia USB para escuchar más de la señal de salida de su ordenador.
13

Ajuste del audio
Para configurar el Uber Mic como dispositivo de grabación y reproducción predeterminado, siga las indicaciones que se incluyen a continuación sobre la base del sistema operativo de su ordenador.
Windows:
1.Use el cable USB incluido para conectar el Uber Mic a su ordenador.
2.En la barra de tareas, localice el icono del altavoz que corresponde al control de volumen. Haga clic derecho en él y seleccione Playback Devices (Dispositivos de reproducción).
Como alternativa, haga clic en Start Menu (menú Inicio) > Control Panel (Panel de control) (o Settings [Ajustes] > Control Panel en la Vista clásica) > Hardware and Sound (Hardware y sonido) > Sound (Sonido).
3.En el panel de control de Windows Sound (Sonido de Windows), seleccione la pestaña Playback y seleccione M-Audio Uber Mic como dispositivo predeterminado.
4.Haga clic en la pestaña Recording (Grabación) y seleccione M-Audio Uber Mic como el dispositivo predeterminado.
5.Haga clic en Properties (Propiedades) en la esquina inferior derecha.
6.En la nueva ventana, haga clic en la pestaña Advanced (Avanzadas) y seleccione 2-channel, 16-bit, 48000 Hz (DVD Quality) [2 canales, 16 bits, 44100 Hz (calidad de DVD)] como formato predeterminado.
7.Deseleccione ambas casillas debajo de Exclusive Mode (Modo exclusivo).
8.Haga clic en OK (Aceptar) para cerrar la ventana Properties.
9.Haga clic en OK para cerrar el panel de control Sound.
macOS:
1.Use el cable USB incluido para conectar el Uber Mic a su ordenador.
2.Vaya a Applications (Aplicaciones) > Utilities (Utilidades) > Audio MIDI Setup Configuración de audio MIDI).
3.En la ventana Audio Devices seleccione M-Audio Uber Mic en la columna izquierda.
4.Haga clic derecho o pulse Ctrl y haga clic en M-Audio Uber Mic y seleccione Use this device for sound input (Utilizar este dispositivo como entrada de sonido).
5.Haga clic derecho o pulse Ctrl y haga clic en M-Audio Uber Mic y seleccione Use this device for sound input (Utilizar este dispositivo como salida de sonido) para monitorizar las señales del micrófono/ordenador a través de la salida para auriculares del Uber Mic.
6.Salga de la configuración MIDI de audio.
Configuración del Uber Mic con su software
Nota para los usuarios de Windows: Para utilizar su Uber Mic con Pro Tools | First M-Audio Edition, descargue el controlador para Windows para el Uber Mic desde m-audio.com.
Asegúrese de que su programa de software de audio esté configurado para recibir audio desde el Uber Mic. Esto puede hacerse habitualmente en Preferences (Preferencias), Device Setup (Configuración de dispositivos) u Options (Opciones). Para más información, consulte el manual de su software.
Para configurar Uber Mic con Pro Tools | First M-Audio Edition:
1.Use el cable USB incluido para conectar el Uber Mic a su ordenador.
2.Abra Pro Tools | First M-Audio Edition.
3.Vaya a Setup > Playback Engine… (Configuración > Motor de reproducción).
4.Abra el menú desplegable Playback Engine y seleccione M-Audio Uber Mic.
Nota: Es posible que tenga que guardar y reiniciar su proyecto.
5.Seleccione su Sample Rate (Tasa de muestreo) y luego haga clic en OK para cerrar la ventana de configuración.
Puede agregar ahora pistas de audio para recibir audio de Uber Mic y transmitir audio grabado a través de las
Salida de auriculares de Uber Mic.
14
 Loading...