


 Loading...
M-AUDIO
SBX10
English
User Guide
! |
CAUTION |
! |
|
ATTENTION: |
|
! |
|
PRECAUCION: |
|
|
RISK OF ELECTRIC SHOCK |
|
|
RISQUE DE CHOC ELECTRIQUE |
|
|
RIESGO DE ELECTROCHOQUE |
|
|||
|
DO NOT OPEN |
|
|
|
N’OUVRIR PAS |
|
|
|
NO ABRIR LA TAPA |
|
CAUTION: TO REDUCE THE RISK OF |
|
AFIN DEVITER UN CHOC |
PARA REDUCIREL RIESGO DE |
|||||||
ELECTRIC SHOCK, DO NOT REMOVE |
|
|
ELECTRIQUE ET LES |
SACUDIDAS ELECTRICAS, NO |
||||||
COVER (OR BACK). NO USER- |
CONSEQUENCES GRAVES QUI |
|
DEBERA QUITARSE LA TAPA |
|||||||
SERVICABLE PARTS INSIDE. REFER |
POURRAIENT ENRESULTER, TENTEZ |
|
(NI PARTE POSTERIOR). |
|||||||
SERVICING TO QUALIFIED SERVICE |
PAS D’OUVRIR L’APPAREIL ET DE |
|
CONSULTESE AL PERSONAL |
|||||||
|
PERSONNEL |
TOUCHER AUX COMPOSANTS |
|
CAPACITADO PARA LAS |
||||||
|
|
|
INTERNES SANS LA PRESENCE |
|
REPARACIONES INTERNAS. |
|||||
|
|
|
D’UNE PERSONNE QUALIFIEE. |
|
|
|
|
|||
WARNING: TO PREVENT FIRE OR ELECTRIC SHOCK, DO NOT EXPOSE THIS APPLIANCE TO RAIN OR MOISTURE.
ADVERTENICIA: PARA EVITAR EL RIESGO DE INCENDIO O SACUDIDA ELECTRICA, NO DEBERA EXPONERSE ESTE APARATO A LA LLUVIA O HUMEDAD.
CAUTION: TO PREVENT ELECTRIC SHOCK DO NOT USE THIS (POLARIZED) PLUG WITH AN EXTENSION CORD, RECEPTACLE OR OTHER OUTLET UNLESS THE BLADES CAN BE FULLY INSERTED TO PREVENT BLADE EXPOSURE.
ATTENTION: POUR PREVENIR LES CHOCS ELECTRIQUES NE PAS UTILISER CETTE FICHE POLARISEE AVEC UN PROLONGATEUR. UNE PRISE DE COURANT OU UNE AUTRE SORTIE DE COURANT, SAUF SILES LAMES PEUVENT ETRE INSEREES A FOND SANS EN LAISSER AUCUNE PARTIE FOND SANS EN LAISSERAUCUNE PARTIE A DECOUVERT.
PRECAUCION: PARA EVITAR SACUDIDAS ELECTRICAS, NO DEBERA UTILIZARSE ESTA CLAVIJA POLARIZADA CON UN CORDON DE PROLONGACION, RECEPTACULO U OTRO TIPO DE SALIDA A MENOS QUE SE HAYAN INSERTASO COMPLETAMENTE LAS LENGÜETAS PARA EVITAR SU EXPOSICION.
NOTE: Some products are equipped with dual or multi-voltage transformers (which is indicated on the back panel). If you wish to change the voltage, please bring your unit to an authorized service technician for internal conversion.
ATTENTION: Quelques piéces sont munies de transformateurs á double ou á multi-voltage (indiqué au panneau arriére). Si vous voulez changer le voltage, veuillez apporter votre appareil au fournisseur de pour le transformer.
ZUR BEACHTUNG: Einige Geräte sind mit Umschaltern für unterschiedliche Netzspannungen ausgerüstet (ein Vermerk auf der Rückseite weist darauf hin).
Die Anpassung, wenn notwendig, muß von einem qualifizieren Techniker in einer Servicestation vorgenommen werden.
NOTA: Ciertos componentes de están dotados de transformadores de doble tensión o de varias tensiones (Io que se indica en el panel posterior). Si se desea cambiar la tensión, sírvanse llevar el aparato a un técnico autorizado por para su conversión interna.
NOTE TO CATV SYSTEMS INSTALLER: This reminder is provided to call the CATV system installer’s attention to Article 820-22 of the NEC that provides guidelines for proper grounding and, in particular, specifies that the cable ground shall be connected to the grounding system of the building, as close to the point of cable entry as practical.
NOTA PARA EL INSTALADOR DE ANTENAS DE TELEVISION COLECTIVAS: La presente advertencia se provee para llamar la atención del instalador al Artículo 820-22 de NEC (Córdigo Eléctrico Nacional) donde se facilitan las directrices para la pertinente puesta a tierra y que especifica en particular que el condutor a tierra del cable debe connectarse al sistema de conexión a tierra del edificio, lo más proximo posible al punto de entrada del cable.
The lightning flash with arrowhead, within an equilateral triangle, is intended to alert the user of
presence of uninsulated “dangerous voltage” within the product’s enclosure; that may be of sufficient magnitude to constitute a risk of
electric shock to persons.
The exclamation point within an equilateral triangle ! intended to alert the user of the presence of
important operating and maintenance (servicing) instructions in the literature accompanying the appliance.
Warning: This speaker shall not be placed in a closed area during operation so that the main switch can be easily accessed by the user.

IMPORTANT SAFETY INSTRUCTION
1.READ INSTRUCTIONS
All the safety and operating instructions should be read before the appliance is operated.
2.RETAIN INSTRUCTIONS
The safety and operating instructions should be retained for future reference.
3.HEED WARNINGS
All warning on the appliance and in the operating instructions should be adhered to.
4.FOLLOW INSTRUCTIONS
All operating and use instructions should be followed.
5.WATER AND MOISTURE
The appliance should not be used near water – for example, near a bathtub, washbowl, kitchen sink, laundry tub, in a wet basement, or near a swimming pool, etc.
6.CARTS AND STANDS
The appliance should be used only with a cart or stand that is recommended by the manufacturer.
6A. An appliance and cart combination should be moved with care. Quick stops, excessive force, and uneven sTurfaces may cause the appliance and cart combination to overturn.
7.WALL OR CEILING MOUNTING
This equipment is not designed
for use mounted on a wall or a ceiling.
8. VENTILATION
The appliance should be situated so that its location or position does not interfere with its proper ventilation. For example, the appliance should not be situated on a bed, sofa, rug, or similar surface that may block the ventilation openings, or places in a built-in installation, such as bookcase or cabinet that may impede the flow of air through the ventilation openings.
At least 30 cm free space around the unit for normal ventilation is required.
9.HEAT
Do not install near any heat sources such as radiators, heat registers, stoves, or other apparatus (including amplifiers) that produce heat.
10.CLEANING
The appliance should be cleaned only with dry cloth.
11.POWER SOURCES
The appliance should be connected to a power supply only of the type described in the operating instructions or as marked on the appliance.
12.POWER CORD PROTECTION
Power-supply cord should be routed so that they are not likely to be walked on or pinched by items placed upon or against them, playing particular attention to cords at plugs, convenience receptacles, and the point where they exit from the appliance.
13.POLARIZED PLUG
Do not defeat the safety purpose of the polarized or grounding-type plug. A polarized plug has two blades with one wider than the other. A grounding type plug has two blades and a
third grounding prong. The wide blade or the third prong are provided for your safety. When the provided plug does not fit into your outlet, consult an electrician for replacement of the obsolete outlet.
14.UNPLUG POWER CORD
Unplug this apparatus during lightning storms or when unused for long periods of time.
15.OBJECT AND LIQUID ENTRY
No object filled with liquids, such as vases, etc. shall be placed on the apparatus.
16.ACCESSORIES
Only use attachments/accessories specified by the manufacturer.
17.SERVICING
The user should not attempt to service the appliance beyond that described in the operating instructions. All other servicing should be referred to qualified service personnel.
18.DAMAGE REQUIRING SERVICE
The appliance should be serviced by qualified service personnel when:
a)The power-supply cord or the plug has been damaged; or
b)Objects have fallen, or liquid has been spilled into the appliance; or
c)The appliance has been exposed to rain; or
d)The appliance does not appear to operate normally or exhibits a marked change in performance; or
e)The appliance has been dropped, or the enclosure is damaged.
Table of Contents
Introduction . . . . . . . . . . . . . . . . . . . . . . . . . . . . . . . . . . |
5 |
What’s in the Box? . . . . . . . . . . . . . . . . . . . . . . . . . . . . . . |
5 |
SBX10 Features . . . . . . . . . . . . . . . . . . . . . . . . . . . . . . . . |
5 |
1.Subwoofer Driver . . . . . . . . . . . . . . . . . . . . . . . . . . 5
2.LED Indicator . . . . . . . . . . . . . . . . . . . . . . . . . . . . 5
3.Variable Crossover . . . . . . . . . . . . . . . . . . . . . . . . . 6
4.Phase Select . . . . . . . . . . . . . . . . . . . . . . . . . . . . . 7
5.Unbalanced RCA Inputs . . . . . . . . . . . . . . . . . . . . . . 7
6.TRS Inputs . . . . . . . . . . . . . . . . . . . . . . . . . . . . . . 7
7.XLR Inputs . . . . . . . . . . . . . . . . . . . . . . . . . . . . . . 7
8.Bass Reflex Port . . . . . . . . . . . . . . . . . . . . . . . . . . 7
9.XLR Outputs . . . . . . . . . . . . . . . . . . . . . . . . . . . . . 8
10.TRS Outputs . . . . . . . . . . . . . . . . . . . . . . . . . . . . 8
11.Subwoofer Bypass/Defeat . . . . . . . . . . . . . . . . . . . . 8
12.Volume Control. . . . . . . . . . . . . . . . . . . . . . . . . . . 8
13.Power Switch. . . . . . . . . . . . . . . . . . . . . . . . . . . . 8
14.Power Socket . . . . . . . . . . . . . . . . . . . . . . . . . . . 8
15.AC Voltage Select Switch . . . . . . . . . . . . . . . . . . . . 8 Power Amplifier (not pictured) . . . . . . . . . . . . . . . . . . . . 8 Enclosure (not pictured) . . . . . . . . . . . . . . . . . . . . . . . . 9 Thermal Protection (not pictured) . . . . . . . . . . . . . . . . . . 9
Setting Up the SBX10 Subwoofer . . . . . . . . . . . . . . . . . . . . . 10
Connecting the Power . . . . . . . . . . . . . . . . . . . . . . . . . 10
Connecting Audio. . . . . . . . . . . . . . . . . . . . . . . . . . . . 10
Adjusting the Back Panel Controls . . . . . . . . . . . . . . . . . 11
Placing the SBX10 Subwoofer . . . . . . . . . . . . . . . . . . . . . . . 13
Where to Start . . . . . . . . . . . . . . . . . . . . . . . . . . . . . 13
Appendix A - Technical Specifications . . . . . . . . . . . . . . . . . . 14
Appendix B - Block Diagram . . . . . . . . . . . . . . . . . . . . . . . . 15
Your SBX10 Warranty . . . . . . . . . . . . . . . . . . . . . . . . . . . . 16
Warranty Terms . . . . . . . . . . . . . . . . . . . . . . . . . . . . . 16
Warranty Registration . . . . . . . . . . . . . . . . . . . . . . . . . 16
SBX10
Introduction
Thank you for choosing the M-Audio SBX10 active subwoofer. SBX10 has been designed to integrate seamlessly with the M-Audio BX, CX, and DSM lines of active studio monitors, extending the low-frequency response of the total monitoring system down to 20Hz. Moreover, the versatile design of SBX10 allows it to work well with any combination of active studio monitors in a 2-channel stereo or multichannel surround environment.
For professional engineers at commercial studios and home studio owners alike, SBX10 helps set a new standard in studio monitoring.
English
What’s in the Box?
Your M-Audio SBX10 box contains:
One SBX10 active powered subwoofer with removable driver protection grill
One detachable AC power cord
One non-latching footswitch for Subwoofer Bypass function
Four removable cone-shaped feet
This manual
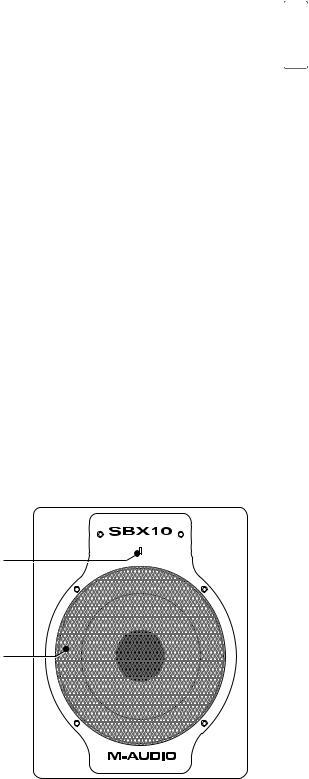
SBX10 Features
1. Subwoofer Driver
Redesigned and upgraded for SBX10, the |
|
|
|
transducer driver utilizes a 10-inch composite |
|
|
|
diaphragm and well damped rubber surround, |
|
|
|
|
|
|
|
all driven by a high-temperature voice coil. It |
2 |
|
|
|
|||
is designed to deliver a tight and punchy |
|
|
|
low-frequency response (in contrast to the |
|
|
|
"boomy" or hyped response characteristic of |
|
|
|
underdamped subwoofers). The driver's high |
|
|
|
Bl factor (electromagnet force factor) creates a |
|
|
|
powerful motor that allows the cone to follow |
1 |
|
|
the input signal very accurately, resulting in |
|
|
|
excellent low-frequency extension and |
|
|
|
transient response. |
|
|
|
2. LED Indicator
The LED Indicator lights up blue when the subwoofer is powered on. When the Subwoofer Bypass feature is engaged, the
LED Indicator will flash red to indicate that no sound is coming out of the subwoofer and that the full-bandwidth signal is being routed to the direct-field monitors.
5

8 |
|
7 |
9 |
6 |
10 |
5 |
11 |
|
Unbalanc |
4 |
|
3 |
12 |
 13
13
14
FUSE
A065484
15
3. Variable Crossover
You can use SBX10 in a variety of monitoring contexts, from 2-channel to multichannel (e.g., 5.1, 7.1) systems, and as an accompaniment to practically any direct-field monitors. To this end, we have provided a versatile yet efficient way to tailor the response of the subwoofer to work well in any typical monitoring system. For use in a 2-channel system, there is an in-line low-pass filter control that allows you to adjust the crossover frequency. You can set it anywhere from 50Hz to 200Hz. It splits the signal by routing everything below that frequency to the subwoofer and everything above it to your main monitors. And by using a 4th-order Linkwitz-Riley topology, the circuit enables you to achieve the flattest net response through the crossover point. For multichannel systems, the SBX10 subwoofer can reproduce just the output of the LFE (low-frequency effects) channel, or it can reproduce the bass from some or all of the main channels using conventional multichannel bass management schemes. In this multichannel context, you can simply "open up" the SBX10 subwoofer fully by setting it to 200Hz (for use with external bass managers), or you can set it to 120Hz (to comply with the Dolby Digital standard for the LFE band limit).
6
Loading...