


User Guide
English ( 3 – 6 )
Guía del usuario
Español ( 7 – 10 )
Guide d'utilisation
Français ( 11 – 14 )
Guida per l'uso
Italiano ( 15 – 18 )
Benutzerhandbuch
Deutsch ( 19 – 22 )
Appendix
English ( 23 )

5
2
3
7
9
8
4
6
User Guide (English)
Introduction
The BX5 Carbon was designed and tested by veteran audio engineers to meet your needs in a studio
monitoring environment. It is focused on the functional goal of delivering pure, original sound without
any additional coloration. The BX5 Carbon monitor is self-powered, directly accepting a line-level
signal from a variety of sources.
The BX5 Carbon is designed to overcome all the limitations of conventional studio reference monitors
within the digital audio environment. This system delivers a wide-range frequency response by
employing two extraordinary drivers and unique crossover technology licensed by M-Audio. It boasts
a stable and balanced low-mid frequency response along with a defined mid and high frequency
response as well. Both drivers are magnetically shielded for desktop music production.
For pro engineers at commercial studios to home studio owners, the BX5 Carbon sets a new
affordable standard in studio monitoring.
Box Contents
• BX5 Carbon (1)
• Power Cable
• User Guide
• Safety & Warranty Manual
Support
For complete system requirements, compatibility information, and product registration, visit the MAudio website: m-audio.com/bx5carbon.
For additional product support, visit m-audio.com/support.
Features
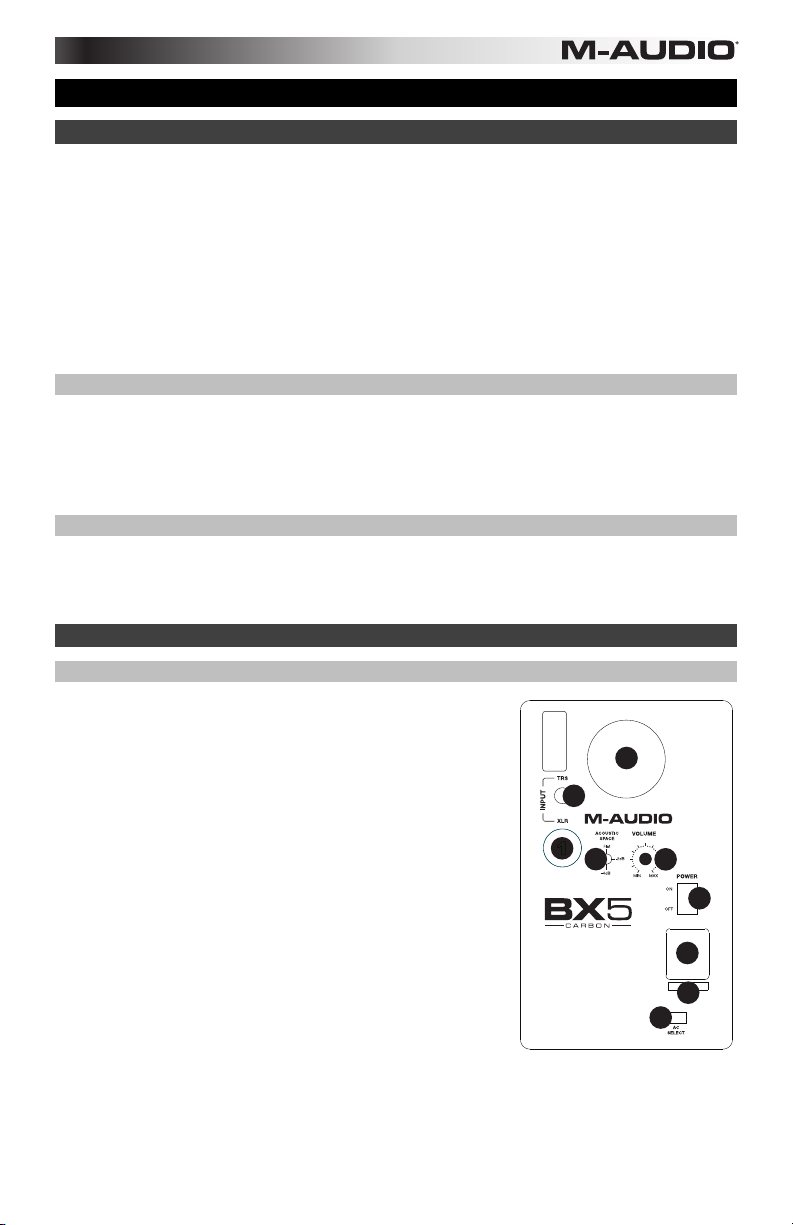
Rear Panel
1. XLR Input: This jack accepts XLR input connections with
either balanced or unbalanced wiring. The input wiring of
an XLR connector should be as follows:
• XLR Pin 1: signal ground (shield)
• XLR Pin 2: signal positive (+)
• XLR Pin 3: signal negative (–)
2. TRS Input: This jack accepts 1/4" connections with either
balanced or unbalanced wiring. For balanced wiring, a
three-conductor TRS plug is necessary. The input wiring
of a TRS connector should be as follows:
• TRS Tip: signal positive (+)
• TRS Ring: signal negative (–)
• TRS Sleeve: signal ground (shield)
Unbalanced 1/4" wiring can be done with either a two- or
three-conductor (TS or TRS) plug. A two-conductor (TS)
plug automatically grounds the signal negative input,
whereas a three-conductor (TRS) plug, wired
unbalanced, provides the option of leaving the negative input open or grounded. We
recommend that you ground the unused negative input (this can be done by wiring the ring
and sleeve of the TRS plug together). The TRS input is summed through a balanced input
amplifier with the XLR input, allowing both inputs to be used simultaneously. Input
specifications apply to both.
3
1

3. Sub-Frequency Vent Port: This port aids in reproduction of very low frequencies by
discharging frequencies below 60 Hz and to act as a cooling mechanism to prevent
overheating. This port should not be blocked.
4. Acoustic Space Switch: Your BX5 monitors should ideally be placed at least one foot
away from the nearest wall, ceiling, or other large, flat surface. In the real world, this may
be impractical due to space limitations within your studio. For that reason, BX5 monitors
feature an acoustic space switch. This switch compensates for placement near walls.
Tip: Be sure to leave at least 3" of space between the rear of the speaker and a wall to
allow the rear-firing port to "breathe" properly. Placing the speaker any closer than 3" may
adversely affect low-frequency response.
5. Volume Control: Use the volume control to set the output sound pressure from the BX5
Carbon to proper levels as required.
6. Power Switch: This switch turns the monitor on and off.
7. Power Receptacle: Accepts a detachable 3-circuit line cord in order to power the monitor.
8. Fuse Holder: Holds the external main fuse.
9. Voltage-Select Switch: Provides two selections, 115V AC and 230V AC, and should be
set to match the "house supply" (receptacle) voltage of the country or location in which the
speaker is used. The 115V setting is correct for the USA, while the 230V setting is correct
for most of the UK and Europe.
Front Panel
The front panel houses the Power LED, which
indicates whether the speakers (amplifier) power is
on or off.
1. Power LED
2
BX5
2. HF Driver (tweeter)
3. LF Driver (woofer)
1
3
4

Installation
For optimal performance of the BX5 Carbon, please read the following thoroughly and carefully
prior to installation.
Precautions
• Handling: Please do not touch the speaker cones. The BX5 Carbon set is packaged in
the box tightly, so your attention is required when taking the monitors out of the box. To
avoid possible damage to the speaker units, hold both sides of the monitor in order to pull
it out of the box. The speaker cones should not be touched in order to avoid damage even
after they are out of the box.
• Correct Power Operation: Since the BX5 Carbon contains its own amplifier, it must be
connected to a power outlet using the detachable AC cable provided. Before connecting
power, please make sure that the Voltage-Select Switch located on the speaker's rear
panel is set to the appropriate position, as described in the rear-panel features list
appearing earlier in this manual.
WARNING! Use of improper Voltage-Select Switch combinations may result in hazardous
conditions and/or damage to speaker components not covered by speaker warranty.
• Connections: You can connect either an XLR balanced cable or TRS
balanced/unbalanced cable from the input of each BX5 Carbon to your corresponding
preamp, computer or game console outputs. We recommend that you use high-quality
balanced or unbalanced cables for input connections. Also, ALWAYS turn off the power of
the BX5 Carbon and turn the volume of the BX5 Carbon down to a minimum before
making the necessary connections.
Setup
The configuration and placement of your BX5 Carbon monitors on speaker stands or your
desktop workstation may affect the performance of the speakers. Use the following tips to
achieve the best performance out of your BX5 Carbon monitors.
Tip: If possible, place your BX5 Carbon monitors on speaker stands instead of your desktop.
Desks tend to resonate sympathetically at low frequencies and may adversely affect the bass
response of your monitors. If speaker stands are not possible due to space restrictions and you
notice a buildup in bass, try placing the monitors on isolation pads to acoustically de-couple the
monitors from the desk.
XLR Balanced Connection
Assure that the power switch of the BX5 Carbon is turned off and that the volume control of the
BX5 Carbon is turned down to a minimum. Connect the male end of an XLR balanced cable to
the balanced input of the BX5 Carbon (refer to the following diagram for balanced connection).
TRS Balanced/Unbalanced Connection
Assure that the power switch of the BX5 Carbon is turned to off and that the volume control of
the BX5 Carbon is turned down to a minimum. Connect the male end of a TRS balanced or TS
unbalanced cable to the TRS input of the BX5 Carbon (refer to the following diagram for TRS
connection).
Connecting to Preamp or Computer Outputs
Before connecting, make sure the output device's power has been turned off. Plug the XLR
balanced, TRS balanced or TS unbalanced cable to the corresponding output connectors of a
pre‑amplifier, computer or game console.
5
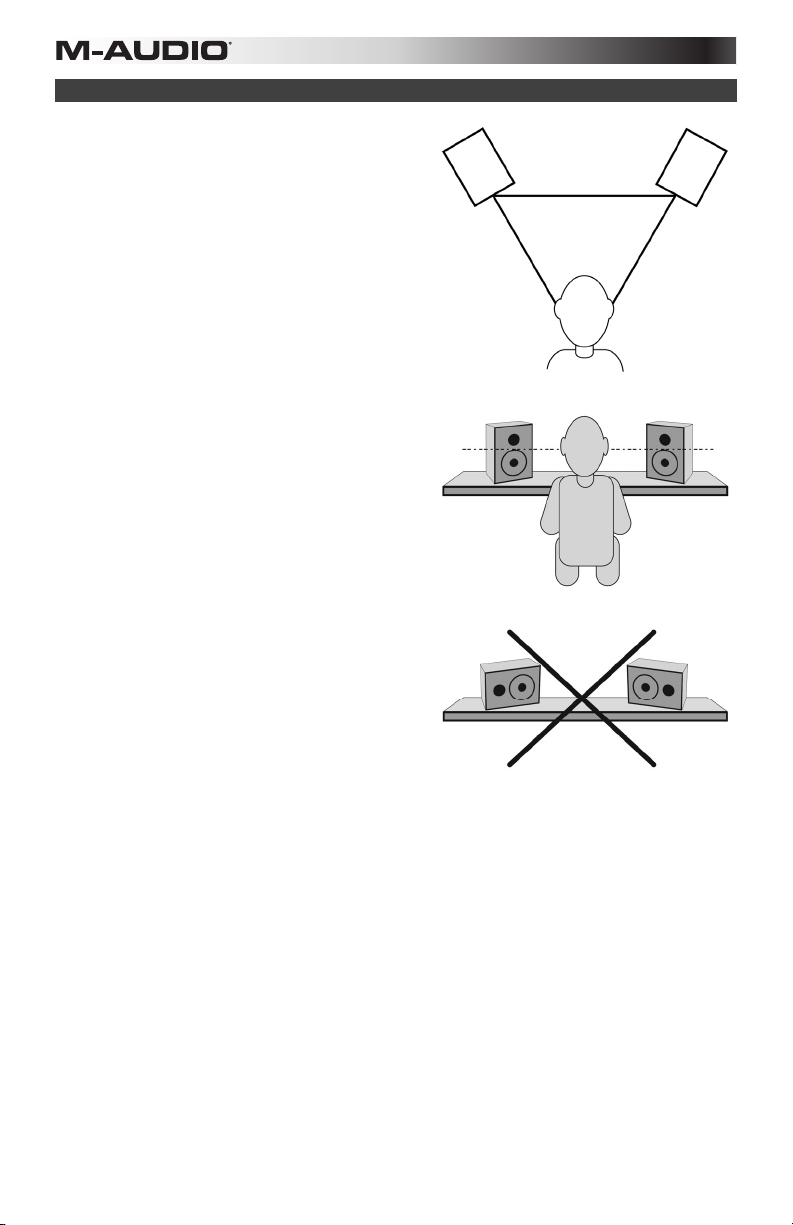
Speaker Placement
Placing speakers is one of the most important
procedures in order to monitor sound accurately.
To monitor with the BX5 Carbons performing to
their maximum capability, an appropriate listening
environment and correct placement are required.
Please refer to the following for correct BX5 Carbon
placement.
1. The monitors and the listener should basically
align to form a regular triangle. Refer to the
following diagram.
2. Position the monitors so that the top of the
woofers are level with your ears in a normal
listening environment. Refer to the following
diagram.
3. Place the monitors vertically with the woofer
on the bottom. Placing the BX5 Carbon
horizontally is not recommended.
Remarks: DO NOT place any obstacles that may
block the flow of air in front or between the
monitors. Also remove reflective materials such as
glass, mirrors or metal from the monitoring
environment. PLACE THOSE MATERIALS AWAY
FROM THE PATH OF THE SOUND FROM THE
BX5 Carbons.
6
5
2
3
7
9
8
4
6
Guía del usuario (Español)
Introducción
Los BX5 Carbon han sido diseñados y comprobados por expertos ingenieros de sonido con el
fin de satisfacer sus necesidades de monitorización en el estudio. El principal objetivo de estos
monitores consiste en ofrecer sonido original, de la máxima pureza y sin ninguna clase de
coloración. Los BX5 Carbon son monitores activos, compatibles con señales de línea
procedentes de numerosas fuentes de audio.
Los monitores BX5 Carbon han sido concebidos para superar las limitaciones propias de los
monitores de estudio convencionales en el entorno del audio digital. El sistema ofrece una
amplia respuesta en frecuencia gracias a la extraordinaria calidad de sus unidades de agudos
y graves y a la exclusiva tecnología de sus crossovers. Estos monitores proporcionan una
respuesta estable y equilibrada en los bajos-medios, así como una excelente definición en las
frecuencias medias y altas. Gracias a la protección magnética de las unidades de agudos y
graves, los BX5 Carbon resultan ideales en cualquier entorno de producción multimedia
basado en computadora.
Con su precio asequible, los monitores BX5 Carbon establecen un nuevo estándar en la
monitorización de estudio, tanto para el usuario profesional como para el propietario de un
studio doméstico.
Contenido de la caja
• Monitor BX5 Carbon (1)
• Cable de alimentación
• Guía del usuario
• Manual sobre la seguridad y garantía
Soporte
Para conocer los requisitos completos del sistema, la información de compatibilidad y realizar
el registro del producto, visite el sitio web de M-Audio: m-audio.com/bx5carbon.
Para soporte adicional del producto, visite m-audio.com/support.
Características
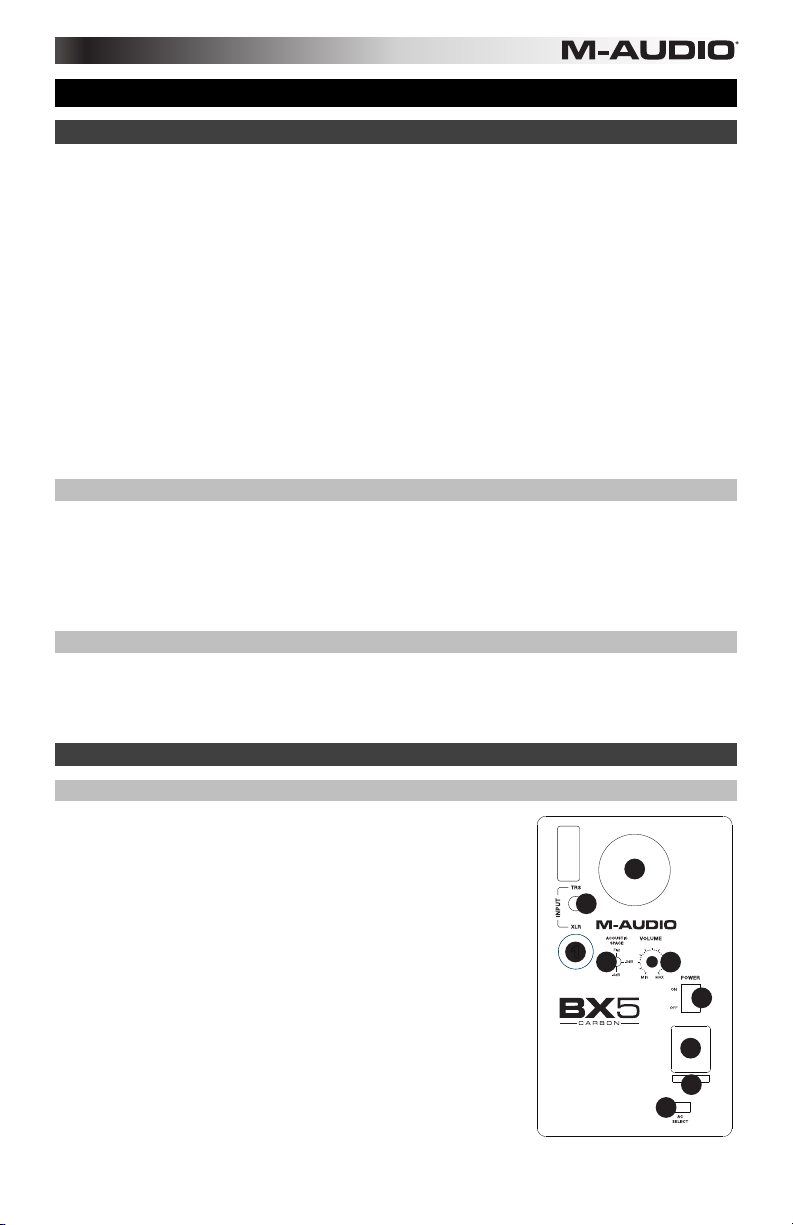
Panel trasero
1. Entrada XLR: Este conector XLR admite señales de entrada
balanceadas y no balanceadas. El cableado de la entrada
XLR se realiza de acuerdo con el siguiente esquema
• Patilla 1: Tierra (Masa)
• Patilla 2: Positivo (+)
• Patilla 3: Negativo (–)
2. Entrada TRS: Este conector 1/4" (6,35 mm) admite señales
de entrada balanceadas y no balanceadas. Si desea
establecer una línea balanceada deberá utilizar conectores
TRS (tip-ring-sleeve) balanceados, con cables de tres
conductores. El cableado de la entrada TRS se realiza de
acuerdo con el siguiente esquema:
• Punta: Positivo(+)
• Anillo: Negativo (–)
• Pantalla: Tierra (Masa)
1
7

El cableado no balanceado puede realizarse con dos o con tres conductores (TS y TRS,
respectivamente). Si utiliza un conector TS de dos conductores, la señal de entrada
negativa se conecta automáticamente a la masa, mientras que si emplea un conector
TRS de tres conductors soldado en modo no balanceado tendrá la opción de dejar el polo
negativo abierto o conectarlo a la masa. Es aconsejable conectar a la masa la entrada
negativa no utilizada. Para ello basta con unir el anillo y la pantalla del conector TRS. La
señal presente en la entrada TRS se suma a la de la entrada XLR a través de un
amplificador de entrada balanceada, por lo que ambas entradas pueden ser utilizadas de
manera simultánea. Las especificaciones de entrada son aplicables a ambas entradas.
3. Puerto de subfrecuencias: Este puerto ayuda en la reproducción de frecuencias muy
bajas al descargar las frecuencias inferiores a 60 Hz y actuar como mecanismo de
enfriamiento para evitar el recalentamiento. Este puerto no debe bloquearse.
4. Interruptor de acústica de espacio: los monitores BX5 deben colocarse idealmente
como mínimo a 30 cm (1 pie) de distancia de la pared más cercana, el cielo raso u otra
superficie grande y plana. En el mundo real, esto puede no ser factible debido a las
limitaciones de espacio de su estudio. Por esta razón, los monitores BX5 incluyen un
interruptor de interruptor de acústica de espacio. Este interruptor compensa la ubicación
de las paredes.
Consejo: Asegúrese de dejar como mínimo 7,5 cm (3 pulg.) de espacio entre la parte trasera
del altavoz y la pared, para permitir que el puerto trasero "respire" apropiadamente. Si se coloca
el altavoz a menos de 7,5 cm, puede afectarse perjudicialmente la respuesta en frecuencias
bajas.
5. Control de volumen: Este control de volumen permite establecer el nivel de presión
sonora emitido por el BX5 Carbon.
6. Switch de encendido: Prende y apaga el monitor.
7. Toma de alimentación: Esta toma admite un cable de alimentación de tres polos, a
través del cual el monitor recibe la alimentación necesaria.
8. Portafusible: Acoge el fusible externo principal.
9. Conmutador de selección de tensión: Dispone de dos opciones (115V CA y 230V CA).
Coloque este interruptor de manera que el valor de tensión corresponda con el tipo de
corriente eléctrica disponible en el país o región donde desee utilizar los monitores. El
ajuste "115V" es el adecuado para los Estados Unidos de América, mientras que en la
mayoría de los países europeos se emplea una tensión de 230V.
Panel frontal
El panel frontal de los monitores dispone de un LED de
alimentación que indica el estado de los mismos
(encendido/apagado).
1. LED de alimentación
2. Driver de frecuencia agudos (tweeter)
3. Driver de frecuencia graves(woofer)
2
1
3
BX5
8

Instalación
Por favor, antes de instalar los BX5 Carbon y con el fin de obtener el máximo rendimiento de
los monitores, lea atentamente las siguientes instrucciones.
Precauciones
• Manipulación de los monitores: Evite tocar los monitores por los conos. Los BX5
Carbon están apretados dentro del embalaje. Retírelos de la caja con precaución. Con el
fin de evitar posibles daños, sujete los monitores por los lados al sacarlos de la caja y
evite tocar los conos, incluso después de haber desembalado los monitores.
• Alimentación: Los monitores BX5 Carbon contienen su propio amplificador y por
consiguiente, necesitan recibir alimentación eléctrica a través del cable de alimentación
CA suministrado. Antes de conectar los monitores a la red eléctrica, asegúrese de que el
interruptor de selección de tensión (situado en la parte trasera de los monitores) se
encuentra en la posición adecuada. (Consulte la sección anterior).
¡ATENCIÓN!: El uso de un valor de tensión inapropiado podría provocar situaciones
peligrosas y/o daños en los componentes del monitor que no están cubiertos por la
garantía.
• Conexiones: Puede conectar la entrada balanceada XLR o la entrada TRS balanceada o
no balanceada de ambos monitores a las salidas del dispositivo que desee monitorizar
(preamplificador, ordenador, consola, etc.). Conecte las entradas utilizando cables
balanceados o no balanceados de alta calidad. Antes de proceder a su conexión,
asegúrese de que los BX5 Carbon están APAGADOS y ponga el volumen en su posición
mínima.
Configuración
La configuración y colocación de los monitores BX5 Carbon en los soportes de altavoces
sobretu mesa de trabajo puede influir en las prestaciones de los monitores. Sigue los consejos
que proponemos a continuación para obtener el mejor rendimiento de tus monitores BX5
Carbon.
Consejo: Si es posible, coloque sus monitores BX5 Carbon sobre unos soportes en lugar
dehacerlo directamente sobre el escritorio. Los escritorios suelen resonar con las frecuencia
másbajas, pudiendo afectar negativamente la respuesta de graves de sus monitores. Si por
falta de espacio no es posible colocar unos soportes y se observa un aumento de frecuencias
graves, coloque los monitores sobre las almohadillas de aislamiento paraseparar
acústicamente los monitores del escritorio.
Conexión XLR balanceada
Asegúrese de que el BX5 Carbon está apagado y ponga el volumen en su posición mínima.
Conecte el conector XLR macho de un cable balanceado en la entrada balanceada del BX5
Carbon (véase diagram de conexión balanceada).
Conexión TRS balanceada/ no balanceada
Asegúrese de que el BX5 Carbon está apagados y ponga el volumen en su posición mínima.
Conecte un cable TRS balanceado o un cable TS no balanceado en la entrada TRS del BX5
Carbon (véase diagrama de conexión TRS).
Conexión con las salidas de un preamplificador, computadora o consola de
juegos
Antes de conectar el monitor, asegúrese de que los dispositivos de salida están apagados.
Conecte la entrada balanceada XLR o la entrada TRS balanceada o no balanceada de ambos
monitores a las salidas del dispositivo que desee monitorizar (preamplificador, ordenador,
consola, etc.).
9

Colocación de los monitores
La buena colocación de los monitores es un factor
fundamental en la obtención de un sonido fiable y
preciso. Para obtener la máxima calidad de sonido
con los BX5 Carbon es imprescindible instalarlos
en un entorno de escucha idóneo y colocarlos
adecuadamente. Para una ubicación correcta de
los BX5 Carbon tenga en cuenta lo siguiente:
1. Los dos monitores y el oyente han de formar
un triángulo equilátero. Observe el siguiente
diagrama.
2. Coloque los monitores de manera que, en
condiciones de escucha normales, la parte
superior de los woofers se encuentre al mismo
nivel que sus oídos observe el siguiente
diagrama.
3. Disponga los BX5 Carbon verticalmente, con
el woofer en la parte inferior. No es
aconsejable colocar los BX5 Carbon en
sentido horizontal.
Nota: EVITE la presencia de objetos que puedan
obstaculizar la circulación de aire delante de los
monitores o alrededor de los mismos. Evite
asimismo la presencia de materiales reflectantes
como cristales, espejos o superficies metálicas en
el entorno de escucha. MANTENGA DICHOS
MATERIALES ALEJADOS DE LA TRAYECTORIA
DEL SONIDO DE LOS BX5 Carbon.
10

5
2
3
7
9
8
4
6
Guide d'utilisation (Français)
Instalación
Les BX5 Carbon ont été conçus et testés par des ingénieurs du son chevronnés afin qu'elles
respondent à vos besoins de monitoring en studio. Leur fonction principale est de fournir un
son original et pur, sans coloration superflue. Les moniteurs BX5 Carbon ont une amplificateur
intégré, et acceptent de façon directe des signaux de niveau de ligne provenant de sources
variées.
Les moniteurs BX5 Carbon ont été mis au point pour éliminer toutes les restrictions inhérentes
aux enceintes de référence à champ direct classiques en environnement audionumérique.
Grâce à l'exceptionnelle qualité de ses unités de graves et d'aigus ainsi qu'à sa technologie
unique de crossover, les BX5 Carbon fournissent une réponse en fréquence remarquablement
large. Elles offrent en effet une réponse en fréquences basses-moyennes stable et équilibrée
ainsi qu'une réponse très définie dans les fréquences moyennes et hautes. Les unités de
graves et d'aigus sont munies d'un blindage magnétique les rendant idéales pour l'utilisation
avec des systèmes de production musicale basés sur ordinateur.
Pour les utilisateurs aussi bien professionnels qu'amateurs, les enceintes BX5 Carbon
définissent un nouveau standard en matière de monitoring de studio, caractérisé par leur
excellente qualité et leur prix abordable.
Contenu de la boîte
• 1 moniteur BX5 Carbon
• 1 câble d'alimentation CA
• Guide d'utilisation
• Consignes de sécurité et informations concernant la garantie
Assistance
Pour tous les renseignements concernant la configuration système minimale requise, la
compatibilité et l’enregistrement du produit, veuillez visiter le site m-audio.com/bx5carbon.
Pour toute assistance supplémentaire, veuillez visiter le site m-audio.com/support.
Característiques
Face arrière
1. Entrée XLR: Cette prise accepte des entrées XLR avec des
câbles aussi bien symétriques qu'asymétriques. Le câblage
du connecteur XLR d'entrée devra être le suivant :
• Broche XLR 1 : Masse / Blindage
• Broche XLR 2 : Point chaud (+)
• Broche XLR 3 : Point froid (-)
2. Entrée TRS: Cette prise accepte des jacks 6,35 mm (1/4")
avec des câbles aussi bien symétriques qu'asymétriques.
En cas de câblage symétrique, une fiche symétrique à trois
conducteurs est nécessaire. Le câblage du connecteur TRS
d'entrée devra être le suivant :
11
• Pointe : Point chaud (+)
• Bague : Point froid (–)
• Corps : Masse / Blindage
1

La connexion asymétrique peut être réalisé avec des connecteurs à deux ou trois
conducteurs (TS ou TRS). Les fiches TS à deux conducteurs connectent
automatiquement le signal négatif à la masse tandis que les fiches symétriques à trois
conducteurs câblées de façon asymétrique offrent la possibilité de laisser ouvert le signal
négatif ou de le connecter à la masse. Nous vous recommandons de connecter à la
masse le signal négatif non utilisée. Pour ce faire il suffit de relier la bague (signal négatif)
au corps (masse) du connecteur TRS. L'entrée TRS est ajoutée à l'entrée XLR par un
amplificateur d'entrée symétrique, permettant ainsi l'utilisation simultanée de deux
entrées. Les spécifications d'entrée s'appliquent aux deux entrées.
3. Port de sous-fréquences: Cet évent contribue à la reproduction des très basses
fréquences en déchargeant les fréquences inférieures à 60 Hz et en agissant comme
mécanisme de refroidissement afin d'éviter la surchauffe. Cet évent ne doit pas être
obstrué.
4. Acoustic spazio interrupteur: Vos moniteurs BX5 devraient idéalement être placés à au
moins un pied du mur, du plafond ou de toute autre grande surface plane la plus proche.
Dans le monde réel, c'est peut-être peu pratique en raison du manque d'espace dans
votre studio. Pour cette raison, les moniteurs BX5 disposent d'un interrupteur de acoustic
spazio interrupteur. Cet interrupteur compense pour le placement près de murs.
Conseil: Assurez-vous d’avoir au moins 3 po d’espace entre l’arrière du caisson hautparleur et le mur pour permettre à la sortie arrière de « respirer » correctement. Placer le
haut-parleur à moins de 3 po pourrait affecter la réponse basse fréquence.
5. Contrôle de volume: Utilisez la commande de volume pour régler le niveau de pression
sonore des moniteurs BX5 Carbon.
6. Interrupteur d'alimentation: Ce commutateur met le moniteur sous et hors tension.
7. Prise d'alimentation: Permet la connexion d'un câble d'alimentation triphasé.
8. Porte-fusible: Contient le fusible externe principal.
9. Interrupteur de selection de la tension: Deux positions sont disponibles : 115VCA et
230VCA. Elles doivent être sélectionnées en fonction de la tension de secteur du lieu où
les enceintes sont utilisées. Si vous vous trouvez aux Etats-Unis, placez l'interrupteur en
position 115V; dans la plupart des pays européens vous devrez sélectionner la position
230V.
Face avant
Sur la face avant figure le voyant d'alimentation indiquant
si les enceintes (c'est-à-dire leur amplificateur) sont
allumées ou éteintes.
2
BX5
1. LED d'alimentation
2. Driver de fréquences hautes (tweeter)
1
3. Driver de fréquences de basses (woofer)
3
12

Installation
Pour que les performances des moniteurs BX5 Carbon soient optimales, veuillez lire attentivement ce
qui suit avant de procéder à leur installation.
Précautions à prendre
• Manipulation : Veillez à ne pas tenir les moniteurs par les cônes. Les moniteurs BX5 Carbon
étant emballés de façon très serrée, retirez-les de la boîte avec précaution. Afin d'éviter que les
moniteurs ne soit endommagés, tenez-les toujours par les deux côtés lorsque vous les retirez
de la boîte. Même lorsque les moniteurs ont déjà été sortis de la boîte, évitez de toucher leurs
cônes. Ceci pourrait les abîmer.
• Alimentation correcte : Les BX5 Carbon intégrant leur propre amplificateur, ils doivent être
connectés à une prise de courant à l'aide des câbles d'alimentation CA fournis. Avant de les
relier au secteur, veuillez vous assurer que l'interrupteur de sélection de tension situé sur la face
arrière des moniteurs est réglé sur la position appropriée (comme indiqué plus haut dans ce
manuel dans la liste des caractéristiques de la face arrière).
ATTENTION! Un mauvais réglage de l'interrupteur de sélection de tension peut donner lieu à
des situations dangereuses et/ou provoquer des dommages au niveau des composants des
moniteurs. Ces situations et ces dommages ne sont pas couverts par la garantie des moniteurs.
• Connexions : Vous pouvez connecter soit un câble symétrique XLR, soit un câble
symétrique/asymétrique TRS pour relier l'entrée de chaque BX5 Carbon aux sorties
correspondantes d'un préamplificateur, d'un ordinateur ou d'une console.
Pour les connexions aux entrées, nous vous recommandons d'utiliser des câbles symétriques
ou asymétriques haute qualité. Avant d'effectuer les connexions nécessaires, mettez
TOUJOURS les moniteurs BX5 Carbon hors tension et réduisez leur volume au minimum.
Configuration
La configuration et le positionnement de vos moniteurs BX5 Carbon sur des pieds, ou le bureau de
votre station de travail peut affecter les performances des haut-parleurs. Suivez les conseils suivants
pour obtenir les meilleures performances avec vos moniteurs BX5 Carbon.
Conseil : Si possible, placez vos moniteurs BX5 Carbon sur des supports au lieu de les situer sur
votre bureau. Les bureaux ont tendance à résonner aux basses fréquences et peuvent affecter la
réponse des basses de vos moniteurs. Si les supports de moniteurs ne sont pas possibles en raison
de l’espace et que vous remarquez des problèmes de basses, essayez de situer les moniteurs sur
des coussinets isolants pour délier acoustiquement les moniteurs du bureau.
Connexion XLR symétrique
Assurez-vous que l'interrupteur d'alimentation de l'enceinte BX5 Carbon est en position "éteint" et que
la commande de volume est réglée au minimum. Connectez l'extrémité mâle d'un câble XLR
symétrique à l'entrée symétriqu du moniteur BX5 Carbon (référez-vous au schéma suivant pour plus
de renseignements à propos de la connexion symétrique).
Connexion TRS symétrique/asymétrique
Assurez-vous que l'interrupteur d'alimentation de l'enceinte BX5 Carbon est en position "éteint" et que
la commande de volume est réglée au minimum. Connectez un câble TRS symétrique ou TS
asymétrique à l'entrée TRS du moniteur BX5 Carbon (référez-vous au schéma suivant pour plus de
renseignements à propos de la connexion TRS).
Connexion aux sorties d'un préamplificateur ou d'un ordinateur
Avant d'effectuer la connexion, assurez-vous que l'alimentation des dispositifs de sortie est coupée.
Branchez un câble symétrique XLR, un câble TRS symétrique, ou encore un câble TS asymétrique
aux connecteurs de sortie d'un préamplificateur, d'un ordinateur ou d'une console.
13

Placement des enceintes
Le placement des enceintes joue un rôle très
important dans le monitoring de haute précision.
Pour que les performances des BX5 Carbon soient
optimales, un environnement d'écoute approprié et
une disposition correcte des moniteurs sont
indispensables. Veuillez vous référer à ce qui suit
pour placer correctement vos BX5 Carbon.
1. Les deux unités et l'auditeur devraient en
principe être placés de manière à former un
triangle équilatéral. Référez-vous au schéma
suivant :
2. Positionnez les enceintes de manière à ce que
le haut des woofers soit au même niveau que
vos oreilles dans un environnement d'écoute
normal. Référez-vous au schéma suivant :
3. Placez les BX5 Carbon en position verticale,
avec le woofer en bas. Il n'est pas conseillé de
placer les BX5 en position horizontale.
Remarques : NE BLOQUEZ PAS la circulation
d'air devant ou entre les moniteurs. De plus,
éliminez de l'environnement d'écoute miroirs et
objets en verre ou métal car ils ont des proprieties
réflectives. PLACEZ CES MATERIAUX HORS DE
LA TRAJECTOIRE DU SON DEPUIS LES BX5
Carbon.
14

5
2
3
7
9
8
4
6
Guida per l'uso (Italiano)
Introduzione
I monitor BX5 Carbon sono stati progettati e testati da ingegneri audio di elevata esperienza
per soddisfare le richieste degli utenti in un ambiente di monitoraggio da studio. Si basano
sull'obiettivo funzionale di offrire un suono originale puro senza colorazioni aggiuntive. I monitor
BX5 Carbon dispongono di amplificatori propri, accettando direttamente un segnale a livello di
linea da diverse origini.
Gli BX5 Carbon sono stati progettati per superare tutti i limiti dei monitor di riferimento
convenzionali in ambienti audio digitali. Questo sistema offre un'ampia gamma di risposta in
frequenza grazie a due straordinari driver e a un'unica tecnologia crossover brevettata da MAudio. Il sistema vanta una risposta in frequenze medie-basse stabile e equilibrata, oltre a una
risposta in frequenze medie-alte molto ben definita. Entrambi i driver sono schermati
magneticamente per la produzione musicale tramite computer.
Essendo utilizzabile sia dagli utenti professionali degli studi commerciali sia dai possessori di
studi casalinghi, i monitor BX5 Carbon introducono un nuovo standard abbordabile per il
monitoraggio da studio.
Contenuti della confezione
• Monitor BX5 Carbon (1)
• Cavo di alimentazione
• Guida per l'uso
• Istruzioni di sicurezza e garanzia
Assistenza
Per conoscere i requisiti di sistema completi, informazioni in merito alla compatibilità e per la
registrazione del prodotto, recarsi al sito Web di M-Audio: m-audio.com/bx5carbon.
Per ulteriore assistenza, recarsi alla pagina m-audio.com/support.
Caratterístiche
Pannello posteriore
1. Ingresso XLR: Questo jack accetta collegamenti di
ingressi XLR con cablaggio bilanciato o sbilanciato. Il
cablaggio di ingresso di un connettore XLR deve
seguire lo schema seguente:
• XLR Pin 1: massa (schermo)
• XLR Pin 2: segnale positivo (+)
• XLR Pin 3: segnale negativo (-)
2. Ingresso TRS: Questo ingresso accetta connettori
jack 6,35 mm (1/4") con cablaggio bilanciato o
sbilanciato. Per il cablaggio bilanciato è necessario un
connettore TRS a tre conduttori. Il cablaggio di
ingresso di un connettore TRS deve seguire lo schema
15
seguente:
• TRS Tip: segnale positivo (+)
• TRS Ring: segnale negativo (-)
• TRS Sleeve: massa (schermo)
1

Il cablaggio sbilanciato da 6,35 mm (1/4") può essere effettuato con spina a due o tre
conduttori (TS o TRS). Un connettore TS a 2 conduttori collega automaticamente a massa
l'ingresso di segnale negativo, mentre un connettore TRS a 3 conduttori sbilanciato offre
la possibilità di lasciare aperto oppure di collegare a massa il segnale negativo. Si
consiglia di mettere a terra l'ingresso negativo inutilizzato, cosa che è possibile fare
collegando insieme l'anello e il manicotto della spina TRS. L'ingresso TRS viene sommato
all'ingresso XLR attraverso un amplificatore di ingresso bilanciato, consentendo l'utilizzo
simultaneo di entrambi gli ingressi. Le specifiche degli ingressi sono applicabili a entrambi
gli ingressi.
3. Porta d'uscita d'aria: Questa porta aiuta nella riproduzione di bassissime frequenze
scaricando frequenze al di sotto di 60 Hz e agisce come meccanismo di raffreddamento
per evitare il surriscaldamento. Questa porta non deve essere bloccata.
4. Acustica spazio interruttore: I monitor BX5 devono essere collocati ad almeno 30 cm
dalla parete più vicina, dal soffitto o da qualsiasi altra superficie ampia e piatta. In realtà
ciò può essere poco pratico a causa di limiti di spazio imposti dal proprio studio. Per
questo motivo, i monitor BX5 sono dotati di un interruttore de acústica de spazio. Questo
interruttore compensa per il collocamento vicino alle pareti.
Suggerimento: lasciare almeno 7 cm di spazio tra la parte posteriore dell'altoparlante e la
parete per lasciar "respirare" correttamente la porta posteriore. Collocare l'altoparlante a
meno di 7 cm può influire negativamente sulla risposta delle basse frequenze.
5. Controllo volume: Utilizzare il controllo del volume per impostare il livello di pressione
Sonora in uscita in base ai livelli richiesti.
6. Interruttore di alimentazione: consente di accendere e spegnere l'alimentazione dei
monitor.
7. Presa di alimentazione: Accetta il cavo di alimentazione a tre poli scollegabile che serve
per alimentare il monitor.
8. Portafusibile: Alloggio per il fusibile principale esterno.
9. Selettore di tensione: Offre 2 selezioni - 115V c.a. e 230V c.a. e deve essere impostato
in base alla tensione in uso nel paese o nella regione in cui viene utilizzato il monitor.
L'impostazione a 115V è corretta per gli USA, mentre quella a 230V viene utilizzata in
gran parte di paesi europei.
Pannello frontale
Il pannello frontale dispone di un LED di
alimentazione che indica se gli altoparlanti sono
accesi o spenti.
1. LED di alimentazione
2. Driver alta frequenza (tweeter)
3. Driver bassa frequenza (woofer)
2
1
3
BX5
16

Installazione
Per ottenere prestazioni ottimali dai BX5 Carbon, leggere attentamente quanto segue prima
dell'installazione.
Precauzioni
• Manipolazione: Non toccare mai i coni degli altoparlanti. I BX5 Carbon sono stati imballati
in modo sicuro, quindi è necessaria particolare attenzione al momento dell'estrazione dei
monitor dalla scatola. Per evitare possibili danni agli altoparlanti, afferrare entrambi i lati
del monitor allo scopo di estrarlo dalla scatola. Evitare di toccare i coni degli altoparlanti
anche dopo aver estratto i monitor della scatola.
• Utilizzo corretto dell'alimentazione: Poiché i BX5 Carbon contengono un proprio
amplificatore, quest'ultimo deve essere collegato a una presa elettrica mediante il cavo
c.a. scollegabile fornito nella confezione. Prima di collegare l'alimentazione, assicurarsi
che il selettore di tensione presente nel pannello posterior degli altoparlanti sia stato
impostato nella posizione appropriata, come descritto in precedenza in questo manuale.
ATTENZIONE! L'uso di una tensione inadeguata può comportare condizioni pericolose
e/o danni a componenti degli altoparlanti non coperti dalla garanzia.
• Collegamenti: È possibile collegare l'ingresso XLR bilanciato o l'ingresso TRS
bilanciato/sbilanciato di ciascun monitor BX5 Carbon alle uscite corrispondenti di
preamplificatore, computer o mixer. È consigliato l'utilizzo di cavi bilanciati o sbilanciati di
alta qualità per i collegamenti in ingresso. Spegnere SEMPRE l'alimentazione degli BX5
Carbon e abbassare al minimo il volume prima di eseguire i collegamenti.
Configurazione
La configurazione e il posizionamento dei monitor BX5 Carbon su supporti per altoparlanti o
sulla stazione di lavoro desktop possono influire sulle prestazioni degli altoparlanti. Avvalersi
dei seguenti suggerimenti per ottenere le migliori prestazioni dei monitor BX5 Carbon.
Suggerimento: Se possibile, collocare i monitor BX5 Carbon su appositi supporti invece che
su banco. I banchi tendono a risuonare alle basse frequenze e possono influire negativamente
sulla risposta ai bassi dei monitor. Se non è possibile adottare appositi supporti per altoparlanti
per motivi di spazio e si nota un accumulo nei bassi, provare a collocare i monitor un pad
isolante per disaccoppiare acusticamente i monitor dal banco.
Collegamento bilanciato XLR
Assicurarsi che l'interruttore di alimentazione del BX5 Carbon sia stato disattivato e che il
controllo del volume sia stato abbassato al minimo. Collegare l'estremità maschio di un cavo
bilanciato XLR all'ingresso bilanciato del BX5 Carbon (fare riferimento al diagramma seguente
per il collegamento bilanciato).
Collegamento TRS bilanciato / sbilanciato
Assicurarsi che l'interruttore di alimentazione del BX5 Carbon sia stato disattivato e che il
controllo del volume sia stato abbassato al minimo. Collegare un cavo bilanciato TRS o un
cavo sbilanciato TS all'ingresso TRS del BX5 Carbon (fare riferimento al diagramma seguente
per il collegamento TRS).
Collegamento alle uscite del preamplificatore o del computer
Prima di effettuare il collegamento, assicurarsi che l'alimentazione degli impianti d'uscita sia
stata disattivata. Collegare il cavo XLR bilanciato, TRS bilanciato o TS sbilanciato ai connettori
di uscita corrispondenti di preamplificatore, computer o mixer.
17

Posizionamento degli altoparlanti
Il posizionamento degli altoparlanti rappresenta una delle
procedure più importanti per consentire un monitoraggio
preciso del suono. Per sfruttare al massimo le capacità di
monitoraggio dei BX5 Carbon, è necessario un ambiente
di ascolto appropriato e un posizionamento corretto. Fare
riferimento a quanto segue per posizionare in modo
corretto i BX5 Carbon.
1. In generale, le due unità e l'ascoltatore dovrebbero
essere allineati in modo da formare un triangolo
regolare. Fare riferimento al diagramma seguente.
2. Posizionare i monitor in modo che la parte superiore
dei woofer sia a livello delle orecchie in un ambiente
di ascolto normale. Fare riferimento al diagramma
seguente.
3. Posizionare i monitor BX5 Carbon verticalmente con
il woofer in basso. Non è infatti consigliato
posizionare i monitor orizzontalmente.
Nota: NON frapporre ostacoli che possano bloccare il
flusso d'aria vicino ai monitor. Rimuovere anche eventuali
materiali riflettenti quali vetri, specchi o metallo
dall'ambiente di monitoraggio. POSIZIONARE QUESTO
TIPO DI MATERIALI LONTANO DAL PERCORSO DEL
SUONO PROVENIENTE DAI BX5 Carbon.
18

5
2
3
7
9
8
4
6
Benutzerhandbuch (Deutsch)
Einleitung
Alle BX5 Carbon-Monitor wurden von erfahrenen Audio-Ingenieuren speziell im Hinblick auf die
Anforderungen in der Studioumgebung entwickelt und getestet und sind für die unverfälschte
Wiedergabe des originalen Klangmaterials ohne zusätzliche Aufbereitung konzipiert. BX5
Carbon benötigen keine externe Leistungsverstärkung, sondern arbeiten direkt mit den LineSignalen der verschiedensten Audioquellen.
Im Vergleich zu den im digitalen Audiobereich üblichen Nahfeldmonitoren bieten BX5 Carbon
eine Reihe von Vorteilen. So sorgen die erstklassige Qualität der Hoch- und Tieftöner sowie die
einzigartige, von M-Audio patentierte Crossover-Technologie für einen breiten, ausgeglichenen
Frequenzgang im Tiefmitteltonbereich sowie für eine definierte Leistung im Mittel- und
Hochtonbereich. Durch die magnetische Abschirmung der Lautsprecher sind Störeinflüsse im
Bereich der Desktop-Musikproduktion ausgeschlossen.
Mit den BX5 Carbon bietet M-Audio einen neuen und erschwinglichen Standard für den
Nahfeldbereich – sowohl für professionelle Studios als auch für das Heim-Studio.
Lieferumfang
• BX5 Carbon (1)
• Netzkabel
• Benutzerhandbuch
• Sicherheitshinweise und Garantieinformationen
Kundendienst
Für die vollständigen Systemanforderungen, Kompatibilitätsdetails und die Registrierung Ihres
Produkts besuchen Sie bitte die M-Audio Website: m-audio.com/bx5carbon.
Für zusätzlichen Produkt-Support besuchen Sie m-audio.com/support.
Funktionen
Rückseite
1. XLR-Eingang: Über den XLR-Eingang können sowohl
symmetrische als auch unsymmetrische Audioquellen
angeschlossen werden. Das Anschlussdiagramm für die
Belegung des XLR-EINGANGS sieht wie folgt aus:
• XLR Pin 1: Masse (Erdung)
• XLR Pin 2: Positiv (+)
• XLR Pin 3: Negativ (–)
2. Klinkeneingang (Stereo): Über den 6,3mm (1/4")
Klinkeneingang können sowohl symmetrische als auch
unsymmetrische Kabel angeschlossen werden. Für die
symmetrische Signalführung ist eine 6,35 mm- (1/4"-)
Stereoklinke (3 Leiter) erforderlich. Das
Anschlussdiagramm für die Belegung des
19
KLINKENEINGANGS sieht wie folgt aus:
• Spitze: Positiv (+)
• Ring: Negativ (–)
• Schaft: Masse (Erdung)
Für die unsymmetrische Signalführung können sowohl 6,3 mm (1/4") Mono- als auch 6,3
(1/4") mm Stereoklinken verwendet werden.
1

Der negative Pol wird bei Monoklinken automatisch an die Masse gelegt, während bei
Stereoklinken die Möglichkeit besteht, den negativen Pol unbelegt zu lassen. Wir
empfehlen Ihnen jedoch, in jedem Falle den unbelegten Pol zu erden. Brücken Sie hierzu
Ring und Schaft der Stereoklinke. Die Signale des KLINKENEINGANGS werden über
einen symmetrischen Eingangsverstärker mit den Signalen des XLR-EINGANGS
summiert, d.h. beide Eingänge können gleichzeitig genutzt werden. Die angegebenen
Eingangsdaten beziehen sich auf beide Eingänge.
3. Bassreflexöffnung: Diese Öffnung unterstützt die Reproduktion von besonders tiefen
Frequenzen, indem Frequenzen unterhalb von 60 Hz ausgegeben werden. Gleichzeitig
dient sie als Kühlvorrichtung, um ein Überhitzen zu vermeiden. Diese Öffnung sollte nicht
blockiert werden.
4. Akustischen abstand schalter: Sollten Ihre BX5-Monitore idealerweise mindestens
einen Fuß von der nächsten Wand, Decke oder jeder anderen großen, ebene Fläche
entfernt sein. Dies ist in Ihrem Studio vielleicht aus Platzgründen praktisch nicht
durchführbar. Aus diesem Grund verfügen BX5-Monitore über einen Akustischen abstand
schalter. Dieser Schalter kompensiert die Platzierung in der Nähe von Wänden.
Tipp: Achten Sie darauf, einen Abstand von mindestens 3" zwischen der Rückseite des
Lautsprechers und der Wand zu lassen, damit das nach hinten abstrahlende Rohr "atmen"
kann. Das Platzieren der Lautsprecher näher als 3" kann sich nachteilig auf die
Basswiedergabe auswirken.
5. Lautstärkeregler: Über diesen Lautstärkeregler kann der Schallpegel des abgestrahlten
Signals eingestellt werden.
6. Netzschalter: dieser Schalter aktiviert bzw. deaktiviert den Monitor.
7. Netzanschluss: Für abnehmbare 3-polige Kältenetzstecker.
8. Sicherungshalter: Von außen zugängliche Netzsicherung.
9. Spannungsumschalter: Über diesen Schalter können Sie Versorgungsspannung (115V
AC und 230V AC) einstellen. Beachten Sie bitte, dass die Versorgungsspannung je nach
Land variieren kann. In den USA sind 115V (AC) gängig, während in Großbritannien und
in den meisten Ländern Resteuropas mit 230V (AC) gearbeitet wird.
Vorderseite
An der Vorderseite der BX5 Carbon befindet sich
eine Betriebsanzeige (Power-LED), an der Sie
ablesen, ob die Monitore ein- oder ausgeschaltet
sind.
1. Betriebsanzeige (Power-LED)
2. Hochtöner
3. Tieftöner
(Tweeter)
(Woofer)
20
2
1
3
BX5

Installation
Bevor Sie die BX5 Carbon installieren, lesen Sie sich bitte die folgenden Ausführungen
aufmerksam durch, denn sie enthalten wichtige Hinweise zur optimalen Ausnutzung der
Monitorleistung.
Sicherheitshinweise
• Handling: Greifen Sie beim Herausnehmen der Monitore nicht in die Lautsprecherhörner.
Die BX5 Carbon sitzen relativ fest in der Verpackung, sodass Sie hier besonders
vorsichtig vorgehen sollten. Halten Sie die Monitore mit beiden Händen an den Seiten fest
und ziehen Sie sie nach oben aus dem Karton. Achten Sie darauf, dass Sie die Hörner
auch nach dem Auspacken nicht berühren.
• Betrieb: Die BX5 Carbon verfügen über eine eingebaute Hochleistungsendstufe und
müssen demzufolge an das Versorgungsnetz angeschlossen werden. Nutzen Sie hierzu
das mitgelieferte Netzkabel. Vergewissern Sie sich, dass die richtige
Versorgungsspannung am Spannungsumschalter (Monitorrückseite) eingestellt ist, bevor
Sie die BX5 Carbon an das Versorgungsnetz anschließen (siehe den vorstehenden
Abschnitt).
ACHTUNG! Ist die Versorgungsspannung falsch eingestellt, besteht die Gefahr, dass u.a.
die von der Garantie ausgeschlossenen Bauteile beschädigt werden.
• Anschluss: Für den Anschluss Ihrer Audioquelle (Vorverstärker, Computer, Spielkonsole)
können Sie den XLR-Eingang (symmetrisch) bzw. den Klinkeneingang (Mono oder
Stereo) der BX5 Carbon nutzen. Verwenden Sie nur qualitativ hochwertige Stereo- bzw.
Monokabel für den Anschluss der Audioquellen. Schalten Sie die BX5 Carbon aus und
drehen Sie die Lautstärkeregler bis auf Null herunter, bevor Sie die Audioquellen
anschließen.
Konfiguration
Konfiguration und Positionierung der BX5 Carbon-Monitore auf Lautsprecherstativen oder Ihrer
Arbeitsfläche können die Leistung der Lautsprecher beeinflussen. Folgende Tipps können
dabei behilflich sein, die beste Leistung aus Ihren BX5 Carbon-Monitoren herauszuholen.
Tipp: Wenn möglich, montieren Sie Ihre BX5 Carbon-Monitore auf Stative und stellen Sie sie
nicht auf den Tisch. Tische u.Ä. schwingen bei tiefen Frequenzen mit und können so die
Basswiedergabe der Lautsprecher beeinträchtigen. Falls Sie die Lautsprecher aus Platzmangel
nicht auf Stativen betreiben können und Sie eine zu basslastige Wiedergabe wahrnehmen,
stellen Sie die Monitore auf spezielle Isolationsplatten um sie von der Tischplatte zu trennen.
XLR-Anschluss (symmetrisch)
Vergewissern Sie sich, dass der Monitore ausgeschaltet und der Lautstärkeregler
heruntergedreht sind. Schließen Sie den XLR-Stecker des Verbindungskabels an die XLREingangsbuchse (siehe das folgende Diagramm).
Klinkenanschluss (wahlweise symmetrisch bzw. unsymmetrisch)
Vergewissern Sie sich, dass der Monitore ausgeschaltet und der Lautstärkeregler
heruntergedreht sind. Schließen Sie den Stecker des Stereo- oder Monokabels an den
Klinkeneingang der BX5 an (siehe das folgende Diagramm).
Anschluss von Vorverstärker oder Computer
Stellen Sie sicher, dass die anzuschließenden Geräte ausgeschalten sind. Schließen Sie
Geräte über ein XLR-Kabel (Stereo) bzw. ein Klinkenkabel (Mono- oder Stereo) an die Monitore
an.
21

Aufstellung der Monitore
Die Aufstellung der Monitore ist für die
Wahrnehmung und Beurteilung der Soundqualität
entscheidend. Voraussetzung für die optimale
Ausnutzung des Klangpotentials der BX5 Carbon
sind eine geeignete Hörumgebung und eine
korrekte Aufstellung der Monitore. Die folgenden
Erläuterungen sollen Ihnen die Aufstellung der
Monitore erleichtern.
1. Platzieren Sie die BX5 Carbon so, dass die
Entfernung zwischen den Boxen und die
Entfernung der Boxen zum Hörer in etwa ein
gleichseitiges Dreieck bildet siehe das
folgende Diagramm).
2. Die Tieftöner sollten sich hierbei in Ohrenhöhe
befinden (normale Hörumgebung; siehe das
folgende Diagramm).
3. Stellen Sie die Monitore vertikal auf, und zwar
so, dass sich der Tieftöner unter dem
Hochtöner befindet. Eine horizontale
Aufstellung wird nicht empfohlen.
Hinweis: Achten Sie darauf, dass sich KEINE
Gegenstände zwischen oder vor den Boxen
befinden. Entfernen Sie Gegenstände aus
schallreflektierendem Material (z. B. Glas, Spiegel
oder Metall) aus der Monitorumgebung.
GEGENSTÄNDE AUS
SCHALLREFLEKTIERENDEM MATERIAL SIND
GENERELL AUSSERHALB DES SCHALLWEGS
ZU POSITIONIEREN.
22

Appendix (English)
Technical Specifications
Type
LF Driver
HF Driver
Frequency Response
Crossover Frequency
LF Amplifier Power
HF Amplifier Power
Signal-to-Noise Ratio
Input Connectors
Polarity
Input Impedance
Input Sensitivity
Protection
Indicator
Power Requirements
Cabinet
Dimension
(height x width x depth)
Weight
(without packing)
* Specifications are subject to change without notice.
Trademarks and Licenses
All other product or company names are trademarks or registered trademarks of their
respective owners.
2-way near-field studio reference monitors
5-inch (127 mm) Kevlar curved cone with high temperature voice
coil and damped rubber surround. Magnetically shielded
1-inch (25 mm) magnetically shielded natural silk dome
56 Hz – 22 kHz
3 kHz
40 W
30 W
100 dB typical A-weighted
1 x XLR balanced input connector
1 x TRS balanced/unbalanced input connector
Positive signal at + input produce outward LF cone displacement
20 KΩ balanced, 10 KΩ unbalanced
85 mV pink noise input produces 90 dBA output SPL at 1 meter
with volume control at maximum
RF interference, output current limiting, over temperature, turn-
on/off transient, subsonic filter, external mains fuse.
Power on/off indicator on rear panel
Factory-programmed for 115 V ~50/60 Hz, 230 V ~50/60 Hz, or
100 V ~50/60 Hz
Vinyl-laminated high-acoustic-efficiency MDF
9.8" x 6.9" x 7.9"
250 mm x 176 mm x 200 mm
11 lbs.
5.0 kg
23

m-audio.com
Manual Verison 1.1
 Loading...