


MIDISPORT 8x8-s

Table of Contents
Introduction . . . . . . . . . . . . . . . . . . . . . . . . . . . . . . . . . . . . . . . . . . . . . . . . . . .2
Features . . . . . . . . . . . . . . . . . . . . . . . . . . . . . . . . . . . . . . . . . . . . . . . . . . . . . .2
Package Contents . . . . . . . . . . . . . . . . . . . . . . . . . . . . . . . . . . . . . . . . . . . . . . .3
Product Layout . . . . . . . . . . . . . . . . . . . . . . . . . . . . . . . . . . . . . . . . . . . . . . . .3
Front Panel . . . . . . . . . . . . . . . . . . . . . . . . . . . . . . . . . . . . . . . . . . . . . . . .3
Back Panel . . . . . . . . . . . . . . . . . . . . . . . . . . . . . . . . . . . . . . . . . . . . . . . .4
Overview . . . . . . . . . . . . . . . . . . . . . . . . . . . . . . . . . . . . . . . . . . . . . . . . . . . . .5
Quick Guide to Getting Started . . . . . . . . . . . . . . . . . . . . . . . . . . . . . . . . . . . .6
Hardware Installation . . . . . . . . . . . . . . . . . . . . . . . . . . . . . . . . . . . . . . . . . . .7
Driver Software Installation . . . . . . . . . . . . . . . . . . . . . . . . . . . . . . . . . . . . . .8
MIDI Interface Modes . . . . . . . . . . . . . . . . . . . . . . . . . . . . . . . . . . . . . . . . . .17
Stand-Alone Modes . . . . . . . . . . . . . . . . . . . . . . . . . . . . . . . . . . . . . . . . . . . .18
MIDISPORT Mode Assignments . . . . . . . . . . . . . . . . . . . . . . . . . . . . . . . . .19
USB Mode . . . . . . . . . . . . . . . . . . . . . . . . . . . . . . . . . . . . . . . . . . . . . . .19
PC Mode . . . . . . . . . . . . . . . . . . . . . . . . . . . . . . . . . . . . . . . . . . . . . . . . .20
Mac Mode . . . . . . . . . . . . . . . . . . . . . . . . . . . . . . . . . . . . . . . . . . . . . . . .20
Cable Test Mode . . . . . . . . . . . . . . . . . . . . . . . . . . . . . . . . . . . . . . . . . . .21
Thru Mode . . . . . . . . . . . . . . . . . . . . . . . . . . . . . . . . . . . . . . . . . . . . . . .21
Patchbay Operation . . . . . . . . . . . . . . . . . . . . . . . . . . . . . . . . . . . . . . . .22
SMPTE Operation . . . . . . . . . . . . . . . . . . . . . . . . . . . . . . . . . . . . . . . . . . . . .22
SMPTE Writer . . . . . . . . . . . . . . . . . . . . . . . . . . . . . . . . . . . . . . . . . . . .23
SMPTE Reader . . . . . . . . . . . . . . . . . . . . . . . . . . . . . . . . . . . . . . . . . . . .23
SMPTE "Write" Button . . . . . . . . . . . . . . . . . . . . . . . . . . . . . . . . . . . . .24
SMPTE "Format" Button . . . . . . . . . . . . . . . . . . . . . . . . . . . . . . . . . . . .25
Setting Up Your MIDI Studio . . . . . . . . . . . . . . . . . . . . . . . . . . . . . . . . . . . .25
Typical MIDI System Set-up: . . . . . . . . . . . . . . . . . . . . . . . . . . . . . . . . .25
Using the MIDISPORT in your Application Software . . . . . . . . . . . . . . . . .27
MIDISPORT Remote Control Software . . . . . . . . . . . . . . . . . . . . . . . . . . . .28
Remote Control Operation . . . . . . . . . . . . . . . . . . . . . . . . . . . . . . . . . . . . . . .29
Windows Menus . . . . . . . . . . . . . . . . . . . . . . . . . . . . . . . . . . . . . . . . . . . . . .30
Macintosh Menus . . . . . . . . . . . . . . . . . . . . . . . . . . . . . . . . . . . . . . . . . . . . .32
Remote Control Patchbay Operation . . . . . . . . . . . . . . . . . . . . . . . . . . . . . . .34
Diagnostics Software . . . . . . . . . . . . . . . . . . . . . . . . . . . . . . . . . . . . . . . . . . .36
Test Results for Mac or PC . . . . . . . . . . . . . . . . . . . . . . . . . . . . . . . . . . . . . .38
SMPTE/MIDI Time Code Tutorial . . . . . . . . . . . . . . . . . . . . . . . . . . . . . . . .40
Before Calling Tech Support . . . . . . . . . . . . . . . . . . . . . . . . . . . . . . . . . . . . .49
Limited Lifetime Warranty . . . . . . . . . . . . . . . . . . . . . . . . . . . . . . . . . . . . . .50
Midisport 8x8
™
MANUAL
version: MS8-09092000
1

Introduction
Thank you for purchasing the MIDISPORT™ 8x8/s multi-port MIDI interface
for USB equipped PC and Macintosh computers. The MIDISPORT’s high speed
Universal Serial Bus connection to the computer assures reliable and speedy
transfer of MIDI data. The MIDISPORT 8x8/s can also be connected to the serial
port of PCs and “legacy” Macintosh computers.
The MIDISPORT performs SMPTE read/write functions using either the front
panel control switches or the included remote control software, which will also
control patchbay settings for your new MIDISPORT 8x8/s.
Follow the installation instructions in this manual and you will be up and
running in no time. The MIDISPORT installs externally to your computer,
requiring no computer disassembly. Expansion is easy too — just plug in
additional MIDISPORT units for more MIDI ports (USB only).
Features
The MIDISPORT 8x8/s USB MIDI Interface has the following features:
•8 independent in / 8 independent out MIDI Interface (128x128 MIDI
channels) in professional 19" single height rack mount chassis.
• High-speed connection to USB-equipped PC or Mac computers.
• Alternate "legacy" serial connection to non-USB PC or Mac computers.
• MIDI in and out activity indicators for each port.
• Includes 6 ft. USB cable.
• When disconnected from the PC, unit operates as a stand-alone MIDI
patchbay, as well as a SMPTE to MTC synchronizer.
• Built-in "MIDI cable tester" mode.
•Windows 98 compatible -- true Plug-and-Play installation requires no IRQ,
I/O Address or DMA channel setup
• Mac OMS Compatible. Works with Mac OS 8.6 and above.
• Includes Windows and Mac Control Panel software.
SMPTE Time Code Writer/Reader
• Reads and writes 24, 25, 29.97, 30 drop or 30 non-drop frame LTC SMPTE
formats.
• Any SMPTE time write offset may be set-up via included control panel
software
• Converts LTC SMPTE to MIDI Time Code (MTC) for syncing any MTC
capable software.
• Selectable "flywheel" that can be set to any value from 1 frame to 255 frames,
or infinite flywheel.
2
• Can perfectly regenerate even the worst SMPTE Time Code.
• Performs "JAM" sync in all modes.
Please read the installation instructions thoroughly before physically installing
your MIDISPORT 8x8/s. For software driver installation information please
refer to the section “Software Installation.”
Package Contents
Included in the MIDISPORT 8x8/s package are:
• This manual.
•MIDISPORT 8x8/s Interface.
•1 Standard USB A/B Cable for Mac or PC.
•1 serial adapter cable for the PC.
•1 Power Supply, 9V DC 500mA "wall wart."
• Driver Software diskette/CD for Windows 95/98/2000 and MacOS. The CD
also includes Opcode’s OMS v.2.3.7 for use with MacOS.
IMPORTANT: IF YOU RECEIVED A FLOPPY DISK INSTEAD OF A
CD, USE THE INSTALLATION INSTRUCTIONS AND DRIVERS ON
THE FLOPPY DISK. All of the latest driver software, including
Opcode’s OMS, is also downloadable from our website at
www.midiman.net - Click on the “Drivers” page, then select
“MIDISPORT 8x8/s.”
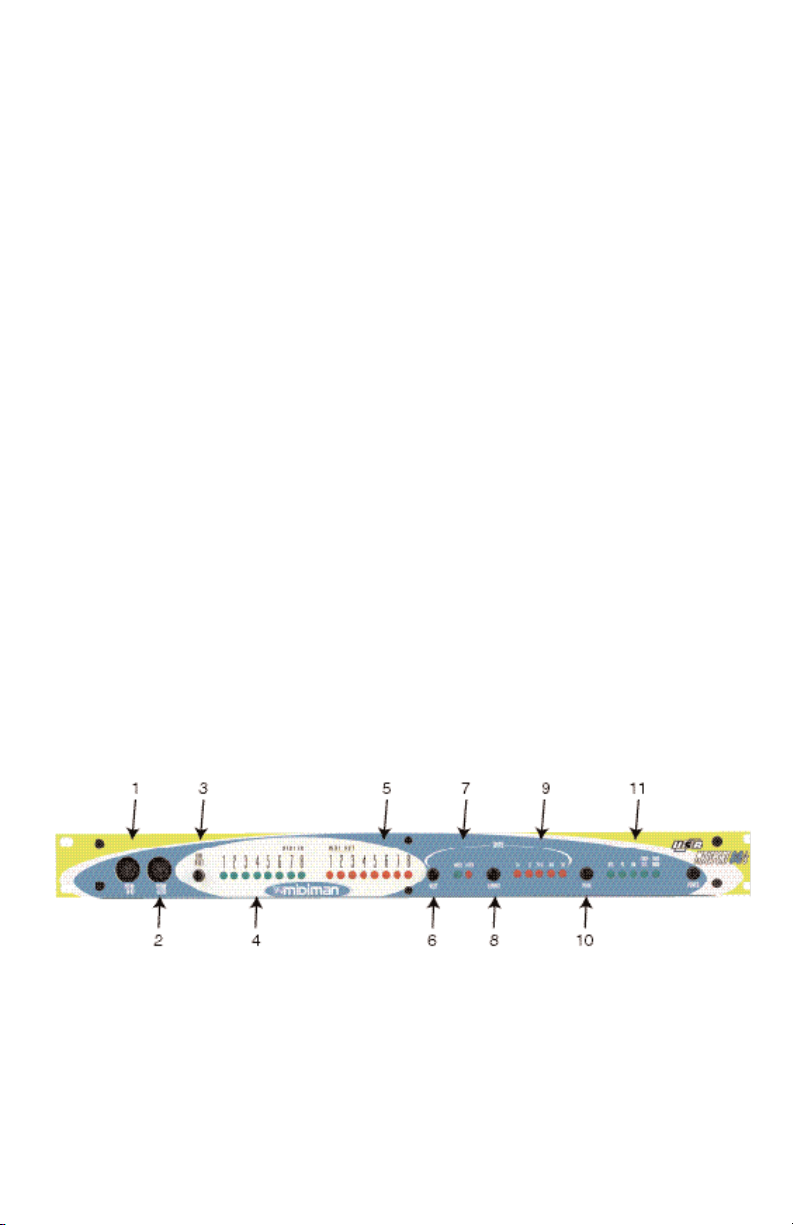
Product Layout
Front Panel
1. MIDI In 8 - This standard MIDI jack connects the MIDISPORT Port 8 input to
the output of a MIDI device using a standard MIDI cable.
2. MIDI Out 8 - This standard MIDI jack connects the MIDISPORT Port 8
output to the input of a MIDI device using a standard MIDI cable.
3. MIDI Reset button - This button, when pressed, acts as a "panic button,"
sending an "all notes off" and "all controllers off" messages to the
3

MIDISPORT outputs in the event of a stuck note or other confusion from too
much MIDI information.
4 MIDI In Indicator LEDs 1 through 8 - These LEDs will light to indicate
activity on each MIDI Input port, in response to MIDI data received from
external devices.
5. MIDI Out Indicator LEDs 1 through 8 - These LEDs will light to indicate
activity on each MIDI Out port, in response to MIDI data being sent from the
computer.
6. Write button - Starts and stops the SMPTE writer, and can also be used to set
the Write Offset time.
7. "Writing" and "Locked" LEDs - the "Writing" LED indicates SMPTE writer
status, lighting when SMPTE Write mode is engaged; The "Locked" LED
indicates SMPTE reader/regenerator status, lighting when a valid SMPTE
code is recognized at the SMPTE In jack.
8. Format button - Manually selects the format of SMPTE Output. Push
repeatedly until the proper format is set.
9. SMPTE Format LEDs - Indicates the current SMPTE output format. "24"
indicates 24 fps (frames per second), "25" indicates 25 fps, "29.97" indicates
29.97 fps, "30D" indicates 30 fps drop-frame, and "30" indicates 30 fps.
10. Mode button - Manually selects the mode in which the MIDISPORT will
operate. Push repeatedly until the proper mode is selected.
11. Mode indicator LEDs - When lit, these LEDs indicate which mode is
currently selected.
Back Panel
12. Power Jack - this 2.5 mm jack is used to connect the MIDISPORT to the “wall
wart” 9vDC power supply included with the unit. Only the proper value
power supply should be used with the MIDISPORT.
13. SMPTE In and Out Jacks - these 1/4” phone jacks receive or send a SMPTE
timecode signal, respectively.
14. PC / Mac Host Connector - this 8 pin mini-DIN connector is used to connect
the MIDISPORT to the host computer’s serial port, should the user choose to
operate in this mode.
4

15. USB Connector - used to connect the MIDISPORT to the host computer’s USB
port.
16. MIDI In Jacks 1 through 7 – These jacks receive MIDI input from any MIDI
device sending information from its MIDI output jack (or ‘Thru’ jack, in some
cases).
17. MIDI Out Jacks 1 through 7 – These jacks send MIDI information received
from the host computer to the input of any MIDI capable device.
Overview
The MIDISPORT 8x8/s provides eight independent MIDI input ports and eight
independent MIDI output ports. Each individual MIDI port supports 16 MIDI
channels; therefore the MIDISPORT is capable of receiving 128 channels (16x8)
and transmitting 128 channels. MIDI is the acronym for “Musical Instrument
Digital Interface” and is the protocol used when MIDI keyboards and devices
that record and playback the MIDI information, such as computers and
hardware sequencers, communicate with each other.
The MIDISPORT may be connected to your computer using either USB or
"legacy" serial connection. USB (Universal Serial Bus) is a powerful new
technology that allows easy connection between a computer and its peripherals.
USB allows connection of multiple peripheral devices running simultaneously —
all without having to open your computer and configure jumpers, I/O
addresses, DMA channels, etc. It also allows "hot plugging," i.e. connecting
and/or disconnecting a peripheral while the computer is powered up.
Although USB is the more modern, faster transfer mechanism, you may choose
instead to use the "legacy" serial connection if your computer does not meet the
requirements for USB operation, which will be outlined below. Legacy serial
connection may be made between the MIDISPORT and a PC’s serial (also known
as "COM") port, or between the MIDISPORT and an (older) Macintosh
computer’s printer or modem port. When using the legacy serial connection,
different software drivers must be installed from when you use the USB
connection. However, the MIDISPORT remote control software is the same
regardless of USB or legacy serial connection.
PC USB Requirements: You must be running Windows 98 to properly install the
MIDISPORT 8x8/s. Also, either your motherboard must support USB or you will
need to install a PCI-to-USB host adapter to provide the USB ports. It is possible
for a motherboard to support USB and yet not have the physical port connectors
installed. A simple USB back panel extender can be purchased at a computer
supply store and can be easily installed and connected to the motherboard to
provide USB port connectors.
5

Apple Computer USB Requirements: Your Apple must support USB with the
physical ports present. Standard iMac’s, G3’s and G4’s with USB ports will work
just fine.
IMPORTANT: For the Mac, an OMS MIDI driver is provided. You
MUST have a sequencer that supports OMS, and have OMS
properly installed in order to use the MIDISPORT.
While operating as a MIDI interface, the MIDISPORT 8x8/s also provides
SMPTE time code read/write capability. SMPTE time code is converted by the
MIDISPORT to MIDI time code (MTC), allowing you to synchronize your
sequencer or recording software to incoming SMPTE. Remote Control software
included with your MIDISPORT may be used to configure and control the
SMPTE functions. The convenient front panel switches may also be used to start
and stop SMPTE writing, or set the current SMPTE format (frame rate) and start
time. For those of you not familiar with SMPTE, or just need a quick refresher, a
SMPTE tutorial is included later in this manual.
Finally, when not being used as a MIDI interface, the MIDISPORT 8x8/s
operates in "Stand-Alone" mode. The stand-alone mode is active whenever:
1. the MIDISPORT is powered up but disconnected from the computer, or
2. the MIDISPORT front panel mode is set to "Cable Test" or "Thru Mode", or
3. the MIDISPORT is connected to the computer but the front panel USB, PC, or
MAC mode does not match the driver installation/settings on the host
computer.
When standing alone, the MIDISPORT operates as a dedicated MIDI patchbay
and SMPTE writer. The MIDI patchbay programs, which are set up by the
MIDISPORT remote control software while the MIDISPORT is being used as a
MIDI interface, may be selected in stand-alone mode via the MIDISPORT front
panel RESET button. The SMPTE format, write start time, and SMPTE writer
start/stop may also be controlled directly from the front panel. Their standalone operation is described in greater detail in a later section of this manual.
Two diagnostics are available in stand-alone mode: Cable Test and Thru Mode.
The first allows you to test and verify a MIDI cable. Thru Mode provides a
means for routing all MIDISPORT MIDI input ports to all MIDISPORT MIDI
output ports, essentially connecting all MIDI devices connected to your
MIDISPORT.
Quick Guide to Getting Started
Here is a brief outline of the steps required to use your MIDISPORT with an
Apple or PC computer:
1. Attach the MIDISPORT to your powered-off computer and attach the
included power supply to the MIDISPORT (see "Hardware Installation").
6

2. Install the software drivers and Remote Control software (see "Software
Installation"). Mac users must first install and configure OMS (included on
CD or available by download from the MIDISPORT ‘Drivers’ page of our
web site).
3. Connect your keyboards and sound modules to the MIDISPORT (see "Setting
Up Your MIDI Studio").
4. With the proper "Interface" mode selected on the MIDISPORT, power up your
computer.
5. Configure the MIDISPORT in the Remote Control software and your
application software (see "Using the MIDISPORT in your Application
Software").
Hardware Installation
We recommend that you power down (turn off) your computer for a first time
MIDISPORT hardware installation. If you plan to use USB with a PC, before you
power down you should verify that your computer’s USB port is installed and
enabled (Apple computers equipped with USB come with the USB already
enabled so you can skip this step if you are an Apple user). On your PC, go to
Start | Control Panel | Systems | Device Manager. Make sure that a "Universal
serial bus controller" heading exists and that USB is not disabled. If the heading
does not exist, either you have no USB hardware installed in your computer, or
you do have it installed but it is not enabled in your computer’s BIOS (check
your computer’s user guide on how to do this). If USB is not installed or
enabled, your computer will not recognize the MIDISPORT.
For PC legacy serial port operation, select a serial port that is not already
assigned to another peripheral, such as an external modem or serial mouse.
Also, make sure that the serial port is enabled, and that you are aware of which
COM port number is assigned to that port -- generally, either COM1 or COM2.
For Mac legacy serial port use, select either your modem or printer port to use
with the MIDISPORT, whichever is more convenient. We suggest using the
modem port for MIDI whenever possible. Disconnect anything that might be
attached presently to that selected port.
1. Find a good location near your computer station to place the MIDISPORT, or
find a space in your 19" rack and secure the unit to it. Plug the MIDISPORT’s
wall wart power supply into a convenient power outlet, and plug the other
end into your MIDISPORT. Keep the wall wart transformer away from
unbalanced audio cables to prevent the possibility of unwanted noise.
2a. For USB operation: The USB port on your computer is a small (1/8" x 3/8"),
rectangular female connector and is usually grouped in one or more sets of
two. Take the male end of the USB cable that matches the size of your host
computer’s USB port and plug it into the USB port on the back of your
7

computer. Take the other end of the USB cable and plug it into the USB port
on the back panel of the MIDISPORT. This male end of your USB cable is
more square (1/4" x 1/4") and should fit easily into the female USB connector
on your MIDISPORT.
2b. For PC serial operation: using the provided PC serial cable, connect the
MIDISPORT’s "PC/MAC HOST" port to one end of the cable and the
computer’s serial port (which you have already determined is available) to
the other end.
2c. For Apple serial operation: using a standard Mac serial cable, connect the
MIDISPORT’s "PC/MAC HOST" port to one end of the cable and the
computer’s modem or printer port (which you previously selected) to the
other end.
3. Next, power up your MIDISPORT. Each LED will light one-by-one, in
sequence from left to right, as the MIDISPORT performs a self-test. Then the
MIDISPORT will set itself to its stored settings, in this case the factory
settings. After this any setting changes you make will be saved each time the
MIDISPORT is turned off, and restored whenever the MIDISPORT is turned
back on.
Proceed to the next section, "USB Driver Installation," or "Serial Driver
Installation" for Windows or Mac.
Driver Software Installation
MIDI application software communicates with devices such as the MIDISPORT
via software known as "drivers." A software driver is a special, dedicated
program that makes a MIDI interface accessible to an application in a standard
manner. On the included CD (or diskette), Midiman supplies the software
drivers that enable you to use the MIDISPORT on your USB port with either
Windows 98, Windows 2000, or Opcode’s OMS for Mac OS 8.6 or higher
(required). For serial port operation, Win 95 or higher is required for PC, and
Mac OS 7.5 or higher is recommended for the Mac.
Different PC and Mac software drivers are supplied for installation on both the
USB port and legacy serial port. Both installation procedures are covered in this
section. All MIDISPORT drivers are supplied on the included media.
If your MIDISPORT 8x8/s came with a floppy disk, there is a "readme" file that
will give you instructions on how to install the driver software from the floppy.
Locate the file on the floppy entitled "#install8x8Mac" for Mac users, or
"#install8x8.txt" for PC users. Double-click on the filename to open it. Carefully
follow the instructions given to properly install your driver software (we assume
all Mac owners can read a PC formatted floppy disk).
NOTE: You may need to download the proper driver software from
our website if you received a floppy disk and have no floppy drive.
8

To do this, go to www.midiman.net and click on the “Drivers”
button. Locate the MIDISPORT 8x8/s in the list and then click on
either the PC or the Mac driver. These are self-extracting files and
must be expanded to a folder or floppy for installation.
USB Driver Installation for Windows 98 and Higher
This driver for the MIDISPORT 8x8/s USB interface requires Windows 98 or
higher. Please make sure that the Windows operating system is installed on
your system, and that your USB port is enabled. Check your computer manual
for more information. Make sure that USB mode is selected on the MIDISPORT
by pressing the front panel Mode button until the USB LED blinks before
proceeding.
USB Driver Installation for Windows 98
1. Boot Windows 98 or with the MIDISPORT connected or connect it after
Windows has been booted.
2. When the Add New Hardware Wizard reports that it detected an Unknown
Device, click "Next."
3. On the next screen select the "Search for the best driver for your device" item
& click "Next".
4. Indicate to Windows where to look for the driver installation files. Select
"Choose Path," then type in (or browse until you locate) [your CD ROM drive
letter]:\8x8MidiSport\win98&w2k. In most cases this will be
d:\8x8MidiSport\win98&w2k, but your CD drive may be a different drive
letter. If your unit came with a floppy disk, use the drive letter of your
floppy drive, most often A:\8x8MidiSport\win98&w2k.
5. On the next screen, Windows will indicate it has searched for the driver files
for the "Midiman USB Midisport 8x8/s Loader" and is now ready to install
the driver. Click the "Next" button to continue.
6. Windows will copy files and then indicate it has finished installing the
software that your new hardware device requires. Click the "Finish" button.
7. Next you will see Windows indicate that it has found another Unknown
Device & then see it automatically install the software for the "Midiman USB
Midisport 8x8/s Midi Driver".
Hold on, we're not done yet.
8. The Add New Hardware Wizard will once again report it has detected an
Unknown Device, click "Next".
9. On the next screen select the "Search for the best driver for your device." item
& click "Next".
10. Indicate to Windows where to look for the driver installation files (this
should be the exact same place you had Windows look for the previous
9

software), the click the "Next" button.
11. On the next screen, Windows will indicate it has searched for the driver files
for the "Midiman USB Midisport 8x8/s Midi Driver" and is now ready to
install the driver. Click the "Next" button to continue.
12. Windows will copy files and then once again indicate it has finished
installing the software that your new hardware device requires. Click the
"Finish" button.
The software drivers are now all loaded and functional. If you look in the Device
Manager, you will find 2 parts for the Midisport driver; one under the "Universal
Serial Bus" controller group and the other under the "Sound, video, & game
controllers" group. Your MIDISPORT is ready for use. Refer to the sections
"Setting Up Your MIDI Studio" and "Using the MIDISPORT in your Application
Software" for more information.
USB Driver Installation for Windows 2000
1. Boot Windows 2000 with the Midisport connected or connect it after
Windows 2000 has been booted.
2. Windows will detect the presence of a USB Device and will start the Found
New Hardware Wizard.
3. Click the "Next" button on the first screen.
4. Select the "Search for suitable driver for my device" item and push the "Next" button.
5. Select the appropriate source for the driver files.
6. The Drive File Search Results screen will indicate that it has found a driver
for this device; push the "Next" button to install the driver.
7. After Windows copies the loader portion of the driver, two things will
happen rather quickly:
a) The Found New Hardware Wizard will display a screen indicating it has
finished installing the software for this device and requesting you to click
the "Finish" button.
b) An "Unsafe Removal of Device" screen will be shown indicating the
"Midiman USB Midisport 8x8 Loader" has been unplugged. This is because
after the loader has completed loading firmware into the Midisport, the
hardware reconfigures itself as a new device, reporting this to Windows over
the USB interface.
8. Click the "OK" button on "Unsafe Removal of Device" screen.
9. Click the "Finish" button on the Completing the Found New Hardware
Wizard screen.
10.You will then see Windows indicate that it has found another new USB
Device for which it will automatically install the Midiman USB MidiSport8x8
Midi Driver.
10

Before you can use the USB Midisport under Windows 2000, you must manually
install another portion of the Midisport drivers.
11.Click on the "Start" button in the task bar.
12.Click open the "Settings" item.
13.Select the "Control Panel".
14.Click open the "Add/Remove Hardware" icon.
15.Click the "Next" button on the first Add/Remove Hardware Wizard screen.
16.Select the "Add/Troubleshoot a device" item and push the "Next" button.
17.After searching for a new hardware device you will be shown a screen from
which to choose a hardware device; select the "Add a new device" item and
push the "Next" button.
18.On the next screen select the "No, I want to select the hardware from a list"
item and push the "Next" button.
19.Select the "Sound, video and game controllers" from the hardware type list
and push the "Next" button.
20.Click on the "Have Disk..." button.
21.You will be prompted for the location of the manufacturer's driver diskette;
browse to or enter the appropriate disk drive specification and click "OK".
22.When the "Digital Signature Not Found" window pops up push the "Yes"
button to indicate that you want to continue the installation.
23.On the "Select a Device Driver" screen select the "Midiman USB Midisport8x8
Midi" entry & click "Next".
24.Click "Next" button to Start Device Driver Installation.
25.When the "Digital Signature Not Found" window pops up push the "Yes"
button to indicate that you want to continue the installation.
26.When the files have been copied click the "Finish" button on the "Completing
the Found New Hardware Wizard" screen.
27.In order for the driver installation to be completed you will be required to exit
and restart Windows.
USB Driver Installation on the Mac
You must first install Opcodes’s OMS. This is available on the MIDISPORT
drivers page of our website, or can be installed from the driver CD by opening
the OMS folder and then double clicking the OMS install icon.
This release version of the MIDISPORT drivers requires Macintosh operating
system OS 8.6 or higher. This is offered by Apple as a free update to OS 8.5
11

owners. Please check the Apple website at http://asu.info.apple.com for
update information.
NOTE: As of yet, only two MIDISPORTs can be configured and
used with OMS in USB operation. Please check the MIDIMAN
website for driver updates at www.midiman.net.
OMS is a MIDI manager program that is made by Opcode. We have included it
on the CD disk for your convenience, and also offer it as a free download from
our website’s Midisport drivers page. OMS is required to run the MIDISPORT,
and it is important that you install OMS before running the MIDISPORT
Installer. Locate the OMS installer program on this CD in the OMS 2.3.7 folder,
and simply double click its icon to install OMS. Once this has been successfully
completed, you can move on to the the next step- the MIDISPORT 1.0 Installer.
FOR FIRST TIME INSTALLS: If you power up your Mac with the MIDISPORT
attached, you will receive a message that an “unknown USB device has been
detected. Click OK and proceed with the driver installation. You may also install
the drivers first, and then plug in the MIDISPORT. Make sure that USB mode is
selected on the MIDISPORT by pressing the front panel Mode button until the
USB LED blinks.
1. Insert the Driver Software CD. Open the MIDISPORT8x8 folder, then the
USB8x8 folder. There, you will find the MIDISPORT Installer program. If
your unit came with a floppy, you will first find an MS8x8Mac folder, then
the USB8x8 folder.
2. Run the MIDISPORT Installer by double clicking on it. This installs all of the
MIDISPORT's extensions as well as the MIDISPORT OMS Driver. However,
YOU MUST HAVE OMS INSTALLED FIRST BEFORE YOU RUN THIS
INSTALLER PROGRAM. Otherwise, the MIDISPORT OMS Driver will not
be placed in the OMS folder.
Once installed, you should have 2 MIDISPORT extensions in your extensions
folder, which resides in your System folder. They are: 1) MIDISport8Driver; 2)
MIDISport8Shim. The installer will also place the MIDISPORT OMS Driver in
the OMS folder, which also resides in your system folder. Now it is time to
configure OMS.
Go to the Control Panel or Chooser under the Apple Menu, and make sure
AppleTalk is turned off (this is recommended, although OMS will sense that it is
on and prompt you to turn it off). If you are installing your MIDISPORT driver
and configuring OMS for the first time, follow these instructions to configure
OMS.
First Time OMS Configuration Instructions:
1. In the Opcode folder, which you will find on your hard drive, locate the OMS
12

Applications folder, then OMS Setup. Double click on OMS Setup.
2. OMS will inform you that it has not yet been configured. Click OK.
3. The Create A New Studio Setup dialog box now appears. Click OK.
4. The "OMS Driver Search" box asks you to choose the port on which you've
attached the MIDISPORT (either Modem or Printer). DO NOT choose a port,
just click "Search." OMS begins Searching. IMPORTANT: If the USB cable is
not correctly hooked up to the MIDISPORT, setup will fail.
5. "OMS Driver Setup" shows the MIDISPORT in a list when OMS successfully
finds the driver. Click OK. OMS will now define (shows "Identifying") all
eight of the MIDISPORT output ports.
7. The "OMS MIDI Device Setup" dialog box will appear showing the
MIDISPORT's eight available output ports with open check boxes to the left
of each port. You will now have to check these open boxes to enable each of
the output ports. Now click on OK.
8. Next, the "My Studio Setup" appears with a file save dialog box over it. You
will now need to name and save your new Studio Setup (or use the default
name) before you can assign various instruments to the MIDISPORT's
outputs and inputs. Assign your various instruments and you are done.
9. Your MIDISPORT is ready for use. Pressing the front panel Mode switch until
the USB LED begins to pulse will make the MIDISPORT available as a USB
interface.
You can run the OMS 'Test Studio' utility by going to the 'Studio' menu and
releasing the mouse on "Test Studio". Playing a note on your keyboard will give
you an audio message from your computer, "MIDI received," while the arrow
pointing to the keyboard icon flashes. Clicking on a keyboard icon with the
mouse pointer will send a tone cluster to the corresponding MIDISPORT output
port. The LED will light, and your sound module should play the chord.
You may now exit OMS Setup by quitting the application. The rest is up to
configuration within your music software. Generally, this means selecting “OMS
Compatibility,” or “Open Music System” for your MIDI system setup.
Serial Driver Installation for Windows 98 or 2000
Connect the MIDISPORT to the chosen serial port on your computer. Power up
the MIDISPORT, then boot your computer.
1. From the Windows Start menu, select Settings | Control Panel | Add New
Hardware.
2. Select the Next> button.
3. Once again, select the Next> button. The system will now search for Plug
and Play (PnP) hardware.
13

4. If Windows does find one or more PnP devices, select No, the device isn’t in
the list and select Next>. (The MIDISPORT 8x8/s is not PnP on the serial
port, and will never show up in this list.)
5. Windows then asks if you would like it to search for the new hardware.
Select “No, I want to select the hardware from a list” and press the Next>
button.
6. Windows wants you to select the type of hardware you are installing. Scroll
down the list and highlight Sound, video and game controllers. Then click
on Next>.
7. When the next dialog appears, click on the Have Disk... button.
8. Insert the Driver Software CD or diskette in the proper drive and click on
OK. Type in (or browse until you locate) [your CD ROM drive
letter]:\8x8MIDISPORT\win98&w2k. In most cases this will be
d:\\8x8MIDISPORT\win98&w2k, but your CD drive may be a different
drive letter. If your unit came with a floppy disk, use the drive letter of your
floppy drive, most often A:\.
9. When the next dialog appears, click on OK to the MIDISPORT 8x8/s.
10. When the next dialog appears, click on Finish. Windows will copy and install
the Windows driver files.
11. Next you will be prompted for the MIDISPORT 8x8/s setup. The driver
COM Port setting defaults to Disable. Click on the arrow to select the proper
COM port. Click on OK.
12. Your MIDISPORT drivers are installed! Pressing the front panel Mode switch
until the PC LED lights and begins to blink will make the MIDISPORT
available as a serial port interface. To test the MIDISPORT functionality on
your PC’s COM port, see section “PC Diagnostics Application.”
Serial Driver Installation for Windows 95
Connect the MIDISPORT to the chosen serial port on your computer. Power up
the MIDISPORT, then boot your computer.
1. From the Windows95 Start menu, select Settings | Control Panel | Add New
Hardware.
2. Press the Next> button.
3. Click radio button No because you do not want Windows to search for new
hardware. Click on Next>.
4. Scroll down in the box and select Sound, video and game controllers. Click
on the Next> button.
5. Click on Have Disk... button.
14

6. Insert the Driver Software CD or diskette in the proper drive and click on
OK. Type in (or browse until you locate) [your CD ROM drive
letter]:\8x8MIDISPORT\win98&w2k. In most cases this will be
d:\8x8MIDISPORT\win98&w2k, but your CD drive may be a different drive
letter. If your unit came with a floppy disk, use the drive letter of your
floppy drive, most often A:\.
7. When the next dialog appears, click on OK to the MIDISPORT 8x8/s.
8. When the next dialog appears, click on Finish. Windows will copy and install
the Windows driver files.
9. Next you will be prompted for the MIDISPORT 8x8/s setup. The driver
COM Port setting defaults to Disable. Click on the arrow to select the proper
COM port. Click on OK.
10. Your MIDISPORT drivers are installed! Pressing the front panel Mode switch
until the PC LED lights and begins to blink will make the MIDISPORT
available as a serial port interface. To test the MIDISPORT functionality on
your PC’s COM port, see section “PC Diagnostics Application.”
Serial Port Configuration in Windows
In order to communicate with the MIDISPORT 8x8/s, the Windows driver needs
to know what serial (COM) port you are connecting the MIDISPORT 8x8/s to.
The MIDISPORT driver is smart enough to detect which COM ports are installed
in your system. This helps you to select the proper one from the “COM Port” list
box. You also have the option of disabling the MIDISPORT driver from the
Device Manager, which is handy if you would like to leave the driver installed
while the MIDISPORT hardware is not physically connected to your system.
If at a later time you encounter problems using the MIDISPORT 8x8/s on a serial
port with Windows, verify that Windows has loaded the MIDISPORT 8x8/s
driver. The MIDISPORT appears in the Device Manager, under Sound, video
and game controllers. To verify that the driver is loaded, from the Windows
Start menu, select Settings | Control Panel | System | Device Manager. You
should see a Midiman MIDISPORT 8x8/s entry under Sound, video and game
controllers (you may have to click on the “+” sign to display the devices under
Sound, video and game controllers). The MIDISPORT outputs will also show up
under Settings | Control Panel | Multimedia | MIDI, as well as the MIDI
Devices & Instruments list from the Devices tab in Windows98 or 2000 (the
Advanced tab in Windows95).
At any time, you may reconfigure your MIDISPORT 8x8/s Windows driver
setup. To do so, from the Windows Start menu, select Settings | Control Panel |
System | Device Manager | Sound, video and game controllers | Midiman
MIDISPORT 8x8/s | Midiman Driver Setup.
15

The “COM Port” listbox allows you to select the COM port that is connected to
the MIDISPORT 8x8/s unit. For proper operation, this setting must match the
actual COM port that is connected to the MIDISPORT 8x8/s.
The “Configure Input Connection” section allows you to operate the
MIDISPORT MIDI inputs in the typical fashion, or merged together into one
stream. Most commercially available MIDI programs will accept the default
setup, which makes the MIDISPORT 8x8/s look like 9 MIDI input devices: MIDI
In-1 through MIDI In-8, and SMPTE In (Sync/Status information). On the other
hand, some older commercial and some shareware MIDI applications can only
handle one MIDI stream. In this case, select “Merge All.”
IMPORTANT: Only select the “Merge All” feature if your MIDI
application allows only one input to be selected at a time in its MIDI
setup. The “Merge All” can affect SMPTE sync performance
adversely because the MIDI Time Code (MTC) from the SMPTE port
must be merged with any other MIDI data that is coming in on In-1
through In-8. This incoming MIDI data can “jitter” the MTC and
make the timing look irregular to the receiving MIDI application.
Serial Driver Installation on the Mac
You must first install Opcodes’s OMS. This is available on the MIDISPORT
drivers page of our website, or can be installed from the driver CD by opening
the OMS folder and then double clicking the OMS install icon.
OMS is a MIDI manager program that is made by Opcode. OMS is required to
run the MIDISPORT, and it is essential that you install OMS before installing the
MIDISPORT OMS Driver. Locate the OMS installer program on this CD in the
OMS 2.3.7 folder, and simply double click its icon to install OMS. Make sure that
“Mac” mode is selected on the MIDISPORT by pressing the front panel Mode
button until the “Mac” LED blinks. Once this has been successfully completed,
you can move on to the the next step.
1. Insert the supplied Driver Sofware CD or diskette. Have your System Folder
open, with the OMS Folder accessible. Double click on the disk icon when it
appears and open the MIDISPORT8x8 folder for Macintosh (if your unit came
with a floppy disk, this folder will be MS8x8Mac). Open the Serial8x8 folder,
then drag the MIDISPORT OMS Driver icon into the OMS Folder.
2. Within your Hard Drive files, find the Opcode folder. In the Opcode folder,
find the OMS Applications folder, then OMS Setup. Double click on OMS
Setup.
3. OMS will inform you that it has not yet been configured. Click OK.
4. The Create A New Studio Setup dialog box now appears. Click OK.
5. The “OMS Driver Search” box asks you to choose the port on which you’ve
attached the MIDISPORT (either Modem or Printer). Choose a port, click
16
 Loading...