


 Loading...
Quickstart Guide
English ( 3 – 9 )
Guía de inicio rápido
Español ( 10 – 16 )
Guide d’utilisation rapide
Français ( 17 – 23 )
Guida rapida
Italiano ( 24 – 30 )
Schnellstart-Anleitung
Deutsch ( 31 – 37 )
Appendix
English ( 38 – 39 )

Quickstart Guide (English)
Introduction
Box Contents
Code 49 |
Quickstart Guide |
USB Cable |
Safety & Warranty Manual |
Software Download Cards
Important: Visit m-audio.com to download the complete User Guide and Code Preset Editor. The Preset Editor gives you a visual and intuitive way to edit the various messages that Code's controls send to your computer without having to use the hardware interface.
Support
For the latest information about this product (system requirements, compatibility information, etc.) and product registration, visit m-audio.com.
For additional product support, visit m-audio.com/support.
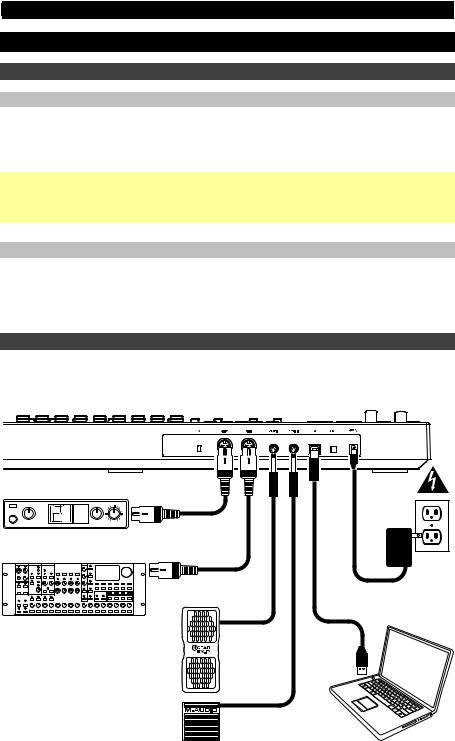
Quick Start / Connection Diagram
Remember to select Code 49 as the controller in the Preferences, Device Setup, or Options of your digital audio workstation (DAW).
Items not listed in Introduction > Box Contents are sold separately.
MIDI |
PIANO |
PATCH |
ORGAN |
GUITAR/BASS |
|
PERFORM |
BRASS/ORCH |
RHYTHM |
SYNTH/PAD |
RHYTHM |
|
GM |
SPECIAL FX |
External MIDI Sound Module
(optional)
Power
(optional)
External MIDI Sequencer
(optional)
Expression Pedal |
|
|
(optional) |
|
|
Sustain Pedal |
Computer |
|
(optional) |
||
|
3
Features
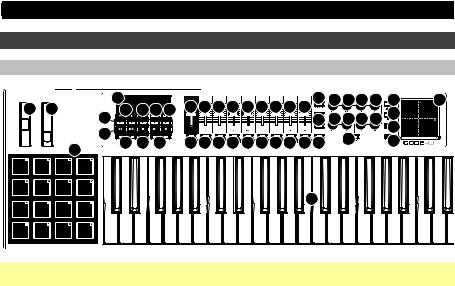
Top Panel
|
|
15 |
|
|
|
|
|
|
|
|
|
|
8 |
12 12 |
12 12 |
24 |
22 |
2 |
3 |
16 17 18 19 |
7 |
7 |
7 |
7 |
7 |
7 |
7 |
7 |
7 |
|
|
24 |
|
||
|
|
20 |
|
|
|
|
|
|
|
|
|
|
11 12 12 |
12 12 |
|
||
|
|
14 |
|
|
|
|
|
|
|
|
|
|
|
|
|
23 |
|
|
|
21 |
|
|
|
|
|
|
|
|
|
|
13 |
|
23 |
|
|
|
|
6 |
4 |
9 |
9 |
9 |
9 |
9 |
9 |
9 |
9 |
9 10 |
|
|
|||
|
|
5 |
|
|
|
|
|
|
|
|
|
|
|
|
|
|
|
|
|
|
|
|
|
|
|
|
|
|
|
|
1 |
|
|
|
|
Important: For a more complete explanation of these controls and how to use them, download the Code 49 User Guide at m-audio.com.
1.Keyboard: This 49-note keyboard is velocity-sensitive with aftertouch and, in conjunction with the Key Octave –/+ buttons, can access the full range of 127 available MIDI notes (10 octaves).
2.Pitch-Bend Wheel: Move this wheel to send MIDI pitch bend information.
You can also change this wheel’s MIDI assignment. See the User Guide to learn how to do this.
3.Modulation Wheel: Move this wheel to send continuous controller data—MIDI CC #01 (modulation), by default.
You can also change this wheel’s MIDI assignment. See the User Guide to learn how to do this.
4.Key Octave –/+: Press one of these buttons to move the keyboard up or down an octave.
Press and hold Transpose and press one of the buttons to move the keyboard down or up a semitone.
5.Pads: Use these pads to trigger drum hits or other samples in your software or external MIDI sound module. The pads are velocity-sensitive, which makes them very responsive and intuitive to play.
You can also change these pads’ MIDI and Color assignments. See the User Guide to learn how to do this.
6.Pad Octave –/+: Press one of these buttons to move the pads up or down an octave.
Press and hold Transpose and press one of the buttons to move the pads down or up a semitone.
7.Faders (F1–F9): Use these faders to send MIDI CC messages to your software or external MIDI device. Use the Fader Mode button to change their current mode.
You can also change these faders’ MIDI assignments. See the User Guide to learn how to do this.
8.Fader Mode: Press this button to switch the Faders (F1–F9) between their two modes, distinguishable by this button’s color:
Red: MIDI Mode (the default)
Green: Mackie Control®/HUI® Mode.
Learn more about these modes in the User Guide.
9.Buttons (B1–B9): Use these buttons to send MIDI CC messages to your software or external MIDI device. They can function as momentary or toggle (latching) buttons. Use the Button Mode button to change their current mode.
You can also change these buttons’ MIDI, HID, and Color assignments. Please see the User Guide to learn how to do this.
4

10.Button Mode: Press this button to cycle the Buttons (B1–B9) through their three modes, distinguishable by this button’s color:
Red: MIDI Mode (the default)
Green: Mackie Control/HUI Mode
Yellow: HID Mode
Learn more about these modes in the User Guide.
11.Bank Right/Left: Press one of these buttons to move to the next or previous bank of assignable controls (Faders, Buttons, and Encoders). This will affect only the assignable controls that are in the same mode as the Bank Right/Left buttons, distinguishable by this button’s color:
Red: MIDI Mode
Green: Mackie Control/HUI Mode
Yellow: HID Mode
White: Global (the default; this affects all assignable controls regardless of their current modes) Learn more about these modes in the User Guide.
12.Encoders (E1–E8): Use these 360º knobs to send MIDI CC messages to your software or external MIDI device. You can also change these encoders’ MIDI assignments. Please see the User Guide to learn how to do this.
13.Encoder Mode: Press this button to switch the Encoders (E1–E8) between their two modes, distinguishable by this button’s color:
Red: MIDI Mode (the default)
Green: Mackie Control/HUI Mode
Learn more about these modes in the User Guide.
14.Transport Controls: These six buttons are dedicated buttons for sending conventional Mackie Control/HUI transport control commands: Rewind ( ), Fast-Forward ( ), Stop (), Play (), and Record ().
15.Display: Use this screen to view parameter values, settings, and messages relevant to Code 49’s current operation. The various messages shown here are described throughout the User Guide.
16.Preset Down/Up (): Use these buttons to move to the previous or next preset.
You can also use these buttons to cycle through the editable parameters shown in the display, set the global MIDI channel, or set the MIDI channel of a zone of the keyboard. See the User Guide to learn how to do this.
Press and hold Shift and press these buttons to move to the previous or next program.
17.Shift: Press and hold this button to access the secondary functions of certain buttons and keys. Press this button in Zone Edit Mode to access additional zone editing functions.
18.Channel: Press this button to enter or exit Channel Mode. In Channel Mode, use the Preset Down/Up () buttons to change Code 49’s global MIDI channel. See the User Guide to learn more about this mode.
Press and hold Shift and press this button to send a MIDI Snap Shot. This sends the assigned MIDI message and current position/value of all controls.
19.Edit: Press this button to enter or exit Edit Mode. In Edit Mode:
•Use the Preset Down/Up () buttons to change the value or setting of the parameter shown in the display.
•Use the keyboard’s keys to access additional functions or commands.
Learn more about this mode in the User Guide.
20.Zone, 1–4: Press the Zone button to enter Zone Mode, which lets you use 4 different overlapping or non-overlapping ranges of keys on different MIDI channels. This is useful for sending notes to 4 external synthesizers from the same keyboard, for example.
Press any of the 1–4 buttons (when the Zone Button is active/lit) to activate or deactivate those zones of the keyboard. When a zone is active, its corresponding button will be lit.
Press and hold the Zone Button for 1 second to enter or exit Zone Edit Mode. You can press any of the flashing 1–4 buttons to edit that zone.
5
21.Transpose: Press and hold this button and press one of the Pad Octave –/+ or Key Octave –/+ buttons to move the pads or keys (respectively) down or up a semitone.
Press and hold Shift and press this button to send a “MIDI Panic” message. This means all MIDI notes will stop and all controls will stop sending their messages.
22.X/Y Pad: This touch-sensitive pad lets you control two parameters simultaneously in a twodimensional way (rather than a traditional one-dimensional modulation wheel). You can assign the parameter and range of each axis, X (horizontal) and Y (vertical). This pad can be in one of three modes as determined by the X-Mode and Y-Mode buttons.
23.X/Y Buttons: Press one of these buttons to send the minimum value for the parameter assigned to that axis.
Press and hold Shift and press one of these buttons to send the middle value for the parameter assigned to that axis (e.g., a MIDI value of 64—halfway between 0 and 127).
In Edit Mode, press one of these buttons when assigning a parameter to assign it to that axis: X (horizontal) or Y (vertical).
In HID Mode, use the X or Y button as a left-click or right-click mouse command (respectively).
24.X-Mode / Y-Mode: Press one of these buttons to cycle through the available modes for that axis of the X/Y Pad, distinguishable by the button’s color:
Red: MIDI CC Mode (the axis is assigned to a MIDI CC number)
Pink: In MIDI Note Mode (the axis is assigned a range, scale, or group of MIDI notes)
Yellow: HID Mode (the axis lets you use the X/Y Pad as a mouse/track pad) Learn more about these modes in the User Guide.
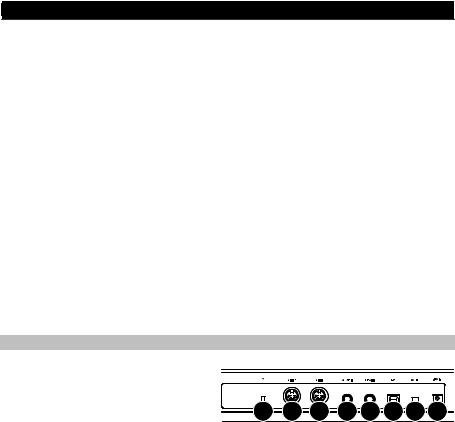
Rear Panel
1.Power Input: If you do not want to use a computer in your setup (i.e., if you are using
Code 49 to control an external MIDI module), connect Code 49’s power input to a power outlet using an optional power adapter (9 VDC, 1 A, center-positive, sold separately). Alternatively, you can connect Code 49’s USB Port to a power outlet using a standard USB charger (sold separately).
8 |
7 |
6 |
5 |
4 |
3 |
2 |
1 |
2.Power Switch: Press this button to power the Code 49 on or off.
3.USB Port: Use a standard USB cable to connect this USB port to your computer. The computer’s USB port provides ample power to Code 49. This connection is also used to send and receive MIDI data to and from your computer.
This connection is also relevant to Code 49’s MIDI Out and MIDI In:
•If an external device is connected to the MIDI Out, your computer can send MIDI messages out along this path: computer Code 49 external device.
•If an external device is connected to the MIDI In, the external device sends MIDI messages in along this path: external device Code 49 computer. MIDI messages can then be sent to an external device via the MIDI Out, but it must pass through the computer first.
4.Sustain In: Connect an optional 1/4” (6.35 mm) TS sustain pedal to this input.
You can also change this input’s MIDI assignment. See the User Guide to learn how to do this.
5.Volume In: Connect an optional 1/4” (6.35 mm) TRS expression pedal to this input.
You can also change this input’s MIDI assignment. See the User Guide to learn how to do this.
6.MIDI In: Use a standard five-pin MIDI cable to connect this MIDI In to the MIDI Out of an external MIDI device (e.g., another MIDI controller). The MIDI messages sent to this MIDI In will be sent to your computer via the USB port.
7.MIDI Out: Use a standard five-pin MIDI cable to connect this MIDI Out to the MIDI In of an external MIDI device (e.g., a synthesizer, sequencer, drum machine, etc.).
8.Kensington® Lock Slot: You can use this slot to secure your Code 49 to a table or other surface.
6

Basic Operations
This chapter covers just some basic features of your Code 49. To get the most out of your Code 49, remember to download the full User Guide at m-audio.com for more in-depth explanations of the available controls and features.
Presets
A preset is a saved collection of MIDI assignments for Code 49’s controls, channel settings, keyboard zone settings, etc. You can store up to 12 presets in Code 49’s internal memory, enabling you to use a dedicated preset for each digital audio workstation (DAW), virtual instrument, or project/session, for example.
We recommend visiting m-audio.com and downloading the Code Preset Editor, which gives you a visual and intuitive way to edit the various messages that Code's controls send to your computer without having to use the hardware interface.
To select a preset, use the Preset Down/Up () buttons. The current preset number will appear in the display.
To store a preset:
1.Press Edit to enter Edit Mode. The button will light up.
2.Press the keyboard’s Store key.
3.Press the keyboard’s Enter key. The current settings will be stored as a preset.
Control Modes
Fader Modes: The Faders (F1–F9) are always in one of two modes. Press Fader Mode to switch between them, distinguishable by the Fader Mode button’s color:
MIDI Mode (red): Moving the faders will send MIDI CC messages.
Mackie Control/HUI Mode (green): Moving the faders will send messages using the Mackie Control/HUI protocol.
Button Modes: The Buttons (B1–B9) are always in one of three modes. Press Button Mode button to cycle through them, distinguishable by the Button Mode button’s color:
MIDI Mode (red): Pressing the buttons will send MIDI CC messages.
Mackie Control/HUI Mode (green): Pressing the buttons will send messages using the Mackie Control/HUI protocol.
HID Mode (yellow): Pressing the buttons will send ASCII character messages.
Encoder Modes: The Encoders (E1–E8) are always in one of two modes. Press Encoder Mode to switch between them, distinguishable by the Encoder Mode button’s color:
MIDI Mode (red): Moving the encoders will send MIDI CC messages.
Mackie Control/HUI Mode (green): Moving the encoders will send messages using the Mackie Control/HUI protocol.
X-Modes / Y-Modes: The X/Y Pad is always in one of three modes. Press X-Mode or Y-Mode to cycle through them, distinguishable by the X-Mode or Y-Mode button’s color (respectively):
MIDI Mode (red): The axis is assigned to a MIDI CC number.
MIDI Note Mode (pink): The axis is assigned to a range, scale, or group of MIDI notes.
HID Mode (yellow): The axis lets you use the X/Y Pad as a mouse/track pad.
7

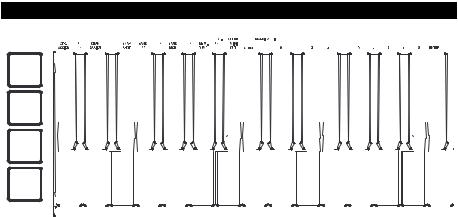
Edit Mode
Edit Mode lets you set various functions on Code 49. For instance, you can assign MIDI parameters, set MIDI value ranges, change the colors of buttons, or assign MIDI channels.
To enter or exit Edit Mode, press Edit. The button will light up while in Edit Mode.
Basic Control Assignments
When you select a control to edit, you can set any of the following:
•MIDI assignment (Ctrl Assign): This number determines what type of MIDI message the control sends (a MIDI CC number, for example).
•Data 1 (if applicable): This number determines how the control functions (whether a button acts as a momentary or toggle button, for example). This applies only to a button, a pad, or the sustain pedal when its MIDI message (described above) is a non-registered parameter number (NRPN, a parameter number higher than 127).
•Data 2: This number determines the control’s minimum value, its “released” message, etc.
•Data 3: This number determines the control’s maximum value, its “pressed” message, etc.
All of these numbers and their corresponding parameters are listed in the User Guide. Some numbers correspond to their conventional MIDI parameters, but others may be less familiar to you, particularly NRPNs.
Editing Controls
This section is a brief overview of how to edit the basic control assignments described above. Please note, though, that different controls have different available parameters, settings, values, etc., so refer to the User Guide for a more in-depth explanation of how you can edit each control. You can use Edit Mode for a lot more than changing just the settings described here, as well.
Important:
•In Edit Mode, moving or pressing any control will cause it to send its MIDI message. In other words, Edit Mode does not prevent/disable controls from sending their normal data. Keep this in mind while selecting controls to edit them. The exceptions are the keyboard’s lowest 25 keys, which you can use to access additional functions or commands (see the diagram on the next page).
•After making your changes in Edit Mode, you must press the keyboard’s Enter key to save them. To cancel your changes at any time, press Edit to exit Edit Mode.
8
|
|
|
|
|
|
|
|
|
|
|
|
|
|
|
|
|
|
|
|
|
|
|
|
|
|
|
|
|
|
|
|
|
|
|
|
|
|
|
|
|
|
|
|
|
|
|
|
|
|
|
|
|
|
|
|
|
|
|
|
|
|
|
|
|
|
|
|
|
|
|
|
|
|
|
|
|
|
|
|
|
|
|
|
|
|
|
|
|
|
|
|
|
|
|
|
|
|
|
|
|
|
|
|
|
|
|
|
|
|
|
|
|
|
|
|
|
|
|
|
|
|
|
|
|
|
|
|
|
|
|
|
|
|
|
|
|
|
|
|
|
|
|
|
|
|
|
|
|
|
|
|
|
|
|
|
|
|
|
|
|
|
|
|
|
|
|
|
|
|
|
|
|
|
|
|
|
|
|
|
|
|
|
|
|
|
|
|
|
|
|
|
|
|
|
|
|
|
|
|
|
|
|
|
|
|
|
|
|
|
|
|
|
|
|
|
|
|
|
|
|
|
|
|
|
|
|
|
|
|
|
|
|
|
|
|
|
|
|
|
|
|
|
|
|
|
|
|
|
|
|
|
|
|
|
|
|
|
|
|
|
|
|
|
|
|
|
|
|
|
|
|
|
|
|
|
|
|
|
|
|
|
|
|
|
|
|
|
|
|
|
|
|
|
|
|
|
|
|
|
|
|
|
|
|
|
|
|
|
|
|
|
|
|
|
|
|
|
|
|
|
|
|
|
|
|
|
|
|
|
|
|
|
|
|
|
|
|
|
|
|
|
|
|
|
|
|
|
|
|
|
|
|
|
|
|
|
|
|
|
|
|
|
|
|
|
|
|
|
|
|
|
|
|
|
|
|
|
|
|
|
|
|
|
|
|
|
|
|
|
|
|
|
|
|
|
|
|
|
|
|
|
|
|
|
|
|
|
|
|
|
|
|
|
|
|
|
|
|
|
|
|
|
|
|
|
|
|
|
|
|
|
|
|
|
|
|
|
|
|
|
|
|
|
|
|
|
|
|
|
|
|
|
|
|
|
|
|
|
|
|
|
|
|
|
|
|
|
|
|
|
|
|
|
|
|
|
|
|
|
|
Ctrl Assign |
|
|
|
|
|
|
|
|
|
|
|
Numeric Keys 0–9 |
|
|
|
Enter |
||||||||||||||
To assign or edit a control:
1.Press Edit to enter Edit Mode. The button will light up.
2.Select the control you want to assign or edit by moving or pressing it. Its name (and number, if available) will appear in the display.
3.Set any of the four control settings below. You can do more than one and in any order:
Control Assign:
i.Press the keyboard’s Ctrl Assign key.
ii.Use the keyboard’s numeric keys (0–9) to enter the number that corresponds to the desired MIDI message as specified in the User Guide.
Data 1 (if applicable): This applies only to a button, a pad, or the sustain pedal when its MIDI message is a non-registered parameter number (NRPN, a parameter number higher than 127).
i.Press the keyboard’s Data 1 key.
ii.Use the keyboard’s numeric keys (0–9) to enter the Data 1 value, which will appear in the display. This number corresponds to a specific MIDI parameter specified in the User Guide.
Data 2:
i.Press the keyboard’s Data 2 key.
ii.Use the keyboard’s numeric keys (0–9) to enter the Data 2 value, which will appear in the display. This number corresponds to, usually, the minimum value set on a control.
Data 3:
i.Press the keyboard’s Data 3 key.
ii.Use the keyboard’s numeric keys (0–9) to enter the Data 3 value, which will appear in the display. This number corresponds to, usually, the maximum value set on a control.
4.To save your changes, press the keyboard’s Enter key. Your changes will be saved and you will automatically exit Edit Mode.
To cancel your changes, press Edit. You will exit Edit Mode without saving anything.
9
Guía de inicio rápido (Español)
Introducción
Contenido de la caja
Code 49 |
Guía de inicio rápido |
Cable USB |
Manual sobre la seguridad y garantía |
Tarjeta de descarga de software |
|
Importante: Visite m-audio.com para descargar la Guía del usuario completa el editor de presets Code. El editor de voces le brinda una forma visual e intuitiva de editar los diversos mensajes que los controles del Code envían su ordenador sin tener que utilizar la interfaz de hardware.
Soporte
Para obtener la información más completa acerca de este product (los requisitos del sistema, compatibilidad, etc) y registro del producto, visite m-audio.com.
Para soporte adicional del producto, visite m-audio.com/support.
Diagrama de instalación y conexión rápida
Recuerde seleccionar Code 49 (DAW). Los elementos que no venden por separado.
como controlador en su estación de trabajo de audio digital se enumeran en Introducción > Contenido de la caja se
MIDI |
PIANO |
PATCH |
ORGAN |
GUITAR/BASS |
|
PERFORM |
BRASS/ORCH |
RHYTHM |
SYNTH/PAD |
RHYTHM |
|
GM |
SPECIAL FX |
Módulo de sonido MIDI externo
(opcional)
Secuenciador MIDI externo
(opcional)
Pedal de expresión
(opcional)
Pedal de sostenido
(opcional)
Toma de corriente
(opcional)
Ordenador
10
Características
Panel superior
|
|
15 |
|
|
|
|
|
|
|
|
|
|
8 |
12 12 |
12 12 |
24 |
22 |
2 |
3 |
16 17 18 19 |
7 |
7 |
7 |
7 |
7 |
7 |
7 |
7 |
7 |
|
|
24 |
|
||
|
|
20 |
|
|
|
|
|
|
|
|
|
|
11 12 12 |
12 12 |
|
||
|
|
14 |
|
|
|
|
|
|
|
|
|
|
|
|
|
23 |
|
|
|
21 |
|
|
|
|
|
|
|
|
|
|
13 |
|
23 |
|
|
|
|
6 |
4 |
9 |
9 |
9 |
9 |
9 |
9 |
9 |
9 |
9 10 |
|
|
|||
|
|
5 |
|
|
|
|
|
|
|
|
|
|
|
|
|
|
|
|
|
|
|
|
|
|
|
|
|
|
|
|
1 |
|
|
|
|
Importante: Para obtener una explicación más completa de estos controles y de cómo utilizarlos, descargue la Guía del usuario de Code 49 en m-audio.com.
1.Teclado: Este teclado de 49 notas con post-pulsación es sensible a la velocidad y, en conjunto con los botones de octava de teclado –/+, puede acceder a la gama completa de 127 notas MIDI (10 octavas).
2.Rueda de inflexión de pitch (tono): Mueva esta rueda para enviar información de inflexión de pitch MIDI.
También puede cambiar la asignación MIDI de esta rueda. Consulte la Guía del usuario para aprender a hacerlo.
3.Rueda de modulación: Mueva esta rueda para enviar datos del controlador continuo –MIDI CC #01 (modulación), por defecto.
También puede cambiar la asignación MIDI de esta rueda. Consulte la Guía del usuario para aprender a hacerlo.
4.Octava de teclado –/+: Pulse uno de estos botones para desplazar el teclado una octava hacia arriba o abajo.
Mantenga pulsado Transpose (Transponder) y pulse uno de los botones para desplazar el teclado un semitono hacia arriba o abajo.
5.Pads: Utilice estos pads para disparar golpes de batería u otras muestras en su software o módulo de sonido MIDI externo. Los pads son sensibles a la velocidad, lo que los hace de rápida respuesta y muy intuitivos para tocar.
También puede cambiar las asignaciones MIDI y de Color de estos pads. Consulte la Guía del usuario para aprender a hacerlo.
6.Octava de pads –/+: Pulse uno de estos botones para desplazar los pads una octava hacia arriba o abajo.
Mantenga pulsado Transpose (Transponder) y pulse uno de los botones para desplazar los pads un semitono hacia arriba o abajo.
7.Fáders (F1–F9): Utilice estos fáders para enviar mensajes de MIDI CC a su software o dispositivo MIDI externo. Utilice el botón Fader Mode (Modo de fáders) para cambiar su modo actual.
También puede cambiar las asignaciones MIDI de estos fáders. Consulte la Guía del usuario para aprender a hacerlo.
8.Fader Mode (Modo de fáders): Pulse este botón para conmutar los fáders (F1–F9) entre sus dos modos, distinguibles por el color de este botón:
Rojo: Modo MIDI (opción predeterminada)
Verde: Modo Mackie Control®/HUI®.
Para más información acerca de estos modos, consulte la Guía del usuario.
9.Botones (B1–B9): Utilice estos botones para enviar mensajes MIDI CC a su software o dispositivo MIDI externo. Pueden funcionar como botones momentáneos o de conmutación (enganche). Utilice el botón Button Mode (Modo de botones) para cambiar su modo actual.
También puede cambiar las asignaciones MIDI, HID, y Color de estos botones. Consulte la Guía del usuario para aprender a hacerlo.
11

10.Button Mode (Modo de botones): Pulse este botón para realizar un ciclo de los botones (B1–B9) entre sus tres modos, distinguibles por el color de este botón:
Rojo: Modo MIDI (opción predeterminada)
Verde: Modo Mackie Control/HUI
Amarillo: Modo HID
Para más información acerca de estos modos, consulte la Guía del usuario.
11.Banco izquierdo/derecho Pulse uno de estos botones para pasar al banco de controles asignables siguiente o anterior (fáders, botones y codificadores). Esto afecta solo a los controles asignables que están en el mismo modo, como los botones de banco izquierdo/derecho, distinguibles por el color de este botón:
Rojo: Modo MIDI
Verde: Modo Mackie Control/HUI
Amarillo: Modo HID
Blanco: Global (opción predeterminada, afecta a todos los controles asignables, independientemente de sus modos actuales)
Para más información acerca de estos modos, consulte la Guía del usuario.
12.Codificadores (E1–E8): Utilice estas perillas de 360º para enviar mensajes MIDI CC a su software o dispositivo MIDI externo. También puede cambiar las asignaciones MIDI de estos codificadores. Consulte la Guía del usuario para aprender a hacerlo.
13.Encode Mode (Modo de codificadores): Pulse este botón para conmutar los codificadores (E1–E8) entre sus dos modos, distinguibles por el color de este botón:
Rojo: Modo MIDI (opción predeterminada)
Verde: Modo Mackie Control/HUI
Para más información acerca de estos modos, consulte la Guía del usuario.
14.Controles de transporte: Estos seis botones son botones dedicados al envío de comandos de control de transporte Mackie Control/HUI convencionales: Rebobinar ( ), Avance rápido ( ), Parar (),
Reproducir () y Grabar ().
15.Pantalla: Utilice esta pantalla para ver valores de parámetros, ajustes y mensajes correspondientes a la operación de Code 49 en ese momento. Los diversos mensajes que se muestran aquí se describen en la Guía del usuario.
16.Subir/bajar presets (): Utilice estos botones para pasar al preset anterior o siguiente.
También puede utilizar estos botones para recorrer los parámetros editables mostrados en la pantalla, configurar el canal MIDI global o configurar el canal MIDI de una zona del teclado. Consulte la Guía del usuario para aprender a hacerlo.
Mantenga pulsado Shift (función secundaria) y pulse estos botones para pasar al programa anterior o siguiente.
17.Shift (Función secundaria): Mantenga pulsado este botón para acceder a las funciones secundarias de ciertos botones y teclas. Pulse este botón en modo Zone Edit (Edición de zona) para acceder a las funciones de edición de zona adicionales.
18.Channel (Canal): Pulse este botón para entrar al modo Channel (Canal). En modo Channel (Canal), utilice los botones Subir/bajar presets () para cambiar el canal MIDI global del Code 49. Para más información acerca de este modo, consulte la Guía del usuario.
Mantenga pulsado Shift y pulse este botón para enviar un mensaje de instantánea MIDI. Esto envía el mensaje MIDI asignado y la posición/valor actual de todos los controles.
19.Edit (Editar): Pulse este botón para entrar o salir del modo Edit (Edición). En modo de edición:
•Utilice los botones Subir/bajar presets () para cambiar el valor o ajuste del parámetro que se muestra en la pantalla.
•Utilice las teclas del teclado para acceder a funciones o comandos adicionales.
Conozca más información acerca de este modo en la Guía del usuario.
20.Zona, 1–4: Pulse el botón Zone (Zona) para entrar al modo Zone (Zona), que le permite utilizar 4 gamas de teclas distintas superpuestas o no en diferentes canales MIDI. Esto resulta útil para enviar notas a 4 sintetizadores externos desde el mismo teclado, por ejemplo.
Pulse cualquiera de los botones 1–4 (cuando el botón Zone está activo/encendido) para activar o desactivar esas zonas del teclado. Cuando una zona está activa, el botón correspondiente se ilumina.
Mantenga pulsado el botón Zone durante un segundo para entrar o salir del modo Zone Edit (Edición de zona). Puede pulsar cualquiera de los botones 1–4 destellantes para editar esa zona.
12
Loading...