


 Loading...
USER GUIDE
ENGLISH ( 3 – 6 )
GUÍA DEL USUARIO
ESPAÑOL ( 7 – 10 )
GUIDE D'UTILISATION
FRANÇAIS ( 11 – 14 )
GUIDA PER L'USO
ITALIANO ( 15 – 18 )
BENUTZERHANDBUCH
DEUTSCH ( 19 – 22 )

USER GUIDE (ENGLISH)
Box Contents
y |
M-Track Plus |
y |
USB Cable |
y |
Software DVD |
y |
User Guide |
y |
iLok 2 |
y Safety Instructions & Warranty Information booklet |
|
Support
For complete system requirements, compatibility information, and product registration, visit the support section of the M-Audio website: www.m-audio.com/support.
Quick Start
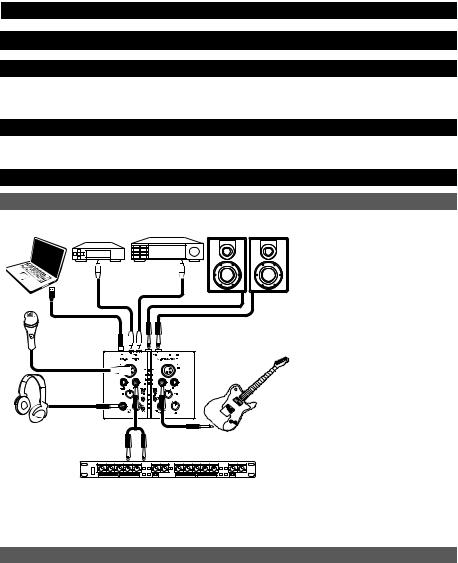
Setup Scenario*
Computer |
Digital |
Stereo System |
Monitors |
|
Cable Box** |
Receiver*** |
|||
|
|
|||
|
|
STEREO 1 |
|
|
|
284 |
VOL: 28 |
|
|
* Items not listed in Box Contents are |
|
|
not included. |
|
Microphone |
** Monitor audio sources connected to |
|
|
M-Track Plus's S/PDIF IN by setting |
|
|
the INPUT SELECTOR to "DIGITAL." |
|
|
To monitor audio sources connected to |
|
Guitar |
the MIC INPUTS or GUITAR / LINE |
|
INPUTS, switch it back to "ANALOG." |
||
Headphones |
This way, you can leave your mics or |
|
instruments connected to M-Track |
||
|
||
|
Plus while listening to your TV's audio |
|
|
over your connected monitors—or |
|
|
leave M-Track Plus connected to your |
|
|
media setup even while you record |
|
|
your music. |
External Effects Module
(e.g., compressor, reverb, etc.)
Notes:
*** If you do not have monitors, you can connect M-Track Plus's S/PDIF OUT to a stereo system receiver to hear the audio through your home speaker system.
yWhen recording a guitar or bass with an active pickup, set the M-Track Plus's MIC/LINE / GUITAR SWITCH to "MIC/LINE." If your instrument uses a passive pickup, set the switch to "GUITAR."
yDo not use the MIC INPUT and GUITAR/LINE INPUT at the same time on one channel. This may overload the channel and cause distortion.
yPlug the M-Track Plus directly into your computer, and avoid using a USB hub. Hubs can interfere with the M-Track Plus's audio and MIDI timing signals.
Recommended Installations
We highly recommend installing the following software applications:
Pro Tools Express: We've included Pro Tools Express with your M-Track Plus so you can get started making music with a professional DAW right out of the box:
1.Insert the DVD into your computer's DVD drive. Double-click the DVD to view its contents. Locate, open, and follow the installation instructions.
2.After activating Pro Tools Express and receiving the license, connect the included iLok 2 to a USB port on your computer and transfer the license to it.
Connect the iLok 2 to your computer whenever you want to use Pro Tools Express. The software will launch once it verifies the license on the iLok 2. (Visit www.avid.com to check for any available software updates.)
Ignite (www.airmusictech.com/getignite): We recommend downloading Ignite, a music creation tool designed by AIR Music Technology to be easiest way to capture, build, and share musical ideas. Ignite works well on its own or as a writing companion to the production capabilities of your software.
3

Audio Setup
The M-Track Plus is a class-compliant device that can be used with any digital audio workstation (DAW) or recording software that supports USB audio. To enable your M-Track Plus to send and receive audio to and from your computer, follow the instructions below for your computer's operating system.
Be sure your audio software program is set up to receive audio via the M-Track Plus. This can usually be done in your software's "Preferences" or "Device Setup." Please consult your software manual for more information.
If you want even lower latency, read the text in the gray box at the bottom of the page, which discusses ASIO4ALL.
Windows
Windows 7:
1.Use the included cable to connect the M-Track Plus to your computer.
2. |
Go to Start Menu Control Panel Hardware and Sound Sound. |
3.Click the Playback tab and select M-Track Plus as the default device.
4.Click the Recording tab and select M-Track Plus as the default device.
5.Click Properties in the lower right-hand corner.
6.In the new window, click the Advanced tab and select 2-channel, 16-bit, 44100 Hz (CD Quality) as the default format.
7.Uncheck both boxes under Exclusive Mode.
8.Click the Levels tab and set the slider to "4."
9.Click OK to close the Properties window.
10.Click OK to close the Sound control panel.
Note: If you are using the ASIO4ALL driver (see below), before you open the ASIO4ALL control panel, use the steps above to make sure M-Track Plus is not selected as the default device. If you want to play your computer's audio through M-Track Plus after you close your DAW, you may need to repeat the steps above to reselect it as the default device.
Windows Vista:
1.Use the included cable to connect the M-Track Plus to your computer.
2. |
Go to Start Menu Control Panel Sound. (If you don't see Sound, select Switch to Classic View, and the Sound |
|
Control Panel should become available.) |
3.Click the Playback tab and select M-Track Plus as the default device.
4.Click the Recording tab and select M-Track Plus as the default device.
5.Click Properties in the lower right-hand corner.
6.In the new window, click the Advanced tab and select 2-channel, 16-bit, 44100 Hz (CD Quality) as the default format.
7.Uncheck both boxes under Exclusive Mode.
8.Click OK to close the Properties window.
9.Click OK to close the Sound control panel.
Note: If you are using the ASIO4ALL driver (see below), before you open the ASIO4ALL control panel, use the steps above to make sure M-Track Plus is not selected as the default device. If you want to play your computer's audio through M-Track Plus after you close your DAW, you may need to repeat the steps above to reselect it as the default device.
Windows XP:
1.Use the included cable to connect the M-Track Plus to your computer.
2. |
Go to Start Menu Control Panel Sounds and Audio Devices. |
3.Click the Audio tab.
4.Under Sound Playback and Sound Recording, select USB Audio Codec as the default device. (If you have other USB audio devices connected to your computer, which may have identical names, you may need to try selecting each one until the M-Track Plus is recognized.)
5.Click OK.
Note: If you are using the ASIO4ALL driver (see below), before you open the ASIO4ALL control panel, use the steps above to make sure M-Track Plus is not selected as the default device. If you want to play your computer's audio through M-Track Plus after you close your DAW, you may need to repeat the steps above to reselect it as the default device.
IMPORTANT: If you experience too much latency after adjusting your software latency settings, we recommend the free ASIO4ALL (Audio Stream Input/Output) driver for Windows at www.asio4all.com. ASIO drivers generally perform better and with lower latency since they create a more efficient communication between audio devices and software.
To download and install ASIO4ALL:
1.Go to www.asio4all.com and download the latest release for your region.
2.Double-click the downloaded ASIO4ALL .exe file.
3.Follow the on-screen instructions to install ASIO4ALL.
To set up ASIO4ALL with your DAW:
1.With M-Track Plus connected to your computer, open your DAW.
2.Click the arrow icon in the Windows System Tray, which will open the ASIO4ALL control panel. 
3.Click the wrench icon in the lower right corner of the control panel. 
4.Under the WDM Device List, click the + box next to M-Track Plus to expand it. (In Windows XP, this will appear as
USB Audio Codec.)
5.Make sure both boxes next to the Out and In under M-Track Plus (or USB Audio Codec in Windows XP) are checked/lit. If they are not, click them. 
6.Make sure all other boxes are unchecked/unlit. If they are checked/lit, click them.
7.Close the control panel.
Note: You can select M-Track Plus as your default device in the ASIO4ALL control panel only if it is not selected as your Windows default device.
4

Mac
1.Use the included USB cable to connect the M-Track Plus to your computer.
2. Go to System Preferences Sound.
3.Under the Output tab, select M-Track Plus as your default device.
4.Under the Input tab, select M-Track Plus as your default device.
5.Close the window.
Features
1 |
6 7 |
2 |
4 |
5 |
13 |
|
|
|
|
|
|
|
|
12 |
11 |
|
|
|
8 |
|
|
|
|
|
9 |
|
|
|
10 |
|
|
|
3 |
|
|
|
|
|
1.USB PORT – Use the included cable to connect the M-Track Plus to a computer. M-Track Plus requires a USB 1.1 (or higher) connection.
2.MAIN OUT – Use standard 1/4" cables to connect this output to a pair of powered speakers. The level of this output is controlled by the MAIN LEVEL knob.
3.MAIN LEVEL – Adjusts the output volume of the MAIN OUT so you can control the listening level of your connected powered monitors.
4.MIDI IN – Use a standard five-pin MIDI cable to connect this input to the MIDI OUT of an external MIDI device.
5.MIDI OUT – Use a standard five-pin MIDI cable to connect this output to the MIDI IN of an external MIDI device.
6.S/PDIF IN – Connect the digital output of another device (e.g., a keyboard, digital cable box, media streaming device, etc.) to this input using a 75 Ω coaxial (RCA) cable. Note that the GAIN knobs, MAIN LEVEL knob, and HEADPHONE VOLUME knob do not affect the signal level; the signal will be sent straight to your DAW without any adjustments.
7.S/PDIF OUT – Connect the digital input of another device (e.g., a stereo system receiver, solid-state flash recorder, etc.) to this output using a 75 Ω coaxial (RCA) cable. The signal sent from this output is identical to that of the MAIN OUT.
8.INPUT SELECTOR – Selects M-Track Plus's input source. For normal operation (using the MIC INPUTS and GUITAR/LINE INPUTS), set this switch to "ANALOG." When using the S/PDIF IN, set this switch to "DIGITAL"; M-Track Plus will ignore the GUITAR/LINE INPUTS and INSERTS.
9.PHANTOM POWER LED – Lights up when phantom power is engaged.
10.MIDI OUT LED – Flashes when MIDI data is sent from your software to M-Track Plus's MIDI OUT.
11.MIDI IN LED – Flashes whenever MIDI data is received from an external MIDI controller.
12.USB LED – Illuminates when a valid USB connection has been established between your computer and M-Track Plus. Use this light to verify that M-Track Plus is receiving power and is ready to use.
13.LED METERS – Indicates the audio level of the MAIN OUT.
5

15 14 16 16 14 18
18 |
15 |
17 |
17 |
19 |
|
22 |
|
23 21 |
20 |
14.MIC INPUT – Connect a microphone to this input with an XLR cable.
15.GUITAR / LINE INPUT – Connect a line-level device or guitar to this input with a 1/4" cable. This input can accept a balanced or unbalanced signal.
NOTE: Do not use the MIC INPUT and GUITAR/LINE INPUT at the same time on one channel. This may overload the channel and cause distortion.
16.MIC/LINE / GUITAR SWITCH – When this switch is in the "GUITAR" position, the channel will serve as a high-impedance input for connecting guitar or bass instruments. When the switch is in the "MIC/LINE" position, the channel will accept mic or line-level signals.
17.GAIN – Adjusts the channel's input gain level. For your signal's gain to be at an optimally high level, make sure that its loudest output causes the amber lights on the LED METERS to illuminate. (Higher levels can result in "clipping" or distortion of the signal, and signals recorded at lower levels may not be heard in the mix.) After that, do the same in your software using its meters.
18.INSERT – The insert jack allows you to insert a compressor, EQ, or any other signal processor in between the M-Track Plus's preamplifier and A/D converter. Any processing done by a connected insert processor will be recorded into your software.
19.PHANTOM POWER SWITCH – This switch activates and deactivates phantom power. When activated, phantom power supplies +48V to both XLR mic inputs. Please note that most dynamic microphones do not require phantom power, while most condenser microphones do. Do not use phantom power with any ribbon microphones as it will damage them. Consult your microphone's documentation to find out whether it needs phantom power.
20.MONITOR MIX – Blend in any amount of zero-latency signal (direct monitoring) from your inputs with the output from your DAW. When fully in the "USB" position, you will hear only sound from your DAW. When fully in the "DIRECT" position, you will hear only your source through M-Track Plus's inputs.
This knob is useful during recording when dealing with the "buffer size" and "latency." The computer takes a short amount of time to process the incoming audio before sending it back out; this time is determined by the buffer size setting. Latency is the resulting delay between the incoming sound (playing your instrument, singing, etc.) and outgoing sound (when you hear it in the DAW). Higher buffer sizes result in higher latency.
If your computer is powerful enough, you may be able to set your buffer size low enough such that you may never need direct monitoring. In this case, set the knob all the way to the "USB" position to monitor only the audio output of your DAW.
In other cases, though, low buffer sizes can consume a lot of your computer's CPU and cause audio glitches, so you may need to use a higher buffer setting, resulting in latency. In this case, use a higher buffer size and turn the knob more towards the "DIRECT" position to monitor your incoming signal without latency. When listening to the playback, turn it all the way to the "USB" position.
21.MONO / STEREO – Switches the headphones and MAIN OUT mixes between mono or stereo operation. Use the stereo setting to direct-monitor the input signal when recording a stereo source, if you want to hear each channel in their respective left and right sides. Use the mono setting to directmonitor the input signal when recording only one source or if you want to hear both channels equally on each side. This switch does not affect the DAW playback or how your sound is recorded into your DAW; it affects only how you hear the input signal in the headphones and MAIN OUT.
22.HEADPHONES – Connect your 1/4" headphones to this output.
23.HEADPHONE VOLUME – Adjusts the volume level of the headphone output.
6
GUÍA DEL USUARIO (ESPAÑOL)
Contenido de la caja
y |
M-Track Plus |
y |
Cable USB |
y |
DVD software |
y |
Guía del usuario |
y |
iLok 2 |
y Folleto de información sobre la seguridad y la garantía |
|
Soporte
Para obtener información sobre los requisitos completos de sistema, la compatibilidad y el registro del producto, visite la sección de soporte del sitio web de M-Audio: www.m-audio.com/support.
Guía de inicio rápido
Diagrama de Conexión*
Computadora |
Digital |
Sistema estéreo |
Altavoces |
|
Decodificador** |
Receptor*** |
|||
|
||||
|
|
STEREO 1 |
|
|
|
284 |
VOL: 28 |
|
Microfóno
Guitarra
 Auriculares
*Los elementos que no se enumeran en Contenido de la caja no están incluidos.
**Monitoree las fuentes de audio conectadas a la S/PDIF IN (Entrada S/PDIF) del M-Track Plus colocando el SELECTOR DE ENTRADA en "DIGITAL". Para monitorear fuentes de audio conectadas a las ENTRADAS PARA MICRÓFONO o las ENTRADAS PARA GUITARRA / LÍNEA, vuelva a colocarlo en "ANALOG" (Analógica). De esta forma puede dejar sus micrófonos o instrumentos conectados al M-Track Plus mientras escucha el audio de su televisor por sus monitores conectados —o dejar el M-Track Plus conectado a su instalación de medios incluso mientras graba su música.
***Si no tiene monitores, puede conectar la S/PDIF OUT (Salida S/PDIF) del M- Track Plus al receptor de un sistema estéreo para oír el audio por su sistema de altavoces hogareños.
Notas: |
Módulo de efectos externos |
(por ej. compresor, reverberación, etc.) |
yCuando grabe una guitarra o bajo con captor activo, ajuste el CONMUTADOR MICROFÓNO/LÍNEA / GUITARRA de M- Track Plus a "MIC/LINE". Si su instrumento usa un captor pasivo, ajuste el conmutador a "GUITAR".
yNo utilice la ENTRADA DE MICROFONO (Microphone) y la ENTRADA DE GUITARRA / LÍNEA (Guitar / Line) al mismo tiempo en el mismo canal. Esto puede saturar el canal y causar distorsión.
yEnchufe la M-Track Plus directamente a su computador y evite usar un hub USB. Los hubs pueden interferir con las señales de sincronización de audio y MIDI de la interfaz M-Track Plus.
Instalaciones adicionales
También recomendamos especialmente instalar las siguientes aplicaciones de software:
Pro Tools Express: Hemos incluido Pro Tools Express con su M-Track Plus, de modo que puede comenzar a hacer música con una DAW profesional en cuanto abra la caja:
1.Inserte el DVD en el lector de DVD-ROM de la computadora. Haga doble clic en el DVD para ver su contenido. Localice, abra y siga las instrucciones de instalación.
2.Después de activar Pro Tools Express y recibir la licencia, conecte el iLok 2 incluido a un puerto USB de su computadora y transfiera la licencia al mismo.
Conecte el iLok 2 a su computadora toda vez que desee usar Pro Tools Express. El software se abre una vez que se verifica la licencia en el iLok 2. (Visite www.avid.com para verificar las posibles actualizaciones del software disponibles.)
Ignite (www.airmusictech.com/getignite): Recomendamos bajar Ignite, una herramienta de creación musical diseñada por Air Music Technology para ser la manera más fácil de capturar, construir y compartir ideas musicales. Ignite funciona bien por sí mismo o como complemento de redacción de las capacidades de producción de su DAW. Los controles del M-Track Plus están totalmente integrados con Ignite, a fin de brindar un fácil control de las tareas comunes como selección de presets, control de parámetros y navegación de interfaces. Para más información, consulte la sección Cómo controlar Ignite de este manual.
7

Configuración de audio
M-Track Plus es un dispositivo que cumple especificaciones de clase y que se puede usar con cualquier estación de trabajo o software de grabación de audio digital compatible con el audio USB. Para permitir que M-Track Plus envíe y reciba audio hacia y desde la computadora, siga las instrucciones de más abajo correspondientes al sistema operativo de la misma.
Asegúrese de que su programa de software de audio esté configurado para recibir audio por M- Track Plus. Esto se puede hacer habitualmente en "Preferences" o "Device Setup" (Configuración de dispositivos) de su software. Para más información, consulte el manual de su software.
Si desea una latencia aún menor, lea el texto del cuadro gris del pie de la página, que se refiere a ASIO4ALL.
Windows
Windows 7:
1.Use el cable incluido para conectar el M-Track Plus a su computadora.
2. |
Vaya al menú Start Control Panel Hardware and Sound Sound (Inicio > Panel de control > Hardware y |
|
Sonido > Sonido). |
3.Haga clic en la pestaña Playback (Reproducción) y seleccione M-Track Plus como dispositivo predeterminado.
4.Haga clic en la pestaña Recording (Grabación) y seleccione M-Track Plus como dispositivo predeterminado.
5.Haga clic en Properties (Propiedades) en la esquina inferior derecha.
6.En la nueva ventana, haga clic en la pestaña Advanced (Avanzadas) y seleccione 2-channel, 16-bit, 44100 Hz (CD Quality) [2 canales, 16 bits, 44100 Hz (calidad de CD)] como formato predeterminado.
7.Deseleccione ambas casillas debajo de Exclusive Mode (Modo exclusivo).
8.Haga clic en la pestaña Levels (Niveles) y ajuste el deslizador a "4".
9.Haga clic en OK (Aceptar) para cerrar las ventana Properties.
10.Haga clic en OK para cerrar el panel de control Sound.
Nota: Si está usando el driver ASIO4ALL (ver abajo), antes de abrir el panel de control de ASIO4ALL, siga los pasos precedentes para asegurarse de que el M-Track Plus no esté seleccionado como dispositivo predeterminado. Si desea reproducir el audio de su computadora a través de M-Track Plus después de cerrar su DAW, es posible que deba repetir los pasos precedentes para volver a seleccionarlo como dispositivo predeterminado.
Windows Vista:
1.Use el cable incluido para conectar el M-Track Plus a su computadora.
2. |
Vaya al menú Start Control Panel Sound (Inicio > Panel de control > Sonido). (Si no ve Sound, seleccione |
|
Switch to Classic View (Cambiar a vista clásica) —el panel de control Sound debe aparecer.) |
3.Haga clic en la pestaña Playback (Reproducción) y seleccione M-Track Plus como dispositivo predeterminado.
4.Haga clic en la pestaña Recording (Grabación) y seleccione M-Track Plus como dispositivo predeterminado.
5.Haga clic en Properties (Propiedades) en la esquina inferior derecha.
6.En la nueva ventana, haga clic en la pestaña Advanced (Avanzadas) y seleccione 2-channel, 16-bit, 44100 Hz (CD Quality) [2 canales, 16 bits, 44100 Hz (calidad de CD)] como formato predeterminado.
7.Deseleccione ambas casillas debajo de Exclusive Mode (Modo exclusivo).
8.Haga clic en OK (Aceptar) para cerrar las ventana Properties.
9.Haga clic en OK para cerrar el panel de control Sound.
Nota: Si está usando el driver ASIO4ALL (ver abajo), antes de abrir el panel de control de ASIO4ALL, siga los pasos precedentes para asegurarse de que el M-Track Plus no esté seleccionado como dispositivo predeterminado. Si desea reproducir el audio de su computadora a través de M-Track Plus después de cerrar su DAW, es posible que deba repetir los pasos precedentes para volver a seleccionarlo como dispositivo predeterminado.
Windows XP:
1.Use el cable incluido para conectar el M-Track Plus a su computadora.
2. |
Vaya al menú Start Control Panel Sounds and Audio Devices (Inicio > Panel de control > Dispositivos de sonido |
y audio).
3.Haga clic en la pestaña Audio.
4.En Sound Playback (Reproducción de sonido) y Sound Recording (Grabación de sonido) seleccione USB Audio Codec (Códec de audio USB) como dispositivo predeterminado. (Si tiene conectados a su computadora otros dispositivos de audio USB que puedan tener nombres idénticos, puede ser necesario que pruebe a seleccionar cada uno hasta que se reconozca el M-Track Plus.)
5.Haga clic en OK (Aceptar).
Nota: Si está usando el driver ASIO4ALL (ver abajo), antes de abrir el panel de control de ASIO4ALL, siga los pasos precedentes para asegurarse de que el M-Track Plus no esté seleccionado como dispositivo predeterminado. Si desea reproducir el audio de su computadora a través de M-Track Plus después de cerrar su DAW, es posible que deba repetir los pasos precedentes para volver a seleccionarlo como dispositivo predeterminado.
IMPORTANTE: Si sigue experimentando latencia después de ajustar los parámetros de latencia de su computadora, recomendamos gratuitamente el driver ASIO4ALL (Entrada/salida de corriente de audio) para PC de www.asio4all.com. En general, los drivers ASIO funcionan mejor y con menor latencia, dado que crean una comunicación más eficiente entre los dispositivos de audio y el software.
Para bajar e instalar ASIO4ALL:
1.Vaya a www.asio4all.com y baje la versión más reciente correspondiente a su región.
2.Haga doble clic en el archivo ASIO4ALL .exe que bajó.
3.Siga las instrucciones de la pantalla para instalar ASIO4ALL.
8
Loading...